
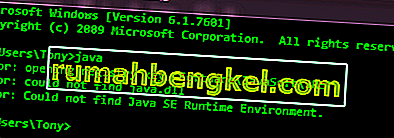
I was getting the same error (below) for Oracle when I clicked on a G2 application.
Error: opening registry key ‘SoftwareJavaSoftJava Runtime Environment’
Error: could not find java.dll
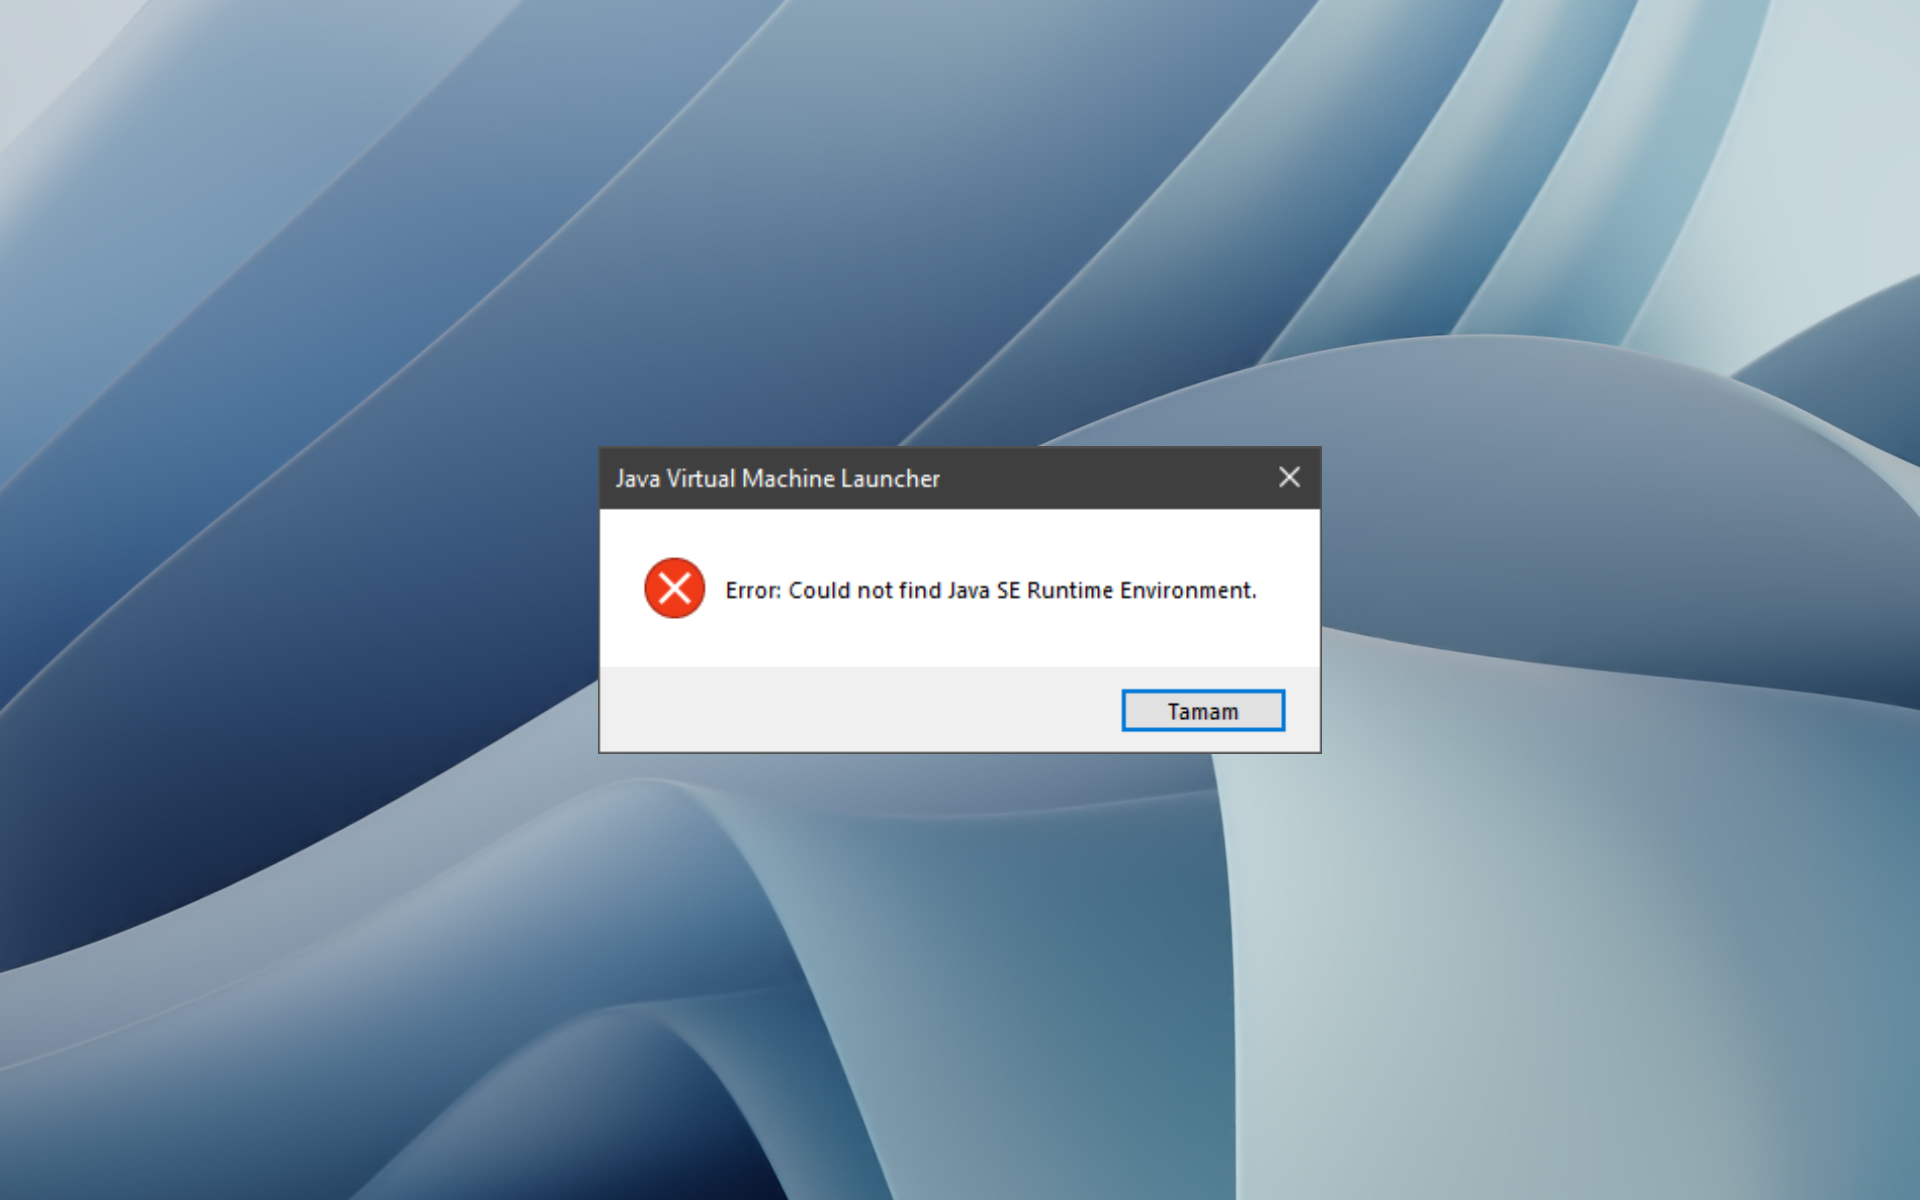
Error: Could not find Java SE Runtime Environment.
I restarted the machine, still the same.
I reinstalled the app (which includes Oracle), still the same.
I checked all the suggested registry settings as suggested and my registry was fine.
I checked the shortcut path and it fires up javaw.exe with a string following within the shortcut. I navigated to the G2 program files and I tried clicking in the javaw.exe directly within the application folder and got the same error.
I did some research into this and found that Java has a Javaw.exe within the following path:
C:Program FilesJavajre7binjavaw.exe
I navigated to the path and clicked on this javaw.exe file and didn’t get any errors
I renamed the javaw.exe in the G2 app to javaw_old.exe and then copied and pasted the javaw.exe file from the above path into my app folder. Files side by side, you could see a file size difference and the date was 8 months difference. The newer and larger file being the one in the latest Java install folder.
Clicked on the G2 shortcut and the application opened without any errors.
If you have the same issue as me where everything Java is okay and your still getting the error, try find the java(.exe) file that your app is erroring on, rename it and copy and paste the same file from your Java folder (C:Program FilesJavajre7bin) to the same folder your app’s Java file is located.
I hope this helps someone.
When trying to open a Java .jar file through the command prompt, such as using the command “Java -Jar xxxx.jar”, you might encounter the following error message:
Error: opening registry key ‘SoftwareJavaSoftJRE’

Error: could not find java.dll

Error: Could not find Java SE Runtime Environment.
This could be due to several factors, including but not limited to:
- Corrupted registry
- Missing Java path in your Environment Variables
- Java installation folder being moved
For example, we encountered this issue when updating Java SE to the latest version – we likely previously had a 32-bit Java installation, and when running the 64-bit Java installer, our Java path changed.

Luckily, this is fairly easy to fix, as it just requires addressing one of the above problems with the appropriate solution. Follow our steps below to get your Java commands via command prompt working again, and leave a comment in the comments section if you encounter any further issues (or know of a better solution).
- Delete all previous versions of Java (using “Programs and Features” uninstall process). If java folder is remains in “C:/Program Files/…”, please delete it.
- Clean up your registry (delete your java key):
- Go to Start and then Run
- Type in ‘regedit’ in the edit field
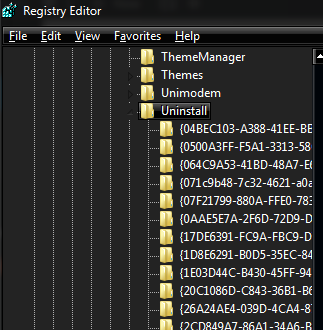
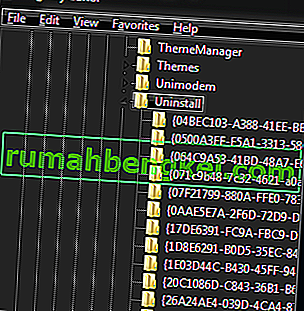
- Go to HKEY_LOCAL_MACHINE/Software/Microsoft/Windows/CurrentVersion/Uninstall
- Under this Uninstall folder you will find many registry entries within curly brackets.

Regedit uninstall pathway. - Click on Edit tab and then Find
- Note: Highlight Uninstall folder before performing search for particular registry.
- Enter version string as value to find corresponding registry entry to be deleted.
- Once you find registry key, highlight that key and then Right click on it and choose Delete
- Confirm the delete and click Yes
Steps for finding registry keys for any version of Java 7
Follow format 7.0.xxx
where xxx can be 100, 120, 130, 140 and so on.
for example:
- Type 7.0.100 in search field, finds registry key for Java7 update 10
- Type 7.0.120 in search field, finds registry key for Java7 update 12
- Type 7.0.180 in search field, finds registry key for Java7 update 18
Steps for finding registry keys for any version of Java 6
Follow format 6.0.xxx
where xxx can be 100, 120, 130, 140 and so on.
for example:
- Type 6.0.100 in search field, finds registry key for Java6 update 10
- Type 6.0.120 in search field, finds registry key for Java6 update 12
- Type 6.0.180 in search field, finds registry key for Java6 update 18
Steps for finding registry keys for any version of Java 1.5
Follow format 1.5.0.xxx
where xxx can be 100, 120, 130, 140 and so on.
for example:
- Type 1.5.0.100 in search field, finds registry key for jre1.5.0_01
- Type 1.5.0.120 in search field, finds registry key for jre1.5.0_12
- Type 1.5.0.180 in search field, finds registry key for jre1.5.0_18
- Steps for finding registry keys for any version of Java 1.4
Follow format 1.4.2_xxx
where xxx can be 01, 12, 13, 14 and so on.
for example:
- Type 1.4.2_01 in search field, finds registry key for jre1.4.0_01
- Type 1.4.2_12 in search field, finds registry key for jre1.4.0_12
- Type 1.4.2_18 in search field, finds registry key for jre1.4.0_18
Reinstall Java and set system variable JAVA_HOME to your JRE (or JDK) path.
Eg:
JAVA_HOME - C:Program FilesJavajdk1.7.0_71

Path - C:Program FilesJavajdk1.7.0_71bin
You can check if this was a successful solution with the following commands
echo %JAVA_HOME%

java -version
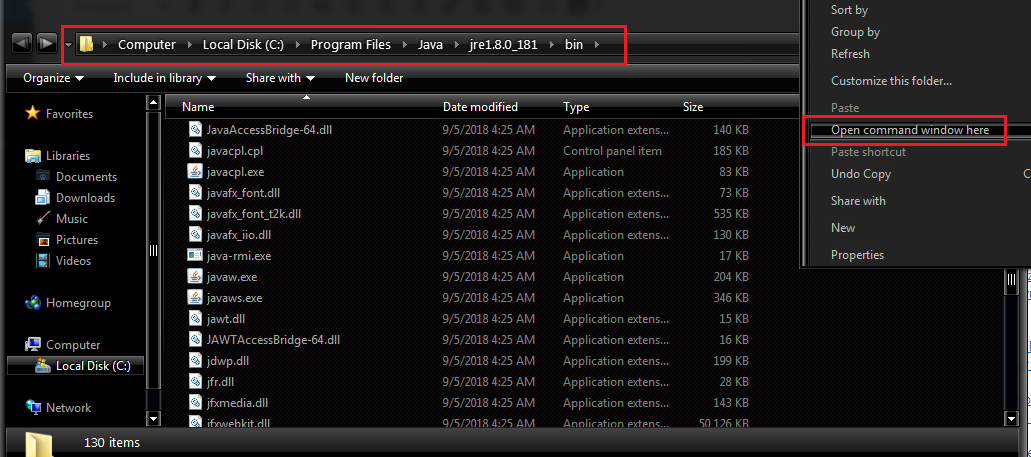
Manually open command window to Java pathway.As a side note, you can also launch a command prompt directly from within the Java folder – navigate to your C:Program FilesJavabin folder (or wherever your Java is installed), hold Shift + Right click inside the window, and click “Open a command window here”.

Kamil Anwar
Kamil is a certified MCITP, CCNA (W), CCNA (S) and a former British Computer Society Member with over 9 years of experience Configuring, Deploying and Managing Switches, Firewalls and Domain Controllers also an old-school still active on FreeNode.
При попытке открыть файл Java .jar из командной строки, например с помощью команды «Java -Jar xxxx.jar», вы можете получить следующее сообщение об ошибке:
Ошибка: открытие раздела реестра «Software JavaSoft JRE» Ошибка: не удалось найти java.dll Ошибка: не удалось найти среду выполнения Java SE.
Это может быть связано с несколькими факторами, включая, помимо прочего:
- Поврежденный реестр
- Отсутствует путь Java в ваших переменных среды
- Папка установки Java перемещается
Например, мы столкнулись с этой проблемой при обновлении Java SE до последней версии — вероятно, раньше у нас была 32-разрядная установка Java, и при запуске 64-разрядного установщика Java путь к Java изменился.
К счастью, это довольно легко исправить, поскольку для этого достаточно решить одну из вышеуказанных проблем с помощью соответствующего решения. Следуйте приведенным ниже инструкциям, чтобы ваши Java-команды через командную строку снова заработали, и оставьте комментарий в разделе комментариев, если у вас возникнут какие-либо дополнительные проблемы (или вы знаете лучшее решение).
- Удалите все предыдущие версии Java (используя процесс удаления «Программы и компоненты»). Если папка java остается в «C: / Program Files /…», удалите ее.
- Очистите реестр (удалите ключ java):
- Перейдите в Пуск, а затем Выполнить
- Введите regedit в поле редактирования.
- Перейдите в HKEY_LOCAL_MACHINE / Software / Microsoft / Windows / CurrentVersion / Uninstall.
- В этой папке «Удалить» вы найдете множество записей реестра в фигурных скобках.

- Перейдите на вкладку «Редактировать», а затем — «Найти».
- Примечание. Выделите папку «Удалить» перед выполнением поиска в конкретном реестре.
- Введите строку версии в качестве значения, чтобы найти соответствующую запись реестра, которую нужно удалить.
- Как только вы найдете раздел реестра, выделите его, а затем щелкните его правой кнопкой мыши и выберите Удалить.
- Подтвердите удаление и нажмите Да
Шаги по поиску ключей реестра для любой версии Java 7
Следуйте формату 7.0.xxx
где xxx может быть 100, 120, 130, 140 и так далее.
например:
- Введите 7.0.100 в поле поиска, найдите раздел реестра для обновления 10 для Java7
- Введите 7.0.120 в поле поиска, найдите раздел реестра для обновления 12 для Java7.
- Введите 7.0.180 в поле поиска, найдите раздел реестра для обновления Java7 18
Шаги по поиску ключей реестра для любой версии Java 6
Следуйте формату 6.0.xxx
где xxx может быть 100, 120, 130, 140 и так далее.
например:
- Введите 6.0.100 в поле поиска, найдите раздел реестра для обновления 10 для Java6
- Введите 6.0.120 в поле поиска, найдите раздел реестра для обновления 12 для Java6.
- Введите 6.0.180 в поле поиска, найдет раздел реестра для обновления Java6 18
Шаги по поиску ключей реестра для любой версии Java 1.5
Следуйте формату 1.5.0.xxx
где xxx может быть 100, 120, 130, 140 и так далее.
например:
- Введите 1.5.0.100 в поле поиска, найдите раздел реестра для jre1.5.0_01
- Введите 1.5.0.120 в поле поиска, найдите раздел реестра для jre1.5.0_12
- Введите 1.5.0.180 в поле поиска, найдите раздел реестра для jre1.5.0_18
- Шаги по поиску ключей реестра для любой версии Java 1.4
Следуйте формату 1.4.2_xxx
где xxx может быть 01, 12, 13, 14 и так далее.
например:
- Введите 1.4.2_01 в поле поиска, найдите раздел реестра для jre1.4.0_01
- Введите 1.4.2_12 в поле поиска, найдет ключ реестра для jre1.4.0_12
- Введите 1.4.2_18 в поле поиска, найдите ключ реестра для jre1.4.0_18
Переустановите Java и установите системную переменную JAVA_HOME в свой путь JRE (или JDK) .
Например:
JAVA_HOME - C: Program Files Java jdk1.7.0_71 Путь - C: Program Files Java jdk1.7.0_71 bin
Вы можете проверить, было ли это успешным решением, с помощью следующих команд
echo% JAVA_HOME% java -версия
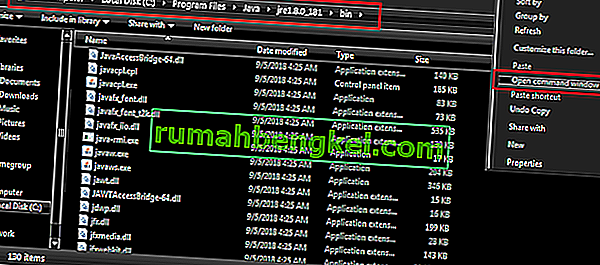
Вручную откройте командное окно для пути Java. В качестве примечания, вы также можете запустить командную строку прямо из папки Java — перейдите в папку C: Program Files Java bin ( или там, где установлена ваша Java) , удерживайте Shift + щелкните правой кнопкой мыши внутри окна и нажмите «Открыть командное окно здесь».
Try these fixes to resolve Java Runtime Environment not found error
by Vlad Turiceanu
Passionate about technology, Windows, and everything that has a power button, he spent most of his time developing new skills and learning more about the tech world. Coming… read more
Updated on September 19, 2022
Reviewed by
Vlad Turiceanu

Kamil Anwar
Kamil is a certified MCITP, CCNA (W), CCNA (S) and a former British Computer Society Member with over 9 years of experience Configuring, Deploying and Managing Switches, Firewalls and Domain Controllers also an old-school still active on FreeNode.
При попытке открыть файл Java .jar из командной строки, например с помощью команды «Java -Jar xxxx.jar», вы можете получить следующее сообщение об ошибке:
Ошибка: открытие раздела реестра «Software JavaSoft JRE» Ошибка: не удалось найти java.dll Ошибка: не удалось найти среду выполнения Java SE.
Это может быть связано с несколькими факторами, включая, помимо прочего:
- Поврежденный реестр
- Отсутствует путь Java в ваших переменных среды
- Папка установки Java перемещается
Например, мы столкнулись с этой проблемой при обновлении Java SE до последней версии — вероятно, раньше у нас была 32-разрядная установка Java, и при запуске 64-разрядного установщика Java путь к Java изменился.
К счастью, это довольно легко исправить, поскольку для этого достаточно решить одну из вышеуказанных проблем с помощью соответствующего решения. Следуйте приведенным ниже инструкциям, чтобы ваши Java-команды через командную строку снова заработали, и оставьте комментарий в разделе комментариев, если у вас возникнут какие-либо дополнительные проблемы (или вы знаете лучшее решение).
- Удалите все предыдущие версии Java (используя процесс удаления «Программы и компоненты»). Если папка java остается в «C: / Program Files /…», удалите ее.
- Очистите реестр (удалите ключ java):
- Перейдите в Пуск, а затем Выполнить
- Введите regedit в поле редактирования.
- Перейдите в HKEY_LOCAL_MACHINE / Software / Microsoft / Windows / CurrentVersion / Uninstall.
- В этой папке «Удалить» вы найдете множество записей реестра в фигурных скобках.
- Перейдите на вкладку «Редактировать», а затем — «Найти».
- Примечание. Выделите папку «Удалить» перед выполнением поиска в конкретном реестре.
- Введите строку версии в качестве значения, чтобы найти соответствующую запись реестра, которую нужно удалить.
- Как только вы найдете раздел реестра, выделите его, а затем щелкните его правой кнопкой мыши и выберите Удалить.
- Подтвердите удаление и нажмите Да
Шаги по поиску ключей реестра для любой версии Java 7
Следуйте формату 7.0.xxx
где xxx может быть 100, 120, 130, 140 и так далее.
например:
- Введите 7.0.100 в поле поиска, найдите раздел реестра для обновления 10 для Java7
- Введите 7.0.120 в поле поиска, найдите раздел реестра для обновления 12 для Java7.
- Введите 7.0.180 в поле поиска, найдите раздел реестра для обновления Java7 18
Шаги по поиску ключей реестра для любой версии Java 6
Следуйте формату 6.0.xxx
где xxx может быть 100, 120, 130, 140 и так далее.
например:
- Введите 6.0.100 в поле поиска, найдите раздел реестра для обновления 10 для Java6
- Введите 6.0.120 в поле поиска, найдите раздел реестра для обновления 12 для Java6.
- Введите 6.0.180 в поле поиска, найдет раздел реестра для обновления Java6 18
Шаги по поиску ключей реестра для любой версии Java 1.5
Следуйте формату 1.5.0.xxx
где xxx может быть 100, 120, 130, 140 и так далее.
например:
- Введите 1.5.0.100 в поле поиска, найдите раздел реестра для jre1.5.0_01
- Введите 1.5.0.120 в поле поиска, найдите раздел реестра для jre1.5.0_12
- Введите 1.5.0.180 в поле поиска, найдите раздел реестра для jre1.5.0_18
- Шаги по поиску ключей реестра для любой версии Java 1.4
Следуйте формату 1.4.2_xxx
где xxx может быть 01, 12, 13, 14 и так далее.
например:
- Введите 1.4.2_01 в поле поиска, найдите раздел реестра для jre1.4.0_01
- Введите 1.4.2_12 в поле поиска, найдет ключ реестра для jre1.4.0_12
- Введите 1.4.2_18 в поле поиска, найдите ключ реестра для jre1.4.0_18
Переустановите Java и установите системную переменную JAVA_HOME в свой путь JRE (или JDK) .
Например:
JAVA_HOME - C: Program Files Java jdk1.7.0_71 Путь - C: Program Files Java jdk1.7.0_71 bin
Вы можете проверить, было ли это успешным решением, с помощью следующих команд
echo% JAVA_HOME% java -версия
Вручную откройте командное окно для пути Java. В качестве примечания, вы также можете запустить командную строку прямо из папки Java — перейдите в папку C: Program Files Java bin ( или там, где установлена ваша Java) , удерживайте Shift + щелкните правой кнопкой мыши внутри окна и нажмите «Открыть командное окно здесь».
Try these fixes to resolve Java Runtime Environment not found error
by Vlad Turiceanu
Passionate about technology, Windows, and everything that has a power button, he spent most of his time developing new skills and learning more about the tech world. Coming… read more
Updated on September 19, 2022
Reviewed by
Vlad Turiceanu
Passionate about technology, Windows, and everything that has a power button, he spent most of his time developing new skills and learning more about the tech world. Coming… read more
- A Java Runtime error might appear if you have installed an older JRE software.
- If you have wondered how to fix Java issues, reinstalling it can help you.
- To fix the Java Runtime Environment not found error, make sure to have the latest version of Java.
- Download the JRE version that corresponds with your system type so you won’t deal with other types of Java issues.
XINSTALL BY CLICKING THE DOWNLOAD FILE
This software will repair common computer errors, protect you from file loss, malware, hardware failure and optimize your PC for maximum performance. Fix PC issues and remove viruses now in 3 easy steps:
- Download Restoro PC Repair Tool that comes with Patented Technologies (patent available here).
- Click Start Scan to find Windows issues that could be causing PC problems.
- Click Repair All to fix issues affecting your computer’s security and performance
- Restoro has been downloaded by 0 readers this month.
The Java Development Kit (JDK), the Java Virtual Machine (JVM), and the Java Runtime Environment (JRE) form a trio of Java platform components for developing and running Java apps.
A runtime environment is a piece of software designed to run other software. For example, as the runtime environment for Java, the JRE contains the Java class libraries, the Java class loader, and the JVM.
So if you don’t have JRE installed or you have an older version of the software, you might encounter one of the following messages:
- Error: Could not find Java SE Runtime Environment – you don’t have the Java SE version installed on your system
- This application needs version 1.x or higher of the Java Runtime Environment – you should update your Java version to the latest you can find on the official website
- A Java Runtime Environment(JRE) or Java Development Kit (JDK) must be available to run this app – like the first error, check if you have installed JRE or JDK and if not, install them
Today’s guide will explore the most efficient and easy methods to resolve the Java Runtime Environment not found and the other similar errors with Java. Read on for more details.
Why is JRE not installed?
In Windows and macOS, installing the Java Developmental Kit (JDK) in previous releases optionally installed a Java Runtime Environment (JRE).
However, with JDK 11, Oracle removed JRE to be installed optionally. Therefore, with JDK 11 release, the JRE or Server JRE is no longer offered, and only the JDK is provided.
Also, the Java Runtime Environment not found it could be caused by several other reasons, which we have listed below.
- Java is not installed on your PC.
- Java installation was not completed due to some errors.
- The environment variables of Java are not set.
- You might have more than one Java Runtime installation.
- A Windows misconfiguration can also trigger this problem.
How do I fix the Java runtime environment not found?
1. Run Windows troubleshooter
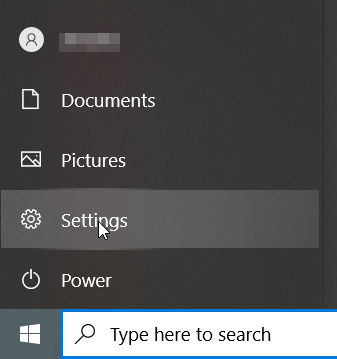
- Select Start, and click on Settings.

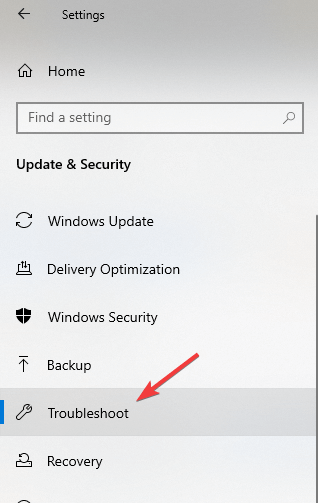
- Choose Update & Security, and then click Troubleshoot.

- Select the type of troubleshooting you want to run, then select Run the troubleshooter.
- Allow the troubleshooter to run and then answer any questions on the screen.
Some PC issues are hard to tackle, especially when it comes to corrupted repositories or missing Windows files. If you are having troubles fixing an error, your system may be partially broken.
We recommend installing Restoro, a tool that will scan your machine and identify what the fault is.
Click here to download and start repairing.
You can try the recovery options if you see a message that no changes or updates are necessary. This is a built-in troubleshooter tool from Windows 10.
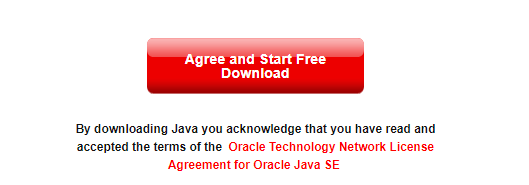
2. Download Java Runtime Environment (JRE)
- Download JRE from the official website.
- Choose if you need a 32bit or a 64bit architecture of JRE based on your PC specifications.
- Click on the Agree and download button to start the actual download.

If you don’t know which version of Java is the correct version for your system, you can find out by searching in the Start menu the term System Information.
It would be best if you opened the first option that appears after the search and then checked the value under System Type (32-bit or 64-bit).
- Could not create the Java virtual machine [Fixed]
- Runtime Error 9: Subscript Out of Range [Fix]
- Runtime error 3709: The Connection Cannot be Used [Fix]
- Runtime Error 52: Bad Filename or Number [Fix]
- Runtime Error 57121: Application-Defined or Object-Defined [Fix]
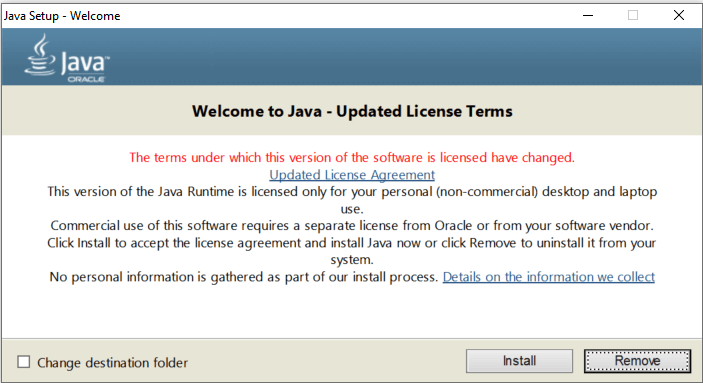
3. Install Java Runtime Environment (JRE)
- Right-click on the downloaded JRE setup file.
- Select Run as administrator and accept the installation prompt.
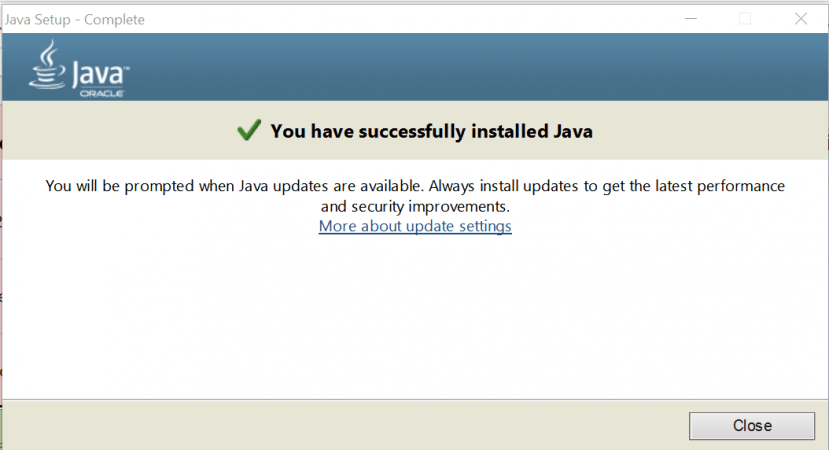
- Click on the Install button to complete the installation.

- You will receive a message that the installation was successful. Next, click on close the complete the installation and close the window.

We recommend you check if there is a new Java update each time you encounter this issue. Unfortunately, the software will not update automatically, so you must perform this task manually.
How can I fix Java Runtime Environment not found on Windows 11?
The above solutions also work perfectly well for Windows 11 PC. So, to summarize the answers, here’s what you can do to fix the Java Runtime Environment not found on Windows 11.
- Uninstall all Java versions from your PC and install the latest one from the official website.
- Configure the Environment Variables for Java on your PC.
- Reset your PC.
- Check for viruses or malware.
Where is JRE located?
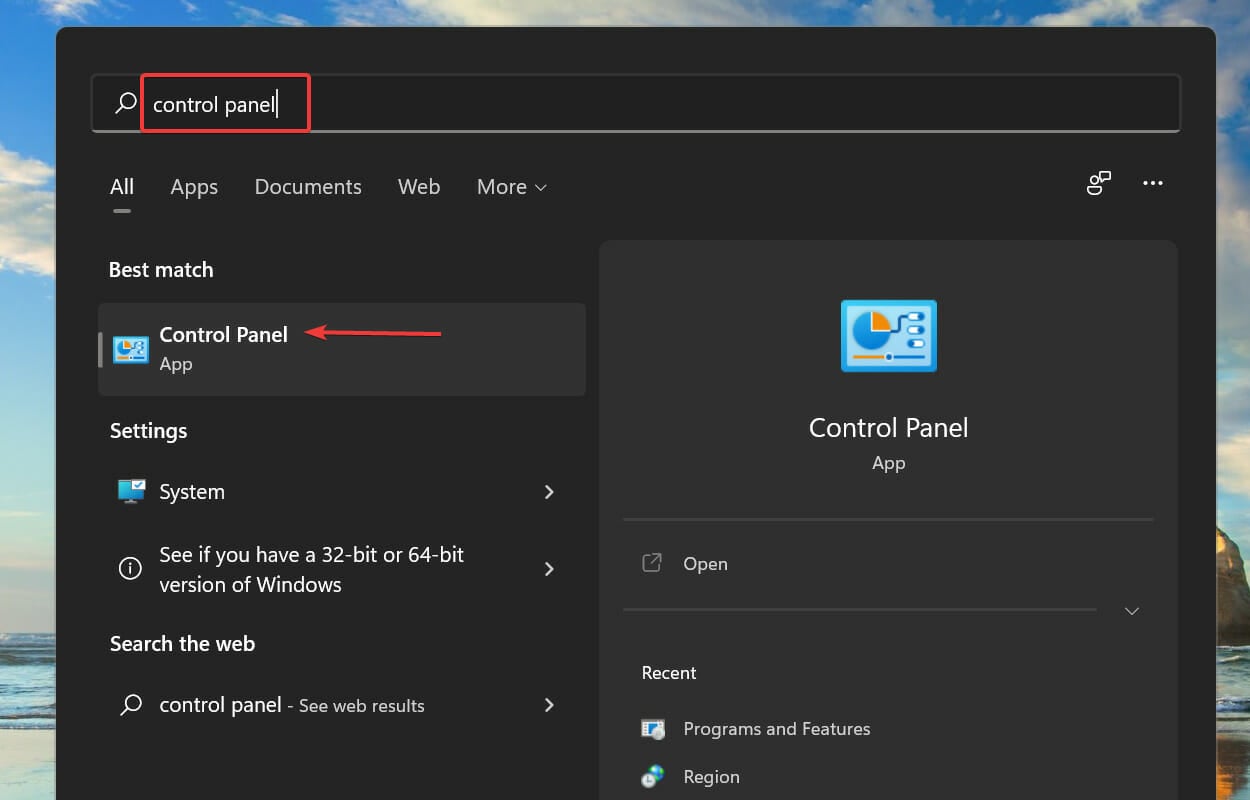
- Open the Start menu.
- Click on Control Panel.

- Select Java.

- Switch to the Java tab.
- Click View.
- Check the Path column for the version of the JRE you have installed.
- You will see a path. For example
C:appsjdkjrebinjavaw.exe - So, the path is
C:appsjdkbin
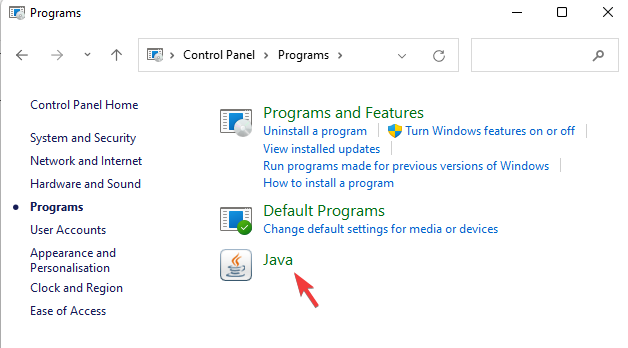
That is it. You should now have the latest version of Java Runtime Environment on your PC and no longer receive the error message.
Please write us in a comment below if these solutions helped you or if there are any other suggestions that we should include in our article.
Still having issues? Fix them with this tool:
SPONSORED
If the advices above haven’t solved your issue, your PC may experience deeper Windows problems. We recommend downloading this PC Repair tool (rated Great on TrustPilot.com) to easily address them. After installation, simply click the Start Scan button and then press on Repair All.
![]()
In this post, I will be sharing how to fix error: could not find java se runtime environment. This error may occur if you are trying to run a simple java -version command or when you try to open a .jar file using the «java -jar xxx.jar» command in the command window. You will face the following message:
Read Also: Bad operand types for binary operator in java
Error: Registry key ‘SoftwareJavaSoftJRE’
Error: could not find java.dll
Error: Could not find Java SE Runtime Environment.
[Fixed] Error: could not find java se runtime environment
1. Go to «Programs and Features» and uninstall all the previous java versions. Check the location «C:/Program Files/…» and delete all the java folders inside it.
2. Also, clean up your registry (delete the java key present inside it).
3. Go to Start and then click on the Run.
4. Type «regedit»
5. Go to the path «HKEY_LOCAL_MACHINE/Software/Microsoft/Windows/CurrentVersion/Uninstall» . Uninstall folder will contain many registry entries within curly brackets as shown below.

6. Now, click on the Edit tab and then Find (Note: Highlight Uninstall folder before searching for the particular registry.)
7. Enter version string as value to find corresponding registry entry to be deleted.
Steps for finding registry keys
a. Any version of Java 7
Follow format 7.0.xxx
where xxx can be 100, 120, 130, 140, and so on
Please refer to below examples:
Type 7.0.100 in the search field, it will find registry key for Java7 update 10
Type 7.0.120 in the search field, it will find registry key for Java7 update 12
Type 7.0.180 in the search field, it will find registry key for Java7 update 18
b. Any version of Java 6
Follow format 6.0.xxx
where xxx can be 100, 120, 130, 140, and so on
Please refer to below examples:
Type 6.0.100 in the search field, it will find registry key for Java6 update 10
Type 6.0.120 in the search field, it will find registry key for Java6 update 12
Type 6.0.180 in the search field, it will find registry key for Java6 update 18
c. Any version of Java 5
Follow format 1.5.0.xxx
where xxx can be 100, 120, 130, 140, and so on
Please refer to below examples:
Type 1.5.0.100 in the search field, it will find registry key for jre1.5.0_01
Type 1.5.0.120 in the search field, it will find registry key for jre1.5.0_12
Type 1.5.0.180 in the search field, it will find registry key for jre1.5.0_18
8. Once you find the registry key, highlight that key and then Right-click on it and choose Delete.
9. Confirm the Delete and click Yes.
After following the above steps, now, reinstall Java and set System variable JAVA_HOME in your machine to your JRE(or JDK) path.
Please find the example below:
JAVA_HOME- C:Program FilesJavajdk1.7.0_80
Path- C:Program FilesJavajdk1.7.0_80bin
How to Check Error is Resolved
You can check if the above solution is correct by executing the following commands in the command window.
1. By printing JAVA_HOME in the command window.
echo %JAVA_HOME%
2. Checking the version of Java in the command window.
java -version
That’s all for today, please mention in the comments in case you know any other way to solve the error: could not find java se runtime environment.
Reference:
Oracle docs