
 При работе с программами, утилитами и запуске игр пользователи могут столкнуться с появлением ошибок: «Path not found» и «Path does not exist». В этой статье рассмотрим, что это за ошибки и что делать, чтобы их исправить.
Что означают ошибки «Path not found» и «Path does not exist»
Пользователи, владеющие основами английского языка или потрудившиеся воспользоваться переводчиком без проблем поймут суть данных ошибок:
- Path not found – с английского переводится как: «Путь не найден»;
- Path does not exist – с английского переводится как: «Путь не существует».
Обе эти ошибки оповещают об одной и той же проблеме, а именно — о невозможности построить путь к указанному файлу. Это может быть, как исполняемый exe файл, так и вспомогательные файлы, требуемые для работы программы или игры.
«Path not found» и «Path does not exist» — что делать, если возникли ошибки
Прежде всего, стоит узнать, что это за путь и к какому файлу он ведет. Если речь идет о ярлыке, то следует зайти в его свойства из контекстного меню, которое вызывается правой кнопкой мыши при клике по ярлыку и посмотреть полный путь. Затем зайти в проводник и проследовать по указанному пути, убедившись, что он существует.
Целостность пути может быть нарушена в результате:
- Переноса папки, например, в другую папку, на другой диск или съемный носитель;
- Из-за изменения названия корневой директории или одной из внутренних промежуточных папок;
- Повреждения файла, к которому происходит непосредственное обращение. Например, в результате ручного вмешательства или вследствие действий вирусных программ.
Если исключить последний пункт, то решений у данной проблемы 2:
- Зайти в свойства ярлыка и изменить путь к исполняемому файлу;
- Дать корректное соответствующее пути, указанному в свойствах ярлыка, название папок.
Что касается повреждения файла или его отсутствия, то решается данная проблема исключительно переустановкой программы. Некоторые приложения и игры предоставляют функционал для проверки целостности файлов и дают возможность их быстро восстановить без необходимости выполнять полную переустановку.
Если ошибки «Path not found» и «Path does not exist» возникают не во время запуска, а непосредственно во время работы программы, то диагностировать проблемный файл становится на порядок сложнее. Если в тексте ошибки указан путь, то нужно опять-таки по нему проследовать. Если из подсказок есть только конечный файл, к которому происходит обращение, то можно воспользоваться встроенным поиском Windows, чтобы его найти. Но это может стать весьма проблематичным, если файл был удален или переименован.
Ошибки «Path not found» и «Path does not exist» могут возникать и в программировании: при компиляции программ или их запуске. Причина аналогичная – не верное указан путь / url. И решение стандартное – сопоставить указанный путь с иерархией каталогов и сверить соответствие имен папок.
С абсолютным путем (вида: https://www.urfix.ru/content/images/index.php) проблемы возникают редко, так как ссылка будет работать корректно при указании на нее из любого файла и из любой директории.
А вот с относительными путями все сложнее (вида: /content/images/index.php), в которых не указаны корневые директории. Каждый начинающий вебмастер и программист сталкивался с подобной ошибкой. Решается элементарно: либо указывается абсолютный путь, либо – относительный, согласно иерархии каталогов.
Не нашли ответ? Тогда воспользуйтесь формой поиска:
На чтение 7 мин. Просмотров 685 Опубликовано 03.09.2019
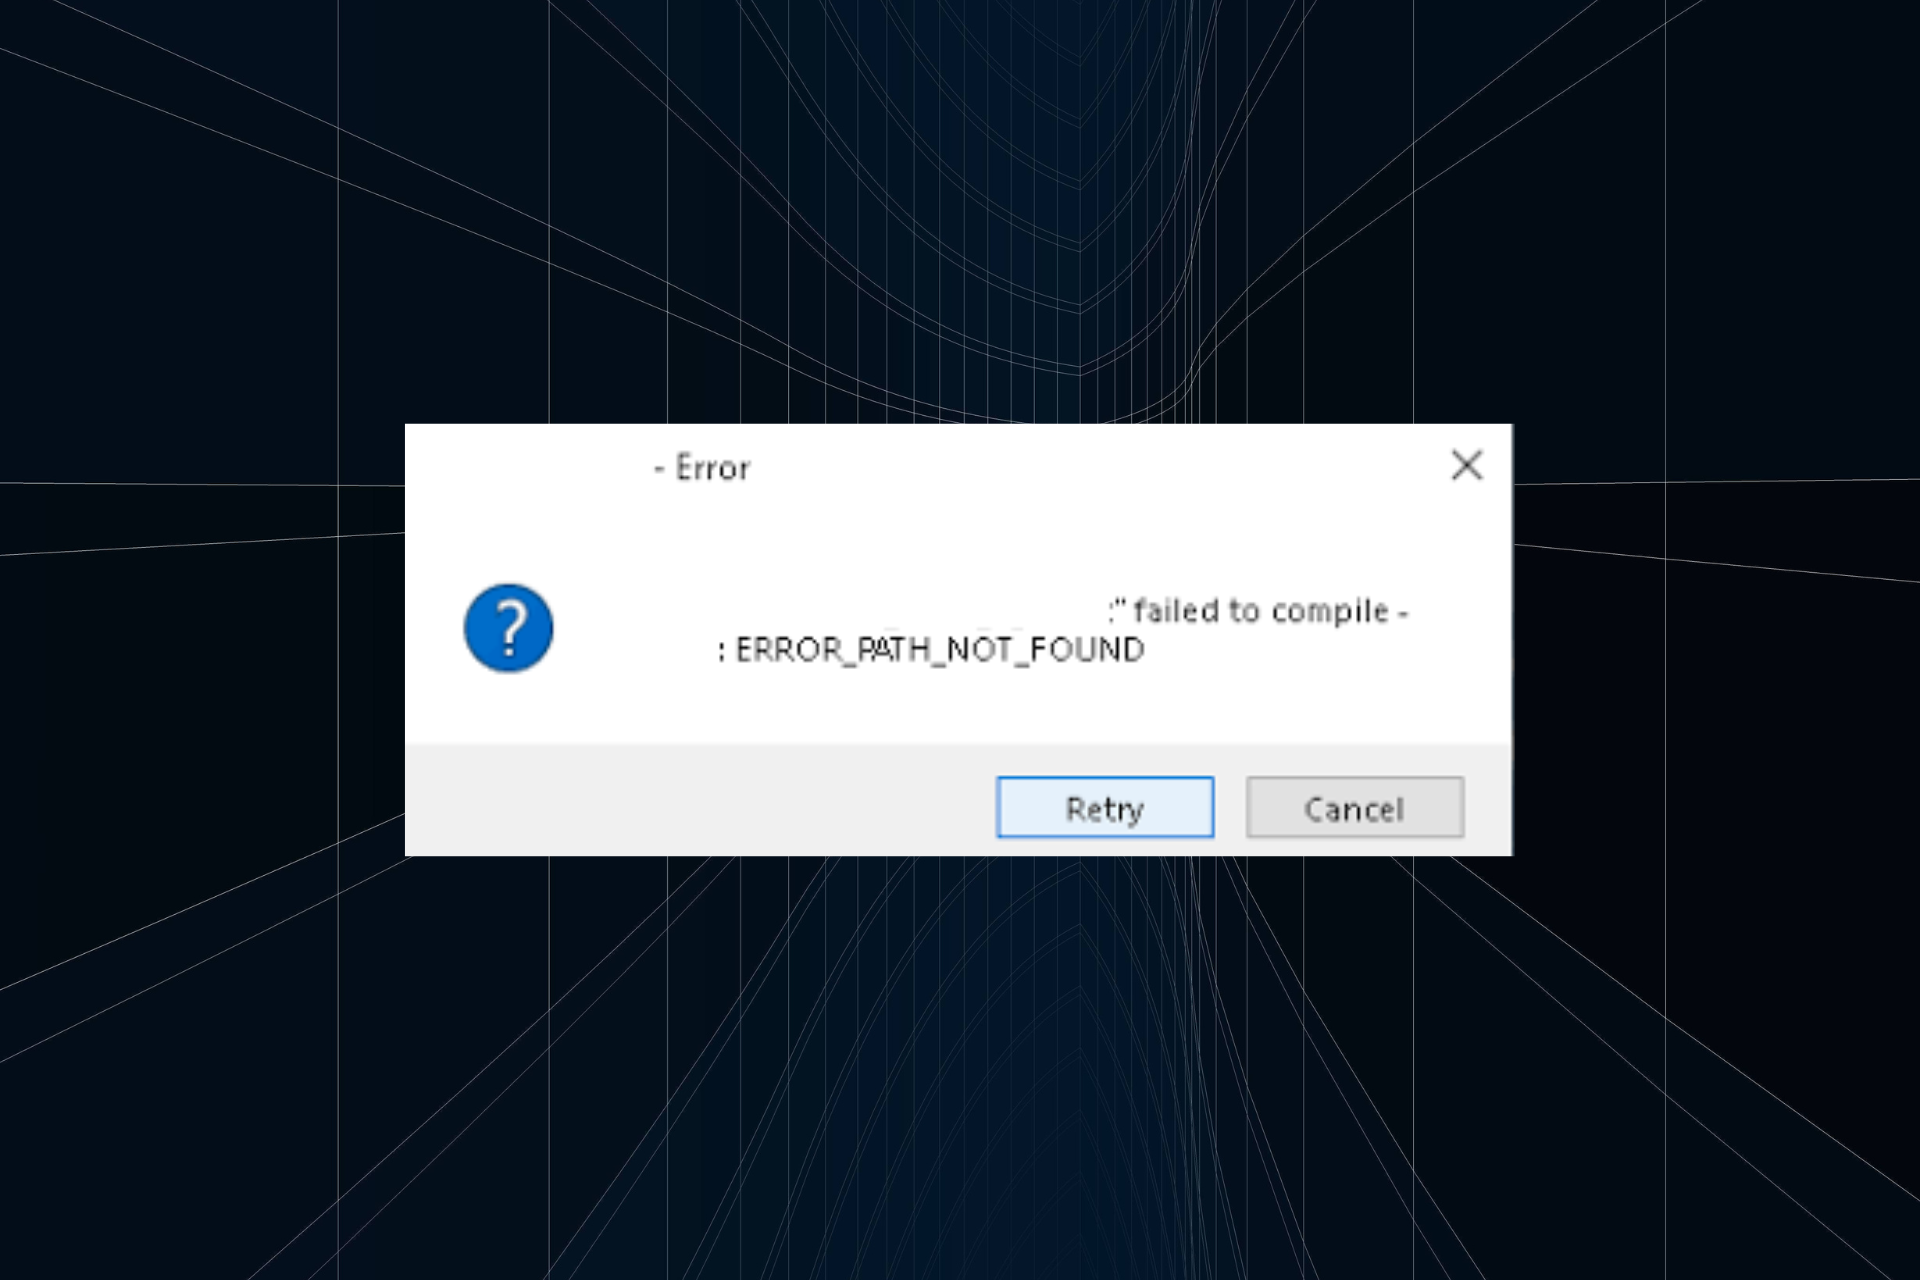
Если вы получаете сообщение об ошибке «ERROR_PATH_NOT_FOUND 3 (0x3)» или «Системе не удается найти указанный путь», используйте шаги по устранению неполадок, перечисленные в этой статье, чтобы исправить это.
Содержание
- ERROR_PATH_NOT_FOUND: что это такое и как это исправить
- Решение 1. Проверьте свой антивирус
- Решение 2 – Ремонт вашего реестра
- Решение 3 – Выполнить сканирование SFC и DISM
- Решение 4 – Обновите свою ОС
- Решение 5 – Очистите ваши временные файлы и папки
- Решение 6 – Выполнить сканирование CHKDSK
- Решение 7. Загрузите файл/приложение снова
- Решение 8 – Изменить местоположение файла
- Решение 9 – Удалить конфликтующее программное обеспечение
- Решение 10 – восстановление системы
ERROR_PATH_NOT_FOUND: что это такое и как это исправить
Сообщение Системе не удается найти указанный путь может быть проблематичным, но иногда могут возникать похожие проблемы. Что касается этих проблем, вот некоторые похожие проблемы, о которых сообщили пользователи:
- Error_path_not_found Windows 7 sp1 . Эта проблема может возникать в любой версии Windows, и даже если вы не используете Windows 10, попробуйте любое из наших решений.
- Путь ошибки не найден Lenovo . Эта проблема возникает у многих брендов ПК, и для ее устранения установите последние обновления и выполните сканирование SFC и DISM.
Решение 1. Проверьте свой антивирус

Несколько пользователей сообщили, что причиной этой проблемы был их антивирус, и для ее устранения предлагается временно отключить стороннее антивирусное программное обеспечение. Если отключение антивируса не решает проблему, возможно, вам придется удалить его.
Пользователи утверждают, что удаление вашего антивируса может решить проблему в некоторых случаях, поэтому вы можете попробовать это. Если удаление антивируса решает проблему, вам следует подумать о переходе на другое антивирусное решение. На рынке есть много отличных антивирусных инструментов, но если вы хотите получить максимальную защиту, которая не будет мешать вашему антивирусу, обязательно попробуйте BullGuard .
Решение 2 – Ремонт вашего реестра
Самый простой способ восстановить реестр – использовать специальный инструмент, например CCleaner . Не забудьте сначала сделать резервную копию реестра, если что-то пойдет не так. Если вы не установили очиститель реестра на свой компьютер, ознакомьтесь с нашей статьей о лучших очистителях реестра для использования на ПК с Windows 10.
- ЧИТАЙТЕ ТАКЖЕ: ИСПРАВЛЕНИЕ: ошибка «Gdi32full.dll отсутствует» (или не была найдена) в Windows 10
Решение 3 – Выполнить сканирование SFC и DISM
Другой причиной ошибки Система не может найти путь указано может быть повреждение файла. Иногда ваша установка Windows может быть повреждена, что может привести к появлению этой и многих других ошибок. Однако вы можете решить проблему, выполнив сканирование SFC. Для этого просто выполните следующие простые шаги:
-
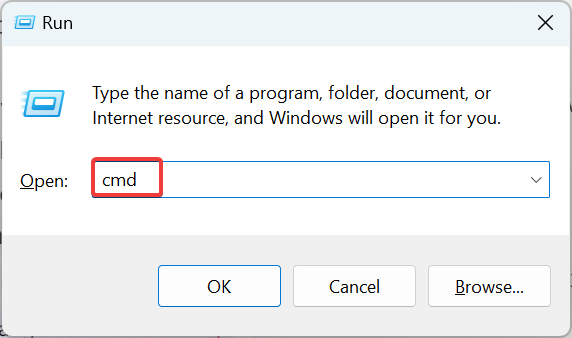
Откройте меню Win + X с помощью сочетания клавиш Ключ Windows + X . Кроме того, вы можете щелкнуть правой кнопкой мыши кнопку Пуск. Выберите в меню Командная строка (Администратор) или PowerShell (Администратор) .

-
После открытия командной строки выполните команду sfc/scannow .
- Сканирование SFC должно начаться. Мы должны отметить, что это сканирование может занять около 10-15 минут, поэтому не вмешивайтесь в него.


Если проблема не устраняется после запуска сканирования SFC, возможно, вам придется запустить сканирование DISM. Это довольно просто, и вы можете сделать это, выполнив следующие действия:
- Запустите Командную строку от имени администратора.
-
Введите команду DISM/Online/Cleanup-Image/RestoreHealth и нажмите Enter .
- DISM Scan начнет восстанавливать вашу установку. Этот процесс может занять около 20 минут, иногда больше, поэтому не прерывайте его.

После завершения сканирования DISM проверьте, устранена ли проблема. Если проблема все еще существует, повторите сканирование SFC еще раз.
Решение 4 – Обновите свою ОС
Если вы продолжаете получать сообщение об ошибке Система не может найти указанный , вы можете исправить проблему, просто установив последние обновления. Эта проблема может возникать из-за определенных ошибок в вашей системе, и лучший способ устранить их – это поддерживать вашу систему в актуальном состоянии. Для этого просто выполните следующие действия:
- Откройте Настройки приложения . Вы можете сделать это быстро, используя сочетание клавиш Windows Key + I .
-
Перейдите в раздел Обновление и безопасность .
-
На правой панели нажмите кнопку Проверить обновления .


Теперь Windows проверит наличие доступных обновлений. Если какие-либо обновления доступны, они будут загружены автоматически в фоновом режиме. После загрузки обновлений просто перезагрузите компьютер, чтобы установить их.
Как только ваш компьютер обновится, проблема должна быть полностью решена.
- ЧИТАЙТЕ ТАКЖЕ: Исправлено: отсутствующие группы и приложения в Windows 10, 8.1 Стартовый экран
Решение 5 – Очистите ваши временные файлы и папки
Иногда временные или старые файлы могут вызывать ошибку Система не может найти указанный путь . Если это так, вам нужно удалить эти файлы с вашего ПК. Лучший способ сделать это – использовать инструмент очистки диска в Windows 10.
Это довольно полезный инструмент, который может освободить место и удалить проблемные файлы, и вы можете использовать его, выполнив следующие действия:
-
Нажмите Windows Key + S и введите очистка диска . Теперь выберите Очистка диска .
-
Выберите системный диск, по умолчанию это должен быть C, и нажмите ОК .
- Очистка диска теперь будет сканировать ваш диск.
-
Когда откроется окно Очистка диска , вы увидите список файлов. Выберите все файлы в списке и нажмите ОК .
- Необязательно: Если вы хотите, вы можете нажать кнопку Очистить системные файлы , чтобы удалить старые и ненужные системные файлы с вашего компьютера.


После использования очистки диска, проверьте, сохраняется ли проблема. Некоторые пользователи утверждают, что причиной этой проблемы была папка Windows.old, поэтому обязательно выберите Предыдущие установки Windows в Очистка диска , чтобы удалить ее.
Решение 6 – Выполнить сканирование CHKDSK
В некоторых случаях повреждение файла может привести к появлению сообщения Система не может найти указанный путь . Чтобы устранить эту проблему, вам нужно запустить сканирование chkdsk и просканировать системный диск. Это довольно просто сделать, и вы можете сделать это, выполнив следующие действия:
- Запустите Командную строку от имени администратора.
-
Когда откроется командная строка, введите команду chkdsk/f X: . Обязательно замените X буквой, обозначающей системный диск. Почти во всех случаях это C.
- Вас попросят запланировать сканирование. Нажмите Y , чтобы сделать это.
- Теперь перезагрузите компьютер, и сканирование chkdsk запустится до запуска Windows.

После того, как сканирование закончено, проверьте, все еще ли проблема. Если вы хотите, вы можете также повторить это сканирование для всех других разделов в вашей системе и проверить, помогает ли это.
Решение 7. Загрузите файл/приложение снова
Эта ошибка также возникает, если процесс загрузки был поврежден или поврежден. В этом случае попробуйте снова загрузить соответствующий файл или все приложение. Вы также можете использовать специальный менеджер загрузок для этой задачи.
- ЧИТАЙТЕ ТАКЖЕ: Исправлено: в Windows 10 отсутствует XAudio2_6.dll
Решение 8 – Изменить местоположение файла
Перемещение файла, затронутого ошибкой «путь не найден», в другую папку может решить проблему. Попробуйте переместить файл в другую папку на том же диске. Если это не работает, попробуйте переместить его на другой диск.
Кроме того, убедитесь, что для папки назначения не установлено значение «Только для чтения». Вот как это проверить:
- Нажмите правой кнопкой мыши на папку> выберите Свойства .
- Перейдите в раздел «Атрибуты»> параметр Только для чтения должен быть отключен

Решение 9 – Удалить конфликтующее программное обеспечение
В некоторых случаях сторонние приложения могут вызывать эту проблему, и для исправления сообщения Система не может найти указанный путь рекомендуется удалить все недавно установленные приложения или приложение, которое дает вам сообщение. эта ошибка.
Это довольно просто сделать, но если вы хотите полностью удалить приложение, мы рекомендуем использовать программное обеспечение для удаления. С помощью программного обеспечения для удаления, такого как Revo Uninstaller , вы полностью удалите все файлы, связанные с приложением, которое вы пытаетесь удалить, и убедитесь, что проблема не появится снова.
Решение 10 – восстановление системы
Если эта проблема начала возникать недавно, вы можете исправить ее, просто выполнив Восстановление системы. Это довольно просто сделать, и вы можете сделать это, выполнив следующие действия:
-
Нажмите Windows Key + S и введите восстановление системы . Выберите в меню Создать точку восстановления .
-
Нажмите кнопку Восстановление системы .
-
Откроется окно Восстановление системы . Нажмите Далее , чтобы продолжить.
-
Установите флажок Показать больше точек восстановления , если он доступен. Выберите нужную точку восстановления и нажмите Далее .
- Следуйте инструкциям на экране.


После выполнения восстановления системы проверьте, устранена ли проблема.
Если вы столкнулись с другими обходными путями этой ошибки, не стесняйтесь перечислять шаги по устранению неполадок в разделе комментариев ниже.
Примечание редактора . Этот пост был первоначально опубликован в августе 2017 года и с тех пор был полностью переработан и обновлен для обеспечения свежести, точности и полноты.
Discover easy solutions to quick get rid of the error
by Madalina Dinita
Madalina has been a Windows fan ever since she got her hands on her first Windows XP computer. She is interested in all things technology, especially emerging technologies… read more
Updated on April 5, 2023
Reviewed by
Alex Serban

After moving away from the corporate work-style, Alex has found rewards in a lifestyle of constant analysis, team coordination and pestering his colleagues. Holding an MCSA Windows Server… read more
- Many users complained that they get the ERROR_PATH_NOT_FOUND error when trying to open an app or perform an update.
- Ensure that the security solution you’re using doesn’t interfere with the OS.
- To fix this error, you should use dedicated software to repair the registry or clean the temporary files, amongst other solutions.
XINSTALL BY CLICKING THE DOWNLOAD FILE
Fortect is a system repair tool that can scan your complete system for damaged or missing OS files and replace them with working versions from its repository automatically.
Boost your PC performance in three easy steps:
- Download and Install Fortect on your PC.
- Launch the tool and Start scanning
- Right-click on Repair, and fix it within a few minutes
- 0 readers have already downloaded Fortect so far this month
While some error codes are specific, others can be encountered in a wide array of problems, thus making it slightly trickier to troubleshoot them. One such is the ERROR_PATH_NOT_FOUND message in Windows.
It indicates that Windows can’t access the disk or the data it’s trying to read. The error has been reported while opening files, running applications, and even during a Windows update. So, let’s find out how you can fix things.
Why does ERROR_PATH_NOT_FOUND error occur?
Here are a few reasons you might be getting the error:
- Critical files are missing: When critical files, either related to the program, a specific driver, or even Windows Update components, are missing, you may come across the error.
- Corrupt system files: In case the system files are corrupt, you are bound to face issues using the PC, and there’s a chance that apps crash at launch.
- Improper installation of the app: If the problem is limited to a particular program, it’s likely that the initial installation didn’t go through properly.
- Issues with the disk: Corrupt disk sectors can also affect the process of reading data and trigger such errors.
How can I fix ERROR_PATH_NOT_FOUND error?
Before we start making the major changes, here are a few quick things you can try:
- Restart the computer and then try the operation that failed earlier.
- Disable any antivirus or security software on the PC and check whether the ERROR_PATH_NOT_FOUND code disappears during installing a Windows update or running a program. If it works, we recommend you switch to a Windows-friendly antivirus.
- Check for any pending updates and install them.
- Move the affected file to a different location.
- Take ownership of the folder where the file throwing the error is stored.
- Reinstall the app throwing the error. While removing it, use the dedicated tool or an effective uninstaller software to get rid of any leftover files and registry entries.
If none work, head to the solutions listed next.
1. Repair your registry
The simplest way to repair your registry is to use a dedicated tool. Don’t forget first to back up your registry in case anything goes wrong.
Many reasons are causing the ERROR_PATH_NOT_FOUND code, which means that Windows cannot access the main disk where your OS is installed.
We recommend using third-party software to fix it and keep your computer safe from common Windows errors.
2. Repair corrupt system files and check for disk issues
- Press Windows + R to open Run, type cmd, and hit Ctrl + Shift + Enter.

- Click Yes in the UAC prompt.
- Paste the following commands individually and hit Enter after each to run the DISM tool:
DISM /Online /Cleanup-Image /CheckHealthDISM /Online /Cleanup-Image /ScanHealthDISM /Online /Cleanup-Image /RestoreHealth - Now, execute the following command to run the SFC scan:
sfc /scannow
- Once done with both, run the following command for Check Disk:
chkdsk /f /r /x - Press Y and then hit Enter to confirm running the utility the next you restart.
- Finally, restart the computer and wait for the scan to run.
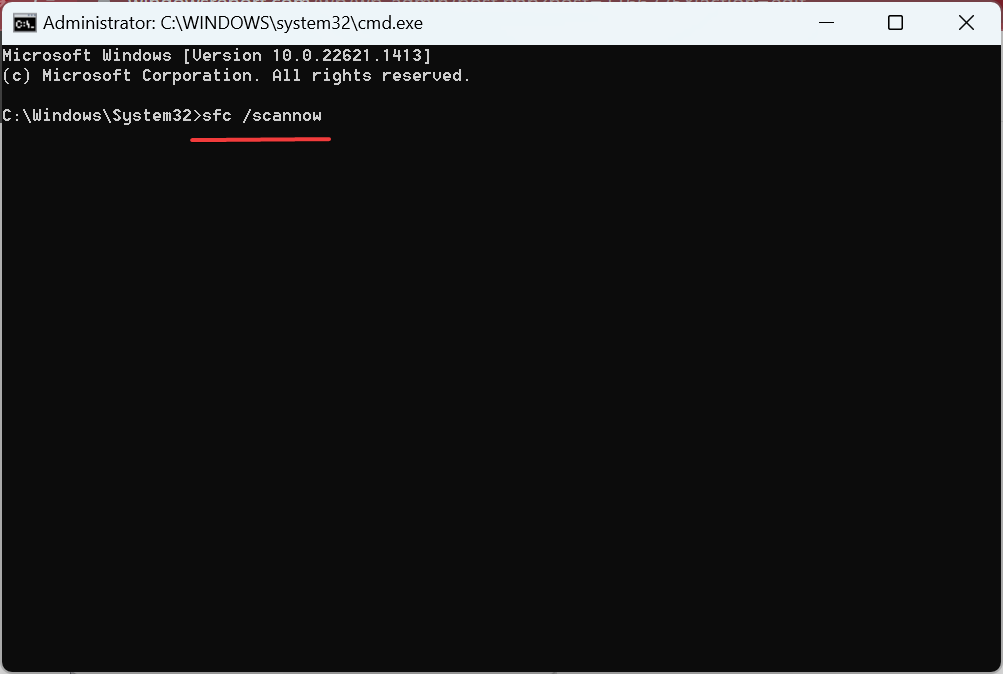
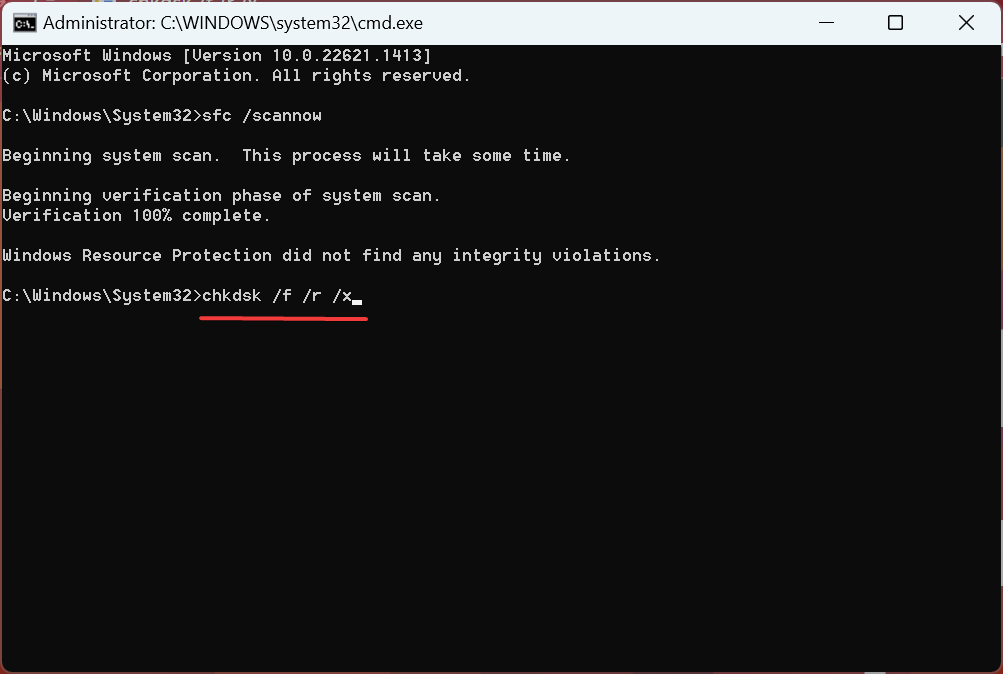
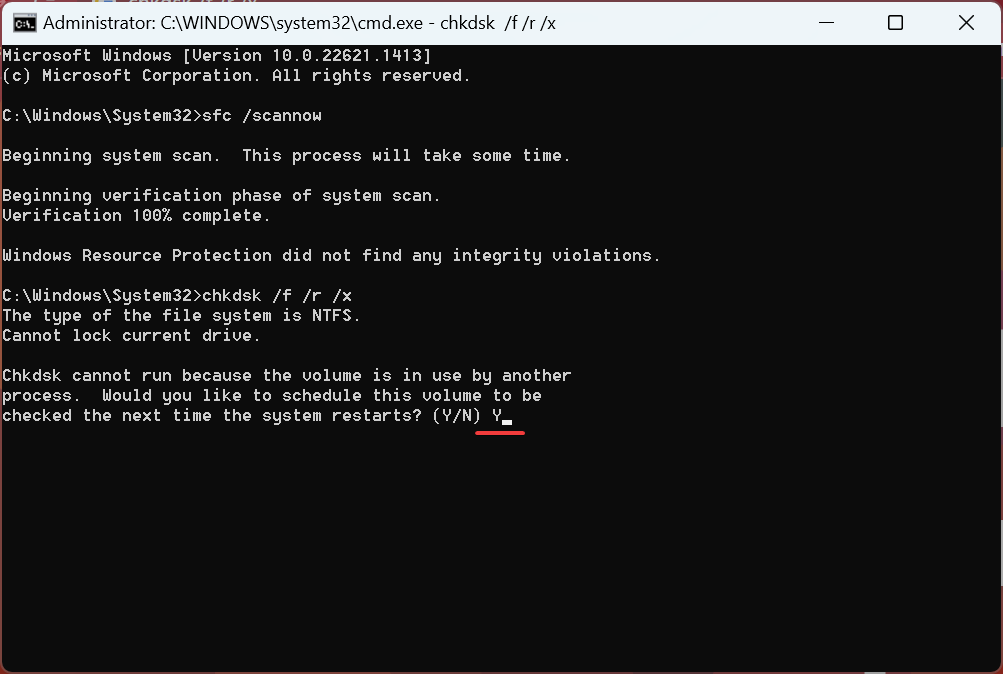
The DISM (Deployment Image Servicing and Management) and SFC (System File Checker) scans primarily repair the corrupt system files, while Check Disk aims to fix issues with the storage drive, if any. After running the three, check whether the ERROR_PATH_NOT_FOUND message is fixed.
3. Replace the affected file
Some users checked the error logs and were able to identify the affected file. This is usually tricky because once you know what’s causing the trouble, simply replacing the file (or the whole folder) fixes things in no time.
All you have to do is find a healthy computer with the same Windows version and architecture and copy the files from it to the PC throwing the error.
Here are a few of the affected files/folders, replacing which helped users:C:WindowsSystem32DriverStoreFileRepositoryhpsamd.inf_amd64_0784fd3ef0d7ec93 C:WindowsSystem32DriverStoreFileRepositorycapimg.inf_amd64_5a4379f63bea786c
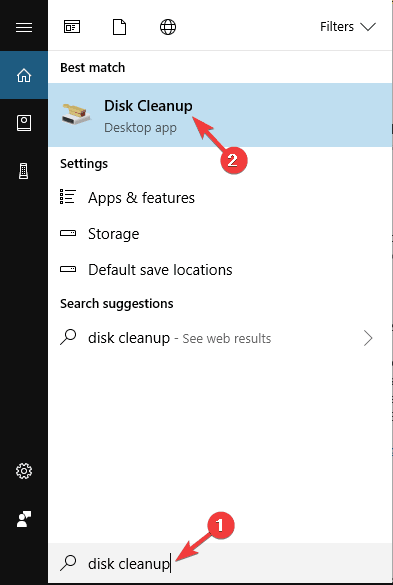
4. Clean the temporary files and folders
- Press Windows + S, search for Disk Cleanup, and then launch the utility.

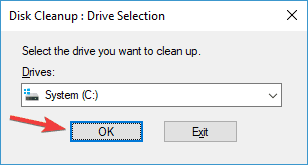
- Select your system drive and click OK. By default, it should be C:, so choose that from the dropdown menu.

- When Disk Cleanup window opens, you’ll see a list of files. Select all files on the list and click OK.

- You may also choose Clean up system files if this doesn’t work, but be extra cautious when deleting any entries there.
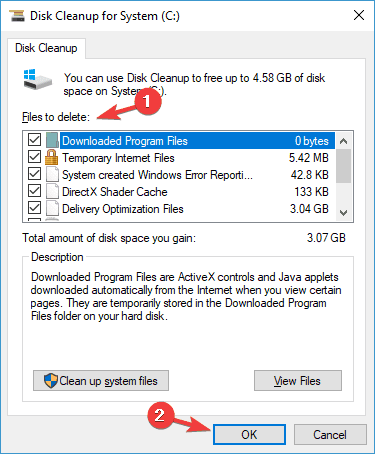
After using Disk Cleanup, check if the ERROR_PATH_NOT_FOUND code is still there. Several users claim that Windows.old folder was the cause for this issue, so be sure to select Previous Windows installations in Disk Cleanup to remove it.
- Fix: Page Fault in Nonpaged Area on Windows 10
- Apoint.exe: What is it & How to Fix its Errors
- Bindflt.sys Blue Screen: How to Fix It in 5 Steps
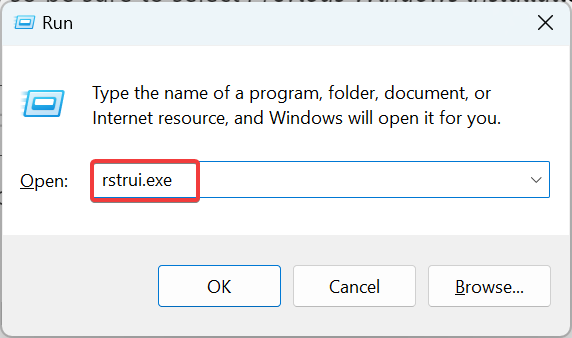
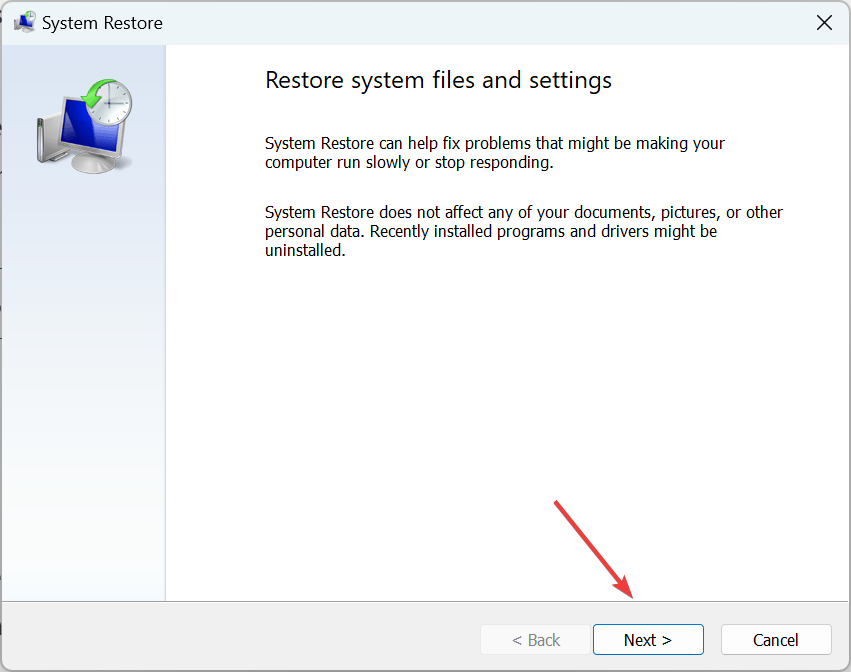
5. Perform a System Restore
- Press Windows + R to open Run, type rstrui.exe, and hit Enter.
- If there’s an option, select Choose a different restore point, or simply click Next.

- Choose a restore point from the list created before the error first appeared, and click Next.
- Finally, verify the restore details, and click Finish to start the process.
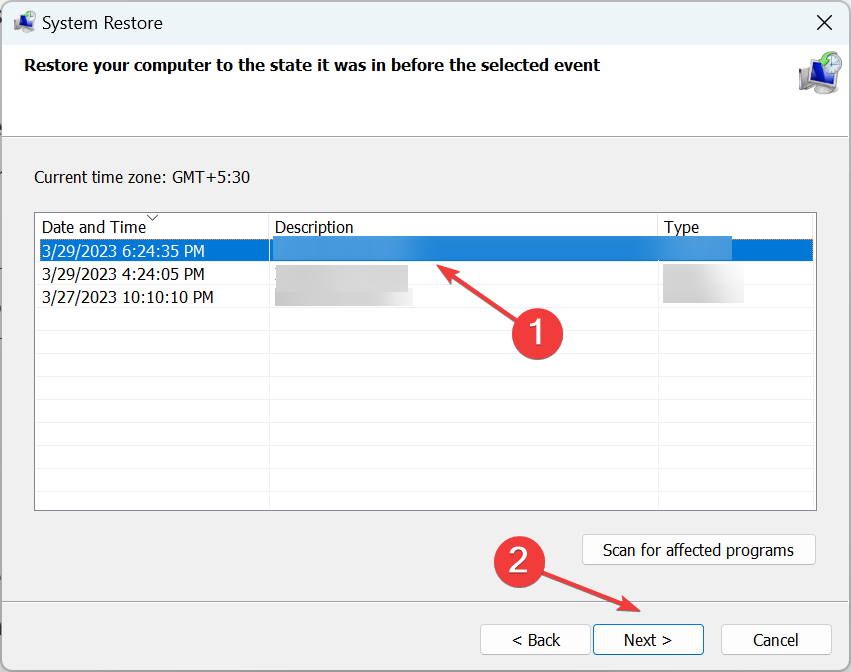

Wait for the restore process to complete. Your computer will restart during the process, so we recommend you save any open files. And once it’s complete, the ERROR_PATH_NOT_FOUND error should be gone for good.
Also, before you leave, check some quick tips to boost Windows performance and the best repair tools to get rid of such errors easily.
If you’ve encountered other workarounds for this error, please list the troubleshooting steps in the comment section below.
Still having issues? Fix them with this tool:
SPONSORED
Some driver-related issues can be solved faster by using a dedicated tool. If you’re still having problems with your drivers, just download DriverFix and get it up and running in a few clicks. After that, let it take over and fix all of your errors in no time!
![]()
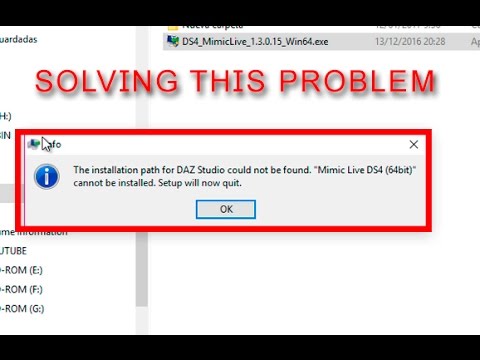
You may get an error stating that the path to install daz studio could not be found. It turns out there are several ways to fix this problem, so we’ll discuss that now.
Recommended
Speed up your PC today with this easy-to-use download.
Hello,
I am wondering if anyone has encountered similar problems before – when I download some plugins in .exe format, I get a message that “The daz Studio installation path was not found” and that the download failed.
I tried to set the path in the environment components (I was wrong, it’s true), I even always switched to another Amchine, and the program always failed there.
Me andI use daz 3d series for 3 of this special project even as plugins. I supposedly wanted you to work with this version (only most people don’t).
I am trying to charge Dreamlights point and ball pointers. Dreamlight’s help is good, so I think they are working on a product, but they have no luck so far. Thought I’d ask here if anyone has ever encountered annoyance and had a solution.
Is DAZ Studio offline?
The Work Offline option allows you to select a successful entry to the DAZ 3D store when people hit the Start button and work locally.
In this article, we will show you how to change the daz3d installation path and save your content to other submission pages. We will also configure Daz. You should be aware of the new location of the layman, next to the daz studio, the table of contents does not pay. Whether you want to organize your content in different subfolders or save your own data to an external drive, this type of tutorial will be of great help to you.
Changing Paths In Daz Manager Installation
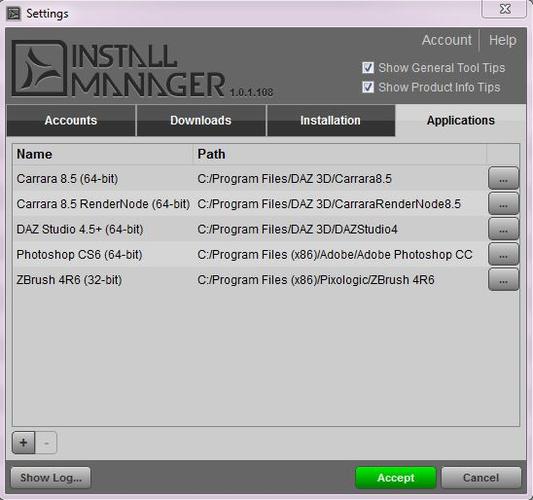
Which is the default install path for DAZ Studio?
The default installation option where DAZ Install Manager will be installed is almost certainly: 2) Click the gear icon in the upper right corner. 3) Click the Install tab and you will recognize the Label and Path and see this path where the DIM will be installed. You may need to add this custom directory to the DAZ Studio Content Manager.
After installing Daz Manager, you might be wondering how to change the location of all content. If you want to permanently change the location of these downloaded installed products or products In the case of a specific Daz Installation Manager (DIM), we can make the following changes.
Do you need to uninstall Daz Studio install manager?
Along with DAZ Studio (and Install Manager) there is also a database for background services. There may be corrupted records found there, so we need to consider the second consideration to get the problems smoothly again (or fixed properly). DAZ Studio must be installed using Install Manager and then uninstalled.
First, we really want to create our new directory. In my case, and as a trigger for the article, I will share a folder on my desktop and therefore name it Other Location. The file remains empty at the moment.
Then we really need to open DIM, zip your account, and in the Ready to Download and Ready to Install tabs we can see Announcements in the lower right corner. Details “. Let’s tickle the chest and a new section will definitely appear.
As you can see from the marker, here we can indicate where we both want to download or install our content, depending on the invoice we issue. In my travel bag, since I haven’t assigned a new directory, I only see one path.
To add a boy, click the small product icon. A new screen should appear where we click the entire plus symbol and we can now define our new directory. In my case, this is my previous site in the Alternate Location folder.
Whenyou’re done, agree to help everyone, and now you should find out about our new features available.
Our new plan is ready. I can now create my Dark Fantasy weapon set in my new folder.
Find The New Daz3d Daz Installation Path In Studio
After all my content is installed, we can open Daz Studio to use this method in our project. We will inform you that there is new information for free with ready-made files.
Recommended
Is your PC running slow? Do you have problems starting up Windows? Don’t despair! ASR Pro is the solution for you. This powerful and easy-to-use tool will diagnose and repair your PC, increasing system performance, optimizing memory, and improving security in the process. So don’t wait — download ASR Pro today!

Edit> Content Settings> tab> Click Content Manager
How do I manually install a Daz file?
Find the folder with the contents of DAZ. You can usually find it by going to My Computer> Local C:> Program Files> DAZ> Studio> Articles & Other Content.Find the content you want – install it.Select the folder to run in the compressed file, then right-click and select Copy.
In this newly acquired window, we click on DAZ Studio Formats, and where Directory says, “We need to click Add.” Now we are specifying a storage location for our new directory. Just accept, and we’re almost there.
If we enable the left panel, we should now see the new location of the folder and room with the previously loaded content. Otherwise, right-click in the pane area and select Refresh.
It loaded correctly and our new location is outside of this object. So this is basically a way to change your daz 3d adding path. Now, every time we open Daz Studio, we will add content that appears to be available.
Accessing Daz From Blog Posts External Reader
Using content on an external drive is pretty straightforward. Before opening Daz Studio, we must install the device. As soon as we enter the program, we go back to the “Directory Content Manager” and I add the directory to our file on the external drive. Our content must be available for use. Keep in mind that every time our employees open the program, the reader may already be connected to the computer.
Conclusion: How To Change The Daz3d Installation Path
We’ve seen that creating new channels can be difficult, but not rocket science. This tutorial shows you how to change the daz3d install path correctly, and I would recommend to all browsers, for example, add the effective location to your current drive. In the long termIn the long term, long-term owners will have a wide range of valuable assets, and sometimes you need some structure. Even if a person saves the entire contents of / My Library, it can affect the performance of your computer. So always keep this last tip in mind.
How to change DAZ Library location?
Step 1. In Daz Central, look at the gear icon in the upper right corner. Step for: Select Modify next to the usual Base Path Location. Step 3: Keep choosing the location where you want to save the file (s) and click “Choose folder”.
PS: Can you identify the 3D model of the dog that was used in comparison to the beginning of this blog.
Speed up your PC today with this easy-to-use download.
How do I manually install a Daz file?
Find the folder with the contents of DAZ. You can usually find it by going to My Computer> Local C:> Program Files> DAZ> Studio> Content.Find the items you want to install.For now, select the execution folder from the compressed list, then right-click and select Copy.
How to change DAZ Library location?
Step 1: In Daz Central, select the “Gear” tattoo in the upper right corner. Step 2: Select “Modify” next to “Base Path Location”. Step 3: Continue choosing the property to save the file (s) and click “Select folder”.
Is DAZ Studio offline?
The Work Offline option allows you to switch between entering the DAZ 3d Store by pressing the Start button and local operations.
Chemin D Installation De Daz Studio Introuvable
Daz Studio Installationspfad Nicht Gefunden
Daz Studio Installatiepad Niet Gevonden
Ruta De Instalacion De Daz Studio No Encontrada
Caminho De Instalacao Do Daz Studio Nao Encontrado
Nie Znaleziono Sciezki Instalacji Daz Studio
Percorso Di Installazione Di Daz Studio Non Trovato
Daz 스튜디오 설치 경로를 찾을 수 없습니다
Put Ustanovki Daz Studio Ne Najden
Daz Studio Installationssokvag Hittades Inte
INBASDLP13987:~ kanopi$ sudo npm install -g opencv4nodejs
Password:
npm ERR! code 1
npm ERR! path /opt/homebrew/lib/node_modules/opencv4nodejs
npm ERR! command failed
npm ERR! command sh -c node ./install/install.js
npm ERR! info install using lib dir: /opt/homebrew/lib/node_modules/opencv4nodejs/node_modules/opencv-build/opencv/build/lib
npm ERR! /opt/homebrew/lib/node_modules/opencv4nodejs/install/install.js:37
npm ERR! throw new Error(‘library dir does not exist: ‘ + libDir)
npm ERR! ^
npm ERR!
npm ERR! Error: library dir does not exist: /opt/homebrew/lib/node_modules/opencv4nodejs/node_modules/opencv-build/opencv/build/lib
npm ERR! at Object. (/opt/homebrew/lib/node_modules/opencv4nodejs/install/install.js:37:9)
npm ERR! at Module._compile (node:internal/modules/cjs/loader:1092:14)
npm ERR! at Object.Module._extensions..js (node:internal/modules/cjs/loader:1121:10)
npm ERR! at Module.load (node:internal/modules/cjs/loader:972:32)
npm ERR! at Function.Module._load (node:internal/modules/cjs/loader:813:14)
npm ERR! at Function.executeUserEntryPoint [as runMain] (node:internal/modules/run_main:76:12)
npm ERR! at node:internal/main/run_main_module:17:47
npm ERR! A complete log of this run can be found in:
npm ERR! /Users/kanopi/.npm/_logs/2021-03-25T01_15_39_828Z-debug.log
Please help in resolving this issue…
Also tried the below:
npm i opencv4nodejs
npm WARN deprecated urix@0.1.0: Please see https://github.com/lydell/urix#deprecated
npm WARN deprecated har-validator@5.1.5: this library is no longer supported
npm WARN deprecated resolve-url@0.2.1: https://github.com/lydell/resolve-url#deprecated
npm WARN deprecated xmldom@0.1.31: Deprecated due to CVE-2021-21366 resolved in 0.5.0
npm WARN deprecated xmldom@0.4.0: Deprecated due to CVE-2021-21366 resolved in 0.5.0
npm WARN deprecated chokidar@2.1.8: Chokidar 2 will break on node v14+. Upgrade to chokidar 3 with 15x less dependencies.
npm WARN deprecated fsevents@1.2.13: fsevents 1 will break on node v14+ and could be using insecure binaries. Upgrade to fsevents 2.
npm WARN deprecated babel-eslint@10.1.0: babel-eslint is now @babel/eslint-parser. This package will no longer receive updates.
npm WARN deprecated request@2.88.0: request has been deprecated, see https://github.com/request/request/issues/3142
npm ERR! code 1
npm ERR! path /opt/homebrew/lib/node_modules/appium/node_modules/appium-webdriveragent/node_modules/opencv4nodejs
npm ERR! command failed
npm ERR! command sh -c node ./install/install.js
npm ERR! info install using lib dir: /opt/homebrew/lib/node_modules/appium/node_modules/appium-webdriveragent/node_modules/opencv-build/opencv/build/lib
npm ERR! /opt/homebrew/lib/node_modules/appium/node_modules/appium-webdriveragent/node_modules/opencv4nodejs/install/install.js:37
npm ERR! throw new Error(‘library dir does not exist: ‘ + libDir)
npm ERR! ^
npm ERR!
npm ERR! Error: library dir does not exist: /opt/homebrew/lib/node_modules/appium/node_modules/appium-webdriveragent/node_modules/opencv-build/opencv/build/lib
npm ERR! at Object. (/opt/homebrew/lib/node_modules/appium/node_modules/appium-webdriveragent/node_modules/opencv4nodejs/install/install.js:37:9)
npm ERR! at Module._compile (node:internal/modules/cjs/loader:1092:14)
npm ERR! at Object.Module._extensions..js (node:internal/modules/cjs/loader:1121:10)
npm ERR! at Module.load (node:internal/modules/cjs/loader:972:32)
npm ERR! at Function.Module._load (node:internal/modules/cjs/loader:813:14)
npm ERR! at Function.executeUserEntryPoint [as runMain] (node:internal/modules/run_main:76:12)
npm ERR! at node:internal/main/run_main_module:17:47
npm ERR! A complete log of this run can be found in:
npm ERR! /Users/kanopi/.npm/_logs/2021-03-25T14_06_03_819Z-debug.log
![]()
Jeru Luke
19.8k13 gold badges78 silver badges86 bronze badges
asked Mar 25, 2021 at 1:25
![]()
1
It worked when specifically installing opencv-build before-hand, but make sure neither opencv-build nor opencv4nodejs are actually defined in package.json dependencies,
So what I did is install them via postinstall as such:
"scripts": {
    "postinstall": "npm i opencv-build && npm i opencv4nodejs",
For this, I first had to install cmake in my case.
brew install cmake
BTW: It also took quite a while to install opencv-build — minutes of very intensive processing — according to the extra heat and sound emitted, and I thought it was stuck at first.
With this approach we can use opencv4nodejs but it’s not listed as a dependency.
answered Apr 8, 2021 at 6:55
![]()
Ovidiu DolhaOvidiu Dolha
5,3151 gold badge21 silver badges30 bronze badges
1
Might be late for the original poster, but since I had to search a lot to find a solution, I want to share what helped me with others:
I had to run the following commands to get this fixed:
Brew install cmake
npm i -g node-gyp
npm i opencv-build
npm i @u4/opencv4nodejs
you may need to run the following command if the link is not automatically created.
brew link --force opencv@4
answered Feb 6 at 11:56
![]()