You’ve been working hard on a React app that uses React Router (or Reach Router). Things are progressing nicely. You’re ahead of your deadline and you might just leave work early to enjoy those extra few hours of the weekend. You decide to do one last pass-through of your app before taking off. «That button should have a little more border-radius to it.» you think. You change it, hit refresh, your app breaks. It’s not your typical error. If it were, you wouldn’t have sworn under your breath. Cannot read property 'state' of undefined, no worries. You’ve seen that one plenty of times. This one was different. It wasn’t even that the app crashed, it’s deeper than that. You stare at your monitor through your fingers. That’s it. That’s all you get. Your whole app breaks on refresh and all you get is three words.
Cannot GET /dashboard
«Probably a hot module replacement issue. Just an anomaly» — you optimistically convince yourself. To validate your assumption you restart the app. «Home page looks good. Navigating works fine. Let’s try to refresh again.»
Cannot GET /settings
Defeat. No other words describe it so perfectly. There goes your long weekend. There might even go your whole weekend since you have literally no idea what’s going on. Luckily for you, you found this post. Meta, right?
First, let’s establish the problem you’re having. To do that, we’ll need to talk about how the browser and client-side routers work.
In the old days, things were simple. If you wanted to get the contents of /dashboard, the browser would make a GET request to your server, by inspecting the path portion of the URL the server would figure out that the user was requesting the /dashboard page. It would then grab that page and send it back to the browser as a response.
Then these things called client-side routers (CSR) came into the picture. With a CSR (like React Router), you’re no longer making requests to your server every time you change routes. Instead, your CSR is just handling that for you locally on the browser. So when you go to /dashboard, instead of making a GET request to your server, your CSR is using a browser API called history.pushState to manually change the URL and render the View for that specific route — all without causing a page refresh.
Let’s look at that process a little more in depth.
The first time a user loads your app (i.e., visits your website), they don’t have any JavaScript loaded. That means no React and no React Router — so the first request will always be to your server. Then, assuming there was a successful GET request, all your JavaScript loads and React Router confidently hijacks your routing. From here on out, any other route changes in your app will be handled by React Router.
Notice the issue yet? React Router can only load after the first successful GET request to your server (or /). The reason for the dreaded Cannot GET /* error is because, if you’re at /dashboard and then hit refresh, the browser will make a GET request to /dashboard which will fail since you have no logic on your server for handling that request (since React Router is supposed to do it).
In case the issue is still fuzzy, here’s another example. Say you are really proud of the app you’ve been working on and you want to share it with your Mom. The app is Tic Tac Toe and has three routes, /, /play, and leaderboard. You send your Mom the link https://tictactyler.com/play since you want to play with her. When she enters that URL into her browser and hits enter, what happens? At this point, she has no JavaScript, no React, and no React Router. The browser makes a GET request to /play and, since you’re relying on React Router to handle all the routing logic (but she has no React Router yet), the app crashes and she gets Cannot GET /play.
«Alright, alright, alright.» — Matthew Mcconaughey
Now the big question, how do we fix this?
The root of the issue is that you’re relying entirely on client side routing without setting up any logic to handle server-side routing. There are two main ideas for solving this problem. The first, set up both client and server side routing. The second, redirect all server requests to /index.html which will download all the JS resources and allow React Router to take it from there. Most of the solutions we’ll look at involve the latter as it’s more simple.
Hash History
TBH, this one is kind of a hack. Have you ever seen those URLs with # in them? They’re using Hash History. The idea is by appending a # to the end of the root of your URL, anything after that # won’t be sent to the server. So if the URL was https://ui.dev/#/courses, the browser would make a GET request to https://ui.dev, get back all the JavaScript, React Router would then load, see /courses, and show the proper view for that route. React Router provides a HashRouter component you could use that will get you hash-based routing, but honestly, unless you REALLY need it, there are better options.
Catch-all
If you already have a server you’re using, this is probably your best bet. The main idea here is that you redirect all of your server requests to /index.html. The outcome is similar to Hash History. Any request that is made to your server will respond with the index page (and then fetch any JS resources you need), React Router will then take over and load the appropriate view. The actual code for this varies on which type of server you have.
Express
app.get('/*', function(req, res) {
res.sendFile(path.join(__dirname, 'path/to/your/index.html'), function(err) {
if (err) {
res.status(500).send(err)
}
})
})
Apache .htaccess
RewriteBase /
RewriteRule ^index.html$ - [L]
RewriteCond %{REQUEST_FILENAME} !-f
RewriteCond %{REQUEST_FILENAME} !-d
RewriteRule . /index.html [L]
Nginx .conf
location / {
if (!-e $request_filename){
rewrite ^(.*)$ /index.html break;
}
}
No Server
For those blessed developers who don’t have to worry about managing a server, there are options for you as well and they (typically) come baked into the hosting service you’re using. There are obviously a lot of different variations here but you need to find a service that supports client-side routers.
For example, if you host with Firebase, one of the questions it asks you is
Configure as a single-page app (rewrite all urls to /index.html)?
Netlify also supports client-side routing, you just need to create a /_redirects file with the following rule
As you can probably guess, that tells Netlify to redirect all requests to .index.html.
Webpack / Development
This section is for everyone who ran into this problem in development using webpack-dev-server.. Just as above, what we need to do it tell Webpack Dev Server to redirect all server requests to /index.html. There are just two properties in your webpack config you need to set to do this, publicPath and historyApiFallback.
publicPath: '/',
historyApiFallback: true,
publicPath allows you to specify the base path for all the assets within your application. historyAPIFallback will redirect 404s to /index.html.
Here’s an example of a basic webpack config file with both options in case you need it.
var path = require('path');
var HtmlWebpackPlugin = require('html-webpack-plugin');
module.exports = {
entry: './app/index.js',
output: {
path: path.resolve(__dirname, 'dist'),
filename: 'index_bundle.js',
publicPath: '/'
},
module: {
rules: [
{ test: /.(js)$/, use: 'babel-loader' },
{ test: /.css$/, use: [ 'style-loader', 'css-loader' ]}
]
},
devServer: {
historyApiFallback: true,
},
plugins: [
new HtmlWebpackPlugin({
template: 'app/index.html'
})
]
};
That’s it. Go enjoy your weekend now 🍻.
Probably do the trick:
<IfModule mod_rewrite.c>
    RewriteEngine On
    RewriteBase /
    RewriteCond %{REQUEST_FILENAME} !-d
    RewriteCond %{REQUEST_FILENAME} !-f
    RewriteRule ^(.*)$ index.php [QSA,L]
</IfModule>
UPDATE 1
At this part of code:
RewriteRule ^index.php$ - [L]
[L] Stop the rewriting process immediately and don’t apply any more rules. So,
RewriteCond %{REQUEST_FILENAME} !-f
RewriteCond %{REQUEST_FILENAME} !-d
RewriteCond %{REQUEST_FILENAME} !-l
RewriteRule . /index.php [NC,L]
Are not interpreted.
UPDATE 2:
The server will follow symbolic links:
Options +FollowSymLinks
The server will disable multi views:
Options -MultiViews
Rewrite engine will be enabled:
RewriteEngine On
Base directory for rewrite will be /:
RewriteBase /
If request match a not existing file, continue:
RewriteCond %{REQUEST_FILENAME} !-f
If request match a not existing directory, continue:
RewriteCond %{REQUEST_FILENAME} !-d
Rewrite to index.php, in a not sensitive case, and stop execution of next rules:
RewriteRule index.php [NC,L]
So, try the follow:
Options +FollowSymLinks
Options -MultiViews

RewriteEngine On
RewriteBase /
RewriteCond %{REQUEST_FILENAME} !-f
RewriteCond %{REQUEST_FILENAME} !-d
RewriteRule index.php [NC,L]
Are you getting the ‘If you are having trouble loading marketplace, please force restart the app and the issue should resolve’ error whenever you open Roblox on your Mobile and PC?
If your answer is YES then you have come to the right place. Unlike other Roblox errors, this error does not prevent you from playing your favorite game.
The only thing is you will see this error message whenever you launch Roblox on your device. According to the error message, this can be fixed by simply force restarting Roblox.
In our previous guide, we have already explained how to force restart on Roblox on Android, iOS and PC.
Without any further ado, let’s get started:
Whenever you launch Roblox on your Mobile or PC, you will get a message on top of the screen.
The full error message reads, ‘If you are having trouble loading marketplace, please force restart the app and the issue should resolve.’
As mentioned above, this error message would not cause any trouble while playing games on Roblox.
However, if you want to get rid of this message, you need to force restart Roblox. To know how to do it on Mobile and PC, follow the steps written below:
How to Force Restart Roblox on Mobile
It is pretty easy to force restart Roblox on a Mobile. However, if you follow the steps written below:
- First, open up the Settings app.
- Now, go to Apps and then App Management.
- After that, scroll down and search for Roblox.
- Once found, tap on it and then tap on the ‘Force Stop‘.
- Once done, launch Roblox and check if the error remains.
- That’s it.
How to Force Restart Roblox on PC?
To force restart Roblox on your PC, you need to follow the steps mentioned below:
- First, press Ctrl+Shift+Esc on your keyword.
- When you do so, you will the Task Manager opened on the screen.
- Once opened, go to Processes and find Roblox.
- Once found, right-click on Roblox and hit End Task.
- That’s it.
That’s all you need to know about how to fix the “If you are having trouble loading marketplace, please force restart the app and the issue should resolve” error on Roblox.
Английский язык,
вопрос задал Torebay2004,
9 месяцев назад
Добавить свой ответ
Ответы на вопрос
Ответил ciaromee
11
1 — d
2 — g
3 — h
4 — b
5 — c
6 — a
7 — f
8 — e
Добавить свой ответ
Предыдущий вопрос
Следующий вопрос
Новые вопросы
Математика,
1 месяц назад
В доме Кости больше этажей, чем в доме Олега, в доме Тани меньше этажей,
чем в доме Олега, а в доме Феди больше этажей, чем в Танином доме.
Выберите утверждения, которые следуют из приведённых…
Математика,
1 месяц назад
как изменится разность если к уменьшаемому прибавить,а из вычитаемого вычесть 198?
Другие предметы,
9 месяцев назад
ПОМОГИТЕ РЕШИТЬ ТеСТ ПО ТЕХНОЛОГИИ ПОЖАЛУЙСТА
1.Сантехническое устройство для подачи и смешивания горячей и холодной воды
А) Вран
Б) Вентиль
В) Смеситель
2.Что следует сделать в первую очередь…
Биология,
9 месяцев назад
Помогите пожалуйста! Срочно! Билогия 6 класс Даю лучший ответ!!!!
Математика,
6 лет назад
помогите с 3 очень срочно пожалуйста…
Химия,
6 лет назад
Чтобы получить 4,4 г сульфида железа (II) необходимо взять ___г железа.
Whether you’re an advanced spreadsheet user, or you’re more comfortable with the more basic functions of spreadsheets, we’ve all experienced a #REF! error at some point. However, these errors pose a more difficult problem in a business environment, especially when you are sharing your files with other users, or collaborating on them simultaneously. If a #REF! error is left uncorrected, there is a high risk of losing entire columns, rows, or even sheets of data.
Let’s explore the most common types of #REF! errors you may encounter when dealing with a spreadsheet, and how you can rectify these to avoid the risk of losing important data.
Why am I getting #REF! In spreadsheets?
There are many ways you can end up with a #REF! in one of your cells. It can result from accidentally deleting a row/column, putting incorrect references into a formula, or moving formulas/sheets to a new location. Although #REF! errors can appear in any number of situations, they will always originate from one of two places:
- Losing the reference of a particular cell
- Losing the reference of a particular spreadsheet
Let’s explore these two scenarios in more detail and how to correct the #REF! errors in each.
How to solve #REF! When you have lost the reference of a particular cell
This is the most common way for users to receive the #REF! error. Losing the reference of a particular cell can happen in many different ways when using formulas in your spreadsheets:
- Deleting an essential cell
- Deleting an essential row/column
- Deleting an essential sheet
- Copying and pasting your formula to another cell/sheet
You can rectify all of the above using the following methods. Let’s look at a use case as an example to show how to correct #REF! errors in these circumstances.
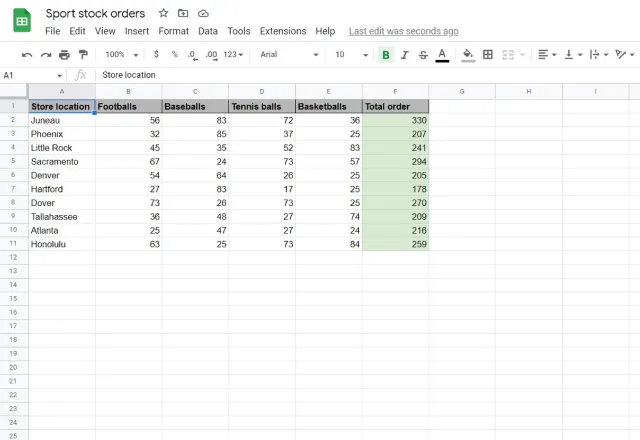
Imagine that I am managing the orders of my sportswear chain. The screenshot below shows my spreadsheet containing the number of orders placed for each product, for each store location. I have used a simple SUM formula to calculate the total number of orders for each store.
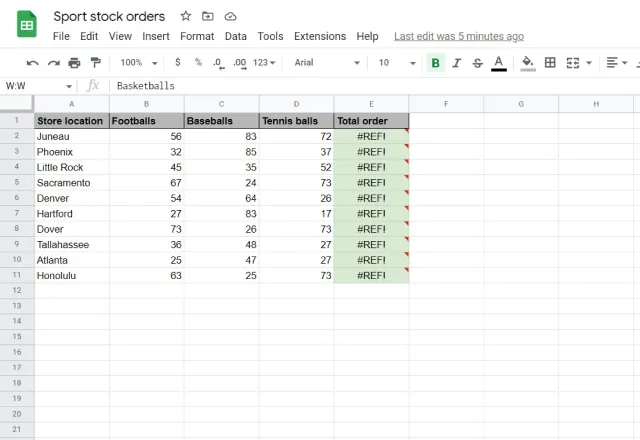
I have canceled all of the basketball orders across my stores. To keep my spreadsheet up-to-date, I delete the basketball column entirely. When I do this, #REF! errors appear.
So, how can I rectify this? Let’s look at the two main ways I can solve my #REF! errors.
Undo actions and reinsert inputs
The simplest way to rectify this error is to undo your actions to revert back to your original spreadsheet and find another way to fulfill your objective.
- Undo your actions by clicking the Undo button in the toolbar, or using the shortcuts Ctrl + Z, or Cmd + Z for Mac.
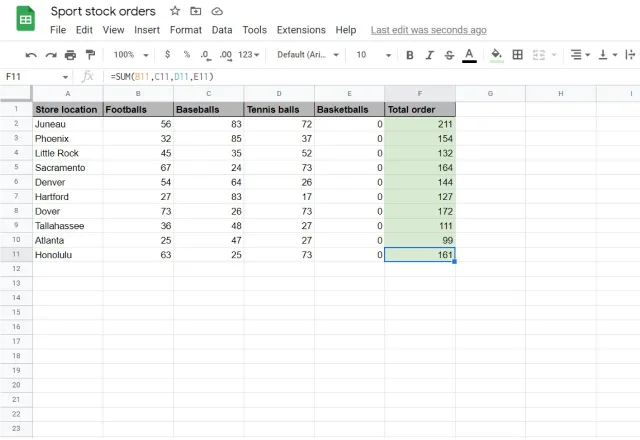
- Your original data should appear. In this example, my basketball column has reappeared.
- You can choose to find an alternative solution to your problem. In this case, I could replace the cells in the basketball column with a zero value ‘0’, so that the formula remains valid and I get the result I’m looking for.
Use the IFERROR function
Although this function does not correct a #REF! error, it is extremely useful to employ into your spreadsheets when choosing to share them with other users.
Not only does it allow you to clean your spreadsheet up from multiple errors, but you can adjust the formula in order to leave a message for future users. This could be to let them know there is a problem with the formula. As a result, things are clearer for newcomers to the spreadsheet, rather than just being presented with a #REF!.
- Double click the cell containing #REF!
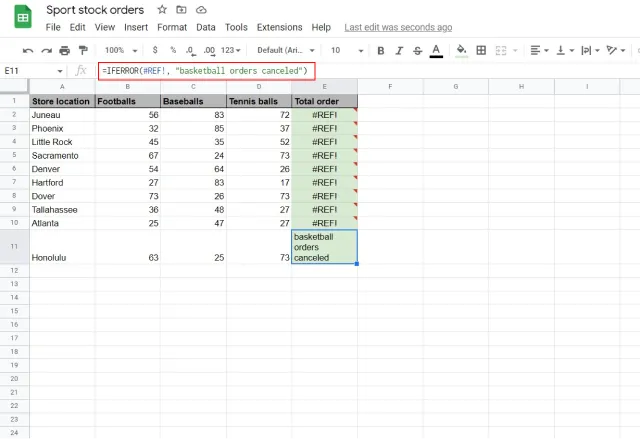
- Rewrite your formula using the IFERROR. You can choose to replace your errors with a blank cell or a zero value, or you can opt to add a message to alert other users of the issue. For example, in my formula, I will use the following:
=IFERROR(#REF!, “basketball orders canceled”)
For more information on how to use the IFERROR function for #REF! Errors and other spreadsheet errors, take a look at our article on How to use the IFERROR function in Google Sheets.
How to solve #REF! When you have lost the reference of a particular spreadsheet
There are two main ways you may lose the reference of a particular spreadsheet:
- Deleting a spreadsheet file that has been used within a formula in another spreadsheet file
- Sharing a spreadsheet with other users who do not have access to the other files referenced in a formula
Firstly, always make note of the sources that play a part in your spreadsheet formulas. You can do this by adding a comment to the cell containing the formula. That way, you know exactly which files you cannot delete without affecting your formulas.
What’s more, you can avoid #REF! errors completely by making a copy of the files referenced in the formula and adding them to the folder where your current spreadsheet is located. That way, even if the original sources are deleted, you have your own copies that will allow the formula to work. This is also a great solution when sharing your spreadsheet with other users – they will then have access to all the data within that folder.
How to remove multiple #REF! errors at once
If you want to get rid of numerous #REF! errors, you have two options: you can correct each of them manually using the techniques shown above, or you can target all of them at once. The latter will save you a lot of time, although it may not show you how each reference error came about.
If you want to target all of your #REF! errors at the same time, follow these steps.
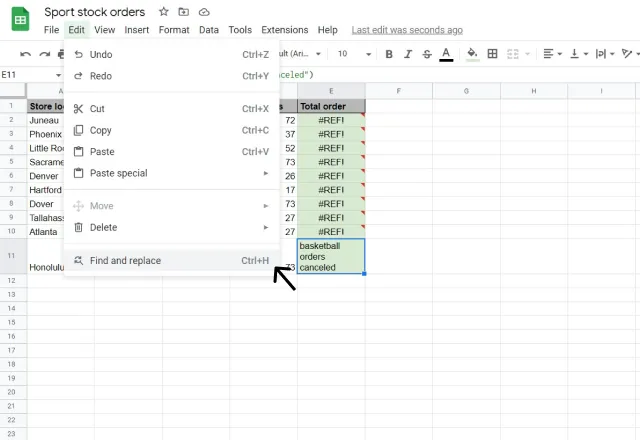
1. Open the Find and replace feature by using the keyboard shortcut Ctrl + H/Cmd + Shift + H, or head to Edit > Find and replace.
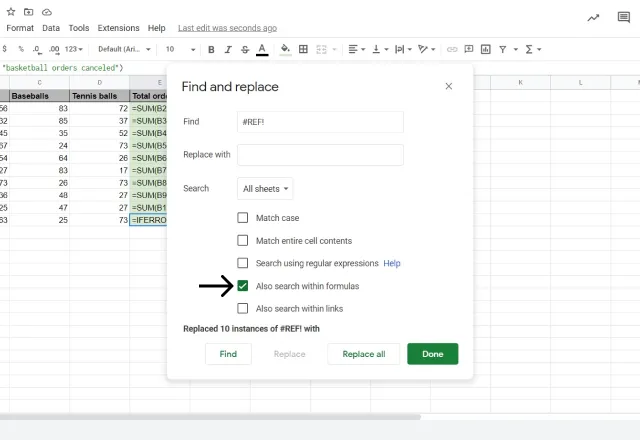
2. When the box appears, type ‘#REF!’ into the Find box. To replace with blank cell, leave the Replace with field blank. Tick the box, Also search within formulas.
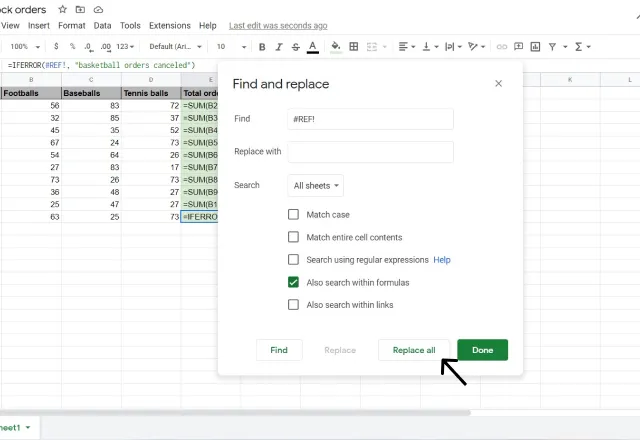
3. Click on the Replace all button to apply. You should see a message notifying you of how many #REF! errors have been found and replaced.
#REF error Google spreadsheet
And there you have it! When it comes to #REF! errors, prevention is the best cure. When dealing with these errors within a single Google Sheets file, it’s often best to undo your actions to revert the changes and find an alternative solution. On the other hand, if you’re dealing with #REF! errors that span across multiple spreadsheets in different locations, make a note of the different files involved in your formulas, and make copies to avoid risking worse repercussions. Ultimately, the best solution is to get rid of your #REF! errors by using the simple Find and replace feature.
Interested in learning more about reverting changes and protecting your sheets from any accidental edits? Check out our article on How to view the edit history in Google Sheets.
Alternatively, discover related blog posts below!
Editor’s note: This is a revised version of a previous post that has been updated for accuracy and comprehensiveness.


