
Очень часто при удалении снапшотов или консолидации дисков виртуальных машин на хостах VMWare ESXi, я сталкиваюсь с ошибкой “Unable to access a file since it is locked”. Это довольна частая проблема связана с ошибками в системе резервного копирования ВМ (я встречал проблему в Veeam, HP Data Protector, Veritas). Блокировка виртуального диска снапшота виртуальной машины не позволит вам выполнить консолидацию (Virtual machine disks consolidation is needed), Storage vMotion на другой дисковый массив, выполнить резервное копирование или удалить текущий снапшот. Иногда виртуальную машины с блокировками нельзя даже элементарно включить.
Ошибка с доступом к заблокированному файлу виртуального диска или снапшот в VMWare может выглядеть так:
Unable to access file since it is locked.
An error occurred while consolidating disks: One or more disks are busy.

Так же вы можете увидеть такую ошибку:
An error occurred while consolidating disks: msg.snapshot.error-DISKLOCKED.
Чаще всего ошибка “Unable to access file since it is locked” появляется:
- Когда некоторые файлы включенной виртуальной машины содержат метки блокировки другими хостаим ESXi;
- При добавлении виртуальных дисков в appliance резервного копирования во время неудачных сессий создания бэкапа;
Чтобы найти источник блокировки и снять ее, сначала нужно определить заблокированные файлы.
- С помощью SSH клиента подключитесь к хосту ESXi, на котором зарегистрирована проблемная ВМ;
- Перейдите в каталог с файлами виртуальной машины:
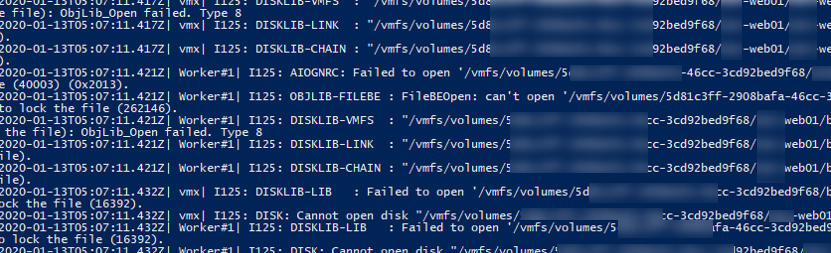
cd /vmfs/volumes/VMFS_DATASTORE_NAME/LOCKED_VM - Найдите ошибки консолидации, блокировки файлов в журнале vmware.log:
cat vmware.log | grep lock - В логе должны содержаться примерно такие ошибки:
VigorSnapshotManagerConsolidateCallback: snapshotErr = Failed to lock the file (5:4008)
2020-01-13T05:07:11.432Z| vmx| I125: DISK: Cannot open disk "/vmfs/volumes/5121c3ff-230b21a-41aa-21d92b219221/msk-web01/msk-web01_1-000002.vmdk": Failed to lock the file (16392).
2020-01-13T05:07:11.432Z| Worker#1| I125: DISKLIB-LIB : Failed to open '/vmfs/volumes/5121c3ff-230b21a-41aa-21d92b219221/msk-web01/msk-web01-000002.vmdk' with flags 0xa Failed to lock the file (16392).
2020-01-13T05:07:11.432Z| Worker#1| I125: DISK: Cannot open disk "/vmfs/volumes/5121c3ff-230b21a-41aa-21d92b219221/msk-web01/msk-web01-000002.vmdk": Failed to lock the file (16392).
2020-01-13T05:07:11.432Z| vmx| I125: [msg.fileio.lock] Failed to lock the file

- В этом примере видно, что заблокирован файл
msk-web01_1-000002.vmdk
; - С помощью следующей команды можно вывести текущую цепочку снапшотов начиная с указанного, до flat диска:
vmkfstools -qv10 msk-web01_1-000002.vmdk - Теперь выведем информацию о снапшоте, и его владельце (RO owner):
vmkfstools -D msk-web01-000001-delta.vmdkLock [type 10c000021 offset 242835456 v 856, hb offset 3153920 gen 3, mode 1, owner 5cbac61a-4b6e32b7-0480-d06726ae7900 mtime 5199410 num 0 gblnum 0 gblgen 0 gblbrk 0] RO Owner[0] HB Offset 3153920 5cbac61a-4b6e32b7-0480-d06726ae7900 Addr <4, 532, 83>, gen 859, links 1, type reg, flags 0, uid 0, gid 0, mode 600


В строке RO Owner указан MAC адрес сетевой карты хоста ESXi, который заблокировал данный файл снапшота (MAC адрес выделен на скриншоте). Также обратите внимание на значение Mode:
- mode 1 – блокировка на чтение/запись (например, у включенной ВМ);
- mode 2 – обычно означает, что диск заблокирован приложением резервного копирования.
Чтобы по известному MAC адресу найти ESXi сервер, можно воспользоваться следующими командами в PowerCLI (преобразуйте полученный ранее MAC адрес в формат с двоеточиями):
Import-Module VMware.VimAutomation.Core -ErrorAction SilentlyContinue
connect-viserver vcenter1
Get-VMHost | Get-VMHostNetworkAdapter | Where-Object {$_.Mac -like "d0:67:26:ae:79:00"} | Format-List -Property *
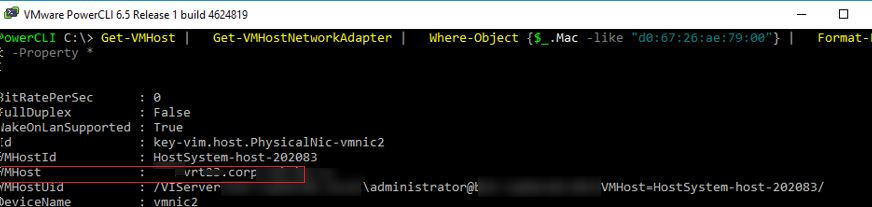
Имя ESXi хоста будет указано в поле VMHost.
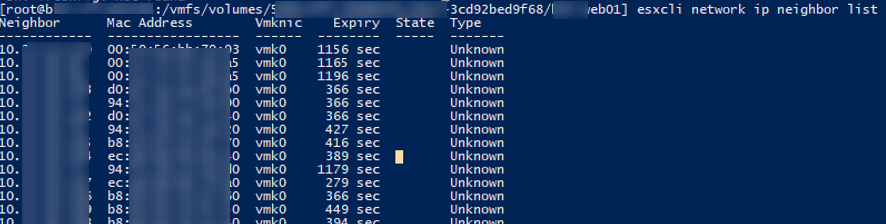
Также вы можете вывести ARP таблицу прямо с хоста ESXi и получить IP и MAC адреса всех соседних серверов ESXi в сети VMkernel:
esxcli network ip neighbor list
Чтобы снять блокировку с файла ВМ просто перезагрузите найденный ESXi хост (предварительно смигрируйте с него все ВМ с помощью VMotion). Если вы не можете перезагрузить хост, перезапустите службу Management Agent (hostd) в Maintenance Mode из SSH консоли хоста:
services.sh restart
После этого попробуйте выполнить консолидацию или удалить снашот ВМ.
Ошибка “Unable to access file since it is locked” довольно часто возникает в Veeam Backup & Replication при использовании прокси-сервера Veeam. Из-за ошибок при резервном копировании Veeam может не отключить корректно диск виртуальной машины.
Чтобы исправить проблему, откройте параметры ВМ, на которой установлен прокси Veeam. Удалите из оборудования ВМ диск ВМ, файлы которой заблокированы.
Убедитесь, что вы выбрали опцию “Remove from virtual machine”, а не “Remove from virtual machine and delete files from disk”. Иначе вы можете случайно удалить ваш vmdk диск.
В этой статье мы расскажем о возможных причинах, по которым не запускается виртуальная машина VMware Workstation. Мы рассмотрим самые распространённые ошибки, а также разберём, почему они возникают и как их исправить.
Ошибка VMware Workstation and Device/Credential Guard are not compatible
При включении VMware Workstation на Windows 10 может возникнуть ошибка со следующим текстом:
VMware Workstation and Device/Credential Guard are not compatible. VMware Workstation can be run after disabling Device/Credential Guard. Please visit http://www.vmware.com/go/turnoff_CG_DG/ for more detailsЧаще всего эта ошибка возникает из-за того, что включено ПО Device Guard — оно помогает защитить систему от вредоносных файлов. Device Guard позволяет настроить список файлов, которые Windows будет считать безопасными. Если на компьютер попадут файлы, которые не входят в список, система автоматически удалит их. Работе VMware в таких случаях мешает компонент Hyper-V.
Как исправить
Обратите внимание
Чтобы отключить Hyper-V, необходимо внести изменения в реестр Windows. Перед отключением Hyper-V обязательно создайте резервную копию ОС.
Чтобы исправить ошибку, отключите Hyper-V с помощью функционала «Выполнить».
-
1.
Нажмите сочетание клавиш Win + R.
-
2.
В поисковую строку введите «gpedit.msc» и нажмите Ок.
-
3.
Перейдите в раздел «Политика Локальный компьютер» — «Конфигурация компьютера» — «Административные шаблоны» — «Система» — «Device Guard». Дважды кликните на строку «Включить средство обеспечения безопасности на основе виртуализации».
-
4.
В новом окне выберите пункт «Отключено» и нажмите Ok.
-
5.
Перейдите в раздел «Панель управления» — «Программы и компоненты» — «Включение или отключение компонентов Windows». Отключите Hyper-V и нажмите Ок. Если система предложит перезагрузить компьютер, откажитесь от перезагрузки.
-
6.
Откройте командную строку от имени администратора. Поочередно выполните команды:
bcdedit /create {0cb3b571-2f2e-4343-a879-d86a476d7215} /d "DebugTool" /application osloaderbcdedit /set {0cb3b571-2f2e-4343-a879-d86a476d7215} path "EFIMicrosoftBootSecConfig.efi"bcdedit /set {bootmgr} bootsequence {0cb3b571-2f2e-4343-a879-d86a476d7215}bcdedit /set {0cb3b571-2f2e-4343-a879-d86a476d7215} loadoptions DISABLE-LSA-ISO,DISABLE-VBSbcdedit /set hypervisorlaunchtype offЗатем перезагрузите компьютер.
Ошибка Cannot open the disk
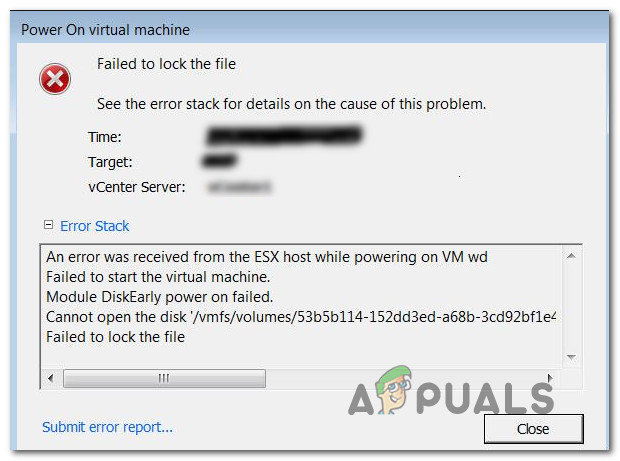
Ещё одна распространенная ошибка при запуске виртуальной машины в VMware — Cannot open the disk. Её текст следующий:
An unexpected error was received from the ESX host while powering on VM.На следующей строке будет указана одна из причин этой ошибки. Разберём, что означает каждая:
1) Failed to lock the file. Это значит, что процесс, который вы используете, не может открыть файл. При этом файл используется другим процессом. Что может привести к ошибке:
- при работе с ВМ вы пытаетесь запустить вторую ВМ, используя тот же VMX-файл,
- вы запустили ВМ с подключенным диском при помощи утилиты vmware-mount,
- вы добавили виртуальный диск к ВМ, которая уже используется.
2) The parent virtual disk has been modified since the child was created. Эта ошибка возникает, если повреждён снимок ВМ.
3) The destination file system does not support large files означает, что на целевом хранилище невозможно открыть файл ВМ того же размера.
4) Could not open/create change tracking file. Эта проблема может возникнуть, если файл filename-ctk.vmdk создавался ранее и не очищался перед созданием новой ВМ. Здесь filename — это название вашего файла.
5) Cannot allocate memory. Тот случай, когда в модуле VMFS не хватает места.
6) The file specified is not a virtual disk возникает в случаях, если повреждён .VMDK-файл дескриптора.
7) Insufficient permission to access file. Такая проблема может возникнуть при использовании хранилищ типа NFS. Она сообщает о том, что экспорт NFS работает неправильно, так как права на чтение и запись файла не даны либо даны некорректно.
Как исправить
Единого решения для этого типа ошибки нет. Чаще всего причина связана с локальными настройками компьютера. Рекомендации по исправлению ошибки описаны в официальной документации.
I can’t get my VM to open. I get:
Reason: Failed to lock the file.
Cannot open the disk ‘vmfs/volumes/x/x/x.vmdk’ or one of the snapshot disks it depends on.
There are several solutions posted for this that tell you to delete the .lck files. I don’t see any .lck files.
I have 5 other VMs on the ESX host that work. I have been trying to replicate this VM with Veeam. It worked for a few months and then stopped working (the replication, not the VM). I checked again today to see if there were snapshots and it showed nothing. I created a snapshot to see if it would reveal the Consolidated Helper and it did. I deleted my snapshot and not the Consolidated Helper and the VM crashed, which was also the vCenter Server.
When I pull it back up I get that error.
Some VMware users are reporting that they cannot start one or more virtual machines that they configured on their computer. Upon powering on the virtual machine, the window displays the following error: “An unexpected error was received from the ESX host while powering on VM VM_name. Failed to lock the file.”
What is causing the Failed to lock the file issue?
We investigated this particular issue by looking at various user reports and the repair strategies that are commonly used to fix this particular error message with WMware. Based on our investigations, there are several different culprits that are known to trigger this particular error message:
- A second virtual machine is already using the .vmx file – As it turns out, this particular issue can occur if you attempt to start a second virtual machine that is using the same virtual machine configuration (.vmx) file as another machine that was configured first. In this case, you can resolve the issue by deleting the .lck folders & logs.
- The virtual machine contains mounted disks – As several users have reported, this issue can also occur if you try to power on a virtual machine with mounted disks that we’re enforced via the VMware-mount utility. If this scenario is applicable, you can resolve the issue by deleting the .lck folders & logs.
- The virtual machine is started during snapshot operation – We actually tested this and it lead us right to the “Failed to lock the file” error. You’ll see this exact error if you try to turn on the virtual machine through the user interface facilitated during the snapshot operation. If this is what’s causing the issue, deleting the logs & the .lck folders from the virtual machine folder will resolve the issue.
- The virtual machine is already in use – You might also be encountering this issue if the virtual machine you are trying to start is already in use. This typically happens if you’re running a dual configuration. In this case, all you need to do is close the other instance that is running the same virtual machine and the error will stop occurring.
- VMware Workstation doesn’t have admin access – As it turns out, this particular issue can also occur if you VMware Workstation is not granted admin access. If this scenario is applicable, you can resolve the issue by forcing your OS to allow administrative privileges.
If you’re currently encountering this exact issue and you’re looking for a way to resolve it without losing any data, this article will provide you with some troubleshooting suggestions. Down below, you’ll find a collection of potential repair strategies that other users in a similar situation have commonly used to fix this particular error.
For the best results, we advise you to follow the methods below in the order that they are presented since they are ordered by difficulty and efficiency. If you go through with them in order without skipping any steps, one of them is bound to resolve the problem regardless of the culprit that is causing the issue.
Method 1: Running VMware as admin
In some cases, the fix is as simple as ensuring that the VMware application has administrative privileges. This should happen by default, but certain settings might prevent the application from getting admin access.
Some users that were encountering the “Failed to lock the file” error have reported that the issue stopped occurring after they launched VMware Workstation in admin mode.
Here’s a quick guide on how to do this:
- On your desktop, right-click on the VMware shortcut and choose Run as administrator.
Note: If you don’t have a desktop shortcut, navigate to the installation folder of WMware and right-click on vmplayer.exe. Unless you set up a custom location, you will be able to find it in: C:Program Files (x86)VMwareVMware Player - At the UAC (User Account Control), click Yes to grant administrative privileges.
- Launch the virtual machine that was previously triggering the issue to see if the issue has been resolved. If you no longer encounter the “Failed to lock the file” error, continue with the steps below to make the change permanent.
Note: In the current state, you will have to repeat Step 1 & Step 2 every time you launch VMware in order to circumvent the issue. - Right-click on the VMware Workstation executable or shortcut and choose Properties.
- Inside the Properties screen, go to the Compatibility tab, check the box associated with Run this program as an administrator (under Settings) and click Apply to save the current configuration.
- Open VMware normally and see if the issue has been resolved.
If the issue is still occurring, move down to the next method below.
Method 2: Deleting the LCK folders of the virtual machine
Several affected users have managed to resolve this issue by locating the physical location of the virtual machine that was failing with the “Failed to lock the file” and deleting the LCK folders. After doing this and restarting their computer, most affected users have reported that the issue has been resolved.
If you haven’t established a custom location for it, your virtual machine will typically be located inside the Documents folder under the Virtual Machines folder.
Here’s what you need to do:
- Make sure that VMware is completely closed and the virtual machine is powered off.
- Open File Explorer and navigate to Documents > Virtual Machines, then select the virtual machine that you’re encountering the issue with.
Note: If you saved your virtual machine in a custom location, use the File Explorer to navigate there. - If you have multiple virtual machines, double-click on the one that is creating the issue.
- Inside your virtual machine folder, you should be able to find one or two folders with the name ending in “lck“. Select both, then right-click and choose Delete to remove them. If you find any .log files outside the .lck folders, delete them also.
Note: Deleting these folders will not have any negative effect on your virtual machine. The next time you start the virtual machine, VMware will automatically recreate the two folders once again. - Restart your computer.
- At the next startup, launch the virtual machine and see if the issue has been resolved.

Kevin Arrows
Kevin Arrows is a highly experienced and knowledgeable technology specialist with over a decade of industry experience. He holds a Microsoft Certified Technology Specialist (MCTS) certification and has a deep passion for staying up-to-date on the latest tech developments. Kevin has written extensively on a wide range of tech-related topics, showcasing his expertise and knowledge in areas such as software development, cybersecurity, and cloud computing. His contributions to the tech field have been widely recognized and respected by his peers, and he is highly regarded for his ability to explain complex technical concepts in a clear and concise manner.
Failed to Lock The File is something a common issue in VMware Virtual environment and I thought to write this article as few of my colleagues asked couple of times how to find the vmdk locks in similar situations.
Normally, this happens when there is a lock in place from an ESXi host and another host is trying to power on the Virtual Machine with the lock. I have seen this in many times when there is an latency issue, manual registration of the Virtual Machine or due to an incomplete back up jobs. Sometimes finding the lock is bit of time consuming work but these simple steps can help you to save more time when there is a troubleshooting event.
You might be able to see something similar to the below error message

Kevin Arrows
Kevin Arrows is a highly experienced and knowledgeable technology specialist with over a decade of industry experience. He holds a Microsoft Certified Technology Specialist (MCTS) certification and has a deep passion for staying up-to-date on the latest tech developments. Kevin has written extensively on a wide range of tech-related topics, showcasing his expertise and knowledge in areas such as software development, cybersecurity, and cloud computing. His contributions to the tech field have been widely recognized and respected by his peers, and he is highly regarded for his ability to explain complex technical concepts in a clear and concise manner.


