

Ошибка failed to initialize возникает во многих приложениях при попытке запуска. Часто на такую ошибку жалуются пользователи steam, Skyrim, battleye service и прочих.
В каждом конкретном случае решение проблемы может быть разным, но как показывает практика, вам поможет:
- Запустите программу или игру от имени администратора (Правой кнопкой мыши на ярлык приложения, выберите пункт «Запуск от имени администратора». Появится окно подтверждения, выберите «Да»). Решение помогает в большинстве случаев, решает проблему в Steam и battleye service.
- Если ошибка failed to initialize возникает в играх, к примеру в Skyrim, рекомендуем обновить драйвера видеокарты до последней версии.
- Если игра запускается в стиме, проверьте целостность файлов игры: зайдите в свойства игры, выберите пункт «Локальные файлы», а затем нажмите «Проверка целостности кеша».
- Обновите DitectX (как это сделать описано ниже)
- Обновите MS Visual C++, MS .NET Framework, VCredist (как это сделать описано ниже).
Fix The application failed to initialize properly: The main cause of this error is outdated or corrupted .NET framework but it’s not limited to this as there are other reasons as to why this error is caused such as corrupted Registry, driver conflicts or corrupted Windows Files. If you have an old version of Windows or you didn’t update your copy of Windows from a long time then chances are it’s because of outdated .NET framework and to fix the error you just need to update it.
These errors will be fixed by the below-listed methods:
The application failed to initialize properly (0xc0000135)
The application failed to initialize properly (0xc0000005)
The application failed to initialize properly (0xc0000005)
The application failed to initialize properly (0xc0150002)

The complete error which you will receive will look something like this:
Application Error esrv.exe: The application failed to initialize properly (Error Code). Click on OK to terminate the application.
Now we have discussed this error in detail it’s time to discuss how to actually fix this error, so without wasting any time let’s see how to fix this error with the below-listed troubleshooting steps.
Table of Contents
1
Make sure to create a restore point just in case something goes wrong.
Method 1: Make sure Windows is Up to Date
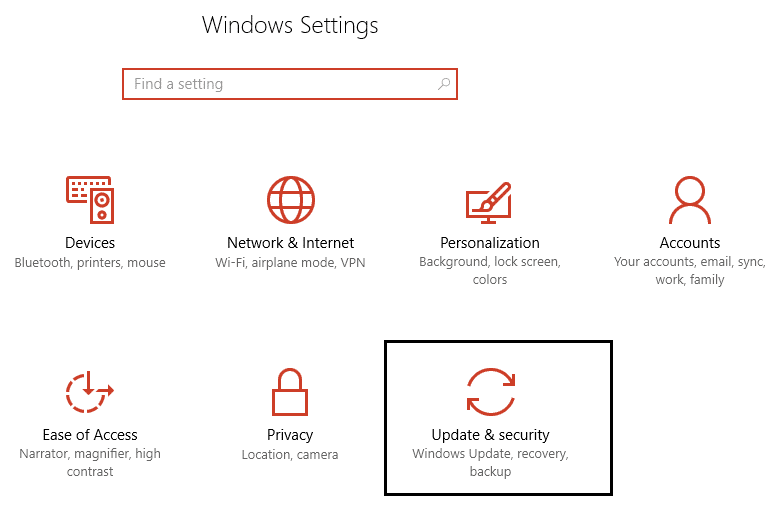
1.Press Windows Key + I then select Update & Security.
2.Next, click Check for updates and make sure to install any pending updates.

3.Press Windows Key + R then type services.msc and hit enter.

4.Find Windows Update in the list and right-click then select Properties.

5.Make sure Startup type is set to Automatic or Automatic (Delayed Start).
6.Next, click Start and then click Apply followed by OK.
See if you’re able to Fix The application failed to initialize properly error, if not then continue with the next method.
Method 2: Reinstall .NET Framework
1.Press Windows Key + X then select Control Panel.

2.Click Uninstall a program and find .NET framework in the list.
3.Right-click on .Net Framework and select Uninstall.
4.If ask for confirmation select Yes.
5.Once uninstall is complete make sure to reboot your PC to save changes.
6.Now press Windows Key + E then navigate to Windows folder: C:Windows
7.Under Windows folder rename assembly folder to assembly1.

8.Similarly, rename Microsoft.NET to Microsoft.NET1.
9.Press Windows Key + R then type “regedit” and hit Enter.

10.Navigate to the following Registry Key: HKEY_LOCAL_MACHINESoftwareMicrosoft
11.Delete the .NET Framework key then close everything and restart your PC.

12.Download and Install .Net Framework.
Download Microsoft .NET Framework 3.5
Download Microsoft .NET Framework 4.5
Method 3: Turn on the Microsoft .net Framework
1.Right click on the Windows button and select control panel.
2.Click on programs.

3.Now select “Turn Windows features on or off” under Programs and Features.

4.Now select “Microsoft .net Framework 3.5“. You have to expand each of its components and check both of them:
Windows Communication Foundation HTTP Activation
Windows Communication Foundation HTTP non-Activation

5.Click OK and close everything. Reboot your PC to save changes.
6.Reinstalling .NET Framework will Fix The application failed to initialize properly.
Method 4: Run CCleaner and Malwarebytes
Perform a Full antivirus scan to make sure your computer is secure. In addition to this run CCleaner and Malwarebytes Anti-malware.
1.Download and install CCleaner & Malwarebytes.
2.Run Malwarebytes and let it scan your system for harmful files.
3.If malware is found it will automatically remove them.
4.Now run CCleaner and in the “Cleaner” section, under the Windows tab, we suggest checking the following selections to be cleaned:
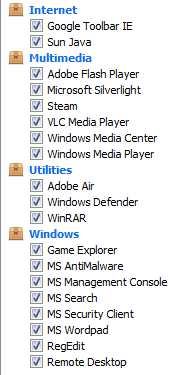
5.Once you’ve made certain the proper points are checked, simply click Run Cleaner, and let CCleaner run its course.
6.To clean your system further select the Registry tab and ensure the following are checked:
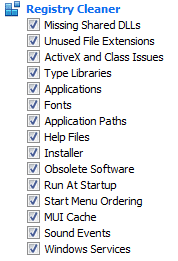
7.Select Scan for Issue and allow CCleaner to scan, then click Fix Selected Issues.
8.When CCleaner asks “Do you want backup changes to the registry?” select Yes.
9.Once your backup has completed, select Fix All Selected Issues.
10.Restart your PC to save changes.
Recommended for you:
- Fix Error Code 0x8007000D when trying to activate Windows
- How to Fix Application Error 523
- Fix We couldn’t update the system reserved partition
- Windows Explorer has stopped working [SOLVED]
That’s it you have successfully Fix The application failed to initialize properly but if you still have any queries regarding this article then please feel free to ask them in the comment’s section.
Dear all,
The Samsung 980 Pro series is out there for many months now. I understand there is still no specific Samsung driver for the NVMe. Unfortunately, it is therefore also not fully integrated into Samsung Magician. Even if Magician is advertised as a relevant download on the 980 Pro support pages.
Are there any plans to provide a driver?
Are there any plans to adapt Magician?
It almost feels as if different development groups at Samsung would not communicate with each other. This is a first. I always was impressed by the professionalism of Samsung…
Please advise!
Download PC Repair Tool to quickly find & fix Windows errors automatically
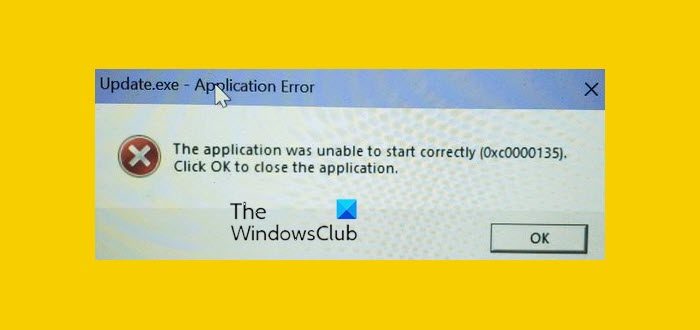
One of the errors you can encounter on the Windows system is the 0xc0000135 error. When you attempt to launch a program you get an error stating either of the two:
The application failed to initialize properly (0xc0000135). Click OK to terminate the application.
OR
The application was unable to start correctly (0xc0000135). Click OK to terminate the application.
So long as the error shows up, you may not be able to open the app. When this happens, our primary suspect is that you have an outdated .NET Framework or device drivers. Registry errors, third-party apps, and damaged system files can also cause the problem.
To eliminate the error 0xc0000135 for good on Windows 11/10, try out the methods mentioned below.
- Repair or reinstall the application, which is giving this error.
- Repair, Update, and Reinstall the .NET Framework.
- Troubleshoot in Clean Boot State.
Not sure how to implement the above processes? Read on.
1] Repair or reinstall the application giving this error
You only get the error 0xc0000135 whenever you try to open a specific application, so this application is most likely the cause of the issue. The first thing you should do to fix the error is to repair the application or reinstall it entirely.
Press the Windows + R combination to open the Run dialog box. Inside Run, type appwiz.cpl and press OK.
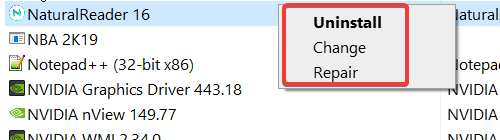
Find the application giving the 0xc0000135 error and right-click on it. Depending on the program, you may see only the Uninstall option or Uninstall, Change, and Repair. I recommend that you try repairing the program first. If that doesn’t fix the error, then uninstall the application, restart your computer, and reinstall it.
If you cannot uninstall the program, try uninstaling it in Safe Mode.
2] Repair, Update, Reinstall the .NET Framework
This issue isn’t as common as the other factors we’ve explored in this article, but the 0xc0000135 error can directly result from an outdated .NET Framework.
Right-click on the Start button and select Run.
Enter appwiz.cpl and click OK.
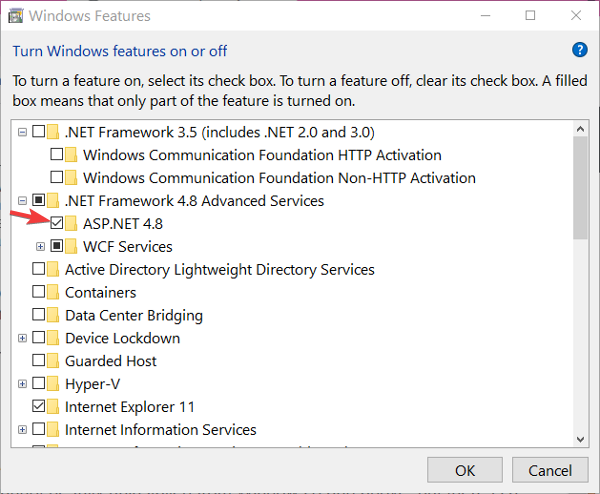
From the left-hand pane of the Programs and Features page, click on the Turn Windows features on or off link.
Click on the “–” sign next to .NET Framework Advanced Services to reveal other services under it. Mark the checkbox beside ASP.NET and click on the OK button at the bottom.
If you don’t find the .NET Framework on the Windows Features page, visit Microsoft’s official website and download the latest version of the .NET Framework. Install the downloaded .NET Framework on your computer and, finally, restart your machine.
3] Troubleshoot in Clean Boot State
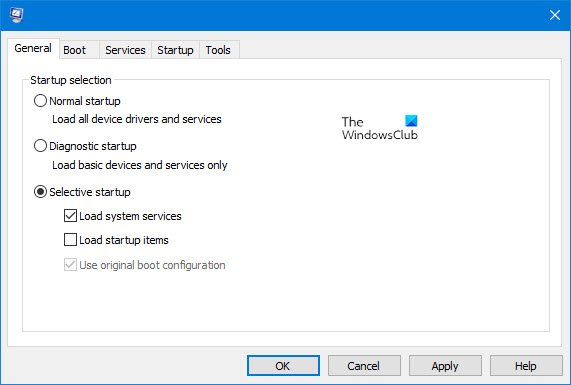
If repairing or reinstalling .NET Framework and the application does not fix the 0xc0000135 error, it means that it’s caused by other system factors—the best way to isolate the application and troubleshoot the error.
A clean boot achieves this because your computer starts with only a selected set of drivers and software. We published a detailed guide on performing a clean boot on your Windows system.
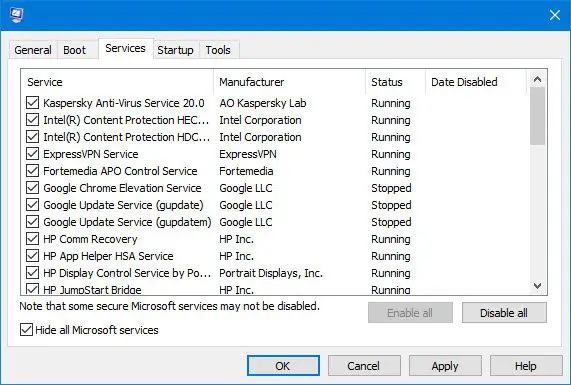
When your computer starts up in the clean boot state, open the application giving the error and see if the error persists. If it doesn’t, manually enable the services and drivers one after the other and perform clean boots till you find the buggy software causing the 0xc0000135 error.
This operation is tedious and critical, so I recommend creating a system restore point before beginning.
Other similar errors:
- The application failed to initialize properly (0xc0000005)
- The application was unable to start correctly (0xc0000142)
- The application was unable to start correctly (0xc00007b)
- The application was unable to start correctly (0xc0000022)
- The application was unable to start correctly (0xc0000018).

Anand Khanse is the Admin of TheWindowsClub.com, a 10-year Microsoft MVP (2006-16) & a Windows Insider MVP (2016-2022). Please read the entire post & the comments first, create a System Restore Point before making any changes to your system & be careful about any 3rd-party offers while installing freeware.
If you suddenly encountered an error saying, “The application failed to initialize properly (0xc0000005)” when you are using an application on your Windows 10 computer, read on as this post will provide you some potential fixes that could help you fix the error.
You can encounter the “The application failed to initialize properly (0xc0000005)” error on many applications such as VLC, Chrome, Word, and any other executable files and even the operating system files. When you get this kind of error, you will see the following error message:
“The application failed to initialize properly (0xc0000005). Click on OK to close the application.”
This kind of application error can occur due to several reasons which include damaged installation of the application or system files may have gotten corrupted or damaged. It could also be caused by a malware infection. There are a couple of suggestions provided in this post to help you resolve the error. You can try to run both a System File Checker scan and the DISM tool or reinstall the problematic application or repair-install Windows 10 as well as run a malware scan. Note that the options provided below do not have to be followed in sequence.
Option 1 – Try to run a System File Checker scan
As mentioned, the error could be due to corrupted or damaged system files and one of the ways you can fix that is by running a System File Checker or SFC scan on your computer. To do so, follow these steps:
- In the Windows Start Search, type “command prompt” and right-click on Command Prompt from the search results, and then select the “Run as administrator” option.
- After opening Command Prompt with admin privileges, type the “sfc /scannow” and tap Enter to execute it.
- Once the scan is finished, restart your computer and see if the “The application failed to initialize properly (0xc0000005)” error is fixed or not.
Option 2 – Run the DISM tool
You can try running the Deployment Imaging and Servicing Management or DISM tool to fix the application error. Using this built-in tool, you have various options such as the “/ScanHealth”, “/CheckHealth”, and “/RestoreHealth”.
- Open the Command Prompt with admin privileges.
- Then type in the following commands and make sure to hit Enter right after you type each one of them:
- Dism /Online /Cleanup-Image /CheckHealth
- Dism /Online /Cleanup-Image /ScanHealth
- exe /Online /Cleanup-image /Restorehealth
- Do not close the window if the process takes a while as it will probably take a few minutes to finish.
Option 3 – Try reinstalling the application
You might also want to uninstall the application and download its latest working version and then install it back again. Note that when you do this, you will lose all your app data.
Option 4 – Try to repair install Windows 10
- First, you have to click this link and then click the Download Tool Now button.
- Next, click the “Use the tool to create installation media (USB flash drive, DVD, or ISO file)…” option and follow the next given instructions on the screen.
- Now select the ISO file option in step 5.
- After that, you should now have an ISO file.
- Next, go to the location where you’ve downloaded the ISO file.
- Then right-click on the Windows 10 ISO file and select the Open with option and then select File Explorer.
- Now click on “setup.exe” and follow the next instructions that appear on the screen. When asked, you have to select either Nothing (clean install) or Keep personal files only option. Take note that you must not select the “Keep personal files, apps, and Windows settings”.
Option 5 – Try scanning your computer using Windows Defender
It is possible that your computer is infected with malware which could be why you’re getting the “The application failed to initialize properly (0xc0000005)” error. Thus, you need to scan your computer using Windows Defender.
- Tap the Win + I keys to open Update & Security.
- Then click on the Windows Security option and open Windows Defender Security Center.
- Next, click on Virus & threat protection > Run a new advanced scan.
- Now make sure that Full Scan is selected from the menu and then click the Scan Now button to get started.
Do You Need Help with Your Device?
Our Team of Experts May Help

Troubleshoot.Tech Experts are There for You!
GET HELP
Troubleshoot.Tech experts work with all versions of Microsoft Windows including Windows 11, with Android, Mac, and more.
Share this article:
You might also like
The issue with the abrupt system reboots to force Windows 10 updates on a computer has been lessened with Active Hours. This feature keeps a record of the hours during which a system remains active and prevents the installation of updates during such hours. For example, when a system restart is needed to complete the installation of an update, Active Hours delays the update and allows you to finish what you’re doing on your computer. Thus, if you haven’t heard of this feature, then now is the time you do, read this post to configure and use Active Hours in your Windows 10 computer.
There are three ways you can configure Active Hours. The first one is for general users, whereas the rest of the two methods are for users who knows their way about the Windows Registry and Group Policy. To get started, refer to every given option below.
Option 1 – Configure Active Hours via Windows 10 Settings
- Go to Settings > Update & Security. From there, click on the “Change active hours” option under the Windows Update section.
- Next, you can select a time (“Start time” and “End time”) during which the restart can occur.
- After that, click on the Save button and exit.
Note: Keep in mind that the values you’ve entered indicate the hours during which your system is in use, namely, ACTIVE. It is important for your active hour’s interval period and it can be anything between 1 and 18 hours since you can’t go beyond 18 hours. In addition, there is no option to configure different active hours on different days and you can’t specify different active hours for weekends and weekdays as well.
On the other hand, Windows 10 also offer users an option to override Active Hours. All you have to do is go to Settings > Update & Security > Windows Update > Restart Options. From there, you can choose a custom restart time when your computer will restart to install the updates but this is only a one-time setting.
Option 2 – Configure Active Hours via Registry Editor
- Tap the Win + R keys to open the Run utility and type “Regedit” in the field and tap Enter or click OK to open the Registry Editor.
- Next, navigate to this registry path: HKEY_LOCAL_MACHINESOFTWAREMicrosoftWindowsUpdateUXSettings
- In the given registry path, you can choose to change “ActiveHoursStart” and “ActiveHoursEnd”.
Note: There are no extra settings available in the Registry Editor but you can change the remote computer’s Active hours settings using the Registry Editor.
Option 3 – Configure Active Hours via Group Policy
Note that this option is available for the Windows 10 Pro and Educational or Enterprise versions. It is mostly used by computers in Business or through remote access. To get started, follow these steps:
- Tap the Win + R keys to launch Run and type “gpedit.msc” in the field and tap Enter or click OK to open the Group Policy Editor.
- Next, navigate to this group policy setting: Local Computer Policy > Computer Configuration > Administrative Templates > Windows Components > Windows Updates.
- From there, look for a policy labeled “Turn off auto-restart for updates during active hours” and double click on it. This will open a new window.
- Click on the Enabled radio button to enable Active Hours. You also have the option to choose active hours just like in the first given option above. It works just fine except when the following policies don’t override:
- No Auto-restart with logged-on users for scheduled automatic updates installations.
- Always automatically restart at the scheduled time.
- Since Group Policy allows you to reduce the range of active hours, you can configure it if you want it to be less than 18 hours. Just find the policy setting labeled “Specify Active hours range for auto -restarts. The minimum is 8 hours”.
- After you set the Active Hours, click the Apply and OK buttons to save the changes made.
Read More
Error 2 — What is it?
Error 2 is a typical Battle.net error code. Battle.net is a desktop app that allows you to access all Blizzard games.
It enables Blizzard gamers around the world to play multiplayer matches together, online. Error 2 occurs when you are unable to connect to the login server. This error code is displayed in the following format:
Battle.net Error #2: Unable to connect. Please try again later. If the problem persists, please contact technical support.
Solution

Anand Khanse is the Admin of TheWindowsClub.com, a 10-year Microsoft MVP (2006-16) & a Windows Insider MVP (2016-2022). Please read the entire post & the comments first, create a System Restore Point before making any changes to your system & be careful about any 3rd-party offers while installing freeware.
If you suddenly encountered an error saying, “The application failed to initialize properly (0xc0000005)” when you are using an application on your Windows 10 computer, read on as this post will provide you some potential fixes that could help you fix the error.
You can encounter the “The application failed to initialize properly (0xc0000005)” error on many applications such as VLC, Chrome, Word, and any other executable files and even the operating system files. When you get this kind of error, you will see the following error message:
“The application failed to initialize properly (0xc0000005). Click on OK to close the application.”
This kind of application error can occur due to several reasons which include damaged installation of the application or system files may have gotten corrupted or damaged. It could also be caused by a malware infection. There are a couple of suggestions provided in this post to help you resolve the error. You can try to run both a System File Checker scan and the DISM tool or reinstall the problematic application or repair-install Windows 10 as well as run a malware scan. Note that the options provided below do not have to be followed in sequence.
Option 1 – Try to run a System File Checker scan
As mentioned, the error could be due to corrupted or damaged system files and one of the ways you can fix that is by running a System File Checker or SFC scan on your computer. To do so, follow these steps:
- In the Windows Start Search, type “command prompt” and right-click on Command Prompt from the search results, and then select the “Run as administrator” option.
- After opening Command Prompt with admin privileges, type the “sfc /scannow” and tap Enter to execute it.
- Once the scan is finished, restart your computer and see if the “The application failed to initialize properly (0xc0000005)” error is fixed or not.
Option 2 – Run the DISM tool
You can try running the Deployment Imaging and Servicing Management or DISM tool to fix the application error. Using this built-in tool, you have various options such as the “/ScanHealth”, “/CheckHealth”, and “/RestoreHealth”.
- Open the Command Prompt with admin privileges.
- Then type in the following commands and make sure to hit Enter right after you type each one of them:
- Dism /Online /Cleanup-Image /CheckHealth
- Dism /Online /Cleanup-Image /ScanHealth
- exe /Online /Cleanup-image /Restorehealth
- Do not close the window if the process takes a while as it will probably take a few minutes to finish.
Option 3 – Try reinstalling the application
You might also want to uninstall the application and download its latest working version and then install it back again. Note that when you do this, you will lose all your app data.
Option 4 – Try to repair install Windows 10
- First, you have to click this link and then click the Download Tool Now button.
- Next, click the “Use the tool to create installation media (USB flash drive, DVD, or ISO file)…” option and follow the next given instructions on the screen.
- Now select the ISO file option in step 5.
- After that, you should now have an ISO file.
- Next, go to the location where you’ve downloaded the ISO file.
- Then right-click on the Windows 10 ISO file and select the Open with option and then select File Explorer.
- Now click on “setup.exe” and follow the next instructions that appear on the screen. When asked, you have to select either Nothing (clean install) or Keep personal files only option. Take note that you must not select the “Keep personal files, apps, and Windows settings”.
Option 5 – Try scanning your computer using Windows Defender
It is possible that your computer is infected with malware which could be why you’re getting the “The application failed to initialize properly (0xc0000005)” error. Thus, you need to scan your computer using Windows Defender.
- Tap the Win + I keys to open Update & Security.
- Then click on the Windows Security option and open Windows Defender Security Center.
- Next, click on Virus & threat protection > Run a new advanced scan.
- Now make sure that Full Scan is selected from the menu and then click the Scan Now button to get started.
Do You Need Help with Your Device?
Our Team of Experts May Help
Troubleshoot.Tech Experts are There for You!
GET HELP
Troubleshoot.Tech experts work with all versions of Microsoft Windows including Windows 11, with Android, Mac, and more.
Share this article:
You might also like
The issue with the abrupt system reboots to force Windows 10 updates on a computer has been lessened with Active Hours. This feature keeps a record of the hours during which a system remains active and prevents the installation of updates during such hours. For example, when a system restart is needed to complete the installation of an update, Active Hours delays the update and allows you to finish what you’re doing on your computer. Thus, if you haven’t heard of this feature, then now is the time you do, read this post to configure and use Active Hours in your Windows 10 computer.
There are three ways you can configure Active Hours. The first one is for general users, whereas the rest of the two methods are for users who knows their way about the Windows Registry and Group Policy. To get started, refer to every given option below.
Option 1 – Configure Active Hours via Windows 10 Settings
- Go to Settings > Update & Security. From there, click on the “Change active hours” option under the Windows Update section.
- Next, you can select a time (“Start time” and “End time”) during which the restart can occur.
- After that, click on the Save button and exit.
Note: Keep in mind that the values you’ve entered indicate the hours during which your system is in use, namely, ACTIVE. It is important for your active hour’s interval period and it can be anything between 1 and 18 hours since you can’t go beyond 18 hours. In addition, there is no option to configure different active hours on different days and you can’t specify different active hours for weekends and weekdays as well.
On the other hand, Windows 10 also offer users an option to override Active Hours. All you have to do is go to Settings > Update & Security > Windows Update > Restart Options. From there, you can choose a custom restart time when your computer will restart to install the updates but this is only a one-time setting.
Option 2 – Configure Active Hours via Registry Editor
- Tap the Win + R keys to open the Run utility and type “Regedit” in the field and tap Enter or click OK to open the Registry Editor.
- Next, navigate to this registry path: HKEY_LOCAL_MACHINESOFTWAREMicrosoftWindowsUpdateUXSettings
- In the given registry path, you can choose to change “ActiveHoursStart” and “ActiveHoursEnd”.
Note: There are no extra settings available in the Registry Editor but you can change the remote computer’s Active hours settings using the Registry Editor.
Option 3 – Configure Active Hours via Group Policy
Note that this option is available for the Windows 10 Pro and Educational or Enterprise versions. It is mostly used by computers in Business or through remote access. To get started, follow these steps:
- Tap the Win + R keys to launch Run and type “gpedit.msc” in the field and tap Enter or click OK to open the Group Policy Editor.
- Next, navigate to this group policy setting: Local Computer Policy > Computer Configuration > Administrative Templates > Windows Components > Windows Updates.
- From there, look for a policy labeled “Turn off auto-restart for updates during active hours” and double click on it. This will open a new window.
- Click on the Enabled radio button to enable Active Hours. You also have the option to choose active hours just like in the first given option above. It works just fine except when the following policies don’t override:
- No Auto-restart with logged-on users for scheduled automatic updates installations.
- Always automatically restart at the scheduled time.
- Since Group Policy allows you to reduce the range of active hours, you can configure it if you want it to be less than 18 hours. Just find the policy setting labeled “Specify Active hours range for auto -restarts. The minimum is 8 hours”.
- After you set the Active Hours, click the Apply and OK buttons to save the changes made.
Read More
Error 2 — What is it?
Error 2 is a typical Battle.net error code. Battle.net is a desktop app that allows you to access all Blizzard games.
It enables Blizzard gamers around the world to play multiplayer matches together, online. Error 2 occurs when you are unable to connect to the login server. This error code is displayed in the following format:
Battle.net Error #2: Unable to connect. Please try again later. If the problem persists, please contact technical support.
Solution
 Error Causes
Error 2 may be triggered due to several reasons. These include:
- Program conflict
- Security software conflict
- Bad DNS cache entry
- Issues with network devices
- Viruses and malware
- Registry corruption
Error 2 is not a fatal error like the blue screen of death error codes. However, this error may hamper your ability to play Blizzard multi-player games. To overcome this problem it is advisable to fix error 2 immediately.
Further Information and Manual Repair
To resolve this error you don’t need to spend hundreds of dollars to hire a professional and get it fixed. Here are some of the easy do-it-yourself methods to resolve this error on your PC. These methods require no technical expertise or knowledge. Let’s get started:
Method 1
Error 2 may sometimes pop up on the screen due to program conflict. This happens when you have Blizzard games and other programs running on your PC at the same time.
In such a situation, it is advisable to close background applications to resolve conflicts between Blizzard games and other programs running in the background.
Method 2
Sometimes antivirus programs and firewalls can also hinder and interfere with the game’s connection to our servers. In this event, the best way to fix the error is to temporarily uninstall your security software.
Method 3
If error 2 is triggered by the issues with network devices then simply power cycle network devices to re-stabilize the connection.
Power cycling router and modem allow you to reset and reestablish a connection to your ISP. To do this, shut down the computer then power down/unplug the router and the modem.
Allow the modem to sit for 60 seconds, unplugged. Then turn it on and allow it to boot up till the front panel connection lights show a steady connection.
Now turn on the router and do the same as you did with the modem. After that start the computer and allow it to completely boot up. Now try logging on to the Blizzard gaming server.
This will hopefully resolve the issue.
Method 4
Viruses and malware infections can also trigger error 2. In such a situation install an antivirus and remove all malicious programs infecting your PC.
Method 5
If the cause of the error is related to registry corruption, then it is advisable to download Restoro. This is a user-friendly PC Fixer with a registry cleaner. The registry cleaner removes all unnecessary and obsolete files corrupting the registry, cleans and repairs the corrupted registry in a few minutes.
Click here to download Restoro on your PC to resolve error 2. For further information you may be interested in these similar issues:
Read More
Socket Error 10060 — What is it?
Socket Error 10060 is basically a connection time-out error. This error occurs when the remote FTP server does not respond to CuteFTP.
This time-out error occurs after an FTP session is established but even the server doesn’t respond. The error message is displayed in the following format:
‘Connection timed out. A connection attempt failed because the connected party did not properly respond after a period of time, or established connection failed because connected host failed to respond.’
Solution
 Error Causes
Socket Error 10060 may occur due to multiple reasons including:
- Blocked port
- Data connection incorrect settings
- When the web proxy connection setting does not allow enough time to receive a response from the destination website and therefore the connection is timed-out.
- Registry issues
- Viral infection
Further Information and Manual Repair
Here are some of the best and quick DIY methods to resolve Socket Error 10060 on your PC.
Method 1: Troubleshoot the Web Proxy Connection
This method is workable and effective if Socket Error 10060 occurs only when the web proxy service is used. To execute it, here’s what you need to do: install the Winsock Proxy Client on your PC.
Disable the web proxy settings under the LAN settings on the Connections tab of the internet options. Once you disable the settings, then try to go to the website that you giving you the error. If the site is accessible, the error is resolved.
Method 2: Increase Web Proxy Time out Settings
If disabling the web proxy settings doesn’t work, then try increasing time-out settings. To do so, you will also have to modify the registry.
Remember serious problems may occur if you modify the registry incorrectly.
- Here’s what you need to do, click start, run and then type Regedit in the dialogue box.
- Navigate to the following registry subkey: HKEY_LOCAL_MACHINESYSTEMCurrentControlSetServicesW3ProxyParameters.
- On the right side of the Registry Editor, right-click Request TimeoutSecs and then click Modify.
- Click decimal, they type the number of seconds that you want the proxy service to wait until the session times out.
- To confirm changes, click OK.
- Now restart WWW publishing service by going to start, run and type cmd. Click OK to continue.
- Type net stop iisadmin/y and then press enter. After that type net start iisadmin /y and then press enter. Test the new settings by going to the website that displayed the Socket Error 10060 message.
Method 3: Switch from Passive Mode to Active Port Mode
This method is effective if the error occurs due to incorrect data connection settings.
CuteFTP uses passive mode by default so to ensure the error is resolved, you may have to switch from passive mode to active port mode. To make this switch, open the site manager and then click once on the name of the problem website.
Now on the Type tab change the data connection type to use the port.
Method 4: Configure Firewall Settings
Sometimes the error may also occur due to Firewall. To resolve, configure Firewall settings to allow FTP protocol.
Method 5: Download Restoro
Whether the error occurs due to viral infection or registry issues, it is advisable to download Restoro.
This is an advanced and multi-functional PC fixer embedded with multiple utilities like antivirus and a registry cleaner. The registry cleaning utility removes junk files, cookies, and invalid entries damaging the registry.
It cleans, repairs, and restores the registry while the antivirus removes all types of viruses like spyware and Trojans in seconds thereby resolving socket error code 10060.
It is safe, user-friendly, and compatible with all Windows versions. Click here to download Restoro today.
Read More
Screen flickering in Windows 10 — What Is It?
Screen flickering when you’re using Windows 10 is quite a common problem. It is often caused by apps that are not compatible with the operating system, or faulty display drivers.
There are a lot of possibilities for why this issue occurs. If you are one of the many users that encounter this kind of problem, you might want to check on your task manager to see if everything is working fine. One common sign that something wrong has happened is if the task manager flickers, as well. To fix this, you will need to update an app, uninstall an app, or update your display driver.
Solution
Error Causes
Common causes of the screen flickering when running on Windows 10 are software issues. This is most likely caused by the following:
- Faulty display driver
- You have an application installed that is not compatible with your operating system
Further Information and Manual Repair
In order to fix the issue of your screen flickering when you have Windows 10 as your operating system, follow these simple steps.
Note: It is very important to consult with an authorized computer technician if you are not highly confident in solving this issue by yourself. Furthermore, you can also use software to fix this problem.
- The first method is by checking if your task manager is flickering. To open the task manager, all you have to do is right-click or press and hold the start button, then select task manager.
If you have confirmed that the task manager is the one causing the screen flickers, the display driver can possibly be your problem. To fix it, all you have to do is update your display driver.
How to update the display driver
- You have to reset your computer and boot it on Safe Mode.
-In order to do this, you have to hold the Shift key while selecting Power>Restart. When your computer boots up, you will be greeted by a Choose an option screen. From there, you have to select Troubleshoot, then Advanced Options, then Startup Settings, and then Restart. When your computer restarts, select 4 or hit the F4 key to enter into Safe Mode.
- When your computer finally boots up in Safe Mode, right-click or press and hold the Start button. From there, click Device Manager.
- From the Device Manager screen, you have to expand the Display Drivers section, right-click on the driver that might be causing the problem then select Uninstall. Don’t forget to tick the Delete the driver software for this device box, press the OK button, and then restart your computer.
— When you have two, or more, drivers installed on your computer, all you have to do is disable the other drivers. You can do this by right-clicking on the driver in the Device Manager and click the Yes box next to disable. Shut down your PC after this, disconnect the installation, and boot your computer back on.
- When your PC boots up after the restart, click on the Start button then click on Settings.
- You need to go to Update & Security, then Windows Update, and then check for updates.
— If you are using multiple drivers and this technique doesn’t work, repeat the process in Step 3 and try to disable a different driver.
Remove an incompatible app
There are two ways to remove an incompatible app to fix the issue of a screen flicker on Windows 10. Apps like Norton AV, iCloud, and IDT Audio are usually the ones causing the problem. Uninstalling these apps could solve the problem. Uninstall the apps by using the methods below:
First Solution: Uninstall an app in Settings
- Click Start, and then click Settings.
- Click on System, and then click on Apps & Features.
- A window will pop up and from there you will need to select the application you wish to uninstall. Click the app, and then click uninstall. Follow the screen prompt to fully uninstall the program.
Second Solution: Uninstall an app in the Start Menu
- Click Start, and then click All Apps.
- Look for the application you will need to uninstall, right-click the said app, and then click Uninstall. Follow the screen prompt to fully uninstall the program.
[/section]
Read More
File Transfer Protocol Server, also known as FTP Server, is a private or public service that can host files that can be accessed both locally and globally. It is a quick, flexible and seamless service that allows you to store any kind of files depending on the total size of the server. If you’ve always found an FTP server useful, then the good thing is you can now create your FTP server since Windows 10 now allows it. You can host this server locally and later on make it globally available via the internet. So if you are planning to set up an FTP server on your Windows 10 computer, read on as this post will guide you on how to do so.
To set up the FTP server, you need to configure it first and then configure the Windows Firewall for the connections to go through. For more details, refer to the following steps:
Step 1: You need to configure the FTP server on Windows 10.
- In the Search box, type in “Turn Windows Features On or Off” to search for it.
- Then click on the appropriate result which will open a mini window.
- From this mini window, scroll down to the list and expand “Internet Information Services where you have to expand the FTP Server section.
- Next, select all the checkboxes to enable all the entries under FTP Server and then click the OK button to apply the changes made.
- And now, since your computer is now allowed to host an FTP server, you need to configure it. To do so, type “Internet Information Services (IIS) Manager” in the Search box and click on the appropriate entry.
- Next, right-click on Sites under the navigation bar of Connections and select Add FTP Site. This will open a new window where you have to input some information about your FTP hosting.
- Now enter the details and click on Next.
- Upon clicking Next, you will be prompted to give some authentication details. Enter the following details in the screenshot below.
- Now click on Finish. After that, you will get an FTP Server being hosted on your Windows 10 PC.
And now that you’ve successfully configured the FTP Server, the next thing you have to do is to allow connections from and to the FTP server. Refer to the next step below.
Step 2: Configure the Windows Firewall for FTP connections to pass-through
- In the Start Search, type “Allow an app or feature through Windows Firewall” and click on the related search result which will open a window with all the settings.
- From there, click on the Change Settings button. This will display a list where you have to mark all the checkboxes for the FTP server to enable them in both the Private and Public configurations.
- After that, click OK. This will allow you access to the FTP server on your local network.
Read More
AudioToAudio is a browser extension for Google Chrome developed by Mindspark Inc. This extension allows users easy access to popular audio converting websites.
When installed, it changes the default search engine, home page, and new tab to MyWay.com. While active AudioToAudio gathers user browsing activities such as, but not limited to: visited websites, clicked links, search queries. This data is later used/sold by the Mindspark ad network to better target ads.
While browsing the internet with this extension enabled, you will see additional injected ads, sponsored content (such as links to web pages, banner ads, affiliate shop links, etc), and even pop-up ads from time to time if the regular ads are blocked.
AudioToAudio has been marked as a Browser Hijacker by several anti-virus applications and is marked for removal by most of them.
About Browser Hijackers
Browser hijacking is a form of unwanted software, commonly a web browser add-on or extension, which causes modifications in web browser’s settings. They are created to interfere with browser functions for various purposes. Typically, hijackers are developed for the benefit of cyber hackers often through revenue generation from forced ad clicks and website visits. However, it isn’t that innocent. Your online safety is compromised and it is also extremely annoying. Some browser hijackers are programmed to make particular modifications beyond the browsers, like changing entries in the computer registry and letting other malware further damage your computer.
How to determine if your browser has been hijacked
When your web browser is hijacked, the following might happen:
1. your web browser’s homepage is suddenly different
2. you get re-directed to sites you never meant to visit
3. The default search page of the web browser is changed
4. discover new toolbars that you simply did not add
5. you see numerous ads pop up on the web browsers or computer screen
6. webpages load slowly and often incomplete
7. Inability to navigate to certain websites, especially antivirus and also other computer security software sites.
How they infect computers
There are many ways your computer or laptop can become infected with a browser hijacker. They usually arrive by way of spam email, via file-sharing networks, or by a drive-by-download. They can also be deployed via the installation of an internet browser toolbar, extension, or add-on. A browser hijacker could also come bundled up with some free software that you unknowingly download and install the browser hijack, compromising your PC security. Some of the most well-known hijackers are AudioToAudio, Babylon Toolbar, Conduit Search, OneWebSearch, Sweet Page, and CoolWebSearch.
Removing browser hijackers
Some hijackers could be removed by just uninstalling the related freeware or add-ons through the Add or Remove Programs in the Microsoft Windows Control Panel. But, the majority of hijackers are quite tenacious and require specialized applications to eliminate them. Novice computer users shouldn’t ever attempt the manual form of removal, as it requires thorough computer knowledge to carry out repairs on the computer registry and HOSTS file.
Browser hijackers can be effectively removed by installing and running anti-malware software on the affected PC. Safebytes Anti-Malware has a sophisticated anti-malware engine to help you prevent browser hijacking in the first place, and mop up any existing issues. In addition to anti-malware, a system optimizer tool, similar to Total System Care, could help you resolve Windows registry errors, eliminate unwanted toolbars, secure online privacy, and increase overall computer performance.
How To Get Rid Of Malware That Is Preventing Anti-Malware Installation?
All malware is bad, but certain types of malware do more damage to your computer than others. Some malware types alter internet browser settings by including a proxy server or change the PC’s DNS settings. In these cases, you will be unable to visit some or all internet sites, and thus not able to download or install the required security software to remove the malware. If you are reading this article, you probably have got affected by malware that prevents you from installing a computer security program like Safebytes Anti-Malware. There are a few actions you can take to get around this problem.
Install in Safe Mode
In Safe Mode, you are able to modify Windows settings, un-install or install some applications, and remove hard-to-delete viruses and malware. In the event the malware is blocking access to the internet and affecting your PC, running it in Safe Mode allows you to download anti-malware and run a diagnostic scan whilst limiting possible damage. In order to enter into Safe Mode or Safe Mode with Networking, press the F8 key while the PC is starting up or run MSCONFIG and locate the “Safe Boot” options in the “Boot” tab. Once you are in Safe Mode, you can attempt to download and install your anti-malware software without the hindrance of the malicious software. Now, you can actually run the antivirus scan to remove computer viruses and malware without any interference from another application.
Switch over to a different web browser
Malicious code could exploit vulnerabilities in a particular internet browser and block access to all anti-virus software websites. If you suspect that your Internet Explorer happens to be hijacked by a computer virus or otherwise compromised by cybercriminals, the best plan of action would be to switch to an alternate browser like Chrome, Firefox, or Safari to download your favorite computer security program – Safebytes Anti-Malware.
Install and run antivirus from your Thumb drive
Here’s another solution which is creating a portable USB anti-virus software package that can scan your computer for malicious software without needing installation. Adopt these measures to use a USB drive to fix your infected computer system.
1) Download Safebytes Anti-Malware or MS Windows Defender Offline onto a virus-free computer system.
2) Mount the USB drive on the same computer.
3) Double-click the executable file to run the installation wizard.
4) Choose the USB flash drive as the destination for saving the file. Do as instructed on the screen to finish up the installation process.
5) Transfer the USB drive from the uninfected PC to the infected computer.
6) Double-click the EXE file to open the Safebytes tool from the thumb drive.
7) Run Full System Scan to detect and clean-up up all types of malware.
Protect Your PC and Privacy With SafeBytes Anti-Malware
If you’re looking to install an anti-malware application for your computer, there are several tools in the market to consider but you should not trust blindly anyone, irrespective of whether it is paid or free software. A few of them do a good job in removing malware threats while many will damage your computer by themselves. When searching for an antivirus tool, purchase one that offers reliable, efficient, and complete protection against all known viruses and malware. When considering commercial anti-malware software options, most people choose popular brands, like SafeBytes, and are very happy with them.
Safebytes is among the well-established computer solutions companies, which provide this all-inclusive anti-malware application. Through its cutting-edge technology, this software will help you protect your PC against infections brought on by various kinds of malware and other threats, including spyware, adware, computer viruses, worms, trojan horses, keyloggers, potentially unwanted program (PUPs), and ransomware.
SafeBytes anti-malware takes computer protection to a whole new level with its advanced features. Here are a few of the good ones:
Robust, Anti-malware Protection: Safebytes is built on the very best virus engine within the industry. These engines can find and eliminate threats even during the early phases of a malware outbreak.
Real-Time Protection: Malware programs trying to enter the computer are identified and stopped as and when detected by the SafeBytes real-time protection shields. This software will constantly monitor your PC for any suspicious activity and updates itself regularly to keep abreast of the constantly changing threat scenarios.
Internet Security: Safebytes assigns all websites a unique safety rating that helps you to get an idea of whether the webpage you’re going to visit is safe to browse or known to be a phishing site.
Lightweight: SafeBytes is a lightweight application. It uses up a really small amount of processing power as it works in the background so you’re free to use your Windows-based computer the way you want.
Premium Support: For any technical problems or product guidance, you may get 24/7 professional assistance via chat and e-mail.
Overall, SafeBytes Anti-Malware is a solid program since it has loads of features and could detect and eliminate any potential threats. You now may realize that this tool does more than just scan and eliminate threats from your computer. So when you want advanced forms of protection features & threat detections, purchasing SafeBytes Anti-Malware will be well worth the money!
Technical Details and Manual Removal (Advanced Users)
If you’d like to carry out the removal of AudioToAudio manually rather than utilizing an automated software tool, you can follow these simple steps: Go to the Windows Control Panel, click on the “Add/Remove Programs” and there, select the offending application to uninstall. In case of suspicious versions of web browser plugins, you can easily get rid of them through your browser’s extension manager. You may also want to reset your home page and search engine providers, as well as clear your browser cache and cookies.
If you decide to manually delete the system files and registry entries, utilize the following checklist to ensure that you know exactly what files to remove before undertaking any actions. However, this can be a tricky task and only computer professionals could carry it out safely. In addition, some malware is capable of replicating or preventing deletion. It is recommended that you do the removal procedure in Safe Mode.
For more information and manual removal instructions visit www.ErrorTools.com
Download Safebytes Anti-Malware: https://errortools.com/download/safebytes-anti-malware/
AudioToAudio is a browser extension for Google Chrome developed by Mindspark Inc. This extension allows users easy access to popular audio converting websites.
When installed, it changes the default search engine, home page, and new tab to MyWay.com. While active AudioToAudio gathers user browsing activities such as, but not limited to: visited websites, clicked links, search queries. This data is later used/sold by the Mindspark ad network to better target ads.
While browsing the internet with this extension enabled, you will see additional injected ads, sponsored content (such as links to web pages, banner ads, affiliate shop links, etc), and even pop-up ads from time to time if the regular ads are blocked.
AudioToAudio has been marked as a Browser Hijacker by several anti-virus applications and is marked for removal by most of them.
Read More
If you encounter an error message that says, “<Drive>: is not accessible, The File or directory is corrupted and unreadable” when you try to connect your USB or external device, then the File System could have been corrupted or the external device might be infected with malware. On the other hand, it is also possible that the device might have some physical damage.
To fix the “The file or directory is corrupted and unreadable” error, you can try to run Check Disk or scan your computer for malware or you could also format the destination drive. For more details, refer to each one of the given options below.
Option 1 – Run the Check Disk utility
You can also run the Check Disk utility to fix the error when you connect your USB or external device.
- In the Windows Search box, type “command prompt” and from the search results, right click on Command Prompt and select “Run as administrator”.
- After opening Command Prompt, type this command and tap Enter: chkdsk <Partition Letter>: /f /r /x /b
- The command you entered will start to check for errors and fix them automatically. Else, it will throw an error message saying, “Chkdsk cannot run because the volume is in use by another process. Would you like the schedule this volume to be checked the next time the system restarts? (Y/N)”.
- Tap the Y key to schedule Disk Check the next time your computer restarts.
Option 2 – Try to format the destination drive
Formatting the drive can also help you resolve the error. To format it, follow these steps:
- To get started formatting your drive, tap the Win + E keys and then go the access page of the drive.
- Next, right click on the drive and select Format.
- After that, uncheck the “Quick Format” option and then format your drive properly.
- Now once the formatting process is finished, unplug the drive and plug it back in afterwards.
- Check if the error is already fixed. If the drive is not initialized, tap the Win + R keys and hit Enter.
- After opening the Run dialog box, type “diskmgmt.msc” and hit Enter to open Disk Management.
- From there, right click on the drive volume and select initialize Disk.
- Next, select the correct partition type and proceed.
Option 3 – Try scanning your computer for malware using Windows Defender
Your computer could be infected with malware which might have triggered the “The file or directory is corrupted and unreadable” error. To fix this, you need to scan your computer using a reliable program like Windows Defender.
- Tap the Win + I keys to open Update & Security.
- Then click on the Windows Security option and open Windows Defender Security Center.
- Next, click on Virus & threat protection > Run a new advanced scan.
- Now make sure that Full Scan is selected from the menu and then click the Scan Now button to get started.
Read More
What is the Error 421?
Error 421 is a common SMTP (Simple Mail Transfer Protocol) Outlook error message. MS Outlook is one of the best and popular email applications widely used by PC Windows users for sending and receiving emails within and outside workplaces.
It is most commonly used in offices by professionals for faster communication.
This error may occur while sending and receiving emails on the server. The error 421 messages is displayed in either of the following formats:
“An unknown error has occurred: Server error 421”
«Could not send your message. Error 421»
421 4.2.1 : (DYN:T1) http://postmaster.info.aol.com/errors/421dynt1.html
421 4.3.1 Out of disk space for temp file
421 4.3.2 All server ports are busy
421 Downstream server error
421 Fork failed
421 Greylisting enabled, please try later
“An unknown error has occurred. Subject ‘Testing’, Account: ‘pop.charter.net’, Server: ‘mail.charter.net’, Protocol: SMTP, Server Response:
’421 Message rejected’, Port: 25, Secure(SSL): No, Server Error: 421, Error Number: 0x800CCC67”
Solution
Error Causes
Some common causes for this critical Outlook error are:
- PST storage size exceeds 2GB file size
- Improper ISP settings
- Slow internet connection
- PST file corruption
- Trojan attack and viral infection
This is a critical Outlook error that should be resolved timely. If you delay, it may cause you a great deal of inconvenience.
The error code 421 hampers your ability to access your email account, send and receive emails, add new contacts, view emails, calendar entries, and journals. In other words, it just brings your email activities to a standstill locking you out of the account.
Further Information and Manual Repair
To resolve this error code on your system, you don’t always have to hire a professional or call the network personnel to do the job. It may be a critical error but the good news is that it is quite easy to fix. Even if you don’t have technical expertise, you can still repair it.
Here are some of the best methods to repair this issue on your system:
1. Change the Server Settings to its Maximum Limit
Try changing your server settings. Here set the inbound connections limit at the maximum limit.
- To do this, open the Microsoft Exchange Server Administrator utility. The access path of this utility will vary depending on the installation procedure used to set up Exchange Server.
- Once you open the MS Exchange Server Administrator utility, click the ‘Connections’ icon in the left side navigation pane. Now double click the internet mail service icon in the right side pane. As you click it, the Properties window will open.
- Now click the ‘Connections’ tab in the Properties window and then click the ‘Advanced’ button. This will open the configuration window.
- Here reset the number for ‘Maximum Number of Inbound Connections’ to a high number, its maximum limit. After changing the settings, close all open Exchange Server Administrator program windows to successfully complete the process.
After the process is complete, try accessing your Outlook email account again; if it works, then that’s great the error 421 is resolved. However, if it doesn’t, then the problem could be related to viral infection.
2. Download a PST Repair Tool
If the cause of the error is PST files corruption, then not only will you be locked out of your email account, you are also at risk of losing all the data stored in your email account.
However, the best way to resolve the error and ensure full data recovery is to download a reliable PST repair tool. By running a PST repair tool on your system, you can resolve the error 421 right away. It recovers your data, repairs corrupt and damaged PST files.
3. Scan Your PC with Restoro.
If viral infection and Trojans are causing the error 421 to pop up on your system, then it is recommended to download and scan your PC with Restoro.
This is an advanced, intuitive, and user-friendly PC fixer. It is not just an antivirus but also a system optimizer and a registry cleaner.
Unlike common antivirus software that only removes viruses and simultaneously slows down the system’s speed, Restoro removes all types of malicious software on your PC including malware, spyware, Trojans, and viruses, and also boosts the speed of your PC significantly.
It is safe, easy to operate, and a quick fixer. It is compatible with all Windows versions.
Click here to download Restoro and resolve error 421 today!
Read More
![]()
Hello and welcome everyone, just a few years ago we had FLASH video content on the internet, we had FLASH games, full FLASH website experiences, and more, but then flash was shut down mostly due to security reasons meaning that in just a few months we have lost most of FLASH web content.
However, there is still FLASH content on the internet even today, there are still FLASH videos and flash games, but we can not play any of that content since browsers do not support FLASH and you can not get the FLASH plugin for browsers. So what might be the solution for this situation?
Ruffle and FLASH emulation
Emulation of course. We will not be able to get the flash player working, well at least not the original and official one, but we can make flash content playable again inside our browsers.
The first thing is first, we need to get an emulator package from the internet in order for this trick to work, one we will be using is RUFFLE. It is lightweight, it is free, it is open source and it is reliable, everything we need.
Download RUFFLE from its official website here.
For Chrome and Edge download the ZIP package, for Firefox, go to the Firefox section of the tutorial.
There is also a desktop version of RUFFLE there so if you are keen on playing your flash content on your desktop computer you might well grab that as well, but for the sake of this tutorial where we are enabling flash in our browsers, we will not focus on that part since it is pretty straightforward.
Now once you have downloaded the RUFFLE emulator, please extract it to the desired folder somewhere on your computer.
Once it is extracted, start your browser of choice and follow instructions.
FOR CHROME:
- Navigate to: chrome://extensions/
- Turn ON developer mode in the top right corner
- Click on Load unpacked
- Navigate to the folder where you have extracted RUFFLE
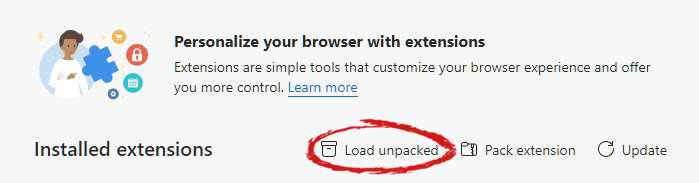
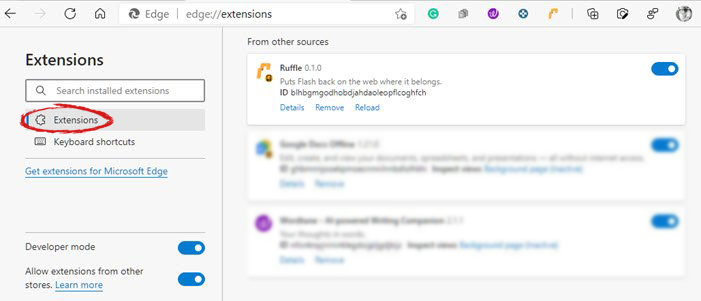
FOR EDGE:
- Navigate to: edge://extensions/
- Turn ON developer mode on the bottom left corner
- Navigate to the folder where you have extracted RUFFLE
- Turn RUFFLE ON
FOR FIREFOX:
- Go to the RUFFLE download page, we can not use the zip package we were using for Chrome and Edge
- Right-click on the Firefox download link
- Save link by clicking on Save link as…
- Navigate to about: debugging
- Click on this Firefox
- Click Load Temporary Add-on
- Select the .xpi that you have downloaded
BONUS:
If you want to enable FLASH content live on your website use: <script src=»path_to_ruffle/ruffle.js»></script>
Read More
In case you don’t know, Groove Music is due to retire its OneDrive streaming service this month. Despite that being the case, there is actually a workaround you can try to still continue enjoying music streaming. The app also allows you to play your own local files and if required, you can also modify or tailor the experience with new features – for instance, Groove Music brings an Equalizer to the settings of the app.
As the name suggests, the equalizer allows you to tweak frequency responses to your liking. On top of being able to tweak individual bands, the equalizer supports few pre-set settings to enable quick changes. This post will guide you on the process of accessing and using the equalizer in the Groove Music app. To get started, refer to the instructions provided below.
Step 1: You need to make sure that you are running the latest version of the Groove Music app or version 10.18011.1211.0 or higher in order to use the equalizer in Groove Music. If needed, you can check the version number from Windows Store.
Step 2: Open Windows Store and then click on the ellipses icon and select the Downloads and Updates option.
Step 3: Next, search for Groove Music and check its version number.
Step 4: Now that you’ve verified the version number of Groove Music, you need to open the equalizer setting. It is enabled by default and to access it, click on the gear icon for Settings and select equalizer under the Playback settings.
Step 5: After that, the Equalizer window will pop up. It is where you can configure the equalizer settings using the drop-down menu. Here are the following presets you can choose from:
- Flat
- Treble Boost
- Bass Boost
- Headphones
- Laptop
- Portable speakers
- Home Stereo
- TV
- Car
- Custom
Step 6: Drag the dots upwards or downwards to set your own preferences, as needed.
Note: The only downside to this setting is that there is no shortcut available for quick access as you have to navigate through the Settings section manually to access it and change the preset configurations. In addition, the Groove Music app also works on the mobile version of Windows 10.
Read More
![]()
Copyright © 2023, ErrorTools. All Rights Reserved
Trademark: Microsoft Windows logos are registered trademarks of Microsoft. Disclaimer: ErrorTools.com is not affiliated with Microsoft, nor claims direct affiliation.
The information on this page is provided for information purposes only.
![]()