
I’ve always used Google2SRT, a light software to download subtitles from Youtube. Now it no longer works: «Startup Error: Failed to find Java VM».
I have Java installed, I have Netbeans installed and working, I have never had any Java related issues.
I’ve tried reinstalling everything, I’ve tried creating a JAVA_HOME and JRE_HOME System variable and pointing it to «C:Program FilesJavajre1.8.0_191» according to this tutorial: https://confluence.atlassian.com/doc/setting-the-java_home-variable-in-windows-8895.html
It felt odd because I didn’t even had this environment variable previously. I have no idea what’s the issue.
I’ve tried uninstalling Netbeans and other programming tools as well.
I’m on Windows 7 x64.
java -debug -version > "%userprofile%desktopjavaDebug.log" 2>&1 returns:
java version «1.8.0_191»
Java(TM) SE Runtime Environment (build 1.8.0_191-b12)
Java HotSpot(TM) 64-Bit Server VM (build 25.191-b12, mixed mode)
I have also tried setting maximum heap size in _JAVA_OPTIONS
System Variables
Charles won’t start with «Failed to find Java VM»
Charles uses Java so you need to have a Java Runtime Environment installed. You can download Java from Oracle.
If you are using the 32 bit version of Charles you must have a 32 bit JRE installed, and vice versa if you’re using the 64 bit version of Charles you must have a 64 bit JRE installed.
If you have the correct JRE installed and you still get a «Failed to find Java VM» message, please try reinstalling Java – if Charles can’t find your JRE then it is likely that your registry contains some invalid details, which reinstalling will correct. Also note that Charles requires a JRE and will not run if you only have the JDK installed. When you install the JDK it will offer to install a JRE as well, so this is usually not an issue.
Содержание
- Как исправить ошибку Windows 2 при загрузке Java VM
- 3 решения для исправления ошибки Windows 2 Java VM
- Шаги по исправлению ошибки Windows 2
- 1. Обновите Java
- 2. Удалите системную переменную Javapath
- 3. Откройте установщик программного обеспечения через командную строку
- Failed to find java vm windows
- Сообщение об ошибке #1: не удалось создать виртуальную машину java.
- Сообщение об ошибке #2: ошибка при открытии раздела реестра.
- Сообщение об ошибке #3: Виртуальная машина java лаунчер не может найти основной класс: программа завершает работу
- Сообщение об ошибке #4: не удалось открыть jarфайл.
- Wuala error: “Failed to find Java VM” even when Java is installed
- 2 Answers 2
- Not the answer you’re looking for? Browse other questions tagged windows 64-bit wuala or ask your own question.
- Related
- Hot Network Questions
- Subscribe to RSS
- How to fix Windows error 2 while loading the Java VM
- 3 solutions to fix Windows error 2 Java VM
- Steps to fix Windows error 2
- 1. Update Java
- 2. Delete the Javapath System Variable
- 3. Open the Software Installer via the Command Prompt
Как исправить ошибку Windows 2 при загрузке Java VM
3 решения для исправления ошибки Windows 2 Java VM
- Обновить Java
- Удалите системную переменную Javapath
- Откройте установщик программного обеспечения через командную строку
Сообщение об ошибке « Windows error 2 при загрузке Java VM » появляется у некоторых пользователей при попытке установить программное обеспечение, которое использует Java Launcher Launch Anywhere. Следовательно, пользователи не могут установить программное обеспечение, когда появляется это сообщение об ошибке.
Это сообщение об ошибке стало всплывать для пользователей после выпуска версии Java VM 1.8.0_60. Если сообщение об ошибке Java VM « Windows error 2 » звучит знакомо, ознакомьтесь с некоторыми исправлениями, приведенными ниже.
Шаги по исправлению ошибки Windows 2
1. Обновите Java
Сначала убедитесь, что ваша версия Java обновлена. Если нет, обновите Java до последней версии. Так пользователи могут обновлять Java в Windows.
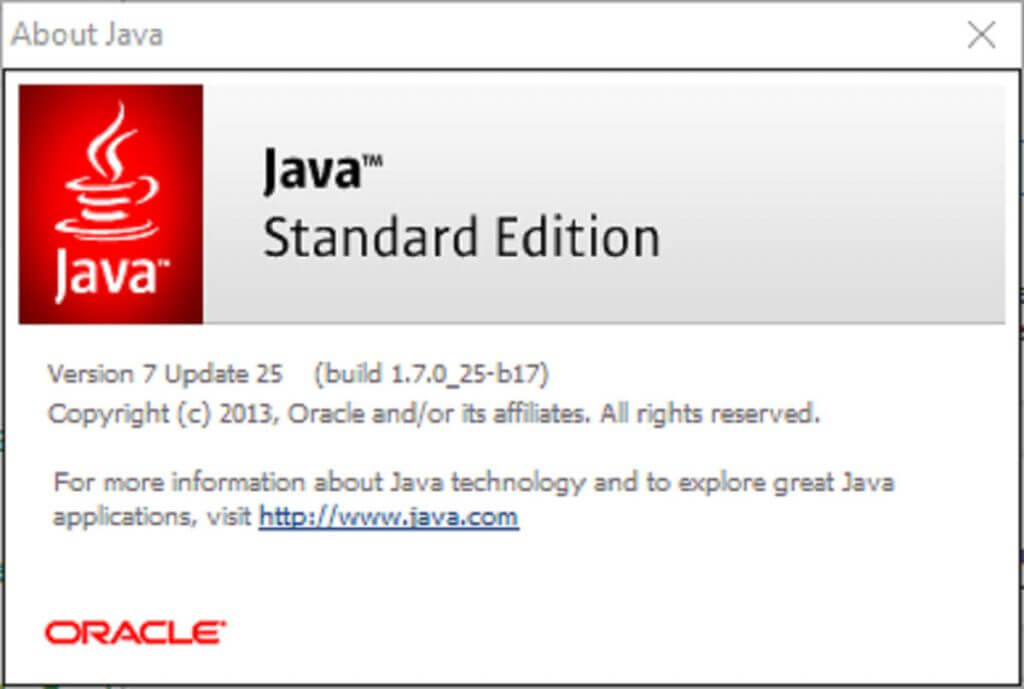
- Пользователи могут проверить свои версии Java через панель управления Java. Чтобы открыть это, нажмите клавишу Windows + горячую клавишу R.
- Войдите в «Панель управления» в разделе «Выполнить» и нажмите кнопку ОК .
- Затем нажмите Java на панели управления, чтобы открыть окно ниже.

- Нажмите кнопку О программе , чтобы открыть сведения о версии. Если требуется обновление, сначала удалите предыдущую версию Java.
- Для этого введите «appwiz.cpl» в текстовом поле «Выполнить» и нажмите ОК . Откроется апплет «Программы и компоненты», показанный на снимке ниже.
- Введите «Java» в поле поиска. Затем выберите Java и нажмите Удалить , чтобы удалить его.
- Перезагрузите Windows после удаления Java.
- Откройте страницу загрузки Java, чтобы получить последнюю версию. Нажмите кнопку Принять и начать бесплатную загрузку , чтобы сохранить последнюю версию Java в папке.
- Откройте установочный файл Java, чтобы установить последнюю версию.
– СВЯЗАННО: Как исправить ошибку Skype ‘Javascript требуется для входа’
2. Удалите системную переменную Javapath
Некоторые пользователи заявили на форумах, что они исправили ошибку « Windows error 2 », удалив путь к системной переменной Java. Так что это одно из лучших решений для ошибки Java VM. Следуйте приведенным ниже инструкциям, чтобы удалить путь к системной переменной Java.
- Откройте Run, нажав клавишу Windows + R.
- Введите “systempropertiesadvanced” в текстовое поле “Открыть” и нажмите кнопку ОК .
- Выберите вкладку «Дополнительно», показанную ниже.
- Нажмите кнопку Переменные среды , чтобы открыть окно, показанное ниже.
- Выберите переменную javapath в этом окне.
- Нажмите кнопку Удалить , чтобы удалить переменную javapath.
3. Откройте установщик программного обеспечения через командную строку
Это скорее обходной путь, чем исправление. Тем не менее, пользователи подтвердили, что могут открыть установщик программного обеспечения через командную строку. Пользователи могут открыть установщик Launch Anywhere через командную строку следующим образом.
- Нажмите сочетание клавиш Windows + X, чтобы открыть меню Windows 10 Win + X.
- Нажмите Командная строка (администратор) , чтобы открыть окно CP от имени администратора.
- Пользователи Windows 7 могут открыть подсказку, введя «Командная строка» в поле поиска меню «Пуск». Затем щелкните правой кнопкой мыши командную строку и выберите Запуск от имени администратора .
- Затем введите команду LAX_VM в командной строке следующим образом: Installer_file.exe LAX_VM C: Program FilesJavajdk1.8.0_60binjava.exe. Затем нажмите клавишу возврата.
Обратите внимание, что приведенная выше команда LAX_VM является примером, который пользователям необходимо изменить, чтобы он точно совпадал с именами их файлов установщика и путями JDK. Синтаксис для приведенной выше команды подсказки: LAX_VM.
Таким образом, пользователям нужно будет как минимум изменить имя файла установщика. Некоторым пользователям также может потребоваться изменить путь к папке, если они установили JDK в пользовательский каталог. Однако C: Program FilesJavajdk1.8.0_60binjava.exe является каталогом JDK по умолчанию.
Таким образом, пользователи могут устранить ошибку Java VM в Windows. Пользователи также могут загрузить исправление для ошибки «ошибка Windows em 2 при загрузке виртуальной машины Java » на этой веб-странице.
Failed to find java vm windows
Если ваша система частенько выдает сообщения об ошибках запуска Java Virtual Machine «виртуальной машины Java», вам не нужно беспокоиться, эти ошибки очень легко устранить.
Функции JVM (Java Virtual Machine)
Виртуальная машина java отвечает за выделение памяти и сбор мусора, наряду с интерпретацией байт-кода в машинный код.
Среда выполнения Java (JRE) является обязательным для установки на вашем компьютере для некоторых приложений, чтобы работать должным образом. Основным компонентом JRE является виртуальная машина Java (JVM), которая помогает запускать Java-приложения. Java-файл, при компиляции, производит ‘.класс’ файл, а не исполняемый файл. Этот класс файл содержит байт-код java, который в jvm интерпретируется в машиночитаемые инструкции. Jvm — независит от платформы, поскольку он обеспечивает машинный интерфейс, который не зависит от базовой операционной системы и аппаратной архитектуры.
Могут быть случаи, когда вы можете получить сообщения об ошибках при запуске jvm, в таких ситуациях, как загрузка в компьютер, игра в игры, такие как minecraft, или открытие определенных Java-приложений. В этой статье я собрал несколько решений, которые могут помочь вам исправить ошибки запуска виртуальной машины Java для Windows.

Сообщение об ошибке #1: не удалось создать виртуальную машину java.
Это сообщение об ошибке обычно возникает при попытке запуска Java-игр, таких как minecraft.
➦Откройте панель управления.
➦Зайти в систему.
➦Перейти к расширенным свойствам системы.
➦Нажмите кнопку ‘переменные среды’.
➦В системных переменных, нажмите кнопку ‘новый’.
➦Поставьте новое имя переменной: _JAVA_OPTIONS
➦Вбейте новое значение переменной: -Xmx512M
➦Нажмите кнопку ‘ОК’.
-Xmx/S-это параметр конфигурации, который управляет количеством памяти которое использует java.
- Xmx — это максимальный размер памяти, которая может быть выделена.
- Xms — это минимальный размер памяти, которая может быть выделена.
Сообщение об ошибке #2: ошибка при открытии раздела реестра.
Эта ошибка может возникнуть при работе с Java в командной строке.
➦Открываем папку WINDOWSsystem32.
➦Удаляем исполняемый файл java файлов, в том числе java.exe, javaw.exe и javaws.exe.
➦Далее переустанавливаем среду JRE.
 Сообщение об ошибке #3: Виртуальная машина java лаунчер не может найти основной класс: программа завершает работу
➦Нажмите кнопку «Пуск» в главном меню.
➦В окне поиска введите «mrt» и нажмите клавишу Enter. Будет запущена утилита Windows под названием ‘Средство удаления вредоносных программ Microsoft Windows ‘.
➦Нажмите кнопку «Далее» и выберите «полное сканирование».
➦Перезагрузите компьютер после завершения сканирования.
➦Нажмите кнопку «Пуск» и запустить программу настройки системы, набрав команду «msconfig» в поле поиска.
➦ Перейдите на вкладку «запуска» и снимите галочку рядом с ‘WJView.exe’ и ‘javaw.exe’.
➦Перезагрузитесь при запросе.
Сообщение об ошибке #4: не удалось открыть jarфайл.
Эта ошибка может возникнуть при попытке открыть приложение.
➦Нажмите кнопку ‘Пуск’ и перейдите к ‘программам по умолчанию’.
➦Выберите «сопоставление типа файла или протокола программе’.
➦Нажмите на расширения (.jar) для просмотра программы, которая открывает его по умолчанию.
➦Нажмите кнопку «изменить программу» и выбрите программу по умолчанию «виртуальная машина java лаунчер».
➦Нажмите кнопку «закрыть» и проверьте, устранена ли проблема.
➦Если нет, попробуйте удалить и переустановить Java.
➦Если проблема не устранена, обратитесь в техническую поддержку приложения, которое дает вам ошибку.
Если вы столкнулись с еще какими-либо ошибками Java Virtual Machine напишите о них в комментариях, постараюсь помочь.
Wuala error: “Failed to find Java VM” even when Java is installed
I have just installed Wuala, some kind of Dropbox equivalent, and, when I start it, a window appear telling «Failed to find Java VM«.
I already have a Java VM installed, but I have checked again, and the Java VM is installed and be launched from the command line.
2 Answers 2
Wuala requires the following line to be present in the wuala.ini file (on Windows 7 is located here C:Users AppDataRoamingWuala ):
vm.location=C:Program Files (x86)Javajre1.6.0binclientjvm.dll
Note the above path is applicable to Windows 7 64-bit, for JRE 6 32-bit. Also note that Wuala does not start when using the server dll of the JRE 7 64-bit.
Latest versions of Wuala also show this message but for different reason. Wuala installer will install 32-bit Java VM if it is not present on the system. Sometime later, the 32-bit Java VM gets uninstalled for some reason, perhaps when some update removes older insecure VM and replaces it with new one, which happens to be 64-bit. Wuala then stops working.
The solution is to install both 32-bit and 64-bit Java VM side by side by downloading offline 32-bit installer from java.com. This is a supported configuration, although it’s not the default. Reinstalling Wuala does the job too as it triggers installation of the right Java VM.
Not the answer you’re looking for? Browse other questions tagged windows 64-bit wuala or ask your own question.
Hot Network Questions
To subscribe to this RSS feed, copy and paste this URL into your RSS reader.
site design / logo © 2021 Stack Exchange Inc; user contributions licensed under cc by-sa. rev 2021.4.16.39093
By clicking “Accept all cookies”, you agree Stack Exchange can store cookies on your device and disclose information in accordance with our Cookie Policy.
How to fix Windows error 2 while loading the Java VM

- Download Restoro PC Repair Tool that comes with Patented Technologies (patent available here).
- Click Start Scan to find Windows issues that could be causing PC problems.
- Click Repair All to fix issues affecting your computer’s security and performance
- Restoro has been downloaded by 0 readers this month.
3 solutions to fix Windows error 2 Java VM
- Update Java
- Delete the Javapath System Variable
- Open the Software Installer via the Command Prompt
The “Windows error 2 while loading the Java VM” error message is one that pops up for some users when trying to install software that rely on the Launch Anywhere Java launcher. Consequently, the users can’t install the software when that error message pops up.
That error message started to pop up for users after the release of Java VM version 1.8.0_60. If the “Windows error 2” Java VM error message sounds familiar, check out some the fixes for it below.
Steps to fix Windows error 2
1. Update Java
First, check that your Java version is up to date. If not, update Java to the latest version. This is how users can update Java in Windows.
- Users can check their Java versions via the Java Control Panel. To open that, press the Windows key + R hotkey.
- Enter ‘Control Panel’ in Run, and click the OK button.
- Then click Java in the Control Panel to open the window below.
![]()
- Click the About button to open version details. If an update is required, uninstall the previous Java version first.
- To do that, enter ‘appwiz.cpl’ in Run’s text box and clicking OK. That will open the Programs and Features applet shown in the snapshot directly below.

- Enter ‘Java’ in the search box. Then select Java and click Uninstall to remove it.
- Restart Windows after uninstalling Java.
- Open the Java download page to get the latest version. Press the Agree and Start Free Download button to save the latest Java version to a folder.
- Open the Java setup file to install the latest version.
2. Delete the Javapath System Variable
Some users have stated on forums that they’ve fixed the “Windows error 2” error by deleting a Java system variable path. So that’s one of the best resolutions for the Java VM error. Follow the guidelines below to delete the Java system variable path.
- Open Run by pressing the Windows key + R.
- Input ‘systempropertiesadvanced’ in the Open text box, and click the OK button.
- Select the Advanced tab shown directly below.
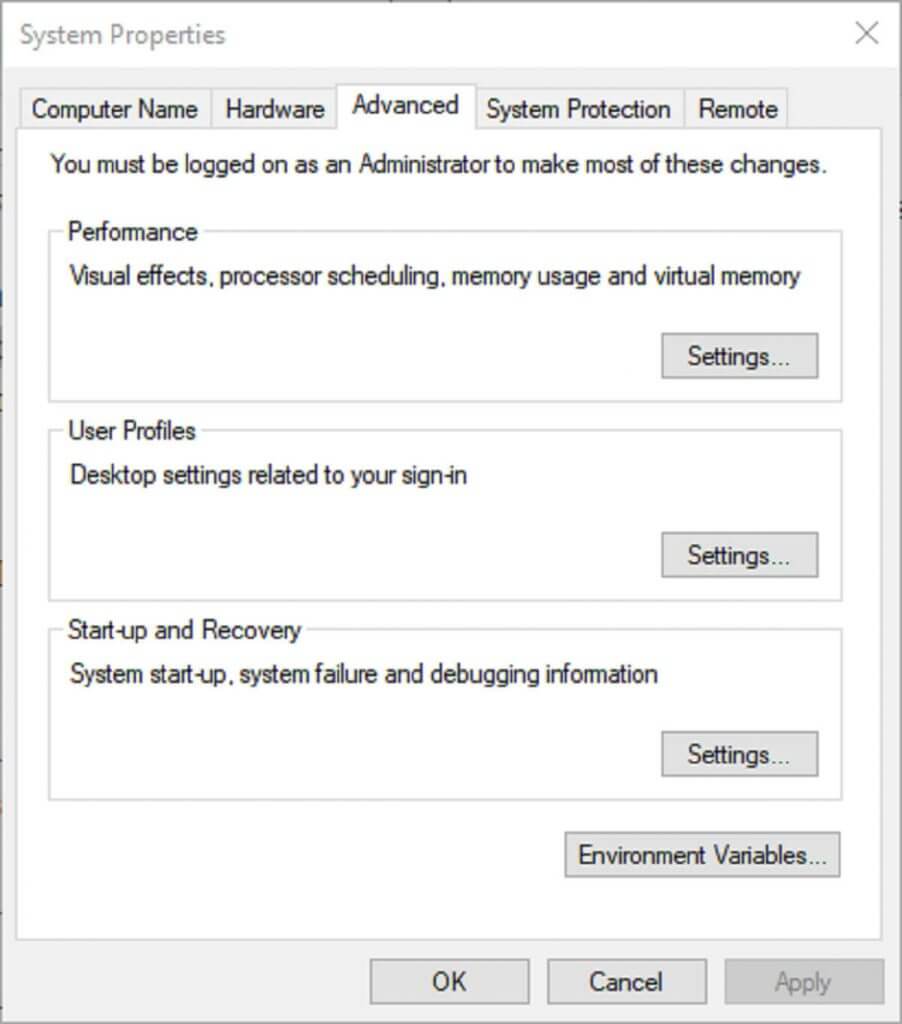
- Press the Environment Variables button, which opens the window shown directly below.
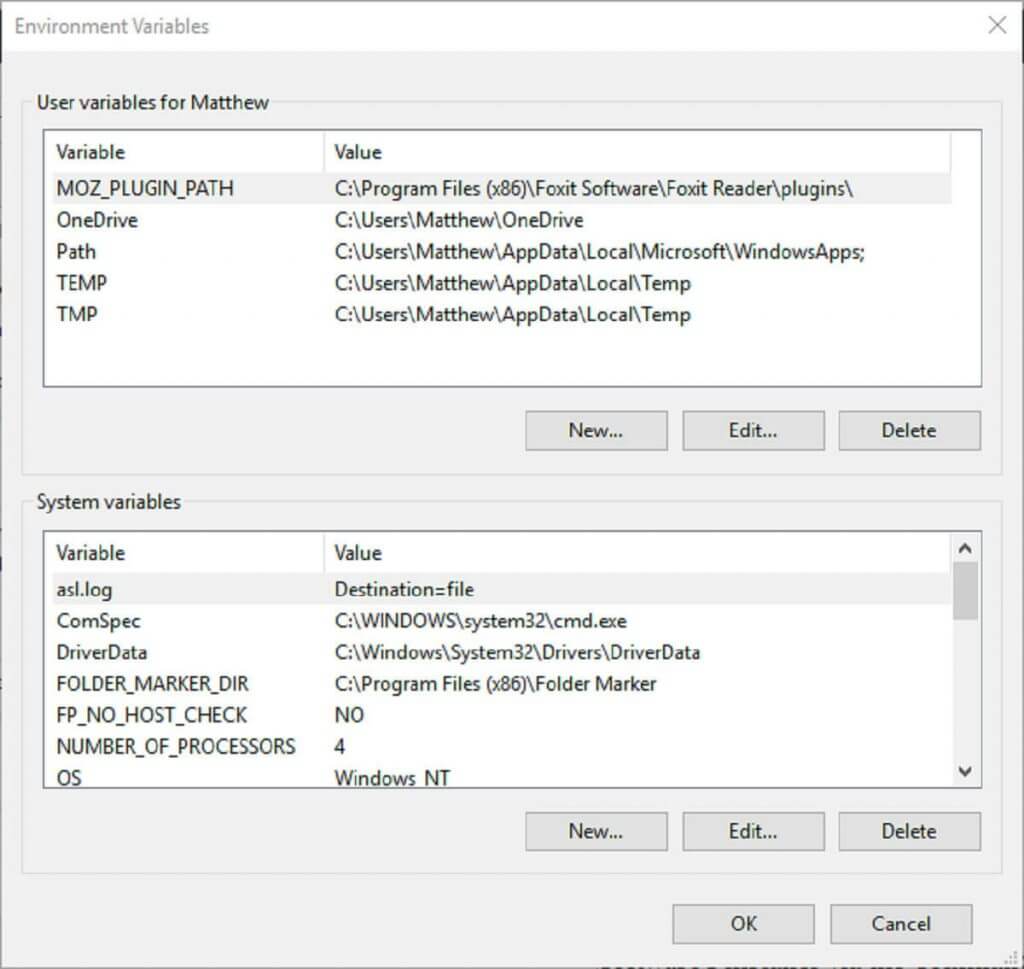
- Select the javapath variable on that window.
- Click the Delete button to erase the javapath variable.
3. Open the Software Installer via the Command Prompt
This is more of a workaround than a fix. Nevertheless, users have confirmed they can open the software’s installer via the Command Prompt. Users can open the Launch Anywhere installer via the Command Prompt as follows.
- Press the Windows key + X keyboard shortcut to open Windows 10’s Win + X menu.
- Click Command Prompt (Admin) to open the CP window as administrator.
- Windows 7 users can open the Prompt by entering ‘Command Prompt’ in the Start menu search box. Then right-click Command Prompt and select Run as administrator.
- Next, enter a LAX_VM command in the Prompt as follows: Installer_file.exe LAX_VM C:Program FilesJavajdk1.8.0_60binjava.exe. Then press the Return key.
Note that the LAX_VM command above is an example that users will need to modify so that it matches their exact installer file names and JDK paths. The syntax for the above Prompt command is: LAX_VM .
Thus, users will need to edit the installer file name at least. Some users might also need to adjust the folder path if they’ve installed JDK at a custom directory. However, C:Program FilesJavajdk1.8.0_60binjava.exe is the default JDK directory.
So that’s how users can resolve the Java VM error in Windows. Users can also download a hotfix patch for the “Windows error 2 while loading the Java VM” error at this webpage.
Problem
Unable to open the Rich Client on Web Server. It opens up successfully on the Application Server and Client Machines.
Symptom
The following error is displayed when trying to open the Rich Client on the Web Server:
«cognosrcp.exe — Unable to Locate Component. This application has failed to start because MSVCR71.dll was not found. Re-installing the application may fix this problem.»
«Startup Error. Failed to find Java VM.»
Cause
Known Defect. Contact IBM Customer Support for further details if required.
Environment
Distributed Environment
Resolving The Problem
Ensure that the PATH Variable is pointing to a directory containing the MVCR71.dll file.
If no Path Variable is set on the Web Server then adding a directory which contains the file should fix the problem. Since there are several instances of this DLL file within different folders, the best way to check which directory to point to, is to determine what the Path Variable is set to on the Application Server.
[{«Product»:{«code»:»SS9S5U»,»label»:»Cognos 8 Planning»},»Business Unit»:{«code»:»BU053″,»label»:»Cloud & Data Platform»},»Component»:»Contributor»,»Platform»:[{«code»:»PF033″,»label»:»Windows»}],»Version»:»8.4″,»Edition»:»»,»Line of Business»:{«code»:»LOB10″,»label»:»Data and AI»}},{«Product»:{«code»:»SSPN2D»,»label»:»Cognos Planning»},»Business Unit»:{«code»:»BU059″,»label»:»IBM Software w/o TPS»},»Component»:»Contributor»,»Platform»:[{«code»:»PF033″,»label»:»Windows»}],»Version»:»8.4″,»Edition»:»»,»Line of Business»:{«code»:»LOB10″,»label»:»Data and AI»}}]
I have just installed Wuala, some kind of Dropbox equivalent, and, when I start it, a window appear telling «Failed to find Java VM«.
I already have a Java VM installed, but I have checked again, and the Java VM is installed and be launched from the command line.
asked Jun 2, 2012 at 10:08
![]()
Wuala requires the following line to be present in the wuala.ini file (on Windows 7 is located here C:Users<USERNAME>AppDataRoamingWuala):
vm.location=C:Program Files (x86)Javajre1.6.0binclientjvm.dll
Note the above path is applicable to Windows 7 64-bit, for JRE 6 32-bit.
Also note that Wuala does not start when using the server dll of the JRE 7 64-bit.
![]()
HackToHell
6,3183 gold badges38 silver badges62 bronze badges
answered Aug 10, 2012 at 6:34
![]()
cozcoz
2051 silver badge7 bronze badges
1
Latest versions of Wuala also show this message but for different reason. Wuala installer will install 32-bit Java VM if it is not present on the system. Sometime later, the 32-bit Java VM gets uninstalled for some reason, perhaps when some update removes older insecure VM and replaces it with new one, which happens to be 64-bit. Wuala then stops working.
The solution is to install both 32-bit and 64-bit Java VM side by side by downloading offline 32-bit installer from java.com. This is a supported configuration, although it’s not the default. Reinstalling Wuala does the job too as it triggers installation of the right Java VM.
answered Mar 25, 2015 at 19:08
![]()