
-
#1
Whenever I open OBS, I get this message. Doesn’t seem to matter if I run it as an administrator or not. But within 3 or 4 attempts of launching OBS Studio, it eventually seems to work, launching all the Twitch docks and connecting to my account.
Here’s the latest log: https://obsproject.com/logs/Kv04hhaDIze3UyrC
Code:
21:02:23.154: CPU Name: AMD Ryzen 7 2700 Eight-Core Processor
21:02:23.154: CPU Speed: 3194MHz
21:02:23.154: Physical Cores: 8, Logical Cores: 16
21:02:23.154: Physical Memory: 32695MB Total, 28199MB Free
21:02:23.154: Windows Version: 10.0 Build 17763 (revision: 805; 64-bit)
21:02:23.154: Running as administrator: true
21:02:23.154: Aero is Enabled (Aero is always on for windows 8 and above)
21:02:23.154: Windows 10 Gaming Features:
21:02:23.154:     Game Bar: Off
21:02:23.154:     Game DVR: Off
21:02:23.154:     Game DVR Background Recording: Off
21:02:23.156: Sec. Software Status:
21:02:23.156:     Windows Defender Antivirus: enabled (AV)
21:02:23.157:     Windows Firewall: enabled (FW)
21:02:23.157:     Windows Defender Antivirus: enabled (ASW)
21:02:23.157: Current Date/Time: 2019-11-03, 21:02:23
21:02:23.157: Browser Hardware Acceleration: true
21:02:23.157: Portable mode: false
21:02:23.429: OBS 24.0.3 (64-bit, windows)
21:02:23.429: ---------------------------------
21:02:23.430: ---------------------------------
21:02:23.430: audio settings reset:
21:02:23.430:     samples per sec: 44100
21:02:23.430:     speakers:        2
21:02:23.431: ---------------------------------
21:02:23.431: Initializing D3D11...
21:02:23.431: Available Video Adapters:
21:02:23.432:     Adapter 0: NVIDIA GeForce GTX 1660
21:02:23.432:       Dedicated VRAM: 1987051520
21:02:23.432:       Shared VRAM:    4256710656
21:02:23.432:       output 0: pos={0, 0}, size={1920, 1080}, attached=true
21:02:23.433:       output 1: pos={1920, 0}, size={1920, 1080}, attached=true
21:02:23.434: Loading up D3D11 on adapter NVIDIA GeForce GTX 1660 (0)
21:02:23.492: D3D11 loaded successfully, feature level used: b000
21:02:23.492: D3D11 GPU priority setup success
21:02:23.972: ---------------------------------
21:02:23.972: video settings reset:
21:02:23.972:     base resolution:   1920x1080
21:02:23.972:     output resolution: 1920x1080
21:02:23.972:     downscale filter:  Bicubic
21:02:23.972:     fps:               60/1
21:02:23.972:     format:            NV12
21:02:23.972:     YUV mode:          601/Partial
21:02:23.972: NV12 texture support enabled
21:02:23.973: Audio monitoring device:
21:02:23.973:     name: Default
21:02:23.973:     id: default
21:02:23.973: ---------------------------------
21:02:23.976: [CoreAudio encoder]: CoreAudio AAC encoder not installed on the system or couldn't be loaded
21:02:23.976: Failed to load 'en-US' text for module: 'decklink-ouput-ui.dll'
21:02:24.006: [AMF] AMF Test failed due to one or more errors.
21:02:24.006: Failed to initialize module 'enc-amf.dll'
21:02:24.039: [obs-browser]: Version 2.7.15
21:02:24.042: NVENC supported
21:02:24.129: Failed to load 'en-US' text for module: 'StreamDeckPlugin.dll'
21:02:24.137: VLC found, VLC video source enabled
21:02:24.141: No blackmagic support
21:02:24.144: ---------------------------------
21:02:24.144:   Loaded Modules:
21:02:24.144:     win-wasapi.dll
21:02:24.144:     win-mf.dll
21:02:24.144:     win-dshow.dll
21:02:24.144:     win-decklink.dll
21:02:24.144:     win-capture.dll
21:02:24.144:     vlc-video.dll
21:02:24.144:     text-freetype2.dll
21:02:24.144:     StreamDeckPlugin.dll
21:02:24.144:     rtmp-services.dll
21:02:24.144:     obs-x264.dll
21:02:24.144:     obs-vst.dll
21:02:24.144:     obs-transitions.dll
21:02:24.144:     obs-text.dll
21:02:24.144:     obs-qsv11.dll
21:02:24.144:     obs-outputs.dll
21:02:24.144:     obs-filters.dll
21:02:24.144:     obs-ffmpeg.dll
21:02:24.144:     obs-browser.dll
21:02:24.144:     image-source.dll
21:02:24.144:     frontend-tools.dll
21:02:24.144:     enc-amf.dll
21:02:24.144:     decklink-ouput-ui.dll
21:02:24.144:     coreaudio-encoder.dll
21:02:24.144: ---------------------------------
21:02:24.144: ==== Startup complete ===============================================
21:02:24.148: All scene data cleared
21:02:24.148: ------------------------------------------------
21:02:24.154: [window-capture: 'Window Capture'] update settings:
21:02:24.154:     executable: Photoshop.exe
21:02:24.155: [WASAPISource::TryInitialize]:[Analog Connector (2- AudioBox USB)] Failed to activate client context: 88890004
21:02:24.155: [WASAPISource::WASAPISource] Device '{0.0.1.00000000}.{6c18c410-b108-499d-a2d4-740ea97a1ce8}' not found.  Waiting for device
21:02:24.156: [Media Source 'Starting Soon Video']: settings:
21:02:24.156:     input:                   C:/Users/conta/Pictures/Stream Assets/startingsoon/startingsoon.mp4
21:02:24.156:     input_format:            (null)
21:02:24.156:     speed:                   100
21:02:24.156:     is_looping:              yes
21:02:24.156:     is_hw_decoding:          no
21:02:24.156:     is_clear_on_media_end:   yes
21:02:24.156:     restart_on_activate:     yes
21:02:24.156:     close_when_inactive:     no
21:02:24.157: [Media Source 'Music']: settings:
21:02:24.157:     input:                   C:/Users/conta/Pictures/Stream Assets/music/wünsche - soundcloud bumps - 08 birds.mp3
21:02:24.157:     input_format:            (null)
21:02:24.157:     speed:                   100
21:02:24.157:     is_looping:              yes
21:02:24.157:     is_hw_decoding:          no
21:02:24.157:     is_clear_on_media_end:   yes
21:02:24.157:     restart_on_activate:     yes
21:02:24.157:     close_when_inactive:     no
21:02:24.157: [Media Source 'BRB Video']: settings:
21:02:24.157:     input:                   C:/Users/conta/Pictures/Stream Assets/berightback/berightback.mp4
21:02:24.157:     input_format:            (null)
21:02:24.157:     speed:                   100
21:02:24.157:     is_looping:              yes
21:02:24.157:     is_hw_decoding:          no
21:02:24.157:     is_clear_on_media_end:   yes
21:02:24.157:     restart_on_activate:     yes
21:02:24.157:     close_when_inactive:     no
21:02:24.556: WASAPI: Device 'Speakers (Realtek High Definition Audio)' initialized
21:02:24.562: Switched to scene 'Main'
21:02:24.570: signal_handler_connect: signal 'item_visible' not found
21:02:24.570: signal_handler_connect: signal 'item_visible' not found
21:02:24.570: signal_handler_connect: signal 'item_visible' not found
21:02:24.570: signal_handler_connect: signal 'item_visible' not found
21:02:24.570: signal_handler_connect: signal 'item_visible' not found
21:02:24.570: signal_handler_connect: signal 'item_visible' not found
21:02:24.570: signal_handler_connect: signal 'item_visible' not found
21:02:24.570: signal_handler_connect: signal 'item_visible' not found
21:02:24.570: signal_handler_connect: signal 'item_visible' not found
21:02:24.570: signal_handler_connect: signal 'item_visible' not found
21:02:24.570: signal_handler_connect: signal 'item_visible' not found
21:02:24.570: signal_handler_connect: signal 'item_visible' not found
21:02:24.570: signal_handler_connect: signal 'item_visible' not found
21:02:24.570: signal_handler_connect: signal 'item_visible' not found
21:02:24.570: ------------------------------------------------
21:02:24.570: Loaded scenes:
21:02:24.570: - scene 'Main':
21:02:24.570:     - source: 'Display Capture' (monitor_capture)
21:02:24.570:     - source: 'Desktop Audio' (wasapi_output_capture)
21:02:24.570:         - filter: 'Compressor' (compressor_filter)
21:02:24.570:     - source: 'Samson Q7x Mic via Presonus Audiobox USB' (wasapi_input_capture)
21:02:24.570:         - filter: 'Noise Suppression' (noise_suppress_filter)
21:02:24.570:         - filter: 'Noise Gate' (noise_gate_filter)
21:02:24.570:         - filter: 'Compressor' (compressor_filter)
21:02:24.570:         - filter: 'Gain' (gain_filter)
21:02:24.570:     - source: 'Overlay Scene' (scene)
21:02:24.570: - scene 'Tablet Display Capture':
21:02:24.570:     - source: 'Display Capture' (monitor_capture)
21:02:24.570: - scene 'BRB':
21:02:24.570:     - source: 'Music' (ffmpeg_source)
21:02:24.570:     - source: 'BRB Video' (ffmpeg_source)
21:02:24.570: - scene 'Starting Soon':
21:02:24.570:     - source: 'Music' (ffmpeg_source)
21:02:24.570:     - source: 'Starting Soon Video' (ffmpeg_source)
21:02:24.570: - scene 'Overlay Scene':
21:02:24.570:     - source: 'Main Overlay' (image_source)
21:02:24.570:     - source: 'Tip Jar' (browser_source)
21:02:24.570:         - monitoring: monitor only
21:02:24.570:     - source: 'Alert Box' (browser_source)
21:02:24.570:         - monitoring: monitor only
21:02:24.570:     - source: 'Newest Follower' (text_gdiplus)
21:02:24.570:     - source: 'Now Playing' (text_gdiplus)
21:02:24.570:         - filter: 'Scroll' (scroll_filter)
21:02:24.570: - scene 'Photoshop Capture':
21:02:24.570:     - source: 'Window Capture' (window_capture)
21:02:24.570: ------------------------------------------------
21:02:28.113: OAuth::GetToken: Failed to get token from remote:
-
#2
It really sucks that this doesn’t have an answer, because I’m having the same issue. It’ll say «Failed to authenticate with Twitch. Failed to get token from remote. Operation was timed out after 5000 milliseconds (with 0 response or 0kb received or whatever it says.)» First, it won’t be able to log into my Twitch at all, and then it’ll get as far as «Loading channel information» before it gives up. I’m not sure what’s going on with it.
When using OBS Studio with Twitch, connecting your account is important. When that happens, Twitch will attempt to do a security check to make sure you are who you say you are. Sometimes, this process goes wrong, and you won’t be able to launch your live stream on the platform.
The “Failed to authenticate with Twitch” issue is relatively common, but fortunately, there are a few ways you can get past these problems. If OBS failed to authenticate with Twitch, try these five methods and fixes to get you back on track!
- Restart OBS Studio
- Reconnect Twitch With OBS Studio
- Reset and Fix Your Stream Key
- Use A Custom Ingest Server
- Re-install OBS Studio
The easiest thing would be to try these methods in the order below. We cover each fix in more detail, so keep on reading.
Authenticating with Twitch ensures that all the software you are using with the platform is safe and secure. Log in directly with your Twitch credentials and verify your identity via two-factor authentication.
After you are logged in and authenticated, OBS Studio can send your stream directly to Twitch servers without the need for a custom ingest server. Skipping this step can potentially remove the risk of lag and dropped frames.
How To Fix OBS Failed To Authenticate With Twitch
Use the methods below in order to fix the OBS failed to authenticate with Twitch error:
1. Restart OBS Studio
If you haven’t restarted OBS Studio, do so now. This simple fix can help repair any communication errors between Twitch and OBS.
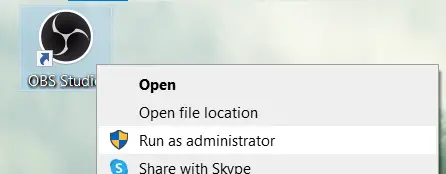
When you start up OBS Studio, be sure to run it as an administrator. This allows OBS all of the permissions it requires to communicate and work with external software.
Right-click on the OBS Studio shortcut and select run as administrator.
2. Reconnect Twitch With OBS Studio
To connect directly with Twitch through OBS Studio, you need to log in to the software with your Twitch credentials. This will link your account and allow direct communication between the two platforms.
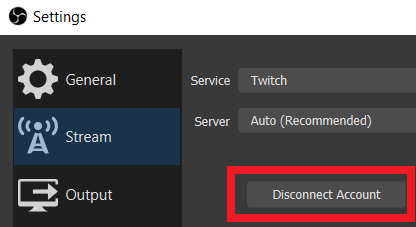
- First off, go to your OBS Studio settings and click the stream tab.
- Find the disconnect account button and click it. This will log you out of Twitch on OBS Studio.
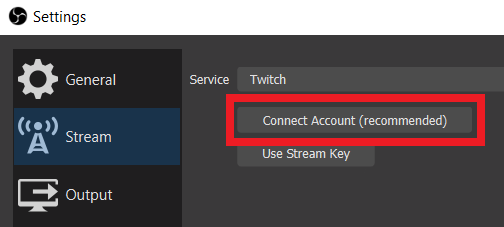
- The tab will refresh and you will see a connect account button. Click it.
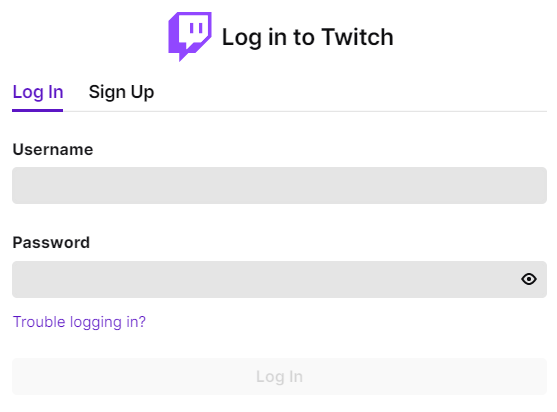
- A new window will appear. Log in using your Twitch credentials.
- Complete the security questions that appear next. This might require access to your email account or mobile phone number.
- You are now logged into Twitch again on OBS Studio. This reconnection should re-authenticate you on OBS Studio.
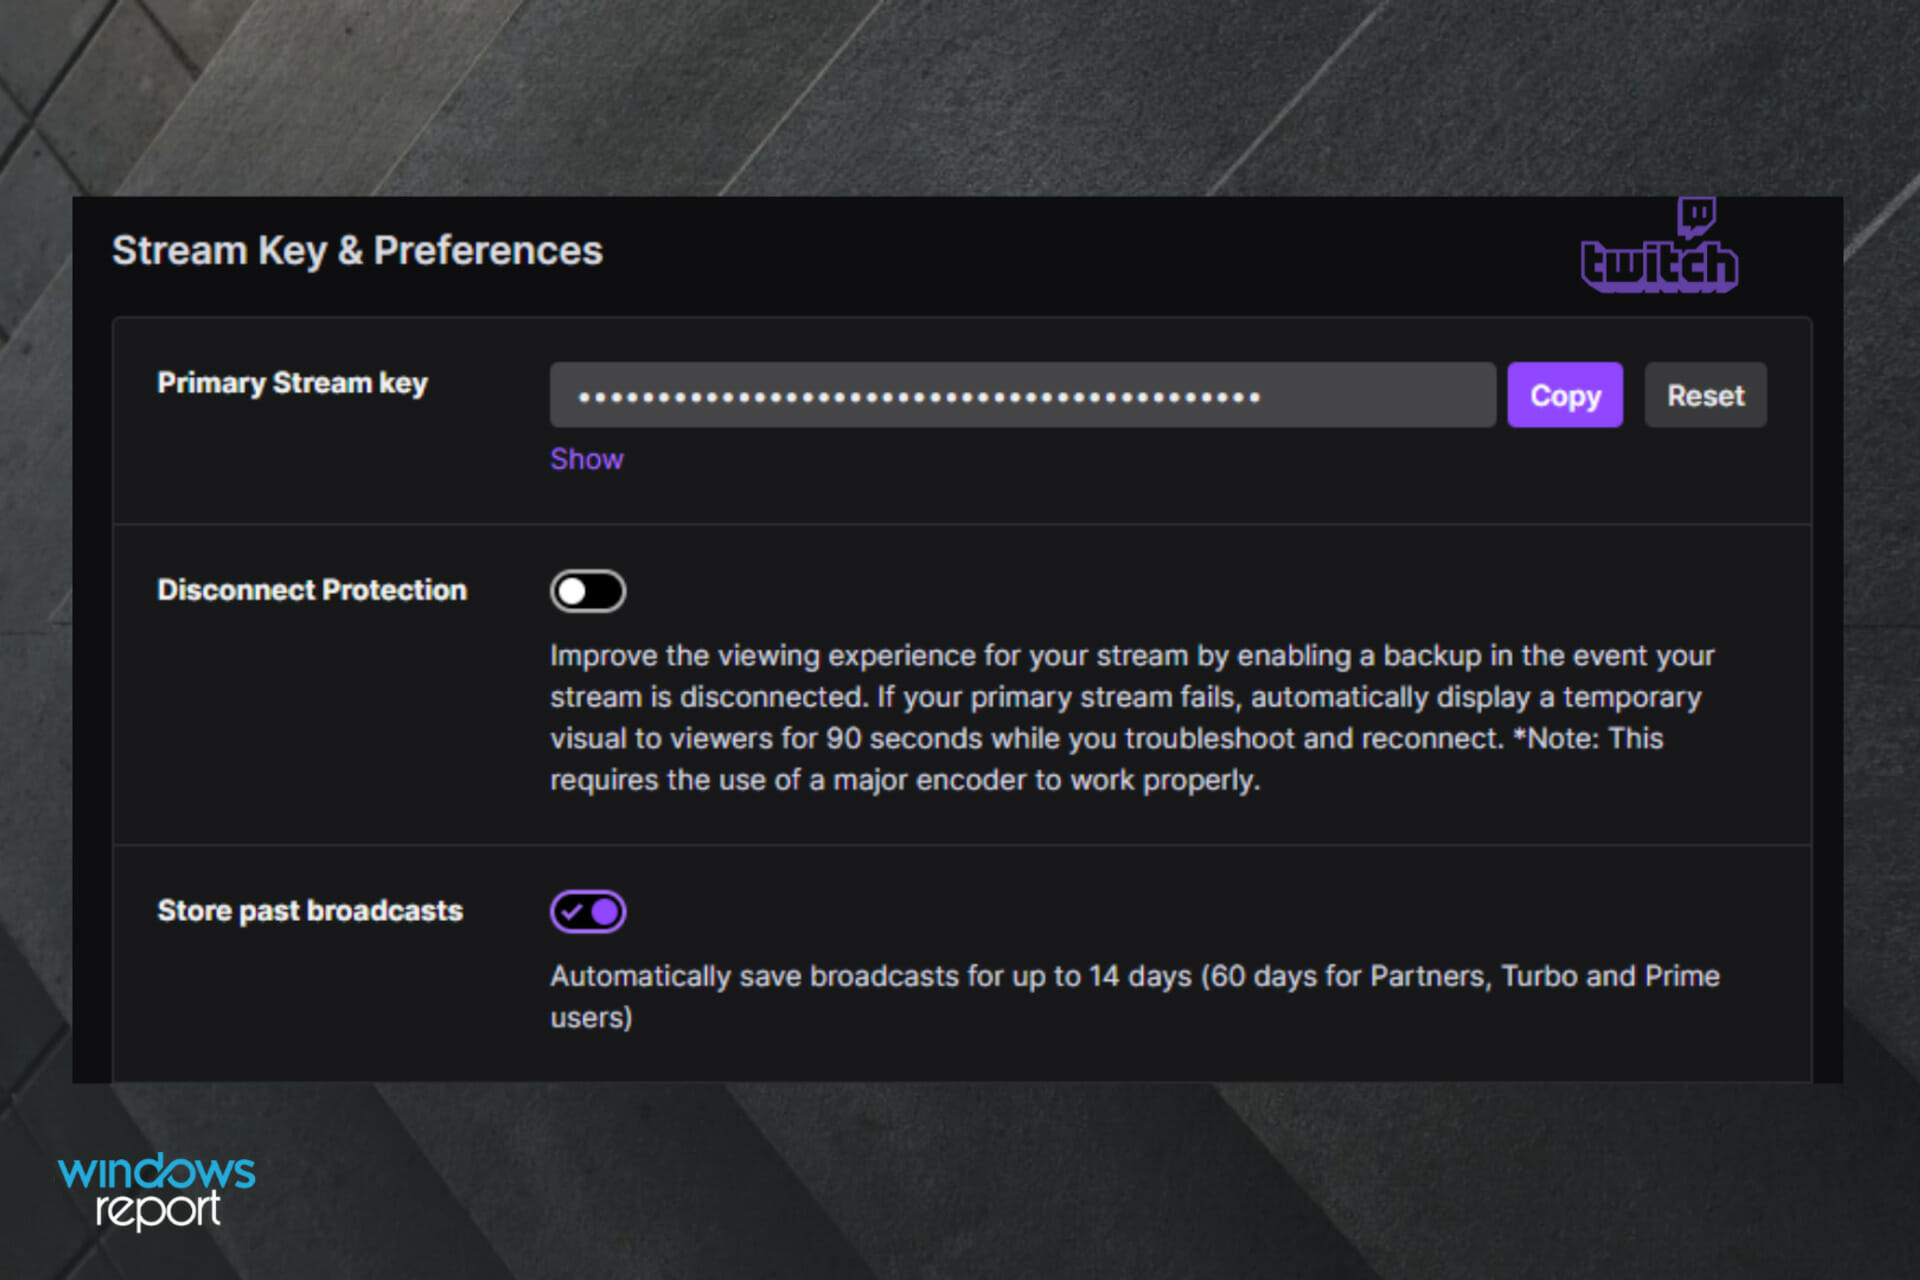
3. Reset and Fix Your Stream Key
A stream key is a unique alphanumeric code that acts as an access code to your stream. Anybody with this key can stream to your channel, so it’s essential to keep it secret.
Every now and then, it can help to completely reset your stream key to help with security and authentication.
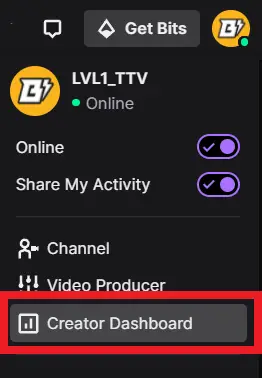
To reset your stream key, navigate to your Twitch creator dashboard. You can find the link to this by clicking your profile picture in the top right-hand corner of the Twitch homepage.
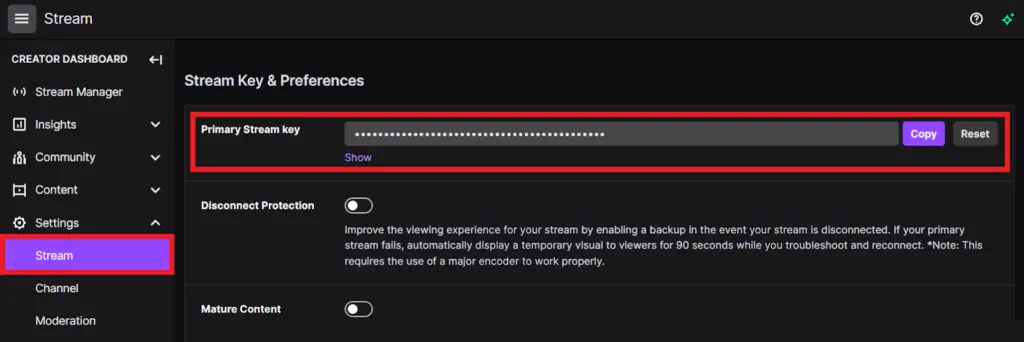
Once inside the creator dashboard, click the stream tab in the menu on the left-hand side.
In the stream key and preferences settings, you’ll see the first line is named primary stream key. Click the reset button at the end of the line to reset your key. You’ll know it has been reset when the tick logo appears.
4. Use A Custom Ingest Server
You can use your stream key to use a custom ingest server rather than connecting your Twitch account to OBS Studio. This can skip the authentication process but is slightly less secure.
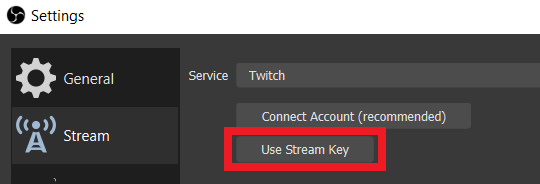
In your stream settings menu, rather than clicking connect account, click the use stream key instead.
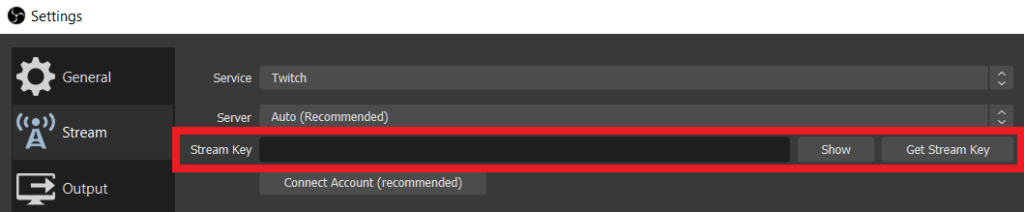
Paste your stream key from Twitch (as seen in the previous fix) and click apply. You will now be streaming to a custom ingest server rather than a direct connection.
5. Re-install OBS Studio
Finally, it may be worthwhile re-installing OBS Studio altogether. Some builds of OBS are known to crash or bug out and can be fixed with a totally new install.
Don’t worry about losing your scenes; these will carry over from one install to the next. The one thing you will need to do is re-install plugins that were previously added to OBS Studio. If you need help installing new or existing plugins, follow our guide.
In Conclusion
Authenticating with Twitch is an essential step in the streaming process. It allows for both OBS and Twitch to keep your streaming information secure.
Follow the steps above, and hopefully, you will find a way to fix the OBS failed to authenticate with Twitch error! If none of the fixes above work, you can always reach out to the OBS forums, as they have a very supportive community there.
Автор:
Christy White
Дата создания:
3 Май 2021
Дата обновления:
8 Июнь 2023
Twitch — это платформа для прямых трансляций, управляемая Amazon. Впервые он был представлен в 2011 году, тогда он назывался Justin.tv. Стриминг стал очень распространенным явлением в наши дни из-за огромной популярности Twitch. С ростом индустрии киберспорта трансляция текущих турниров стала основой успешного мероприятия. Это также помогает организаторам мероприятий и другим стримерам финансово, в то время как некоторые сейчас делают это как работу. Однако в некоторых случаях делать то, что вам нравится, может быть немного сложно, поскольку вы сталкиваетесь с определенными проблемами при попытке стримить. Одна из этих ошибок — «Ошибка аутентификации при повторной попытке‘, Который появляется, когда вы пытаетесь транслировать. С этой ошибкой легко справиться, и она обычно вызвана вашими настройками ограничения видео в Twitch и т. Д. Мы предложим несколько решений, которые вы можете применить, чтобы помочь решить проблему. Но сначала давайте разберемся в причинах проблемы. Это сообщение об ошибке отображается с черным экраном, пока вы пытаетесь транслировать на своем канале. Это может быть связано со следующими факторами — Следуйте приведенным ниже решениям, чтобы решить вашу проблему. Надеюсь, одно из решений устранит проблему за вас. Как мы уже упоминали выше, настройка ограничения видео, похоже, вызывает проблему. Поскольку вы можете ограничить качество потока для разных зрителей, но в некоторых случаях из-за аффилированных лиц никто не может просматривать поток. Следовательно, вам придется отключить его. Вот как это сделать: Битрейт потока также может вызвать появление проблемы. В случае, если вышеуказанное решение не решит проблему для вас, вам придется изменить битрейт вашего потока. Вот как это сделать в OBS:

Содержание

Что вызывает ошибку «Ошибка аутентификации при повторной попытке»?
Решение 1. Отключите ограничение видео

Решение 2.Измените битрейт потока

Приложение для потоковой передачи OBS, или Open Broadcasting Software, имеет непревзойденную популярность благодаря своей разработке с открытым исходным кодом и бесплатному ценнику. . Однако бывают случаи, когда программное обеспечение просто не работает должным образом, что приводит к разочарованию пользователей. Одной из таких ошибок является Не удалось загрузить информацию о канале для Twitch. Вот как исправить эту ошибку.
Содержание
- Проверьте соединение Twitch и OBS
- Обновить OBS
- Запуск OBS от имени администратора
- Включение двухфакторной аутентификации на Twitch
Сначала перейдите в OBS в «Файл», а затем «Настройки». Вторая категория в настройках — «Поток»; откройте эту вкладку и убедитесь, что ваша учетная запись подключена к нужному потоковому сервису. Рекомендуется обойти ключ трансляции для OBS и вместо этого разрешить ему подключаться к вашей учетной записи потоковой передачи. Если OBS подключен, следует перейти ко второму этапу устранения неполадок.

Обновить OBS
<р>Вполне возможно, что OBS устарел. Приложение должно автоматически проверять наличие обновлений и сообщать пользователю об их обнаружении. Вы можете решить, как обновить OBS, если это необходимо, хотя приложение, как правило, выполняет эту задачу хорошо.
Запуск OBS от имени администратора
Повышение привилегий для приложения может смягчить проблемы с разрешениями, которые могут не быть сразу видно. Щелкните правой кнопкой мыши OBS на рабочем столе или в папке с файлами и выберите «Запуск от имени администратора». Это даст приложению повышенные разрешения только для этого единственного экземпляра; Идеальная защита — никогда не предлагать приложениям постоянный доступ администратора. Если это не решит проблему, вы можете убедиться, что ваша двухфакторная аутентификация активна на Twitch.
Включение двухфакторной аутентификации на Twitch
В Twitch откройте свой профиль и откройте настройки. Найдите вкладку «Безопасность и конфиденциальность» и нажмите кнопку «Настроить двухфакторную аутентификацию» в этом окне. Вам будет предложено настроить номер телефона для вашей учетной записи Twitch, после чего 2FA будет включена. Это может затруднить вход в систему в будущем, но защитит вашу учетную запись намного лучше, чем просто использование паролей.
Оглавление:
- Как мне получить ключ от Twitch?
- 1. Установите двухфакторную проверку с телефоном
- 2. Используйте Authy для двухфакторной проверки
- 3. Попробуйте использовать другой веб-браузер
Видео: THIS WAS 6 YEARS AGO! Asmongold Exposed By Reddit — Best of Asmongold #30 (Stream Highlights) 2023
Для потоковой передачи на Twitch.tv вам определенно понадобится ключ Twitch Stream. Если вы являетесь стримером Twitch, вы, вероятно, знаете о проблемах с утечкой данных, которые возникли у службы из-за доступа из других служб, таких как Streamlabs OSB. После этого многие стримеры начали получать Twitch не удалось получить ошибку ключа потока.
Вот что сказал один стример об ошибке в выделенном субреддите:
Я просто открыл OBS, чтобы начать потоковую передачу, и OBS сказал, что не может соединить меня. Я открыл Twitch, чтобы проверить мой ключ потока, и я продолжаю получать эту ошибку. У кого-то еще есть проблемы? Благодарю.
Вот почему они решили сохранить последовательность регистрации зрителей такой же простой, как и раньше, но стримеры должны будут зарегистрироваться в 2FA (двухфакторная авторизация), чтобы получить ключ потока. Узнайте, как это исправить, следуя инструкциям ниже.
1. Установите двухфакторную проверку с телефоном
- Перейдите к Twitch в вашем браузере.
- Войдите с вашими учетными данными.
- Откройте «Настройки» и выберите « Безопасность и конфиденциальность».
- В разделе « Безопасность»> «Двухфакторная аутентификация» нажмите « Настроить двухфакторную аутентификацию».
- Это приведет вас к странице 2FA. Введите свой пароль и позже свой номер телефона.
- Вы получите код подтверждения на свой смартфон. Введите ключ, чтобы установить 2FA.

- Теперь вам нужно просто попытаться получить ключ потока снова.

2. Используйте Authy для двухфакторной проверки
- Загрузите приложение Authy на свой компьютер отсюда. Кроме того, вы можете использовать ваше устройство Android или iOS. Желательно, чтобы вы установили его на нескольких устройствах.
- Установите приложение и настройте свою учетную запись Authy на своем ПК или портативных устройствах, введя свой номер телефона.
- В браузере выберите « Twitch» > « Настройки» > « Безопасность и конфиденциальность» > « Двухфакторная аутентификация» и нажмите « Установить двухфакторную аутентификацию».
- Введите пароль и номер телефона, связанный с Authy.
- Выберите способ получения токена для входа (с помощью SMS, телефонного звонка или на текущем устройстве).
- Теперь, каждый раз, когда вы пытаетесь войти в Twitch и запросить ключ потока, вы получите маркер аутентификации на вашем устройстве.

3. Попробуйте использовать другой веб-браузер

Чтобы решить эту проблему, попробуйте использовать другой веб-браузер. Вы можете использовать любой браузер, но вы бы порекомендовали UR Browser.
Если вы не знакомы, UR Browser — это браузер, ориентированный на конфиденциальность, с такими полезными функциями, как отслеживание, конфиденциальность и защита от вредоносных программ.
Кроме того, есть встроенный VPN и блокировщик рекламы, поэтому, если вам нужен безопасный и надежный браузер, UR Browser может быть правильным выбором для вас.
Рекомендация редактора
UR Browser
- Быстрая загрузка страницы
- Конфиденциальность на уровне VPN
- Усиленная безопасность
- Встроенный антивирусный сканер
Скачать сейчас UR Browser
Это должно сделать это. Кроме того, вы можете очистить кеш вашего браузера и проверить соединение. Однако Twitch не удалось получить ключ потока, ошибка возникает почти всегда, потому что у вас не включен 2FA в вашей учетной записи.
Исправлено: не удалось разблокировать с этой ошибкой ключа восстановления битлокера

BitLocker — одна из лучших функций безопасности Windows 10. Он шифрует данные на вашем диске, предотвращая тем самым прослушивание других пользователей. Тем не менее, все плюсы могут быстро обернуться против вас, если вы потеряете ключ BitLocker или что-то в этом роде пойдет не так. Но ладно …
Исправить запрос ключа не удалось пара с помощью этих 8 простых решений

Вы получаете ошибку запроса ключа в Steam? Исправьте это, проверив кеш игры или попробуйте очистить кеш загрузки в Steam.
Windows 10 Redstone 2, чтобы получить функцию потока

Возможно, самое большое преимущество, которое вы имеете, когда используете несколько устройств Microsoft одновременно, это то, что они все вам знакомы. Тот факт, что вы можете переключаться между своим рабочим столом и телефоном Windows 10, сохраняя при этом тот же интерфейс, значительно облегчает вашу работу и повышает производительность. …

Weak account security can prevent the retrieval of your stream key
by Aleksandar Ognjanovic
Aleksandar’s main passion is technology. With a solid writing background, he is determined to bring the bleeding edge to the common user. With a keen eye, he always… read more
Updated on August 17, 2022
Reviewed by
Vlad Turiceanu

Passionate about technology, Windows, and everything that has a power button, he spent most of his time developing new skills and learning more about the tech world. Coming… read more
- Some users claimed that Twitch failed to retrieve the stream key, but several tips will fix it.
- The easiest way to get rid of this issue is by enrolling with the two-factors authentication.
- Using a dedicated browser will help you solve the Twitch failure to retrieve stream keys.
- CPU, RAM and Network limiter with hot tab killer
- Integrated with Twitch, Discord, Instagram, Twitter and Messengers directly
- Built-in sound controls and custom music
- Custom color themes by Razer Chroma and force dark pages
- Free VPN and Ad blocker
- Download Opera GX
Twitch is one of the best streaming platforms and is getting more popular daily. To stream on Twitch.tv, you’ll need a Twitch Stream key.
If you frequently use this app, you’re probably aware of the issues with the service’s data breach due to access from other services like Streamlabs OSB.
After those, many streamers started getting the Twitch failed to retrieve stream key error. Here’s what one user had to say about the error:
I just opened OBS to start streaming, and OBS said it couldn’t connect me. I opened Twitch to check my stream key, and I just keep getting this error. Anyone else having issues? Thanks.
That’s why they decided to keep the viewer’s logging sequence as simple as before, but streamers will need to enroll in the 2FA (two-factor authorization) to retrieve the stream key. Learn how to fix this with the steps below.
What is a stream key?
For those who don’t know, by stream key, we mean a special code that allows OBS to link/communicate with a streaming platform (like Twitch). Then, it sends your video content for live streaming.
Each streaming platform has a unique stream key. You’ll need to find this key in your account settings if you want to link OBS with your preferred platform.
Your Twitch stream key lets the software know where to send your video. Keep in mind that every Twitch channel has one, and most streaming apps require you to enter your key before you start recording.
Why can’t I get Twitch stream key?
The reasons you are not getting your stream key are within a close circle. Below are some of the causes:
- Insecure account: Every streamer should always secure their Twitch account with 2FA authentication. This protects your stream key and your account from being hijacked.
- Complex verification method: While SMS verification for 2FA in Twitch is secured, you can use a simpler one in Authy. This allows you to access your account quickly.
Now, let’s see what you can do if Twitch failed to retrieve stream keys. To discover the solution that suits you the most, make sure you read this guide completely.
Quick Tip:
To fix this problem, try using a different web browser. Opera GX is integrated within a modern UI that is easy to navigate. It is specifically built to cater to the world of streaming and gaming.
This browser lets you connect to your Twitch account from the Speed Dial. Just enter your credentials and set it up to get real-time notifications about your channels and access the platform in one click.

Opera GX
This browser offers a complete web experience, where you can always stream without any problem.
What can I do if Twitch failed to retrieve stream keys?
1. Set the two-factor verification with a phone
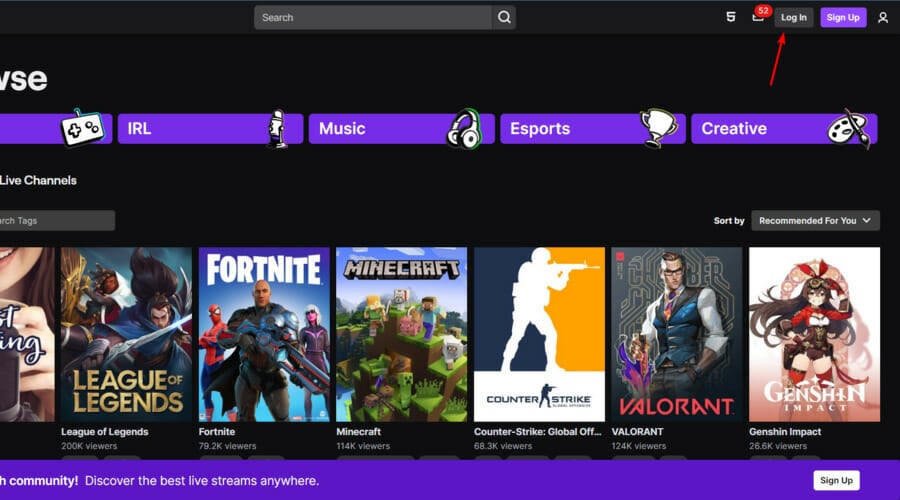
- Navigate to the Twitch web version.
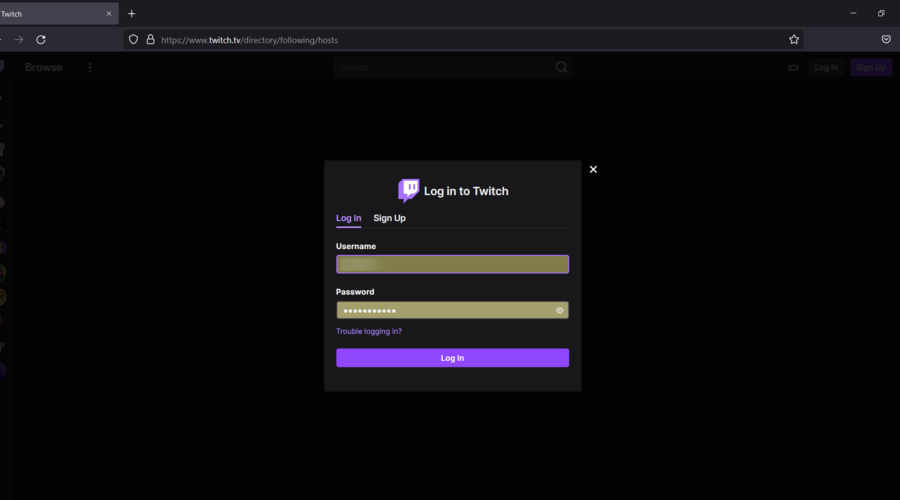
- Click the Log In button in the upper right corner of the window.

- Enter your Twitch credentials, then click again on Log In.
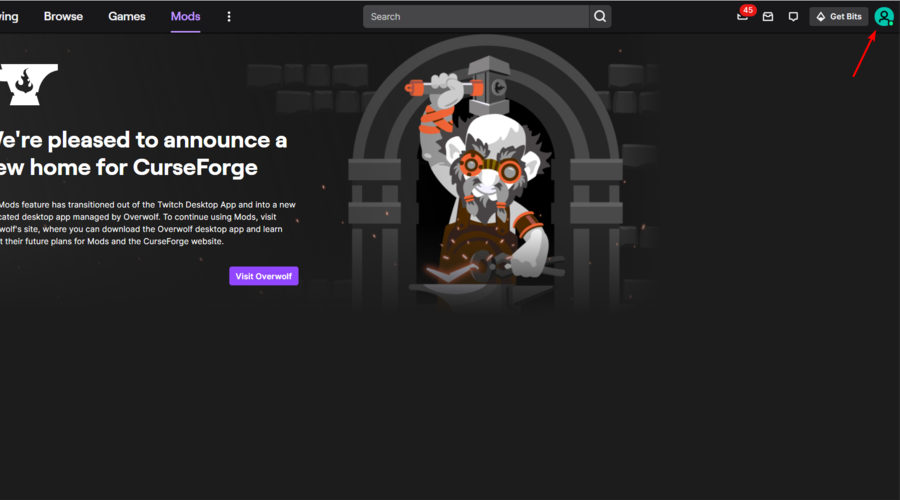
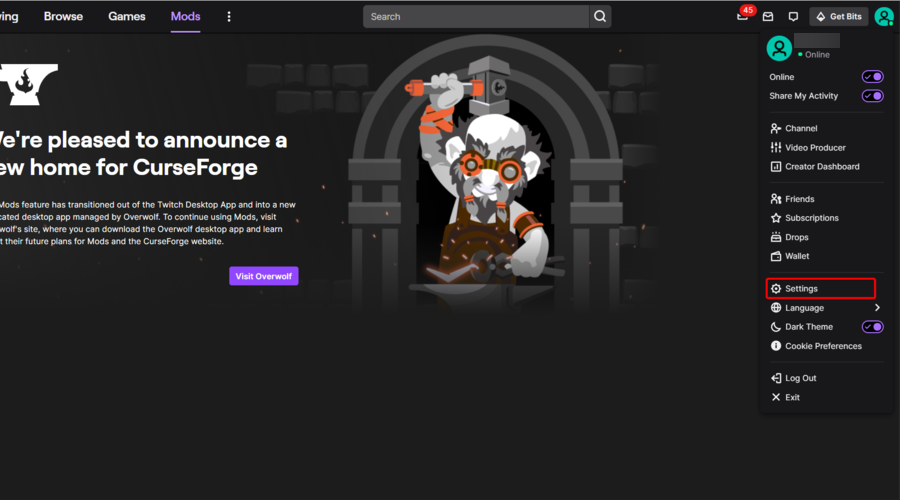
- In the top-right corner of the window, click on your profile image.
- Navigate to Settings.
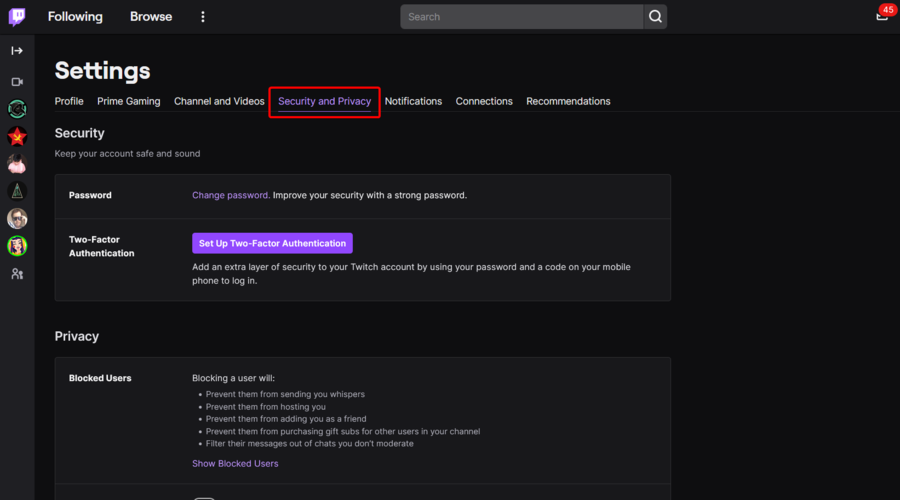
- Click on Security and Privacy.
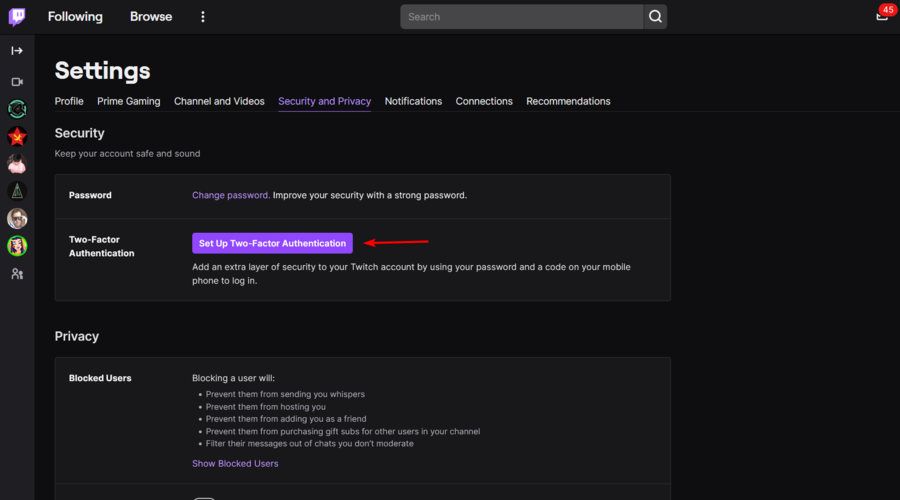
- Scroll down to the Security section, look at Two-Factor Authentication, and click on Set Up Two-Factor Authentication.
- This will take you to the 2FA page. There, click on the Enable 2FA button.
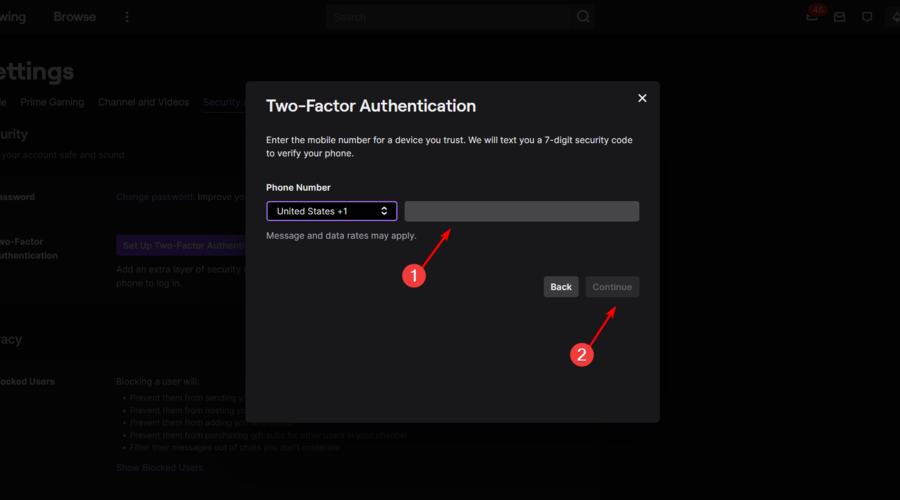
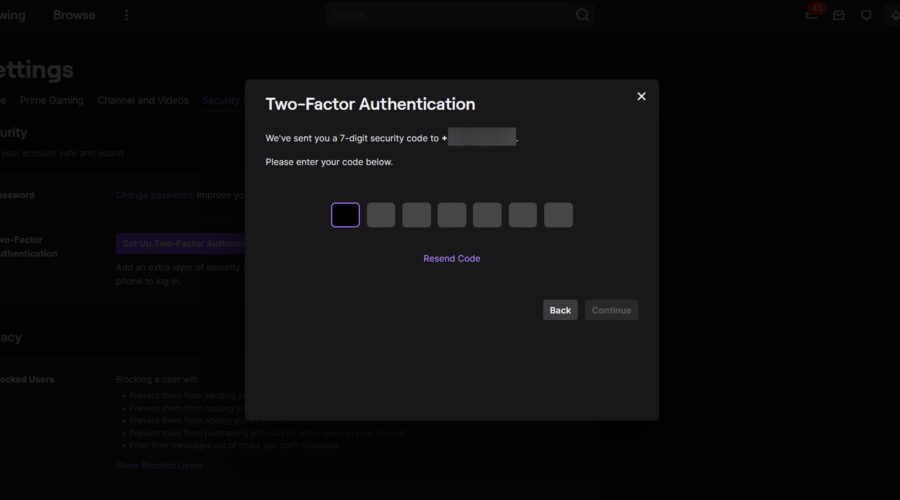
- Enter your phone number, then click on Continue.
- Type the 7-digit security code received on your phone.
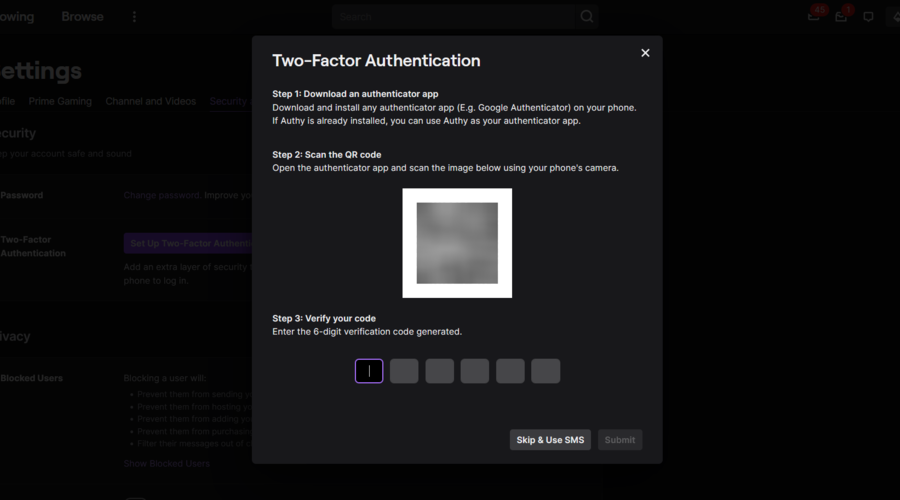
- Scan the QR code with your phone, then enter the 6-digit verification code received (Or you can choose to Skip & Use SMS).
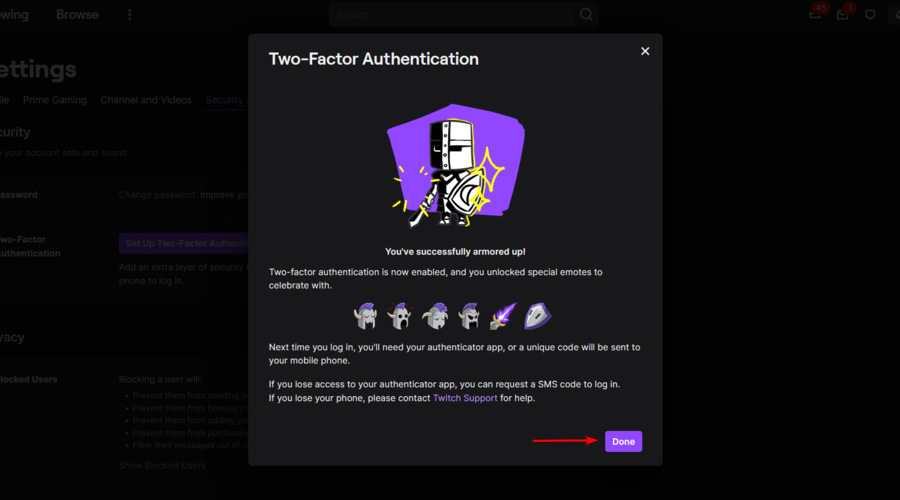
- Click on Done.
- What you’ll need to do now is try retrieving the stream key again.

Setting up the 2FA verification not only secures your account but also solves issues like Streamlabs stream key error on Twitch, OBS can’t access streaming, or not connecting.
2. Use Authy for two-factor verification
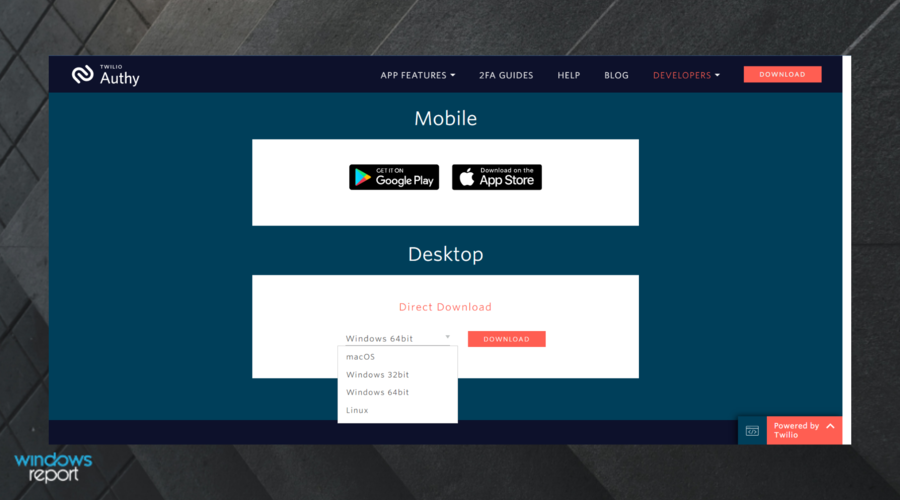
- Download the Authy app on your Windows PC.
- Install the application and set up your Authy account.
- Navigate to the Twitch web version. Click on Log In from the top-right corner of the window.
- Type your Twitch credentials, then click again on Log In.
- In the top-right corner of the window, click on your profile image.
- Go to Settings.
- Click on Security and Privacy.
- Scroll down to the Security section and click on the Set Up Two-Factor Authentication button.
- Enter the password and the phone number associated with Authy.
- Choose how you want to receive a log-in token (via SMS, phone call, or on the current device).
- Now, whenever you try and log in to Twitch and ask for the stream key, you’ll get the authentication token on your device.
The Authy for Twitch verification is simpler and is a quick way to solve the OBS failure to get stream key text from a remote issue.
- Why does Yahoo Keep Opening in Chrome? Stop it like This
- Chrome Freezing Windows 10 PC: 7 Quick Fixes
- How to Copy Text from Websites That Don’t Allow It [5 Ways]
Remember that whoever got your Twitch stream key can stream on your channel. In these terms, we strongly recommend not sharing your stream key with anyone and don’t show it during a video or live stream.
However, if you want to share it, make sure you trust those people (family, close friends, etc.).
That should do it. Alternatively, you can clear your browser’s cache and inspect the connection. However, the Twitch failed to retrieve stream key error occurs almost always because you don’t have a 2FA enabled on your account.
If you are experiencing other issues like Twitch not loading on Chrome or Firefox, check our guide on how to fix it effortlessly.
Feel free to let us know the fix that helped you retrieve your stream key in the comments below.
![]()
Newsletter
Weak account security can prevent the retrieval of your stream key
by Aleksandar Ognjanovic
Aleksandar’s main passion is technology. With a solid writing background, he is determined to bring the bleeding edge to the common user. With a keen eye, he always… read more
Updated on August 17, 2022
Reviewed by
Vlad Turiceanu
Passionate about technology, Windows, and everything that has a power button, he spent most of his time developing new skills and learning more about the tech world. Coming… read more
- Some users claimed that Twitch failed to retrieve the stream key, but several tips will fix it.
- The easiest way to get rid of this issue is by enrolling with the two-factors authentication.
- Using a dedicated browser will help you solve the Twitch failure to retrieve stream keys.
- CPU, RAM and Network limiter with hot tab killer
- Integrated with Twitch, Discord, Instagram, Twitter and Messengers directly
- Built-in sound controls and custom music
- Custom color themes by Razer Chroma and force dark pages
- Free VPN and Ad blocker
- Download Opera GX
Twitch is one of the best streaming platforms and is getting more popular daily. To stream on Twitch.tv, you’ll need a Twitch Stream key.
If you frequently use this app, you’re probably aware of the issues with the service’s data breach due to access from other services like Streamlabs OSB.
After those, many streamers started getting the Twitch failed to retrieve stream key error. Here’s what one user had to say about the error:
I just opened OBS to start streaming, and OBS said it couldn’t connect me. I opened Twitch to check my stream key, and I just keep getting this error. Anyone else having issues? Thanks.
That’s why they decided to keep the viewer’s logging sequence as simple as before, but streamers will need to enroll in the 2FA (two-factor authorization) to retrieve the stream key. Learn how to fix this with the steps below.
What is a stream key?
For those who don’t know, by stream key, we mean a special code that allows OBS to link/communicate with a streaming platform (like Twitch). Then, it sends your video content for live streaming.
Each streaming platform has a unique stream key. You’ll need to find this key in your account settings if you want to link OBS with your preferred platform.
Your Twitch stream key lets the software know where to send your video. Keep in mind that every Twitch channel has one, and most streaming apps require you to enter your key before you start recording.
Why can’t I get Twitch stream key?
The reasons you are not getting your stream key are within a close circle. Below are some of the causes:
- Insecure account: Every streamer should always secure their Twitch account with 2FA authentication. This protects your stream key and your account from being hijacked.
- Complex verification method: While SMS verification for 2FA in Twitch is secured, you can use a simpler one in Authy. This allows you to access your account quickly.
Now, let’s see what you can do if Twitch failed to retrieve stream keys. To discover the solution that suits you the most, make sure you read this guide completely.
Quick Tip:
To fix this problem, try using a different web browser. Opera GX is integrated within a modern UI that is easy to navigate. It is specifically built to cater to the world of streaming and gaming.
This browser lets you connect to your Twitch account from the Speed Dial. Just enter your credentials and set it up to get real-time notifications about your channels and access the platform in one click.
Opera GX
This browser offers a complete web experience, where you can always stream without any problem.
What can I do if Twitch failed to retrieve stream keys?
1. Set the two-factor verification with a phone
- Navigate to the Twitch web version.
- Click the Log In button in the upper right corner of the window.
- Enter your Twitch credentials, then click again on Log In.
- In the top-right corner of the window, click on your profile image.
- Navigate to Settings.
- Click on Security and Privacy.
- Scroll down to the Security section, look at Two-Factor Authentication, and click on Set Up Two-Factor Authentication.
- This will take you to the 2FA page. There, click on the Enable 2FA button.
- Enter your phone number, then click on Continue.
- Type the 7-digit security code received on your phone.
- Scan the QR code with your phone, then enter the 6-digit verification code received (Or you can choose to Skip & Use SMS).
- Click on Done.
- What you’ll need to do now is try retrieving the stream key again.
Setting up the 2FA verification not only secures your account but also solves issues like Streamlabs stream key error on Twitch, OBS can’t access streaming, or not connecting.
2. Use Authy for two-factor verification
- Download the Authy app on your Windows PC.
- Install the application and set up your Authy account.
- Navigate to the Twitch web version. Click on Log In from the top-right corner of the window.
- Type your Twitch credentials, then click again on Log In.
- In the top-right corner of the window, click on your profile image.
- Go to Settings.
- Click on Security and Privacy.
- Scroll down to the Security section and click on the Set Up Two-Factor Authentication button.
- Enter the password and the phone number associated with Authy.
- Choose how you want to receive a log-in token (via SMS, phone call, or on the current device).
- Now, whenever you try and log in to Twitch and ask for the stream key, you’ll get the authentication token on your device.
The Authy for Twitch verification is simpler and is a quick way to solve the OBS failure to get stream key text from a remote issue.
- Why does Yahoo Keep Opening in Chrome? Stop it like This
- Chrome Freezing Windows 10 PC: 7 Quick Fixes
- How to Copy Text from Websites That Don’t Allow It [5 Ways]
- Did Not Connect: Potential Security Issue In Firefox: Fix
- There Is A Problem With Adobe Acrobat/Reader: Fix
Remember that whoever got your Twitch stream key can stream on your channel. In these terms, we strongly recommend not sharing your stream key with anyone and don’t show it during a video or live stream.
However, if you want to share it, make sure you trust those people (family, close friends, etc.).
That should do it. Alternatively, you can clear your browser’s cache and inspect the connection. However, the Twitch failed to retrieve stream key error occurs almost always because you don’t have a 2FA enabled on your account.
If you are experiencing other issues like Twitch not loading on Chrome or Firefox, check our guide on how to fix it effortlessly.
Feel free to let us know the fix that helped you retrieve your stream key in the comments below.
![]()