
Пользователи Windows 10 могут иногда сталкиваться с ошибками asio.sys на своих компьютерах. Было бы хорошо узнать, что такое asio.sys, прежде чем перейти к решению.
Asio.sys — это драйвер, специфичный для компьютеров ASUS. Поврежденные файлы и неисправное оборудование часто вызывают эту ошибку. Это часто приводит к ошибкам Blue Screen of Death.
Стоит отметить, что ошибка Asio.sys также может быть вызвана заражением вредоносным ПО, повреждением жесткого диска и повреждением памяти.
Шаги для исправления ошибок Asio.sys
Вот подробный список процесса устранения неполадок для решения проблем asio.sys. Имейте в виду, что эти шаги довольно сложны. Итак, выполняйте каждый шаг.
Решение 1. Обновите драйверы системного устройства.
Ошибка типа «синий экран» asio.sys, влияющая на вашу систему, может быть вызвана устаревшими драйверами устройств .
По многим причинам драйверы, которые работают нормально, могут просто перестать работать в следующую минуту. Но вы можете обновить драйвер устройства, чтобы исправить проблему BSOD.
Независимо от того, являетесь ли вы экспертом в поиске, загрузке и обновлении драйверов, процедура все равно может быть очень напряженной и расстраивающей. Ухудшение проблем при загрузке не того драйвера или несовместимой версии драйвера.
Таким образом, из-за сложности и нехватки времени рекомендуется использовать инструмент обновления драйверов для ускорения процесса.
Средство обновления драйверов автоматически обновит все драйверы устройств на вашем компьютере, а не только драйверы, связанные с ошибкой asio.sys.
Одно из самых надежных обновлений драйверов, которое мы тестировали в Tweakbit.
TweakBit Driver Updater — это комплексное решение для автоматического обновления. Обновление драйверов оптимизирует ваш компьютер, обеспечивая правильную работу устройств в соответствии с последними функциями.
- Скачать сейчас TweakBit’s Driver Updater
Решение 2. Исправьте записи реестра
Иногда ошибки Asio.sys Blue Screen могут быть связаны с проблемами в реестре Windows. Таким образом, вам нужно будет исправить любые проблемы реестра, прежде чем вы сможете исправить эту системную ошибку.
Если вы не являетесь экспертом в этом, не пытайтесь редактировать реестр Windows вручную, чтобы избавиться от недействительных ошибок asio.sys. Если вы неправильно отредактируете свой реестр, ваш компьютер может перестать функционировать, и это может привести к необратимому повреждению вашей ОС.
Поэтому по этой причине мы рекомендуем вам использовать надежное средство очистки реестра для сканирования и исправления проблем реестра asio.sys. Когда вы используете очиститель реестра, процедура поиска отсутствующих файлов, неработающей ссылки в реестре или недействительных записей реестра может стать проще.
Если вы не знаете, какой Registry Cleaner установить на свой компьютер, ознакомьтесь с этим руководством.
Решение 3: Запустите полное сканирование вредоносных программ на вашем компьютере
Ошибка остановки файла asio.sys может быть вызвана заражением вашего компьютера вредоносным ПО.
Запустите полное сканирование системы с использованием антивирусных и вредоносных программ . Затем перезагрузите компьютер и проверьте, сохраняется ли проблема.
Не знаете, какой антивирус установить на свой компьютер? Это руководство поможет вам.
Решение 4. Удалите недавно установленные программы
Удаление сторонних приложений может быть правильным решением, если ошибка BSOD asio.sys связана с определенной программой.
Просто зайдите в Панель управления, перейдите в раздел «Программы и компоненты», выберите программу, которую вы недавно установили, и удалите ее с вашего ПК. 
Перезагрузите компьютер.
Решение 5: Запустите SFC
Средство проверки файлов Windows — это доступный инструмент Windows, который может сканировать и восстанавливать системные файлы Windows.
Чтобы запустить SFC, откройте командную строку как администратор и введите sfc / scannow . Нажмите Enter. 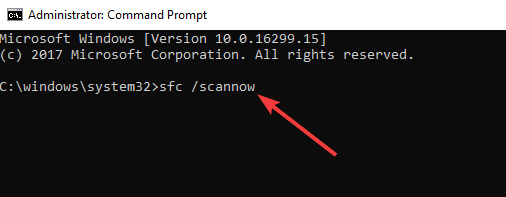
На этом этапе средство проверки системных файлов начинает сканирование системных файлов. Это должно занять несколько минут, так что наберитесь терпения.
Решение 6. Установите все доступные обновления Windows
Время от времени Microsoft обновляет и улучшает системные файлы Windows, которые могут быть связаны с asio.sys. Время от времени найти подходящее решение проблемы asio.sys может быть легко, как обновить Windows с помощью текущего пакета обновления или любого другого патча, выпущенного Microsoft.
Итак, зайдите в Настройки и проверьте наличие обновлений. 
Решение 7. Проверьте наличие повреждений жесткого диска
Как упоминалось ранее, проблемы asio.sys могут быть вызваны проблемами с повреждением жесткого диска.
К счастью, в Microsoft встроен простой сервис, известный как Check Disk, который может исправить проблемы с повреждением жесткого диска.
Чтобы использовать его, запустите командную строку как администратор рекламы и введите chkdsk / f . 
CheckDisk начнет сканирование на наличие повреждений жесткого диска.
Решение 9. Проверьте RAM на наличие повреждений
Повреждение памяти может привести к ошибкам BSOD asio.sys. Если вы сталкиваетесь со случайной перезагрузкой компьютера, сбоем компьютера, получением «звуковых» кодов при запуске, а также проблемами BSOD asio.sys, это может указывать на повреждение памяти компьютера.
Для получения дополнительной информации о том, как исправить проблемы с ОЗУ, ознакомьтесь с руководствами ниже:
- Как исправить поврежденный дамп памяти эффективно и результативно
- Решите: у вашего компьютера недостаточно памяти в Windows 10, 8.1 или 7
Мы надеемся, что эти решения помогут вам решить проблемы с asio.sys. Обратная связь от вас будет оценена.
Easy and tested solutions for this issue
by Madalina Dinita
Madalina has been a Windows fan ever since she got her hands on her first Windows XP computer. She is interested in all things technology, especially emerging technologies… read more
Updated on November 14, 2022
Reviewed by
Vlad Turiceanu

Passionate about technology, Windows, and everything that has a power button, he spent most of his time developing new skills and learning more about the tech world. Coming… read more
- An asio.sys error may be triggered by malware, a corrupted HDD, or system memory issues.
- Often, you can get Asio.sys and a Blue Screen of Death, which shuts you off the system.
- A BSOD fixer tool can quickly get you out of trouble.
XINSTALL BY CLICKING THE DOWNLOAD FILE
This software will repair common computer errors, protect you from file loss, malware, hardware failure and optimize your PC for maximum performance. Fix PC issues and remove viruses now in 3 easy steps:
- Download Restoro PC Repair Tool that comes with Patented Technologies (patent available here).
- Click Start Scan to find Windows issues that could be causing PC problems.
- Click Repair All to fix issues affecting your computer’s security and performance
- Restoro has been downloaded by 0 readers this month.
Windows 10 users may sometimes encounter the asio.sys error on their machines. It would be good to know what asio.sys is before we move on to the solutions.
Variations of asio.sys issues read Can’t open asio.sys (5) or system service exception asio.sys.
What is ASIO Sys?
- What is ASIO Sys?
- How do I fix asio.sys error?
- 1. Update the Universal ASIO driver
- 2. Run an SFC
- 3. Run a complete malware scan
- How do I download and install the Realtek ASIO component?
ASIO.sys is a virtual driver for Asus PC Probe. It is specific to ASUS computers.
The ASUS PC sound is guaranteed not to undergo sample-rate conversion or digital signal processing when using ASIO or Audio Stream Input/Output mode.
It is chosen by audiophiles seeking perfect fidelity since it is almost entirely accurate to its source.
Corrupt files and faulty hardware often cause this asio.sys error. And this often leads to Blue Screen of Death errors.
It is worth mentioning that Asio.sys error may also be triggered by malware infections, corrupted hard disk issues, and memory corruption issues.
How do I fix asio.sys error?
Before starting any core fixes we have put together, you should consider using a specialized BSOD troubleshooter.
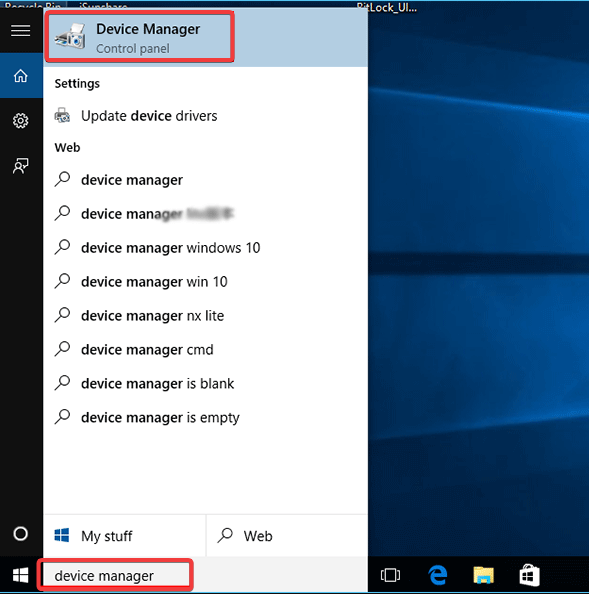
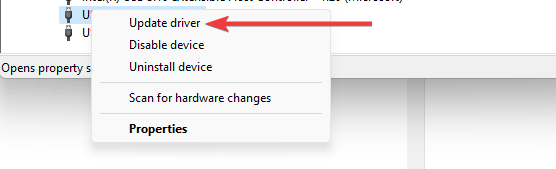
1. Update the Universal ASIO driver
- Press Windows Key + S, then type Device Manager.

- Expand Universal ASIO Driver, right-click on Universal ASIO Driver and select Update driver.

- Once done, restart the PC.
Thankfully, there is another more accessible way to update your drivers. Download third-party software that does it for you. Not only will it be safer, but it will also save you the time of searching and doing it manually.
Moreover, the software will ensure that only the latest compatible drivers are being downloaded so that you won’t have any problems with version mismatching.
⇒ Get DriverFix
2. Run an SFC
A System File Checker is an accessible tool within Windows that can scan and repair your Windows system files.
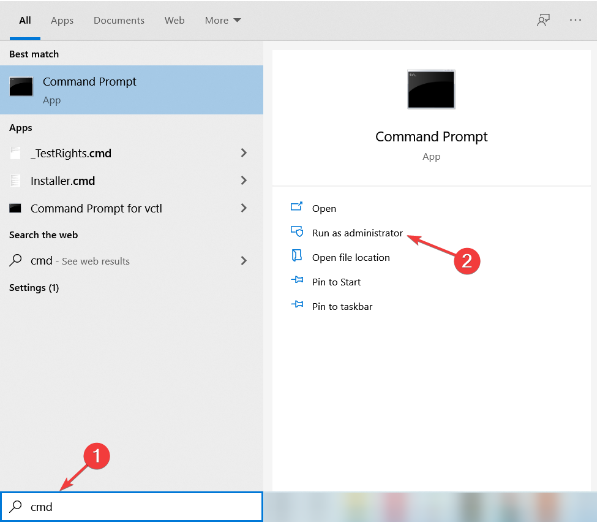
- Type cmd in the Search box and click on Run as Administrator to open an elevated Command Prompt window.
2. When Command Prompt opens, enter the following command and press Enter: sfc /scannow
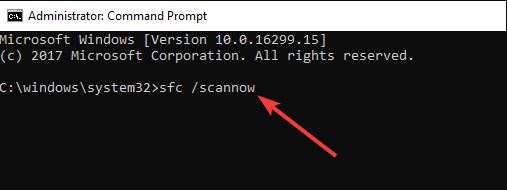
3. Don’t close Command Prompt or interrupt the repair process. It can take a while, so wait patiently while it completes.
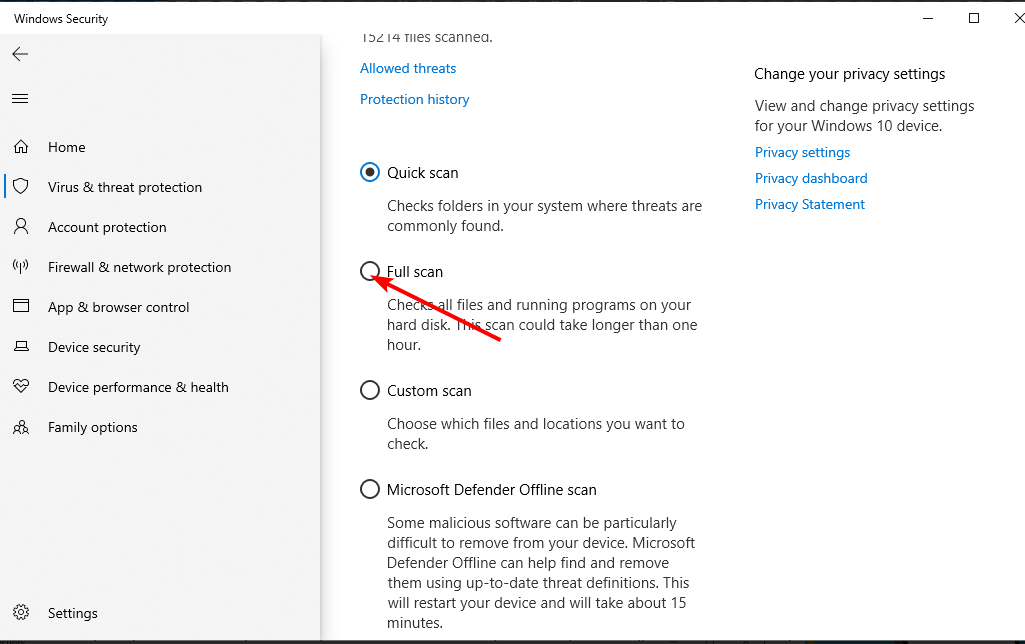
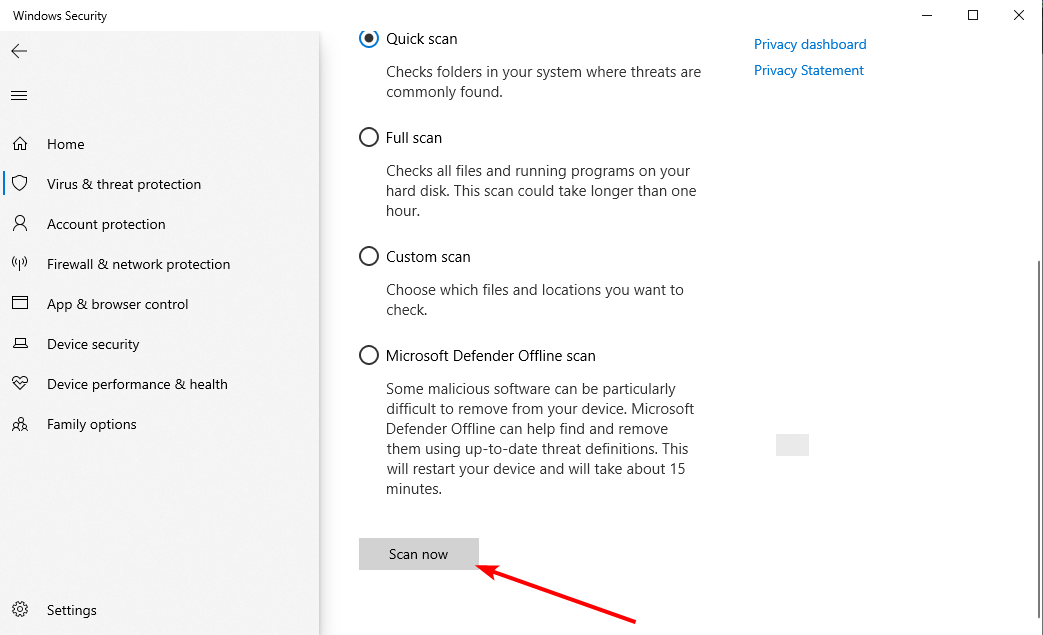
3. Run a complete malware scan
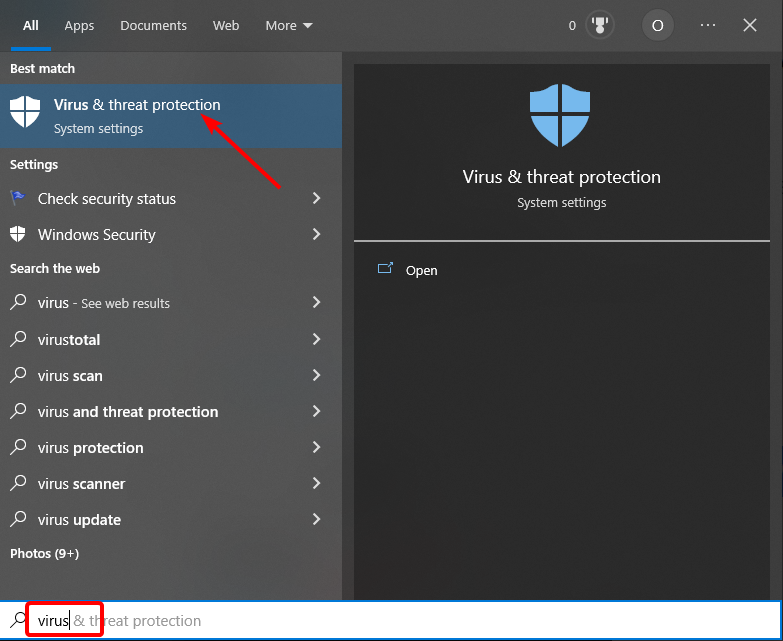
- Press the Start button, type virus, and select the Virus & threat protection option.

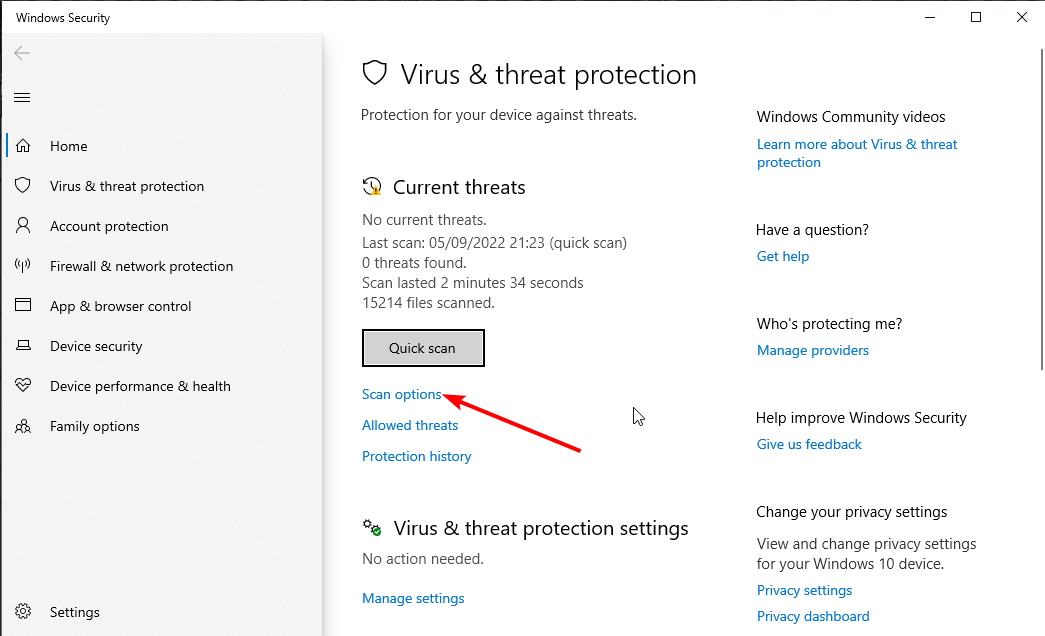
- Choose Scan options.

- Select the Full Scan option.

- Finally, click the Scan now button and wait for the scan to finish.

Alternatively, you can run a full system scan using other antimalware tools.
How do I download and install the Realtek ASIO component?
- Visit the official site for the driver download (this will depend on your computer manufacturer).
- Once you locate the Realtek ASIO driver, click on download.

- You should then click the downloaded file to install it on your computer.
This ASUS error can often be stubborn to get rid of, but if you have tried these solutions, you should have successfully fixed the asio.sys error.
Lastly, tell us what worked for you in the comments section below.
Still having issues? Fix them with this tool:
SPONSORED
If the advices above haven’t solved your issue, your PC may experience deeper Windows problems. We recommend downloading this PC Repair tool (rated Great on TrustPilot.com) to easily address them. After installation, simply click the Start Scan button and then press on Repair All.
![]()
AsIO.sys — файл программы Asus PC Probe, которая устанавливает драйвер для материнской платы ASUS и служит для мониторинга компонентов ПК. Если вы меняли компоненты компьютера и не удалили программу Asus PC Probe, то столкнетесь с кодом ошибки SYSTEM SERVICE EXCEPTION и указанием на файл AsIO.sys в Windows 10/8.1/7.
Нужно удалить программу Asus PC Probe, чтобы избавиться от синего экрана, но как это сделать, если все новые компоненты установлены и нет возможности загрузиться на рабочий стол. Если вы опытный пользователь и вы можете загрузиться на рабочий стол, то удалите программу Asus PC Probe через инсталлятор, но я покажу, что делать, когда нет возможности попасть на рабочий стол.
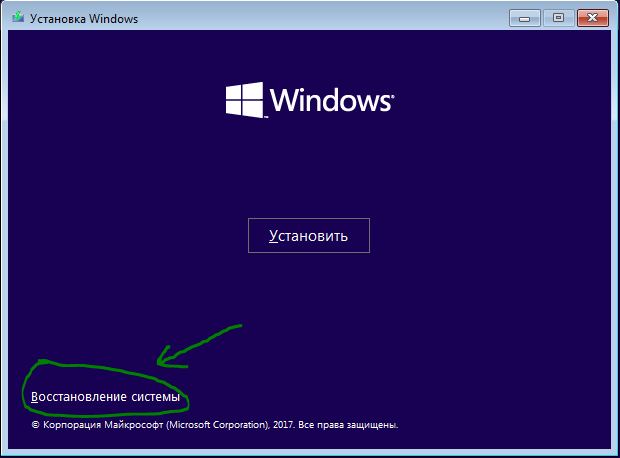
1. Включите и выключите компьютер 4-5 раза, доходя до ошибки или загрузки логотипа Windows. Далее вас перебросит в дополнительные параметры загрузки, где вы должны выбрать «Параметры загрузки» > «Перезагрузить» > и нажать F4 «Безопасный режим«. Это даст вам возможность загрузиться на рабочий стол и вы сможете удалить Asus PC Probe.
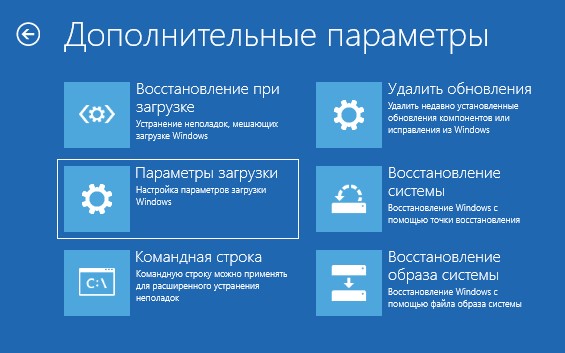
2. Если вы не можете попасть в дополнительные параметры, то нужно создать установочную флешку и на пункте установки нажать снизу на «Восстановление системы». Далее вас перекинет в дополнительные параметры, где вы можете запустить безопасный режим, как в пункте 1.
Смотрите еще:
- Исправить ошибку nvlddmkm.sys синего экрана Windows 10
- Исправить ошибку Dxgkrnl.sys на синем экране Windows 10
- Исправить ошибку fltMgr.sys на синем экране Windows 10
- Ошибка win32kfull.sys на синем экране в Windows 10
- Ошибка dxgmms2.sys на синем экране Windows 10
[ Telegram | Поддержать ]
Проблемы SYS, связанные с asio.sys, в большинстве случаев могут являться результатом отсутствия или повреждения драйвера устройства для Third-Party Application или неисправного оборудования, что приводит к выводу сообщения об ошибке «синий экран смерти» (BSOD). Для устранения неполадок, связанных с файлом SYS, большинство профессионалов ПК заменят файл на соответствующую версию. В некоторых случаях Device Manager (Диспетчер устройств) пытается загрузить связанный с asio.sys драйвер, который несовместим или устарел для вашей ОС, поэтому мы рекомендуем запустить сканирование драйверов, чтобы выявить устаревшие драйвера устройства.
SYS используется форматом Windows System File, которые являются типами Системные файлы. Если вам нужно заменить файл asio.sys, вы можете найти версию %%os%% в нашей базе данных, перечисленной в таблице ниже. В текущем каталоге файлов могут отсутствовать редкие или очень старые версии asio.sys, но вы можете запросить необходимую версию, нажав на кнопку Request (Запрос) рядом с необходимой версией файла. Если вы не нашли необходимую вам версию файла в нашей базе, представленной ниже, мы рекомендуем обратиться непосредственно к Windows Software Developer.
Как правило, ошибки подобного типа больше не возникают после размещения надлежащей версии файла asio.sys в соответствующем месте, однако вам следует выполнить проверку ещё раз. Повторно запустите Third-Party Application, чтобы убедиться в успешном решении проблемы.
| Asio.sys Описание файла | |
|---|---|
| Тип файла: | SYS |
| Группа: | |
| App: | Third-Party Application |
| Версия: | 1.0 |
| Создано: | Windows Software Developer |
| File: | asio.sys |
| Размер (в байтах): | 13368 |
| SHA-1: | 8453fc3198349cf0561c87efc329c81e7240c3da |
| MD5: | 68726474c69b738eac3a62e06b33addc |
| CRC32: |
Продукт Solvusoft
Загрузка
WinThruster 2022 — Сканировать ваш компьютер на наличие ошибок реестра в asio.sys
Windows
11/10/8/7/Vista/XP
Установить необязательные продукты — WinThruster (Solvusoft) | Лицензия | Политика защиты личных сведений | Условия | Удаление
SYS
asio.sys
Идентификатор статьи: 1295804
Asio.sys
| Имя | Контрольная сумма MD5 | Размер файла | Загрузить | |||||||||||||||||
|---|---|---|---|---|---|---|---|---|---|---|---|---|---|---|---|---|---|---|---|---|
| + asio.sys | 68726474c69b738eac3a62e06b33addc | 13.05 KB | ||||||||||||||||||
|
Ошибки Asio.sys
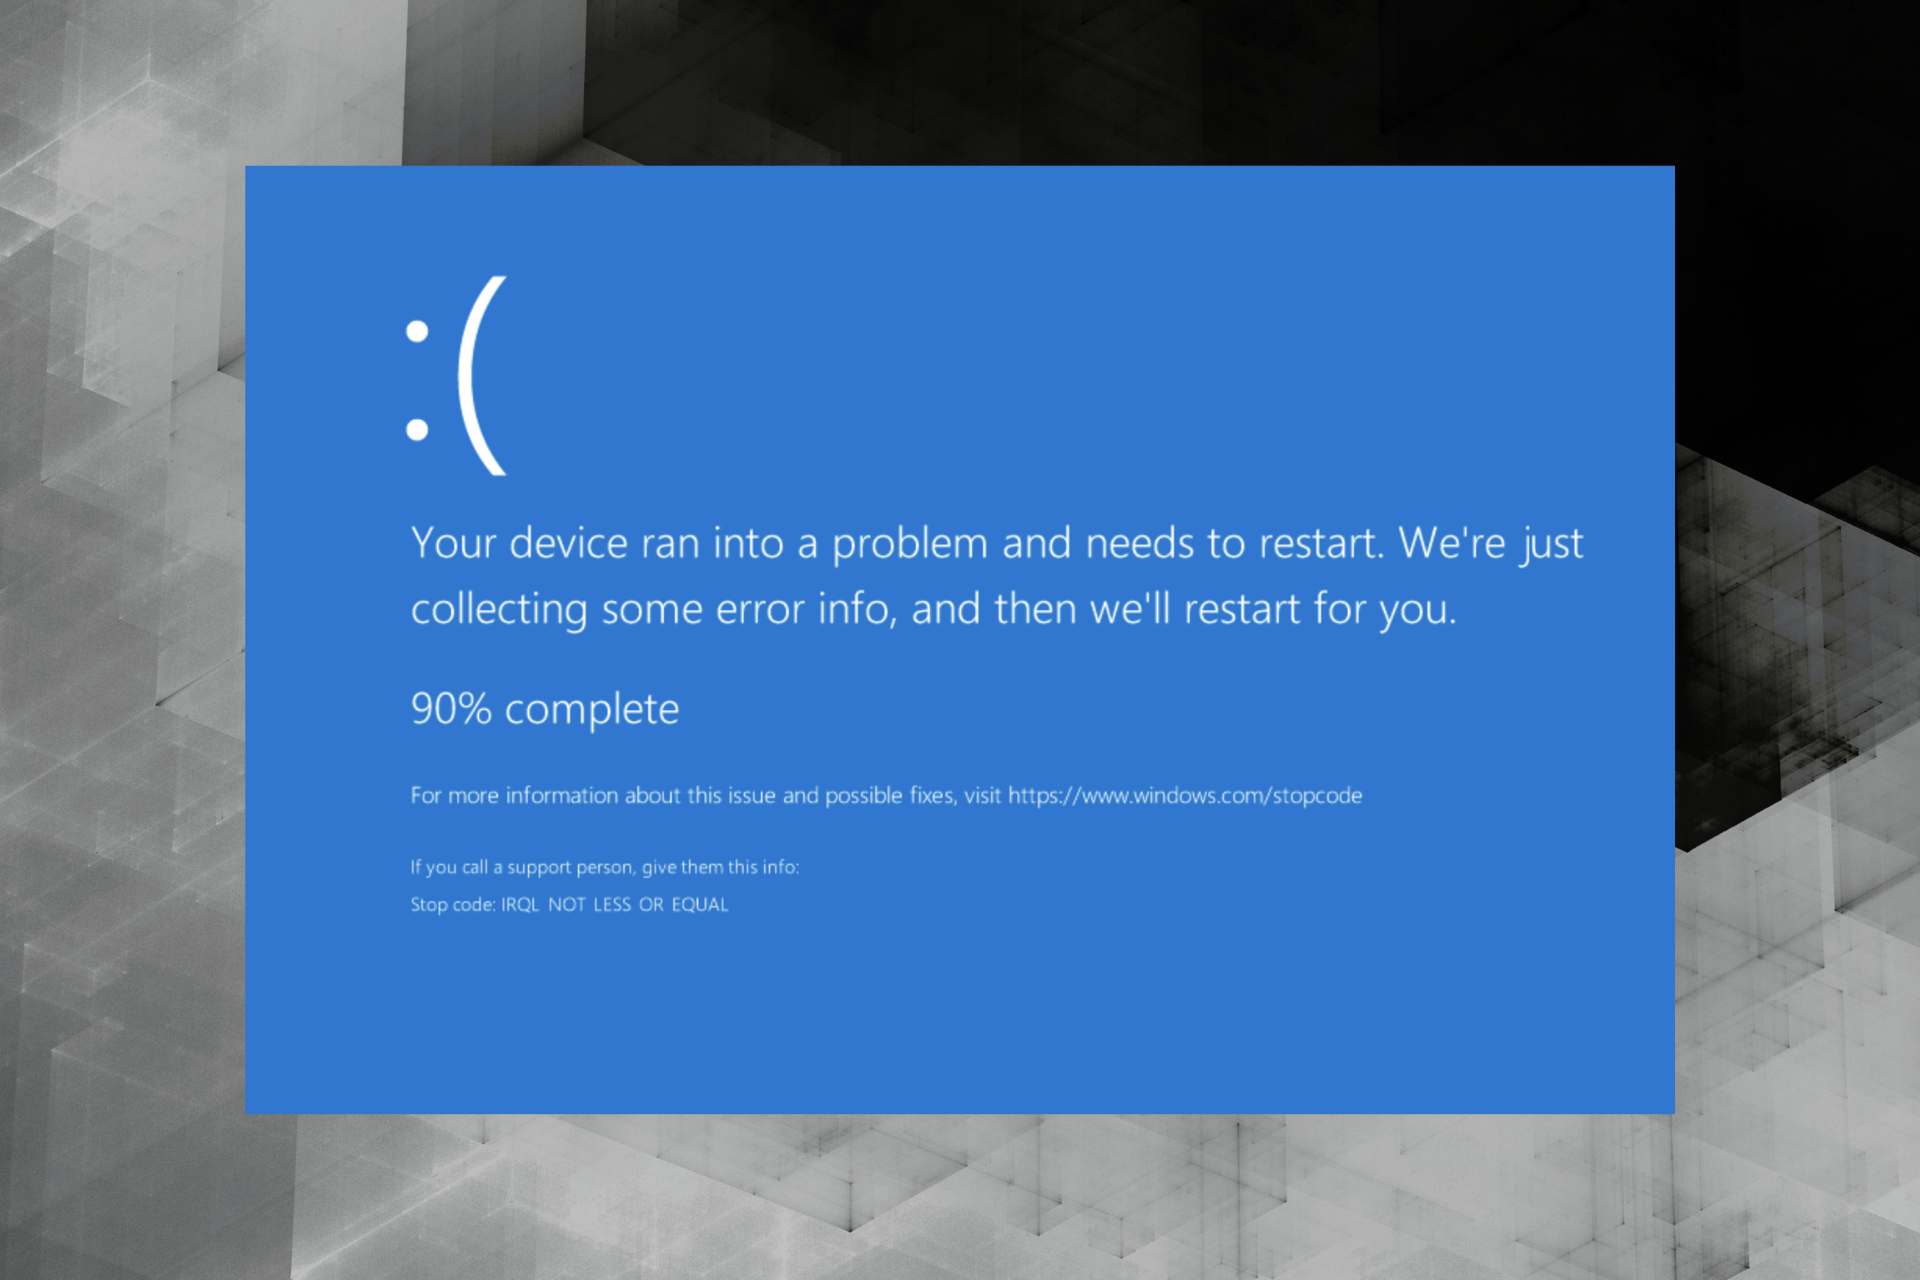
Синий экран ошибок смерти, или BSOD, обычно встречаются с asio.sys. Эти ошибки «Stop» asio.sys включают в себя:
- «Обнаружена проблема: asio.sys вызвал проблему и завершение работы Windows, чтобы предотвратить повреждение. «
- «: (Windows столкнулась с проблемой с asio.sys и нуждается в перезапуске. «
- «0x0A: IRQL_NOT_LESS_EQUAL — asio.sys»
- 0x0000001E: КМОДЕ_ИСКЛЮЧЕНИЕ_НЕТ_ОБРАБАТЫВАЕТСЯ — asio.sys
- 0x050: СТРАНИЦА_FAULT_IN_NONPAGED_AREA — asio.sys
В большинстве случаев после установки нового оборудования или программного обеспечения возникнут ошибки синего экрана asio.sys. Ошибки asio.sys, связанные с Third-Party Applications, часто возникают во время установки программного обеспечения, связанного с asio.sys, во время завершения работы или запуска Windows или во время загрузки драйвера устройства, связанного с Windows Software Developer. Отслеживание того, когда и где возникает ошибка STOP, является важной информацией при устранении проблемы. Notating при возникновении ошибок asio.sys STOP имеет первостепенное значение для поиска причины проблем, связанных с Third-Party Applications, и сообщая о них за помощью.
Источник ошибок Asio.sys
Ошибки Blue Screen asio.sys часто вызваны связанными проблемами с оборудованием, программным обеспечением, драйвером устройства или прошивкой. Они могут быть связаны либо с программным обеспечением Third-Party Application или аппаратным обеспечением Windows Software Developer, но это не обязательно так.
Более конкретно, данные ошибки asio.sys могут быть вызваны следующими причинами:
- Устаревшие, неправильно настроенные или поврежденные драйверы устройств Third-Party Application.
- Повреждение реестра Windows из-за недавнего изменения программного обеспечения (установка или удаление), связанного с asio.sys.
- Поврежденный и/или зараженный вирусами asio.sys.
- Конфликт оборудования, связанного с установкой оборудования OFWindows Software Developer или asio.sys.
- Установка Third-Party Application или драйверов устройств (asio.sys), вызывающих удаление или повреждение.
- Сбой жесткого диска, связанный с asio.sys Синий экран смерти.
- Поврежденная оперативная память/память из asio.sys Синий экран смерти.
The error “can’t open AsIO.sys” can occur at startup, installing or opening an ASUS utility. If you’re experiencing this error, don’t worry. The tips below may help you fix the error.
What’s AsIO.sys?
AsIO.sys is a driver file that belongs to ASUS. Usually it’s preinstalled on your ASUS computer and installed along with the ASUS motherboard. The error “can’t open AsIO.sys” is one of the common errors that ASUS users have reported. It usually occurs to AURA & AI Suite.
You may encounter this error whenever you start your computer, or when you install AURA or AI Suite. Select one of the links below for the fix depending on your situation.
Fix: If you run into this error when you open AURA or AI Suite
Fix: If you run into this error when you install AURA or AI Suite
Fix: If you run into this error When you start your computer
Fix: If you run into this error when you open AURA or AI Suite
The message “can’t open AsIO.sys” can pop up at opening AURA or AI Suite. To fix the error, you just need to run the utility as administrator.
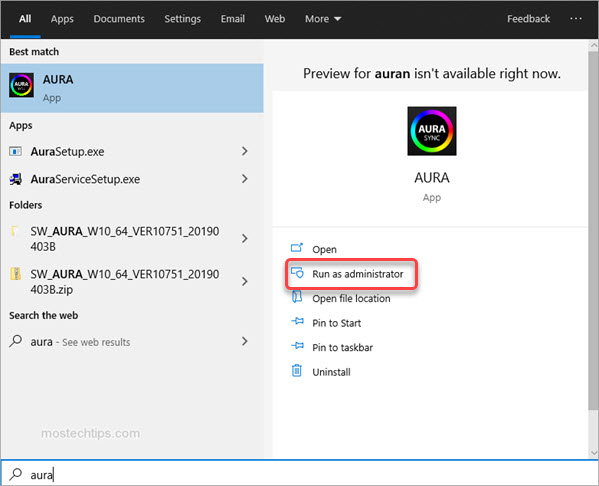
1) On your keyboard, press the Windows logo key.
2) Type the utility you have the problem with (AURA or AI Suite), and then click on Run as administrator. Then you should be able to open the program.
Fix: If you run into this error when you install AURA or AI Suite
Many users have reported that this error occurs when they install AURA or AI Suite (I, II or III). If you also can’t install AURA or AI Suite due to this error, you can follow these steps to fix it.
1) Right-click on the downloaded file of the utility (the zip file) and select Properties.
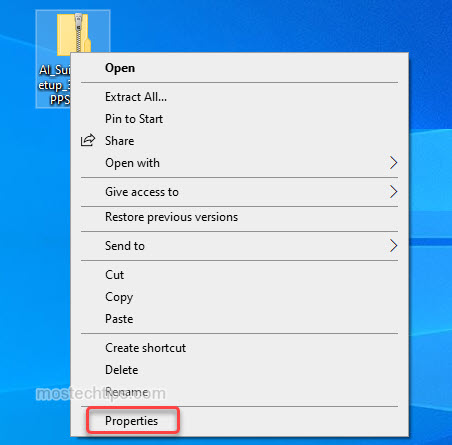
2) At the bottom, tick the “Unblock” checkbox, and then click OK to save the changes.

3) Extract the zip file.
4) Open the extracted folder and then locate the file called “AsusSetup.exe”.
5) Right-click on “AsusSetup.exe” and select Run as administrator. Then you should install the utility successfully.

Fix: If you run into this error When you start your computer
If this error message pops up at startup, the ASUS utilities (usually, AURA or AI Suite) could be the culprit.
If you have multiple ASUS utilities installed, to figure out which utility is causing the problem, you can uninstall them one by one then you can determine which one is causing the problem. If you only have one ASUS utility installed, just uninstall it and reinstall it as administrator.
Here’s how to do it:
1) Right-click on the Start menu button and select Apps and Features.
2) Scroll down and select one of the ASUS utilities.
3) Click Uninstall, then the confirmation dialog will pop up, then click Uninstall again.
4) Once the uninstallation is done, restart your computer and check to see if the error still occurs.
If the error still occurs, it means that utility is not the cause. If you have multiple ASUS utilities installed, repeat the steps above until you figure out the one that’s causing the problem.
Once you figure out and uninstall the utility that’s causing the problem, you can reinstall it by following these steps:
a) Right-click on the downloaded file of the utility (.zip file) and select Properties.

b) At the bottom, tick the “Unblock” check box, and then click OK to save the changes.
c) Extract the zip file.
d) Open the extracted folder and locate the file called “AsusSetup.exe”.
e) Right-click on “AsusSetup.exe” and select Run as administrator.
Hopefully you can fix the “Can’t open AsIO.sys” with the above tips. If you have any questions, feel free to drop a comment below. I’ll get back to you ASAP.
-
08-21-2019 09:04 PM
#11

ROG Guru: Yellow Belt
Array
Rewerend PC SpecsRewerend PC Specs Motherboard Asus Crosshair V Formula — Z Processor AMD FX-9370 Memory (part number) 2 x KHX23C11T3K2/8X Graphics Card #1 R9 Fury X 4gb Sapphire Sound Card Asus Xonar Phoebus Monitor SAMSUNG U28E590D 28″ uHD + freeSync Storage #1 Samsung SSD EVO 540 250Gb Storage #2 Seagate 7200.14 2TB CPU Cooler Corsair Hydro H105 Case Cooler Master Cosmos II Power Supply ENERMAX ERV1000EWT-G Revolution87+ 1000W Gold Keyboard Microsoft SideWinder X6 Mouse Saitek MAD CATZ R.A.T. 7 Headset Asus ROG Orion Mouse Pad Steel Series PAD Headset/Speakers Genius Home Theather SW 5.1 OS MS Windows 8.1 Pro Network Router Asus RT-N18U Accessory #1 Zalman ZM-MFC3 FAN/TEMP CONTROLLER
Hey I just fixed that ASio.sys creepy window….fresh install didn�t helped but uninstall all software from AiSuite except DIP5 make it work again without that annoying box…
I hope that could help others, rest of the SW are not so usefull anyway. But I need AiSuite for my Ryujin 360.Cheers.
-
01-15-2020 04:11 PM
#12
New ROGer
Array
Riverdog64 PC SpecsRiverdog64 PC Specs Motherboard ASUS ROG Crosshair VII Hero (Wi-Fi) X470 Processor AMD Ryzen 7 2700X Memory (part number) CORSAIR VENGEANCEL 16GB (2X 8GB) DDR4 3600 Graphics Card #1 GIGABYTE Radeon VII 16GB PCI Express Sound Card on-board Monitor ASUS ROG Swift PG278QR 27� Gaming Monitor 1440p 1ms 165Hz DP HDMI G-SYNC Storage #1 Samsung SSD 970 PRO 512GB — NVMe M.2 Storage #2 Seagate BarraCuda 2TB HDD � 3.5 Inch SATA 6Gb/s CPU Cooler Fractal Design Cooler FD-WCU-CELSIUS-S24 Case CORSAIR Carbide 270R Mid-Tower Case, Window Side Panel Power Supply CORSAIR RM750x, 750 Watt, 80+ Gold Keyboard Redragon K582-BA Wired Mechanical Gaming Keyboard Mouse Redragon Cobra Gaming Mouse Combo, 10,000DPI Mouse Pad who cares?
I found a solution the «Can’t open asio.sys (5) error.
I chalk this up to poor instructions on the ASUS downloads site…
This error is related to installation of ASUS AI Suite 3 versions before .52 and Windows 10 (as far as I know only Windows 10). I make no guarantees that this will work for you or that there is not another way, but this is what I did to fix the problem.
When downloading AI Suite, you have to first identify your motherboard. I am not positive if there are different versions of the program for each motherboard, but just in case there are, go through that process to find the Utilities download section for your motherboard.
There is an updated files that call itself ASUS AI Suite 3 vers. xx.52 but it is only an updater as far as AI Suite is concerned and if you run it on its own, without an earlier version of AI Suite installed already, it only installs two other programs in the suite and not the one used for overclocking.
In the same Utilities software list, you will find the xx.51 version of AI Suite as well. This has ALL the software. I installed that one first. (be careful… there are several «setup.exe» «AsusSetup.exe» files. I used the «AsusSetup.exe» after I uncompressed the files each time). Afterwards I rebooted and though AI Suite’s overclocking program was not installed (finally), I go the all too familiar ASio.sys (5) can’t be opened or found error.
THEN I installed the xx.52 version that appears to not be the entire AI Suite 3. After a reboot, this error was gone.
-
01-25-2020 04:24 AM
#13
ROG Guru: Orange Belt
Array
Braegnok PC SpecsBraegnok PC Specs Motherboard Asus Crosshair X670E Gene Processor AMD Ryzen 9 7950X Memory (part number) CMT32GX5M2B6000Z30K Graphics Card #1 EVGA RTX 3090 Ti FTW3 Ultra Monitor Alienware AW3423DW Storage #1 Samsung 990 Pro CPU Cooler Optimus AM5 Foundation Case Asus Prime AP201 Power Supply SeaSonic Prime TX-1600 Keyboard Das Keyboard 4 Ultimate Mouse G502 Lightspeed Headset SteelSeries Arctis Pro OS Windows 11 Pro
I was able to fix the can’t open asio.sys (5),.. I’m running Windows 10 64-Bit.
I used System Restore, and went back to before installing Asus A1 Suite, then installed Ver. 3.00.36 and checked all box’s, after rebooting I had the can’t open asio.sys (5) box,.. then went bask to Asus site and installed the ver 52 update.
With the first install ( ver .36 ) the EZ Update, and USB BIOS Flashback does not work!,.. that is why I was getting the error at startup, after installing update ver 52 you only have two options to check which is the EZ Update and USB BIOS Flashback, I checked both box’s, installed update,.. and all is good now.
Hope this helps
Last edited by Braegnok; 01-25-2020 at 05:43 AM.
-
01-26-2020 12:13 AM
#14
ROG Member
Array
areserhat PC Specsareserhat PC Specs Motherboard Rog Strix X570 E Processor AMD Ryzen 3700x Memory (part number) Kingston 2933MHZ Graphics Card #1 Rog StrixRx580 Monitor AOC C24G1 Storage #1 Samsung M2 970 250gb Storage #2 Samsung M2 970 Plus 500gb CPU Cooler Rog Ryujin 240 Case Corsair Crystal 680x Power Supply Rog Strix 750W PSU Keyboard Corsair K95 RGB Platinium Mouse Rog Gladius Origin Headset Steelseries Arctis 7 Mouse Pad Steelseries QCK Prism Headset/Speakers Logitech Z533 White OS Windows 10 Pro Accessory #1 Rog Terminal Accessory #2 Rog Led Strips
I had this problem before 2 times. Thanks to Asus we are expert on finding a way. Anyway below is my solution which works well.
Download the latest aura and just install the lightning updates. Probably there is a crash between Ai Suite and Aura drivers.
Ps. I am now travelling maybe I gave wrong file info when I return back I will update this answer.
-
05-23-2020 01:11 PM
#15
New ROGer
Array
Great this worked for me!!
Originally Posted by Riverdog64
I chalk this up to poor instructions on the ASUS downloads site…
This error is related to installation of ASUS AI Suite 3 versions before .52 and Windows 10 (as far as I know only Windows 10). I make no guarantees that this will work for you or that there is not another way, but this is what I did to fix the problem.
When downloading AI Suite, you have to first identify your motherboard. I am not positive if there are different versions of the program for each motherboard, but just in case there are, go through that process to find the Utilities download section for your motherboard.
There is an updated files that call itself ASUS AI Suite 3 vers. xx.52 but it is only an updater as far as AI Suite is concerned and if you run it on its own, without an earlier version of AI Suite installed already, it only installs two other programs in the suite and not the one used for overclocking.
In the same Utilities software list, you will find the xx.51 version of AI Suite as well. This has ALL the software. I installed that one first. (be careful… there are several «setup.exe» «AsusSetup.exe» files. I used the «AsusSetup.exe» after I uncompressed the files each time). Afterwards I rebooted and though AI Suite’s overclocking program was not installed (finally), I go the all too familiar ASio.sys (5) can’t be opened or found error.
THEN I installed the xx.52 version that appears to not be the entire AI Suite 3. After a reboot, this error was gone.
Hi thanks for the post, this worked perfectly for me.
-
07-15-2020 07:16 PM
#16
ROG Junior Member
Array
Originally Posted by Riverdog64
I chalk this up to poor instructions on the ASUS downloads site…
This error is related to installation of ASUS AI Suite 3 versions before .52 and Windows 10 (as far as I know only Windows 10). I make no guarantees that this will work for you or that there is not another way, but this is what I did to fix the problem.
When downloading AI Suite, you have to first identify your motherboard. I am not positive if there are different versions of the program for each motherboard, but just in case there are, go through that process to find the Utilities download section for your motherboard.
There is an updated files that call itself ASUS AI Suite 3 vers. xx.52 but it is only an updater as far as AI Suite is concerned and if you run it on its own, without an earlier version of AI Suite installed already, it only installs two other programs in the suite and not the one used for overclocking.
In the same Utilities software list, you will find the xx.51 version of AI Suite as well. This has ALL the software. I installed that one first. (be careful… there are several «setup.exe» «AsusSetup.exe» files. I used the «AsusSetup.exe» after I uncompressed the files each time). Afterwards I rebooted and though AI Suite’s overclocking program was not installed (finally), I go the all too familiar ASio.sys (5) can’t be opened or found error.
THEN I installed the xx.52 version that appears to not be the entire AI Suite 3. After a reboot, this error was gone.
This also worked for me.
-
09-07-2020 09:37 AM
#17
New ROGer
Array
mguizz PC Specsmguizz PC Specs Motherboard ROG STRIX Z390 F GAMING Memory (part number) Corsair Vengeance Pro Graphics Card #1 GeForce RTX 2070 SUPER Monitor Dell U2719D
I had this issue & fixed it the following way.
Go to the specific motherboard ‘Driver & Tools’ page & download from ‘Software and Utility’ the latest AI Suite & latest Ez Update (AIS V3.00.51 & EZU v3.00.11 at time of writing) installers.
Install AI Suite & reboot
Install Ez UpateHope it works for you, cheers.
Last edited by mguizz; 09-07-2020 at 09:55 AM.


The error “can’t open AsIO.sys” can occur at startup, installing or opening an ASUS utility. If you’re experiencing this error, don’t worry. The tips below may help you fix the error.
What’s AsIO.sys?
AsIO.sys is a driver file that belongs to ASUS. Usually it’s preinstalled on your ASUS computer and installed along with the ASUS motherboard. The error “can’t open AsIO.sys” is one of the common errors that ASUS users have reported. It usually occurs to AURA & AI Suite.
You may encounter this error whenever you start your computer, or when you install AURA or AI Suite. Select one of the links below for the fix depending on your situation.
Fix: If you run into this error when you open AURA or AI Suite
Fix: If you run into this error when you install AURA or AI Suite
Fix: If you run into this error When you start your computer
Fix: If you run into this error when you open AURA or AI Suite
The message “can’t open AsIO.sys” can pop up at opening AURA or AI Suite. To fix the error, you just need to run the utility as administrator.
1) On your keyboard, press the Windows logo key.
2) Type the utility you have the problem with (AURA or AI Suite), and then click on Run as administrator. Then you should be able to open the program.
Fix: If you run into this error when you install AURA or AI Suite
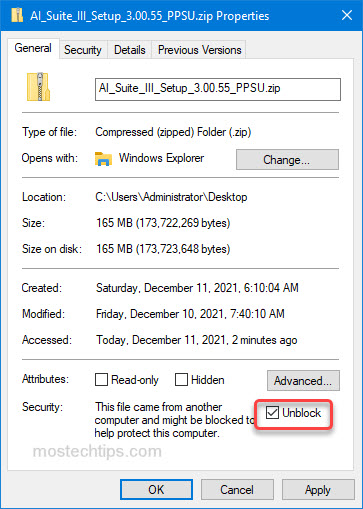
Many users have reported that this error occurs when they install AURA or AI Suite (I, II or III). If you also can’t install AURA or AI Suite due to this error, you can follow these steps to fix it.
1) Right-click on the downloaded file of the utility (the zip file) and select Properties.
2) At the bottom, tick the “Unblock” checkbox, and then click OK to save the changes.
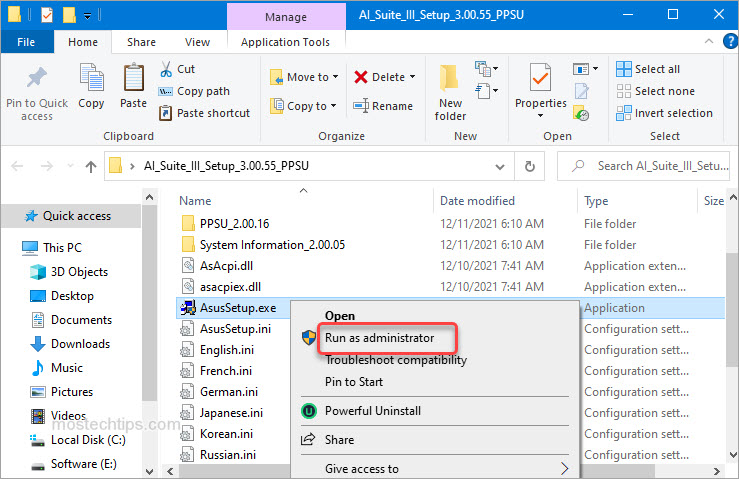
3) Extract the zip file.
4) Open the extracted folder and then locate the file called “AsusSetup.exe”.
5) Right-click on “AsusSetup.exe” and select Run as administrator. Then you should install the utility successfully.
Fix: If you run into this error When you start your computer
If this error message pops up at startup, the ASUS utilities (usually, AURA or AI Suite) could be the culprit.
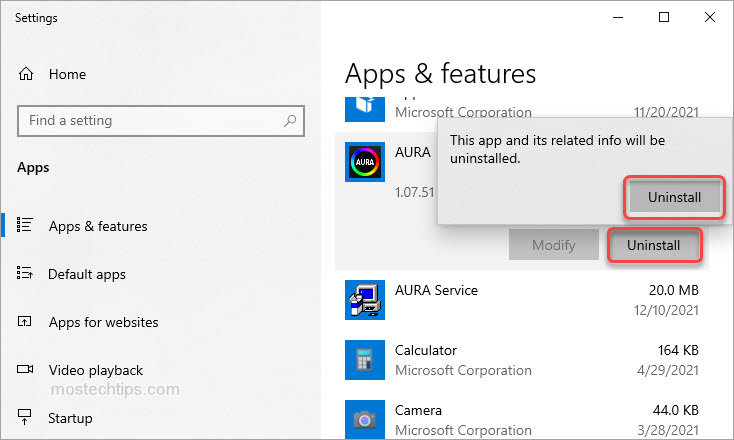
If you have multiple ASUS utilities installed, to figure out which utility is causing the problem, you can uninstall them one by one then you can determine which one is causing the problem. If you only have one ASUS utility installed, just uninstall it and reinstall it as administrator.
Here’s how to do it:
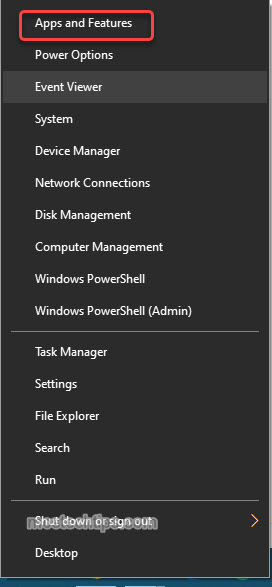
1) Right-click on the Start menu button and select Apps and Features.
2) Scroll down and select one of the ASUS utilities.
3) Click Uninstall, then the confirmation dialog will pop up, then click Uninstall again.
4) Once the uninstallation is done, restart your computer and check to see if the error still occurs.
If the error still occurs, it means that utility is not the cause. If you have multiple ASUS utilities installed, repeat the steps above until you figure out the one that’s causing the problem.
Once you figure out and uninstall the utility that’s causing the problem, you can reinstall it by following these steps:
a) Right-click on the downloaded file of the utility (.zip file) and select Properties.
b) At the bottom, tick the “Unblock” check box, and then click OK to save the changes.
c) Extract the zip file.
d) Open the extracted folder and locate the file called “AsusSetup.exe”.
e) Right-click on “AsusSetup.exe” and select Run as administrator.
Hopefully you can fix the “Can’t open AsIO.sys” with the above tips. If you have any questions, feel free to drop a comment below. I’ll get back to you ASAP.
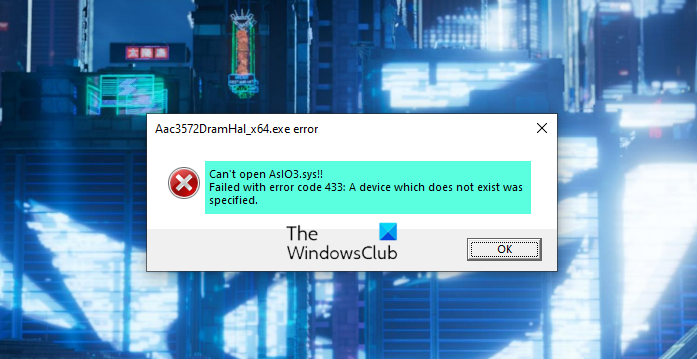
Некоторые пользователи Asus столкнулись с ошибкой: не удается открыть AsIO3.sys при работе на компьютере с Windows 11/10. Это ошибка, которая может помешать вам использовать компьютер, так как система не сможет получить доступ к этому файлу. Когда возникает ошибка такого типа, что-то не так с записями реестра или системными файлами, связанными с операционной системой. В этой статье мы объясним причины, по которым файл AsIO3.sys может быть недоступен, и способы решения этой проблемы.
Не удается открыть AsIO3.sys! Ошибка с кодом ошибки 433, Указано несуществующее устройство
Полная проверка системы, обновление драйверов и удаление недавно установленных программ могут помочь решить эту проблему. Читайте дальше, чтобы узнать все, что вам нужно знать об ошибке AsIO3.sys на компьютерах ASUS и о том, как ее исправить.
Что такое AsIO3.sys и почему он не открывается?
AsIO3.sys — это драйвер, разработанный специально для компьютеров ASUS. AsIO расшифровывается как ввод-вывод Asus. Как часть предустановленного программного обеспечения на вашем компьютере ASUS, это приложение отслеживает температуру оперативной памяти и скорость графического процессора. Он также управляет другим оборудованием, например скоростью внутренних вентиляторов. Этот инструмент упрощает мониторинг и управление компьютером ASUS, поскольку он уведомляет вас о возникновении проблем, связанных с оборудованием.
Были сообщения о том, что пользователи сталкивались с сообщением об ошибке «Не удается открыть AsIO3.sys» при попытке запустить свой компьютер. К этой ошибке могут привести несколько факторов, в том числе заражение вредоносным программным обеспечением, неисправность жестких дисков и повреждение памяти. Ознакомьтесь с этой статьей, если вы столкнулись с этой ошибкой на своем компьютере ASUS.
Если вы не можете открыть ошибку AsIO3.sys на компьютерах ASUS, следуйте приведенным ниже советам. Прежде чем применять эти методы, обязательно сделайте резервную копию своих данных на случай, если с ними что-то пойдет не так и ваши данные будут потеряны.
- Переустановите драйвер или программное обеспечение ASUS.
- Отключить или удалить Asus TUF Armoury Crate
- Обновите драйверы вашего устройства
- Запустите средство проверки системных файлов
- Выполнить восстановление системы
Рассмотрим подробнее каждый метод:
1]Переустановите драйвер или программное обеспечение ASUS.
Этот метод требует переустановки драйвера или программного обеспечения Asus, которое включает или устанавливает этот файл AsIO3.sys.
2]Отключить или удалить Asus TUF Armoury Crate
Решение этой проблемы — отключить или удалить Asus TUF Armoury Crate & Aura Creator. Ниже приведены шаги, которые вы можете предпринять, чтобы удалить все приложения и службы Armoury Crate:
- Откройте веб-браузер и перейдите к оружейному ящику. веб-сайт поддержки.
- На Драйвер и утилита нажмите на раскрывающееся меню.
- Здесь вы найдете два варианта, Windows 11 64-разрядная или же Windows 10 64-разрядная версиявыберите тот вариант, который соответствует вашим потребностям, чтобы загрузить инструмент удаления Armoury Crate.
- Нажми на Скачать кнопку, чтобы получить файл.
- Как только вы загрузите его, откройте проводник (Windows+Е ключи) и перейдите к Загрузки папка.
- Распаковать “Armoury_Crate_Uninstall_Tool.zip» и дважды щелкните «Armoury Crate Uninstall Tool.exe», чтобы начать процесс удаления.
- После завершения удаления перезагрузите систему.
Примечание. Официальный инструмент для очистки AC — лучший способ удалить ящик Armory.
3]Обновите драйверы вашего устройства
Неисправный или устаревший драйвер также может быть причиной этой ошибки синего экрана. В таком случае у вас есть два варианта на выбор:
4]Запустите средство проверки системных файлов
Если приведенные выше решения не работают, похоже, ваша система повреждена. Чтобы устранить повреждение системных файлов, вы можете использовать утилиту проверки системных файлов, выполнив следующие действия:
Для начала запустите командную строку от имени администратора.
В командной строке скопируйте и вставьте следующую команду:
sfc/scannow
Теперь нажмите клавишу Enter, и он просканирует систему на наличие поврежденных файлов. Когда сканирование будет завершено, перезагрузите компьютер и посмотрите, решена ли проблема.
5]Выполните восстановление системы
Это решение очень эффективно для устранения многих проблем на ПК с Windows, включая такие ошибки BSOD. Так что, если ничего не помогает, просто восстановите свою систему до прежнего состояния. Таким образом, вы сможете восстановить свою систему в прежнее состояние, которое в то время функционировало должным образом.
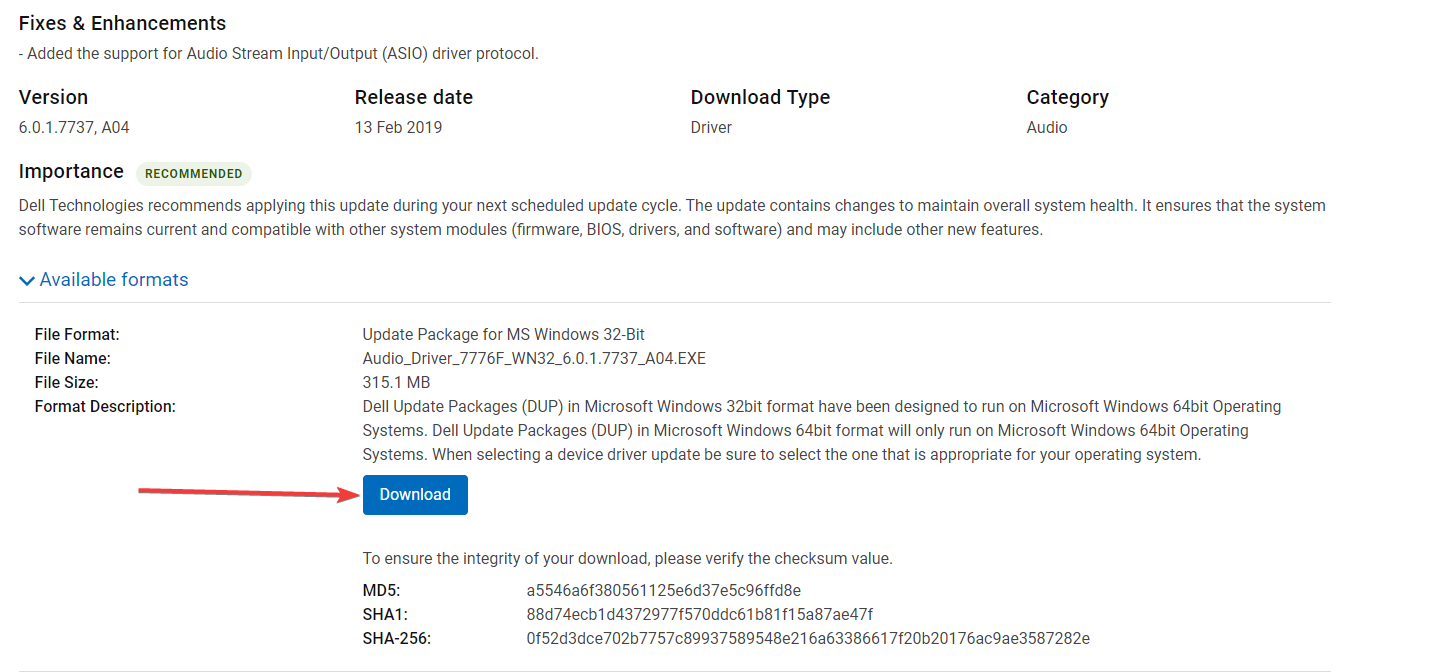
Как скачать аудиодрайверы Asus?
Следующие шаги помогут вам выполнить загрузку аудиодрайверов Asus для Windows 11/10:
- Прежде всего, посетите asus.com.
- Затем найдите свой продукт по серийному номеру.
- На следующей странице нажмите Драйверы и утилиты.
- Выберите операционную систему, а затем загрузите аудиодрайвер.
Сообщение по теме: Как исправить ошибку «синий экран» Tcpip.sys на компьютере с Windows