
Очевидно, что ошибка 511 CPU Fan not detected ссылается на кулер процессора, который не удается обнаружить. То есть BIOS не видит вентилятор ЦП и экстренно завершает работу компьютера, чтобы предотвратить его перегрев и выход из строя. При этом бывают ситуации, когда вентилятор продолжает вращаться и даже на максимальных оборотах. Также встречаются и случаи, когда кулер раскручивается и останавливается прямо перед появление ошибки. Наша текущая цель – разобраться с причинами неполадки и восстановить правильную работу Windows.
Содержание
- Причины ошибки 511
- Как исправить ошибку 511 CPU Fan not detected?
- Проверить качество подключения вентилятора
- Очистить систему охлаждения
- Заменить кулер
- Настроить скорость вращения BIOS
Причины ошибки 511
CPU Fan not detected может появляться из-за нескольких основных причин:
- Неисправность кулера и не только его. Реже, но поломка может быть у материнской платы или блока питания.
- Слишком большое количество пыли и грязи, которые мешают работе вентилятора и его нормальному обнаружению.
- Плохой контакт на разъемах кулера материнской платы.
- Несовместимость кулера с материнской платой, радиатором охлаждения.
- Некорректная скорость работы вентиляторов.
Как исправить ошибку 511 CPU Fan not detected?
Начать следует с того, чтобы открыть корпус системного блока или снять заднюю крышку ноутбука и посмотреть на реакцию кулера на кнопку запуска. Если он не вращается совсем, вполне может быть заклинившим или поврежденным. В остальных случаях проблему могут быть в BIOS или контактах кулера.
Проверить качество подключения вентилятора
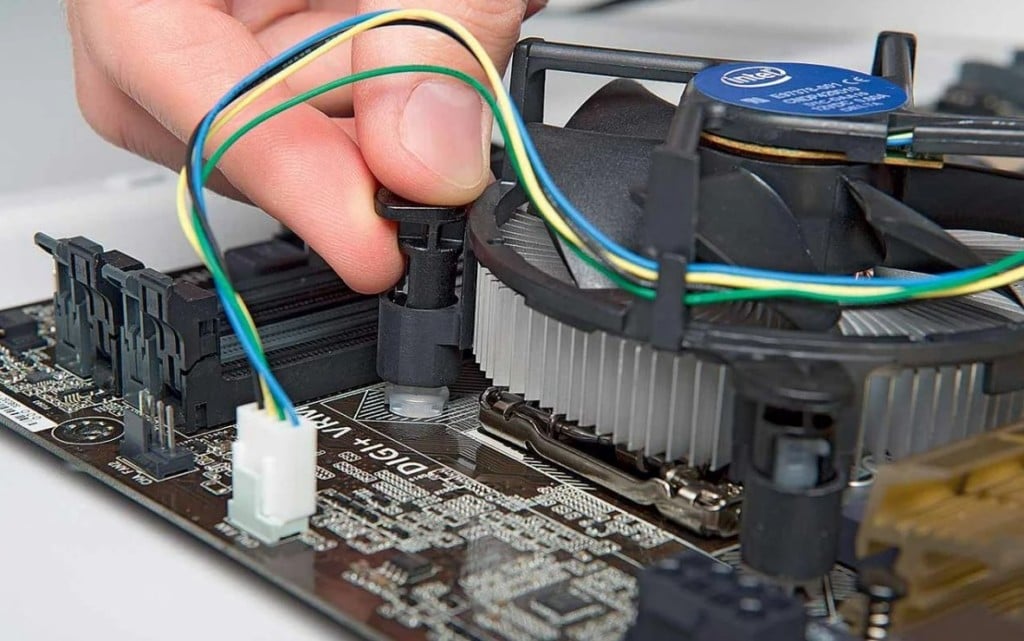
Самое первое и простое в реализации действие – извлечь разъем кулера, очистить его сжатым воздухом и подключить заново. Только обязательно перед этим нужно выключить компьютер, как и перед любыми другими действиями внутри него.
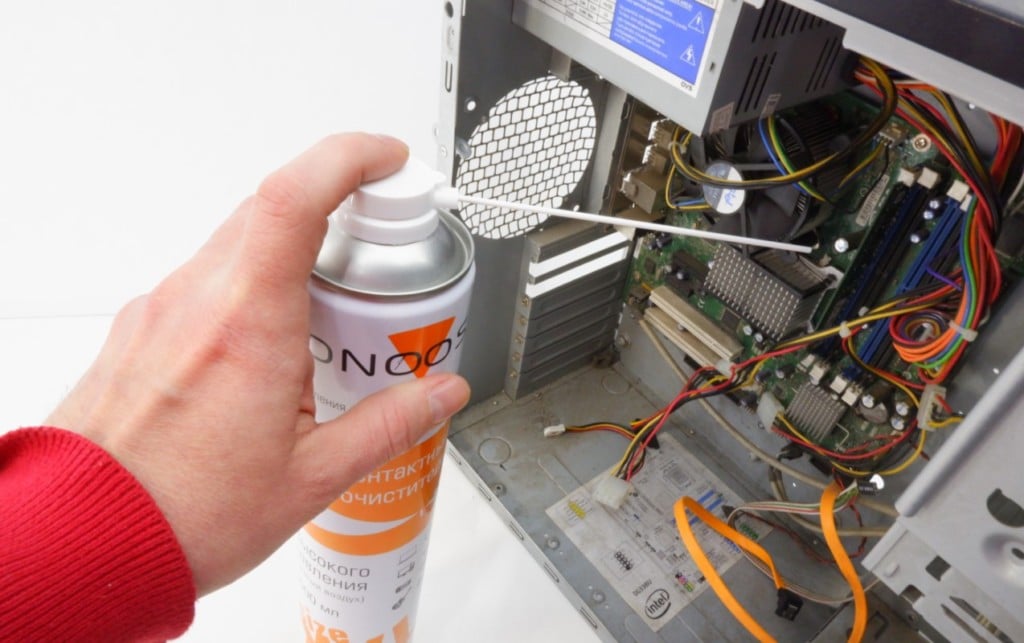
Очистить систему охлаждения
Очень много пользователей написало, что после очистки системы охлаждения ошибка 511 исчезла. У нас есть 2 пути: быстрый и более качественный. В роли простого решения можно использовать баллончик со сжатым воздухом. Стоит продуть им лопасти и радиатор, а также вручную проверить, что он вращается легко, без посторонних звуков. Еще рекомендуется осмотреть кулер на наличие физических повреждений.
Мы рекомендуем снять вентилятор процессора полностью и очистить все с помощью пылесоса и кисточки. Для этого нужно открутить винты или откинуть защелки, на которых он держится. Еще следует извлечь кабель из разъема на материнской плате. Также стоит нанести новую термопасту. Подобное обслуживание следует проводить каждый год, а оно, скорее всего, не выполнялось уже достаточно давно.
Заменить кулер
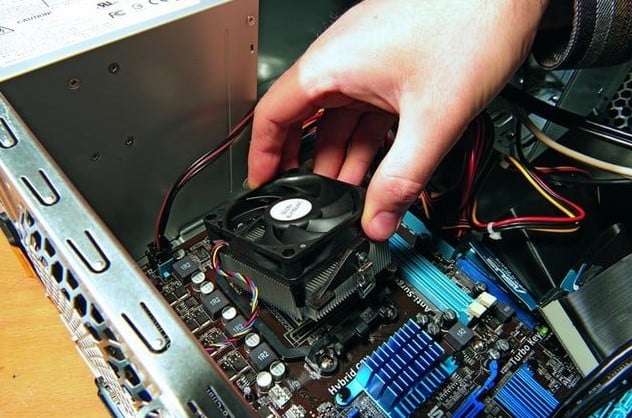
К сожалению, даже визуально рабочий кулер может быть неисправным. То есть он крутится, все как обычно, но система не обнаруживает вентилятор из-за обрыва цепи управления. В подобном случае лучшим решением будет замена. Также стоит учитывать, что нестандартные кулера от других производителей могут работать неправильно. Лучше использовать оригинальный вентилятор.
Настроить скорость вращения BIOS
Похоже, что слишком низкая скорость вращения кулера тоже может стать причиной проблемы. Самый эффективный способ вернуть ее в рабочее состояние – сделать сброс BIOS. Однако куда проще использовать программы SpeedFan, конечно же, при условии, что есть возможность запустить компьютер, то есть ошибка появляется не при каждом пуске.
Если отобразилась ошибка 511 CPU Fan not detected, вам нужно проверить качество контактов, очистить кулер и радиатор процессора и уже тогда подключить другой вентилятор. На одном из этапов все должно запуститься нормально. Правда, есть один хитрый способ – подключить кулер процессора к другому разъему (обычно есть вентилятор на корпусе), а его уже – к входу на вентилятор ЦП. Мы такое решение не одобряем, так как при повышенной мощности работы железо может перегреться.
А что вы знаете о данной ошибке? Поделитесь своим опытом с другими читателями.
101-Option ROM Checksum Error
System ROM or expansion board option ROM checksum.
-
Verify the correct ROM.
-
Flash the ROM if needed.
-
If an expansion board was recently added, remove it to see if the problem remains.
-
Clear CMOS. (See Appendix B, Password Security and Resetting CMOS.)
-
If the message disappears, there may be a problem with the expansion card.
-
Replace the system board.
103-System Board Failure
DMA or timers.
-
Clear CMOS. (See Appendix B, Password Security and Resetting CMOS.)
-
Remove expansion boards.
-
Replace the system board.
110-Out of Memory Space for Option ROMs
Recently added PCI expansion card contains an option ROM too large to download during POST.
-
If a PCI expansion card was recently added, remove it to see if the problem remains.
-
In Computer Setup, set Advanced > Device Options > NIC PXE Option ROM Download to DISABLE to prevent PXE option ROM for the internal NIC from being downloaded during POST to free more memory for an expansion card’s option ROM. Internal PXE option ROM is used for booting from the NIC to a PXE server.
162-System Options Not Set
Configuration incorrect.
RTC (real-time clock) battery may need to be replaced.
Run Computer Setup and check the configuration in Advanced > Onboard Devices.
Reset the date and time under Control Panel. If the problem persists, replace the RTC battery. See the Hardware Reference Guide for instructions on installing a new battery, or contact an authorized dealer or reseller for RTC battery replacement.
163-Time & Date Not Set
Invalid time or date in configuration memory.
RTC (real-time clock) battery may need to be replaced.
Reset the date and time under Control Panel (Computer Setup can also be used). If the problem persists, replace the RTC battery. See the Hardware Reference Guide for instructions on installing a new battery, or contact an authorized dealer or reseller for RTC battery replacement.
163-Time & Date Not Set
CMOS jumper may not be properly installed.
Check for proper placement of the CMOS jumper if applicable.
164-MemorySize Error
Memory amount has changed since the last boot (memory added or removed).
Press the F1 key to save the memory changes.
164-MemorySize Error
Memory configuration incorrect.
-
Run Computer Setup or Windows utilities.
-
Make sure the memory module(s) are installed properly.
-
If third-party memory has been added, test using HP-only memory.
-
Verify proper memory module type.
201-Memory Error
RAM failure.
-
Ensure memory modules are correctly installed.
-
Verify proper memory module type.
-
Remove and replace the identified faulty memory module(s).
-
If the error persists after replacing memory modules, replace the system board.
213-Incompatible Memory Module in Memory Socket(s) X, X, …
A memory module in memory socket identified in the error message is missing critical SPD information, or is incompatible with the chipset.
-
Verify proper memory module type.
-
Try another memory socket.
-
Replace DIMM with a module conforming to the SPD standard.
214-DIMM Configuration Warning
Populated DIMM Configuration is not optimized.
Rearrange the DIMMs so that each channel has the same amount of memory.
219-ECC Memory Module Detected ECC Modules not supported on this Platform
Recently added memory module(s) support ECC memory error correction.
-
If additional memory was recently added, remove it to see if the problem remains.
-
Check product documentation for memory support information.
301-Keyboard Error
Keyboard failure.
-
Reconnect keyboard with computer turned off.
-
Check connector for bent or missing pins.
-
Ensure that none of the keys are depressed.
-
Replace keyboard.
303-Keyboard Controller Error
I/O board keyboard controller.
-
Reconnect keyboard with computer turned off.
-
Replace the system board.
304-Keyboard or System Unit Error
Keyboard failure.
-
Reconnect the keyboard with computer turned off.
-
Ensure that none of the keys are depressed.
-
Replace the keyboard.
-
Replace the system board.
501-Display Adapter Failure
Graphics display controller.
-
Reseat the graphics card (if applicable).
-
Clear CMOS. (See Appendix B, Password Security and Resetting CMOS.)
-
Verify monitor is attached and turned on.
-
Replace the graphics card (if possible).
510-Flash Screen Image Corrupted
Flash Screen image has errors.
Reflash the system ROM with the latest BIOS image.
511-CPU, CPUA, or CPUB Fan not Detected
CPU fan is not connected or may have malfunctioned.
-
Reseat CPU fan.
-
Reseat fan cable.
-
Replace CPU fan.
512-Chassis, Rear Chassis, or Front Chassis Fan not Detected
Chassis, rear chassis, or front chassis fan is not connected or may have malfunctioned.
-
Reseat chassis, rear chassis, or front chassis fan.
-
Reseat fan cable.
-
Replace chassis, rear chassis, or front chassis fan.
513-Front Chassis fan not detected
Front chassis fan is not connected or may have malfunctioned.
-
Reseat front chassis fan.
-
Reseat fan cable.
-
Replace front chassis fan.
515-Power Supply fan not detected
Power supply fan is not connected or may have malfunctioned.
-
Reseat power supply fan.
-
Reseat fan cable.
-
Replace power supply fan.
601-Diskette Controller Error
Diskette controller circuitry or floppy drive circuitry incorrect.
-
Check and/or replace cables.
-
Clear CMOS. (See Appendix B, Password Security and Resetting CMOS.)
-
Replace diskette drive.
-
Replace the system board.
605-Diskette Drive Type Error
Mismatch in drive type.
-
Disconnect any other diskette controller devices (tape drives).
-
Clear CMOS. (See Appendix B, Password Security and Resetting CMOS.)
660-Display cache is detected unreliable
Integrated graphics controller display cache is not working properly and will be disabled.
Replace system board if minimal graphics degrading is an issue.
912-Computer Cover Has Been Removed Since Last System Startup
Computer cover was removed since last system startup.
No action required.
917-Front Audio Not Connected
Front audio harness has been detached or unseated from motherboard.
Reconnect or replace front audio harness.
918-Front USB Not Connected
Front USB harness has been detached or unseated from motherboard.
Reconnect or replace front USB harness.
921-Device in PCI Express slot failed to initialize
There is an incompatibility/problem with this device and the system or PCI Express Link could not be retrained to an x1.
Try rebooting the system. If the error reoccurs, the device may not work with this system
1151-Serial Port A Address Conflict Detected
Both external and internal serial ports are assigned to COM1.
-
Remove any serial port expansion cards.
-
Clear CMOS. (See Appendix B, Password Security and Resetting CMOS.)
-
Reconfigure card resources and/or run Computer Setup or Windows utilities.
1152-Serial Port B Address Conflict Detected
Both external and internal serial ports are assigned to COM2.
-
Remove any serial port expansion cards.
-
Clear CMOS. (See Appendix B, Password Security and Resetting CMOS.)
-
Reconfigure card resources and/or run Computer Setup or Windows utilities.
1155-Serial Port Address Conflict Detected
Both external and internal serial ports are assigned to same IRQ.
-
Remove any serial port expansion cards.
-
Clear CMOS. (See Appendix B, Password Security and Resetting CMOS.)
-
Reconfigure card resources and/or run Computer Setup or Windows utilities.
1720-SMART Hard Drive Detects Imminent Failure
Hard drive is about to fail. (Some hard drives have a hard drive firmware patch that will fix an erroneous error message.)
-
Determine if hard drive is giving correct error message. Enter Computer Setup and run the Drive Protection System test under Storage > DPS Self-test.
-
Back up contents and replace hard drive.
1796-SATA Cabling Error
One or more SATA devices are improperly attached. For optimal performance, the SATA 0 and SATA 1 connectors must be used before SATA 2 and SATA 3.
Ensure SATA connectors are used in ascending order. For one device, use SATA 0. For two devices, use SATA 0 and SATA 1. For three devices, use SATA 0, SATA 1, and SATA 2.
1801-Microcode Patch Error
Processor is not supported by ROM BIOS.
-
Upgrade BIOS to proper version.
-
Change the processor.
2200-PMM Allocation Error during MEBx Download
Memory error during POST execution of the Management Engine (ME) BIOS Extensions option ROM.
-
Reboot the computer.
-
Unplug the power cord, re-seat the memory modules, and reboot the computer.
-
If the memory configuration was recently changed, unplug the computer, restore the original memory configuration, and reboot the computer.
-
If the error persists, replace the system board.
2201-MEBx Module did not checksum correctly
Memory error during POST execution of the Management Engine (ME) BIOS Extensions option ROM.
-
Reboot the computer.
-
Unplug the power cord, re-seat the memory modules, and reboot the computer.
-
If the memory configuration was recently changed, unplug the power cord, restore the original memory configuration, and reboot the computer.
-
If the error persists, replace the system board.
2202-PMM Deallocation Error during MEBx cleanup
Memory error during POST execution of the Management Engine (ME) BIOS Extensions option ROM.
-
Reboot the computer.
-
Unplug the power cord, re-seat the memory modules, and reboot the computer.
-
If the memory configuration was recently changed, unplug the power cord, restore the original memory configuration, and reboot the computer.
-
If the error persists, replace the system board.
2212-USB Key Provisioning failure writing to device
USB device used for USB key provisioning will not allow BIOS to update provision file properly.
-
Try a different USB key device for provisioning.
-
If the error persists, update to the latest BIOS version and ME firmware version.
-
If the error still persists, replace the system board.
2217-ME Firmware Version request failure
ME firmware is not properly responding to BIOS query for version information.
-
Reboot the computer.
-
If the error persists, update to the latest BIOS version and ME firmware version.
-
If the error still persists, replace the system board.
2218-ME Firmware Version should be updated
ME firmware must be updated to match current functionality contained in the system BIOS.
-
Update to the latest ME firmware version.
-
If the error persists and system BIOS has been recently updated, restore previous system BIOS version.
-
If the error still persists, replace the system board.
2219-USB Key Provisioning file has invalid header identifier
Provisioning file contained on the USB key has been corrupted or is not a valid version for the current ME firmware.
-
Recreate the provisioning file using third party management console software.
-
If the error persists and system BIOS has been recently updated, restore previous system BIOS version. Otherwise, update the ME firmware version.
-
If the error still persists, replace the system board.
2220-USB Key Provisioning file has mismatch version
Provisioning file contained on the USB key is not a valid version for the current ME firmware.
-
Reboot the computer.
-
If the error persists and system BIOS has been recently updated, restore previous system BIOS version. Otherwise, update the ME firmware version.
-
If the error still persists, replace the system board.
2230-General error during MEBx execution
Error occurred during MEBx execution which fails into the “General” grouping. Status information displayed along with the error provides further clarity into the failure. MEBx handles transference of information between the system BIOS and ME firmware.
-
Reboot the computer.
-
If the error persists, update to the latest BIOS version and ME firmware version.
-
If the error still persists, replace the system board.
2231-ME error during MEBx execution
Error occurred during MEBx execution which fails into “ME” grouping.
-
Reboot the computer.
-
If the error persists, update to the latest BIOS version and ME firmware version.
-
If the error still persists, replace the system board.
2232-AMT error during MEBx execution
Error occurred during MEBx execution which fails into “AMT” grouping.
-
Reboot the computer.
-
If the error persists, update to the latest BIOS version and ME firmware version.
-
If the error still persists, replace the system board.
2233-HECI error during MEBx execution
Error occurred during MEBx execution which fails into “MEI or HECI” grouping.
-
Reboot the computer.
-
If the error persists, update to the latest BIOS version and ME firmware version.
-
If the error still persists, replace the system board.
2239-ME image lock failure
Special system configurations with reduced ME firmware image require BIOS control of ME firmware upgrading. A failure has occurred after the ME firmware update process in which the BIOS could not relock the ME firmware region.
-
Reboot the computer.
-
If the error persists, update to the latest BIOS version and ME firmware version.
-
If the error still persists, replace the system board.
2240-ME image unlock failure
Special system configurations with reduced ME firmware image require BIOS control of ME firmware upgrading. A failure has occurred prior to the ME firmware update process in which the BIOS could not unlock the ME firmware region.
-
Reboot the computer.
-
If the error persists, update to the latest BIOS version and ME firmware version.
-
If the error still persists, replace the system board.
Invalid Electronic Serial Number
Electronic serial number is missing.
Enter the correct serial number in Computer Setup.
Network Server Mode Active and No Keyboard Attached
Keyboard failure while Network Server Mode enabled.
-
Reconnect keyboard with computer turned off.
-
Check connector for bent or missing pins.
-
Ensure that none of the keys are depressed.
-
Replace keyboard.
Parity Check 2
Parity RAM failure.
Run Computer Setup and Diagnostic utilities.
На чтение 3 мин. Просмотров 11 Опубликовано 15.12.2019
Автор Кристина Олещук задал вопрос в разделе Железо
После того как я переставил батарею процессора,при загрузке винды пишет «system fan can not be detected»что делать? и получил лучший ответ
Ответ от Ёергей .[гуру]
что за батарея процессора?

I am working on a computer that is giving me a error saying «515 — Power supply fan not dectected I tested with another power supply from a
working workstation and same issue. I reset the bios by holding down the yellow button on the motherboard for 5 seconds. and same issue.
I have tried two different power supply’s and the same issue. As soon as I turn the computer on the power supply fan start spinning like an airplane engine. I thought it was the CPU and tested with another CPU. Same issue. I had never seen this issue before. And I’ve been working with desktop for a long time.
Here is the solution to fix HP 515 error Power Supply Fan Not Detected error.
For those of you who are here who have installed a new power supply into your HP machine and want to get rid of the power supply fan error (515), there are a couple of possible solutions.
The problem is based on the fact that the original power supply provides a tachometric signal from the OEM PSU (tacho- meaning speed, and metric meaning the measure of) to the motherboard that tells it if our PSU fan is spinning and everything is ok. When the power supply is replaced, that signal is no longer provided to the motherboard.
To fix the 515 Power Supply Fan error, you must find some other way of providing the tachometric signal that the motherboard is expecting to see at boot to avoid encountering the fan error.
We could take the easy route and take advantage of the fact that we already have places on our motherboard outputting the tachometric signal that the other part of the motherboard is expecting! This signal is found on any fan connector on the motherboard for which a fan is connected and spinning. For a generic fan connector this signal is outputted from the SENSE signal or pin 3 on this diagram below.
So our goal really becomes, find which pin on our motherboard that is expecting to have a tachometric signal provided to it (for 8000 series it is pin 2 on the P2 connector according to below picture and send the signal from our cpu or case fan (pin 3 on a generic connector), to that pin on the motherboard using a single piece of insulated wire.
This is the finished wire on HP 8000 series machine and it successfully bypasses the fan error at little to no cost.
You should upgrade or use an alternative browser.
- Status
- Not open for further replies.
-
- Nov 23, 2019
-
- 4
-
- 0
-
- 10

-
#1
I have an HP 8000 Elite which I recently changed it’s power supply.
The computer is working great, but when I turn on the computer, I get a 515 power supply fan not detected error.
I can press F1 to continue anyway, but it’s really annoying.
I did some research but all the diagrams are a bit different from what I have.
I found this schema:
View: https://imgur.com/58qTH6B
And I was wondering if I should do the same wiring ?
Which wire should I connect to which?
Thanks!
![]()
-
- Jun 17, 2015
-
- 4,917
-
- 46
-
- 12,990
-
#2
if you used the exact part shouldn’t make this weird report, if you used a different part, well, all you can do is read, cut solder, buy adaptors and similar stuff to make it work the way you need it
that or sell the thing, a prebuilt pc is always just problems
-
- Nov 23, 2019
-
- 4
-
- 0
-
- 10
-
#3
did you used a normal psu or a exact replacement part for that hp?if you used the exact part shouldn’t make this weird report, if you used a different part, well, all you can do is read, cut solder, buy adaptors and similar stuff to make it work the way you need it
that or sell the thing, a prebuilt pc is always just problems
hey,
I had to get an adapter because the motherboard had a 6 pin connector:
https://www.ebay.com/itm/323857034491
-
#4
hey,I have an HP 8000 Elite which I recently changed it’s power supply.
The computer is working great, but when I turn on the computer, I get a 515 power supply fan not detected error.
I can press F1 to continue anyway, but it’s really annoying.
I did some research but all the diagrams are a bit different from what I have.I found this schema:
View: https://imgur.com/58qTH6B
And I was wondering if I should do the same wiring ?
Which wire should I connect to which?
Thanks!
I have hp8200 elite town also.then i get the answer as below
https://linustechtips.com/main/topi…sff-fix/page/5/?tab=comments#comment-13194112
-
- Nov 23, 2019
-
- 4
-
- 0
-
- 10
-
#5
hey yonkhuan,
So just to be sure about what I need to do, I need to remove the yellow cord entirely (from the 12 pin connector, and the 6 pin connector) and split the green cord from the fan into the 6 pin connector where the yellow cord was ?
-
#6
Last edited: Jan 11, 2020
-
- Nov 23, 2019
-
- 4
-
- 0
-
- 10
-
#7
- Status
- Not open for further replies.
Similar threads
- Advertising
- Cookies Policies
- Privacy
- Term & Conditions
We have solved this HP Press F1 Power Supply Fan Not Detected 515 error problem!
Just use our HP Adapter Cables and it will work out-of-the-box WITHOUT the 515 error instantly.
NO more DIY is required! This is the final perfect solution to this well-known HP Power Supply Fan Not Detected 515 error.
Buy one at HP Adapter Cables from modDIY.com now!
Below manual fix is ONLY required if you are NOT using our HP adapter cable.
Here is the solution to fix HP 515 error Power Supply Fan Not Detected error.
For those of you who are here who have installed a new power supply into your HP machine and want to get rid of the power supply fan error (515), there are a couple of possible solutions.
The problem is based on the fact that the original power supply provides a tachometric signal from the OEM PSU (tacho- meaning speed, and metric meaning the measure of) to the motherboard that tells it if our PSU fan is spinning and everything is ok. When the power supply is replaced, that signal is no longer provided to the motherboard.
To fix the 515 Power Supply Fan error, you must find some other way of providing the tachometric signal that the motherboard is expecting to see at boot to avoid encountering the fan error.
We could take the easy route and take advantage of the fact that we already have places on our motherboard outputting the tachometric signal that the other part of the motherboard is expecting! This signal is found on any fan connector on the motherboard for which a fan is connected and spinning. For a generic fan connector this signal is outputted from the SENSE signal or pin 3 on this diagram below.
So our goal really becomes, find which pin on our motherboard that is expecting to have a tachometric signal provided to it (for 8000 series it is pin 2 on the P2 connector according to below picture and send the signal from our cpu or case fan (pin 3 on a generic connector), to that pin on the motherboard using a single piece of insulated wire.
This is the finished wire on HP 8000 series machine and it successfully bypasses the fan error at little to no cost.

Tags:
- power supply fan not detected
- hp psu adapter 515 Error
- error power supply fan not detected