
The code and inputs
I’m trying to establish SSL connection and I’m getting 400 No required SSL certificate was sent response from the server. I’m doing this in a standard way like it’s described for example here; I run Java 8.
The sample of my code would be:
    OkHttpClient client     = new OkHttpClient();
    KeyStore keyStoreClient = getClientKeyStore();
    KeyStore keyStoreServer = getServerKeyStore();
    String algorithm        = ALGO_DEFAULT;//this is defined as "PKIX"

    KeyManagerFactory keyManagerFactory = KeyManagerFactory.getInstance(algorithm);
    keyManagerFactory.init(keyStoreClient, PASSWORD_SERVER.toCharArray());

    SSLContext sslContext = SSLContext.getInstance("TLS");

    TrustManagerFactory trustManagerFactory = TrustManagerFactory.getInstance(algorithm);
    trustManagerFactory.init(keyStoreServer);

    sslContext.init(keyManagerFactory.getKeyManagers(), trustManagerFactory.getTrustManagers(), new SecureRandom());

    client.setSslSocketFactory(sslContext.getSocketFactory());
    client.setConnectTimeout(32, TimeUnit.SECONDS); // connect timeout
    client.setReadTimeout(32, TimeUnit.SECONDS);    // socket timeout

    return client;
And here is the code that I use to send GET-request:
public String get(String url) throws IOException
{
    String callUrl  = URL_LIVE.concat(url);
    Request request = new Request.Builder()
            .url(callUrl)
            .build();
    Response response = this.client.newCall(request).execute();
    return response.body().string();
}
I enabled:
System.setProperty("javax.net.debug", "ssl");
So to see debug messages — but there’s no errors/warnings/alerts there, the only thing is in the very end:
main, called close()
main, called closeInternal(true)
main, SEND TLSv1.2 ALERT:  warning, description = close_notify
main, WRITE: TLSv1.2 Alert, length = 26
main, called closeSocket(true)
Which is the only thing I can treat as «abnormal» stuff (but I doubt it is).
I tried:
- Different protocols disabling/enabling. For instance, forcing
TLSv1/TLSv1.1for the socket with no success. To try that I wrapped my ssl factory into another factory which disables/enables certain protocols. - Disabling
SSLv2Hello— but it doesn’t change the picture. - Install Oracle policies because before there were notices about some skipped algorithms and this installation «solved» that but the overall result is still same.
- Setting
System.setProperty("sun.security.ssl.allowUnsafeRenegotiation", "true");— lame, but also didn’t change a thing apart from message in the logAllow unsafe renegotiation: true(was «false» obviously) - Using
KeyManagerFactory.getDefaultAlgorithm()asalgorithmforKeyManagerFactory.getInstance()call. That raises exceptionGet Key failed: Given final block not properly paddedand as far as I got the idea, it’s because of wrong algorithm used (read this). My default algorithm is:SunX509 - Adding the certificate directly to my machine with
keytool -importcert -file /path/to/certificate -keystore keystore.jks -alias "Alias"and then using this in my program viaSystem.setProperty("javax.net.ssl.trustStore","/path/to/keystore.jks");with setting password:System.setProperty("javax.net.ssl.trustStorePassword","mypassword");(I set password inkeytoolafter which confirmed trusted certificate withyes); see this and this posts. No errors were raised with this — but issue persisted. - Adding the certificate to the global keystore (the one located in
JAVA_PATH/jre/lib/security/cacerts) with:keytool -import -trustcacerts -keystore cacerts -storepass changeit -noprompt -alias Alias -file /path/to/certificate(see this); looks like import operation was successful but it didn’t change the picture
There’s also notice in debug: ssl: KeyMgr: choosing key: 1 (verified: OK) — not sure if it’s relevant as I’m not SSL expert.
Unfortunately I can not see the server-side logs so I can’t observe the full picture.
Question
What can be the reason for this 400 error and how can I progress further (debug/try something else) ? Any tips would be much appreciated.
I’ve been having the title error from my browser when trying to set up SSL enabled nginx server with client verification on
Below is my nginx.conf:
keepalive_timeout  100;

server_tokens off;

server {
    listen 10.111.1.11:11111;
    server_name localhost;
    ssl on;
    ssl_certificate ca.crt;
    ssl_certificate_key newca.key;
    ssl_client_certificate client.crt;
    ssl_verify_client on;

    location / {
        root html;
        index index.html index.htm;
        proxy_ssl_session_reuse off;
        proxy_pass http://10.111.1.11::1234;
        proxy_ssl_name 10.111.1.11;
        proxy_ssl_server_name on;
        proxy_ssl_protocols SSLv3 TLSv1 TLSv1.1 TLSv1.2;
        proxy_ssl_ciphers HIGH:!aNULL:!MD5;
        proxy_ssl_certificate ca.crt;
        proxy_ssl_certificate_key newca.key;
    }
}
and below are my steps in generating the certificates and keys:
Create the CA Key and Certificate for signing Client Certs
openssl genrsa -des3 -out ca.key 4096
openssl req -new -x509 -days 365 -key ca.key -out ca.crt
Create the Client Key and CSR
openssl genrsa -des3 -out client.key 4096
openssl req -new -key client.key -out client.csr
My organization name,common name,email are different for ca.crt and client.crt values
Common name for ca.crt is server IP
Common name for client.crt is client IP
Sign the client certificate with our CA cert
openssl x509 -req -days 365 -in client.csr -CA ca.crt -CAkey ca.key -set_serial 01 -out client.crt
Convert to .p12 so import in OSX works
openssl pkcs12 -export -clcerts -inkey client.key -in client.crt -out client.p12 -name "MyKey"
Removed passphrase for both ca and client keys
openssl rsa -in ca.key -out newca.key

openssl rsa -in client.key -out newclient.key
I tried uploading the client.crt and client.p12 to my browser as Trusted Root Certification Authorities and still to no avail (same error).
Any tips?
Set nginx to debug and here is the output.
2018/04/08 11:27:37 [error] 1552#1552: *39078 open() "/srv/www/[redacted]/current/web/favicon.ico" failed (2: No such file or directory), client: 162.158.58.176, server: [redacted], request: "GET /favicon.ico HTTP/1.1", host: "[redacted]", referrer: "https://[redacted]/"
2018/04/13 03:12:35 [debug] 6145#6145: *1 SSL_do_handshake: -1
2018/04/13 03:12:35 [debug] 6145#6145: *1 SSL_get_error: 2
2018/04/13 03:12:35 [debug] 6145#6145: *1 epoll add event: fd:20 op:1 ev:80002001
2018/04/13 03:12:35 [debug] 6145#6145: *1 event timer add: 20: 60000:1523589215193
2018/04/13 03:12:35 [debug] 6145#6145: *1 reusable connection: 0
2018/04/13 03:12:35 [debug] 6145#6145: *1 SSL handshake handler: 0
2018/04/13 03:12:35 [debug] 6145#6145: *1 SSL_do_handshake: 1
2018/04/13 03:12:35 [debug] 6145#6145: *1 SSL: TLSv1.2, cipher: "ECDHE-ECDSA-AES128-GCM-SHA256 TLSv1.2 Kx=ECDH Au=ECDSA Enc=AESGCM(128) Mac=AEAD"
2018/04/13 03:12:35 [debug] 6145#6145: *1 reusable connection: 1
2018/04/13 03:12:35 [debug] 6145#6145: *1 http wait request handler
2018/04/13 03:12:35 [debug] 6145#6145: *1 malloc: 00005590B1CE93B0:1024
2018/04/13 03:12:35 [debug] 6145#6145: *1 SSL_read: -1
2018/04/13 03:12:35 [debug] 6145#6145: *1 SSL_get_error: 2
2018/04/13 03:12:35 [debug] 6145#6145: *1 free: 00005590B1CE93B0
2018/04/13 03:12:35 [debug] 6145#6145: *1 http wait request handler
2018/04/13 03:12:35 [debug] 6145#6145: *1 malloc: 00005590B1CE93B0:1024
2018/04/13 03:12:35 [debug] 6145#6145: *1 SSL_read: 920
2018/04/13 03:12:35 [debug] 6145#6145: *1 SSL_read: -1
2018/04/13 03:12:35 [debug] 6145#6145: *1 SSL_get_error: 2
2018/04/13 03:12:35 [debug] 6145#6145: *1 reusable connection: 0
2018/04/13 03:12:35 [debug] 6145#6145: *1 posix_memalign: 00005590B1BB95F0:4096 @16
2018/04/13 03:12:35 [debug] 6145#6145: *1 http process request line
2018/04/13 03:12:35 [debug] 6145#6145: *1 http request line: "GET / HTTP/1.1"
2018/04/13 03:12:35 [debug] 6145#6145: *1 http uri: "/"
2018/04/13 03:12:35 [debug] 6145#6145: *1 http args: ""
2018/04/13 03:12:35 [debug] 6145#6145: *1 http exten: ""
2018/04/13 03:12:35 [debug] 6145#6145: *1 posix_memalign: 00005590B1CE9B50:4096 @16
2018/04/13 03:12:35 [debug] 6145#6145: *1 http process request header line
2018/04/13 03:12:35 [debug] 6145#6145: *1 http header: "Host: [redacted]"
2018/04/13 03:12:35 [debug] 6145#6145: *1 http header: "Connection: Keep-Alive"
2018/04/13 03:12:35 [debug] 6145#6145: *1 http header: "Accept-Encoding: gzip"
2018/04/13 03:12:35 [debug] 6145#6145: *1 http header: "CF-IPCountry: US"
2018/04/13 03:12:35 [debug] 6145#6145: *1 http header: "X-Forwarded-For: 75.82.11.54"
2018/04/13 03:12:35 [debug] 6145#6145: *1 http header: "CF-RAY: 40aac07bd82477b4-LAX"
2018/04/13 03:12:35 [debug] 6145#6145: *1 http header: "X-Forwarded-Proto: https"
2018/04/13 03:12:35 [debug] 6145#6145: *1 http header: "CF-Visitor: {"scheme":"https"}"
2018/04/13 03:12:35 [debug] 6145#6145: *1 http header: "cache-control: max-age=0"
2018/04/13 03:12:35 [debug] 6145#6145: *1 http header: "upgrade-insecure-requests: 1"
2018/04/13 03:12:35 [debug] 6145#6145: *1 http header: "user-agent: Mozilla/5.0 (Macintosh; Intel Mac OS X 10_13_4) AppleWebKit/537.36 (KHTML, like Gecko) Chrome/65.0.3325.181 Safari/537.36"
2018/04/13 03:12:35 [debug] 6145#6145: *1 http header: "accept: text/html,application/xhtml+xml,application/xml;q=0.9,image/webp,image/apng,*/*;q=0.8"
2018/04/13 03:12:35 [debug] 6145#6145: *1 http header: "accept-language: en-US,en;q=0.9"
2018/04/13 03:12:35 [debug] 6145#6145: *1 http header: "cookie: [redacted]"
2018/04/13 03:12:35 [debug] 6145#6145: *1 http header: "CF-Connecting-IP: [redacted]"
2018/04/13 03:12:35 [debug] 6145#6145: *1 http header done
2018/04/13 03:12:35 [info] 6145#6145: *1 client sent no required SSL certificate while reading client request headers, client: 108.162.215.129, server:[redacted], request: "GET / HTTP/1.1", host: "[redacted]"
2018/04/13 03:12:35 [debug] 6145#6145: *1 http finalize request: 496, "/?" a:1, c:1
2018/04/13 03:12:35 [debug] 6145#6145: *1 event timer del: 20: 1523589215193
2018/04/13 03:12:35 [debug] 6145#6145: *1 http special response: 496, "/?"
2018/04/13 03:12:35 [debug] 6145#6145: *1 http set discard body
2018/04/13 03:12:35 [debug] 6145#6145: *1 xslt filter header
2018/04/13 03:12:35 [debug] 6145#6145: *1 charset: "" > "utf-8"
2018/04/13 03:12:35 [debug] 6145#6145: *1 HTTP/1.1 400 Bad Request
Server: nginx
Date: Fri, 13 Apr 2018 03:12:35 GMT
Content-Type: text/html; charset=utf-8
Content-Length: 648
Connection: close
X-Frame-Options: SAMEORIGIN
X-Content-Type-Options: nosniff
X-XSS-Protection: 1; mode=block
Если вы ежедневно пользуетесь интернетом, вы наверняка сталкивались с неполадками сети. Иногда вместо желаемой страницы браузер показывает код ошибки. Когда веб-сервер и клиент (т. е. браузер) общаются друг с другом, они передают сообщения о состоянии. И только когда возникает ошибка, появляется соответствующее сообщение. Ошибка HTTP 400 говорит, что с запросом клиента что-то пошло не так. Что значит ошибка 400 Bad Request и как её исправить?

Способы исправления ошибки 400 Bad Request.
Что такое ошибка 400 Bad Request
Со статусом ошибки веб-сервер показывает статус запросов. Если сервер возвращает запрос с ошибкой 200 (которую при обычном сёрфинге не видно), это означает, что всё в порядке – запрос был успешным, и желаемый контент был передан. Другое дело, когда появляются ошибка 400 bad request или 500, так как они указывают на несколько возможных проблем. Все ошибки 1xx являются информационными, 2xx – успешные запросы, 3xx и далее означает, что передача данных прошла успешно, но клиент должен выполнить дополнительный шаг. Обычно это связано с обменом информацией, который браузер делает автоматически. В сообщениях об ошибках дела обстоят несколько иначе. В то время как ошибки 5xx связаны с сервером, 4xx относятся к ошибочным запросам клиента.
Почему это происходит
Это значит, что сам запрос каким-то образом стал неправильным. HTTP-протокол не был соблюдён (по крайней мере, согласно веб-серверу), поэтому запрос не может быть обработан. Сервер интерпретировал запрос как ошибочный или даже вредоносный, поэтому не отображает содержимое страницы. Причины таких неполадок обычно связаны с используемым браузером или с неправильным вводом данных пользователем:
- Неправильный URL – если пользователь вводит неправильный адрес или, например, использует специальные запрещённые символы.
- Неправильные файлы cookie – если файлы cookie в вашем браузере устарели или не соответствуют содержимому, это тоже может стать причиной появления ошибки 400 Bad Request.
- Устаревшие записи DNS – кэш DNS может содержать данные, которые ссылаются на неверные IP-адреса.
- Слишком большие файлы – если вы пытаетесь загрузить большие файлы, сервер может отказаться их принимать. Он классифицирует это как «Bad Request» (плохой запрос).
- Слишком длинный заголовок – для определения запроса при общении клиента и сервера используется заголовок. Некоторые веб-серверы устанавливают максимальный предел для его длины.

Причины довольно разнообразны, поэтому сразу определить, что вызвало «HTTP 400 Bad Request» невозможно. Однако, если целевой сервер использует IIS 7.0, IIS 7.5 или IIS 8.0, более подробную информацию можно получить из кода ошибки:
- 1 – недопустимый заголовок пункта назначения;
- 2 – недопустимый заголовок глубины;
- 3 – недопустимый заголовок операции;
- 4 – недопустимый заголовок перезаписи;
- 5 – неверный заголовок перевода;
- 6 – недействительный запрос;
- 7 – недопустимая длина содержимого;
- 8 – недействительный таймаут;
- 9 – недействительный токен блокировки.
Ошибка 400 вступает в игру не только при сёрфинге. Такую ошибку от сервера также могут получать и другие программы, такие как клиенты электронной почты.
Для исправления ошибки 400 иногда достаточно просто обновить страницу. Особенно, если на этом сайте ошибка появилась впервые. Если обновление страницы не решит проблему, попробуйте почистить кэш браузера. Возможно, он сохранил копию сообщения об ошибке как оригинал целевой страницы.
Проблема с браузером
Ошибка HTTP 400 возникает, если заголовок HTTP слишком длинный. В принципе, заголовки не имеют ограничения по размеру, однако целевой сервер, возможно, установил предел. Заголовок состоит из нескольких полей, в которых определены запросы и ответы. Если оба абонента соответствуют параметрам, запрашиваемые данные будут передаваться без проблем. Если это не сработает, появится сообщение об ошибке. Поскольку процесс связан с обменом данными между браузером и сервером, а Bad Request обычно вызван проблемами с клиентом, вероятно, причиной ошибки является браузер. Лучший способ проверить, может ли ваш браузер по умолчанию быть причиной проблемы – временно переключиться на другой.
Если с помощью другого браузера доступ к странице получить удалось, вернитесь к исходному браузеру и удалите все файлы cookie (если вы ещё этого не сделали). Куки-файлы передаются в заголовке. Это значит, что сервер узнает о вашем предыдущем посещении. Если браузеру приходится обрабатывать слишком много запросов, заголовок может превышать ограничение длины. Если это проблема с сетью сохранится, и ошибка 400 будет возникать даже на YouTube, полностью переустановите браузер или сбросьте его настройки по умолчанию. В Firefox введите about:support. Здесь вы найдёте много полезной информации, которая поможет обнаружить ошибки. Даже если вы обратитесь в службу поддержки, всё же важно иметь эти данные. На этой странице есть кнопка «Очистить Firefox». После нажатия расширения и некоторые настройки будут удалены, но текущие параметры сохранятся.
Удаление ненужных данных в Firefox:
- войдите в параметры из главного меню;
- перейдите на вкладку «Конфиденциальность»;
- нажмите «Удалить файлы cookie»;
- повторите попытку доступа к сайту, проблема должна быть решена.

В Internet Explorer используйте кнопку «Сброс» или «Восстановить значения по умолчанию». Она находится в настройках на вкладке «Дополнительно». Поскольку Internet Explorer воспринимает кэш и cookie как настройки, их также рекомендуется удалить. Удаление ненужных данных в Internet Explorer:
- Инструменты – Свойства обозревателя;
- Общие – История – Настройки;
- Просмотр файлов.
Вы можете находить эти файлы cookie и удалять их вручную регулярно.
Функция сброса параметров в Chrome доступна в системных настройках. Браузер сохранит ваши личные данные, такие как пароли и история, а всё остальное будет сброшено до исходного состояния. Закройте браузер и перезапустите его, чтобы изменения вступили в силу. Удаление ненужных данных в Google Chrome:
- зайдите в настройки;
- в поле поиска введите «cookie», затем нажмите «Настройки контента»;
- в разделе «Файлы cookie» нажмите «Все файлы cookie и данные сайта»;
- выберите конкретный файл cookie, чтобы удалить его.

Вирусы
Причиной возникновения 400 Bad Request могут быть вирусы, попавшие на ПК из интернета. Откройте свой антивирус и запустите полное глубокое сканирование системы. Большинство популярных программ имеют схожие функции и меню, поэтому проблем возникнуть не должно. Дождитесь окончания сканирования ПК. Если вирусы были найдены, откорректируйте настройки, удалите их и перезагрузите ПК. Если же проблемы обнаружены не были, переходите к следующему шагу.
Проблемы у интернет-провайдера
К сожалению, описанные выше решения не всегда решают проблему. Тогда вам следует обратиться за помощью в другое место. Частота появления ошибки (только на одном сайте или на всех сразу) подскажет, куда следует обратиться за помощью. Если код ошибки 400 возникает только на определённом сайте, и попытки её исправить не увенчались успехом, вы можете связаться с администратором ресурса или оператором сайта. Если ошибка появляется на всех страницах, и вы не можете пользоваться интернетом, обратитесь к своему провайдеру. В любом случае, служба поддержки может помочь вам.
В обеих ситуациях вы должны предоставить столько информации, сколько сможете. Она включает в себя все попытки, которые вы уже предприняли, чтобы избавиться от ошибки. С другой стороны, вам также необходимо предоставить информацию о вашей системе: какую ОС и браузер вы используете? Есть ли установленные расширения? Используете ли вы брандмауэр или прокси? Вся эта информация поможет оператору и веб-мастеру решить проблему. Если вы недавно изменили ISP или интернет-провайдер очень медленный или ненадёжный, то веб-трафик с вашего ПК на любой сайт в интернете может быть повреждён. Интернет-провайдер может перенастроить некоторые из своих настроек (например, ввести новые прокси-серверы или кешировать), что вызывает нестабильность. Возможным признаком проблем здесь является то, что вы не сможете просматривать сайты.
Проблемы с .NET Framework
Ошибка 400 Bad Request может возникнуть в результате повреждения или неудачного обновления библиотеки .NET Framework. Скачайте с официального сайта Microsoft последнюю версию плагина и переустановите его. Перезагрузите ПК и проверьте доступ к сайту.
Проблемы с антивирусом
Некоторое антивирусное ПО блокирует сайты и контент, который считается нежелательным или вредоносным. При этом может возникнуть сбой сети. Попробуйте отключить сканирование системы в антивирусе или просто завершить процесс. Если после этого ошибка исчезнет, обновите свой антивирус или скачайте любой другой.
Проблема с брандмауэром
Всегда используйте брандмауэр и хорошую защиту от вирусов и шпионских программ. Осторожней переходите по ссылкам во всплывающих окнах и контекстной рекламе. Если безопасность вашего ПК будет нарушена, злоумышленники смогут получить несанкционированный доступ к данным, устранить последствия которого практически невозможно.
Проблемы с windows
Если ваш компьютер недостаточно защищён, могут возникнуть всевозможные проблемы, в том числе HTTP 400. Включите автоматические обновления безопасности от Microsoft и очистите реестр. Сделать это можно с помощью специальных утилит, например, CCleaner. На некоторых сайтах социальных сетей и игр вам предлагается загрузить и запустить специальное ПО, которое позволит напрямую взаимодействовать с другими людьми в интернете (без использования веб-браузера). Это ПО, если оно написано неправильно или даже незаконно, может повредить весь HTTP-трафик с вашего ПК. Избавиться от такого нежелательного софта может быть очень сложно. В худшем случае вам, возможно, придётся переустановить свою операционную систему.
СОВЕТ. Если на вашем компьютере установлено два или более браузера, проверьте доступ к сайту на всех из них. Если на каком-либо браузере вам всё же удастся получить доступ к сайту без ошибок, используйте только его, а остальные удалите или обновите. Если вы столкнулись с проблемой на довольно небольшом сайте, посетите некоторые из таких крупных сайтов, как Amazon, Ebay, Google, Microsoft или Yahoo. Если проблема возникает только на небольших ресурсах, это указывает на кривой трафик с вашего ПК.
Как видите, избавиться от ошибки 400 можно по-разному. Если администрация сайта ответит, что проблема возникает только у вас, тогда обратитесь к своему поставщику интернета. Возможно, исправить неполадки можно с помощью нескольких простых настроек ПК. Если вы знаете ещё какие-либо способы борьбы с ошибкой 400, поделитесь с нашими читателями в комментариях.
На чтение 7 мин. Просмотров 14 Опубликовано 15.12.2019
При посещении веб-сайта с установленным сертификатом безопасности (для шифрования данных по протоколам SSL/TLS), который браузер не может проверить, выдаются следующие предупреждения:
Internet Explorer:
«Сертификат безопасности этого веб-узла не был выпущен доверенным центром сертификации».
Firefox 3:
«(Имя сайта) использует недействительный сертификат безопасности. К сертификату нет доверия, так как сертификат его издателя неизвестен». Или: «(Имя сайта) использует недействительный сертификат безопасности. К сертификату нет доверия, так как он является самоподписанным».
Давайте разберемся, почему браузеры так реагируют на некоторые сертификаты и как от избавиться от этой ошибки.
Содержание
- Почему возникает ошибка SSL?
- Самоподписанные SSL сертификаты
- Ошибка в установке SSL сертификата
- Другие сообщения браузеров об ошибке SSL
- Очередь просмотра
- Очередь
- YouTube Premium
- Хотите сохраните это видео?
- Пожаловаться на видео?
- Понравилось?
- Не понравилось?
- Текст видео
Почему возникает ошибка SSL?
Браузеры обычно разрабатываются с уже встроенным списком доверенных поставщиков SSL сертификатов. К таким относятся всем известные компании Comodo, Thawte, Geotrust, Symantec, RapidSSL, GlobalSign и некоторые другие.


Тем не менее многие поставщики SSL сертификатов в этих списках отсутствуют, так как далеко не у всех есть договоренности с разработчиками веб-браузеров. При открытии сайта с SSL сертификатом, выданным одним из таких поставщиков, браузер выдает предупреждение, что Центр сертификации (ЦС), выдавший SSL сертификат, не является доверенным. То же происходит, когда на сайте установлен самоподписанный SSL сертификат. Internet Explorer выдает довольно общее предупреждение, тогда как Firefox 3 различает SSL сертификаты, выданные самим сервером (самоподписанные SSL сертификаты), и другие виды недоверенных сертификатов.
Если Вы купили SSL сертификат у нас и после его установки возникает такая ошибка, Вы можете устранить ее, следуя инструкциям ниже. Нет необходимости устанавливать дополнительное ПО на клиентские устройства и приложения, чтобы устранить ошибку с доверенным SSL сертификатом. Первое, что следует сделать, это найти причину ошибки SSL с помощью тестера SSL сертификатов. Перейдя по ссылке, Вы можете ввести Ваш домен и запустить проверку SSL сертификата. Если присутствует ошибка SSL о недоверенном сертификате, сервис об этом сообщит. Он различает два типа ошибок:
Самоподписанные SSL сертификаты
Возможной причиной подобной ошибки SSL может быть установленный на сервере самоподписанный SSL сертификат. Браузеры не принимают самоподписанные сертификаты, потому что они сгенерированы Вашим сервером, а не независимым центром сертификации. Чтобы определить, является ли Ваш SSL сертификат самоподписанным, посмотрите с помощью вышеназванного тестера, указан ли центр сертификации в поле Issuer. В случае самоподписанного SSL, в этой графе указывается название Вашего сервера и далее написано «Self-signed».
 Решение: Купить SSL сертификат от доверенного центра сертификации.
Если после установки доверенного SSL сертификата на Вашем сервере нашелся самоподписанный, мы рекомендуем пересмотреть инструкции по установке и убедится, что Вы выполнили все нужные шаги.
Ошибка в установке SSL сертификата
Наиболее распространенной причиной ошибки типа «к сертификату нет доверия» — это неверная установка SSL на сервер (или серверы), на котором размещен сайт. С помощью все того же тестера SSL сертификатов Вы можете проверить, в этом ли причина проблемы. В блоке Certification Paths перечислены промежуточные и корневые сертификаты, установленные на Вашем сервере. Если в этом блоке указано «Path #X: Not trusted», значит у Вас ошибка в установке SSL сертификата и клиенту не удалось установить издателя Вашего SSL сертификата.
Решение: Чтобы устранить эту ошибку SSL, установите файл промежуточного сертификата на сервер, следуя инструкциям по установке для Вашего сервера. Промежуточные и корневые сертификаты Вы можете скачать в личном кабинете, вместе с Вашим основным SSL сертификатом.
После установки сертификата дополнительно убедитесь, что установка была произведена правильно. Если нужно, перезагрузите сервер.
Другие сообщения браузеров об ошибке SSL
Ниже приведены еще несколько предупреждающих сообщений, выдаваемых различными браузерами. Internet Explorer 6:
«Информация, которой Вы обмениваетесь с этим сайтом, не может быть просмотрена или изменена другими. Тем не менее, имеются замечания по сертификату безопасности сайта. Сертификат безопасности выдан компанией, не входящей в состав доверенных. Просмотрите сертификат, чтобы определить, следует ли доверять центру сертификации. Хотите продолжить?»
Internet Explorer 7:
«Сертификат безопасности этого веб-узла не был выпущен доверенным центром сертификации. Наличие ошибок в сертификате безопасности может означать, что вас пытаются обмануть или хотят перехватить информацию, передаваемую на сервер».
The code and inputs
I’m trying to establish SSL connection and I’m getting 400 No required SSL certificate was sent response from the server. I’m doing this in a standard way like it’s described for example here; I run Java 8.
The sample of my code would be:
And here is the code that I use to send GET-request:
So to see debug messages — but there’s no errors/warnings/alerts there, the only thing is in the very end:
Which is the only thing I can treat as «abnormal» stuff (but I doubt it is).
I tried:
- Different protocols disabling/enabling. For instance, forcing TLSv1 / TLSv1.1 for the socket with no success. To try that I wrapped my ssl factory into another factory which disables/enables certain protocols.
- Disabling SSLv2Hello — but it doesn’t change the picture.
- Install Oracle policies because before there were notices about some skipped algorithms and this installation «solved» that but the overall result is still same.
- Setting System.setProperty(«sun.security.ssl.allowUnsafeRenegotiation», «true»); — lame, but also didn’t change a thing apart from message in the log Allow unsafe renegotiation: true (was «false» obviously)
- Using KeyManagerFactory.getDefaultAlgorithm() as algorithm for KeyManagerFactory.getInstance() call. That raises exception Get Key failed: Given final block not properly padded and as far as I got the idea, it’s because of wrong algorithm used (read this). My default algorithm is: SunX509
- Adding the certificate directly to my machine with keytool -importcert -file /path/to/certificate -keystore keystore.jks -alias «Alias» and then using this in my program via System.setProperty(«javax.net.ssl.trustStore»,»/path/to/keystore.jks»); with setting password: System.setProperty(«javax.net.ssl.trustStorePassword»,»mypassword»); (I set password in keytool after which confirmed trusted certificate with yes ); see this and this posts. No errors were raised with this — but issue persisted.
- Adding the certificate to the global keystore (the one located in JAVA_PATH/jre/lib/security/cacerts ) with: keytool -import -trustcacerts -keystore cacerts -storepass changeit -noprompt -alias Alias -file /path/to/certificate (see this); looks like import operation was successful but it didn’t change the picture
There’s also notice in debug: ssl: KeyMgr: choosing key: 1 (verified: OK) — not sure if it’s relevant as I’m not SSL expert.
Unfortunately I can not see the server-side logs so I can’t observe the full picture.
Question
What can be the reason for this 400 error and how can I progress further (debug/try something else) ? Any tips would be much appreciated.
Очередь просмотра
Очередь
- Удалить все
- Отключить
YouTube Premium
![]()
Хотите сохраните это видео?
- Пожаловаться
Пожаловаться на видео?
Выполните вход, чтобы сообщить о неприемлемом контенте.
Понравилось?
Не понравилось?
Текст видео
For some reason unknown to me, nginx won’t redirect «400 Bad Request — No required SSL certificate was sent» errors that are generated when accessing an SSL enabled site via an IP address.
In my case I’m tunneling a subdomain via CloudFlare through my home router and want to redirect any requests made using the public IP address.
Using the usual error_page directive just doesn’t work.
I spent quite a while trying to find out why error_page won’t work for this specific 400 Bad Request situation and couldn’t find an answer so instead I came up with this workaround.
Create a config file as shown in /etc/nginx/sites-enabled/:
Obviously you’ll need to reference your own cert files and it may well work without any at all, I haven’t tried.
OS: CentOS 7
SW: NginX
Existing stuff
- dhparam.pem
- mydomain.com.crt
- mydomain.com.csr
- mydomain.com.key
Issue:
I’m trying to create a client verification by creating client certificates and then authenticate one servers requests with NginX to my destination server. However I constantly get the 400 Bad Request - No required SSL certificate was sent error message. What am I doing wrong? Here is what I did:
-
openssl genrsa -out client.key 4096
-
openssl req -new -key client.key -out client.csr
-
openssl x509 -req -days 365 -sha256 -in client.csr -CA mydomain.com.crt -CAkey client.key -set_serial 2 -out client.crt
Every command runs successfully, however, the error stays. Also in my NginX, on the destination server, I have:
ssl_certificate         /etc/nginx/ssl/mydomain.com.crt;
ssl_certificate_key     /etc/nginx/ssl/mydomain.com.key;
ssl_client_certificate  /etc/nginx/ssl/mydomain.com.crt;
NGINX Configuration:
server {
    listen 80;
    listen 443 ssl;

    ssl_dhparam /etc/nginx/ssl/dhparam.pem;
    ssl_protocols TLSv1 TLSv1.1 TLSv1.2;
    ssl_prefer_server_ciphers on;
    ssl_ciphers "EECDH+AESGCM:EDH+AESGCM:ECDHE-RSA-AES128-GCM-SHA256:AES256+EECDH:DHE-RSA-AES128-GCM-SHA256:AES256+EDH:ECDHE-RSA-AES256-GCM-SHA384:DHE-RSA-AES256-GCM-SHA384:ECDHE-RSA-AES256-SHA384:ECDHE-RSA-AES128-SHA256:ECDHE-RSA-AES256-SHA:ECDHE-RSA-AES128-SHA:DHE-RSA-AES256-SHA256:DHE-RSA-AES128-SHA256:DHE-RSA-AES256-SHA:DHE-RSA-AES128-SHA:ECDHE-RSA-DES-CBC3-SHA:EDH-RSA-DES-CBC3-SHA:AES256-GCM-SHA384:AES128-GCM-SHA256:AES256-SHA256:AES128-SHA256:AES256-SHA:AES128-SHA:DES-CBC3-SHA:HIGH:!aNULL:!eNULL:!EXPORT:!DES:!MD5:!PSK:!RC4";

    add_header Strict-Transport-Security "max-age=63072000; includeSubdomains; preload";

    ssl_certificate         /etc/nginx/ssl/mydomain.com.crt;
    ssl_certificate_key     /etc/nginx/ssl/mydomain.com.key;
    ssl_client_certificate  /etc/nginx/ssl/client.crt;

    ssl_verify_client optional;

    server_name uploads.mydomain.com;
    root /var/www/html/com.mydomain.uploads/public;

    error_log /var/log/nginx/mydomain.com/error.log;
    access_log /var/log/nginx/mydomain.com/access.log main;

    index index.php;

    rewrite ^/index.php?(.*)$ /$1 permanent;

    location / {
        try_files $uri @rewrite;
    }

    location @rewrite {
        rewrite ^(.*)$ /index.php/$1 last;
    }

    location ~ ^/index.php(/|$) {
        fastcgi_pass unix:/var/run/php-fpm/uploads.sock;
        fastcgi_split_path_info ^(.+.php)(/.*)$;
        include fastcgi_params;
        fastcgi_param SCRIPT_FILENAME $document_root$fastcgi_script_name;
        fastcgi_param SSL_CLIENT_VERIFY    $ssl_client_verify;
        fastcgi_param SSL_CLIENT_S_DN       $ssl_client_s_dn;
    }
}
![]()
Lenniey
5,1402 gold badges18 silver badges29 bronze badges
asked Jun 27, 2018 at 7:54
![]()
2
It was a very stupid mistake and now I’m ashamed of myself.
I though that the website certificates are the same as the CA ones. So now I’ve created new ca.key and ca.crt files and signed the clients certificate with them and voila.
ssl_certificate         /etc/nginx/ssl/mydomain.com.crt;

ssl_certificate_key     /etc/nginx/ssl/mydomain.com.key;

ssl_client_certificate  /etc/nginx/ssl/ca.crt;
So all the commands in order:
Create CA key and cert:
- openssl req -x509 -nodes -days 365 -newkey rsa:2048 -keyout
nginx-selfsigned.key -out nginx-selfsigned.crt
Create client key and CSR
- openssl genrsa -out client.key 2048
- openssl req -new -key client.key -out client.csr
Sign client CSR with CA files
- openssl x509 -req -days 3652 -sha256 -in client.csr -CA nginx-selfsigned.crt -CAkey nginx-selfsigned.key -set_serial 2 -out
client.crt
OPTIONAL: Convert client.crt to a base64 encoded pem including the private key
- openssl pkcs12 -export -clcerts -in client.crt -inkey
client.key -out client.p12 - openssl pkcs12 -in client.p12 -out client.pem -nodes
HUGE NOTE!
The Organization name of the CA files and Client files CANNOT BE EQUAL! Otherwise it will break and fail to authenticate.
I hope I’ve helped others who also as dumb as I was.
answered Jun 28, 2018 at 12:09
![]()
BertBert
9841 gold badge12 silver badges30 bronze badges
2
Доброго времени суток.
Настроен доступ на сайт https://ir.nalog.ru:8443/ais (Единый гос.реестр юр.лиц (ЕГРЮЛ) и Единый гос.реестр инд.предпринимателей (ЕГРИП)) :
Правило — «Allow Site ir.nalog.ru».
Протоколы — HTTP, HTTPS, 8443 SSL (также настроен SSL-туннель по порту 8443 на Bandwidth Splitter).
From — конкретный компьютер из внутренней сети.
Destination — «http://nalog.ru/*» (URL set), «*Nalog.Ru» (Domain Name set), также пробовал всю External-сеть.
Пользователи — сделал All Users.
Также на рабочий компьютер пользователя установлено КриптоПро, и установлены личные сертификаты для доступа.
Начала возникать ошибка:

По логам ISA: SSL-туннель по 8443 порту устанавливается:
Сами запросы в момент «отлупа»:
| Bytes Sent | Bytes Received | Client IP | Destination IP | Destination Port | Protocol | Action | Rule | Result Code | Log Record Type |
| 0 | 0 | 192.168.181.131 | 213.24.57.10 | 8443 | 8443 SSL | Initiated Connection | Allow Site ir.nalog.ru | 0x0 ERROR_SUCCESS | Firewall |
| 0 | 0 | 192.168.181.131 | 213.24.57.10 | 8443 | 8443 SSL | Initiated Connection | Allow Site ir.nalog.ru | 0x0 ERROR_SUCCESS | Firewall |
| 675 | 4033 | 192.168.181.131 | 213.24.57.10 | 8443 | 8443 SSL | Closed Connection | Allow Site ir.nalog.ru | 0x80074e24 FWX_E_CONNECTION_KILLED | Firewall |
Пробовал:
сделать All Outbound Traffic с компьютера пользователя на External,
установить сертификат от ir.Nalog.ru в «Доверенные ЦС» на прокси-сервере,
чистил SSL-кэш в браузере клиента,
чистил cookies в браузере клиента,
сброс параметров настройки IE по умолчанию (Сервис-Свойства-Дополнительно-Сброс),
настройка канала в BSplitter (http-boost 10Мбит/с на 20 сек с уменьшением до 5Мбит/с).
В свойствах протокола «8443 SSL» стоит только фильтр «BSplitter Filter».
Также, у другого пользователя перестала подключаться АРМ Поставщика ZakazRF.ru (тоже с именными сертификатами и КриптоПро), сам АРМ уже явно пишет ошибку «Удаленный хост разорвал подключение».
Насколько понимаю, при отправке http/https-запроса, часть его где-то теряется.
На прокси-сервер приезжали обновления kb2718704, kb2676562, kb2656376-v2, kb2712808; их в последствии откатил — но и это не дало результатов.
В какую сторону копать? Куда ещё можно смотреть?
Материал из Wiki — Iphoster — the best ever hosting and support. 2005 — 2023
Перейти к:навигация, поиск

Nginx — ошибка 400 Bad Request — No required SSL certificate was sent
Ошибка при входе на сайт по https:// :
Nginx - ошибка 400 Bad Request - No required SSL certificate was sent
может быть по нескольким причинам:
1) Браузер отправляет на Nginx неверный запрос, когда размер заголовков запроса больше допустимого предела. Например, большие куки.
Решение — увеличить размер больших заголовков для nginx в секции http {}:
large_client_header_buffers 4 16k;
и перезапустить nginx
2) Проверить в конфиге nginx наличие опций’ssl_client_certificate и ssl_verify_client
 ssl_client_certificate /etc/nginx/cloudflare.crt;
 ssl_verify_client
Закомментировать их и перезапустить nginx.
Set nginx to debug and here is the output.
2018/04/08 11:27:37 [error] 1552#1552: *39078 open() "/srv/www/[redacted]/current/web/favicon.ico" failed (2: No such file or directory), client: 162.158.58.176, server: [redacted], request: "GET /favicon.ico HTTP/1.1", host: "[redacted]", referrer: "https://[redacted]/"
2018/04/13 03:12:35 [debug] 6145#6145: *1 SSL_do_handshake: -1
2018/04/13 03:12:35 [debug] 6145#6145: *1 SSL_get_error: 2
2018/04/13 03:12:35 [debug] 6145#6145: *1 epoll add event: fd:20 op:1 ev:80002001
2018/04/13 03:12:35 [debug] 6145#6145: *1 event timer add: 20: 60000:1523589215193
2018/04/13 03:12:35 [debug] 6145#6145: *1 reusable connection: 0
2018/04/13 03:12:35 [debug] 6145#6145: *1 SSL handshake handler: 0
2018/04/13 03:12:35 [debug] 6145#6145: *1 SSL_do_handshake: 1
2018/04/13 03:12:35 [debug] 6145#6145: *1 SSL: TLSv1.2, cipher: "ECDHE-ECDSA-AES128-GCM-SHA256 TLSv1.2 Kx=ECDH Au=ECDSA Enc=AESGCM(128) Mac=AEAD"
2018/04/13 03:12:35 [debug] 6145#6145: *1 reusable connection: 1
2018/04/13 03:12:35 [debug] 6145#6145: *1 http wait request handler
2018/04/13 03:12:35 [debug] 6145#6145: *1 malloc: 00005590B1CE93B0:1024
2018/04/13 03:12:35 [debug] 6145#6145: *1 SSL_read: -1
2018/04/13 03:12:35 [debug] 6145#6145: *1 SSL_get_error: 2
2018/04/13 03:12:35 [debug] 6145#6145: *1 free: 00005590B1CE93B0
2018/04/13 03:12:35 [debug] 6145#6145: *1 http wait request handler
2018/04/13 03:12:35 [debug] 6145#6145: *1 malloc: 00005590B1CE93B0:1024
2018/04/13 03:12:35 [debug] 6145#6145: *1 SSL_read: 920
2018/04/13 03:12:35 [debug] 6145#6145: *1 SSL_read: -1
2018/04/13 03:12:35 [debug] 6145#6145: *1 SSL_get_error: 2
2018/04/13 03:12:35 [debug] 6145#6145: *1 reusable connection: 0
2018/04/13 03:12:35 [debug] 6145#6145: *1 posix_memalign: 00005590B1BB95F0:4096 @16
2018/04/13 03:12:35 [debug] 6145#6145: *1 http process request line
2018/04/13 03:12:35 [debug] 6145#6145: *1 http request line: "GET / HTTP/1.1"
2018/04/13 03:12:35 [debug] 6145#6145: *1 http uri: "/"
2018/04/13 03:12:35 [debug] 6145#6145: *1 http args: ""
2018/04/13 03:12:35 [debug] 6145#6145: *1 http exten: ""
2018/04/13 03:12:35 [debug] 6145#6145: *1 posix_memalign: 00005590B1CE9B50:4096 @16
2018/04/13 03:12:35 [debug] 6145#6145: *1 http process request header line
2018/04/13 03:12:35 [debug] 6145#6145: *1 http header: "Host: [redacted]"
2018/04/13 03:12:35 [debug] 6145#6145: *1 http header: "Connection: Keep-Alive"
2018/04/13 03:12:35 [debug] 6145#6145: *1 http header: "Accept-Encoding: gzip"
2018/04/13 03:12:35 [debug] 6145#6145: *1 http header: "CF-IPCountry: US"
2018/04/13 03:12:35 [debug] 6145#6145: *1 http header: "X-Forwarded-For: 75.82.11.54"
2018/04/13 03:12:35 [debug] 6145#6145: *1 http header: "CF-RAY: 40aac07bd82477b4-LAX"
2018/04/13 03:12:35 [debug] 6145#6145: *1 http header: "X-Forwarded-Proto: https"
2018/04/13 03:12:35 [debug] 6145#6145: *1 http header: "CF-Visitor: {"scheme":"https"}"
2018/04/13 03:12:35 [debug] 6145#6145: *1 http header: "cache-control: max-age=0"
2018/04/13 03:12:35 [debug] 6145#6145: *1 http header: "upgrade-insecure-requests: 1"
2018/04/13 03:12:35 [debug] 6145#6145: *1 http header: "user-agent: Mozilla/5.0 (Macintosh; Intel Mac OS X 10_13_4) AppleWebKit/537.36 (KHTML, like Gecko) Chrome/65.0.3325.181 Safari/537.36"
2018/04/13 03:12:35 [debug] 6145#6145: *1 http header: "accept: text/html,application/xhtml+xml,application/xml;q=0.9,image/webp,image/apng,*/*;q=0.8"
2018/04/13 03:12:35 [debug] 6145#6145: *1 http header: "accept-language: en-US,en;q=0.9"
2018/04/13 03:12:35 [debug] 6145#6145: *1 http header: "cookie: [redacted]"
2018/04/13 03:12:35 [debug] 6145#6145: *1 http header: "CF-Connecting-IP: [redacted]"
2018/04/13 03:12:35 [debug] 6145#6145: *1 http header done
2018/04/13 03:12:35 [info] 6145#6145: *1 client sent no required SSL certificate while reading client request headers, client: 108.162.215.129, server:[redacted], request: "GET / HTTP/1.1", host: "[redacted]"
2018/04/13 03:12:35 [debug] 6145#6145: *1 http finalize request: 496, "/?" a:1, c:1
2018/04/13 03:12:35 [debug] 6145#6145: *1 event timer del: 20: 1523589215193
2018/04/13 03:12:35 [debug] 6145#6145: *1 http special response: 496, "/?"
2018/04/13 03:12:35 [debug] 6145#6145: *1 http set discard body
2018/04/13 03:12:35 [debug] 6145#6145: *1 xslt filter header
2018/04/13 03:12:35 [debug] 6145#6145: *1 charset: "" > "utf-8"
2018/04/13 03:12:35 [debug] 6145#6145: *1 HTTP/1.1 400 Bad Request
Server: nginx
Date: Fri, 13 Apr 2018 03:12:35 GMT
Content-Type: text/html; charset=utf-8
Content-Length: 648
Connection: close
X-Frame-Options: SAMEORIGIN
X-Content-Type-Options: nosniff
X-XSS-Protection: 1; mode=block
About
This article shows you how to configure a client authentication via the ownership of a certificat on a Nginx web server.
Prerequisites
The server should be already configured for HTTPS as client certificate (client authentication) is a functionality of SSL (ie this is a step that is part of the handshake).
Create a root CA (ie a root private key and certificate)
In a client authentication mechanism, you are the root certification authority.
You create and sign certificate for your client (hence client certificate authentication) with your own private key.
Create a root private key and a ca certificate by following the example in this article: Root Certificate
If you want this certificate to sign only client certificate, you can set the pathlen to 0
basicConstraints = critical, CA:true, pathlen:0
NGINX server configuration
In the server block:
-
set the list of authorized CA (there is only one) with the ssl_client_certificate option 1)
-
set the verification on with the ssl_verification_one 2)
-
set the verification depth on the chain with the ssl_verify_depth 3) (not needed in our case but this is a configuration)
-
redirect the possible verification error to an error_page 4)
server {
    # known / trusted client certificate authorities
    ssl_client_certificate /etc/nginx/client_certs/root_certificate.pem;
    # set the verification on
    ssl_verify_client on;
    # set the verification depth on the chain
    ssl_verify_depth 1;
    # you can also redirect the possible error code
    # error_page 495 496 =400 /400.html;
}
Test that the client authentication fails
Without the customized error page, you should get the default 400 page.
For instance:
-
with the browser,
-
with curl:
curl -v https://example.com
*   Trying 192.98.54.226:443...
* Connected to https://example.com (192.98.54.226) port 443 (#0)
* schannel: disabled automatic use of client certificate
* schannel: ALPN, offering http/1.1
* schannel: ALPN, server accepted to use http/1.1
> GET / HTTP/1.1
> Host: https://example.com
> User-Agent: curl/7.79.1
> Accept: */*
>
* schannel: server closed the connection
* Mark bundle as not supporting multiuse
< HTTP/1.1 400 Bad Request
< Server: nginx/1.20.1
< Date: Tue, 08 Mar 2022 09:21:09 GMT
< Content-Type: text/html
< Content-Length: 237
< Connection: close
<
<html>
<head><title>400 No required SSL certificate was sent</title></head>
<body>
<center><h1>400 Bad Request</h1></center>
<center>No required SSL certificate was sent</center>
<hr><center>nginx/1.20.1</center>
</body>
</html>
* Closing connection 0
* schannel: shutting down SSL/TLS connection with https://example.com port 443
Create the client private key and the certificate signing request
With openssl, create the private key client and a certificate signing request
The client DN information are in a configuration file
[ req ]
# Options for the `req` tool: PKCS#10 certificate request and certificate generating utility. (`man req`)
distinguished_name	= req_distinguished_name
# does not prompt for dn fields
prompt			= no

# Default md (message digest to use for the hash/fingerprint)
# option: SHA-1 is deprecated, so use SHA-2 family instead
# TLS server certificates and issuing CAs must use a hash algorithm from the SHA-2 family in the signature algorithm
# https://support.apple.com/en-us/HT210176
default_md          = sha256

[ req_distinguished_name ]
# CN used to create the CA root
C			= YourOrganisationCountry
O			= YourOrganisationFullName
CN			= TheUserName

[ client_extensions ]
# List of extensions to add to certificate generated
# It can be overridden by the -extensions command line switch.
# See the (`man x509v3_config`) manual page for details of the extension section format.
# See https://www.openssl.org/docs/man1.0.2/man5/x509v3_config.html
# for explanation

# A CA certificate must contains: CA: true
basicConstraints = critical, CA:false

# Purposes for which the certificate public key can be used for
# object short names or the dotted numerical form of OIDs (object identifier)
# OpenSSL has an internal table of OIDs that are generated when the library is built, and their corresponding NIDs are available as defined constants
# For example the OID for commonName has the following definitions:
#  * SN_commonName                   "CN"
#  * LN_commonName                   "commonName"
#  * NID_commonName                  13
#
# Example: new dotted NID object initialization
# int new_nid = OBJ_create("1.2.3.4", "NewOID", "New Object Identifier");
# ASN1_OBJECT *obj = OBJ_nid2obj(new_nid);
keyUsage = critical, digitalSignature
# Used for client auth / email protection
extendedKeyUsage=clientAuth

# as seen https://www.openssl.org/docs/man1.0.2/man1/openssl-req.html under v3_ca example
subjectKeyIdentifier=hash
authorityKeyIdentifier=keyid:always,issuer:always
-
The openssl req 5) request
openssl req
   -new `# Ask a certificate signing request`
   -keyout client_private_key.pem `# The private key output (created if the key option is not given)`
   -nodes `#don't encrypt the created private key`
   -out client_csr.pem `# The certificate signing request (CSR) file `
   -config client.ini `# The client DN information`
-
output
Generating a RSA private key
...........................+++++
.....................................................................+++++
writing new private key to 'client_private_key'
-----
Sign the certificate request with the root CA private key
Signing of the certificate with openssl x509 6)
openssl
     x509 `# output a certificate`
    -req `#input is a certificate request, sign and output`
    -days 365 `#How long till expiry of a signed certificate - def 30 days`
    -in client_csr.pem
    -out client_certificate.pem
    -CA root_certificate.pem
    -CAkey root_private_key.pem
    -set_serial 0x"$(openssl rand -hex 16)"  `# large random unique identifier for the certificate. `
    -extensions client_extensions
    -extfile client.ini
For the serial number, you need to provide an unique value with each signing. we provides a hash that should be unique (ie have zero chance of collision) (same than the rand_serial but our openssl version didn’t had this extension)
Signature ok
subject=C = NL, ST = Noord-holland, L = Oegstgeest, O = Bytle, OU = Bytle, CN = foo, emailAddress = [email protected]
Getting CA Private Key
Creation of the client certificate — PKCS #12 (PFX)
To create a PKCS12 (old pfx) with:
-
the client private key
-
and the client certificate
run the below openssl command 7) and gives a passphrase to protect it (on transit such as email)
openssl pkcs12
    -export `# Create the p12 file `
    -out client_certificate.p12 `# file name created `
    -inkey client_private_key.pem `# File to read private key from `
    -in client_certificate.pem
    -certfile root_certificate.pem `#A filename to read additional certificates from `
Browser
For every browser, you need to import:
-
the pk12 (client certificate and client private key)
-
the CA root certificate in the trusted root CA list
Chrome uses the windows store while Firefox uses its own truststore. The below procedure is for Chrome.
-
In the address bar chrome://settings > Security and Privacy > Security > Manage certificates.
-
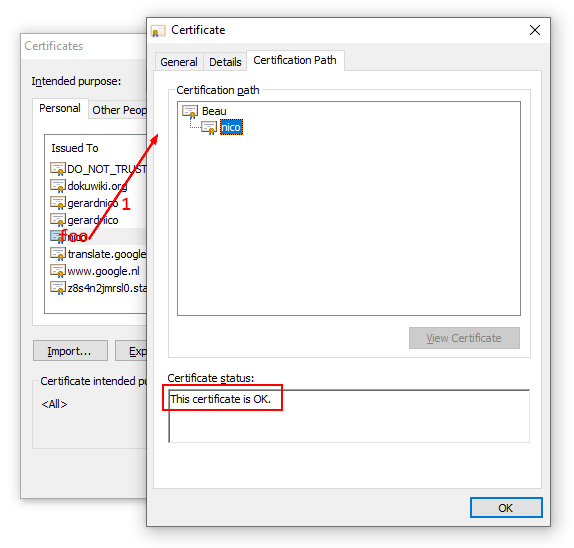
Once imported you can verify the certificate. Search your certificate by the CN given during the creation, click on it and verify that it’s ok.
-
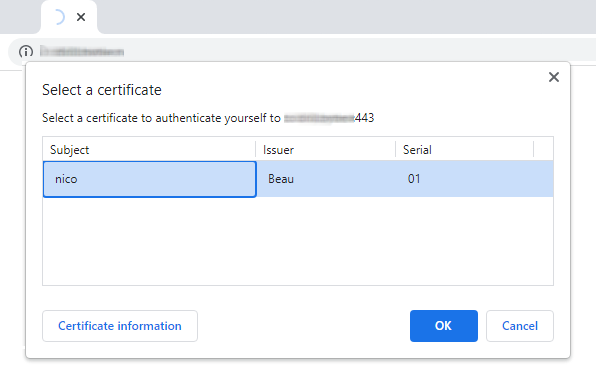
Stop chrome, restart, open chrome and go to your website, chrome should propose you to choose the certificate.
-
Stop chrome, restart, open chrome and go to your website, chrome should propose you to choose the certificate.
-
Once you choose your certificate, the normal home page for the website should show up.
Curl
With curl at the command line.
curl -v
   --cert client_certificate.pem
   --key client_private_key.pem
   https://example.com
*   Trying 192.98.53.226:443...
* TCP_NODELAY set
* Connected to example.com (192.98.53.226) port 443 (#0)
* ALPN, offering h2
* ALPN, offering http/1.1
* successfully set certificate verify locations:
*   CAfile: /etc/ssl/certs/ca-certificates.crt
  CApath: /etc/ssl/certs
* TLSv1.3 (OUT), TLS handshake, Client hello (1):
* TLSv1.3 (IN), TLS handshake, Server hello (2):
* TLSv1.2 (IN), TLS handshake, Certificate (11):
* TLSv1.2 (IN), TLS handshake, Server key exchange (12):
* TLSv1.2 (IN), TLS handshake, Request CERT (13):
* TLSv1.2 (IN), TLS handshake, Server finished (14):
* TLSv1.2 (OUT), TLS handshake, Certificate (11):
* TLSv1.2 (OUT), TLS handshake, Client key exchange (16):
* TLSv1.2 (OUT), TLS handshake, CERT verify (15):
* TLSv1.2 (OUT), TLS change cipher, Change cipher spec (1):
* TLSv1.2 (OUT), TLS handshake, Finished (20):
* TLSv1.2 (IN), TLS handshake, Finished (20):
* SSL connection using TLSv1.2 / ECDHE-RSA-AES256-GCM-SHA384
* ALPN, server accepted to use h2
* Server certificate:
*  subject: CN=example.com
*  start date: Mar  7 19:55:54 2022 GMT
*  expire date: Jun  5 19:55:53 2022 GMT
*  subjectAltName: host "example.com" matched cert's "example.com"
*  issuer: C=US; O=Let's Encrypt; CN=R3
*  SSL certificate verify ok.
* Using HTTP2, server supports multi-use
* Connection state changed (HTTP/2 confirmed)
* Copying HTTP/2 data in stream buffer to connection buffer after upgrade: len=0
* Using Stream ID: 1 (easy handle 0x55b9461e5820)
> GET / HTTP/2
> Host: example.com
> user-agent: curl/7.68.0
> accept: */*
>
* Connection state changed (MAX_CONCURRENT_STREAMS == 128)!
< HTTP/2 200
< server: nginx/1.20.1
< date: Tue, 08 Mar 2022 11:02:51 GMT
< content-type: text/html; charset=utf-8
< content-length: 150
<
<html>
                        <head><title>Home page</title></head>
                        <body>
                        <h1>Home Page</h1>
                        </body>
* Connection #0 to host example.com left intact
</html>
OpenSsl
With openssl:
openssl s_client -connect host:4433
   -cert client_certificate.pem
   -key client_private_key.pem
   -state
In the output:
-
you can see that the server request client certificates
---
Acceptable client certificate CA names
C = NL, O = Foo, CN = Bar
Requested Signature Algorithms: ECDSA+SHA256:ECDSA+SHA384:ECDSA+SHA512:Ed25519:Ed448:RSA-PSS+SHA256:RSA-PSS+SHA384:RSA-PSS+SHA512:RSA-PSS+SHA256:RSA-PSS+SHA384:RSA-PSS+SHA512:RSA+SHA256:RSA+SHA384:RSA+SHA512:ECDSA+SHA224:ECDSA+SHA1:RSA+SHA224:RSA+SHA1
Shared Requested Signature Algorithms: ECDSA+SHA256:ECDSA+SHA384:ECDSA+SHA512:Ed25519:Ed448:RSA-PSS+SHA256:RSA-PSS+SHA384:RSA-PSS+SHA512:RSA-PSS+SHA256:RSA-PSS+SHA384:RSA-PSS+SHA512:RSA+SHA256:RSA+SHA384:RSA+SHA512
Peer signing digest: SHA256
Peer signature type: RSA-PSS
Server Temp Key: X25519, 253 bits
---
-
you should see the client certificate on the server.
-
If the client certificate was not requested by the server, you read in the output:
---
No client certificate CA names sent
Peer signing digest: SHA256
Peer signature type: ECDSA
Server Temp Key: X25519, 253 bits
---
Iphone
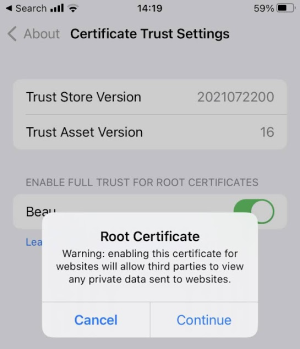
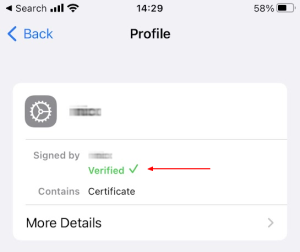
To be able to use the certificate on a mobile, you should install them at the operating system level.
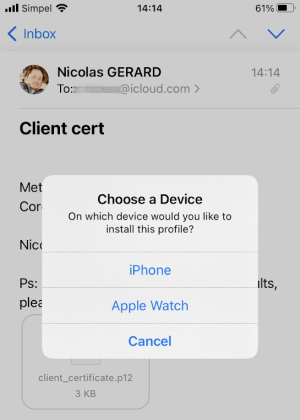
For instance, on a iphone  , to install the certificate on mobile:
-
you send them by mail as attachement as p12 (The extension “.p12” is claimed by iOS and cannot be claimed by another app),
-
Click on them on the email mobile app and download them.
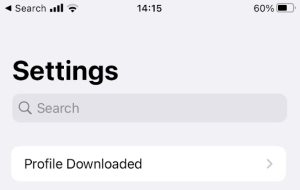
-
Go to the settings app and install the downloaded profiles (ie p12 and root certificate)
-
Go to the settings app and install the downloaded profiles (ie p12 and root certificate)
-
Trust the root certificate in the Settings > Certificate trust settings
-
Verify that your profile is valid in Settings >Vps & Device Management
-
Verify that your profile is valid in Settings >Vps & Device Management
Done
You need to preserve the cryptographic material. It can be done on a server with openssl for instance, were list keep track of issued certificate) but
you can also save them in a key or password manager such as keepass.
Keep:
-
your root private key and certificate if you need to create/sign new client certificate
-
the signed client certificate (in case you need to revoke it)
That’s all. Felicitations !
Error: No required SSL was sent
400 Bad Request
No required SSL certificate was sent
nginx/1.20.1
The possible causes are:
-
Proxy: Check that your are talking to your server directly and not through a proxy such as Cloudflare (passing client certificate via proxy is not the default, the certificate should be on the proxy)
-
Check that the client certificate is valid. If you don’t have the CA certificate set as trusted (ie in the truststore), it will not be send by the client
-
Iphone: you should use Safari. Chrome, Firefox does not have access to the certificate
Debug
See How to debug / test a TLS / SSL connection ?
ca_certificate.srl: No such file or directory
When signing a request, you may get this error:
root_certificate.srl: No such file or directory
140102105605440:error:06067099:digital envelope routines:EVP_PKEY_copy_parameters:different parameters:../crypto/evp/p_lib.c:93:
140102105605440:error:02001002:system library:fopen:No such file or directory:../crypto/bio/bss_file.c:69:fopen('root_certificate.srl','r')
140102105605440:error:2006D080:BIO routines:BIO_new_file:no such file:../crypto/bio/bss_file.c:76:
SRL is an extension for a file that manages the certificate serial number sequencec.
You would get this error while signing the certificate:
-
if you don’t have enable the use of the SRL
-
or if you don’t have provided explicitly the serial number via the rand_serial or set_serial option.