
Всем привет.
Многим наверное знакома проблема температурной ошибки, выскакивающей когда надо и не надо.
Замучила она меня вконец и я решил с ней разобраться ‘по-взрослому’ :-))))
Много писать не буду скажу только тезисно:
1. Внес изменения в прошивку взяв из ЭТОГО поста .
РЕЗУЛЬТАТ: не помогло, т.к. проблема у меня была в другом, но полезно в целом. Лучше внести.
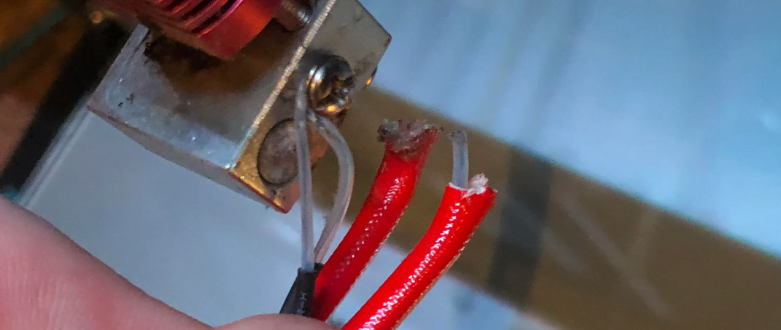
2. Обмотал головку хотенда лентой ФУМ.
РЕЗУЛЬТАТ: очень помогло в плане стабильности удержания температуры- стоит показатель как вкопанный теперь. Пару слов о ФУМ: это второпластовая лента. Фторопласт обладает высокой температурной стойкостью -температура течения — 297 градусов, разрушения-более 300. Очень рекомендую. Никаких силиконовых кожухов и прочей дряни. Дешево и сердито.
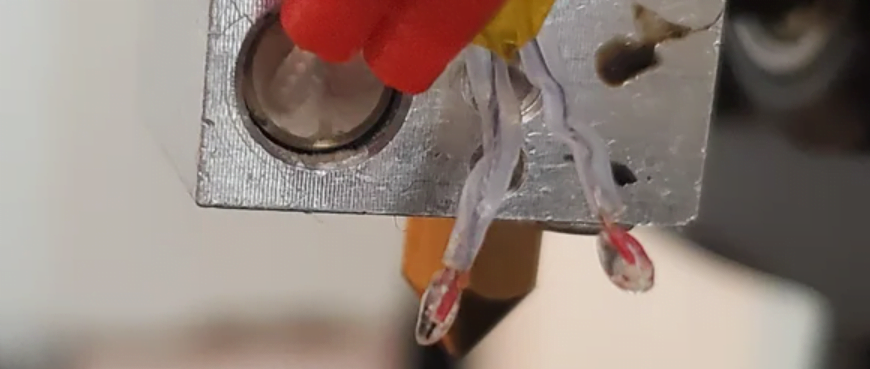
3. САМОЕ ГЛАВНОЕ: выяснена причина трудных пусков принтера иногда и необъяснимых вылетов с этим RUNAWAY в процессе работы: оголенные провода патронного нагревателя –замыкали об корпус его же гильзы!!! Очень рекомендую проверить. И обмотать той же ФУМ-кой например. Поясняющую картинку- приложил.

Конечный результат всех стараний: температура набирается быстро, стоит как вкопанная, вылетов нет.
Всем бобра! 
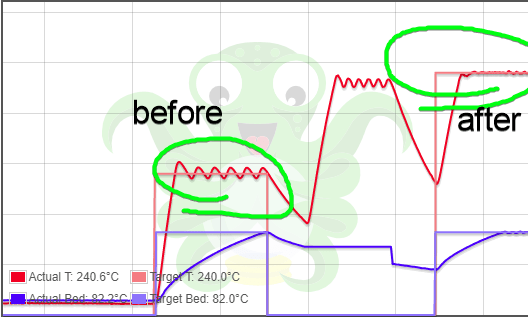
Столкнулся вчера с такой грозной ошибкой на Anicubic Kossel. Пару раз запускал на печать — полминуты-минута и печать встает с этой ошибкой. Решил проверить что реально с температурой. Запустил печать и выяснил:
— разогрев идет нормально, до 200-201 (PLA, холодный стол)
— головка начинает опускаться и температура на глазах падает — 192 — 190 — 189
— начинается печать, температура не поднимается, держится на уровне 189-191 и через небольшое время принтер останавливается
Стал искать по 3DToday — ничего полезного не нашел, кроме советов заменить нагреватель, и термистор заодно. Нашел также советы по правке прошивки — увеличить термал протекшн:
#define WATCH_TEMP_PERIOD 40 // Seconds
#define WATCH_TEMP_INCREASE 4 // Degrees Celsius
Рядом с этими строками, чуть выше, нашлась и моя ошибка:
* If you get false positives for ‘Thermal Runaway’ increase THERMAL_PROTECTION_HYSTERESIS
* and/or THERMAL_PROTECTION_PERIOD
Только относилась она к другим переменным:
#if ENABLED(THERMAL_PROTECTION_HOTENDS)
#define THERMAL_PROTECTION_PERIOD 40 // Seconds — default 40
#define THERMAL_PROTECTION_HYSTERESIS 4 // Degrees Celsius — default 4
Попробовал увеличить до 6. Запускаю — Runaway. Увеличил до 10. Запускаю — Runaway. Попробовал увеличить WATCH_TEMP_INCREASE до 10. Runaway.
Оставил проблему на другой день — утро вечера мудренее.
Утром ошибка повторилась. И повторилась. Полез уже искать нагреватели на Алях, решив что мой таки дохнет. Для этого решил взглянуть на свой. Да не смог открутить. Ключи не подошли — тонкий проворачивается, потолще не лезет. Зато выяснил для себя (а собирал почти год назад и после этого не лез в него) что термистор, в отличие от прикрученного нагревателя — просто болтается в своей дырке (и не надо меня пинать ногами, что об этом все знают — я не волшебник, я только учусь). Ларчик просто открывался… Провод термистора при опускании головы чуть-чуть натягивался и термистор немного вылазил из своего убежища. Не настолько, чтобы совсем не определять температуру нагревателя, но достаточно, чтобы ее искажать. Нагреватель работал нормально. Но принтер об этом не знал. Поправил термистор, запустил печать — температура 202-200-198, всё печатается, без проблем.
Так как в тырнетах не нашлось с пол пинка решение моей проблемы — ни через поисковики, ни через 3D Today (может конечно плохо искал или невнятно разжевал поисковику, чего мне от него надо) — решил оставить для потомков решение этой проблемы здесь, вырубив ее топором… на пластике.
В общем. Квинтессенция мысли. Найдено на Эникубик Коссель, но возможно применимо и к другим принтерам, где термистор не фиксируется.
Если у вас вдруг начинает возникать ошибка Thermal Runaway или Heating failed, но пластик при этом течет нормально — это необязательно сдохший нагревательный элемент. Возможно у вас просто натянулся провод и термистор немного вылез — попробуйте засунуть его до центра отверстия и закрепить провода, чтобы он больше не вылазил.
![]()
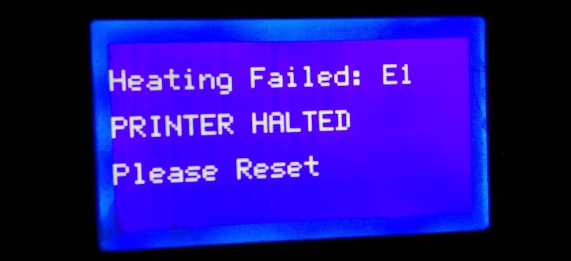
Hi, I have a problem with temperature swinging and with error »E1 Err: MINTEMP / E1 THERMAL RUNAWAY (PRINTER HALTED Please reset)». I have SKR 1.3 board and 2208 UART driver on Ender 3. When turn on printer temperature works like normal. Then heated to working temperature (in this time works well) when starts printing (via USB or card) temperature swings a lot (like from 150°C to 210°C in range with less than second. When printing around one hour or less, printer beeps and I got error »E1 Err: MINTEMP PRINTER HALTED Please reset» or »E1 THERMAL RUNAWAY PRINTER HALTED Please reset». And I have a second problem with speed of printings. I print around 50mm/s and one straight line prints like 50mm/s, then one random line print like 100mm/s. Can I setup this in configuration.h?
What could be a problem for both situations?
I record video from this situation (link below)
https://drive.google.com/open?id=13DBjCPzpazk-YW4d8C1iu6ngvgbPMwuV
![]()
Primmson
changed the title
E1 Err: MINTEMP / E1 THERMAL RUNAWAY (PRINTER HALTED Please reset)
[BUG] E1 Err: MINTEMP / E1 THERMAL RUNAWAY (PRINTER HALTED Please reset)
Nov 10, 2019
![]()
It looks like you have a wiring issue with the thermistor, it’s unlikely to be just electrical noise with that much deviation caused by movement so check thoroughly that all the connections are sound and that there are no breaks in the wiring.
![]()
It looks like you have a wiring issue with the thermistor, it’s unlikely to be just electrical noise with that much deviation caused by movement so check thoroughly that all the connections are sound and that there are no breaks in the wiring.
I replace termistor one month ago and then works okay. Yesterday I do PID autotune and check resistance of termistor.
![]()
did you try and replace the thermistor again?
![]()
Configurations, please
Please ZIP up your Configuration.h and Configuration_adv.h files (as
requested in the Issue template) and drop them into your next reply.
We’ll check them over and see if anything is amiss.
![]()
I have a similar problem, the «THERMAL RUNAWAY» does not appear but actually the nozzle temperature keeps going from 215 ° to 209 ° as if the stabilization of the temperature was not stable.
![]()
![]()
@Gerggg What you describe sounds like a smooth curve on the temperature graphs, thats caused by PIDs not being tuned properly and is different from the instantaneous dodgy readings shown in this issue.
A resent PR changed the PID dT, but when PIDs are loaded from EEPROM this is not taken into account, so you may need to retune or reload the defaults.
![]()
Configurations, please
Please ZIP up yourConfiguration.handConfiguration_adv.hfiles (as
requested in the Issue template) and drop them into your next reply.
We’ll check them over and see if anything is amiss.
Marlin.zip
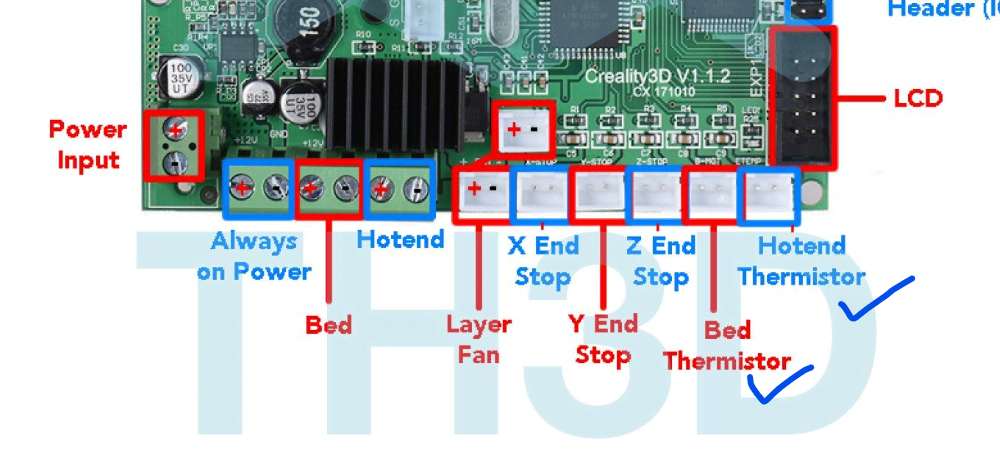
Hi, this is my configuration. I installed SKR 1.3 board with 2208 stepper drivers (UART) and BL touch.
![]()
Sorry @Primmson but at this point I have to assume it’s a hardware issue with your printer as the temperature readings jump around instantly and by large amounts showing huge amounts of noise, I’ve asked a few others with SKR 1.3 boards and I can’t find anyone else with a similar problem.
I’m hesitant to offer you a software solution because it would just hide the underlying hardware issue not fix it and that could cause more issues.
(If I do find anything in software that could be causing this, I’l let you know .. but it’s a lot more likely its hardware.)
Hi, I connect new thermistor and now is reads ok. But I have problem with acceleration when printing. I reduce speed and acceleration on ender (not on configuration.h). When printing with speed 40mm/s works great, and then just one straight line prints with abnormal speed and acceleration. Where can I set up this? Thanks for all answers!
![]()
![]()
This issue has been automatically locked since there has not been any recent activity after it was closed. Please open a new issue for related bugs.
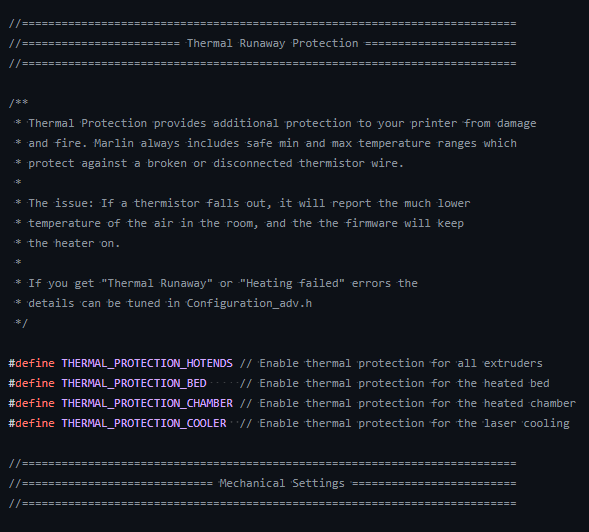
When you are getting the error such as Heating Failed or Thermal Runaway, you might be scratching your head and think why the printer is so poor and not able to finish the print. But reality, the printer is actually protecting you from resulting in fires in some cases, which is called Thermal Runaway Protection. E1 stands for Hotend number 1, which is default hotend number for most of the printer. If you have more than a hotend, you may face E2 or E3 Printer Halted.
What is Thermal Runaway Protection?
Most modern printers such as Ender 3, Artillery Sidewinder or Anycubic Kobra series, they are equip with newer Marlin firmware which has Thermal Runaway Safety feature. The feature designed to stop the printing process whether it detects the thermal no longer in the safe range.
Thermal Runaway: E1 Printer Halted during Printing
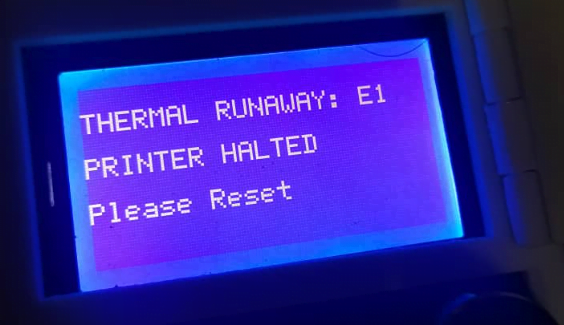
When you received this message during printing, it means the printer unable to maintain the temperature around the configured temperature. In this example we set the temperature at 200C. The main causes could be:
- Heater Cartridgeloose or disconnected, unable supply heat to maintain the temp at 200C
- Solution: Reconnect the wire from the board and also to the hotend.
- Heater Cartridge wire broken, could be printer movement causing it to break
- Solution: Replace a heater cartridge, if change to different wattage, do perform PID tuning
- Thermistor bulb broken or cartridge thermistor is dented
- Solution: Replace thermistor immediately, don’t try to fix it as some board does not have thermistor short protection, may cause the board to fry
- Heater Cartridge wearing out, causing temperature fluctuation during printing. up and down +-10C.
- PID Tuning is required. Step by Step Guide
Thermal Runaway: E1 Printer Halted during Startup
In some cases, you might be getting thermal runaway during start of your printer, this means the thermistor already out of the temperature even heating is not here, normally acceptable range is from -15 to 260C. When it’s over 260C even during Start Up, it could means only 2 things, thermistor or motherboard need to be replaced. Heater Cartridge can be ruled out since this does not involve heating.
To identify which is the main causes,
- Unplug both bed and hot end thermistor from the motherboard
- Boot up the printer. If only the printer running fine, replace thermistor.
- If printer still showing the same error, replace motherboard & thermistor as thermistor port shorted.
- REMEMBER to throw the existing thermistor together otherwise you will be shorting your new board.
Some motherboard may have multiple thermistor port like SKR 1.4, but most of the time, when you shorted the port, all port will be malfunction together. The only solution is to change the board or even ugprade to a better board such as SKR 2 or SKR 3 which has thermistor short circuit protection.
Heating Failed: E1 Printer Halted during Heating
Heating fail usually happens during heating up the nozzle, and also before the printing start. Heating Failed highly related to the heater cartridge because the nozzle unable to reach the expected temperature. To identify the issue, Go the Menu > Temperature and set the temperature to 200C
- If temperature reached 190~195C and stay over there,
- do PID tuning Step by Step Guide
- If even after PID tuning still failed, replace heater cartridge.
- If temperature is not moving, remain at the room temperature,
- Heater cartridge broken, loose or disconnected, please do refer to the thermal runaway fixes above. Replace a heater cartridge is recommended.
- Mosfet of the motherboard burnt. Motherboard replacement is required.
- If your printer happen to have extra relay (PSU or module) for heating, check the relay if burnt. Try bypass the relay and see if heating up is working with direct current.
If you need to video guide, Thomas Sanladerer has a great video on explaining the thermal runaway issue
References: https://3dprinterly.com/how-to-fix-heating-fail-thermal-runaway-protection/
Topic: Ender 3 Pro: «THERMAL RUNAWAY: E1 PRINTER HALTED» error… (Read 7795 times)
0 Members and 1 Guest are viewing this topic.
This is almost surely not the right place for this post, but I have no idea where else to go (Creality’s own forum seems pretty languid…) and hoping long time users may have some good insight.
I’ve been getting consistent «THERMAL RUNAWAY: E1 PRINTER HALTED» errors starting this morning, always occurring about a few minutes into the print (barely at the second layer of the base), at what feels like the exact same time.
I was under Marlin 1.0.1, and upgraded to 1.0.3 (which I believe is the latest for my motherboard, v4.2.2).
Any ideas?…
Thanks.

Logged
If one of your thermocouples is loose, or the connection intermittent, this could trip the protection. Sometimes this can occur once things heat up enough, or if the cable or connection is poor, it could occur once the hot end or bed moves enough to put strain on the cable. It could be a combination of the two.
This describes it pretty well: https://3dprinting.stackexchange.com/questions/8466/what-is-thermal-runaway-protection/8467
This is just a pointer in the direction where I think the problem is. No guarantees, etc…
Good luck,
John
« Last Edit: January 04, 2022, 01:07:37 am by JohnG »
Logged
«Those who learn the lessons of history are doomed to know when they are repeating the mistakes of the past.» Putt’s Law of History
If one of your thermocouples is loose, or the connection intermittent, this could trip the protection. Sometimes this can occur once things heat up enough, or if the cable or connection is poor, it could occur once the hot end or bed moves enough to put strain on the cable. It could be a combination of the two.
This describes it pretty well: https://3dprinting.stackexchange.com/questions/8466/what-is-thermal-runaway-protection/8467
This is just a pointer in the direction where I think the problem is. No guarantees, etc…
Good luck,
John
John — thank you very much for pitching in. I managed to detach the fan shroud to look inside and tightened the thermistor (hopefully not too much…) and it seems this made the issue go away. Not sure why this was happening after a certain time of running, maybe heat and dilation of parts contributed to triggering the issue from a certain point on.
I’m printing! ![]()
Logged
Yes the constant heating and cooling cycles will tend to loosen up parts. Differential thermal expansion, etc.
Logged
Profile -> Modify profile -> Look and Layout -> Don’t show users’ signatures
I get this on a Prusa Mini when it’s just too cold where I print. Taking it to a warm place always fixes the problem. Not sure where you are, but considering it’s January it may be relevant.
Logged
Doesn’t the thermocouple display maximum if the two wires are touching completely and it displays minimum if the wires are loose? I’d say the metal screw that holds the thermocouple is touching both it’s pins at the same time, intermittently, because of dilation coefficients and stepper impulses, else the thermocouple is faulty, change it they are cheap.
« Last Edit: January 06, 2022, 07:48:06 am by BatGroupCraft »
Logged
这个问题我遇到过。
如果硬件没问题,就检查打印设置。
cura软件的起始温度和打印温度设置要一致,第二层开启风扇的速度不要100%,改成50%。
意义就是把温度不要突变。有些硬件的PID性能不一定合适或没设置好。
I have encountered this problem.
If the hardware is OK, check the print settings.
The starting temperature of the cura software should be the same as the printing temperature setting, and the speed of turning on the fan on the second layer should not be 100%, but 50%.
The meaning is to keep the temperature from changing. The PID performance of some hardware may not be suitable or not set properly.
Logged
What is Thermal Runaway Protection? #
Thermal Runaway Protection is enabled in all Unified Firmware releases for all printers. This feature prevents the printer from operating when there is an issue with a heater or thermistor. Thermal Runaway errors occur when a thermistor fails to report a temperature properly, when a heater overshoots its target temperature or heats while it should be idle, or when a thermistor fails to register an increase in temperature when attempting to heat that device. In these cases, the firmware should present an error message and then immediately attempt to cut power to all functions of the printer, which prevents overheating, damage, and possible fire.
Thermal Runaway errors may NOT be able to control external devices that have their own power supplies or control units. When you encounter a Thermal Runaway error, you should ensure that you completely power down the printer and any additional devices or accessories attached to it.
E1 MaxTemp Error – Printer Halted #
The E1 MaxTemp error indicates that there is an issue with the “E1” device, which would be “Extruder 1” or the main hot-end on most 3D printers. An E2 error would indicate an issue on a second extruder/hot-end, and the bed has its own error as well. Typical causes of these errors include:
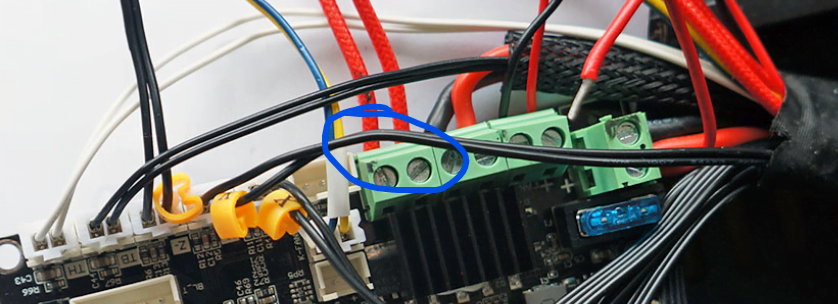
- Thermistor wire is pinched, damaged, unplugged, not fully seated, etc.
- Heater cartridge wire is pinched, damaged, unplugged, not fully inserted into the screw terminal, plugged into the wrong terminal, etc.
- Bed heater wire is pinched, damaged, de-soldered, unplugged, not fully inserted into the terminal, plugged into the wrong terminal, etc.
- Mainboard damage, including shorts to screw terminals, faulty wiring, blown components, incorrect wire configuration or polarity, etc.
The E1 MaxTemp error IS NOT a problem with the firmware itself in most cases. This instance is the firmware correctly displaying an error when there is a potentially dangerous situation, hence it is operating as intended. Once an error occurs, the printer must be reset by completely powering down the printer then powering it back on.
What do I do if this error occurs? #
- Unplug the printer and associated devices from power. This includes any other ancillary items, such as MOSFETS, SSRs, any third-party or external components that have separate power supplies or cables, etc. The printer and ALL accessories should be powered off and disconnected.
- Allow everything to cool before handling. Components may be hot, even if the error occurred while the printer was idle. Make sure to leave time for everything to cool while disconnected from power.
- Completely and thoroughly inspect ALL printer components, with an emphasis on the heaters and thermistors, their wiring, and their connectors. Check for any pinched or damaged wires, check for any loose or improper connections to the mainboard, check for any damaged components.
- Thoroughly examine the printer’s mainboard for damaged components, destroyed terminals, or any signs of an electrical short. The mainboard can also be the cause of the issue if there are electrical shorts, failed components, or improper installation.
- Depending on what component is causing the issue, you may consider replacing that component with a new one. Assuming nothing else on the printer is damaged, you can replace hot-end components as needed. If you can determine the cause of the problem, you can also ensure that the issue is corrected so that it does not occur repeatedly.
- If you are using a brand-new printer that is still under warranty, contact the manufacturer about exercising that warranty. Thermal Runaway errors SHOULD NOT occur on brand-new hardware from the factory. If you encounter this error while the printer is under warranty and still using stock components, immediately discontinue use and contact the manufacturer.
$begingroup$
My Ender 3 Pro started throwing the Thermal Runaway E1 error last week. Previous to that I had not modified or changed anything on the printer in months, other than move it’s location. I replaced the thermistor yesterday and set off a test print but got the same error.
Is this an issue with the motherboard? Or with the heater cartridge?
Printer specs:
- Ender 3 Pro
- Creality 4.2.7 silent motherboard
- all metal dual gear extruder
- Glass bed
- stock everything else
![]()
Trish
20.4k10 gold badges46 silver badges93 bronze badges
asked Nov 14, 2021 at 10:36
![]()
$endgroup$
9
$begingroup$
I solved this issue by using a multimeter to measure the resistance across both the thermistor and the heater cartridge. The resistance for the Ender 3 Pro are:
- Thermistor ~ 100k ohms
- Heater Cartridge ~ 14.4 ohms
My thermistor showed a resistance within the correct value, however my heater cartridge had a resistance of 0 ohms.
answered Nov 21, 2021 at 22:34
![]()
$endgroup$
You must log in to answer this question.
Not the answer you’re looking for? Browse other questions tagged
.
Not the answer you’re looking for? Browse other questions tagged
.
$begingroup$
My Ender 3 Pro started throwing the Thermal Runaway E1 error last week. Previous to that I had not modified or changed anything on the printer in months, other than move it’s location. I replaced the thermistor yesterday and set off a test print but got the same error.
Is this an issue with the motherboard? Or with the heater cartridge?
Printer specs:
- Ender 3 Pro
- Creality 4.2.7 silent motherboard
- all metal dual gear extruder
- Glass bed
- stock everything else
![]()
Trish
20.4k10 gold badges46 silver badges93 bronze badges
asked Nov 14, 2021 at 10:36
![]()
$endgroup$
9
$begingroup$
I solved this issue by using a multimeter to measure the resistance across both the thermistor and the heater cartridge. The resistance for the Ender 3 Pro are:
- Thermistor ~ 100k ohms
- Heater Cartridge ~ 14.4 ohms
My thermistor showed a resistance within the correct value, however my heater cartridge had a resistance of 0 ohms.
answered Nov 21, 2021 at 22:34
![]()
$endgroup$
You must log in to answer this question.
Not the answer you’re looking for? Browse other questions tagged
.
Not the answer you’re looking for? Browse other questions tagged
.
mozolis
Новичок
Решил присоеденится к обладателям 3д принтеров! купил ендер 3 про ,собрал ,захожу в мениу нажымаю ауто хоме принтер по моленку подвигаетса и выдаёт “THERMAL RUNAWAY, PRINTER HALTED, Please reset”!!!??? прошивка мерлин 0.0.8
как решить ???
спосибо!!!

Fockus
Администратор
Решил присоеденится к обладателям 3д принтеров! купил ендер 3 про ,собрал ,захожу в мениу нажымаю ауто хоме принтер по моленку подвигаетса и выдаёт “THERMAL RUNAWAY, PRINTER HALTED, Please reset”!!!??? прошивка мерлин 0.0.8
как решить ???
спосибо!!!
Проверь термистор, может быть он не надежно закреплен
Dimetresko
Новичок
Проверь термистор, может быть он не надежно закреплен
у меня вот такая же беда. Термистор цел и сидит плотно, я даже менял его, не помогло и сразу при включении Ender пищит и пишет тоже самое
Хочу настроить пид не знаю поможет ли, или надо в прошивку лезть
Fockus
Администратор
у меня вот такая же беда. Термистор цел и сидит плотно, я даже менял его, не помогло и сразу при включении Ender пищит и пишет тоже самое
Хочу настроить пид не знаю поможет ли, или надо в прошивку лезть
Можно попробовать откалибровать, видимо нагревательный блок что-то обдувает и нагреватель не может нагреться. Можно еще попробовать выключить обдув и откалибровать без него
If you are in the 3D printing field, you might have heard about thermal runaway protection. It definitely stirred up a fuss in the 3D printing community because of its importance and lack of implementation in 3D printers as a safety feature.
This article will guide you on what you need to know about thermal runaway protection.
Thermal runaway protection is a safety feature in your 3D printer which turns the heating systems off if it noticed some kind of fault. If your thermistor is slightly disconnected, it can feed incorrect temperatures to your 3D printer. This has resulted in fires in some cases.
You definitely don’t want to be on the wrong end of thermal runaway protection, so this article will guide you through testing and fixing the thermal runaway feature on your 3D printer.
What is Thermal Runaway Protection and Why Is It Important?
To prevent your 3D printer from thermal runaway problems, the manufacturers have added a safety feature which is known as thermal runaway protection.
This feature is designed to stop the printing process whenever it detects a problem in the printer, especially if the temperature is getting out of control.
This is the best solution to protect your printer, before you start the printing process make sure that this safety feature is activated in the printer’s firmware.
A thermal runaway is one of the most dangerous and frustrating problems that can occur during the printing process. Thermal runaway error is a situation in which the printer can’t maintain the right temperature and may heat up to an extreme level.
Despite all other issues that occur due to this problem, the major threat is that the printer can catch fire which is not so uncommon in this situation.
Basically, thermal runaway protection does not protect the thermal runaway error directly but it aborts the reasons that can cause this problem.
It means that if thermal runaway protection detects that the wrong value of the 3D printer thermistor (temperature reader by detecting the variation in resistance) is being processed for a long time, it will automatically shut down the printing process to avoid damages.
Misalignment or fault in the temperature sensor is one of the basic reasons behind the thermal runway errors.
If the thermistor is not working properly, the printer will keep on increasing the printing temperature to reach the targeted heat and can take the temperature to an extreme level.
This feature will protect your printer from thermal runaway error, the risks of catching fire, and damaging the printer or the people around it.
Check out my related article called How to Flash & Upgrade 3D Printer Firmware – Simple Guide.
How Do You Properly Test for Thermal Runaway?
A really simple method shown in the video below is to use a hair dryer on your hotend for a minute or so, to decrease the operating temperature of your nozzle, thereby prompting the ‘Thermal Runaway Printed Halted’ error.
If you don’t have access to a nearby hairdryer, you can do another method.
To do a proper test for the thermal runaway protection feature, you can disconnect the heater element of the hotend or the heated print bed at the time of printing or while sending commands directly to the printer via USB to set a temperature.
You can also disconnect the heater element when the printer is turned off or even if it is heating up.
The disconnecting of the heater element means the nozzle will not be heated. After the temperature testing period and settings specified in the firmware, the printer should stop working and will halt if the thermal protection feature is enabled.
It is recommended to turn off the printer and then reconnect the wires because you may touch the open cables if you try to reconnect the wires while the printer is ON.
When the printer stops working after displaying a thermal runaway error you must restart or reset the printer before starting the printing process.
If the printer keeps on working and does not halt, shut down the printer quickly as it is a clear sign that the thermal runaway protection is not enabled.
If you want a more recent video, Thomas Sanladerer made a simple video on how to test the thermal runaway protection on your machine. The video was created because Voxelab (Aquila) did not ensure this basic protection on their machines that all 3D printers should have.
How Do You Fix a Thermal Runaway?
There are two possibilities of a thermal runaway error, one is that the thermistor is broken or faulty and the other is the thermal runaway protection not activated.
Below, I will go through how to implement the solution to the issue.
Activating Thermal Runaway Protection
The video below takes you through the process of flashing your 3D printer mainboard to activate thermal runaway protection.
Replace Broken Thermistor
The video below goes through how to replace your thermistor if it is broken.
Before you move forward make sure that your printer is not running and is turned off. Unscrew the fan shroud off to take that out of the way.
Cut down the zip ties that are holding the wires. Now take a small Phillips screwdriver to remove the screw that holds the thermistor at the right place.
Take the broken thermistor out but if it got stuck, it is probably due to the fact that molten plastic is holding the thermistor inside.
If you face such an issue, heat up the hotend to around 185°C as it will melt the plastic, remove that plastic with a tool, then set your hotend to cool down before working with it again.
After the cool down, you should be able to pull out the thermistor gently.
As inserting the new thermistor is a bit difficult, you should put the plug end of the thermistor in the old thermistor wire and fix it with tape. Now pull the exact wire back from the opposite side and you can get the thermistor inserted properly.
Now plug in the new thermistor in the exact spot where the old thermistor was plugged.
Put the zip ties again on the wires and double-check that no wire is open and the thermistor is plugged in properly. Now insert the wires on the other end of the thermistor into the bottom hole and screw them up gently.
The screws should be in the center of the two wires. Now screw up the parts and fan shroud back with the printer.
Methods to Fix Printer Halted Heating Failures
If your nozzle doesn’t manage to reach your desired temperature before giving an error, there are a few reasons for it which I’ll describe. There are also some pretty simple solutions to accompany these causes.
A usual fix of a halted heating 3D printer is to double-check the assembly of your extruder, making sure there are no large gaps between the heat break, heater block, and nozzle. Ensure your wiring is secure and is put in the correct way round.
A dodgy connection somewhere in your system can definitely be a reason for the ‘HEATING FAILED’ error in your 3D printer, especially if you didn’t properly follow a tutorial or video guide on assembling your 3D printer.
Common connection problems are found in either the heater or temperature sensor of your 3D printer. It can be a good idea to check the resistance of your heater cartridge, making sure it falls close to the specified value.
Some people have had other issues such as a fried mainboard, needing a Power Supply Unit (PSU) replacement, or a hotend replacement.
Since a thermistor sometimes runs underneath screws, they can easily get crushed or come loose, meaning the connection isn’t secure enough to adequately measure the actual temperature of your heater block.
You can get yourself a new thermistor and replace it using the instructions above.
Make sure when you replace your thermistor, you don’t touch either wire to the heater block because it can fry your mainboard.
- Dialing in your stepper driver voltage can help if they are significantly off
- Replace your thermistor
- Use the original mainboard
- Replace heating element
- Check that wires aren’t loose on heater block – re-tighten screws if needed
- Do PID tuning
Does the Ender 3 Have Thermal Runaway?
The Ender 3s that are being shipped now have thermal runaway protection feature enabled.
In the past, it wasn’t always the case, so if you have bought an Ender 3 recently, it will definitely have this feature enabled but if you bought it a while back, follow the steps about to test whether it is active.
It is recommended to follow precautionary measures to avoid this problem. The first thing you should do is the printer’s regular maintenance. Make sure that the printer is assembled correctly, wiring is pretty fine, and the printer is not making any errors.
Make sure that the thermistor is placed in the center of the heat block and is working properly.
Keep the thermal runaway protection feature activated in your firmware but if your Ender 3 is old and it doesn’t have a thermal runaway protection feature in its firmware then you should install other firmware that has the feature activated such as Marlin.
One of the most terrifying issues that could arise with 3D printing is thermal runaway. It might ignite a fire in your house in addition to harming your printer. In the context of 3D printers, thermal runaway refers to a situation in which a printer cannot stop heating up, frequently as a result of faulty or improperly fitted gear.
To fix a thermal runway error on your Anycubic, firstly make sure that the print is up-to-date on maintenance. Next, check the thermal runway protection mechanisms in the firmware of your Anycubic. Make sure to keep the environment where your Anycubic is placed as fire safe as possible. Lastly, if the thermistor is broken, you must replace it with another one.
In this article, we’ll discuss a few ways to keep your Anycubic from experiencing thermal runaway. Both hardware (physical) and firmware (online) options exist in these solutions. Let’s start by thinking about the state of your printer.
Common Solutions
Check Your Printer
Taking evasive action is the primary line of defense against thermal runaway on an Anycubic. Checking your printer is the simplest approach to prevent thermal runaway. This refers to performing routine maintenance on your printer to make sure all systems are stable, and it is operating properly.
Make that all of the instructions for assembling your Anycubic were properly followed, especially those pertaining to the wiring. Additionally, make sure your hot end’s thermistor and heating cartridge aren’t too far away from one side.
Related: Why Is My Anycubic Kobra Not Sticking to Bed? Answered
You should secure those two wires into place after making sure they are positioned properly. This entails tightening the thermistor and heating cartridge screws on the hot end’s bottom. By doing this, you can prevent your thermistor from escaping the heat block, which would probably result in thermal runaway.
You should maintain your printer in this condition in addition to making sure your Anycubic is correctly put together and nothing is broken. Everyone wants to get to the printing stage as soon as possible but performing the occasional maintenance check can keep you informed about your Anycubic’s functionality and help you avoid many issues in the future.
Watching the first layer of each print before it leaves the printer is a smart technique to make sure your printer is operating properly. It might be worthwhile to spend money on monitoring tools and software if you are unable to monitor the print or if your print will take a while.
Furthermore, vacuuming is always a good idea. Dust is extremely combustible and can lead to mechanical or electrical issues.
Firmware
The thermal runaway protection mechanisms in your Anycubic firmware are the second fix. The firmware of your 3D printer enables the motors, sensors, and other parts of your device to communicate with one another.
A feature known as thermal runaway protection can identify when the printer’s heating system is malfunctioning. When the system determines that the goal temperature is too distant from the actual temperature, this program in the Anycubic firmware causes heating to halt. This is typically caused by a thermistor that is malfunctioning or in the wrong spot and isn’t detecting the temperature correctly.
Related: Best Cura Settings for Anycubic Mega X
Safe Environment
Maintaining a safe atmosphere for your printer is an effective preventative measure against thermal runaway. You’ve already taken steps to reduce the risk that your printer poses to the area around it. It’s time to make sure that your printer is not in danger from its surroundings or environment.
The most apparent precaution is to avoid putting any flammable substances – like acetone – near the hot end or the printer as a whole. Keep your desk organized and especially devoid of paper because fire needs fuel to start.
In order to avoid problems caused by high heat, like the controller board burning out, you must also make sure that the space where you keep your printer is not excessively warm. A room with some type of ventilation is also necessary for your printer’s setup. For the purpose of dispersing any fumes or smoke, airflow is extremely important.
On that note, it wouldn’t be a terrible idea to keep some fire safety equipment close to your Anycubic just in case. Installing a smoke detector will notify you of any fire indications. If the worst-case scenario happens, keeping a fire extinguisher close by is also a wise security precaution.
Replace Thermistor
Your problem may be rooted in a broken thermistor. In that case, it’s best to replace it.
Follow the below steps to safely replace the thermistor:
- Make absolutely sure your Anycubic printer is powered off and not operating before continuing.
- The fan shroud should be removed by unscrewing it.
- Shorten the length of the zip ties keeping the wires in place. Use a little screwdriver to now detach the screw holding the thermistor in its proper position.
- Remove the damaged thermistor, however, if it gets trapped, it is likely because molten plastic is keeping the thermistor inside. If you experience this problem, heat your hotend to about 185°C or 365°F so that the plastic can melt, extract it with a tool, and then allow your hotend to cool before trying again.
- You ought to be able to carefully remove the thermistor after it has cooled down.
- The plug end of the new thermistor should be inserted into the old thermistor wire and secured with tape because installing the new thermistor is a bit challenging. To correctly insert the thermistor, pull the precise wire back from the other side now.
- The new thermistor should now be plugged in exactly where the previous one was.
- Attach the zip ties to the wires again, check to make sure no wires are exposed, and that the thermistor is properly connected. The wires on the other end of the thermistor should now be inserted into the bottom hole and carefully screwed up.
How to Test for Thermal Runway?
It’s very to test for thermal runway. Using a hair dryer on your hotend for about a minute to lower the nozzle’s working temperature should be able to prompt the Thermal Runway error.
You can use a different technique if there isn’t a hairdryer around.
Another proper test When printing or while sending commands to the printer directly via USB to specify a temperature, you can disable the heater element of the hotend or the heated print bed to properly test the thermal runaway protection feature.
You can disconnect the heater element when the printer is shut off or even just starting to warm up.
Related: Anycubic Kobra Screen Goes Black? Fixed
The nozzle won’t be heated because the heater element has been disconnected. The printer should cease operations and will shut down if the thermal protection feature is activated after the temperature testing period and settings defined in the firmware.
It is advised to disconnect the printer first, then reconnect the wires, as doing so while the printer is on could result in you touching the exposed cables.
You must reboot or reset the printer if it stops functioning after displaying a thermal runaway error before you can begin printing.
If the printer continues to operate without stopping, immediately shut it down because this is an obvious indication that the thermal runaway prevention is not turned on.
Frequently Asked Questions
Why is the 3D Printer Extruder Not Heating Up?
If your extruder is not heating up, make sure that the appropriate extruder is chosen on each tab of the settings. Choose the left or right extruder from the top menu, then be sure to choose the primary extrusion on the first tab, the support extruder on the second tab, and the infill extruder on the third tab.
What Causes Overheating in Printers?
The plastic not being cooled down quickly enough is the most frequent reason for overheating. When this occurs, the hot plastic has free reign to assume various shapes as it gradually cools. It is much advisable to swiftly cool the layers for many plastics in order to prevent form changes after printing.
What Happens if You Print PLA Too Hot?
Stringing and blobs/oozing will occur when you print at an excessively high temperature (with any material, not only PLA), as a result of the filament being runny and erupting out the nozzle in an uncontrolled manner. You may also notice artifacts in your prints because it is unregulated.
What Causes Thermistor Failure?
These failures are typically brought on by handling damage, excessive heat, thermal mismatch, etc., which results in mechanical separation between the resistor element and the lead materials. The second most frequent failure cause is parameter change or drifts in resistance value as the thermistor ages.
Conclusion
A thermal runway error is a 3D printing enthusiast’s worst nightmare. Make sure to follow the preventive and remedial solutions discussed in this article to continue to safely print with your Anycubic.
What is Thermal Runaway Protection?
Thermal runaway protection is now enabled in all Marlin firmware releases. This feature prevents the printer from operating when there is an issue with a heater or thermistor. Thermal runaway errors occur when a thermistor fails to report a temperature properly, when a heater overshoots its target temperature or heats while it should be idle, or when a thermistor fails to register an increase in temperature when attempting to heat that device. In these cases, the firmware should present an error message and then immediately attempt to cut power to all functions of the printer, which prevents overheating, damage, and possible fire.
Thermal runaway errors may NOT be able to control external devices that have their own power supplies or control units. When you encounter a thermal runaway error, you should ensure that you completely power down the printer and any additional devices or accessories attached to it.
The E1 MaxTemp error indicates that there is an issue with the “E1” device, which would be “Extruder 1” or the main hot-end on most 3D printers. An E2 error would indicate an issue on a second extruder/hot-end, and the bed has its own error as well. Typical causes of these errors include:
- Thermistor wire is pinched, damaged, unplugged, not fully seated, etc.
- Heater cartridge wire is pinched, damaged, unplugged, not fully inserted into the screw terminal, plugged into the wrong terminal, etc.
- Bed heater wire is pinched, damaged, de-soldered, unplugged, not fully inserted into the terminal, plugged into the wrong terminal, etc.
- Mainboard damage, including shorts to screw terminals, faulty wiring, blown components, incorrect wire configuration or polarity, etc.
The E1 MaxTemp error IS NOT a problem with the firmware itself in most cases. This instance is the firmware correctly displaying an error when there is a potentially dangerous situation, hence it is operating as intended. Once an error occurs, the printer must be reset by completely powering down the printer then powering it back on.
What do I do if this error occurs?
- Unplug the printer and associated devices from power. This includes any other ancillary items, such as MOSFETS, SSRs, any third-party or external components that have separate power supplies or cables, etc. The printer and ALL accessories should be powered off and disconnected.
- Allow everything to cool before handling. Components may be hot, even if the error occurred while the printer was idle. Make sure to leave time for everything to cool while disconnected from power.
- Completely and thoroughly inspect ALL printer components, with an emphasis on the heaters and thermistors, their wiring, and their connectors. Check for any pinched or damaged wires, check for any loose or improper connections to the mainboard, check for any damaged components.
- Thoroughly examine the printer’s mainboard for damaged components, destroyed terminals, or any signs of an electrical short. The mainboard can also be the cause of the issue if there are electrical shorts, failed components, or improper installation.
- Depending on what component is causing the issue, you may consider replacing that component with a new one. Assuming nothing else on the printer is damaged, you can replace hot-end components as needed. If you can determine the cause of the problem, you can also ensure that the issue is corrected so that it does not occur repeatedly.
- If you are using a brand-new printer that is still under warranty, contact the manufacturer about exercising that warranty. Thermal Runaway errors SHOULD NOT occur on brand-new hardware from the factory. If you encounter this error while the printer is under warranty and still using stock components, immediately discontinue use and contact the manufacturer.