
-
Partition Wizard
-
Partition Magic
- Top 5 Solutions to DISM Error 2 on Windows 10
By Sherry | Follow |
Last Updated December 01, 2020
Have you ever encountered DISM error 2 on Windows 10? How to solve the problem? There are some solutions provided by MiniTool Partition Wizard and you can feel free to have a try to fix this error.
DISM refers to Deployment Image Servicing and Management. It’s a Windows built-in tool, which mounts and services the Windows Images. It’s commonly used to solve problems on PC.
However, some users have reported that they encountered errors while using this tool. Our previous post has already introduced DISM error 50. Here, I will talk about DISM error 2. DISM error 2 usually comes with a message “unable to access the image” while running some commands related to “dism.exe /image:C: /cleanup-image”.
If you’re facing the same problem, you can follow the solutions listed in the following contents to solve it.
Solution 1: Disable or Uninstall Your Antivirus
In some cases, the security software could get in the way of some processes on your computer, which might be the reason for “DISM error 2 unable to access the image”. To fix the problem, you can try disable or uninstall your antivirus application temporarily. Then check if the DISM works properly. If the error still exists, you should move on to the next solution.
Solution 2: Refresh DISM
Another way to fix the DISM error 2 is to refresh the DISM tool. Here are the detailed steps.
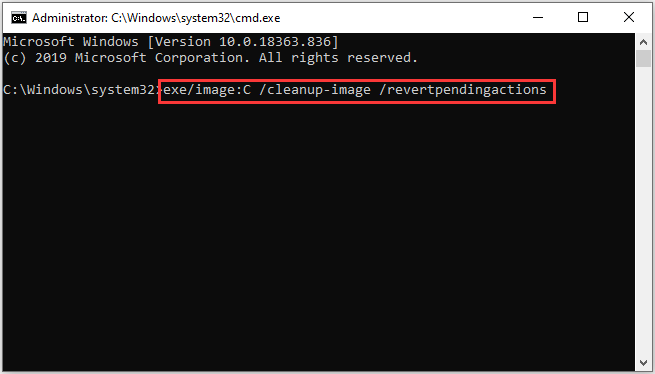
Step 1: Press Win + S to open Search and type cmd in the search box. Then right-click Command Prompt from the search results and select Run as administrator.
Step 2: Input the command: dism.exe/image:C /cleanup-image /revertpendingactions. Then press Enter to execute it. This will revert pending tasks, including any Windows updates.
Step 3: Restart your PC and access Windows Recovery Environment. Then go to Command Prompt.
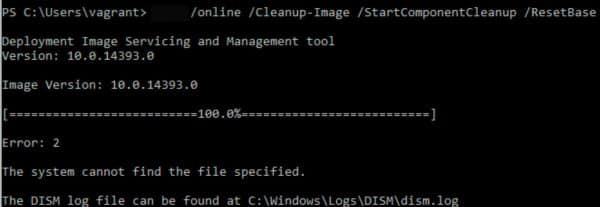
Step 4: Input dism.exe /online/Cleanup-Image /StartComponentCleanup and press Enter to clean up the component store and help everything to run properly again.
Step 5: Restart your computer and start Windows in Safe Mode. Then run Command Prompt as administrator.
Step 6: Execute the sfc/scannow command and wait until the process is completed.
Then you can run the command dism.exe /online /Cleanup-Image /RestoreHealth and check if it works properly. If you still encounter DISM error 2 during the process, try the next solution.
Solution 3: Run Disk Defragmenter
When your DISM tool doesn’t work and Disk Cleanup can’t free up much space, you can try using Disk Defragmenter to rearrange fragmented data. Log in as administrator and follow the steps below.
Step 1: Press Win + E to open File Explorer.
Step 2: Select This PC and right-click Local Disk (C:). Then choose Properties.
Step 3: In the pop-up window, select Tools tab. Then click Optimize under Optimize and defragment drive.
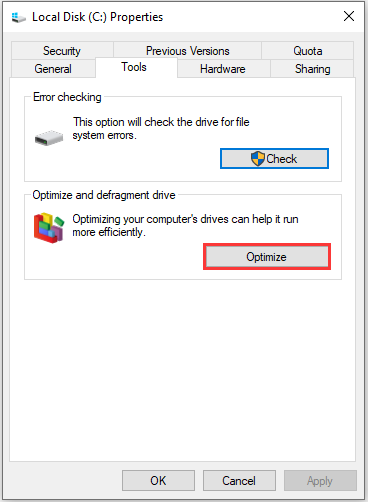
Then follow the onscreen instructions to finish the process. Once it’s done, click Apply and OK.
Solution 4: Perform a System Restore
You can also try performing a system restore to fix DISM error 2 unable to access the image if you have created a System Restore point. In this way, you can revert some changes of your computer to an earlier state, which is helpful to fix various problems.
Here is how to fix DISM error 2 via System Restore.
Tip: This won’t affect your personal files such as documents, music, photos, and videos.
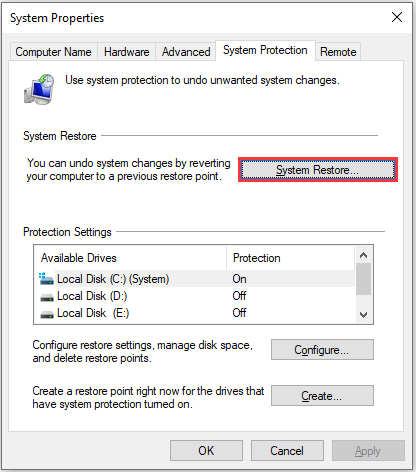
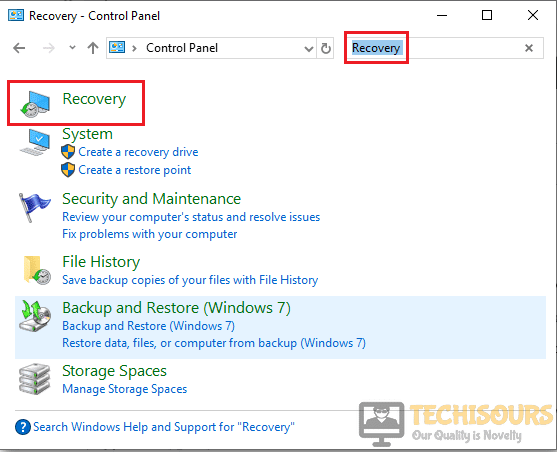
Step 1: Open Search utility and then input restore in the search box. Then click Create a restore point.
Step 2: In the pop-up window, click System Restore button. Click Next to skip the wizard.
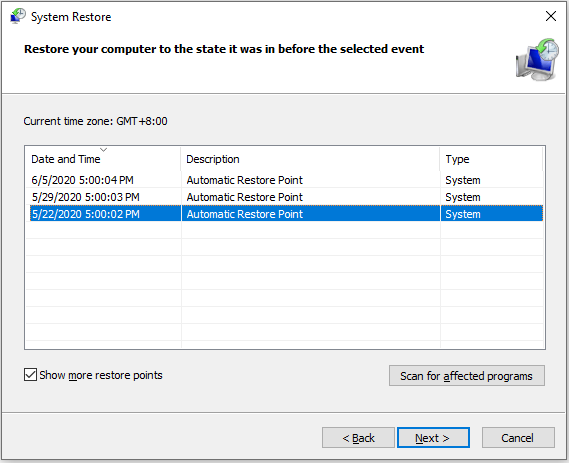
Step 3: Select a system restore point according to the description and the creating time and data. Then click Next.
After the operation, you can try running DISM commands and check if the error has been fixed. If the problem still appear, you might need to reset your PC with Keep my files option.
About The Author

Position: Columnist
Sherry has been a staff editor of MiniTool for a year. She has received rigorous training about computer and digital data in company. Her articles focus on solutions to various problems that many Windows users might encounter and she is excellent at disk partitioning.
She has a wide range of hobbies, including listening to music, playing video games, roller skating, reading, and so on. By the way, she is patient and serious.
DISM is a command-line tool that is used to fix corrupt Windows files on a computer, but sometimes DISM can itself run into the DISM Error 2 especially on Windows 10 and Windows 7. The full error message usually states “DISM error 2 File not Found or DISM Error 2 Unable to access the image”. In this article, we have concluded the reasons due to which the error occurs and have also listed the solutions for them.
Make sure to read through all of the solutions and also to analyze the reasons due to which they are triggered in order to ensure complete eradication of the error message from your computer.
What Causes the DISM Error 2 on Windows 10?
After going through the solutions that are commonly adopted to fix this error message, we concluded that the following must be some of the most crucial reasons due to which it is triggered in the first place.
- Command Line: In certain cases, the command line that the user is adopting might be incorrectly configured or the command used might not have been implemented properly. Therefore, we recommend that you try using a slightly different command that might sometimes do the trick and fix the DISM error 2 on your computer.
- Stuck Tool: The DISM Tool can sometimes get stuck while executing certain commands and that can end up triggering this error message. Therefore, we recommend that you run some commands on your computer that get rid of this.
- Antivirus: The Antivirus being used by the computer can sometimes block the DISM tool from accessing the drive by hogging its resources or falsely flagging it as a virus. Therefore, we recommend that you try and disable the Antivirus at least temporarily to ensure that the DISM error 2 isn’t being triggered because of it.
- Bad Sectors: The Hardrive often acquires bad sectors due to prolonged usage and this can really end up harming the tool’s ability to be able to repair the drive if it has been damaged beyond repair. Therefore, we recommend that you check for any wear, tear or bad sectors on the hard disk.
- Damaged OS: The operating system that you are using might be in a faulty state or it might not be working properly due to which the DISM error 2 is being triggered. Therefore, we recommend that you try and repair the operating system and then check to see if doing so fixes the issue.
Now that you have gone through the reasons behind its occurrence, it is about time that we move on towards implementing the solutions.
Before You Start:
Before you begin with any of the fixes make sure you are using the correct DISM version. If you are experiencing DISM error 2 it is recommended that you run the commands using WinPE. WinPE is Windows Pre-Installation Environment, it is often used to perform a recovery operation in Windows. Once done now continue on with implementing some of the advanced solutions listed below.
Fixing the DISM Error 2 Unable to Access the Image:
Solution 1: Try Using A Different Command
Some users were able to work around the error with a different command, try using the following commands in the command window and see which one works best for you:
dism.exe /image:C: /cleanup-image /revertpendingactions
OR,
dism.exe /online /cleanup-image /reverpendingactions
Solution 2: Refresh DISM Tool
By refreshing the DISM tool in Windows you might also be able to fix the error. To refresh the DISM tool follow these steps:
- Hold down the “Window + R” keys together on your keyboard to open up a “Run” dialog box.
- In the “Run” prompt type in “cmd” and then hold down on the “Shift + CTRL + Enter” keys to open an “Elevated Command Prompt”. If the system asks you for permission click to choose “YES”.

Run Command Prompt - In the new elevated command prompt window type the following command:

exe/image:C /Cleanup-image /revertpendingactions
4. Press “Enter” now and after the process is completed “Restart” your PC.
5. After the restart, now repeat steps one, two, and three and run the following command:
exe /online/Cleanup-Image /StartComponentCleanup
6. Once the process is completed again restart your computer.
7. Now, once again repeat steps 1,2,3 to run an elevated command prompt.
8. Type in the following command and hit “Enter”.
sfc/scannow
9. Then restart your computer once again.
10. Now, once again repeat steps one, two, and three to run an elevated command prompt.
11. Type in the following command and again hit “Enter”.
dism.exe /online /Cleanup-image /RestoreHealth
12. This will hopefully solve the DISM error on your pc, if not follow down for other solutions.
Solution 3: Disable Your Anti-Virus
Sometimes your anti-virus software can interfere with certain apps or tasks being carried out on your computer so try to disable it and then perform the task again. If you use a third-party anti-virus on your system you can simply navigate into it from the icon-tray on the taskbar, for others using Windows Defender can follow this procedure:
- On the search bar near the Start menu search for “Windows Security” and click to select it.

Choose Windows Security Option - In the left pane click on “Virus & Threat Protection” and scroll down to “Virus & threat protection Settings”.

Virus and threat protection - Below the Virus & Threat protection settings click to select “Manage Settings”. Here you are presented with three different security settings.
- Then turn off “Real-time Protection” by clicking on the slide button.
- Windows will ask for your permission at this stage click to select “YES”.
Disable real-Time Protection - Now proceed to check if the dism error 2 windows pe got resolved.


Solution 4: Check Hard Drive For Bad Sectors
Sometimes the error is caused by a dying or malfunctioning hard-drive so it’s better to check your hard-drive for bad sectors and low health. You can download Hard-disk Sentinel and monitor the health and temperature of your hard disk.

Solution 5: Using the Disk-Cleanup Tool
Windows come with a disk-cleanup tool, it helps reset the defragmented data and can help resolve errors caused by corrupted files. To use the Disk-Clean-up tool follow the steps below:
- Open the “File Explorer” or “This PC” on your computer.

Click on This PC - In here locate the option of “Local Disk C (OS Drive)” and right-click on it.
- From the drop-down menu click to select “Properties” at the bottom.
- From the new window click on the “Tools” tab located beside the “General” tab.
- In the Tools, tab click on “Optimize” in the “Optimize and Defragment Drive” section.

Choose Optimize Option - Now just simply follow the on-screen instructions to successfully optimize the drive.


Solution 6: Perform A System Restore
System Restore is a program that creates restore points in your PC at a specific location and time. These points help restore the system to an earlier error-free version or before the installation of a new program. To perform a system restore follow the below-listed steps:
- On the search bar near the Start menu type in “Create A Restore Point” and open it from the search results.
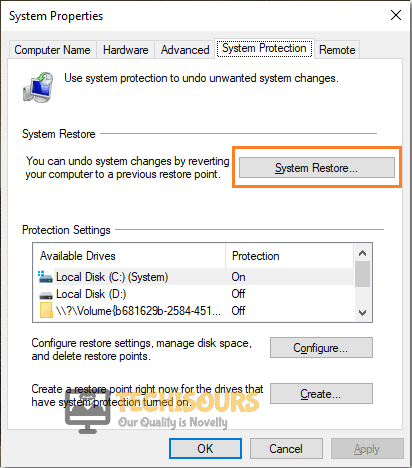
- A new window will pop up on your screen from here click on “System Restore”.

Choose System Restore Option - If you cannot click on System Restore, the reason is the drives on your pc are not protected. In this scenario, click to select “Local Disk C”.
- Next, click on the “Configure” button.
- In the new window select “Turn On System Protection” instead of “Disable System Protection”.
- Then click “OK” and “Apply” afterward.
- Now, click on the “System Restore” option.
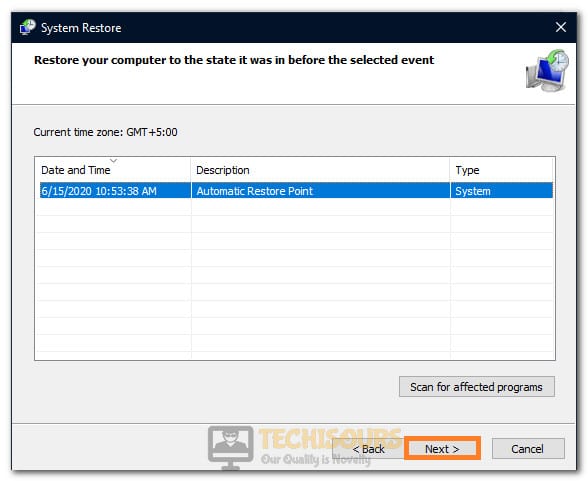
- Create a restore point to a date when your PC was perfectly fine and then click “Next”.

Selecting the Restore Point - Once the procedure is complete, run DISM and see if the error has been eradicated.
Solution 7: Use Source Options
DSIM Errors can be caused by Windows Updates, thus here we will make use of the source option to store the non-corrupted files. To activate the source options follow the steps below:
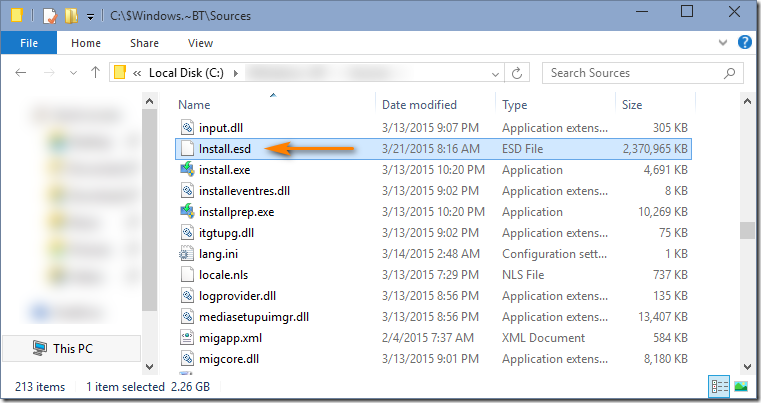
Note: To accomplish this task you need to “install.wim” file or “install.esd” file from a Windows installation media, make sure they are from the same windows version. You can download Window installation media from Microsoft’s official website.
- Plug in the Windows installation media into the computer and notice the “Drive Letter”. (e.g. “E:” )
- Then “Open” the media explorer and explore its contents.
- Look for the “Source” directory and see if it contains a file named “win” or “install.esd”.

Select install.esd file - Next, type in “Command Prompt” in the search bar and press the Enter button. The system will ask you for permission here click on “YES”.
Run Command Prompt - Now, enter the following command in the elevated command prompt and press “Enter”.
DISM /Online /Cleanup-Image /RestoreHealth /Source:repairSourceinstall.wim
7. Once the process is completed, restart your computer finally and see if the error is gone.
Note: This will repair the file without Windows update, this way DISM can work without meeting the broken update file.
Solution 8: Repairing Windows
Newly installed drivers or updates on the system can cause errors and finding the faulty driver can be very hard, so use Windows repair to repair such bugs.
- On the search bar near the Start menu type “Reset This PC” and click to select it.
- On the new window in the left “Recovery” pane click on “Get Started”.

Choose Recovery - A new popup menu will appear displaying you two options:
Keep My Files (It will keep your all files even on C drives, but only remove apps that you installed and settings setup).

Remove Everything (It will remove all files on your PC).
4. From here choose to select “Keep My Files”.
5. Lastly, just go through the Windows procedure and let it do its work; only make sure you do not power OFF your computer when the process is going on.
6. Once completed now see if you have been able to overcome the error.
Hopefully, the aforementioned solutions will help you resolve the error smoothly but if the issue still exists feel free to Contact Us here.
Когда вы запускаете сканирование DISM в своей системе Windows 11 или Windows 10, вы можете получить сообщение об ошибке Unable to access the Image 2, которая, следовательно, останавливает операцию восстановления образа системы Windows и хранилища компонентов на вашем устройстве. В этом посте представлены наиболее применимые решения ошибки.

Когда в вашей системе возникает ошибка DISM 2, известное сопровождающее описание ошибки может быть любым из следующих;
- Не удается получить доступ к изображению. Убедитесь, что путь к изображению и каталог Windows для изображения существуют, и у вас есть разрешения на чтение для папки.
- Произошла ошибка при попытке запустить процесс обслуживания образа, расположенного в C:. Дополнительные сведения см. в файле журнала.
- Система не может найти указанный файл.
Во всех случаях вы можете просмотреть файл журнала, расположенный по адресу C:WindowsLogsDISMdism.log.
Если DISM Не удается получить доступ к изображению Ошибка 2 произошло на вашем компьютере с Windows 11/10, чтобы решить эту проблему, вы можете попробовать наши рекомендуемые ниже исправления в произвольном порядке (после того, как вы прошли начальный контрольный список) и посмотреть, что работает для вас!
- Начальный контрольный список
- Обновить инструмент DISM
- Запустите сканирование DISM и укажите другой источник
- Восстановить реестр Windows
- Сбросьте настройки ПК или облака, переустановите или выполните восстановление обновления на месте
Давайте подробно рассмотрим перечисленные решения.
1]Начальный контрольный список
Прежде чем засучить рукава и погрузиться в приведенные ниже решения, вы можете выполнить следующие предварительные задачи и после каждой задачи проверить, работает ли инструмент DISM без проблем и выдает коды ошибок:
- Проверьте права доступа к файлам/папкам. Как и в случае с этой ошибкой 2, и как указано в выводе, убедитесь, что у вас есть разрешения на чтение в каталоге/папке Windows.
- Оптимизация и дефрагментация диска. Когда данные или файлы фрагментированы по всему жесткому диску, эта дезорганизация данных иногда может помешать возможности Windows получить доступ к указанным файлам, что потенциально может вызвать ошибку DISM 2. Таким образом, вы можете запустить дефрагментацию диска, чтобы переупорядочить фрагментированные данные, а затем посмотрите, успешно ли выполняется сканирование DISM.
- Временно отключите или удалите антивирус. Что касается ПК с Windows, известны случаи, когда программное обеспечение безопасности (особенно от сторонних поставщиков) могло мешать некоторым процессам на вашем компьютере. Это вероятный виновник — поэтому, чтобы решить проблему, вы можете попробовать временно отключить или удалить антивирусное приложение.
- Убедитесь, что Windows обновлена. Важно убедиться, что Windows обновлена, чтобы вы знали, что используете последнюю версию инструмента DISM. Однако, если ваша система обновлена или ошибка начала возникать после недавнего обновления Windows, вы можете выполнить восстановление системы или удалить обновление, а затем снова запустить сканирование DISM. Если ошибка в фокусе снова появляется, вы можете перейти к решениям, приведенным ниже.
2]Обновить инструмент DISM
Если первоначальный контрольный список не сработал, ваша следующая линия действий для решения проблемы DISM Не удается получить доступ к изображению Ошибка 2 на вашем компьютере с Windows 11/10 — это обновить инструмент DISM — обновив инструменты DISM на вашем ПК, /Восстановление здоровья коммутатор будет автоматически включен для запуска сканирования и автоматического восстановления поврежденных файлов из операционной сети.
Чтобы обновить DISM Tool, вы можете использовать ожидающие действия параметр для DISM. Запустите командную строку и выполните следующую команду:
dism.exe /image:C: /cleanup-image /revertpendingactions
После этого перезагрузите компьютер и при загрузке выполните приведенную ниже команду в командной строке с повышенными привилегиями, чтобы очистить хранилище компонентов:
dism.exe /онлайн/Cleanup-Image/StartComponentCleanup
Перезагрузите компьютер после завершения очистки и запустите средство проверки системных файлов в безопасном режиме. Затем, наконец, вы можете запустить команду ниже
dism.exe/онлайн/Cleanup-Image/RestoreHealth
Если ошибка повторяется, попробуйте следующее решение.
4]Восстановить реестр Windows
Это решение сработало для пострадавшего пользователя, у которого было кратковременное отключение питания, и компьютер в спящем режиме перезагрузился, но Windows зависла, была перезагружена вручную и дошла до логотипа Windows с вращающимися точками на экране, а затем вылетела с BSOD. При запуске сканирования DISM возникла ошибка. Однако позже пользователь сообщил, что это не проблема DISM, а оказалось, что после отключения питания реестр сильно поврежден. В этом случае сработало восстановление реестра Windows, а затем запуск инструмента DISM завершился без выдачи какого-либо кода ошибки.
5]Сбросьте настройки ПК или облака, переустановите или выполните восстановление обновления на месте.
На данный момент, если ошибка в выделении по-прежнему не исправлена после того, как вы исчерпали указанные выше параметры, это, скорее всего, связано с серьезным повреждением системы. В этом случае вашим следующим действием будет сброс Windows 11/10 или облачная переустановка для сброса всех компонентов Windows. Если обе процедуры не помогли решить проблему, вы можете попробовать восстановить обновление на месте.
Надеюсь это поможет!
Как исправить ошибку DISM 5 «Отказано в доступе»?
Обычно это происходит из-за недостаточных разрешений в системе. Поэтому многие люди могут исправить DISM Error 5 Access Denied, просто убедившись, что текущий вошедший в систему пользователь имеет права администратора в системе. Кроме того, запуск команды DISM в безопасном режиме с поддержкой сети может решить проблему. Если это не поможет, активируйте и используйте встроенную учетную запись суперадминистратора в Windows.
Почему DISM не работает?
Если DISM не работает в вашей системе и выдает коды ошибок, такие как 87, 112, 11, 50, 3, 87,1726, 1392, 1393, 1910, вы можете решить проблему, просто отключив определенные антивирусные функции или отключив или вообще удалить антивирус. После отключения антивируса повторите сканирование DISM еще раз.
win10ltsb
Ошибка: 2
Не удалось получить доступ к образу.
Убедитесь, что путь к образу и каталог Windows образа существуют и учетная запись обладает правами на чтение папки.
захожу в винду в режиме восстановления через коммандную строку, ввожу (учетка администратора встроенного)
DISM /Image:C /Cleanup-Image /RestoreHealth /Source:WIM:C:install.wim /scratchdir:D:1
wim находится в корне C, Ос там же
Что делаю не так?
лог
Здраствуйте. При обновленни win7 выключили системник и теперь он заходит только через восстановление системы и перезагружается. И не получается удалить через командную строку обновления. Я набираю dism /image:*: /get-packages выдает ошибка 2. Не удалось получить доступ к образу. Убедитесь, что путь к образу и каталог Windows образа существуют и уч.запись обладает правами на чтение папки. Файл журнала DISM находится по адресу x:windowsLogsDISMdism.log. Что делать помогите?
На это сообщение еще не было создано никаких ответов.
Будьте первым, кто ответит на него.
![]()
Ваш ответ