
DISM — это встроенный инструмент командной строки, который помогает обнаруживать и восстанавливать образ системы Windows. Но, как и любая другая функция Windows, она может время от времени сталкиваться с неожиданными ошибками. Например, некоторые пользователи столкнулись с ошибкой DISM 2 при использовании инструмента.
Итак, если вы также столкнулись с ошибкой DISM 2, следующие решения помогут вам избавиться от нее навсегда. Проверять В чем разница между CHKDSK, SFC и DISM в Windows 10?
Ошибка DISM 2 появляется, когда система не может найти определенный файл во время сканирования DISM. Ошибка останавливает процесс проверки образа системы Windows и процесс восстановления хранилища компонентов. К счастью, избавиться от этого сообщения об ошибке очень легко.
Вот все эффективные решения, которые вы можете попробовать в этом случае.
1. Обновите инструмент DISM
Первое решение для удаления сообщения об ошибке — обновить инструмент DISM. Обновление инструмента автоматически восстановит поврежденные файлы из операционной сети.
Вы можете обновить DISM, выполнив следующие действия.
- Откройте командную строку с правами администратора.
- Введите следующую команду и нажмите Enter.
dism.exe/image:C /cleanup-image /revertpendingactions
- После этого перезагрузите систему.
- Снова откройте командную строку в режиме администратора.
- Выполните следующую команду, чтобы очистить хранилище компонентов.
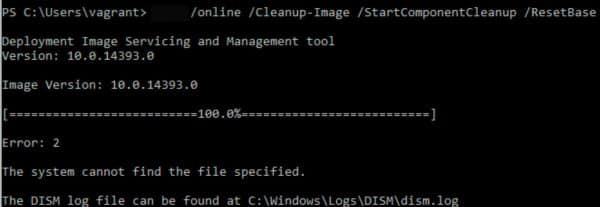
dism.exe /online/Cleanup-Image /StartComponentCleanup
- Снова перезагрузите систему и откройте командную строку с правами администратора.
- Введите и выполните следующую команду, чтобы запустить сканирование SFC.
sfc /scannow
- Это оно. Перезагрузите систему еще раз и попробуйте запустить сканирование DISM. Проверьте, сохраняется ли проблема.
Проверять Как исправить код ошибки 0xc0000225 в Windows.
2. Запустите сканирование CHKDSK
Сообщение об ошибке может появиться из-за проблем с жестким диском. В этом случае вы можете рассмотреть возможность запуска сканирования CHKDSK.
Сканирование CHKDSK находит и устраняет все проблемы, связанные с жестким диском. Вот как играть.
- Откройте командную строку в режиме администратора.
- Введите следующую команду и нажмите Enter.
chkdsk /offlinescanandfix
Процесс сканирования займет некоторое время. Как только это будет сделано, перезагрузите систему и проверьте наличие проблемы.
3. Отключите антивирус.
Ошибка DISM 2 может быть вызвана антивирусным приложением, установленным в системе. Вам придется отключить такие приложения, чтобы решить проблему.
Различные приложения имеют разные способы отключения, но большинство из них можно отключить, щелкнув правой кнопкой мыши значок приложения на панели задач и выбрав параметр отключения.
Если вы используете брандмауэр Microsoft Defender, вот как его отключить.
- Откройте меню «Пуск» и введите Безопасность Windows , И нажмите Enter.
- выберите Межсетевой экран и защита сети из правой панели.
- Нажмите частная сеть.
- Отключите переключатель рядом с Брандмауэр Microsoft Defender.
Попробуйте запустить сканирование DISM и проверьте, появляется ли снова сообщение об ошибке.
4. Выполните восстановление системы.
Выполнение восстановления системы — еще одно решение, которое вы можете попробовать в этом случае. В процессе вы вернете некоторые изменения в вашей системе в предыдущее состояние.
Чтобы выполнить восстановление системы, вам нужно будет выполнить следующие шаги.
- Откройте меню «Пуск» и введите Восстановить , И нажмите Enter.
- Нажмите восстановление системы.
- В мастере восстановления системы нажмите следующий.
- Выберите точку восстановления и нажмите «Далее».
Это оно. Дождитесь завершения процесса восстановления. Затем запустите сканирование DISM и проверьте, сталкиваетесь ли вы с сообщением об ошибке.
5. Перезагрузите ПК.
Если ни один из этих шагов не помогает, вы можете перезагрузить компьютер. Вот как перезагрузить ПК с Windows.
- Откройте настройки с помощью Win + I.
- На вкладке «Система» выберите восстановление.
- Нажмите Сбросить ПК.
Следуйте инструкциям на экране, чтобы перезагрузить компьютер. Проверять Способы сброса Windows до заводского режима.
Ошибка DISM 2. устранена
Неожиданные ошибки DISM могут появляться при выполнении сканирования DISM на компьютере с Windows. К счастью, ошибки DISM легко устранить. Если вы столкнулись с ошибкой DISM 2, рассмотрите возможность использования приведенных выше решений. Теперь вы можете просмотреть Лучшие способы исправить ошибки Центра обновления Windows в Windows 11.
When you run the DISM scan on your Windows 11 or Windows 10 system, you may get the Unable to access the Image Error 2, which consequently stops the Windows system image and component store repair operation on your device. This post provides the most applicable solutions to the error.

Error: 2, Unable to access the image, Make sure that the image path and the Windows directory for the image exist and you have Read permissions on the folder.
When the DISM Error 2 occurs on your system, the known accompanying error description could be any of the following;
- Unable to access the image. Make sure that the image path and the Windows directory for the image exist and you have Read permissions on the folder.
- An error occurred while attempting to start the servicing process for the image located at C:. For more information, review the log file.
- The system cannot find the file specified.
In all cases, you can review the logfile located at C:WindowsLogsDISMdism.log.
If the DISM Unable to access the Image Error 2 has occurred on your Windows 11/10 computer, to resolve the issue, you can try our recommended fixes below in no particular order (after you must have gone through the initial checklist) and see what works for you!
- Initial checklist
- Refresh DISM Tool
- Run the DISM scan and specify another source
- Restore Windows Registry
- Reset PC or Cloud Reinstall or perform In-place Upgrade Repair
Let’s see the listed solutions in detail.
1] Initial checklist
Before you roll up your sleeves and dive into the solutions below, you can carry out the following pre-tasks, and after each task see if the DISM tool runs without issues and throwing error codes:
- Check for file/folder permissions. As is the case in an instance of this Error 2, and as indicated in the output, make sure you have Read permissions on the Windows directory/folder.
- Optimize and defragment drive. When data or files are fragmented all across the hard drive, this disorganization of data sometimes can interfere with Windows ability to access specified files, which could potentially trigger the DISM error 2. So, you can run Disk Defragmenter to rearrange fragmented data, and afterwards see if the DISM scan runs successfully.
- Temporarily disable or uninstall antivirus. As far as Windows PC goes, there are known cases where the security software (especially from third-party vendors) could interfere with some processes on your computer. This is a likely culprit – so, to fix the problem, you can try disabling or uninstalling your antivirus application temporarily.
- Make sure Windows is up to date. It is important to make sure Windows is updated, so that you know you’re running the latest version of the DISM tool. If however, your system is up to date or the error started to occur after a recent Windows update, you can perform System Restore or uninstall the update then run the DISM scan again. If the error in focus reappears, you can then proceed with the solutions proper below.
2] Refresh DISM Tool
If the initial checklist didn’t pan out, your next line of action to resolve the DISM Unable to access the Image Error 2 on your Windows 11/10 computer is to refresh the DISM Tool – by refreshing the DISM tools on your PC, the /Restorehealth switch will be automatically enabled to run scans and repair the corrupted files automatically from the operating network.
To refresh DISM Tool, you can use the revertpendingactions parameter for DISM. Run Command Prompt, and execute the following command:
dism.exe /image:C: /cleanup-image /revertpendingactions
Afterward, restart your PC, and on boot, run the command below in elevated Command prompt to clean up the component store:
dism.exe /online/Cleanup-Image /StartComponentCleanup
Restart your computer once the cleanup completes, and run System File Checker in Safe Mode. Then finally, you can run the command below
dism.exe /online /Cleanup-Image /RestoreHealth
If the error in hand reoccurs, try the next solution.
Read: There is a system repair pending which requires reboot to complete
3] Run the DISM scan and specify another source

It’s likely the error you’re currently getting is due to the Windows image on the PC is damaged or corrupted. In this case, you can run the DISM scan and specify another source. You can clean up the system components, and specify an alternative Windows image repair source, which will then be used to repair a corrupted Windows image by following the instructions described in this post.
4] Restore Windows Registry
This solution worked for an affected user that had a brief power outage and the PC in sleep mode rebooted, but Windows froze and was manually rebooted and got to the Windows logo with spinning dots screen and then crashed with a BSOD. On running DISM scan, the error was triggered. However, the user later reported it wasn’t a DISM problem, rather it appeared that after the power outage the Registry got super corrupted. In this case, what worked was to Restore Windows Registry, and afterwards, running the DISM tool completed without throwing any error code.
5] Reset PC or Cloud Reinstall or perform In-place Upgrade Repair

At this point, if the error in highlight is still not fixed after you have exhausted the options above, it’s most likely due to some kind of severe system corruption. In this case, your next line of action is to reset Windows 11/10 or Cloud Reinstall to reset every Windows component. If both procedures fails to resolve the issue, you can try In-place Upgrade Repair.
Hope this helps!
How do I fix DISM Error 5 Access Denied?
This typically occurs due to insufficient permissions on the system. Therefore, many people can fix DISM Error 5 Access Denied by simply making sure the current logged in user has administrator privilege on the system. Also, running the DISM command in Safe mode with Networking may solve the issue. If this does not help, activate and use the built-in super-admin account in Windows.
Why is DISM not working?
If DISM failed on your system and throws error code(s) like 87, 112, 11, 50, 3, 87,1726, 1392, 1393, 1910 you might be able to fix the problem simply by disabling certain antivirus features or by disabling or uninstalling your antivirus altogether. Once you disable your antivirus, repeat the DISM scan again.
DISM is a command-line tool that is used to fix corrupt Windows files on a computer, but sometimes DISM can itself run into the DISM Error 2 especially on Windows 10 and Windows 7. The full error message usually states “DISM error 2 File not Found or DISM Error 2 Unable to access the image”. In this article, we have concluded the reasons due to which the error occurs and have also listed the solutions for them.
Make sure to read through all of the solutions and also to analyze the reasons due to which they are triggered in order to ensure complete eradication of the error message from your computer.
What Causes the DISM Error 2 on Windows 10?
After going through the solutions that are commonly adopted to fix this error message, we concluded that the following must be some of the most crucial reasons due to which it is triggered in the first place.
- Command Line: In certain cases, the command line that the user is adopting might be incorrectly configured or the command used might not have been implemented properly. Therefore, we recommend that you try using a slightly different command that might sometimes do the trick and fix the DISM error 2 on your computer.
- Stuck Tool: The DISM Tool can sometimes get stuck while executing certain commands and that can end up triggering this error message. Therefore, we recommend that you run some commands on your computer that get rid of this.
- Antivirus: The Antivirus being used by the computer can sometimes block the DISM tool from accessing the drive by hogging its resources or falsely flagging it as a virus. Therefore, we recommend that you try and disable the Antivirus at least temporarily to ensure that the DISM error 2 isn’t being triggered because of it.
- Bad Sectors: The Hardrive often acquires bad sectors due to prolonged usage and this can really end up harming the tool’s ability to be able to repair the drive if it has been damaged beyond repair. Therefore, we recommend that you check for any wear, tear or bad sectors on the hard disk.
- Damaged OS: The operating system that you are using might be in a faulty state or it might not be working properly due to which the DISM error 2 is being triggered. Therefore, we recommend that you try and repair the operating system and then check to see if doing so fixes the issue.
Now that you have gone through the reasons behind its occurrence, it is about time that we move on towards implementing the solutions.
Before You Start:
Before you begin with any of the fixes make sure you are using the correct DISM version. If you are experiencing DISM error 2 it is recommended that you run the commands using WinPE. WinPE is Windows Pre-Installation Environment, it is often used to perform a recovery operation in Windows. Once done now continue on with implementing some of the advanced solutions listed below.
Fixing the DISM Error 2 Unable to Access the Image:
Solution 1: Try Using A Different Command
Some users were able to work around the error with a different command, try using the following commands in the command window and see which one works best for you:
dism.exe /image:C: /cleanup-image /revertpendingactions
OR,
dism.exe /online /cleanup-image /reverpendingactions
Solution 2: Refresh DISM Tool
By refreshing the DISM tool in Windows you might also be able to fix the error. To refresh the DISM tool follow these steps:
- Hold down the “Window + R” keys together on your keyboard to open up a “Run” dialog box.
- In the “Run” prompt type in “cmd” and then hold down on the “Shift + CTRL + Enter” keys to open an “Elevated Command Prompt”. If the system asks you for permission click to choose “YES”.

Run Command Prompt - In the new elevated command prompt window type the following command:

exe/image:C /Cleanup-image /revertpendingactions
4. Press “Enter” now and after the process is completed “Restart” your PC.
5. After the restart, now repeat steps one, two, and three and run the following command:
exe /online/Cleanup-Image /StartComponentCleanup
6. Once the process is completed again restart your computer.
7. Now, once again repeat steps 1,2,3 to run an elevated command prompt.
8. Type in the following command and hit “Enter”.
sfc/scannow
9. Then restart your computer once again.
10. Now, once again repeat steps one, two, and three to run an elevated command prompt.
11. Type in the following command and again hit “Enter”.
dism.exe /online /Cleanup-image /RestoreHealth
12. This will hopefully solve the DISM error on your pc, if not follow down for other solutions.
Solution 3: Disable Your Anti-Virus
Sometimes your anti-virus software can interfere with certain apps or tasks being carried out on your computer so try to disable it and then perform the task again. If you use a third-party anti-virus on your system you can simply navigate into it from the icon-tray on the taskbar, for others using Windows Defender can follow this procedure:
- On the search bar near the Start menu search for “Windows Security” and click to select it.

Choose Windows Security Option - In the left pane click on “Virus & Threat Protection” and scroll down to “Virus & threat protection Settings”.

Virus and threat protection - Below the Virus & Threat protection settings click to select “Manage Settings”. Here you are presented with three different security settings.
- Then turn off “Real-time Protection” by clicking on the slide button.
- Windows will ask for your permission at this stage click to select “YES”.
Disable real-Time Protection - Now proceed to check if the dism error 2 windows pe got resolved.


Solution 4: Check Hard Drive For Bad Sectors
Sometimes the error is caused by a dying or malfunctioning hard-drive so it’s better to check your hard-drive for bad sectors and low health. You can download Hard-disk Sentinel and monitor the health and temperature of your hard disk.

Solution 5: Using the Disk-Cleanup Tool
Windows come with a disk-cleanup tool, it helps reset the defragmented data and can help resolve errors caused by corrupted files. To use the Disk-Clean-up tool follow the steps below:
- Open the “File Explorer” or “This PC” on your computer.

Click on This PC - In here locate the option of “Local Disk C (OS Drive)” and right-click on it.
- From the drop-down menu click to select “Properties” at the bottom.
- From the new window click on the “Tools” tab located beside the “General” tab.
- In the Tools, tab click on “Optimize” in the “Optimize and Defragment Drive” section.

Choose Optimize Option - Now just simply follow the on-screen instructions to successfully optimize the drive.


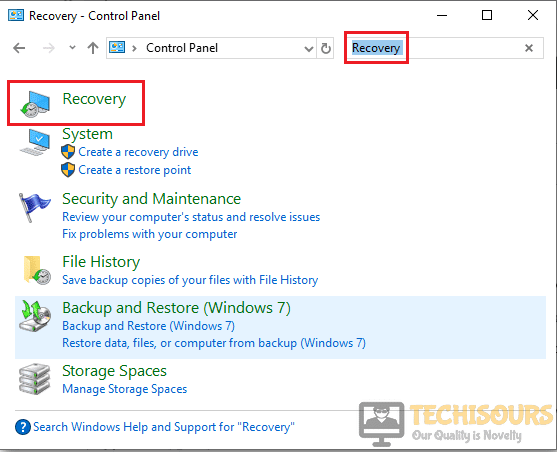
Solution 6: Perform A System Restore
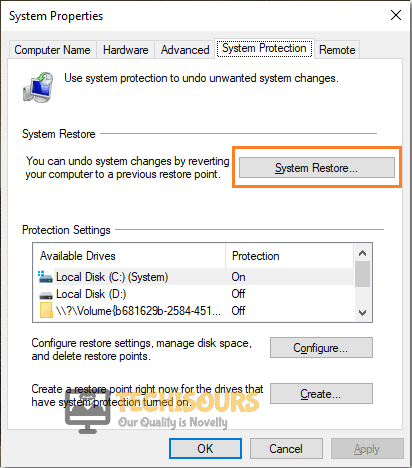
System Restore is a program that creates restore points in your PC at a specific location and time. These points help restore the system to an earlier error-free version or before the installation of a new program. To perform a system restore follow the below-listed steps:
- On the search bar near the Start menu type in “Create A Restore Point” and open it from the search results.
- A new window will pop up on your screen from here click on “System Restore”.

Choose System Restore Option - If you cannot click on System Restore, the reason is the drives on your pc are not protected. In this scenario, click to select “Local Disk C”.
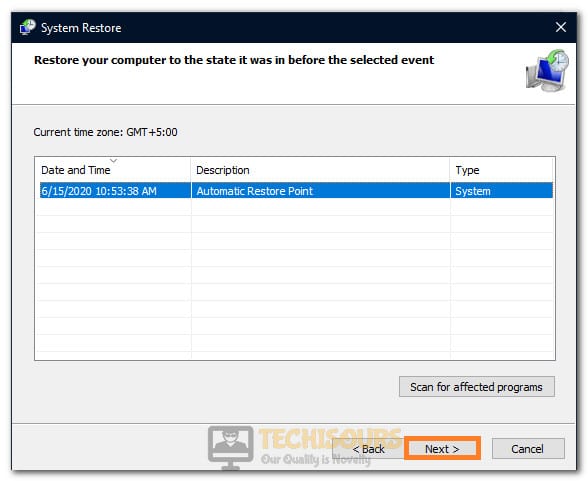
- Next, click on the “Configure” button.
- In the new window select “Turn On System Protection” instead of “Disable System Protection”.
- Then click “OK” and “Apply” afterward.
- Now, click on the “System Restore” option.
- Create a restore point to a date when your PC was perfectly fine and then click “Next”.

Selecting the Restore Point - Once the procedure is complete, run DISM and see if the error has been eradicated.
Solution 7: Use Source Options
DSIM Errors can be caused by Windows Updates, thus here we will make use of the source option to store the non-corrupted files. To activate the source options follow the steps below:
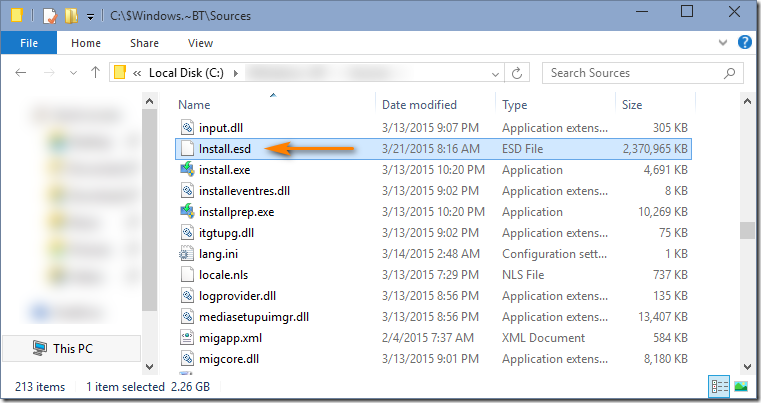
Note: To accomplish this task you need to “install.wim” file or “install.esd” file from a Windows installation media, make sure they are from the same windows version. You can download Window installation media from Microsoft’s official website.
- Plug in the Windows installation media into the computer and notice the “Drive Letter”. (e.g. “E:” )
- Then “Open” the media explorer and explore its contents.
- Look for the “Source” directory and see if it contains a file named “win” or “install.esd”.

Select install.esd file - Next, type in “Command Prompt” in the search bar and press the Enter button. The system will ask you for permission here click on “YES”.
Run Command Prompt - Now, enter the following command in the elevated command prompt and press “Enter”.
DISM /Online /Cleanup-Image /RestoreHealth /Source:repairSourceinstall.wim
7. Once the process is completed, restart your computer finally and see if the error is gone.
Note: This will repair the file without Windows update, this way DISM can work without meeting the broken update file.
Solution 8: Repairing Windows
Newly installed drivers or updates on the system can cause errors and finding the faulty driver can be very hard, so use Windows repair to repair such bugs.
- On the search bar near the Start menu type “Reset This PC” and click to select it.
- On the new window in the left “Recovery” pane click on “Get Started”.

Choose Recovery - A new popup menu will appear displaying you two options:
Keep My Files (It will keep your all files even on C drives, but only remove apps that you installed and settings setup).

Remove Everything (It will remove all files on your PC).
4. From here choose to select “Keep My Files”.
5. Lastly, just go through the Windows procedure and let it do its work; only make sure you do not power OFF your computer when the process is going on.
6. Once completed now see if you have been able to overcome the error.
Hopefully, the aforementioned solutions will help you resolve the error smoothly but if the issue still exists feel free to Contact Us here.
DISM или средство обслуживания образов развертывания и управления ими, также известное как средство готовности обновления системы, помогает исправить некоторые ошибки повреждения Windows, которые могут привести к тому, что обновления и пакеты обновления не будут установлены, например, если файл поврежден.
Этот инструмент можно использовать для обслуживания образа Windows или для подготовки образа WinRE (среда восстановления Windows) и / или WinPE (среда предустановки Windows), но его также можно использовать для обслуживания .wim (образ Windows) или .vhd /. VHDX (виртуальный жесткий диск).
Всякий раз, когда вы пытаетесь использовать командную строку DISM и отображаете ошибку DISM 2 в виде сообщения, вы, возможно, не знаете, что делать в таком случае первым, но есть способы, которые вы можете попробовать, как описано ниже, чтобы исправить ошибку.
Эпический гид оповещения! Все, что вам нужно знать о DISM, прямо здесь!
Как исправить ошибку DISM 2
- Временно отключите или удалите антивирус
- Проверьте версию DISM
- Обновить инструмент DISM
- Перезагрузите компьютер с помощью опции «Сохранить мои файлы»
- Используйте инструмент очистки диска
Решение 1. Временно отключите или удалите антивирус
Иногда ваше программное обеспечение безопасности может помешать некоторым процессам на вашем компьютере, поэтому в случае возникновения ошибки DISM 2 вы можете временно отключить антивирус или удалить его, а если проблема не исчезнет, вы можете смонтировать образ и проверить результат еще раз.
Не забудьте переустановить или включить антивирус, как только вы закончите.
Решение 2. Проверьте версию DISM
Убедитесь, что вы используете правильную версию DISM, установленную с Windows ADK. Кроме того, не монтируйте образы в защищенные папки, такие как папка UserDocuments.
Если процессы DISM прерваны, временно отключитесь от сети и рассмотрите возможность запуска команд из WinPE.
Решение 3. Обновите инструмент DISM
- Щелкните правой кнопкой мыши «Пуск» и выберите « Командная строка» («Администратор»).

- Введите эту команду: exe / image: C / cleanup-image / revertpendingactions . Это вернет отложенные задачи, и это включает любые обновления Windows, которые ожидают.
- Загрузите компьютер и запустите в командной строке восстановления
- Выполните эту команду: exe / online / Cleanup-Image / StartComponentCleanup . Это очищает хранилище компонентов и помогает всему снова работать правильно
Работа в командной строке будет походить на прогулку по парку после прочтения этого руководства!
Перезапустите, а затем запустите сканирование SFC в безопасном режиме, выполнив следующие действия:
- Нажмите Пуск, затем перейдите в поле поиска и введите CMD.
- Перейти к командной строке в результатах поиска
- Щелкните правой кнопкой мыши и выберите « Запуск от имени администратора».

- Введите SFC / SCANNOW

- Нажмите Enter
- Перезагрузите компьютер, а затем выполните следующую команду: dism.exe / online / Cleanup-Image / RestoreHealth
Если это не поможет, попробуйте следующее решение.
Решение 4. Перезагрузите компьютер с помощью опции «Сохранить мои файлы»
Если вы попытались восстановить систему, но она не работает, перезагрузите компьютер с опцией Сохранить мои файлы.
Выполнение сброса позволяет вам выбрать, какие файлы вы хотите сохранить или удалить, а затем переустановить Windows, поэтому выполните следующие действия:
- Нажмите Пуск
- Нажмите Настройки

- Нажмите Обновить и безопасность

- Нажмите Recovery на левой панели

- Нажмите Сбросить этот ПК

- Нажмите Начать

- Выберите опцию Сохранить мои файлы
Примечание: все ваши личные файлы будут удалены и настройки сброшены. Любые установленные вами приложения будут удалены, и только предустановленные приложения, поставляемые с вашим ПК, будут переустановлены.
Сброс ПК не будет работать? Не паникуйте! Решите проблему в кратчайшие сроки с помощью нашего подробного руководства!
Решение 5. Используйте инструмент очистки диска
Поскольку средство DISM не работает или выдает ошибку DISM 2, а очистка диска не может освободить много места, используйте средство дефрагментации диска для перегруппировки фрагментированных данных в системе, выполнив следующие действия:
- Войти как Администратор
- Нажмите Пуск и выберите Проводник
- Развернуть этот компьютер
- Щелкните правой кнопкой мыши на локальном диске (C 🙂 и выберите Свойства
- Перейти на вкладку Инструменты

- В разделе « Оптимизация и дефрагментация диска» выберите « Оптимизировать».

- Нажмите « Применить», затем нажмите «Ввод» или «ОК».
Вам удалось исправить ошибку DISM 2 на вашем компьютере, используя любое из этих решений? Дайте нам знать, оставив комментарий в разделе ниже.
СВЯЗАННЫЕ ИСТОРИИ, ЧТОБЫ ПРОВЕРИТЬ:
- Как быстро исправить ошибку DISM 50 в Windows 10
- Исправлено: сбой DISM в Windows 10
- Исправлено: зависание в цикле автоматического восстановления в Windows 10
Когда вы запускаете сканирование DISM в своей системе Windows 11 или Windows 10, вы можете получить сообщение об ошибке Unable to access the Image 2, которая, следовательно, останавливает операцию восстановления образа системы Windows и хранилища компонентов на вашем устройстве. В этом посте представлены наиболее применимые решения ошибки.

Когда в вашей системе возникает ошибка DISM 2, известное сопровождающее описание ошибки может быть любым из следующих;
- Не удается получить доступ к изображению. Убедитесь, что путь к изображению и каталог Windows для изображения существуют, и у вас есть разрешения на чтение для папки.
- Произошла ошибка при попытке запустить процесс обслуживания образа, расположенного в C:. Дополнительные сведения см. в файле журнала.
- Система не может найти указанный файл.
Во всех случаях вы можете просмотреть файл журнала, расположенный по адресу C:WindowsLogsDISMdism.log.
Если DISM Не удается получить доступ к изображению Ошибка 2 произошло на вашем компьютере с Windows 11/10, чтобы решить эту проблему, вы можете попробовать наши рекомендуемые ниже исправления в произвольном порядке (после того, как вы прошли начальный контрольный список) и посмотреть, что работает для вас!
- Начальный контрольный список
- Обновить инструмент DISM
- Запустите сканирование DISM и укажите другой источник
- Восстановить реестр Windows
- Сбросьте настройки ПК или облака, переустановите или выполните восстановление обновления на месте
Давайте подробно рассмотрим перечисленные решения.
1]Начальный контрольный список
Прежде чем засучить рукава и погрузиться в приведенные ниже решения, вы можете выполнить следующие предварительные задачи и после каждой задачи проверить, работает ли инструмент DISM без проблем и выдает коды ошибок:
- Проверьте права доступа к файлам/папкам. Как и в случае с этой ошибкой 2, и как указано в выводе, убедитесь, что у вас есть разрешения на чтение в каталоге/папке Windows.
- Оптимизация и дефрагментация диска. Когда данные или файлы фрагментированы по всему жесткому диску, эта дезорганизация данных иногда может помешать возможности Windows получить доступ к указанным файлам, что потенциально может вызвать ошибку DISM 2. Таким образом, вы можете запустить дефрагментацию диска, чтобы переупорядочить фрагментированные данные, а затем посмотрите, успешно ли выполняется сканирование DISM.
- Временно отключите или удалите антивирус. Что касается ПК с Windows, известны случаи, когда программное обеспечение безопасности (особенно от сторонних поставщиков) могло мешать некоторым процессам на вашем компьютере. Это вероятный виновник — поэтому, чтобы решить проблему, вы можете попробовать временно отключить или удалить антивирусное приложение.
- Убедитесь, что Windows обновлена. Важно убедиться, что Windows обновлена, чтобы вы знали, что используете последнюю версию инструмента DISM. Однако, если ваша система обновлена или ошибка начала возникать после недавнего обновления Windows, вы можете выполнить восстановление системы или удалить обновление, а затем снова запустить сканирование DISM. Если ошибка в фокусе снова появляется, вы можете перейти к решениям, приведенным ниже.
2]Обновить инструмент DISM
Если первоначальный контрольный список не сработал, ваша следующая линия действий для решения проблемы DISM Не удается получить доступ к изображению Ошибка 2 на вашем компьютере с Windows 11/10 — это обновить инструмент DISM — обновив инструменты DISM на вашем ПК, /Восстановление здоровья коммутатор будет автоматически включен для запуска сканирования и автоматического восстановления поврежденных файлов из операционной сети.
Чтобы обновить DISM Tool, вы можете использовать ожидающие действия параметр для DISM. Запустите командную строку и выполните следующую команду:
dism.exe /image:C: /cleanup-image /revertpendingactions
После этого перезагрузите компьютер и при загрузке выполните приведенную ниже команду в командной строке с повышенными привилегиями, чтобы очистить хранилище компонентов:
dism.exe /онлайн/Cleanup-Image/StartComponentCleanup
Перезагрузите компьютер после завершения очистки и запустите средство проверки системных файлов в безопасном режиме. Затем, наконец, вы можете запустить команду ниже
dism.exe/онлайн/Cleanup-Image/RestoreHealth
Если ошибка повторяется, попробуйте следующее решение.
4]Восстановить реестр Windows
Это решение сработало для пострадавшего пользователя, у которого было кратковременное отключение питания, и компьютер в спящем режиме перезагрузился, но Windows зависла, была перезагружена вручную и дошла до логотипа Windows с вращающимися точками на экране, а затем вылетела с BSOD. При запуске сканирования DISM возникла ошибка. Однако позже пользователь сообщил, что это не проблема DISM, а оказалось, что после отключения питания реестр сильно поврежден. В этом случае сработало восстановление реестра Windows, а затем запуск инструмента DISM завершился без выдачи какого-либо кода ошибки.
5]Сбросьте настройки ПК или облака, переустановите или выполните восстановление обновления на месте.
На данный момент, если ошибка в выделении по-прежнему не исправлена после того, как вы исчерпали указанные выше параметры, это, скорее всего, связано с серьезным повреждением системы. В этом случае вашим следующим действием будет сброс Windows 11/10 или облачная переустановка для сброса всех компонентов Windows. Если обе процедуры не помогли решить проблему, вы можете попробовать восстановить обновление на месте.
Надеюсь это поможет!
Как исправить ошибку DISM 5 «Отказано в доступе»?
Обычно это происходит из-за недостаточных разрешений в системе. Поэтому многие люди могут исправить DISM Error 5 Access Denied, просто убедившись, что текущий вошедший в систему пользователь имеет права администратора в системе. Кроме того, запуск команды DISM в безопасном режиме с поддержкой сети может решить проблему. Если это не поможет, активируйте и используйте встроенную учетную запись суперадминистратора в Windows.
Почему DISM не работает?
Если DISM не работает в вашей системе и выдает коды ошибок, такие как 87, 112, 11, 50, 3, 87,1726, 1392, 1393, 1910, вы можете решить проблему, просто отключив определенные антивирусные функции или отключив или вообще удалить антивирус. После отключения антивируса повторите сканирование DISM еще раз.