
-
Partition Wizard
-
Partition Manager
- 4 Ways to Fix the “%1 Is Not a Valid Win32 Application” Error
By Linda | Follow |
Last Updated February 18, 2022
Have you encountered the “1 is not a valid Win32 application” error when installing a program? Why does this issue happen? How to solve this problem? This post from MiniTool Partition Wizard will show you all.
1 Is Not a Valid Win32 Application
Many people have reported the “1 is not a valid Win32 application” error and this error has the following variants:
- %1 is not a valid Win32 application.
- [Error 193] %1 is not a valid Win32 application.
- DLL load failed: %1 is not a valid Win32 application.
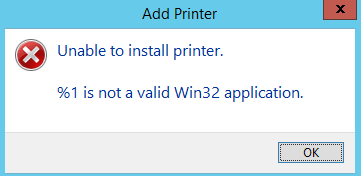
The specific error message may vary depending on what program you are opening or running, but there must be “%1 is not a valid Win32 application” in the error message.
Why does the error occur? The possible reasons are as follows:
- Incompatibility between the Windows version/type and program.
- Corrupted Installer file.
- Active Firewall.
3 Solutions to .exe Is Not a Valid Win32 Application
How to Fix the “%1 Is Not a Valid Win32 Application” Error
To fix the error, you can try the following methods one by one.
Method 1. Download the Installer File Compatible with the System
In most cases, the “1 is not a valid Win32 application” occurs due to the incompatibility between the Windows version/type and program. Please make sure you have downloaded the right version of the installer file.
- Press Windows key + R to call out the Run box.
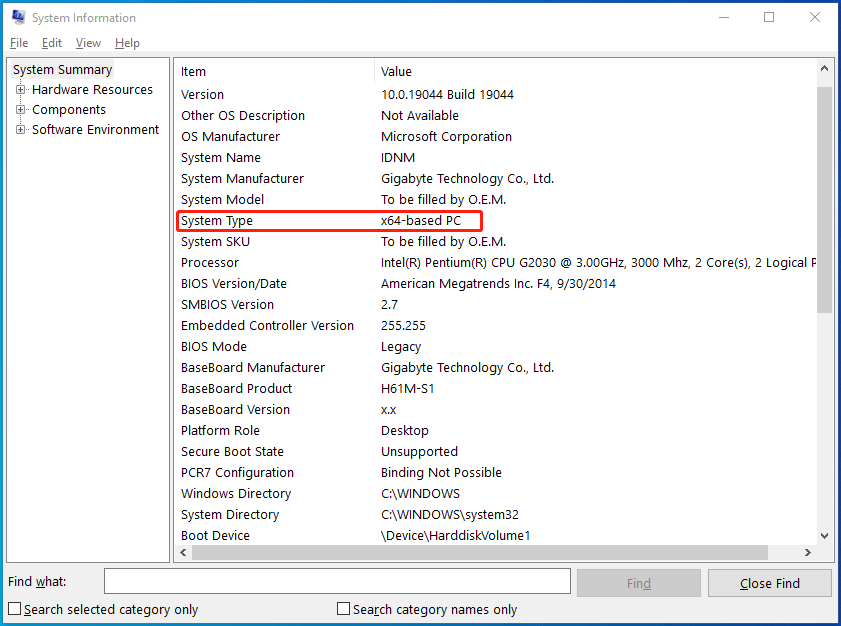
- In the Run box, type “msinfo32” and press Enter to open the System Information window.
- In the right pane, check the System Type If the system type is x64, you should download the 64-bit installer file. If the system type is x86, you should download the 32-bit installer file.
Method 2. Run the Program as Administrator
Some programs may need an administrator privilege for running. Giving the administrator privilege may solve the problem. You just need to right-click the installer file and choose Run as administrator. If this method works and this installer file will be used frequently, you can give it a permanent administrator through the following steps:
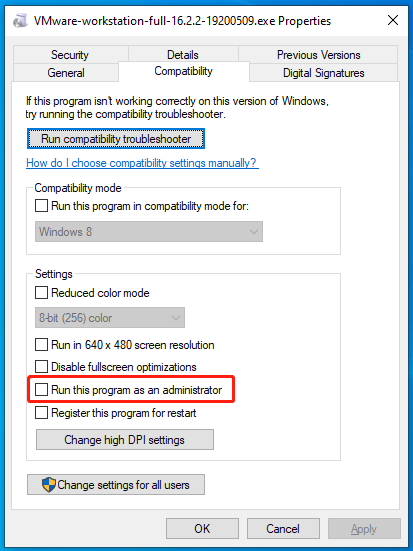
- Right-click on the installer file and then choose Properties.
- Go to the Compatibility tab, check the box before “Run this program as an administrator”, and then click the OK button.
Now, you can double-click the program to run it as an administrator directly.
Method 3. Disable Windows Firewall
When you try to install third-party programs, disabling Windows Firewall is a good choice. Here is the guide:
- Open Control Panel.
- Change the View by to Small icons.
- Click Windows Defender Firewall.
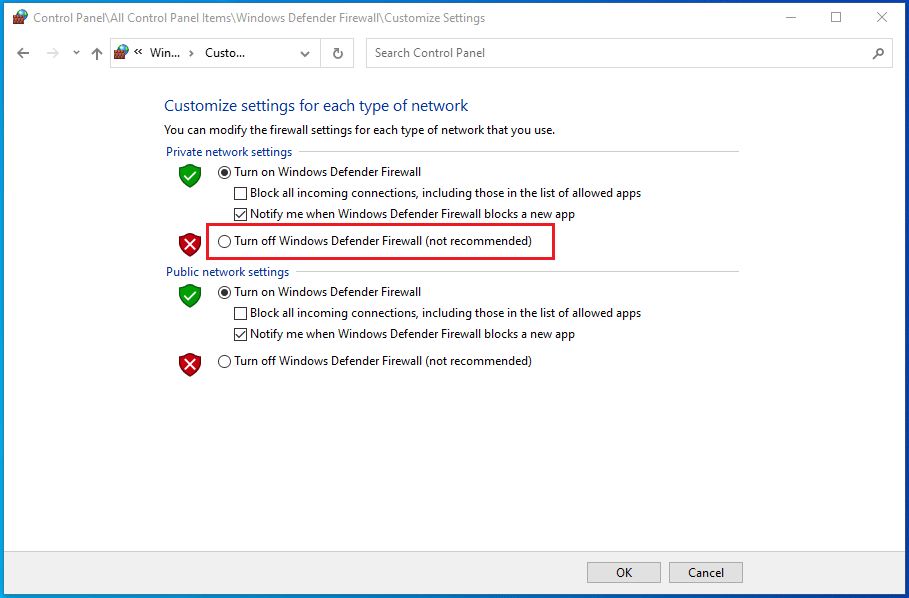
- Click Turn Windows Defender Firewall on or off.
- Check Turn off Windows Defender Firewall (not recommend).
- Click the OK button apply and save changes.
Method 4. Repair the Broken DISM
Some users reported that they have encountered “Aborted — Feature setup [193] %1 is not a valid Win32 application” when they try running the NTLite. Then, they have solved the problem through the following steps:
- Try the following code from the elevated command-line: dism /online /Get-Intl.
- Edit xml in NTLite’s folder before starting it and change code <ForceDismExe>false</ForceDismExe> to <ForceDismExe>true</ForceDismExe>.
- Start the program again.
In most cases, you don’t know the specific cause of the “1 is not a valid Win32 application” error. You should check the program log file to find more information.
[Solved 2022] DISM Failed On Windows 10/8/7 Computer
About The Author

Position: Columnist
Author Linda has been working as an editor at MiniTool for 1 year. As a fresh man in IT field, she is curious about computer knowledge and learns it crazily. Maybe due to this point, her articles are simple and easy to understand. Even people who do not understand computer can gain something.
By the way, her special focuses are data recovery, partition management, disk clone, and OS migration.

-
Вопрос
-
Hi
I have an issue with dism on a new image I have applied to multiple computers. I had planed to run a dism command in a script, but no matter what dism command I try to run I get
Error 193. It is on Windows 7 Professional x64 bit.In C:WindowsLogsDismdism.log I get an error saying:
DismHostLib: Failed to create dismhost.exe servicing process.
Any ideas on what is causing this failure?
Thomas | MCP | http://www.techwork.dk
-
Изменено
Thomas Nielsen
6 июля 2013 г. 9:10
-
Изменено
Все ответы
-
Hi Leo
I also get the error when I run dism.exe commands manually from a command prompt. I have also tried to run sfc /scannow, but it does not change any thing.
Maybe your link can fix it, but I don’t like it says «By default, the DismHost.exe is located in directory of C:Progam FilesCommon Files.»
that is not correct. The location of c:windowssystem32dismHave you tried it yourself?
Thomas | MCP | http://www.techwork.dk
-
Изменено
Thomas Nielsen
6 июля 2013 г. 9:15
typo
-
Изменено
-
Are you running DISM from an elevated command prompt?
-
-
Предложено в качестве ответа
TK MAHATO
8 июля 2013 г. 20:51
-
Предложено в качестве ответа
-
Are you running DISM from an elevated command prompt?
Yes I am. Otherwise I would get Error: 740. I have also tried disabling UAC, but I get the same error.
Thomas | MCP | http://www.techwork.dk
-
Hi,
Try to create another administrator account and login to see if the same issue occurs.Regards,
Leo Huang
TechNet Subscriber Support
If you are
TechNet Subscription user and have any feedback on our support quality, please send your feedback
here.
Leo Huang
TechNet Community Support
-
Hi Leo
I just tried with another administrator account, but still the same error. It is a brand new image without a lot of software installed on the system..
Thomas | MCP | http://www.techwork.dk
-
Изменено
Thomas Nielsen
15 июля 2013 г. 11:21
change
-
Изменено
-
Hi,
How’s everything going? Please feel free to give me any update.
Thank you for your cooperation.
Regards,
Leo Huang
TechNet Subscriber Support
If you are
TechNet Subscription user and have any feedback on our support quality, please send your feedback
here.
Leo Huang
TechNet Community Support -
Hello — I also had error 193 when trying to apply Windows updates (.msu) on an imaged Win7x64 computer using DISM. Once I specified a non-default scratch directory (/ScratchDir:C:Scratch) with the DISM command, the process continued.
The next error I ran into was Error 5 — Access Denied. I temporarily turned off my McAfee Virus Scan, reran the DISM command and it then completed the package addition successfully, no more errors.
-
Изменено
eldonwagner
3 декабря 2014 г. 19:38
-
Изменено


Существует множество инструментов для восстановления Windows 10/11, которые можно использовать для восстановления сломанных или поврежденных файлов. Например, если ваша установка Windows 10 повреждена, вы обычно можете исправить это с помощью встроенной команды SFC /scannow.
Однако SFC также может выйти из строя, или проблема может заключаться не только в ней. В этом случае вам нужно использовать другую встроенную команду восстановления в DISM.
Что теперь произойдет, если DISM выйдет из строя в Windows 10/11? В этом руководстве мы покажем вам, как исправить инструмент, и вернемся к поддержанию вашего ПК в отличной форме.
Что такое ошибка DISM?
Существуют различные причины сбоя DISM в Windows 10. Ниже приведены некоторые варианты ошибки DISM и причины ее возникновения:
- Сбой DISM, операция не выполнялась — это довольно распространенная проблема с DISM. Однако вы можете решить эту проблему, выполнив DISM, используя ISO-файл Windows 10.
- DISM не удалось загрузить поставщика, выгрузить автономный реестр, очистить файловые буферы, установить каталог Windows и смонтировать образ — вот некоторые распространенные проблемы, с которыми вы можете столкнуться при сканировании DISM. Однако вы сможете исправить большинство из них, используя наши решения.
- Ошибка DISM 0x8000ffff, 0x800f0954, 0x800f081f. Если вы получаете какую-либо из этих ошибок, попробуйте скопировать файл install.wim из ISO-образа Windows 10 и использовать его для сканирования DISM.
- Сбой DISM при обработке команды cleanup-image, add-package — это некоторые распространенные проблемы с DISM, но их можно решить с помощью одного из наших решений.
- Сбой DISM при попытке скопировать загрузочные файлы. Это еще одна распространенная проблема с DISM, но вы можете исправить ее, очистив компоненты образа системы.
- Dism.exe не удалось проверить командную строку для загрузки диспетчера wim. Если у вас возникли какие-либо из этих проблем, перезапустите компоненты обновления Windows и проверьте, помогает ли это.
Удаляет ли DISM файлы?
DISM работает в основном для восстановления сломанных и поврежденных файлов на ПК. Он ведет журнал ошибок, обнаруженных на вашем ПК, и примененных исправлений.
Он не удаляет ваши файлы, приложения или данные. Так что вам не о чем беспокоиться.
Как исправить ошибку DISM?
1. Проверьте свой антивирус
В некоторых редких случаях эта проблема может быть вызвана вашим антивирусом. Ваш антивирус может мешать работе вашей системы и вызывать эту проблему.
Если в вашей системе произошел сбой DISM, вы можете решить проблему, просто отключив определенные антивирусные функции или приложение. Вы также пытаетесь удалить антивирусное программное обеспечение, если его отключение не решает проблему.
Если это решит проблему, вам, возможно, придется рассмотреть одно из лучших современных антивирусных программ в ESET NOD 32.
Это программное обеспечение использует передовые технологии для обеспечения безопасности вашего ПК, не вызывая ошибок. Более того, он обеспечивает как автономную, так и онлайн-безопасность и гарантирует вашу конфиденциальность. Так что пусть он позаботится о вашей безопасности, пока вы беспокоитесь о других вещах.
2. Введите правильное местоположение файла Install.wim.
Если DISM выдает сообщение «Не удается найти исходные файлы», вам необходимо смонтировать ISO-файл Windows 10 и указать расположение файла Install.wim.
Чтобы указать расположение файла, введите следующую команду в командной строке и нажмите Enterдля ее запуска:DISM /Online /Cleanup-Image /RestoreHealth /source:WIM:X:SourcesInstall.wim:1 /LimitAccess
Помните, что вам нужно заменить X буквой, соответствующей диску, на котором смонтирован ISO-файл Windows 10.
3. Скопируйте Install.wim на жесткий диск.
Немногие пользователи предположили, что вы можете решить эту проблему, скопировав Install.wim в корневой каталог вашего жесткого диска.
Чтобы получить файл Install.wim, загрузите ISO-образ Windows 10, смонтируйте его и найдите файл Install.wim.
После копирования файла Install.wim обязательно укажите правильное расположение файла Install.wim перед запуском сканирования DISM.
Кроме того, помните, что команда DISM чувствительна к регистру, и пользователи сообщали, что ввод install.wim вместо Install.wim приводил к сбою DISM. Поэтому введите правильное имя файла перед запуском сканирования DISM.
Несколько пользователей также сообщили, что DISM не поддерживает пробелы в исходном расположении. Итак, убедитесь, что в имени папки, содержащей файл, нет пробелов.
4. Очистите компоненты образа системы
- Откройте командную строку от имени администратора.
- Введите команду ниже и нажмите Enter.
Dism.exe /online /Cleanup-Image /StartComponentCleanup

- Дождитесь завершения процесса.
- Кроме того, вы также можете запустить следующие команды:
DISM /Online /Cleanup-Image /StartComponentCleanupDISM /Online /Cleanup-Image /AnalyzeComponentStore - Попробуйте снова выполнить сканирование DISM после выполнения этих команд. Запустите команды ниже:
Dism.exe /online /Cleanup-Image /StartComponentCleanupDism.exe /online /Cleanup-Image /StartComponentCleanup /ResetBase
Если вы столкнулись с ошибкой DISM 193, 740, 14098, 3017 и подобными вариантами, вы можете решить эти проблемы, очистив компоненты образа системы. Это просто, если вы выполните шаги, описанные выше.
5. Запустите средство устранения неполадок Центра обновления Windows.
- Нажмите Windows + I, чтобы открыть приложение «Настройки».
- Выберите параметр «Обновление и безопасность».

- Выберите «Устранение неполадок» в меню слева.
- Выберите Центр обновления Windows и нажмите Запустить средство устранения неполадок.

- Следуйте инструкциям на экране, чтобы завершить устранение неполадок.
По словам пользователей, иногда проблемы с DISM могут возникать из-за проблем с Центром обновления Windows.
Если DISM не удалось завершить или запустить в вашей системе, вы можете решить проблему, запустив средство устранения неполадок Центра обновления Windows.
После завершения устранения неполадок попробуйте повторно запустить сканирование DISM, и оно должно завершиться.
6. Сбросьте службы Центра обновления Windows
- Откройте командную строку от имени администратора.
- Когда запустится командная строка, выполните следующие команды:
net stop wuauservcd %systemroot%SoftwareDistributionren Download Download.oldnet start wuauservnet stop bitsnet start bitsnet stop cryptsvccd %systemroot%system32ren catroot2 catroot2oldnet start cryptsvc
Если DISM не удалось завершить, показывая, что DISM не поддерживает обслуживание на ПК с Windows, проблема может быть связана со службами Центра обновления Windows.
Однако вы можете решить эту проблему, просто сбросив службы Центра обновления Windows. После выполнения этих команд компоненты Центра обновления Windows должны перезапуститься, и проблема будет решена.
7. Отключить прокси
- Откройте приложение «Настройки».
- Выберите опцию «Сеть и Интернет».

- Выберите Прокси в меню слева. На правой панели отключите все настройки.

Если DISM не удалось завершить или запустить на вашем ПК, проблема может заключаться в вашем прокси-сервере. Многие пользователи используют прокси-сервер для защиты своей конфиденциальности в Интернете, но иногда ваш прокси-сервер может мешать работе вашей системы и приводить к этой и другим проблемам.
После отключения прокси проверьте, решена ли проблема. Хотя прокси — отличный способ защитить вашу конфиденциальность в Интернете, многие пользователи предпочитают использовать VPN, а не прокси.
Если вы хотите защитить свою конфиденциальность в Интернете и ищете хороший VPN, мы настоятельно рекомендуем вам рассмотреть PIA.
8. Убедитесь, что ваш. wim не доступен только для чтения
Для этого выполните следующие действия:
- Найдите файл install.wim на жестком диске, щелкните его правой кнопкой мыши и выберите «Свойства».

- Когда откроется окно «Свойства», обязательно снимите флажок «Только для чтения». Теперь нажмите «Применить» и «ОК», чтобы сохранить изменения.

Многие пользователи копируют файл install.wim из установочного ISO-образа Windows 10, чтобы запустить сканирование DISM в автономном режиме.
Однако несколько пользователей сообщили, что DISM дал сбой из-за того, что файл install.wim был установлен как файл только для чтения.
Если это произойдет, ваш компьютер не сможет ничего записать в файл install.wim, и сканирование DISM не будет завершено. Таким образом, изменение свойств файла install.wim должно решить проблему в этом случае.
После внесения этих изменений попробуйте повторно запустить сканирование DISM.
9. Выполните обновление на месте
- Скачайте и запустите Media Creation Tool.
- Теперь выберите опцию «Обновить этот компьютер сейчас».
- Программа установки подготовит необходимые файлы, так что вам придется подождать.
- Выберите Загрузить и установить обновления (рекомендуется) и нажмите Далее.
- Подождите, пока скачаются обновления.
- Следуйте инструкциям на экране. На экране «Все готово к установке» нажмите «Изменить, что сохранить».
- Выберите «Сохранить личные файлы и приложения» и нажмите «Далее».
- Следуйте инструкциям на экране, чтобы завершить процесс обновления на месте.
Если сканирование DISM не удалось завершить на вашем ПК, вашим окончательным решением может быть обновление на месте. Этот процесс переустановит Windows 10 и принудительно обновит ее до последней версии.
В отличие от переустановки, этот процесс сохранит все ваши файлы и установленные приложения, поэтому вы сможете продолжить с того места, на котором остановились.
Как узнать, работает ли DISM?
DISM не требует много времени для сканирования вашего ПК на наличие ошибок. Обычно это от 10 до 30 минут, но иногда может занять несколько часов.
Пользователи иногда сообщают, что он зависает на отметке прогресса около 20%. Но это не значит, что он не работает, это нормально. Пока он показывает прогресс, но команда все еще работает.
Что делать, если DISM не работает в Windows 11?
Если вы перешли на новую ОС, вы уже знаете, что она не так уж сильно отличается от Windows 10, за исключением некоторых новых функций и улучшенного дизайна.
И да, DISM может выходить из строя в Windows 11 так же часто, как и в более старых ОС, так что к этому нужно быть готовым.
К счастью, все перечисленные выше решения будут без проблем работать на новой ОС, и она станет еще более доступной.

В Windows 11 проще получить доступ к средству устранения неполадок
Как вы можете видеть на нашем снимке экрана выше, в Windows 11 параметр «Устранение неполадок» находится прямо в настройках системы, для доступа к нему требуется меньше кликов.
Сбой DISM в Windows 10 может лишить вас необходимого встроенного инструмента для бесплатного восстановления вашего ПК. Но с исправлениями в этом руководстве вы сможете снова заставить его работать.
Не стесняйтесь сообщить нам, если вам удалось снова заставить DISM работать в Windows 10, в комментариях ниже.
The «1 is Not a Valid Win32 Application» error, also known as CreateProcess Error 193, is a common issue faced by Windows users. This error typically occurs when a user tries to run an application that is not compatible with their system or has been corrupted. In this guide, we will walk you through the steps required to resolve this issue and get your application up and running again.
Table of Contents
- Understanding the Error
- Solutions to Fix the Error
- Solution 1: Checking the File Extension
- Solution 2: Run a System File Check
- Solution 3: Reinstall the Application
- Solution 4: Run a Virus Scan
- Solution 5: Update Windows
- FAQ
- Related Links
Understanding the Error
CreateProcess Error 193, or the ‘1 is Not a Valid Win32 Application’ error, can occur due to various reasons, such as:
- The application is not compatible with your system
- The file has been corrupted
- The file has an incorrect extension
- The registry key for the application is damaged
- The system is infected with malware
Knowing the root cause of the problem will help you choose the right solution to fix the issue.
Solutions to Fix the Error
There are multiple solutions to fix the CreateProcess Error 193. We recommend following these solutions in the order they are presented below.
Solution 1: Checking the File Extension
An incorrect file extension may cause the CreateProcess Error 193. To resolve this issue, follow these steps:
- Locate the application’s executable file (the file with a .exe extension).
- Right-click on the file and choose ‘Properties’ from the context menu.
- In the ‘Properties’ window, check the file extension under the ‘General’ tab.
- If the file extension is not .exe, change it to .exe and click ‘OK.’
- Try running the application again.
If the error persists, proceed to the next solution.
Solution 2: Run a System File Check
Running a System File Check (SFC) helps identify and fix any corrupted system files that may be causing the error. To run an SFC, follow these steps:
- Press
Windows + Xkeys and select ‘Command Prompt (Admin)’ or ‘Windows PowerShell (Admin)’ from the list. - In the command prompt or PowerShell, type
sfc /scannowand pressEnter. - The system will scan for and attempt to fix any corrupted files. Wait for the process to complete.
- Once the scan is complete, restart your computer and try running the application again.
If the error still occurs, move on to the next solution.
Solution 3: Reinstall the Application
Reinstalling the application can fix any corrupted files or registry keys associated with the application. To reinstall the application, follow these steps:
- Press
Windows + Rkeys to open the Run dialog box. - Type
appwiz.cpland pressEnterto open the ‘Programs and Features’ window. - Locate the application causing the error, right-click on it, and select ‘Uninstall.’
- Follow the on-screen instructions to uninstall the application.
- Download the latest version of the application from its official website or a trusted source.
- Install the application and try running it again.
If the problem persists, proceed to the next solution.
Solution 4: Run a Virus Scan
Malware infections can cause the CreateProcess Error 193. To check for and remove any malware from your system, follow these steps:
- Update your antivirus software to the latest version.
- Run a full system scan using your antivirus software.
- If any malware is detected, follow the on-screen instructions to remove it.
- Restart your computer and try running the application again.
If the error still occurs, try the final solution.
Solution 5: Update Windows
Updating Windows can resolve compatibility issues and fix any system bugs that may be causing the error. To update Windows, follow these steps:
- Press
Windows + Ikeys to open the Settings app. - Click on ‘Update & Security.’
- In the ‘Windows Update’ tab, click on ‘Check for updates.’
- If any updates are available, follow the on-screen instructions to install them.
- Restart your computer and try running the application again.
If none of the above solutions work, the application may be incompatible with your system or has other issues. Contact the application’s support team for further assistance.
FAQ
1. What does ‘1 is Not a Valid Win32 Application’ mean?
This error message indicates that the application you are trying to run is not compatible with your system or has been corrupted. It can also occur due to incorrect file extensions, damaged registry keys, or malware infections.
2. Can I fix the ‘1 is Not a Valid Win32 Application’ error by running the application in compatibility mode?
Running the application in compatibility mode can sometimes fix the error. To do this, right-click on the application’s executable file, select ‘Properties,’ click on the ‘Compatibility’ tab, check the ‘Run this program in compatibility mode for’ box, and choose the appropriate Windows version from the dropdown menu.
3. Do I need to reinstall my operating system to fix the CreateProcess Error 193?
Reinstalling the operating system is a last resort and should only be considered if all other solutions fail. Before taking this step, try the solutions provided in this guide and contact the application’s support team for assistance.
4. Can faulty hardware cause the ‘1 is Not a Valid Win32 Application’ error?
While it’s less common, faulty hardware, such as a damaged hard drive, can cause the error. If none of the solutions provided in this guide work, consider checking your hardware or consulting a professional.
5. Can I prevent the CreateProcess Error 193 from occurring in the future?
To minimize the chances of encountering this error in the future, ensure that you:
- Always download and install applications from trusted sources
- Keep your Windows operating system and applications updated
- Regularly run system file checks and virus scans
- Maintain a clean and organized registry
- How to perform a System File Check (SFC)