В этом руководстве мы поделимся тремя различными методами, которые помогут вам исправить ошибку TWRP 70. Одним из самых больших преимуществ экосистемы с открытым исходным кодом, такой как Android, является множество настроек, которые вы можете попробовать. Ну, речь идет не только о том, чтобы попробовать пакеты значков, шрифты и темы. Как только вы разблокируете загрузчик устройства, вы откроете ворота для множества настроек. Затем вы можете прошить кастомное рекавери, такое как TWRP, которое, в свою очередь, позволяет прошивать MOD и ZIP-файлы.
Точно так же вы можете даже получить root права на свое устройство, запустив ZIP-файл установщика Magisk. Однако больше всего пользователей интересуют пользовательские ПЗУ. Что ж, с таким количеством привилегий, связанных с этими ПЗУ, мы не можем винить этот выбор. В связи с этим существует два варианта пользовательских ПЗУ. Первая партия включает чистые ПЗУ AOSP, которые не поставляются с Google Apps.
Кроме того, есть ПЗУ, такие как Pixel Experience, в которых встроены Google Apps, Services и Frameworks. Однако именно с прежним набором ПЗУ вам необходимо установить ZIP-пакет Google Apps или GApps после установки нужного ПЗУ. Но некоторые пользователи жаловались на получение TWRP Error 70 при прошивке этих GApps. В этом руководстве мы рассмотрим различные причины этой ошибки, а затем перечислим подробные шаги по их устранению, что, в свою очередь, также устранит ошибку TWRP 70. Следуйте вместе.
Каждое устройство Android поставляется с выделенным размером для каждого из его разделов, включая систему, данные, поставщика и другие. Поэтому, когда вы прошиваете Custom ROM, они устанавливаются в системный раздел. Это приводит к тому, что занимает большую часть раздела (который вы ранее освободили, очистив системный раздел непосредственно перед перепрошивкой ПЗУ).
Затем после прошивки ПЗУ наступает очередь прошивки GApps. Это также установлено в системном разделе. Однако некоторые устройства поставляются с системным разделом меньшего размера. В результате после того, как вы записали ПЗУ, оно занимает большую часть места. Следовательно, не осталось места для установки Gapps. Это причина, по которой вы в конечном итоге получаете ошибку TWRP 70. Да, это единственная причина этой ошибки.
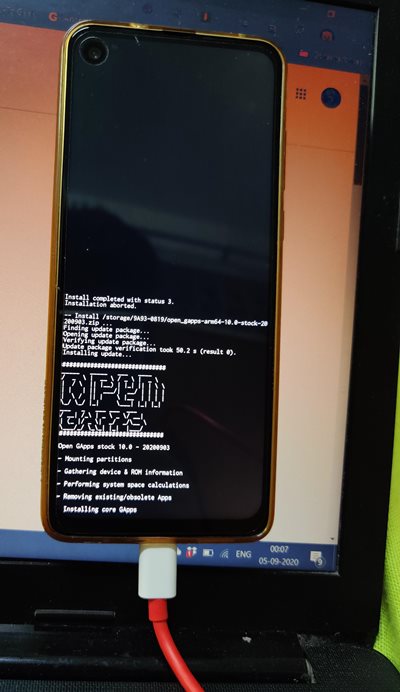
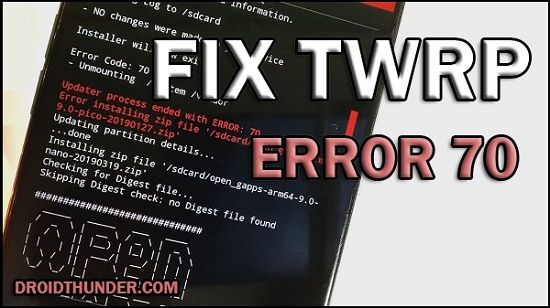
На самом деле, эта ошибка выдает одно из самых подробных и понятных сообщений, которые вы могли бы получить. Часть ошибки гласит: «Недостаточно места для хранения в системном разделе. Возможно, вы захотите использовать меньший пакет Open GApps или рассмотреть возможность удаления некоторых приложений с помощью gapps-config». Таким образом, используя само это сообщение об ошибке, мы поделимся тремя различными методами исправления ошибки TWRP 70.
Я буду перечислять эти исправления, начиная с того, которое требует наименьших усилий и которое проще всего выполнить. Разные пользователи смогли исправить свои проблемы, используя любой из трех перечисленных ниже способов. Поэтому вы должны попробовать каждый из них, пока не добьетесь успеха. Следуйте инструкциям по устранению ошибки TWRP 70.
ИСПРАВЛЕНИЕ 1. Запустите самый маленький вариант GApps (Pico)
Краткое объяснение: Загрузите вариант GApps Pico и прошейте его через TWRP.
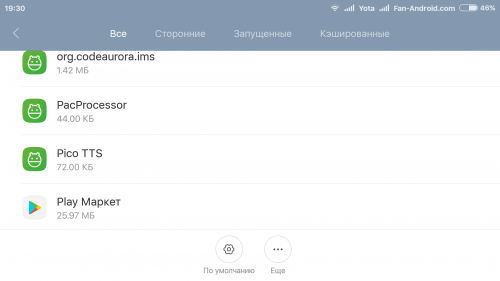
Более подробное объяснение: у GApps довольно много вариантов. Единственная разница между каждой из этих сборок — количество Google Apps. Среди них самый маленький пакет под названием Pico поставляется только с самым минимумом, необходимым для запуска установщика пакетов Google, Play Services и Text To Speech в качестве службы специальных возможностей. Следовательно, это самый маленький пакет, который должен быть менее 100 МБ.
И поскольку в вашем системном разделе мало места для хранения, рекомендуется загрузить и прошить эту сборку. Как только вы это сделаете, вы сможете загрузить свое устройство, войти в свою учетную запись Google. Затем в мастере установки выберите все приложения, которые нужно восстановить, и все. Или вы также можете загрузить то же самое из Play Store после завершения установки. В этой заметке, вот шаги, чтобы загрузить и установить самый маленький ZIP GApps и, следовательно, исправить ошибку TWRP 70.
Направляйтесь к Сайт OpenGApps и сначала выберите архитектуру процессора. Вот что означает каждая из этих архитектур: ARM: ARMv7 или armeabi, ARM64: AArch64 или arm64 и x86: x86 или x86abi. Большинство Android-устройств, выпущенных после 2016 года, имеют ARM64 и поэтому выбирают эту сборку. Чтобы быть вдвойне уверенным, вы можете установить приложение Droid Info из Play Store. Запустите его и перейдите в раздел «Система» и посмотрите на набор инструкций. Затем выберите эту архитектуру на веб-сайте OpenGApps.
Далее выберите версию Android. На данный момент он содержит только GApps до Android 10. Если вы ищете GApps для Android 11, перейдите к этому руководству: Загрузите GApps (Google Apps) для Android 11. Наконец, в третьем разделе выберите Pico и нажмите на красную кнопку загрузки. После загрузки файла перенесите его на свое устройство.
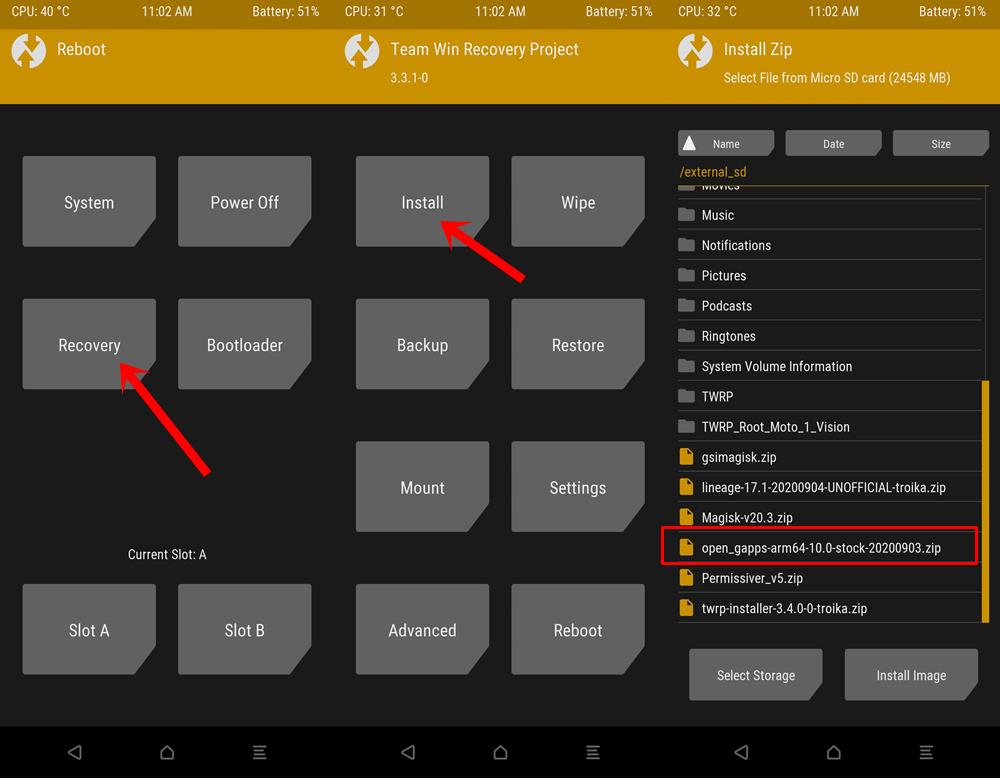
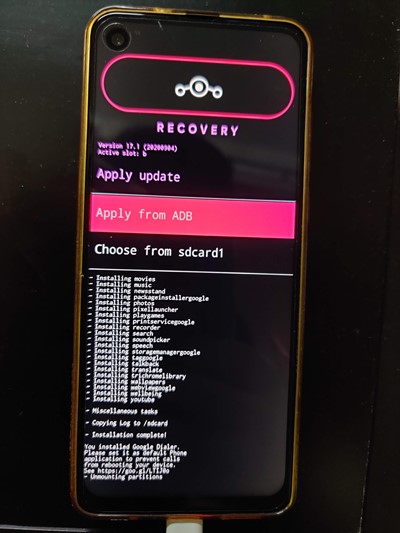
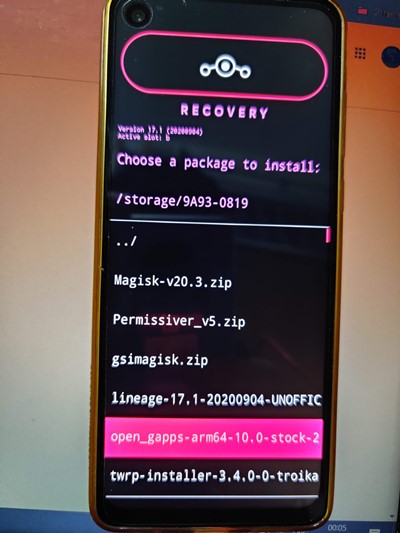
Поскольку вы уже загрузились в TWRP, вы можете обратиться к нашему руководству о том, как перенести или установить файлы через TWRP Recovery. [3 Methods]. Или вы можете использовать общий подход: загрузить устройство в Систему, передать файл на ваше устройство, а затем перезагрузить устройство в TWRP. Как только это будет сделано, прошейте Custom ROM, а затем ZIP-файл Pico Gapps. Это должно исправить ошибку TWRP 70. Однако в некоторых редких случаях, если вы все еще получаете эту ошибку, вот несколько других способов исправить эту проблему.
Исправление 2: отредактируйте файл конфигурации GApps
Если бы описанный выше метод не дал желаемых результатов, то здесь мы бы продвинули этот метод на шаг вперед. В этом разделе мы не будем загружать меньший пакет GApps. Скорее, мы будем преобразовывать любые скачанные вами приложения GApp в самые маленькие.
Для этого мы изменим файлы конфигурации GApps и перечислим все ненужные приложения Google, которые не нужно устанавливать. Таким образом, хотя пакет GApps по-прежнему будет иметь все приложения, он будет устанавливать только те, которые мы указали в его файле конфигурации. С учетом сказанного, вот шаги по настройке файла конфигурации GApps и, следовательно, исправлению ошибки TWRP 70:
- Щелкните правой кнопкой мыши любое место на рабочем столе и выберите «Создать» > «Текстовый документ».
- Введите в этом блокноте следующие команды:
- Исключить книги Исключить слайды Исключить листы Исключить клавиатуру Google Исключить Messenger Исключить PixelIcons Исключить номеронабиратель Google Исключить ExchangeGoogle Исключить PlayGames Исключить PixelLauncher Исключить CloudPrint Исключить документы Исключить NewsWidget Исключить камеру Google Исключить контакты Google Исключить Keep Исключить Hangouts Исключить Fitness Исключить Chrome Исключить Earth
- Сохраните этот файл как gapps-config. Затем извлеките содержимое ZIP-файла GApps.
- Переместите этот файл gapps-config в извлеченную папку ZIP.
- Как только это будет сделано, перепакуйте этот ZIP-файл. Для этого щелкните правой кнопкой мыши файл Gapps и выберите «Добавить в <имя файла>.rar».
- Наконец, перенесите этот файл на свое устройство и загрузите его в TWRP. Теперь попробуйте прошить этот ZIP-файл GApps, это должно исправить ошибку TWRP 70.
Исправление 3: увеличьте размер системного раздела через TWRP
Как упоминалось ранее, GApps устанавливается в системный раздел. Поэтому, если в этом разделе нет необходимого места, вы обязательно получите вышеупомянутую ошибку. Один из способов справиться с этим — вручную увеличить размер этого раздела через TWRP. Просто имейте в виду, что весь процесс может быть рискованным и может привести к поломке вашего устройства. Продолжайте на свой страх и риск. Мы рекомендуем вам также сделать полную резервную копию (обычную резервную копию, а также резервную копию Nandroid). Это потому, что мы будем стирать раздел данных. Итак, с учетом сказанного, вот необходимые шаги:
- Для начала загрузите свое устройство в TWRP Recovery. Вы можете воспользоваться нашим руководством о том, как загрузить любое устройство Android в TWRP Recovery.
- Затем перейдите в «Очистить» и выберите «Форматировать данные». Введите YES в отведенное место и нажмите на кнопку с галочкой, расположенную в правом нижнем углу.
- Как только это будет сделано, перейдите к «Установить» и выберите нужный пользовательский ПЗУ. Проведите пальцем вправо, чтобы установить это ПЗУ.
- После прошивки ПЗУ перейдите в «Очистка»> «Расширенная очистка» и выберите системный раздел. Нажмите «Восстановить» или «Изменить файловую систему».
- На следующем экране выберите параметр «Изменить размер файловой системы». Проведите вправо, чтобы изменить размер системного раздела.
- После успешного завершения процесса вы можете установить пакет GApps.
- Перейдите в «Установить»> «Выбрать GApps»> «Проведите пальцем вправо», чтобы прошить его.
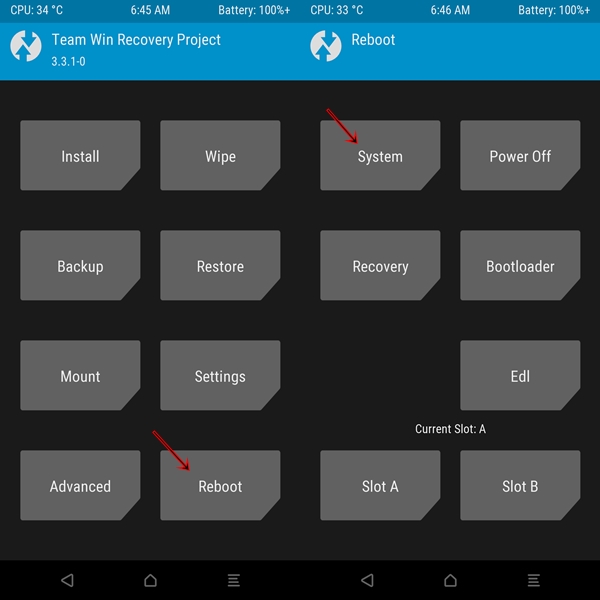
- Теперь вы можете перезагрузить устройство в ОС. Для этого перейдите к «Перезагрузить» и нажмите «Система».
Вот и все. На этом мы завершаем руководство о том, как исправить ошибку TWRP 70. Мы поделились тремя разными методами для одного и того же. Сообщите нам в комментариях, каким методом удалось решить проблему в вашем случае. Кроме того, если у вас есть какие-либо вопросы относительно вышеуказанных шагов, оставьте их в разделе комментариев. Мы вернемся к вам с решением как можно скорее.
Solve TWRP Error 70 while installing GApps. GApps (Google Apps) is the Google core application and usually includes Google Play Store, Gmail, YouTube, Maps, Google+ and Google Drive, etc. If you have some of these apps, you already have GApps installed on your device. These apps are always running in the background under the process of com.google.process.gapps. However, these apps do not come pre-installed with third-party custom ROMs due to restrictions.
To overcome this issue, users often flash GApps externally as flashable zip package files through a custom recovery. But sometimes, while installing these Google apps, users have noticed certain errors like ‘Updater process ended with an error: 70 error installing zip file’ or ‘Error Status 7 Installation aborted’ or ‘zip signature verification failed twrp’. Soon after this error appears in TWRP recovery, the installation process fails.
Open GApps arm 8.0- Mounting /data /system
- Gathering device & ROM information

- Performing system space calculations...

Insufficient storage space calculations in
System partition. You may want to use a
smaller Open GApps package or consider
removing some apps using gapps-config.
See: '/sdcard/Download/open_gapps_log.txt'
for complete details and information.

- Copying Log to /sdcard/Download

- NO changes were made to your device

Installer will now exit...

Error Code: 70
- Unmounting /system

Updater process ended with ERROR: 70
Error installing zip file '/sdcard/open_gapps-arm-8.0-stock-20190221.zip'
Updating partition details...
...done
What is Error 70?
The Updater Process ended with Error: 70 appears in TWRP while flashing GApps (Google Apps). The main reason for this error is the insufficient storage space available in your device system partition.
That means you should free some space from your system partition to install the Open GApps package. Sometimes simply updating TWRP recovery can solve this problem. However, it is a very rare scenario.
Related:
- How to Fix Blocked by Play Protect Error
- How to Solve Error Executing Updater Binary In Zip
Along with GApps, even custom ROM like LineageOS, Resurrection Remix, etc., is installed in the system partition. Every Android phone and tablet has a separate, fixed-size system partition.
Moreover, this twrp error code 70 is usually observed in older Android phones with 2GB or less internal storage. Besides, the size of Open GApps increases with every update. Hence it becomes difficult to flash these GApps and avoid the TWRP 70 error.
To solve error 70 in TWRP, you can either flash a smaller GApps package or uninstall certain apps from your device. What if you flash pico GApps and still encounter error code 70?
In this easy steps guide, we’ll manually fix the twrp error code 70 GApps. This tutorial will guide you to solve TWRP error gapps using easy methods. Interested users may proceed to our actual article given below.
How to Fix Error 70 in TWRP while flashing GApps
In this article, we’ll use three methods to Fix Error code 70 while installing Google Apps.
Disclaimer
Proceed at your own risk. We will not be held liable for any damage whatsoever for the same.
Method 1: Resize System Partition
At first, we’ll use the Repair or Change File System option in the TWRP custom recovery.
Steps to Fix TWRP Error 70
- Boot your Android device into TWRP recovery.
- As you enter the TWRP, first create a Nandroid backup of your current ROM.
- From the main menu, select the Wipe option.
- On the next screen, swipe right to start the factory reset process.
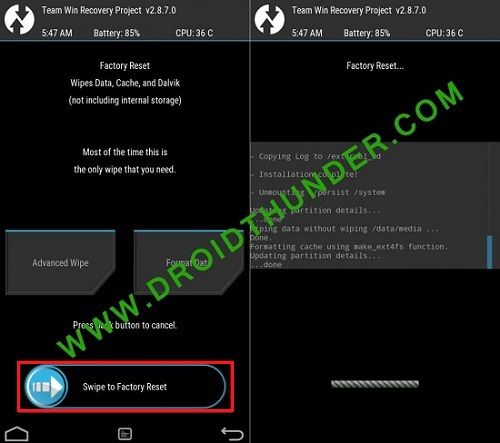
- This step will delete all the data present on your phone.
- Hence ensure to back up everything before doing this step.
- Now click on the Install option and flash the custom ROM.
- Again go to the main menu and select the Wipe option.
- Then click on the Advanced Wipe option.

- Tick ONLY System Partition.
- Now click on the Repair or Change File System option.
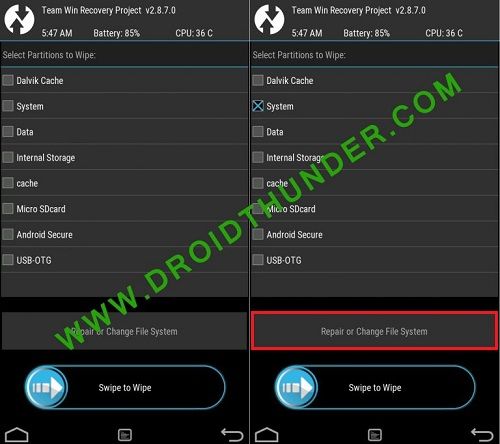
- On the next screen, select the Resize File System option.
- Swipe right to resize the system partition.
- If the resize system partition process fails, go back and implement the same steps again.
- As soon as it completes, go back and install the GApps package file.
- Finally! This is how you can flash GApps successfully without getting error 70.
Method 2: Flashing Pico GApps
If Method 1 doesn’t work, and you still get Error 70 in TWRP, then follow Method 2 given below.
Steps to Fix TWRP Error 70
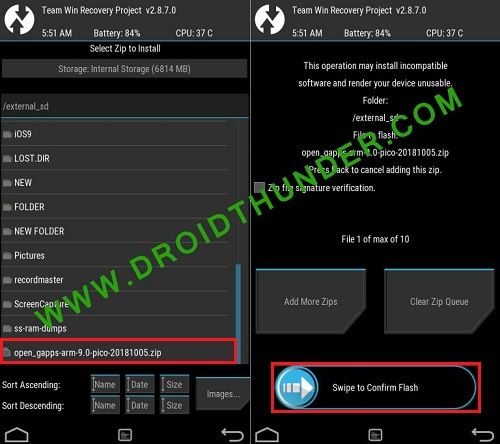
- Download the Pico GApps package.
- The Pico variant of Google Apps is the smallest and most compressed package file.
- And if you are confused between ARM, ARM64, or x86 GApps package, refer to our guide:
- Check which ARM, ARM64, OR x86 processor your Android phone uses.
- Install this GApps Pico variant from TWRP recovery. This time it will be installed without giving any TWRP error.
- Finally! This is how you can flash GApps Pico without getting an error.
Method 3: Using GApps config.txt
In this method, we’ll create a new Google Apps config text file and copy it into the GApps zip file.
Steps to Fix TWRP Error 70
- On your PC, create a text file.
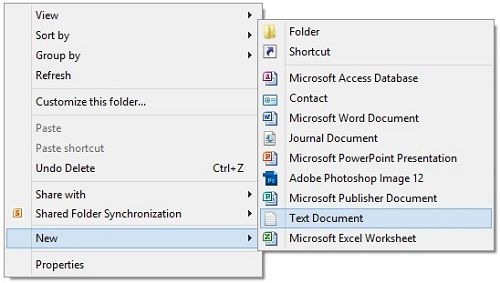
- Rename that text file as gapps-config.

- Open that text file and write these lines in it:
Exclude Books
Exclude Slides
Exclude Sheets
Exclude Keyboard Google
Exclude Messenger
Exclude PixelIcons
Exclude Dialer Google
Exclude ExchangeGoogle
Exclude PlayGames
Exclude VRService
Exclude PixelLauncher
Exclude CloudPrint
Exclude Docs
Exclude NewsWidget
Exclude Camera Google
Exclude Google Contacts
Exclude Keep
Exclude Hangouts
Exclude Fitness
Exclude Chrome
Exclude Earth

- Save the text file.
- Extract the GApp.zip file on your PC.
- Now copy the gapps-config.txt file into the extracted GApp folder.
- Right-click the folder and select Add to archive.
- Select the zip format and click OK.
- Install this gapps.zip file from TWRP recovery. This time it will be flashed without giving any error.
Conclusion
Finally! This is how you can flash GApps without getting error code 70. I hope this helps you to successfully flash Google Apps on your Android device. Unfortunately, if you face any difficulty during this process, then kindly comment below.
Source: XDA
GApps, что означает «Приложения Google», представляет собой пакет всех необходимых приложений G Suite для устройства Android. Когда вы загружаете на устройство пользовательское ПЗУ, эти приложения требуют ручной установки. Если вы загрузили собственное ПЗУ самостоятельно, проблем с прошивкой GApps также не возникнет.

Увеличение системного раздела вашего устройства может быть полезным для нормального функционирования вашего устройства, поэтому, если вы знаете, как это сделать, вы должны всегда выбирать это.
С другой стороны, установка уменьшенной версии пакета GApps предотвратит любые риски и даст вам возможность вручную загрузить все оставшиеся приложения Google позже.
Итак, убедитесь, что вы знаете, что делаете, прежде чем экспериментировать со своим телефоном, и наслаждайтесь вашим пользовательским ПЗУ и пакетом прошитых GApps, независимо от его размера.
Знаете ли вы о каком-то другом, возможно, более простом исправлении для кода ошибки 70? Если это так, поделитесь им с нами в комментариях ниже.
In this tutorial, we will be sharing three different methods that will help you to fix TWRP Error 70. One of the biggest perks of having an open-source ecosystem like Android is the plethora of tweaks that you could try out. Well, it’s not just about trying out icon packs, fonts, and themes. Once you unlock the device’s bootloader, you open the gates to the plentitude of customizations. You could then flash a custom recovery like TWRP, which in turn allows you to flash MODs and ZIP files.
Likewise, you could even root your device by flashing Magisk Installer ZIP. However, it is with Custom ROMs that users are interested in the most. Well, with so many perks attached to these ROMs, we can’t blame this choice. In this regard, there are two variants of the Custom ROMs. The first batch involves pure AOSP ROMs that don’t come with Google Apps.
Then there are ROMs some like Pixel Experience that has Google Apps, Services, and Frameworks baked inside the ROM. However, it is with the former set of ROMs that you need to install Google Apps or GApps ZIP package after installing the desired ROM. But some users have complained about getting the TWRP Error 70 while flashing these GApps. In this tutorial, we will have a look at the various reasons for this error and then list out detailed steps to fix them which in turn will fix the TWRP Error 70 as well. Follow along.
- Fix Magisk Module Bootloop without TWRP Recovery
- How to Fix TWRP Error 20 GApps after flashing LineageOS
- Fix Mi Account Authorization | Unbrick Xiaomi | EDL Mode
- How to Fix Error: Cannot load recovery.img
The Reasons for TWRP Error 70
Every Android device comes with a dedicated size for each of its partitions, including the system, data, vendor among others. So when you flash a Custom ROM, they get installed to the system partition. This ends up taking a major chunk of the partition (that you had earlier freed up by wiping the system partition just before flashing the ROM).

Then after flashing the ROM, comes the turn of flashing GApps. This is also installed in the system partition. However, some devices come with a smaller system partition. As a result, once you have flashed a ROM, it takes up the majority of the space. Hence there is no storage left for the installation of Gapps. This is the reason why you end up getting TWRP Error 70. Yes, this is the only reason for this error.
Infact, this error throws up among the most detailed and self-explanatory message that you could get a hold of. A part of the error reads “Insufficient storage space calculations in System partition. You may want to use a smaller Open GApps package or consider removing some apps using gapps-config.” So making use of this error message itself, we will be sharing three different methods to fix the TWRP Error 70.
I will be listing these fixes starting from the one that calls for the least effort and is the easiest to execute. Different users have been able to fix their issues using any of the below-mentioned three methods. So you should try out each of them until you achieve success. Follow along for the complete instructions to fix the TWRP Error 70.
- How to Fix TWRP Error 7 (While Flashing Custom ROM via TWRP)
- How to Fix FAILED (remote: unknown command) Error
- Mi Unlock Tool Errors and their Fixes
- How to Flash a Custom ROM without TWRP Recovery
FIX 1: Flash the Smallest GApps (Pico) Variant
The Shorter Explanation: Download the GApps Pico variant and flash it via TWRP.
The Longer Explanation: GApps comes with quite a few variants. The only difference between each of these builds is the number of Google Apps. Among them, the smallest package named Pico only comes with the bare minimum that is required to run the Google Package Installer, Play Services, and Text To Speech as an Accessibility service. Hence this is the smallest package that should be under 100MB.
And since your system partition is short on storage space it is recommended that you download and flash this build. Once you do so, you will be able to boot your device, sign in with your Google Account. Then from the setup wizard select all the apps that you need to restore and that’s it. Or you could also download the same from Play Store once the setup is complete. On that note, here are the steps to download and install the smallest GApps ZIP and hence fix the TWRP Error 70.
Head over to the OpenGApps site and first off select the CPU Architecture. Here is what each of these architecture signifies: ARM: ARMv7 or armeabi, ARM64: AArch64 or arm64, and x86: x86 or x86abi. Most of the Android devices released after 2016 have ARM64 and hence select this build. Just to be double sure, you could install the Droid Info app from the Play Store. Launch it and head over to the System section and have a look at the Instructions set. Then select that architecture from the OpenGApps website.
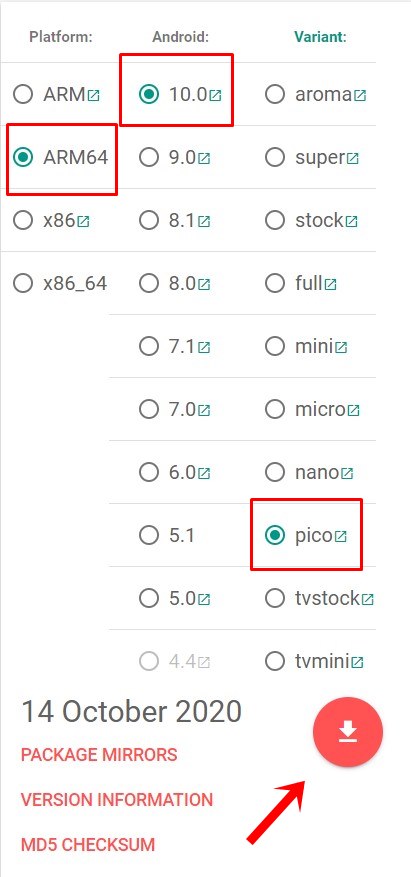
Next up, select the Android version. As of now, it only holds GApps till Android 10. if you are looking for Android 11 GApps, then head over to this guide: Download GApps (Google Apps) for Android 11. Finally, from the third section, select Pico and then click on the red download button. Once the file has been downloaded transfer it to your device.

Since you are already booted to TWRP, you could refer to our guide on How To Transfer or Install Files via TWRP Recovery [3 Methods]. Or you could take the general approach of booting the device to System, transferring the file to your device, and then rebooting your device to TWRP. Once that is done, flash the Custom ROM and then the Pico Gapps ZIP file. This should fix the TWRP Error 70. However, in some rare cases, if you are still getting this error, then here are some other methods to rectify this issue.
Fix 2: Edit the GApps Config File
If the above method didn’t give out desirable results, then here we would take that method a step further. In this section, we wouldn’t be downloading a smaller GApps package. Rather, we would be converting whatever GApps you have downloaded to the smallest one.
For that, we will be modifying the GApps configuration files and will list out all the unnecessary Google apps that it doesn’t have to install. So while the GApps package will still be having all the apps, it would only install the ones that we have instructed it to in its config file. With that said, here are the steps to tweak the GApps Config file and hence fix the TWRP Error 70:
- Right-click on any space on your desktop and select New > Text Document.
- Type in the following commands in that notepad file:
-
Exclude Books
Exclude Slides
Exclude Sheets
Exclude Keyboard Google
Exclude Messenger
Exclude PixelIcons
Exclude Dialer Google
Exclude ExchangeGoogle
Exclude PlayGames
Exclude VRService
Exclude PixelLauncher
Exclude CloudPrint
Exclude Docs
Exclude NewsWidget
Exclude Camera Google
Exclude Google Contacts
Exclude Keep
Exclude Hangouts
Exclude Fitness
Exclude Chrome
Exclude Earth
- Save that file as gapps-config. Then extract the contents of the GApps ZIP file.
- Move this gapps-config file inside that extracted ZIP folder.
- Once that is done, repack this ZIP file. To do so, right-click on the Gapps file and select Add to <filename>.rar
- Finally, transfer this file to your device and boot your device to TWRP. Now try flashing this GApps ZIP file, this should fix the TWRP Error 70.
- How to Install OTA Updates in Rooted Android Device
- How to Permanently Install TWRP without TWRP ZIP File (only using TWRP.img file)
- Root Android Devices Without TWRP Recovery
- How to Fix TWRP Error 7 (While Flashing Custom ROM via TWRP)
Fix 3: Increase the Size of System Partition via TWRP
As mentioned before, GApps is installed in the system partition. So if this partition doesn’t have the required space, then you are bound to get the aforementioned error. One way to deal with this is to manually increase the size of this partition via TWRP. Just keep in mind that the entire process might be risky and may brick your device. Proceed ahead at your own risk. We would suggest you take a complete backup as well (normal backup as well as Nandroid backup). This is because we will be wiping the data partition. So with that said, here are the required steps:
- To begin with, boot your device to TWRP Recovery. You may take the help of our guide on How to Boot Any Android Device to TWRP Recovery.
- Then go to Wipe and select Format Data. Type in YES in the space provided and tap on the checkmark button situated at the bottom right.

- Once that is done, head over to Install and select the desired custom ROM. Perform a right swipe to install that ROM.
- After the ROM has been flashed, go to Wipe > Advanced Wipe and select the System partition. Tap on Repair or Change File System.
- In the next screen, select the Resize File System option. Swipe right to resize the system partition.

- Once the process is completed successfully, you may now flash the GApps package.
- Go to Install > Select GApps > Perform a right swipe to flash it.
- You may now reboot your device to the OS. For that, head over to Reboot and tap System.


That’s it. With this, we conclude the guide on how to fix the TWRP Error 70. We have shared three different methods for the same. Do let us know in the comments which method managed to fix the issue in your case. Furthermore, if you have any queries concerning the above steps, drop them in the comments section. We will get back to you with a solution as soon as possible.
- [GUIDE] Flash ROMs/Magisk/TWRP/Kernels on A/B Partition Devices
- How to Flash Various Files in A/B Partition Devices
- Install Custom ROMs on any Android Device- Includes A/B Partition
- How to Fix FAILED (remote: unknown command) Error
About Chief Editor

Sadique Hassan
administrator
A technical geek by birth, he always has a keen interest in the Android platform right since the birth of the HTC Dream. The open-source environment always seems to intrigue him with the plethora of options available at his fingertips. “MBA by profession, blogger by choice!”
Checklist
- The issue is not answered by reading the FAQ
- The issue is part of The Open GApps Project scope (and not of the pre-built OpenGApps.org packages scope, for support on those see XDA Forum)
If Open GApps installation fails:
- Is the issue reproducible using the latest version of your recovery?
- Is the issue reproducible with (the latest) TWRP recovery? (other recoveries are only best-effort)
Issue description:
Open GApps installation fails with error 70 (Insufficient space on system partition)
Relevant snippet of open_gapps_log.txt (please note the strange text-values for sizes!)
         Total System Size (KB) | Filesystem
         Used System Space (KB) | 1K-blocks
        Current Free Space (KB) | Used
Reproduction Steps:
Latest TWRP already installed on both partitions A and B (currently: version 3.3.1-0.)
- Activate partition A
- Install custom ROM (e.g.: Resurrection Remix. This typically gets installed on the other partition, i.e.: B)
- Activate partition B
- Reboot into TWRP
- Install OpenGapps (i.e.: on partition B)
Expected behavior:
OpenGapps installs without error.
Observed behavior:
Install fails with error 70
In-depth explanation
Relevant section of open_gapps_log.txt:
                    Device Name | jasmine_sprout
                   Device Model | Mi A2
                    Device Type | phone
                     Device CPU | arm64-v8a,armeabi-v7a,armeabi
          Device A/B-partitions | true
             Installer Platform | arm
                   ROM Platform | arm64
My Device is a A/B partioned device. This gets detected correctly and installer.sh sets SYSTEM_MOUNT to /system.
But: on my device, /system_root is relevant instead of /system.
(FYI: /system exists but is empty and not mentioned in /etc/fstab)
This somehow leads to df=$(df -k $SYSTEM | tail -n 1); to /only/ return this line:
Filesystem 1K-blocks Used Available Use% Mounted on
Interestingly, after starting the custom ROM and then rebooting into TWRP, df -k /system works as expected!
Solve TWRP Error 70 while installing GApps. GApps (Google Apps) is the Google core application and usually includes Google Play Store, Gmail, YouTube, Maps, Google+ and Google Drive, etc. If you have some of these apps, you already have GApps installed on your device. These apps are always running in the background under the process of com.google.process.gapps. However, these apps do not come pre-installed with third-party custom ROMs due to restrictions.
Sadique Hassan
administrator
A technical geek by birth, he always has a keen interest in the Android platform right since the birth of the HTC Dream. The open-source environment always seems to intrigue him with the plethora of options available at his fingertips. “MBA by profession, blogger by choice!”
Checklist
- The issue is not answered by reading the FAQ
- The issue is part of The Open GApps Project scope (and not of the pre-built OpenGApps.org packages scope, for support on those see XDA Forum)
If Open GApps installation fails:
- Is the issue reproducible using the latest version of your recovery?
- Is the issue reproducible with (the latest) TWRP recovery? (other recoveries are only best-effort)
Issue description:
Open GApps installation fails with error 70 (Insufficient space on system partition)
Relevant snippet of open_gapps_log.txt (please note the strange text-values for sizes!)
         Total System Size (KB) | Filesystem
         Used System Space (KB) | 1K-blocks
        Current Free Space (KB) | Used
Reproduction Steps:
Latest TWRP already installed on both partitions A and B (currently: version 3.3.1-0.)
- Activate partition A
- Install custom ROM (e.g.: Resurrection Remix. This typically gets installed on the other partition, i.e.: B)
- Activate partition B
- Reboot into TWRP
- Install OpenGapps (i.e.: on partition B)
Expected behavior:
OpenGapps installs without error.
Observed behavior:
Install fails with error 70
In-depth explanation
Relevant section of open_gapps_log.txt:
                    Device Name | jasmine_sprout
                   Device Model | Mi A2
                    Device Type | phone
                     Device CPU | arm64-v8a,armeabi-v7a,armeabi
          Device A/B-partitions | true
             Installer Platform | arm
                   ROM Platform | arm64
My Device is a A/B partioned device. This gets detected correctly and installer.sh sets SYSTEM_MOUNT to /system.
But: on my device, /system_root is relevant instead of /system.
(FYI: /system exists but is empty and not mentioned in /etc/fstab)
This somehow leads to df=$(df -k $SYSTEM | tail -n 1); to /only/ return this line:
Filesystem 1K-blocks Used Available Use% Mounted on
Interestingly, after starting the custom ROM and then rebooting into TWRP, df -k /system works as expected!