
Windows users sometimes experience problems when connecting their PC to an Internet source. The most common of these Windows errors is the error message “Windows can’t connect to the network“. Moreover, we’ve seen many people complaining about such problems, and we all know how inconvenient it can be when we can’t connect to the Internet with our computer when we need it.

There are no specifics on what could be causing this problem, but we’ve narrowed it down to a few causes, which we’ll cover in the next section of this article. Even though the error message doesn’t specify any methods to fix the problem, you shouldn’t worry because there are several reliable solutions to fix the “Windows can’t connect to this network” error.
Moreover, these solutions have been described step by step in this article, and all you need to do now is to follow them thoroughly to fix the Network error, be it on Windows 10 or Windows 11, and restore normalcy to your computer.
Table of Contents
1
Why am I getting Windows can’t connect to this network error?
As mentioned earlier, the “Windows can’t connect to the network” doesn’t provide details about the cause of the problem. However, there are a few things you should be aware of when facing this problem on your computer, and they include:
- Outdated Network Adapters Drivers: Network adapter drivers are the intermediaries between your computer and the network source. So, if you use outdated or faulty network adapters, your PC may get the problem that Windows 10 can’t connect to this network. Therefore, it is essential that you regularly check for updates for the drivers.
- Disabled Internet Source: Unknowingly, the router or other device you are trying to connect to WiFi may already be turned off or have problems. In this case, the computer has no problem, and your router needs to be checked. Maybe you can restart the router or turn on and off your device hotspot and try to connect your computer again.
- Having pending Windows updates: Errors that are due to pending Windows updates usually cause computers to lose performance. This can also be the reason for the network error message you get when you try to connect to your WiFi.
Malware: Malware can also cause connection problems by changing your network settings. So, if you receive the error message, you most likely have a virus on your PC. For this reason, it is important that you have an antivirus program installed on your computer.
Now that we are clear about the possible causes for the “Windows 11 can’t connect to this network” error, here are the most effective solutions you can try to fix the issue:
Fix 1: Restart your PC
This solution may seem cliché for fixing problems on our devices, but it’s very effective for fixing these network errors. Restarting the computer will clean up all corrupted caches, and the computer can be restarted. So, try restarting your computer to see if that fixes the problem. If that doesn’t work, proceed to the next solution.
Fix 2: Run Network Troubleshooter
Even if the WiFi error message does not include an option to run network troubleshooting, you can run it manually to find out what’s causing your network connectivity issues and how to fix them. Perform network troubleshooting at PC by following the steps below:
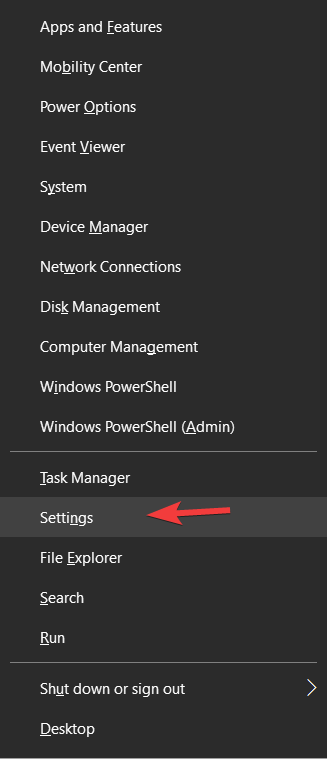
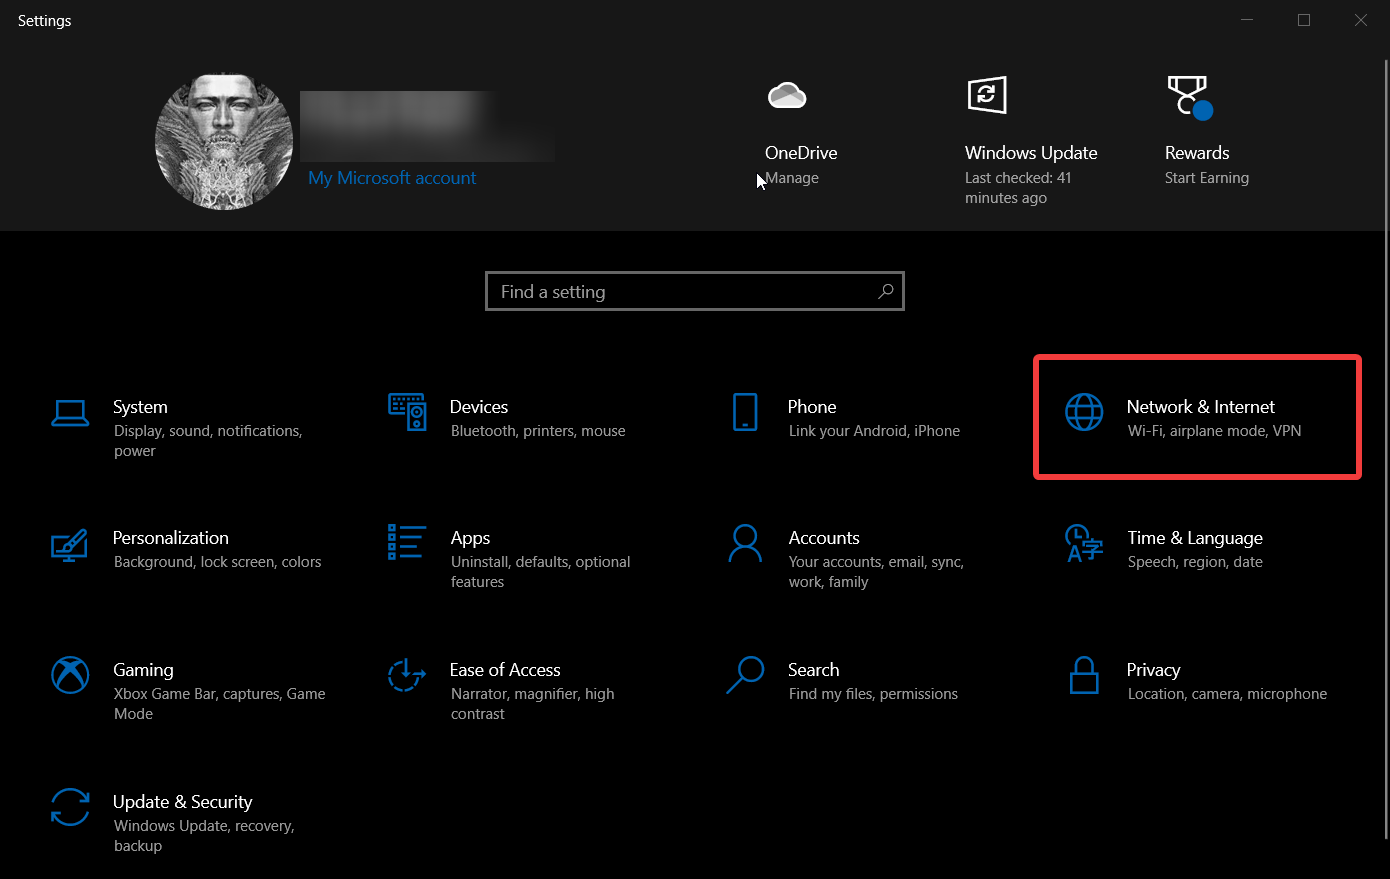
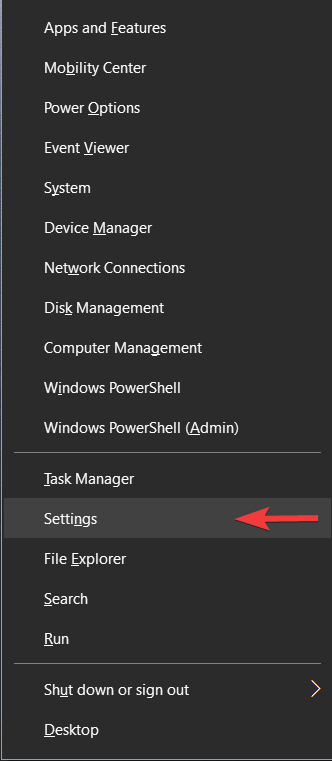
Step 1: Press Windows + I simultaneously to open Settings on your computer.
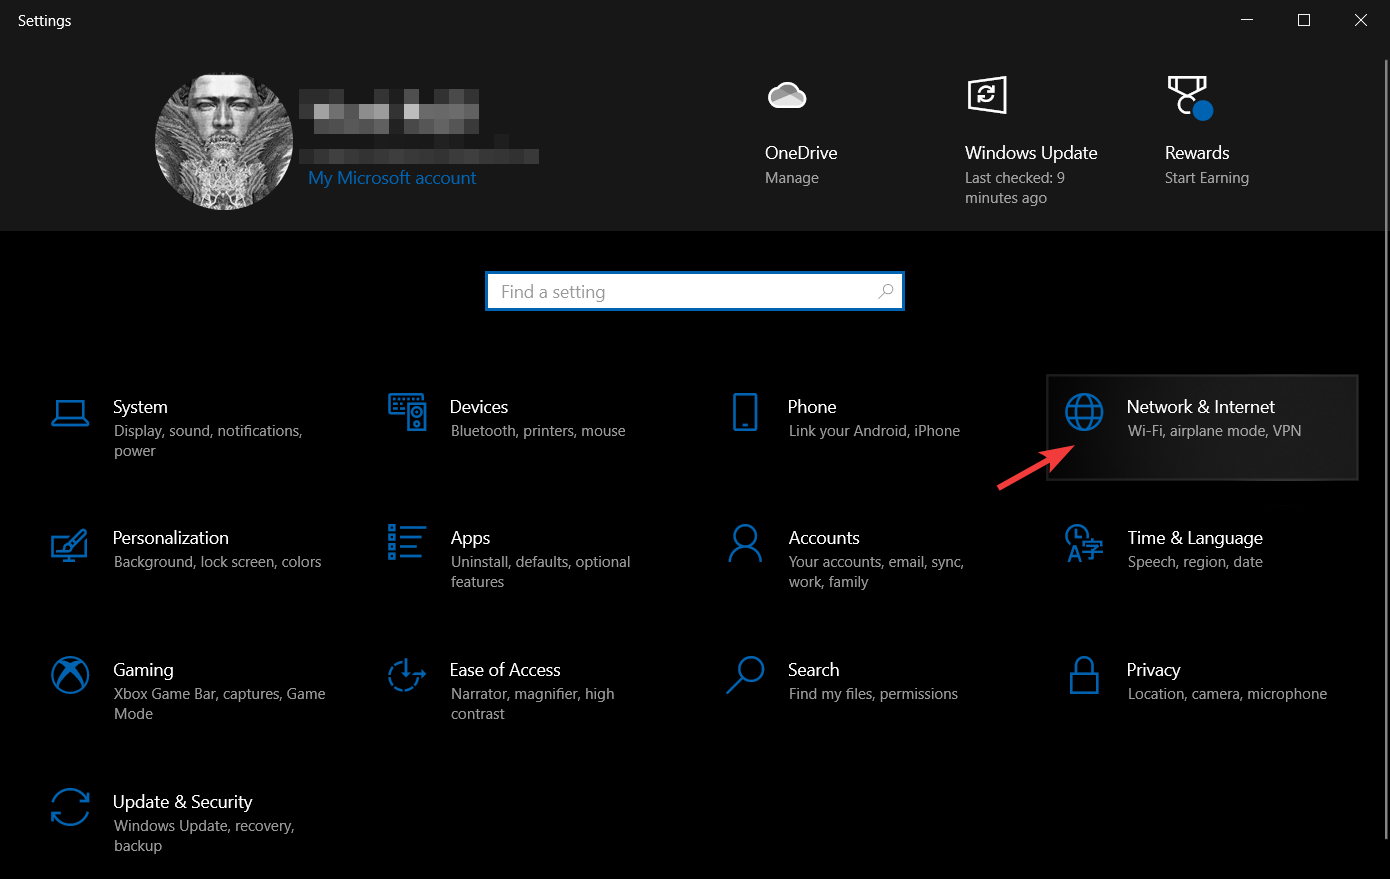
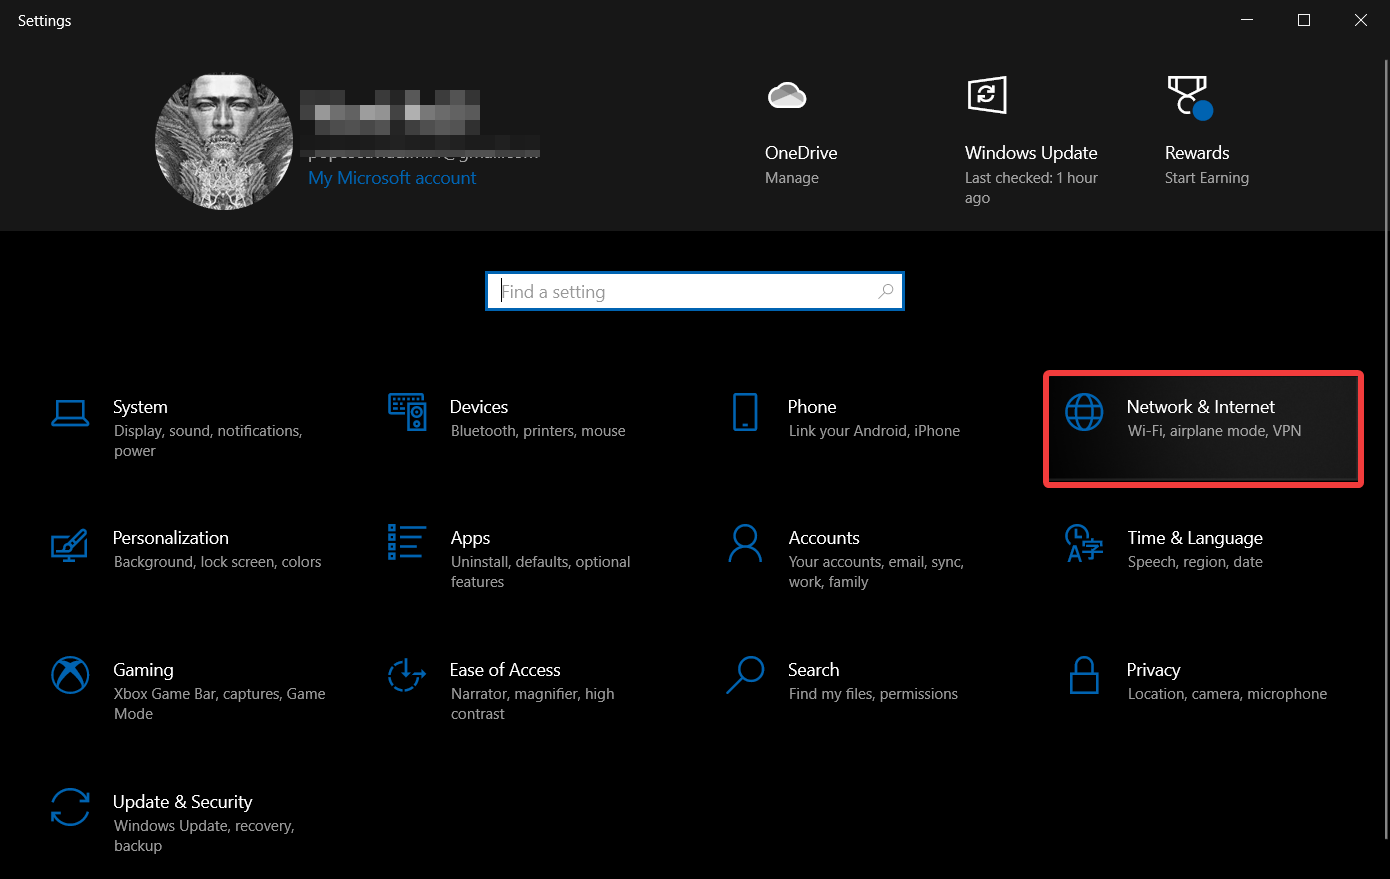
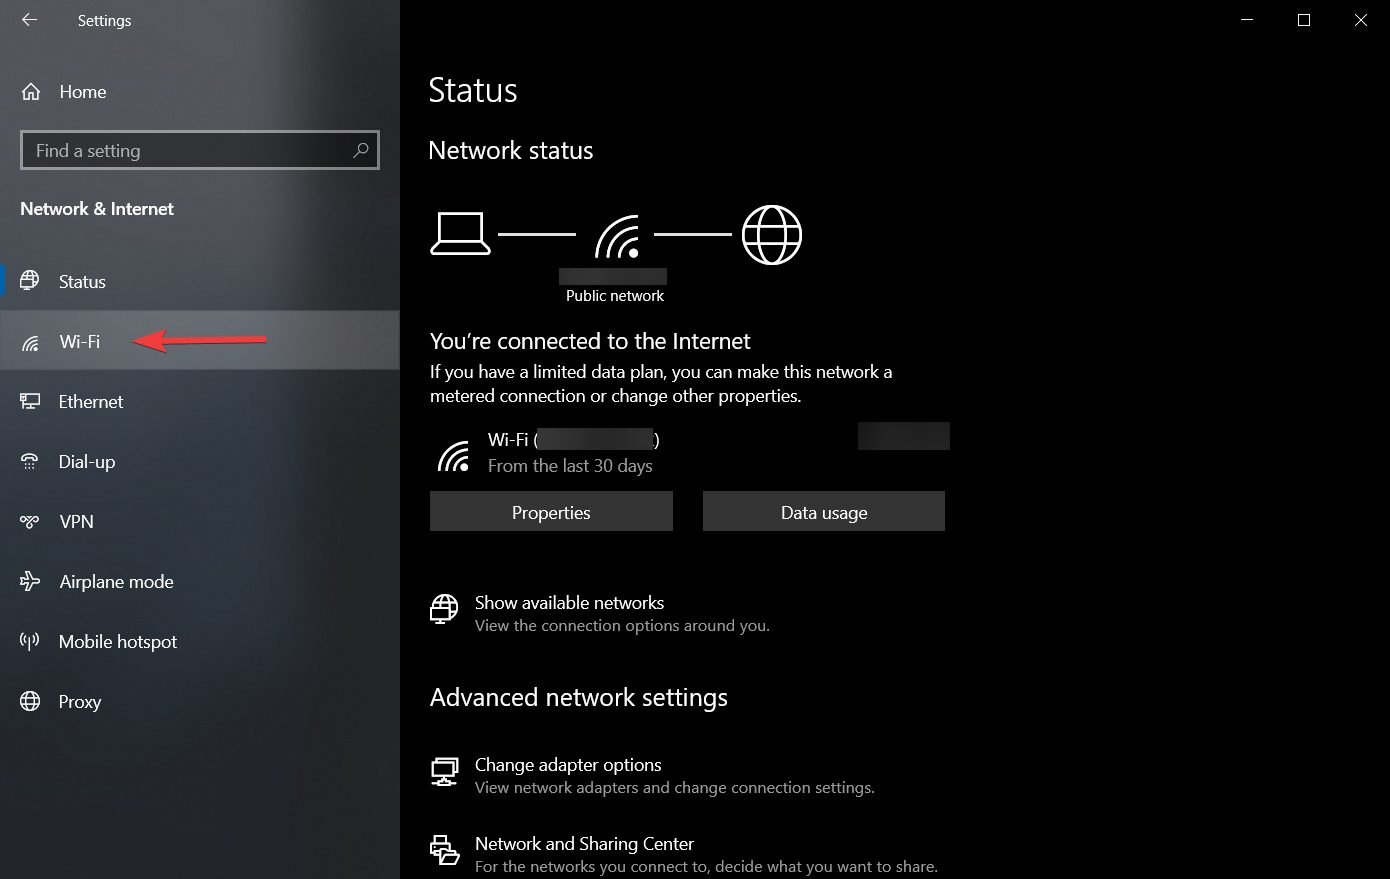
Step 2: Select Network & Internet on the settings page.

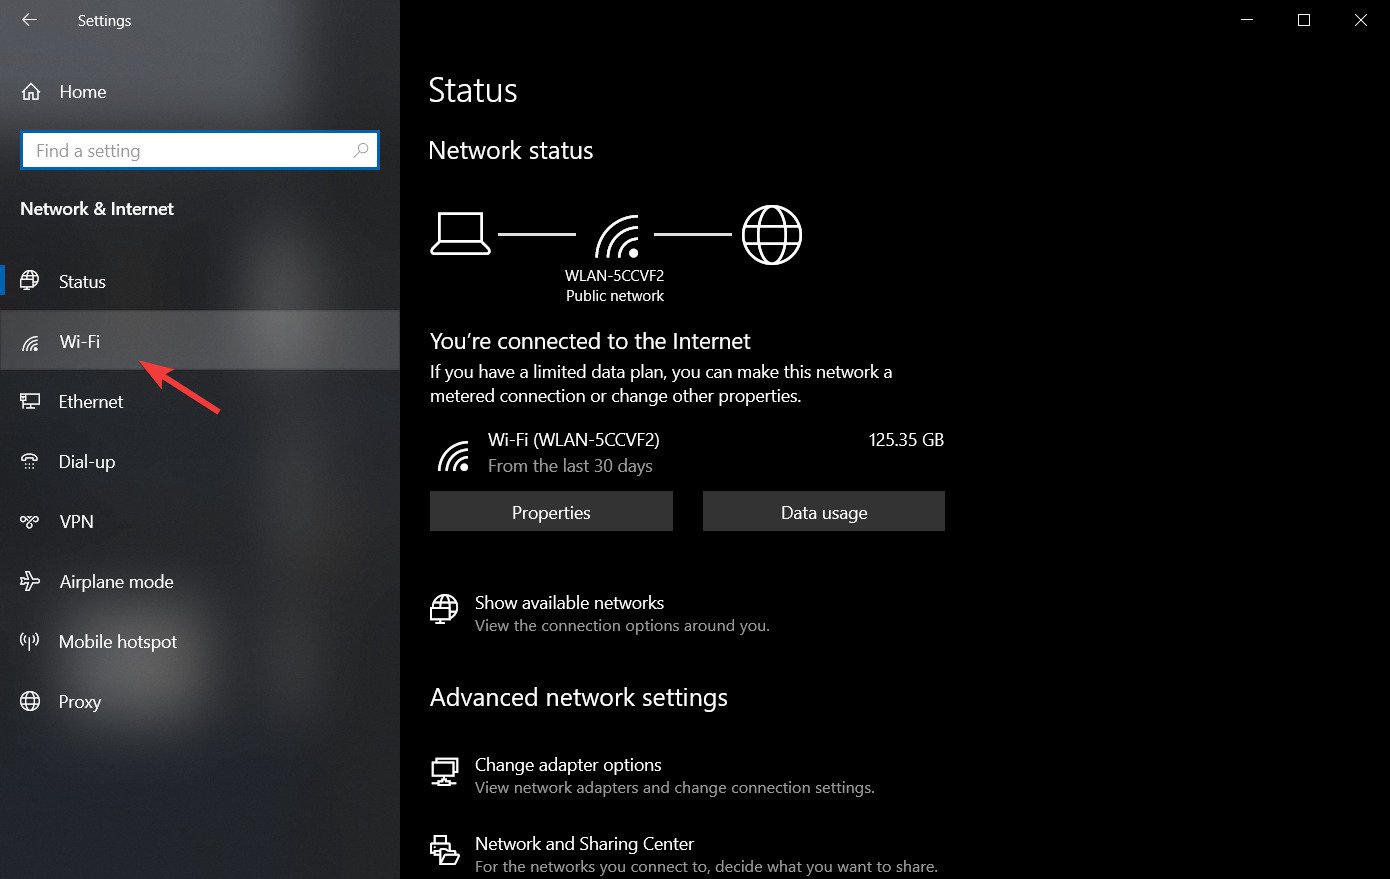
Step 3: On the status category, click Network troubleshooter and allow it to run

If the troubleshooter can find any issue, it’ll indicate and lead you on how it can be fixed.
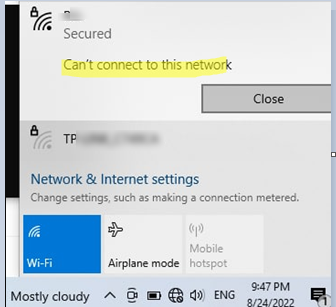
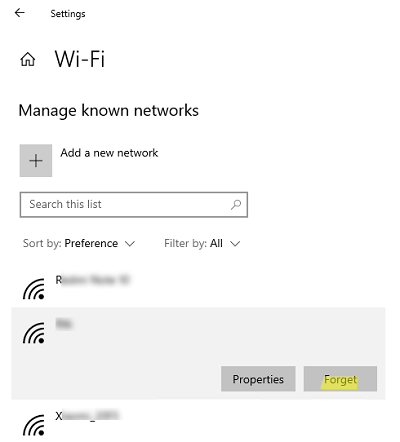
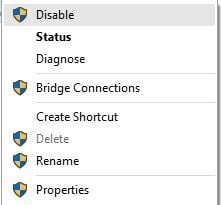
Fix 3: Forget Network and Reconnect
Suppose you try to connect to WiFi and get an error message. In that case, it’s most likely because your computer is still seeing another device or it hasn’t completely disconnected from a previous device. In this case, you can disconnect and reconnect using the “Forget Network” option. Here’s how:
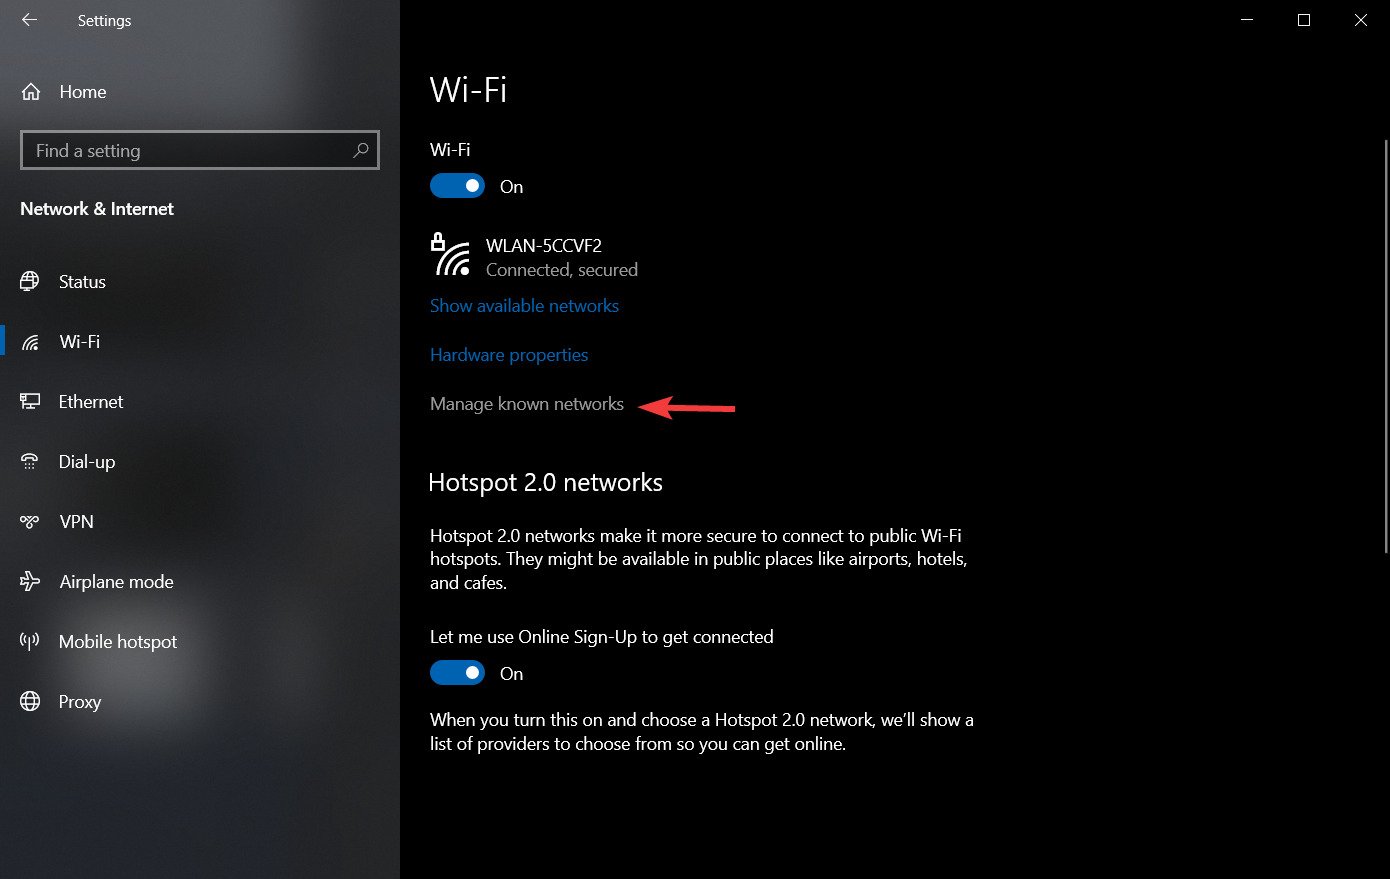
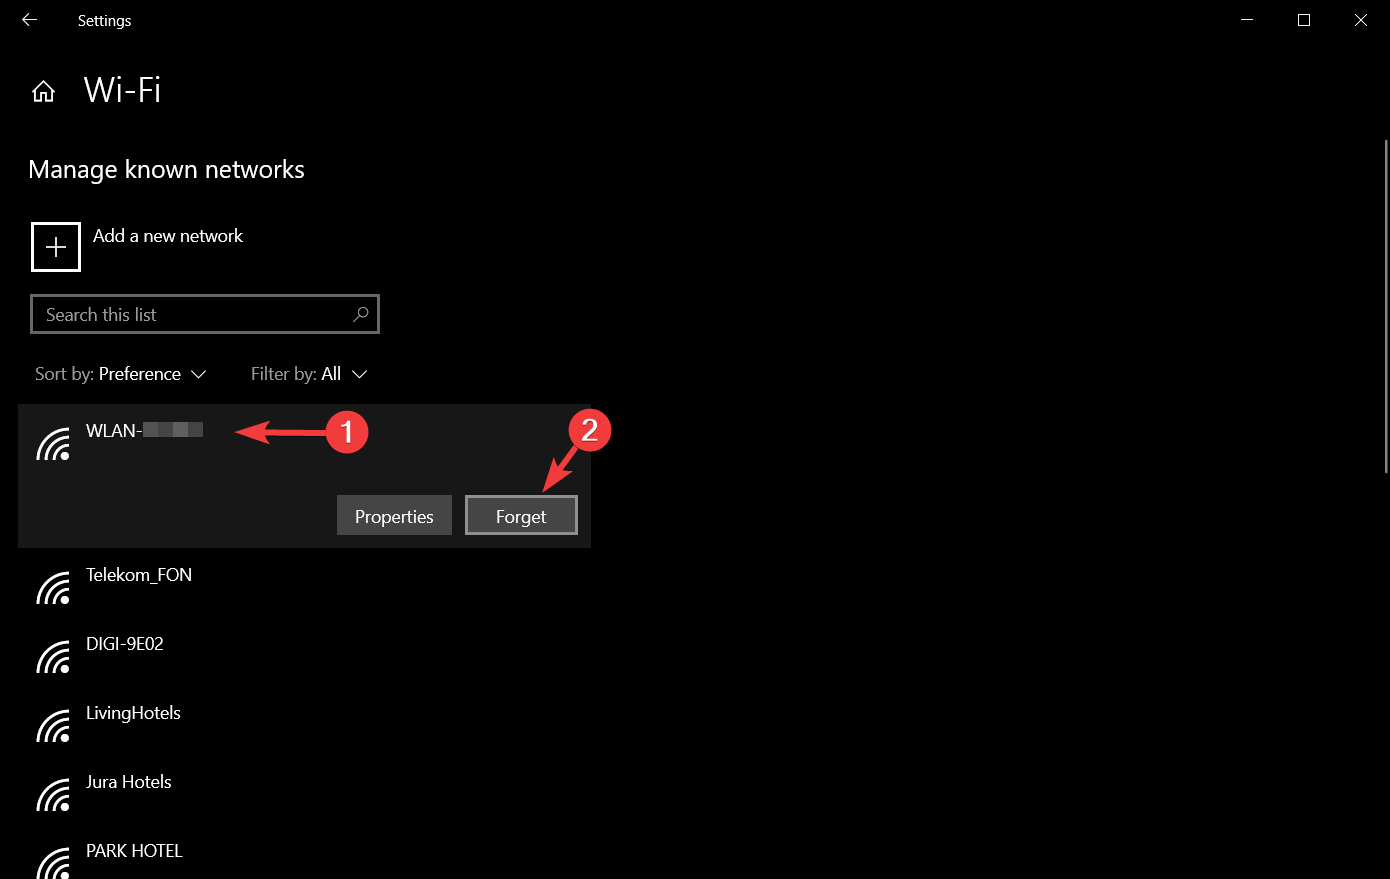
Step 1: Go to Settings on your computer and click Network & Internet.
Step 2: Select WiFi from the vertical pane on the resulting page and click Manage known networks.

Step 3: You’ll see the list of networks you have connected with on your computer. Now click on your recent networks and select Forget to remove those networks from your PC

After that, try to connect your WiFi again and see if it works.
Fix 4: Run Network Adapter troubleshooter
Some users were able to fix the “Windows cannot connect to this network” error by running a network adapter troubleshooter on their computers. This way, you can check if there are any problems with your network adapter and fix them as well. Here you can learn how to run the troubleshooter:
Step 1: Open Settings and select Update & Security.

Step 2: Click on Troubleshoot option on the vertical pane of the page.

Step 3: Then click on Network Adapter and hit the Run the troubleshooter button on the option.
Fix 5: Uninstall Network Adapter Driver
The presence of network adapter drivers establishes network connections. Whenever there is a problem with the drivers on your computer, errors like this will occur. However, you can fix the “Windows cannot connect to this network” error by uninstalling your computer’s current network adapter driver.
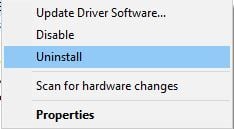
Step 1: Enter Device Manager in Windows Search Box and open it

Step 2: Double-click on the Network adapters option and right-click your wireless adapter from the drop-down list.

Step 3: Afterwards, select Uninstall device.
Step 4: Check the box that says Delete the driver software for this device and click Uninstall again.
After uninstalling the drivers, restart your computer, and new drivers will be installed on your computer.
Fix 6: Enable and Disable Airplane mode
Enabling and disabling Airplane mode on the computer has helped some people fix the “Windows can’t connect to this network” error. This way, your computer’s network connection is refreshed, which can also help solve your network problem. So it’s worth a try.
Fix 7: Turn on the physical WiFi switch
Some computers are equipped with a physical WiFi switch, and if it’s not turned on, you’ll not be able to connect to a network. So if you’re using such a computer, turn on the switch and try to connect to your WiFi again.
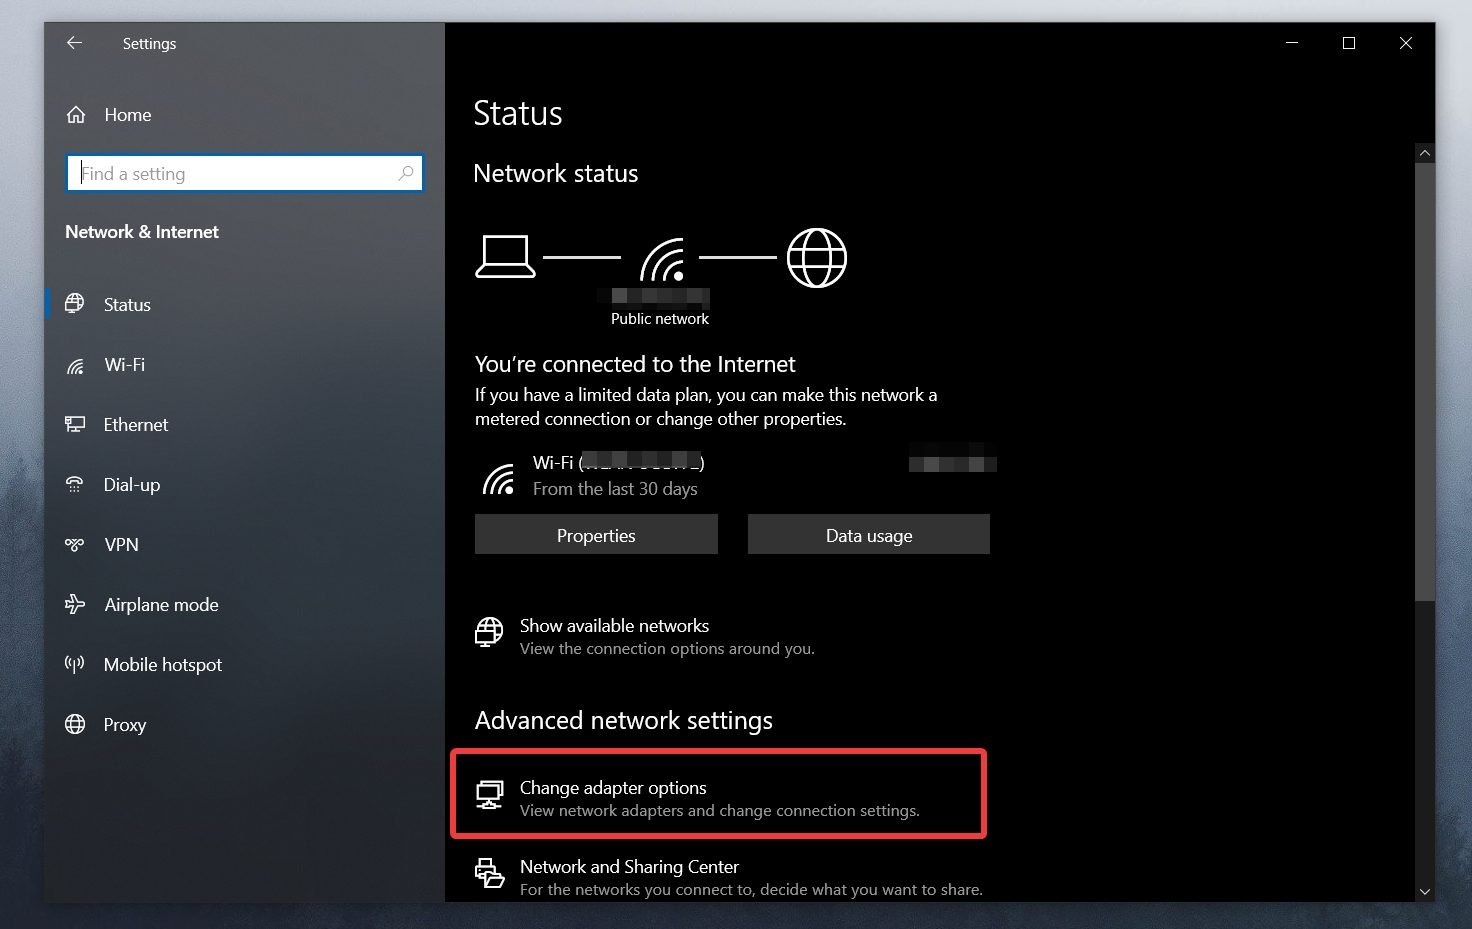
Fix 8: Reset Network
You may be experiencing network problems at your PC due to a change in network configuration, for whatever reason. Resetting the network is one of the solutions to the problem of Windows not being able to connect to it. Follow these steps to reset your network:
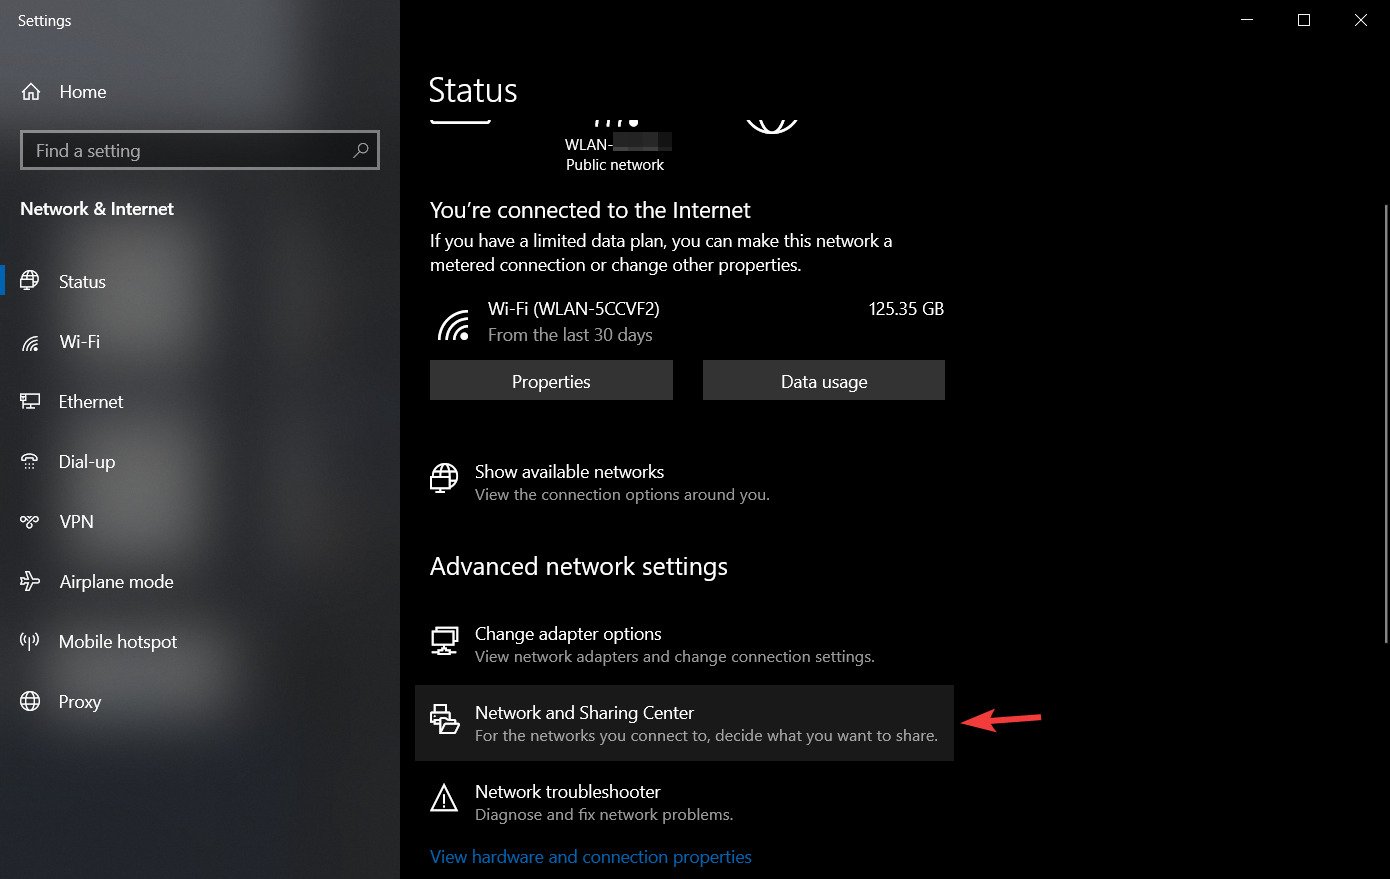
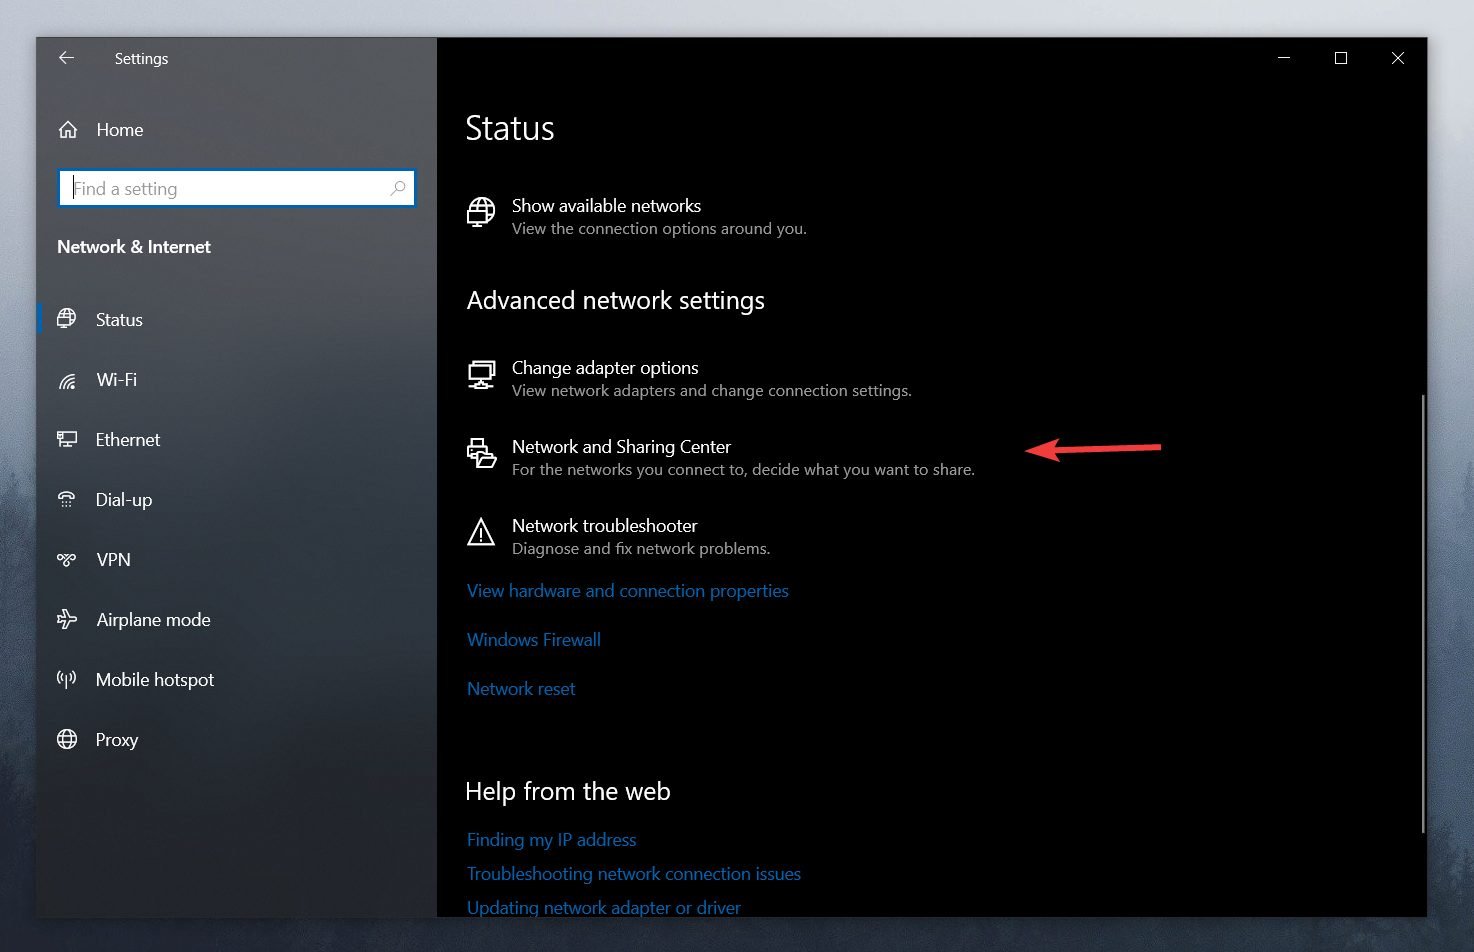
Step 1: Go to Settings on your computer and click Network & Internet.
Step 2: On the Status page, scroll down and hit the Network reset option

Step 3: Then click on Reset now on the next page.
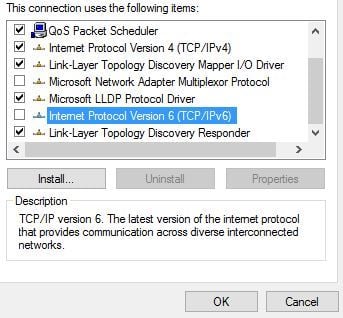
Fix 9: Disable IPv6 on your computer
If all other solutions do not work, you can also try disabling IPv6 on your PC. This has worked for some users, so that it might work for you too.
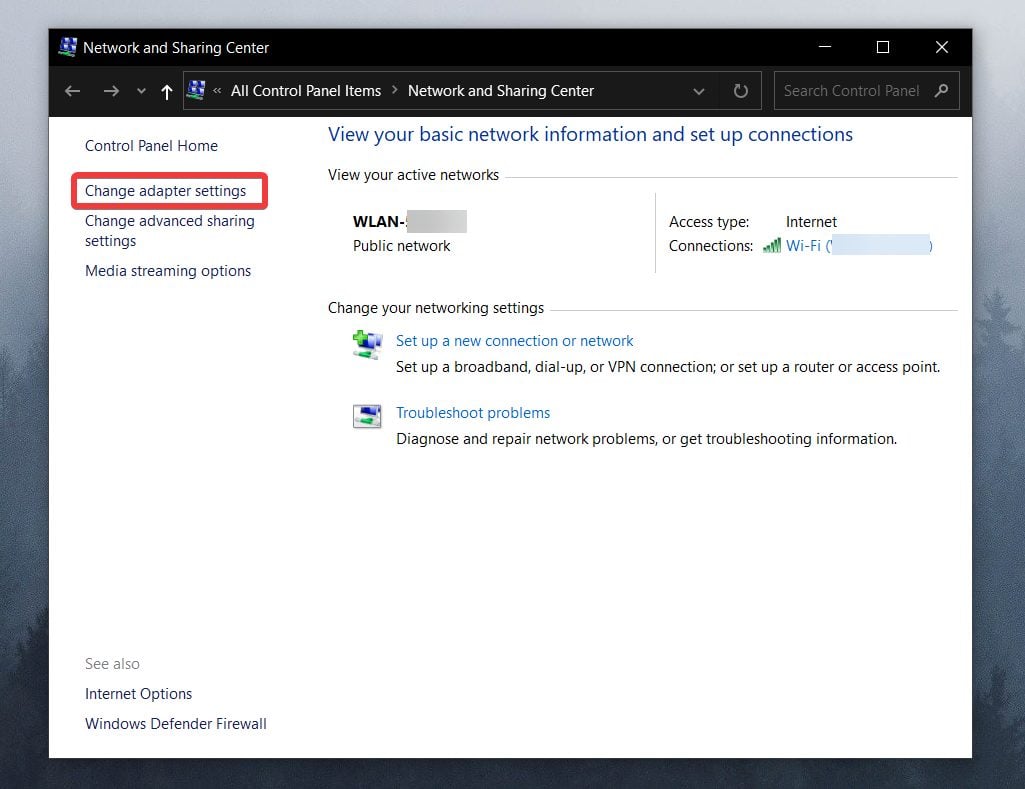
Step 1: Type Control Panel in Windows Search Box and launch it

Step 2: Set the View by option at the top right corner of the Control Panel to Large icon and click on Network and Sharing Center.

Step 3: Select Change adapter settings.

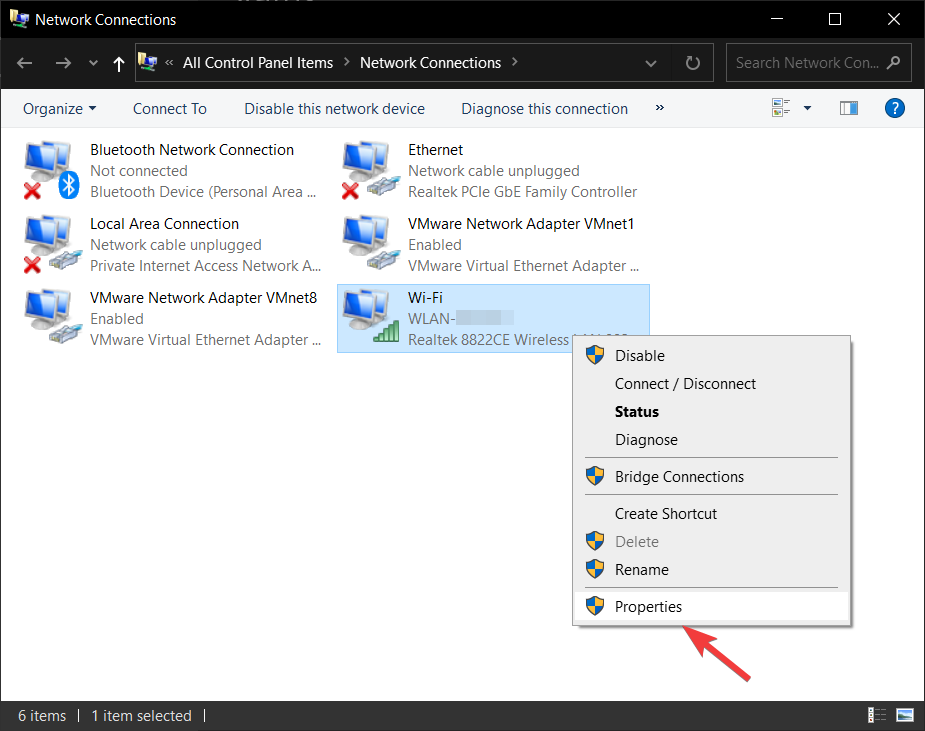
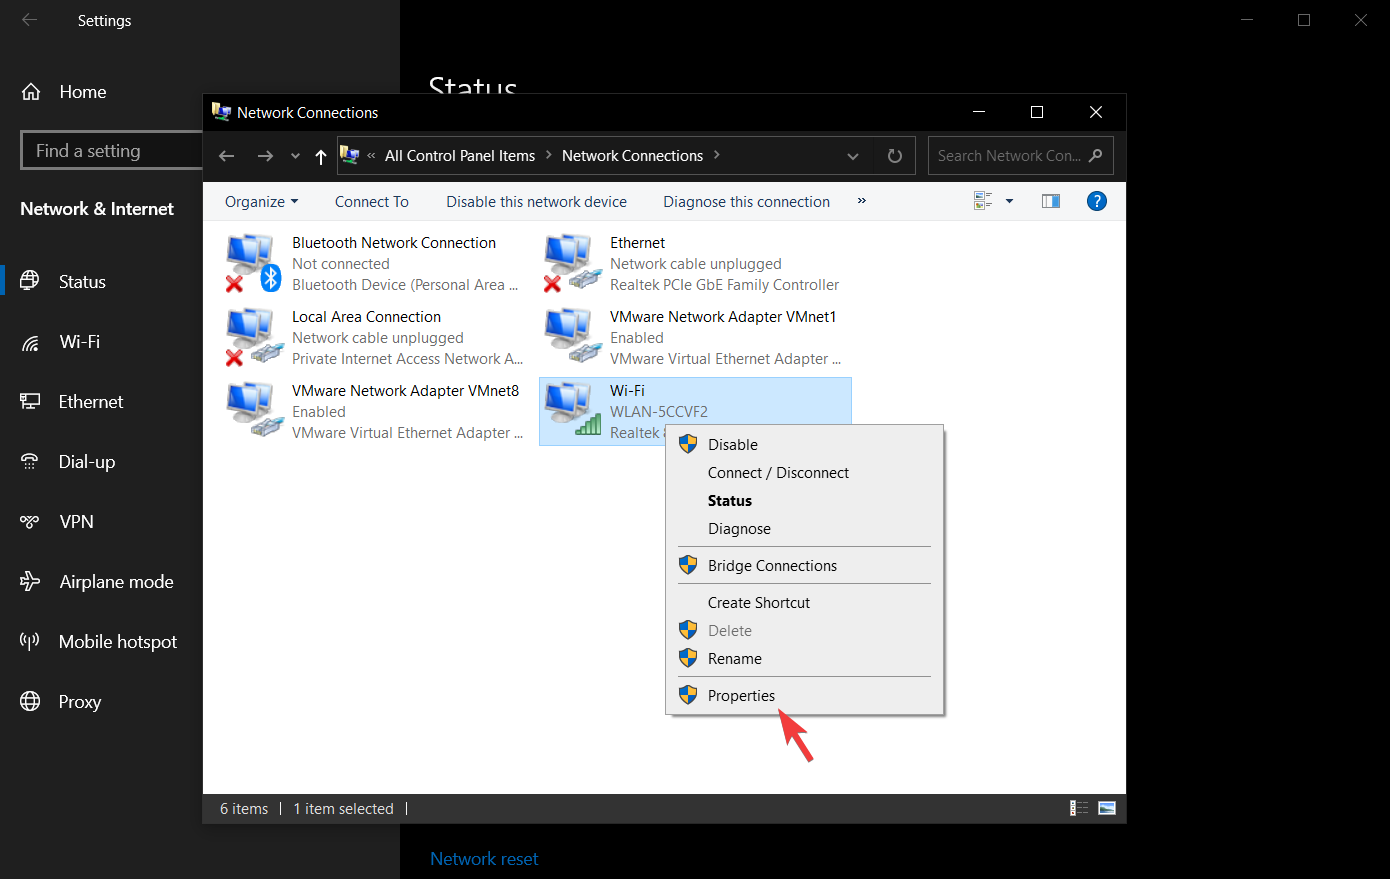
Step 4: On your network connection page, right-click WiFi and select Properties from the drop-down menu

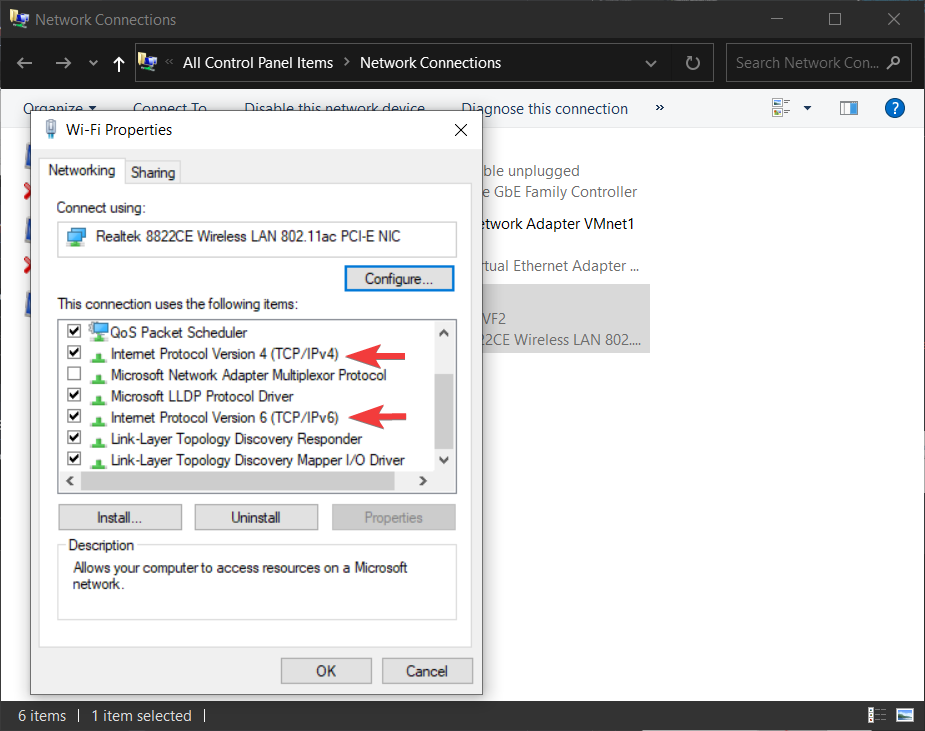
Step 5: After that, uncheck the Internet Protocol Version 6 (TCP/IPv6) option and select OK to save the change.

Fix 10: Release the IP and flush the DNS cache
This method isn’t as complex as it sounds and can also help fix the “Windows 10/11 cannot connect to this network” error. Follow these instructions to free the IP and clear the DNS cache:
Step 1: Press Windows + R keys to open the Run Command box.
Step 2: Type cmd and press Enter to open the command prompt
Step 3: In the command prompt, type in these commands and press Enter after each of them:
netsh winsock reset
netsh int ip reset
ipconfig /release
ipconfig /renew
ipconfig /flushdns
Step 4: Afterward, close the window and restart your PC.
Fixing Network Error Issues in Windows Made Easy
The solutions discussed in this article should help you fix your computer’s “Windows can’t connect to this network” error. And it’s important to know that you may need to try more than one of the solutions before you can fix the problem. If the problem might occur again, you can return to the solutions and test them again to fix the problem.
FAQs about Windows Network Error Issues
There are several reasons why your PC cannot connect to the Internet. However, most often it is because you are using outdated network adapters or your network settings on the computer are compromised by malware. Consider updating the network adapter and using an antivirus program on your computer.
If you are looking for how to connect WiFi to your computer manually, follow this guide:
Step 1: Open the Start menu on your computer
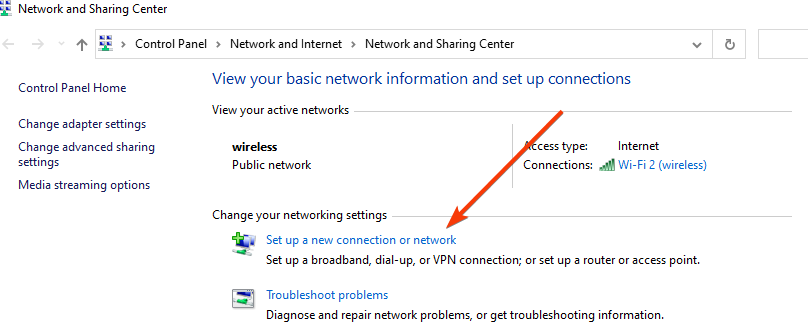
Step 2: In the related settings section, click Network and Sharing Center and select Set up a new connection or network.
Step 3: Select Manually connect to a wireless network and hit Next
Step 4: Enter the WiFi info on the resulting page and click Next again.
Step 5: After that, click Close to end the process.
Windows cannot connect to this network is an error message you get when there is a problem with your PC WiFi connection. So if you try to connect to your PC WiFi and get this error message, we have discussed ways to fix this problem for you in this article.
The «Windows Can’t Connect to This Network Error» is most often caused by outdated or corrupted drivers for the network adapter on your computer. This error usually appears after changing the WiFi password, while trying to connect to a WiFi network after disconnecting, but can also occur at other times.
There are several reasons that might explain why Windows 11 is not connecting to a network. The most common ones are incorrect settings or being too far away from the router. However, there are other potential causes: Wi-Fi being turned off, a software issue preventing the connection, the need for authentication on the network, or too many people using the same network.
Was this article helpful?
YesNo
TechPP is supported by our audience. We may earn affiliate commissions from buying links on this site.
Встретить ситуацию с пропаданием связи, когда нарушается интернет-соединение, можно достаточно часто. Отключение чаще всего происходит не по вине пользователя. Что делать, если пишет «Internet connection error» (имеется в виду предупреждение, содержащееся в системном сообщении), мы сейчас и посмотрим. Более того, попробуем разобрать основные причины возникновения таких ситуаций и обратим внимание на возможные методы их устранения.
Internet connection error: что делать?
Итак, если рассматривать основные причины отключения интернета, чаще всего в их числе приоритетное место занимает проникновение на компьютер вирусов, исполняемых апплетов, называемых Malware и Adware, а также неправильная настройка самого подключения.

Сейчас будем исходить из того, что с оплатой услуг провайдера все в порядке, а сетевое оборудование работает без сбоев. Хотя, в общем-то, в некоторых случаях при постоянном появлении сообщения об отсутствии подключения может потребоваться повторная инсталляция драйверов сетевых устройств или установка корректных параметров маршрутизатора, например роутера при наличии сетевых подключений.
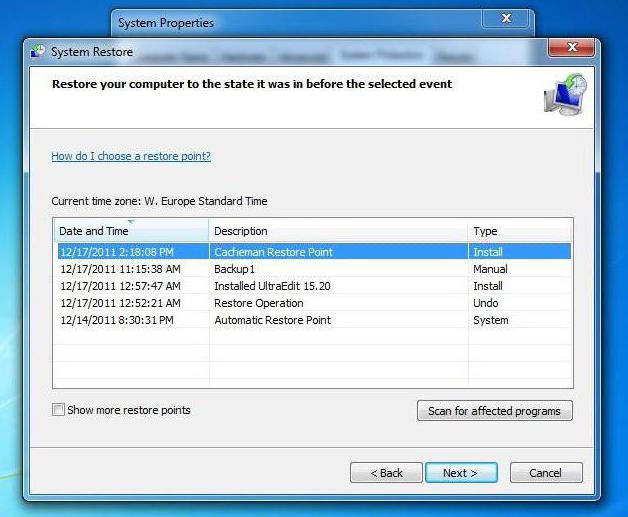
Восстановление системы
Если сбой произошел ни с того ни с сего, раньше все работало как часы, а сейчас на экране появилось сообщение Internet connection error, что делать, будет понятно, если обратить внимание именно на время возникновения такой ситуации.
Сейчас будем исходить из того, что с оплатой услуг провайдера все в порядке, а сетевое оборудование работает без сбоев. Хотя, в общем-то, в некоторых случаях при постоянном появлении сообщения об отсутствии подключения может потребоваться повторная инсталляция драйверов сетевых устройств или установка корректных параметров маршрутизатора, например роутера при наличии сетевых подключений.
Восстановление системы
Если сбой произошел ни с того ни с сего, раньше все работало как часы, а сейчас на экране появилось сообщение Internet connection error, что делать, будет понятно, если обратить внимание именно на время возникновения такой ситуации.
Действительно, мало ли какие настройки «слетели». Самым простым способом устранения проблемы станет обычный откат системы до контрольной точки, но она во временном промежутке может быть более ранней, чем время появления сбоя.
Проверка на вирусы и вредоносные коды
Теперь посмотрим, как поступить, если первый способ ничего не дал, и система снова выдает предупреждение Internet connection error. Что делать? В обязательном порядке проверить систему на вирусы, используя какую-нибудь портативную версию программы (ведь инсталлированный антивирус уже мог пропустить угрозу).
В качестве пакета можно взять KVRT, в наилучшей степени зарекомендовавший себя в области портативных приложений. К тому же и со штатным антивирусом конфликты полностью исключаются.
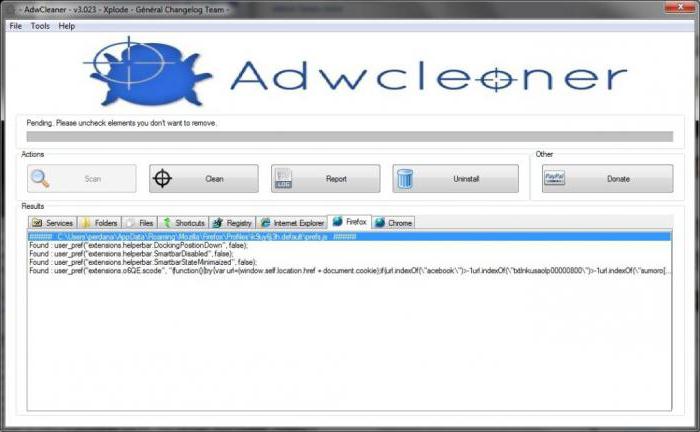
Но и такие утилиты могут не определять потенциально нежелательное ПО, заменяющее оригинальный файл HOSTS или вносящее в него собственные записи. В этом случае потребуется использовать утилиты вроде Adware Cleaner или что-то похожее.
Проверка параметров подключения
Если потенциальных или существующих угроз не обнаружено, можно проверить настройки самого подключения. Допустим, система снова выдает предупреждение вроде Internet connection error. Что делать теперь?
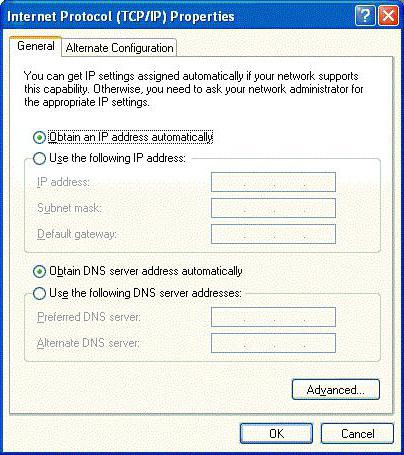
Необходимо зайти в свойства подключения и проверить настройки протокола TCP/IP. Желательно (что применяется в большинстве случаев) использовать автоматическое получение адресов IP и DNS-сервера. Иногда стоит обратить внимание на задействование прокси. Если провайдер не поддерживает предоставление таких услуг, прокси-сервер необходимо отключить (снять галочку на соответствующем поле). В крайнем случае нужно ввести правильные значения для всех задействованных полей (их предоставляет провайдер при подключении пользовательского компьютера к интернету или системный администратор в случае с сетевыми терминалами).
Использование специальных утилит восстановления
Кроме всего вышесказанного, если пользователь не хочет или не может заниматься устранением проблемы самостоятельно, могут помочь специальные программы восстановления интернет-подключения и всего, что с этим связано.
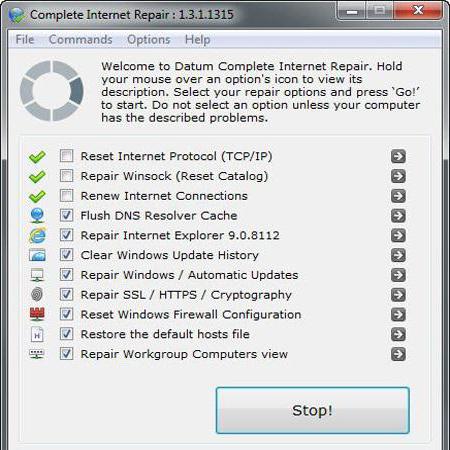
Одной из самых простых и интересных автоматизированных утилит является программа Complete Internet Repair. По большому счету пользователю нужно всего лишь запустить процесс сканирования на наличие проблем, после чего активировать их исправление. В обоих процессах участие юзера сведено к минимуму.
Заключение
Естественно, это далеко не все причины, которые могут повлиять на отключение интернета. Скажем так: здесь были рассмотрены наиболее часто возникающие штатные и нештатные ситуации. Но, как уже можно заметить, способы устранения проблемы в большинстве случаев достаточно просты и могут быть выполнены юзером любого уровня подготовки.
При попытке подключиться к одной из доступных Wi-Fi сетей в Windows 10 может появляться ошибка:
Не удается подключиться к этой сети
Can’t connect to this network
Причиной ошибки может быть неправильный пароль, некорректные настройки сетевого профиля WLAN для сохраненной сети (тип шифрования или аутентификации), драйвер Wi-Fi адаптера, измененные настройки точки доступны и т.д. В этой статье мы рассмотрим, как исправить эту ошибку и восстановить Wi-Fi подключение в Windows.
Убедитесь, что вы ввели правильный ключ безопасности (пароль для подключения). Нежелательно использовать в пароле Wi-Fi кириллицу или спец символы.
Самый первый и простой вариант решения проблемы – начните с перезагрузки вашего компьютера и Wi-Fi роутера.
Если предыдущий способ не помог, возможно проблема связана с тем, что изменились настройки Wi-Fi роутера (пароль сети, настройки шифрования) и Windows не может подключиться к вашему роутеру с предыдущими сохраненными настройками в Wi-Fi профиле этой сети. Попробуйте удалить сохраненные настройки беспроводной сети в Windows и переподключиться к точке доступа :
- Перейдите в панель Settings -> Network and Internet -> Wi-Fi -> Manage known networks (или выполните команду быстрого доступа
ms-settings:network-wifi
); - Найдите в списке вашу Wi-Fi сеть и удалите ее (Forget/Забыть);
Можно удалить профиль сети из командной строки:
netsh wlan delete profile name="имя_сети"
- Заново подключитесь к вашей Wi-Fi точке доступа, укажите ключ безопасности сети (пароль для подключения).
Проверьте, что драйвер вашего сетевого адаптера поддерживает типы шифрования и аутентификации, которые разрешены на вашей точке доступа Wi-Fi. Список стандартов и типов шифрования, которые поддерживает ваш Wi-FI драйвер Windows можно вывести с помощью команды:
netsh wlan show all
Например, в моем случае:
Radio types supported : 802.11n 802.11g 802.11b
FIPS 140-2 mode supported : Yes
Authentication and cipher supported in infrastructure mode:
Open None
WPA2-Personal CCMP
Open WEP-40bit
Open WEP-104bit
Open WEP
WPA-Enterprise TKIP
WPA-Personal TKIP
WPA2-Enterprise TKIP
WPA2-Personal TKIP
WPA-Enterprise CCMP
WPA-Personal CCMP
WPA2-Enterprise CCMP
WPA3-Personal CCMP
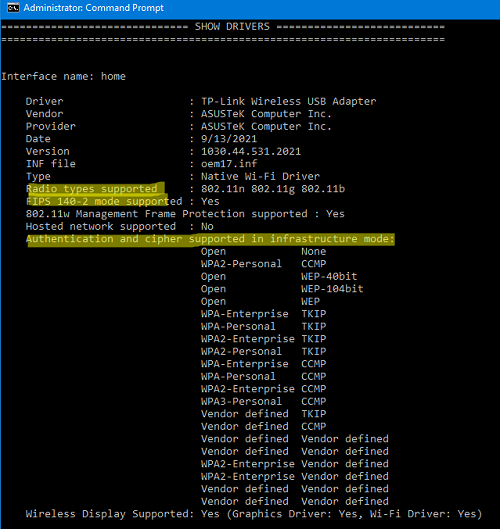
Убедитесь, что эти режимы поддерживаются вашей точкой доступа Wi-Fi (нужно зайти на интерфейс управления вашей точки доступа и проверить настройки безопасности). В некоторых случаях нужно обновить драйвер вашего сетевого адаптера.
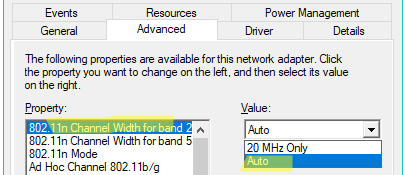
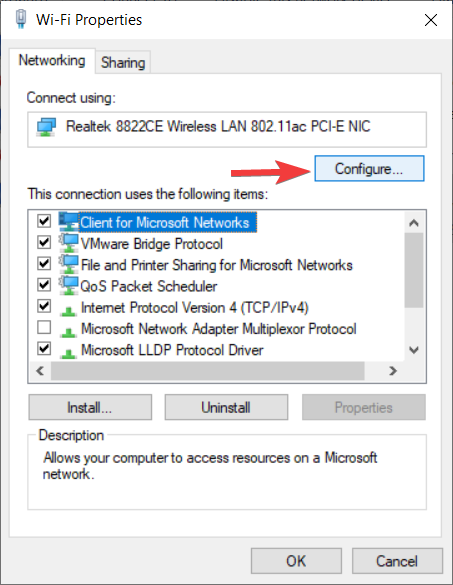
Откройте свойства сетевого драйвера адаптера в Device Manager, перейдите на вкладку Advanced и проверьте, какие режимы разрешены в его настройках. В этом примере режиме 802.11n отключен. Если ваша точка доступа и драйвер адаптера поддерживают его, включите эту опцию.
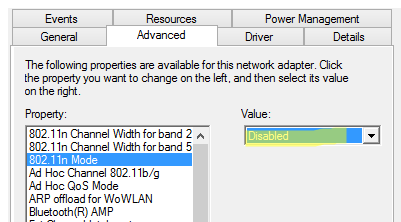
Также попробуйте изменить ширину канала в параметре 802.11n Channel Width for band 2 с
20 MHz
Only на
Auto
.
Удалите/переустановите сетевой драйвер вашего Wi-Fi адаптера (консоль
devmgmt.msc
). Разверните секцию сетевых адаптера, щелкните по вашему Wi-Fi адаптеру и выберите (Удалить устройства/Uninstall device).
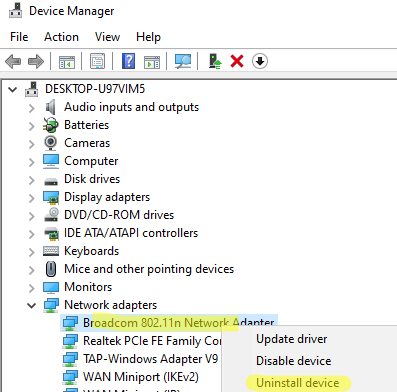
При удалении устройства вам будет предложено также удалить драйвер из хранилища драйверов. Включите опцию Delete the driver software for this device и нажмите Uninstall.
После этого выполните обнаружение новых устройств Actions -> Scan for hardware changes и дождитесь, пока Windows обнаружит ваш Wi-Fi адаптер и установит подходящие драйвера.
Это также сбросит текущие настройки вашего Wi-Fi адаптера (полезно, если вы изменяли их вручную).
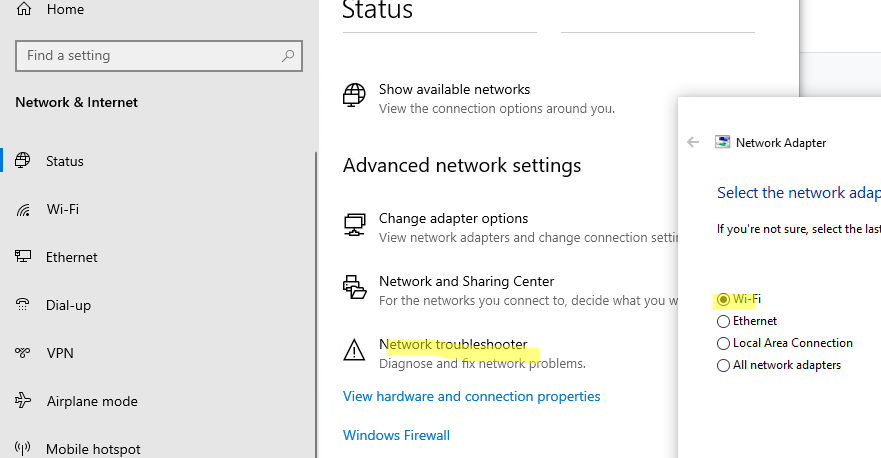
Запустите средство диагностики и устранения неполадок сети Settings -> Network and Internet > Status и нажмите на кнопку Network troubleshooter в секции Advanced network properties (или выполните команду
msdt.exe /id networkdiagnosticsnetworkadapter
). Выберите тип сетевого адаптера Wi-Fi и дождитесь пока мастер найдет и исправит возможные сетевые проблемы.
Одной из самых простых и интересных автоматизированных утилит является программа Complete Internet Repair. По большому счету пользователю нужно всего лишь запустить процесс сканирования на наличие проблем, после чего активировать их исправление. В обоих процессах участие юзера сведено к минимуму.
Заключение
Естественно, это далеко не все причины, которые могут повлиять на отключение интернета. Скажем так: здесь были рассмотрены наиболее часто возникающие штатные и нештатные ситуации. Но, как уже можно заметить, способы устранения проблемы в большинстве случаев достаточно просты и могут быть выполнены юзером любого уровня подготовки.
При попытке подключиться к одной из доступных Wi-Fi сетей в Windows 10 может появляться ошибка:
Не удается подключиться к этой сети
Can’t connect to this network
Причиной ошибки может быть неправильный пароль, некорректные настройки сетевого профиля WLAN для сохраненной сети (тип шифрования или аутентификации), драйвер Wi-Fi адаптера, измененные настройки точки доступны и т.д. В этой статье мы рассмотрим, как исправить эту ошибку и восстановить Wi-Fi подключение в Windows.
Убедитесь, что вы ввели правильный ключ безопасности (пароль для подключения). Нежелательно использовать в пароле Wi-Fi кириллицу или спец символы.
Самый первый и простой вариант решения проблемы – начните с перезагрузки вашего компьютера и Wi-Fi роутера.
Если предыдущий способ не помог, возможно проблема связана с тем, что изменились настройки Wi-Fi роутера (пароль сети, настройки шифрования) и Windows не может подключиться к вашему роутеру с предыдущими сохраненными настройками в Wi-Fi профиле этой сети. Попробуйте удалить сохраненные настройки беспроводной сети в Windows и переподключиться к точке доступа :
- Перейдите в панель Settings -> Network and Internet -> Wi-Fi -> Manage known networks (или выполните команду быстрого доступа
ms-settings:network-wifi
); - Найдите в списке вашу Wi-Fi сеть и удалите ее (Forget/Забыть);
Можно удалить профиль сети из командной строки:
netsh wlan delete profile name="имя_сети" - Заново подключитесь к вашей Wi-Fi точке доступа, укажите ключ безопасности сети (пароль для подключения).
Проверьте, что драйвер вашего сетевого адаптера поддерживает типы шифрования и аутентификации, которые разрешены на вашей точке доступа Wi-Fi. Список стандартов и типов шифрования, которые поддерживает ваш Wi-FI драйвер Windows можно вывести с помощью команды:
netsh wlan show all
Например, в моем случае:
Radio types supported : 802.11n 802.11g 802.11b
FIPS 140-2 mode supported : Yes
Authentication and cipher supported in infrastructure mode:
Open None
WPA2-Personal CCMP
Open WEP-40bit
Open WEP-104bit
Open WEP
WPA-Enterprise TKIP
WPA-Personal TKIP
WPA2-Enterprise TKIP
WPA2-Personal TKIP
WPA-Enterprise CCMP
WPA-Personal CCMP
WPA2-Enterprise CCMP
WPA3-Personal CCMP
Убедитесь, что эти режимы поддерживаются вашей точкой доступа Wi-Fi (нужно зайти на интерфейс управления вашей точки доступа и проверить настройки безопасности). В некоторых случаях нужно обновить драйвер вашего сетевого адаптера.
Откройте свойства сетевого драйвера адаптера в Device Manager, перейдите на вкладку Advanced и проверьте, какие режимы разрешены в его настройках. В этом примере режиме 802.11n отключен. Если ваша точка доступа и драйвер адаптера поддерживают его, включите эту опцию.
Также попробуйте изменить ширину канала в параметре 802.11n Channel Width for band 2 с
20 MHz
Only на
Auto
.
Удалите/переустановите сетевой драйвер вашего Wi-Fi адаптера (консоль
devmgmt.msc
). Разверните секцию сетевых адаптера, щелкните по вашему Wi-Fi адаптеру и выберите (Удалить устройства/Uninstall device).
При удалении устройства вам будет предложено также удалить драйвер из хранилища драйверов. Включите опцию Delete the driver software for this device и нажмите Uninstall.
После этого выполните обнаружение новых устройств Actions -> Scan for hardware changes и дождитесь, пока Windows обнаружит ваш Wi-Fi адаптер и установит подходящие драйвера.
Это также сбросит текущие настройки вашего Wi-Fi адаптера (полезно, если вы изменяли их вручную).
Запустите средство диагностики и устранения неполадок сети Settings -> Network and Internet > Status и нажмите на кнопку Network troubleshooter в секции Advanced network properties (или выполните команду
msdt.exe /id networkdiagnosticsnetworkadapter
). Выберите тип сетевого адаптера Wi-Fi и дождитесь пока мастер найдет и исправит возможные сетевые проблемы.
При появлении ошибки подключения к Wi-Fi сети вы можете найти более подробную информацию о причине ошибки в журнале Event Viewer.
- Откройте консоль Event Viewer (
eventvwr.msc
) и перейдите в раздел Applications and Services Logs -> Microsoft -> Windows -> WLAN-AutoConfig -> Operational; - Проверьте наличие ошибок и предупреждений в этом журнале;
- В моем примере тут нашлось событие EventID 8001 (AcmConnection), со следующим описанием:
Network Adapter: Broadcom 802.11n Network Adapter
Interface GUID: {c8342b50-2894-4d8f-84d7-907fce8e1784}
Connection Mode: Manual connection with a profile
Profile Name: HMNWRK
SSID: HMNWRK
BSS Type: Infrastructure
 Failure Reason:The specific network is not available.
RSSI: 255
Судя по ошибке данная точка доступа Wi-Fi оказалось недоступна (выключена) в момент подключения к ней.
Или еще одна похожая ошибка:
EventID 11006 (MsmSecurity)
WLAN-AutoConfig
Wireless security failed.
Reason: Dynamic key exchange did not succeed within configured time
Здесь похоже, что ваш компьютер не успел обменяться ключами с роутером за определенное время (точка доступа не загрузилась, тормозит, или вне зоны доступа).

Если ничего не помогает, и проблема появляется при подключении к любой Wi-Fi сети (будь то аппаратная точка доступа, или программная Wi-Fi точка доступа на Windows, Linux или Android), очистите таблицу маршрутизации и кэш DNS, выполните полный сброс сетевых настроек в Windows :
route -f
ipconfig /flushdns
netsh int ip reset
netsh int ipv4 reset
netsh int tcp reset
netsh winsock reset
Перезагрузите компьютер и подключитесь к своей сети. Ошибка
“Windows не удалось подключиться к Wi-Fi
” должна исчезнуть.
Несколько дополнительных советов по решению проблемы:
- Слабый и нестабильный сигнал Wi-Fi сети может вызывать эту ошибку. Проверьте уровень сигнала Wi-Fi и наименее загруженные каналы с помощью PowerShell. Попробует переключить вашу точку доступа на один из свободных номеров каналов;
- Измените имя (SSID) Wi-Fi сети на точке доступа;
- Если в настройках роутера жестко задан режима работы беспроводной сети (802.11 b/g/n). попробуйте выбрать тот, режим, который поддерживается драйвером Wi-FI в Windows или переключиться в режим Auto. Например, некоторые старые модели Wi-Fi адаптеров не поддерживают более современный режим 802.11n (работают только в 802.11g);
- Проверьте, не включена ли в настройках Wi-Fi роутера блокировка клиентов по MAC адресу
Most common cause for this connection error is an outdated driver
by Milan Stanojevic
Milan has been enthusiastic about technology ever since his childhood days, and this led him to take interest in all PC-related technologies. He’s a PC enthusiast and he… read more
Updated on January 12, 2023
Reviewed by
Alex Serban

After moving away from the corporate work-style, Alex has found rewards in a lifestyle of constant analysis, team coordination and pestering his colleagues. Holding an MCSA Windows Server… read more
- Windows 10 sometimes won’t connect to the Internet, and there can be a multitude of reasons for that.
- Depending on the exact error, there are various solutions that you can try out, with varying levels of difficulty.
- Network problems are common and this message is a generic one from Windows.
- There are two general types of network problems, some of them being categorized as physical and others as setup-related.
XINSTALL BY CLICKING THE DOWNLOAD FILE
This software will keep your drivers up and running, thus keeping you safe from common computer errors and hardware failure. Check all your drivers now in 3 easy steps:
- Download DriverFix (verified download file).
- Click Start Scan to find all problematic drivers.
- Click Update Drivers to get new versions and avoid system malfunctionings.
- DriverFix has been downloaded by 0 readers this month.
Internet access is crucial for many people in this day and age, and there have been reports that users are getting Windows 10 can’t connect to this network message while trying to establish an Internet connection.
This in turn can cause a wide range of problems, including not being able to work remotely, stopping you from researching a problem, and even not allowing you to enjoy a relaxing time with your family watching your favorite shows.
No matter which category you fit in, solving network issues as fast and as securely as possible is of paramount importance.
In this guide, we will cover every way of dealing with network issues, including the most common solutions for general problems, and also step-by-step information for troubleshooting specific issues.
- Why is my laptop is showing Can’t connect to this network?
- The most common solutions to dealing with network issues
- How can I fix Windows 10 can’t connect to a wireless network?
- 1. Modify network adapter settings
- 2. Modify Internet properties settings
- 3. Manage wireless connections
- Windows 10 can’t connect to this network after an update
- 1. Use Command Prompt
- 2. Uninstall the antivirus software
- 3. Check if IPv4 and IPv6 protocols are enabled
- Windows 10 can’t connect to this network, enter APN and try again
- Windows 10 can’t connect to this network and WEP problems
- Windows 10 can’t connect to the network after waking from Sleep Mode
- 1. Disable IPv6 / Change Power Management settings
- 2. Change Power Options
- 3. Turn off the Connect to Wi-Fi hotspots option
- Windows 10 can’t connect to the network after a password change
- What can I do to prevent these issues from occurring again?
Why is my laptop is showing Can’t connect to this network?
This issue can occur if your PC isn’t connected to the Internet there are multiple causes for this issue, but the most common is your adapter settings.
In some instances, it’s possible that Windows can’t find the Wi-Fi network, and that’s usually caused by a problem with your adapter, so you need to check it.
Many reported that their HP laptop is not connecting to Wi-Fi, and if you encounter this problem, then you should update your drivers.
The most common solutions to dealing with network issues
➡ Check for a faulty connection
A problem with your actual network connection is one of the most common issues, and it can be split into two categories:
- Setup-related issues
As you might expect, not having the right login details will surely cause connectivity issues, so it is best to check in advance that the credentials you used are correct.
If you find that the information you used to log into your network is not correct, you could get in contact with your Internet Service Provider and request that they are refreshed.
- Physical problems
When it comes down to the physical part of this issue, a connection that can not be maintained or used properly can include problems with the router, problems with the network card on your device, and even problems with the cables connected to the router/network card.
To check for physical problems, make sure that the router is running optimally, and that all the respective lights are turned on.
Furthermore, it would be recommended that you check if the cables are cut, or have any other sort of damage (both to and from your router/ethernet port, etc).
➡ Check your drivers
As we all know by now, drivers are an essential element to any hardware that we use, bridging the gap between software and the device itself, and having issues with drivers is not going to help.
If this important element is not fully updated, or if the driver gets corrupted, a full re-install should resolve this issue. (more details about this step in the guide below).
➡ Make sure the ISP has a good connection
In some cases, you might find that even if the above-mentioned elements are all ticked without problems, the ISP might have problems with the distribution of the Internet on their network.
To find out if that is the case, you should contact your ISP by phone and ask if everything is running smoothly on their side.
If they don’t report any issues, then it is safe to assume that the issue is local, so let’s dive into the steps you need to follow in order to resolve this annoying problem once and for all.
How can I fix Windows 10 can’t connect to a wireless network?
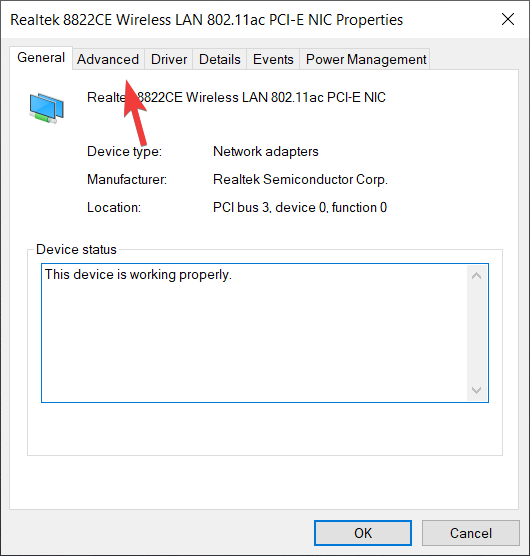
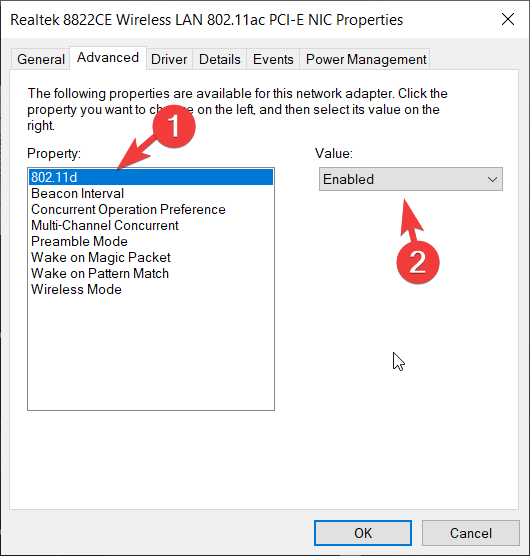
1. Modify network adapter settings
- Change the channel width for your network adapter
- Press Win Key + X and choose Settings.

- Choose Network & Internet.

- Click Change adapter options.
- Locate your wireless adapter and right-click it. Choose Properties from the menu.

- Click the Configure button.

- Choose the Advanced tab.

- Select the 802.11d from the Property list and set the value to Enabled.
- Click OK to save the changes.

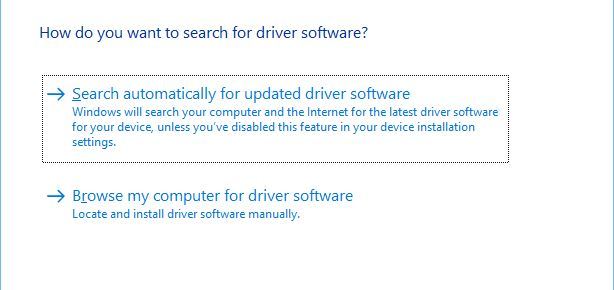
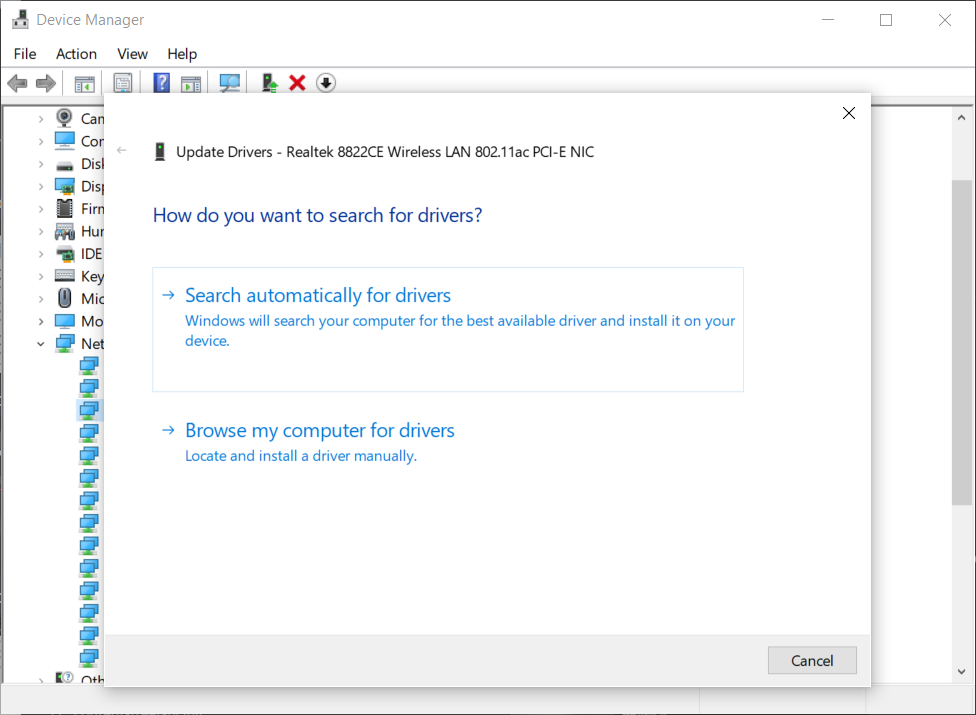
- Update your network adapter driver manually
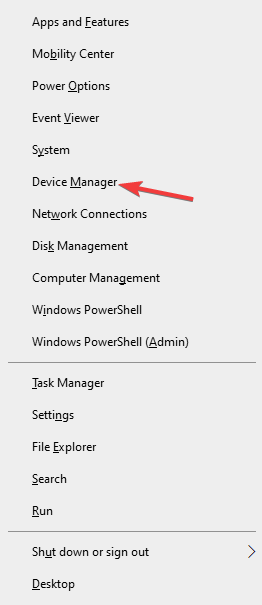
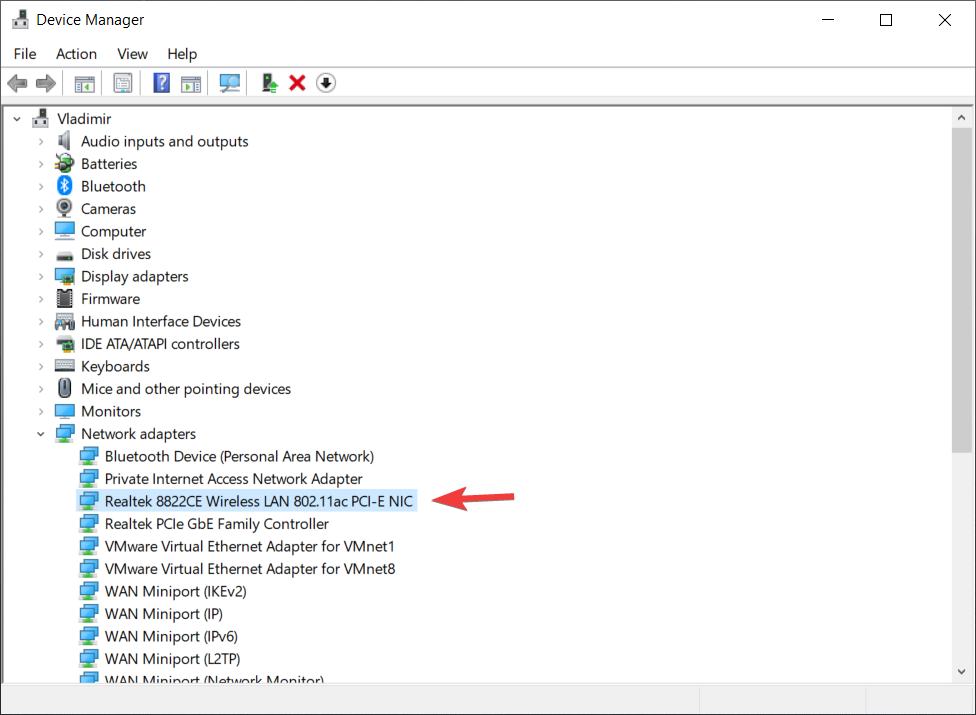
- Press the Win Key + X, and choose Device Manager from the list.

- Under the Network adapters dropped-down, find the wireless network adapter in the list (The exact name will depend on your system configuration).

- Right-click it and choose Update Driver Software.

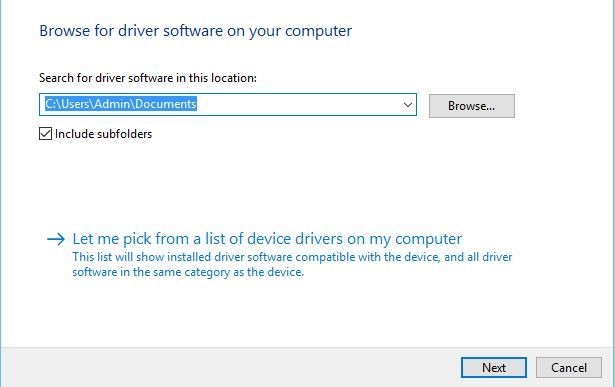
- Click Browse my computer for driver software.

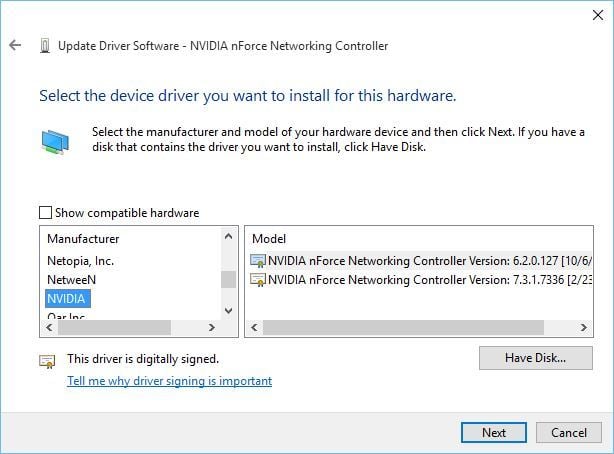
- Now click on Let me pick from a list of device drivers on my computer.

- Make sure that Show compatible hardware is not checked.

- Find your network adapter manufacturer and select the driver you wish to install.
- After you’ve installed the driver, restart your computer.
Did you know that you can update drivers automatically? Updating drivers manually can be tedious and a bit hard to follow, but there’s a way to automate this process.
By using specialized driver updater software like DriverFix you can automatically update all drivers on your PC with just a few clicks.
- Make sure that your adapter and router are using the same security type
In order to protect your data, wireless connections come with certain security types such as WPA2-PSK (AES) or WPA-PSK (AES).
For your network connection to work properly, your router and computer need to use the same security type.
You can set the security type for your router by following the instructions from your router’s instruction manual.
After you’ve set a specific security type on your router, you need to check if the same security type is being used on your computer as well.
To do that, you need to follow these steps:
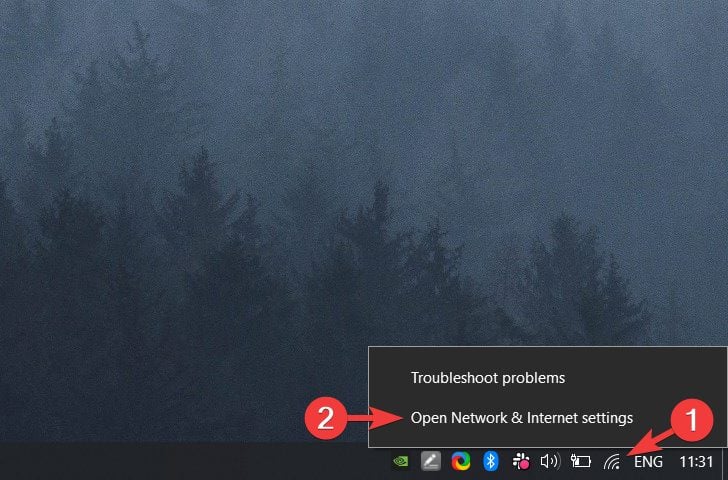
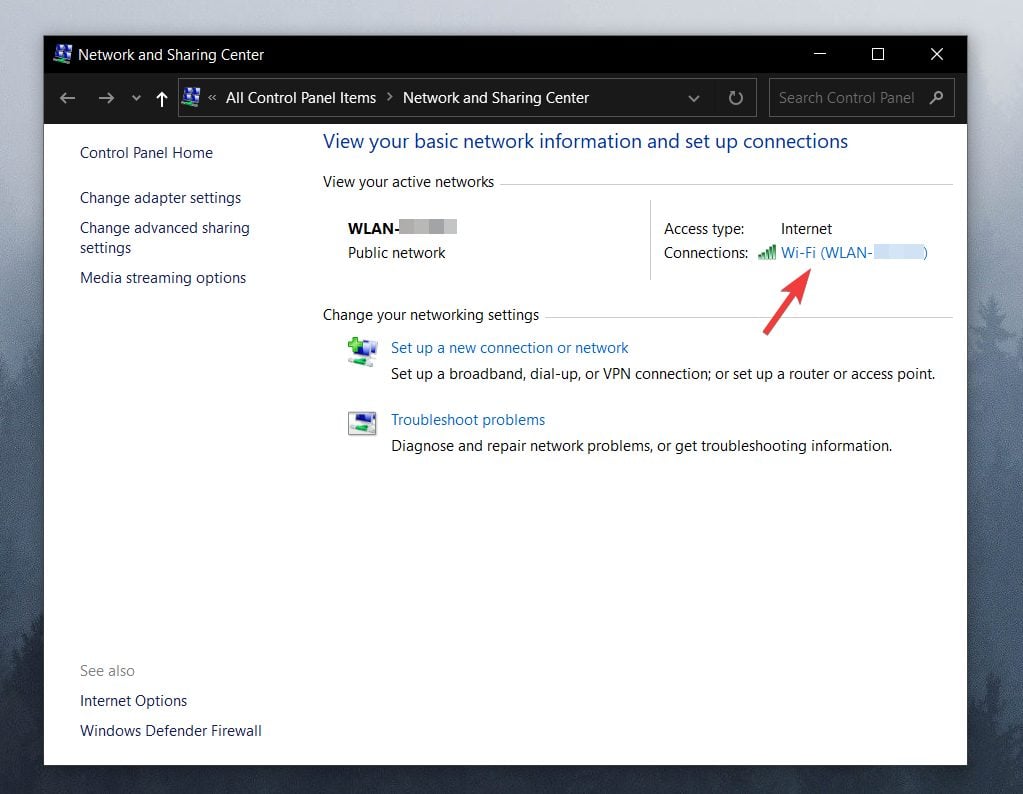
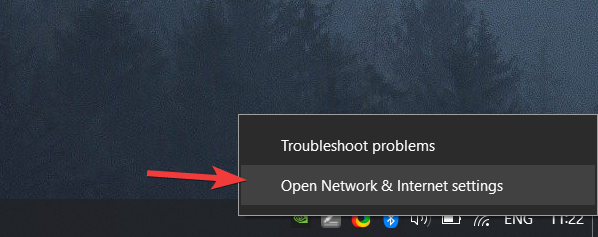
- Right-click the network connection icon next to your clock, and choose Open Network & Internet settings.

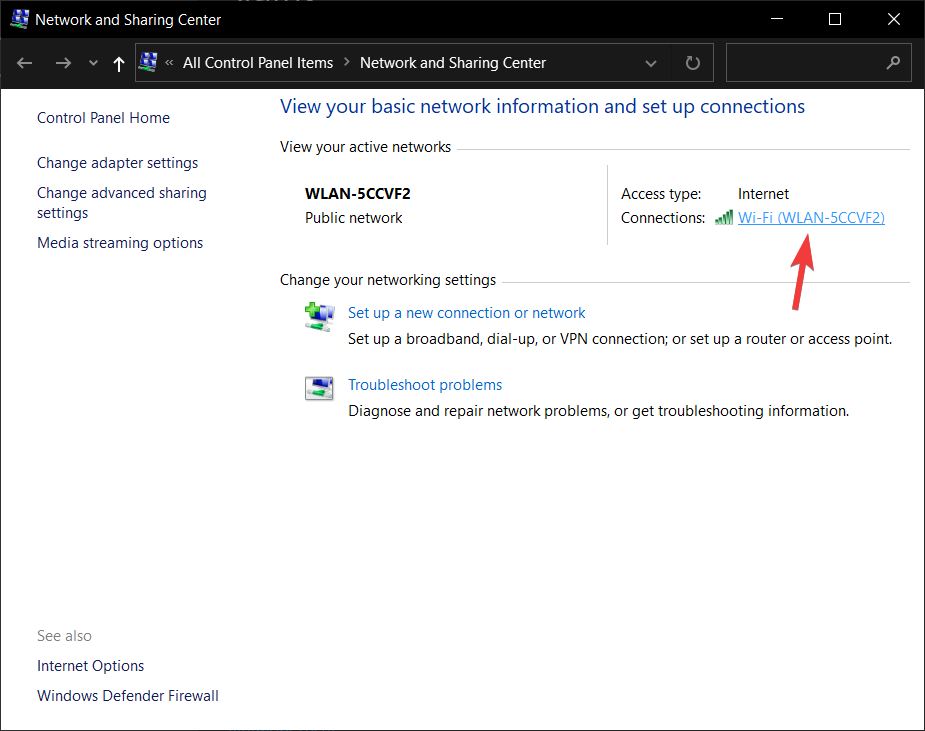
- Choose Network and Sharing Center.
- Click on your connection link.

- Choose Wireless Properties.

- In the Security tab, you should see your connection security type.

- After choosing the correct one, simply click OK.

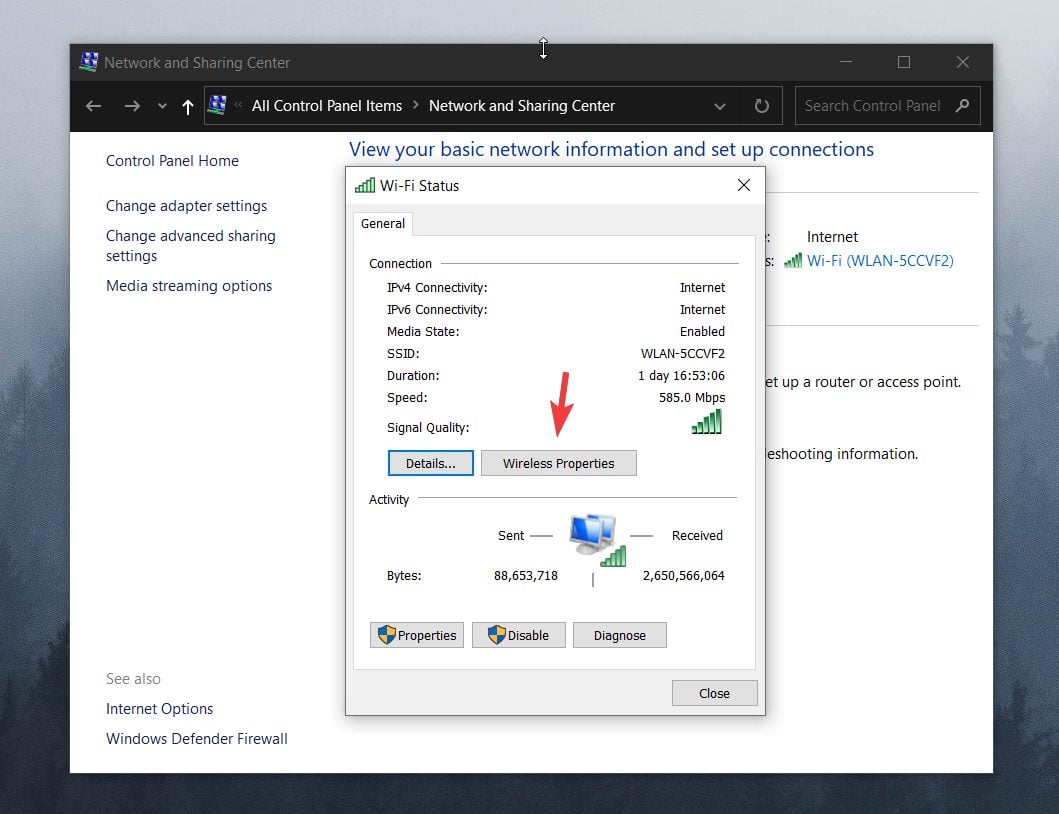


NOTE
The security type section should show the same security type that your router is using. You might have to try several different security types before you find the right one.
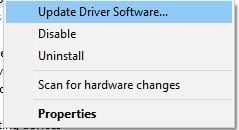
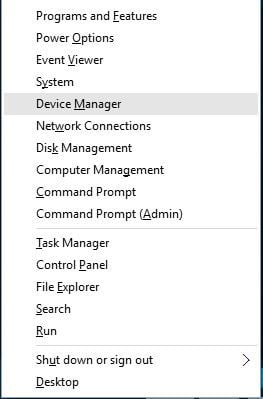
- Uninstall your network adapter
- Press Win Key + X and choose Device Manager from the list.

- Locate your network adapter and right-click it.
- Choose Uninstall. (If asked, check to Delete the driver software for this device and click OK.)

- After the driver has been uninstalled, restart your computer and Windows 10 will automatically install the new driver.
If you find that Windows didn’t install the drivers automatically after the restart process, simply follow these steps.
- Change your network adapter
If nothing else works, maybe you should change your network adapter.
Certain USB Wi-Fi adapters aren’t compatible with Windows 10, and if that’s the case, you might have to replace your current adapter with a newer model.
2. Modify Internet properties settings
- Change the wireless network mode
- Right-click the network connection icon from the taskbar and choose Open Network & Internet settings.
- Choose Network and Sharing Center.
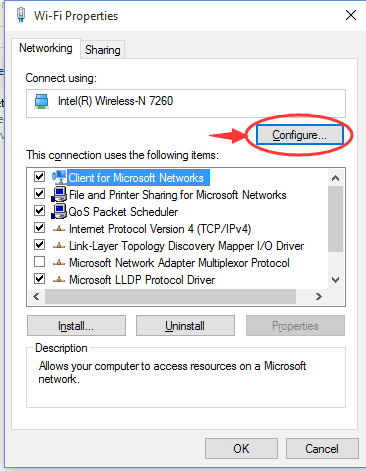
- Click Change adapter settings, locate your wireless network adapter, right-click it and choose Properties from the menu.

- When the Properties window opens, click the Configure button.

- Go to the Advanced tab.
- Select Wireless mode from the Property list and modify its value from the drop-down menu. (In most cases IEEE 802.11b/g should work, but if it doesn’t, try experimenting with different options.)
- Press OK.

You can change the wireless network mode for your router and your wireless adapter. In order for your network to work, your router and network adapter need to use the same or similar network mode.
If you want to change the network mode of your router, you’ll need to check the instruction manual, but in most cases, it won’t be necessary to change the wireless network mode on your router.
- Disable IPv6 on your computer and router
- Open Network & Internet settings by right-clicking your network icon in the taskbar.

- Click the Network and Sharing Center option.
- Click on your current connection.
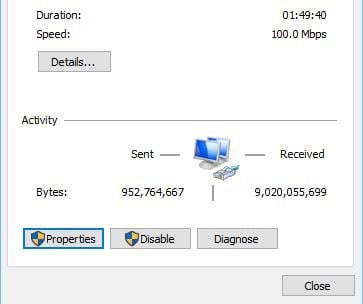
- In the Connection status window, click the Properties button.

- Find Internet Protocol Version 6 (TCP /IPv6) and uncheck it.

- Click OK button to save the changes.
- Restart your computer in order to apply the changes.
If the problem still persists, you might have to disable IPv6 on your router.
Disabling IPv6 on your router is a complicated process, and it’s different for every type of router, so before you do that, check your router’s instruction manual.
If you encounter any issues or if your network protocol is missing, be sure to check out this guide that will help you get back on track.
3. Manage wireless connections
- Disable and enable your wireless connection
- Click the search button and input Network.
- Choose Settings from the list.

- Choose Network & Internet.
- Click Change adapter options.

- Locate your wireless connection, right-click it and choose Disable.

- Right-click the same connection again and choose Enable.
- Forget the wireless connection
- Press Win + X keys and click on Settings.

- Navigate to Network & Internet.
- Go to Wi-Fi section.
- Click on Manage known networks.
- Select your Wireless network and click Forget.
- After you’ve done that, connect to the same wireless network again.
- Add the connection manually
- Right-click the network icon next to your clock.
- Choose Open Network & Internet settings.
- Open the Network and Sharing Center.

- Click Set up a new connection or network.

- Choose Manually connect to a wireless network and click Next.
- Enter the requested information such as network name, security key, and security type.
- Click Next to finish the process.
After you’ve created a new network connection, everything should be working without any problems. If the issue persists, try changing the security type of your new network.
- Use ipconfig /release command
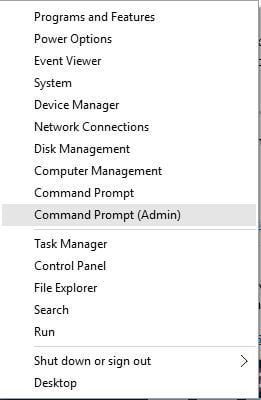
- Press the Win Key + X and from the list choose Command Prompt (Admin).

- When Command Prompt starts, enter the following lines and after each line press Enter to run it:
ipconfig /releaseipconfig /renew
- Close Command Prompt and try to connect to the network again.
Outdated drivers are the main reason for errors & system issues. If some of your files are missing or crashing, an automated solution like DriverFix can solve these problems in just a couple of clicks. And it’s also lightweight on your system!
It is possible that in some instances you won’t be able to run Command Prompt with admin rights but the solution for this issue is pretty straightforward.
Windows 10 can’t connect to this network after an update
1. Use Command Prompt
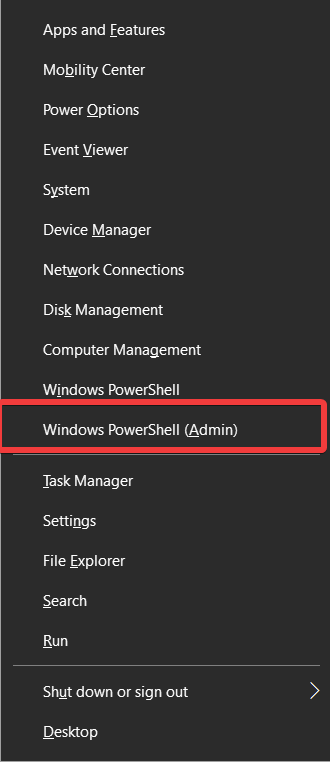
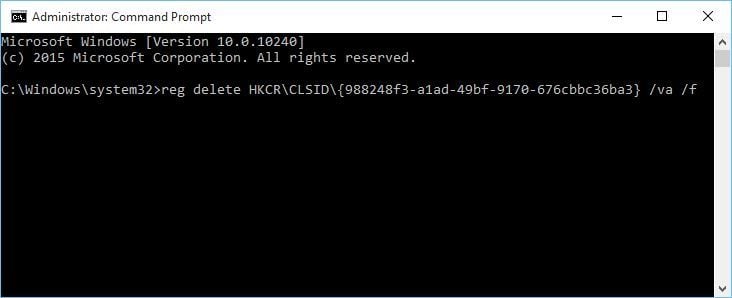
- Press Win Key + X and choose Command Prompt (Admin) or the PowerShell (Admin) equivalent.

- When Command Prompt starts, type the following and press Enter to run it:
reg delete HKCRCLSID{988248f3-a1ad-49bf-9170-676cbbc36ba3} /va /f

- Now enter the following line and press Enter to run it:
netcfg -v -u dni_dne
- Close Command Prompt and restart your computer.

2. Uninstall the antivirus software
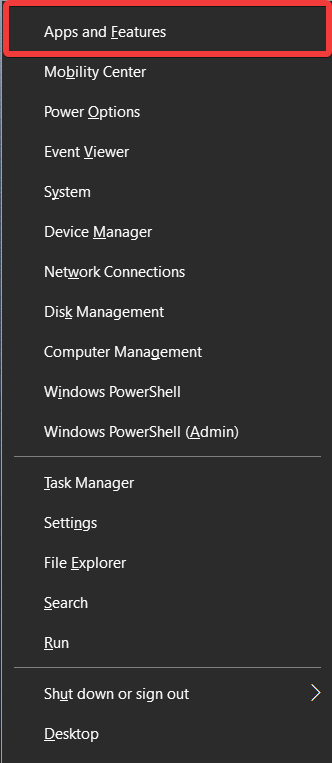
- Press the Win Key + X and choose Apps and features.

- Locate your antivirus software and click Uninstall.
- Restart your computer.
For Norton users, there’s this complete guide to uninstall the antivirus. Also, there’s a similar uninstall guide regarding McAfee.
If your network connection starts working, you can install your antivirus software again, making sure to allow the Internet connection through the settings of the app.
3. Check if IPv4 and IPv6 protocols are enabled
- Right-click the network icon next to your Windows clock and click Open Network & Internet settings.
- Choose the Network and Sharing Center.
- Click Change adapter options.
- Find your adapter, right-click it and choose Properties.
- Make sure that IPv4 and IPv6 protocols are enabled.
- Click OK and check if the issue has been resolved.
Some users might find that they can’t access the IPv4 proprieties, but there is a simple fix for this problem.
Windows 10 can’t connect to this network, enter APN and try again
This error occurs when trying to use your Windows 10 device to connect to a cellular network, and will stop you from accessing data altogether.
To eliminate the possibility of having network issues that stem from your PC, simply follow these steps:
- Connect your PC to an Ethernet or Wi-Fi network.
- Open a browser and check to see if web pages are loading.
- If the Internet is connected, then contact your mobile ISP and ask for APN credentials.
- Use the credentials to sign into the mobile network.
If the Internet doesn’t connect through Ethernet or Wi-Fi, then it is safe to assume that your PC is not set up properly. To resolve this, simply follow the other methods described in this guide.
Windows 10 can’t connect to this network and WEP problems
We have already covered how to create a wireless connection manually in this article, but in order to connect to the network that uses WEP security, you have to set the Security type to WEP for your new connection.
Follow these steps to do so:
- Right-click the network connection icon and click on Open Network & Internet settings.
- Choose Network and Sharing Center from the menu that appears.
- Click on the link of your Internet connection.
- Click on the Wireless Properties button.
- Open the Security tab, and choose WEP as your network security type.
- Click OK.
We should also mention that the WEP security type isn’t the safest, and it’s advised that you switch to the WPA2 security type.
- Wi-Fi is not connecting automatically on Windows 10/11
- Fix Can’t connect to this network error in Windows 11
- Windows 10/11 can’t find WiFi network [STEP-BY-STEP GUIDE]
Windows 10 can’t connect to the network after waking from Sleep Mode
1. Disable IPv6 / Change Power Management settings
We have already explained how to disable IPv6 in this article, under the Modify internet properties settings solution.
If you’re getting Windows 10 can’t connect to this network message after your computer wakes up from Sleep Mode, you need to do check the Power Management settings for your adapter.
To do that, follow these steps:
- Press Win Key + X and open the Device Manager.
- Navigate to the Network Adapters section.
- Locate your wireless adapter and right-click it. Choose Properties from the menu.

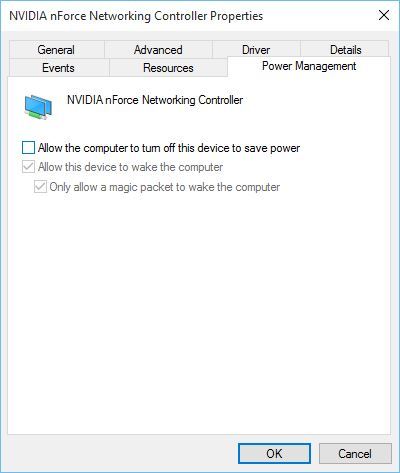
- Navigate to the Power Management tab.
- Uncheck Allow the computer to turn off this device to save power and save the changes.


If you use a USB network adapter, you’ll have to repeat this step for all USB devices in Device Manager.
After doing this, if your PC won’t recognize the USB devices, there are a few great solutions to apply.
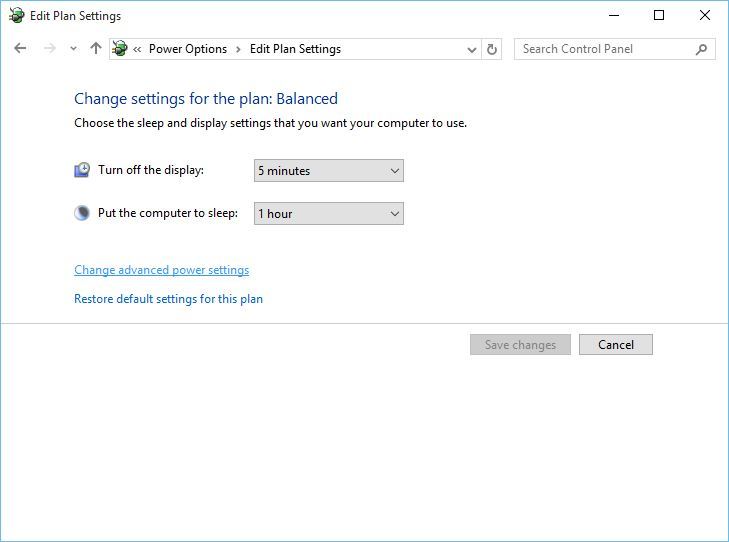
2. Change Power Options
- Press Win Key + S and type Power.
- Open the Power & Sleep settings.
- Click the Additional power settings link from the Related settings section.
- Find your selected power plan and click the Change plan settings.

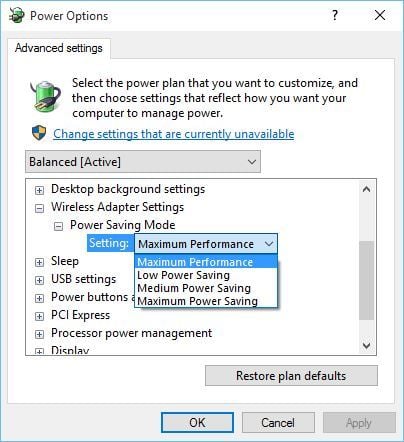
- Now click Change advanced power settings.

- Navigate through the list and go to Wireless Adapter Settings, and choose Power Saving Mode.
- Change its Setting to Maximum Performance and save the changes.

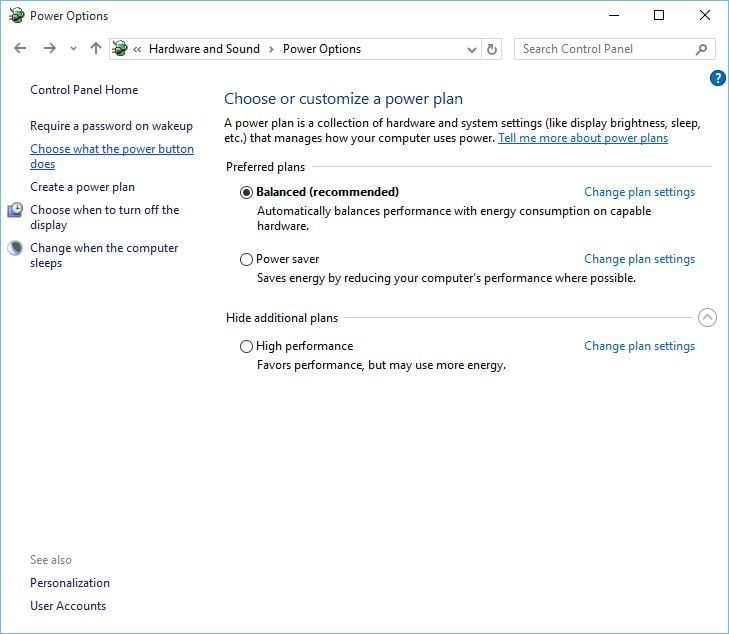
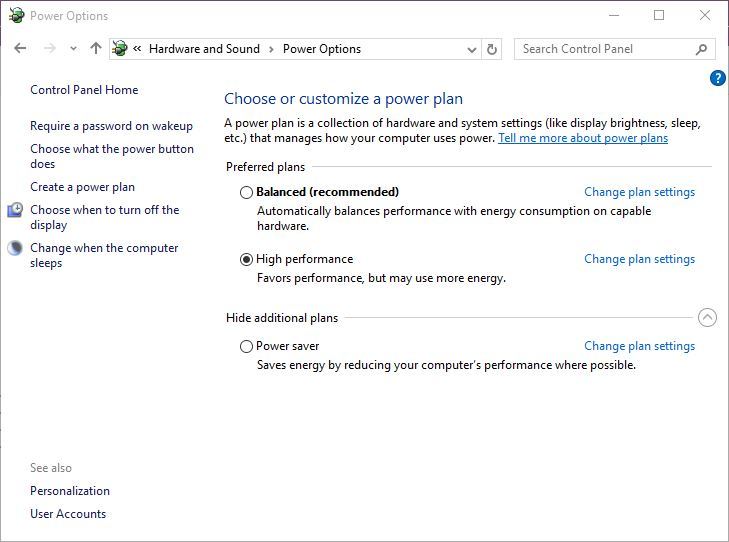
If this solution doesn’t work, you can also try changing your power plan to High Performance. To do that, follow these steps:
- Open Power Options.
- Select the High-performance power plan.
- Click OK to apply the settings.
Some users have stated that their power plan settings are completely missing, and there are few fixes you can try if that is the case.
3. Turn off the Connect to Wi-Fi hotspots option
- Press Win Key + X and open Settings.

- Navigate to Network & Internet.
- Go to Wi-Fi and click on Manage Wi-Fi settings.
- Make sure that Connect to Wi-Fi hotspots and Send information about Wi-Fi connections to help discover nearby Wi-Fi are turned off.

Few users have reported that this solution has worked for them, so you might give it a try.
If Windows doesn’t find your Wi-Fi adapter, check out this article to fix the issue.
5.4. Disable and enable your network connection / turn on and off Airplane mode
In order to fix Windows 10 can’t connect to this network error, you can disable and enable your network connection to fix the problem.
In addition, you can try turning the Airplane mode on and off in order to fix this problem.
For any Airplane mode errors, you may encounter there’s this awesome guide that can be of help.
Windows 10 can’t connect to the network after a password change
If you’ve recently changed your password for the wireless network and now can’t connect to your network, you might want to forget the connection, as shown in a previous solution.
In addition, you need to check if the security type on your computer matches the security type on your router (also described above).
Additionally, toggle the option to connect automatically to your network to Off. This will allow you to input your new password.
What can I do to prevent these issues from occurring again?
➡ Keep your OS updated
Keeping your Windows 10 OS updated at all times not only protects you from encountering network issues but also keeps you safe.
The latest Windows 10 release, updates the security features of your PC that will keep third parties away from your personal data, while also improving and fixing known bugs.
➡ Ensure that all drivers are updated constantly
To achieve this, you should either regularly use the Device Manager to manually search for updates for each of the important drivers, or you can use automatic and specialized software to do this job for you.
➡ Keep your network login credentials accessible
Losing your network credentials is not a huge problem, but it is enough to cause you unnecessary stress when dealing with network issues.
If you have this information easily accessible, then you can first test out if the credentials were used correctly, and if not, simply contact your ISP provider for more details.
Dealing with network issues is never pleasant, especially if you were getting ready for a Netflix binge-watch session with your loved ones, or were requiring your Internet connection for online gaming.
Following our advice will certainly offer you a fighting chance in solving these issues as fast as possible, and once you do, our recommendations for preventing them from ever bothering you again can also come in very handy,
There can be many causes that can result in your device not being able to connect to the Internet. We truly hope that our solutions have been helpful and that you’ve managed to resolve this issue.
If you have any questions, feel free to reach out to us in the comments section below.
![]()
Troubleshooting network problems in Windows
If you can’t get email, browse the web, or stream music, chances are you’re not connected to your network and can’t get onto the internet. To fix the problem, here are some things you can try.
Things to try first
Try these things first to help you fix or narrow down the connection problem.
-
Make sure Wi‑Fi is turned on. Select the «No internet connection» icon on the right side of the taskbar, and make sure Wi-Fi is turned on. If it isn’t, select it to turn it on. Also, make sure Airplane mode is turned off.
-
Select Manage Wi-Fi connections (>) on the Wi-Fi quick setting, see if a Wi-Fi network you recognize and trust appears in the list of networks. If it does, select the Wi-Fi network, and they try to connect to it. If it says Connected underneath the network name, select Disconnect, wait a moment, and then select Connect again.
-
Try connecting to a network on a different frequency band. Many consumer Wi-Fi routers broadcast at two different network frequency bands: 2.4 GHz and 5 GHz. These will appear as separate networks in the list of available Wi-Fi networks. If your list of available Wi-Fi networks includes both a 2.4 GHz network and a 5 GHz network, try connecting to the other network. To learn more about the differences between 2.4 GHz networks and 5 GHz networks, check out Wi-Fi problems and your home layout.
-
Make sure the physical Wi‑Fi switch on your laptop is turned on. (An indicator light usually shows when it’s on.)
-
Run the Network troubleshooter. The Network troubleshooter can help diagnose and fix common connection problems.
To run the Network troubleshooter
-
Select Start > Settings > System > Troubleshoot > Other troubleshooters .
-
Follow the steps in the troubleshooter and see if that fixes the problem.
-
Restart your modem and wireless router. This helps create a new connection to your internet service provider (ISP).
When you do this, everyone that is connected to your Wi-Fi network will be temporarily disconnected. The steps you take to restart your modem and router can vary, but here are the general steps.
Note: If you have a cable modem/Wi-Fi router combo device, you only need to follow the steps for the single device.
-
Unplug the power cable for the router from the power source.
-
Unplug the power cable for the modem from the power source.
Some modems have a backup battery. If you unplug the modem and lights stay on, remove the battery from the modem.
-
Wait at least 30 seconds or so.
If you had to remove the battery from the modem, put it back in.
-
Plug the modem back into the power source. The lights on the modem will blink. Wait for them to stop blinking.
-
Plug your router back into the power source.
Wait a few minutes for the modem and router to fully power on. You can usually tell when they’re ready by looking at the status lights on the two devices.
-
On your PC, try to connect again.
Connection problems can be due to a variety of reasons—problems with the website, your device, the Wi-Fi router, modem, or your Internet Service Provider (ISP). Try the following steps to help narrow down the source of the problem.
-
If the «Wi-Fi connected» icon appears on the right side of the taskbar, visit a different website. If the website opens, there might be a problem with the specific website. If you can’t connect to another website, go to the next step.
-
On another laptop or phone, try to connect to the same network. If you can connect, the source of the problem is likely due to your device—go to the section Network troubleshooting on your device. If you can’t connect to the network on any device, continue to the next step.
-
Check to see if there is a problem with the connection to your Wi-Fi router. Do this by using a ping test.
-
Select Search on the taskbar, and type command prompt. The Command Prompt button will appear. To the right of it, select Run as administrator > Yes.
-
At the command prompt, type ipconfig, and then select Enter. Look for the name of your Wi-Fi network within the results, and then find the IP address listed next to Default gateway for that Wi-Fi network. Write down that address if you need to. For example: 192.168.1.1
-
At the prompt, type ping <DefaultGateway> and then select Enter. For example, type ping 192.168.1.1 and select Enter. The results should be something like this:
-
-
Reply from 192.168.1.1: bytes=32 time=5ms TTL=64
-
Reply from 192.168.1.1: bytes=32 time=5ms TTL=64
-
Reply from 192.168.1.1: bytes=32 time=5ms TTL=64
-
Reply from 192.168.1.1: bytes=32 time=5ms TTL=64
-
Ping statistics for 192.168.1.1: Packets: Sent = 4, Received = 4, Lost = 0 (0% loss), Approximate round trip times in milli-seconds: Minimum = 4ms, Maximum = 5ms, Average = 4ms
If you see results like this and are getting a reply, then you have a connection to your Wi-Fi router, so there might be a problem with your modem or ISP. Contact your ISP or check online on another device (if you can) to see if there’s a service outage.
If the results of the ping test indicate that you are not getting a reply from the router, try connecting your PC directly to your modem by using an Ethernet cable (if you can). If you can connect to the internet using an Ethernet cable, it confirms the connection problem is due to the Wi-Fi router. Make sure you’ve installed the latest firmware and see the documentation for your router.
Run network commands
Try running these network commands to manually reset the TCP/IP stack, release and renew the IP address, and flush and reset the DNS client resolver cache:
-
Select Search on the taskbar, and type command prompt. The Command Prompt button will appear. To the right of it, select Run as administrator > Yes.
-
At the command prompt, run the following commands in the listed order, and then check to see if that fixes your connection problem:
-
Type netsh winsock reset and select Enter.
-
Type netsh int ip reset and select Enter.
-
Type ipconfig /release and select Enter.
-
Type ipconfig /renew and select Enter.
-
Type ipconfig /flushdns and select Enter.
-
Uninstall the network adapter driver and restart
If the previous steps didn’t work, try to uninstall the network adapter driver, and then restart your computer. Windows will automatically install the latest driver. Consider this approach if your network connection stopped working properly after a recent update.
Before uninstalling, make sure you have drivers available as a backup. Visit the PC manufacturer’s website and download the latest network adapter driver from there. If your PC can’t connect to the internet, you’ll need to download a driver on a different PC and save it to a USB flash drive so you can install the driver on your PC. You’ll need to know the PC manufacturer and model name or number.
-
Select Search on the taskbar, type device manager, and then select Device Manager from the list of results.
-
Expand Network adapters, and locate the network adapter for your device.
-
Select the network adapter, press and hold (or right-click), and then select Uninstall device > check the Attempt to remove the driver for this device check box > Uninstall.
-
After uninstalling the driver, select Start > Power > Restart .
After your PC restarts, Windows will automatically look for and install the network adapter driver. Check to see if that fixes your connection problem. If Windows doesn’t automatically install a driver, try to install the backup driver you saved before uninstalling.
Check if your network adapter is compatible with the latest Windows Update
If you lost your network connection immediately after upgrading to or updating Windows 11, it’s possible that the current driver for your network adapter was designed for a previous version of Windows. To check, try temporarily uninstalling the recent Windows Update:
-
Select Start > Settings > Windows Update > Update history > Uninstall updates .
-
Select the most recent update, then select Uninstall.
If uninstalling the most recent update restores your network connection, check to see if an updated driver is available:
-
Select Search on the taskbar, type device manager, and then select Device Manager from the list of results.
-
Expand Network adapters, and locate the network adapter for your device.
-
Select the network adapter, press and hold (or right-click), then select Update driver > Search automatically for updated driver software, and then follow the instructions.
-
After installing the updated driver, select Start > Power > Restart if you’re asked to restart, and see if that fixes the connection issue.
If Windows can’t find a new driver for your network adapter, visit the PC manufacturer’s website and download the latest network adapter driver from there. You’ll need to know the PC manufacturer and model name or number.
Do one of the following:
-
If you couldn’t download and install a newer network adapter driver, hide the update that’s causing you to lose your network connection. To learn how to hide updates, see Hide Windows Updates or driver updates.
-
If you could successfully install updated drivers for your network adapter, then reinstall the latest updates. To do this, select Start > Settings > Windows Update > Check for updates.
Use network reset
Using network reset should be the last step you try. Consider using it if the steps above don’t help to get you connected.
This can help solve connection problems you might have after upgrading from Windows 10 to Windows 11. It can also help to fix the problem where you can connect to the internet, but can’t connect to shared network drives. Network reset removes any network adapters you have installed and the settings for them. After your PC restarts, any network adapters are reinstalled, and the settings for them are set to the defaults.
-
Select Start > Settings > Network & internet > Advanced network settings > Network reset.
Open Network & Internet Status settings -
On the Network reset screen, select Reset now > Yes to confirm.
Wait for your PC to restart, and see if that fixes the problem.
Notes:
-
After using network reset, you might need to reinstall and set up other networking software you might be using, such as VPN client software or virtual switches from Hyper‑V (if you’re using that or other network virtualization software).
-
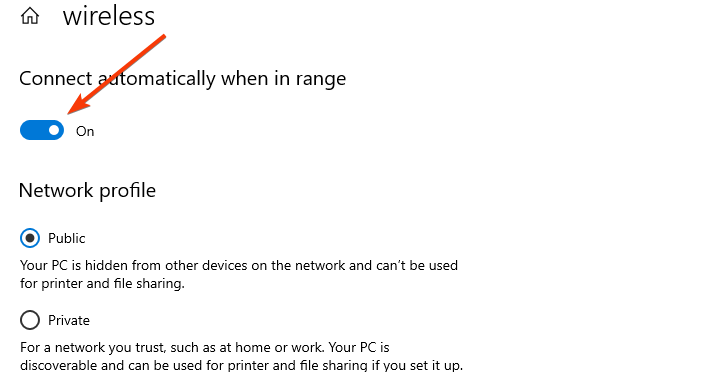
Network reset might set each one of your known network connections to a public network profile. In a public network profile, your PC is not discoverable to other PCs and devices on the network, which can help make your PC more secure. However, if your PC is used for file or printer sharing, you’ll need to make your PC discoverable again by setting it to use a private network profile. To do this, select Start > Settings > Network & internet > Wi-Fi . On the Wi-Fi screen, select Manage known networks > the network connection you want to change. Under Network profile type, select Private.
Check your Wi-Fi settings
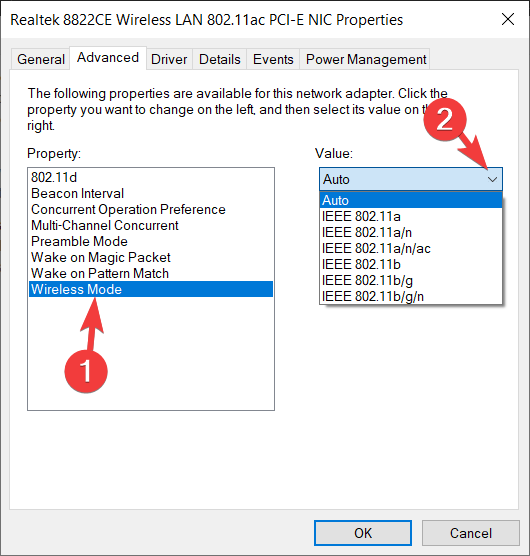
Wi-Fi adapter manufacturers might have different advanced settings you can change based on your network environment or connection preferences.
Check the Wireless Mode setting for your network adapter and make sure it matches the capabilities of the network you’re trying to connect to. If it doesn’t match, you won’t be able to connect, and the network might not appear in the list of available networks. The Wireless Mode will often be set to Auto or something similar by default, which enables connection for every kind of network that’s supported.
To find the wireless mode setting
-
In Device Manager, select Network adapters, and then double-click the network adapter name.
-
Select the Advanced tab and look for a Wireless Mode setting. Make sure it’s set to the mode your network is using.
Wi-Fi profile settings
Windows uses the Wi-Fi profile to save the settings that are needed to connect to a Wi-Fi network. These settings include the network security type, key, network name (SSID), and so on. If you can’t connect to a Wi-Fi network that you could connect to before, it’s possible that the network settings might have changed or the profile is corrupted.
To fix this, remove (or «forget») the network connection, then reconnect to the network. When you forget a network connection, it removes the Wi-Fi network profile from your PC.
To forget a network
-
Select Start > Settings > Network & internet .
-
Select Wi-Fi , then select Manage known networks.
-
Select the network you want to forget, then select Forget.
Afterwards, select the Wi-Fi icon on the taskbar and try to reconnect to the network to renew the network connection.
Check your home layout
Your Wi-Fi network might be affected by the network’s frequency band, channel congestion, and/or signal strength. For more info, see Wi-Fi problems and your home layout.
Check for additional symptoms for the «No internet connection» icon.
There may be additional troubleshooting steps you can try, depending on which symptoms you’re having. To view these steps, check out Wi-Fi connection icons and what they mean.
Related topics
-
Setting up a wireless network
-
How to find your wireless network password
-
Analyze the wireless network report
-
Wi-Fi tools and apps
-
Make a Wi-Fi network public or private in Windows
Things to try first
Try these things first to help you fix or narrow down the connection problem.
-
Make sure Wi‑Fi is turned on. Select the «No internet connection» icon
on the right side of the taskbar, and make sure Wi-Fi is turned on. If it isn’t, select it to turn it on. Also, make sure Airplane mode is turned off.

-
Afterwards, see if a Wi-Fi network you recognize and trust appears in the list of networks. If it does, select the Wi-Fi network, and they try to connect to it. If it says Connected underneath the network name, select Disconnect, wait a moment, and then select Connect again.
-
Try connecting to a network on a different frequency band. Many consumer Wi-Fi routers broadcast at two different network frequency bands: 2.4 GHz and 5 GHz. These will appear as separate networks in the list of available Wi-Fi networks. If your list of available Wi-Fi networks includes both a 2.4 GHz network and a 5 GHz network, try connecting to the other network. To learn more about the differences between 2.4 GHz networks and 5 GHz networks, check out Wi-Fi problems and your home layout.
-
Make sure the physical Wi‑Fi switch on your laptop is turned on. (An indicator light usually shows when it’s on.)
-
Run the Network troubleshooter. The Network troubleshooter can help diagnose and fix common connection problems.
To run the Network troubleshooter
-
Select the Start button > Settings > Network & Internet > Status.
Open Network & Internet Status settings -
Under Change your network settings, select Network troubleshooter.
-
Follow the steps in the troubleshooter, and see if that fixes the problem.
-
Restart your modem and wireless router. This helps create a new connection to your internet service provider (ISP).
When you do this, everyone that is connected to your Wi-Fi network will be temporarily disconnected. The steps you take to restart your modem and router can vary, but here are the general steps. (Note: If you have a cable modem/Wi-Fi router combo device, you only need to follow the steps for the single device.)-
Unplug the power cable for the router from the power source.
-
Unplug the power cable for the modem from the power source.
Some modems have a backup battery. If you unplug the modem and lights stay on, remove the battery from the modem.
-
Wait at least 30 seconds or so.
If you had to remove the battery from the modem, put it back in.
-
Plug the modem back into the power source. The lights on the modem will blink. Wait for them to stop blinking.
-
Plug your router back into the power source.
Wait a few minutes for the modem and router to fully power on. You can usually tell when they’re ready by looking at the status lights on the two devices.
-
On your PC, try to connect again.
-
Connection problems can be due to a variety of reasons—problems with the website, your device, the Wi-Fi router, modem, or your Internet Service Provider (ISP). Try the following steps to help narrow down the source of the problem.
-
If the «Wi-Fi connected» icon appears on the right side of the taskbar, visit a different website. If the website opens, there might be a problem with the specific website. If you can’t connect to another website, go to the next step.
-
On another laptop or phone, try to connect to the same network. If you can connect, the source of the problem is likely due to your device—go to the section Network troubleshooting on your device. If you can’t connect to the network on any device, continue to the next step.
-
Check to see if there is a problem with the connection to your Wi-Fi router. Do this by using a ping test.
-
In the search box on the taskbar, type command prompt. The Command Prompt button will appear. To the right of it, select Run as administrator > Yes.
-
At the command prompt, type ipconfig, and then select Enter. Look for the name of your Wi-Fi network within the results, and then find the IP address listed next to Default gateway for that Wi-Fi network. Write down that address if you need to. For example: 192.168.1.1
-
At the prompt, type ping <DefaultGateway> and then select Enter. For example, type ping 192.168.1.1 and select Enter. The results should be something like this:
-
-
Reply from 192.168.1.1: bytes=32 time=5ms TTL=64
-
Reply from 192.168.1.1: bytes=32 time=5ms TTL=64
-
Reply from 192.168.1.1: bytes=32 time=5ms TTL=64
-
Reply from 192.168.1.1: bytes=32 time=5ms TTL=64
-
Ping statistics for 192.168.1.1: Packets: Sent = 4, Received = 4, Lost = 0 (0% loss), Approximate round trip times in milli-seconds: Minimum = 4ms, Maximum = 5ms, Average = 4ms
If you see results like this and are getting a reply, then you have a connection to your Wi-Fi router, so there might be a problem with your modem or ISP. Contact your ISP or check online on another device (if you can) to see if there’s a service outage.
If the results of the ping test indicate that you are not getting a reply from the router, try connecting your PC directly to your modem by using an Ethernet cable (if you can). If you can connect to the internet using an Ethernet cable, it confirms the connection problem is due to the Wi-Fi router. Make sure you’ve installed the latest firmware and see the documentation for your router.
Run network commands
Try running these network commands to manually reset the TCP/IP stack, release and renew the IP address, and flush and reset the DNS client resolver cache:
-
In the search box on the taskbar, type command prompt. The Command Prompt button will appear. To the right of it, select Run as administrator > Yes.
-
At the command prompt, run the following commands in the listed order, and then check to see if that fixes your connection problem:
-
Type netsh winsock reset and selectEnter.
-
Type netsh int ip reset and select Enter.
-
Type ipconfig /release and select Enter.
-
Type ipconfig /renew and select Enter.
-
Type ipconfig /flushdns and select Enter.
-
Uninstall the network adapter driver and restart
If the previous steps didn’t work, try to uninstall the network adapter driver, and then restart your computer. Windows will automatically install the latest driver. Consider this approach if your network connection stopped working properly after a recent update.
Before uninstalling, make sure you have drivers available as a backup. Visit the PC manufacturer’s website and download the latest network adapter driver from there. If your PC can’t connect to the internet, you’ll need to download a driver on a different PC and save it to a USB flash drive so you can install the driver on your PC. You’ll need to know the PC manufacturer and model name or number.
-
In the search box on the taskbar, type device manager, and then select Device Manager from the list of results.
-
Expand Network adapters, and locate the network adapter for your device.
-
Select the network adapter, press and hold (or right-click), and then select Uninstall device > check the Attempt to remove the driver software for this device check box > Uninstall.
-
After uninstalling the driver, select the Start button > Power > Restart.
After your PC restarts, Windows will automatically look for and install the network adapter driver. Check to see if that fixes your connection problem. If Windows doesn’t automatically install a driver, try to install the backup driver you saved before uninstalling.
Check if your network adapter is compatible with the latest Windows Update
If you lost your network connection immediately after upgrading or updating Windows 10, it’s possible that the current driver for your network adapter was designed for a previous version of Windows. To check, try temporarily uninstalling the recent Windows Update:
-
Select the Start button, then select Settings > Update & Security >Windows Update > View update history >Uninstall updates.
-
Select the most recent update, then select Uninstall.
If uninstalling the most recent update restores your network connection, check to see if an updated driver is available:
-
In the search box on the taskbar, type device manager, and then select Device Manager from the list of results.
-
Expand Network adapters, and locate the network adapter for your device.
-
Select the network adapter, select Update driver >Search automatically for updated driver software, and then follow the instructions.
-
After installing the updated driver, select the Start button > Power > Restart if you’re asked to restart, and see if that fixes the connection issue.
If Windows can’t find a new driver for your network adapter, visit the PC manufacturer’s website and download the latest network adapter driver from there. You’ll need to know the PC manufacturer and model name or number.
Do one of the following:
-
If you couldn’t download and install a newer network adapter driver, hide the update that’s causing you to lose your network connection. To learn how to hide updates, see Hide Windows Updates or driver updates.
-
If you could successfully install updated drivers for your network adapter, then reinstall the latest updates. To do this, select the Start button, then select Settings > Update & Security > Windows Update > Check for updates.
Use network reset
Using network reset should be the last step you try. Consider using it if the steps above don’t help to get you connected.
This can help solve connection problems you might have after upgrading from a previous version of Windows to Windows 10. It can also help to fix the problem where you can connect to the internet, but can’t connect to shared network drives. Network reset removes any network adapters you have installed and the settings for them. After your PC restarts, any network adapters are reinstalled, and the settings for them are set to the defaults.
Note: To use network reset, your PC must be running Windows 10 Version 1607 or later. To see which version of Windows 10 your device is currently running, select the Start button, then select Settings > System > About.
-
Select the Start button, then select Settings > Network & Internet > Status > Network reset.
Open Network & Internet Status settings -
On the Network reset screen, select Reset now > Yes to confirm.
Wait for your PC to restart, and see if that fixes the problem.
Notes:
-
After using network reset, you might need to reinstall and set up other networking software you might be using, such as VPN client software or virtual switches from Hyper‑V (if you’re using that or other network virtualization software).
-
Network reset might set each one of your known network connections to a public network profile. In a public network profile, your PC is not discoverable to other PCs and devices on the network, which can help make your PC more secure. However, if your PC is used for file or printer sharing, you’ll need to make your PC discoverable again by setting it to use a private network profile. To do this, select the Start button, then select Settings > Network & Internet > Wi-Fi . On the Wi-Fi screen, select Manage known networks > the network connection you want to change > Properties. Under Network profile, select Private.
Check your Wi-Fi settings
Wi-Fi adapter manufacturers might have different advanced settings you can change based on your network environment or connection preferences.
Check the Wireless Mode setting for your network adapter and make sure it matches the capabilities of the network you’re trying to connect to. If it doesn’t match, you won’t be able to connect, and the network might not appear in the list of available networks. The Wireless Mode will often be set to Auto or something similar by default, which enables connection for every kind of network that’s supported.
To find the wireless mode setting
-
In Device Manager, select Network adapters, and then double-click the network adapter name.
-
Select the Advanced tab and look for a Wireless Mode setting. Make sure it’s set to the mode your network is using.
Wi-Fi profile settings
Windows uses the Wi-Fi profile to save the settings that are needed to connect to a Wi-Fi network. These settings include the network security type, key, network name (SSID), and so on. If you can’t connect to a Wi-Fi network that you could connect to before, it’s possible that the network settings might have changed or the profile is corrupted.
To fix this, remove (or «forget») the network connection, then reconnect to the network. When you forget a network connection, it removes the Wi-Fi network profile from your PC.
To forget a network
-
Select the Wi-Fi network icon on the right side of the taskbar, then select Network & Internet settings.
-
Select Wi-Fi , then select Manage known networks.
-
Select the network you want to forget, then select Forget.
Afterwards, select the Wi-Fi icon on the taskbar and try to reconnect to the desired network to renew the network connection.
Check your home layout
Your Wi-Fi network might be affected by the network’s frequency band, channel congestion, and/or signal strength. For more info, see Wi-Fi problems and your home layout.
Check for additional symptoms for the «No internet connection» icon 
There may be additional troubleshooting steps you can try, depending on which symptoms you’re having. To view these steps, check out Wi-Fi connection icons and what they mean.
Related topics
-
Setting up a wireless network
-
How to find your wireless network password
-
Analyze the wireless network report
-
Wi-Fi tools and apps
-
Make a Wi-Fi network public or private in Windows 10
-
Make sure Wi-Fi is turned on.
-
Swipe in from the right edge of the screen, select Settings, then select the Network icon.
-
Turn on Wi-Fi.
-
-
Make sure the physical Wi‑Fi switch on your laptop is turned on. (An indicator light usually shows when it’s on.)
-
Make sure your PC isn’t in airplane mode.
-
Swipe in from the right edge of the screen, select Settings, then select the Network icon.
-
Turn off Airplane mode.
-
-
Move closer to the router or access point if you can.
-
If you don’t see the network name at all, the router or access point might not be set to broadcast the network name. In this case, you’ll need to connect to it manually.
-
Swipe in from the right edge of the screen, and then select Settings.
-
Select the Network icon, and then select Hidden network.
-
Type the network name and select Next.
-
Type the password and select Next.
-
Follow any additional instructions to get connected.
-
-
The network will be added to your list of networks and will be available to connect to when your computer is in range of the network. To connect to the network, follow these steps:
-
Open Connect to a Network by selecting the network icon in the notification area.
-
Select Unnamed Network, select Connect, and then type the network information. The network will be added to your list of networks and will be available to connect to in the future when your computer is in range of the network..
-
Let Windows try to help you fix the problem. Try running the Network troubleshooter to see if it can diagnose and fix the problem.
Select the Start button, start typing Network problems, and then select Identify and repair network problems in the list.
The Network Troubleshooter (mentioned above) can help diagnose and fix common connection problems. After using that, try running the network commands below because the combination of doing these two things can help you get connected.
If your problem isn’t fixed after running the Network troubleshooter, try to:
-
Reset the TCP/IP stack.
-
Release the IP address.
-
Renew the IP address.
-
Flush and reset the DNS client resolver cache.
Here’s how to run networking commands in a command prompt:
-
Select the Start button, start typing cmd, right-click Command Prompt in the list, select Run as Administrator, and then select Yes.
-
At the command prompt, run the following commands in the listed order and then check to see if that fixes your connection problem:
-
Type netsh winsock reset and press Enter.
-
Type netsh int ip reset and press Enter.
-
Type ipconfig /release and press Enter.
-
Type ipconfig /renew and press Enter.
-
Type ipconfig /flushdns and press Enter.
-
This helps create a new connection to your Internet service provider (ISP). When you do this, everyone that is connected to your Wi-Fi network will be temporarily disconnected.
The steps you take to restart your modem and router can vary, but here are the general steps:
-
Unplug the power cable for the router from the power source.
-
Unplug the power cable for the modem from the power source.
Some modems have a backup battery. So if you unplug the modem and lights stay on, remove the battery from the modem.
-
Wait at least 30 seconds or so.
If you had to remove the battery from the modem, put it back in.
-
Plug the modem back into the power source. The lights on the modem will blink. Wait for them to stop blinking.
-
Plug your router back into the power source.
Wait a few minutes for the modem and router to fully power on. You can usually tell when they’re ready by looking at the status lights on the two devices.
-
On your PC, try to connect again.
Make sure it’s not a problem with your cable modem or Internet service provider (ISP). If it is, contact your ISP.
-
Select the Start button, start typing cmd, right-click Command Prompt in the list, select Run as Administrator, and then select Yes.
-
At the command prompt, type ipconfig.
Look for the IP address listed next to Default gateway. Write down that address if you need to. For example, 192.168.1.1.
-
At the prompt, type ping <Default gateway> and press Enter. For example, type ping 192.168.1.1 and press Enter.
The result should be something like this:
Reply from 192.168.1.1: bytes=32 time=5ms TTL=64
Reply from 192.168.1.1: bytes=32 time=5ms TTL=64
Reply from 192.168.1.1: bytes=32 time=5ms TTL=64
Reply from 192.168.1.1: bytes=32 time=5ms TTL=64
Ping statistics for 192.168.1.1: Packets: Sent = 4, Received = 4, Lost = 0 (0% loss), Approximate round trip times in milli-seconds: Minimum = 4ms, Maximum = 5ms, Average = 4ms
If the ping is successful and you see results similar to the results above, but you can’t connect to the Internet on your PC, there may be a problem with your modem or Internet service provider (ISP).
If you’re still having trouble connecting to a network, it might be related to your network adapter.
-
Try using the Network Adapter troubleshooter to automatically find and fix some problems. This troubleshooter will disable and re-enable the adapter, and try some other common repairs.
Select the Start button, start typing Troubleshooting, and then select Troubleshooting in the list. Select View all > Network Adapter.
-
Update the network adapter driver. An outdated or incompatible network adapter driver can cause connection problems. Check to see if an updated driver is available.
-
Select the Start button, start typing Device Manager, and then select it in the list.
-
In Device Manager, select Network adapters, right-click your adapter, and then select Properties.
-
Select the Driver tab, and then select Update Driver.
-
Select Search automatically for updated driver software.
-
If Windows can’t find a new driver for your network adapter, visit the PC manufacturer’s website and download the latest network adapter driver from there. If your PC can’t connect to the Internet, you’ll need to download a driver on a different PC and save it to a USB flash drive so you can install the driver on your PC. You’ll need to know the PC manufacturer and model name or number.
Here are some things to check and try with your router if you’re at home and having trouble getting connected.
-
If you don’t see the network name, sign in to your router and check to see if it’s set to broadcast the network name.
-
Connect your PC to your router using an Ethernet cable.
-
Open your web browser and type the IP address for your wireless router. (For example, 192.168.1.1 or 172.16.0.0—check the documentation for your router to find the default IP address.)
-
Sign in with your user name and password, then make sure an option labeled Enable SSID Broadcast, Wireless SSID broadcast, or something similar is turned on. This setting is often on a Wireless Settings page.
-
-
Check to see if your Wi-Fi network uses Media Access Control (MAC) address filtering for security. If it does, you’ll need to add the MAC address for your PC to the access list on your router before you can connect.
-
Select the Start button. Start typing cmd and right-click Command Prompt in the list. Select Run as Administrator, and then select Yes.
-
At the command prompt, type ipconfig /all.
Write down the address that appears next to Physical Address for your wireless network adapter. This is the address you’ll need to add to the access list on your router.
To add the MAC address to the access list on your router:
-
Open your web browser and type the IP address for your wireless router. (For example, 192.168.1.1 or 172.16.0.0—check the documentation for your router to find the default IP address.)
-
Sign in with your user name and password, then look for a setting that says MAC Address Filter or something similar.
-
Add the MAC address you wrote down for your PC to the access list and save your changes.
On your PC, try to connect to the Wi-Fi network again.
-
-
Make sure Wi-Fi is turned on.
-
On a laptop, open Windows Mobility Center by selecting the Start
button and then selecting Control Panel > Mobile PC > Windows Mobility Center. -
Look in the Wireless Network section. If Wi-Fi is on, the button should say Turn wireless off.
-
-
Make sure the physical Wi‑Fi switch on your laptop is turned on. (An indicator light usually shows when it’s on.)
-
Check and make sure your PC isn’t in airplane mode.
-
Move closer to the router or access point if you can.
-
If you don’t see the network name at all, the router or access point might not be set to broadcast the network name. In this case, you’ll need to connect to it manually.
-
Open Manage Wireless Networks by selecting the Start
button, and then selecting Control Panel. In the search box , type wireless and then select Manage wireless networks. -
Select Add, and then select Manually create a network profile.
-
Type the network information.
-
If you want Windows to automatically connect when the network is in range, select the Start this connection automatically check box.
-
Select the Connect even if the network is not broadcasting check box, select Next, and then select Close.
-
-
The network will be added to your list of networks and will be available to connect to when your computer is in range of the network. To connect to the network, follow these steps:
-
Open Connect to a Network by selecting the network icon in the notification area.
-
Select Unnamed Network, select Connect, and then type the network information. The network will be added to your list of networks and will be available to connect to in the future when your computer is in range of the network..
-
 button and then selecting Control Panel > Mobile PC > Windows Mobility Center.
Let Windows try to help you fix the problem. Try running the Network troubleshooter to see if it can diagnose and fix the problem.
Open the Network troubleshooter by right-clicking the network icon in the notification area and then selecting Troubleshoot problems.
The Network Troubleshooter (mentioned above) can help diagnose and fix common connection problems. After using that, try running the network commands below because the combination of doing these two things can help you get connected.
If your problem isn’t fixed after running the Network troubleshooter, try to:
-
Reset the TCP/IP stack.
-
Release the IP address.
-
Renew the IP address.
-
Flush and reset the DNS client resolver cache.
Here’s how to run networking commands in a command prompt:
-
Select the Start button
. Type cmd in the search box, right-click cmd in the list, select Run as administrator, and then select Yes. -
At the command prompt, run the following commands in the listed order and then check to see if that fixes your connection problem:
-
Type netsh winsock reset and press Enter.
-
Type netsh int ip reset and press Enter.
-
Type ipconfig /release and press Enter.
-
Type ipconfig /renew and press Enter.
-
Type ipconfig /flushdns and press Enter.
-
This helps create a new connection to your Internet service provider (ISP). When you do this, everyone that is connected to your Wi-Fi network will be temporarily disconnected.
The steps you take to restart your modem and router can vary, but here are the general steps:
-
Unplug the power cable for the router from the power source.
-
Unplug the power cable for the modem from the power source.
Some modems have a backup battery. So if you unplug the modem and lights stay on, remove the battery from the modem.
-
Wait at least 30 seconds or so.
If you had to remove the battery from the modem, put it back in.
-
Plug the modem back into the power source. The lights on the modem will blink. Wait for them to stop blinking.
-
Plug your router back into the power source.
Wait a few minutes for the modem and router to fully power on. You can usually tell when they’re ready by looking at the status lights on the two devices.
-
On your PC, try to connect again.
Make sure it’s not a problem with your cable modem or Internet service provider (ISP). If it is, contact your ISP.
-
Select the Start button
. Type cmd in the search box, right-click cmd in the list, select Run as administrator, and then select Yes. -
At the command prompt, type ipconfig.
Look for the IP address listed next to Default gateway. Write down that address if you need to. For example, 192.168.1.1.
-
At the prompt, type ping <Default gateway> and press Enter. For example, type ping 192.168.1.1 and press Enter.
The result should be something like this:
Reply from 192.168.1.1: bytes=32 time=5ms TTL=64
Reply from 192.168.1.1: bytes=32 time=5ms TTL=64
Reply from 192.168.1.1: bytes=32 time=5ms TTL=64
Reply from 192.168.1.1: bytes=32 time=5ms TTL=64
Ping statistics for 192.168.1.1: Packets: Sent = 4, Received = 4, Lost = 0 (0% loss), Approximate round trip times in milli-seconds: Minimum = 4ms, Maximum = 5ms, Average = 4ms
If the ping is successful and you see results similar to the results above, but you can’t connect to the Internet on your PC, there may be a problem with your modem or Internet service provider (ISP).
If you’re still having trouble connecting to a network, it might be related to your network adapter.
-
Try using the Network Adapter troubleshooter to automatically find and fix some problems. This troubleshooter will disable and re-enable the adapter, and try some other common repairs.
Open the Network Adapter troubleshooter by selecting the Start button
and then selecting Control Panel. In the search box, type troubleshooter and then select Troubleshooting > View all > Network Adapter. -
Update the network adapter driver. An outdated or incompatible network adapter driver can cause connection problems. Check to see if an updated driver is available.
-
Open Device Manager by selecting the Start button
, selecting Control Panel, selecting System and Security, and then, under System, selecting Device Manager . If you’re prompted for an administrator password or confirmation, type the password or provide confirmation. -
In Device Manager, select Network adapters, right-click your adapter, and then select Properties.
-
Select the Driver tab, and then select Update Driver.
-
Select Search automatically for updated driver software.
-
 . If you’re prompted for an administrator password or confirmation, type the password or provide confirmation.
If Windows can’t find a new driver for your network adapter, visit the PC manufacturer’s website and download the latest network adapter driver from there. If your PC can’t connect to the Internet, you’ll need to download a driver on a different PC and save it to a USB flash drive so you can install the driver on your PC. You’ll need to know the PC manufacturer and model name or number.
Here are some things to check and try with your router if you’re at home and having trouble getting connected.
-
If you don’t see the network name, sign in to your router and check to see if it’s set to broadcast the network name.
-
Connect your PC to your router using an Ethernet cable.
-
Open your web browser and type the IP address for your wireless router. (For example, 192.168.1.1 or 172.16.0.0—check the documentation for your router to find the default IP address.)
-
Sign in with your user name and password, then make sure an option labeled Enable SSID Broadcast, Wireless SSID broadcast, or something similar is turned on. This setting is often on a Wireless Settings page.
-
-
Check to see if your Wi-Fi network uses Media Access Control (MAC) address filtering for security. If it does, you’ll need to add the MAC address for your PC to the access list on your router before you can connect.
-
Select the Start
button. Type cmd in the search box and right-click cmd in the list. Select Run as administrator, and then select Yes. -
At the command prompt, type ipconfig /all.
Write down the address that appears next to Physical Address for your wireless network adapter. This is the address you’ll need to add to the access list on your router.
To add the MAC address to the access list on your router:
-
Open your web browser and type the IP address for your wireless router. (For example, 192.168.1.1 or 172.16.0.0—check the documentation for your router to find the default IP address.)
-
Sign in with your user name and password, then look for a setting that says MAC Address Filter or something similar.
-
Add the MAC address you wrote down for your PC to the access list and save your changes.
On your PC, try to connect to the Wi-Fi network again.
-