
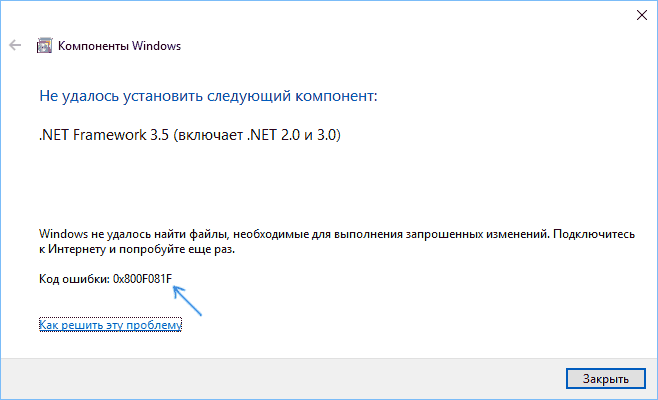
 Иногда при установке .NET Framework 3.5 в Windows 10 появляется ошибка 0x800F081F или 0x800F0950 «Windows не удалось найти фалы, необходимые для выполнения запрошенных изменений» и «Не удалось применить изменения», причем ситуация является достаточно распространенной и не всегда легко разобраться, в чем дело.
В этой инструкции подробно о нескольких способах исправить ошибку 0x800F081F при установке компонента .NET Framework 3.5 в Windows 10, от более простых к более сложным. Сама установка описывается в отдельной статье Как установить .NET Framework 3.5 и 4.5 в Windows 10.
Прежде чем приступать, обратите внимание, что причиной ошибки, особенно 0x800F0950, может оказаться неработающий, отключенный Интернет или заблокированный доступ к серверам Майкрософт (например, если вы отключали слежку Windows 10). Также причиной иногда оказываются сторонние антивирусы и файрволлы (попробуйте временно их отключить и повторить установку).
Ручная установка .NET Framework 3.5 для исправления ошибки
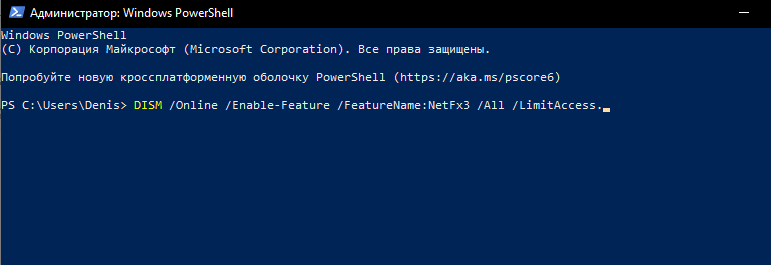
Первое, что следует попробовать при ошибках во время установки .NET Framework 3.5 в Windows 10 в «Установке компонентов» — использовать командную строку для ручной установки.
Первый вариант предполагает использование внутреннего хранилища компонентов:
- Запустите командную строку от имени администратора. Для этого можно начать набирать «Командная строка» в поиске на панели задач, затем нажать правой кнопкой мыши по найденному результату и выбрать пункт «Запустить от имени администратора».
- Введите команду
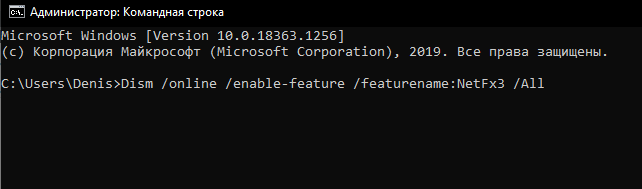
DISM /Online /Enable-Feature /FeatureName:NetFx3 /All /LimitAccess
и нажмите Enter.

- Если всё прошло успешно, закройте командную строку и перезагрузите компьютер. .NET Framework5 будет установлен.

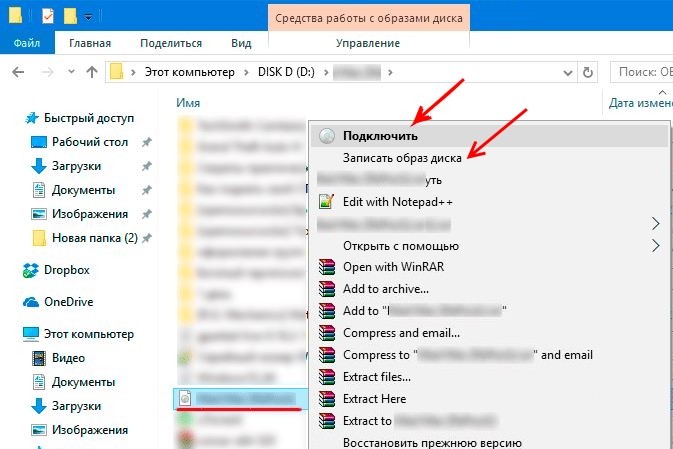
Если этот способ также сообщил об ошибке, попробуем использовать установку из дистрибутива системы.
Вам потребуется либо загрузить и смонтировать образ ISO с Windows 10 (обязательно в той же разрядности, что у вас установлена, для монтирования нажимаем правой кнопкой мыши по образу и выбираем «Подключить». См. Как скачать оригинальный ISO Windows 10), либо, при наличии, подключить флешку или диск с Windows 10 к компьютеру. После этого выполняем следующие шаги:
- Запустите командную строку от имени администратора.
- Введите команду
DISM /Online /Enable-Feature /FeatureName:NetFx3 /All /LimitAccess /Source:D:sourcessxs
где D: — буква смонтированного образа, диска или флешки с Windows 10 (на моем скриншоте буква J).

- Если команда была выполнена успешно, перезагрузите компьютер.

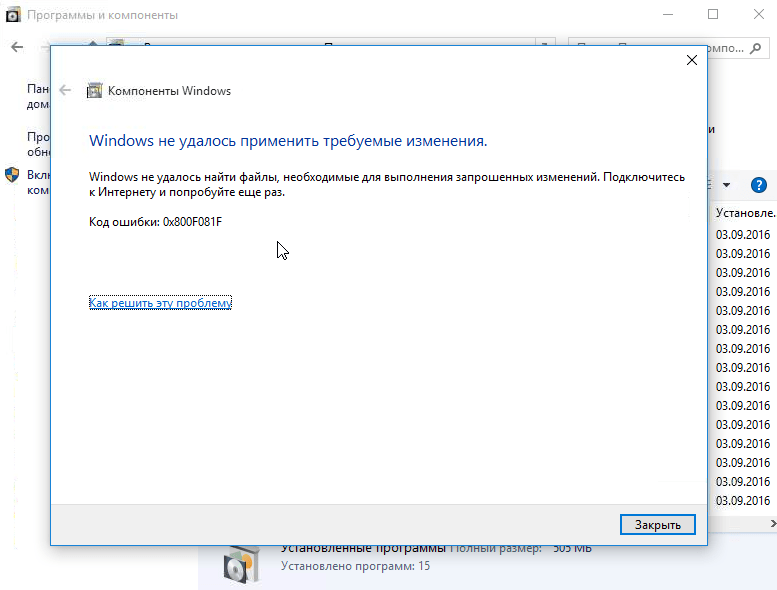
С большой вероятностью один из описанных выше методов поможет в решении проблемы и ошибка 0x800F081F или 0x800F0950 будет исправлена.
Исправление ошибок 0x800F081F и 0x800F0950 в редакторе реестра
Этот способ может оказаться полезным, когда установка .NET Framework 3.5 происходит на корпоративном компьютере, где для обновлений используется свой сервер.
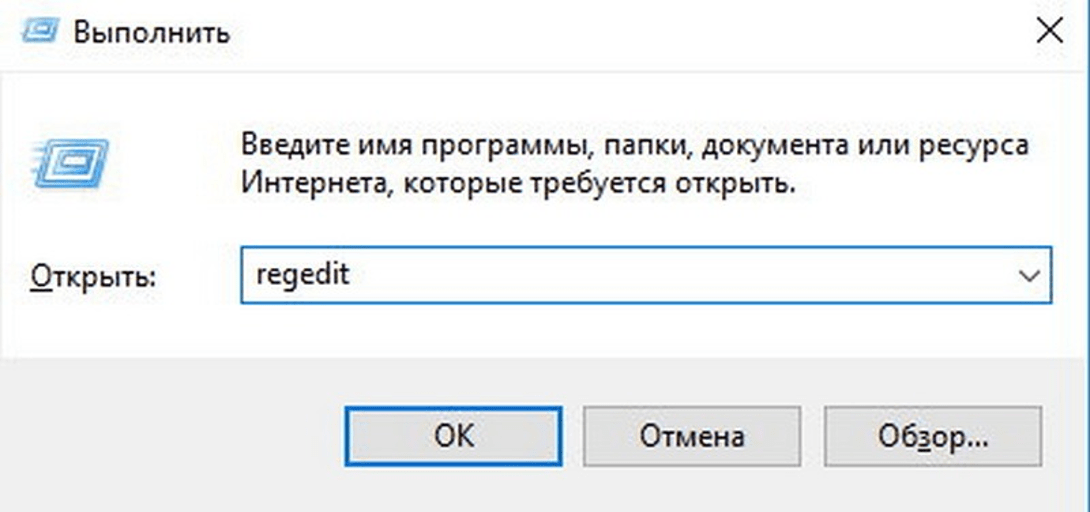
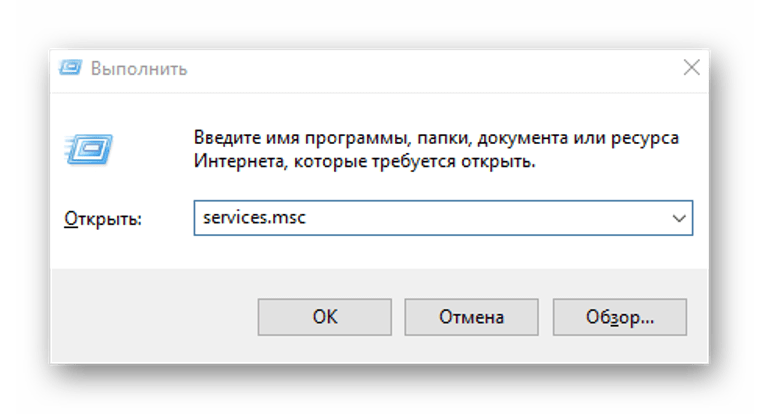
- Нажмите клавиши Win+R на клавиатуре, введите regedit и нажмите Enter (Win — клавиша с эмблемой Windows). Откроется редактор реестра.
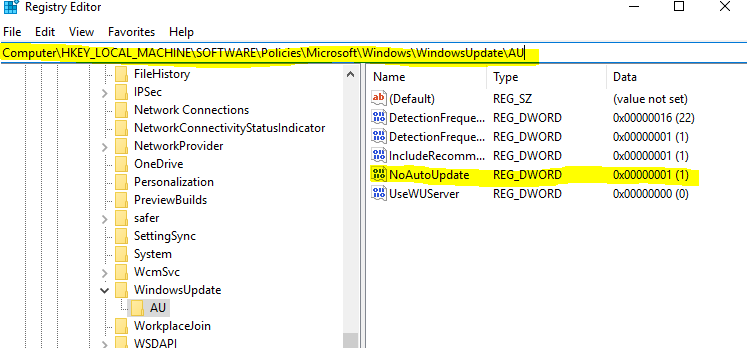
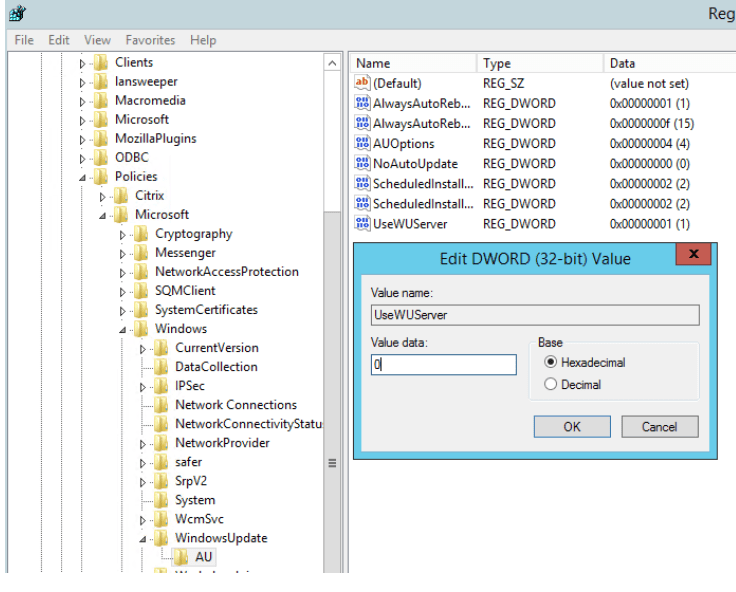
- В редактор реестра перейдите к разделу
HKEY_LOCAL_MACHINESOFTWAREPoliciesMicrosoftWindowsWindowsUpdateAU
При отсутствии такого раздела, создайте его.
- Измените значение параметра с именем UseWUServer на 0, закройте редактор реестра и перезагрузите компьютер.

- Попробуйте выполнить установку через «Включение и отключение компонентов Windows».

Если предложенный метод помог, то после установки компонента стоит изменить значение параметра на исходное (если он имел значение 1).
Дополнительная информация
Некоторые дополнительные сведения, которые могут оказаться полезными в контексте ошибок при установке .NET Framework 3.5:
- На сайте Майкрософт есть утилита для устранения проблем с установкой .Net Framework, доступная на странице https://www.microsoft.com/en-us/download/details.aspx?id=30135. О её эффективности судить не берусь, обычно ошибка исправлялась до её применения.
- Поскольку рассматриваемая ошибка имеет прямое отношение к возможности связаться с центром обновлений Windows, если вы каким-то образом отключали или блокировали его, попробуйте снова включить. Также на официальном сайте https://support.microsoft.com/ru-ru/help/10164/fix-windows-update-errors доступно средство автоматического устранения неполадок центра обновлений.
На сайте Майкрософт присутствует оффлайн установщик .NET Framework 3.5, но для предыдущих версий ОС. В Windows 10 он просто загружает компонент, а при отсутствии интернет-подключения сообщает об ошибке 0x800F0950. Страница загрузки: https://www.microsoft.com/ru-RU/download/confirmation.aspx?id=25150
0x800f081f — это ошибка обновления, связанная с патчами KB5000842 или KB5001391, которые были выпущены для исправления предыдущих проблем с печатью. Данное обновление позволяет пользователям обновить систему до новой сборки Windows 21H1, которая устраняет ранее существовавшие ошибки. К сожалению, несмотря на его важность, многим пользователям не удается загрузить его из-за появляющейся ошибки. Ждать, пока Windows решит эту проблему, совершенно бессмысленно, поскольку данная ошибка требует действий вручную. Как показало исследование, ошибка 0x800f081f обычно вызвана отключенным или же неисправной конфигурацией .NET Framework, что предотвращает обеспечение надлежащей связи с обновлениями Windows. Обычно это основная причина появления ошибки 0x800f081f, однако есть и другие, которые следует обсудить в инструкциях, приведенных ниже.

Скачать средство восстановления Windows
Скачать средство восстановления Windows

Существуют специальные утилиты для восстановления Windows, которые могут решить проблемы, связанные с повреждением реестра, неисправностью файловой системы, нестабильностью драйверов Windows. Мы рекомендуем вам использовать Advanced System Repair Pro, чтобы исправить «Ошибка Центра обновления Windows 0x800f081f» в Windows 10.
1. Воспользуйтесь средством устранения неполадок Центра обновления Windows
Прежде чем приступить к решению проблем с .NET Framework, важно попробовать более простой шаг, а именно средство устранения неполадок Windows. Это встроенная утилита, способная решать временные проблемы, возникающие на ПК. Хотя для полного решения проблемы этого способа обычно недостаточно, все же следует попробовать, выполнив следующие действия.
- Откройте Настройки через Меню Пуск или нажмите Windows key + I кнопки одновременно. Перейдите в Обновление и безопасность > Устранение неполадок.
- На правой панели найдите Центр обновления Windows и нажмите Запустить средство устранения неполадок.
- Завершите процесс, следуя инструкциям на экране, и перезагрузите компьютер.
2. Перезапустите .NET Framework 3.5 и 4.8.
Иногда Windows не может установить необходимое обновление из-за плохой конфигурации .NET Framework. Данная проблема часто переплетается с ошибкой 0x800f081f, поскольку Windows часто зависит от данного компонента. Чтобы исправить это, выполните следующие действия.
- Тип Панель управления в строку поиска рядом с Меню Пуск.
- Откройте ее и выберите Программы и компоненты.
- Затем выберите Включение или отключение компонентов Windows.
- Вы сразу увидите список функций Windows.
- Нужно найти .NET Framework 3.5 и .NET Framework 4.8.
- Снимите с них флажки и нажмите OK чтобы временно отключить их.
- Затем нажмите Перезапустить сейчас чтобы перезагрузить компьютер.
- Как только вы загрузитесь обратно, откройте то же окно, повторив предыдущие шаги.
- Теперь вы должны установить флажки для обоих . NET Framework , которые были отключены, и нажмите «ОК».
- Затем Windows попросит вас выбрать один из двух вариантов. Выбирайте Скачать файлы из Центра обновления Windows.
- После применения всех изменений закройте окно.
Теперь, в качестве следующего этапа этого решения, нам следует включить .NET Framework с помощью DISM (средство обслуживания и управления образами развертывания).
- Откройте Командная строка , введя CMD в поле поиска рядом с Меню Пуск кнопку.
- Щелкните правой кнопкой мыши по Командная строка , а затем выбрать Запуск от имени администратора.
- После открытия консоли скопируйте и вставьте эту команду
DISM /Online /Enable-Feature /FeatureName:NetFx3 /Allи нажмите Enter. - Как только Windows напишет, что операция успешно завершена, вы можете закрыть консоль и снова попытаться установить проблемное обновление.
3. Проверьте целостность системных файлов.
Поврежденные или отсутствующие системные компоненты могут быть причиной таких ошибок, как 0x800f081f. Именно поэтому важно проверить их целостность, прежде чем переходить к другим методам решения. Ниже мы будем использовать как SFC (средство проверки системных файлов), так и DISM (обслуживание образов развертывания и управление ими), которые помогут обнаружить и восстановить отсутствующие и поврежденные компоненты. Вот как:
С помощью SFC
- Откройте Командная строка , введя
cmdв поле поиска рядом с Меню Пуск кнопку. - Щелкните правой кнопкой мыши по Командная строка , а затем выбрать Запуск от имени администратора.
- После открытия консоли введите
sfc /scannowкоманду и нажмите Enter. - Когда процесс восстановления будет завершен, перезагрузите компьютер.
С помощью DISM
- Откройте Командная строка как мы это делали на предыдущем шаге.
- Скопируйте и вставьте эту команду
DISM.exe /Online /Cleanup-image /Restorehealth. - Нажмите Enter и подождите, пока Windows закончит сканирование и исправление.
- После этого перезагрузите компьютер и снова установите обновление.
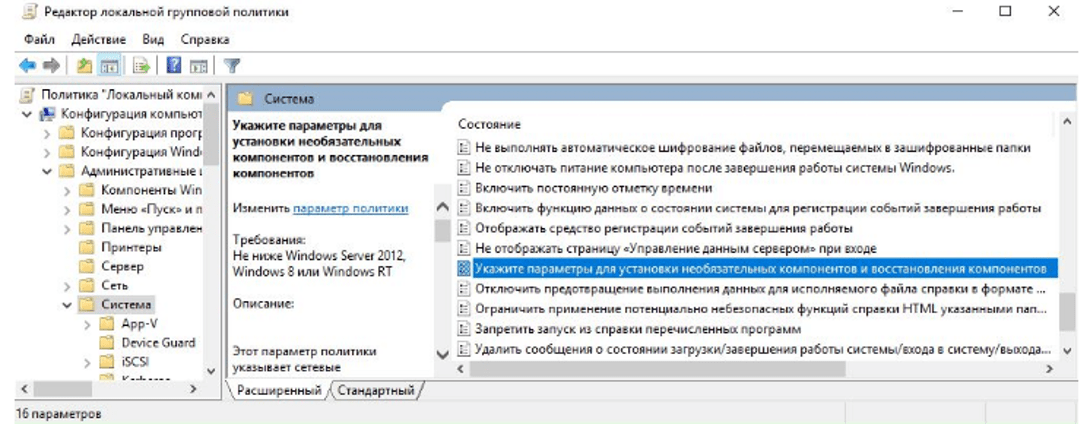
4. Укажите параметры для установки необязательных компонентов и восстановления компонентов.
Использование этого метода поможет нам перенастроить параметры локальной групповой политики, чтобы Windows загружал содержимое для восстановления и дополнительные компоненты непосредственно из Центра обновления Windows. Вот как можно выполнить это простое, но очень эффективное решение:
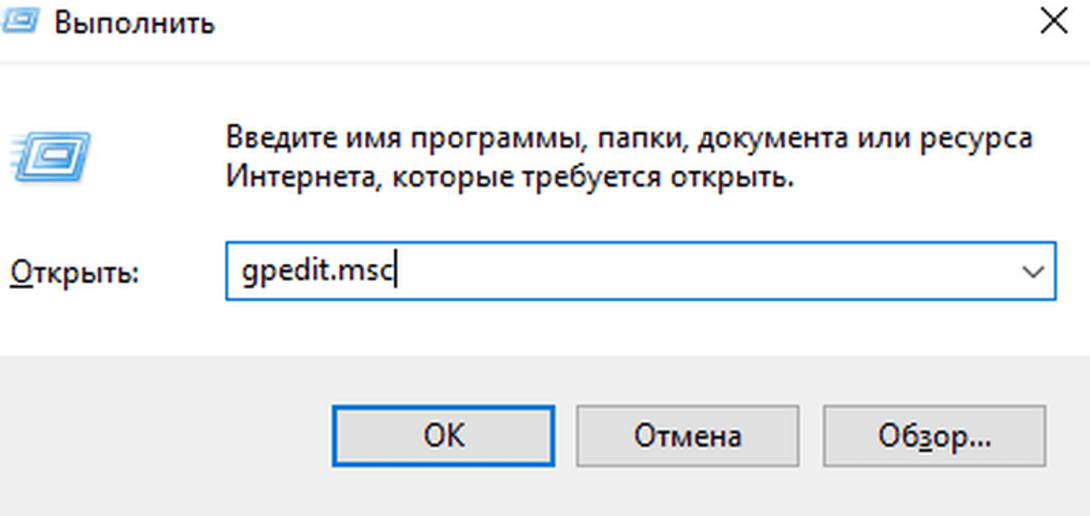
- Нажмите Windows key + R комбинацию клавиш и напишите
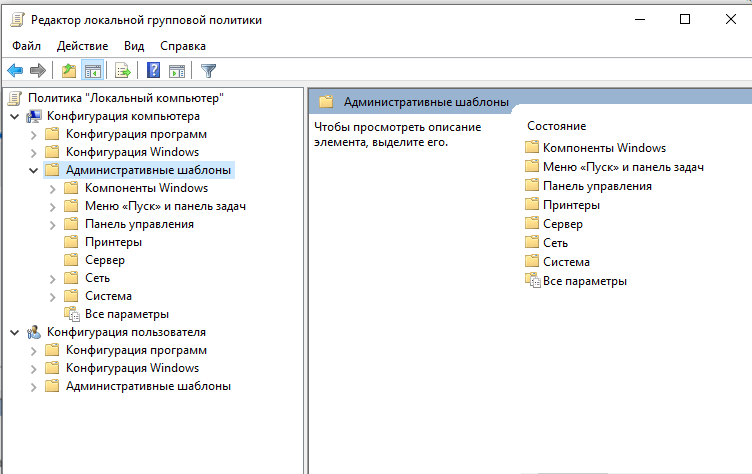
gpedit.msc. - Редактор локальной групповой политики откроется. На левой панели перейдите в Административные шаблоны > Система.
- На правой панели прокрутите список вниз, пока не найдете Укажите параметры для установки необязательных компонентов и восстановления компонентов.
- Дважды щелкните по этому тексту, и выберете Включено , потом поставьте галочку напротив Скачайте содержимое для восстановления и дополнительные компоненты непосредственно из Центра обновления Windows вместо использования служб Windows Server Update Services (WSUS). опцию.
- После выполнения этих шагов нажмите Применить и OK для сохранения изменений.
Теперь вы можете попробовать установить обновление еще раз. Если и это не помогло решить проблему, перейдите к дальнейшим инструкциям ниже.
5. Перезапустите компоненты и Службу обновления Windows.
Этот метод поможет вам сбросить настройки Центра обновления Windows. Этот способ часто помогает, поскольку перезапускает важные службы с нуля. Вся процедура включает перезапуск служб BITS, Cryptographic, MSI Installer и Windows Update, а также переименование некоторых папок обновлений (SoftwareDistribution и Catroot2). Эти папки содержат специальные подписи для обновлений Windows. Исходя из этого, мы заставим Windows удалить поврежденные элементы и пересоздать компоненты обновления с нуля. Мы будем использовать консоль для выполнения необходимых команд. Это более сложный вариант, но для его выполнения не потребуется много времени и знаний. Просто следуйте инструкциям ниже. Просто следуйте инструкциям ниже:
- Откройте Командная строка , введя
cmdв поле поиска рядом с Меню Пуск кнопку. - Щелкните правой кнопкой мыши по Командная строка , а затем выбрать Запуск от имени администратора.
- Скопируйте и вставьте этот список команд одну за другой, нажимая Enter после каждой из них. (Это действие отключит службы, отвечающие за обновления Windows)
- Затем мы должны переименовать вышеупомянутые папки. Просто вставьте эти команды, нажимая Enter после каждой.
- Наконец, все, что осталось сделать, это вернуть отключенные службы. Введите эти команды так же, как мы делали ранее.
- На этом все. Перейдите в Центр обновления Windows и попробуйте установить обновление снова.
net stop wuauserv

net stop cryptSvc

net stop bits

net stop msiserver
ren C:WindowsSoftwareDistribution SoftwareDistribution.old

ren C:WindowsSystem32catroot2 Catroot2.old
net start wuauserv

net start cryptSvc

net start bits

net start msiserver
6. Попробуйте загрузить конфликтующее обновление из каталога Microsoft.
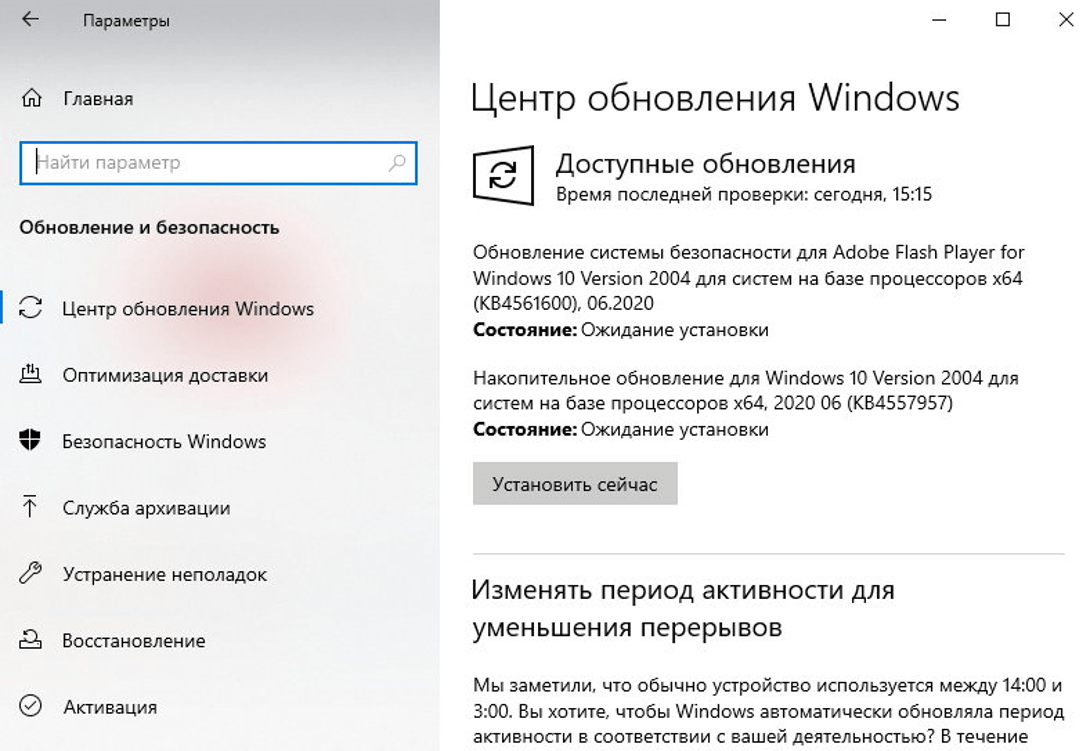
Случаи, когда Windows не может получить накопительные обновления с сервера, случаются довольно часто. Хотя предыдущие шаги уже должны были устранить проблемы с сервером при получении обновлений, Windows, все равно, может иметь проблемы с получением обновлений по другим причинам. Если у вас та же ситуация, можно попробовать установить необходимое обновление прямо из каталога Microsoft. Перед тем как это сделать, нам нужно будет записать, какое обновление необходимо установить. Для этого:
- Нажмите Windows key + I одновременно.
- Затем перейдите в Обновление и безопасность.
- В правой части окна выберите Просмотр журнала обновлений.
- После этого найдите и запишите самое последнее обновление, которое вызывает ошибку (вверху списка).
- Затем загрузите записанное обновление из Microsoft Update Catalog.
7. Используйте Media Creation Tool.
В качестве последней рекомендации среди всех упомянутых решений мы советуем установить обновления через Media Creation Tool. Это официальная утилита Microsoft, специально созданная для пользователей, которым не удается обновить свою систему. Эта процедура никак не повлияет на ваши личные данные, а просто обновит ваш компьютер. Для этого выполните следующие действия:
- Для начала, вам нужно скачать утилиту с веб-сайта Microsoft.
- Затем запустите загруженный файл.
- После того, как вы согласитесь с Условиями использования, вам будет предложено два варианта на выбор. Выберите Обновить этот компьютер сейчас.
- Выберите Сохранить личные файлы чтобы они не пострадали.
- Наконец, запустите процесс и дождитесь его завершения.
- Надеемся, этот метод помог вам избавиться от ошибки 0x8009001d.
Итоги
Самостоятельное решение 0x800f081f или подобных проблем может затратить уйму времени и усилий, однако так и не увенчаться успехом. К счастью, есть люди, которые уже протестировали и собрали наиболее эффективные решения в одно руководство, чтобы помочь пользователям избежать ненужной потери времени и энергии. Надеемся, что ошибка 0x800f081f вас больше не докучает. Если на вашем ПК есть еще какие-то проблемы, вы можете найти множество других статей для Windows и Mac на нашем веб-сайте.
-
Question
-
When I try to enable the .NET Framework from windows features I got this message
Windows couldn’t find required files to complete the requested changes. Make sure you’re connected to the internet and try again.Error code: 0x800F081F
(BTW the internet connection is fine, i think the problem may be in the update center)
I did every thing yet it still not working,
I already try this:
1- Installing .net3.5 from the installer and the package
2-installing it from the command prompt
3- installing it from distribuion CD, mounted ISO, or folder Sourcessxs folder copied to hard drive (including using /LimitAccess switch).4-from *Windows features on or off*
5- From the group police (then administrator then system then specify settings for opt.. ) I found that *contact windows update dir..* is enabled and ok
6-No success with DISM method of scanhealth & restorehealth, although these run OK.
7- many people say that i have to Uninstall KB2966826 and KB2966828, then try installing 3.5 from programs and features… but unfortunately I didn’t find those updates
-I neither found them in update history nor from control panel —the error i found every time is «the system cannot find the file specified error code 0x80070002«
Can any one helpd please, I really to fix it ASAP.
-
Edited by
khashabolla
Sunday, January 10, 2016 11:17 AM
-
Edited by
All replies
-
Hi khashabolla,
Thank you for posting in MSDN forum.
.NET Framework 3.5 is included in Win 10, so you couldn’t install it from outside, no matter web installer or standalone installer.
So, you may first check if the .NET Framework 3.5 is available in the Control Panel on Windows 10 Technical Preview and if available, you may enable it from the Control Panel to install it on the computer. To check if the.NET Framework 3.5 is available in Control
Panel and to enable it, please follow these steps:a) Press “Windows Logo” + “R” keys on the keyboard.
b) Type “appwiz.cpl” in the “Run” command box and press “ENTER”.
c) In the “Programs and Features” window, click on the link “Turn Windows features on or off”.
d) Check if the “.NET Framework 3.5 (includes .NET 2.0 and 3.0)” option is available in it.
e) If yes, then enable it and then click on “OK”.
f) Follow the on-screen instructions to complete the installation and restart the computer, if prompted.
This will install the .NET Framework 3.5 feature on the computer. There is also another way by which .NET Framework 3.5 gets installed on the computer. This is done by the apps on demand.
If an app requires the .NET Framework 3.5, but doesn’t find that version enabled on your computer, it displays the prompt for installing the .NET Framework 3.5 on demand, either during installation, or when you run the app for the first time after
its installation. In this prompt, you can choose the option “Install this feature” to enable the .NET Framework 3.5 on the computer.Best Regards,
We are trying to better understand customer views on social support experience, so your participation in this interview project would be greatly appreciated if you have time. Thanks for helping make community forums a great place.
Click
HERE to participate the survey.-
Proposed as answer by
宝宝徐
Tuesday, January 12, 2016 1:26 AM -
Marked as answer by
宝宝徐
Monday, January 18, 2016 5:28 AM -
Unmarked as answer by
Jack Zhai-MSFTMicrosoft contingent staff
Thursday, July 26, 2018 7:11 AM
-
Proposed as answer by
-
Windows10 online update create this folder:
C:ESDWindowssourcessxs
There are just one file. (microsoft-windows-netfx3-ondemand-package)Take windows 8.1 installation media and copy files from x:sourcessxs to C:ESDWindowssourcessxs (1174 files)
run cmd.exe as administratorexecute this command
Dism /online /enable-feature /featurename:NetFx3 /All /LimitAccess /Source:C:ESDWindowssourcessxs-
Proposed as answer by
Harvey J
Sunday, August 21, 2016 1:56 PM
-
Proposed as answer by
-
I did everything stated here but when i got to step f) i got the same error code and message (The system cannot find the file specified)… please what do i do!?
-
Proposed as answer by
kucharzgotuje
Friday, July 13, 2018 11:59 AM
-
Proposed as answer by
-
I had this problem as well on my machine at work. Try doing the following it worked and allowed me to download the .Net Framework 3.5 on my Windows 10 PC : Go into RegEdit and set the HKEY_LOCAL_MACHINESOFTWAREPoliciesMicrosoftWindowsWindowsUpdateAU
folder. DoubleClick on UseWUServer(UseWindowsUpdateServer) and change the value to 0. If the value is already 0 this fix may not work for you. You may need to restart afterwards.If this works for you please mark as answer.
-
Proposed as answer by
felipe55
Thursday, January 12, 2017 4:00 PM
-
Proposed as answer by
-
This worked perfectly for me!! Thank YOU!!
-
Thanks this works for me!!! I had been looking for a resolution over 2 hrs.
-
This does not work! I follow theses instructions, pretending I have not tried it a hundred times myself, and the outcome is no different than before. This is a BIG problem. I am rolling Windows 10 out to more than a 200 machines and I
cannot have these problems. I have tried enabling the .NET 3.5 immediately after installing the image, prior to any other installations, updates, or profile moves; the problem comes up later. I started removing installed Security updates to see if that
would help, it doesn’t. Please help, this is a BIG problem for me and many others. -
Unfortunately, this does not work for me. I get the same error message. I downloaded the 3.5 installer and that would not even complete the install for me. This is not just one machine, this is many. Please, any other ideas you have would
be much appreciated. -
This registry change worked for me. Thanks.
-
It helped. Thanks a lot for the answer
-
Not sure how this got marked as the correct answer given that the orginal query actually states the the user already tried this approach
When I try to enable the .NET Framework from windows features I got this message
Windows couldn’t find required files to complete the requested changes. Make sure you’re connected to the internet and try again. -
This registry edit seemed to help with installing this and some other problems with finding updates, such as with SQL Server Express. Thanks.
-
This worked for me, but to reiterate, a restart was indeed required.
-
Yes! Thanks so much, this worked after trying multiple other solutions. Note also that you have to run regedit as administrator or you won’t be able to change the value to 0.
-
The registry edit worked for me, thanks! It did not work until I restarted the computer though. After restarting, it worked fine!
-
DISM /Online /Enable-Feature /FeatureName:NetFx3 /All
-
Proposed as answer by
jyatesNZ
Friday, March 22, 2019 4:01 AM
-
Proposed as answer by
-
Registry edit worked for me. Thx! You could also tell the person or dept. who manages the internal WSUS machine to approve the dot Net 3.5 installer package. That would most likely work as well once the source files are downloaded to WSUS.
-
Edited by
AStutso
Friday, July 7, 2017 3:57 PM
-
Edited by
-
Thank you. It saved my day!
-
This worked great for me. Thanks.
-
Regedit and reboot. Spot on thanks.
-
This one worked for me . Thankyoi
-
Worked for me here!!!
Windows 10 Pro, fresh lappy install…
Thanks you!!!
-
Removing the workstation from the domain also makes allows the feature to install. It seems that a group policy is configuring a WSUS server that is either down or not working. Fixing the WSUS config would also like fix the problem.
-
Thx for this, fixed it for me too!
-
Many thanks for this fix, I had been looking for some time. Regards,
-
This worked for me. Thanks.
-
Windows10 online update create this folder:
C:ESDWindowssourcessxs
There are just one file. (microsoft-windows-netfx3-ondemand-package)Take windows 8.1 installation media and copy files from x:sourcessxs to C:ESDWindowssourcessxs (1174 files)
run cmd.exe as administratorexecute this command
Dism /online /enable-feature /featurename:NetFx3 /All /LimitAccess /Source:C:ESDWindowssourcessxsThe dism command has worked for me on several machines. However, what I did was copy the Windows 10 .iso file to the hdd and them mount it. Then, I use the drive letter of the mounted .iso instead of C:ESD in the dism command.
-
THIS is the fix that worked! Thanks, Paul Bill!
-
Edited by
TexasGary
Tuesday, October 10, 2017 1:53 PM
-
Edited by
-
Thank you Paul! This just helped me.
-
Did you follow through on this, ie contacting WSUS admin and asking them to approve the 3.5 updates? I will trying this and post back if it works as the workaround is a poor solution in my opinion. If the machine is making use of WSUS no one should be circumventing
that unless all else fails and your post was the first one I saw that had this idea which I believe should be the recommended and approved solution (if it works that is). -
is not working.i don’t see where the install this feature is
-
Perfect, it works like a charm. Just remember to run Regedit as an administrator and do a restart when done.
-
This worked perfectly for me also after a couple of hours of internet search. Thanks for posting this , as already mentioned ,Just remember to restart the PC..
Jenki
-
This worked for me! Thank you!
-
Office Windows 10, version 1703 (OS Build 15063.674)
I have tried to install by using either dotnetfx35Setup.exe or dotnetfx35.exe(full package) without success.
Thanks for your registry solution which did resolve this issue. The office PC was <g class=»gr_ gr_419 gr-alert gr_spell gr_inline_cards gr_run_anim ContextualSpelling ins-del» data-gr-id=»419″ id=»419″>setup</g>
to receive the update from WSUS server which I assume the value «1» to force PC only get <g class=»gr_ gr_578 gr-alert gr_gramm gr_inline_cards gr_run_anim Grammar only-ins doubleReplace replaceWithoutSep» data-gr-id=»578″
id=»578″>update</g> from internal WSUS.After change value to «0», it works.
Thanks,
JohnnyW2012
-
This worked for me!
Thanks!
-
works after using regedit as administrator
-
Thank you very much, Harvey,
That was the winning hint after testing douzend of other hints. The only I did change was I did use the Windows 10 installation media.
Wolfgang
-
Hi khashabolla,
Thank you for posting in MSDN forum.
.NET Framework 3.5 is included in Win 10, so you couldn’t install it from outside, no matter web installer or standalone installer.
So, you may first check if the .NET Framework 3.5 is available in the Control Panel on Windows 10 Technical Preview and if available, you may enable it from the Control Panel to install it on the computer. To check if the.NET Framework 3.5 is available in Control
Panel and to enable it, please follow these steps:a) Press “Windows Logo” + “R” keys on the keyboard.
b) Type “appwiz.cpl” in the “Run” command box and press “ENTER”.
c) In the “Programs and Features” window, click on the link “Turn Windows features on or off”.
d) Check if the “.NET Framework 3.5 (includes .NET 2.0 and 3.0)” option is available in it.
e) If yes, then enable it and then click on “OK”.
f) Follow the on-screen instructions to complete the installation and restart the computer, if prompted.
This will install the .NET Framework 3.5 feature on the computer. There is also another way by which .NET Framework 3.5 gets installed on the computer. This is done by the apps on demand.
If an app requires the .NET Framework 3.5, but doesn’t find that version enabled on your computer, it displays the prompt for installing the .NET Framework 3.5 on demand, either during installation, or when you run the app for the first time after
its installation. In this prompt, you can choose the option “Install this feature” to enable the .NET Framework 3.5 on the computer.Best Regards,
We are trying to better understand customer views on social support experience, so your participation in this interview project would be greatly appreciated if you have time. Thanks for helping make community forums a great place.
Click
HERE to participate the survey.Another example of someone under the Microsoft moniker who should not be allowed to mark posts as answers…
This is not the fix to the poster’s issue.
The regedit answer is the solution (albeit a bit of a kluge). That should be marked as the answer.
-
doesn’t work for me
there’s nothing like that in my Win 10 registry

-
Dear Microsoft.
Have you lost your mind? This issue is 1 year old and it still reproducible. Installing one of your products to another your product requires 1 hour research and hacking registry.
This is really charming, one «Moderator» (Jiayi Li) wrote senseless and helpless post and another Moderator (Wen Xu) marked it as answer. I hope that you will get bonus for your great hard work
And finally, thanks Paul Bill for answer that helped me. Paul’s post has 45 votes, but it isn’t marked as an answer… Probably because he is not a moderator.
-
Which registry change? I searched and searched, found nothing except repetitions that «it works». The DSIM command does not work either, it complains with error 50.
-
Hi,
In Windows 10 the issue is reolved if you run windows update and let it complete and restart when required. After restart the required update for installing .netfx3 is able to complete itself. (internet required)
Tried all below solutions but failed. There is possibility that when windows update restart is pending then it won’t get any more updates till it is completed and restarted.
-
Hello,
I am hoping you can please help me as I have been trying to install net 3.5 for many days and many many hour spent. This is the first instance I have seen this fix yet the directory does not exist for me. in regedit as admin I can only find HKEY_LOCAL_MACHINESOFTWAREPoliciesMicrosoftWindows
and WindowsUpdate is not there. I also can find nothing with AU. Also the error I have when trying to install 3.5 from my mounted drive is this:Error: 50
The operation is complete but NetFx3 feature was not enabled.
The DISM log file can be found at C:WindowsLogsDISMdism.log
After this checking my log file I will see this error :
2018-01-11 10:45:38, Error DISM DISM Package Manager: PID=3820 TID=3964 Parent features must be enabled before this feature can be enabled. «NetFx3»
— CPackageManagerCLIHandler::Private_ProcessFeatureChange
2018-01-11 10:45:38, Error DISM DISM Package Manager: PID=3820 TID=3964 One or more features could not be enabled. — CPackageManagerCLIHandler::Private_ProcessFeatureChange(hr:0x80070032)
2018-01-11 10:45:38, Error DISM DISM Package Manager: PID=3820 TID=3964 Failed while processing command enable-feature. — CPackageManagerCLIHandler::ExecuteCmdLine(hr:0x80070032)So something about Parent features must be enabled. Any help would really be appreciated, thank you
-
same as you. i tried two given solutions like you, and now, every time I’m booting up my laptop, windows requires me restart my laptop to complete installing .NET FRAMEWORK 3.5.
Damn it!
-
Edited by
mywill102
Friday, January 12, 2018 4:52 AM
-
Edited by
-
out of the 100s of things i’ve tried this was the only one that worked for us, thanks Paul. One workstation fixed 100 to go, lets hope this fixes them all! thanks MS.
-
in regedit as admin I can only find HKEY_LOCAL_MACHINESOFTWAREPoliciesMicrosoftWindows and WindowsUpdate is not there. I also can find nothing with AU. Also the error I have when trying to install 3.5 from my mounted drive is this:
Error: 50
The operation is complete but NetFx3 feature was not enabled.
The DISM log file can be found at C:WindowsLogsDISMdism.log
After this checking my log file I will see this error :
DISM DISM Package Manager: PID=3820 TID=3964 Parent features must be enabled before this feature can be enabled. «NetFx3» [….]
I have the exactly same problem here (no only me). Dear Microsoft, please help.
-
Hello,
I am hoping you can please help me as I have been trying to install net 3.5 for many days and many many hour spent. This is the first instance I have seen this fix yet the directory does not exist for me. in regedit as admin I can only find HKEY_LOCAL_MACHINESOFTWAREPoliciesMicrosoftWindows
and WindowsUpdate is not there. I also can find nothing with AU. Also the error I have when trying to install 3.5 from my mounted drive is this:Error: 50
The operation is complete but NetFx3 feature was not enabled.
The DISM log file can be found at C:WindowsLogsDISMdism.log
After this checking my log file I will see this error :
2018-01-11 10:45:38, Error DISM DISM Package Manager: PID=3820 TID=3964 Parent features must be enabled before this feature can be enabled. «NetFx3»
— CPackageManagerCLIHandler::Private_ProcessFeatureChange
2018-01-11 10:45:38, Error DISM DISM Package Manager: PID=3820 TID=3964 One or more features could not be enabled. — CPackageManagerCLIHandler::Private_ProcessFeatureChange(hr:0x80070032)
2018-01-11 10:45:38, Error DISM DISM Package Manager: PID=3820 TID=3964 Failed while processing command enable-feature. — CPackageManagerCLIHandler::ExecuteCmdLine(hr:0x80070032)So something about Parent features must be enabled. Any help would really be appreciated, thank you
I have just the same problem.
-
Nope , not a solution for me. Tried all methods suggested after a day on forums. Inlcuding reg mods still no joy I get the same as other users when using dsim command which is error 50 Basically it appears to have installed 3.5 fine as it is readily available
for selection under windows features. However if i select it , install process seems to go fine and asks for restart. doesnt matter how many times i try this and restart it is still not enabled under windows features. Please someone help with this . (recently
fresh installed windows 10pro 64 anniversary pack which started this problem. previous install of windows 10 pro 64 wasnt anniversary and 3.5 worked fine from the start) something to do with the 4.6 in anniversary taking over and disabling 3.5 for good ??????????????? -
This should not be marked as the answer to the issue the OP had.
More worrisome is that this is still an issue on a fresh fully updated Windows 10 install. If this is working as designed, which it may be, we could at least be provided with a meaningful error message.
-
Winner winner chicken dinner!
-
Say, I was int he same boat where none of the above suggestions worked. However, I ran across a fix in another post that worked for me. Essentially, reboot into safe mode (repair mode, I guess) and install it from there.
-Restart from power button in windows with ‘shift’ key held down.
-Go to troubleshoot, then advanced options
-startup repair
-log in to windows
-go to Control panel->programs and features->Turn Windows features on (with your sexy moves) and off
-Check the box by the install .net framework 3.5
-watch it finally work (hopefully!)
restart and it should finally stay checked on.
-
Proposed as answer by
cuculcina
Monday, February 12, 2018 1:26 PM
-
Proposed as answer by
-
This is the solution for error 50, posted from PapaJon_s1
-
Edited by
cuculcina
Monday, February 12, 2018 1:26 PM
-
Edited by
-
Works for me too!
in Windows 10 1709 with error 50 in DISM.
SOLUTION: Restart in reapir mode. Check the box for install .net framework 3.5 and finally works!-
Edited by
Plácido Domenech
Sunday, February 18, 2018 1:01 PM
-
Edited by
-
After trying many different solutions, this was the one that did the trick. Thank you!
-
This worked for me as well. Thank you!
-
After many attempts and hours of researching — what worked for me to fix the problem.
Problem: Trying to Add Windows Feature — .NET Framework 3.5 (includes .NET 2.0 and 3.0). After attempting to use the Dism command line within normal Windows use — kept getting the «Error 50» message and failure to install the above. My system is
Windows 10 Pro 64-bit; the original Windows 10 install disk inserted into my DVD drive («E»).Solution: Reboot system — holding down the «shift» key right after or when you see your Bios screen — you need to be able to have the option — «To specify an advanced option for this choice, press F8.» [note — your screen should also
be highlighting that you are choosing Windows 10 to start your system]Next step: choose to start your system with «Safe Mode with Command Prompt». Note — even on a fast system you need to wait a minute or 2 until the c:windows system32> prompt appears [I have an AMD Ryzen 1700x with a Samsung 960EVO SSD drive
plus 32GB high speed RAM and it takes a minute or so to load]Next step: [you need to have a DOS window with c:windowssystem32> showing or the next command won’t work.
Type in the Dism command (my DVD drive is «E»
dism /online /enable-feature /featurename:NetFx3 /All /Source:e:sourcessxs /LimitAccess
Your system should reply with «Deployment Image Servicing and Management tool — Version: 10.0.16299.15
My system stated also — Image Version: 10.0.16299.214
Then processed 100.0% — enabling feature(s) and stated «The operation completed successfully.»
Final step: Reboot and verify the installation of «.NET Framework 3.5» by checking in through the Control Panel of Windows.
Hope this help others.
Really Micro$oft — what a royal pain in the A… We really don’t need this kind of stuff happening. You guys need to check your work a lot better. This Creators update has been a nightmare!
-
Edited by
Pedro99999
Thursday, March 8, 2018 5:40 PM -
Proposed as answer by
Pedro99999
Thursday, March 8, 2018 6:05 PM
-
Edited by
-
I had this problem as well on my machine at work. Try doing the following it worked and allowed me to download the .Net Framework 3.5 on my Windows 10 PC : Go into RegEdit and set the HKEY_LOCAL_MACHINESOFTWAREPoliciesMicrosoftWindowsWindowsUpdateAU
folder. DoubleClick on UseWUServer(UseWindowsUpdateServer) and change the value to 0. If the value is already 0 this fix may not work for you. You may need to restart afterwards.If this works for you please mark as answer.
Worked for me, and no restart required.
Thank you.
-
Proposed as answer by
ESSENCE56
Tuesday, March 20, 2018 6:36 PM
-
Proposed as answer by
-
PapaJon — After many many tries this did the trick for me. Thx
-
Thank you for this tip. It has worked
Nice day
-
PERFECT!!!!!!
Thank You. This worked for me. It makes sense too.
-
This is of no help to me the AU folder for me I have a folder named UX in it is is another folder named settings
-
this seems to be the ultimate solution.
calling the command line from «Safe Mode with Command Prompt»
dism /online /enable-feature /featurename:NetFx3 /All /Source:e:sourcessxs /LimitAccess
To make it easier I copied the cab-file from sourcessxs to C: and saved the command line
dism /online /enable-feature /featurename:NetFx3 /All /Source:C: /LimitAccess
to a batch-file net35.bat also at C:
-
worked like a charm for me !!! Tks for the tip man
-
I had this problem as well on my machine at work. Try doing the following it worked and allowed me to download the .Net Framework 3.5 on my Windows 10 PC : Go into RegEdit and set the HKEY_LOCAL_MACHINESOFTWAREPoliciesMicrosoftWindowsWindowsUpdateAU
folder. DoubleClick on UseWUServer(UseWindowsUpdateServer) and change the value to 0. If the value is already 0 this fix may not work for you. You may need to restart afterwards.If this works for you please mark as answer.
Thanks a ton, most helpful answer on this by far.
-
Thank God this regedit worked for me.
Thank you guys
-
can’t find any UseWUServer.There are only Default and NoAutoReboot.Please help!
-
Edited by
Soumya1729
Friday, April 6, 2018 6:58 AM
-
Edited by
-
i cant find the windows update folder are you sure its the right directory !?
-
2 hours ? i looking for almost a year and a half man youre lucky mate
-
In order to resolve this issue, you need the installation media.
Must be an Administrator to do this
Insert the Installation Media
Copy the file from <CDROM>SourcesSXS to C:Temp
Launch an elevated command prompt
execute this command
Dism /online /enable-feature /featurename:NetFx3 /All /LimitAccess /Source:C:Tempsourcessxs -
I had the same problem, the HKEY/LOCALMACHINE…/AU folder does not exist in the RegEdit folder on my computer. What worked for me:
1. Enable the WindowsUpdate service via ‘computer management’ —> ‘services and applications’ —> double click ‘services’ and search for ‘windows update’ service —> enable
2. Once the windows update service is enabled go to ‘control panel’ —> ‘program and features’ —>’turn windows features on or off’ —> check the ‘.net framework 3.5’ box and click OK
3. Windows will now download the necessary files (takes about 5 to 10min)
Hope this helps!
-
Proposed as answer by
staples66
Sunday, April 22, 2018 3:56 PM
-
Proposed as answer by
-
This worked for me.
Make sure Computer is connected to Internet.
Go to services.msc
Scroll down to Windows Update
Right Click, then Properties
Make sure Start Type is Automatic, then Start the service by clicking on Start Button in same dialog box
Now Go to Control Panel > Programs > Programs and Features > Turn Windows features on or off
In Windows Features Check all boxes for .NET Framework 3.5 (includes .NET 2.0 and 3.0), then OK
Windows should try to connect on internet and install this .NET Framework 3.5
-
Windows10 online update create this folder:
C:ESDWindowssourcessxs
There are just one file. (microsoft-windows-netfx3-ondemand-package)Take windows 8.1 installation media and copy files from x:sourcessxs to C:ESDWindowssourcessxs (1174 files)
run cmd.exe as administratorexecute this command
Dism /online /enable-feature /featurename:NetFx3 /All /LimitAccess /Source:C:ESDWindowssourcessxsThis solution worked for me. OS Build: 14393.1944
I copied the microsoft-windows-netfx3-ondemand-package.cab from my Windows 10 installer.
-
Edited by
msdn_anonymous_2323
Wednesday, May 2, 2018 3:12 AM
-
Edited by
-
Hey Cuculcina, thank you, your solution worked for me, I was going crazy, after trying dozens of methods,
cheers, God bless you all……….
-
This was my fix, I really thought I was losing it since 3 of 20 of our systems did not need special tweaks.
Thank you Paul
ChazBo Jr.
-
I had the same problem with the computer in my Display Name but this fixed it thanks so much the real answer form Microsoft above this says to try the same thing the creator had problems with LOL.
-
Say, I was int he same boat where none of the above suggestions worked. However, I ran across a fix in another post that worked for me. Essentially, reboot into safe mode (repair mode, I guess) and install it from there.
-Restart from power button in windows with ‘shift’ key held down.
-Go to troubleshoot, then advanced options
-startup repair
-log in to windows
-go to Control panel->programs and features->Turn Windows features on (with your sexy moves) and off
-Check the box by the install .net framework 3.5
-watch it finally work (hopefully!)
restart and it should finally stay checked on.
WOW! I never knew Startup Repair actually did anything besides annoying people!
This worked like a charm, instead of going direcctly to pop-up asking to reboot, it actually did something for a few seconds, then it said it was activated, not even needed to reboot.Thank you very much, whoever you are.
-
I tried this and No luck! Although my registry value was set to 1 and I changed it to 0.
ComputerHKEY_MachineSoftwarePoliciesMicrosoftWindowsWindowsUpdateAU change the value of USeWUServer to 0
Windows 10 Pro.
-
Edited by
AbdulFarooque
Tuesday, May 15, 2018 4:52 PM
-
Edited by
-
I tried all of the above mentioned methods, unfortunately without any luck
I am getting 0x8E5E03FA error
I searched it and I think its connected to WU service, but service is working.
getting same error when trying offline with DISM , safe mode also not working, (Microsoft conveniently hid this feature even more by the way in version 1803)
My system:
OS: Windows 10 pro version 1803 build 17134.48
Mainboard: Asus X99 Sabertooth,
CPU: Intel i7 6800K
GPU: Nvidia GTX 1070
RAM 4×4 Gb Corsair Vengence LPX
OS is loaded Son Samsung 850 EVO SSD (120Gb)
-
Edited by
george_jibuti
Tuesday, May 15, 2018 11:15 PM
-
Edited by
-
You are the man! worked great been trying to fix for some time.
-
Thank you , it’s works for me .
Good day !
-
Worked perfectly … thank you!
-
I had this problem as well on my machine at work. Try doing the following it worked and allowed me to download the .Net Framework 3.5 on my Windows 10 PC : Go into RegEdit and set the HKEY_LOCAL_MACHINESOFTWAREPoliciesMicrosoftWindowsWindowsUpdateAU
folder. DoubleClick on UseWUServer(UseWindowsUpdateServer) and change the value to 0. If the value is already 0 this fix may not work for you. You may need to restart afterwards.If this works for you please mark as answer.
Thanks a ton, most helpful answer on this by far.
The registry worked for me. I had an issue with a laptop at work! Thank you!
-
I had this problem as well on my machine at work. Try doing the following it worked and allowed me to download the .Net Framework 3.5 on my Windows 10 PC : Go into RegEdit and set the HKEY_LOCAL_MACHINESOFTWAREPoliciesMicrosoftWindowsWindowsUpdateAU
folder. DoubleClick on UseWUServer(UseWindowsUpdateServer) and change the value to 0. If the value is already 0 this fix may not work for you. You may need to restart afterwards.If this works for you please mark as answer.
Can this please be marked as the real answer?
The marked answer will give the same error as trying to install from Win Update. This Reg fix allows the download through Windows Features to complete. -
i dont have the registry value «WindowsUpdateAU» under HKEY_LOCAL_MACHINESOFTWAREPoliciesMicrosoftWindows.
i have also tried every other suggestion in this blog but nothing works for me.
i also get the error i found every time is «the system cannot find the file specified error code 0x80070002»
any ideas please?
-
This did not work for me. I get the error code: 0x800F0954.
I also have tried everything listed in the initial question. This is a fresh install of Windows 10.
-
This worked. I had to run the DISM.exe from the command line to install .NET 3.5
-
Worked for me after doing all the same steps as the original poster. Thank you!
-
https://www.microsoft.com/en-gb/download/details.aspx?id=25150
-
The Full Package installer should work:
https://www.microsoft.com/en-gb/download/details.aspx?id=25150
-
None of the above didn’t worked for me, but this did:
Downlad Windows 10 upgrade
https://download.microsoft.com/download/E/0/A/E0A1E6A8-26F8-4399-9C22-27419BC37B51/Windows10Upgrade9252.exeWait like forever
Try once again to enable dotNet Framework 3.5 in System Function whatever
Should work.
-
This finally worked for me! All of the other options failed. The registry key was not on my system. Rebooting to safe mode with command line is the ONLY thing that worked. I spent hours on this… thank you!
-
I tried to do this RegEdit fix but I don’t have a WindowsUpdate or AU folder. Why would I be missing those?
-
This may or may not fix the error for others, but it worked on mine.
From the following 2 webpages I was able to clarify the Microsoft instructions on the first webpage for fixing the 0x800F081F error. It would be nice if Microsoft would clarify the first webpage since it is linked in the 0x800F081F Error window in Windows
10.https://support.microsoft.com/en-us/help/2734782/net-framework-3-5-installation-error-0x800f0906-0x800f081f-0x800f0907
https://docs.microsoft.com/en-us/previous-versions/windows/it-pro/windows-8.1-and-8/hh825020(v=win.10)
Resolution for Windows 10
Error code 0x800F0906, 0x800F081F, or 0x800F0907To fix the error codes for Windows 10, follow these steps:
1. Download the Windows Media Creation tool, and create an ISO image locally, or create an image for the version of Windows that you have installed.
2. Open the group policy editor. For example, on a computer that is running Windows 10, from the start screen, type Edit Group Policy, and then select Edit Group Policy to open the Group Policy Editor.
3. Click Computer Configuration, click Administrative Templates, click
System, and then double-click the Specify settings for optional component installation and component repair setting.Also follow these steps:
1. Mount the ISO image that’s created in step 1 above.
2. In the window opened in step 3 above, select Enabled, and point the «Alternate source file path» to the ISO X:sourcessxs folder from the mounted ISO. <— «X:» is your
mounted drive letter for the ISO3. Run the gpupdate /force from the command line. <— I ran this step as Admin (Admin may not be needed)
4. Now add the .Net framework feature.
I didn’t need to restart. Hope this works for people who couldn’t get the methods above to work.
-
Edited by
RFguy
Thursday, July 19, 2018 3:35 PM -
Proposed as answer by
Einherj
Tuesday, April 9, 2019 7:19 PM
-
Edited by
-
This may or may not fix the error for others, but it worked on mine.
From the following 2 webpages I was able to clarify the Microsoft instructions on the first webpage for fixing the 0x800F081F error. It would be nice if Microsoft would clarify the first webpage since it is linked in the 0x800F081F Error window in Windows
10.https://support.microsoft.com/en-us/help/2734782/net-framework-3-5-installation-error-0x800f0906-0x800f081f-0x800f0907
https://docs.microsoft.com/en-us/previous-versions/windows/it-pro/windows-8.1-and-8/hh825020(v=win.10)
Resolution for Windows 10
Error code 0x800F0906, 0x800F081F, or 0x800F0907To fix the error codes for Windows 10, follow these steps:
1. Download the Windows Media Creation tool, and create an ISO image locally, or create an image for the version of Windows that you have installed.
2. Open the group policy editor. For example, on a computer that is running Windows 10, from the start screen, type Edit Group Policy, and then select Edit Group Policy to open the Group Policy Editor.
3. Click Computer Configuration, click Administrative Templates, click
System, and then double-click the Specify settings for optional component installation and component repair setting.Also follow these steps:
1. Mount the ISO image that’s created in step 1 above.
2. In the window opened in step 3 above, select Enabled, and point the «Alternate source file path» to the ISO X:sourcessxs folder from the mounted ISO. <— «X:» is your
mounted drive letter for the ISO3. Run the gpupdate /force from the command line. <— I ran this step as Admin (Admin may not be needed)
4. Now add the .Net framework feature.
I didn’t need to restart. Hope this works for people who couldn’t get the methods above to work.
This is the only thing that worked for me on Windows 10, SurfacePro 4.
-
Proposed as answer by
ananda vardhana
Friday, March 8, 2019 12:49 AM
-
Proposed as answer by
-
Alexander Nikolaev VI’s solution of running Dism /online /enable-feature /featurename:NetFx3 /All /LimitAccess /Source:C:ESDWindowssourcessxs
on an admin command prompt worked for me. Thanks Alex. -
I actually signed in to say thank you as this was driving me up the wall and your solution was what fixed my issue
-
This worked for me. Thank you very much
-
I had this problem as well on my machine at work. Try doing the following it worked and allowed me to download the .Net Framework 3.5 on my Windows 10 PC : Go into RegEdit and set the HKEY_LOCAL_MACHINESOFTWAREPoliciesMicrosoftWindowsWindowsUpdateAU
folder. DoubleClick on UseWUServer(UseWindowsUpdateServer) and change the value to 0. If the value is already 0 this fix may not work for you. You may need to restart afterwards.If this works for you please mark as answer.
Worked 100% for me thanks Paul
-
This works for me. I have a WIndows 10 Enterprise running as VMware workstation host and couple WIndows 10 Enterprise image running as VMware VM. So far, this only happened with my WIn10 host machine. ALl Win10 VMs don’t have this issue. Strange!
-
Windows 10, 10.0.17134 Build 17134, the path was ComputerHKEY_LOCAL_MACHINESOFTWAREMicrosoftPolicyManagerdefaultUpdateAllowUpdateService
Change «Value» to 0
-
Tried all the options from this post, this was the one that worked for me. Had to delete the last two folders of the path.
I inserted the Windows 10 Pro Disc and copied the only file inside this directory:
<CDROM>SourcesSXS
into this directory:
C:Temp
Then launched command prompt as admin and pasted this:
Dism /online /enable-feature /featurename:NetFx3 /All /LimitAccess /Source:C:Temp
There was a percentage of the progress, then finally ended up at 100% and saying that it completed successfully.
Thanks all for the help.
-
In my case, it was a corrupted installation of «Microsoft Visual C++ 2017 Redistributable (x64)».
I went to Control Panel -> Programs and Features -> Uninstall or change a program -> Right clicked «Microsoft Visual C++ 2017 Redistributable (x64)» and uninstall.
When the window appears click repair and wait for the operation to complete then reboot. After that everything worked fine
-
Worked for me thanks. You should get an interview for Microsoft
-
Superb! FYI: repair stated that it could not repair the system, however, after returning to program and features, it actually worked. Thanks!!!
-
I tried this for installation of .Net framework 3.5 but getting following error:
The changes couldn’t be completed. Please reboot your system and try again. Error code 0x800F0950
-
This worked perfect!! Thank You!!
Should I change the value back to 1 ??
Thanks Again!!!
-
This worked form me also! Thank you!
-
Brilliant. just exporting the file in the location that that file is copied (you don’t have to extract all of it)
-
GOD BLESS YOU! IT WORKED! I was in dispire after trying all Microsoft recommended things. Yours HELPED! THANK YOU!!!
-
In Given Directory after RegEdit there is no windows Update option in windows Directory .
Suggest me some thing so that it work -
Thank you. This solved the problem
-
It is a loop of the problem.
Best Regards Ari
-
that path is unfortunately unavailable on my system.
Best Regards Ari
-
Thank you very much this also worked for me.
-
Proposed as answer by
koreli
Wednesday, November 7, 2018 6:46 AM -
Edited by
koreli
Wednesday, November 7, 2018 6:47 AM
-
Proposed as answer by
-
I tried .net repair, online installers. Must use/download the latest iso (1803) and DISM command with my Windows 10.0.17134.345 on Lenovo T480
Dism /online /enable-feature /featurename:NetFX3 /All /Source:D:sourcessxs
-
Proposed as answer by
JonHalseth
Friday, November 9, 2018 4:41 PM
-
Proposed as answer by
-
Changing the registry entry to 0 worked for me. Our environment uses WSUS and the failure was telling me that it could not find the files using WSUS. After changing the registry, I rebooted and retried checking the box to allow MS to download the
files. it was able to go out and get the .net files.
William McConnell
-
I had this problem as well on my machine at work. Try doing the following it worked and allowed me to download the .Net Framework 3.5 on my Windows 10 PC : Go into RegEdit and set the HKEY_LOCAL_MACHINESOFTWAREPoliciesMicrosoftWindowsWindowsUpdateAU
folder. DoubleClick on UseWUServer(UseWindowsUpdateServer) and change the value to 0. If the value is already 0 this fix may not work for you. You may need to restart afterwards.If this works for you please mark as answer.
This fixed it for me. I can’t believe I had to do this on my brand new Surface Pro. This was an issue almost TWO YEARS AGO, and I still had to find this registry hack on a forum to fix it? Get it together MS. Seriously.
-
its worked perfectly for me!! thank you.
-
Thank you. Removing from the domain, restarting, deleted the registry entry. I was then able to go to the control panel and turn Windows features on/off for .NET 2.0 and 3.5.
-
Great. It’s working fine. Thanks for your support and sharing knowledge.
-
Thank you very Much. This helped me after I’ve struggled for days.
-
It worked! Thanks for your contribution to the community.
-
This saved me a ton of time and frustration. Thanks!
-
This worked. Reboot was needed. Thank you!!!
-
MVP — Hello from 2019 — Thanks for the save.
-
Ironically, 2019 here, he didn’t specify where this actually works, and if you still a full installer (like I did at first) it doesn’t actually work — instead you need to install it through the control panel -> windows and features.
Not exactly sure why that worked, but when none of the installers work, I tried that, and well, it worked.
-
This worked for me. Thanks
-
Bravo! So SIMPLE it was painful, but thank you so much!…
-
This worked for me!
Thanks!
-
Thank you!
Worked for me.
-
Thank you Paul! Life saver on this fix…
-
Close! and thank you for the clue
Set the reg key above and restart Windows update Service
-
Thanks this worked for me too with the Microsoft Windows Server 2019 Standard. it was nightmare as I wasted time one after the other and finally hit the jackpot. Thanks @jkbarr30
-
I wish I could vote 1000 times for Paul Bill’s answer. Thanks so much.
-
Edited by
lunarquaker
Friday, March 29, 2019 8:49 PM
clarify whose answer
-
Edited by
-
This may or may not fix the error for others, but it worked on mine.
From the following 2 webpages I was able to clarify the Microsoft instructions on the first webpage for fixing the 0x800F081F error. It would be nice if Microsoft would clarify the first webpage since it is linked in the 0x800F081F Error window in Windows
10.https://support.microsoft.com/en-us/help/2734782/net-framework-3-5-installation-error-0x800f0906-0x800f081f-0x800f0907
https://docs.microsoft.com/en-us/previous-versions/windows/it-pro/windows-8.1-and-8/hh825020(v=win.10)
Resolution for Windows 10
Error code 0x800F0906, 0x800F081F, or 0x800F0907To fix the error codes for Windows 10, follow these steps:
1. Download the Windows Media Creation tool, and create an ISO image locally, or create an image for the version of Windows that you have installed.
2. Open the group policy editor. For example, on a computer that is running Windows 10, from the start screen, type Edit Group Policy, and then select Edit Group Policy to open the Group Policy Editor.
3. Click Computer Configuration, click Administrative Templates, click
System, and then double-click the Specify settings for optional component installation and component repair setting.Also follow these steps:
1. Mount the ISO image that’s created in step 1 above.
2. In the window opened in step 3 above, select Enabled, and point the «Alternate source file path» to the ISO X:sourcessxs folder from the mounted ISO. <— «X:» is your
mounted drive letter for the ISO3. Run the gpupdate /force from the command line. <— I ran this step as Admin (Admin may not be needed)
4. Now add the .Net framework feature.
I didn’t need to restart. Hope this works for people who couldn’t get the methods above to work.
This worked for me. Windows 10 Pro, old install. I just needed to reinstall .NET 3.5 for a reason.
-
Yes this Work — Must restart then install feature
-
Thanks Paul for this fix. It has certainly worked for many but I wanted to add one thing here. This fix may not work for corporate environment with WSUS and GPOs in place.
Fix for this is to download the latest ISO of Windows 10 and point the installer to it
CMD -> dism /online /enable-feature /featurename:NetFX3 /all /Source:’newSXSfolderfromISO’ /LimitAccess
in my case command looks like -> dism /online /enable-feature /featurename:NetFX3 /all /Source:E:supportsxs /LimitAccess
Raghu Sharma
-
Thanks,
this works for me.
-
I had this problem as well on my machine at work. Try doing the following it worked and allowed me to download the .Net Framework 3.5 on my Windows 10 PC : Go into RegEdit and set the HKEY_LOCAL_MACHINESOFTWAREPoliciesMicrosoftWindowsWindowsUpdateAU
folder. DoubleClick on UseWUServer(UseWindowsUpdateServer) and change the value to 0. If the value is already 0 this fix may not work for you. You may need to restart afterwards.If this works for you please mark as answer.
worked very well. thanks a lot
-
Hi Guys
This worked perfectly as soon as I changed the value to 1=0
I was able to enable the Feature for .Net
Thanks a million
-
I can find my way here HKEY_LOCAL_MACHINESOFTWAREPoliciesMicrosoftWindows But there is no WindowsUpdateAU Folder listed
-
What worked for me was going into gpedit.msc, administrative templates, windows components, windows updates. There were a few items in there that were enabled such as ‘specify intranet windows update location’. I disabled those and then it worked. You
need admin rights to do that. -
Installing .NET Framework 3.5 is not always the same solution depending of the Windows version !
This is my solution to install this package «Offline» without Internet access:
Windows 7/Windows Server 2008 R2:
DISM.EXE /Online /Enable-Feature /FeatureName:NetFx3 /NoRestart
Windows 8.1/Windows Server 2012 R2:
Put original DVD / ISO in the computer (D:)
DISM.EXE /Online /Enable-Feature /FeatureName:NetFx3 /All /LimitAccess /Source:D:sourcessxs
Windows 10 (1507 — LTSB 2015 Or 1607 — LTSB 2016):
CAB File is available on the DVD /ISO, assume is D:
DISM.EXE /Online /Add-Package /PackagePath:»D:sourcessxsMicrosoft-Windows-NetFx3-OnDemand-Package.cab»
Windows 10 (1809 — LTSC 2019):
CAB File is available on the DVD / ISO, assume is D:
DISM.EXE /Online /Add-Package /PackagePath:»D:sourcessxsmicrosoft-windows-netfx3-ondemand-package~31bf3856ad364e35~amd64~~.cab» /NoRestart
Then install language pack also on the DVD / ISO (Sample for French Canada):
DISM.EXE /Online /Add-Package /PackagePath:»Microsoft-Windows-NetFx3-OnDemand-Package~31bf3856ad364e35~amd64~fr-CA~.cab» /NoRestart
-
This is exactly a description of the process which the OP describes as failing with the error code 0x800F081F. With respect, what we are looking for is a solution to the problem, not a description of what doesn’t work.
-
Try Go into RegEdit and set the HKEY_LOCAL_MACHINESOFTWAREPoliciesMicrosoftWindowsWindowsUpdateAU folder. DoubleClick on UseWUServer(UseWindowsUpdateServer)
and change the value to 0.and Restart your machine. That should do the trick!
-
this help. perfect! yey…
-
I had this problem as well on my machine at work. Try doing the following it worked and allowed me to download the .Net Framework 3.5 on my Windows 10 PC : Go into RegEdit and set the HKEY_LOCAL_MACHINESOFTWAREPoliciesMicrosoftWindowsWindowsUpdateAU
folder. DoubleClick on UseWUServer(UseWindowsUpdateServer) and change the value to 0. If the value is already 0 this fix may not work for you. You may need to restart afterwards.If this works for you please mark as answer.
This fixed it for me!!
-
thank you. this worked for me.
-
There is no WindowsUpdate folder under HKEY_LOCAL_MACHINESOFTWAREPoliciesMicrosoftWindows …. I am using Windows 10 version
18343 19h1 insider preview (slow)… Can you tell me how can I do this…. -
This worked for me, thank you!
-
Thank you that worked. Question — do you need to switch it back after the install is complete?
-
This registry change works. This should be the accepted answer, not the fluff response from the mod.
-
Thank you, this worked for me.
-
This worked for me! Thank you! Thank You! Thank You!
-
This worked first time!
Thanks
-
Yes! it works for me. thanks
-
This worked for me, THANK YOU!!
-
Thanks a lot… It’s worked on my windows 10 too…
-
This worked for me. Thanks a lot, you has been a great help for my big headache.
-
A modified above worked for me on Win10 2004 (May 2020 update). I am using WinPro on home pc =no WSUS and therefore no WSUS in registry in AU key. Unsure as to why people are seeing WSUS enabled in reg or gp on home computers…anyway, I also
did not have Win10 installation media as it was a digital download upgrade. I used 7zip to open the downloaded .EXE and found sourcessxs within the «1sources» directory, copied the dotnet3 on demand cab files to c:sxs then ran the
dism line above in (powershell as admin) changing the path to the folder I created (c:sxs). It successfully completed and box checked without having to reboot, although I did for good measure.Thank you everyone, except Microsoft, for the solutions provided.
-
10 years later.. same error.. NICE MICROSOFT!!!

 in Windows 10 1709 with error 50 in DISM.

Версия Виндовс 10 оснащена широким функционалом и возможностями. Но после последнего обновления стали появляться баги в работе обновленных продуктов от компании «Майкрософт». Загрузка технологии .Net Framework сопровождается кодом ошибки 0x800f081f. Соответственно, владелец гаджета пытается найти ответы на вопросы: из-за чего появляется ошибка 0x800f081f и как ее исправить в Windows 10?
Что вызывает код ошибки 0x800F081F?
В основном, она возникает при сбое во время обновления операционки. В итоге выполнить установку кумулятивных пакетов становится невозможно. После возникновения неполадки рабочая среда Виндовса подвергается разного рода проблемам, происходит зависание устройства. Неполадки такого рода обычно появляются на ПК с 64-разрядным процессором.

Причины возникновения данной ошибки:
- повреждение системных файлов;
- появление конфликтов между обновлениями системы и установленными программами;
- сбой при обновлении ОС, связанный с блокировкой вирусными ПО, файерволом;
- появление ошибки во время инсталляции кумулятивных обновлений.
Основной причиной ее появления также может стать сбой обновления Винды по причине некорректной работы .Net Framework. Здесь пользователь может установить программу повторно с использованием автономного установщика пакета утилиты.
Исходя из причины появления ошибки 0x800f081f, выбирают метод ее устранения. Для этого не требуется переходить к радикальным мерам, типа переустановки ОС. Достаточно воспользоваться одним из предложенных методов.

Способы исправления проблемы
В «десятке» имеются средства, помогающие выявить и устранить проблему. Такие же инструменты присутствуют и у сторонних разработчиков. Пользователю необходимо выполнить ряд манипуляций:
- проверить гаджет на наличие вирусных программ;
- обновить драйверы;
- очистить реестр, применив соответствующие утилиты.
Но перед выполнением этих действий юзеру нужно попробовать один из ниже перечисленных способов устранения проблемы, сопровождающейся кодом ошибки 0x800f081f.
Пробуем установить .Net Framework 3.5
Если на ПК уже установлена утилита, а ошибка все равно появляется, нужно попробовать обновить библиотеку. Возможно, программа просто не активирована на устройстве.
Для запуска технологии понадобится выполнить следующее:
- Открыть окно «Выполнить» нажатием горячих клавиш: «Win+R».
- Набрать в строке: OptionalFeatures.

- В открывшемся окне установить маркеры рядом со строкой «.Net Framework 3.5…».
- Нажать «Ok».

- Дождаться окончания процесса.
- Перезагрузить устройство.
Если после запуска компонента произошел сбой, пользователю понадобится инсталлировать утилиту с помощью автономного установщика приложения.
Используем команду DISM
Средство Командной строки, которое применяется для обслуживания образа системы, а также подготовки образа среды предустановки Винды. Операция выполняется с администраторскими правами.
Пошаговая инструкция:
- Нажать «Пуск» ПКМ.
- Выбрать из появившегося списка «Windows PowerShell».

- Ввести: DISM /Online /Enable-Feature /FeatureName:NetFx3 /All /LimitAccess.
- Нажать «Enter».
После завершения процедуры установки утилиты пользователю останется перезагрузить гаджет. Если во время процедуры возник сбой, можно воспользоваться методом установки программы из дистрибутива ОС.
Устраняем проблему через образ системы
Представляет собой полный слепок состояний операционной системы, включает все настройки, конфигурации и установленные в ОС программы. Для использования метода юзеру понадобится загрузить и смонтировать образ ISO в «десятке».
Чтобы воспользоваться этим вариантом, нужно скачать софт Media Creation Tools, далее следовать инструкции:
- Открыть программу.
- В открывшемся окне поставить маркер рядом со строкой «Создать установочный носитель…»

- Выбрать язык, архитектуру и выпуск ОС.
- Нажать «Далее».
- В открывшемся списке выбрать файл ISO, указать путь к папке.
- После загрузки ISO системы кликнуть ПКМ, выбрать «Подключить».
- Открыть КС (требуются администраторские права).

- Ввести путь: DISM /Online /Enable-Feature /FeatureName:NetFx3 /All /LimitAccess /Source:e:sourcessxs, где e:sourcessxs.

После выполнения всех пунктов компонент ОС установится за короткий промежуток времени. При запуске софта ошибка больше не должна появиться.
Через regedit
Стандартная встроенная утилита предоставляет пользователю доступ к многочисленным служебным файлам в графическом режиме. Метод применяется на корпоративных устройствах, где имеется собственный сервер.
Порядок действий:
- Нажать: «Win + R».
- Ввести в строку: regedit. Нажать «Enter».
- Перейти по пути: HKEY_LOCAL_MACHINESOFTWAREPoliciesMicrosoftWindowsWindowsUpdateAU.
- Поменять значение на «0» параметра UseWUServer.
- Закрыть окно реестра, перезагрузить ПК.
- Инсталлировать Фреймворк, используя «Включение и отключение компонентов Windows».
После решения проблемы таким методом юзеру нужно вернуть первоначальные настройки.
Редактор групповой политики
Для нормального функционирования ОС требуется восстановление файла с использованием редактора.
Воспользоваться инструментом можно следующим образом:
- Открыть окно «Выполнить».
- Ввести в строку: gpedit.msc.
- Нажать «Enter».
- Перейти в раздел «Конфигурация системы», далее – в «Административные шаблоны».
- Выбрать папку «Система».
- Справа выбрать и запустить «Укажите параметры для установки…».
- В окне «Включено» сохранить настройки.

Редактором в «десятке» можно воспользоваться только в Профессиональной, Корпоративной и Образовательной версиях.
Устанавливаем соответствующие обновления
Появление ошибки 0x800f081f может быть связано с отсутствием последних обновлений Винды. Проверить их наличие можно следующим образом:
- Открыть «Пуск».

- Перейти в «Параметры».
- Тапнуть по разделу «Обновление и безопасность».

- Кликнуть пункт «Проверка наличия обновлений».
- При обнаружении обновлений установить их через раздел «Параметры».

Если метод не помог, то понадобится обновить конкретный компонент: ввести в Командную строку: Dism /online /enable-feature /featurename:NetFx3 /All. Если подтвердить действия, произойдет процесс инсталляции, по завершению его юзер должен перезапустить девайс.
Через официальную утилиту Microsoft .NET Framework Repair Tool
Средство восстановления доступно на сайте разработчика. Помогает обнаружить проблемы, а также причины их возникновения. С помощью утилиты можно восстановить поврежденные файлы поддерживаемой версии .Net Framework. Приложение имеет простой и понятный интерфейс, предусмотрена поддержка Командной строки и ряд дополнительных возможностей.
Отключение антивируса и брандмауэра
Встроенные антивирусные ПО нередко блокируют процесс обновлений. Такие программы применяют особые алгоритмы, которые прогнозируют опасность действий других программ. Алгоритмы универсальны, срабатывают не на конкретный код. Поэтому они зачастую блокируют безопасные софты.
Исправить ошибку с помощью отключения антивируса можно следующим образом:
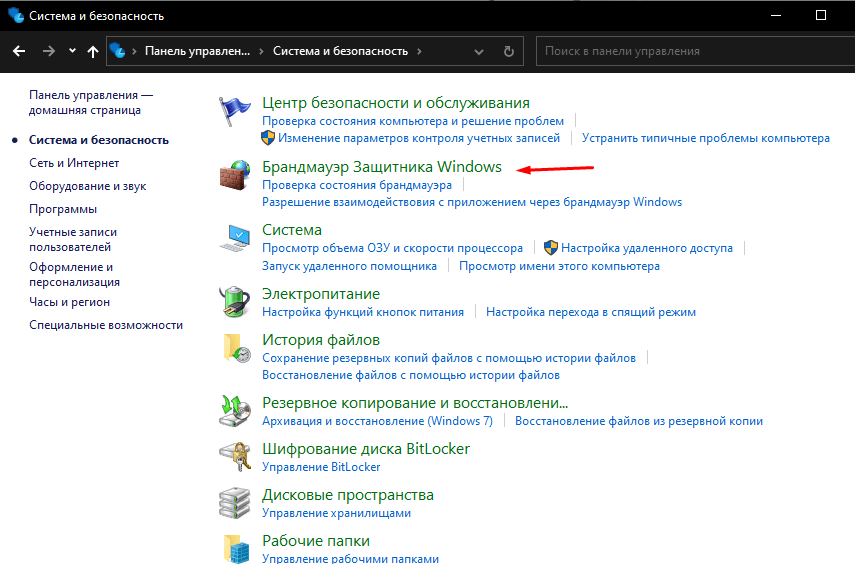
- Зайти в Панель управления.

- Кликнуть по разделу «Система и безопасность».

- Нажать на «Брандмауэр Защитника Windows».
- Выбрать включение/отключение опции.

- Поставить маркер возле параметра отключения.
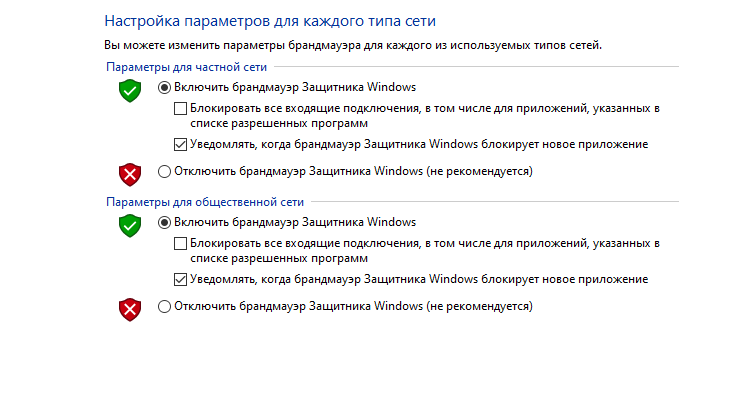
- Сохранить настройки.
После отключения антивирусного ПО пользователю потребуется снова проверить причины, спровоцировавшие появление ошибки.
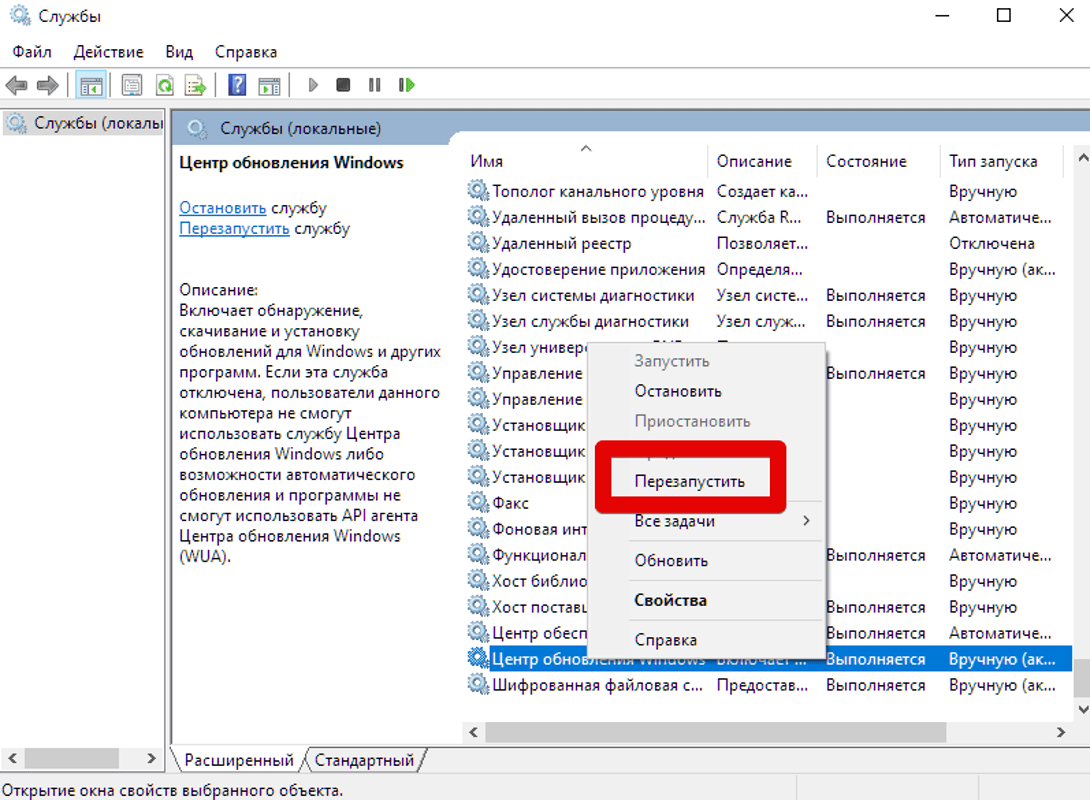
Включаем/выключаем Центр обновлений
Если ошибка возникла в ходе обновления операционки, можно попытаться включить или отключить ЦО.
Для этого понадобится:
- Вызвать окно «Выполнить».
- Ввести в строку: services.msc.
- Нажать «Enter».

- В перечне найти Центр обновлений, щелкнуть по нему ПКМ.

- В окне выбрать «Перезапустить».
- Если ЦО был выключен, нажать «Включить».
После перезапуска ЦО инсталляция файлов должна происходить без ошибок.
Решить возникшие неполадки в сопровождении кода ошибки 0x800f081f можно несколькими способами. Обычно методы помогают справиться с поставленной задачей. Но, если же ни один из них не помог устранить неполадку, пользователю остается только переустановить систему.
Ошибка с кодом 0x800f081f появляется только в операционной системе Windows 10 и только в 64-разрядных версиях. Обычно связана она с невозможностью установки и запуска программы на Windows 10, если для её работы требуется библиотека NET Framework 3.5. Однако её исправление не такое лёгкое, как может показаться на первый взгляд. Ниже рассмотрим способы, которые помогут справиться с ошибкой 0x800f081f.

Содержание
- Устранение ошибки 0x800f081f
- Способ 1: Установка нужных обновлений
- Способ 2: Переустановка NET Framework 3.5
- Способ 3: Специальная команда
- Способ 4: Восстановление системы
Как уже было написано выше – эта ошибка появляется только на компьютерах и системах с определённой конфигурацией. Если на вашем компьютере уже установлены библиотеки NET Framework 3.5, а ошибка всё равно возникает, то скорее всего это связано с тем, что библиотеку нужно обновить. Также проблема может возникать в случае с некорректно установленными обновлениями.
Способ 1: Установка нужных обновлений
В большинстве случаев ошибка с кодом 0x800f081f появляется в Windows в тех случаях, когда у вас не установлены нужные обновления. Это решается очень просто:
- Перейдите в «Параметры» операционной системы. Чтобы это сделать воспользуйтесь комбинацией клавиш Win+I. Также можно нажать на иконку «Пуска» и выбрать там иконку в виде шестерёнки.
- Выберите там пункт «Обновление и безопасность».
- Нажмите на кнопку «Проверка наличия обновлений».
- Ожидайте завершение проверки. Обычно она длится несколько минут, но в некоторых случаях результаты приходится ждать несколько часов. Пока идёт проверка не рекомендуется пользоваться компьютером.
- Если были обнаружены какие-либо обновления, то рекомендуется их установить из интерфейса «Параметров», воспользовавшись соответствующей кнопкой.
- Ожидайте завершения установки обновлений. Она может длится до нескольких часов, но чаще всего компьютер справляется за 20-30 минут. Во время установки обновлений система может перезагрузиться несколько раз. Это нормально.


Если после установки обновлений ничего не поменялось, и ошибка так и осталась, то рекомендуется воспользоваться специальными командами, которые вводятся в интерфейсе «Командной строки»:
- Откройте саму «Консоль». Для этого можно воспользоваться комбинацией клавиш Win+R. В появившейся строке введите команду cmd. Нажмите Ctrl+Shift+Enter для её применения от имени администратора. Если запустить «Командую строку» в обычном режиме, то корректно ввести нужную команду не получится.
- В «Командой строке» пропишите значение:
Dism /online /enable-feature /featurename:NetFx3 /AllНажмите Enter для применения команды.
- В «Командной строке» может запуститься процесс инициализации и обновления библиотеки. Ожидайте его завершения.
- Когда всё закончится перезагрузите компьютер и проверьте, была ли устранена ошибка.


Способ 2: Переустановка NET Framework 3.5
Так как ошибка с кодом 0x800f081f связана с неполадками в работе библиотеки NET Framework, то логично будет предложить, что его нужно переустановить, чтобы ошибка исчезла. Также вполне вероятно, что у вас просто не установлена данная библиотека, поэтому и не получается запустить то или иное приложение.
Для начала рассмотрим, как удалить библиотеку NET Framework, если она у вас уже установлена, но работает некорректно:
- Откройте «Панель управления» любым удобным для вас способом. Например, её можно запустите через поисковую строку по компонентам системы.
- Для удобства напротив «Просмотр» установите значение «Крупные значки» или «Мелкие значки».
- Найдите там элемент «Программы и компоненты». Перейдите по нему.
- Воспользуйтесь поиском в верхней правой части окна и найдите там «NET Framework». Выделите его кликом левой кнопки мыши.
- Нажмите на кнопку «Удалить».


Если вы не смогли найти в списке установленных программ компонент «NET Framework», то скорее всего он просто не установлен в вашей операционной системе. В любом случае, удалили вы его или нет, вам потребуется перейти на официальный сайт Майкрософт и скачать библиотеку оттуда. Скачивание и установка производятся по следующей инструкции:
- Перейдите на официальный сайт Майкрософт и воспользуйтесь поиском, что расположен в верхней правой части сайта. Введите туда наименование искомого объекта. В данном случае это библиотека NET Framework 3.5.
- В результатах поиска выберите приемлемый для вас вариант.
- На странице скачивания выберите язык продукта и нажмите на кнопку «Скачать».
- После скачивания библиотеки откройте установочный файл и следуйте инструкциям мастера установки. Сам процесс не должен занять у вас много времени.
- Когда закончите установку нужно будет перезагрузить компьютер.


Способ 3: Специальная команда
Для этого вам понадобится «Командная строка», а также флешка с записанным на ней установочным образом той версии Windows, которая на данный момент находится у вас на компьютере. Версия должна полностью совпадать с вашей по разрядности и типу, то есть если на компьютере стоит Windows 10 Pro x64, то и образ должен быть от Windows 10 Pro x64.
Читайте также:
Как сделать откат системы через BIOS
Как удалить обновления в Windows (Виндовс) 10
Код ошибки 43 — причины появления и методы устранения
Ошибка при запуске приложения 0xc000007b
После создания установочного носителя можно приступать непосредственно к процедуре устранения ошибки при помощи специальной команды:
- Вставьте флешку с загрузочным носителем.
- Откройте «Командную строку» от имени администратора. Про то, как это сделать было написано в инструкции выше.
- В неё введите команду:
Dism /online /enable-feature /featurename:NetFx3 /All /Source:X:sourcessxs /LimitAccessВместо знака X нужно написать букву флешки, на которой находится образ с операционной системой. Нажмите Enter для применения.
- Дождитесь окончания выполнения команды. После этого рекомендуется перезагрузить компьютер и проверьте, исчезла ли ошибка 0x800f081f.

Способ 4: Восстановление системы
Данный способ является больше крайней мерой, когда ни один из описанных выше не сработал. Вы можете воспользоваться «Точками восстановления» и выполнить процедуру по следующей инструкции:
- Откройте «Панель управления». Её можно открыть из поисковой строки Windows.
- Для удобства установите значение «Крупные значки» напротив параметра «Просмотр».
- Теперь найдите и перейдите в «Восстановление».
- Нажмите на пункт «Запуск восстановления системы». Если у вас нет на компьютере «Точек восстановления», то вы получите соответствующую ошибку. В таком случае этот способ не для вас.
- Если же на компьютере были обнаружены «Точки восстановления», то появится соответствующее окно с кратким описанием процедуры восстановления системы. Там нужно нажать на «Далее».
- В следующем окне выберите «Точку восстановления». Каждой из них присвоено имя в зависимости от даты её создания.
- Когда выберите нужную «Точку» нажмите «Готово» и ожидайте завершения процедуры восстановления. Пока идёт процесс компьютер лучше не трогать.


Процедура восстановления не подразумевает удаление или повреждение пользовательских данных, но некоторые настройки системы могут быть сброшены до тех, которые стояли на момент создания той или иной «Точки восстановления».
Если на компьютере нет «Точек восстановления», то вы можете выполнить процедуру при помощи образа операционной, записанного на флешку:
- Вставьте флешку с образом ОС и перезагрузите компьютер.
- Войдите в BIOS компьютера. Для этого не дожидаясь загрузки операционной системы нажмите на клавиши от F2 до F12 или Delete. На разных компьютерах может быть разная клавиша для входа в BIOS. Подробнее можно посмотреть в документации к компьютеру или материнской плате.
- В интерфейсе BIOS вам нужно перейти в раздел «Boot» или «Advanced». Название раздела зависит от версии BIOS. Управление в этой среде происходит при помощи клавиш со стрелочками и клавиши Enter.
- Далее найдите и выберите параметр «1st Boot Device». В разных версиях название может меняться, но смысл останется тот же.
- После выбора данного пункта появится соответствующее меню, где вам нужно будет указать свою флешку.
- Сохраните настройки и выйдите из BIOS. Для этого можно воспользоваться клавишей F10 или пунктом в верхнем меню «Save changes & Exit».
- После перезапуска компьютера он загрузится с флешки. Появится окошко, где вам нужно выбрать язык и раскладку клавиатуры, а затем нажать на «Далее».
- Теперь найдите в нижней левой части окна пункт «Восстановление системы».
- В плитках выберите вариант «Диагностика».
- Затем «Восстановление образа системы».
- В следующих окна нужно будет согласиться с условиями, воспользовавшись кнопками «Далее» и «Готово».


Как видите, ошибку с кодом 0x800f081f можно решить несколькими способами. Универсальным в данном случае является последний способ, но он же считается скорее крайней мерой.