
Hi I am trying to save a downloaded mp4 file to my gallery.
Downloading the url by using , downloadTask
in
func urlSession(_ session: URLSession,
                    downloadTask: URLSessionDownloadTask,
                    didFinishDownloadingTo location: URL){
}
I am getting the url
file:///private/var/mobile/Containers/Data/Application/8D761DFE-C050-426D-B91C-61DE441FB496/Library/Caches/com.apple.nsurlsessiond/Downloads/com.te.dn/CFNetworkDownload_KFSYSW.tmp
I am creating a path by using,
let path = NSSearchPathForDirectoriesInDomains(FileManager.SearchPathDirectory.documentDirectory, FileManager.SearchPathDomainMask.userDomainMask, true)
        let documentDirectoryPath:String = path[0]
        let fileManager = FileManager()
        let destinationURLForFile = URL(fileURLWithPath: documentDirectoryPath.appendingFormat("/file1.mp4"))

if fileManager.fileExists(atPath: destinationURLForFile.path){

        }
        else{
            do {
                try fileManager.moveItem(at: location, to: destinationURLForFile)
                // show file

            }catch{
                print("An error occurred while moving file to destination url")
            }
        }
I could successfully move the file (not getting any error while moving).
Then I trying to save the file getting error
let url = URL(fileURLWithPath: destinationURLForFile.path)
url value is :
file:///var/mobile/Containers/Data/Application/8DF0C849-56A1-42B3-A081-0C992D18F973/Documents/file1.mp4


        PHPhotoLibrary.shared().performChanges({
            PHAssetChangeRequest.creationRequestForAssetFromVideo(atFileURL: url)
        }) { saved, error in
            if saved {
                let alertController = UIAlertController(title: "Your video was successfully saved", message: nil, preferredStyle: .alert)
                let defaultAction = UIAlertAction(title: "OK", style: .default, handler: nil)
                alertController.addAction(defaultAction)
                self.present(alertController, animated: true, completion: nil)
            }
            else
            {
                print(error?.localizedDescription ?? "f")
            }

        }
o/p : Error :- The operation couldn’t be completed. (Cocoa error -1.)
Cocoa error 1 (Cocoa error -1) is a screen recording error that occurs in iOS and Mac devices. Mostly, users face this error code when they try to save the screen recording. Therefore, it is also known as Cocoa error -1 exporting.

This error code doesn’t look severe, but users have lost important data because of this error code as it prevents the users from saving the screen recording. Therefore, let’s fix this error code.
However, before fixing this error code, we have to understand this error code completely because this error has some variations.

Variations of Cocoa Error -1 in iPhone
So far, we have mentioned a general concept about Cocoa error 1. But apart from that, users have faced this error code in several other situations. So, let’s see those.
Variations of Cocoa Error -1 in macOS
Apart from this error only occurring in iPhones, several macOS users have also reported this error code.
- macOS users have faced this error code on the new 13-inch MacBook Pro with an M1 chipset running macOS 10.15. Here, the issue occurs while trying to access the images in the Photos app.
- In some cases, when iMac users move all of their pictures to the NAS (Network-Attached Storage) folder, everything works fine upon looking at the individual pictures. But the shared albums are partially populated. So, when they try to import an individual picture, they face the error message.
- Sometimes the issue also occurs after storing the Photos library on a locally connected USB drive with a WD Thunderbolt Duo. Here, the users have formatted the USB drive as HFS+J.
- Users have also reported this error code while trying to import something from a PC to an iPhone 8 and iPhone 7.
These are all the use cases regarding the cocoa error 1 issue. Now, let’s see the reasons for the occurrence of this error code.
What Causes the Cocoa Error 1 Issue?
-1 is Apple’s way of saying that a particular error code is unidentified. However, according to our ballpark guesses, one of the following can be the reason for the occurrence of this issue.
- The most common reason for the occurrence of this error code is low available storage for saving the screen recording.
- If you’ve faced this error code while screen recording, then sometimes, this error code is specific to the recording of a particular application. So, check if that is the issue in your case or not.
- Sometimes, this error code occurs while trying to record some protected or copyrighted content. For example, trying to screen record a Netflix movie.
- As you know, iOS devices come with built-in screen recording software. So, using a third-party software application for screen recording can be the reason for the occurrence of this error code.
- If you’ve faced this error code on a Mac system, then a damaged photo library can be the reason for the occurrence of this error code.
- In rare cases, the low battery mode of the iOS can also cause this error code.
How to Fix this Error Message?
Tip 1: Checking the Storage
Before you want to try any complex solutions to this error code, you should check whether your iOS/macOS device has enough storage or not. Because sometimes, when the device can’t find a suitable amount of space for saving a screen recording file, then that device shows this error code.
- First, you’ll go to the ‘Settings’ application for your iOS device.
- Then, you’ll choose the ‘General’ option in the list of available Settings options.

Choosing the ‘General’ option inside the ‘Settings’ options’ list - Inside the ‘General’ settings window, you’ll choose the ‘iPhone Storage’ option.

Choosing the ‘iPhone Storage’ option inside the ‘General’ window - In the next window, you can see your iPhone storage.

iPhone storage stats


Note: If your storage is low, then you should consider clearing your storage before trying the screen recording again
However, if this scenario doesn’t relate to your use case, then try the next bonus tips and solutions.
Tip 2: Checking Whether an Update is Available or Not
As the issues like cocoa error 1 are mostly software glitches, therefore, Apple generally resolves such issues in the next stable updates. So, check whether your device has a stable update available or not. If yes, then update your device to the latest stable version and check if this fixes the issue or not.
- First, you’ll ‘follow the first two steps of Tip # 1,’ to go inside the ‘General’ settings window.
- Then, you’ll choose the ‘Software Update’ option.

Software update – iPhone settings - In the next window, you can see your current iOS version. Plus, you should also make the ‘Automatic Updates’ option to ‘On’ because this way, your device will automatically download the latest update when available and connected to the network.

Enabling Automatic Updates


However, if the update is not available or updating the device hasn’t resolved your issue, then try the main solutions.
1. Turning Off the Low-Power Mode
Low-Power Mode is one of Apple’s highlighted features on iOS devices. Apple automatically offers to turn it on when the battery of the device hits 20%. So, if that is your case, then turning it off can fix this error code.
- First, you’ll check whether the battery icon in the status bar of your iOS device is yellow or not. If yes, then this shows that the iOS device is in the Low-Power Mode.

An indication that the Low-Power Mode is turned on

Note: If you’re not seeing a yellow battery icon, then that is not your case. Try any other solution
- So, you’ll navigate to the ‘Settings’ app of your iOS device.
- Then, you’ll choose the ‘Battery’ option from the list of Settings’ options.

Battery settings – iPhone - On the next screen, you’ll turn off the notch against the ‘Low-Power Mode’ option.

Turning off Low Power Mode – iPhone


Note: You can also use Siri for turning off the Low-Power Mode. For example, you can say something like, ‘Hey Siri, Turn Off the Low Power/Battery Mode’
Note: You can also plug in your device and charge. Here, the device will automatically turn off the Low-Power Mode when it’ll reach a suitable battery percentage
If this solution has resolved your issue, then good for you. Otherwise, try the next solution.
2. Restarting the iOS Device
Restarting Procedure for iPhone X, 11, or 12
- First, you’ll press and hold the ‘Power’ and ‘Volume’ buttons until the power-off slider appears.

Pressing and holding the ‘Power’ and ‘Volume-Down’ buttons for turning off iPhone X, 11 and 12 - Then, you’ll drag the slider and wait for 30 seconds to power off the device.
- Lastly, you’ll turn on the device again by pressing and holding the ‘Power’ button until you see the Apple logo.

Pressing and holding the ‘Power’ button for turning on iPhone X, 11 and 12


Restarting Procedure for iPhone SE (2nd generation), 8, 7, or 6
- First, you’ll press and hold the ‘Power’ button until the power-off slider appears.

Pressing and holding the ‘Power’ button for turning off iPhone 8, 7 and 6 - Then, you’ll ‘follow the last two steps of Restarting Procedure for iPhone X, 11, or 12.’

Restarting Procedure for iPhone SE (1st generation), 5, or earlier
- First, you’ll press and hold the ‘Power’ button at the top of the iPhone 5 or earlier until the power-off slider appears.

Pressing and holding the ‘Power’ button for turning off iPhone 5, or earlier - Then, you’ll ‘follow the last two steps of Restarting Procedure for iPhone X, 11, or 12.’

3. Creating a New Photos Library
Specific to macOS Users
If you’re facing this error code in a macOS system while accessing your images in the Photos application, then creating a new Photos Library will fix your issue.
Note: Before trying any of the following steps, make sure that all of your pictures are in the iCloud. This is so you can easily recover them.
- First, you’ll create a new Photos Library on your macOS system in the ‘Pictures’ folder.
- Then, you’ll set the newly created library as the system library.
Note: Make sure that iCloud photos are enabled
- Lastly, your macOS system will automatically start downloading everything from the Photos Library in the iCloud to the newly created Photos Library.
Note: If your macOS system doesn’t have enough storage, then you should take a backup of your current Photos Library and delete it from your macOS system. This way, you’ll still have the previous version of Photos Library on your macOS system
- Now, you’ll open the Photos application, but while opening, you’ll hold down the option key and then click on the ‘Create New…’ button.
- Then, you’ll name it ‘Photos Library.photoslibrary’ and locate it in your ‘Pictures’ folder.

Clicking on the ‘Create New…’ button for creating a new library - After this, you’ll open the new library and then navigate into the ‘General’ tab of Photos Preference.
- Then, you’ll click on the ‘Use as System Photos Library’ option.

Choosing the ‘General’ tab and clicking on the ‘Use as System Photos Library’ option - Now, you’ll go into the ‘iCloud’ tab and you’ll set it up as the final screenshot. The control will start downloading everything from the iCloud to the new library.

Choosing the ‘iCloud’ tab


Note: Your macOS system should have enough storage space for downloading all the pictures from iCloud
If you’re also stuck in a similar situation with your macOS system, then this solution will fix the issue. However, if you’re facing this issue with removable storage or NAS, then read the following scenarios.
- An external drive must be formatted APFS or MacOS Extended (journaled) (preferred for spinning drives).
- It must not be (or have been) used for the time machine.
- It must have the ‘ignore ownership’ checkbox ticked.
- It should not be on a memory stick, SD, or similar.
- It must also not be a network drive because a direct connection is required, like a USB or Thunderbolt.
- File sharing services such as iCloud Drive, Dropbox, OneDrive, etc. are not compatible with Photos libraries.
Conclusion
If any of the solutions didn’t work for your iOS device, reinstalling the iOS software with the help of the ‘Reinstall iOS’ section and factory resetting your iOS device is your last resort.
Well, without the answers to some of the questions above I’m going to be guessing a little. But you have one huge advantage. If all your photos are in iCloud, you can easily recover your full library from there:
The easiest way is to create a new empty library on your mac, (in the pictures folder is the normal place). Set this new library as the system library, and make sure iCloud photos is enabled, and your mac will then download everything from iCloud photos library into your newly created library.
First do you have enough space on your mac for your full library to be downloaded again. If so, carry on — if not, take a backup of your current library and then delete it from your mac. ( You still have the previous version on your old Mac, don’t you?)
Then:
Hold down the option key while starting photos, and click «create new». Name it Photos Library.photoslibrary, and locate it in your pictures folder. (First screenshot).
Then open the new library — go into photos preferences (general tab), and click «use as system photos library» (second screenshot)
Finally in photos preferences iCloud tab, set it up as the final screenshot. (You need to have enough space on your mac to download all the photos from iCloud)
It will then download everything from iCloud to the new library.

Привет, я пытаюсь сохранить загруженный файл mp4 в свою галерею.
Загрузка URL с помощью, downloadTask
В
func urlSession(_ session: URLSession,
                    downloadTask: URLSessionDownloadTask,
                    didFinishDownloadingTo location: URL){
}
Я получаю URL
file:///private/var/mobile/Containers/Data/Application/8D761DFE-C050-426D-B91C-61DE441FB496/Library/Caches/com.apple.nsurlsessiond/Downloads/com.te.dn/CFNetworkDownload_KFSYSW.tmp
Я создаю путь, используя,
let path = NSSearchPathForDirectoriesInDomains(FileManager.SearchPathDirectory.documentDirectory, FileManager.SearchPathDomainMask.userDomainMask, true)
        let documentDirectoryPath:String = path[0]
        let fileManager = FileManager()
        let destinationURLForFile = URL(fileURLWithPath: documentDirectoryPath.appendingFormat("/file1.mp4"))

if fileManager.fileExists(atPath: destinationURLForFile.path){

        }
        else{
            do {
                try fileManager.moveItem(at: location, to: destinationURLForFile)
                // show file

            }catch{
                print("An error occurred while moving file to destination url")
            }
        }
Я смог успешно переместить файл (без ошибок при перемещении).
Затем я пытаюсь сохранить файл, получаю ошибку
let url = URL(fileURLWithPath: destinationURLForFile.path)
Значение url:
file:///var/mobile/Containers/Data/Application/8DF0C849-56A1-42B3-A081-0C992D18F973/Documents/file1.mp4


        PHPhotoLibrary.shared().performChanges({
            PHAssetChangeRequest.creationRequestForAssetFromVideo(atFileURL: url)
        }) { saved, error in
            if saved {
                let alertController = UIAlertController(title: "Your video was successfully saved", message: nil, preferredStyle: .alert)
                let defaultAction = UIAlertAction(title: "OK", style: .default, handler: nil)
                alertController.addAction(defaultAction)
                self.present(alertController, animated: true, completion: nil)
            }
            else
            {
                print(error?.localizedDescription ?? "f")
            }

        }
O / p: Ошибка: — The operation couldn’t be completed. (Cocoa error -1.)
1 ответ
Лучший ответ
Не удается сохранить видео из файла m3u8.
Но мы можем загрузить видео в автономном режиме, а также не можем перейти к видео в галерею.
Здесь код яблока HLSCatalog
0
Vineesh TP
21 Ноя 2018 в 19:29

Many iPhone users report that they get a “cocoa error-1. They get an error message that is failed to save the screen recording” or “Failed to save recording” error. Sometimes, it may be caused by your inattention. And additionally, if you want any other apps for screen recording. Here are some of the fixes to solve the problem.
Fix 1: Restart your iPhone
iPhone X/8/8 Plus
- Press the volume-up button for a few seconds and release it, then again press the volume-down button and release it.
- Press and hold the side button until the Apple logo appears on the screen. Now, your device will be rebooted successfully.
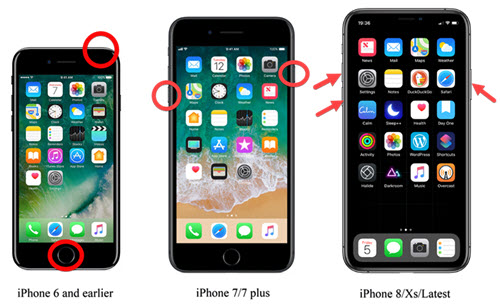
iPhone 7/7 Plus
Press and hold Volume Down and Power button at the same time until the Apple logo appears on the screen.
iPhone 6s and earlier
Press and hold the sleep button and home button simultaneously until the Apple logo appears on the screen.
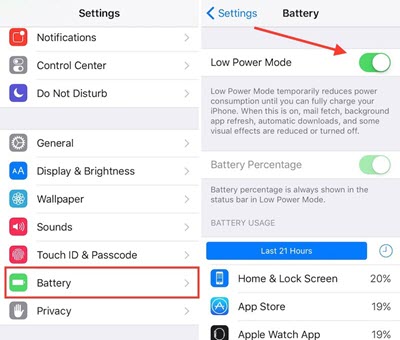
Fix 2: Check the Power Mode option
- Launch Settings.
- Select the Battery option.
- Check the “Low power mode” is turned On or not. If already “Turned On” then “Turn Off” it.
Note: If the “Low power mode” is already Turned Off, then Turn On it for a few seconds and Turn Off it again.
- Now, Restart your device.
Fix 3: Reset All Settings
- Launch Settings.
- Select General -> Reset.
- Choose “Reset All Settings”.
- Enter the passcode, if asked.
- Now, tap and confirm the action to “Reset All Settings“.
Fix 4: Free up the storage
If you have not enough space to save the screen record file then delete the unwanted or unused files, images, videos to free up the storage.
- Launch Settings.
- Select General-> Storage.
- After that, Delete the unwanted files, apps, or other contents.

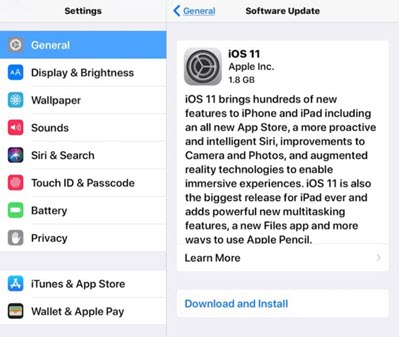
Fix 5: Update your iOS
- Launch Settings.
- Select General -> Software update.
- If the Software update is available, tap on the “Download the install” option to update the iOS(Enter the passcode if needed). Note: Upgrading your iOS device to the newest iOS version will give some “bug fixes”.
Fix 6: Clear History and website data from safari
- Launch Settings.
- Select “Safari”.
- Now, Scroll down the screen and tap on “Clear History and Website Data”.
- Now, Restart your iPhone.

Hope the above solutions may be useful to fix this issue. If you still have the issue, then contact the Apple Support team. And if you know any other useful solution to fix this issue, then share us in the comment box. Thank you and keep supporting iPhoneTopics.com
Professional Blogger, SEO, and Software Developer. Founder of iPhoneTopics.com and Homeremediesforme.com. He created this blog to share tips about iPhone, iPad, iPod, Mac, and Apple TV and to fix the issues that occur in it. Contact on: [email protected]