На сайте возникла критическая ошибка на одной странице

Главная » WordPress » На сайте возникла критическая ошибка WordPress | Как исправить?

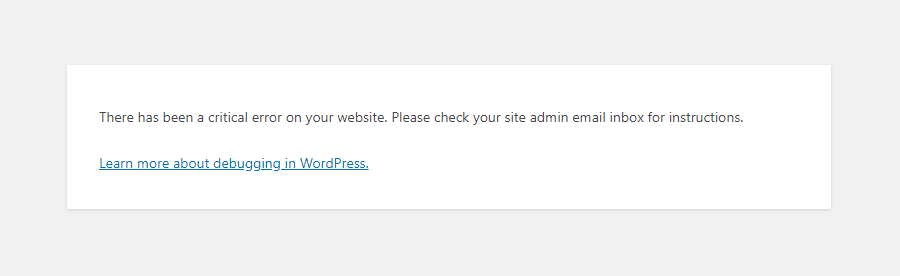
Ошибка, которую вы увидели на экране: «На сайте возникла критическая ошибка WordPress«, полный текст выглядит следующим образом:

На сайте возникла критическая ошибка. Пожалуйста, проверьте входящие сообщения почты администратора для дальнейших инструкций.

Существуют различные другие версии этой ошибки, которые появляются в зависимости от того, какие изменения вы делаете: обновления php, ошибка wordpress install, ошибка при неудачном входе, ошибка при активации woocommerce и т.д.

Начиная с версии WordPress 5, благодаря режиму отладки, на экране появляется сообщение о том, что на сайте возникли технические проблемы. В WordPress 5.2 — 5.3 мы получали сообщение об ошибке «На сайте возникли технические проблемы«. Но в последнем выпуске WordPress 5.4 разработчики WordPress изменили сообщение. В этой статье я рассмотрю, как это исправить.

Существует множество распространенных ошибок wordpress, с которыми вы можете столкнуться, например:

  • 500 internal server error,
  • 504 Gateway Timeout error,
  • 404 Page Not Found ,
  • 405 Method Not Allowed Error,
  • WordPress File And Folder Permissions Error,
  • Error Establishing a Database Connection in WordPress,
  • White Screen of Death (WSOD) Error и многие другие. Я подробно рассматривал все эти ошибки в других статьях моего блока.

Содержание

  1. Что означает эта критическая ошибка WordPress?
  2. Как исправить критическую ошибку в WordPress?
  3. Включите режим отладки в WordPress
  4. WordPress обновление PHP до версии 7.4 или выше
  5. Проверка версии PHP в WordPress
  6. Устранение проблем, связанных с конфликтом тем
  7. Устранение проблем, связанных с конфликтом плагинов
  8. Исправление ошибочных пользовательских кодов
  9. Вывод
  10. Нужна помощь от эксперта по WordPress?

Что означает эта критическая ошибка WordPress?

На сайте возникла критическая ошибка

WordPress 6.2.2 имеет встроенную функцию, которая обнаруживает, когда плагин или тема вызывают фатальную ошибку на сайте. Она уведомляет вас об этом автоматическим письмом. Такого рода проблемы генерируют PHP FATAL ошибки. Фатальные ошибки возникают, когда PHP перестает работать и требует, устранение неполадки, прежде чем вы сможете завершить процесс.

Существует довольно много причин, по которым вы можете столкнуться с критической ошибкой в WordPress, поэтому постарайтесь вспомнить, каким было ваше последнее действие.

  • Вы установили или удалили плагин?
  • Вы активировали или деактивировали плагин?
  • Загрузили, активировали или деактивировали новую тему?
  • Вносили ли вы какие-либо изменения в веб-хостинг?
  • Обновляли ли вы что-либо через FTP?
  • Обновляли ли вы версию PHP?

CMS WordPress и некоторые из активных плагинов требуют использования большого количества памяти, либо на сайте много одновременных посещений, может возникнуть высокое потребление памяти PHP. Если потребности в памяти превысят установленные лимиты, на сайте возникнет ошибка: «На сайте произошла критическая ошибка WordPress«.

Эта ошибка является очень общей и не несет никакой информации, поскольку она показывается всем пользователям, которые просматривают сайт. Поэтому логично, что в целях безопасности она не показывает больше информации.

При фатальной ошибке ваш запрос не может быть выполнен. Вместо того чтобы показывать сломанные страницы с многочисленными ошибками, WordPress теперь показывает приличный экран. Вот и все.

Для отладки фактической возникшей ошибки и ее причины необходимо активировать режим отладки в WordPress. Далее я объясню, как это сделать.

Как исправить критическую ошибку в WordPress?

Включите режим отладки в WordPress

Войдите на свой сайт с помощью FTP и проверьте журналы ошибок. Если это не поможет, попробуйте включить режим отладки.

wp_debug включение

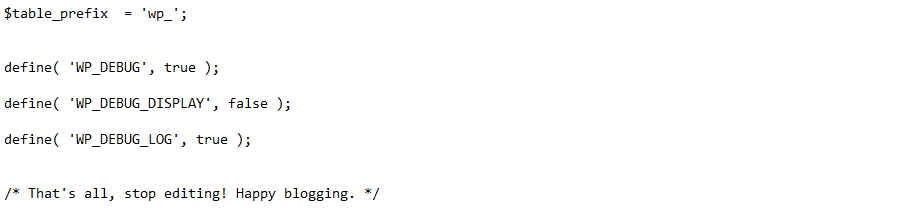
Существует несколько вариантов активации режима отладки в WordPress. Один из самых быстрых и эффективных — изменить файл wp-config.php, который будет находиться в корне нашего сайта. Для этого подключитесь к файлам сайта по FTP и откройте файл wp-config.php из корневой папки WordPress в текстовом редакторе. Найдите следующие строки и отредактируйте добавив следующие строки:

define(‘WP_DEBUG’, true);

define( ‘WP_DEBUG_LOG’, true );

define( ‘WP_DEBUG_DISPLAY’, false );

@ini_set( ‘display_errors’, 0 );

Измените значения false на true и сохраните. Теперь, когда вы обновите страницу сайта, вы можете увидеть другие ошибки, которые могут дать вам лучшее понимание того, откуда исходит ошибка. Вы также можете проверить журналы отладки через FTP. Не забудьте вернуть значение false после завершения работы.

Возможно, файл уже содержит некоторые из этих строк, если это так, проверьте, что они одинаковые, и оставьте одну из них WP_DEBUG_LOG. Сохраните изменения в файле wp-config.php, и с этого момента WordPress будет записывать в этот файл любое предупреждение, уведомление или ошибку, возникающую на сайте. Расположение будет в папке wp-content/debug.log

Предыдущими строками мы указываем WordPress сохранять возможные ошибки, которые могут возникнуть, в файле debug.log и не показывать их на экране.

Это настоятельно рекомендуется, чтобы не показывать конфиденциальную информацию пользователю, который переходит на наш сайт. Если мы разрабатываем сайт и он еще не опубликован, то можем выводить ошибки на экран.

Как только активировали режим отладки, можем загрузить или прочитать файл напрямую /www/wp-content/debug.log, который будет иметь содержание, аналогичное следующему:

Wordpress debug log просмотр

В зависимости от уровня журнала он покажет нам предупреждения, уведомления, ошибки или все вместе. В нашем случае он покажет все уровни журнала. В основном сосредоточимся на строках, которые начинаются с «PHP Fatal error» или «Error», которые являются теми ошибками, которые могут привести к тому, что веб-страница не будет показана пользователю.

Существуют и другие уровни ошибок, но эти — самые важные. Теперь давайте узнаем, как решить эту проблему, обновив версию PHP.

WordPress обновление PHP до версии 7.4 или выше

WordPress написан на языке PHP, и ваш хостинг устанавливает его версию.

Прежде чем приступить к обновлению версии PHP, мы настоятельно рекомендуем вам сделать резервную копию вашего сайта и базы данных. В случае если что-то пойдет не так, вы сможете восстановить сайт из резервной копии.

Как и при обновлении WordPress, плагинов и тем, также важно обновить PHP WordPress до последней версии. Есть две причины, по которым вам необходимо обновить версию PHP.

  1. Сайт WordPress будет работать быстрее
  2. Новая версия PHP более эффективна. Вы можете увеличить производительность вашего сайта в 3-4 раза.

Также сайт будет более безопасным. WordPress — самая популярная CMS, построенная на PHP. Следовательно, хакерам легко взломать сайт wordpress. Обновив PHP, вы получите новейшие функции безопасности, которые отсутствуют в предыдущей версии PHP. Поэтому очень важно обновить PHP до последней версии.

Проверка версии PHP в WordPress

Чтобы проверить текущую версию PHP, вы можете создать новый файл, допустим serverinfo.php. Теперь отредактируйте этот файл и добавьте в него следующий код. После этого запустите файл, и он предоставит вам всю информацию о системе, на которой работает ваш сервер.

<?php

   phpinfo(); // Функция информации о версии php

Устранение проблем, связанных с конфликтом тем

Для этого просто активируйте тему по умолчанию, например, Twenty Twenty или выше.

К сожалению, поскольку ваш сайт отображает ошибку, вам придется устранять неполадки с помощью файлового менеджера вашего хостера (например, файлового менеджера cPanel) или использовать FTP или sFTP (это защищенная версия FTP).

Важно отметить, что при смене темы вы не потеряете настройки выбранной темы.

Для этого переименуйте папку с активной темой, добавив в конце названия папки DISABLE или DISABLED. Например, если вы используете Twenty Nineteen и папка называется «twentynineteen «, вы назовете ее «twentynineteenDISABLE» или «twentynineteenOLD». Вернитесь в верхнюю часть сайта и обновите страницу.

Цель — посмотреть, исчезнет ли ошибка. Если не исчезнет, то это что угодно, но не тема.

Устранение проблем, связанных с конфликтом плагинов

Если дело не в теме, это может быть проблема с плагином. В некотором смысле, поиск и устранение неисправностей схожи. Однако гораздо проще переименовать папку плагина в «pluginsOFF». Посетите сайт и войдите в систему. Это приведет к закрытию всех плагинов. Обратите внимание, что это не удалит первоначальные настройки этих плагинов, так как они сохранятся, когда вы снова включите их позже.

После того, как плагины будут отключены, вернитесь и переименуйте папку в начальный вид «plugin». Зайдите в админку WordPress и снова включите каждый из них по очереди, пока не появится сообщение «На сайте возникла критическая ошибка».

Когда вы обнаружили проблему, вам, вероятно, нужно восстановить объект или модуль, который ее вызвал. Вы можете сделать это несколькими способами.

Скачайте оригинальные файлы плагина прямо из каталога плагинов WordPress и замените плагин через Файловый менеджер вашего хостера (или cPanel) или через FTP или sFTP.

Использовать плагин WP Rollback для восстановления плагина до предыдущей версии.

Если вы используете WP Rollback, есть несколько версий на выбор. Он подскажет вам, какая версия у вас установлена. Выберите плагин для восстановления. Нажмите на «Rollback», если он доступен в списке плагинов в вашем администраторе WordPress.

Исправление ошибочных пользовательских кодов

Если ничего из вышеперечисленного не помогло, то ни плагины, ни темы не являются виновниками, и следующее, что нужно сделать, это проверить, не имеют ли какие-либо из ваших пользовательских кодов несовместимости с текущей версией WordPress, темы, плагинов или PHP.

Чтобы исправить это, просто удалите пользовательские коды из файла functions.php темы или из того места, куда вы их добавляли, и проверьте, нет ли больше критических ошибок WordPress.

Если критические ошибки исправлены, то вы уже знаете, что виновником является:

  • Ваш пользовательский код.
  • Или версия PHP, из-за проблем с совместимостью между ними.

Вывод

Увидеть сообщение «На сайте возникла критическая ошибка WordPress» может показаться тревожным сигналом, но теперь она предупреждает вас и даже предлагает ссылку, по которой можно узнать, как отладить такие ошибки WordPress.

Кроме того, сайт WordPress отправит вам электронное письмо с инструкциями, а иногда даже активирует режим восстановления WordPress.

Если вы не получили письмо от WP, вы можете посмотреть в журналы сервера и получить запись, связанную с этой проблемой?

Это также может помочь вам найти решение. Вы можете получить доступ к журналу ошибок через FTP или cPanel, зайдя в корневой каталог установки WordPress. Вы также можете поговорить с вашим хостинг-провайдером, чтобы узнать, где хранятся журналы ошибок, так как у каждого хостера они разные.

Нужна помощь от эксперта по WordPress?

Нет технических знаний? Поможем исправить. На вашем веб-сайте произошла критическая ошибка? Свяжитесь с нами прямо сейчас и мы мгновенно исправим проблемы с WordPress.

Ссылка на хостинг: Сегодня поговорим об ошибках на WordPress. На сайте возникла критическая ошибка WordPress — разбираем эту и другие ошибки WordPress!

Решение проблемы с белым экраном.

Критическая ошибка на сайте WordPress

Критическая ошибка на сайте WordPress

Как исправить – на сайте возникли временные проблемы технического характера WordPress

Как исправить – на сайте возникли временные проблемы технического характера WordPress

Ошибка WordPress: белый экран. На сайте возникла критическая ошибка WordPress

Ошибка WordPress: белый экран. На сайте возникла критическая ошибка WordPress

Плагин для решения проблем на вашем сайте WordPress

Плагин для решения проблем на вашем сайте WordPress

Как создал сайт и не наполняю... | Критическая ошибка на сайтах WordPress. ВАЖНО!!!

Как создал сайт и не наполняю… | Критическая ошибка на сайтах WordPress. ВАЖНО!!!

ТОП 5 ошибок WordPress и их решения

ТОП 5 ошибок WordPress и их решения

Как решить проблемы в здоровье сайта WordPress: Curl error 28, Operation timed out и др.

Как решить проблемы в здоровье сайта WordPress: Curl error 28, Operation timed out и др.

Ошибки WordPress | Топ 3 способа их исправить.

Ошибки WordPress | Топ 3 способа их исправить.

Что такое ошибка 404 на сайте? Как исправить ошибку 404 на сайте WordPress?

Что такое ошибка 404 на сайте? Как исправить ошибку 404 на сайте WordPress?

#BIZPROBLEM 30. На сайте возникла серьезная ошибка. Не работает форма регистрации #website #bug

#BIZPROBLEM 30. На сайте возникла серьезная ошибка. Не работает форма регистрации #website #bug

Ошибка импорта шаблонов как решить

Ошибка импорта шаблонов как решить

Ошибка с кэшем админки WordPress

Ошибка с кэшем админки WordPress

Еще читайте: Как заставить работать кнопку «Добавить медиафайл» в WordPress.

ТОП 5 ошибок WordPress по моему мнению, с которыми сталкиваются владельцы сайтов.

Занимаюсь разработкой WordPress c 2016 года, автор нескольких плагинов и шаблонов. Участвую в развитии сообщества WP на GitHub.

  • Установила на двух разных сайтах с последней версией WP.
    На одном в консоли грид появилась нормально, но после попытки установить шорткод на страницу, страница ушла в белый экран, а в консоли появилось сообщение:
    ”На сайте возникла критическая ошибка. Пожалуйста, проверьте входящие сообщения почты администратора для дальнейших инструкций. Узнайте больше про решение проблем с WordPress.”

    Более того, когда я пытаюсь добавиь шорткод к странице используя Гутенберг блок появляется красное предупреждение: ”Ошибка обновления.” Убрала аргументы в шорткоде, не помогло.

    Попытки убрать и установить плагин заново не помогли.

    На втором сайте сразу после установки и ввода Яндек.Дзен id появилось сообщение:
    ”Предпросмотр шорткода
    Ошибка”
    Здесь не было проблем с добавкой шорткода используя блок, но на странице сообщение ”Ошибка”:
    https://falundafa-sevkavkaz.ru/yandeks-dzen/

    Ваш плагин выглядит очень полезным и, безусловно, уникальным. Хотелось бы наладить его.
    Спасибо!

    The page I need help with: [log in to see the link]

  • Nothing is more terrifying than when your WordPress site goes down, especially when you get an alarming message like “There has been a critical error on this website.”

    When you’re locked out and the frontend is entirely down, you need to know how to fix the critical error now. Every minute that passes is driving away visitors as they encounter a glaring error screen.

    Luckily, fixing this critical error is usually just a matter of adding a small PHP function or deleting a problem plugin. Here we’ll go over a variety of ways to troubleshoot this issue and get your site up and running again fast.

    Check out our video guide to fixing the ”There Has Been a Critical Error on Your Website” Error

    What Causes the “There Has Been a Critical Error on Your Website” Error?

    If you’ve been using WordPress for some time, you’ve likely heard of or possibly even encountered its most infamous error: the White Screen of Death. This startling glitch would cause your entire website, and sometimes even your backend, to load as a blank white page.

    In recent versions of WordPress, this blank screen has been replaced with the critical error and the text “There has been a critical error on your website. Please check your site admin email inbox for instructions.”

    The "There Has Been a Critical Error on Your Website" error.

    Занимаюсь разработкой WordPress c 2016 года, автор нескольких плагинов и шаблонов. Участвую в развитии сообщества WP на GitHub.

  • Установила на двух разных сайтах с последней версией WP.
    На одном в консоли грид появилась нормально, но после попытки установить шорткод на страницу, страница ушла в белый экран, а в консоли появилось сообщение:
    ”На сайте возникла критическая ошибка. Пожалуйста, проверьте входящие сообщения почты администратора для дальнейших инструкций. Узнайте больше про решение проблем с WordPress.”

    Более того, когда я пытаюсь добавиь шорткод к странице используя Гутенберг блок появляется красное предупреждение: ”Ошибка обновления.” Убрала аргументы в шорткоде, не помогло.

    Попытки убрать и установить плагин заново не помогли.

    На втором сайте сразу после установки и ввода Яндек.Дзен id появилось сообщение:
    ”Предпросмотр шорткода
    Ошибка”
    Здесь не было проблем с добавкой шорткода используя блок, но на странице сообщение ”Ошибка”:
    https://falundafa-sevkavkaz.ru/yandeks-dzen/

    Ваш плагин выглядит очень полезным и, безусловно, уникальным. Хотелось бы наладить его.
    Спасибо!

    The page I need help with: [log in to see the link]

  • Nothing is more terrifying than when your WordPress site goes down, especially when you get an alarming message like “There has been a critical error on this website.”

    When you’re locked out and the frontend is entirely down, you need to know how to fix the critical error now. Every minute that passes is driving away visitors as they encounter a glaring error screen.

    Luckily, fixing this critical error is usually just a matter of adding a small PHP function or deleting a problem plugin. Here we’ll go over a variety of ways to troubleshoot this issue and get your site up and running again fast.

    Check out our video guide to fixing the ”There Has Been a Critical Error on Your Website” Error

    What Causes the “There Has Been a Critical Error on Your Website” Error?

    If you’ve been using WordPress for some time, you’ve likely heard of or possibly even encountered its most infamous error: the White Screen of Death. This startling glitch would cause your entire website, and sometimes even your backend, to load as a blank white page.

    In recent versions of WordPress, this blank screen has been replaced with the critical error and the text “There has been a critical error on your website. Please check your site admin email inbox for instructions.”

    The "There Has Been a Critical Error on Your Website" error.

    The “There Has Been a Critical Error on Your Website” error.

    While this is less panic-inducing than your site simply refusing to load at all, the error text isn’t much more helpful than before, and it’s likely to leave you wondering: What causes this critical error?

    Much like the White Screen of Death, the issue can usually be traced back to an issue with PHP: either your memory limit being surpassed, or an error in your code, plugins, or theme. It may also be an issue of database corruption.

    While the error text itself may not be very helpful, knowing this makes troubleshooting much easier.

    You may also want to look into these other WordPress errors, as you could be experiencing multiple of them:

    • ERR_CONNECTION_TIMED_OUT — Caused by a slow or overloaded web server.
    • ERR_CACHE_MISS — If you see this, look into your website’s cache or PHP tools like plugins, as they’re very likely the cause.
    • 500 Internal Server Error — A serious error that can usually be traced back to server file corruption.
    • Error Establishing a Database Connection — Corruption in your database or a database server issue can be the root of this problem.
    • HTTP 503 Service Unavailable — Indicates an issue with your server.
    • HTTP 502 Bad Gateway — Yet another server issue, often caused by too many visitors overloading it.

    And if you see any other strange errors, look through these HTTP status codes.

    How to Fix the “There Has Been a Critical Error on Your Website” Error?

    You’re here to get your site up and running again, and to that end, we’ve collected several different potential ways to fix the issue. Knowing that the cause is likely PHP-related, these may involve editing core WordPress files. Even with your site in a broken state, make sure to back it up before implementing any of these suggestions, as we don’t want to make it worse!

    If you’re able to log in to your website’s backend, that will help immensely. But as your entire site is likely down, you’ll very likely need to access it through FTP (or SFTP).

    Contact your web host or look through your hosting dashboard to find your FTP login credentials, and make sure to install an FTP client like FileZilla. This guide on connecting to WordPress over FTP can help too.

    Enable Debug in WordPress

    If you’re having trouble with WordPress, one of the first things you should do is enable debugging. With debug mode on, you’ll be able to see the various PHP errors occurring on your site, and you can use this to trace back to the root of the issue.

    As you may be unable to access your dashboard, you’ll also need to enable the debug log. This will write all PHP errors to a file.

    If you’re hosting with Kinsta, enabling debugging with MyKinsta is very easy. Just log in to the hosting dashboard, then go to Sites > Tools > WordPress debugging and click Enable. You can then look around your site to find the cause of the issue or check the log. Make sure to disable debugging when you’re done, as it’s visible to your visitors as well as you.

    If you need to manually turn on debugging, or you need to access the debug log, follow these steps.

    • Step 1: Connect to your site with FTP.
    • Step 2: Find wp-config.php in the root folder and open it with a text editor or IDE.
    • Step 3: Place the following code at the bottom of the document, just before the final message, then save and close the file:
    define( 'WP_DEBUG', true );
    
    define( 'WP_DEBUG_DISPLAY', false );
    
    define( 'WP_DEBUG_LOG', true );

    Here’s what it will look like when done:

    wp-config.php debug.

    wp-config.php debug.

    Debugging is now enabled on your site and errors will be written to the log. You can find the debug log in the wp-content folder, named debug.log.

    Look for names of your theme or plugins which will point to them being the cause or references to a specific file. Even if you aren’t sure what to do with this information, save it someplace — it can help you if you need to reach out for support.

    When you’re finished debugging, make sure to remove these lines of code.

    Roll Back Your Site

    When WordPress errors rear their head, restoring a backup can be a quick and easy way out. While it won’t always solve the issue, it’s definitely worth a shot. And if the problem happens again, you may be able to retrace your steps next time.

    How you restore your website all depends on how you backed it up. If you use a plugin, follow the instructions in the documentation. If backups are included with your web host, you’ll likely be able to do it from your hosting dashboard.

    For instance, Kinsta users can restore a backup by logging into MyKinsta, finding your site under Sites, going to the Backups tab, then clicking Restore to

    Before restoring to your live site, try it on a staging site to ensure that the site is indeed functioning and you’re not overwriting your hard work.

    Revert to a Default Theme

    Sometimes the critical error can be traced back to a conflict within your theme. The best way to test for this is to temporarily delete it and revert to a default theme, which should immediately clear up the issue.

    Make sure you back up your site first, as you’ll need a way to get your theme files back once they’re gone. Simply reinstalling the theme may cause you to lose your custom styling.

    If you have access to your dashboard, this is easy. Just go to Appearance > Themes, click on the theme to select it, and then click Delete in the lower right corner of the pop-up window.

    If you don’t see the option, then try downloading and switching to a different theme. The safest bet is to try a default theme like Twenty Twenty-One.

    Twenty Twenty-One theme

    Changing the WordPress theme to a default option like Twenty Twenty-One.

    If you don’t have access to your backend, follow these instructions to revert to a default theme with FTP.

    • Step 1: Connect to your site with FTP.
    • Step 2: Navigate to wp-content/themes. You have two choices here: either rename your theme folder (will allow you to turn the theme back on later) or simply delete it.
    • Step 3: If you don’t have a backup theme here already, manually download Twenty Twenty and place its files into the themes folder.

    Your site should now revert to Twenty Twenty. If it loads properly now, you know it was a theme conflict.

    To restore your theme files, simply reinstall the theme or change the folder back to its original name.

    Disable All Plugins

    When you’re having a critical error, a plugin is often to blame. If you have several or even dozens of plugins on your site, trying to locate the one that’s the issue may seem like a daunting task.

    But there’s an easy way to find the problem plugin: simply turn them all off and see if that fixes the problem. If it does, enable them one by one until your site breaks again. And there’s the culprit!

    To disable your plugins from the dashboard, visit Plugins > Installed Plugins and tick the checkbox at the top of the list to select them all. Then click Bulk Actions > Deactivate, which should be enough to disable any conflicts and restore your site.

    You can also click Delete instead to entirely remove their files, though you will need to reinstall them manually or restore a backup.

    Deactivating installed plugins in WordPress.

    Deactivating installed plugins in WordPress.

    You can then turn them on one by one by returning to Installed Plugins and clicking Activate on each.

    You can do essentially the same thing through FTP.

    • Step 1: Log in to your site with FTP.
    • Step 2: Open the wp-content folder to find your plugins.
    • Step 3: Rename the plugins folder to plugins_old and verify that your site is working again.
    • Step 4: Rename the folder back to “plugins”. The plugins should be disabled still, so you should be able to log in to your dashboard and activate them one by one. If the plugins reactivate automatically, rename individual plugin folders with _old until your site is restored.

    Raise the PHP Memory Limit

    Even if a plugin or theme is the cause of your broken website, the PHP memory limit is often the real one to blame.

    What is the PHP memory limit? Your web server only has a certain amount of RAM, or memory, so WordPress sets a hard limit on how much memory a single PHP script can take up. When this limit is exceeded, you’ll encounter the white screen of death or the critical error.

    While you don’t want to set the memory limit too high and allow misconfigured scripts to slow your site to a crawl, the default value may be far too low. Raising your PHP limit just a bit could instantly fix your broken website.

    • Step 1: Access your site through FTP and open wp-config.php.
    • Step 2: Insert the following code right before the final line and save.
    define( 'WP_MEMORY_LIMIT', '128M' );

    Defining the memory limit in wp-config-php.

    Defining the memory limit in wp-config-php.

    You can also try 256M if this doesn’t fix the issue, but anything higher is definitely unnecessary unless specifically called for in plugin documentation. If the issue is with the memory limit, the plugin you’re using is almost certainly broken and needs to be disabled.

    A side note: Some hosts may enforce an extremely low memory limit and won’t allow you to raise it. If this is the problem, your only option is to switch to a better host or delete the plugin causing the problem.

    While Kinsta does enforce a memory limit, it’s set to 256 MB. You should have no issues with legitimate working plugins on a Kinsta plan.

    Raise the Max Upload File Size and Text Processing Functions

    If you’re only seeing the critical error in certain situations and not constantly on every page, a small tweak to a few PHP functions might be able to fix it.

    Uploading large files and finding yourself on an error screen is probably a result of the max upload file size being too small, while certain large pages breaking can be fixed by increasing recursion and backtrack limits.

    First, check what your maximum upload size is and compare it to the file you’re trying to upload. You can find this by visiting Media > Add New and checking beneath the file uploader.

    Checking the maximum upload file size in WordPress.

    Checking the maximum upload file size in WordPress.

    To fix either of these issues, you’ll need to log into FTP and edit the wp-config.php file, placing the new code right above the final comment line.

    To increase the max upload file size, add this code:

    ini_set('upload_max_size' , '256M' );
    ini_set('post_max_size','256M');

    And to fix the breaking of large pages on your site, add this code:

    ini_set('pcre.recursion_limit',20000000);
    
    ini_set('pcre.backtrack_limit',10000000);

    Clear Your Site Cache

    Caching is a great way to speed up your website, and most of the time it’s strictly a good thing. But sometimes the cache can get corrupted, leaving your site throwing out errors.

    When this happens, a simple solution is to clear the cache, which should be all you need to get rid of the problem and restore your site to working order.

    No fear: The cached version of your pages will soon be restored, allowing your site to load quickly again. Clearing the cache will simply delete the stuck corrupted files.

    MyKinsta users can clear their site’s cache through their hosting dashboard. Visit Sites > Tools and then click Clear Cache.

    Using a different host, or maybe a caching plugin? Check out their documentation; they should be able to give you detailed instructions.

    Upgrade Your PHP Version

    Outdated PHP can cause your site to break, and other conflicts are sure to occur. You usually want your site on the latest version of PHP supported by WordPress, which is currently PHP 7.3 to 8.0.

    Some WordPress users prefer to stay on PHP 7.4 as they’re concerned about theme and plugin compatibility. Usually, this won’t cause problems. But if you’re using PHP 5.x, it’s imperative you upgrade as it can cause serious conflicts.

    A PHP upgrade is a big deal, so make sure you have a backup ready before trying it.

    Kinsta users can upgrade PHP version with MyKinsta without needing to do anything complicated. Just log in and go to Sites > Tools, then click Modify under PHP engine. Select the version you want and, after a short wait, your site will be running on the latest PHP version.

    If you’re not using Kinsta, upgrading PHP will rely on your host. Contact them for help.

    Check for Malware

    Sometimes a critical error can be caused by malware, especially if you’re noticing strange PHP scripts that can’t be traced back to your plugins or theme. Removing malware is a tough task, more so when you’re locked out of your website and can’t even run a scan.

    It can be hard to tell the difference between legitimate files and suspicious ones added by malware, and deleting random core files isn’t likely to end well. Malware can also modify PHP files, hiding scripts in them you won’t notice as malicious unless you’re a developer.

    If you suspect malware is the cause, then it may be best to turn to your web host for help.

    Where to Get WordPress Support If All Else Fails?

    If you’ve tried all these options and nothing is working, you definitely have a real problem on your hands. But you can always turn to your web host for help identifying and fixing the issue. A good web host will provide you with the support you need to get your site up and running again.

    Along with every plan, Kinsta offers live WordPress support 24/7. With our support tools integrated into your MyKinsta dashboard, getting help at any time is only a click away. Response times are fast — often less than two minutes — so you won’t be waiting around with a down site for hours or days.

    So how does the scope of support compare to this particular issue? Kinsta offers technical support when errors appear on your site, including the titular critical error. We can help you identify exactly which files or plugins are causing the problem.

    Kinsta support, by the numbers.

    Kinsta support, by the numbers.

    While you’ll need to go in and fix the issue either yourself or with the help of a developer, Kinsta support is happy to offer instructions on how to do so (for instance, how to access the file through FTP).

    Every plan includes access to the same great support; there’s no priority support plan, and no special treatment given to certain customers. So if you’re stuck on a critical error and need help resolving it, turn to Kinsta support for assistance.

    Summary

    The WordPress critical error can have a variety of causes, though the issue often has to do with PHP. Either the PHP memory limit has been exceeded, or your plugins or themes are having issues.

    The quickest way to fix the problem is to roll back your website if you have a backup, but there are a variety of other methods you can try, from raising the PHP memory limit to identifying and disabling a problem plugin.

    Troubleshooting may require trying a few different things, but don’t get discouraged if you can’t fix it yourself. You can always get WordPress support from a host like Kinsta. When in doubt, turn to the experts.

    And if your site is often plagued by errors, check out our guide to the 65+ most common WordPress errors.

    Столкнулся с проблемой небольшой на WP.
    Залил тему, активировал ее и потом появилась вот такая ошибка «На сайте возникла критическая ошибка. Пожалуйста, проверьте входящие сообщения почты администратора для дальнейших инструкций.»
    Раньше уже сталкивался с подобной, но решалось все просто, удалил последние изменения в коде, сейчас вообще ничего не помогает, плагины удалил если что
    на форуме видел что пишут про создание файла wp-config.php и написание define(‘WP_DEBUG’, true);


    • Вопрос задан

      более двух лет назад

    • 4775 просмотров

    Понравилась статья? Поделить с друзьями:
  • На сайте возникла критическая ошибка xampp
  • На сайте возникла критическая ошибка wp admin
  • На сайте возникла критическая ошибка wordpress что делать
  • На сайте возникла критическая ошибка wordpress после переноса
  • На сайте возникла критическая ошибка wordpress админка