

Обновление данных в базах — один из ключевых элементов при работе в MySQL. Под обновлением подразумевается изменение значений в существующих записях таблицы. Обновление допускает различные варианты: как изменение значений полей в группе строк (в том числе и всех строк таблицы), так и корректировку значения поля отдельной строки.
Для полноценной работы как с локальными базами данных, так и с облачными базами данных cloud.timeweb.com, важно понимать синтаксис команд для обновления данных.
Ключевой командой для изменения записей в таблице базы данных в MySQL является UPDATE. Обновление происходит последовательно, от первой до последней строки, по порядку. В зависимости от типа обновления в MySQL выделяется два синтаксиса для оператора UPDATE.
В случае обновления одной таблицы синтаксис выглядит следующим образом:
UPDATE LOW_PRIORITY IGNORE table_reference
    SET assignment_list
    WHERE where_condition
    ORDER BY ...
    LIMIT row_count
Обязательный параметр:
SET assignment_list — указывает, какие столбцы нужно изменить и каким образом (assignment_list — список столбцов и новых значений).
Необязательные параметры:
LOW_PRIORITY— если указан этот параметр, выполнениеUPDATEоткладывается до тех пор, пока другой пользователь не решит просмотреть данные таблицы.IGNORE— в этом сценарии выполнениеUPDATEне прерывается, даже если в процессе возникают какие-либо ошибки. Если возникают дубликаты в столбце с уникальным ключом, то такие строки не обновляются.WHERE where_condition— широко известный оператор задает условия, по которым отбираются строки для обновления (where_condition — список условий). Если параметрыWHEREне указаны, обновятся все строки таблицы.ORDER BY— если указан этот параметр, строки обновляются в заданном порядке.LIMIT row_count— ограничение на количество обновляемых строк (row_count — некое число строк). Считаются строки, которые попадают под условиеWHERE, независимо от того, изменились они или нет.
В случае обновления нескольких таблиц одновременно синтаксис будет следующим:
UPDATE LOW_PRIORITY IGNORE table_references
    SET assignment_list
    WHERE where_condition
table_references — список таблиц, которые мы хотим изменить. Они изменятся таким образом, как указано в assignment_list.
При обновлении нескольких таблиц нельзя использовать параметр ORDER BY или LIMIT. Помимо этого, при обновлении нескольких таблиц нет гарантий, что они будут обновлены в указанном порядке.
Остальные параметры запроса (необязательные) — LOW_PRIORITY, IGNORE и WHERE — работают так же, как в сценарии обновления одной таблицы.
Итак, давайте рассмотрим примеры использования оператора UPDATE в MySQL.
Для начала создадим базу данных для книжного магазина. В ней будет 4 таблицы: книги, жанры, писатели и покупки.
Воспользуемся операторами CREATE TABLE и INSERT INTO, чтобы создать таблицы author, genre, book и sales.
CREATE TABLE author (
    id INT PRIMARY KEY AUTO_INCREMENT,
    name_author VARCHAR(50) NOT NULL
    );
INSERT INTO author (name_author)
VALUES ('Leo Tolstoy'),
('Franz Kafka'),
('Nikolai Gogol'),
('William Shakespeare'),
('Homer');
CREATE TABLE genre (
    id INT PRIMARY KEY AUTO_INCREMENT,
    name_genre VARCHAR(30) NOT NULL
);
INSERT INTO genre (name_genre)
VALUES ('Realist novel'),
('Dystopian novel'),
('Picaresque novel'),
('Epic poetry');
CREATE TABLE book (
    book_id INT PRIMARY KEY AUTO_INCREMENT,
    title VARCHAR(50),
    author_id INT NOT NULL,
    genre_id INT,
    price DECIMAL(8,2) NOT NULL,
    amount INT DEFAULT 0,
    FOREIGN KEY (author_id) REFERENCES author (id),
    FOREIGN KEY (genre_id) REFERENCES genre (id)
);
INSERT INTO book (title, author_id, genre_id, price, amount)
VALUES ('Anna Karenina', 1,1, 650.00, 15),
('The Castle', 2,2, 570.20, 6),
('Dead Souls', 3,3, 480, 2),
('Iliad', 5,4, 518.99, 4),
('Odyssey', 5,4, 518.99, 7);
CREATE TABLE sales (
    id INT PRIMARY KEY AUTO_INCREMENT,
    book_id INT NOT NULL,
    count INT NOT NULL,
    cost DECIMAL(8,2) NOT NULL,
    FOREIGN KEY (book_id) REFERENCES book (book_id)
    );
Получаем следующие таблицы. Таблица book:
Столбцы:
- book_id – уникальный идентификатор книги;
- title – название книги;
- author_id – идентификатор автора (внешний ключ);
- genre_id – идентификатор жанра (внешний ключ);
- price – цена книги за один экземпляр;
- amount – количество книг на складе.
Таблица genres:
Столбцы:
- id – уникальный идентификатор;
- name_genre – обозначение жанра.
Таблица author:
Столбцы:
- id – уникальный идентификатор;
- name_author – имя автора книги.
Таблица sales:
Столбцы:
- id – уникальный идентификатор операции;
- book_id – уникальный идентификатор книги из таблицы book (внешний ключ);
- count – количество купленных книг;
- cost – общая стоимость товаров.
Операции по обновлению данных
Теперь, создав образец базы данных, мы покажем выполнение различных операций по обновлению данных с использованием оператора UPDATE и других команд в MySQL.
1. Обновление всех строк
Если при использовании UPDATE вы не используете задающий условия параметр WHERE, то будут обновлены все строки в таблице. Предположим, в книжном магазине проходит акция «Всё по 500» — изменим цену всех книг на фиксированную 500 рублей:
UPDATE book
SET price=500;
В результате выполнения запроса мы получим такую табличку:
Если мы попробуем присвоить значение, которое уже находится в столбце, то MySQL заметит это и не обновит его.
Если мы захотим присвоить значение NULL столбцу, при создании которого было указано NOT NULL, то запрос вернет ошибку:
Column 'name_column' cannot be nullВ то же время, если указать параметр IGNORE, то значение будет изменено на значение по умолчанию для конкретного типа: 0 для числовых, “” для символьных и «нулевое» для дат. Например, 0000 для типа данных YEAR или 0000-00-00 00:00:00 для типа DATETIME.
2. Обновление строк с условием
Изменение всех строк таблицы требуется довольно редко. Гораздо чаще нам необходимо обновить значения для какой-то конкретной записи или для нескольких. Допустим, мы хотим изменить строки по какому-то условию. Например, устроим распродажу книг, которых осталось в наличии меньше 5 штук. Для этого в MySQL с командой UPDATE используем оператор WHERE:
UPDATE book
SET price=300
WHERE amount < 5;
Результат выполнения запроса:
Хорошо видно, что изменились только строки с книгами Dead Souls и Iliad, так как только они удовлетворяли прописанному в запросе условию.
3. Обновление значений с выражением
При обновлении мы можем задавать столбцу не только статичное значение, но и выражения. Предположим, в магазине проходит акция, и на книги русских писателей объявлена скидка в 15%:
UPDATE book
SET price=price * 0.85
WHERE author_id in (1,3);
В таблице author имеется только два русских писателя – Leo Tolstoy и Nikolai Gogol с author_id 1 и 3 соответственно.
Результат выполнения запроса:
Обновление значений происходит в определенном порядке: слева направо. Например, следующий запрос сначала увеличит значение amount на 1, а потом удвоит его:
UPDATE book
SET amount = amount + 1, amount =amount*2;
Результат выполнения запроса:
4. Обновление с DEFAULT
Также мы можем изменить значение строк на значения «по умолчанию» DEFAULT, которые задаются при создании или изменении таблицы. Для того чтобы узнать, какие значения в нашей таблице используются по умолчанию, выполним запрос:
DESC bookВ результате получим следующую структуру нашей таблицы в MySQL:
Заменим значения столбца amount на значение DEFAULT. Так как по умолчанию значение для amount было 0, мы должны получить все 0:
UPDATE book
SET amount=DEFAULT;
Результат выполнения запроса соответствует ожиданиям:
5. Обновление нескольких столбцов
Используя один запрос, мы можем обновить сразу несколько столбцов. Например, изменим значения цены и количества у строк со значением book_id < 4:
UPDATE book
SET price=price*0.9,
       amount = amount - 1
WHERE book_id < 4;
Результат выполнения запроса:
6. Использование LIMIT
Используя параметр LIMIT, мы можем ограничить количество записей, которые должны быть обновлены. Например, обновим только первую строку:
UPDATE book
SET price=100
WHERE genre_id = 4
LIMIT 1;
В таблице имеется две строки с genre_id равным 4, но, так как мы указали LIMIT 1, обновится только одна:
Также следует отметить, что LIMIT N вовсе не означает, что мы обновим N строк. В результате запроса произойдёт обработка первых N строк, подходящих под условие WHERE, независимо от того, обновились эти строки в итоге или нет.
7. Обновление нескольких таблиц
В MySQL мы можем обновить сразу несколько таблиц:
UPDATE book, author
SET amount=amount + 3,
author.name_author = '-'
WHERE book.book_id = 4 and author.id = 4;
Результат запроса в таблице book:
Результат запроса в таблице authors:
8. Обновление таблиц с объединением (INNER JOIN)
Во время обновления можно также объединять таблицы при помощи команды INNER JOIN.
UPDATE book b INNER JOIN author a
ON b.author_id = a.id
SET b.title = CONCAT(b.title, ' (', a.name_author,')');
Указывать INNER необязательно, так как этот тип объединения используется по умолчанию. Запрос можно переписать следующим образом, и мы получим такой же результат:
UPDATE book, author a
SET b.title = CONCAT(b.title, ' (', a.name_author,')')
WHERE b.author_id = a.id;
9. Обновление таблиц с объединением (LEFT JOIN)
Также мы можем использовать LEFT JOIN. В этом случае обязательно указывать, что мы используем именно левое объединение. Например, можно изменить на складе количество книг после их покупки. Добавим в таблицу sales две строки:
INSERT INTO sales (book_id, count, cost)
VALUES (1, 3, (SELECT price FROM book WHERE book_id = 1)*3),
(3, 1, (SELECT price FROM book WHERE book_id = 3)*1);
Магазин продал 3 книги Anna Karenina и 1 книгу Dead Souls. Выполним запрос:
UPDATE book LEFT JOIN sales on book.book_id = sales.book_id
SET amount = amount - count
WHERE sales.book_id is not NULL;
В итоге обновления видим, что количество книг на складе уменьшилось (для тех, которые мы продали):
Если мы попробуем не использовать LEFT JOIN, то получим ошибку «Out of range value for column ‘amount’ at row 3», т.к. amount не может быть отрицательным. Или, если добавить IGNORE, получим:
Как можно видеть в данном случае во всех строках количество уменьшилось на три книги, что нам не очень подходит.
10. Обновление с CASE, IF, IFNULL, COALESCE
При обновлении таблицы также возможно использовать условные операторы, такие как CASE, IF и т.д.
Функция CASE проверяет истинность набора условий и, в зависимости от результата, возвращает один из возможных результатов. Синтаксис при работе с UPDATE в MySQL для операторов CASE и WHEN будет следующий:
UPDATE book
SET price =
  CASE genre_id
  WHEN 1 THEN 100
  WHEN 2 THEN 150
  ELSE price
  END;
В данном случае, если книга имеет жанр 1 мы устанавливаем стоимость 100, если жанр 2 – стоимость 150.
Результат выполнения запроса:
Функция IF в зависимости от результата условного выражения возвращает одно из двух значений. Если книга имеет жанр 4, то мы уменьшаем ее стоимость на 200, иначе оставляем стоимость прежней:
UPDATE book
SET price = IF (genre_id = 4, price-200, price);
Результат выполнения запроса:
Функция IFNULL проверяет значение выражения – если оно имеет значение NULL, то возвращается определенное значение, в противном случае возвращается само выражение. Пусть одно из значений amount оказалось NULL:
Проверим все значения в столбце amount, и если встретится NULL, заменим его на 0:
UPDATE book
SET amount = IFNULL(amount, 0);
Результат выполнения запроса:
Функция COALESCE довольна похожа на IFNULL. Основная особенность заключается в том, что данная функция может принимать сразу несколько значений (два и более). Как и IFNULL, возвращает первое не равное NULL.
Для того чтобы посмотреть, как работает этот вариант, создадим таблицу следующего вида:
И выполним запрос:
UPDATE test_table
SET col4 = COALESCE(col1, col2, col3, 'нет значения');
Результат выполнения запроса:
11. Обновление с сортировкой
Сортировка может помочь при обновлении поля с уникальным ключом. Если мы захотим сдвинуть наши id на 1, то, изменив первую строку, мы получим две строки, у которых id = 2, и возникнет ошибка. Но если добавить ORDER BY и начать обновлять с конца, то запрос успешно выполнится:
UPDATE book
SET book_id=book_id+1
Результат выполнения запроса:
12. Обновление на основе данных из других таблиц
Также в MySQL при работе с UPDATE в условии WHERE возможно использовать вложенные команды SELECT и FROM. В рассматриваемом примере мы сначала получаем идентификатор жанра ‘Epic poetry’, а потом на основе полученного значения отбираем строки для обновления таблицы.
UPDATE book
SET amount = 0
WHERE genre_id = (
   SELECT id
   FROM genre
   Where name_genre = 'Epic poetry'
);
Как вариант, мы можем выбрать значения, которые нужно изменить, используя запрос:
UPDATE book
SET price = (
SELECT MIN (cost)
FROM sales)
WHERE amount < 5;
Мы изменяем значения price всех книг, у которых количество на складе меньше 5, на минимальную сумму продажи.
Минимальная сумма продаж у нас 480:
В этой ситуации невозможно обновить таблицу, выбрав значения из той же таблицы в подзапросе. Но есть вариант использовать небольшую хитрость – мы можем объединить таблицу с собой:
UPDATE book AS book_1
    INNER JOIN(
        SELECT genre_id, MIN(amount) AS min_amount
        FROM book
        GROUP BY genre_id
    ) AS book_2 ON book_1.genre_id = book_2.genre_id
SET book_1.amount = book_2.min_amount;
В данном случае подзапрос создает временную таблицу для присоединения и закрывает ее до того, как начнется выполнение UPDATE.
Подзапрос находит минимальное количество книг для каждого жанра, после чего используется для обновления столбца amount. В нашей таблице только у жанра 4 имеется больше одной строки. Значения в обеих строках должно замениться на минимальное для этого жанра – 4.
Результат выполнения запроса:
Есть еще один вариант обновления – использование SELECT FROM SELECT:
UPDATE book AS book_1
SET book_1.price = (SELECT MIN(price) AS min_price FROM (
SELECT price
FROM book) as book_2);
В данном случае также создается временная таблица. Однако в этом случае присваивается только одно значение всем строкам.
Заключение
Мы постарались максимально подробно раскрыть особенности применения оператора UPDATE в MySQL. Но, конечно, практическое применение может продемонстрировать немало других интересных вариантов.
Подготовка среды MySQL
Для примеров этой статьи я использовал ту же самую базу данных (travel) и таблицы (manufacturers и airplanes), которые применялись в нескольких последних статьях этой серии.
Замечание. Примеры предполагают, что вы проработали предыдущую статью. В этом случае база данных travel уже должна быть установлена и готова для работы. Если нет, вы также можете использовать примеры данной статьи, только имейте в виду, что результаты ваших запросов могут несколько отличаться от приведенных здесь.
Для установки базы данных travel — если вы этого еще не сделали — загрузите файл MySQL_06_setup.sql и выполните скрипт SQL на экземпляре MySQL. Скрипт создает базу данных, таблицы и вставляет в них тестовые данные. В качестве альтернативы, вы можете создать базу данных, а затем выполнить следующий скрипт для создания таблиц manufacturers и airplanes:
CREATE TABLE manufacturers (
manufacturer_id INT UNSIGNED NOT NULL AUTO_INCREMENT,
manufacturer VARCHAR(50) NOT NULL,
create_date TIMESTAMP NOT NULL DEFAULT CURRENT_TIMESTAMP,
last_update TIMESTAMP NOT NULL
DEFAULT CURRENT_TIMESTAMP ON UPDATE CURRENT_TIMESTAMP,
PRIMARY KEY (manufacturer_id) )
ENGINE=InnoDB AUTO_INCREMENT=1001;CREATE TABLE airplanes (
plane_id INT UNSIGNED NOT NULL AUTO_INCREMENT,
plane VARCHAR(50) NOT NULL,
manufacturer_id INT UNSIGNED NOT NULL,
engine_type VARCHAR(50) NOT NULL,
engine_count TINYINT NOT NULL,
max_weight MEDIUMINT UNSIGNED NOT NULL,
wingspan DECIMAL(5,2) NOT NULL,
plane_length DECIMAL(5,2) NOT NULL,
parking_area INT GENERATED ALWAYS
AS ((wingspan * plane_length)) STORED,
icao_code CHAR(4) NOT NULL,
create_date TIMESTAMP NOT NULL
DEFAULT CURRENT_TIMESTAMP,
last_update TIMESTAMP NOT NULL
DEFAULT CURRENT_TIMESTAMP
ON UPDATE CURRENT_TIMESTAMP,
PRIMARY KEY (plane_id),
CONSTRAINT fk_manufacturer_id
FOREIGN KEY (manufacturer_id)
REFERENCES manufacturers (manufacturer_id) )
ENGINE=InnoDB AUTO_INCREMENT=101;
Затем вам нужно добавить данные в таблицы manufacturers и airplanes для поддержки примеров в этой статье. Начните с таблицы manufacturers, выполнив следующий оператор INSERT, который добавит производителя Beagle Aircraft Limited:
INSERT INTO manufacturers (manufacturer)

VALUES ('Beagle Aircraft Limited');

SELECT manufacturer_id

FROM   manufacturers

WHERE  manufacturer = 'Beagle Aircraft Limited';
После вставки данных оператор SELECT возвращает вновь добавленное значение из столбца manufacturer_id. Если вы следовали в точности последней паре статей, то значение будет равно 1008. Если нет, отметьте для себя значение manufacturer_id, которое вы получите, поскольку оно вам понадобится далее в статье, начиная со следующего оператора INSERT:
INSERT INTO airplanes

  (plane, manufacturer_id, engine_type, engine_count,

    wingspan, plane_length, max_weight, icao_code)

VALUES

  ('A.61 Terrier',1008,'piston',1,36,23.25,2400,'AUS6'),

  ('B.121 Pup',1008,'piston',1,31,23.17,1600,'PUP'),

  ('B.206',1008,'piston',2,55,33.67,7500,'BASS'),

  ('D.4-108',1008,'piston',1,36,23.33,1900,'D4'),

  ('D.5-108 Husky',1008,'piston',1,36,23.17,2400,'D5');
Если необходимо, замените значение 1008 на ваше значение manufacturer_id и выполните этот оператор. Сделав это, вы должны быть готовы следовать примерам из данной статьи. Однако имейте в виду, что ряд следующих примеров ссылается на столбец Manufacturer_id, поэтому, если значение в вашей системе не равно 1008, обязательно используйте правильное значение.
Синтаксис оператора UPDATE
Оператор UPDATE в MySQL поддерживает 5 предложений, два из которых являются обязательными, а три — необязательными, что отмечено в следующем синтаксисе:
UPDATE [IGNORE] table_name

SET column = value [, column = value]...

[WHERE where_condition]

[ORDER BY order_list]

[LIMIT row_count]
Этот синтаксис включает не все элементы оператора UPDATE, но представляет их большинство. Это те, которые вы будете использовать большую часть времени, не только при изучении этого оператора, но также и после его освоения. Полный синтаксис оператора UPDATE вы найдете в документации MySQL.
Вот объяснение этих пяти предложений:
- Предложение UPDATE, одно из двух обязательных предложений, задает таблицу, которая является целью обновления. Вы можете указать несколько таблиц в этом предложении, разделив их запятыми, но я в этой статье сфокусируюсь на обновлениях одной таблицы. Я оставлю тему обновления нескольких таблиц для более продвинутых статей.
- Предложение SET, другое обязательное предложение, определяет обновляемые столбцы. Вы можете включить задания для одного или более столбцов. Для каждого задания указывается имя столбца, знак равенства и новое значение. Если включены несколько заданий, разделяйте их запятыми.
- Предложение WHERE определяет подлежащие обновлению строки на основе одного или нескольких условий. Предложение работает во многом подобно предложению WHERE в операторе SELECT. Хотя предложение WHERE не является обязательным, вам следует очень внимательно выполнять оператор UPDATE, который не включает это предложение. Без него оператор обновит каждую строку таблицы, если не включено предложение LIMIT.
- Предложение ORDER BY задает порядок, в котором должны обновляться строки. Это может использоваться в ситуациях, которые в противном случае могут привести к ошибке, как вы увидите далее в статье. Предложение ORDER BY подобно аналогичному предложению в операторе SELECT. Это предложение не может использоваться для обновления нескольких таблиц.
- Предложение LIMIT ограничивает число строк, которые будут обновляться. Если включено предложение WHERE, количество применяется к строкам, возвращаемым этим предложением. Это означает, что оператор оперирует теми строками, которые удовлетворяют условиям WHERE, вне зависимости от того, были ли эти строки фактически обновлены. Как и в случае предложения ORDER BY, предложение LIMIT не может использоваться для обновления нескольких таблиц.
С этими пятью предложениями вы можете построить разнообразные операторы UPDATE. По большей части вы будете использовать предложения UPDATE, SET и WHERE, хотя предложения ORDER BY и LIMIT тоже могут иногда пригодиться.
Когда вы увидите этот оператор в действии, у вас не должно возникнуть проблем с пониманием того, как эти предложения работают, и использованием их для обновления данных. На самом деле, обновлять данные очень просто, но если вы не будете осторожны, можно натворить много бед. Модификацию данных может оказаться сложно отменить, поэтому необходимо действовать осторожно, особенно когда вы только начали изучение оператора UPDATE. Конечно, не следует практиковаться в производственной базе. Если вы выполняете обновление в производственной среде, убедитесь, что вы делаете это в рамках транзакции, о чем я собираюсь рассказать далее в этой серии.
Выполнение базового обновления в MySQL
Пора посмотреть оператор UPDATE в действии, чтобы вы почувствовали, как он работает. Как я уже говорил, только предложения UPDATE и SET являются обязательными, поэтому с них и начнем.
Предположим, что вы хотите округлить все значения в столбце wingspan таблицы airplanes до целых чисел. Чтобы добиться этого, создадим следующий оператор UPDATE:
UPDATE airplanes

SET wingspan = ROUND(wingspan);
Предложение UPDATE задает airplanes в качестве целевой таблицы, а предложение SET указывает, что значения в столбце wingspan должны округляться, что достигается при использовании встроенной функции ROUND.
Это все, что требуется для обновления данных wingspan. Однако есть большая вероятность, что при попытке запустить этот оператор вы получите следующую ошибку:
Error Code: 1175. You are using safe update mode and you tried to update a table without a WHERE that uses a KEY column. To disable safe mode, toggle the option in Preferences -> SQL Editor and reconnect.

(Вы используете безопасный режим обновления  пытались обновить таблицу без предложения WHERE, которое использует КЛЮЧЕВОЙ столбец. Для отключения безопасного режима переключите опцию в Preferences -> SQL Editor и соединитесь повторно.)
По умолчанию вы не можете выполнить обновление без предложения WHERE, которое задает ключевой столбец. Это помогает гарантировать, что вы не внесете радикальные изменения, о которых потом будете жалеть. Вы можете отключить безопасный режим (как предлагается в сообщении об ошибке) либо на постоянной основе, либо временно. Я рекомендую это делать временно, чтобы избежать нежелательных изменений когда-либо впоследствии.
Для временного отключения безопасного режима используйте оператор SET для установки системной переменной SQL_SAFE_UPDATES в значение 0 до выполнения оператора UPDATE, а затем установки переменной в 1 после выполнения оператора, как показано в следующем примере:
SET SQL_SAFE_UPDATES = 0;

UPDATE airplanes

SET wingspan = ROUND(wingspan);

SET SQL_SAFE_UPDATES = 1;
Операторы SET просто переключают переменную во время текущей сессии. Однако имейте в виду, что оператор SET поддерживает опцию GLOBAL, которая устанавливает переменную на глобальном уровне. Возьмите за правило не использовать этот параметр при отключении безопасных обновлений. Гораздо менее рискованно использовать этот тип изменений на уровне сессии, чтобы избежать незапланированных несчастных случаев. Используйте GLOBAL, только если это важно в ваших обстоятельствах.
Более подробно о SET, глобальных переменных и настройках читайте в документации MySQL.
Даже на сессионном уровне оператор SET делает возможным выполнение оператора UPDATE без генерации ошибки. Подтвердить изменения после выполнения скрипта выше можно с помощью простого оператора SELECT:
SELECT * FROM airplanes;
На рисунке 1 показаны результаты, возвращаемые оператором SELECT. Обратите внимание, что значения wingspan теперь являются целыми числами.
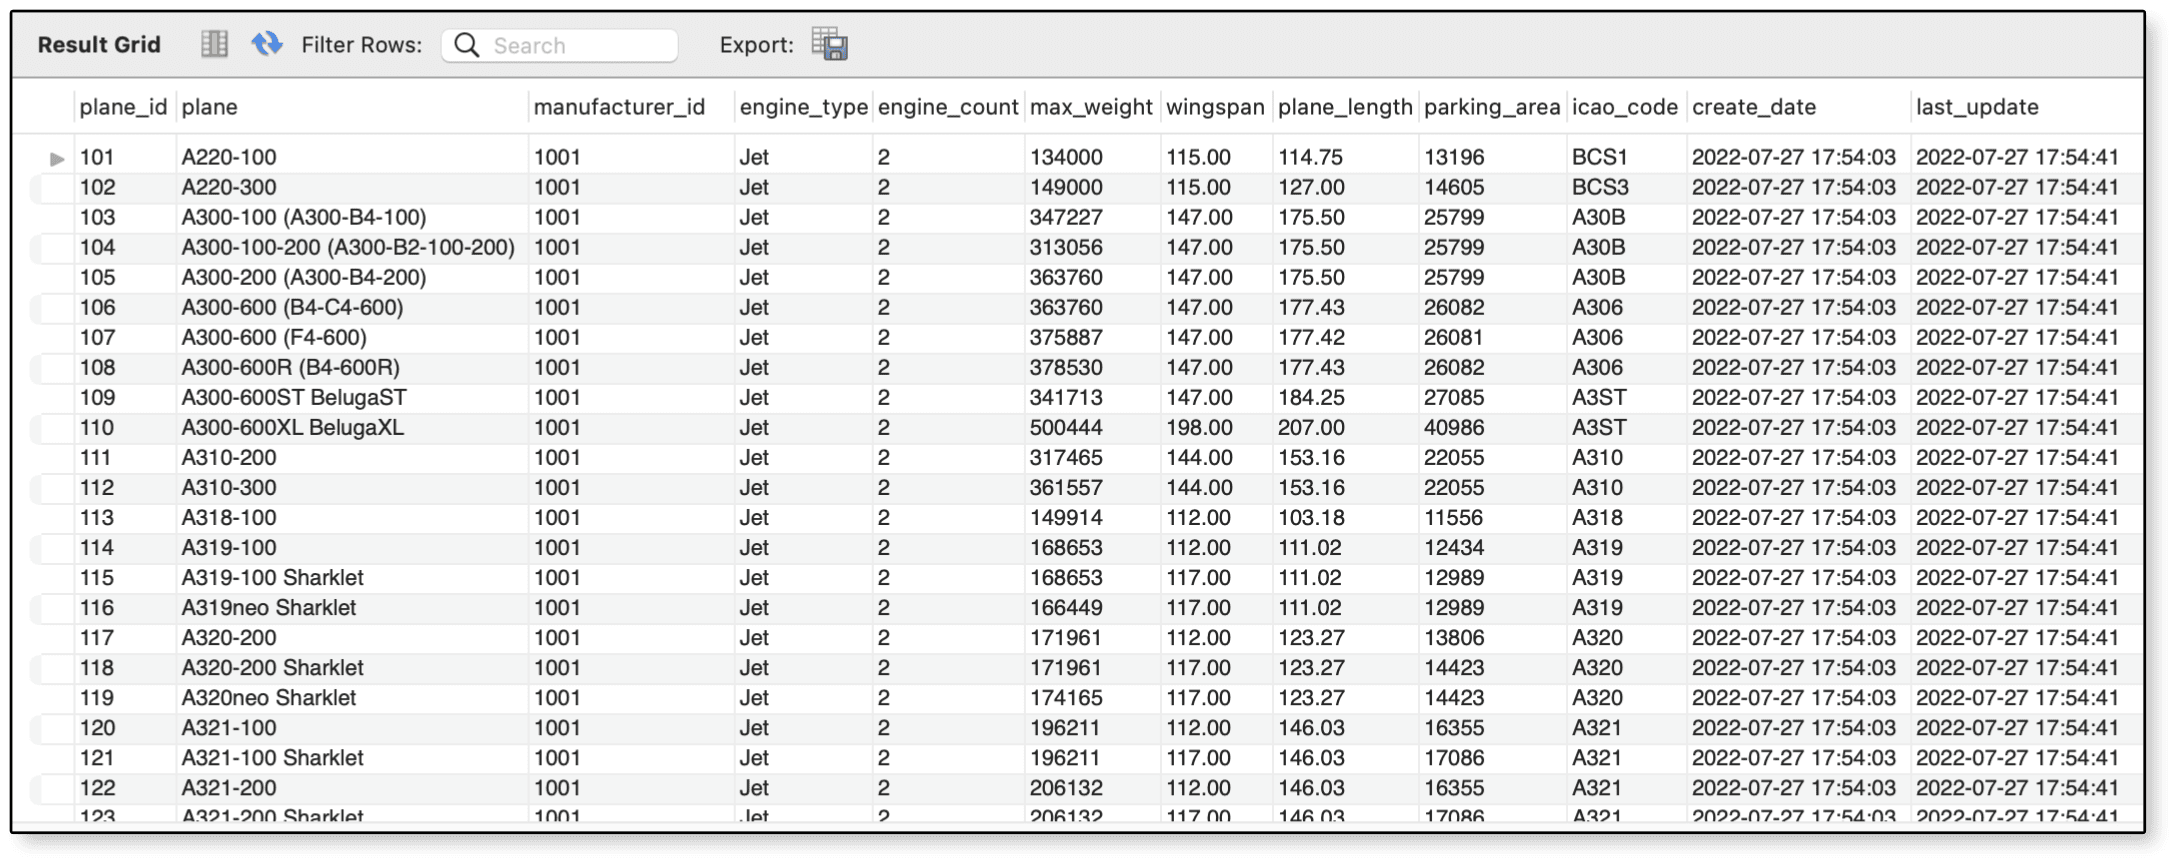
Рис.1. Округление значений в столбце wingspan
В некоторых случаях вам может потребоваться обновить несколько столбцов одновременно. Для этого вам нужно добавить задания для этих столбцов, разделяя их запятыми. Например, следующий оператор UPDATE модифицирует оба столбца wingspan и plane_length:
SET SQL_SAFE_UPDATES = 0;

UPDATE airplanes

SET wingspan = ROUND(wingspan), plane_length = ROUND(plane_length);

SET SQL_SAFE_UPDATES = 1;
Задания для обоих столбцов работают одинаково. Вы просто округляете значения столбца до целых чисел. Если запросить таблицу airplanes после выполнения оператора UPDATE, ваши результаты должны выглядеть подобно показанным на рис.2.
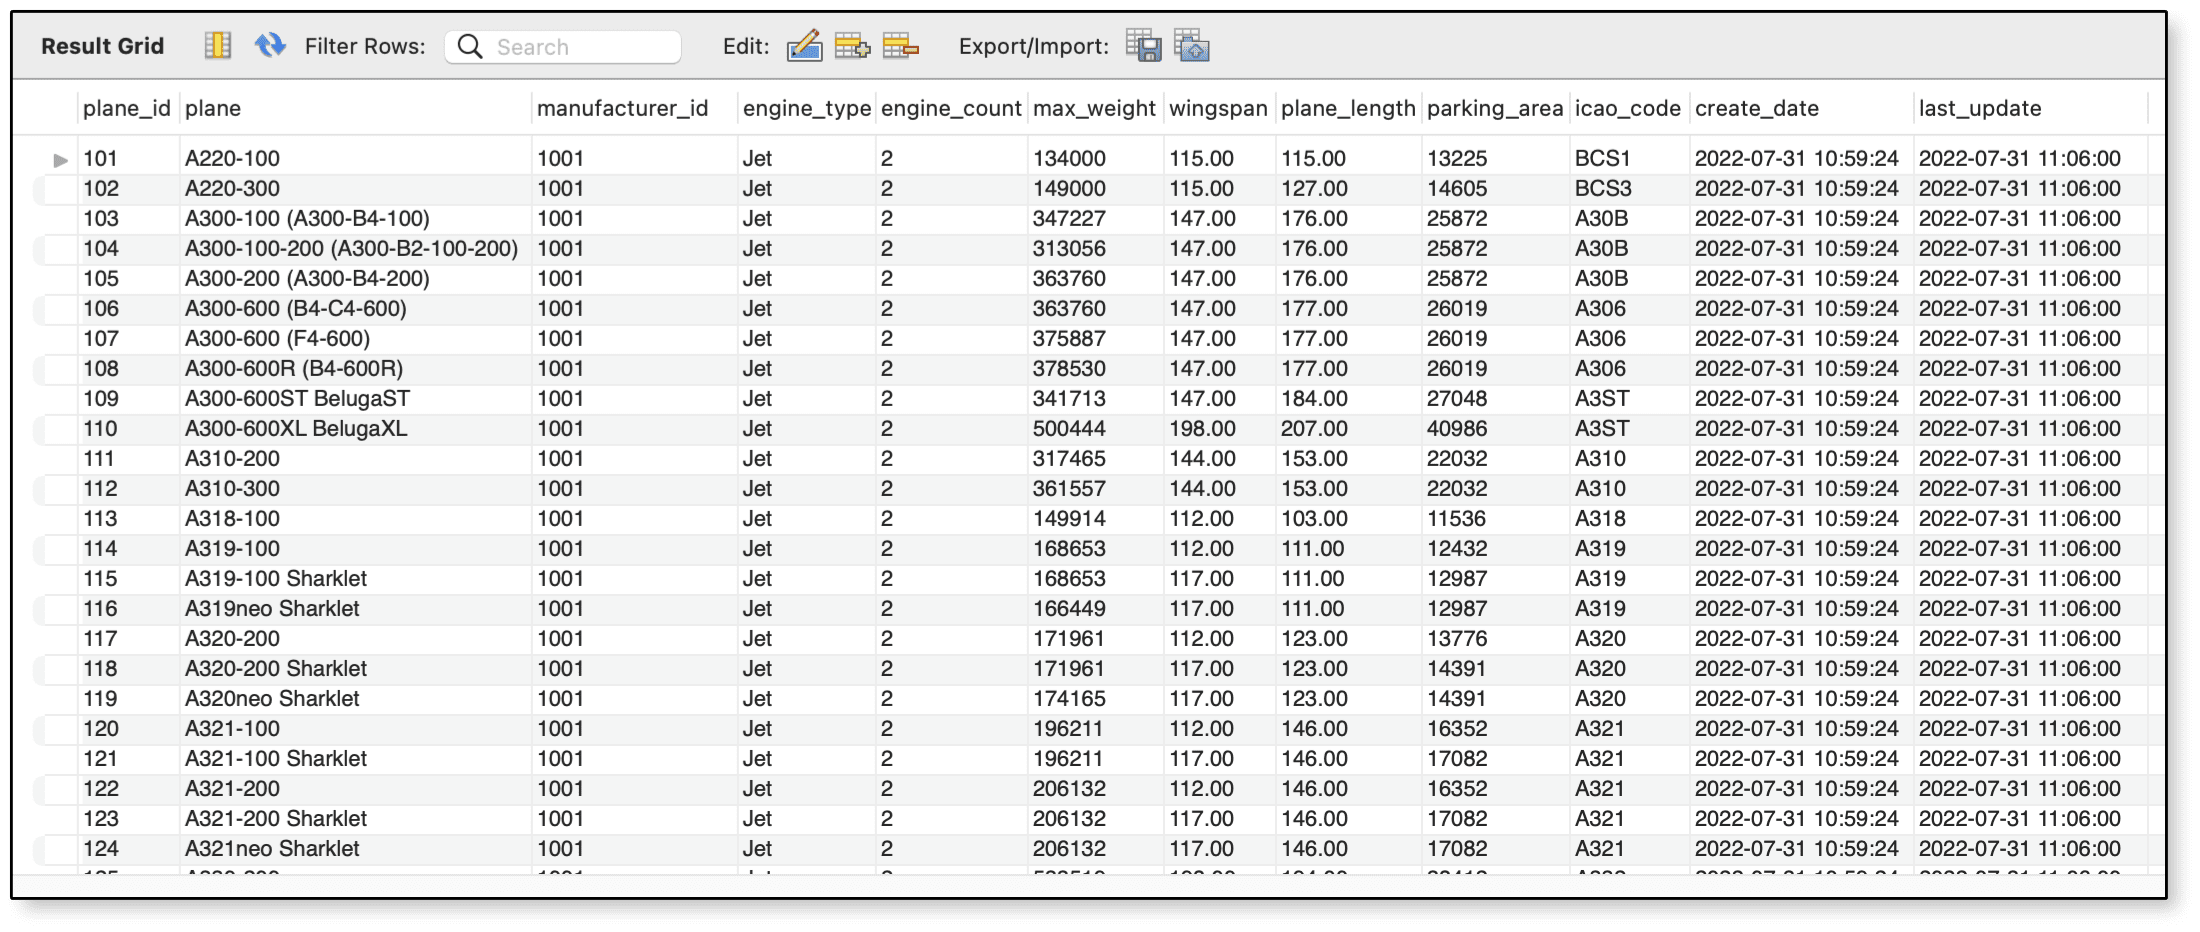
Рис.2. Округление значений в столбцах wingspan и plane_length
Используя предложения UPDATE и SET, вы можете быстро обновить все значения столбца. Просто будьте осторожны, если используете этот подход. Слишком легко все испортить.
Добавление предложения WHERE в оператор UPDATE
Большинство ваших операторов UPDATE будут, вероятно, включать предложение WHERE, чтобы помочь вам лучше определить данные, подлежащие изменению. Предложение WHERE задает одно или более условий, которые сужают объем обновляемых строк. Например, следующий оператор включает предложение WHERE, которое ограничивает обновляемые строки значением 1008 в столбце manufacturer_id:
UPDATE airplanes

SET engine_type = 'piston (adg-i)'

WHERE manufacturer_id = 1008;

SELECT *

FROM   airplanes

WHERE manufacturer_id = 1008;
Предложение SET в этом операторе устанавливает engine_type в значение «piston (adg-i)» для целевых строк. Результаты выполнения оператора должны выглядеть как на рис.3.

Рис.3. Ограничение обновления заданными строками
Замечание: Если вам интересно, значение adg-i — это ссылка на классификацию Airplane Design Group (ADG), систему, используемую для классификации самолетов, подразделяя их на шесть групп на базе размаха крыльев и высоты хвоста. i в нижнем регистре означает, что самолеты в этом примере относятся к Группе I. (Я понимаю, что вы, вероятно, захотите добавть столбец для групп ADG. Подход, который я использовал здесь, предназначался только для демонстрации этих концепций.)
Таким образом, оказывается, что аэроплан B.206 должен фактически быть в Группе II, и значит нам нужно обновить эту запись без обновления остальных. К счастью, вы можете определять несколько условий в предложении WHERE, чтобы сократить число строк. В следующем примере предложение WHERE включает два условия, одно для столбца manufacturer_id, а другое — для столбца plane.
UPDATE airplanes

SET engine_type = 'piston (adg-ii)'

WHERE manufacturer_id = 1008 AND plane = 'B.206';
Как в предыдущем примере, предложение WHERE ограничивает обновление строками, для которых значение manufacturer_id равно 1008. Однако это предложение также указывает, что значение plane должно равняться B.206. Два условия связываются логическим оператором AND, который означает, что оба условия должны быть истинны для обновляемых строк.
После выполнения оператора UPDATE вы можете опять вывести эти строки. Ваши результаты должны быть похожи на представленные на рис.4. Обратите внимание, что самолет B.206 теперь представлен в группе Group II.

Рис.4. Ограничение обновления одной заданной строкой
Вы можете сделать предложение WHERE настолько детальным, чтобы гарантировать обновление целевых строк и никаких больше. Для этого используйте ваши логические операторы корректно, чтобы гарантировать точную логику условных выражений.
Работа с значениями столбца
В первом примере этой статьи вы видели, как использовать системную функцю ROUND для округления значений в таблице airplanes. Когда вы обновляете столбец этим способом, MySQL использует текущее значение для создания нового значения. Способность использовать текущее значение делает возможным построить на этом значении новое способами, выходящими за пределы простого применения функции. Например, следующий оператор UPDATE добавит 3 к значению wingspan и 5 к значению plane_length:
UPDATE airplanes

SET wingspan = wingspan + 3, plane_length = plane_length + 5

WHERE plane_id = 344;
В этом случае я использовал значение plane_id = 344 в предложении WHERE, которое мне пришлось искать в таблице. Однако вы могли бы использовать другой метод для нахождения этого значения, например, выбрать его с помощью подзапроса, что я планирую рассмотреть далее в этой серии.
После выполнения этого оператора вы можете выполнить запрос к таблице airplanes для проверки результатов, которые должны быть похожи на представленные на рис.5.

Рис.5. Увеличение значений в столбцах wingspan и plane_length
Если вы сравните рисунки 5 и 4, то увидите, что строка со значением plane_id = 344 была обновлена. Вы можете также заметить, что MySQL автоматически обновила столбец parking_area, который является генерируемым столбцом, перемножающим значения wingspan и plane_length.
Если вы попытаетесь обновить столбец на то же самое значение, которое уже есть, MySQL окажется достаточно умен, чтобы понять это и не менять исходное значение. Такой подход может потенциально уменьшить бесполезную нагрузку и минимизировать воздействие на конкурирующие операции, которые могут пытаться извлечь или модифицировать это значение в то же самое время. MySQL также понимает, когда вы пытаетесь вставить неприемлемое значение в столбец. Например, следующий оператор UPDATE пытается изменить значение столбца engine_type на NULL:
UPDATE airplanes SET engine_type = NULL WHERE plane_id = 344;
Поскольку столбец определен как NOT NULL, оператор UPDATE потерпит неудачу и сгенерирует следующую ошибку:
Error Code: 1048. Column 'engine_type' cannot be null

(столбец 'engine_type' не может быть null)
Вы также получите ошибку, если попытаетесь обновить столбец значением некорректного типа данных. Например, следующий оператор UPDATE пытается обновить столбец max_weight на строковое значение unknown:
UPDATE airplanes

SET max_weight = 'unknown'

WHERE plane_id = 344;
Неудивительно, что этот оператор также не будет выполнен, поскольку столбец max_weight определен с типом данных MEDIUMINT. Вместо обновления MySQL вернет следующую ошибку:
Error Code: 1366. Incorrect integer value: 'unknown' for column 'max_weight' at row 1

(Некорректное целое значение: 'unknown' для столбца 'max_weight' в строке 1)
Как и в случае вставки данных, для обновления данных вам следует иметь информацию о целевых столбцах, которые вы пытаетесь обновить. Недостаточно знать только тип данных. Вы должны также понимать, как определен тип данных. Например, если вы попытаетесь обновить столбец icao_code строкой abcdef, будет генерироваться ошибка, поскольку столбец определен как CHAR(4).
Обновление столбцов внешнего ключа в таблицах MySQL
У вас может появиться желание обновить значение в столбце внешнего ключа. Однако это может оказаться непросто, поскольку MySQL выполняет проверки внешнего ключа. Например, предположим, что вы хотите обновить столбец manufacturer_id в таблице airplanes:
UPDATE airplanes

SET manufacturer_id = 2001

WHERE manufacturer_id = 1008;
Неудивительно, что MySQL заблокирует вашу попытку выполнить этот оператор и вернет вместо этого следующую ошибку (если вы не добавили ключевое слово IGNORE):
Error Code: 1452. Cannot add or update a child row: a foreign key constraint fails (`travel`.`airplanes`, CONSTRAINT `fk_manufacturer_id` FOREIGN KEY (`manufacturer_id`) REFERENCES `manufacturers` (`manufacturer_id`))

(Невозможно добавить или изменить дочернюю строку: нарушение ограничения внешнего ключа)
Вы не можете обновить внешний ключ значением, которого не существует в ссылочном столбце. Вы должны сначала внести необходимые изменения в родительскую таблицу. Однако это тоже может оказаться затруднительным. Например, вы могли бы попытаться обновить значение manufacturer_id в таблице manufacturers:
UPDATE manufacturers

SET manufacturer_id = 2001

WHERE manufacturer_id = 1008;
К сожалению, это приведет к тому, что MySQL опять сгенерирует ошибку, поскольку вы не можете обновить значение, на которое ссылается внешний ключ:
Error Code: 1451. Cannot delete or update a parent row: a foreign key constraint fails (`travel`.`airplanes`, CONSTRAINT `fk_manufacturer_id` FOREIGN KEY (`manufacturer_id`) REFERENCES `manufacturers` (`manufacturer_id`))

(Нельзя удалить или обновить родительскую строку: нарушено ограничение внешнего ключа.)
Вы можете обойти эти проблемы, временно отключив проверки внешнего ключа в пределах сессии (или установив опцию CASCADE для внешнего ключа, о чем я буду говорить в последующей статье). Для этого установите системную переменную foreign_key_checks в значение 0 перед выполнением оператора UPDATE, а затем установите ее обратно в значение 1 после выполнения операторов:
SET foreign_key_checks = 0;

UPDATE manufacturers

SET manufacturer_id = 2001

WHERE manufacturer_id = 1008;

UPDATE airplanes

SET manufacturer_id = 2001

WHERE manufacturer_id = 1008;

SET foreign_key_checks = 1;
Таким образом вы можете обновить значения manufacturer_id в обеих таблицах без возникновения ошибок внешнего ключа. В качестве напоминания скажу, избегайте использования опции GLOBAL в ваших операторах SET. Если выключить проверки внешнего ключа на глобальном уровне, вы рискуете нарушить целостность ваших данных.
После выполнения этих операторов вы можете сделать запрос к таблице manufacturers, чтобы проверить выполненные изменения:
SELECT * FROM manufacturers WHERE manufacturer_id = 2001;
На рисунке 6 показаны данные, возвращаемые этим оператором. Как видно, таблица была обновлена без проблем, в частности, потому что вы задали новое значение первичного ключа, которого еще не существовало.
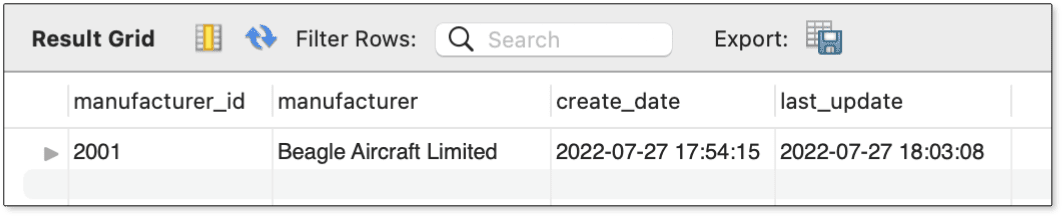
Рис.6. Обновление таблицы manufacturers
Вы можете также запросить таблцу airplanes, чтобы проверить, что строки были правильно обновлены:
SELECT * FROM airplanes WHERE manufacturer_id = 2001;
На рисунке 7 показаны результаты, возвращаемые запросом. Как и ожидалось, значения manufacturer_id были обновлены для всех целевых строк.

Рис.7. Обновление столбца manufacturer_id в таблице airplanes
Вероятно, вам не придется обновлять столбцы внешнего ключа слишком часто, но важно понимать, во что это выливается, если случится. Просто знайте, что имеются и другие проблемы, о которых стоит беспокоиться, например, не пытаться вставить повторяющиеся значения первичных ключей.
Обновление столбцов первичного ключа в таблицах MySQL
Как и в случае внешних ключей, вам может иногда понадобиться обновить значения в столбце первичного ключа. Если вы обновляете единственное значение (как в случае выше), то обычно проблем не возникает, коль скоро новое значение удовлетворяет требованиям столбца. Однако все становится сложнее, если одновременно обновляются несколько значений. Например, следующий оператор UPDATE пытается добавить 1 ко всем значениям plane_id в строках, для которых значение manufacturer_id равно 2001:
UPDATE airplanes

SET plane_id = plane_id + 1

WHERE manufacturer_id = 2001;
Оператор имеет хороший шанс завершиться неудачно из-за порядка, в котором MySQL обновляет каждую строку данных (поскольку вы не можете делать никаких предположений о порядке, который ядро базы данных выберет при обновлении данных). Это связано с тем, что MySQL пытается обновить исходное значение на значение, которое уже существует и само ожидает обновления. Например, если MySQL пытается обновить первую строку с 342 на 343 перед обновлением второй строки, то оператор завершится неудачно, и MySQL вернет следующую ошибку:
Error Code: 1062. Duplicate entry '343' for key 'airplanes.PRIMARY'

(дубликат записи 343 для ключа 'airplanes.PRIMARY')
У вас может возникнуть соблазн включить ключевое слово IGNORE, чтобы попытаться обойти эту проблему:
UPDATE IGNORE airplanes

SET plane_id = plane_id + 1

WHERE manufacturer_id = 2001;
Ключевое слово IGNORE дает указание MySQL вернуть предупреждение, а не ошибку, и продолжить, а не остановить, выполнение оператора. В этом случае вы, вероятно, получите четыре предупреждения и сообщение, что одна строка была успешно обновлена:
1 row(s) affected, 4 warning(s):

1062 Duplicate entry '343' for key 'airplanes.PRIMARY'

1062 Duplicate entry '344' for key 'airplanes.PRIMARY'

1062 Duplicate entry '345' for key 'airplanes.PRIMARY'

1062 Duplicate entry '346' for key 'airplanes.PRIMARY'

Rows matched: 5 Changed: 1 Warnings: 4
Если обратиться к таблице airplanes, то можно увидеть, что только последняя строка была обновлена, что видно на рисунке 8. Это объясняется тем, что только последняя строка не пыталась обновить первичный ключ существующим значением.

Рис.8. Использование опции IGNORE при обновлении столбца plane_id
Лучшим решением будет включить предложение ORDER BY, которое сортирует строки по значениям plane_id в убывающем порядке:
UPDATE airplanes

SET plane_id = plane_id + 1

WHERE manufacturer_id = 2001

ORDER BY plane_id DESC;
Когда вы включаете ORDER BY таким образом, MySQL применяет обновление, начиная с последней строки, позволяя инкрементировать значения на 1 без возникновения ошибок или предупреждений.
На рисунке 9 показаны данные после выполнения оператора UPDATE.

Рис.9. Добавление предложения ORDER BY в оператор UPDATE
Вероятно, вам не очень часто потребуется использовать предложение ORDER BY, но это может оказаться весьма полезным.
В этом смысле похоже ведет себя другое предложение — LIMIT, — которое ограничивает число обновляемых строк. Например, следующий оператор обновления ограничивает число строк значением 3:
UPDATE airplanes

SET plane_id = plane_id + 1

WHERE manufacturer_id = 2001

ORDER BY plane_id DESC

LIMIT 3;
Поскольку оператор UPDATE также содержит предложение ORDER BY, три обновляемых строк следуют снизу вверх. На рисунке 10 показаны результаты запроса к таблице после обновления.

Рис.10. Добавление предложения LIMIT в оператор UPDATE
Я полагаю, что вы не очень часто будете включать предложение LIMIT в операторы UPDATE (если вообще будете), но могут возникнуть ситуации, когда вы сочтете это полезным. Например, вы захотите протестировать оператор UPDATE, который предположительно должен модифицировать большое число строк. Включение предложения LIMIT во время тестирования оператора сократит время на обработку, чтобы проверить правильность работы оператора.
Работа с оператором UPDATE в MySQL
Оператор UPDATE является одним из наиболее часто используемых при работе с даными в MySQL. В большинстве случаев вы ограничитесь предложениями UPDATE, SET и WHERE. Иногда вы можете отказаться от предложения WHERE — на свой страх и риск — а иногда вы можете сочетать его с предложением ORDER BY или LIMIT (или обоми). Однако основная масса ваших обновлений, вероятно, будет ограничиваться тремя основными предложениями.
Независимо от используемых предложений вам нужно понимать, как они работают, чтобы гарантировать наиболее эффективную модификацию данных при точности обновления. К счастью, оператор UPDATE довольно прост для понимания, поэтому у вас не должно возникнуть проблем с его применением.
I have the following table of counters:
CREATE TABLE cache (
    key text PRIMARY KEY,
    generation int
);
I would like to increment one of the counters, or set it to zero if the corresponding row doesn’t exist yet. Is there a way to do this without concurrency issues in standard SQL? The operation is sometimes part of a transaction, sometimes separate.
The SQL must run unmodified on SQLite, PostgreSQL and MySQL, if possible.
A search yielded several ideas which either suffer from concurrency issues, or are specific to a database:
-
Try to
INSERTa new row, andUPDATEif there was an error. Unfortunately, the error onINSERTaborts the current transaction. -
UPDATEthe row, and if no rows were modified,INSERTa new row. -
MySQL has an
ON DUPLICATE KEY UPDATEclause.
EDIT: Thanks for all the great replies. It looks like Paul is right, and there’s not a single, portable way of doing this. That’s quite surprising to me, as it sounds like a very basic operation.
![]()
asked Mar 27, 2009 at 17:07
![]()
3
MySQL (and subsequently SQLite) also support the REPLACE INTO syntax:
REPLACE INTO my_table (pk_id, col1) VALUES (5, '123');
This automatically identifies the primary key and finds a matching row to update, inserting a new one if none is found.
Documentation: https://dev.mysql.com/doc/refman/8.0/en/replace.html
![]()
answered Mar 27, 2009 at 17:15
![]()
andygeersandygeers
6,8739 gold badges49 silver badges63 bronze badges
4
SQLite supports replacing a row if it already exists:
INSERT OR REPLACE INTO [...blah...]
You can shorten this to
REPLACE INTO [...blah...]
This shortcut was added to be compatible with the MySQL REPLACE INTO expression.
answered Mar 27, 2009 at 17:19
![]()
Kyle CroninKyle Cronin
77.4k43 gold badges147 silver badges163 bronze badges
1
I would do something like the following:
INSERT INTO cache VALUES (key, generation)
ON DUPLICATE KEY UPDATE (key = key, generation = generation + 1);
Setting the generation value to 0 in code or in the sql but the using the ON DUP… to increment the value. I think that’s the syntax anyway.
answered Mar 27, 2009 at 17:45
![]()
jmozjmoz
7,8395 gold badges31 silver badges33 bronze badges
1
the ON DUPLICATE KEY UPDATE clause is the best solution because:
REPLACE does a DELETE followed by an INSERT so for an ever so slight period the record is removed creating the ever so slight possibility that a query could come back having skipped that if the page was viewed during the REPLACE query.
I prefer INSERT … ON DUPLICATE UPDATE … for that reason.
jmoz’s solution is the best:
though I prefer the SET syntax to the parentheses
INSERT INTO cache
SET key = 'key', generation = 'generation'
ON DUPLICATE KEY
UPDATE key = 'key', generation = (generation + 1)
;
answered Mar 28, 2009 at 22:47
![]()
Fire CrowFire Crow
7,4194 gold badges36 silver badges35 bronze badges
1
In PostgreSQL there is no merge command, and actually writing it is not trivial — there are actually strange edge cases that make the task «interesting».
The best (as in: working in the most possible conditions) approach, is to use function — such as one shown in manual (merge_db).
If you don’t want to use function, you can usually get away with:
updated = db.execute(UPDATE ... RETURNING 1)
if (!updated)
  db.execute(INSERT...)
Just remember that it is not fault proof and it will fail eventually.
answered Mar 27, 2009 at 17:41
Standard SQL provides the MERGE statement for this task. Not all DBMS support the MERGE statement.
answered Mar 27, 2009 at 17:27
![]()
Jonathan LefflerJonathan Leffler
727k140 gold badges900 silver badges1275 bronze badges
If you don’t have a common way to atomically update or insert (e.g., via a transaction) then you can fallback to another locking scheme. A 0-byte file, system mutex, named pipe, etc…
answered Mar 27, 2009 at 17:11
![]()
SheaShea
11k2 gold badges19 silver badges20 bronze badges
Could you use an insert trigger? If it fails, do an update.
answered Mar 27, 2009 at 17:12
![]()
Michael ToddMichael Todd
16.6k4 gold badges49 silver badges69 bronze badges
1
If you’re OK with using a library that writes the SQL for you, then you can use Upsert (currently Ruby and Python only):
Pet.upsert({:name => 'Jerry'}, :breed => 'beagle')
Pet.upsert({:name => 'Jerry'}, :color => 'brown')
That works across MySQL, Postgres, and SQLite3.
It writes a stored procedure or user-defined function (UDF) in MySQL and Postgres. It uses INSERT OR REPLACE in SQLite3.
answered Nov 5, 2013 at 15:06
![]()
Seamus AbshereSeamus Abshere
8,2864 gold badges43 silver badges61 bronze badges
И остальные запросы к БД как проверять? Может они заголовки какие возвращают, которые можно в if проверить?
-
Вопрос заданболее трёх лет назад
-
2765 просмотров
Конечно возвращают.
php.net/manual/ru/mysqli.query.php
Возвращает FALSE в случае неудачи. В случае успешного выполнения запросов SELECT, SHOW, DESCRIBE или EXPLAIN mysqli_query() вернет объект mysqli_result. Для остальных успешных запросов mysqli_query() вернет TRUE.
Пригласить эксперта
$res = $mysqli->query('UPDATE smth....');
var_dump( $res );
// 'true' if success
// else 'false'-
Показать ещё
Загружается…
09 июн. 2023, в 01:21
10000 руб./за проект
09 июн. 2023, в 01:06
50000 руб./за проект
09 июн. 2023, в 00:36
1000 руб./за проект
Минуточку внимания
SQL UPDATE Statement

The SQL UPDATE statement is used to update or modify the existing records in a specific table.
The SQL UPDATE statement is also used to update all records (without SQL WHERE clause) or specific records that match a specified criteria using SQL WHERE clause.
This is accomplished by carefully constructing a where clause.
Sql update statement using update query in sql, mysql update where, syntax, update multiple, update from table, update table set column,
update record in sql, update set multiple column values, update where in, Duplicate Key, Aggregate Function, Batch, Bulk Data, Calculate Values.
SQL UPDATE Syntax
The basic syntax of SQL UPDATE statement with SQL WHERE clause is as follows:
UPDATE table_name1
SET column_name1 = value_1, column_name2 = value_2,...column_nameN = value_N
WHERE some_column_name_1 = some_value_1;
You can combine N number of conditions using AND or OR operators.
Note: The SQL WHERE clause in the SQL UPDATE statement!
The SQL WHERE clause specifies criteria to update, which row or rows that should be updated.
If you omit the SQL WHERE clause, all rows will be updated!
Sample Database Table — Books
| BookId | BookName | BookPrice | RelYear | DomainName | AuthorName |
|---|---|---|---|---|---|
| 1 | Head First SQL | 123.45 | 2012 | Performance | Geetha |
| 2 | From Access To SQL Server | 178.69 | 2009 | Optimization | Vinoth Kumar |
| 3 | Oracle PL/sql By Example | 150 | 2009 | Performance | Devi Mai |
| 4 | Postgre Sql Server Programming | 60 | 2008 | Performance | Devi Mai |
Sample Database Table Structure — Books
| Column Name | Data Type |
|---|---|
| BookID | Number |
| BookName | Text |
| BookPrice | Number |
| RelYear | Number |
| DomainName | Text |
| AuthorName | Text |
Text Column Vs Numeric Column
SQL requires single or double (most database support) quotes around text or string values.
However, we write numeric fields without quotes:
SQL UPDATE Example
Example 1
The following SQL statement will update a existing row, but only update data in the «AuthorName» and
«BookPrice» column
for BookID = 2, in the «Books» table:
UPDATE Books
SET AuthorName = 'Devi Mai', BookPrice = 260
WHERE BookID = 2;
The result of above query is:
| BookId | BookName | BookPrice | RelYear | DomainName | AuthorName |
|---|---|---|---|---|---|
| 1 | Head First SQL | 123.45 | 2012 | Performance | Geetha |
| 2 | From Access To SQL Server | 260 | 2009 | Optimization | Devi Mai |
| 3 | Oracle PL/sql By Example | 150 | 2009 | Performance | Devi Mai |
| 4 | Postgre Sql Server Programming | 60 | 2008 | Performance | Devi Mai |
Example 2
The following SQL statement will update two existing rows, but only update data in the «BookPrice», «RelYear» and «DomainName»
columns for AuthorName = «Devi Mai» and BookID greater than «2», in the «Books» table:
UPDATE Books
SET BookPrice = 180, RelYear = 2010, DomainName = 'Programming'
WHERE AuthorName = 'Devi Mai' AND BookID > 2;
The result of above query is:
| BookId | BookName | BookPrice | RelYear | DomainName | AuthorName |
|---|---|---|---|---|---|
| 1 | Head First SQL | 123.45 | 2012 | Performance | Geetha |
| 2 | From Access To SQL Server | 260 | 2009 | Optimization | Devi Mai |
| 3 | Oracle PL/sql By Example | 180 | 2010 | Programming | Devi Mai |
| 4 | Postgre Sql Server Programming | 180 | 2010 | Programming | Devi Mai |
Example 3
The following SQL statement will update all existing rows, but only update data in the «BookPrice», «RelYear» and «DomainName»
column, in the «Books» table:
UPDATE Books SET
BookPrice = 50, RelYear = 2016, DomainName = 'Sql Programming';
The result of above query is:
| BookId | BookName | BookPrice | RelYear | DomainName | AuthorName |
|---|---|---|---|---|---|
| 1 | Head First SQL | 50 | 2016 | Sql Programming | Geetha |
| 2 | From Access To SQL Server | 50 | 2016 | Sql Programming | Devi Mai |
| 3 | Oracle PL/sql By Example | 50 | 2016 | Sql Programming | Devi Mai |
| 4 | Postgre Sql Server Programming | 50 | 2016 | Sql Programming | Devi Mai |
Sql server update command using sql update multiple set, update table from table, update set where in, update multiple rows, update query with select,
multiple updates in one query, postgres update statement, update from mssql, update multiple fields, update all columns, multiple updates in one query, change value in table,
Update Column to Null, Update Increase Salary by 10 Percent, Update Only if Value Changed, Update Top n Rows.
SQL Update Duplicate Key
If an ON DUPLICATE KEY UPDATE clause is included and a row to be inserted would result in a duplicate value in a UNIQUE index or PRIMARY KEY, the old row is updated.
The system always detects for duplicate rows throughout the update process unless a table is established as MULTISET (without UNIQUE constraints) to allow duplicate entries. The sequence in which updates are applied can have an impact on the final outcome of a transaction.
Example 1: For example, if column a is declared as UNIQUE and contains the value 1, the following two statements have similar effect:
INSERT INTO t1 (a,b,c) VALUES (1,2,3)
  ON DUPLICATE KEY UPDATE c=c+1;

UPDATE t1 SET c=c+1 WHERE a=1;
The results aren’t quite the same: The INSERT statement increases the auto-increment value of an auto-increment column in an InnoDB table, but the UPDATE statement does not.
If column b is also unique, the INSERT command is replaced by this UPDATE statement:
UPDATE t1 SET c=c+1 WHERE a=1 OR b=2 LIMIT 1;If a=1 OR b=2 matches several rows, only one row is updated. In general, you should try to avoid using an ON DUPLICATE KEY UPDATE clause on tables with multiple unique indexes.
With ON DUPLICATE KEY UPDATE, the affected-rows value per row is 1 if the row is inserted as a new row, 2 if an existing row is updated, and 0 if an existing row is set to its current values. If you specify the CLIENT_FOUND_ROWS flag to the mysql_real_connect() C API function when connecting to mysqld, the affected-rows value is 1 (not 0) if an existing row is set to its current values.
If a table contains an AUTO_INCREMENT column and INSERT … ON DUPLICATE KEY UPDATE inserts or updates a row, the LAST_INSERT_ID() function returns the AUTO_INCREMENT value.
The ON DUPLICATE KEY UPDATE clause can contain multiple column assignments, separated by commas.
You can use the VALUES(col name) function to refer to column values from the INSERT section of the INSERT… ON DUPLICATE KEY UPDATE statement in assignment value expressions in the ON DUPLICATE KEY UPDATE clause. In other words, in the ON DUPLICATE KEY UPDATE clause, VALUES(col_name) refers to the value of col_name that would be entered if there were no duplicate-key conflict. This function comes in handy when inserting several rows. The VALUES() function is only useful in the ON DUPLICATE KEY UPDATE clause or the INSERT statements; otherwise, it returns NULL. Example:
INSERT INTO t1 (a,b,c) VALUES (1,2,3),(4,5,6)
  ON DUPLICATE KEY UPDATE c=VALUES(a)+VALUES(b);
That statement is identical to the following two statements:
INSERT INTO t1 (a,b,c) VALUES (1,2,3)
  ON DUPLICATE KEY UPDATE c=3;
INSERT INTO t1 (a,b,c) VALUES (4,5,6)
  ON DUPLICATE KEY UPDATE c=9;
Note: Beginning with MySQL 8.0.20, using VALUES() to refer to the new row and columns is deprecated, and it may be removed in a future version of MySQL. Alternatively, as detailed in the next few paragraphs of this section, utilise row and column aliases.
Starting with MySQL 8.0.19, you can use an alias for the row, with one or more of its columns optionally appended, after the VALUES or SET clause and before the AS keyword. The statement shown previously using VALUES() to retrieve the new column values can be written in the form shown here using the row alias new:
INSERT INTO t1 (a,b,c) VALUES (1,2,3),(4,5,6) AS new
  ON DUPLICATE KEY UPDATE c = new.a+new.b;
If, in addition, you use the column aliases m, n, and p, you can omit the row alias in the assignment clause and write the same statement like this:
INSERT INTO t1 (a,b,c) VALUES (1,2,3),(4,5,6) AS new(m,n,p)
  ON DUPLICATE KEY UPDATE c = m+n;
When utilising column aliases in this way, even if you don’t use it directly in the assignment clause, you must still use a row alias after the VALUES clause.
An INSERT… SELECT… ON DUPLICATE KEY UPDATE statement that uses VALUES() in the UPDATE clause, such as this one, produces a warning starting with MySQL 8.0.20:
INSERT INTO t1
  SELECT c, c+d FROM t2
  ON DUPLICATE KEY UPDATE b = VALUES(b);
You can eliminate such warnings by using a subquery instead, like this:
INSERT INTO t1
  SELECT * FROM (SELECT c, c+d AS e FROM t2) AS dt
  ON DUPLICATE KEY UPDATE b = e;
You can also use row and column aliases with a SET clause, as mentioned previously. Employing SET instead of VALUES in the two INSERT … ON DUPLICATE KEY UPDATE statements just shown can be done as shown here:
INSERT INTO t1 SET a=1,b=2,c=3 AS new
  ON DUPLICATE KEY UPDATE c = new.a+new.b;

INSERT INTO t1 SET a=1,b=2,c=3 AS new(m,n,p)
  ON DUPLICATE KEY UPDATE c = m+n;
The table name and the row alias must not be the same. If column aliases aren’t used, or if they’re the same as the column names, the ON DUPLICATE KEY UPDATE clause must use the row alias to separate them. Column aliases must be distinct from the row aliases they apply to (that is, no column aliases referring to columns of the same row may be the same).
These criteria apply to valid types of SELECT query expressions that you can refer to in an ON DUPLICATE KEY UPDATE clause for INSERT… SELECT statements:
Column references from queries on a single table, which may or may not be a derived table.
Column references from queries that join multiple tables and DISTINCT queries.
As long as the SELECT doesn’t employ GROUP BY, references to columns in other tables are allowed. One unintended consequence is that nonunique column names must be qualified.
It is not possible to make references to columns from a UNION. To get around this limitation, recast the UNION as a derived table and consider the rows as a single-table result set.
For example, this statement produces an error:
INSERT INTO t1 (a, b)
  SELECT c, d FROM t2
  UNION
  SELECT e, f FROM t3
ON DUPLICATE KEY UPDATE b = b + c;
Instead, use an equivalent statement that rewrites the UNION as a derived table:
INSERT INTO t1 (a, b)
SELECT * FROM
  (SELECT c, d FROM t2
   UNION
   SELECT e, f FROM t3) AS dt
ON DUPLICATE KEY UPDATE b = b + c;
References to columns from GROUP BY queries can also be made using the technique of rewriting a query as a derived table.
Because the outcomes of INSERT… SELECT statements are dependent on the ordering of rows from the SELECT, which cannot always be guaranteed, it is possible for the source and replica to diverge when recording INSERT… SELECT ON DUPLICATE KEY UPDATE statements. As a result, statements like INSERT… SELECT ON DUPLICATE KEY UPDATE are marked as hazardous for statement-based replication. When using statement-based mode, such statements generate a warning in the error log, and when using MIXED mode, they are recorded to the binary log using the row-based format. An INSERT… ON DUPLICATE KEY UPDATE statement can also be used to update a table with multiple unique or main keys.
Example 2:
Consider the following example:
Step 1:
CREATE SET TABLE t1 (
a INTEGER,
b INTEGER)
PRIMARY INDEX (a);
Step 2:
INSERT INTO t1 VALUES (1,1);

INSERT INTO t1 VALUES (1,2);
Step 3:
UPDATE t1
SET b = b + 1
WHERE a = 1; /* fails */

UPDATE t1
SET b = b - 1
WHERE a = 1; /* succeeds */
Because it creates a duplicate entry, the initial UPDATE request fails.
Both UPDATE requests succeed if the order of the UPDATE requests is reversed, as the UPDATE does not result in duplicate rows.
CREATE SET TABLE t1 (
  a INTEGER,
  b INTEGER)
  PRIMARY INDEX (a);

  INSERT INTO t1 VALUES (1,1);

  INSERT INTO t1 VALUES (1,2);

  UPDATE t1
  SET b = b - 1
  WHERE a = 1; /* succeeds */

  UPDATE t1
  SET b = b + 1
  WHERE a = 1; /* succeeds */
This is a common method for both simple and join updates. Updates that affect the values of the primary or secondary indexes, on the other hand, are done as separate delete and insert operations.
SQL Update Having
Only a Select statement can be used with the Having clause. It will not function if you use the Having clause in SQL with an update or delete query.
When you want to create a condition that involves a grouping (aggregating) function, use Having instead of Where. Because aggregate functions (such as sum, count, and so on) are not supported by the Where clause, the Having clause is utilized.
In a GROUP BY clause, the Having clause is utilized. When GROUP BY isn’t used, the Where or Having clause will usually produce the same result.
Example 1: So let’s have a look at a real-world example of how to use SQL Server’s Having Clause. The SQL Server Management Studio was used to create the example on SQL Server 2012.
Creating a table in SQL Server
Now we create a table named employee using:
Create table Employee
(
    EmpID int,
    EmpName varchar(30),
    EmpSalary int
)
The following is the sample data for the employee Table:
The Having clause is used only with the Select statement.
The following example defines the Having clause with an update statement.
Update Statement with Having clause:
Update Employee set [EmpSalary] ='16000' having EmpID=1 Example 2:
UPDATE contacts_domains cd,
 (SELECT id FROM contacts_domains GROUP BY domain_id
   HAVING COUNT(contact_id) = 1) AS cdtmp
SET cd.dominant = 1
WHERE cd.id = cdtmp.id
SQL Update Aggregate Function
Using the aggregate function SUM() and the GROUP BY clause, update the data in the columns with the SQL UPDATE statement.
Example 1:
Sample table: customer1
To change the value of ‘outstanding_amt’ of ‘customer1’ table with following conditions:
modified value for ‘outstanding_amt’ is 0, sum of ‘ord_amount’ from ‘orders’ table must be greater than 5000 which satisfies the condition bellow:
unique ‘cust_code’ of ‘customer1’ makes a group, and ‘cust_code’ of ‘customer1’ and ‘orders’ must be same, the following SQL statement can be used:
UPDATE  customer1
SET outstanding_amt=0
WHERE (SELECT SUM(ord_amount) FROM orders
WHERE customer1.cust_code=orders.cust_code
GROUP BY cust_code )>5000;
Example 2: SQL update columns with NULL:
In the following we are going to discuss, how the NULL works with the UPDATE statement.
Sample table: agent1
To update the ‘agent1’ table with following conditions:
Modified value for ‘phone_no’ is NULL, ‘commission’ must be more than .15, the following SQL statement can be used :
SQL Code:
UPDATE  agent1
SET phone_no=NULL
WHERE commission>=.15;
Here is a new document which is a collection of questions with short and simple answers, useful for learning SQL as well as for interviews.
Example 3:
itemid  availableqty
100     0
101	80
102	220
103	190
104	0
105	0
Query:
update tblitemmaster set availableqty=(select sum(availableqty) from stockdetails where itemid =110)
where ItemID =102
but this is updating at time only one record.
SQL Update Append
Append string
Using MySQL’s concat method, we can append a string of data to an existing field’s data. We’re not altering or updating existing data here; instead, we’re simply adding the string to the end(or beginning) of the field data.
Example: For example, we’d like to put a site signature to the end of user comments. We can’t use any update command because each user’s post is different, thus we’ll use concat to add the site signature to each post stored within a record field in our update command.
concat(field_name,"string to add")
SELECT CONCAT('string1' , '-','string2')
Output:
string1-string2Now let us see how it is used in a MySQL table query.
UPDATE photo_img SET dtl=CONCAT(dtl,'site_data to add')
WHERE  gal_id='22'
GROUP_CONCAT: The command above will append the string site_data at the end of each record dtl field with a gal_id of 22.
If we don’t use the Where clause in SQL, the concat query will modify all of the records.
SQL Update Batch
What’s the best technique to update one or more columns in a table with millions of entries with data from another table with minimal risk and maximum efficiency? Process inserts, deletes, and updates in batches is one of my favourite ways to deal with tables with millions of records.
Example 1: Using a transaction to update data in batches of 10,000 records at a time is a simple and efficient approach to update millions of records. The goal is to batch out your data so that you can process fewer records at a time.
use DatabaseName
go

DECLARE @batchId INT
DECLARE @batchSize INT
DECLARE @results INT

SET @results = 1
SET @batchSize = 10000
SET @batchId = 0

-- when 0 rows returned, exit the loop
WHILE (@results > 0)
	BEGIN
	BEGIN TRAN;

	UPDATE Table1 SET columnA = Table2.columnA
	FROM Table2
	INNER JOIN Table1 ON Table2.Id = Table1.Id
	WHERE Table1.columnA is null
	AND (Table2.Id > @batchId
	AND Table2.Id <= @batchId + @batchSize)

	SET @results = @@ROWCOUNT

	-- next batch
	SET @batchId = @batchId + @batchSize

	COMMIT TRAN;
END
The sql below is just to measure the performance of this update, it is not needed to update your data.
DECLARE @startTime DATETIME

SELECT  @startTime = GETDATE()
SET STATISTICS PROFILE ON
SELECT  COUNT(*)
FROM Table1 first OPTION (RECOMPILE)
SET STATISTICS PROFILE OFF

SELECT  'It took ' + CONVERT(VARCHAR(8), DATEDIFF(ms, @startTime, GETDATE())) + ' ms'
GO
In the query above we declare the following variables to do the batching:
- @results – this variable will hold the number of records updated; when zero, the query will stop. This is to avoid an infinite loop.
- @batchId – this is set to zero initially, and it is used to compare the table id against it, and after each update, it is set to the id plus the batch size. This allows splitting the millions of records into batches.
- @batchSize – the number of records to update at a time.
It is important to know that the above algorithm will only work when your table’s primary keys are of type int. If your table’s primary keys are guids, the above will not work.
The portion at the conclusion of the query is solely for reviewing the performance of your updates; updating the data is not required, but it is a handy way to observe how the query performs overall.
I hope you find the material in this post useful, and that it teaches you how to update millions of data in batches, which is easier and safer than doing it all at once.
Example 2: You shouldn’t update 10,000 rows in a set unless you’re sure the operation isn’t causing Page Locks (due to multiple rows per page being part of the UPDATE operation). The problem is that at 5000 locks, Lock Escalation (from Row or Page to Table locks) occurs. So, just in case the procedure uses Row Locks, it’s best to keep it below 5000.
To limit the amount of rows that will be updated, you should not use SET ROWCOUNT. There are two issues to consider:
It has that been deprecated since SQL Server 2005 was released (11 years ago):
In a future release of SQL Server, using SET ROWCOUNT will have no effect on DELETE, INSERT, or UPDATE statements. In new development work, avoid using SET ROWCOUNT with DELETE, INSERT, and UPDATE statements, and prepare to alter existing applications that utilise it. Use the TOP syntax to achieve a similar result.
It can affect more than just the statement you are dealing with:
When the SET ROWCOUNT option is used, most Transact-SQL queries will stop executing once the specified number of rows have been impacted. This contains the use of triggers. The ROWCOUNT option has no effect on dynamic cursors, but it does limit the number of rows in which keyset and insensitive cursors can be used. With this option, proceed with caution.
Instead, use the TOP () clause.
Having an explicit transaction here serves no purpose. It makes the code more complicated, because there’s no way to handle a ROLLBACK, which isn’t even necessary because each statement is its own transaction (i.e. auto-commit).
You don’t have a TRY / CATCH structure if you find a reason to keep the explicit transaction. Please see my DBA response. StackExchange for a transaction-handling TRY/CATCH template:
Are we required to handle Transaction in C# Code as well as in Store procedure
I believe the real WHERE clause is not being presented in the example code in the Question, so depending solely on what has been shown, a better model (please see remark below regarding performance) would be a better model:
DECLARE @Rows INT,
        @BatchSize INT; -- keep below 5000 to be safe

SET @BatchSize = 2000;

SET @Rows = @BatchSize; -- initialize just to enter the loop

BEGIN TRY
  WHILE (@Rows = @BatchSize)
  BEGIN
      UPDATE TOP (@BatchSize) tab
      SET    tab.Value = 'abc1'
      FROM  TableName tab
      WHERE tab.Parameter1 = 'abc'
      AND   tab.Parameter2 = 123
      AND   tab.Value <> 'abc1' COLLATE Latin1_General_100_BIN2;
      -- Use a binary Collation (ending in _BIN2, not _BIN) to make sure
      -- that you don't skip differences that compare the same due to
      -- insensitivity of case, accent, etc, or linguistic equivalence.

      SET @Rows = @@ROWCOUNT;
  END;
END TRY
BEGIN CATCH
  RAISERROR(stuff);
  RETURN;
END CATCH;
By testing @Rows against @BatchSize, you can avoid that final UPDATE query (in most cases) because the final set is typically some number of rows less than @BatchSize, in which case we know that there are no more to process (which is what you see in the output shown in your answer). Only in those cases where the final set of rows is equal to @BatchSize will this code run a final UPDATE affecting 0 rows.
I also added a condition to the WHERE clause to prevent rows that have already been updated from being updated again.
NOTE REGARDING PERFORMANCE
I emphasized «better» above (as in, «this is a better model») because this has several improvements over the O.P.’s original code, and works fine in many cases, but is not perfect for all cases. For tables of at least a certain size (which varies due to several factors so I can’t be more specific), performance will degrade as there are fewer rows to fix if either:
- There is no index to support the query, or there is an index but at least one column in the WHERE clause is a string data type that does not employ a binary collation, in which case a COLLATE clause is added to the query to force the binary collation, invalidating the index in the process (for this particular query).
- This is the predicament @mikesigs found himself in, necessitating a different strategy. The updated method INNER JOINS the table being updated on the clustered index key column to a temporary table that contains the IDs for all rows to be updated (s). (Whether or not the clustered index columns are the main key, it’s critical to capture and join on them.)
Please see @mikesigs answer below for details. The approach shown in that answer is a very effective pattern that I have used myself on many occasions. The only changes I would make are:
- Explicitly create the #targetIds table rather than using SELECT INTO…
- For the #targetIds table, declare a clustered primary key on the column(s).
- For the #batchIds table, declare a clustered primary key on the column(s).
- For inserting into #targetIds, use INSERT INTO #targetIds (column_name(s)) SELECT and remove the ORDER BY as it’s unnecessary.
SQL Update Bulk Data
Today we’ll look at how to use a single stored procedure and a user-defined table type to insert and update numerous records. If the Id column value, i.e. the primary key, does not exist, we will insert the records, and if the Id column value is duplicated, we will update the records. To implement this capability, we’ll develop a stored procedure and a User defined table type. I’ll also show you how to test our solution by calling the stored procedure with SQL.
Using the CASE command, you can bulk update MySQL data with just one query.
Syntax:
update yourTableName
set yourUpdateColumnName = ( Case yourConditionColumnName WHEN Value1 THEN ‘’UpdatedValue’
WHEN Value2 THEN ‘UpdatedValue’
.
.
N
END)
where yourConditionColumnName IN(Value1,Value2,.....N);
Example 1:
Step 1: First of all we will create a Database named `BulkImportDemo`. Later on we will use the same database to create the tables and procedures.
CREATE DATABASE BulkImportDemo Step 2: Following the creation of the database, we’ll construct a table in the same database to show bulk insert and update features.
USE BulkImportDemo

CREATE TABLE Employee
(
    Id INT IDENTITY(1,1) PRIMARY KEY,
    EmpName VARCHAR(35),
    Position VARCHAR(50),
    [Location] VARCHAR(50),
    Age INT,
    Salary DECIMAL
)
Here we have created table named Employee , this table has Id column as primary key which is auto increment column.
Step 3: Our employee table is ready to insert and update the data. Now we will create User defined table datatype.
What is User Defined table type ?
The user specifies table type is a custom datatype that stores data in a tabular style. These datatypes can be passed as a parameter in a stored procedure, which is referred to as a Table Valued Parameter.
We will create user defined table type for Employee as below.
CREATE TYPE tblTypeEmployee AS TABLE
(
    Id INT,
    EmpName VARCHAR(35),
    Position VARCHAR(50),
    [Location] VARCHAR(50),
    Age INT,
    Salary DECIMAL
)
Here we created User defined table type. After executing above command you can see this type in Object Explorer of BulkImportDemo database.
Programmability ==> Types ==> User-Defnied Table Types.
Step 4: Now we will create the stored procedure to perform the insert and update operation.
CREATE PROCEDURE spBulkImportEmployee
(
      @tblEmployeeTableType [dbo].tblTypeEmployee REadonly
)
AS
BEGIN
    MERGE Employee  AS dbEmployee
    USING @tblEmployeeTableType AS tblTypeEmp
    ON (dbEmployee.Id = tblTypeEmp.Id)

WHEN  MATCHED THEN
   UPDATE SET  EmpName = tblTypeEmp.EmpName,
   Position = tblTypeEmp.Position,
   [Location]= tblTypeEmp.[Location],
   Age= tblTypeEmp.Age,
   Salary= tblTypeEmp.Salary

WHEN NOT MATCHED THEN
  INSERT ([EmpName],[Position],[Location],Age,Salary)
  VALUES (tblTypeEmp.EmpName,
  tblTypeEmp.Position,tblTypeEmp.[Location],tblTypeEmp.Age,tblTypeEmp.Salary);
END
Here we have created the procedure named `spBulkImportEmployee` which is accepting the table type created in an earlier step as a parameter, also known as table valued parameter.
We used SQL server’s ‘Merge’ functionality to update and insert data in the same query. If the value of the Id column already exists in the table, the remainder of the fields will be updated; otherwise, a new record will be inserted.
Step 5: Now we will see how to test the stored procedure (spBulkImportEmployee) created in an earlier step.
We have to create a variable of User defined table type to pass it as parameter of procedure.
-- Declaring the variable of user defined table type
DECLARE @tblTypeEmployee tblTypeEmployee

--Inserting some records
INSERT INTO @tblTypeEmployee ([ID],[EmpName],[Position],[Location],Age,Salary)
VALUES (0,'Cedric Kelly','Senior Javascript Developer','Edinburgh',22,43360)
      ,(0,'Dai Riosy','Personnel Lead','London',22,43360)
      ,(3,'Cara Stevens','Sales Assistant','Edinburgh',22,43360)
      ,(0,'Thor Walton','Senior Developer','Sydney',27,217500)
      ,(10,'Paul Byrd','Team Leader','Sydney',42,92575)
      ,(6,'Finn Camacho','Software Engineer','California',34,372000)
      ,(0,'Rhona Davidson','Integration Specialist','Newyork',37,725000)
      ,(12,'Michelle House','Support Engineer','California',28,98540)

  -- Executing procedure
EXEC spBulkImportEmployee  @tblTypeEmployee
The first line declares the table type variable, the second line inserts some dummy records in the table type variable, and finally the procedure is executed by calling the ‘EXEC’ command.
Example 2:
To understand the above concept, let us create a table.
Step 1: The query to create a table is as follows:
create table UpdateAllDemo BookId int,BookName varchar(200);Step 2: Insert some records in the table using insert command. The query to insert record is as follows:
insert into UpdateAllDemo values(1000,'Introduction to C');
insert into UpdateAllDemo values(1001,'Introduction to Java');
Step 3: Display all records from the table using select statement. The query is as follows:
select *from UpdateAllDemo;Output:
BookId      BookName
 1000    Introduction to C
 1001    Introduction to Java
Step 4: Now, we will do bulk update i.e. update the Value ‘Introduction to C’ with the value ‘C in Depth’, and Value ‘Introduction to Java’ with the value ‘Java in Depth’.
You can use CASE command for this as shown above. The query is as follows:
update UpdateAllDemo
set BookName = (CASE BookId WHEN 1000 THEN 'C in Depth'
 when 1001 THEN 'Java in Depth'END)
Where BookId IN(1000,1001);
Now you can check the values are updated in the table or not using select statement.
The query to check updated value in the table is as follows:
select *from UpdateAllDemo;The following is the output displaying the bulk update is successful:
BookId   BookName
1000     C in Depth
1001     Java in Depth
SQL Update Calculate Values
Using an arithmetical expression, modify the data of the columns with the SQL UPDATE command.
Example:
Sample table: neworder
To change the value of ‘advance_amount’ column with a new value as specified ‘ord_amount’*10, the following SQL statement can be used:
UPDATE neworder
SET advance_amount=ord_amount*.10;
Example 2: Sql select re-ordering columns:
Update columns in SQL using arithmetical expressions and where clauses.
We’ll go through how to use an arithmetical expression and the SQL WHERE clause to update the data of columns with the SQL UPDATE command.
Sample table: neworder
To update the value of ‘advance_amount’ with following conditions:
New value for ‘advance_amount is ‘ord_amount’*10, ‘ord_date’ must be greater than ’01-Aug-08′, the following SQL statement can be used:
SQL Code:
UPDATE neworder
SET advance_amount=ord_amount*.10
WHERE ord_date>'01-Aug-08';
Example 3: SQL update columns with arithmetical expression and boolean ‘AND’:
We’ll go over how to utilise the SQL UPDATE statement with arithmetical expressions, SQL WHERE clauses, and the boolean operator AND to update the values of columns.
Sample table: customer1
To change the value of ‘outstanding_amt’ of ‘customer1’ table with following conditions :
Modified value for ‘outstanding_amt’ is ‘outstanding_amt’-(‘outstanding_amt’*.10), ‘cust_country’ must be ‘India’, and ‘grade’ must be 1, the following SQL statement can be used :
SQL Code:
UPDATE customer1
SET outstanding_amt=outstanding_amt-(outstanding_amt*.10)
WHERE cust_country='India' AND grade=1;
Example 4: SQL update columns with arithmetical expression and comparison operator:
We’ll go over how to use the SQL UPDATE statement with an arithmetical expression and the COMPARISON operator to update information of columns.
Sample table: neworder
To change the value of ‘advance_amount’ of ‘neworder’ table with the following condition:
Modified value for ‘advance_amount’ is ‘ord_amount’*.10, ‘ord_date’ must be greater than ’01-Aug-08′, and ‘ord_date’ must be less than ’01-Dec-08′, the following SQL statement can be used:
SQL Code:
UPDATE neworder
SET advance_amount=ord_amount*.10
WHERE ord_date>'01-Aug-08' AND ord_date<'01-Dec-08';
Example 5: The calculated numbers can be updated in columns. Using a single UPDATE line, the following will increase the salaries of all employees in the Employee table by 10%.
Update Calculated Data
UPDATE Employee
SET Salary = Salary + (Salary * 10/100);
Now, the Select * from Employee query will display the following result.
The subquery can be used to update data in one table from another table. By selecting Salary from the Employee table for the matching EmployeeID values, the following Change statement will update the Salary in the Consultant table.
UPDATE Consultant
SET salary = (SELECT salary
FROM Employee
WHERE Employee.EmployeeID = Consultant.ConsultantID);
Note:
- A sign column value must be returned by the subquery; otherwise, an error will be raised.
- If the subquery fails to discover any rows that match, the value is set to NULL.
SQL Update Case When
If you want to choose and alter a record depending on certain conditions. We can use case CASE expression instead of cursor or looping. The CASE statement is similar to the IF-THEN-ELSE statement.
I have a SQL server table with a column that I want to update based on the value of an existing column in the current row. In this case, the CASE expression can be used to choose or set a new value from the input data.
The CASE expression has two formats,
- To decide the result, the simple CASE expression compares an expression to a set of simple expressions.
- To decide the outcome, the searched CASE expression analyses a set of Boolean expressions.
- The ELSE argument is available in both versions.
Syntax:
The syntax for mass update with CASE WHEN/ THEN/ ELSE is as follows:
UPDATE yourTableName set yourColumnName=case when yourColumnName=Value1 then anyUpdatedValue1
when yourColumnName=Value2 then anyUpdatedValue2
when yourColumnName=Value3 then anyUpdatedValue3
when yourColumnName=Value4 then anyUpdatedValue4
else yourColumnName
end;
Example 1: Create SQL table that contains the below columns. We will use State code column for CASE expression Insert Values in to table.
INSERT INTO dbo.Customer (FirstName, LastName, StateCode, PayRate,Gender)
VALUES('Sagar', 'Shinde', 'MH', 15.00,'M')
INSERT INTO dbo.Customer (FirstName, LastName, StateCode, PayRate,Gender)
VALUES('Swapnil', 'Shinde', 'MP', 5.00 ,'M')
INSERT INTO dbo.Customer (FirstName, LastName, StateCode, PayRate,Gender)
VALUES('Pankaj', 'Shinde', 'MP', 20.00 ,'M')
Let’s use CASE expression to update state c9de column value. In above table, I want to change state value i.e. MH to ‘Maharastra’ and ‘MP’ to ‘Madhya Pradesh.
UPDATE Customer
SET StateCode = CASE StateCode
WHEN 'MH' THEN 'Maharastra'
WHEN 'MP' THEN 'Madhya Pradesh'
ELSE NULL
END
We used a CASE expression to update the state code column. It is first verified for existing columns before being modified.
Example 2:
Step 1: let us first create a table. The query to create a table is as follows :
create table CaseUpdateDemo
Id int,Name varchar(100);
Step 2: Insert some records in the table using insert command. The query is as follows:
insert into CaseUpdateDemo values(1,'John');
insert into CaseUpdateDemo values(2,'Carol');
insert into CaseUpdateDemo values(3,'Mike');
insert into CaseUpdateDemo values(4,'Bob');
Step 3: Display all records from the table using select statement. The query is as follows:
select *from CaseUpdateDemo;Output:
Id     Name
1    John
2    Carol
3    Mike
4    Bob
Step 4: Now you can write the query we discussed above to update column id with Case WHEN THEN ELSE. The query is as follows:
update CaseUpdateDemo set Id=case when Id=1 then 1001
when Id=2 then 1002
when Id=3 then 1003
when Id=4 then 1004
else Id
end;
Now you can check whether the table is updated for ID column using select statement. The query is as follows:
select *from CaseUpdateDemo;Output:
Id      Name
1001    John
1002    Carol
1003    Mike
1004    Bob
SQL Update Column to Null
In contrast to DDL (Data Definition Language), DCL (Data Control Language), and TCL (Transaction Control Language), the UPDATE command is a DML command. This means it’s used to change data that already exists. SELECT, INSERT, DELETE, and other DML commands are examples.
When using the UPDATE statement, utilise the NULL keyword to change the value of a column.
UPDATE takes a table and controls which row to alter and what value to set it to using the SET keyword. The WHERE keyword evaluates a condition and, if true, executes the SET section, which updates the value of that row. It is not set to the new value if false.
Syntax:
UPDATE [table]
SET [column]=0
WHERE [column] IS NULL;
Null values can be replaced in SQL by searching a column in a table for nulls and replacing them with UPDATE, SET, and WHERE. It substitutes them with 0 in the case above.
Because unclean data can lead to inaccurate analysis, cleaning data is critical for analytics. Null values are a typical type of erroneous data. Because they are ignored in aggregation functions, you must ensure that this is the behaviour you expect; otherwise, you must replace null values with relevant data.
Example 1: Firstly, let’s create a table using CREATE TABLE command:
Step 1: — create a table
CREATE TABLE students (Sr_No integer,Name varchar(20), Gender varchar(2));Step 2: — insert some values
INSERT INTO students VALUES (1, 'Nikita', 'F');
INSERT INTO students VALUES (2, 'Akshit', 'M');
INSERT INTO students VALUES (3, 'Ritesh', 'F');
INSERT INTO students VALUES (4, 'Himani', 'F');
Step 3: — fetch some values
SELECT * FROM students ;Step 4: To UPDATE Column value, use the below command:
UPDATE TABLE [TABLE_NAME]To set column value to NULL use syntax:
update [TABLE_NAME] set [COLUMN_NAME] = NULL where [CRITERIA] Example: For the above table
update students set Gender = NULL where Gender='F';

SELECT * FROM students ;
Column value can also be set to NULL without specifying the ‘where’ condition.
Example:
update students set Gender = NULL;

SELECT * FROM students ;
If you have set a constraint that a particular column value can not be NULL, and later try to set it as NULL, then it will generate an error.
Example:
-- create a table
CREATE TABLE students (Sr_No integer,Name varchar(20), Gender varchar(2) NOT NULL);

-- insert some values
INSERT INTO students VALUES (1, 'Nikita', 'F');
INSERT INTO students VALUES (2, 'Akshit', 'M');
INSERT INTO students VALUES (3, 'Ritesh', 'F');
INSERT INTO students VALUES (4, 'Himani', 'F');

-- fetch some values
SELECT * FROM students ;
Output:
ERROR: Gender may not be NULL.
Example 2:
- To replace Nulls with 0s use the UPDATE command.
- Can use filters to only edit certain rows within a column.
Update can be used for a lot of different problems. For example:
To add 1 to every value in a column you can run:
UPDATE [table]
SET [column]=[column]+1;
Takes the values in a column and adds 1 to them.
To set every value to a random integer on the interval [1,10]:
UPDATE [table]
SET [column]=1+random()*9::int;
Generates a random double precision (float8) type number from [0,1), multiplies it by 9, and adds 1 to that value and casts it to an integer type for each row.
To set values to 0 for even 1 for odd:
UPDATE [table]
SET [column]=MOD([column],2);
Uses MOD to set the column values to the remainder of the column values divided by 2.
Note: Update can also be used for other problems like:
Generating random data
- Adding one to every row in a column (or where a condition is true)
- Setting Values based on if a column is even or odd
Example 3: For example, for a customer whose previous address required two address lines but now requires only one, you would use the following entry:
UPDATE customer
   SET address1 = '123 New Street',
   SET address2 = null,
   city = 'Palo Alto',
   zipcode = '94303'
   WHERE customer_num = 134;
SQL Update Increase Salary by 10 Percent
If you want to add Percentage to the current column value. Salary in a corporation is a great example. Each employee’s compensation must be updated based on the Hike Percentage.
Example 1: Increasing Salary By Percentage:
lets assume the Hike percentage is equal for all employees, and I am counting 15 Percentage as Hike.
Step 1: Lets create the table and insert some records.
CREATE TABLE [Details].Employees
(
    Id INT IDENTITY(1,1),
    FullName VARCHAR(50),
    Salary FLOAT
)
Step 2: Inserting records into the Employees Table,
INSERT INTO [Details].Employees VALUES
(
    'Sundaram',
    1000.00
),
(
    'Saravana Kumar',
    2000.00
),
(
    'Pushparaj',
        3000.00
),
(
    'Karthik K',
    4000.00
),
(
    'Akilan',
    5000.00
)
Step 3: Lets select all the records from the table Employee.
SELECT * FROM [Details].EmployeesStep 4: Now lets update the salary column by 15 percentage for all records.
UPDATE Details.Employees
SET Salary = salary * 1.15
Select all the record from the table,
SELECT * FROM [Details].EmployeesNote: increase the value by applying some percentage.
Example 2: When the corporation has agreed to increase staff compensation by 15%. That’s incredible in this market to receive 15%!!!!! I need to apply this incremental for the employee table as a database developer. We have a standard emp table in my company, from which I have selected only three columns for the sake of simplicity. The code for the table’s structure is as follows:
Step 1: Create table:
CREATE TABLE emp
(id INT IDENTITY(1,1), name VARCHAR(32), salary float)
Step 2: Insert table:
Our company is very small, hence I have populated the data of all five employees below.
INSERT INTO emp VALUES ('Tom', 1000.00)
INSERT INTO emp VALUES ('Dick', 2000.00)
INSERT INTO emp VALUES ('Harry', 3000.00)
INSERT INTO emp VALUES ('Mery', 4000.00)
INSERT INTO emp VALUES ('Zen', 5000.00)
Step 3: Now its the time to update the salaries. but we cant apply code directly.
UPDATE emp
SET salary = (salary * 115)/100
NOTE: Use salary * 115 / 100 instead. The operator precedence rule is broken, thus the result is incorrect.
The pay fields of all employees have been updated by 15%. This is the most efficient and straightforward method of bringing about the change. Isn’t that why SQL is known as «SO EASY»?
Consider a circumstance in which we can’t use the UPDATE command directly. Perhaps we should go over the steps one by one for this specific case and make the necessary alterations. Perhaps we’ll need to use a stored procedure to update each entry. Obviously, that situation is not straightforward, but I’ll use this simple example to demonstrate various approaches for accessing a table’s data.
The most basic approach is to use a cursor. SQL Server comes with built-in cursor support. It sets aside some memory in the database, loads all of the data into it, and then processes the data row by row. Here is an example..
BEGIN
DECLARE @id INT
DECLARE myCursor CURSOR
FOR
SELECT id FROM emp
OPEN myCursor
    FETCH NEXT FROM myCursor
    INTO @id
WHILE @@FETCH_STATUS = 0
    BEGIN
      UPDATE emp
      SET salary = (salary * 115)/100
      WHERE emp.id = @id
      FETCH NEXT FROM myCursor INTO @id
    END
CLOSE myCursor
DEALLOCATE myCursor
END
Here, I’ve allocate memory for myCursor and used the SELECT command to populate the cursor with all data. Then, using a WHILE loop, I opened the cursor, fetched all the rows one by one, and conducted the UPDATE action using the @id variable, which contains the employee ids. Finally, I’ve closed and dealtlocated the cursor to free up memory (optional, but a good practice).
To obtain all rows, the next way is to use a temporary table using the TOP keyword.
BEGIN
SELECT id, name, salary INTO #temp FROM emp
DECLARE @i INT, @count INT
SET @i = 1
SELECT @count = COUNT(id) FROM #temp
WHILE (@i <= @count)
  BEGIN
    UPDATE emp
    SET salary = (salary * 115)/100
    WHERE emp.id = (SELECT TOP 1 id from #temp)
    DELETE #temp
    WHERE #temp.id = (SELECT TOP 1 id from #temp)
    SET @i = @i + 1
  END
END
All of the data from the emp table has been moved to the temporary table (#temp). Then I used the TOP keyword to go to the first row. I erased the first row after doing a UPDATE on the emp table. As a result, the second row will be the top row next time. In order to iterate in this manner, I used a WHILE loop.
This approach is fairly effective; nevertheless, excessive use of DELETE may harm efficiency (I hope all tables may not have only 5 rows.). Additionally, the usage of subqueries may reduce performance.
The final method is as follows. I’ve used a temporary table and a WHILE loop here as well. The IDENTITY column in the temp table is the only change. I’ve mapped this identity column (id) and the looping variable (@i) to each and every row. Once they’ve been mapped, I’ll be able to quickly identify each row and do a UPDATE operation on it. (We must make sure that both the identity column and the looping variable increament in the same way, such as 1 and 1, 2 and 2, and so on.)
BEGIN
CREATE TABLE #temp
(id INT IDENTITY(1,1), name VARCHAR(32), salary float)
INSERT INTO #temp
SELECT name, salary FROM emp
DECLARE @i INT
SET @i = 1
 WHILE (@i <= (SELECT COUNT(id) FROM #temp))
  BEGIN
    UPDATE emp
    SET salary = (salary * 115)/100
    WHERE emp.id = @i
    SET @i = @i + 1
  END
 END
Now we come to the point of performance. Here I have depicted the SQL Server profiler data in tabular format.
CPU				READ	WRITE	DURATION
Direct SQL				15	5	0	15
Cursor					15	93	2	35
Temp table with TOP			0	236	0	61
Temp table with IDENTITY column		0	142	0	18
As a result, we may conclude that straight SQL always provides the best results. This is due to the fact that it is a set-based technique, and the data is modified in pieces rather than individually. Both the READ and DURATION numbers are reduced when using direct SQL. In terms of performance, I believe the cursor is not a good decision, even though it outperforms the temp table with TOP technique. For any non-set based solution, I concur and recommend using a temp table with an IDENTITY column. It also performs better in real time than the cursor or the «temp table with TOP» method.
SQL Update Multiple Set
You define a column and its new value, then another set of columns and values, just as you did with single columns. Use the SET clause to specify extra columns if you want to update several columns. The SET command, which defines the column where the update is necessary, is always followed by the UPDATE statement.
Syntax for UPDATE for multiple columns:
UPDATE table_name
SET column_name1= value1, column_name2= value2
WHERE condition;
TIP: When updating several columns in a UPDATE statement, the column/value pairs in the SET clause must be separated by a comma.
Example 1: Now, for the demonstration follow the below steps:
Step 1: Create a database
we can use the following command to create a database called Multiple.
CREATE DATABASE Multiple;Step 2: Use database
Use the below SQL statement to switch the database context to geeks:
USE Mutliple;Step 3: Table definition
We have the following demo_table in our Mutliple’s database.
CREATE TABLE demo_table(
NAME VARCHAR(20),
AGE INT,
CITY VARCHAR(20) );
Step 4: Insert data into a table
INSERT INTO demo_table VALUES
('ROMY KUMARI', 22, 'NEW DELHI'),
('PUSHKAR JHA',23, 'NEW DELHI'),
('AKANKSHA GUPTA',22, 'PUNJAB'),
('SUJATA JHA', 30,'PATNA'),
('PREETI GIRI', 26,'BANGLORE'),
('PREM GUPTA',31,'PUNE'),
('RAM KAPOOR', 34,'PUNE'),
('SHEETAL AWASTHI',32, 'RAJASTHAN');
Step 5: View data of the table
SELECT * FROM demo_table;Step 6: Update multiple columns
For the purpose of demonstration let’s update AGE value to be 30 and CITY value to be PUNJAB where CITY value is ‘NEW DELHI’.
UPDATE demo_table
SET AGE=30, CITY='PUNJAB'
WHERE CITY='NEW DELHI';
view content of table demo_table:
SELECT * FROM demo_table;We can see that the table is updated now with the desired value.
Example 2: Here we’ll update both the First and Last Names:
UPDATE Person.Person
 Set FirstName = 'Kenneth'
    ,LastName =  'Smith'
 WHERE BusinessEntityID = 1
You can add as many columns as you wish, just be sure to separate them with a comma.
Be careful! You can not easily “undo” your mistakes. One trick I do, to make it easier to test and learn is to “wrap” my update statements in a transaction, that way I can try them out without permanently changing my database.
So here is the same example to update multiple columns, but protected with the transaction.
BEGIN TRANSACTION

 -- Try an update…

 UPDATE Person.Person
 Set FirstName = 'Kenneth'
    ,LastName =  'Smith'
 WHERE BusinessEntityID = 1

-- Let's look at what we updated
 SELECT * FROM PERSON.PERSON
 WHERE BusinessEntityID = 1

 -- Undo changes…
 ROLLBACK
SQL Update Multiple
In PostgreSQL, you can update the values of many columns at once. A single UPDATE statement can change the values of many columns.
In PostgreSQL, updating many columns is a breeze.
Syntax:
Here is the syntax to update multiple columns in PostgreSQL.
UPDATE table_name
SET column1 = value1, column2 = value2, ...
[WHERE condition];
You must supply the table name, column names and new values as a comma-separated list, and optionally a WHERE condition to update only particular rows in your table in the above SQL query.
It returns the number of rows that have been updated, as seen in the example below, where count is the number of rows that have been changed.
Example 1: Let’s look at an UPDATE example that shows how to update more than one column in a table.
In this UPDATE example, we have a table called suppliers with the following data:
supplier_id	supplier_name		city			state
100		Microsoft		Redmond			Washington
200		Google			Mountain View		California
300		Oracle			Redwood City		California
400		Kimberly-Clark		Irving			Texas
500		Tyson Foods		Springdale		Arkansas
600		SC Johnson		Racine			Wisconsin
700		Dole Food Company	Westlake Village	California
800		Flowers Foods		Thomasville		Georgia
900		Electronic Arts		Redwood City		California
Now let’s demonstrate how to use the UPDATE statement to update more than one column value at once. Enter the following UPDATE statement:
UPDATE suppliers
SET supplier_id = 150,
    supplier_name = 'Apple',
    city = 'Cupertino'
WHERE supplier_name = 'Google';
There will be 1 record updated. Select the data from the suppliers table again:
SELECT * FROM suppliers;Output:
supplier_id	supplier_name		city			state
100		Microsoft		Redmond			Washington
150		Apple			Cupertino		California
300		Oracle			Redwood City		California
400		Kimberly-Clark		Irving			Texas
500		Tyson Foods		Springdale		Arkansas
600		SC Johnson		Racine			Wisconsin
700		Dole Food Company	Westlake Village	California
800		Flowers Foods		Thomasville		Georgia
900		Electronic Arts		Redwood City		California
This UPDATE example would update the supplier_id to 150, the supplier_name to ‘Apple’ and city to ‘Cupertino’ where the supplier_name is ‘Google’.
The SQL UPDATE command is used for After data has been inserted into rows in the database, one or more of those rows’ column values can be changed. Constants, identifiers to other data sets, and expressions can all be used to update column values. They can be applied to a full column or a portion of its values based on conditions.
Syntax:
The UPDATE command uses the following syntax:
UPDATE [ ONLY ] table SET
       column = expression [, ...]
       [ FROM source ]
       [ WHERE condition ]

UPDATE [ ONLY ] table
The ONLY keyword can be used to specify that only the table table and none of its sub-tables should be modified. If the table is inherited by any other tables, this is only significant.
SET column = expression [, ...]The needed SET clause is followed by an update expression, separated by commas, for each column name whose values need to be changed. This expression is always of the form column = expression, where column is the name of the updated column (which may or may not be aliased or dot-notated), and expression is the new value to be put into the column.
FROM sourceThe FROM clause is a PostgreSQL addition that enables table columns from different data sources to change the value of a column.
WHERE conditionThe WHERE clause specifies the condition that will cause a table row to be updated. If no value is supplied, all values in the column will be changed. As with a SELECT statement, this can be used to qualify sources in the FROM clause.
Example 1:
Maybe you’re building an ETL process, like loading a file, or need to compare two tables? How would you write that update?
One of the most difficult aspects of making updates, especially when there are many columns, is determining which records have changed and just updating those entries.
One technique is to compare each column in the WHERE clause, using an OR to separate each comparison.
UPDATE c
    SET c.FirstName   = u.FirstName,
        c.LastName    = u.LastName,
        c.MiddleName  = u.MiddleName,
        c.DateOfBirth = u.DateOfBirth
FROM #Customer c
    JOIN #Updates u ON u.CustomerID = c.CustomerID
WHERE c.FirstName    <> u.FirstName
    OR c.LastName    <> u.LastName
    OR c.MiddleName  <> u.MiddleName
    OR c.DateOfBirth <> u.DateOfBirth;
This works fine, as long as every column isn’t nullable. But what if MiddleName and DateOfBirth allows NULLs?
You could do something like this…
UPDATE c
    SET c.FirstName   = u.FirstName,
        c.LastName    = u.LastName,
        c.MiddleName  = u.MiddleName,
        c.DateOfBirth = u.DateOfBirth
FROM #Customer c
    JOIN #Updates u ON u.CustomerID = c.CustomerID
WHERE c.FirstName <> u.FirstName
    OR c.LastName <> u.LastName
    OR CASE WHEN c.MiddleName = u.MiddleName                     THEN 0
            WHEN c.MiddleName  IS NULL AND u.MiddleName  IS NULL THEN 0
            ELSE 1 END = 1
    OR CASE WHEN c.DateOfBirth = u.DateOfBirth                   THEN 0
            WHEN c.DateOfBirth IS NULL AND u.DateOfBirth IS NULL THEN 0
            ELSE 1 END = 1;
This is effective… However, it is difficult to read, and you must now keep track of which columns are nullable and which are not. What occurs if you update LastName to permit NULL? The update is incorrect and needs to be rectified.
This is where my favourite hack comes in: identifying modified rows using the EXISTS and EXCEPT set operators.
The Basics — How EXCEPT works
The EXCEPT set operator examines two sets of records and returns all records from the first set that do not match a record in the second set.
-- Returns nothing
SELECT 1, NULL
EXCEPT
SELECT 1, NULL;

-- Returns NULL
SELECT NULL
EXCEPT
SELECT 1;

-- Returns 1
SELECT 1
EXCEPT
SELECT NULL;
Because the two sets are identical, the first example returns nothing, but the following two instances yield records from the first set because no matching records could be found in the second set.
It’s also worth nothing that the EXCEPT operator accepts NULL value comparisons as equal. In contrast to traditional comparison operators. It is because of this difference that we are able to use it to locate modified rows.
Let’s set up some sample data:
IF OBJECT_ID('tempdb..#Customer','U') IS NOT NULL DROP TABLE #Customer;

--SELECT * FROM #Customer
CREATE TABLE #Customer (
CustomerID int NOT NULL PRIMARY KEY,
FirstName varchar(50) NOT NULL,
MiddleName varchar(50) NULL,
LastName varchar(50) NOT NULL,
DateOfBirth date NULL,
);
INSERT INTO #Customer (CustomerID, FirstName, MiddleName, LastName, DateOfBirth)
VALUES ( 1, 'Sheldon' , 'Dennis' ,'Saunders' , '2019-12-10')
, ( 2, 'Barry' , NULL ,'Richardson' , '1990-09-29')
, ( 3, 'Rosa' , 'Evelyn' ,'Rodriquez' , '1974-09-11')
, ( 4, 'Dwayne' , NULL ,'Neal' , '1997-01-26')
, ( 5, 'Jane' , NULL ,'Green' , '1977-01-13')
, ( 6, 'Margaret' , NULL ,'Rodriguez' , '1991-06-08')
, ( 7, 'Chris' , 'Stephen' ,'King' , '1982-11-15')
, ( 8, 'Joe' , NULL ,'Smith' , '1972-09-18')
, ( 9, 'Paul' , NULL ,'Ramirez' , '1971-02-20')
, (10, 'Amanda' , 'Beverly' ,'White' , '2013-04-28');Here we’ve got some sample data…We have a customer table, where we store the customers first, middle and last name, and their birth date. Note that MiddleName and DateOfBirth allow NULL.
Now lets create a new table where we can make modifications to the data for us to sync back to the original #Customer table:
IF OBJECT_ID('tempdb..#Updates','U') IS NOT NULL DROP TABLE #Updates; --SELECT * FROM #Updates
SELECT c.CustomerID, c.FirstName, c.MiddleName, c.LastName, c.DateOfBirth
INTO #Updates
FROM #Customer c;

UPDATE #Updates SET LastName    = 'Brown'      WHERE CustomerID = 5; -- Change Last Name
UPDATE #Updates SET MiddleName  = 'John'       WHERE CustomerID = 9; -- Add Middle Name
UPDATE #Updates SET MiddleName  = NULL         WHERE CustomerID = 3; -- Remove Middle Name
UPDATE #Updates SET DateOfBirth = '1990-09-22' WHERE CustomerID = 2; -- Change DateOfBirth

-- Add new Customer
INSERT INTO #Updates (CustomerID, FirstName, MiddleName, LastName, DateOfBirth)
VALUES (11, 'Chad', NULL, 'Baldwin', '1990-01-12');
Now we have a copy of the #Customer table named #Updates, and we’ve made a few changes to the data.
Let’s use EXISTS and EXCEPT to find all records which changed…
SELECT *
FROM #Customer c
    JOIN #Updates u ON u.CustomerID = c.CustomerID
WHERE EXISTS (
    SELECT c.FirstName, c.MiddleName, c.LastName, c.DateOfBirth
    EXCEPT
    SELECT u.FirstName, u.MiddleName, u.LastName, u.DateOfBirth
);
Cool right? This is giving you all records in #Customer which do not have a matching record in #Updates.
To go from that to an update or a merge statement, is fairly simple:
UPDATE c
    SET c.FirstName   = u.FirstName,
        c.MiddleName  = u.MiddleName,
        c.LastName    = u.LastName,
        c.DateOfBirth = u.DateOfBirth
FROM #Customer c
    JOIN #Updates u ON u.CustomerID = c.CustomerID
WHERE EXISTS (
    SELECT c.FirstName, c.MiddleName, c.LastName, c.DateOfBirth
    EXCEPT
    SELECT u.FirstName, u.MiddleName, u.LastName, u.DateOfBirth
);
Merge
MERGE INTO #Customer c
USING #Updates u ON u.CustomerID = c.CustomerID
WHEN MATCHED AND EXISTS (
    SELECT c.FirstName, c.MiddleName, c.LastName, c.DateOfBirth
    EXCEPT
    SELECT u.FirstName, u.MiddleName, u.LastName, u.DateOfBirth
    )
THEN
    UPDATE SET c.FirstName    = u.FirstName,
    c.MiddleName = u.MiddleName,
    c.LastName = u.LastName,
    c.DateOfBirth = u.DateOfBirth
WHEN NOT MATCHED BY TARGET
THEN
    INSERT (CustomerID, FirstName, MiddleName, LastName, DateOfBirth)
    VALUES (u.CustomerID, u.FirstName, u.MiddleName, u.LastName, u.DateOfBirth);
What about performance?
When comparing query plans generated by the first approach and the EXISTS/EXCEPT method, the latter appears to produce a little more difficult execution plan.
Considering this, I’ve found that the EXISTS/EXCEPT approach almost always outperforms the EXISTS/EXCEPT method, even with very huge workloads. Not only does it always move quicker, but it also requires many fewer reads from the dependent tables.
Example 2: A simple UPDATE:
It shows how to use the UPDATE statement. It tells PostgreSQL to change the value of the retail column in the stock table to the floating-point constant value of 29.95. The WHERE clause limits any changes to rows that meet the criteria it specifies.
booktown=# SELECT retail FROM stock
booktown-#        WHERE isbn = '0590445065';
Output:
 retail
--------
  23.95
(1 row)
booktown=# UPDATE stock
booktown-# SET retail = 25.95
booktown-# WHERE isbn = '0590445065';
UPDATE 1
booktown=# SELECT retail FROM stock
booktown-# WHERE isbn = '0590445065';Output:
 retail
--------
 25.95
(1 row)
Example 4-53’s UPDATE 1 notification indicates that one record has been properly updated. Even if the amended value is identical to the previously stored record, the statement is still considered an update, and the database files on disc are changed as a result of the statement.
Example 3: Updating Entire Columns:
If the WHERE clause is not given, the UPDATE statement will change all of the values in the specified column. When updating columns with an expression rather than a constant value, this is most useful. When a SET clause expression is used, it is re-evaluated just before each row is updated. As a result, the value of each row is dynamically updated to a value determined by the interpreted expression’s value.
The following example shows how to use a UPDATE statement on the retail column of the stock table. It raises the selling price of each stocked book using a mathematical equation. The expression itself has several components, separated by parentheses to enforce order of execution.
The current profit margin of the book is determined by the (retail / cost) sub-expression, which is then increased by one tenth using the + operator and a floatingpoint constant of 0.1. The 0.1::numeric syntax casts the floating point constant to a numeric value explicitly. This is required since the division sub-expression returns a numeric value as a result. Finally, the new profit margin is multiplied by the base cost from the cost column, yielding the new price that should be updated in the retail column.
SQL CODE:
booktown=# SELECT isbn, retail, cost
booktown-#        FROM stock
booktown-#        ORDER BY isbn ASC
booktown-#        LIMIT 3;
Output:
    isbn    | retail  | cost
------------+--------+-------
 0385121679 | 36.95  | 29.00
 039480001X | 32.95  | 30.00
 0394800753 | 16.95  | 16.00
(3 rows)
booktown=# UPDATE stock
booktown-# SET retail =
booktown-# (cost * ((retail / cost) + 0.1::numeric));
booktown=# SELECT isbn, retail, cost
booktown-# FROM stock
booktown-# ORDER BY isbn ASC
booktown-# LIMIT 3;Output:
    isbn    | retail | cost
------------+--------+-------
 0385121679 |  39.85 | 29.00
 039480001X |  35.95 | 30.00
 0394800753 |  18.55 | 16.00
(3 rows)
Because there is no WHERE clause in Example 4-54’s UPDATE statement, it affects all entries in the stock table.
Example 4: Updating Several Columns:
You can change many columns of a table in a single statement by separating assignment expressions in the SET clause with commas. For the Publisher with the id of 113, this example updates both the name and address columns of the publishers database.
SQL CODE:
booktown=# UPDATE publishers
booktown-#        SET name = 'O'Reilly & Associates',
booktown-#            address = 'O'Reilly & Associates, Inc. '
booktown-#                   || '101 Morris St, Sebastopol, CA 95472'
booktown-#        WHERE id = 113;
UPDATE 1
booktown=# SELECT name, substr(address, 1, 40) || '...' AS short_address
booktown-#        FROM publishers
booktown-#        WHERE id = 113;
Output:
         name          |                short_address
-----------------------+---------------------------------------------
 O'Reilly & Associates | O'Reilly & Associates, Inc. 101 Morris S...
(1 row)
Both the name and address columns are assigned by string constants in Example UPDATE statement. The input apostrophes are escaped by many backslashes within the string constants. Following the change, the SELECT query checks that the desired information was updated.
This also demonstrates the use of the || text concatenation operator, and the substr() function, in practical usage. The address column is set with two string constants that are attached through the || operator in order to prevent the query from wrapping past the edge of the terminal. The substr() function is then used in the SELECT verification to prevent the output from wrapping. Each of these are used here to maintain readability of the output (of course, you would not want to display only a substring of the address field if you were interested in verifying its complete contents).
Example 5: Updating from Several Sources:
PostgreSQL supports a powerful non-standard enhancement to the SQL UPDATE statement in the form of the FROM clause. By using the FROM clause, you can apply your knowledge of the SELECT statement to draw input data from other existing data sets, such as tables, or sub-selects.
This example uses an UPDATE statement in conjunction with a FROM clause to modify the row data within the stock table via the stock_backup table. The WHERE clause describes the relationship between the table to be updated and its source. Wherever the isbn column is found to match, the value in the stock table is modified to the value from the previously populated stock_backup table.
SQL CODE
booktown=# UPDATE stock
booktown-#        SET retail = stock_backup.retail
booktown-#        FROM stock_backup
booktown-#        WHERE stock.isbn = stock_backup.isbn;
The FROM clause supports each of the JOIN syntax options described in the section titled Retrieving Rows with SELECT, enabling a wide variety of update methods from existing data sets. Further, as stated previously, sub-selects may be used as a data source to the FROM clause, just as is possible with the SELECT command.
SQL Update Top n Rows
APPROACH 1: Update wiht TOP 1:
Update consist in updating a set of data filtered by the where clause but sometimes we only need to update the top N records without affecting the others.
Syntax :
UPDATE TOP (N) table_name
SET column_name = value;
Example 1:
- We are going to use ‘Sales.Customers’ table from WideWorldImporters database.
- Next, we are going to update CreditLimit column and set it to NULL1. Updating Top N Records Using Top (N)
- The update statement of Sql Server supports the use of TOP clause to specify the number of records to update.
1. We are going to proceed to update the top 10 CreditLimit records.
UPDATE TOP (10) Sales.Customers
SET CreditLimit = '100';
As you can see CustomerIDs where updated on a random order.
The order of records that are going to be updated is not certain when using TOP N as rows as order can change each time you execute this query.
2. Updating Top N Records Using A CTE
By using a common table expression CTE we can select which top 10 values we would like to be updated.
This is possible by selecting the top 10 values in the inner CTE part.
Unlike using TOP (N), by using Order by in the inner CTE, we can select the order on which rows are going to be updated.
Example:
WITH C AS(
SELECT TOP (10) CustomerID
      ,CreditLimit
FROM Sales.Customers
ORDER BY CustomerID
)
UPDATE C
SET CreditLimit = 100;
Updated values are ordered by CustomerID, this order is not random.
3. Updating Top N Records Using Subqueries
This option is pretty similar than using a CTE, but the difference here is that we need a column on which we are going to filter the updated values.
Example:
UPDATE Sales.Customers
SET CreditLimit = 100
WHERE CustomerID IN(
        SELECT TOP (10) CustomerID
        FROM Sales.Customers
        ORDER BY CustomerID)
Results are similar than using a CTE as the order on which columns are going to be updated is established by using Order by in the INNER query.
4. Updating Top N Records Using ROWCOUNT
This option is available since Sql Server 2005 and available on Sql Server 2019:
I do not recommend using it because ROWCOUNT use is confusing and this should not be a reliable option as columns can’t be ordered before updating them.
SET ROWCOUNT 10
UPDATE Sales.Customers
SET CreditLimit = 100
SET ROWCOUNT 0;
APPROACH 2:
The update statement in MySQL supports the use of LIMIT clause to specify the number of rows that can be updated. In this tutorial, we use two examples to show how to use them effectively.
Practice #1: Update top 2 rows.
The following update query increases the UnitPrice by 10% for the first two products in the Condiments category (ordered by ProductID).
To instruct MySQL how to pick the products for update, we use ORDER BY clause. To update only 2 rows, we use LIMIT clause. In this query, the data is sorted by ProductID in ascending order and the first 2 products are chosen by the LIMIT 2 clause.
Most of the queries in the tutorials need Northwind MySQL database, you can download the database script on this page.
UPDATE products
SET UnitPrice = UnitPrice * 1.1
WHERE CategoryID = 2
ORDER BY ProductID
LIMIT 2;
Before update — the screenshot below shows that the UnitPrice for the two products are $10 and $22 (for CategoryID 2 only — Condiments).
After update — 2 rows updated. Now the UnitPrice for the two products are increased by 10% to $11 and $24.2
MySQL update query for 2 rows only.
Update UnitPrice for the top 5 most expensive products.
The following update query reduces the UnitPrice by 10% for the top 5 most expensive products.
UPDATE products
SET UnitPrice = UnitPrice * 0.9
ORDER BY UnitPrice DESC
LIMIT 5;
Before update — It will shows the UnitPrice for the top 5 most expensive products.
After update — 5 rows updated. UnitPrice is reduced by 10% for the top 5 most expensive products.
SQL Update Window Function
Window functions should not be used to delete or update many statements in a row, according to MySQL standards.
This is due to the DELETE and UPDATE clauses’ incompatibility with the SELECT and ORDER clauses. SELECT cannot be at the same query level as the UPDATE statement since it uses SET.
I attempted to update the column using the ROW NUMBER() window ranking function, but received the following error: ‘Windowed function can only exist in SELECT or ORDER BY clause’:
Example 1:
Then I did some workaround and used the Windows function indirectly using a CTE (Common Table Expression) for this. I will show you step by step how I accomplished this using CTE.
Step 1: Let’s first create a table with some test data,
CREATE TABLE Test
(
    ID INT,
    Value VARCHAR(10) NOT NULL
)
GO
Step 2: Insert data
INSERT INTO Test (Value) VALUES('Sunday'),('Monday'),
('Tuesday'),('Wednesday'),('Thursday'),('Friday'),('Saturday')
GO
As we can see that in column ID NULL values get inserted as we didn’t specify any values for this column during INSERT statement.
Step 3: So, when I tried this UPDATE statement using ROW_NUMBER() with SET I got the following error,
UPDATE Test
SET ID = ROW_NUMBER() OVER(ORDER BY Value)
GO
Step 4: Then I used CTE to update the ID values in table test in this manner,
;WITH CTE AS
(
    SELECT Value, ROW_NUMBER() OVER(ORDER BY Value) as RN
    FROM Test
)

UPDATE T
SET ID = RN
FROM CTE C JOIN Test T ON T.value = C.Value
When I ran this SQL code I didn’t get any error and ID column values to get updated with unique values.
Example 2: Using the DELETE() and UPDATE() as sub-queries of the main query as shown below:
WITH student_marks AS
 (
 SELECT [ marks],  LAG( [ marks]) OVER (ORDER BY [student_id]) AS marks_lag
 FROM student
 )
 UPDATE  student_marks
 SET [marks] = marks_lag
With this, the UPDATE function used in the sub-query is made possible; same applies to the DELETE function.