
The java <class-name> command syntax
First of all, you need to understand the correct way to launch a program using the java (or javaw) command.
The normal syntax1 is this:
java [ <options> ] <class-name> [<arg> ...]
where <option> is a command line option (starting with a «-» character), <class-name> is a fully qualified Java class name, and <arg> is an arbitrary command line argument that gets passed to your application.
1 — There are some other syntaxes which are described near the end of this answer.
The fully qualified name (FQN) for the class is conventionally written as you would in Java source code; e.g.
packagename.packagename2.packagename3.ClassName
However some versions of the java command allow you to use slashes instead of periods; e.g.
packagename/packagename2/packagename3/ClassName
which (confusingly) looks like a file pathname, but isn’t one. Note that the term fully qualified name is standard Java terminology … not something I just made up to confuse you 
Here is an example of what a java command should look like:
java -Xmx100m com.acme.example.ListUsers fred joe bert
The above is going to cause the java command to do the following:
- Search for the compiled version of the
com.acme.example.ListUsersclass. - Load the class.
- Check that the class has a
mainmethod with signature, return type and modifiers given bypublic static void main(String[]). (Note, the method argument’s name is NOT part of the signature.) - Call that method passing it the command line arguments («fred», «joe», «bert») as a
String[].
Reasons why Java cannot find the class
When you get the message «Could not find or load main class …», that means that the first step has failed. The java command was not able to find the class. And indeed, the «…» in the message will be the fully qualified class name that java is looking for.
So why might it be unable to find the class?
Reason #1 — you made a mistake with the classname argument
The first likely cause is that you may have provided the wrong class name. (Or … the right class name, but in the wrong form.) Considering the example above, here are a variety of wrong ways to specify the class name:
-
Example #1 — a simple class name:
java ListUserWhen the class is declared in a package such as
com.acme.example, then you must use the full classname including the package name in thejavacommand; e.g.java com.acme.example.ListUser -
Example #2 — a filename or pathname rather than a class name:
java ListUser.class java com/acme/example/ListUser.class -
Example #3 — a class name with the casing incorrect:
java com.acme.example.listuser -
Example #4 — a typo
java com.acme.example.mistuser -
Example #5 — a source filename (except for Java 11 or later; see below)
java ListUser.java -
Example #6 — you forgot the class name entirely
java lots of arguments
Reason #2 — the application’s classpath is incorrectly specified
The second likely cause is that the class name is correct, but that the java command cannot find the class. To understand this, you need to understand the concept of the «classpath». This is explained well by the Oracle documentation:
- The
javacommand documentation - Setting the Classpath.
- The Java Tutorial — PATH and CLASSPATH
So … if you have specified the class name correctly, the next thing to check is that you have specified the classpath correctly:
- Read the three documents linked above. (Yes … READ them! It is important that a Java programmer understands at least the basics of how the Java classpath mechanisms works.)
- Look at command line and / or the CLASSPATH environment variable that is in effect when you run the
javacommand. Check that the directory names and JAR file names are correct. - If there are relative pathnames in the classpath, check that they resolve correctly … from the current directory that is in effect when you run the
javacommand. - Check that the class (mentioned in the error message) can be located on the effective classpath.
- Note that the classpath syntax is different for Windows versus Linux and Mac OS. (The classpath separator is
;on Windows and:on the others. If you use the wrong separator for your platform, you won’t get an explicit error message. Instead, you will get a nonexistent file or directory on the path that will be silently ignored.)
Reason #2a — the wrong directory is on the classpath
When you put a directory on the classpath, it notionally corresponds to the root of the qualified name space. Classes are located in the directory structure beneath that root, by mapping the fully qualified name to a pathname. So for example, if «/usr/local/acme/classes» is on the class path, then when the JVM looks for a class called com.acme.example.Foon, it will look for a «.class» file with this pathname:
/usr/local/acme/classes/com/acme/example/Foon.class
If you had put «/usr/local/acme/classes/com/acme/example» on the classpath, then the JVM wouldn’t be able to find the class.
Reason #2b — the subdirectory path doesn’t match the FQN
If your classes FQN is com.acme.example.Foon, then the JVM is going to look for «Foon.class» in the directory «com/acme/example»:
-
If your directory structure doesn’t match the package naming as per the pattern above, the JVM won’t find your class.
-
If you attempt rename a class by moving it, that will fail as well … but the exception stacktrace will be different. It is liable to say something like this:
Caused by: java.lang.NoClassDefFoundError: <path> (wrong name: <name>)because the FQN in the class file doesn’t match what the class loader is expecting to find.
To give a concrete example, supposing that:
- you want to run
com.acme.example.Foonclass, - the full file path is
/usr/local/acme/classes/com/acme/example/Foon.class, - your current working directory is
/usr/local/acme/classes/com/acme/example/,
then:
# wrong, FQN is needed
java Foon

# wrong, there is no `com/acme/example` folder in the current working directory
java com.acme.example.Foon

# wrong, similar to above
java -classpath . com.acme.example.Foon

# fine; relative classpath set
java -classpath ../../.. com.acme.example.Foon

# fine; absolute classpath set
java -classpath /usr/local/acme/classes com.acme.example.Foon
Notes:
- The
-classpathoption can be shortened to-cpin most Java releases. Check the respective manual entries forjava,javacand so on. - Think carefully when choosing between absolute and relative pathnames in classpaths. Remember that a relative pathname may «break» if the current directory changes.
Reason #2c — dependencies missing from the classpath
The classpath needs to include all of the other (non-system) classes that your application depends on. (The system classes are located automatically, and you rarely need to concern yourself with this.) For the main class to load correctly, the JVM needs to find:
- the class itself.
- all classes and interfaces in the superclass hierarchy (e.g. see Java class is present in classpath but startup fails with Error: Could not find or load main class)
- all classes and interfaces that are referred to by means of variable or variable declarations, or method call or field access expressions.
(Note: the JLS and JVM specifications allow some scope for a JVM to load classes «lazily», and this can affect when a classloader exception is thrown.)
Reason #3 — the class has been declared in the wrong package
It occasionally happens that someone puts a source code file into the
the wrong folder in their source code tree, or they leave out the package declaration. If you do this in an IDE, the IDE’s compiler will tell you about this immediately. Similarly if you use a decent Java build tool, the tool will run javac in a way that will detect the problem. However, if you build your Java code by hand, you can do it in such a way that the compiler doesn’t notice the problem, and the resulting «.class» file is not in the place that you expect it to be.
Still can’t find the problem?
There lots of things to check, and it is easy to miss something. Try adding the -Xdiag option to the java command line (as the first thing after java). It will output various things about class loading, and this may offer you clues as to what the real problem is.
Also, consider possible problems caused by copying and pasting invisible or non-ASCII characters from websites, documents and so on. And consider «homoglyphs», where two letters or symbols look the same … but aren’t.
You may run into this problem if you have invalid or incorrect signatures in META-INF/*.SF. You can try opening up the .jar in your favorite ZIP editor, and removing files from META-INF until all you have is your MANIFEST.MF. However this is NOT RECOMMENDED in general. (The invalid signature may be the result of someone having injected malware into the original signed JAR file. If you erase the invalid signature, you are in infecting your application with the malware!) The recommended approach is to get hold of JAR files with valid signatures, or rebuild them from the (authentic) original source code.
Finally, you can apparently run into this problem if there is a syntax error in the MANIFEST.MF file (see https://stackoverflow.com/a/67145190/139985).
Alternative syntaxes for java
There are three alternative syntaxes for the launching Java programs using the java command.
-
The syntax used for launching an «executable» JAR file is as follows:
java [ <options> ] -jar <jar-file-name> [<arg> ...]e.g.
java -Xmx100m -jar /usr/local/acme-example/listuser.jar fredThe name of the entry-point class (i.e.
com.acme.example.ListUser) and the classpath are specified in the MANIFEST of the JAR file. -
The syntax for launching an application from a module (Java 9 and later) is as follows:
java [ <options> ] --module <module>[/<mainclass>] [<arg> ...]The name of the entrypoint class is either defined by the
<module>itself, or is given by the optional<mainclass>. -
From Java 11 onwards, you can use the
javacommand to compile and run a single source code file using the following syntax:java [ <options> ] <sourcefile> [<arg> ...]where
<sourcefile>is (typically) a file with the suffix «.java».
For more details, please refer to the official documentation for the java command for the Java release that you are using.
IDEs
A typical Java IDE has support for running Java applications in the IDE JVM itself or in a child JVM. These are generally immune from this particular exception, because the IDE uses its own mechanisms to construct the runtime classpath, identify the main class and create the java command line.
However it is still possible for this exception to occur, if you do things behind the back of the IDE. For example, if you have previously set up an Application Launcher for your Java app in Eclipse, and you then moved the JAR file containing the «main» class to a different place in the file system without telling Eclipse, Eclipse would unwittingly launch the JVM with an incorrect classpath.
In short, if you get this problem in an IDE, check for things like stale IDE state, broken project references or broken launcher configurations.
It is also possible for an IDE to simply get confused. IDE’s are hugely complicated pieces of software comprising many interacting parts. Many of these parts adopt various caching strategies in order to make the IDE as a whole responsive. These can sometimes go wrong, and one possible symptom is problems when launching applications. If you suspect this could be happening, it is worth trying other things like restarting your IDE, rebuilding the project and so on.
Other References
- From the Oracle Java Tutorials — Common Problems (and Their Solutions)
The Java “Could not find or load main class” error is thrown when the JVM fails to find or load the main class while executing a program. It usually occurs when executing a Java program from the command line.
Install the Java SDK to identify and fix these errors
What Causes Error: Could not find or load main class
The «Could not find or load main class» error occurs when the JVM fails to load the main class. This can happen due to various reasons, such as:
- The class being declared in the incorrect package.
- The file path of the class not matching the fully qualified name.
- Incorrectly specified classpath of the application.
- Missing dependencies from the classpath.
- Incorrect directory path on the classpath.
- A typo in the class name.
Error: Could not find or load main class Example
Here’s an example of the Java «Could not find or load main class» error thrown when an incorrect class name is specified during execution:
Here’s an example Java class MyClass.java:
public class MyClass {
    public static void main(String[] args) {
        System.out.println("Hello World");
    }
}
Now the above class is compiled using the command line:
$ javac MyClass.javaThe compiler generates an executable .class file for MyClass:
$ ls
MyClass.class   MyClass.java
Now if the java command is used to execute the .class file with an incorrect name, the «Could not find or load main class» error is thrown:
$ java Myclass
Error: Could not find or load main class Myclass
The generated .class file has the exact same name as the Java class, which in this case is MyClass.class. Specifying the correct name will execute the program successfully:
$ java MyClass
Hello World
How to Fix Error: Could not find or load main class
There are several ways the «Could not find or load main class» error can occur while executing Java programs. Most of the time, it occurs because of specifying an incorrect class name, class file extension, file path or classpath.
The following tips can be useful to resolve the «Could not find or load main class» error:
- Using correct class name — The spelling and casing of the class name should be checked when executing the program.
- Using the class name without the .class extension — The
javacommand expects the class name for executing the program, without the .class extension. Therefore, the following syntax should be used to execute Java classes: java <classname> - Using the correct file path — The path to the .class file should be checked and corrected if the error occurs. Remember to use the fully qualified name of the class that is in a package if executing it from outside the directory structure of the package.
- Correct classpath definition — The classpath should be checked and defined correctly if the error comes up. It can also be specified using the
java -cpor-classpathcommand line arguments.
Track, Analyze and Manage Errors With Rollbar
Managing errors and exceptions in your code is challenging. It can make deploying production code an unnerving experience. Being able to track, analyze, and manage errors in real-time can help you to proceed with more confidence. Rollbar automates error monitoring and triaging, making fixing Java errors easier than ever. Sign Up Today!
Introduction
Java developers often face the ‘could not find or load main class’ error out of the blue during compilation. If you keep getting this error without any specific reason, you are not alone. Whether you’re just starting out as a programmer or have some experience under the belt, we’ve all seen this error at least once. And we know it has nothing to do with our code.
Why does the “JVM could not find or load the main class” error occur?
As the name suggests, the ‘could not find or load main class’ error means that the JVM (Java Virtual Machine) could not locate the main class in your code and throws this runtime error. The question is can we not find it?
It is one of the most unpredicted and spontaneous errors in Java, which occurs due to the tendency of JVM to stick with a default classpath, the “main class not found issue” is something that haunts amateurs and professionals alike. As serious as it seems, it is not that difficult to fix. We will be exploring in this article how you can easily fix this annoying Java compilation error.

What Is Classpath?
Before we dive into the how and why of it, we need to understand what Classpath is and its role in Java.
The classpath is the file path where the JRE (Java runtime environment) searches for the classes and other resource files to run the code. As the name suggests, it is simply a file path where the .class format files can be found in a JDK package or directory.
Classpath can be set using two ways:
- Using the -classpath option at the time of executing the code,
- By setting the file path to the system CLASSPATH environment variable.
When the JVM is unable to locate the main class, it is usually because you would have entered the wrong .class name to run the classpath or the corresponding .class files have been altered.
See this example of generating a class file of a simple code:
1. public class example01 {
2. public static void main(String[] args) {
3. out.println("This is a simple code");
4. }
5. }
To run a .class file, you can use the following command:
java <.class filename>
Now if we run this line of code to run the class we made.
$ java eg01
Output:
Error: Could not find or load main class
It will fail with the error “Could not find or load main class eg01.”
As mentioned earlier, the .class file will have the same name given to the Java class of the program. So, in this case, the main class will have the name example01, not eg01.
Let’s try this one more with the correct name:
$ java example01
Output:
This is a simple code
Now it ran successfully.
While it’s not as simple in a project, the easiest way to rectify it is by either manually specifying the classpath or using packages.
Using Packages
Packages are used in Java to group similar classes or to provide a unique namespace to a group of classes. We will be now creating a class called example02 and place it in a package called example02Package.
1. package example02Package;
2. public class example02 {
3. public static void main(String args[]) {
4. out.println("File is found successfully!");
5. }
6. }
We will then use this package to visualize how the classpath works in Java. In your files directory, a package is represented as an independent folder by its name that you can easily observe in a file manager application.
After ensuring that the working directory is the same as the one that contains the package folder, you can also change the working directory on the terminal (command prompt) by using the cd command on almost every popular operating system.
Example02.java can be compiled by running the following command:
- package example02Package;
- javac example02Package/example02.java
This will now save the compiled .class file in the example02Package directory.
To run the compiled class, you need to type in the fully qualified class name in the command line. The fully qualified name of a Java class is written by prefixing it with the package name.
For this example, this is the fully qualified name:
java example02Package.example02
Using packages also allows Java developers to call executables from different packages from the same working directory. It can be easily done just by modifying the fully qualified class name without getting the ‘could not find or load main class error.
Manually Specifying Classpath
The other way to prevent could not find or load main class error is by manually specifying the classpath. It is recommended to manage your java files by creating separate directories for all source files and classes.
Just like the .class files are labeled as classes. the directory with source files is labeled as src. It also helps in significantly reducing the chances of JVM not being able to find the main class.
If you use this method for organization, this is how the directory structure of your projects will look like before compilation:
|___Project01
|     |___src
|           |___example02Package
|                       |___example02.java
|
|     |___classes
The indentations in the above example show the one level of the file hierarchy that your project should be following.
When compiling this code, you must make sure that your working directory is Project01. The following command is used to execute it:
javac -d classes src/testPackage/Test.java
The .class executable file must be saved in Project01/classes/example02Package. Now, the file directory structure will look like this:
|___Project01
|     |___src
|           |___example02Package
|                       |___example02.java
|
|         classes
|           |___example02Package
|                       |___example02.class
To run the .class file, you have to run the Java command with the fully qualified class name and the specification of the local classpath. Every path is declared relative to the working directory, which in this example is Project01.
java -classpath classes example02Package
Running this command will now provide you with the desired output without any chances of getting the error. The question is, why do you need to reorganize the files to solve such a small runtime error?
Why Organizing Files is important in Java?
The primary reason behind why the ‘could not find or load main class ’ is encountered is because JVM is unable to locate where your .class files were being saved.
The easiest way to resolve this error and prevent it from ever happening is to organize where the .class files are saved. Developers have to explicitly indicate the JVM to look for the .class file in the assigned location. This can only be done by organizing the source files and executables separately and using the working directory to manage either manually or using packages.
Your project code will likely keep expanding over time as the project work keeps going. By adding more constructs such as inheritance, inner classes, and more to your project, the file system keeps getting more complex. In such projects, this simple practice of organizing files can save you several hours of precious time that it would take in debugging if something goes wrong and you end up getting the could not find or load main class error.
See Also: What Are Annotations in Java – How do They Work
Conclusion
“Could not find or load main class” error is very common in Java however, we have discussed some effective ways to prevent this error in the article above. The file organization methods we discussed not only prevent this error but also make your code and directories manageable. These fixes go a long way for Java developers as they save a lot of time and trouble when debugging, especially for complex codes!

1. Overview
Occasionally when we run a Java program, we might see “Could not find or load main class.” It’s easy to guess the reason: The JVM failed to find the main class and gave this error. But why couldn’t it?
In this tutorial, we’ll discuss the probable reasons for failure to find the main class. We’ll also see how to fix them.
2. Sample Program
We’ll start with a HelloWorld program:
public class HelloWorld {
    public static void main(String[] args) {
        System.out.println("Hello world..!!!");
    }
}
Now let’s compile it:
$ javac HelloWorld.javaHere, the compiler will generate a .class file for our program. This .class file will be generated in the same directory. The .class file will have the same name as the class name given in the Java program. This .class file is executable.
In the following sections, we’ll run this .class file and try to understand the probable reasons for error “Could not find or load main class.”
3. Wrong Class Name
To run a .class file generated by Java compiler, we can use this command:
java <.class filename>Now let’s run our program:
$ java helloworld
Error: Could not find or load main class helloworld
And it failed with the error “Could not find or load main class helloworld.”
As discussed earlier, the compiler will generate the .class file with the exact same name given to the Java class in the program. So in our case, the main class will have the name HelloWorld, not helloworld.
Let’s give it one more try with correct casing:
$ java HelloWorld
Hello world..!!!
This time it ran successfully.
3.1. File Extension
To compile a Java program, we must provide the file name with its extension (.java):
$ javac HelloWorld.javaBut to run a .class file, we need to provide the class name, not the file name. So there is no need to provide the .class extension:
$ java HelloWorld.class
Error: Could not find or load main class HelloWorld.class
Again, let’s run our program using the correct class name:
$ java HelloWorld
Hello world..!!!
4. Java Package Names
In Java, we keep similar classes together in what we call a package.
Let’s move HelloWorld class into the com.baeldung package:
package com.baeldung;

public class HelloWorld {
    public static void main(String[] args) {
        System.out.println("Hello world..!!!");
    }
}
Now let’s compile and run the updated HelloWorld program like before:
$ java HelloWorld
Error: Could not find or load main class HelloWorld
But again, we get the error “Could not find or load main class HelloWorld.”
Let’s try to understand what we missed here.
To run a Java class that is in a package, we must provide its fully qualified name. So in our case, HelloWorld‘s fully qualified name is com.baeldung.HelloWorld.
Now, when we created com.baeldung package, we actually created this folder structure:
com/baeldung/HelloWorld.javaFirst, let’s try to run our program from the com/baeldung directory:
$ java com.baeldung.HelloWorld
Error: Could not find or load main class com.baeldung.HelloWorld
Still, we are not able to run our program.
Here, when we specified the fully qualified class name com.baeldung.HelloWorld, Java tried to find the HelloWorld.class file in com/baeldung, under the directory from where we were running the program.
As we were already inside com/baeldung, Java failed to find and run the HelloWorld program.
Now let’s move back to the parent folder and run it:
$ java com.baeldung.HelloWorld
Hello world..!!!
And we are again able to say “Hello” to the world.
5. Invalid Classpath
Before going ahead, let’s first understand what the classpath is. It’s the set of classes available to our currently running JVM.
We use the classpath variable to tell the JVM where to find the .class files on the file system.
While running a program, we can provide the classpath using -classpath option:
java -classpath /my_programs/compiled_classes HelloWorldHere, Java will look for the HelloWorld.class file in /my_programs/compiled_classes folder, a folder whose name we just made up. By default, the classpath variable is set to “.”, meaning the current directory.
In the above section, we changed our directory to run our program. But what if we want to run it from some other folder? That’s when the classpath variable helps us.
To run our program from the directory com/baeldung, we can simply state that our classpath is two directories up — one for each package part:
$ java -claspath ../../ com.baeldung.HelloWorld
Hello world..!!!
Here, “..” represents the parent directory. In our case “../../” represents the top of our package hierarchy.
6. Conclusion
In this article, we learned the probable reasons for the error “Could not find or load main class.”
Then, of course, we also learned how to solve this error.
It is very common to face errors and exceptions in the Java programming language. But some of the most popular and common errors are often faced by programmers who are new in programming. Among these errors, could not find or load main class in Java, is one of them that occurs usually. The error indicates that the java command failed to find or load the main class. It occurs when we try to run a program. When the error occurs, the JVM shows the following error message on the console:
The error is mostly generated when we incorrectly specify the class name at run time of the program.
Reasons to Occur Error
The error generates because the JVM fails to load the main class or package name. There are some other reasons that generate the same error, as follows:
- The class has been declared in the wrong package.
- Dependencies missing from the CLASSPATH.
- The subdirectory path doesn’t match the fully qualified name.
- The wrong directory is on the CLASSPATH.
- The CLASSPATH of the application is incorrectly specified.
- Also occurs, when we have done a mistake with the class name argument.
Solution to the Error
To avoid or resolve the error, we need to specify the absolute package name or class name.
Without Package
The main class is a class in which the main() method is defined. Let’s create a program that generates and displays an error on the console.
DemoClass.java
Output:
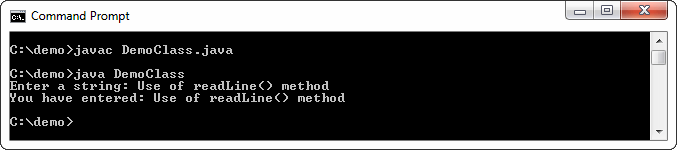
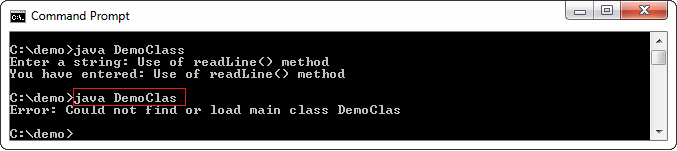
We see that the above program compiles and runs, successfully. Let’s generate the error that could not find or load main class in the above program. To generate and display the error, we have misspelled the class name while typing the java command java DemoClas.
It also occurs when we specify the .class extension at the end of the class name.
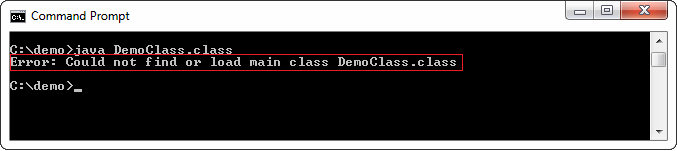
To avoid the error, do not write .class extension at the end of the class name while using the java command.
The error also occurs when we don’t place the class in the correct folder. In the following image, we are not inside the demo folder where the class is located. It means the DemoClass.class file must be inside the directory C:demo.

With Package
In the above program, let’s create a package named com.javatpoint. It means, on compiling the following Java program the .class file will be generated inside the C:democomjavatpointDemoClass.class.

DemoClass.java
Output:
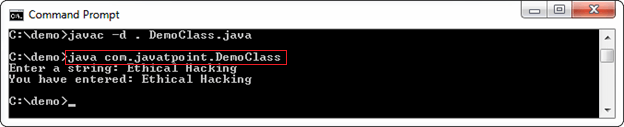
Remember that if the class is inside a package, we must use the full class name, including the package name, in the java command.