
И снова здравствуйте. Перевод следующей статьи подготовлен специально для студентов курса «Администратор Linux». Поехали!

Что такое S.M.A.R.T.?
S.M.A.R.T. (расшифровывается как Self-Monitoring, Analysis, and Reporting Technology) – это технология, вшитая в накопители, такие как жесткие диски или SSD. Ее основная задача – это мониторинг состояния.
На деле, S.M.A.R.T. контролирует несколько параметров во время обычной работы с диском. Он мониторит такие параметры как количество ошибок чтения, время запуска диска и даже состояние окружающей среды. Помимо этого, S.M.A.R.T. также может проводить тесты с использованием накопителя.
В идеале, S.M.A.R.T. позволит прогнозировать предсказуемые отказы, такие как отказы, вызванные механическим износом или ухудшением состояния поверхности диска, а также непредсказуемые отказы, вызванные каким-либо неожиданным дефектом. Поскольку обычно диски не выходят из строя внезапно, S.M.A.R.T. помогает операционной системе или системному администратору идентифицировать те диски, которые скоро выйдут из строя, чтобы их можно было заменить и избежать потери данных.
Что не относится к S.M.A.R.T.?
Все это, конечно, круто. Однако S.M.A.R.T. – это не хрустальный шар. Он не может спрогнозировать отказ со стопроцентной вероятностью и не может гарантировать, что накопитель не выйдет из строя без предупреждения. В лучшем случае S.M.A.R.T. стоит использовать для оценки вероятности поломки.
Учитывая статистический характер прогнозирования отказов, технология S.M.A.R.T. особенно интересует компании, использующие большое количество устройств для хранения данных. Чтобы выяснить, насколько точно S.M.A.R.T. может прогнозировать отказы и сообщать о необходимости замены дисков в центрах обработки данных или серверных мейнфреймах, даже проводились специальные исследования.
В 2016 году Microsoft и университет штата Пенсильвания провели исследование, связанное с SSD.
Согласно этому исследованию, некоторые атрибуты S.M.A.R.T. считаются хорошими индикаторами неизбежности отказа. В особенности в статье упоминаются:
Счетчик переназначенных (Realloc) секторов:
Несмотря на то, что основополагающие технологии радикально отличаются, этот показатель остается востребованным как в мире SSD, так и в мире жестких дисков. Стоит отметить, что из-за особенностей алгоритмов балансировки износа, используемых в SSD, когда несколько секторов выходят из строя, то с большой вероятностью можно предположить, что скоро выйдут из строя еще больше.
Ошибки в цикле Program/Erase (P/E):
Это признак проблем с основным оборудованием флеш-памяти, связанных с тем, что диск не может удалить данные из блока или сохранить их там. Дело в том, что процесс производства несовершенен, поэтому появление таких ошибок вполне можно ожидать. Однако флеш-память имеет ограниченное число циклов записи/удаления. По этой причине внезапное увеличение числа событий может сигнализировать о том, что диск достигает своего предела, и вполне ожидаемо, что другие ячейки памяти также начнут выходить из строя.
CRC и неисправимые ошибки («Data Error ”):
События такого типа могут быть вызваны ошибками хранения, либо проблемами с внутренним каналом связи накопителя. Этот индикатор учитывает как исправленные ошибки (без проблем сообщенные хост-системе), так и неисправленные ошибки (из-за которых происходит блокировка диска, сообщившего хост-системе о невозможности чтения). Другими словами, исправляемые ошибки невидимы для операционной системы, тем не менее они влияют на производительность накопителя, увеличивая вероятность переназначения сектора.
SATA downshift count:
Из-за временных помех, проблем с каналом связи между накопителем и хостом или из-за внутренних проблем с накопителем, интерфейс SATA может переключиться на более низкую скорость передачи сигналов. Снижение скорости соединения ниже номинального уровня оказывает очевидное влияние на производительность диска. Таким образом, этот показатель является наиболее значимым, в особенности, когда он коррелирует с наличием одного или нескольких предыдущих показателей.
Согласно исследованию, 62% вышедших из строя SSD показали наличие как минимум одного из вышеприведенных симптомов. С другой стороны можно сказать, что 38% изученных накопителей сломались без индикации этих симптомов. В исследованиях не упоминалось, были ли какие-то еще сообщения об отказах от S. M. A. R. T. по другим «симптомам». По этой причине нельзя напрямую сопоставить эти значения с отказом без предупреждения в 36% случаев из статьи от Google.
В исследовании Microsoft и университета штата Пенсильвания не раскрывались модели исследуемых дисков, однако, по словам авторов, большинство дисков поступают от одного и того же поставщика в течение уже нескольких поколений.
В ходе исследования также были отмечены значительные различия в надёжности между различными моделями. Например, «худшая» изученная модель показывает двадцатипроцентную частоту отказов через 9 месяцев после первой ошибки переназначения и до 36-ти процентов отказов в течение 9 месяцев после первого появления ошибок данных. «Худшей» моделью было названо более старое поколение дисков, рассматриваемых в статье.
С другой стороны, с теми же симптомами, что приведены выше, накопители нового поколения отказали в 3% и 20% в соответствии с теми же ошибками. Трудно сказать, можно ли объяснить эти цифры улучшением конструкции накопителя и производственного процесса, или здесь роль играет эффект устаревания накопителя.
Самое интересное, что упоминается в статье (я уже писал об этом ранее), так это то, что увеличение количества зарегистрированных ошибок может случить тревожным индикатором:
«Существует большая вероятность появления симптомов, предшествующих отказу SSD, которые активно себя проявляют и быстро прогрессируют, сильно сокращая время жизни накопителя до нескольких месяцев.»
Другими словами, одна случайная ошибка, о которой сообщил S.M.A.R.T., определенно не должна рассматриваться как сигнал о неизбежном отказе. Однако, когда исправный SSD начинает сообщать о все большем количестве ошибок, следует ждать краткосрочного или среднесрочного сбоя.
Но как узнать, в каком состоянии сейчас ваш SSD? Для удовлетворения своего любопытства, либо из желания начать внимательно следить за своими накопителями, вы можете использовать инструмент мониторинга smartctl.
Использование smartctl для мониторинга состояния вашего SSD в Linux
Чтобы следить за S.M.A.R.T статусом вашего диска, я предлагаю использовать инструмент smartctl, который является частью пакета smartmontool (по крайней мере на Debian/Ubuntu).
sudo apt install smartmontoolssmartctl – это инструмент командной строки, но это особенно помогает в случаях, когда вам нужно автоматизировать сбор данных, например, с ваших серверов.
Первый шаг в использовании smartctl – это проверка того, есть ли на вашем диске S.M.A.R.T. и поддерживается ли он инструментом:
sh$ sudo smartctl -i /dev/sdb
smartctl 6.6 2016-05-31 r4324 [x86_64-linux-4.9.0-6-amd64] (local build)
Copyright (C) 2002-16, Bruce Allen, Christian Franke, www.smartmontools.org

=== START OF INFORMATION SECTION ===
Model Family:     Seagate Momentus 7200.4
Device Model:     ST9500420AS
Serial Number:    5VJAS7FL
LU WWN Device Id: 5 000c50 02fa0b800
Firmware Version: D005SDM1
User Capacity:    500,107,862,016 bytes [500 GB]
Sector Size:      512 bytes logical/physical
Rotation Rate:    7200 rpm
Device is:        In smartctl database [for details use: -P show]
ATA Version is:   ATA8-ACS T13/1699-D revision 4
SATA Version is:  SATA 2.6, 3.0 Gb/s
Local Time is:    Mon Mar 12 15:54:43 2018 CET
SMART support is: Available - device has SMART capability.
SMART support is: Enabled
Как видите, мой внутренний жесткий диск ноутбука действительно поддерживает S.M.A.R.T. и он включен. Итак, как теперь получить S.M.A.R.T статус? Есть ли какие-то зафиксированные ошибки?
Выдача отчета «о всей S.M.A.R.T. информации о диске» — это опция -a:
sh$ sudo smartctl -i -a /dev/sdb
smartctl 6.6 2016-05-31 r4324 [x86_64-linux-4.9.0-6-amd64] (local build)
Copyright (C) 2002-16, Bruce Allen, Christian Franke, www.smartmontools.org

=== START OF INFORMATION SECTION ===
Model Family:     Seagate Momentus 7200.4
Device Model:     ST9500420AS
Serial Number:    5VJAS7FL
LU WWN Device Id: 5 000c50 02fa0b800
Firmware Version: D005SDM1
User Capacity:    500,107,862,016 bytes [500 GB]
Sector Size:      512 bytes logical/physical
Rotation Rate:    7200 rpm
Device is:        In smartctl database [for details use: -P show]
ATA Version is:   ATA8-ACS T13/1699-D revision 4
SATA Version is:  SATA 2.6, 3.0 Gb/s
Local Time is:    Mon Mar 12 15:56:58 2018 CET
SMART support is: Available - device has SMART capability.
SMART support is: Enabled

=== START OF READ SMART DATA SECTION ===
SMART overall-health self-assessment test result: PASSED
See vendor-specific Attribute list for marginal Attributes.

General SMART Values:
Offline data collection status:  (0x82)    Offline data collection activity
                    was completed without error.
                    Auto Offline Data Collection: Enabled.
Self-test execution status:      (   0)    The previous self-test routine completed
                    without error or no self-test has ever
                    been run.
Total time to complete Offline
data collection:         (    0) seconds.
Offline data collection
capabilities:              (0x7b) SMART execute Offline immediate.
                    Auto Offline data collection on/off support.
                    Suspend Offline collection upon new
                    command.
                    Offline surface scan supported.
                    Self-test supported.
                    Conveyance Self-test supported.
                    Selective Self-test supported.
SMART capabilities:            (0x0003)    Saves SMART data before entering
                    power-saving mode.
                    Supports SMART auto save timer.
Error logging capability:        (0x01)    Error logging supported.
                    General Purpose Logging supported.
Short self-test routine
recommended polling time:      (   2) minutes.
Extended self-test routine
recommended polling time:      ( 110) minutes.
Conveyance self-test routine
recommended polling time:      (   3) minutes.
SCT capabilities:            (0x103f)    SCT Status supported.
                    SCT Error Recovery Control supported.
                    SCT Feature Control supported.
                    SCT Data Table supported.

SMART Attributes Data Structure revision number: 10
Vendor Specific SMART Attributes with Thresholds:
ID# ATTRIBUTE_NAME          FLAG     VALUE WORST THRESH TYPE      UPDATED  WHEN_FAILED RAW_VALUE
  1 Raw_Read_Error_Rate     0x000f   111   099   006    Pre-fail  Always       -       29694249
  3 Spin_Up_Time            0x0003   100   098   085    Pre-fail  Always       -       0
  4 Start_Stop_Count        0x0032   095   095   020    Old_age   Always       -       5413
  5 Reallocated_Sector_Ct   0x0033   100   100   036    Pre-fail  Always       -       3
  7 Seek_Error_Rate         0x000f   071   060   030    Pre-fail  Always       -       51710773327
  9 Power_On_Hours          0x0032   070   070   000    Old_age   Always       -       26423
 10 Spin_Retry_Count        0x0013   100   100   097    Pre-fail  Always       -       0
 12 Power_Cycle_Count       0x0032   096   037   020    Old_age   Always       -       4836
184 End-to-End_Error        0x0032   100   100   099    Old_age   Always       -       0
187 Reported_Uncorrect      0x0032   072   072   000    Old_age   Always       -       28
188 Command_Timeout         0x0032   100   096   000    Old_age   Always       -       4295033738
189 High_Fly_Writes         0x003a   100   100   000    Old_age   Always       -       0
190 Airflow_Temperature_Cel 0x0022   056   042   045    Old_age   Always   In_the_past 44 (Min/Max 21/44 #22)
191 G-Sense_Error_Rate      0x0032   100   100   000    Old_age   Always       -       184
192 Power-Off_Retract_Count 0x0032   100   100   000    Old_age   Always       -       104
193 Load_Cycle_Count        0x0032   001   001   000    Old_age   Always       -       395415
194 Temperature_Celsius     0x0022   044   058   000    Old_age   Always       -       44 (0 13 0 0 0)
195 Hardware_ECC_Recovered  0x001a   050   045   000    Old_age   Always       -       29694249
197 Current_Pending_Sector  0x0012   100   100   000    Old_age   Always       -       1
198 Offline_Uncorrectable   0x0010   100   100   000    Old_age   Offline      -       1
199 UDMA_CRC_Error_Count    0x003e   200   200   000    Old_age   Always       -       0
240 Head_Flying_Hours       0x0000   100   253   000    Old_age   Offline      -       25131 (246 202 0)
241 Total_LBAs_Written      0x0000   100   253   000    Old_age   Offline      -       3028413736
242 Total_LBAs_Read         0x0000   100   253   000    Old_age   Offline      -       1613088055
254 Free_Fall_Sensor        0x0032   100   100   000    Old_age   Always       -       0

SMART Error Log Version: 1
ATA Error Count: 3
    CR = Command Register [HEX]
    FR = Features Register [HEX]
    SC = Sector Count Register [HEX]
    SN = Sector Number Register [HEX]
    CL = Cylinder Low Register [HEX]
    CH = Cylinder High Register [HEX]
    DH = Device/Head Register [HEX]
    DC = Device Command Register [HEX]
    ER = Error register [HEX]
    ST = Status register [HEX]
Powered_Up_Time is measured from power on, and printed as
DDd+hh:mm:SS.sss where DD=days, hh=hours, mm=minutes,
SS=sec, and sss=millisec. It "wraps" after 49.710 days.

Error 3 occurred at disk power-on lifetime: 21171 hours (882 days + 3 hours)
  When the command that caused the error occurred, the device was active or idle.

  After command completion occurred, registers were:
  ER ST SC SN CL CH DH
  -- -- -- -- -- -- --
  40 51 00 ff ff ff 0f  Error: UNC at LBA = 0x0fffffff = 268435455

  Commands leading to the command that caused the error were:
  CR FR SC SN CL CH DH DC   Powered_Up_Time  Command/Feature_Name
  -- -- -- -- -- -- -- --  ----------------  --------------------
  60 00 08 ff ff ff 4f 00      00:45:12.580  READ FPDMA QUEUED
  60 00 08 ff ff ff 4f 00      00:45:12.580  READ FPDMA QUEUED
  60 00 08 ff ff ff 4f 00      00:45:12.579  READ FPDMA QUEUED
  60 00 08 ff ff ff 4f 00      00:45:12.571  READ FPDMA QUEUED
  60 00 20 ff ff ff 4f 00      00:45:12.543  READ FPDMA QUEUED

Error 2 occurred at disk power-on lifetime: 21171 hours (882 days + 3 hours)
  When the command that caused the error occurred, the device was active or idle.

  After command completion occurred, registers were:
  ER ST SC SN CL CH DH
  -- -- -- -- -- -- --
  40 51 00 ff ff ff 0f  Error: UNC at LBA = 0x0fffffff = 268435455

  Commands leading to the command that caused the error were:
  CR FR SC SN CL CH DH DC   Powered_Up_Time  Command/Feature_Name
  -- -- -- -- -- -- -- --  ----------------  --------------------
  60 00 00 ff ff ff 4f 00      00:45:09.456  READ FPDMA QUEUED
  60 00 00 ff ff ff 4f 00      00:45:09.451  READ FPDMA QUEUED
  61 00 08 ff ff ff 4f 00      00:45:09.450  WRITE FPDMA QUEUED
  60 00 00 ff ff ff 4f 00      00:45:08.878  READ FPDMA QUEUED
  60 00 00 ff ff ff 4f 00      00:45:08.856  READ FPDMA QUEUED

Error 1 occurred at disk power-on lifetime: 21131 hours (880 days + 11 hours)
  When the command that caused the error occurred, the device was active or idle.

  After command completion occurred, registers were:
  ER ST SC SN CL CH DH
  -- -- -- -- -- -- --
  40 51 00 ff ff ff 0f  Error: UNC at LBA = 0x0fffffff = 268435455

  Commands leading to the command that caused the error were:
  CR FR SC SN CL CH DH DC   Powered_Up_Time  Command/Feature_Name
  -- -- -- -- -- -- -- --  ----------------  --------------------
  60 00 00 ff ff ff 4f 00      05:52:18.809  READ FPDMA QUEUED
  61 00 00 7e fb 31 45 00      05:52:18.806  WRITE FPDMA QUEUED
  60 00 00 ff ff ff 4f 00      05:52:18.571  READ FPDMA QUEUED
  ea 00 00 00 00 00 a0 00      05:52:18.529  FLUSH CACHE EXT
  61 00 08 ff ff ff 4f 00      05:52:18.527  WRITE FPDMA QUEUED

SMART Self-test log structure revision number 1
Num  Test_Description    Status                  Remaining  LifeTime(hours)  LBA_of_first_error
# 1  Short offline       Completed without error       00%     10904         -
# 2  Short offline       Completed without error       00%        12         -
# 3  Short offline       Completed without error       00%         0         -

SMART Selective self-test log data structure revision number 1
 SPAN  MIN_LBA  MAX_LBA  CURRENT_TEST_STATUS
    1        0        0  Not_testing
    2        0        0  Not_testing
    3        0        0  Not_testing
    4        0        0  Not_testing
    5        0        0  Not_testing
Selective self-test flags (0x0):
  After scanning selected spans, do NOT read-scan remainder of disk.
If Selective self-test is pending on power-up, resume after 0 minute delay.
Понимание выходных данных команд smartctl
На выходе получается много информации, которую не всегда легко понять. Наиболее интересной, вероятно, является та часть, которая помечена как “Vendor Specific SMART Attributes with Thresholds”. Она сообщает различные статистические данные, собранные S.M.A.R.T. устройством, и позволяет сравнить эти значения (текущие или худшие за все время) с некоторым порогом, определенным поставщиком.
Например, вот мои отчеты о переназначенных секторах на диске:
ID# ATTRIBUTE_NAME          FLAG     VALUE WORST THRESH TYPE      UPDATED  WHEN_FAILED RAW_VALUE
  5 Reallocated_Sector_Ct   0x0033   100   100   036    Pre-fail  Always       -       3
Вы можете заметить атрибут «Pre-fail». Он означает, что значение является аномальным. Таким образом, если значение превышает пороговое, велика вероятность сбоя. Другая категория »Old_age» используется для атрибутов, отвечающих значениям «нормального износа».
Последнее поле (здесь со значением «3») соответствует исходному значению атрибута, которое сообщает диск. Обычно это число имеет физическое значение. Здесь это фактическое количество переназначенных секторов. Для других атрибутов это может быть температура в градусах Цельсия, время в часах или минутах или количество раз, когда для диска было выполнено определенное условие.
В дополнение к исходному значению, диск с поддержкой S.M.A.R.T. должен сообщать «нормализованные значения» (значения полей, самые худшие и пороговые). Эти значения нормируются в диапазоне 1-254 (0-255 для пороговых значений). Прошивка диска выполняет эту нормализацию с помощью некоторого внутреннего алгоритма. Кроме того, разные производители могут нормализовать один и тот же атрибут по-разному. Большинство значений представлены в процентах, причем чем выше, тем лучше, но так бывает не всегда. Когда параметр ниже или равен пороговому значению, указанному производителем, диск считается неисправным в терминах этого атрибута. Помня о всех указаниях из первой части статьи, когда атрибут, показывающий ранее значение “pre-fail” все-таки дал сбой, наиболее вероятно, что скоро диск выйдет из строя.
В качестве второго примера возьмем “seek error rate”:
ID# ATTRIBUTE_NAME          FLAG     VALUE WORST THRESH TYPE      UPDATED  WHEN_FAILED RAW_VALUE
  7 Seek_Error_Rate         0x000f   071   060   030    Pre-fail  Always       -       51710773327
На самом деле (и это основная проблема отчетности S.M.A.R.T.), точное значение полей каждого атрибута понимает только поставщик. В моем случае Seagate использует логарифмическую шкалу для нормализации значения. Таким образом, «71» означает примерно одну ошибку на 10 миллионов запросов (10 в степени 7,1). Забавно, что самым худшим показателем за все время была одна ошибка на 1 миллион запросов (10 в 6-й степени).
Если я правильно понимаю, то это значит, что головки моего диска сейчас расположены точнее, чем раньше. Я не следил за этим диском внимательно, поэтому анализирую полученные данные весьма субъективно. Возможно накопитель просто надо было немного «обкатать» с тех пор как он был введен в эксплуатацию? Или может быть это следствие механического износа деталей и, следовательно, теперь имеет место меньшая сила трения? В любом случае, какова бы ни была причина, это значение является скорее показателем производительности, чем ранним предупреждением об ошибке. Так что меня оно не сильно беспокоит.
Помимо вышеприведенного и трех крайне подозрительных ошибок, записанных около шести месяцев назад, этот диск находится в удивительно хорошем состоянии (по данным S.M.A.R.T.) для стокового диска ноутбука, проработавшего более 1100 дней (26423 часа).
ID# ATTRIBUTE_NAME          FLAG     VALUE WORST THRESH TYPE      UPDATED  WHEN_FAILED RAW_VALUE
  9 Power_On_Hours          0x0032   070   070   000    Old_age   Always       -       26423
Из любопытства я провел этот же тест на гораздо более новом ноутбуке, оснащенном SSD:
sh$ sudo smartctl -i /dev/sdb
smartctl 6.5 2016-01-24 r4214 [x86_64-linux-4.10.0-32-generic] (local build)
Copyright (C) 2002-16, Bruce Allen, Christian Franke, www.smartmontools.org

=== START OF INFORMATION SECTION ===
Device Model:     TOSHIBA THNSNK256GVN8
Serial Number:    17FS131LTNLV
LU WWN Device Id: 5 00080d 9109b2ceb
Firmware Version: K8XA4103
User Capacity:    256 060 514 304 bytes [256 GB]
Sector Sizes:     512 bytes logical, 4096 bytes physical
Rotation Rate:    Solid State Device
Form Factor:      M.2
Device is:        Not in smartctl database [for details use: -P showall]
ATA Version is:   ACS-3 (minor revision not indicated)
SATA Version is:  SATA 3.2, 6.0 Gb/s (current: 6.0 Gb/s)
Local Time is:    Tue Mar 13 01:03:23 2018 CET
SMART support is: Available - device has SMART capability.
SMART support is: Enabled
Первое, что бросается в глаза, так это то, что несмотря на наличие S.M.A.R.T., устройства нет в базе данных smartctl. Но это не помешает инструменту собирать данные с SSD, однако он не сможет сообщить точные значения различных атрибутов, специфичных для поставщика:
sh$ sudo smartctl -a /dev/sdb
smartctl 6.5 2016-01-24 r4214 [x86_64-linux-4.10.0-32-generic] (local build)
Copyright (C) 2002-16, Bruce Allen, Christian Franke, www.smartmontools.org

=== START OF READ SMART DATA SECTION ===
SMART overall-health self-assessment test result: PASSED

General SMART Values:
Offline data collection status:  (0x00)    Offline data collection activity
                    was never started.
                    Auto Offline Data Collection: Disabled.
Self-test execution status:      (   0)    The previous self-test routine completed
                    without error or no self-test has ever
                    been run.
Total time to complete Offline
data collection:         (  120) seconds.
Offline data collection
capabilities:              (0x5b) SMART execute Offline immediate.
                    Auto Offline data collection on/off support.
                    Suspend Offline collection upon new
                    command.
                    Offline surface scan supported.
                    Self-test supported.
                    No Conveyance Self-test supported.
                    Selective Self-test supported.
SMART capabilities:            (0x0003)    Saves SMART data before entering
                    power-saving mode.
                    Supports SMART auto save timer.
Error logging capability:        (0x01)    Error logging supported.
                    General Purpose Logging supported.
Short self-test routine
recommended polling time:      (   2) minutes.
Extended self-test routine
recommended polling time:      (  11) minutes.
SCT capabilities:            (0x003d)    SCT Status supported.
                    SCT Error Recovery Control supported.
                    SCT Feature Control supported.
                    SCT Data Table supported.

SMART Attributes Data Structure revision number: 16
Vendor Specific SMART Attributes with Thresholds:
ID# ATTRIBUTE_NAME          FLAG     VALUE WORST THRESH TYPE      UPDATED  WHEN_FAILED RAW_VALUE
  1 Raw_Read_Error_Rate     0x000a   100   100   000    Old_age   Always       -       0
  2 Throughput_Performance  0x0005   100   100   050    Pre-fail  Offline      -       0
  3 Spin_Up_Time            0x0007   100   100   050    Pre-fail  Always       -       0
  5 Reallocated_Sector_Ct   0x0013   100   100   050    Pre-fail  Always       -       0
  7 Unknown_SSD_Attribute   0x000b   100   100   050    Pre-fail  Always       -       0
  8 Unknown_SSD_Attribute   0x0005   100   100   050    Pre-fail  Offline      -       0
  9 Power_On_Hours          0x0012   100   100   000    Old_age   Always       -       171
 10 Unknown_SSD_Attribute   0x0013   100   100   050    Pre-fail  Always       -       0
 12 Power_Cycle_Count       0x0012   100   100   000    Old_age   Always       -       105
166 Unknown_Attribute       0x0012   100   100   000    Old_age   Always       -       0
167 Unknown_Attribute       0x0022   100   100   000    Old_age   Always       -       0
168 Unknown_Attribute       0x0012   100   100   000    Old_age   Always       -       0
169 Unknown_Attribute       0x0013   100   100   010    Pre-fail  Always       -       100
170 Unknown_Attribute       0x0013   100   100   010    Pre-fail  Always       -       0
173 Unknown_Attribute       0x0012   200   200   000    Old_age   Always       -       0
175 Program_Fail_Count_Chip 0x0013   100   100   010    Pre-fail  Always       -       0
192 Power-Off_Retract_Count 0x0012   100   100   000    Old_age   Always       -       18
194 Temperature_Celsius     0x0023   063   032   020    Pre-fail  Always       -       37 (Min/Max 11/68)
197 Current_Pending_Sector  0x0012   100   100   000    Old_age   Always       -       0
240 Unknown_SSD_Attribute   0x0013   100   100   050    Pre-fail  Always       -       0

SMART Error Log Version: 1
No Errors Logged

SMART Self-test log structure revision number 1
No self-tests have been logged.  [To run self-tests, use: smartctl -t]

SMART Selective self-test log data structure revision number 1
 SPAN  MIN_LBA  MAX_LBA  CURRENT_TEST_STATUS
    1        0        0  Not_testing
    2        0        0  Not_testing
    3        0        0  Not_testing
    4        0        0  Not_testing
    5        0        0  Not_testing
Selective self-test flags (0x0):
  After scanning selected spans, do NOT read-scan remainder of disk.
If Selective self-test is pending on power-up, resume after 0 minute delay.
Выше вы видите выходные данные абсолютно нового SSD. Данные понятны даже в случае отсутствия нормализации или метаинформации для данных конкретного поставщика, как в моем случае с “Unknown_SSD_Attribute.” Я могу только надеяться, что в последующих версиях smartctl в базе данных появятся данные об этой модели диска, и я смогу лучше определять потенциальные проблемы.
Проверьте свой SSD в Linux с помощью smartctl
До сих пор мы рассматривали данные, собранные во время нормальной работы накопителя. Однако протокол S.M.A.R.T. также поддерживает несколько команд для автономного тестирования для запуска диагностики по требованию.
Автономное тестирование может проводиться во время обычных операций с диском, если не было указано иное. Поскольку тест и запросы ввода-вывода хоста будут конкурировать, производительность диска упадет на время теста. Спецификация S.M.A.R.T. определяет несколько видов автономного тестирования:
Короткое автономное тестирование (-t short)
Такой тест проверит электрическую и механическую, производительность, а также производительность чтения диска. Короткое автономное тестирование обычно занимает всего несколько минут (обычно от 2 до 10).
Расширенное автономное тестирование (-t long)
Этот тест занимает почти в два раза больше времени. Как правило, это просто более детальная версия короткого автономного тестирования. Кроме того, этот тест будет сканировать всю поверхность диска на наличие ошибок данных без ограничения по времени. Продолжительность теста будет пропорциональна размеру диска.
Транспортировочное автономное тестирование (-t conveyance)
Этот тестовый набор предложен в качестве сравнительно быстрого способа проверки на возможные повреждения, возникшие во время транспортировки устройства.
Вот примеры, взятые с тех же дисков, что были выше. Я предлагаю вам угадать, где какой:
sh$ sudo smartctl -t short /dev/sdb
smartctl 6.5 2016-01-24 r4214 [x86_64-linux-4.10.0-32-generic] (local build)
Copyright (C) 2002-16, Bruce Allen, Christian Franke, www.smartmontools.org

=== START OF OFFLINE IMMEDIATE AND SELF-TEST SECTION ===
Sending command: "Execute SMART Short self-test routine immediately in off-line mode".
Drive command "Execute SMART Short self-test routine immediately in off-line mode" successful.
Testing has begun.
Please wait 2 minutes for test to complete.
Test will complete after Mon Mar 12 18:06:17 2018

Use smartctl -X to abort test.
Сейчас производится проверка. Давайте дождемся завершения, чтобы посмотреть результат:
sh$ sudo sh -c 'sleep 120 && smartctl -l selftest /dev/sdb'
smartctl 6.5 2016-01-24 r4214 [x86_64-linux-4.10.0-32-generic] (local build)
Copyright (C) 2002-16, Bruce Allen, Christian Franke, www.smartmontools.org

=== START OF READ SMART DATA SECTION ===
SMART Self-test log structure revision number 1
Num  Test_Description    Status                  Remaining  LifeTime(hours)  LBA_of_first_error
# 1  Short offline       Completed without error       00%       171         -
Проведем тот же тест на другом диске:
sh$ sudo smartctl -t short /dev/sdb
smartctl 6.6 2016-05-31 r4324 [x86_64-linux-4.9.0-6-amd64] (local build)
Copyright (C) 2002-16, Bruce Allen, Christian Franke, www.smartmontools.org

=== START OF OFFLINE IMMEDIATE AND SELF-TEST SECTION ===
Sending command: "Execute SMART Short self-test routine immediately in off-line mode".
Drive command "Execute SMART Short self-test routine immediately in off-line mode" successful.
Testing has begun.
Please wait 2 minutes for test to complete.
Test will complete after Mon Mar 12 21:59:39 2018

Use smartctl -X to abort test.
И еще раз, отправим в сон на две минуты и посмотрим результат:
sh$ sudo sh -c 'sleep 120 && smartctl -l selftest /dev/sdb'
smartctl 6.6 2016-05-31 r4324 [x86_64-linux-4.9.0-6-amd64] (local build)
Copyright (C) 2002-16, Bruce Allen, Christian Franke, www.smartmontools.org

=== START OF READ SMART DATA SECTION ===
SMART Self-test log structure revision number 1
Num  Test_Description    Status                  Remaining  LifeTime(hours)  LBA_of_first_error
# 1  Short offline       Completed without error       00%     26429         -
# 2  Short offline       Completed without error       00%     10904         -
# 3  Short offline       Completed without error       00%        12         -
# 4  Short offline       Completed without error       00%         0         -
Интересно, что в этом случае мы видим, что производители диска и компьютера, похоже, уже тестировали диск (на времени жизни в 0 часов и 12 часов). Я сам определенно был гораздо менее озабочен состоянием диска, чем они. Итак, поскольку я уже показал быстрые тесты, то и расширенный тоже запущу, чтобы посмотреть как это происходит.
sh$ sudo smartctl -t long /dev/sdb
smartctl 6.6 2016-05-31 r4324 [x86_64-linux-4.9.0-6-amd64] (local build)
Copyright (C) 2002-16, Bruce Allen, Christian Franke, www.smartmontools.org

=== START OF OFFLINE IMMEDIATE AND SELF-TEST SECTION ===
Sending command: "Execute SMART Extended self-test routine immediately in off-line mode".
Drive command "Execute SMART Extended self-test routine immediately in off-line mode" successful.
Testing has begun.
Please wait 110 minutes for test to complete.
Test will complete after Tue Mar 13 00:09:08 2018

Use smartctl -X to abort test.
Судя по всему на этот раз ждать придется гораздо дольше, чем при проведении короткого теста. Так что давайте посмотрим:
sh$ sudo bash -c 'sleep $((110*60)) && smartctl -l selftest /dev/sdb'
[sudo] password for sylvain:
smartctl 6.6 2016-05-31 r4324 [x86_64-linux-4.9.0-6-amd64] (local build)
Copyright (C) 2002-16, Bruce Allen, Christian Franke, www.smartmontools.org

=== START OF READ SMART DATA SECTION ===
SMART Self-test log structure revision number 1
Num  Test_Description    Status                  Remaining  LifeTime(hours)  LBA_of_first_error
# 1  Extended offline    Completed: read failure       20%     26430         810665229
# 2  Short offline       Completed without error       00%     26429         -
# 3  Short offline       Completed without error       00%     10904         -
# 4  Short offline       Completed without error       00%        12         -
# 5  Short offline       Completed without error       00%         0         -
В последнем тесте обратите внимание на различие в результатах, полученных с помощью короткого и расширенного теста, даже если они были выполнены один за другим. Ну, возможно, этот диск не в таком уж и хорошем состоянии! Отмечу, что тест остановился после первой ошибки чтения. Поэтому, если вы хотите получить исчерпывающую информацию обо всех ошибках чтения, вам придется продолжать тест после каждой ошибки. Я призываю вас взглянуть на одну очень хорошо написанную страницу руководства smartctl(8) для получения дополнительной информации о параметрах -t select, N-max и -t select, чтобы уметь делать так:
sh$ sudo smartctl -t select,810665230-max /dev/sdb
smartctl 6.6 2016-05-31 r4324 [x86_64-linux-4.9.0-6-amd64] (local build)
Copyright (C) 2002-16, Bruce Allen, Christian Franke, www.smartmontools.org

=== START OF OFFLINE IMMEDIATE AND SELF-TEST SECTION ===
Sending command: "Execute SMART Selective self-test routine immediately in off-line mode".
SPAN         STARTING_LBA           ENDING_LBA
   0            810665230            976773167
Drive command "Execute SMART Selective self-test routine immediately in off-line mode" successful.
Testing has begun.
smartctl 6.6 2016-05-31 r4324 [x86_64-linux-4.9.0-6-amd64] (local build)
Copyright (C) 2002-16, Bruce Allen, Christian Franke, www.smartmontools.org
=== START OF READ SMART DATA SECTION ===
SMART Self-test log structure revision number 1
Num Test_Description Status Remaining LifeTime(hours) LBA_of_first_error
# 1 Selective offline Completed without error 00% 26432 -
# 2 Extended offline Completed: read failure 20% 26430 810665229
# 3 Short offline Completed without error 00% 26429 -
# 4 Short offline Completed without error 00% 10904 -
# 5 Short offline Completed without error 00% 12 -
# 6 Short offline Completed without error 00% 0 -Заключение
Определенно, S.M.A.R.T. – это именно та технология, которую стоит добавить в свой инструментарий для мониторинга работоспособности дисков ваших серверов. Вам также стоит взглянуть на S.M.A.R.T. Disk Monitoring Daemon smartd(8), который может помочь вам автоматизировать мониторинг с помощью отчетов системного журнала.
Учитывая статистическую природу прогнозирования сбоев, я не уверен, что агрессивный S.M.A.R.T. мониторинг будет сильно полезен на персональных компьютерах. Помните, что каким бы ни был накопитель, однажды он все равно выйдет из строя – и, как мы видели ранее, в одной трети случаев он сделает это без предупреждения. Поэтому ничто не обеспечит целостность ваших данных лучше, чем RAID технология и резервные копии!
До встречи на курсе, друзья!
SMART (Self-Monitoring, Analysis, and Reporting Technology) is a feature enabled in all modern hard disk drives and SSDs to monitor/test reliability. It checks different drive attributes to detect the possibility of drive failure. There are different tools available in Linux and Windows to perform the SMART tests.
In this tutorial, we will learn how to test SSD/HDD health in Linux from CLI and GUI
Two methods explained here are:
- Using Smartctl
- Using Gnome Disks
Test SSD Health using Smartctl
Smartctl is a command-line utility tool that can be used to check S.M.A.R.T-enabled HDD or SSD status in the Linux system.
Smartctl utility tool comes with the package smartmontools. The Smartmontools is available by default in all Linux distributions including Ubuntu, RHEL and Centos and Fedora.
To install smartmontools in Linux:
Ubuntu
sudo apt install smartmontools Start the service using the following command.
sudo /etc/init.d/smartmontools startRHEL and CentOS
sudo yum install smartmontoolsFedora
sudo dnf install smartmontoolsSmartd service will start automatically after the successful installation.
If not started, start smartd service:
sudo systemctl start smartdTo test overall-health of the drive, type:
sudo smartctl -d ata -H /dev/sdaWhere,
d — Specifies the type of device.
ata — the device type is ATA, use scsi for SCSI device type.
H — Check the device to report its SMART health status.

The result PASSED indicates that the disk drive is good. If the device reports failing health status, this means either that the device has already failed or could fail very soon.
If it indicates failing use -a option to get more information.
sudo smartctl -a /dev/sda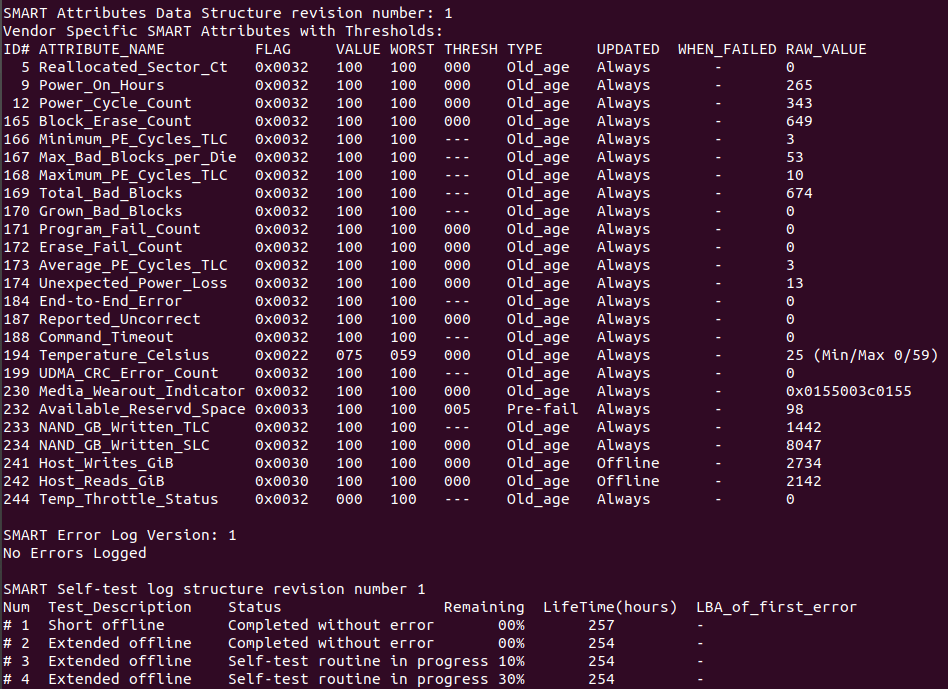
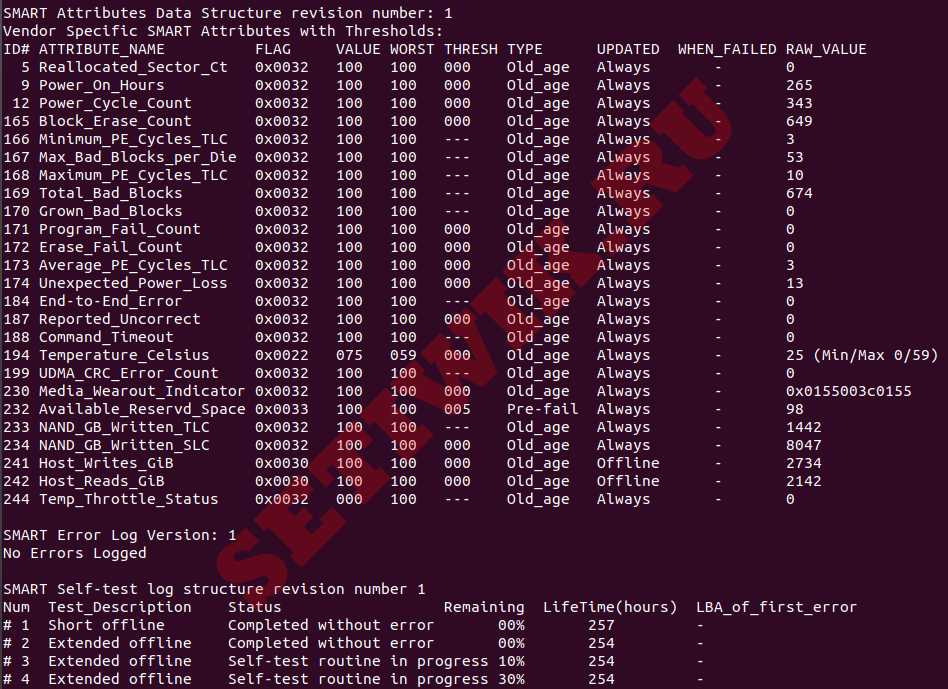
You can monitor the following attributes:
[ID 5] Reallocated Sectors Count — Numbers of sectors reallocated due to read errors.
[ID 187] Reported Uncorrect — Number of uncorrectable errors while accessing read/write to sector.
[ID 230] Media Wearout Indicator — Current state of drive operation based upon the Life Curve.
100 is the BEST value and 0 is the WORST.
Check SMART Attribute Details for more information.
To initiate the extended test (long) using the following command:
sudo smartctl -t long /dev/sda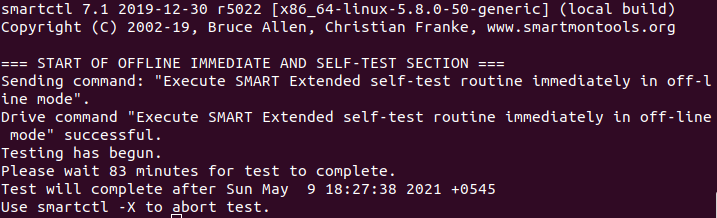
To perform a self test, run:
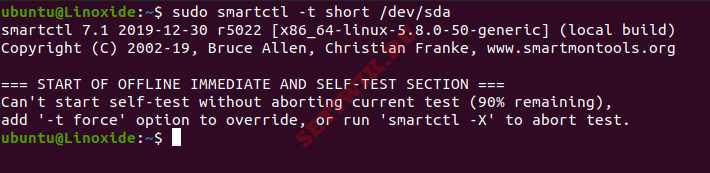
sudo smartctl -t short /dev/sda
To find drive’s self test result, use the following command.
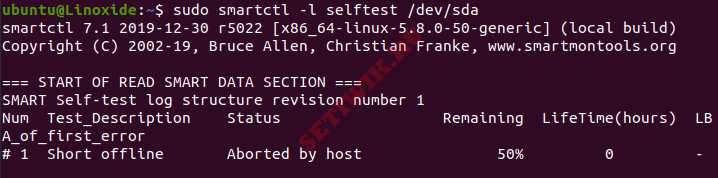
sudo smartctl -l selftest /dev/sda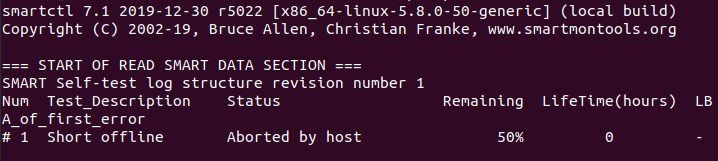
To evaluate estimate time to perform test, run the following command.
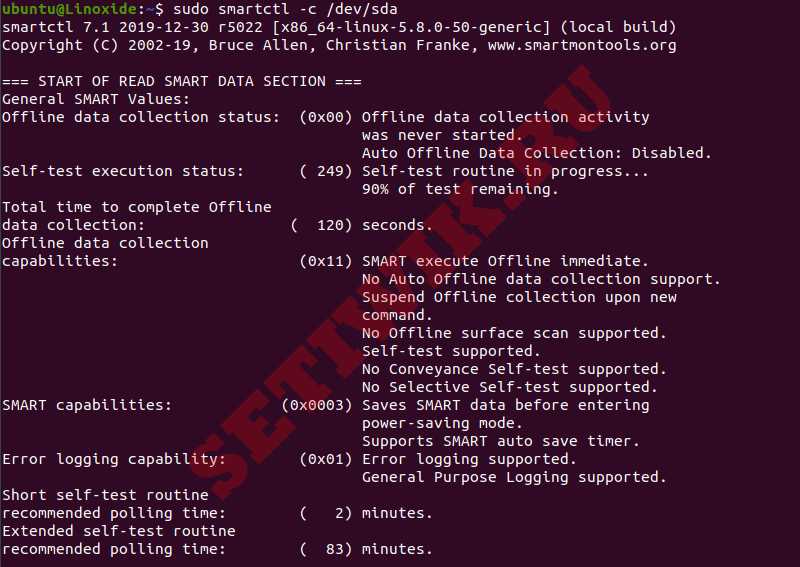
sudo smartctl -c /dev/sda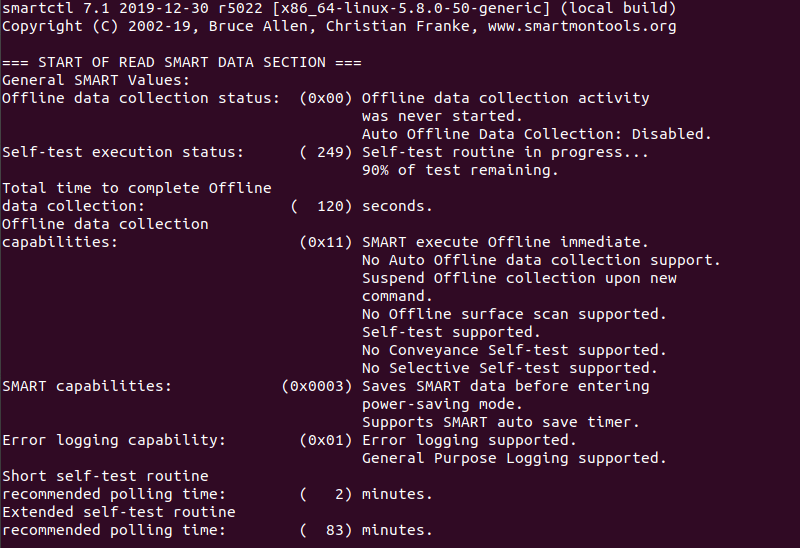
You can print error logs of the disk by using the command:
sudo smartctl -l error /dev/sda
Test SSD/HDD Health using Gnome Disks
With GNOME disks utility you can get a quick review of your SSD drives, format your drives, create a disk image, run standard tests against SSD drives, and restore a disk image.
Install Gnome Disks
In Ubuntu 20.04, the GNOME Disks application comes with the GNOME disk tool installed. If you are unable to find the tool, use the following command to install it.
sudo apt-get install gnome-disk-utilityGNOME Disk is now installed, now you can go to your desktop menu navigate to the application, and launch. From the application, you can overview all your attached drives. You can also use the following command to launch the GNOME Disk application.
sudo gnome-disks 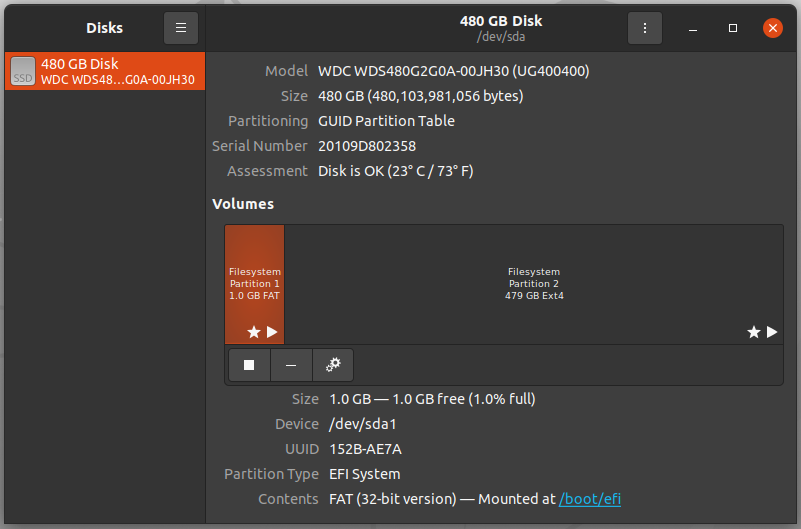
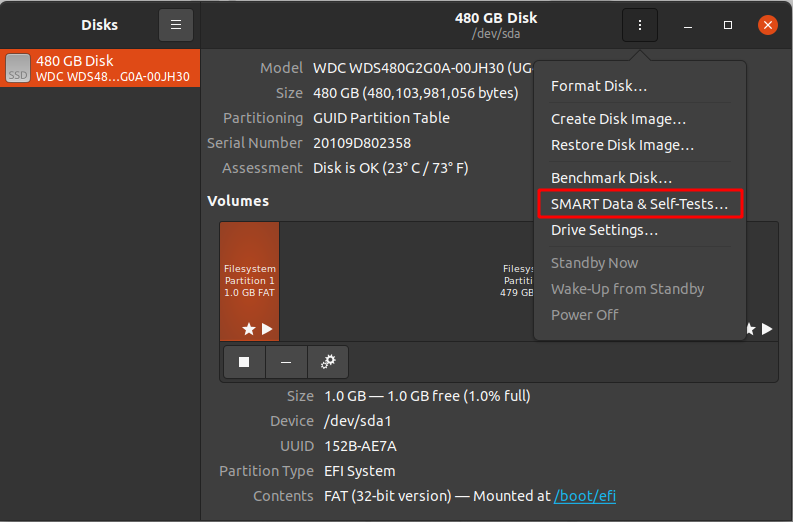
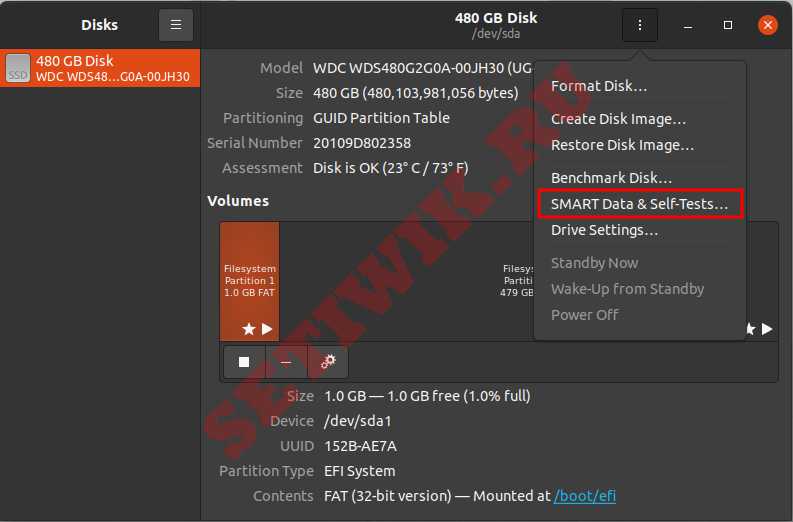
Now the test can be performed on the drives. To do so, launch the GNOME disks and select the disk which you want to test. You can find the quick assessment of the drives such as size, partitioning, Serial number, temp, and health. Click on the gear icon and select SMART Data & Self-tests.
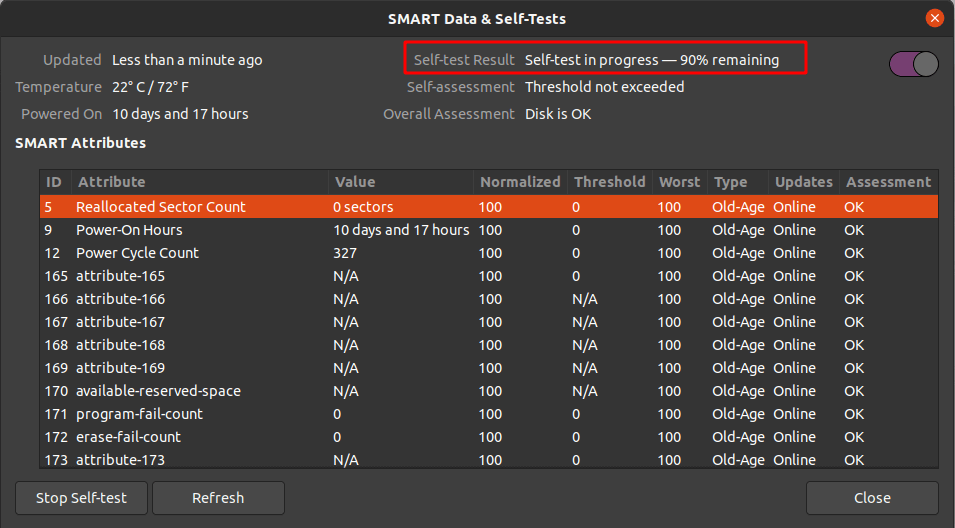
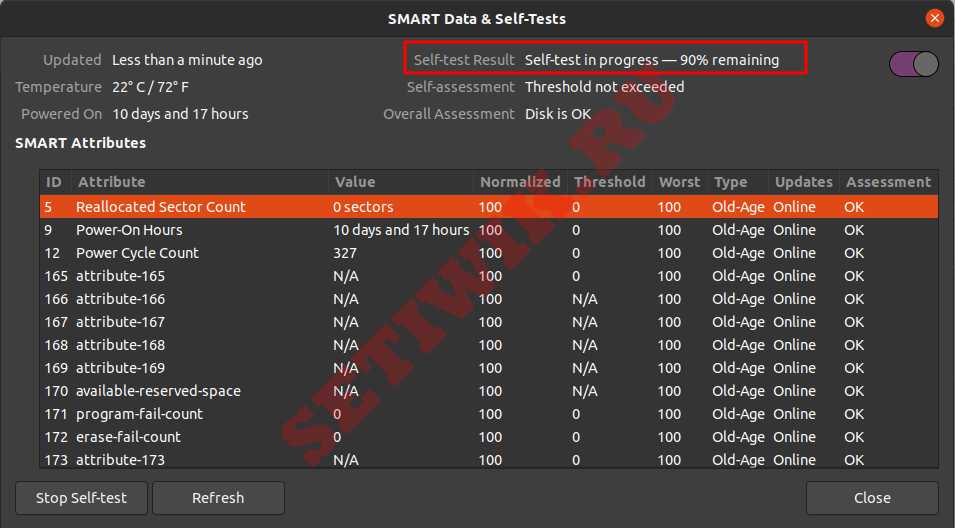
In the new window you can find the results of the last test. In the top right of the window, you can find that the SMART option is enabled. If SMART is disabled, it can be enabled by clicking on the slider. To start the new test click on the Start Self-test button.

Once the Start Self-test button is clicked, a drop down menu will be appeared to select the type of the tests which are Short, Extended and Conveyance. Select the test type and provide your sudo password to continue the test. From the progress meter, percentage of the test complete can be seen.
Conclusion
In this tutorial, I have explained the basic concept of the S.M.A.R.T technology including its uses in the Linux system. Also, I have covered how to install the smartctl command-line utility tool in the Linux machine and how it can be used to monitor the health of hard drives. You have also got an idea about the GNOME Disks utility tool to monitor SSD drives. I hope this article will help you to monitor your SSD drives using smartctl and GNOME Disks utility.
For Kingston drives on Debian-based computers
Similar to this answer execute
# apt-get install smartmontools
However when I execute the command to show the drive info, it looks like SMART was disabled:
# smartctl -a /dev/sda
smartctl 6.2 2013-07-26 r3841 [x86_64-linux-3.13.0-45-generic] (local build)
[ ... ]
SMART support is: Available - device has SMART capability.
SMART support is: Disabled
You need to enable that by executing the following as root:
# smartctl -s on -a /dev/sda
You can then execute a self-test by doing either a short test (which took me about 1 minute):
# smartctl -t short -a /dev/sda
or a more thorough test (which took me about 1.5 hours):
# smartctl -t long -a /dev/sda
Note, in most circumstances you do not need to unmount the drive to execute these tests. If you do, see man smartctl.
Now, when you execute smartctl -a /dev/sda you should then see a self-assessment test result. This is probably all you really need to concern yourself with:
=== START OF READ SMART DATA SECTION ===
SMART overall-health self-assessment test result: PASSED
If you like details, you will also see a table like this:
ID# ATTRIBUTE_NAME          FLAG     VALUE WORST THRESH TYPE      UPDATED  WHEN_FAILED RAW_VALUE
  1 Raw_Read_Error_Rate     0x0032   095   095   050    Old_age   Always       -       0/178007034
  5 Retired_Block_Count     0x0033   100   100   003    Pre-fail  Always       -       0
  9 Power_On_Hours_and_Msec 0x0032   092   092   000    Old_age   Always       -       7626h+46m+45.580s
 12 Power_Cycle_Count       0x0032   100   100   000    Old_age   Always       -       8
171 Program_Fail_Count      0x000a   100   100   000    Old_age   Always       -       0
172 Erase_Fail_Count        0x0032   100   100   000    Old_age   Always       -       0
174 Unexpect_Power_Loss_Ct  0x0030   000   000   000    Old_age   Offline      -       4
177 Wear_Range_Delta        0x0000   000   000   000    Old_age   Offline      -       1
181 Program_Fail_Count      0x000a   100   100   000    Old_age   Always       -       0
182 Erase_Fail_Count        0x0032   100   100   000    Old_age   Always       -       0
187 Reported_Uncorrect      0x0012   100   100   000    Old_age   Always       -       0
189 Airflow_Temperature_Cel 0x0000   030   035   000    Old_age   Offline      -       30 (Min/Max 24/35)
194 Temperature_Celsius     0x0022   030   035   000    Old_age   Always       -       30 (Min/Max 24/35)
195 ECC_Uncorr_Error_Count  0x001c   120   120   000    Old_age   Offline      -       0/178007034
196 Reallocated_Event_Count 0x0033   100   100   003    Pre-fail  Always       -       0
201 Unc_Soft_Read_Err_Rate  0x001c   120   120   000    Old_age   Offline      -       0/178007034
204 Soft_ECC_Correct_Rate   0x001c   120   120   000    Old_age   Offline      -       0/178007034
230 Life_Curve_Status       0x0013   100   100   000    Pre-fail  Always       -       100
231 SSD_Life_Left           0x0013   100   100   010    Pre-fail  Always       -       0
233 SandForce_Internal      0x0032   000   000   000    Old_age   Always       -       3498
234 SandForce_Internal      0x0032   000   000   000    Old_age   Always       -       2885
241 Lifetime_Writes_GiB     0x0032   000   000   000    Old_age   Always       -       2885
242 Lifetime_Reads_GiB      0x0032   000   000   000    Old_age   Always       -       868
If you are looking for what all of these values mean, see the Kingston documentation.
12.08.2019
Сегодня в статье рассмотрим, как в Linux проверить ваш HDD,SSD или USB флешку на битые сектора — Бэд-блоки.
Бэд-блок (англ. bad block) — испорченный кластер (единица хранения данных) дискового носителя информации, куда нельзя записать информацию.
Проверка HDD на бэд-блоки программой badblocks.
Badblocks — стандартная утилита Linux для проверки на битые секторы. Она устанавливается по-умолчанию практически в любой дистрибутив и с ее помощью можно проверить как жесткий диск, так и внешний накопитель.
Но для начала воспользуемся ещё одной стандартной утилитой для просмотра подключенных накопители к нашей системе — fdisk.
sudo fdisk -l- -l — показать список разделов и выйти.
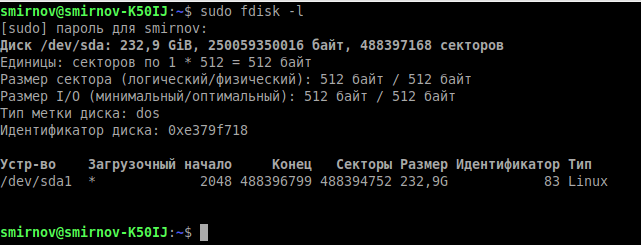
Теперь, когда мы знаем, какие разделы у нас есть, мы можем проверить их на битые секторы программой badblocks:
sudo badblocks -sv /dev/sda1 > ~/badblocks.txt- -v — вывод подробной информации о результатах проверки.
- -s — отображать в правильном порядке ход проверки блоков.
- /dev/sda1 — раздел, который мы хотим проверить на битые секторы.
- > ~/badblocks.txt — выводим результат выполнения команды в файл badblocks.txt расположенный в корневом каталоги пользователя.

Если же в результате были найдены битые секторы, то нам надо дать
указание операционной системе не записывать в них информацию в будущем.
Для этого нам понадобятся утилиты Linux для работы с файловыми
системами:
- e2fsck. Если мы будем исправлять раздел с файловыми система Linux ( ext2,ext3,ext4).
- fsck. Если мы будем исправлять файловую систему, отличную от ext.
Вводим следующие команды:
sudo e2fsck -l ~/badblocks.txt /dev/sda1Или, если у нас файловая система не ext:
sudo fsck -l ~/badblocks.txt /dev/sda1Если после ввода данных команд вы получаете что-то вроде этого:
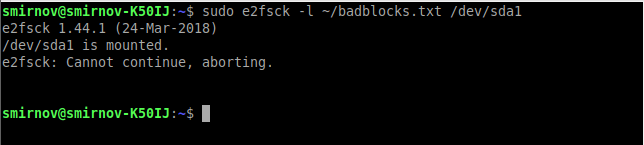
Значит данные операции надо выполнить в командной строке до загрузки операционной системы. Для этого выполним следующее:
sudo nano /etc/network/interfacesВ конце файла дописываем следующие строки:
pre-up e2fsck -l ~/badblocks.txt /dev/sda1Теперь перезагружаем ПК:
sudo rebootТеперь давайте рассмотрим более современный и надежный способ
проверить диск на битые секторы linux. Современные накопители ATA/SATA
,SCSI/SAS,SSD имеют встроенную систему самоконтроля S.M.A.R.T (Self-Monitoring, Analysis and Reporting Technology,
Технология самоконтроля, анализа и отчетности), которая производит
мониторинг параметров накопителя и поможет определить ухудшение
параметров работы накопителя на ранних стадиях. Для работы со S.M.A.R.T в
Linux есть утилита smartmontools.
Давайте сначала ее установим. Если ваш дистрибутив основан на DebianUbuntu, то вводите:
sudo apt install smartmontoolsЕсли же у Вас дистрибутив на основе RHELCentOS, то вводите:
sudo yum install smartmontoolsТеперь, когда мы установили smartmontools мы можем посмотреть страницу помощи, с помощью команды:
man smartctlили
smartctl -hДавайте перейдем к работе с утилитой. Вводим следующую команду с параметром -H,чтобы утилита показала нам информацию о состоянии накопителя:
sudo smartctl -H /dev/sda1
Как видим, проверка диска на битые секторы linux завершена и утилита говорит нам, что с накопителем все в порядке!
Ещё одна команда, если SMART поддерживается, то добавляем -s. Если он не поддерживается или уже включён, то этот аргумент можно убрать.
sudo smartctl -s on -a /dev/sdaДополнительно, можно указать следующие параметры -a или —all, чтобы получить еще больше информации о накопителе, или -x и —xall, чтобы просмотреть информацию в том числе и об остальных параметрах накопителя.
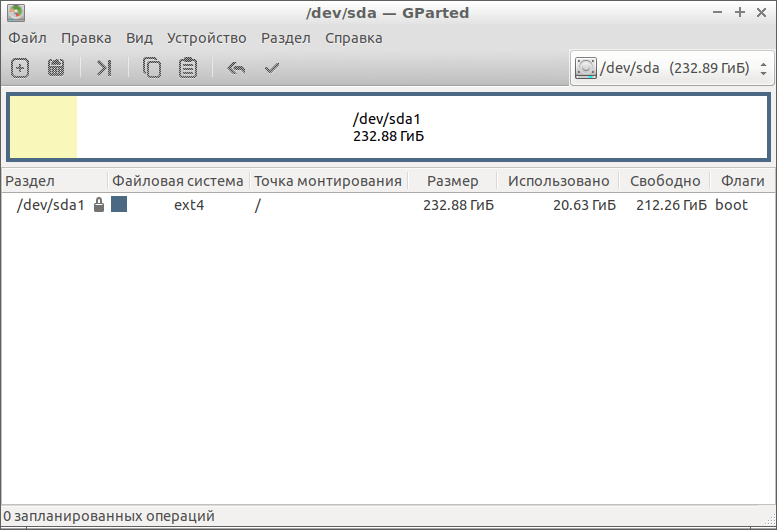
Проверка HDD на бэд-блоки на Linux с помощью GParted
GParted как раз для тех, кому текстовый интерфейс не по душе. Утилита выполняет большое количество задач, связанных с работой HDD на Ubuntu и всех Debian-подобных системах. В их число входит и проверка диска на ошибки.
Для
начала нам нужно скачать и установить GParted. Вводим следующую
команду, чтобы выполнить загрузку из официальных репозиториев:
sudo apt install gparted- Открываем
приложение. На главном экране сразу же выводятся все носители. Если
какой-то из них помечен восклицательным знаком, значит, с ним уже что-то
не так. - Щёлкаем по тому диску, который хотим проверить.
- Жмём на кнопку «Разделы», расположенную сверху.
- Выбираем «Проверка на ошибки».
Программа отсканирует диск. В зависимости от его объёма процесс может занять продолжительное время. После сканирования Вы будете оповещены о его результатах.
Safecopy
Это уже та программа,
которую впору использовать на тонущем судне. Если мы осведомлены, что с
нашим диском что-то не так, и нацелены спасти как можно больше выживших
файлов, то Safecopy придёт на помощь. Её задача как раз заключается в
копировании данных с повреждённых носителей. Причём она извлекает файлы
даже из битых блоков.
Устанавливаем Safecopy:
sudo apt install safecopyПереносим
файлы из одной директории в другую. Выбрать можно любую другую. В
данном случае мы переносим данные с диска sda в папку home.
sudo safecopy /dev/sda /home/Если есть вопросы, то пишем в комментариях.
Также можете вступить в Телеграм канал, ВКонтакте или подписаться на Twitter. Ссылки в шапке страницы.
Заранее всем спасибо!!!
RSS
Добавление RSS-ленты на главную страницу этого сайта не поддерживается, так как это может привести к зацикливанию, замедляющему работу вашего сайта. Попробуйте использовать другой блок, например блок Последние записи, для отображения записей сайта.
Если вы нашли ошибку, пожалуйста, выделите фрагмент текста и нажмите Ctrl+Enter.
5
4
голоса
Рейтинг статьи
Содержание
- Проверка работоспособности SSD накопителя с помощью Smartctl
- Ubuntu
- RHEL и CentOS
- FEDORA
- Проверка работоспособности SSD/HDD
- Проверка работоспособности SSD/HDD дисков с помощью Gnome
- Установка Gnome Disks
- Заключение
SMART (Технология самоконтроля, анализа и отчетности) — это функция, включенная во все современные жесткие диски и твердотельные накопители для мониторинга и тестирования надежности. Он проверяет различные атрибуты диска, чтобы обнаружить возможность отказа диска. Существуют различные инструменты, которые доступны в Linux и Windows для выполнения интеллектуальных тестов работоспособности.
Из этой инструкции вы узнаете, как проверить работоспособность SSD/HDD в Linux с помощью CLI и GUI
Здесь объясняются два метода:
- Использование Smartctl
- Использование Gnome disk
Проверка работоспособности SSD накопителя с помощью Smartctl
Smartctl — это утилита командной строки, которая может быть использована для проверки состояния жесткого диска или SSD с поддержкой S.M.A.R.T в системе Linux.
Утилита Smartctl utility tool поставляется вместе с пакетом smartmontools.Smartmontools доступна по умолчанию во всех дистрибутивах Linux, включая Ubuntu, RHEL, Centos и Fedora.
Как установить smartmontools в Linux:
Ubuntu
$
sudo apt install smartmontools
Запустите службу с помощью следующей команды.
$
sudo /etc/init.d/smartmontools start
RHEL и CentOS
$
sudo yum install smartmontools
FEDORA
$ sudo dnf install smartmontools
Служба Smartd запустится автоматически после успешной установки.
Если вдруг Smartd не запустился, сделать это можно командой:
$
sudo systemctl start smartd
Проверка работоспособности SSD/HDD
Чтобы проверить общее состояние введите команду:
$
sudo smartctl -d ata -H /dev/sda
Опишу команды подробнее:
d – Указывает тип устройства.
ata – тип устройства ATA, используйте scsi для типа устройства SCSI.
H – Проверяет устройство, чтобы сообщить о его состоянии и работоспособности.

Полученный результат указывает на то, что диск исправен. Если устройство сообщает о неисправном состоянии работоспособности, это означает, что устройство уже вышло из строя или может выйти из строя очень скоро.
Это указывает на неудачное использование и появляется возможность получить дополнительную информацию.
$ sudo smartctl -a /dev/sda
Вы можете увидеть следующие атрибуты:
[ID 5] Reallocated Sectors Count – Количество секторов, перераспределенных из-за ошибок чтения.
[ID 187] Reported Uncorrect – Количество неисправимых ошибок при доступе к сектору чтения/записи.
[ID 230] Индикатор износа носителя – Текущее состояние работы диска на основе срока службы.
Если вы видите 100 — это лучшее значение. А если видите 0 — это ХУДШЕЕ значение.
Дополнительные сведения см. в разделе Сведения о интеллектуальных атрибутах.
Чтобы инициировать расширенный тест (long), выполните следующую команду:
$
sudo smartctl -t long /dev/sda

Чтобы выполнить самотестирование, введите команду:
$
sudo smartctl -t short /dev/sda
Чтобы найти результат самопроверки диска, используйте эту команду.
$
sudo smartctl -l selftest /dev/sda
Чтобы оценить время выполнения теста, выполните следующую команду.
$
sudo smartctl -c /dev/sda
Вы можете распечатать журналы ошибок диска с помощью команды:
$
sudo smartctl -l error /dev/sda

Проверка работоспособности SSD/HDD дисков с помощью Gnome
С помощью утилиты GNOME disks вы можете получить информацию о ваших SSD-дисков. Можете отформатировать диски, создать образ диска, выполнить стандартные тесты SSD-дисков и восстановить образ диска.
Установка Gnome Disks
В Ubuntu 20.04 приложение GNOME поставляется с установленным инструментом GNOME disk. Если вы не можете найти инструмент, используйте следующую команду для его установки.
$
sudo apt-get install gnome-disk-utility
GNOME Disk теперь установлен, далее вы можете перейти в меню рабочего стола и запустить его. Из приложения вы можете просмотреть все подключенные диски. А также можете использовать следующую команду для запуска приложения GNOME Disk.
$
sudo gnome-disks
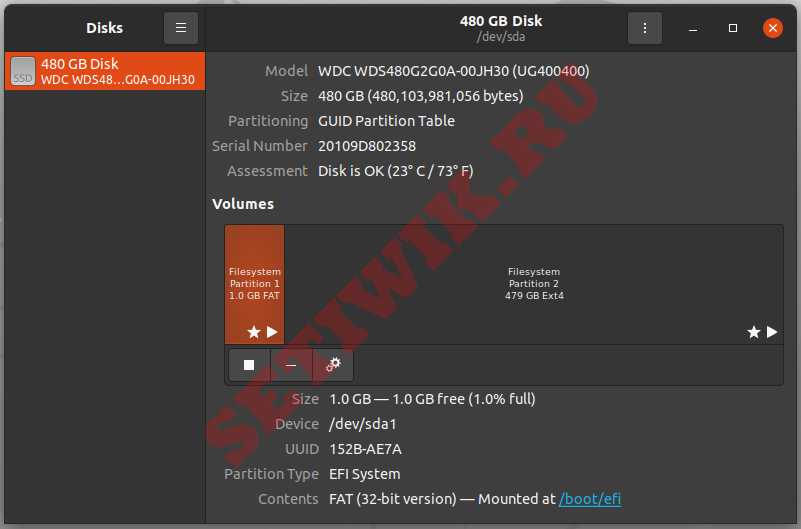
Для того чтоб выполнить тест, запустите GNOME disks и выберите диск, который вы хотите протестировать. Вы можете найти быструю оценку дисков, таких как размер, разделение, серийный номер, температура и работоспособность. Нажмите на значок шестеренки и выберите SMART Data & Self-tests.
В новом окне вы можете найти результаты последнего теста. В правом верхнем углу окна вы можете обнаружить, что интеллектуальная опция включена. Если SMART отключен, его можно включить, нажав на ползунок. Чтобы начать новый тест, нажмите на кнопку Начать тестирование.

Как только будет нажата кнопка Начать Тестирование, появится выпадающее меню для выбора типа тестов:
- Короткие
- Расширенные
- Транспортировочные.
Выберите тип теста и введите свой пароль sudo. На индикаторе прогресса можно увидеть процент завершения теста.
Заключение
В этой инструкции я объяснил основную концепцию технологии S. M. A. R. T,. Кроме того, я рассказал о том, как установить утилиту командной строки smartctl компьютер с Linux и как ее можно использовать для мониторинга работоспособности жестких дисков. У вас также есть представление о утилите GNOME Disks utility tool для мониторинга SSD-накопителей. Надеюсь, что эта статья поможет вам контролировать ваши SSD-диски с помощью утилиты smartctl и GNOME Disks.
И снова здравствуйте. Перевод следующей статьи подготовлен специально для студентов курса «Администратор Linux». Поехали!

Что такое S.M.A.R.T.?
S.M.A.R.T. (расшифровывается как Self-Monitoring, Analysis, and Reporting Technology) – это технология, вшитая в накопители, такие как жесткие диски или SSD. Ее основная задача – это мониторинг состояния.
На деле, S.M.A.R.T. контролирует несколько параметров во время обычной работы с диском. Он мониторит такие параметры как количество ошибок чтения, время запуска диска и даже состояние окружающей среды. Помимо этого, S.M.A.R.T. также может проводить тесты с использованием накопителя.
В идеале, S.M.A.R.T. позволит прогнозировать предсказуемые отказы, такие как отказы, вызванные механическим износом или ухудшением состояния поверхности диска, а также непредсказуемые отказы, вызванные каким-либо неожиданным дефектом. Поскольку обычно диски не выходят из строя внезапно, S.M.A.R.T. помогает операционной системе или системному администратору идентифицировать те диски, которые скоро выйдут из строя, чтобы их можно было заменить и избежать потери данных.
Что не относится к S.M.A.R.T.?
Все это, конечно, круто. Однако S.M.A.R.T. – это не хрустальный шар. Он не может спрогнозировать отказ со стопроцентной вероятностью и не может гарантировать, что накопитель не выйдет из строя без предупреждения. В лучшем случае S.M.A.R.T. стоит использовать для оценки вероятности поломки.
Учитывая статистический характер прогнозирования отказов, технология S.M.A.R.T. особенно интересует компании, использующие большое количество устройств для хранения данных. Чтобы выяснить, насколько точно S.M.A.R.T. может прогнозировать отказы и сообщать о необходимости замены дисков в центрах обработки данных или серверных мейнфреймах, даже проводились специальные исследования.
В 2016 году Microsoft и университет штата Пенсильвания провели исследование, связанное с SSD.
Согласно этому исследованию, некоторые атрибуты S.M.A.R.T. считаются хорошими индикаторами неизбежности отказа. В особенности в статье упоминаются:
Счетчик переназначенных (Realloc) секторов:
Несмотря на то, что основополагающие технологии радикально отличаются, этот показатель остается востребованным как в мире SSD, так и в мире жестких дисков. Стоит отметить, что из-за особенностей алгоритмов балансировки износа, используемых в SSD, когда несколько секторов выходят из строя, то с большой вероятностью можно предположить, что скоро выйдут из строя еще больше.
Ошибки в цикле Program/Erase (P/E):
Это признак проблем с основным оборудованием флеш-памяти, связанных с тем, что диск не может удалить данные из блока или сохранить их там. Дело в том, что процесс производства несовершенен, поэтому появление таких ошибок вполне можно ожидать. Однако флеш-память имеет ограниченное число циклов записи/удаления. По этой причине внезапное увеличение числа событий может сигнализировать о том, что диск достигает своего предела, и вполне ожидаемо, что другие ячейки памяти также начнут выходить из строя.
CRC и неисправимые ошибки («Data Error ”):
События такого типа могут быть вызваны ошибками хранения, либо проблемами с внутренним каналом связи накопителя. Этот индикатор учитывает как исправленные ошибки (без проблем сообщенные хост-системе), так и неисправленные ошибки (из-за которых происходит блокировка диска, сообщившего хост-системе о невозможности чтения). Другими словами, исправляемые ошибки невидимы для операционной системы, тем не менее они влияют на производительность накопителя, увеличивая вероятность переназначения сектора.
SATA downshift count:
Из-за временных помех, проблем с каналом связи между накопителем и хостом или из-за внутренних проблем с накопителем, интерфейс SATA может переключиться на более низкую скорость передачи сигналов. Снижение скорости соединения ниже номинального уровня оказывает очевидное влияние на производительность диска. Таким образом, этот показатель является наиболее значимым, в особенности, когда он коррелирует с наличием одного или нескольких предыдущих показателей.
Согласно исследованию, 62% вышедших из строя SSD показали наличие как минимум одного из вышеприведенных симптомов. С другой стороны можно сказать, что 38% изученных накопителей сломались без индикации этих симптомов. В исследованиях не упоминалось, были ли какие-то еще сообщения об отказах от S. M. A. R. T. по другим «симптомам». По этой причине нельзя напрямую сопоставить эти значения с отказом без предупреждения в 36% случаев из статьи от Google.
В исследовании Microsoft и университета штата Пенсильвания не раскрывались модели исследуемых дисков, однако, по словам авторов, большинство дисков поступают от одного и того же поставщика в течение уже нескольких поколений.
В ходе исследования также были отмечены значительные различия в надёжности между различными моделями. Например, «худшая» изученная модель показывает двадцатипроцентную частоту отказов через 9 месяцев после первой ошибки переназначения и до 36-ти процентов отказов в течение 9 месяцев после первого появления ошибок данных. «Худшей» моделью было названо более старое поколение дисков, рассматриваемых в статье.
С другой стороны, с теми же симптомами, что приведены выше, накопители нового поколения отказали в 3% и 20% в соответствии с теми же ошибками. Трудно сказать, можно ли объяснить эти цифры улучшением конструкции накопителя и производственного процесса, или здесь роль играет эффект устаревания накопителя.
Самое интересное, что упоминается в статье (я уже писал об этом ранее), так это то, что увеличение количества зарегистрированных ошибок может случить тревожным индикатором:
«Существует большая вероятность появления симптомов, предшествующих отказу SSD, которые активно себя проявляют и быстро прогрессируют, сильно сокращая время жизни накопителя до нескольких месяцев.»
Другими словами, одна случайная ошибка, о которой сообщил S.M.A.R.T., определенно не должна рассматриваться как сигнал о неизбежном отказе. Однако, когда исправный SSD начинает сообщать о все большем количестве ошибок, следует ждать краткосрочного или среднесрочного сбоя.
Но как узнать, в каком состоянии сейчас ваш SSD? Для удовлетворения своего любопытства, либо из желания начать внимательно следить за своими накопителями, вы можете использовать инструмент мониторинга smartctl.
Использование smartctl для мониторинга состояния вашего SSD в Linux
Чтобы следить за S.M.A.R.T статусом вашего диска, я предлагаю использовать инструмент smartctl, который является частью пакета smartmontool (по крайней мере на Debian/Ubuntu).
sudo apt install smartmontoolssmartctl – это инструмент командной строки, но это особенно помогает в случаях, когда вам нужно автоматизировать сбор данных, например, с ваших серверов.
Первый шаг в использовании smartctl – это проверка того, есть ли на вашем диске S.M.A.R.T. и поддерживается ли он инструментом:
sh$ sudo smartctl -i /dev/sdb
smartctl 6.6 2016-05-31 r4324 [x86_64-linux-4.9.0-6-amd64] (local build)
Copyright (C) 2002-16, Bruce Allen, Christian Franke, www.smartmontools.org

=== START OF INFORMATION SECTION ===
Model Family:     Seagate Momentus 7200.4
Device Model:     ST9500420AS
Serial Number:    5VJAS7FL
LU WWN Device Id: 5 000c50 02fa0b800
Firmware Version: D005SDM1
User Capacity:    500,107,862,016 bytes [500 GB]
Sector Size:      512 bytes logical/physical
Rotation Rate:    7200 rpm
Device is:        In smartctl database [for details use: -P show]
ATA Version is:   ATA8-ACS T13/1699-D revision 4
SATA Version is:  SATA 2.6, 3.0 Gb/s
Local Time is:    Mon Mar 12 15:54:43 2018 CET
SMART support is: Available - device has SMART capability.
SMART support is: Enabled
Как видите, мой внутренний жесткий диск ноутбука действительно поддерживает S.M.A.R.T. и он включен. Итак, как теперь получить S.M.A.R.T статус? Есть ли какие-то зафиксированные ошибки?
Выдача отчета «о всей S.M.A.R.T. информации о диске» — это опция -a:
sh$ sudo smartctl -i -a /dev/sdb
smartctl 6.6 2016-05-31 r4324 [x86_64-linux-4.9.0-6-amd64] (local build)
Copyright (C) 2002-16, Bruce Allen, Christian Franke, www.smartmontools.org
=== START OF INFORMATION SECTION ===
Model Family:     Seagate Momentus 7200.4
Device Model:     ST9500420AS
Serial Number:    5VJAS7FL
LU WWN Device Id: 5 000c50 02fa0b800
Firmware Version: D005SDM1
User Capacity:    500,107,862,016 bytes [500 GB]
Sector Size:      512 bytes logical/physical
Rotation Rate:    7200 rpm
Device is:        In smartctl database [for details use: -P show]
ATA Version is:   ATA8-ACS T13/1699-D revision 4
SATA Version is:  SATA 2.6, 3.0 Gb/s
Local Time is:    Mon Mar 12 15:56:58 2018 CET
SMART support is: Available - device has SMART capability.
SMART support is: Enabled
=== START OF READ SMART DATA SECTION ===
SMART overall-health self-assessment test result: PASSED
See vendor-specific Attribute list for marginal Attributes.
General SMART Values:
Offline data collection status:  (0x82)    Offline data collection activity
was completed without error.
Auto Offline Data Collection: Enabled.
Self-test execution status:      (   0)    The previous self-test routine completed
without error or no self-test has ever
been run.
Total time to complete Offline
data collection:         (    0) seconds.
Offline data collection
capabilities:              (0x7b) SMART execute Offline immediate.
Auto Offline data collection on/off support.
Suspend Offline collection upon new
command.
Offline surface scan supported.
Self-test supported.
Conveyance Self-test supported.
Selective Self-test supported.
SMART capabilities:            (0x0003)    Saves SMART data before entering
power-saving mode.
Supports SMART auto save timer.
Error logging capability:        (0x01)    Error logging supported.
General Purpose Logging supported.
Short self-test routine
recommended polling time:      (   2) minutes.
Extended self-test routine
recommended polling time:      ( 110) minutes.
Conveyance self-test routine
recommended polling time:      (   3) minutes.
SCT capabilities:            (0x103f)    SCT Status supported.
SCT Error Recovery Control supported.
SCT Feature Control supported.
SCT Data Table supported.
SMART Attributes Data Structure revision number: 10
Vendor Specific SMART Attributes with Thresholds:
ID# ATTRIBUTE_NAME          FLAG     VALUE WORST THRESH TYPE      UPDATED  WHEN_FAILED RAW_VALUE
1 Raw_Read_Error_Rate     0x000f   111   099   006    Pre-fail  Always       -       29694249
3 Spin_Up_Time            0x0003   100   098   085    Pre-fail  Always       -       0
4 Start_Stop_Count        0x0032   095   095   020    Old_age   Always       -       5413
5 Reallocated_Sector_Ct   0x0033   100   100   036    Pre-fail  Always       -       3
7 Seek_Error_Rate         0x000f   071   060   030    Pre-fail  Always       -       51710773327
9 Power_On_Hours          0x0032   070   070   000    Old_age   Always       -       26423
10 Spin_Retry_Count        0x0013   100   100   097    Pre-fail  Always       -       0
12 Power_Cycle_Count       0x0032   096   037   020    Old_age   Always       -       4836
184 End-to-End_Error        0x0032   100   100   099    Old_age   Always       -       0
187 Reported_Uncorrect      0x0032   072   072   000    Old_age   Always       -       28
188 Command_Timeout         0x0032   100   096   000    Old_age   Always       -       4295033738
189 High_Fly_Writes         0x003a   100   100   000    Old_age   Always       -       0
190 Airflow_Temperature_Cel 0x0022   056   042   045    Old_age   Always   In_the_past 44 (Min/Max 21/44 #22)
191 G-Sense_Error_Rate      0x0032   100   100   000    Old_age   Always       -       184
192 Power-Off_Retract_Count 0x0032   100   100   000    Old_age   Always       -       104
193 Load_Cycle_Count        0x0032   001   001   000    Old_age   Always       -       395415
194 Temperature_Celsius     0x0022   044   058   000    Old_age   Always       -       44 (0 13 0 0 0)
195 Hardware_ECC_Recovered  0x001a   050   045   000    Old_age   Always       -       29694249
197 Current_Pending_Sector  0x0012   100   100   000    Old_age   Always       -       1
198 Offline_Uncorrectable   0x0010   100   100   000    Old_age   Offline      -       1
199 UDMA_CRC_Error_Count    0x003e   200   200   000    Old_age   Always       -       0
240 Head_Flying_Hours       0x0000   100   253   000    Old_age   Offline      -       25131 (246 202 0)
241 Total_LBAs_Written      0x0000   100   253   000    Old_age   Offline      -       3028413736
242 Total_LBAs_Read         0x0000   100   253   000    Old_age   Offline      -       1613088055
254 Free_Fall_Sensor        0x0032   100   100   000    Old_age   Always       -       0
SMART Error Log Version: 1
ATA Error Count: 3
CR = Command Register [HEX]
FR = Features Register [HEX]
SC = Sector Count Register [HEX]
SN = Sector Number Register [HEX]
CL = Cylinder Low Register [HEX]
CH = Cylinder High Register [HEX]
DH = Device/Head Register [HEX]
DC = Device Command Register [HEX]
ER = Error register [HEX]
ST = Status register [HEX]
Powered_Up_Time is measured from power on, and printed as
DDd+hh:mm:SS.sss where DD=days, hh=hours, mm=minutes,
SS=sec, and sss=millisec. It "wraps" after 49.710 days.
Error 3 occurred at disk power-on lifetime: 21171 hours (882 days + 3 hours)
When the command that caused the error occurred, the device was active or idle.
After command completion occurred, registers were:
ER ST SC SN CL CH DH
-- -- -- -- -- -- --
40 51 00 ff ff ff 0f  Error: UNC at LBA = 0x0fffffff = 268435455
Commands leading to the command that caused the error were:
CR FR SC SN CL CH DH DC   Powered_Up_Time  Command/Feature_Name
-- -- -- -- -- -- -- --  ----------------  --------------------
60 00 08 ff ff ff 4f 00      00:45:12.580  READ FPDMA QUEUED
60 00 08 ff ff ff 4f 00      00:45:12.580  READ FPDMA QUEUED
60 00 08 ff ff ff 4f 00      00:45:12.579  READ FPDMA QUEUED
60 00 08 ff ff ff 4f 00      00:45:12.571  READ FPDMA QUEUED
60 00 20 ff ff ff 4f 00      00:45:12.543  READ FPDMA QUEUED
Error 2 occurred at disk power-on lifetime: 21171 hours (882 days + 3 hours)
When the command that caused the error occurred, the device was active or idle.
After command completion occurred, registers were:
ER ST SC SN CL CH DH
-- -- -- -- -- -- --
40 51 00 ff ff ff 0f  Error: UNC at LBA = 0x0fffffff = 268435455
Commands leading to the command that caused the error were:
CR FR SC SN CL CH DH DC   Powered_Up_Time  Command/Feature_Name
-- -- -- -- -- -- -- --  ----------------  --------------------
60 00 00 ff ff ff 4f 00      00:45:09.456  READ FPDMA QUEUED
60 00 00 ff ff ff 4f 00      00:45:09.451  READ FPDMA QUEUED
61 00 08 ff ff ff 4f 00      00:45:09.450  WRITE FPDMA QUEUED
60 00 00 ff ff ff 4f 00      00:45:08.878  READ FPDMA QUEUED
60 00 00 ff ff ff 4f 00      00:45:08.856  READ FPDMA QUEUED
Error 1 occurred at disk power-on lifetime: 21131 hours (880 days + 11 hours)
When the command that caused the error occurred, the device was active or idle.
After command completion occurred, registers were:
ER ST SC SN CL CH DH
-- -- -- -- -- -- --
40 51 00 ff ff ff 0f  Error: UNC at LBA = 0x0fffffff = 268435455
Commands leading to the command that caused the error were:
CR FR SC SN CL CH DH DC   Powered_Up_Time  Command/Feature_Name
-- -- -- -- -- -- -- --  ----------------  --------------------
60 00 00 ff ff ff 4f 00      05:52:18.809  READ FPDMA QUEUED
61 00 00 7e fb 31 45 00      05:52:18.806  WRITE FPDMA QUEUED
60 00 00 ff ff ff 4f 00      05:52:18.571  READ FPDMA QUEUED
ea 00 00 00 00 00 a0 00      05:52:18.529  FLUSH CACHE EXT
61 00 08 ff ff ff 4f 00      05:52:18.527  WRITE FPDMA QUEUED
SMART Self-test log structure revision number 1
Num  Test_Description    Status                  Remaining  LifeTime(hours)  LBA_of_first_error
# 1  Short offline       Completed without error       00%     10904         -
# 2  Short offline       Completed without error       00%        12         -
# 3  Short offline       Completed without error       00%         0         -
SMART Selective self-test log data structure revision number 1
SPAN  MIN_LBA  MAX_LBA  CURRENT_TEST_STATUS
1        0        0  Not_testing
2        0        0  Not_testing
3        0        0  Not_testing
4        0        0  Not_testing
5        0        0  Not_testing
Selective self-test flags (0x0):
After scanning selected spans, do NOT read-scan remainder of disk.
If Selective self-test is pending on power-up, resume after 0 minute delay.
Понимание выходных данных команд smartctl
На выходе получается много информации, которую не всегда легко понять. Наиболее интересной, вероятно, является та часть, которая помечена как “Vendor Specific SMART Attributes with Thresholds”. Она сообщает различные статистические данные, собранные S.M.A.R.T. устройством, и позволяет сравнить эти значения (текущие или худшие за все время) с некоторым порогом, определенным поставщиком.
Например, вот мои отчеты о переназначенных секторах на диске:
ID# ATTRIBUTE_NAME          FLAG     VALUE WORST THRESH TYPE      UPDATED  WHEN_FAILED RAW_VALUE
5 Reallocated_Sector_Ct   0x0033   100   100   036    Pre-fail  Always       -       3
Вы можете заметить атрибут «Pre-fail». Он означает, что значение является аномальным. Таким образом, если значение превышает пороговое, велика вероятность сбоя. Другая категория »Old_age» используется для атрибутов, отвечающих значениям «нормального износа».
Последнее поле (здесь со значением «3») соответствует исходному значению атрибута, которое сообщает диск. Обычно это число имеет физическое значение. Здесь это фактическое количество переназначенных секторов. Для других атрибутов это может быть температура в градусах Цельсия, время в часах или минутах или количество раз, когда для диска было выполнено определенное условие.
В дополнение к исходному значению, диск с поддержкой S.M.A.R.T. должен сообщать «нормализованные значения» (значения полей, самые худшие и пороговые). Эти значения нормируются в диапазоне 1-254 (0-255 для пороговых значений). Прошивка диска выполняет эту нормализацию с помощью некоторого внутреннего алгоритма. Кроме того, разные производители могут нормализовать один и тот же атрибут по-разному. Большинство значений представлены в процентах, причем чем выше, тем лучше, но так бывает не всегда. Когда параметр ниже или равен пороговому значению, указанному производителем, диск считается неисправным в терминах этого атрибута. Помня о всех указаниях из первой части статьи, когда атрибут, показывающий ранее значение “pre-fail” все-таки дал сбой, наиболее вероятно, что скоро диск выйдет из строя.
В качестве второго примера возьмем “seek error rate”:
ID# ATTRIBUTE_NAME          FLAG     VALUE WORST THRESH TYPE      UPDATED  WHEN_FAILED RAW_VALUE
7 Seek_Error_Rate         0x000f   071   060   030    Pre-fail  Always       -       51710773327
На самом деле (и это основная проблема отчетности S.M.A.R.T.), точное значение полей каждого атрибута понимает только поставщик. В моем случае Seagate использует логарифмическую шкалу для нормализации значения. Таким образом, «71» означает примерно одну ошибку на 10 миллионов запросов (10 в степени 7,1). Забавно, что самым худшим показателем за все время была одна ошибка на 1 миллион запросов (10 в 6-й степени).
Если я правильно понимаю, то это значит, что головки моего диска сейчас расположены точнее, чем раньше. Я не следил за этим диском внимательно, поэтому анализирую полученные данные весьма субъективно. Возможно накопитель просто надо было немного «обкатать» с тех пор как он был введен в эксплуатацию? Или может быть это следствие механического износа деталей и, следовательно, теперь имеет место меньшая сила трения? В любом случае, какова бы ни была причина, это значение является скорее показателем производительности, чем ранним предупреждением об ошибке. Так что меня оно не сильно беспокоит.
Помимо вышеприведенного и трех крайне подозрительных ошибок, записанных около шести месяцев назад, этот диск находится в удивительно хорошем состоянии (по данным S.M.A.R.T.) для стокового диска ноутбука, проработавшего более 1100 дней (26423 часа).
ID# ATTRIBUTE_NAME          FLAG     VALUE WORST THRESH TYPE      UPDATED  WHEN_FAILED RAW_VALUE
9 Power_On_Hours          0x0032   070   070   000    Old_age   Always       -       26423
Из любопытства я провел этот же тест на гораздо более новом ноутбуке, оснащенном SSD:
sh$ sudo smartctl -i /dev/sdb
smartctl 6.5 2016-01-24 r4214 [x86_64-linux-4.10.0-32-generic] (local build)
Copyright (C) 2002-16, Bruce Allen, Christian Franke, www.smartmontools.org
=== START OF INFORMATION SECTION ===
Device Model:     TOSHIBA THNSNK256GVN8
Serial Number:    17FS131LTNLV
LU WWN Device Id: 5 00080d 9109b2ceb
Firmware Version: K8XA4103
User Capacity:    256 060 514 304 bytes [256 GB]
Sector Sizes:     512 bytes logical, 4096 bytes physical
Rotation Rate:    Solid State Device
Form Factor:      M.2
Device is:        Not in smartctl database [for details use: -P showall]
ATA Version is:   ACS-3 (minor revision not indicated)
SATA Version is:  SATA 3.2, 6.0 Gb/s (current: 6.0 Gb/s)
Local Time is:    Tue Mar 13 01:03:23 2018 CET
SMART support is: Available - device has SMART capability.
SMART support is: Enabled
Первое, что бросается в глаза, так это то, что несмотря на наличие S.M.A.R.T., устройства нет в базе данных smartctl. Но это не помешает инструменту собирать данные с SSD, однако он не сможет сообщить точные значения различных атрибутов, специфичных для поставщика:
sh$ sudo smartctl -a /dev/sdb
smartctl 6.5 2016-01-24 r4214 [x86_64-linux-4.10.0-32-generic] (local build)
Copyright (C) 2002-16, Bruce Allen, Christian Franke, www.smartmontools.org
=== START OF READ SMART DATA SECTION ===
SMART overall-health self-assessment test result: PASSED
General SMART Values:
Offline data collection status:  (0x00)    Offline data collection activity
was never started.
Auto Offline Data Collection: Disabled.
Self-test execution status:      (   0)    The previous self-test routine completed
without error or no self-test has ever
been run.
Total time to complete Offline
data collection:         (  120) seconds.
Offline data collection
capabilities:              (0x5b) SMART execute Offline immediate.
Auto Offline data collection on/off support.
Suspend Offline collection upon new
command.
Offline surface scan supported.
Self-test supported.
No Conveyance Self-test supported.
Selective Self-test supported.
SMART capabilities:            (0x0003)    Saves SMART data before entering
power-saving mode.
Supports SMART auto save timer.
Error logging capability:        (0x01)    Error logging supported.
General Purpose Logging supported.
Short self-test routine
recommended polling time:      (   2) minutes.
Extended self-test routine
recommended polling time:      (  11) minutes.
SCT capabilities:            (0x003d)    SCT Status supported.
SCT Error Recovery Control supported.
SCT Feature Control supported.
SCT Data Table supported.
SMART Attributes Data Structure revision number: 16
Vendor Specific SMART Attributes with Thresholds:
ID# ATTRIBUTE_NAME          FLAG     VALUE WORST THRESH TYPE      UPDATED  WHEN_FAILED RAW_VALUE
1 Raw_Read_Error_Rate     0x000a   100   100   000    Old_age   Always       -       0
2 Throughput_Performance  0x0005   100   100   050    Pre-fail  Offline      -       0
3 Spin_Up_Time            0x0007   100   100   050    Pre-fail  Always       -       0
5 Reallocated_Sector_Ct   0x0013   100   100   050    Pre-fail  Always       -       0
7 Unknown_SSD_Attribute   0x000b   100   100   050    Pre-fail  Always       -       0
8 Unknown_SSD_Attribute   0x0005   100   100   050    Pre-fail  Offline      -       0
9 Power_On_Hours          0x0012   100   100   000    Old_age   Always       -       171
10 Unknown_SSD_Attribute   0x0013   100   100   050    Pre-fail  Always       -       0
12 Power_Cycle_Count       0x0012   100   100   000    Old_age   Always       -       105
166 Unknown_Attribute       0x0012   100   100   000    Old_age   Always       -       0
167 Unknown_Attribute       0x0022   100   100   000    Old_age   Always       -       0
168 Unknown_Attribute       0x0012   100   100   000    Old_age   Always       -       0
169 Unknown_Attribute       0x0013   100   100   010    Pre-fail  Always       -       100
170 Unknown_Attribute       0x0013   100   100   010    Pre-fail  Always       -       0
173 Unknown_Attribute       0x0012   200   200   000    Old_age   Always       -       0
175 Program_Fail_Count_Chip 0x0013   100   100   010    Pre-fail  Always       -       0
192 Power-Off_Retract_Count 0x0012   100   100   000    Old_age   Always       -       18
194 Temperature_Celsius     0x0023   063   032   020    Pre-fail  Always       -       37 (Min/Max 11/68)
197 Current_Pending_Sector  0x0012   100   100   000    Old_age   Always       -       0
240 Unknown_SSD_Attribute   0x0013   100   100   050    Pre-fail  Always       -       0
SMART Error Log Version: 1
No Errors Logged
SMART Self-test log structure revision number 1
No self-tests have been logged.  [To run self-tests, use: smartctl -t]
SMART Selective self-test log data structure revision number 1
SPAN  MIN_LBA  MAX_LBA  CURRENT_TEST_STATUS
1        0        0  Not_testing
2        0        0  Not_testing
3        0        0  Not_testing
4        0        0  Not_testing
5        0        0  Not_testing
Selective self-test flags (0x0):
After scanning selected spans, do NOT read-scan remainder of disk.
If Selective self-test is pending on power-up, resume after 0 minute delay.
Выше вы видите выходные данные абсолютно нового SSD. Данные понятны даже в случае отсутствия нормализации или метаинформации для данных конкретного поставщика, как в моем случае с “Unknown_SSD_Attribute.” Я могу только надеяться, что в последующих версиях smartctl в базе данных появятся данные об этой модели диска, и я смогу лучше определять потенциальные проблемы.
Проверьте свой SSD в Linux с помощью smartctl
До сих пор мы рассматривали данные, собранные во время нормальной работы накопителя. Однако протокол S.M.A.R.T. также поддерживает несколько команд для автономного тестирования для запуска диагностики по требованию.
Автономное тестирование может проводиться во время обычных операций с диском, если не было указано иное. Поскольку тест и запросы ввода-вывода хоста будут конкурировать, производительность диска упадет на время теста. Спецификация S.M.A.R.T. определяет несколько видов автономного тестирования:
Короткое автономное тестирование (-t short)
Такой тест проверит электрическую и механическую, производительность, а также производительность чтения диска. Короткое автономное тестирование обычно занимает всего несколько минут (обычно от 2 до 10).
Расширенное автономное тестирование (-t long)
Этот тест занимает почти в два раза больше времени. Как правило, это просто более детальная версия короткого автономного тестирования. Кроме того, этот тест будет сканировать всю поверхность диска на наличие ошибок данных без ограничения по времени. Продолжительность теста будет пропорциональна размеру диска.
Транспортировочное автономное тестирование (-t conveyance)
Этот тестовый набор предложен в качестве сравнительно быстрого способа проверки на возможные повреждения, возникшие во время транспортировки устройства.
Вот примеры, взятые с тех же дисков, что были выше. Я предлагаю вам угадать, где какой:
sh$ sudo smartctl -t short /dev/sdb
smartctl 6.5 2016-01-24 r4214 [x86_64-linux-4.10.0-32-generic] (local build)
Copyright (C) 2002-16, Bruce Allen, Christian Franke, www.smartmontools.org
=== START OF OFFLINE IMMEDIATE AND SELF-TEST SECTION ===
Sending command: "Execute SMART Short self-test routine immediately in off-line mode".
Drive command "Execute SMART Short self-test routine immediately in off-line mode" successful.
Testing has begun.
Please wait 2 minutes for test to complete.
Test will complete after Mon Mar 12 18:06:17 2018
Use smartctl -X to abort test.
Сейчас производится проверка. Давайте дождемся завершения, чтобы посмотреть результат:
sh$ sudo sh -c 'sleep 120 && smartctl -l selftest /dev/sdb'
smartctl 6.5 2016-01-24 r4214 [x86_64-linux-4.10.0-32-generic] (local build)
Copyright (C) 2002-16, Bruce Allen, Christian Franke, www.smartmontools.org
=== START OF READ SMART DATA SECTION ===
SMART Self-test log structure revision number 1
Num  Test_Description    Status                  Remaining  LifeTime(hours)  LBA_of_first_error
# 1  Short offline       Completed without error       00%       171         -
Проведем тот же тест на другом диске:
sh$ sudo smartctl -t short /dev/sdb
smartctl 6.6 2016-05-31 r4324 [x86_64-linux-4.9.0-6-amd64] (local build)
Copyright (C) 2002-16, Bruce Allen, Christian Franke, www.smartmontools.org
=== START OF OFFLINE IMMEDIATE AND SELF-TEST SECTION ===
Sending command: "Execute SMART Short self-test routine immediately in off-line mode".
Drive command "Execute SMART Short self-test routine immediately in off-line mode" successful.
Testing has begun.
Please wait 2 minutes for test to complete.
Test will complete after Mon Mar 12 21:59:39 2018
Use smartctl -X to abort test.
И еще раз, отправим в сон на две минуты и посмотрим результат:
sh$ sudo sh -c 'sleep 120 && smartctl -l selftest /dev/sdb'
smartctl 6.6 2016-05-31 r4324 [x86_64-linux-4.9.0-6-amd64] (local build)
Copyright (C) 2002-16, Bruce Allen, Christian Franke, www.smartmontools.org
=== START OF READ SMART DATA SECTION ===
SMART Self-test log structure revision number 1
Num  Test_Description    Status                  Remaining  LifeTime(hours)  LBA_of_first_error
# 1  Short offline       Completed without error       00%     26429         -
# 2  Short offline       Completed without error       00%     10904         -
# 3  Short offline       Completed without error       00%        12         -
# 4  Short offline       Completed without error       00%         0         -
Интересно, что в этом случае мы видим, что производители диска и компьютера, похоже, уже тестировали диск (на времени жизни в 0 часов и 12 часов). Я сам определенно был гораздо менее озабочен состоянием диска, чем они. Итак, поскольку я уже показал быстрые тесты, то и расширенный тоже запущу, чтобы посмотреть как это происходит.
sh$ sudo smartctl -t long /dev/sdb
smartctl 6.6 2016-05-31 r4324 [x86_64-linux-4.9.0-6-amd64] (local build)
Copyright (C) 2002-16, Bruce Allen, Christian Franke, www.smartmontools.org
=== START OF OFFLINE IMMEDIATE AND SELF-TEST SECTION ===
Sending command: "Execute SMART Extended self-test routine immediately in off-line mode".
Drive command "Execute SMART Extended self-test routine immediately in off-line mode" successful.
Testing has begun.
Please wait 110 minutes for test to complete.
Test will complete after Tue Mar 13 00:09:08 2018
Use smartctl -X to abort test.
Судя по всему на этот раз ждать придется гораздо дольше, чем при проведении короткого теста. Так что давайте посмотрим:
sh$ sudo bash -c 'sleep $((110*60)) && smartctl -l selftest /dev/sdb'
[sudo] password for sylvain:
smartctl 6.6 2016-05-31 r4324 [x86_64-linux-4.9.0-6-amd64] (local build)
Copyright (C) 2002-16, Bruce Allen, Christian Franke, www.smartmontools.org
=== START OF READ SMART DATA SECTION ===
SMART Self-test log structure revision number 1
Num  Test_Description    Status                  Remaining  LifeTime(hours)  LBA_of_first_error
# 1  Extended offline    Completed: read failure       20%     26430         810665229
# 2  Short offline       Completed without error       00%     26429         -
# 3  Short offline       Completed without error       00%     10904         -
# 4  Short offline       Completed without error       00%        12         -
# 5  Short offline       Completed without error       00%         0         -
В последнем тесте обратите внимание на различие в результатах, полученных с помощью короткого и расширенного теста, даже если они были выполнены один за другим. Ну, возможно, этот диск не в таком уж и хорошем состоянии! Отмечу, что тест остановился после первой ошибки чтения. Поэтому, если вы хотите получить исчерпывающую информацию обо всех ошибках чтения, вам придется продолжать тест после каждой ошибки. Я призываю вас взглянуть на одну очень хорошо написанную страницу руководства smartctl(8) для получения дополнительной информации о параметрах -t select, N-max и -t select, чтобы уметь делать так:
sh$ sudo smartctl -t select,810665230-max /dev/sdb
smartctl 6.6 2016-05-31 r4324 [x86_64-linux-4.9.0-6-amd64] (local build)
Copyright (C) 2002-16, Bruce Allen, Christian Franke, www.smartmontools.org
=== START OF OFFLINE IMMEDIATE AND SELF-TEST SECTION ===
Sending command: "Execute SMART Selective self-test routine immediately in off-line mode".
SPAN         STARTING_LBA           ENDING_LBA
0            810665230            976773167
Drive command "Execute SMART Selective self-test routine immediately in off-line mode" successful.
Testing has begun.
smartctl 6.6 2016-05-31 r4324 [x86_64-linux-4.9.0-6-amd64] (local build)
Copyright (C) 2002-16, Bruce Allen, Christian Franke, www.smartmontools.org
=== START OF READ SMART DATA SECTION ===
SMART Self-test log structure revision number 1
Num Test_Description Status Remaining LifeTime(hours) LBA_of_first_error
# 1 Selective offline Completed without error 00% 26432 -
# 2 Extended offline Completed: read failure 20% 26430 810665229
# 3 Short offline Completed without error 00% 26429 -
# 4 Short offline Completed without error 00% 10904 -
# 5 Short offline Completed without error 00% 12 -
# 6 Short offline Completed without error 00% 0 -Заключение
Определенно, S.M.A.R.T. – это именно та технология, которую стоит добавить в свой инструментарий для мониторинга работоспособности дисков ваших серверов. Вам также стоит взглянуть на S.M.A.R.T. Disk Monitoring Daemon smartd(8), который может помочь вам автоматизировать мониторинг с помощью отчетов системного журнала.
Учитывая статистическую природу прогнозирования сбоев, я не уверен, что агрессивный S.M.A.R.T. мониторинг будет сильно полезен на персональных компьютерах. Помните, что каким бы ни был накопитель, однажды он все равно выйдет из строя – и, как мы видели ранее, в одной трети случаев он сделает это без предупреждения. Поэтому ничто не обеспечит целостность ваших данных лучше, чем RAID технология и резервные копии!
До встречи на курсе, друзья!
Содержание
- Проверка работоспособности SSD накопителя с помощью Smartctl
- Ubuntu
- RHEL и CentOS
- FEDORA
- Проверка работоспособности SSD/HDD
- Проверка работоспособности SSD/HDD дисков с помощью Gnome
- Установка Gnome Disks
- Заключение
SMART (Технология самоконтроля, анализа и отчетности) — это функция, включенная во все современные жесткие диски и твердотельные накопители для мониторинга и тестирования надежности. Он проверяет различные атрибуты диска, чтобы обнаружить возможность отказа диска. Существуют различные инструменты, которые доступны в Linux и Windows для выполнения интеллектуальных тестов работоспособности.
Из этой инструкции вы узнаете, как проверить работоспособность SSD/HDD в Linux с помощью CLI и GUI
Здесь объясняются два метода:
- Использование Smartctl
- Использование Gnome disk
Проверка работоспособности SSD накопителя с помощью Smartctl
Smartctl — это утилита командной строки, которая может быть использована для проверки состояния жесткого диска или SSD с поддержкой S.M.A.R.T в системе Linux.
Утилита Smartctl utility tool поставляется вместе с пакетом smartmontools.Smartmontools доступна по умолчанию во всех дистрибутивах Linux, включая Ubuntu, RHEL, Centos и Fedora.
Как установить smartmontools в Linux:
Ubuntu
$
sudo apt install smartmontools
Запустите службу с помощью следующей команды.
$
sudo /etc/init.d/smartmontools start
RHEL и CentOS
$
sudo yum install smartmontools
FEDORA
$ sudo dnf install smartmontools
Служба Smartd запустится автоматически после успешной установки.
Если вдруг Smartd не запустился, сделать это можно командой:
$
sudo systemctl start smartd
Проверка работоспособности SSD/HDD
Чтобы проверить общее состояние введите команду:
$
sudo smartctl -d ata -H /dev/sda
Опишу команды подробнее:
d – Указывает тип устройства.
ata – тип устройства ATA, используйте scsi для типа устройства SCSI.
H – Проверяет устройство, чтобы сообщить о его состоянии и работоспособности.
Полученный результат указывает на то, что диск исправен. Если устройство сообщает о неисправном состоянии работоспособности, это означает, что устройство уже вышло из строя или может выйти из строя очень скоро.
Это указывает на неудачное использование и появляется возможность получить дополнительную информацию.
$ sudo smartctl -a /dev/sda
Вы можете увидеть следующие атрибуты:
[ID 5] Reallocated Sectors Count – Количество секторов, перераспределенных из-за ошибок чтения.
[ID 187] Reported Uncorrect – Количество неисправимых ошибок при доступе к сектору чтения/записи.
[ID 230] Индикатор износа носителя – Текущее состояние работы диска на основе срока службы.
Если вы видите 100 — это лучшее значение. А если видите — это ХУДШЕЕ значение.
Дополнительные сведения см. в разделе Сведения о интеллектуальных атрибутах.
Чтобы инициировать расширенный тест (long), выполните следующую команду:
$
sudo smartctl -t long /dev/sda
Чтобы выполнить самотестирование, введите команду:
$
sudo smartctl -t short /dev/sda
Чтобы найти результат самопроверки диска, используйте эту команду.
$
sudo smartctl -l selftest /dev/sda
Чтобы оценить время выполнения теста, выполните следующую команду.
$
sudo smartctl -c /dev/sda
Вы можете распечатать журналы ошибок диска с помощью команды:
$
sudo smartctl -l error /dev/sda
Проверка работоспособности SSD/HDD дисков с помощью Gnome
С помощью утилиты GNOME disks вы можете получить информацию о ваших SSD-дисков. Можете отформатировать диски, создать образ диска, выполнить стандартные тесты SSD-дисков и восстановить образ диска.
Установка Gnome Disks
В Ubuntu 20.04 приложение GNOME поставляется с установленным инструментом GNOME disk. Если вы не можете найти инструмент, используйте следующую команду для его установки.
$
sudo apt-get install gnome-disk-utility
GNOME Disk теперь установлен, далее вы можете перейти в меню рабочего стола и запустить его. Из приложения вы можете просмотреть все подключенные диски. А также можете использовать следующую команду для запуска приложения GNOME Disk.
$
sudo gnome-disks
Для того чтоб выполнить тест, запустите GNOME disks и выберите диск, который вы хотите протестировать. Вы можете найти быструю оценку дисков, таких как размер, разделение, серийный номер, температура и работоспособность. Нажмите на значок шестеренки и выберите SMART Data & Self-tests.
В новом окне вы можете найти результаты последнего теста. В правом верхнем углу окна вы можете обнаружить, что интеллектуальная опция включена. Если SMART отключен, его можно включить, нажав на ползунок. Чтобы начать новый тест, нажмите на кнопку Начать тестирование.
Как только будет нажата кнопка Начать Тестирование, появится выпадающее меню для выбора типа тестов:
- Короткие
- Расширенные
- Транспортировочные.
Выберите тип теста и введите свой пароль sudo. На индикаторе прогресса можно увидеть процент завершения теста.
Заключение
В этой инструкции я объяснил основную концепцию технологии S. M. A. R. T,. Кроме того, я рассказал о том, как установить утилиту командной строки smartctl компьютер с Linux и как ее можно использовать для мониторинга работоспособности жестких дисков. У вас также есть представление о утилите GNOME Disks utility tool для мониторинга SSD-накопителей. Надеюсь, что эта статья поможет вам контролировать ваши SSD-диски с помощью утилиты smartctl и GNOME Disks.
What is S.M.A.R.T.?
S.M.A.R.T. –for Self-Monitoring, Analysis, and Reporting Technology— is a technology embedded in storage devices like hard disk drives or SSDs and whose goal is to monitor their health status.
In practice, S.M.A.R.T. will monitor several disk parameters during normal drive operations, like the number of reading errors, the drive startup times or even the environmental condition. Moreover, S.M.A.R.T. and can also perform on-demand tests on the drive.
Ideally, S.M.A.R.T. would allow anticipating predictable failures such as those caused by mechanical wearing or degradation of the disk surface, as well as unpredictable failures caused by an unexpected defect. Since drives usually don’t fail abruptly, S.M.A.R.T. gives an option for the operating system or the system administrator to identify soon-to-fail drives so they can be replaced before any data loss occurs.

What isn’t S.M.A.R.T.?
All that seems wonderful. However, S.M.A.R.T. is not a crystal ball. It cannot predict with 100% accuracy a failure nor, on the other hand, guarantee a drive will not fail without any early warning. At best, S.M.A.R.T. should be used to estimate the likeliness of a failure.
Given the statistical nature of failure prediction, the S.M.A.R.T. technology particularly interests company using a large number of storage units, and field studies have been conducted to estimate the accuracy of S.M.A.R.T. reported issues to anticipate disk replacement needs in data centers or server farms.
In 2016, Microsoft and The Pennsylvania State University conducted a study focussing on SSDs.
According to that study, it appears some S.M.A.R.T. attributes are good indicators of imminent failure. The paper specifically mentions:
Reallocated (Realloc) Sector Count:
While the underlying technology is radically different, that indicator seems as significant in the SSD world than it was in the hard drive world. Worth mentioning because of wear-leveling algorithms used in SSDs, when several blocks start failing, chances are many more will fail soon.Program/Erase (P/E) fail count:
This is a symptom of a problem with the underlying flash hardware where the drive was unable to clear or store data in a block. Because of imperfections in the manufacturing process, few such errors can be anticipated. However, flash memories have a limited number of clear/write cycles. So, once again, a sudden increase in the number of events might indicate the drive has reached its end of life limit, and we can anticipate many more memory cells to fail soon.CRC and Uncorrectable errors (“Data Error”):
These events can be caused either by storage error or issues with the drive’s internal communication link. This indicator takes into account both corrected errors (thus without any issue reported to the host system) as well as uncorrected errors (thus blocks the drive has reported being unable to read to the host system). In other words, correctable errors are invisible to the host operating system, but they nevertheless impact the drive performances since data has to be corrected by the drive firmware, and a possible sector relocation might occur.SATA downshift count:
Because of temporary disturbances, issues with the communication link between the drive and the host, or because of internal drive issues, the SATA interface can switch to a lower signaling rate. Downgrading the link below the nominal link rate has the obvious impact on the observed drive performances. Selecting a lower signaling rate is not uncommon, especially on older drives. So this indicator is most significant when correlated with the presence of one or several of the preceding ones.
According to the study, 62% of the failed SSD showed at least one of the above symptoms. However, if you reverse that statement, that also means 38% of the studied SSDs failed without showing any of the above symptoms. The study did not mention though if the failed drives have exhibited any other S.M.A.R.T. reported failure or not. So this cannot be directly compared to the 36% failure-without-prior-notice mentioned for hard drives in the Google paper.
The Microsoft/Pennsylvania State University paper does not disclose the exact drive models studied, but according to the authors, most of the drives are coming from the same vendor spanning several generations.
The study noticed significant differences in reliability between the different models. For example, the “worst” model studied exhibits a 20% failure rate nine months after the first relocation error and up to 36% failure rate nine months after the first occurrence of data errors. The “worst” model also happens to be the older drive generation studied in the paper.
On the other hand, for the same symptoms, the drives belonging to the youngest generation of devices shows only 3% and 20% respectively failure rate for the same errors. It is hard to tell if those figures can be explained by improvements in the drive design and manufacturing process, or if this is simply an effect of drive aging.
Most interestingly, and I gave some possible reasons earlier, the paper mentions that, rather than the raw value, this is a sudden increase in the number of reported errors that should be considered as an alarming indicator:
“”” There is a higher likelihood of the symptoms preceding SSD failures, with an intense manifestation and rapid progression preventing their survivability beyond a few months “””
In other words, one occasional S.M.A.R.T. reported error is probably not to be considered as a signal of imminent failure. However, when a healthy SSD starts reporting more and more errors, a short- to mid-term failure has to be anticipated.
But how to know if your hard drive or SSD is healthy? Either to satisfy your curiosity or because you want to start monitoring your drives closely, it is time now to introduce the smartctl monitoring tool:
Using smartctl to Monitor Status of your SSD in Linux
There are ways to list disks in Linux but to monitor the S.M.A.R.T. status of your disk, I suggest the smartctl tool, part of the smartmontool package (at least on Debian/Ubuntu).
sudo apt install smartmontoolssmartctl is a command line tool, but this is perfect, especially if you want to automate data collection, on your servers especially.
The first step when using smartctl is to check if your disk has S.M.A.R.T. enabled and is supported by the tool:
sh$ sudo smartctl -i /dev/sdb
smartctl 6.6 2016-05-31 r4324 [x86_64-linux-4.9.0-6-amd64] (local build)
Copyright (C) 2002-16, Bruce Allen, Christian Franke, www.smartmontools.org

=== START OF INFORMATION SECTION ===
Model Family:     Seagate Momentus 7200.4
Device Model:     ST9500420AS
Serial Number:    5VJAS7FL
LU WWN Device Id: 5 000c50 02fa0b800
Firmware Version: D005SDM1
User Capacity:    500,107,862,016 bytes [500 GB]
Sector Size:      512 bytes logical/physical
Rotation Rate:    7200 rpm
Device is:        In smartctl database [for details use: -P show]
ATA Version is:   ATA8-ACS T13/1699-D revision 4
SATA Version is:  SATA 2.6, 3.0 Gb/s
Local Time is:    Mon Mar 12 15:54:43 2018 CET
SMART support is: Available - device has SMART capability.
SMART support is: Enabled
As you can see, my laptop internal hard drive indeed has S.M.A.R.T. capabilities, and S.M.A.R.T. support is enabled. So, what now about the S.MA.R.T. status? Are there some errors recorded?
Reporting “all SMART information about the disk” is the job of the -a option:
sh$ sudo smartctl -i -a /dev/sdb
smartctl 6.6 2016-05-31 r4324 [x86_64-linux-4.9.0-6-amd64] (local build)
Copyright (C) 2002-16, Bruce Allen, Christian Franke, www.smartmontools.org
=== START OF INFORMATION SECTION ===
Model Family:     Seagate Momentus 7200.4
Device Model:     ST9500420AS
Serial Number:    5VJAS7FL
LU WWN Device Id: 5 000c50 02fa0b800
Firmware Version: D005SDM1
User Capacity:    500,107,862,016 bytes [500 GB]
Sector Size:      512 bytes logical/physical
Rotation Rate:    7200 rpm
Device is:        In smartctl database [for details use: -P show]
ATA Version is:   ATA8-ACS T13/1699-D revision 4
SATA Version is:  SATA 2.6, 3.0 Gb/s
Local Time is:    Mon Mar 12 15:56:58 2018 CET
SMART support is: Available - device has SMART capability.
SMART support is: Enabled
=== START OF READ SMART DATA SECTION ===
SMART overall-health self-assessment test result: PASSED
See vendor-specific Attribute list for marginal Attributes.
General SMART Values:
Offline data collection status:  (0x82)    Offline data collection activity
was completed without error.
Auto Offline Data Collection: Enabled.
Self-test execution status:      (   0)    The previous self-test routine completed
without error or no self-test has ever
been run.
Total time to complete Offline
data collection:         (    0) seconds.
Offline data collection
capabilities:              (0x7b) SMART execute Offline immediate.
Auto Offline data collection on/off support.
Suspend Offline collection upon new
command.
Offline surface scan supported.
Self-test supported.
Conveyance Self-test supported.
Selective Self-test supported.
SMART capabilities:            (0x0003)    Saves SMART data before entering
power-saving mode.
Supports SMART auto save timer.
Error logging capability:        (0x01)    Error logging supported.
General Purpose Logging supported.
Short self-test routine
recommended polling time:      (   2) minutes.
Extended self-test routine
recommended polling time:      ( 110) minutes.
Conveyance self-test routine
recommended polling time:      (   3) minutes.
SCT capabilities:            (0x103f)    SCT Status supported.
SCT Error Recovery Control supported.
SCT Feature Control supported.
SCT Data Table supported.
SMART Attributes Data Structure revision number: 10
Vendor Specific SMART Attributes with Thresholds:
ID# ATTRIBUTE_NAME          FLAG     VALUE WORST THRESH TYPE      UPDATED  WHEN_FAILED RAW_VALUE
1 Raw_Read_Error_Rate     0x000f   111   099   006    Pre-fail  Always       -       29694249
3 Spin_Up_Time            0x0003   100   098   085    Pre-fail  Always       -       0
4 Start_Stop_Count        0x0032   095   095   020    Old_age   Always       -       5413
5 Reallocated_Sector_Ct   0x0033   100   100   036    Pre-fail  Always       -       3
7 Seek_Error_Rate         0x000f   071   060   030    Pre-fail  Always       -       51710773327
9 Power_On_Hours          0x0032   070   070   000    Old_age   Always       -       26423
10 Spin_Retry_Count        0x0013   100   100   097    Pre-fail  Always       -       0
12 Power_Cycle_Count       0x0032   096   037   020    Old_age   Always       -       4836
184 End-to-End_Error        0x0032   100   100   099    Old_age   Always       -       0
187 Reported_Uncorrect      0x0032   072   072   000    Old_age   Always       -       28
188 Command_Timeout         0x0032   100   096   000    Old_age   Always       -       4295033738
189 High_Fly_Writes         0x003a   100   100   000    Old_age   Always       -       0
190 Airflow_Temperature_Cel 0x0022   056   042   045    Old_age   Always   In_the_past 44 (Min/Max 21/44 #22)
191 G-Sense_Error_Rate      0x0032   100   100   000    Old_age   Always       -       184
192 Power-Off_Retract_Count 0x0032   100   100   000    Old_age   Always       -       104
193 Load_Cycle_Count        0x0032   001   001   000    Old_age   Always       -       395415
194 Temperature_Celsius     0x0022   044   058   000    Old_age   Always       -       44 (0 13 0 0 0)
195 Hardware_ECC_Recovered  0x001a   050   045   000    Old_age   Always       -       29694249
197 Current_Pending_Sector  0x0012   100   100   000    Old_age   Always       -       1
198 Offline_Uncorrectable   0x0010   100   100   000    Old_age   Offline      -       1
199 UDMA_CRC_Error_Count    0x003e   200   200   000    Old_age   Always       -       0
240 Head_Flying_Hours       0x0000   100   253   000    Old_age   Offline      -       25131 (246 202 0)
241 Total_LBAs_Written      0x0000   100   253   000    Old_age   Offline      -       3028413736
242 Total_LBAs_Read         0x0000   100   253   000    Old_age   Offline      -       1613088055
254 Free_Fall_Sensor        0x0032   100   100   000    Old_age   Always       -       0
SMART Error Log Version: 1
ATA Error Count: 3
CR = Command Register [HEX]
FR = Features Register [HEX]
SC = Sector Count Register [HEX]
SN = Sector Number Register [HEX]
CL = Cylinder Low Register [HEX]
CH = Cylinder High Register [HEX]
DH = Device/Head Register [HEX]
DC = Device Command Register [HEX]
ER = Error register [HEX]
ST = Status register [HEX]
Powered_Up_Time is measured from power on, and printed as
DDd+hh:mm:SS.sss where DD=days, hh=hours, mm=minutes,
SS=sec, and sss=millisec. It "wraps" after 49.710 days.
Error 3 occurred at disk power-on lifetime: 21171 hours (882 days + 3 hours)
When the command that caused the error occurred, the device was active or idle.
After command completion occurred, registers were:
ER ST SC SN CL CH DH
-- -- -- -- -- -- --
40 51 00 ff ff ff 0f  Error: UNC at LBA = 0x0fffffff = 268435455
Commands leading to the command that caused the error were:
CR FR SC SN CL CH DH DC   Powered_Up_Time  Command/Feature_Name
-- -- -- -- -- -- -- --  ----------------  --------------------
60 00 08 ff ff ff 4f 00      00:45:12.580  READ FPDMA QUEUED
60 00 08 ff ff ff 4f 00      00:45:12.580  READ FPDMA QUEUED
60 00 08 ff ff ff 4f 00      00:45:12.579  READ FPDMA QUEUED
60 00 08 ff ff ff 4f 00      00:45:12.571  READ FPDMA QUEUED
60 00 20 ff ff ff 4f 00      00:45:12.543  READ FPDMA QUEUED
Error 2 occurred at disk power-on lifetime: 21171 hours (882 days + 3 hours)
When the command that caused the error occurred, the device was active or idle.
After command completion occurred, registers were:
ER ST SC SN CL CH DH
-- -- -- -- -- -- --
40 51 00 ff ff ff 0f  Error: UNC at LBA = 0x0fffffff = 268435455
Commands leading to the command that caused the error were:
CR FR SC SN CL CH DH DC   Powered_Up_Time  Command/Feature_Name
-- -- -- -- -- -- -- --  ----------------  --------------------
60 00 00 ff ff ff 4f 00      00:45:09.456  READ FPDMA QUEUED
60 00 00 ff ff ff 4f 00      00:45:09.451  READ FPDMA QUEUED
61 00 08 ff ff ff 4f 00      00:45:09.450  WRITE FPDMA QUEUED
60 00 00 ff ff ff 4f 00      00:45:08.878  READ FPDMA QUEUED
60 00 00 ff ff ff 4f 00      00:45:08.856  READ FPDMA QUEUED
Error 1 occurred at disk power-on lifetime: 21131 hours (880 days + 11 hours)
When the command that caused the error occurred, the device was active or idle.
After command completion occurred, registers were:
ER ST SC SN CL CH DH
-- -- -- -- -- -- --
40 51 00 ff ff ff 0f  Error: UNC at LBA = 0x0fffffff = 268435455
Commands leading to the command that caused the error were:
CR FR SC SN CL CH DH DC   Powered_Up_Time  Command/Feature_Name
-- -- -- -- -- -- -- --  ----------------  --------------------
60 00 00 ff ff ff 4f 00      05:52:18.809  READ FPDMA QUEUED
61 00 00 7e fb 31 45 00      05:52:18.806  WRITE FPDMA QUEUED
60 00 00 ff ff ff 4f 00      05:52:18.571  READ FPDMA QUEUED
ea 00 00 00 00 00 a0 00      05:52:18.529  FLUSH CACHE EXT
61 00 08 ff ff ff 4f 00      05:52:18.527  WRITE FPDMA QUEUED
SMART Self-test log structure revision number 1
Num  Test_Description    Status                  Remaining  LifeTime(hours)  LBA_of_first_error
# 1  Short offline       Completed without error       00%     10904         -
# 2  Short offline       Completed without error       00%        12         -
# 3  Short offline       Completed without error       00%         0         -
SMART Selective self-test log data structure revision number 1
SPAN  MIN_LBA  MAX_LBA  CURRENT_TEST_STATUS
1        0        0  Not_testing
2        0        0  Not_testing
3        0        0  Not_testing
4        0        0  Not_testing
5        0        0  Not_testing
Selective self-test flags (0x0):
After scanning selected spans, do NOT read-scan remainder of disk.
If Selective self-test is pending on power-up, resume after 0 minute delay.
Understanding the output of smartctl command
That is a lot of information and it is not always easy to interpret those data. The most interesting part is probably the one labeled as “Vendor Specific SMART Attributes with Thresholds”. It reports various statistics gathered by the S.M.A.R.T. device and let you compare those value (current or all-time worst) with some vendor-defined threshold.
For example, here is how my disk reports relocated sectors:
ID# ATTRIBUTE_NAME          FLAG     VALUE WORST THRESH TYPE      UPDATED  WHEN_FAILED RAW_VALUE
5 Reallocated_Sector_Ct   0x0033   100   100   036    Pre-fail  Always       -       3
You can see this a “pre-fail” attribute. That just means that attribute is corresponding to anomalies. So, if that attribute exceeds the threshold, that could be an indicator of imminent failure. The other category is “Old_age” for attributes corresponding to “normal wearing” attributes.
The last field (here “3”) is corresponding the raw value for that attribute as reported by the drive. Usually, this number has a physical significance. Here, this is the actual number of relocated sectors. However, for other attributes, it could be a temperature in degrees Celcius, a time in hours or minutes, or the number of times the drive has encountered a specific condition.
In addition to the raw value, a S.M.A.R.T. enabled drive must report “normalized” values (fields value, worst and threshold). These values are normalized in the range 1-254 (0-255 for the threshold). The disk firmware performs that normalization using some internal algorithm. Moreover, different manufacturers may normalize the same attribute differently. Most values are reported as a percentage, the higher being the best, but this is not mandatory. When a parameter is lower or equal to the manufacturer supplied threshold, the disk is said to have failed for that attribute. With all the reserves mentioned in the first part of that article, when a “pre-fail” attribute has failed, presumably a disk failure is imminent.
As a second example, let’s examine the “seek error rate”:
ID# ATTRIBUTE_NAME          FLAG     VALUE WORST THRESH TYPE      UPDATED  WHEN_FAILED RAW_VALUE
7 Seek_Error_Rate         0x000f   071   060   030    Pre-fail  Always       -       51710773327
Actually, and this is a problem with S.M.A.R.T. reporting, the exact meaning of each value is vendor-specific. In my case, Seagate is using a logarithmic scale to normalize the value. So “71” means roughly one error for 10 million seeks (10 to the 7.1st power). Amusingly enough, the all-time worst was one error for 1 million seeks (10 to the 6.0th power). If I interpret that correctly, that means my disk heads are more accurately positioned now than they were in the past. I did not follow that disk closely, so this analysis is subject to caution. Maybe the drive just needed some running-in period when it was initially commissioned? Unless this is a consequence of mechanical parts wearing, and thus opposing less friction today? In any case, and whatever the reason is, this value is more a performance indicator than a failure early warning. So that does not bother me a lot.
Besides that, and three suspects errors recorded about six months ago, that drive appears in surprisingly good conditions (according to S.M.A.R.T.) for a stock laptop drive that was powered on for more than 1100 days (26423 hours):
ID# ATTRIBUTE_NAME          FLAG     VALUE WORST THRESH TYPE      UPDATED  WHEN_FAILED RAW_VALUE
9 Power_On_Hours          0x0032   070   070   000    Old_age   Always       -       26423
Out of curiosity, I ran the same test on a much more recent laptop equipped with an SSD:
sh$ sudo smartctl -i /dev/sdb
smartctl 6.5 2016-01-24 r4214 [x86_64-linux-4.10.0-32-generic] (local build)
Copyright (C) 2002-16, Bruce Allen, Christian Franke, www.smartmontools.org
=== START OF INFORMATION SECTION ===
Device Model:     TOSHIBA THNSNK256GVN8
Serial Number:    17FS131LTNLV
LU WWN Device Id: 5 00080d 9109b2ceb
Firmware Version: K8XA4103
User Capacity:    256 060 514 304 bytes [256 GB]
Sector Sizes:     512 bytes logical, 4096 bytes physical
Rotation Rate:    Solid State Device
Form Factor:      M.2
Device is:        Not in smartctl database [for details use: -P showall]
ATA Version is:   ACS-3 (minor revision not indicated)
SATA Version is:  SATA 3.2, 6.0 Gb/s (current: 6.0 Gb/s)
Local Time is:    Tue Mar 13 01:03:23 2018 CET
SMART support is: Available - device has SMART capability.
SMART support is: Enabled
The first thing to notice, even if that device is S.M.AR.T. enabled, it is not in the smartctl database. That won’t prevent the tool to gather data from the SSD, but it will not be able to report the exact meaning of the different vendor-specific attributes:
sh$ sudo smartctl -a /dev/sdb
smartctl 6.5 2016-01-24 r4214 [x86_64-linux-4.10.0-32-generic] (local build)
Copyright (C) 2002-16, Bruce Allen, Christian Franke, www.smartmontools.org
=== START OF READ SMART DATA SECTION ===
SMART overall-health self-assessment test result: PASSED
General SMART Values:
Offline data collection status:  (0x00)    Offline data collection activity
was never started.
Auto Offline Data Collection: Disabled.
Self-test execution status:      (   0)    The previous self-test routine completed
without error or no self-test has ever
been run.
Total time to complete Offline
data collection:         (  120) seconds.
Offline data collection
capabilities:              (0x5b) SMART execute Offline immediate.
Auto Offline data collection on/off support.
Suspend Offline collection upon new
command.
Offline surface scan supported.
Self-test supported.
No Conveyance Self-test supported.
Selective Self-test supported.
SMART capabilities:            (0x0003)    Saves SMART data before entering
power-saving mode.
Supports SMART auto save timer.
Error logging capability:        (0x01)    Error logging supported.
General Purpose Logging supported.
Short self-test routine
recommended polling time:      (   2) minutes.
Extended self-test routine
recommended polling time:      (  11) minutes.
SCT capabilities:            (0x003d)    SCT Status supported.
SCT Error Recovery Control supported.
SCT Feature Control supported.
SCT Data Table supported.
SMART Attributes Data Structure revision number: 16
Vendor Specific SMART Attributes with Thresholds:
ID# ATTRIBUTE_NAME          FLAG     VALUE WORST THRESH TYPE      UPDATED  WHEN_FAILED RAW_VALUE
1 Raw_Read_Error_Rate     0x000a   100   100   000    Old_age   Always       -       0
2 Throughput_Performance  0x0005   100   100   050    Pre-fail  Offline      -       0
3 Spin_Up_Time            0x0007   100   100   050    Pre-fail  Always       -       0
5 Reallocated_Sector_Ct   0x0013   100   100   050    Pre-fail  Always       -       0
7 Unknown_SSD_Attribute   0x000b   100   100   050    Pre-fail  Always       -       0
8 Unknown_SSD_Attribute   0x0005   100   100   050    Pre-fail  Offline      -       0
9 Power_On_Hours          0x0012   100   100   000    Old_age   Always       -       171
10 Unknown_SSD_Attribute   0x0013   100   100   050    Pre-fail  Always       -       0
12 Power_Cycle_Count       0x0012   100   100   000    Old_age   Always       -       105
166 Unknown_Attribute       0x0012   100   100   000    Old_age   Always       -       0
167 Unknown_Attribute       0x0022   100   100   000    Old_age   Always       -       0
168 Unknown_Attribute       0x0012   100   100   000    Old_age   Always       -       0
169 Unknown_Attribute       0x0013   100   100   010    Pre-fail  Always       -       100
170 Unknown_Attribute       0x0013   100   100   010    Pre-fail  Always       -       0
173 Unknown_Attribute       0x0012   200   200   000    Old_age   Always       -       0
175 Program_Fail_Count_Chip 0x0013   100   100   010    Pre-fail  Always       -       0
192 Power-Off_Retract_Count 0x0012   100   100   000    Old_age   Always       -       18
194 Temperature_Celsius     0x0023   063   032   020    Pre-fail  Always       -       37 (Min/Max 11/68)
197 Current_Pending_Sector  0x0012   100   100   000    Old_age   Always       -       0
240 Unknown_SSD_Attribute   0x0013   100   100   050    Pre-fail  Always       -       0
SMART Error Log Version: 1
No Errors Logged
SMART Self-test log structure revision number 1
No self-tests have been logged.  [To run self-tests, use: smartctl -t]
SMART Selective self-test log data structure revision number 1
SPAN  MIN_LBA  MAX_LBA  CURRENT_TEST_STATUS
1        0        0  Not_testing
2        0        0  Not_testing
3        0        0  Not_testing
4        0        0  Not_testing
5        0        0  Not_testing
Selective self-test flags (0x0):
After scanning selected spans, do NOT read-scan remainder of disk.
If Selective self-test is pending on power-up, resume after 0 minute delay.
This is typically the output you can expect for a brand new SSD. Even if, because of the lack of normalization or metainformation for vendor-specific data, many attributes are reported as “Unknown_SSD_Attribute.” I may only hope future versions of smartctl will incorporate data relative to that particular drive model in the tool database, so I could more accurately identify possible issues.
Test your SSD in Linux with smartctl
Until now we have examined the data collected by the drive during its normal operations. However, the S.M.A.R.T. protocol also supports several “self-tests” commands to launch diagnosis on demand.
Unless explicitly requested, the self-tests can run during normal disk operations. Since both the test and the host I/O requests will compete for the drive, the disk performances will degrade during the test. The S.M.A.R.T. specification specifies several kinds of self-test. The most important are:
Short self-test (-t short)
This test will check for the electrical and mechanical performances as well as the read performances of the drive. The short self-test typically only requires few minutes to complete (2 to 10 usually).Extended self-test (-t long)
This test takes one or two orders of magnitude longer to complete. Usually, this is a more in-depth version of the short self-test. In addition, that test will scan the entire disk surface for data errors with no time limit. The test duration will be proportional to the disk size.Conveyance self-test (-t conveyance)
this test suite is designed as a relatively quick way to check for possible damage incurred during transporting of the device.
Here are examples taken from the same disks as above. I let you guess which is which:
sh$ sudo smartctl -t short /dev/sdb
smartctl 6.5 2016-01-24 r4214 [x86_64-linux-4.10.0-32-generic] (local build)
Copyright (C) 2002-16, Bruce Allen, Christian Franke, www.smartmontools.org
=== START OF OFFLINE IMMEDIATE AND SELF-TEST SECTION ===
Sending command: "Execute SMART Short self-test routine immediately in off-line mode".
Drive command "Execute SMART Short self-test routine immediately in off-line mode" successful.
Testing has begun.
Please wait 2 minutes for test to complete.
Test will complete after Mon Mar 12 18:06:17 2018
Use smartctl -X to abort test.
The test has now being stated. Let’s wait until completion to show the outcome:
sh$ sudo sh -c 'sleep 120 && smartctl -l selftest /dev/sdb'
smartctl 6.5 2016-01-24 r4214 [x86_64-linux-4.10.0-32-generic] (local build)
Copyright (C) 2002-16, Bruce Allen, Christian Franke, www.smartmontools.org
=== START OF READ SMART DATA SECTION ===
SMART Self-test log structure revision number 1
Num  Test_Description    Status                  Remaining  LifeTime(hours)  LBA_of_first_error
# 1  Short offline       Completed without error       00%       171         -
Let’s do now the same test on my other disk:
sh$ sudo smartctl -t short /dev/sdb
smartctl 6.6 2016-05-31 r4324 [x86_64-linux-4.9.0-6-amd64] (local build)
Copyright (C) 2002-16, Bruce Allen, Christian Franke, www.smartmontools.org
=== START OF OFFLINE IMMEDIATE AND SELF-TEST SECTION ===
Sending command: "Execute SMART Short self-test routine immediately in off-line mode".
Drive command "Execute SMART Short self-test routine immediately in off-line mode" successful.
Testing has begun.
Please wait 2 minutes for test to complete.
Test will complete after Mon Mar 12 21:59:39 2018
Use smartctl -X to abort test.
Once again, sleep for two minutes and display the test outcome:
sh$ sudo sh -c 'sleep 120 && smartctl -l selftest /dev/sdb'
smartctl 6.6 2016-05-31 r4324 [x86_64-linux-4.9.0-6-amd64] (local build)
Copyright (C) 2002-16, Bruce Allen, Christian Franke, www.smartmontools.org
=== START OF READ SMART DATA SECTION ===
SMART Self-test log structure revision number 1
Num  Test_Description    Status                  Remaining  LifeTime(hours)  LBA_of_first_error
# 1  Short offline       Completed without error       00%     26429         -
# 2  Short offline       Completed without error       00%     10904         -
# 3  Short offline       Completed without error       00%        12         -
# 4  Short offline       Completed without error       00%         0         -
Interestingly, in that case, it appears both the drive and the computer manufacturers seems to have performed some quick tests on the disk (at lifetime 0h and 12h). I was definitely much less concerned with monitoring the drive health myself. So, since I am running some self-tests for that article, let’s start an extended test to so how it goes:
sh$ sudo smartctl -t long /dev/sdb
smartctl 6.6 2016-05-31 r4324 [x86_64-linux-4.9.0-6-amd64] (local build)
Copyright (C) 2002-16, Bruce Allen, Christian Franke, www.smartmontools.org
=== START OF OFFLINE IMMEDIATE AND SELF-TEST SECTION ===
Sending command: "Execute SMART Extended self-test routine immediately in off-line mode".
Drive command "Execute SMART Extended self-test routine immediately in off-line mode" successful.
Testing has begun.
Please wait 110 minutes for test to complete.
Test will complete after Tue Mar 13 00:09:08 2018
Use smartctl -X to abort test.
Apparently, this time we will have to wait much longer than for the short test. So let’s do it:
sh$ sudo bash -c 'sleep $((110*60)) && smartctl -l selftest /dev/sdb'
[sudo] password for sylvain:
smartctl 6.6 2016-05-31 r4324 [x86_64-linux-4.9.0-6-amd64] (local build)
Copyright (C) 2002-16, Bruce Allen, Christian Franke, www.smartmontools.org
=== START OF READ SMART DATA SECTION ===
SMART Self-test log structure revision number 1
Num  Test_Description    Status                  Remaining  LifeTime(hours)  LBA_of_first_error
# 1  Extended offline    Completed: read failure       20%     26430         810665229
# 2  Short offline       Completed without error       00%     26429         -
# 3  Short offline       Completed without error       00%     10904         -
# 4  Short offline       Completed without error       00%        12         -
# 5  Short offline       Completed without error       00%         0         -
In that latter case, pay special attention to the different outcomes obtained with the short and extended tests, even if they were performed one right after the other. Well, maybe that disk is not that healthy after all! An important thing to notice is the test will stop after the first read error. So if you want an exhaustive diagnosis of all read errors, you will have to continue the test after each error. I encourage you to take a look at the very well written smartctl(8) manual page for the more information about the options -t select,N-max and -t select,cont for that:
sh$ sudo smartctl -t select,810665230-max /dev/sdb
smartctl 6.6 2016-05-31 r4324 [x86_64-linux-4.9.0-6-amd64] (local build)
Copyright (C) 2002-16, Bruce Allen, Christian Franke, www.smartmontools.org
=== START OF OFFLINE IMMEDIATE AND SELF-TEST SECTION ===
Sending command: "Execute SMART Selective self-test routine immediately in off-line mode".
SPAN         STARTING_LBA           ENDING_LBA
0            810665230            976773167
Drive command "Execute SMART Selective self-test routine immediately in off-line mode" successful.
Testing has begun.
smartctl 6.6 2016-05-31 r4324 [x86_64-linux-4.9.0-6-amd64] (local build)
Copyright (C) 2002-16, Bruce Allen, Christian Franke, www.smartmontools.org
=== START OF READ SMART DATA SECTION ===
SMART Self-test log structure revision number 1
Num Test_Description Status Remaining LifeTime(hours) LBA_of_first_error
# 1 Selective offline Completed without error 00% 26432 -
# 2 Extended offline Completed: read failure 20% 26430 810665229
# 3 Short offline Completed without error 00% 26429 -
# 4 Short offline Completed without error 00% 10904 -
# 5 Short offline Completed without error 00% 12 -
# 6 Short offline Completed without error 00% 0 -Conclusion
Definitely, S.M.A.R.T. reporting is a technology you can add to your tool chest to monitor your servers disk health. In that case, you should also take a look at the S.M.A.R.T. Disk Monitoring Daemon smartd(8) that could help you automate monitoring through syslog reporting.
Given the statistical nature of failure prediction, I am a little bit less convinced however that aggressive S.M.A.R.T. monitoring is of great benefit on a personal computer. Finally, don’t forget whatever is its technology, a drive will fail— and we have seen earlier, in one-third of the case, it will fail without prior notice. So nothing will replace RAID and offline backups to ensure your data integrity!
SMART (Self-Monitoring, Analysis, and Reporting Technology) is a feature enabled in all modern hard disk drives and SSDs to monitor/test reliability. It checks different drive attributes to detect the possibility of drive failure. There are different tools available in Linux and Windows to perform the SMART tests.
In this tutorial, we will learn how to test SSD/HDD health in Linux from CLI and GUI
Two methods explained here are:
- Using Smartctl
- Using Gnome Disks
Test SSD Health using Smartctl
Smartctl is a command-line utility tool that can be used to check S.M.A.R.T-enabled HDD or SSD status in the Linux system.
Smartctl utility tool comes with the package smartmontools. The Smartmontools is available by default in all Linux distributions including Ubuntu, RHEL and Centos and Fedora.
To install smartmontools in Linux:
Ubuntu
sudo apt install smartmontools Start the service using the following command.
sudo /etc/init.d/smartmontools startRHEL and CentOS
sudo yum install smartmontoolsFedora
sudo dnf install smartmontoolsSmartd service will start automatically after the successful installation.
If not started, start smartd service:
sudo systemctl start smartdTo test overall-health of the drive, type:
sudo smartctl -d ata -H /dev/sdaWhere,
d — Specifies the type of device.
ata — the device type is ATA, use scsi for SCSI device type.
H — Check the device to report its SMART health status.
The result PASSED indicates that the disk drive is good. If the device reports failing health status, this means either that the device has already failed or could fail very soon.
If it indicates failing use -a option to get more information.
sudo smartctl -a /dev/sda
You can monitor the following attributes:
[ID 5] Reallocated Sectors Count — Numbers of sectors reallocated due to read errors.
[ID 187] Reported Uncorrect — Number of uncorrectable errors while accessing read/write to sector.
[ID 230] Media Wearout Indicator — Current state of drive operation based upon the Life Curve.
100 is the BEST value and 0 is the WORST.
Check SMART Attribute Details for more information.
To initiate the extended test (long) using the following command:
sudo smartctl -t long /dev/sda
To perform a self test, run:
sudo smartctl -t short /dev/sda
To find drive’s self test result, use the following command.
sudo smartctl -l selftest /dev/sda
To evaluate estimate time to perform test, run the following command.
sudo smartctl -c /dev/sda
You can print error logs of the disk by using the command:
sudo smartctl -l error /dev/sda
Test SSD/HDD Health using Gnome Disks
With GNOME disks utility you can get a quick review of your SSD drives, format your drives, create a disk image, run standard tests against SSD drives, and restore a disk image.
Install Gnome Disks
In Ubuntu 20.04, the GNOME Disks application comes with the GNOME disk tool installed. If you are unable to find the tool, use the following command to install it.
sudo apt-get install gnome-disk-utilityGNOME Disk is now installed, now you can go to your desktop menu navigate to the application, and launch. From the application, you can overview all your attached drives. You can also use the following command to launch the GNOME Disk application.
sudo gnome-disks
Now the test can be performed on the drives. To do so, launch the GNOME disks and select the disk which you want to test. You can find the quick assessment of the drives such as size, partitioning, Serial number, temp, and health. Click on the gear icon and select SMART Data & Self-tests.
In the new window you can find the results of the last test. In the top right of the window, you can find that the SMART option is enabled. If SMART is disabled, it can be enabled by clicking on the slider. To start the new test click on the Start Self-test button.
Once the Start Self-test button is clicked, a drop down menu will be appeared to select the type of the tests which are Short, Extended and Conveyance. Select the test type and provide your sudo password to continue the test. From the progress meter, percentage of the test complete can be seen.
Conclusion
In this tutorial, I have explained the basic concept of the S.M.A.R.T technology including its uses in the Linux system. Also, I have covered how to install the smartctl command-line utility tool in the Linux machine and how it can be used to monitor the health of hard drives. You have also got an idea about the GNOME Disks utility tool to monitor SSD drives. I hope this article will help you to monitor your SSD drives using smartctl and GNOME Disks utility.
If your data center makes use of Linux machines, one of the administrative tasks you’ll want to undertake is regularly checking the health of the SSD drives used on those machines. Why? Because, even though solid state drives will dramatically outlast rotating platter drives, they do have a finite lifespan. The last thing you want to do is fall victim to that particular end of days. How do you check the health of those drives? As with everything in Linux, there are options. Although a GUI solution exists (GNOME Disks), I highly recommend going with a command line tool for this task. Why? Most of the time, your Linux servers won’t include a GUI; with the command line, you can easily make use it by secure shelling into your remote Linux server and run your tests from the terminal.
The tool in question is smartctl. With this command, you can get a quick glimpse of your SSD health. Of course, how much mileage you get from the command will depend upon what make/model of SSD you employ. Unfortunately, the S.M.A.R.T. tools aren’t always up to date with every SSD drive. Because of this, you cannot be certain the number of times your SSD chips have been written to. Even with that in mind, you can get a good estimation as to the wear and tear on your drives.
Let’s install and use smartctl.
Installation
I will be demonstrating with the Ubuntu platform (Ubuntu 17.10 to be exact). The required package is found on all the standard repositories, so adjust the installation command to fit your particular distribution of choice.
The smartctl utility is a part of the smartmontools package. This can be installed with a single command:
sudo apt install smartmontools
Do note, the above command will also install libgsasl7, libkyotocabinet16v5, libmailutils5, libntlm0, mailutils, mailutils-common, and postfix.
Once the package is installed, you’re ready to go.
SEE: Securing Linux policy (Tech Pro Research)
Usage
To use the smartctl tool, the first thing you will want to do is gather information about the drive, which is done via the command:
sudo smartctl -i /dev/sdX
Where sdX is the name of the drive to be tested.
The above command will print out the details associated with your drive (Figure A).
Figure A
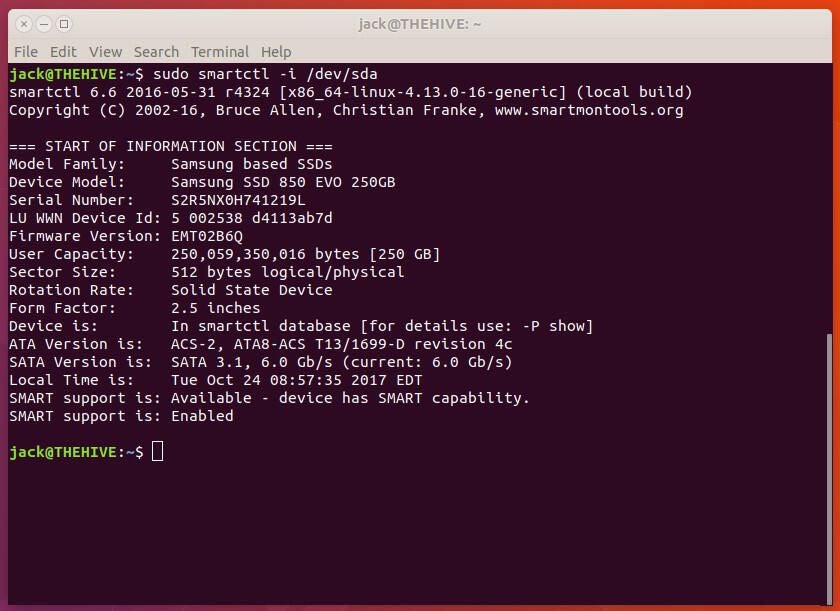
As you can see, the drive in question is in the smartctl database, so information should be up to date.
Let’s run a short test on the drive. These tests will actually wind up giving you the most accurate data on your drive (so it’s important to make use of these included tools). Issue the command:
sudo smartctl -t short -a /dev/sdX
This will immediately report some bits of information (Figure B).
Figure B
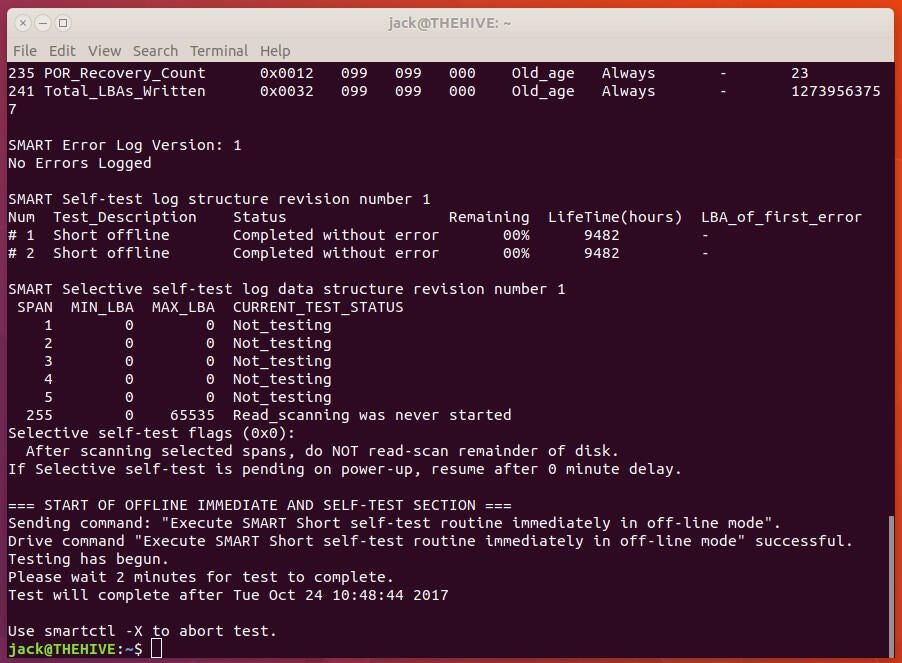
I recommend you run a short and a long test weekly or (monthly) on your drives. To run a long test, the command is:
sudo smartctl -t long -a /dev/sdX
One of the first things you should see is the results of the SMART overall-health self-assessment test. That should say PASSED. If not, you know, right away, there’s something wrong with your SSD.
The short test will examine the following:
- Electrical Properties: The controller tests its own electronics, which is different for each manufacturer.
- Mechanical Properties: Servos and positioning mechanisms are tested (also specific to each manufacturer).
- Read/Verify: A certain area of the disk will be read to verify certain data (the size and position of the region read is unique to each manufacturer).
The long test runs everything included with the short test, while adding:
- No time restriction and in the Read/Verify segment.
- The entire disk is checked (as opposed to just a section).
The short test takes approximately two minutes to complete, whereas the long test will require between 20-60 minutes (depending upon your hardware). To view the results of the test, issue the command sudo smartctl -a /dev/sdX (Where sdX is the name of the drive tested).
The command will print out the results of the test, as well as all of the information you need to verify the health of your SSD (Figure C).
Figure C
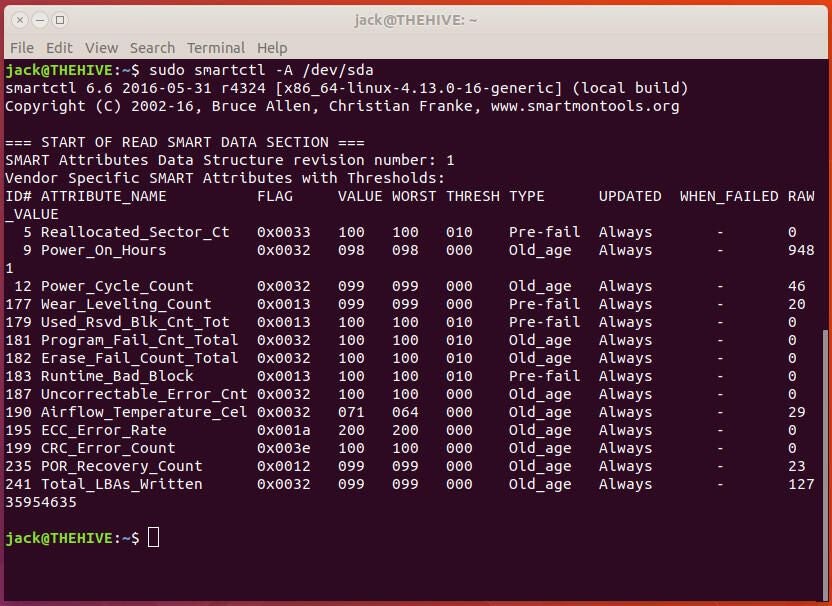
Beyond the Self-test log, there are two values in the output to be examined:
- Power_On_Hours — how many hours the drive has been powered on. Each make/model of drive has a recommended “shelf life” of hours it can be used. Most modern SSDs have fairly incredible lifespans, so chances are you’re not going to bump into the end of life. If you’re using an older drive, this can be an issue.
- Wear_Leveling_Count — Stands for the remaining endurance of the drive in percentage (starting from 100 and decreasing linearly as the drive is written to).
It is important to look at the value and worst value columns. As you can see, my Samsung SSD is currently at a 99 for Wear_Leveling_Count, which is a very healthy drive.
One thing to keep in mind is that different manufacturers will report different data with smartclt. For example, I have a older Intel and Kingston SSD drives attached to the same machine. Both of these drives report similar (and more comprehensive) data. However, neither report the Wear_Leveling_Count. Why? These are both older drives and do not report ID 177 (Wear_Leveling_Count). Instead, your best bet is to run both the short and long tests and verify the health of your drives via those reports.
SEE: Why Munich made the switch from Windows to Linux–and may be reversing course (TechRepublic)
The obvious caveat
There are actually two caveats with smartctl. First off, it’s easy to misinterpret the reported data. Because of this, it’s important that you know the make and model of the drive you are testing. Once you have that information in hand, you can research any anomalies with reported data. Second, it is crucial to make use of the testing tools. Although you can run a command like smartctl -A /dev/sdX, you don’t get the added benefit of the testing results. Make sure to regularly run the short and long tests, to get the most up to date information on your SSD drives as you can.

Though laptops and desktops are very resilient, you should keep checking the health of the components to ensure the longevity. A data storage device is a core-component of any computer. The two main types are known as HDD aka Hard Disk Drive and SSD aka Solid-State Drive. The main differences between these two boils down to the price and the IO speeds, but that’s a discussion for another post. If you want to ensure that your computer performs optimally, it is crucial that your HDD/SSD performs well. In this post, we’ll outline the main ways how you can check the health of your HDD/SSD in Ubuntu 20.04.
Through the interface
With this method, you can perform the tests without much knowledge of terminal commands. You can start by opening up the “Disks” Application.
- You can either start by pressing the “window” key or by clicking on “Activities” in the upper left corner of the screen.
- When the text box for search pops up, type “Disks”, now click on the icon and launch the application.

Once the application opens up, it will list the data storage devices in your computer, as shown below. 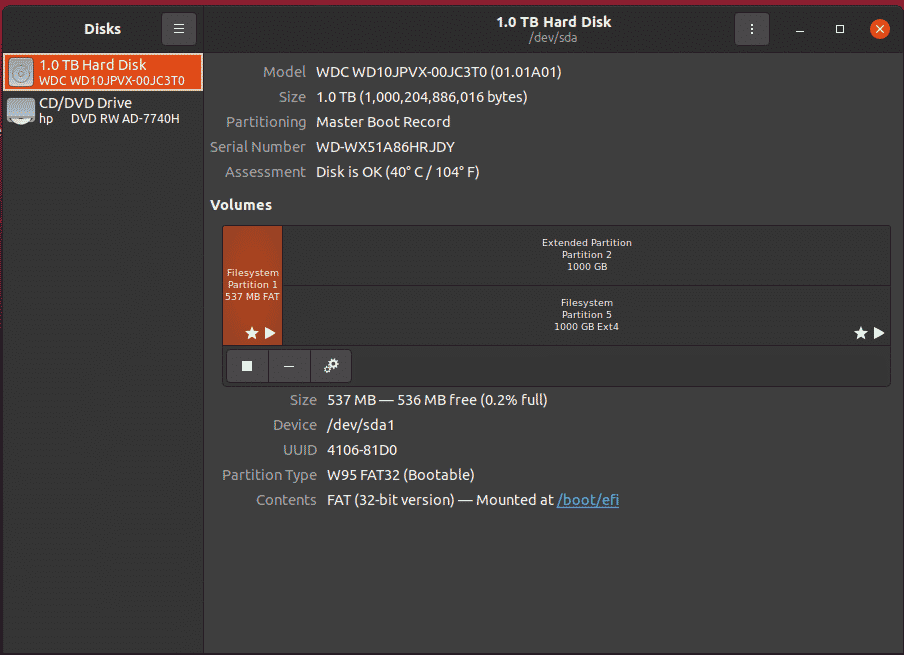
Select the HDD/SSD you want to test. Now:
- Open the options menu, it’s next to the minimize button.
- Select “SMART Data and Tests”
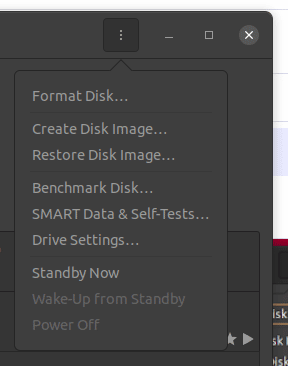
In the window that opens up, you’ll be able to see the status of your data storage device.
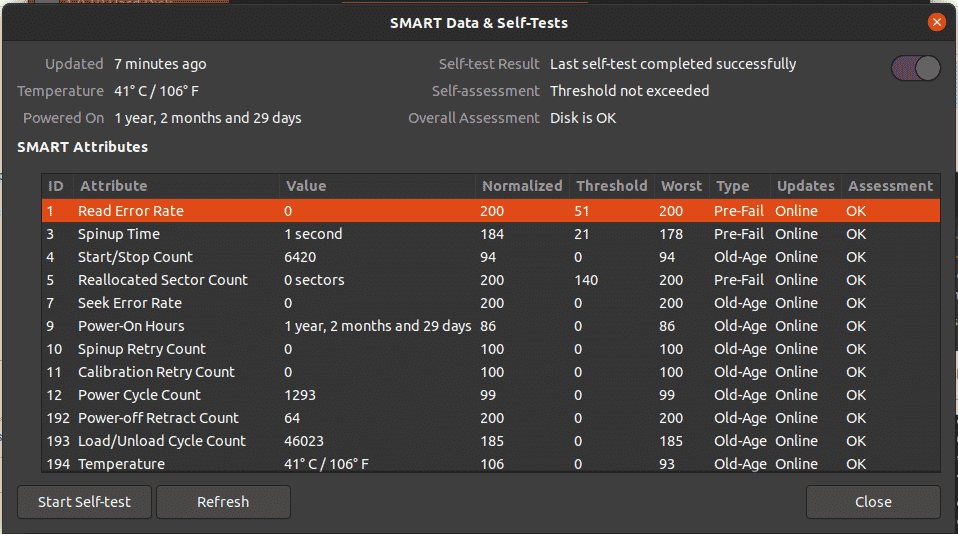
If there are multiple storage devices, you can go back to the previous window and select the other device to test it.
Through the terminal
Through the terminal, you’ll need to start by installing the SmartCtl package. In your terminal, type the following:
$sudo apt-get install smartmontools -y

Once done, you’ll need to start the service through the following command
$systemctl start smartd
Since you need the service running, you need to check the status of the service before running any tests. Type this command to check the status:
$systemctl status smartd
You’ll get an output similar to the following:
 Testing the health of your HDD/SSD

Once the service has been started, get the information of your hard drive through the following command:
$sudo smartctrl -i /dev/sda
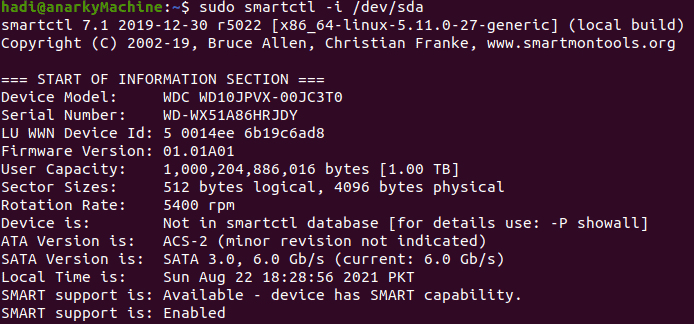
Now you can launch a short test, using the following command:
$sudo smartctl -t short -a /dev/sda
Through this short test, you’ll test the electrical and mechanical properties along with read/verify. You’ll get the following output.
Following a short testing, you can run a long test, using the following command:
$sudo smartctl -t long -a /dev/sda
Through this long test, you’ll get everything included in the short test along with much more.
If you want to inspect the overall health of your data storage device, type and run the following:
$sudo smartctl -d ata -H /dev/sda
You’ll get the following short output, and rather than stats, you’ll see if the test passed or failed.

If you want to explore all the possible options you can use with the smartctl command, you can pull it up by using the following:
$smartctl --help
You’ll get all the arguments and parameters you can mix and match to customize the tests as extensive and comprehensive as possible.

Conclusion
Throughout this post, you got to know about the multiple ways you can check the health of your Hard Disk Drives and Solid-State Drives. If you want to discuss any third-party tools, drop a comment below and let us know.

Karim Buzdar holds a degree in telecommunication engineering and holds several sysadmin certifications including CCNA RS, SCP, and ACE. As an IT engineer and technical author, he writes for various websites.
What is S.M.A.R.T.?
S.M.A.R.T. –for Self-Monitoring, Analysis, and Reporting Technology— is a technology embedded in storage devices like hard disk drives or SSDs and whose goal is to monitor their health status.
In practice, S.M.A.R.T. will monitor several disk parameters during normal drive operations, like the number of reading errors, the drive startup times or even the environmental condition. Moreover, S.M.A.R.T. and can also perform on-demand tests on the drive.
Ideally, S.M.A.R.T. would allow anticipating predictable failures such as those caused by mechanical wearing or degradation of the disk surface, as well as unpredictable failures caused by an unexpected defect. Since drives usually don’t fail abruptly, S.M.A.R.T. gives an option for the operating system or the system administrator to identify soon-to-fail drives so they can be replaced before any data loss occurs.
What isn’t S.M.A.R.T.?
All that seems wonderful. However, S.M.A.R.T. is not a crystal ball. It cannot predict with 100% accuracy a failure nor, on the other hand, guarantee a drive will not fail without any early warning. At best, S.M.A.R.T. should be used to estimate the likeliness of a failure.
Given the statistical nature of failure prediction, the S.M.A.R.T. technology particularly interests company using a large number of storage units, and field studies have been conducted to estimate the accuracy of S.M.A.R.T. reported issues to anticipate disk replacement needs in data centers or server farms.
In 2016, Microsoft and The Pennsylvania State University conducted a study focussing on SSDs.
According to that study, it appears some S.M.A.R.T. attributes are good indicators of imminent failure. The paper specifically mentions:
Reallocated (Realloc) Sector Count:
While the underlying technology is radically different, that indicator seems as significant in the SSD world than it was in the hard drive world. Worth mentioning because of wear-leveling algorithms used in SSDs, when several blocks start failing, chances are many more will fail soon.Program/Erase (P/E) fail count:
This is a symptom of a problem with the underlying flash hardware where the drive was unable to clear or store data in a block. Because of imperfections in the manufacturing process, few such errors can be anticipated. However, flash memories have a limited number of clear/write cycles. So, once again, a sudden increase in the number of events might indicate the drive has reached its end of life limit, and we can anticipate many more memory cells to fail soon.CRC and Uncorrectable errors (“Data Error”):
These events can be caused either by storage error or issues with the drive’s internal communication link. This indicator takes into account both corrected errors (thus without any issue reported to the host system) as well as uncorrected errors (thus blocks the drive has reported being unable to read to the host system). In other words, correctable errors are invisible to the host operating system, but they nevertheless impact the drive performances since data has to be corrected by the drive firmware, and a possible sector relocation might occur.SATA downshift count:
Because of temporary disturbances, issues with the communication link between the drive and the host, or because of internal drive issues, the SATA interface can switch to a lower signaling rate. Downgrading the link below the nominal link rate has the obvious impact on the observed drive performances. Selecting a lower signaling rate is not uncommon, especially on older drives. So this indicator is most significant when correlated with the presence of one or several of the preceding ones.
According to the study, 62% of the failed SSD showed at least one of the above symptoms. However, if you reverse that statement, that also means 38% of the studied SSDs failed without showing any of the above symptoms. The study did not mention though if the failed drives have exhibited any other S.M.A.R.T. reported failure or not. So this cannot be directly compared to the 36% failure-without-prior-notice mentioned for hard drives in the Google paper.
The Microsoft/Pennsylvania State University paper does not disclose the exact drive models studied, but according to the authors, most of the drives are coming from the same vendor spanning several generations.
The study noticed significant differences in reliability between the different models. For example, the “worst” model studied exhibits a 20% failure rate nine months after the first relocation error and up to 36% failure rate nine months after the first occurrence of data errors. The “worst” model also happens to be the older drive generation studied in the paper.
On the other hand, for the same symptoms, the drives belonging to the youngest generation of devices shows only 3% and 20% respectively failure rate for the same errors. It is hard to tell if those figures can be explained by improvements in the drive design and manufacturing process, or if this is simply an effect of drive aging.
Most interestingly, and I gave some possible reasons earlier, the paper mentions that, rather than the raw value, this is a sudden increase in the number of reported errors that should be considered as an alarming indicator:
“”” There is a higher likelihood of the symptoms preceding SSD failures, with an intense manifestation and rapid progression preventing their survivability beyond a few months “””
In other words, one occasional S.M.A.R.T. reported error is probably not to be considered as a signal of imminent failure. However, when a healthy SSD starts reporting more and more errors, a short- to mid-term failure has to be anticipated.
But how to know if your hard drive or SSD is healthy? Either to satisfy your curiosity or because you want to start monitoring your drives closely, it is time now to introduce the smartctl monitoring tool:
Using smartctl to Monitor Status of your SSD in Linux
There are ways to list disks in Linux but to monitor the S.M.A.R.T. status of your disk, I suggest the smartctl tool, part of the smartmontool package (at least on Debian/Ubuntu).
sudo apt install smartmontoolssmartctl is a command line tool, but this is perfect, especially if you want to automate data collection, on your servers especially.
The first step when using smartctl is to check if your disk has S.M.A.R.T. enabled and is supported by the tool:
sh$ sudo smartctl -i /dev/sdb
smartctl 6.6 2016-05-31 r4324 [x86_64-linux-4.9.0-6-amd64] (local build)
Copyright (C) 2002-16, Bruce Allen, Christian Franke, www.smartmontools.org

=== START OF INFORMATION SECTION ===
Model Family:     Seagate Momentus 7200.4
Device Model:     ST9500420AS
Serial Number:    5VJAS7FL
LU WWN Device Id: 5 000c50 02fa0b800
Firmware Version: D005SDM1
User Capacity:    500,107,862,016 bytes [500 GB]
Sector Size:      512 bytes logical/physical
Rotation Rate:    7200 rpm
Device is:        In smartctl database [for details use: -P show]
ATA Version is:   ATA8-ACS T13/1699-D revision 4
SATA Version is:  SATA 2.6, 3.0 Gb/s
Local Time is:    Mon Mar 12 15:54:43 2018 CET
SMART support is: Available - device has SMART capability.
SMART support is: Enabled
As you can see, my laptop internal hard drive indeed has S.M.A.R.T. capabilities, and S.M.A.R.T. support is enabled. So, what now about the S.MA.R.T. status? Are there some errors recorded?
Reporting “all SMART information about the disk” is the job of the -a option:
sh$ sudo smartctl -i -a /dev/sdb
smartctl 6.6 2016-05-31 r4324 [x86_64-linux-4.9.0-6-amd64] (local build)
Copyright (C) 2002-16, Bruce Allen, Christian Franke, www.smartmontools.org

=== START OF INFORMATION SECTION ===
Model Family:     Seagate Momentus 7200.4
Device Model:     ST9500420AS
Serial Number:    5VJAS7FL
LU WWN Device Id: 5 000c50 02fa0b800
Firmware Version: D005SDM1
User Capacity:    500,107,862,016 bytes [500 GB]
Sector Size:      512 bytes logical/physical
Rotation Rate:    7200 rpm
Device is:        In smartctl database [for details use: -P show]
ATA Version is:   ATA8-ACS T13/1699-D revision 4
SATA Version is:  SATA 2.6, 3.0 Gb/s
Local Time is:    Mon Mar 12 15:56:58 2018 CET
SMART support is: Available - device has SMART capability.
SMART support is: Enabled

=== START OF READ SMART DATA SECTION ===
SMART overall-health self-assessment test result: PASSED
See vendor-specific Attribute list for marginal Attributes.

General SMART Values:
Offline data collection status:  (0x82)    Offline data collection activity
                    was completed without error.
                    Auto Offline Data Collection: Enabled.
Self-test execution status:      (   0)    The previous self-test routine completed
                    without error or no self-test has ever
                    been run.
Total time to complete Offline
data collection:         (    0) seconds.
Offline data collection
capabilities:              (0x7b) SMART execute Offline immediate.
                    Auto Offline data collection on/off support.
                    Suspend Offline collection upon new
                    command.
                    Offline surface scan supported.
                    Self-test supported.
                    Conveyance Self-test supported.
                    Selective Self-test supported.
SMART capabilities:            (0x0003)    Saves SMART data before entering
                    power-saving mode.
                    Supports SMART auto save timer.
Error logging capability:        (0x01)    Error logging supported.
                    General Purpose Logging supported.
Short self-test routine
recommended polling time:      (   2) minutes.
Extended self-test routine
recommended polling time:      ( 110) minutes.
Conveyance self-test routine
recommended polling time:      (   3) minutes.
SCT capabilities:            (0x103f)    SCT Status supported.
                    SCT Error Recovery Control supported.
                    SCT Feature Control supported.
                    SCT Data Table supported.

SMART Attributes Data Structure revision number: 10
Vendor Specific SMART Attributes with Thresholds:
ID# ATTRIBUTE_NAME          FLAG     VALUE WORST THRESH TYPE      UPDATED  WHEN_FAILED RAW_VALUE
  1 Raw_Read_Error_Rate     0x000f   111   099   006    Pre-fail  Always       -       29694249
  3 Spin_Up_Time            0x0003   100   098   085    Pre-fail  Always       -       0
  4 Start_Stop_Count        0x0032   095   095   020    Old_age   Always       -       5413
  5 Reallocated_Sector_Ct   0x0033   100   100   036    Pre-fail  Always       -       3
  7 Seek_Error_Rate         0x000f   071   060   030    Pre-fail  Always       -       51710773327
  9 Power_On_Hours          0x0032   070   070   000    Old_age   Always       -       26423
 10 Spin_Retry_Count        0x0013   100   100   097    Pre-fail  Always       -       0
 12 Power_Cycle_Count       0x0032   096   037   020    Old_age   Always       -       4836
184 End-to-End_Error        0x0032   100   100   099    Old_age   Always       -       0
187 Reported_Uncorrect      0x0032   072   072   000    Old_age   Always       -       28
188 Command_Timeout         0x0032   100   096   000    Old_age   Always       -       4295033738
189 High_Fly_Writes         0x003a   100   100   000    Old_age   Always       -       0
190 Airflow_Temperature_Cel 0x0022   056   042   045    Old_age   Always   In_the_past 44 (Min/Max 21/44 #22)
191 G-Sense_Error_Rate      0x0032   100   100   000    Old_age   Always       -       184
192 Power-Off_Retract_Count 0x0032   100   100   000    Old_age   Always       -       104
193 Load_Cycle_Count        0x0032   001   001   000    Old_age   Always       -       395415
194 Temperature_Celsius     0x0022   044   058   000    Old_age   Always       -       44 (0 13 0 0 0)
195 Hardware_ECC_Recovered  0x001a   050   045   000    Old_age   Always       -       29694249
197 Current_Pending_Sector  0x0012   100   100   000    Old_age   Always       -       1
198 Offline_Uncorrectable   0x0010   100   100   000    Old_age   Offline      -       1
199 UDMA_CRC_Error_Count    0x003e   200   200   000    Old_age   Always       -       0
240 Head_Flying_Hours       0x0000   100   253   000    Old_age   Offline      -       25131 (246 202 0)
241 Total_LBAs_Written      0x0000   100   253   000    Old_age   Offline      -       3028413736
242 Total_LBAs_Read         0x0000   100   253   000    Old_age   Offline      -       1613088055
254 Free_Fall_Sensor        0x0032   100   100   000    Old_age   Always       -       0

SMART Error Log Version: 1
ATA Error Count: 3
    CR = Command Register [HEX]
    FR = Features Register [HEX]
    SC = Sector Count Register [HEX]
    SN = Sector Number Register [HEX]
    CL = Cylinder Low Register [HEX]
    CH = Cylinder High Register [HEX]
    DH = Device/Head Register [HEX]
    DC = Device Command Register [HEX]
    ER = Error register [HEX]
    ST = Status register [HEX]
Powered_Up_Time is measured from power on, and printed as
DDd+hh:mm:SS.sss where DD=days, hh=hours, mm=minutes,
SS=sec, and sss=millisec. It "wraps" after 49.710 days.

Error 3 occurred at disk power-on lifetime: 21171 hours (882 days + 3 hours)
  When the command that caused the error occurred, the device was active or idle.

  After command completion occurred, registers were:
  ER ST SC SN CL CH DH
  -- -- -- -- -- -- --
  40 51 00 ff ff ff 0f  Error: UNC at LBA = 0x0fffffff = 268435455

  Commands leading to the command that caused the error were:
  CR FR SC SN CL CH DH DC   Powered_Up_Time  Command/Feature_Name
  -- -- -- -- -- -- -- --  ----------------  --------------------
  60 00 08 ff ff ff 4f 00      00:45:12.580  READ FPDMA QUEUED
  60 00 08 ff ff ff 4f 00      00:45:12.580  READ FPDMA QUEUED
  60 00 08 ff ff ff 4f 00      00:45:12.579  READ FPDMA QUEUED
  60 00 08 ff ff ff 4f 00      00:45:12.571  READ FPDMA QUEUED
  60 00 20 ff ff ff 4f 00      00:45:12.543  READ FPDMA QUEUED

Error 2 occurred at disk power-on lifetime: 21171 hours (882 days + 3 hours)
  When the command that caused the error occurred, the device was active or idle.

  After command completion occurred, registers were:
  ER ST SC SN CL CH DH
  -- -- -- -- -- -- --
  40 51 00 ff ff ff 0f  Error: UNC at LBA = 0x0fffffff = 268435455

  Commands leading to the command that caused the error were:
  CR FR SC SN CL CH DH DC   Powered_Up_Time  Command/Feature_Name
  -- -- -- -- -- -- -- --  ----------------  --------------------
  60 00 00 ff ff ff 4f 00      00:45:09.456  READ FPDMA QUEUED
  60 00 00 ff ff ff 4f 00      00:45:09.451  READ FPDMA QUEUED
  61 00 08 ff ff ff 4f 00      00:45:09.450  WRITE FPDMA QUEUED
  60 00 00 ff ff ff 4f 00      00:45:08.878  READ FPDMA QUEUED
  60 00 00 ff ff ff 4f 00      00:45:08.856  READ FPDMA QUEUED

Error 1 occurred at disk power-on lifetime: 21131 hours (880 days + 11 hours)
  When the command that caused the error occurred, the device was active or idle.

  After command completion occurred, registers were:
  ER ST SC SN CL CH DH
  -- -- -- -- -- -- --
  40 51 00 ff ff ff 0f  Error: UNC at LBA = 0x0fffffff = 268435455

  Commands leading to the command that caused the error were:
  CR FR SC SN CL CH DH DC   Powered_Up_Time  Command/Feature_Name
  -- -- -- -- -- -- -- --  ----------------  --------------------
  60 00 00 ff ff ff 4f 00      05:52:18.809  READ FPDMA QUEUED
  61 00 00 7e fb 31 45 00      05:52:18.806  WRITE FPDMA QUEUED
  60 00 00 ff ff ff 4f 00      05:52:18.571  READ FPDMA QUEUED
  ea 00 00 00 00 00 a0 00      05:52:18.529  FLUSH CACHE EXT
  61 00 08 ff ff ff 4f 00      05:52:18.527  WRITE FPDMA QUEUED

SMART Self-test log structure revision number 1
Num  Test_Description    Status                  Remaining  LifeTime(hours)  LBA_of_first_error
# 1  Short offline       Completed without error       00%     10904         -
# 2  Short offline       Completed without error       00%        12         -
# 3  Short offline       Completed without error       00%         0         -

SMART Selective self-test log data structure revision number 1
 SPAN  MIN_LBA  MAX_LBA  CURRENT_TEST_STATUS
    1        0        0  Not_testing
    2        0        0  Not_testing
    3        0        0  Not_testing
    4        0        0  Not_testing
    5        0        0  Not_testing
Selective self-test flags (0x0):
  After scanning selected spans, do NOT read-scan remainder of disk.
If Selective self-test is pending on power-up, resume after 0 minute delay.
Understanding the output of smartctl command
That is a lot of information and it is not always easy to interpret those data. The most interesting part is probably the one labeled as “Vendor Specific SMART Attributes with Thresholds”. It reports various statistics gathered by the S.M.A.R.T. device and let you compare those value (current or all-time worst) with some vendor-defined threshold.
For example, here is how my disk reports relocated sectors:
ID# ATTRIBUTE_NAME          FLAG     VALUE WORST THRESH TYPE      UPDATED  WHEN_FAILED RAW_VALUE
  5 Reallocated_Sector_Ct   0x0033   100   100   036    Pre-fail  Always       -       3
You can see this a “pre-fail” attribute. That just means that attribute is corresponding to anomalies. So, if that attribute exceeds the threshold, that could be an indicator of imminent failure. The other category is “Old_age” for attributes corresponding to “normal wearing” attributes.
The last field (here “3”) is corresponding the raw value for that attribute as reported by the drive. Usually, this number has a physical significance. Here, this is the actual number of relocated sectors. However, for other attributes, it could be a temperature in degrees Celcius, a time in hours or minutes, or the number of times the drive has encountered a specific condition.
In addition to the raw value, a S.M.A.R.T. enabled drive must report “normalized” values (fields value, worst and threshold). These values are normalized in the range 1-254 (0-255 for the threshold). The disk firmware performs that normalization using some internal algorithm. Moreover, different manufacturers may normalize the same attribute differently. Most values are reported as a percentage, the higher being the best, but this is not mandatory. When a parameter is lower or equal to the manufacturer supplied threshold, the disk is said to have failed for that attribute. With all the reserves mentioned in the first part of that article, when a “pre-fail” attribute has failed, presumably a disk failure is imminent.
As a second example, let’s examine the “seek error rate”:
ID# ATTRIBUTE_NAME          FLAG     VALUE WORST THRESH TYPE      UPDATED  WHEN_FAILED RAW_VALUE
  7 Seek_Error_Rate         0x000f   071   060   030    Pre-fail  Always       -       51710773327
Actually, and this is a problem with S.M.A.R.T. reporting, the exact meaning of each value is vendor-specific. In my case, Seagate is using a logarithmic scale to normalize the value. So “71” means roughly one error for 10 million seeks (10 to the 7.1st power). Amusingly enough, the all-time worst was one error for 1 million seeks (10 to the 6.0th power). If I interpret that correctly, that means my disk heads are more accurately positioned now than they were in the past. I did not follow that disk closely, so this analysis is subject to caution. Maybe the drive just needed some running-in period when it was initially commissioned? Unless this is a consequence of mechanical parts wearing, and thus opposing less friction today? In any case, and whatever the reason is, this value is more a performance indicator than a failure early warning. So that does not bother me a lot.
Besides that, and three suspects errors recorded about six months ago, that drive appears in surprisingly good conditions (according to S.M.A.R.T.) for a stock laptop drive that was powered on for more than 1100 days (26423 hours):
ID# ATTRIBUTE_NAME          FLAG     VALUE WORST THRESH TYPE      UPDATED  WHEN_FAILED RAW_VALUE
  9 Power_On_Hours          0x0032   070   070   000    Old_age   Always       -       26423
Out of curiosity, I ran the same test on a much more recent laptop equipped with an SSD:
sh$ sudo smartctl -i /dev/sdb
smartctl 6.5 2016-01-24 r4214 [x86_64-linux-4.10.0-32-generic] (local build)
Copyright (C) 2002-16, Bruce Allen, Christian Franke, www.smartmontools.org

=== START OF INFORMATION SECTION ===
Device Model:     TOSHIBA THNSNK256GVN8
Serial Number:    17FS131LTNLV
LU WWN Device Id: 5 00080d 9109b2ceb
Firmware Version: K8XA4103
User Capacity:    256 060 514 304 bytes [256 GB]
Sector Sizes:     512 bytes logical, 4096 bytes physical
Rotation Rate:    Solid State Device
Form Factor:      M.2
Device is:        Not in smartctl database [for details use: -P showall]
ATA Version is:   ACS-3 (minor revision not indicated)
SATA Version is:  SATA 3.2, 6.0 Gb/s (current: 6.0 Gb/s)
Local Time is:    Tue Mar 13 01:03:23 2018 CET
SMART support is: Available - device has SMART capability.
SMART support is: Enabled
The first thing to notice, even if that device is S.M.AR.T. enabled, it is not in the smartctl database. That won’t prevent the tool to gather data from the SSD, but it will not be able to report the exact meaning of the different vendor-specific attributes:
sh$ sudo smartctl -a /dev/sdb
smartctl 6.5 2016-01-24 r4214 [x86_64-linux-4.10.0-32-generic] (local build)
Copyright (C) 2002-16, Bruce Allen, Christian Franke, www.smartmontools.org

=== START OF READ SMART DATA SECTION ===
SMART overall-health self-assessment test result: PASSED

General SMART Values:
Offline data collection status:  (0x00)    Offline data collection activity
                    was never started.
                    Auto Offline Data Collection: Disabled.
Self-test execution status:      (   0)    The previous self-test routine completed
                    without error or no self-test has ever
                    been run.
Total time to complete Offline
data collection:         (  120) seconds.
Offline data collection
capabilities:              (0x5b) SMART execute Offline immediate.
                    Auto Offline data collection on/off support.
                    Suspend Offline collection upon new
                    command.
                    Offline surface scan supported.
                    Self-test supported.
                    No Conveyance Self-test supported.
                    Selective Self-test supported.
SMART capabilities:            (0x0003)    Saves SMART data before entering
                    power-saving mode.
                    Supports SMART auto save timer.
Error logging capability:        (0x01)    Error logging supported.
                    General Purpose Logging supported.
Short self-test routine
recommended polling time:      (   2) minutes.
Extended self-test routine
recommended polling time:      (  11) minutes.
SCT capabilities:            (0x003d)    SCT Status supported.
                    SCT Error Recovery Control supported.
                    SCT Feature Control supported.
                    SCT Data Table supported.

SMART Attributes Data Structure revision number: 16
Vendor Specific SMART Attributes with Thresholds:
ID# ATTRIBUTE_NAME          FLAG     VALUE WORST THRESH TYPE      UPDATED  WHEN_FAILED RAW_VALUE
  1 Raw_Read_Error_Rate     0x000a   100   100   000    Old_age   Always       -       0
  2 Throughput_Performance  0x0005   100   100   050    Pre-fail  Offline      -       0
  3 Spin_Up_Time            0x0007   100   100   050    Pre-fail  Always       -       0
  5 Reallocated_Sector_Ct   0x0013   100   100   050    Pre-fail  Always       -       0
  7 Unknown_SSD_Attribute   0x000b   100   100   050    Pre-fail  Always       -       0
  8 Unknown_SSD_Attribute   0x0005   100   100   050    Pre-fail  Offline      -       0
  9 Power_On_Hours          0x0012   100   100   000    Old_age   Always       -       171
 10 Unknown_SSD_Attribute   0x0013   100   100   050    Pre-fail  Always       -       0
 12 Power_Cycle_Count       0x0012   100   100   000    Old_age   Always       -       105
166 Unknown_Attribute       0x0012   100   100   000    Old_age   Always       -       0
167 Unknown_Attribute       0x0022   100   100   000    Old_age   Always       -       0
168 Unknown_Attribute       0x0012   100   100   000    Old_age   Always       -       0
169 Unknown_Attribute       0x0013   100   100   010    Pre-fail  Always       -       100
170 Unknown_Attribute       0x0013   100   100   010    Pre-fail  Always       -       0
173 Unknown_Attribute       0x0012   200   200   000    Old_age   Always       -       0
175 Program_Fail_Count_Chip 0x0013   100   100   010    Pre-fail  Always       -       0
192 Power-Off_Retract_Count 0x0012   100   100   000    Old_age   Always       -       18
194 Temperature_Celsius     0x0023   063   032   020    Pre-fail  Always       -       37 (Min/Max 11/68)
197 Current_Pending_Sector  0x0012   100   100   000    Old_age   Always       -       0
240 Unknown_SSD_Attribute   0x0013   100   100   050    Pre-fail  Always       -       0

SMART Error Log Version: 1
No Errors Logged

SMART Self-test log structure revision number 1
No self-tests have been logged.  [To run self-tests, use: smartctl -t]

SMART Selective self-test log data structure revision number 1
 SPAN  MIN_LBA  MAX_LBA  CURRENT_TEST_STATUS
    1        0        0  Not_testing
    2        0        0  Not_testing
    3        0        0  Not_testing
    4        0        0  Not_testing
    5        0        0  Not_testing
Selective self-test flags (0x0):
  After scanning selected spans, do NOT read-scan remainder of disk.
If Selective self-test is pending on power-up, resume after 0 minute delay.
This is typically the output you can expect for a brand new SSD. Even if, because of the lack of normalization or metainformation for vendor-specific data, many attributes are reported as “Unknown_SSD_Attribute.” I may only hope future versions of smartctl will incorporate data relative to that particular drive model in the tool database, so I could more accurately identify possible issues.
Test your SSD in Linux with smartctl
Until now we have examined the data collected by the drive during its normal operations. However, the S.M.A.R.T. protocol also supports several “self-tests” commands to launch diagnosis on demand.
Unless explicitly requested, the self-tests can run during normal disk operations. Since both the test and the host I/O requests will compete for the drive, the disk performances will degrade during the test. The S.M.A.R.T. specification specifies several kinds of self-test. The most important are:
Short self-test (-t short)
This test will check for the electrical and mechanical performances as well as the read performances of the drive. The short self-test typically only requires few minutes to complete (2 to 10 usually).Extended self-test (-t long)
This test takes one or two orders of magnitude longer to complete. Usually, this is a more in-depth version of the short self-test. In addition, that test will scan the entire disk surface for data errors with no time limit. The test duration will be proportional to the disk size.Conveyance self-test (-t conveyance)
this test suite is designed as a relatively quick way to check for possible damage incurred during transporting of the device.
Here are examples taken from the same disks as above. I let you guess which is which:
sh$ sudo smartctl -t short /dev/sdb
smartctl 6.5 2016-01-24 r4214 [x86_64-linux-4.10.0-32-generic] (local build)
Copyright (C) 2002-16, Bruce Allen, Christian Franke, www.smartmontools.org

=== START OF OFFLINE IMMEDIATE AND SELF-TEST SECTION ===
Sending command: "Execute SMART Short self-test routine immediately in off-line mode".
Drive command "Execute SMART Short self-test routine immediately in off-line mode" successful.
Testing has begun.
Please wait 2 minutes for test to complete.
Test will complete after Mon Mar 12 18:06:17 2018

Use smartctl -X to abort test.
The test has now being stated. Let’s wait until completion to show the outcome:
sh$ sudo sh -c 'sleep 120 && smartctl -l selftest /dev/sdb'
smartctl 6.5 2016-01-24 r4214 [x86_64-linux-4.10.0-32-generic] (local build)
Copyright (C) 2002-16, Bruce Allen, Christian Franke, www.smartmontools.org

=== START OF READ SMART DATA SECTION ===
SMART Self-test log structure revision number 1
Num  Test_Description    Status                  Remaining  LifeTime(hours)  LBA_of_first_error
# 1  Short offline       Completed without error       00%       171         -
Let’s do now the same test on my other disk:
sh$ sudo smartctl -t short /dev/sdb
smartctl 6.6 2016-05-31 r4324 [x86_64-linux-4.9.0-6-amd64] (local build)
Copyright (C) 2002-16, Bruce Allen, Christian Franke, www.smartmontools.org

=== START OF OFFLINE IMMEDIATE AND SELF-TEST SECTION ===
Sending command: "Execute SMART Short self-test routine immediately in off-line mode".
Drive command "Execute SMART Short self-test routine immediately in off-line mode" successful.
Testing has begun.
Please wait 2 minutes for test to complete.
Test will complete after Mon Mar 12 21:59:39 2018

Use smartctl -X to abort test.
Once again, sleep for two minutes and display the test outcome:
sh$ sudo sh -c 'sleep 120 && smartctl -l selftest /dev/sdb'
smartctl 6.6 2016-05-31 r4324 [x86_64-linux-4.9.0-6-amd64] (local build)
Copyright (C) 2002-16, Bruce Allen, Christian Franke, www.smartmontools.org

=== START OF READ SMART DATA SECTION ===
SMART Self-test log structure revision number 1
Num  Test_Description    Status                  Remaining  LifeTime(hours)  LBA_of_first_error
# 1  Short offline       Completed without error       00%     26429         -
# 2  Short offline       Completed without error       00%     10904         -
# 3  Short offline       Completed without error       00%        12         -
# 4  Short offline       Completed without error       00%         0         -
Interestingly, in that case, it appears both the drive and the computer manufacturers seems to have performed some quick tests on the disk (at lifetime 0h and 12h). I was definitely much less concerned with monitoring the drive health myself. So, since I am running some self-tests for that article, let’s start an extended test to so how it goes:
sh$ sudo smartctl -t long /dev/sdb
smartctl 6.6 2016-05-31 r4324 [x86_64-linux-4.9.0-6-amd64] (local build)
Copyright (C) 2002-16, Bruce Allen, Christian Franke, www.smartmontools.org

=== START OF OFFLINE IMMEDIATE AND SELF-TEST SECTION ===
Sending command: "Execute SMART Extended self-test routine immediately in off-line mode".
Drive command "Execute SMART Extended self-test routine immediately in off-line mode" successful.
Testing has begun.
Please wait 110 minutes for test to complete.
Test will complete after Tue Mar 13 00:09:08 2018

Use smartctl -X to abort test.
Apparently, this time we will have to wait much longer than for the short test. So let’s do it:
sh$ sudo bash -c 'sleep $((110*60)) && smartctl -l selftest /dev/sdb'
[sudo] password for sylvain:
smartctl 6.6 2016-05-31 r4324 [x86_64-linux-4.9.0-6-amd64] (local build)
Copyright (C) 2002-16, Bruce Allen, Christian Franke, www.smartmontools.org

=== START OF READ SMART DATA SECTION ===
SMART Self-test log structure revision number 1
Num  Test_Description    Status                  Remaining  LifeTime(hours)  LBA_of_first_error
# 1  Extended offline    Completed: read failure       20%     26430         810665229
# 2  Short offline       Completed without error       00%     26429         -
# 3  Short offline       Completed without error       00%     10904         -
# 4  Short offline       Completed without error       00%        12         -
# 5  Short offline       Completed without error       00%         0         -
In that latter case, pay special attention to the different outcomes obtained with the short and extended tests, even if they were performed one right after the other. Well, maybe that disk is not that healthy after all! An important thing to notice is the test will stop after the first read error. So if you want an exhaustive diagnosis of all read errors, you will have to continue the test after each error. I encourage you to take a look at the very well written smartctl(8) manual page for the more information about the options -t select,N-max and -t select,cont for that:
sh$ sudo smartctl -t select,810665230-max /dev/sdb
smartctl 6.6 2016-05-31 r4324 [x86_64-linux-4.9.0-6-amd64] (local build)
Copyright (C) 2002-16, Bruce Allen, Christian Franke, www.smartmontools.org

=== START OF OFFLINE IMMEDIATE AND SELF-TEST SECTION ===
Sending command: "Execute SMART Selective self-test routine immediately in off-line mode".
SPAN         STARTING_LBA           ENDING_LBA
   0            810665230            976773167
Drive command "Execute SMART Selective self-test routine immediately in off-line mode" successful.
Testing has begun.
smartctl 6.6 2016-05-31 r4324 [x86_64-linux-4.9.0-6-amd64] (local build)
Copyright (C) 2002-16, Bruce Allen, Christian Franke, www.smartmontools.org
=== START OF READ SMART DATA SECTION ===
SMART Self-test log structure revision number 1
Num Test_Description Status Remaining LifeTime(hours) LBA_of_first_error
# 1 Selective offline Completed without error 00% 26432 -
# 2 Extended offline Completed: read failure 20% 26430 810665229
# 3 Short offline Completed without error 00% 26429 -
# 4 Short offline Completed without error 00% 10904 -
# 5 Short offline Completed without error 00% 12 -
# 6 Short offline Completed without error 00% 0 -Conclusion
Definitely, S.M.A.R.T. reporting is a technology you can add to your tool chest to monitor your servers disk health. In that case, you should also take a look at the S.M.A.R.T. Disk Monitoring Daemon smartd(8) that could help you automate monitoring through syslog reporting.
Given the statistical nature of failure prediction, I am a little bit less convinced however that aggressive S.M.A.R.T. monitoring is of great benefit on a personal computer. Finally, don’t forget whatever is its technology, a drive will fail— and we have seen earlier, in one-third of the case, it will fail without prior notice. So nothing will replace RAID and offline backups to ensure your data integrity!
S.M.A.R.T. (Self-Monitoring, Analysis, and Reporting Technology) is a supplementary component built into many modern storage devices through which devices monitor, store, and analyze the health of their operation. Statistics are collected (temperature, number of reallocated sectors, seek errors…) which software can use to measure the health of a device, predict possible device failure, and provide notifications on unsafe values.
Smartmontools
The smartmontools package contains two utility programs for analyzing and monitoring storage devices: smartctl and smartd. Install the smartmontools package to use these tools.
SMART support must be available and enabled on each storage device to effectively use these tools. You can use #smartctl to check for and enable SMART support. That done, you can manually #Run a test and #View test results, or you can use #smartd to automatically run tests and email notifications.
smartctl
smartctl is a command-line tool that «controls the Self-Monitoring, Analysis and Reporting Technology (SMART) system built into most ATA/SATA and SCSI/SAS hard drives and solid-state drives.»
The -i/--info option prints a variety of information about a device, including whether SMART is available and enabled:
# smartctl --info /dev/sda | grep 'SMART support is:'
SMART support is: Available - device has SMART capability.
SMART support is: Enabled
If SMART is available but not enabled, you can enable it:
# smartctl --smart=on /dev/device
You may need to specify a device type. For example, specifying --device=ata tells smartctl that the device type is ATA, and this prevents smartctl from issuing SCSI commands to that device.
Run a test
There are three types of self-tests that a device can execute (all are safe to user data):
- Short: runs tests that have a high probability of detecting device problems,
- Extended or Long: the test is the same as the short check but with no time limit and with complete disk surface examination,
- Conveyance: identifies if damage incurred during transportation of the device.
- Selective: tests a range of LBA (read smartctl(8) § t for more).
The -c/--capabilities flag prints which tests a device supports and the approximate execution time of each test. For example:
# smartctl -c /dev/sda
...
Short self-test routine
recommended polling time:        (   1) minutes.
Extended self-test routine
recommended polling time:        (  74) minutes.
Conveyance self-test routine
recommended polling time:        (   2) minutes.
...
Use -t/--test=test_name flag to run a test:
# smartctl -t short /dev/device
# smartctl -t long /dev/device
# smartctl -t conveyance /dev/device
# smartctl -t select,123+345 /dev/device
View test results
You can view a device’s overall health with the -H flag. «If the device reports failing health status, this means either that the device has already failed, or that it is predicting its own failure within the next 24 hours. If this happens […] get your data off the disk and to someplace safe as soon as you can.»
# smartctl -H /dev/device
You can also view a list of recent test results and detailed information about a device:
# smartctl -l selftest /dev/device
# smartctl -a /dev/device
Generate table with attributes of all disks
![]() This article or section needs language, wiki syntax or style improvements. See Help:Style for reference.
This article or section needs language, wiki syntax or style improvements. See Help:Style for reference.![]()
Reason: The wiki is not a code development platform. Long scripts should be maintained elsewhere. (Discuss in Talk:S.M.A.R.T.)
#!/bin/bash
function drives_csv {
	declare -A drive_values
	for d in `smartctl --scan -d scsi | cut -d' ' -f1`; do
		drive_values["-Drive-----------------"]="${drive_values[-Drive-----------------]},$d"
		for l in `smartctl -A $d | grep ATTRIBUTE_NAME -A30 | grep -v ATTRIBUTE_NAME | column -H1,3,4,5,6,7,8,9,11,12,13,14,15 -t -o, | sed 's/ //g'`; do
			key=`echo $l | cut -d',' -f1`
			value=`echo $l | cut -d',' -f2`
			existing=${drive_values["$key"]}
			drive_values["${key}"]="${existing},${value}"
			#~ echo "${key},${drive_values[$key]}"
		done
	done
	for key in "${!drive_values[@]}"; do
		echo "${key}${drive_values[$key]}"
	done | sort
}
drives_csv | column -s, -t
smartd
The smartd daemon monitors SMART statuses and emits notifications when something goes wrong. It can be managed with systemd and configured using the /etc/smartd.conf configuration file. The configuration file syntax is esoteric, and this wiki page provides only a quick reference. For more complete information, read the examples and comments within the configuration file, or read smartd.conf(5).
daemon management
To start the daemon, check its status, make it auto-start on system boot and read recent log file entries, simply start/enable the smartd.service systemd unit.
smartd respects all the usual systemctl and journalctl commands.
Define the devices to monitor
To monitor for all possible SMART errors on all disks, the following setting must be added in the configuration file.
/etc/smartd.conf
DEVICESCAN -a
Note this is the default smartd configuration and the -a parameter, which is the default parameter, may be omitted.
To monitor for all possible SMART errors on /dev/sda and /dev/sdb, and ignore all other devices:
/etc/smartd.conf
/dev/sda -a
/dev/sdb -a
To monitor for all possible SMART errors on externally connected disks (USB-backup disks spring to mind) it is prudent to tell smartd the UUID of the device since the /dev/sdX of the drive might change during a reboot.
First, you will have to get the UUID of the disk to monitor: ls -lah /dev/disk/by-uuid/ now look for the disk you want to Monitor
$ ls -lah /dev/disk/by-uuid/
lrwxrwxrwx 1 root root   9 Nov  5 22:41 820cdd8a-866a-444d-833c-1edb0f4becac -> ../../sde
lrwxrwxrwx 1 root root  10 Nov  5 22:41 b51b87f3-425e-4fe7-883f-f4ff1689189e -> ../../sdf2
lrwxrwxrwx 1 root root   9 Nov  5 22:42 ea2199dd-8f9f-4065-a7ba-71bde11a462c -> ../../sda
lrwxrwxrwx 1 root root  10 Nov  5 22:41 fe9e886a-8031-439f-a909-ad06c494fadb -> ../../sdf1
I know that my USB disk attached to /dev/sde during boot. Now to tell smartd to monitor that disk simply use the /dev/disk/by-uuid/ path.
/etc/smartd.conf
/dev/disk/by-uuid/820cdd8a-866a-444d-833c-1edb0f4becac -a
Note that you may additionally need -d removable for smartd to work.
Now your USB disk will be monitored even if the /dev/sdX path changes during reboot.
Notifying potential problems
To have an email sent when a failure or new error occurs, use the -m option:
/etc/smartd.conf
DEVICESCAN -m address@domain.com
To be able to send the email externally (i.e. not to the root mail account) a MTA (Mail Transport Agent) or a MUA (Mail User Agent) will need to be installed and configured. Common MUAs are msmtp and Postfix, but perhaps the easiest dma will suffice. Common MTAs are sendmail and Postfix. It is enough to simply configure S-nail if you do not want anything else, but you will need to follow these instructions.
The -M test option causes a test email to be sent each time the smartd daemon starts:
/etc/smartd.conf
DEVICESCAN -m address@domain.com -M test
Emails can take quite a while to be delivered. To make sure you are warned immediately if your hard drive fails, you may also define a script to be executed in addition to the email sending:
/etc/smartd.conf
DEVICESCAN -m address@domain.com -M exec /usr/local/bin/smartdnotify
To send an email and a system notification, put something like this into /usr/local/bin/smartdnotify:
#!/bin/sh
# Send email
echo "$SMARTD_MESSAGE" | mail -s "$SMARTD_FAILTYPE" "$SMARTD_ADDRESS"
# Notify user
wall "$SMARTD_MESSAGE"
If you are running a desktop environment, you might also prefer having a popup to appear on your desktop. In this case, you can use this script (replace X_user and X_userid with the user and userid running X respectively) :
/usr/local/bin/smartdnotify
#!/bin/sh

sudo -u X_user DISPLAY=:0 DBUS_SESSION_BUS_ADDRESS=unix:path=/run/user/X_userid/bus notify-send "S.M.A.R.T Error ($SMARTD_FAILTYPE)" "$SMARTD_MESSAGE" --icon=dialog-warning -u critical
This requires libnotify and a compatible desktop environment. See Desktop notifications for more details.
You can also put your custom scripts into /usr/share/smartmontools/smartd_warning.d/:
This scripts notifies every logged in users on the system via libnotify.
/usr/share/smartmontools/smartd_warning.d/smartdnotify
#!/bin/sh

IFS=$'n'
for LINE in `w -hs`
do
    USER=`echo $LINE | awk '{print $1}'`
    USER_ID=`id -u $USER`
    DISP_ID=`echo $LINE | awk '{print $8}'`
    sudo -u $USER DISPLAY=$DISP_ID DBUS_SESSION_BUS_ADDRESS=unix:path=/run/user/$USER_ID/bus notify-send "S.M.A.R.T Error ($SMARTD_FAILTYPE)" "$SMARTD_MESSAGE" --icon=dialog-warning -u critical
done
This script requires libnotify and procps-ng and a compatible desktop environment.
You can execute your custom scripts with
/etc/smartd.conf
DEVICESCAN -m @smartdnotify
Power management
If you use a computer under control of power management, you should instruct smartd how to handle disks in low power mode. Usually, in response to SMART commands issued by smartd, the disk platters are spun up. So if this option is not used, then a disk which is in a low-power mode may be spun up and put into a higher-power mode when it is periodically polled by smartd.
/etc/smartd.conf
DEVICESCAN -n standby,15,q
More info on smartmontools wiki.
On some devices the -n does not work. You get the following error message in syslog:
# journalctl -u smartd
CHECK POWER MODE: incomplete response, ATA output registers missing
Device: /dev/sdb [SAT], no ATA CHECK POWER STATUS support, ignoring -n Directive
As an alternative, you can use the -i option of smartd. It controls how often smartd spins the disks up to check their status. Default is 30 minutes. To change it, edit /etc/conf.d/smartd.
/etc/conf.d/smartd
SMARTD_ARGS="-i 10800" Check status every 10800 seconds (3 hours)
For more info see smartd(8).
Schedule self-tests
smartd can tell disks to perform self-tests on a schedule. The following /etc/smartd.conf configuration will start a short self-test every day between 2-3am, and an extended self test weekly on Saturdays between 3-4am:
/etc/smartd.conf
DEVICESCAN -s (S/../.././02|L/../../6/03)
Alert on temperature changes
smartd can track disk temperatures and alert if they rise too quickly or hit a high limit. The following will log changes of 4 degrees or more, log when temp reaches 35 degrees, and log/email a warning when temp reaches 40:
/etc/smartd.conf
DEVICESCAN -W 4,35,40
Tip:
- You can determine the current disk temperature with the command
smartctl -A /dev/device | grep Temperature_Celsius - If you have some disks that run a lot hotter/cooler than others, remove
DEVICESCANand define a separate configuration for each device with appropriate temperature settings.
Complete smartd.conf example
Putting together all of the above gives the following example configuration:
DEVICESCANsmartd scans for disks and monitors all it finds-amonitor all attributes-o onenable automatic offline data collection-S onenable automatic attribute autosave-n standby,qdo not check if disk is in standby, and suppress log message to that effect so as not to cause a write to disk-s ...schedule short and long self-tests-W ...monitor temperature-m ...mail alerts
/etc/smartd.conf
DEVICESCAN -a -o on -S on -n standby,q -s (S/../.././02|L/../../6/03) -W 4,35,40 -m username-or-email
Console applications
- skdump — utility to monitor and manage SMART devices to monitor and report hard disk drive health.
- https://0pointer.de/blog/projects/being-smart.html || libatasmart
iostat -x(from sysstat) also provides some disk health metrics: in particular, high values in the f_await column mean that the disk does not respond quickly to requests, and might be failing.
GUI applications
- DisKMonitor — Tools for KDE to monitor SMART devices and MDRaid health status.
- https://github.com/papylhomme/diskmonitor || diskmonitorAUR
- GNOME Disks — GNOME frontend which uses libatasmart to monitor and report hard disk drive health. Part of gnome.
- https://gitlab.gnome.org/GNOME/gnome-disk-utility/ || gnome-disk-utility
- GSmartControl — GUI for smartctl. It allows you to inspect the drive’s SMART data to determine its health, as well as run various tests on it.
- https://gsmartcontrol.shaduri.dev/ || gsmartcontrol
- Plasma Disks — Hard disk health monitoring for KDE Plasma. Part of plasma.
- https://invent.kde.org/plasma/plasma-disks/ || plasma-disks
See also
- Smartmontools Homepage
- Smartmontools on Ubuntu Wiki
- Gentoo: smartmontools
Проверка HDD/SSD/USB flash на бэд-блоки на Linux.
Сегодня в статье рассмотрим, как в Linux проверить ваш HDD,SSD или USB флешку на битые сектора — Бэд-блоки.
Бэд-блок (англ. bad block) — испорченный кластер (единица хранения данных) дискового носителя информации, куда нельзя записать информацию.
Проверка HDD на бэд-блоки программой badblocks.
Badblocks — стандартная утилита Linux для проверки на битые секторы. Она устанавливается по-умолчанию практически в любой дистрибутив и с ее помощью можно проверить как жесткий диск, так и внешний накопитель.
Но для начала воспользуемся ещё одной стандартной утилитой для просмотра подключенных накопители к нашей системе — fdisk.
- -l — показать список разделов и выйти.
Теперь, когда мы знаем, какие разделы у нас есть, мы можем проверить их на битые секторы программой badblocks:
- -v — вывод подробной информации о результатах проверки.
- -s — отображать в правильном порядке ход проверки блоков.
- /dev/sda1 — раздел, который мы хотим проверить на битые секторы.
- >
/badblocks.txt — выводим результат выполнения команды в файл badblocks.txt расположенный в корневом каталоги пользователя.
Если же в результате были найдены битые секторы, то нам надо дать указание операционной системе не записывать в них информацию в будущем. Для этого нам понадобятся утилиты Linux для работы с файловыми системами:
- e2fsck. Если мы будем исправлять раздел с файловыми система Linux ( ext2,ext3,ext4).
- fsck. Если мы будем исправлять файловую систему, отличную от ext.
Вводим следующие команды:
Или, если у нас файловая система не ext:
Если после ввода данных команд вы получаете что-то вроде этого:
Значит данные операции надо выполнить в командной строке до загрузки операционной системы. Для этого выполним следующее:
В конце файла дописываем следующие строки:
Теперь перезагружаем ПК:
Проверка HDD на бэд-блоки на Linux с помощью smartmontools
Теперь давайте рассмотрим более современный и надежный способ проверить диск на битые секторы linux. Современные накопители ATA/SATA ,SCSI/SAS,SSD имеют встроенную систему самоконтроля S.M.A.R.T (Self-Monitoring, Analysis and Reporting Technology, Технология самоконтроля, анализа и отчетности), которая производит мониторинг параметров накопителя и поможет определить ухудшение параметров работы накопителя на ранних стадиях. Для работы со S.M.A.R.T в Linux есть утилита smartmontools.
Давайте сначала ее установим. Если ваш дистрибутив основан на DebianUbuntu, то вводите:
Если же у Вас дистрибутив на основе RHELCentOS, то вводите:
Теперь, когда мы установили smartmontools мы можем посмотреть страницу помощи, с помощью команды:
Давайте перейдем к работе с утилитой. Вводим следующую команду с параметром -H,чтобы утилита показала нам информацию о состоянии накопителя:
Как видим, проверка диска на битые секторы linux завершена и утилита говорит нам, что с накопителем все в порядке!
Ещё одна команда, если SMART поддерживается, то добавляем -s. Если он не поддерживается или уже включён, то этот аргумент можно убрать.
Дополнительно, можно указать следующие параметры -a или —all, чтобы получить еще больше информации о накопителе, или -x и —xall, чтобы просмотреть информацию в том числе и об остальных параметрах накопителя.
Проверка HDD на бэд-блоки на Linux с помощью GParted
GParted как раз для тех, кому текстовый интерфейс не по душе. Утилита выполняет большое количество задач, связанных с работой HDD на Ubuntu и всех Debian-подобных системах. В их число входит и проверка диска на ошибки.
Для начала нам нужно скачать и установить GParted. Вводим следующую команду, чтобы выполнить загрузку из официальных репозиториев:
- Открываем приложение. На главном экране сразу же выводятся все носители. Если какой-то из них помечен восклицательным знаком, значит, с ним уже что-то не так.
- Щёлкаем по тому диску, который хотим проверить.
- Жмём на кнопку «Разделы», расположенную сверху.
- Выбираем «Проверка на ошибки».
Программа отсканирует диск. В зависимости от его объёма процесс может занять продолжительное время. После сканирования Вы будете оповещены о его результатах.
Safecopy
Это уже та программа, которую впору использовать на тонущем судне. Если мы осведомлены, что с нашим диском что-то не так, и нацелены спасти как можно больше выживших файлов, то Safecopy придёт на помощь. Её задача как раз заключается в копировании данных с повреждённых носителей. Причём она извлекает файлы даже из битых блоков.
Переносим файлы из одной директории в другую. Выбрать можно любую другую. В данном случае мы переносим данные с диска sda в папку home.
Если есть вопросы, то пишем в комментариях.
Источник
Мониторинг и проверка состояния SSD в Linux
И снова здравствуйте. Перевод следующей статьи подготовлен специально для студентов курса «Администратор Linux». Поехали!
Что такое S.M.A.R.T.?
S.M.A.R.T. (расшифровывается как Self-Monitoring, Analysis, and Reporting Technology) – это технология, вшитая в накопители, такие как жесткие диски или SSD. Ее основная задача – это мониторинг состояния.
На деле, S.M.A.R.T. контролирует несколько параметров во время обычной работы с диском. Он мониторит такие параметры как количество ошибок чтения, время запуска диска и даже состояние окружающей среды. Помимо этого, S.M.A.R.T. также может проводить тесты с использованием накопителя.
В идеале, S.M.A.R.T. позволит прогнозировать предсказуемые отказы, такие как отказы, вызванные механическим износом или ухудшением состояния поверхности диска, а также непредсказуемые отказы, вызванные каким-либо неожиданным дефектом. Поскольку обычно диски не выходят из строя внезапно, S.M.A.R.T. помогает операционной системе или системному администратору идентифицировать те диски, которые скоро выйдут из строя, чтобы их можно было заменить и избежать потери данных.
Что не относится к S.M.A.R.T.?
Все это, конечно, круто. Однако S.M.A.R.T. – это не хрустальный шар. Он не может спрогнозировать отказ со стопроцентной вероятностью и не может гарантировать, что накопитель не выйдет из строя без предупреждения. В лучшем случае S.M.A.R.T. стоит использовать для оценки вероятности поломки.
Учитывая статистический характер прогнозирования отказов, технология S.M.A.R.T. особенно интересует компании, использующие большое количество устройств для хранения данных. Чтобы выяснить, насколько точно S.M.A.R.T. может прогнозировать отказы и сообщать о необходимости замены дисков в центрах обработки данных или серверных мейнфреймах, даже проводились специальные исследования.
В 2016 году Microsoft и университет штата Пенсильвания провели исследование, связанное с SSD.
Согласно этому исследованию, некоторые атрибуты S.M.A.R.T. считаются хорошими индикаторами неизбежности отказа. В особенности в статье упоминаются:
Счетчик переназначенных (Realloc) секторов:
Несмотря на то, что основополагающие технологии радикально отличаются, этот показатель остается востребованным как в мире SSD, так и в мире жестких дисков. Стоит отметить, что из-за особенностей алгоритмов балансировки износа, используемых в SSD, когда несколько секторов выходят из строя, то с большой вероятностью можно предположить, что скоро выйдут из строя еще больше.
Ошибки в цикле Program/Erase (P/E):
Это признак проблем с основным оборудованием флеш-памяти, связанных с тем, что диск не может удалить данные из блока или сохранить их там. Дело в том, что процесс производства несовершенен, поэтому появление таких ошибок вполне можно ожидать. Однако флеш-память имеет ограниченное число циклов записи/удаления. По этой причине внезапное увеличение числа событий может сигнализировать о том, что диск достигает своего предела, и вполне ожидаемо, что другие ячейки памяти также начнут выходить из строя.
CRC и неисправимые ошибки («Data Error ”):
События такого типа могут быть вызваны ошибками хранения, либо проблемами с внутренним каналом связи накопителя. Этот индикатор учитывает как исправленные ошибки (без проблем сообщенные хост-системе), так и неисправленные ошибки (из-за которых происходит блокировка диска, сообщившего хост-системе о невозможности чтения). Другими словами, исправляемые ошибки невидимы для операционной системы, тем не менее они влияют на производительность накопителя, увеличивая вероятность переназначения сектора.
SATA downshift count:
Из-за временных помех, проблем с каналом связи между накопителем и хостом или из-за внутренних проблем с накопителем, интерфейс SATA может переключиться на более низкую скорость передачи сигналов. Снижение скорости соединения ниже номинального уровня оказывает очевидное влияние на производительность диска. Таким образом, этот показатель является наиболее значимым, в особенности, когда он коррелирует с наличием одного или нескольких предыдущих показателей.
Согласно исследованию, 62% вышедших из строя SSD показали наличие как минимум одного из вышеприведенных симптомов. С другой стороны можно сказать, что 38% изученных накопителей сломались без индикации этих симптомов. В исследованиях не упоминалось, были ли какие-то еще сообщения об отказах от S. M. A. R. T. по другим «симптомам». По этой причине нельзя напрямую сопоставить эти значения с отказом без предупреждения в 36% случаев из статьи от Google.
В исследовании Microsoft и университета штата Пенсильвания не раскрывались модели исследуемых дисков, однако, по словам авторов, большинство дисков поступают от одного и того же поставщика в течение уже нескольких поколений.
В ходе исследования также были отмечены значительные различия в надёжности между различными моделями. Например, «худшая» изученная модель показывает двадцатипроцентную частоту отказов через 9 месяцев после первой ошибки переназначения и до 36-ти процентов отказов в течение 9 месяцев после первого появления ошибок данных. «Худшей» моделью было названо более старое поколение дисков, рассматриваемых в статье.
С другой стороны, с теми же симптомами, что приведены выше, накопители нового поколения отказали в 3% и 20% в соответствии с теми же ошибками. Трудно сказать, можно ли объяснить эти цифры улучшением конструкции накопителя и производственного процесса, или здесь роль играет эффект устаревания накопителя.
Самое интересное, что упоминается в статье (я уже писал об этом ранее), так это то, что увеличение количества зарегистрированных ошибок может случить тревожным индикатором:
«Существует большая вероятность появления симптомов, предшествующих отказу SSD, которые активно себя проявляют и быстро прогрессируют, сильно сокращая время жизни накопителя до нескольких месяцев.»
Другими словами, одна случайная ошибка, о которой сообщил S.M.A.R.T., определенно не должна рассматриваться как сигнал о неизбежном отказе. Однако, когда исправный SSD начинает сообщать о все большем количестве ошибок, следует ждать краткосрочного или среднесрочного сбоя.
Но как узнать, в каком состоянии сейчас ваш SSD? Для удовлетворения своего любопытства, либо из желания начать внимательно следить за своими накопителями, вы можете использовать инструмент мониторинга smartctl .
Использование smartctl для мониторинга состояния вашего SSD в Linux
Чтобы следить за S.M.A.R.T статусом вашего диска, я предлагаю использовать инструмент smartctl , который является частью пакета smartmontool (по крайней мере на Debian/Ubuntu).
smartctl – это инструмент командной строки, но это особенно помогает в случаях, когда вам нужно автоматизировать сбор данных, например, с ваших серверов.
Первый шаг в использовании smartctl – это проверка того, есть ли на вашем диске S.M.A.R.T. и поддерживается ли он инструментом:
Как видите, мой внутренний жесткий диск ноутбука действительно поддерживает S.M.A.R.T. и он включен. Итак, как теперь получить S.M.A.R.T статус? Есть ли какие-то зафиксированные ошибки?
Выдача отчета «о всей S.M.A.R.T. информации о диске» — это опция -a :
Понимание выходных данных команд smartctl
На выходе получается много информации, которую не всегда легко понять. Наиболее интересной, вероятно, является та часть, которая помечена как “Vendor Specific SMART Attributes with Thresholds”. Она сообщает различные статистические данные, собранные S.M.A.R.T. устройством, и позволяет сравнить эти значения (текущие или худшие за все время) с некоторым порогом, определенным поставщиком.
Например, вот мои отчеты о переназначенных секторах на диске:
Вы можете заметить атрибут «Pre-fail». Он означает, что значение является аномальным. Таким образом, если значение превышает пороговое, велика вероятность сбоя. Другая категория »Old_age» используется для атрибутов, отвечающих значениям «нормального износа».
Последнее поле (здесь со значением «3») соответствует исходному значению атрибута, которое сообщает диск. Обычно это число имеет физическое значение. Здесь это фактическое количество переназначенных секторов. Для других атрибутов это может быть температура в градусах Цельсия, время в часах или минутах или количество раз, когда для диска было выполнено определенное условие.
В дополнение к исходному значению, диск с поддержкой S.M.A.R.T. должен сообщать «нормализованные значения» (значения полей, самые худшие и пороговые). Эти значения нормируются в диапазоне 1-254 (0-255 для пороговых значений). Прошивка диска выполняет эту нормализацию с помощью некоторого внутреннего алгоритма. Кроме того, разные производители могут нормализовать один и тот же атрибут по-разному. Большинство значений представлены в процентах, причем чем выше, тем лучше, но так бывает не всегда. Когда параметр ниже или равен пороговому значению, указанному производителем, диск считается неисправным в терминах этого атрибута. Помня о всех указаниях из первой части статьи, когда атрибут, показывающий ранее значение “pre-fail” все-таки дал сбой, наиболее вероятно, что скоро диск выйдет из строя.
В качестве второго примера возьмем “seek error rate”:
На самом деле (и это основная проблема отчетности S.M.A.R.T.), точное значение полей каждого атрибута понимает только поставщик. В моем случае Seagate использует логарифмическую шкалу для нормализации значения. Таким образом, «71» означает примерно одну ошибку на 10 миллионов запросов (10 в степени 7,1). Забавно, что самым худшим показателем за все время была одна ошибка на 1 миллион запросов (10 в 6-й степени).
Если я правильно понимаю, то это значит, что головки моего диска сейчас расположены точнее, чем раньше. Я не следил за этим диском внимательно, поэтому анализирую полученные данные весьма субъективно. Возможно накопитель просто надо было немного «обкатать» с тех пор как он был введен в эксплуатацию? Или может быть это следствие механического износа деталей и, следовательно, теперь имеет место меньшая сила трения? В любом случае, какова бы ни была причина, это значение является скорее показателем производительности, чем ранним предупреждением об ошибке. Так что меня оно не сильно беспокоит.
Помимо вышеприведенного и трех крайне подозрительных ошибок, записанных около шести месяцев назад, этот диск находится в удивительно хорошем состоянии (по данным S.M.A.R.T.) для стокового диска ноутбука, проработавшего более 1100 дней (26423 часа).
Из любопытства я провел этот же тест на гораздо более новом ноутбуке, оснащенном SSD:
Первое, что бросается в глаза, так это то, что несмотря на наличие S.M.A.R.T., устройства нет в базе данных smartctl . Но это не помешает инструменту собирать данные с SSD, однако он не сможет сообщить точные значения различных атрибутов, специфичных для поставщика:
Выше вы видите выходные данные абсолютно нового SSD. Данные понятны даже в случае отсутствия нормализации или метаинформации для данных конкретного поставщика, как в моем случае с “Unknown_SSD_Attribute.” Я могу только надеяться, что в последующих версиях smartctl в базе данных появятся данные об этой модели диска, и я смогу лучше определять потенциальные проблемы.
Проверьте свой SSD в Linux с помощью smartctl
До сих пор мы рассматривали данные, собранные во время нормальной работы накопителя. Однако протокол S.M.A.R.T. также поддерживает несколько команд для автономного тестирования для запуска диагностики по требованию.
Автономное тестирование может проводиться во время обычных операций с диском, если не было указано иное. Поскольку тест и запросы ввода-вывода хоста будут конкурировать, производительность диска упадет на время теста. Спецификация S.M.A.R.T. определяет несколько видов автономного тестирования:
Короткое автономное тестирование ( -t short )
Такой тест проверит электрическую и механическую, производительность, а также производительность чтения диска. Короткое автономное тестирование обычно занимает всего несколько минут (обычно от 2 до 10).
Расширенное автономное тестирование ( -t long )
Этот тест занимает почти в два раза больше времени. Как правило, это просто более детальная версия короткого автономного тестирования. Кроме того, этот тест будет сканировать всю поверхность диска на наличие ошибок данных без ограничения по времени. Продолжительность теста будет пропорциональна размеру диска.
Транспортировочное автономное тестирование ( -t conveyance )
Этот тестовый набор предложен в качестве сравнительно быстрого способа проверки на возможные повреждения, возникшие во время транспортировки устройства.
Вот примеры, взятые с тех же дисков, что были выше. Я предлагаю вам угадать, где какой:
Сейчас производится проверка. Давайте дождемся завершения, чтобы посмотреть результат:
Проведем тот же тест на другом диске:
И еще раз, отправим в сон на две минуты и посмотрим результат:
Интересно, что в этом случае мы видим, что производители диска и компьютера, похоже, уже тестировали диск (на времени жизни в 0 часов и 12 часов). Я сам определенно был гораздо менее озабочен состоянием диска, чем они. Итак, поскольку я уже показал быстрые тесты, то и расширенный тоже запущу, чтобы посмотреть как это происходит.
Судя по всему на этот раз ждать придется гораздо дольше, чем при проведении короткого теста. Так что давайте посмотрим:
В последнем тесте обратите внимание на различие в результатах, полученных с помощью короткого и расширенного теста, даже если они были выполнены один за другим. Ну, возможно, этот диск не в таком уж и хорошем состоянии! Отмечу, что тест остановился после первой ошибки чтения. Поэтому, если вы хотите получить исчерпывающую информацию обо всех ошибках чтения, вам придется продолжать тест после каждой ошибки. Я призываю вас взглянуть на одну очень хорошо написанную страницу руководства smartctl(8) для получения дополнительной информации о параметрах -t select , N-max и -t select , чтобы уметь делать так:
Источник