
During an upgrade of Debian 9 (Stretch) to 10 (Buster), the following error was seen while upgrading the libvirt-daemon-system package:
root@debian ~ # apt-get upgrade
Reading package lists… Done
Building dependency tree
Reading state information… Done
Calculating upgrade… Done
The following packages were automatically installed and are no longer required:
dh-python guile-2.0-libs libasyncns0 libbind9-140 libblas-common libboost-atomic1.67.0 libboost-filesystem1.62.0 libboost-iostreams1.62.0 libboost-random1.62.0 libboost-regex1.67.0 libboost-system1.62.0 libboost-thread1.62.0
libboost-thread1.67.0 libcaca0 libdns162 libevent-2.0-5 libflac8 libgfortran3 libhiredis0.13 libice6 libicu57 libisc160 libisccc140 libisccfg140 liblvm2app2.2 liblvm2cmd2.02 liblwres141 libogg0 libperl5.24 libpulse0
libpython3.5-minimal libpython3.5-stdlib librados2 librbd1 libsdl1.2debian libsm6 libsndfile1 libvorbis0a libvorbisenc2 libx11-xcb1 libxen-4.8 libxi6 libxtst6 linux-image-4.9.0-7-amd64 patch python-certifi python-chardet python-gi
python-idna python-ipaddr python-libvirt python-libxml2 python-pkg-resources python-requests python-six python-urllib3 python3-pyasn1 python3.5 python3.5-minimal rename sgml-base tcpd x11-common xml-core
Use ‘apt autoremove’ to remove them.
0 upgraded, 0 newly installed, 0 to remove and 0 not upgraded.
1 not fully installed or removed.
After this operation, 0 B of additional disk space will be used.
Do you want to continue? [Y/n] y
Setting up libvirt-daemon-system (5.0.0-4+deb10u1) …
virtlockd.service is a disabled or a static unit, not starting it.
Job for virtlogd-admin.socket failed.
See «systemctl status virtlogd-admin.socket» and «journalctl -xe» for details.
A dependency job for virtlogd.service failed. See ‘journalctl -xe’ for details.
invoke-rc.d: initscript virtlogd, action «start» failed.
— virtlogd.service — Virtual machine log manager
Loaded: loaded (/lib/systemd/system/virtlogd.service; indirect; vendor preset: enabled)
Active: active (running) since Wed 2021-06-30 15:25:21 CEST; 1 day 14h ago
Docs: man:virtlogd(8)
https://libvirt.org
Main PID: 28006 (virtlogd)
Tasks: 2 (limit: 4915)
Memory: 1.5M
CGroup: /system.slice/virtlogd.service
|- 28006 /usr/sbin/virtlogd
Jul 02 06:22:16 irczsrvp05 systemd[1]: Dependency failed for Virtual machine log manager.
Jul 02 06:22:16 irczsrvp05 systemd[1]: virtlogd.service: Job virtlogd.service/start failed with result ‘dependency’.
Jul 02 06:23:12 irczsrvp05 systemd[1]: Reloading Virtual machine log manager.
Jul 02 06:23:12 irczsrvp05 systemd[1]: Reloaded Virtual machine log manager.
Jul 02 06:23:15 irczsrvp05 systemd[1]: Dependency failed for Virtual machine log manager.
Jul 02 06:23:15 irczsrvp05 systemd[1]: virtlogd.service: Job virtlogd.service/start failed with result ‘dependency’.
Jul 02 06:24:57 irczsrvp05 systemd[1]: Reloading Virtual machine log manager.
Jul 02 06:24:57 irczsrvp05 systemd[1]: Reloaded Virtual machine log manager.
Jul 02 06:24:59 irczsrvp05 systemd[1]: Dependency failed for Virtual machine log manager.
Jul 02 06:24:59 irczsrvp05 systemd[1]: virtlogd.service: Job virtlogd.service/start failed with result ‘dependency’.
dpkg: error processing package libvirt-daemon-system (—configure):
installed libvirt-daemon-system package post-installation script subprocess returned error exit status 1
Errors were encountered while processing:
libvirt-daemon-system
E: Sub-process /usr/bin/dpkg returned an error code (1)
The output also shows that the virtlogd.service could not be restarted due to a dependency problem.
root@debian ~ # apt-get upgrade
Reading package lists… Done
Building dependency tree
Reading state information… Done
Calculating upgrade… Done
The following packages were automatically installed and are no longer required:
dh-python guile-2.0-libs libasyncns0 libbind9-140 libblas-common libboost-atomic1.67.0 libboost-filesystem1.62.0 libboost-iostreams1.62.0 libboost-random1.62.0 libboost-regex1.67.0 libboost-system1.62.0 libboost-thread1.62.0
libboost-thread1.67.0 libcaca0 libdns162 libevent-2.0-5 libflac8 libgfortran3 libhiredis0.13 libice6 libicu57 libisc160 libisccc140 libisccfg140 liblvm2app2.2 liblvm2cmd2.02 liblwres141 libogg0 libperl5.24 libpulse0
libpython3.5-minimal libpython3.5-stdlib librados2 librbd1 libsdl1.2debian libsm6 libsndfile1 libvorbis0a libvorbisenc2 libx11-xcb1 libxen-4.8 libxi6 libxtst6 linux-image-4.9.0-7-amd64 patch python-certifi python-chardet python-gi
python-idna python-ipaddr python-libvirt python-libxml2 python-pkg-resources python-requests python-six python-urllib3 python3-pyasn1 python3.5 python3.5-minimal rename sgml-base tcpd x11-common xml-core
Use ‘apt autoremove’ to remove them.
0 upgraded, 0 newly installed, 0 to remove and 0 not upgraded.
1 not fully installed or removed.
After this operation, 0 B of additional disk space will be used.
Do you want to continue? [Y/n] y
Setting up libvirt-daemon-system (5.0.0-4+deb10u1) …
virtlockd.service is a disabled or a static unit, not starting it.
No comments yet.
Для управления виртуальными машинам, работающими под управлением систем виртуализации KVM и Xen можно использовать программу с графическим интерфейсом, которая называется Virt-manager. Программа использует демон libvirt, установленный на компьютере с системой виртуализации. Для подключения Virt-manager к демону libvirt можно использовать SSH, что довольно удобно и безопасно. Как правило, демон SSH бывает уже установлен на компьютерах, доступных по сети, поэтому не нужно заботиться о настройке отдельного сетевого демона. Плюс к тому, SSH поддерживает аутентификацию пользователей и надёжное шифрование передаваемых данных.
Настройка демона libvirt для управления виртуальными машинами под управлением KVM (на примере Debian Stretch)
Проверим наличие аппаратной поддержки виртуализации:
$ egrep -c '(vmx|svm)' /proc/cpuinfo
Устанавливаем систему виртуализации qemu с поддержкой KVM и демон libvirt для управления виртуальными машинами, работающими под управлением KVM:
# apt-get install qemu-kvm libvirt-daemon-system
Добавляем пользователя, от имени которого будем заходить на сервер по SSH, в группу libvirt, чтобы он имел доступ к управлению виртуальными машинами:
# usermod -aG libvirt stupin
Пользователь получит доступ к Unix-сокету /var/run/libvirt/libvirt-sock
Установим netcat из OpenBSD, поддерживающий опцию -U для подключения к Unix-сокету. Это нужно для перенаправления подключения от SSH-клиента в Unix-сокет libvirt:
# apt-get install netcat-openbsd
Осталось включить и запустить демона:
# systemctl enable libvirtd
# systemctl start libvirtd
Настройка демона libvirt для управления виртуальными машинами под управлением Xen (на примере Debian Wheezy)
В моём случае Xen был развёрнут в операционной системе Debian Wheezy, где пакет с демоном libvirt называется libvirt-bin. Установим его:
# apt-get install libvirt-bin
Теперь, чтобы пользователь, от имени которого мы будем подключаться по SSH к серверу виртуализации, смог подключиться к демону libvirtd, нужно добавить его в группу libvirt:
# usermod -aG libvirt stupin
Пользователь получит доступ к Unix-сокету /var/run/libvirt/libvirt-sock
Для того, чтобы демон libvirt смог работать с системой виртуализации Xen, нужно включить HTTP-сервер, встроенный в xend. Демон libvirt будет выполнять роль посредника, транслируя входящие запросы в запросы к xend.
Настроим HTTP-сервер, ожидающий подключений на порту 8000 и адресе 127.0.0.1. Для этого нужно прописать в файл /etc/xen/xend-config.sxp следующие опции:
(xend-http-server yes)
(xend-address localhost)
(xend-port 8000)
Чтобы настройки xend вступили в силу, нужно перезапустить его (пример для Debian Wheezy):
# /etc/init.d/xen restart
Будьте осторожны — в конфигурации по умолчанию при перезапуске демона xend перезапускаются также и все виртуальные машины. Чтобы избежать этого, нужно при создании виртуальной машины прописать в её конфигурацию такие настройки:
on_xend_start = 'ignore'
on_xend_stop = 'ignore'
У меня эти настройки были прописаны в каждой виртуальной машине, поэтому я перезапускал xend без опасений.
Установка и использование Virt-manager
Устанавливаем на компьютере администратора пакет с GUI-интерфейсом для управления виртуальными машинами:
# apt-get install virt-manager
Теперь можно попробовать сделать то, ради чего всё и затевалось: подключиться к системе виртуализации из программы virt-manager. Ниже приведены снимки экрана, иллюстрирующие этот процесс.
Запуск virt-manager:

Добавление нового подключения:

Добавление нового подключения:
Новое подключение к системе виртуализации Xen:

Настройки удалённого подключения к системе виртуализации Xen через SSH:
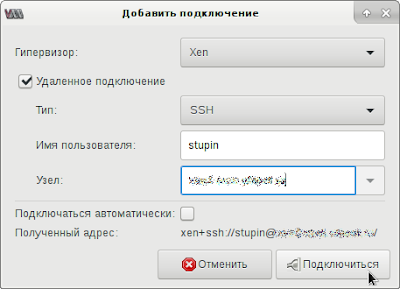
Настройки удалённого подключения к системе виртуализации Xen через SSH:
Подключение к системе виртуализации установлено, виден список виртуальных машин:

Теперь можно подключаться к консоли виртуальной машины и менять её настройки.
Типичные проблемы
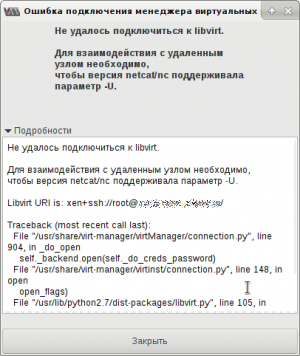
Не установлен пакет netcat-openbsd
Не удалось подключиться к libvirt.
Для взаимодействия с удалённым узлом необходимо, чтобы версия netcat/nc поддерживала параметр -U.
Теперь можно подключаться к консоли виртуальной машины и менять её настройки.
Типичные проблемы
Не установлен пакет netcat-openbsd
Не удалось подключиться к libvirt.
Для взаимодействия с удалённым узлом необходимо, чтобы версия netcat/nc поддерживала параметр -U.
Не установлен пакет libvirt-bin или libvirt-daemon-system
Не удалось подключиться к libvirt.
End of file while reading data: nc: unix connect failed: No such file or directory: Ошибка ввода/вывода
Убедитесь, что на удалённом узле запущен libvirtd.

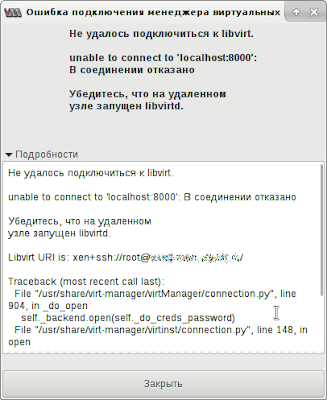
Не настроен HTTP-сервер xend
Не удалось подключиться к libvirt.
unable to connect to ‘localhost:8000’: В соединении отказано
Убедитесь, что на удалённом узле запущен libvirtd.
Не настроен HTTP-сервер xend
Не удалось подключиться к libvirt.
unable to connect to ‘localhost:8000’: В соединении отказано
Убедитесь, что на удалённом узле запущен libvirtd.
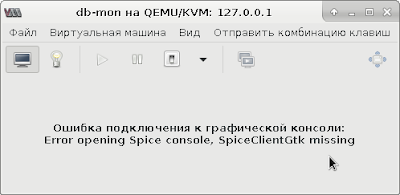
Не установлен пакет gir1.2-spice-client-gtk-3.0
Ошибка подключения к графической консоли:
Error opening Spice console, SpiceClientGtk missing
TLDR;
On Ubuntu 20.04.1, I am trying to run VM’s using KVM. After installing the required packages, I still get below error:
sudo systemctl status libvirtd
Unit libvirtd.service could not be found.
The below is what I have done —
a) check kvm support
$ sudo kvm-ok
INFO: /dev/kvm exists
KVM acceleration can be used
b) install required packages
$ sudo apt install -y qemu qemu-kvm libvirt-daemon libvirt-clients bridge-utils virt-manager
Now, the above should be everything and I must be able to open the virt-manager gui and get going and the libvertd service should have been started already. But, there is no libvirtd service running on my machine still and there is no libvirtd.service unit installed.
And obviously, The virt-manager is not able to connect to the demon so the below errors —
After doing $ sudo virt-manager —> the virt-manager GUI starts with root permissions.

Clearly the window says —
The libvirtd service does not appear to be installed. Install and run
the libvirtd service to manage virtualization on this host.
And obviously, no VM creation is feasible and below is the error on attempting for same.
Reference — How to Install KVM on Ubuntu 20.04
Note: This issue is not duplicate with — KVM Virt-Manager Error: No active connection to Install on
(one answer here ask to install — libvirt-bin , but this packages does not exist in the repo.
$ apt list  libvirt-bin
Listing... Done
Hardware: This attempt is on Quad-Core, Intel CPU Laptop.
Edit — Following the comment from ajgringo619, i could solve the libvirtd.service issue. But other issues still persist.
Below is also posted as seperate Q @ Warning: KVM kernal modules are not loaded. Your VM may perform poorly?
This is the lsmod output —
$ sudo lsmod | grep kvm
kvm_intel             282624  0
kvm                   663552  1 kvm_intel
Should I ignore the warning, is the performance really gonna be poor??
Установка:
Для установки libvirt-daemon-system в Ubuntu / Linux Mint / Debian, введите в Терминал:
sudo apt update
sudo apt install libvirt-daemon-system

TLDR;
On Ubuntu 20.04.1, I am trying to run VM’s using KVM. After installing the required packages, I still get below error:
sudo systemctl status libvirtd
Unit libvirtd.service could not be found.
The below is what I have done —
a) check kvm support
$ sudo kvm-ok
INFO: /dev/kvm exists
KVM acceleration can be used
b) install required packages
$ sudo apt install -y qemu qemu-kvm libvirt-daemon libvirt-clients bridge-utils virt-manager
Now, the above should be everything and I must be able to open the virt-manager gui and get going and the libvertd service should have been started already. But, there is no libvirtd service running on my machine still and there is no libvirtd.service unit installed.
And obviously, The virt-manager is not able to connect to the demon so the below errors —
After doing $ sudo virt-manager —> the virt-manager GUI starts with root permissions.
Clearly the window says —
The libvirtd service does not appear to be installed. Install and run
the libvirtd service to manage virtualization on this host.
And obviously, no VM creation is feasible and below is the error on attempting for same.
Reference — How to Install KVM on Ubuntu 20.04
Note: This issue is not duplicate with — KVM Virt-Manager Error: No active connection to Install on
(one answer here ask to install — libvirt-bin , but this packages does not exist in the repo.
$ apt list  libvirt-bin
Listing... Done
Hardware: This attempt is on Quad-Core, Intel CPU Laptop.
Edit — Following the comment from ajgringo619, i could solve the libvirtd.service issue. But other issues still persist.
Below is also posted as seperate Q @ Warning: KVM kernal modules are not loaded. Your VM may perform poorly?
This is the lsmod output —
$ sudo lsmod | grep kvm
kvm_intel             282624  0
kvm                   663552  1 kvm_intel
Should I ignore the warning, is the performance really gonna be poor??
Установка:
Для установки libvirt-daemon-system в Ubuntu / Linux Mint / Debian, введите в Терминал:
sudo apt update
sudo apt install libvirt-daemon-system
Подробная информация о пакете:
Файлы конфигурации Libvirt daemon
-
Зависимости:
-
init-system-helpers
Вспомогательные инструменты для всех систем init
-
adduser
Добавлять и удалять пользователей и группы
-
debconf
Система управления конфигурацией Debian
-
gettext-base
Утилиты интернационализации GNU для базовой системы
-
iptables
Средства администрирования для фильтрации пакетов и NAT
-
firewalld
Динамически управляемый брандмауэр с поддержкой сетевых зон
-
libc6
Библиотека GNU C: общие библиотеки
-
libgcc1
Библиотека поддержки GCC
-
libvirt-clients
Программы для библиотеки libvirt
-
libvirt-daemon
Демон виртуализации
-
libvirt0
Библиотека для взаимодействия с различными системами виртуализации
-
libxml2
Библиотека XML GNOME
-
logrotate
Утилита вращения журнала
-
lsb-base
Функциональность базового сценария Linux Standard Base
-
policykit-1
Структура для управления политиками администрирования и привилегиями
-
debconf-2.0
1) безопасно ли спрашивать у кого то на форуме какую команду ввести в терминале?
Всё зависит от того, что вы покажете и что сообщите.
Например администаторы серверов Линукс, в своё время показали через трафик пароли от серверов. Трафик был перехвачен, а сервера взломаны.
2) почему это должно быть опасно, если программа ставилась из вашего репозитория и после ввода рут пароля?
Потому что ошибки в программах никто не отменял. А ошибки безопасности тем более. Программист, заявивший, что его программа готова и безопасна на 100%, или глупец, или дурак. И иногда трудно понять, с чем граничит ошибка, с невнимательностью, с равнодушием, с ляпом или с разгильдяйством.
Например одна из ошибок обнаруженных в Линукс, с точки зрения спектрумиста, была просто грандиозным ляпом. Но на столько опасным, что в своё время мне пришлось срочно обновить группу пакетов из сизифа, где ошибка была закрыта.
3) станет ли программа безопаснее после того как пользователь её всё равно запустит, узнав как запустить на форуме?
Программа станет безопаснее, когда обнаружат и закроют ошибки в безопасности. Но не стоит забывать, что аудитор безопасности, удовольствие не из дешёвых. Также не стоит забывать, что новый код, это новые ошибки. И есть большая разница между LTS и программой в самой свежей версии. Само название Линукс, не делает систему безопасной. Безопасной и надёжной её делает человек. Но тот же человек (абстрактно), может быть тем самым фактором, в растущем количестве ошибок в системе.
«Главная опасность для пользователя это его безграмотность.»
на глупость и безграмотность тоже надо рассчитывать
 Больше 20-ти лет назад, на платформе Спектрум говорили:
Идеальной «защиты от дурака» не существует в природе.
Глупость и безграмотность, похожа на обезьяну с гранатой, — никогда не можешь предугадать её действия и чем это закончится.
Skip to navigation
Skip to main content

Infrastructure and Management
- Red Hat Enterprise Linux
- Red Hat Virtualization
- Red Hat Identity Management
- Red Hat Directory Server
- Red Hat Certificate System
- Red Hat Satellite
- Red Hat Subscription Management
- Red Hat Update Infrastructure
- Red Hat Insights
- Red Hat Ansible Automation Platform
Cloud Computing
- Red Hat OpenShift
- Red Hat CloudForms
- Red Hat OpenStack Platform
- Red Hat OpenShift Container Platform
- Red Hat OpenShift Data Science
- Red Hat OpenShift Online
- Red Hat OpenShift Dedicated
- Red Hat Advanced Cluster Security for Kubernetes
- Red Hat Advanced Cluster Management for Kubernetes
- Red Hat Quay
- OpenShift Dev Spaces
- Red Hat OpenShift Service on AWS
Storage
- Red Hat Gluster Storage
- Red Hat Hyperconverged Infrastructure
- Red Hat Ceph Storage
- Red Hat OpenShift Data Foundation
Runtimes
- Red Hat Runtimes
- Red Hat JBoss Enterprise Application Platform
- Red Hat Data Grid
- Red Hat JBoss Web Server
- Red Hat Single Sign On
- Red Hat support for Spring Boot
- Red Hat build of Node.js
- Red Hat build of Thorntail
- Red Hat build of Eclipse Vert.x
- Red Hat build of OpenJDK
- Red Hat build of Quarkus
Integration and Automation
- Red Hat Process Automation
- Red Hat Process Automation Manager
- Red Hat Decision Manager
All Products
This appendix documents common libvirt-related problems and errors along with instructions for dealing with them.
Locate the error on the table below and follow the corresponding link under Solution for detailed troubleshooting information.
Table A.1. Common libvirt errors
| Error | Description of problem | Solution |
|---|---|---|
libvirtd failed to start |
The libvirt daemon failed to start. However, there is no information about this error in /var/log/messages. |
Section A.19.1, “libvirtd failed to start” |
Cannot read CA certificate |
This is one of several errors that occur when the URI fails to connect to the hypervisor. | Section A.19.2, “The URI Failed to Connect to the Hypervisor” |
| Other connectivity errors | These are other errors that occur when the URI fails to connect to the hypervisor. | Section A.19.2, “The URI Failed to Connect to the Hypervisor” |
| PXE boot (or DHCP) on guest failed | A guest virtual machine starts successfully, but is unable to acquire an IP address from DHCP, boot using the PXE protocol, or both. This is often a result of a long forward delay time set for the bridge, or when the iptables package and kernel do not support checksum mangling rules. | Section A.19.3, “PXE Boot (or DHCP) on Guest Failed” |
| Guest can reach outside network, but cannot reach host when using macvtap interface |
A guest can communicate with other guests, but cannot connect to the host machine after being configured to use a macvtap (or This is actually not an error — it is the defined behavior of macvtap. |
Section A.19.4, “Guest Can Reach Outside Network, but Cannot Reach Host When Using macvtap interface” |
Could not add rule to fixup DHCP response checksums on network 'default' |
This warning message is almost always harmless, but is often mistakenly seen as evidence of a problem. | Section A.19.5, “Could not add rule to fixup DHCP response checksums on network ‘default’” |
Unable to add bridge br0 port vnet0: No such device |
This error message or the similar Failed to add tap interface to bridge 'br0': No such device reveal that the bridge device specified in the guest’s (or domain’s) <interface> definition does not exist. |
Section A.19.6, “Unable to add bridge br0 port vnet0: No such device” |
Unable to resolve address name_of_host service '49155': Name or service not known |
QEMU guest migration fails and this error message appears with an unfamiliar host name. | Section A.19.7, “Migration Fails with error: unable to resolve address” |
Unable to allow access for disk path /var/lib/libvirt/images/qemu.img: No such file or directory |
A guest virtual machine cannot be migrated because libvirt cannot access the disk image(s). | Section A.19.8, “Migration Fails with Unable to allow access for disk path: No such file or directory” |
| No guest virtual machines are present when libvirtd is started | The libvirt daemon is successfully started, but no guest virtual machines appear to be present when running virsh list --all. |
Section A.19.9, “No Guest Virtual Machines are Present when libvirtd is Started” |
| Common XML errors | libvirt uses XML documents to store structured data. Several common errors occur with XML documents when they are passed to libvirt through the API. This entry provides instructions for editing guest XML definitions, and details common errors in XML syntax and configuration. | Section A.19.10, “Common XML Errors” |
A.19.1. libvirtd failed to start
- Symptom
-
The libvirt daemon does not start automatically. Starting the libvirt daemon manually fails as well:
#
systemctl start libvirtd.service* Caching service dependencies ... [ ok ] * Starting libvirtd ... /usr/sbin/libvirtd: error: Unable to initialize network sockets. Check /var/log/messages or run without --daemon for more info. * start-stop-daemon: failed to start `/usr/sbin/libvirtd' [ !! ] * ERROR: libvirtd failed to startMoreover, there is not
'more info'about this error in/var/log/messages. - Investigation
-
Change libvirt’s logging in
/etc/libvirt/libvirtd.confby enabling the line below. To enable the setting the line, open the/etc/libvirt/libvirtd.conffile in a text editor, remove the hash (or#) symbol from the beginning of the following line, and save the change:log_outputs="3:syslog:libvirtd"
This line is commented out by default to prevent libvirt from producing excessive log messages. After diagnosing the problem, it is recommended to comment this line again in the
/etc/libvirt/libvirtd.conffile.Restart libvirt to determine if this has solved the problem.
If
libvirtdstill does not start successfully, an error similar to the following will be printed:#
systemctl restart libvirtdJob for libvirtd.service failed because the control process exited with error code. See "systemctl status libvirtd.service" and "journalctl -xe" for details. Sep 19 16:06:02 jsrh libvirtd[30708]: 2017-09-19 14:06:02.097+0000: 30708: info : libvirt version: 3.7.0, package: 1.el7 (Unknown, 2017-09-06-09:01:55, js Sep 19 16:06:02 jsrh libvirtd[30708]: 2017-09-19 14:06:02.097+0000: 30708: info : hostname: jsrh Sep 19 16:06:02 jsrh libvirtd[30708]: 2017-09-19 14:06:02.097+0000: 30708: error : daemonSetupNetworking:502 : unsupported configuration: No server certif Sep 19 16:06:02 jsrh systemd[1]: libvirtd.service: main process exited, code=exited, status=6/NOTCONFIGURED Sep 19 16:06:02 jsrh systemd[1]: Failed to start Virtualization daemon. -- Subject: Unit libvirtd.service has failed -- Defined-By: systemd -- Support: http://lists.freedesktop.org/mailman/listinfo/systemd-devel -- -- Unit libvirtd.service has failed. -- -- The result is failed.The libvirtd man page shows that the missing
cacert.pemfile is used as TLS authority when libvirt is run inListen for TCP/IP connectionsmode. This means the--listenparameter is being passed. - Solution
-
Configure the libvirt daemon’s settings with one of the following methods:
-
Install a CA certificate.
-
Do not use TLS; use bare TCP instead. In
/etc/libvirt/libvirtd.confsetlisten_tls = 0andlisten_tcp = 1. The default values arelisten_tls = 1andlisten_tcp = 0. -
Do not pass the
--listenparameter. In/etc/sysconfig/libvirtd.confchange theLIBVIRTD_ARGSvariable.
-
A.19.2. The URI Failed to Connect to the Hypervisor
Several different errors can occur when connecting to the server (for example, when running virsh).
A.19.2.1. Cannot read CA certificate
- Symptom
-
When running a command, the following error (or similar) appears:
$
virsh -c qemu://$hostname/system_listerror: failed to connect to the hypervisor error: Cannot read CA certificate '/etc/pki/CA/cacert.pem': No such file or directory - Investigation
-
The error message is misleading about the actual cause. This error can be caused by a variety of factors, such as an incorrectly specified URI, or a connection that is not configured.
- Solution
-
- Incorrectly specified URI
-
When specifying
qemu://systemorqemu://sessionas a connection URI,virshattempts to connect to host names’systemorsessionrespectively. This is becausevirshrecognizes the text after the second forward slash as the host.Use three forward slashes to connect to the local host. For example, specifying
qemu:///systeminstructsvirshconnect to thesysteminstance of libvirtd on the local host.When a host name is specified, the QEMU transport defaults to
TLS. This results in certificates. - Connection is not configured
-
The URI is correct (for example,
qemu[+tls]://server/system) but the certificates are not set up properly on your machine. For information on configuring TLS, see the upstream libvirt website.
A.19.2.2. unable to connect to server at ‘host:16509’: Connection refused
- Symptom
-
While libvirtd should listen on TCP ports for connections, the connections fail:
#
virsh -c qemu+tcp://host/systemerror: failed to connect to the hypervisor error: unable to connect to server at 'host:16509': Connection refusedThe libvirt daemon is not listening on TCP ports even after changing configuration in
/etc/libvirt/libvirtd.conf:#
grep listen_ /etc/libvirt/libvirtd.conflisten_tls = 1 listen_tcp = 1 listen_addr = "0.0.0.0"However, the TCP ports for libvirt are still not open after changing configuration:
#
netstat -lntp | grep libvirtd# - Investigation
-
The libvirt daemon was started without the
--listenoption. Verify this by running this command:#
ps aux | grep libvirtdroot 10749 0.1 0.2 558276 18280 ? Ssl 23:21 0:00 /usr/sbin/libvirtdThe output does not contain the
--listenoption. - Solution
-
Start the daemon with the
--listenoption.To do this, modify the
/etc/sysconfig/libvirtdfile and uncomment the following line:# LIBVIRTD_ARGS="--listen"
Then, restart the libvirtd service with this command:
#
/bin/systemctl restart libvirtd.service
A.19.2.3. Authentication Failed
- Symptom
-
When running a command, the following error (or similar) appears:
$
virsh -c qemu://$hostname/system_listerror: failed to connect to the hypervisor error: authentication failed: authentication failed - Investigation
-
If authentication fails even when the correct credentials are used, it is possible that the SASL authentication is not configured.
- Solution
-
-
Edit the
/etc/libvirt/libvirtd.conffile and set the value of theauth_tcpparameter tosasl. To verify:#
cat /etc/libvirt/libvirtd.conf | grep auth_tcpauth_tcp = "sasl" -
Edit the
/etc/sasl2/libvirt.conffile and add the following lines to the file:mech_list: digest-md5 sasldb_path: /etc/libvirt/passwd.db
-
Ensure the cyrus-sasl-md5 package is installed:
#
yum install cyrus-sasl-md5 -
Restart the
libvirtdservice:#
systemctl restart libvirtd -
Set a user name and password for libvirt SASL:
#
saslpasswd2 -a libvirt 1
-
A.19.2.4. Permission Denied
- Symptom
-
When running a
virshcommand as a non-root user, the following error (or similar) appears:$
virsh -c qemu://$hostname/system_listerror: Failed to connect socket to '/var/run/libvirt/libvirt-sock': Permission denied error: failed to connect to the hypervisor - Solution
-
-
Edit the
/etc/libvirt/libvirt.conffile and add the following lines to the file:#unix_sock_group = "libvirt" #unix_sock_ro_perms = "0777" #unix_sock_rw_perms = "0770"
-
Restart the
libvirtdservice:#
systemctl restart libvirtd
-
A.19.3. PXE Boot (or DHCP) on Guest Failed
- Symptom
-
A guest virtual machine starts successfully, but is then either unable to acquire an IP address from DHCP or boot using the PXE protocol, or both. There are two common causes of this error: having a long forward delay time set for the bridge, and when the iptables package and kernel do not support checksum mangling rules.
- Long forward delay time on bridge
-
- Investigation
-
This is the most common cause of this error. If the guest network interface is connecting to a bridge device that has STP (Spanning Tree Protocol) enabled, as well as a long forward delay set, the bridge will not forward network packets from the guest virtual machine onto the bridge until at least that number of forward delay seconds have elapsed since the guest connected to the bridge. This delay allows the bridge time to watch traffic from the interface and determine the MAC addresses behind it, and prevent forwarding loops in the network topology.
If the forward delay is longer than the timeout of the guest’s PXE or DHCP client, the client’s operation will fail, and the guest will either fail to boot (in the case of PXE) or fail to acquire an IP address (in the case of DHCP).
- Solution
-
If this is the case, change the forward delay on the bridge to 0, disable STP on the bridge, or both.
This solution applies only if the bridge is not used to connect multiple networks, but just to connect multiple endpoints to a single network (the most common use case for bridges used by libvirt).
If the guest has interfaces connecting to a libvirt-managed virtual network, edit the definition for the network, and restart it. For example, edit the default network with the following command:
#
virsh net-edit defaultAdd the following attributes to the
<bridge>element:<name_of_bridge='virbr0'
delay='0' stp='on'/>delay='0'andstp='on'are the default settings for virtual networks, so this step is only necessary if the configuration has been modified from the default.If the guest interface is connected to a host bridge that was configured outside of libvirt, change the delay setting.
Add or edit the following lines in the
/etc/sysconfig/network-scripts/ifcfg-name_of_bridgefile to turn STP on with a 0 second delay:STP=on DELAY=0
After changing the configuration file, restart the bridge device:
/usr/sbin/ifdown name_of_bridge
/usr/sbin/ifup name_of_bridge
If name_of_bridge is not the root bridge in the network, that bridge’s delay will be eventually reset to the delay time configured for the root bridge. To prevent this from occurring, disable STP on name_of_bridge.
- The iptables package and kernel do not support checksum mangling rules
-
- Investigation
-
This message is only a problem if all four of the following conditions are true:
-
The guest is using virtio network devices.
If so, the configuration file will contain
model type='virtio' -
The host has the
vhost-netmodule loaded.This is true if
ls/dev/vhost-net -
The guest is attempting to get an IP address from a DHCP server that is running directly on the host.
-
The iptables version on the host is older than 1.4.10.
iptables 1.4.10 was the first version to add the
libxt_CHECKSUMextension. This is the case if the following message appears in the libvirtd logs:warning: Could not add rule to fixup DHCP response checksums on network default warning: May need to update iptables package and kernel to support CHECKSUM rule.
Unless all of the other three conditions in this list are also true, the above warning message can be disregarded, and is not an indicator of any other problems.
When these conditions occur, UDP packets sent from the host to the guest have uncomputed checksums. This makes the host’s UDP packets seem invalid to the guest’s network stack.
-
- Solution
-
To solve this problem, invalidate any of the four points above. The best solution is to update the host iptables and kernel to iptables-1.4.10 or newer where possible. Otherwise, the most specific fix is to disable the
vhost-netdriver for this particular guest. To do this, edit the guest configuration with this command:virsh edit name_of_guest
Change or add a
<driver>line to the<interface>section:<interface type='network'> <model type='virtio'/> <driver name='qemu'/> ... </interface>
Save the changes, shut down the guest, and then restart it.
If this problem is still not resolved, the issue may be due to a conflict between firewalld and the default libvirt network.
To fix this, stop firewalld with the
service firewalld stopcommand, then restart libvirt with theservice libvirtd restartcommand.
In addition, if the
/etc/sysconfig/network-scripts/ifcfg-network_namefile is configured correctly, you can ensure that the guest acquires an IP address by using thedhclientcommand as root on the guest.
A.19.4. Guest Can Reach Outside Network, but Cannot Reach Host When Using macvtap interface
- Symptom
-
A guest virtual machine can communicate with other guests, but cannot connect to the host machine after being configured to use a macvtap (also known as
type='direct') network interface. - Investigation
-
Even when not connecting to a Virtual Ethernet Port Aggregator (VEPA) or VN-Link capable switch, macvtap interfaces can be useful. Setting the mode of such an interface to
bridgeallows the guest to be directly connected to the physical network in a very simple manner without the setup issues (or NetworkManager incompatibility) that can accompany the use of a traditional host bridge device.However, when a guest virtual machine is configured to use a
type='direct'network interface such as macvtap, despite having the ability to communicate with other guests and other external hosts on the network, the guest cannot communicate with its own host.This situation is actually not an error — it is the defined behavior of macvtap. Due to the way in which the host’s physical Ethernet is attached to the macvtap bridge, traffic into that bridge from the guests that is forwarded to the physical interface cannot be bounced back up to the host’s IP stack. Additionally, traffic from the host’s IP stack that is sent to the physical interface cannot be bounced back up to the macvtap bridge for forwarding to the guests.
- Solution
-
Use libvirt to create an isolated network, and create a second interface for each guest virtual machine that is connected to this network. The host and guests can then directly communicate over this isolated network, while also maintaining compatibility with NetworkManager.
Procedure A.8. Creating an isolated network with libvirt
-
Add and save the following XML in the
/tmp/isolated.xmlfile. If the 192.168.254.0/24 network is already in use elsewhere on your network, you can choose a different network.... <network> <name>isolated</name> <ip address='192.168.254.1' netmask='255.255.255.0'> <dhcp> <range start='192.168.254.2' end='192.168.254.254'/> </dhcp> </ip> </network> ...Figure A.3. Isolated Network XML
-
Create the network with this command:
virsh net-define /tmp/isolated.xml -
Set the network to autostart with the
virsh net-autostart isolatedcommand. -
Start the network with the
virsh net-start isolatedcommand. -
Using
virsh edit name_of_guest, edit the configuration of each guest that uses macvtap for its network connection and add a new<interface>in the<devices>section similar to the following (note the<model type='virtio'/>line is optional to include):... <interface type='network' trustGuestRxFilters='yes'> <source network='isolated'/> <model type='virtio'/> </interface>
Figure A.4. Interface Device XML
-
Shut down, then restart each of these guests.
The guests are now able to reach the host at the address 192.168.254.1, and the host will be able to reach the guests at the IP address they acquired from DHCP (alternatively, you can manually configure the IP addresses for the guests). Since this new network is isolated to only the host and guests, all other communication from the guests will use the macvtap interface. For more information, see Section 23.17.8, “Network Interfaces”.
-
A.19.5. Could not add rule to fixup DHCP response checksums on network ‘default’
- Symptom
-
This message appears:
Could not add rule to fixup DHCP response checksums on network 'default'
- Investigation
-
Although this message appears to be evidence of an error, it is almost always harmless.
- Solution
-
Unless the problem you are experiencing is that the guest virtual machines are unable to acquire IP addresses through DHCP, this message can be ignored.
A.19.6. Unable to add bridge br0 port vnet0: No such device
- Symptom
-
The following error message appears:
Unable to add bridge name_of_bridge port vnet0: No such device
For example, if the bridge name is br0, the error message appears as:
Unable to add bridge br0 port vnet0: No such device
In libvirt versions 0.9.6 and earlier, the same error appears as:
Failed to add tap interface to bridge name_of_bridge: No such device
Or for example, if the bridge is named br0:
Failed to add tap interface to bridge 'br0': No such device
- Investigation
-
Both error messages reveal that the bridge device specified in the guest’s (or domain’s)
<interface>definition does not exist.To verify the bridge device listed in the error message does not exist, use the shell command
ip addr show br0.A message similar to this confirms the host has no bridge by that name:
br0: error fetching interface information: Device not found
If this is the case, continue to the solution.
However, if the resulting message is similar to the following, the issue exists elsewhere:
br0 Link encap:Ethernet HWaddr 00:00:5A:11:70:48 inet addr:10.22.1.5 Bcast:10.255.255.255 Mask:255.0.0.0 UP BROADCAST RUNNING MULTICAST MTU:1500 Metric:1 RX packets:249841 errors:0 dropped:0 overruns:0 frame:0 TX packets:281948 errors:0 dropped:0 overruns:0 carrier:0 collisions:0 txqueuelen:0 RX bytes:106327234 (101.4 MiB) TX bytes:21182634 (20.2 MiB) - Solution
-
- Edit the existing bridge or create a new bridge with
virsh -
Use
virshto either edit the settings of an existing bridge or network, or to add the bridge device to the host system configuration.- Edit the existing bridge settings using
virsh -
Use
virsh edit name_of_guestto change the<interface>definition to use a bridge or network that already exists.For example, change
type='bridge'totype='network', and<source bridge='br0'/>to<source network='default'/>. - Create a host bridge using
virsh -
For libvirt version 0.9.8 and later, a bridge device can be created with the
virsh iface-bridgecommand. This creates a bridge device br0 witheth0, the physical network interface that is set as part of a bridge, attached:virsh iface-bridge eth0 br0
Optional: If needed, remove this bridge and restore the original
eth0configuration with this command:virsh iface-unbridge br0
- Edit the existing bridge settings using
- Create a host bridge manually
- Edit the existing bridge or create a new bridge with
A.19.7. Migration Fails with error: unable to resolve address
- Symptom
-
QEMU guest migration fails and this error message appears:
#
virsh migrate qemu qemu+tcp://192.168.122.12/systemerror: Unable to resolve address name_of_host service '49155': Name or service not knownFor example, if the destination host name is
newyork, the error message appears as:#
virsh migrate qemu qemu+tcp://192.168.122.12/systemerror: Unable to resolve address 'newyork' service '49155': Name or service not knownHowever, this error looks strange as we did not use
newyorkhost name anywhere. - Investigation
-
During migration, libvirtd running on the destination host creates a URI from an address and port where it expects to receive migration data and sends it back to libvirtd running on the source host.
In this case, the destination host (
192.168.122.12) has its name set to ‘newyork’. For some reason, libvirtd running on that host is unable to resolve the name to an IP address that could be sent back and still be useful. For this reason, it returned the ‘newyork’ host name hoping the source libvirtd would be more successful with resolving the name. This can happen if DNS is not properly configured or/etc/hostshas the host name associated with local loopback address (127.0.0.1).Note that the address used for migration data cannot be automatically determined from the address used for connecting to destination libvirtd (for example, from
qemu+tcp://192.168.122.12/system). This is because to communicate with the destination libvirtd, the source libvirtd may need to use network infrastructure different from the type that virsh (possibly running on a separate machine) requires. - Solution
-
The best solution is to configure DNS correctly so that all hosts involved in migration are able to resolve all host names.
If DNS cannot be configured to do this, a list of every host used for migration can be added manually to the
/etc/hostsfile on each of the hosts. However, it is difficult to keep such lists consistent in a dynamic environment.If the host names cannot be made resolvable by any means,
virsh migratesupports specifying the migration host:#
virsh migrate qemu qemu+tcp://192.168.122.12/system tcp://192.168.122.12Destination libvirtd will take the
tcp://192.168.122.12URI and append an automatically generated port number. If this is not desirable (because of firewall configuration, for example), the port number can be specified in this command:#
virsh migrate qemu qemu+tcp://192.168.122.12/system tcp://192.168.122.12:12345Another option is to use tunneled migration. Tunneled migration does not create a separate connection for migration data, but instead tunnels the data through the connection used for communication with destination libvirtd (for example,
qemu+tcp://192.168.122.12/system):#
virsh migrate qemu qemu+tcp://192.168.122.12/system --p2p --tunnelled
A.19.8. Migration Fails with Unable to allow access for disk path: No such file or directory
- Symptom
-
A guest virtual machine (or domain) cannot be migrated because libvirt cannot access the disk image(s):
#
virsh migrate qemu qemu+tcp://name_of_host/systemerror: Unable to allow access for disk path /var/lib/libvirt/images/qemu.img: No such file or directoryFor example, if the destination host name is
newyork, the error message appears as:#
virsh migrate qemu qemu+tcp://newyork/systemerror: Unable to allow access for disk path /var/lib/libvirt/images/qemu.img: No such file or directory - Investigation
-
By default, migration only transfers the in-memory state of a running guest (such as memory or CPU state). Although disk images are not transferred during migration, they need to remain accessible at the same path by both hosts.
- Solution
-
Set up and mount shared storage at the same location on both hosts. The simplest way to do this is to use NFS:
Procedure A.9. Setting up shared storage
-
Set up an NFS server on a host serving as shared storage. The NFS server can be one of the hosts involved in the migration, as long as all hosts involved are accessing the shared storage through NFS.
#
mkdir -p /exports/images#cat >>/etc/exports <<EOF/exports/images 192.168.122.0/24(rw,no_root_squash) EOF -
Mount the exported directory at a common location on all hosts running libvirt. For example, if the IP address of the NFS server is 192.168.122.1, mount the directory with the following commands:
#
cat >>/etc/fstab <<EOF192.168.122.1:/exports/images /var/lib/libvirt/images nfs auto 0 0 EOF #mount /var/lib/libvirt/images
It is not possible to export a local directory from one host using NFS and mount it at the same path on another host — the directory used for storing disk images must be mounted from shared storage on both hosts. If this is not configured correctly, the guest virtual machine may lose access to its disk images during migration, because the source host’s libvirt daemon may change the owner, permissions, and SELinux labels on the disk images after it successfully migrates the guest to its destination.
If libvirt detects that the disk images are mounted from a shared storage location, it will not make these changes.
-
A.19.9. No Guest Virtual Machines are Present when libvirtd is Started
- Symptom
-
The libvirt daemon is successfully started, but no guest virtual machines appear to be present.
#
virsh list --allId Name State ---------------------------------------------------- - Investigation
-
There are various possible causes of this problem. Performing these tests will help to determine the cause of this situation:
- Verify KVM kernel modules
-
Verify that KVM kernel modules are inserted in the kernel:
#
lsmod | grep kvmkvm_intel 121346 0 kvm 328927 1 kvm_intelIf you are using an AMD machine, verify the
kvm_amdkernel modules are inserted in the kernel instead, using the similar commandlsmod | grep kvm_amdin the root shell.If the modules are not present, insert them using the
modprobe <modulename>command.Although it is uncommon, KVM virtualization support may be compiled into the kernel. In this case, modules are not needed.
- Verify virtualization extensions
-
Verify that virtualization extensions are supported and enabled on the host:
#
egrep "(vmx|svm)" /proc/cpuinfoflags : fpu vme de pse tsc ... svm ... skinit wdt npt lbrv svm_lock nrip_save flags : fpu vme de pse tsc ... svm ... skinit wdt npt lbrv svm_lock nrip_saveEnable virtualization extensions in your hardware’s firmware configuration within the BIOS setup. See your hardware documentation for further details on this.
- Verify client URI configuration
-
Verify that the URI of the client is configured as intended:
#
virsh urivbox:///systemFor example, this message shows the URI is connected to the VirtualBox hypervisor, not QEMU, and reveals a configuration error for a URI that is otherwise set to connect to a QEMU hypervisor. If the URI was correctly connecting to QEMU, the same message would appear instead as:
#
virsh uriqemu:///systemThis situation occurs when there are other hypervisors present, which libvirt may speak to by default.
- Solution
-
After performing these tests, use the following command to view a list of guest virtual machines:
#
virsh list --all
A.19.10. Common XML Errors
The libvirt tool uses XML documents to store structured data. A variety of common errors occur with XML documents when they are passed to libvirt through the API. Several common XML errors — including erroneous XML tags, inappropriate values, and missing elements — are detailed below.
A.19.10.1. Editing domain definition
Although it is not recommended, it is sometimes necessary to edit a guest virtual machine’s (or a domain’s) XML file manually. To access the guest’s XML for editing, use the following command:
# virsh edit name_of_guest.xml
This command opens the file in a text editor with the current definition of the guest virtual machine. After finishing the edits and saving the changes, the XML is reloaded and parsed by libvirt. If the XML is correct, the following message is displayed:
# virsh edit name_of_guest.xml

Domain name_of_guest.xml XML configuration edited.
When using the edit command in virsh to edit an XML document, save all changes before exiting the editor.
After saving the XML file, use the xmllint command to validate that the XML is well-formed, or the virt-xml-validate command to check for usage problems:
# xmllint --noout config.xml
# virt-xml-validate config.xml
If no errors are returned, the XML description is well-formed and matches the libvirt schema. While the schema does not catch all constraints, fixing any reported errors will further troubleshooting.
- XML documents stored by libvirt
-
These documents contain definitions of states and configurations for the guests. These documents are automatically generated and should not be edited manually. Errors in these documents contain the file name of the broken document. The file name is valid only on the host machine defined by the URI, which may see the machine the command was run on.
Errors in files created by libvirt are rare. However, one possible source of these errors is a downgrade of libvirt — while newer versions of libvirt can always read XML generated by older versions, older versions of libvirt may be confused by XML elements added in a newer version.
A.19.10.2. XML syntax errors
Syntax errors are caught by the XML parser. The error message contains information for identifying the problem.
This example error message from the XML parser consists of three lines — the first line denotes the error message, and the two following lines contain the context and location of the XML code containing the error. The third line contains an indicator showing approximately where the error lies on the line above it:
error: (name_of_guest.xml):6: StartTag: invalid element name
<vcpu>2</vcpu><
-----------------^
- Information contained in this message:
-
- (name_of_guest.xml)
-
This is the file name of the document that contains the error. File names in parentheses are symbolic names to describe XML documents parsed from memory, and do not directly correspond to files on disk. File names that are not contained in parentheses are local files that reside on the target of the connection.
- 6
-
This is the line number in the XML file that contains the error.
- StartTag: invalid element name
-
This is the error message from the libxml2 parser, which describes the specific XML error.
A.19.10.2.1. Stray < in the document
- Symptom
-
The following error occurs:
error: (name_of_guest.xml):6: StartTag: invalid element name
<vcpu>2</vcpu><
-----------------^
- Investigation
-
This error message shows that the parser expects a new element name after the
<symbol on line 6 of a guest’s XML file.Ensure line number display is enabled in your text editor. Open the XML file, and locate the text on line 6:
<domain type='kvm'>
   <name>name_of_guest</name>
<memory>524288</memory>
<vcpu>2</vcpu><
This snippet of a guest’s XML file contains an extra
<in the document: - Solution
-
Remove the extra
<or finish the new element.
A.19.10.2.2. Unterminated attribute
- Symptom
-
The following error occurs:
error: (name_of_guest.xml):2: Unescaped '<' not allowed in attributes values
<name>name_of_guest</name>
--^
- Investigation
-
This snippet of a guest’s XML file contains an unterminated element attribute value:
<domain type='kvm>
<name>name_of_guest</name>
In this case,
'kvm'is missing a second quotation mark. Attribute values must be opened and closed with quotation marks or apostrophes, similar to XML start and end tags. - Solution
-
Correctly open and close all attribute value strings.
A.19.10.2.3. Opening and ending tag mismatch
- Symptom
-
The following error occurs:
error: (name_of_guest.xml):61: Opening and ending tag mismatch: clock line 16 and domain
</domain>
---------^
- Investigation
-
The error message above contains three clues to identify the offending tag:
The message following the last colon,
clock line 16 and domain, reveals that<clock>contains a mismatched tag on line 16 of the document. The last hint is the pointer in the context part of the message, which identifies the second offending tag.Unpaired tags must be closed with
/>. The following snippet does not follow this rule and has produced the error message shown above:<domain type='kvm'> ... <clock offset='utc'>This error is caused by mismatched XML tags in the file. Every XML tag must have a matching start and end tag.
- Other examples of mismatched XML tags
-
The following examples produce similar error messages and show variations of mismatched XML tags.
This snippet contains an mismatch error for
<features>because there is no end tag (</name>):<domain type='kvm'> ... <features> <acpi/> <pae/> ... </domain>
This snippet contains an end tag (
</name>) without a corresponding start tag:<domain type='kvm'> </name> ... </domain>
- Solution
-
Ensure all XML tags start and end correctly.
A.19.10.3. Logic and configuration errors
A well-formatted XML document can contain errors that are correct in syntax but libvirt cannot parse. Many of these errors exist, with two of the most common cases outlined below.
A.19.10.3.1. Vanishing parts
- Symptom
-
Parts of the change you have made do not show up and have no effect after editing or defining the domain. The
defineoreditcommand works, but when dumping the XML once again, the change disappears. - Investigation
-
This error likely results from a broken construct or syntax that libvirt does not parse. The libvirt tool will generally only look for constructs it knows but ignore everything else, resulting in some of the XML changes vanishing after libvirt parses the input.
- Solution
-
Validate the XML input before passing it to the
editordefinecommands. The libvirt developers maintain a set of XML schemas bundled with libvirt that define the majority of the constructs allowed in XML documents used by libvirt.Validate libvirt XML files using the following command:
#
virt-xml-validate libvirt.xmlIf this command passes, libvirt will likely understand all constructs from your XML, except if the schemas cannot detect options that are valid only for a given hypervisor. For example, any XML generated by libvirt as a result of a
virsh dumpcommand should validate without error.
A.19.10.3.2. Incorrect drive device type
- Symptom
-
The definition of the source image for the CD-ROM virtual drive is not present, despite being added:
#
virsh dumpxml domain<domain type='kvm'> ... <disk type='block' device='cdrom'> <driver name='qemu' type='raw'/> <target dev='hdc' bus='ide'/> <readonly/> </disk> ... </domain> - Solution
-
Correct the XML by adding the missing
<source>parameter as follows:<disk type='block' device='cdrom'> <driver name='qemu' type='raw'/> <source file='/path/to/image.iso'/> <target dev='hdc' bus='ide'/> <readonly/> </disk>
A
type='block'disk device expects that the source is a physical device. To use the disk with an image file, usetype='file'instead.
1) безопасно ли спрашивать у кого то на форуме какую команду ввести в терминале?
Всё зависит от того, что вы покажете и что сообщите.
Например администаторы серверов Линукс, в своё время показали через трафик пароли от серверов. Трафик был перехвачен, а сервера взломаны.
2) почему это должно быть опасно, если программа ставилась из вашего репозитория и после ввода рут пароля?
Потому что ошибки в программах никто не отменял. А ошибки безопасности тем более. Программист, заявивший, что его программа готова и безопасна на 100%, или глупец, или дурак. И иногда трудно понять, с чем граничит ошибка, с невнимательностью, с равнодушием, с ляпом или с разгильдяйством.
Например одна из ошибок обнаруженных в Линукс, с точки зрения спектрумиста, была просто грандиозным ляпом. Но на столько опасным, что в своё время мне пришлось срочно обновить группу пакетов из сизифа, где ошибка была закрыта.
3) станет ли программа безопаснее после того как пользователь её всё равно запустит, узнав как запустить на форуме?
Программа станет безопаснее, когда обнаружат и закроют ошибки в безопасности. Но не стоит забывать, что аудитор безопасности, удовольствие не из дешёвых. Также не стоит забывать, что новый код, это новые ошибки. И есть большая разница между LTS и программой в самой свежей версии. Само название Линукс, не делает систему безопасной. Безопасной и надёжной её делает человек. Но тот же человек (абстрактно), может быть тем самым фактором, в растущем количестве ошибок в системе.
«Главная опасность для пользователя это его безграмотность.»
на глупость и безграмотность тоже надо рассчитывать
Больше 20-ти лет назад, на платформе Спектрум говорили:
Идеальной «защиты от дурака» не существует в природе.
Глупость и безграмотность, похожа на обезьяну с гранатой, — никогда не можешь предугадать её действия и чем это закончится.
Skip to navigation
Skip to main content
Infrastructure and Management
- Red Hat Enterprise Linux
- Red Hat Satellite
- Red Hat Subscription Management
- Red Hat Insights
- Red Hat Ansible Automation Platform
Cloud Computing
- Red Hat OpenShift
- Red Hat OpenStack Platform
- Red Hat OpenShift Container Platform
- Red Hat OpenShift Data Science
- Red Hat OpenShift Dedicated
- Red Hat Advanced Cluster Security for Kubernetes
- Red Hat Advanced Cluster Management for Kubernetes
- Red Hat Quay
- OpenShift Dev Spaces
- Red Hat OpenShift Service on AWS
Storage
- Red Hat Gluster Storage
- Red Hat Hyperconverged Infrastructure
- Red Hat Ceph Storage
- Red Hat OpenShift Data Foundation
Runtimes
- Red Hat Runtimes
- Red Hat JBoss Enterprise Application Platform
- Red Hat Data Grid
- Red Hat JBoss Web Server
- Red Hat Single Sign On
- Red Hat support for Spring Boot
- Red Hat build of Node.js
- Red Hat build of Quarkus
Integration and Automation
All Products
This appendix documents common libvirt-related problems and errors along with instructions for dealing with them.
Locate the error on the table below and follow the corresponding link under Solution for detailed troubleshooting information.
Table A.1. Common libvirt errors
| Error | Description of problem | Solution |
|---|---|---|
libvirtd failed to start |
The libvirt daemon failed to start. However, there is no information about this error in /var/log/messages. |
Section A.19.1, “libvirtd failed to start” |
Cannot read CA certificate |
This is one of several errors that occur when the URI fails to connect to the hypervisor. | Section A.19.2, “The URI Failed to Connect to the Hypervisor” |
| Other connectivity errors | These are other errors that occur when the URI fails to connect to the hypervisor. | Section A.19.2, “The URI Failed to Connect to the Hypervisor” |
| PXE boot (or DHCP) on guest failed | A guest virtual machine starts successfully, but is unable to acquire an IP address from DHCP, boot using the PXE protocol, or both. This is often a result of a long forward delay time set for the bridge, or when the iptables package and kernel do not support checksum mangling rules. | Section A.19.3, “PXE Boot (or DHCP) on Guest Failed” |
| Guest can reach outside network, but cannot reach host when using macvtap interface |
A guest can communicate with other guests, but cannot connect to the host machine after being configured to use a macvtap (or This is actually not an error — it is the defined behavior of macvtap. |
Section A.19.4, “Guest Can Reach Outside Network, but Cannot Reach Host When Using macvtap interface” |
Could not add rule to fixup DHCP response checksums on network 'default' |
This warning message is almost always harmless, but is often mistakenly seen as evidence of a problem. | Section A.19.5, “Could not add rule to fixup DHCP response checksums on network ‘default’” |
Unable to add bridge br0 port vnet0: No such device |
This error message or the similar Failed to add tap interface to bridge 'br0': No such device reveal that the bridge device specified in the guest’s (or domain’s) <interface> definition does not exist. |
Section A.19.6, “Unable to add bridge br0 port vnet0: No such device” |
Unable to resolve address name_of_host service '49155': Name or service not known |
QEMU guest migration fails and this error message appears with an unfamiliar host name. | Section A.19.7, “Migration Fails with error: unable to resolve address” |
Unable to allow access for disk path /var/lib/libvirt/images/qemu.img: No such file or directory |
A guest virtual machine cannot be migrated because libvirt cannot access the disk image(s). | Section A.19.8, “Migration Fails with Unable to allow access for disk path: No such file or directory” |
| No guest virtual machines are present when libvirtd is started | The libvirt daemon is successfully started, but no guest virtual machines appear to be present when running virsh list --all. |
Section A.19.9, “No Guest Virtual Machines are Present when libvirtd is Started” |
| Common XML errors | libvirt uses XML documents to store structured data. Several common errors occur with XML documents when they are passed to libvirt through the API. This entry provides instructions for editing guest XML definitions, and details common errors in XML syntax and configuration. | Section A.19.10, “Common XML Errors” |
A.19.1. libvirtd failed to start
- Symptom
-
The libvirt daemon does not start automatically. Starting the libvirt daemon manually fails as well:
#
systemctl start libvirtd.service* Caching service dependencies ... [ ok ] * Starting libvirtd ... /usr/sbin/libvirtd: error: Unable to initialize network sockets. Check /var/log/messages or run without --daemon for more info. * start-stop-daemon: failed to start `/usr/sbin/libvirtd' [ !! ] * ERROR: libvirtd failed to startMoreover, there is not
'more info'about this error in/var/log/messages. - Investigation
-
Change libvirt’s logging in
/etc/libvirt/libvirtd.confby enabling the line below. To enable the setting the line, open the/etc/libvirt/libvirtd.conffile in a text editor, remove the hash (or#) symbol from the beginning of the following line, and save the change:log_outputs="3:syslog:libvirtd"
This line is commented out by default to prevent libvirt from producing excessive log messages. After diagnosing the problem, it is recommended to comment this line again in the
/etc/libvirt/libvirtd.conffile.Restart libvirt to determine if this has solved the problem.
If
libvirtdstill does not start successfully, an error similar to the following will be printed:#
systemctl restart libvirtdJob for libvirtd.service failed because the control process exited with error code. See "systemctl status libvirtd.service" and "journalctl -xe" for details. Sep 19 16:06:02 jsrh libvirtd[30708]: 2017-09-19 14:06:02.097+0000: 30708: info : libvirt version: 3.7.0, package: 1.el7 (Unknown, 2017-09-06-09:01:55, js Sep 19 16:06:02 jsrh libvirtd[30708]: 2017-09-19 14:06:02.097+0000: 30708: info : hostname: jsrh Sep 19 16:06:02 jsrh libvirtd[30708]: 2017-09-19 14:06:02.097+0000: 30708: error : daemonSetupNetworking:502 : unsupported configuration: No server certif Sep 19 16:06:02 jsrh systemd[1]: libvirtd.service: main process exited, code=exited, status=6/NOTCONFIGURED Sep 19 16:06:02 jsrh systemd[1]: Failed to start Virtualization daemon. -- Subject: Unit libvirtd.service has failed -- Defined-By: systemd -- Support: http://lists.freedesktop.org/mailman/listinfo/systemd-devel -- -- Unit libvirtd.service has failed. -- -- The result is failed.The libvirtd man page shows that the missing
cacert.pemfile is used as TLS authority when libvirt is run inListen for TCP/IP connectionsmode. This means the--listenparameter is being passed. - Solution
-
Configure the libvirt daemon’s settings with one of the following methods:
-
Install a CA certificate.
-
Do not use TLS; use bare TCP instead. In
/etc/libvirt/libvirtd.confsetlisten_tls = 0andlisten_tcp = 1. The default values arelisten_tls = 1andlisten_tcp = 0. -
Do not pass the
--listenparameter. In/etc/sysconfig/libvirtd.confchange theLIBVIRTD_ARGSvariable.
-
A.19.2. The URI Failed to Connect to the Hypervisor
Several different errors can occur when connecting to the server (for example, when running virsh).
A.19.2.1. Cannot read CA certificate
- Symptom
-
When running a command, the following error (or similar) appears:
$
virsh -c qemu://$hostname/system_listerror: failed to connect to the hypervisor error: Cannot read CA certificate '/etc/pki/CA/cacert.pem': No such file or directory - Investigation
-
The error message is misleading about the actual cause. This error can be caused by a variety of factors, such as an incorrectly specified URI, or a connection that is not configured.
- Solution
-
- Incorrectly specified URI
-
When specifying
qemu://systemorqemu://sessionas a connection URI,virshattempts to connect to host names’systemorsessionrespectively. This is becausevirshrecognizes the text after the second forward slash as the host.Use three forward slashes to connect to the local host. For example, specifying
qemu:///systeminstructsvirshconnect to thesysteminstance of libvirtd on the local host.When a host name is specified, the QEMU transport defaults to
TLS. This results in certificates. - Connection is not configured
-
The URI is correct (for example,
qemu[+tls]://server/system) but the certificates are not set up properly on your machine. For information on configuring TLS, see the upstream libvirt website.
A.19.2.2. unable to connect to server at ‘host:16509’: Connection refused
- Symptom
-
While libvirtd should listen on TCP ports for connections, the connections fail:
#
virsh -c qemu+tcp://host/systemerror: failed to connect to the hypervisor error: unable to connect to server at 'host:16509': Connection refusedThe libvirt daemon is not listening on TCP ports even after changing configuration in
/etc/libvirt/libvirtd.conf:#
grep listen_ /etc/libvirt/libvirtd.conflisten_tls = 1 listen_tcp = 1 listen_addr = "0.0.0.0"However, the TCP ports for libvirt are still not open after changing configuration:
#
netstat -lntp | grep libvirtd# - Investigation
-
The libvirt daemon was started without the
--listenoption. Verify this by running this command:#
ps aux | grep libvirtdroot 10749 0.1 0.2 558276 18280 ? Ssl 23:21 0:00 /usr/sbin/libvirtdThe output does not contain the
--listenoption. - Solution
-
Start the daemon with the
--listenoption.To do this, modify the
/etc/sysconfig/libvirtdfile and uncomment the following line:# LIBVIRTD_ARGS="--listen"
Then, restart the libvirtd service with this command:
#
/bin/systemctl restart libvirtd.service
A.19.2.3. Authentication Failed
- Symptom
-
When running a command, the following error (or similar) appears:
$
virsh -c qemu://$hostname/system_listerror: failed to connect to the hypervisor error: authentication failed: authentication failed - Investigation
-
If authentication fails even when the correct credentials are used, it is possible that the SASL authentication is not configured.
- Solution
-
-
Edit the
/etc/libvirt/libvirtd.conffile and set the value of theauth_tcpparameter tosasl. To verify:#
cat /etc/libvirt/libvirtd.conf | grep auth_tcpauth_tcp = "sasl" -
Edit the
/etc/sasl2/libvirt.conffile and add the following lines to the file:mech_list: digest-md5 sasldb_path: /etc/libvirt/passwd.db
-
Ensure the cyrus-sasl-md5 package is installed:
#
yum install cyrus-sasl-md5 -
Restart the
libvirtdservice:#
systemctl restart libvirtd -
Set a user name and password for libvirt SASL:
#
saslpasswd2 -a libvirt 1
-
A.19.2.4. Permission Denied
- Symptom
-
When running a
virshcommand as a non-root user, the following error (or similar) appears:$
virsh -c qemu://$hostname/system_listerror: Failed to connect socket to '/var/run/libvirt/libvirt-sock': Permission denied error: failed to connect to the hypervisor - Solution
-
-
Edit the
/etc/libvirt/libvirt.conffile and add the following lines to the file:#unix_sock_group = "libvirt" #unix_sock_ro_perms = "0777" #unix_sock_rw_perms = "0770"
-
Restart the
libvirtdservice:#
systemctl restart libvirtd
-
A.19.3. PXE Boot (or DHCP) on Guest Failed
- Symptom
-
A guest virtual machine starts successfully, but is then either unable to acquire an IP address from DHCP or boot using the PXE protocol, or both. There are two common causes of this error: having a long forward delay time set for the bridge, and when the iptables package and kernel do not support checksum mangling rules.
- Long forward delay time on bridge
-
- Investigation
-
This is the most common cause of this error. If the guest network interface is connecting to a bridge device that has STP (Spanning Tree Protocol) enabled, as well as a long forward delay set, the bridge will not forward network packets from the guest virtual machine onto the bridge until at least that number of forward delay seconds have elapsed since the guest connected to the bridge. This delay allows the bridge time to watch traffic from the interface and determine the MAC addresses behind it, and prevent forwarding loops in the network topology.
If the forward delay is longer than the timeout of the guest’s PXE or DHCP client, the client’s operation will fail, and the guest will either fail to boot (in the case of PXE) or fail to acquire an IP address (in the case of DHCP).
- Solution
-
If this is the case, change the forward delay on the bridge to 0, disable STP on the bridge, or both.
This solution applies only if the bridge is not used to connect multiple networks, but just to connect multiple endpoints to a single network (the most common use case for bridges used by libvirt).
If the guest has interfaces connecting to a libvirt-managed virtual network, edit the definition for the network, and restart it. For example, edit the default network with the following command:
#
virsh net-edit defaultAdd the following attributes to the
<bridge>element:<name_of_bridge='virbr0'
delay='0' stp='on'/>delay='0'andstp='on'are the default settings for virtual networks, so this step is only necessary if the configuration has been modified from the default.If the guest interface is connected to a host bridge that was configured outside of libvirt, change the delay setting.
Add or edit the following lines in the
/etc/sysconfig/network-scripts/ifcfg-name_of_bridgefile to turn STP on with a 0 second delay:STP=on DELAY=0
After changing the configuration file, restart the bridge device:
/usr/sbin/ifdown name_of_bridge
/usr/sbin/ifup name_of_bridge
If name_of_bridge is not the root bridge in the network, that bridge’s delay will be eventually reset to the delay time configured for the root bridge. To prevent this from occurring, disable STP on name_of_bridge.
- The iptables package and kernel do not support checksum mangling rules
-
- Investigation
-
This message is only a problem if all four of the following conditions are true:
-
The guest is using virtio network devices.
If so, the configuration file will contain
model type='virtio' -
The host has the
vhost-netmodule loaded.This is true if
ls/dev/vhost-net -
The guest is attempting to get an IP address from a DHCP server that is running directly on the host.
-
The iptables version on the host is older than 1.4.10.
iptables 1.4.10 was the first version to add the
libxt_CHECKSUMextension. This is the case if the following message appears in the libvirtd logs:warning: Could not add rule to fixup DHCP response checksums on network default warning: May need to update iptables package and kernel to support CHECKSUM rule.
Unless all of the other three conditions in this list are also true, the above warning message can be disregarded, and is not an indicator of any other problems.
When these conditions occur, UDP packets sent from the host to the guest have uncomputed checksums. This makes the host’s UDP packets seem invalid to the guest’s network stack.
-
- Solution
-
To solve this problem, invalidate any of the four points above. The best solution is to update the host iptables and kernel to iptables-1.4.10 or newer where possible. Otherwise, the most specific fix is to disable the
vhost-netdriver for this particular guest. To do this, edit the guest configuration with this command:virsh edit name_of_guest
Change or add a
<driver>line to the<interface>section:<interface type='network'> <model type='virtio'/> <driver name='qemu'/> ... </interface>
Save the changes, shut down the guest, and then restart it.
If this problem is still not resolved, the issue may be due to a conflict between firewalld and the default libvirt network.
To fix this, stop firewalld with the
service firewalld stopcommand, then restart libvirt with theservice libvirtd restartcommand.
In addition, if the
/etc/sysconfig/network-scripts/ifcfg-network_namefile is configured correctly, you can ensure that the guest acquires an IP address by using thedhclientcommand as root on the guest.
A.19.4. Guest Can Reach Outside Network, but Cannot Reach Host When Using macvtap interface
- Symptom
-
A guest virtual machine can communicate with other guests, but cannot connect to the host machine after being configured to use a macvtap (also known as
type='direct') network interface. - Investigation
-
Even when not connecting to a Virtual Ethernet Port Aggregator (VEPA) or VN-Link capable switch, macvtap interfaces can be useful. Setting the mode of such an interface to
bridgeallows the guest to be directly connected to the physical network in a very simple manner without the setup issues (or NetworkManager incompatibility) that can accompany the use of a traditional host bridge device.However, when a guest virtual machine is configured to use a
type='direct'network interface such as macvtap, despite having the ability to communicate with other guests and other external hosts on the network, the guest cannot communicate with its own host.This situation is actually not an error — it is the defined behavior of macvtap. Due to the way in which the host’s physical Ethernet is attached to the macvtap bridge, traffic into that bridge from the guests that is forwarded to the physical interface cannot be bounced back up to the host’s IP stack. Additionally, traffic from the host’s IP stack that is sent to the physical interface cannot be bounced back up to the macvtap bridge for forwarding to the guests.
- Solution
-
Use libvirt to create an isolated network, and create a second interface for each guest virtual machine that is connected to this network. The host and guests can then directly communicate over this isolated network, while also maintaining compatibility with NetworkManager.
Procedure A.8. Creating an isolated network with libvirt
-
Add and save the following XML in the
/tmp/isolated.xmlfile. If the 192.168.254.0/24 network is already in use elsewhere on your network, you can choose a different network.... <network> <name>isolated</name> <ip address='192.168.254.1' netmask='255.255.255.0'> <dhcp> <range start='192.168.254.2' end='192.168.254.254'/> </dhcp> </ip> </network> ...Figure A.3. Isolated Network XML
-
Create the network with this command:
virsh net-define /tmp/isolated.xml -
Set the network to autostart with the
virsh net-autostart isolatedcommand. -
Start the network with the
virsh net-start isolatedcommand. -
Using
virsh edit name_of_guest, edit the configuration of each guest that uses macvtap for its network connection and add a new<interface>in the<devices>section similar to the following (note the<model type='virtio'/>line is optional to include):... <interface type='network' trustGuestRxFilters='yes'> <source network='isolated'/> <model type='virtio'/> </interface>
Figure A.4. Interface Device XML
-
Shut down, then restart each of these guests.
The guests are now able to reach the host at the address 192.168.254.1, and the host will be able to reach the guests at the IP address they acquired from DHCP (alternatively, you can manually configure the IP addresses for the guests). Since this new network is isolated to only the host and guests, all other communication from the guests will use the macvtap interface. For more information, see Section 23.17.8, “Network Interfaces”.
-
A.19.5. Could not add rule to fixup DHCP response checksums on network ‘default’
- Symptom
-
This message appears:
Could not add rule to fixup DHCP response checksums on network 'default'
- Investigation
-
Although this message appears to be evidence of an error, it is almost always harmless.
- Solution
-
Unless the problem you are experiencing is that the guest virtual machines are unable to acquire IP addresses through DHCP, this message can be ignored.
A.19.6. Unable to add bridge br0 port vnet0: No such device
- Symptom
-
The following error message appears:
Unable to add bridge name_of_bridge port vnet0: No such device
For example, if the bridge name is br0, the error message appears as:
Unable to add bridge br0 port vnet0: No such device
In libvirt versions 0.9.6 and earlier, the same error appears as:
Failed to add tap interface to bridge name_of_bridge: No such device
Or for example, if the bridge is named br0:
Failed to add tap interface to bridge 'br0': No such device
- Investigation
-
Both error messages reveal that the bridge device specified in the guest’s (or domain’s)
<interface>definition does not exist.To verify the bridge device listed in the error message does not exist, use the shell command
ip addr show br0.A message similar to this confirms the host has no bridge by that name:
br0: error fetching interface information: Device not found
If this is the case, continue to the solution.
However, if the resulting message is similar to the following, the issue exists elsewhere:
br0 Link encap:Ethernet HWaddr 00:00:5A:11:70:48 inet addr:10.22.1.5 Bcast:10.255.255.255 Mask:255.0.0.0 UP BROADCAST RUNNING MULTICAST MTU:1500 Metric:1 RX packets:249841 errors:0 dropped:0 overruns:0 frame:0 TX packets:281948 errors:0 dropped:0 overruns:0 carrier:0 collisions:0 txqueuelen:0 RX bytes:106327234 (101.4 MiB) TX bytes:21182634 (20.2 MiB) - Solution
-
- Edit the existing bridge or create a new bridge with
virsh -
Use
virshto either edit the settings of an existing bridge or network, or to add the bridge device to the host system configuration.- Edit the existing bridge settings using
virsh -
Use
virsh edit name_of_guestto change the<interface>definition to use a bridge or network that already exists.For example, change
type='bridge'totype='network', and<source bridge='br0'/>to<source network='default'/>. - Create a host bridge using
virsh -
For libvirt version 0.9.8 and later, a bridge device can be created with the
virsh iface-bridgecommand. This creates a bridge device br0 witheth0, the physical network interface that is set as part of a bridge, attached:virsh iface-bridge eth0 br0
Optional: If needed, remove this bridge and restore the original
eth0configuration with this command:virsh iface-unbridge br0
- Edit the existing bridge settings using
- Create a host bridge manually
- Edit the existing bridge or create a new bridge with
A.19.7. Migration Fails with error: unable to resolve address
- Symptom
-
QEMU guest migration fails and this error message appears:
#
virsh migrate qemu qemu+tcp://192.168.122.12/systemerror: Unable to resolve address name_of_host service '49155': Name or service not knownFor example, if the destination host name is
newyork, the error message appears as:#
virsh migrate qemu qemu+tcp://192.168.122.12/systemerror: Unable to resolve address 'newyork' service '49155': Name or service not knownHowever, this error looks strange as we did not use
newyorkhost name anywhere. - Investigation
-
During migration, libvirtd running on the destination host creates a URI from an address and port where it expects to receive migration data and sends it back to libvirtd running on the source host.
In this case, the destination host (
192.168.122.12) has its name set to ‘newyork’. For some reason, libvirtd running on that host is unable to resolve the name to an IP address that could be sent back and still be useful. For this reason, it returned the ‘newyork’ host name hoping the source libvirtd would be more successful with resolving the name. This can happen if DNS is not properly configured or/etc/hostshas the host name associated with local loopback address (127.0.0.1).Note that the address used for migration data cannot be automatically determined from the address used for connecting to destination libvirtd (for example, from
qemu+tcp://192.168.122.12/system). This is because to communicate with the destination libvirtd, the source libvirtd may need to use network infrastructure different from the type that virsh (possibly running on a separate machine) requires. - Solution
-
The best solution is to configure DNS correctly so that all hosts involved in migration are able to resolve all host names.
If DNS cannot be configured to do this, a list of every host used for migration can be added manually to the
/etc/hostsfile on each of the hosts. However, it is difficult to keep such lists consistent in a dynamic environment.If the host names cannot be made resolvable by any means,
virsh migratesupports specifying the migration host:#
virsh migrate qemu qemu+tcp://192.168.122.12/system tcp://192.168.122.12Destination libvirtd will take the
tcp://192.168.122.12URI and append an automatically generated port number. If this is not desirable (because of firewall configuration, for example), the port number can be specified in this command:#
virsh migrate qemu qemu+tcp://192.168.122.12/system tcp://192.168.122.12:12345Another option is to use tunneled migration. Tunneled migration does not create a separate connection for migration data, but instead tunnels the data through the connection used for communication with destination libvirtd (for example,
qemu+tcp://192.168.122.12/system):#
virsh migrate qemu qemu+tcp://192.168.122.12/system --p2p --tunnelled
A.19.8. Migration Fails with Unable to allow access for disk path: No such file or directory
- Symptom
-
A guest virtual machine (or domain) cannot be migrated because libvirt cannot access the disk image(s):
#
virsh migrate qemu qemu+tcp://name_of_host/systemerror: Unable to allow access for disk path /var/lib/libvirt/images/qemu.img: No such file or directoryFor example, if the destination host name is
newyork, the error message appears as:#
virsh migrate qemu qemu+tcp://newyork/systemerror: Unable to allow access for disk path /var/lib/libvirt/images/qemu.img: No such file or directory - Investigation
-
By default, migration only transfers the in-memory state of a running guest (such as memory or CPU state). Although disk images are not transferred during migration, they need to remain accessible at the same path by both hosts.
- Solution
-
Set up and mount shared storage at the same location on both hosts. The simplest way to do this is to use NFS:
Procedure A.9. Setting up shared storage
-
Set up an NFS server on a host serving as shared storage. The NFS server can be one of the hosts involved in the migration, as long as all hosts involved are accessing the shared storage through NFS.
#
mkdir -p /exports/images#cat >>/etc/exports <<EOF/exports/images 192.168.122.0/24(rw,no_root_squash) EOF -
Mount the exported directory at a common location on all hosts running libvirt. For example, if the IP address of the NFS server is 192.168.122.1, mount the directory with the following commands:
#
cat >>/etc/fstab <<EOF192.168.122.1:/exports/images /var/lib/libvirt/images nfs auto 0 0 EOF #mount /var/lib/libvirt/images
It is not possible to export a local directory from one host using NFS and mount it at the same path on another host — the directory used for storing disk images must be mounted from shared storage on both hosts. If this is not configured correctly, the guest virtual machine may lose access to its disk images during migration, because the source host’s libvirt daemon may change the owner, permissions, and SELinux labels on the disk images after it successfully migrates the guest to its destination.
If libvirt detects that the disk images are mounted from a shared storage location, it will not make these changes.
-
A.19.9. No Guest Virtual Machines are Present when libvirtd is Started
- Symptom
-
The libvirt daemon is successfully started, but no guest virtual machines appear to be present.
#
virsh list --allId Name State ---------------------------------------------------- - Investigation
-
There are various possible causes of this problem. Performing these tests will help to determine the cause of this situation:
- Verify KVM kernel modules
-
Verify that KVM kernel modules are inserted in the kernel:
#
lsmod | grep kvmkvm_intel 121346 0 kvm 328927 1 kvm_intelIf you are using an AMD machine, verify the
kvm_amdkernel modules are inserted in the kernel instead, using the similar commandlsmod | grep kvm_amdin the root shell.If the modules are not present, insert them using the
modprobe <modulename>command.Although it is uncommon, KVM virtualization support may be compiled into the kernel. In this case, modules are not needed.
- Verify virtualization extensions
-
Verify that virtualization extensions are supported and enabled on the host:
#
egrep "(vmx|svm)" /proc/cpuinfoflags : fpu vme de pse tsc ... svm ... skinit wdt npt lbrv svm_lock nrip_save flags : fpu vme de pse tsc ... svm ... skinit wdt npt lbrv svm_lock nrip_saveEnable virtualization extensions in your hardware’s firmware configuration within the BIOS setup. See your hardware documentation for further details on this.
- Verify client URI configuration
-
Verify that the URI of the client is configured as intended:
#
virsh urivbox:///systemFor example, this message shows the URI is connected to the VirtualBox hypervisor, not QEMU, and reveals a configuration error for a URI that is otherwise set to connect to a QEMU hypervisor. If the URI was correctly connecting to QEMU, the same message would appear instead as:
#
virsh uriqemu:///systemThis situation occurs when there are other hypervisors present, which libvirt may speak to by default.
- Solution
-
After performing these tests, use the following command to view a list of guest virtual machines:
#
virsh list --all
A.19.10. Common XML Errors
The libvirt tool uses XML documents to store structured data. A variety of common errors occur with XML documents when they are passed to libvirt through the API. Several common XML errors — including erroneous XML tags, inappropriate values, and missing elements — are detailed below.
A.19.10.1. Editing domain definition
Although it is not recommended, it is sometimes necessary to edit a guest virtual machine’s (or a domain’s) XML file manually. To access the guest’s XML for editing, use the following command:
# virsh edit name_of_guest.xml
This command opens the file in a text editor with the current definition of the guest virtual machine. After finishing the edits and saving the changes, the XML is reloaded and parsed by libvirt. If the XML is correct, the following message is displayed:
# virsh edit name_of_guest.xml

Domain name_of_guest.xml XML configuration edited.
When using the edit command in virsh to edit an XML document, save all changes before exiting the editor.
After saving the XML file, use the xmllint command to validate that the XML is well-formed, or the virt-xml-validate command to check for usage problems:
# xmllint --noout config.xml
# virt-xml-validate config.xml
If no errors are returned, the XML description is well-formed and matches the libvirt schema. While the schema does not catch all constraints, fixing any reported errors will further troubleshooting.
- XML documents stored by libvirt
-
These documents contain definitions of states and configurations for the guests. These documents are automatically generated and should not be edited manually. Errors in these documents contain the file name of the broken document. The file name is valid only on the host machine defined by the URI, which may see the machine the command was run on.
Errors in files created by libvirt are rare. However, one possible source of these errors is a downgrade of libvirt — while newer versions of libvirt can always read XML generated by older versions, older versions of libvirt may be confused by XML elements added in a newer version.
A.19.10.2. XML syntax errors
Syntax errors are caught by the XML parser. The error message contains information for identifying the problem.
This example error message from the XML parser consists of three lines — the first line denotes the error message, and the two following lines contain the context and location of the XML code containing the error. The third line contains an indicator showing approximately where the error lies on the line above it:
error: (name_of_guest.xml):6: StartTag: invalid element name
<vcpu>2</vcpu><
-----------------^
- Information contained in this message:
-
- (name_of_guest.xml)
-
This is the file name of the document that contains the error. File names in parentheses are symbolic names to describe XML documents parsed from memory, and do not directly correspond to files on disk. File names that are not contained in parentheses are local files that reside on the target of the connection.
- 6
-
This is the line number in the XML file that contains the error.
- StartTag: invalid element name
-
This is the error message from the libxml2 parser, which describes the specific XML error.
A.19.10.2.1. Stray < in the document
- Symptom
-
The following error occurs:
error: (name_of_guest.xml):6: StartTag: invalid element name
<vcpu>2</vcpu><
-----------------^
- Investigation
-
This error message shows that the parser expects a new element name after the
<symbol on line 6 of a guest’s XML file.Ensure line number display is enabled in your text editor. Open the XML file, and locate the text on line 6:
<domain type='kvm'>
   <name>name_of_guest</name>
<memory>524288</memory>
<vcpu>2</vcpu><
This snippet of a guest’s XML file contains an extra
<in the document: - Solution
-
Remove the extra
<or finish the new element.
A.19.10.2.2. Unterminated attribute
- Symptom
-
The following error occurs:
error: (name_of_guest.xml):2: Unescaped '<' not allowed in attributes values
<name>name_of_guest</name>
--^
- Investigation
-
This snippet of a guest’s XML file contains an unterminated element attribute value:
<domain type='kvm>
<name>name_of_guest</name>
In this case,
'kvm'is missing a second quotation mark. Attribute values must be opened and closed with quotation marks or apostrophes, similar to XML start and end tags. - Solution
-
Correctly open and close all attribute value strings.
A.19.10.2.3. Opening and ending tag mismatch
- Symptom
-
The following error occurs:
error: (name_of_guest.xml):61: Opening and ending tag mismatch: clock line 16 and domain
</domain>
---------^
- Investigation
-
The error message above contains three clues to identify the offending tag:
The message following the last colon,
clock line 16 and domain, reveals that<clock>contains a mismatched tag on line 16 of the document. The last hint is the pointer in the context part of the message, which identifies the second offending tag.Unpaired tags must be closed with
/>. The following snippet does not follow this rule and has produced the error message shown above:<domain type='kvm'> ... <clock offset='utc'>This error is caused by mismatched XML tags in the file. Every XML tag must have a matching start and end tag.
- Other examples of mismatched XML tags
-
The following examples produce similar error messages and show variations of mismatched XML tags.
This snippet contains an mismatch error for
<features>because there is no end tag (</name>):<domain type='kvm'> ... <features> <acpi/> <pae/> ... </domain>
This snippet contains an end tag (
</name>) without a corresponding start tag:<domain type='kvm'> </name> ... </domain>
- Solution
-
Ensure all XML tags start and end correctly.
A.19.10.3. Logic and configuration errors
A well-formatted XML document can contain errors that are correct in syntax but libvirt cannot parse. Many of these errors exist, with two of the most common cases outlined below.
A.19.10.3.1. Vanishing parts
- Symptom
-
Parts of the change you have made do not show up and have no effect after editing or defining the domain. The
defineoreditcommand works, but when dumping the XML once again, the change disappears. - Investigation
-
This error likely results from a broken construct or syntax that libvirt does not parse. The libvirt tool will generally only look for constructs it knows but ignore everything else, resulting in some of the XML changes vanishing after libvirt parses the input.
- Solution
-
Validate the XML input before passing it to the
editordefinecommands. The libvirt developers maintain a set of XML schemas bundled with libvirt that define the majority of the constructs allowed in XML documents used by libvirt.Validate libvirt XML files using the following command:
#
virt-xml-validate libvirt.xmlIf this command passes, libvirt will likely understand all constructs from your XML, except if the schemas cannot detect options that are valid only for a given hypervisor. For example, any XML generated by libvirt as a result of a
virsh dumpcommand should validate without error.
A.19.10.3.2. Incorrect drive device type
- Symptom
-
The definition of the source image for the CD-ROM virtual drive is not present, despite being added:
#
virsh dumpxml domain<domain type='kvm'> ... <disk type='block' device='cdrom'> <driver name='qemu' type='raw'/> <target dev='hdc' bus='ide'/> <readonly/> </disk> ... </domain> - Solution
-
Correct the XML by adding the missing
<source>parameter as follows:<disk type='block' device='cdrom'> <driver name='qemu' type='raw'/> <source file='/path/to/image.iso'/> <target dev='hdc' bus='ide'/> <readonly/> </disk>
A
type='block'disk device expects that the source is a physical device. To use the disk with an image file, usetype='file'instead.
Я попытался установить KVM на ubuntu 17.10 и получил следующую ошибку:
**anuragabhi@abhishek-Notebook:~$** sudo aptitude install qemu-kvm libvirt-bin ubuntu-vm-builder bridge-utils

[sudo] password for anuragabhi:
The following NEW packages will be installed:

    at{a} augeas-lenses{a} bridge-utils dctrl-tools{a} debootstrap{a} devscripts{a} dmeventd{a} dput{a} ebtables{a} ipxe-qemu{a}
    kpartx{a} libaugeas0{a} libb-hooks-endofscope-perl{a} libboost-random1.62.0{a} libboost-regex1.62.0{a} libcacard0{a}
    libclass-method-modifiers-perl{a} libclass-xsaccessor-perl{a} libdata-optlist-perl{a} libdevel-globaldestruction-perl{a}
    libdevmapper-event1.02.1{a} libdistro-info-perl{a} libfdt1{a} libfile-chdir-perl{a} libfile-homedir-perl{a} libfile-which-perl{a}
    libgetopt-long-descriptive-perl{a} libgit-wrapper-perl{a} libibverbs1{a} libimport-into-perl{a} libio-stringy-perl{a} libiscsi7{a}
    liblist-compare-perl{a} liblvm2app2.2{a} liblvm2cmd2.02{a} libmodule-implementation-perl{a} libmodule-runtime-perl{a}
    libmoo-perl{a} libnamespace-clean-perl{a} libnetcf1{a} libnumber-compare-perl{a} libnumber-range-perl{a} libpackage-stash-perl{a}
    libpackage-stash-xs-perl{a} libparams-classify-perl{a} libparams-util-perl{a} libparams-validate-perl{a}
    libpath-iterator-rule-perl{a} libpath-tiny-perl{a} libpod-constants-perl{a} librados2{a} librbd1{a} libreadline5{a}
    librole-tiny-perl{a} libsort-key-perl{a} libsort-versions-perl{a} libspice-server1{a} libstrictures-perl{a}
    libstring-copyright-perl{a} libstring-escape-perl{a} libsub-exporter-perl{a} libsub-exporter-progressive-perl{a}
    libsub-identify-perl{a} libsub-install-perl{a} libsub-quote-perl{a} libtext-glob-perl{a} libtry-tiny-perl{a}
    libunicode-utf8-perl{a} libusbredirparser1{a} libvariable-magic-perl{a} libvirt-bin libvirt-clients{a} libvirt-daemon{a}
    libvirt-daemon-system{a} libvirt0{a} libxen-4.9{a} libxenstore3.0{a} libxml2-utils{a} licensecheck{a} lvm2{a} python-cheetah{a}
    python-libvirt{a} python-vm-builder{a} python3-magic{a} python3-unidiff{a} qemu-block-extra{a} qemu-kvm qemu-system-common{a}
    qemu-system-x86{a} qemu-utils{a} seabios{a} sharutils{a} ubuntu-vm-builder wdiff{a}

The following partially installed packages will be configured:
    install-info
0 packages upgraded, 94 newly installed, 0 to remove and 49 not upgraded.
Need to get 0 B/21.4 MB of archives. After unpacking 91.9 MB will be used.
Do you want to continue? [Y/n/?] y
Extracting templates from packages: 100%
Preconfiguring packages ...
Setting up install-info (6.4.90.dfsg.1-1build1) ...
/usr/sbin/update-info-dir: 3: /etc/environment: $: not found
dpkg: error processing package install-info (--configure):
    subprocess installed post-installation script returned error exit status 127
Errors were encountered while processing:
    install-info
E: Sub-process /usr/bin/dpkg returned an error code (1)
Setting up install-info (6.4.90.dfsg.1-1build1) ...
/usr/sbin/update-info-dir: 3: /etc/environment: $: not found
dpkg: error processing package install-info (--configure):
     subprocess installed post-installation script returned error exit status 127
Errors were encountered while processing:
     install-info
Чтобы решить Ошибка DPKG, я попробовал решение, указанное в ссылке:
E: Подпроцесс / usr / bin / dpkg вернул код ошибки (1) [относится к google chrome]
Но ничего не работает.
Я попробовал несколько команд, и результат был следующим:
anuragabhi@abhishek-Notebook:~$ cat /usr/sbin/update-info-dir
#!/bin/sh
# update-info-dir
# create a dir file from all installed info files
# Copyright 2009, 2014 Norbert Preining
# GPLv2

unset LANGUAGE
unset LANG
if [ -r /etc/environment ] ; then
      . /etc/environment
fi
if [ -r /etc/default/locale ] ; then
    . /etc/default/locale
fi

Help ()
{
    echo "
SYNOPSIS: update-info-dir [-h,--help] [info-directory]

(re-)creates the index of available documentation in info format
(the file /usr/share/info/dir) which is usually presented by info
browsers
on startup."

    exit 0
}


if [ "$1" = "-h" ] || [ "$1" = "--help" ]; then
    Help
fi

if [ -n "$1" ] ; then
    INFODIR="$1"
fi

if [ ! -d "$INFODIR" ] ; then
    echo "Not a directory: $INFODIR." >&2
    exit 1
fi

if [ -r "$INFODIR/dir" ] ; then
    rm -f "$INFODIR/dir.old"
    cp $INFODIR/dir $INFODIR/dir.old
fi

# we have to remove the dir file not make install-info being surprised
rm -f "$INFODIR/dir"

errors=0
find "$INFODIR" -type f | while read file ; do
    case $file in
    */dir|*/dir.gz|*/dir.old|*/dir.old.gz|*-[0-9]|*-[0-9].gz|*-[1-9]
[0-9]|*-[1-9][0-9].gz|*.png|*.jpg)
      # these files are ignored
      continue
    ;;
*)
    install-info "$file" "$INFODIR/dir" || {
    errors=$((errors+1))
  }
  ;;
    esac
done

if [ $errors -gt 0 ] ; then
    exec >&2
    echo
    echo "Updating the index of info documentation produced $errors
    errors."
fi

exit 0

# vim:set expandtab tabstop=2: #
и:
anuragabhi@abhishek-Notebook:~$ cat /etc/environment

PATH="
/usr/local/sbin:/usr/local/bin:/usr/sbin:/usr/bin:/sbin:/bin:/usr/g a
mes:/usr/local/games"


$ cat >> etc/environment <<EOL
JAVA_HOME=/usr/bin/lib/jvm/java-8-oracle
JRE_HOME=/usr/lib/jvm/java-8-oracle/jre
EOL
задан
4 March 2018 в 19:43
поделиться