
Ошибки Kyocera ECOSYS M2030dn
Ошибки Kyocera ECOSYS M2030pn
Ошибки Kyocera ECOSYS M2035dn
Ошибки Kyocera ECOSYS M2040dn
Ошибки Kyocera ECOSYS M2135dn
Ошибки Kyocera ECOSYS M2530dn
Ошибки Kyocera ECOSYS M2535dn
Ошибки Kyocera ECOSYS M2540dn
Ошибки Kyocera ECOSYS M2540dw
Ошибки Kyocera ECOSYS M2635dn
Ошибки Kyocera ECOSYS M2635dw
Ошибки Kyocera ECOSYS M2640idw
Ошибки Kyocera ECOSYS M3040dn
Ошибки Kyocera ECOSYS M3040idn
Ошибки Kyocera ECOSYS M3145dn
Ошибки Kyocera ECOSYS M3145idn
Ошибки Kyocera ECOSYS M2735dw
Ошибки Kyocera ECOSYS M3540dn
Ошибки Kyocera ECOSYS M3540idn
Ошибки Kyocera ECOSYS M3550idn
Ошибки Kyocera ECOSYS M3560idn
Ошибки Kyocera ECOSYS M3645dn
Ошибки Kyocera ECOSYS M3645idn
Ошибки Kyocera ECOSYS M3655idn
Ошибки Kyocera ECOSYS M3660idn
Ошибки Kyocera ECOSYS M3860idn
Ошибки Kyocera ECOSYS M3860idn
Ошибки Kyocera ECOSYS M4125idn
Ошибки Kyocera ECOSYS M4132idn
Ошибки Kyocera ECOSYS M5521cdn
Ошибки Kyocera ECOSYS M5521cdw
Ошибки Kyocera ECOSYS M5526cdn
Ошибки Kyocera ECOSYS M5526cdw
Ошибки Kyocera ECOSYS M6026cdn
Ошибки Kyocera ECOSYS M6026cidn
Ошибки Kyocera ECOSYS M6030cdn
Ошибки Kyocera ECOSYS M6035cidn
Ошибки Kyocera ECOSYS M6230cidn
Ошибки Kyocera ECOSYS M6235cidn
Ошибки Kyocera ECOSYS M6526cdn
Ошибки Kyocera ECOSYS M6526cidn
Ошибки Kyocera ECOSYS M6530cdn
Ошибки Kyocera ECOSYS M6535cidn
Ошибки Kyocera ECOSYS M6630cidn
Ошибки Kyocera ECOSYS M6635cidn
Ошибки Kyocera ECOSYS M8124cidn
Ошибки Kyocera ECOSYS M8130cidn
Ошибки Kyocera ECOSYS P2035d
Ошибки Kyocera ECOSYS P2040dn
Ошибки Kyocera ECOSYS P2040dw
Ошибки Kyocera ECOSYS P2135d
Ошибки Kyocera ECOSYS P2135dn
Ошибки Kyocera ECOSYS P2235dn
Ошибки Kyocera ECOSYS P2235dw
Ошибки Kyocera ECOSYS P3045dn
Ошибки Kyocera ECOSYS P3050dn
Ошибки Kyocera ECOSYS P3055dn
Ошибки Kyocera ECOSYS P3060dn
Ошибки Kyocera ECOSYS P3145dn
Ошибки Kyocera ECOSYS P3150dn
Ошибки Kyocera ECOSYS P3155dn
Ошибки Kyocera ECOSYS P3160dn
Ошибки Kyocera ECOSYS P3260dn
Ошибки Kyocera ECOSYS P4035dn
Ошибки Kyocera ECOSYS P4040dn
Ошибки Kyocera ECOSYS P5021cdn
Ошибки Kyocera ECOSYS P5021cdw
Ошибки Kyocera ECOSYS P5026cdn
Ошибки Kyocera ECOSYS P5026cdw
Ошибки Kyocera ECOSYS P6021cdn
Ошибки Kyocera ECOSYS P6026cdn
Ошибки Kyocera ECOSYS P6030cdn
Ошибки Kyocera ECOSYS P6035cdn
Ошибки Kyocera ECOSYS P6130cdn
Ошибки Kyocera ECOSYS P6230cdn
Ошибки Kyocera ECOSYS P6235cdn
Ошибки Kyocera ECOSYS P7035cdn
Ошибки Kyocera ECOSYS P7040cdn
Ошибки Kyocera ECOSYS P7240cdn
Ошибки Kyocera ECOSYS P8060cdn
Ошибки Kyocera FS-C8600DN
Ошибки Kyocera FS-C8650DN
Ошибки Kyocera FS1016MFP
Ошибки Kyocera FS1018MFP
Ошибки Kyocera FS1020MFP
Ошибки Kyocera FS1024MFP
Ошибки Kyocera FS1025MFP
Ошибки Kyocera FS1028MFP
Ошибки Kyocera FS1030MFP
Ошибки Kyocera FS1035MFP
Ошибки Kyocera FS1040
Ошибки Kyocera FS1050
Ошибки Kyocera FS1060DN
Ошибки Kyocera FS1100
Ошибки Kyocera FS1110
Ошибки Kyocera FS1116MFP
Ошибки Kyocera FS1118MFP
Ошибки Kyocera FS1120
Ошибки Kyocera FS1120MFP
Ошибки Kyocera FS1124MFP
Ошибки Kyocera FS1125MFP
Ошибки Kyocera FS1128MFP
Ошибки Kyocera FS1130MFP
Ошибки Kyocera FS1135MFP
Ошибки Kyocera FS1200
Ошибки Kyocera FS1220MFP
Ошибки Kyocera FS1300D
Ошибки Kyocera FS1320D
Ошибки Kyocera FS1320MFP
Ошибки Kyocera FS1325MFP
Ошибки Kyocera FS1350DN
Ошибки Kyocera FS1370DN
Ошибки Kyocera FS1500
Ошибки Kyocera FS6020
Ошибки Kyocera FS6025MFP
Ошибки Kyocera FS6025MFPB
Ошибки Kyocera FS6030MFP
Ошибки Kyocera FS6500
Ошибки Kyocera FS6525MFP
Ошибки Kyocera FS6530MFP
Ошибки Kyocera FS6700
Ошибки Kyocera FS6900
Ошибки Kyocera FS6950DN
Ошибки Kyocera FS8000CD
Ошибки Kyocera FS8000CN
Ошибки Kyocera FS8100DN
Ошибки Kyocera TASKalfa 180
Ошибки Kyocera TASKalfa 1800
Ошибки Kyocera TASKalfa 1801
Ошибки Kyocera TASKalfa 181
Ошибки Kyocera TASKalfa 205c
Ошибки Kyocera TASKalfa 220
Ошибки Kyocera TASKalfa 2200
Ошибки Kyocera TASKalfa 2201
Ошибки Kyocera TASKalfa 221
Ошибки Kyocera TASKalfa 2420w
Ошибки Kyocera TASKalfa 2460ci
Ошибки Kyocera TASKalfa 2470ci
Ошибки Kyocera TASKalfa 250ci
Ошибки Kyocera TASKalfa 2510i
Ошибки Kyocera TASKalfa 2520i
Ошибки Kyocera TASKalfa 255
Ошибки Kyocera TASKalfa 2550ci
Ошибки Kyocera TASKalfa 2551ci
Ошибки Kyocera TASKalfa 2552ci
Ошибки Kyocera TASKalfa 2553ci
Ошибки Kyocera TASKalfa 255b
Ошибки Kyocera TASKalfa 255c
Ошибки Kyocera TASKalfa 265ci
Ошибки Kyocera TASKalfa 300ci
Ошибки Kyocera TASKalfa 300i
Ошибки Kyocera TASKalfa 3010i
Ошибки Kyocera TASKalfa 3011i
Ошибки Kyocera TASKalfa 305
Ошибки Kyocera TASKalfa 3050ci
Ошибки Kyocera TASKalfa 3051ci
Ошибки Kyocera TASKalfa 306ci
Ошибки Kyocera TASKalfa 307ci
Ошибки Kyocera TASKalfa 308ci
Ошибки Kyocera TASKalfa 3212i
Ошибки Kyocera TASKalfa 3252ci
Ошибки Kyocera TASKalfa 3253ci
Ошибки Kyocera TASKalfa 3500i
Ошибки Kyocera TASKalfa 3501i
Ошибки Kyocera TASKalfa 350ci
Ошибки Kyocera TASKalfa 3510i
Ошибки Kyocera TASKalfa 3511i
Ошибки Kyocera TASKalfa 3550ci
Ошибки Kyocera TASKalfa 3551ci
Ошибки Kyocera TASKalfa 3552ci
Ошибки Kyocera TASKalfa 3553ci
Ошибки Kyocera TASKalfa 356ci
Ошибки Kyocera TASKalfa 358ci
Ошибки Kyocera TASKalfa 4002i
Ошибки Kyocera TASKalfa 4003i
Ошибки Kyocera TASKalfa 400ci
Ошибки Kyocera TASKalfa 4012i
Ошибки Kyocera TASKalfa 4052ci
Ошибки Kyocera TASKalfa 4053ci
Ошибки Kyocera TASKalfa 406ci
Ошибки Kyocera TASKalfa 408ci
Ошибки Kyocera TASKalfa 420i
Ошибки Kyocera TASKalfa 4500i
Ошибки Kyocera TASKalfa 4501i
Ошибки Kyocera TASKalfa 4550ci
Ошибки Kyocera TASKalfa 4551ci
Ошибки Kyocera TASKalfa 4820w
Ошибки Kyocera TASKalfa 5002i
Ошибки Kyocera TASKalfa 5003i
Ошибки Kyocera TASKalfa 500ci
Ошибки Kyocera TASKalfa 5052ci
Ошибки Kyocera TASKalfa 5053ci
Ошибки Kyocera TASKalfa 508ci
Ошибки Kyocera TASKalfa 520i
Ошибки Kyocera TASKalfa 5500i
Ошибки Kyocera TASKalfa 5501i
Ошибки Kyocera TASKalfa 550c
Ошибки Kyocera TASKalfa 552ci
Ошибки Kyocera TASKalfa 5550ci
Ошибки Kyocera TASKalfa 5551ci
Ошибки Kyocera TASKalfa 6002i
Ошибки Kyocera TASKalfa 6003i
Ошибки Kyocera TASKalfa 6052ci
Ошибки Kyocera TASKalfa 6053ci
Ошибки Kyocera TASKalfa 620
Ошибки Kyocera TASKalfa 6500i
Ошибки Kyocera TASKalfa 6501i
Ошибки Kyocera TASKalfa 650c
Ошибки Kyocera TASKalfa 6550ci
Ошибки Kyocera TASKalfa 6551ci
Ошибки Kyocera TASKalfa 7002i
Ошибки Kyocera TASKalfa 7003i
Ошибки Kyocera TASKalfa 7052ci
Ошибки Kyocera TASKalfa 7353ci
Ошибки Kyocera TASKalfa 750c
Ошибки Kyocera TASKalfa 7550ci
Ошибки Kyocera TASKalfa 7551ci
Ошибки Kyocera TASKalfa 8000i
Ошибки Kyocera TASKalfa 8001i
Ошибки Kyocera TASKalfa 8002i
Ошибки Kyocera TASKalfa 8003i
Ошибки Kyocera TASKalfa 8052ci
Ошибки Kyocera TASKalfa 820
Ошибки Kyocera TASKalfa 8353ci
Ошибки Kyocera TASKalfa 9002i
Ошибки Kyocera TASKalfa 9003i
Японская компания Kyocera производит высококачественные лазерные принтеры и МФУ для офисной печати. Их продукция одна из самых востребованных на сегодняшний день. Ведь печатающие устройства Kyocera характеризуются высокой надежностью, износостойкостью и большим сроком эксплуатации. Однако даже их изделия не являются вечными. Со временем принтеры Kyocera начинают сбоить.
К счастью, оргтехника Kyocera оснащена системой самодиагностики (так же, как и струйные принтеры Canon). Поэтому, в случае возникновения проблемы, устройство самостоятельно выявит уязвимое место и сообщит Вам об этом миганием соответствующего индикатора на панели управления либо кодом ошибки, выведенным на дисплей принтера.
Если Вы не являетесь мастером по обслуживанию принтеров и МФУ Kyocera, то, чтобы понять, о чем сообщает печатающее устройство, Вам потребуется расшифровать указанный им код. Для этого мы добавили в статью таблицу кодов ошибок лазерных принтеров Kyocera серии FS и не только.
|
Код ошибки |
Значение ошибки |
Решение проблемы |
|
E-0001 (E1) |
Поврежден чип картриджа либо установлен неоригинальный картридж. |
Замените установленный картридж оригинальной версией изделия. Если хотите сэкономить, тогда купите и установите новый чип на картридж или перепрошейте принтер Kyocera. Однако предварительно не помешает попробовать сбросить ошибку соответствующей комбинацией клавиш (как это сделать, читайте в статье «Сброс ошибки установки неоригинального картриджа в принтерах Kyocera»). |
|
E-0002 (E2) |
Регион использования картриджа и принтера не совпадают. |
Замените чип или прошейте принтер Kyocera. |
|
E-0003 (E3) |
Заполнена память принтера или МФУ Kyocera. |
Отпечатайте ранее отсканированные листы или очистите очередь печати нажатием кнопки Стоп/Сброс (ранее отсканированные листы также удалятся из памяти принтера, даже если они еще не были распечатаны). |
|
E-0007 (E7) |
Тонер-картридж Kyocera израсходовал ресурс красящего вещества. |
Замените или заправьте картридж Kyocera (если используете совместимый или перезаправленный расходник, то после установки его в принтер не забудьте сбросить ошибку зажатием на 3-5 секунды кнопок [Ок] и [Сброс/Стоп]). |
|
E-0008 (E8) |
Открыта крышка принтера либо не работает датчик закрытия крышек устройства. |
Откройте и еще раз закройте переднюю и заднюю крышку принтера. Во время закрытия Вы должны услышать характерный щелчок. Если не помогло, то причина в неисправности датчика. |
|
E-0009 (E9) |
Лоток приема бумаги полон. |
Уберите все отпечатанные листы бумаги из выходящего лотка. Чтобы возобновить печать, нажмите кнопку [Старт]. |
|
E-0012 (E12) |
Ошибка памяти принтера Kyocera. |
Попробуйте уменьшить разрешение печати. Скорее всего, формат создаваемого отпечатка не соответствует возможностям принтера. |
|
E-0014 (E14) |
Установлен неверный формат бумаги (неподдерживаемый принтером Kyocera). |
Поменяйте бумагу на поддерживаемую принтером либо смените ее формат в настройках печати. Попробуйте обновить программное обеспечение. Возможно, это расширит поддерживаемые принтером Kyocera форматы. |
|
E-0015 (E15) |
Устройство не подключено к электрической сети либо на компьютере нет (не работает) драйвера принтера Kyocera. |
Проверьте подключение печатающего аппарата к электрической сети, а также целостность кабеля. Если ошибка не исчезает, скачайте драйвер принтера Kyocera и установите его на компьютер. |
|
E-0017 (E17) |
Ошибка передачи данных. |
Проверьте подключение принтера к компьютеру. Кабель не должен быть длиннее 5 метров, а также обязан поддерживать стандарт USB 2.0. Кроме того, переустановите драйвер принтера и утилиту Kyocera Client Tool. |
|
E-0018 (E18) |
Очередь печати заполнена. |
Очистите очередь печати нажатием кнопки [Сброс] либо через драйвер принтера. |
|
E-0019 (E19) |
Неверный формат печати. |
Отмените печать нажатием кнопки [Стоп/Сброс]. Выберите в настройках принтера соответствующий режим печати, а также установите в лоток поддерживаемый принтером формат бумаги. |
|
J-0000 (jam0000) |
Замятие бумаги за задней крышкой. |
Откройте крышку и извлеките бумагу. Проверьте надежность крепления бумаги в лотке, а также принтер на наличие посторонних предметов. Еще причина может быть в пружине выходного флажка. Если она растянулась, то может плохо работать фиксатор. Также проблема может быть из-за печки, сделайте ее ревизию, переборку и смазку. |
|
J-0501 (jam0501) |
Бумага застряла в принтере Kyocera |
Извлеките замятую бумагу. Проверьте надежность установки бумаги во входной лоток. Проверьте целостность роликов протяжки бумаги, а также принтер на наличие посторонних предметов. Если не помогло, стоит внимательно осмотреть ребра на направляющей пластине. На них могут образоваться сколы, трещины и заусенцы. Их можно слегка подчистить наждачной бумагой (нулевкой). |
|
J-0511 (jam0511) |
Принтер Kyocera замял бумагу. |
Извлеките замятую бумагу и повторите печать. Если проблема не исчезла, несите принтер в сервис. Скорее всего, изношен ролик протяжки бумаги. |
|
C7990 |
Бункер драм-картриджа (блока фотобарабана) заполнен отработанным тонером либо неисправен счетчик отработки красящего вещества. Еще проблема может быть в главной плате PWB. |
Осуществите чистку драм-картриджа (блока фотобарабана). Если проблема в датчике или плате, то нужно отнести принтер в СЦ на диагностику. |
|
F248 |
Ошибка обработки отпечатываемого материала. |
Перезагрузите принтер. Уберите неподдерживаемые спецсимволы из отпечатка. Обновите ПО принтера Kyocera. Смените режим работы принтера с PDL на GDI (Пуск -> Принтеры -> Свойства -> Параметры устройства). |
|
PF |
Отсутствует бумага в лотке подачи. |
Загрузите листы бумаги во входной лоток. Если принтер по-прежнему не печатает, значит нужно искать проблему в чем-то другом. |
|
1101 |
Ошибка сканирования через сеть из-за неправильного имени SMTP сервера. |
Пропишите DNS-адреса помимо прочих настроек печати по сети. |
|
1102 |
Некорректная настройка сканера для работы через сеть |
Зайдите в Web-панель управления принтером (нужно в адресную строку браузера ввести iP принтера Kyocera). Далее в зависимости от модели введите логин и пароль (Admin/Admin или просто admin00 без логина). Далее следуйте инструкции:
Логин и пароль нужны обязательно, если их нет, то следует создать. |
|
2101 |
Ошибка передачи данных при сканировании через сеть. |
Правильно настройте параметры (как для ошибки 1102), только предварительно отключите на ПК антивирус и брандмауэр. |
Если Вы испытали все способы, но не смогли убрать ошибку, то следует нести печатающее устройство в сервисный центр. Кроме того, есть ряд ошибок (высвечиваемых на дисплее принтера), которые нельзя устранить в домашних условиях. Соответствующие коды ошибок принтеров Kyocera представляем в очередной таблице.
Коды ошибок принтеров и МФУ Kyocera, которые нужно устранять в сервисном центре
|
Код ошибки |
Значение ошибки |
Решение проблемы |
|
0030 |
Неисправность платы управления факсом принтера. |
Замена платы. |
|
0100 |
Неисправность платы управления или флеш-памяти принтера. |
Замена платы. |
|
0120 |
Ошибка чтения mac-адреса из-за неисправности флеш-памяти принтера. |
Замена платы. |
|
0190 |
Неисправность платы управления или флеш-памяти принтера. |
Замена платы. |
|
0630 |
Неисправность платы управления принтера. |
Замена платы. |
|
1020 |
Неисправность мотора, привода или отсутствие контакта. |
Разборка принтера и замена изношенных частей. Проверка надежности подключений, замена разорванных (прогоревших) кабелей. Ремонт или замена привода мотора. |
|
1040 |
Неисправность мотора, привода или отсутствие контакта. |
Разборка принтера и замена изношенных частей. Проверка надежности подключений, замена разорванных (прогоревших) кабелей. Ремонт или замена привода мотора. |
|
2000 |
Неисправность главной платы управления, соединительного кабеля или привода принтера. |
Проверить ремни, шестерни и ролики привода. Смазать или заменить, если есть дефекты. Заменить привод или главную плату. |
|
3100 (C3100) |
Неисправность главной платы, привода сканера, датчика положения или нарушение целостности соединений. |
Проверить наличие разрывов и отсутствия контакта. Смазать или заменить изношенные элементы привода. Заменить привод, главную плату, датчик или соединительный кабель. Если Вам повезло, то возможно забыли отключить фиксатор блока сканера. |
|
3101 |
Сетевой кабель не подсоединен, или нарушена работа концентратора. Еще может быть из-за наличия вирусов в системе или неправильно заданным параметрам сервера SMTP. |
Проверить соединения, правильно настроить параметры сети. |
|
3300 |
Неисправность главной платы, датчика CIS или соединительного кабеля. |
Проверить контакты, заменить плату или датчик. |
|
3500 |
Неисправность главной платы или нарушение соединения контактов. |
Проверить контакты, заменить плату. |
|
4000 (C4000) |
Неисправность главной платы, привода сканера или нарушение соединений. Однако чаще всего ошибка лазера. |
Проверить контакты, заменить плату или привод блока сканера. Почистить лазер, смазать ось полигон-мотора, либо полностью заменить блок лазера. |
|
4200 |
Неисправность главной платы, блока сканера или датчика BD. |
Отключить питание принтера на 30 минут. Если не помогло, то следует заменить привод сканера или главную плату принтера. |
|
6000 (С6000) |
Неисправность главной платы, термостата, печки или нарушение соединения контактов. |
Проверить и поправить контакты. Заменить фьюзер. Ремонт или замена печки, термодатчика, термопредохранителя и т.д. |
|
6020 |
Сгорание термистора или главной платы. |
Замена термистора или главной платы. |
|
6030 |
Неисправность главной платы, термостата или термистора. Возможно, причина в отсутствии контакта. |
Проверить соединения. Заменить плату, термостат или термистор. |
|
6400 |
Неисправность главной платы, отсутствие питания или контакта. |
Заменить плату или источник питания. |
|
F000 |
Неисправность главной платы или отсутствие контакта. |
Проверить соединение ремня безопасности. Заменить ремень или плату управления. |
|
F020 |
Неисправность элементов памяти принтера. |
Перезагрузить принтер. Если ошибка не устранилась – заменить плату управления. |
|
F040 |
Неисправность главной платы принтера. |
Перезагрузить принтер. Если ошибка не устранилась – заменить плату управления. |
|
F05D |
Неисправность главной платы. Сбой программного оборудования привода. Проблемы с прошивкой принтера Kyocera. |
Перезагрузить принтер. Если ошибка не устранилась – заменить плату управления. Перепрошить принтер Kyocera. |
|
F245 F246 F247 F375 |
Принтер Kyocera заблокирован из-за проблемы, вызванной отказом источника питания. |
Нужно перепрошить принтер специальной сервисной микропрограммой. |
Обратите внимание: Если у печатающего устройства нет дисплея, то определить проблему можно по светодиодным индикаторам, встроенным в панель управления принтером. Например, у Kyocera Ecosys P2135D нужно сосчитать количество миганий индикаторов красного цвета и таким образом определить число, указывающее на ту или иную ошибку. В свою очередь, у модели Kyocera FS-1040 все зависит от темпа мигания светодиода с надписью «Внимание!» («Attention!»):
- Мигает медленно – указывает на отсутствие бумаги в лотке или тонера в картридже.
- Мигает быстро – оповещает о проблеме с памятью устройства, переполненном лотке или замятии бумаги, а также об использовании неоригинальных расходных материалов.
- Горит постоянно – говорит о проблемах с картриджем или фотобарабаном либо указывает на открытые крышки принтера.

Чтобы потребитель мог наверняка определить проблему, рекомендуем использовать утилиту Kyocera Client Tool, которая идет в комплекте с драйверами принтера.
Ваше Имя:
Ваш вопрос:
Внимание: HTML не поддерживается! Используйте обычный текст.
Оценка:
Плохо
Хорошо
Введите код, указанный на картинке:


Порой бывает трудно понять, почему «не работает принтер». На самом деле при любой ошибке принтер выдает код. Здесь я выкладываю коды ошибок на отличные МФУ Kyocera, которые мы используем при работе.
Коды ошибок Kyocera FS-1020MFP, 1025MFP, 1120MFP, 1125MFP, 1220MFP, 1320MFP, 1325MFP
If the part causing the problem was not supplied, use the unit including the part for replacement.
Release is performed by power supply OFF/ON.
| Код ошибки | Неполадки | Причина | Устранение |
| 0030 | FAX Board System Error Cannot communicate with the modem when activated. *: 4 in 1 model only | Defective FAX control PWB. | Replace the fax control PWB and check for correct operation |
| 0100 | Backup memory read/write error(NOR) Flash returns an abnormal status. | Defective flash memory. | Replace the main PWB and check for correct operation |
| Defective main PWB. | Replace the main PWB and check for correct operation | ||
| 0120 | MAC address data error For data in which the MAC address is invalid. | Defective flash memory. | Replace the main PWB and check for correct operation |
| 0190 | Backup memory error (engine)Unable to read the main PWB IC. | Defective flash memory. | Replace the main PWB and check for correct operation |
| Defective main PWB. | Replace the main PWB and check for correct operation | ||
| 0630 | Scan DMA error Unable to transfer DMA. | Defective main PWB. | Replace the main PWB and check for correct operation |
| 2000 | Main motor error Pulse is not detected after 1000msec. Motor won’t stabilize after 300msec. | Defective connector cable or poor contact in the connector. | Reinsert the connector. Also check for continuity within the connector cable. If none, replace the cable, main motor and Relay PWB (YC4) Relay PWB and main PWB (YC14). |
| Defective drive transmission system of motor. | Check if the gears rotate smoothly. If not, grease the bushes and gears. Check for broken gears and replace if any. | ||
| Defective motor. | Replace the main motor. | ||
| Defective main PWB. | Replace the main PWB and check for correct operation | ||
| 3100 | Scanner Carriage Error The HP sensor won’t be opened when it is driven in the scan direction for 37.44 mm (*1) at the initial scanning when the HP sensor is cut off. The HP sensor won’t be cut off when it is driven in the return direction for 320.44mm (*2) at the initial scanning when the HP sensor is open. | Defective connector cable or poor contact in the connector. | Reinsert the connector. Also check for continuity within the connector cable. If none, replace the cable. Home position sensor and OPWB Scanner motor and main PWB (YC18) |
| Defective home position sensor. | Replace the home position sensor. | ||
| Defective scanner motor. | Replace the scanner motor. | ||
| Defective main PWB. | Replace the main PWB and check for correct operation | ||
| 3300 | AGC Error The resultant AGC fell outside the range of allowance. | Defective connector cable or poor contact in the connector. | Reinsert the connector. Also check for continuity within the connector cable. If none, replace the cable. CIS sensor and main PWB (YC8) |
| CIS sensor. | Replace the CIS sensor. | ||
| Defective main PWB. | Replace the main PWB and check for correct operation | ||
| 3500 | Scan ASIC Error The scan ASIC has been inoperative. | Defective main PWB. | Replace the main PWB and check for correct operation |
| 4000 | Polygon motor synchronize errorPolygon motor is not stabilized within 15 s since the | Defective connector cable or poor contact in the connector. | Reinsert the connector. Also check for continuity within the connector cable. If none, replace the cable. Polygon motor and main PWB (YC17) |
| motor is activated. After polygon motor is stabilized, the ready signal is not detected for 7 s continuously. | Defective polygon motor. | Replace the laser scanner unit | |
| Defective main PWB. | Replace the main PWB and check for correct operation | ||
| 4200 | BD stability error The BD signal is not detected for 1000 ms after processing the compulsion lighting. At the interrupt in VSYNC, the | Defective connector cable or poor contact in the connector. | Reinsert the connector. Also check for continuity within the connector cable. If none, replace the cable. Laser scanner unit (YC1) and main PWB (YC5) |
| BD error is detected continuously for 10 times in 400 ms intervals. | Defective APC PWB. | Replace the laser scanner unit | |
| Defective main PWB. | Replace the main PWB and check for correct operation | ||
| 6000 | Broken fuser heater The temperature does not reach 100° C/212 °F after the fuser heater lamp has been turned on continuously for 30 s | Defective connector cable or poor contact in the connector. | Reinsert the connector. Also check for continuity within the connector cable. If none, replace the cable. fuser heater lamp and Power source PWB (YC102). |
| At the time of 20 degrees or less from specified temperature, the fuser temperature does not rise by 2 degrees or | Fuser thermostat triggered. | Replace the fuser unit | |
| Defective fuser heater. | Replace the fuser unit | ||
| more after the fuser heater lamp has been turned on continuously for 8 s. (during ready or during print) | Defective main PWB. | Replace the main PWB and check for correct operation | |
| 6020 | Abnormally high fuser thermistor temperature Fuser thermistor detects a temperature higher than 210°C/410°F for 3 s | Deformed connector pin. | If the l/F connector pins of the fuser unit and the main unit are deformed owing to foreign matters, such as paper dusts, replace the connectors or the units including the connectors. |
| Shorted fuser thermistor. | Replace the fuser unit | ||
| Defective power source PWB. | Replace the power source PWB | ||
| Defective main PWB. | Replace the main PWB and check for correct operation | ||
| 6030 | Broken fuser thermistor wireAverage input AD given by the thermistor is less than 2 for 300msec. | Defective connector cable or poor contact in the connector. | Reinsert the connector. Also check for continuity within the connector cable. If none, replace the cable. Fuser unit and main PWB (YC15) |
| Broken fuser thermistor wire. | Replace the fuser unit | ||
| Fuser thermostat triggered. | Replace the fuser unit | ||
| Defective main PWB. | Replace the main PWB and check for correct operation | ||
| 6400 | Fixing control zero cross signal error The ZCROSS signal does not reach the main PWB for more than 2 s. | Defective connector cable or poor contact in the connector. | Reinsert the connector. Also check for continuity within the connector cable. If none, replace the cable. Power source PWB (YC103) and main PWB (YC12) |
| Defective power source PWB. | Replace the power source PWB | ||
| Defective main PWB. | Replace the main PWB and check for correct operation | ||
| F000 | Communication Error between Main PCB and Panel PCBCommunication failure during the start-up or operation. *: Only 3 in 1 25/26ppm model, 4 in 1 20/21, 25/26 ppm model | Defective main PWB. | Turn the main power switch off/on to restart the machine. If the error is not resolved, replace main PWB |
| Defective operation PWB. | Replace the operation PWB and check for correct operation. | ||
| F020 | RAM R/W error The average AD value of the sensor input is smaller than 2 during SLP_RLY is off and 300 ms. | Defective main PWB. | Turn the main power switch off/on to restart the machine. If the error is not resolved, replace main PWB |
| F040 | Communication Error between Main PCB and Engine PCBCommunication is failed between the controller and the engine. | Defective main PWB. | Turn the main power switch off/on to restart the machine. If the error is not resolved, replace main PWB |
| F05D | No Engine Main Program Engine program failure. | Defective engine software. | Install the engine software. |
| Defective main PWB. | Turn the main power switch off/on to restart the machine. If the error is not resolved, replace main PWB | ||
| E-0001 | 0001 Установлен неоригинальный картридж с тонером |
Производитель не несет ответственности за повреждения, вызванные использованием неоригинального тонера. Рекомендуется использовать только оригинальные картриджи с тонером. Если вы хотите использовать картридж с тонером, установленный на данный момент, одновременно нажмите Клавиша выбора режима и [Стоп/Сброс] и удерживайте не менее 3 секунд. |
|
| E-0002 | Возникла ошибка: Региональные спецификации установленного картриджа с тонером не соответствуют спецификациям аппарата. |
Установите картридж с тонером, соответствующий спецификациям. |
|
| E-0003 | Память переполнена. Сканирование невозможно из-за нехватки памяти сканера. |
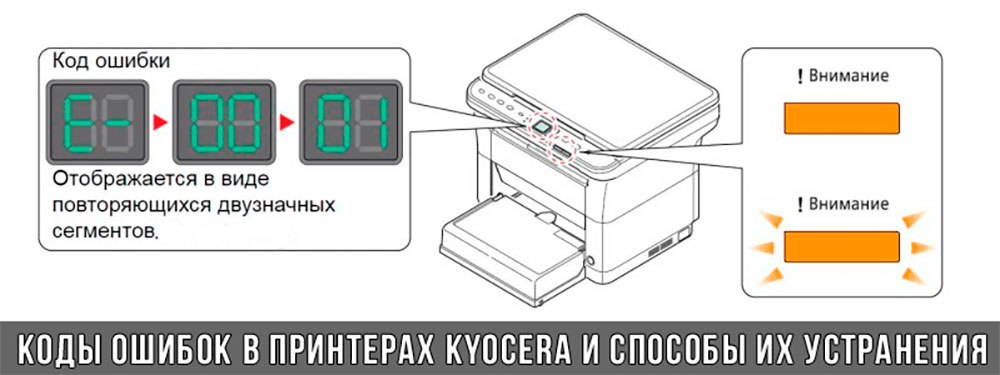
Доступны только отсканированные страницы. Нажмите [Стоп/Сброс], после чего задание будет отменено. Код ошибки E-0001 Отображается в виде повторяющихся двузначных сегментов (E-, 00 и 01). |
|
| E-0007 | Добавьте тонер | В картридже закончился тонер | Установите новый картридж с тонером |
| E-0008 | Открыта крышка | Открыта задняя или передняя крышка | Закройте крышки |
| E-0009 | Лоток переполнен | Внутренний лоток заполнен бумагой | Аппарат приостанавливается после печати 100 листов. Извлеките бумагу из внутреннего лотка и нажмите [ Старт ] для возобновления печати |
| E-0012 | Переполнение памяти | Невозможно продолжение задания из-за нехватки памяти | Измените разрешение печати с «Fast1200» (Быстрая 1200) на 600 т/д. Смотрите (Руководство пользователя) |
| E-0014 | Добавьте бумагу | Формат бумаги во входном лотке отличается от настройки драйвера принтера или KYOCERA Client Tool | Загрузите в лоток бумагу подходящего формата |
| E-0015 | Не подсоединено | USB-кабель не подключен | Нажмите Стоп/Сброс. Подключите USB-кабель |
| Сетевой кабель не подключен | Нажмите Стоп/Сброс. Подключите сетевой кабель | ||
| Выключено питание аппарата | Нажмите Стоп/Сброс. Включите питание | ||
| Не удается найти соответствующий драйвер | Установите соответствующий драйвер | ||
| E-0018 | Ошибка | Указанного файла нет в ящике печати | Нажмите Стоп/Сброс |
| E-0019 | Ошибка | Аппарат не может выполнить данную программу, потому что в ней зарегистрирован неиспользуемый формат оригинала | Нажмите Стоп/Сброс и измените настройки программы |
| J-0511 | Застревание бумаги | Застревание бумаги под задней крышкой | Извлеките застрявшую бумагу. Как -см. инструкцию пользователя. |
Ошибка, код ошибки: E-0001, E-0002, E-0003, E-0007, E-0008, E-0009, E-0012, E-0014, E-0015, E-0018, E-0019, J-0511, C-0030, C-0100, C-0120, C-0190, C-0630, C-2000, C-3100, C-3300, C-3500, C-4000, C-4200, C-6000, C-6020, C-6030, C-6400, C-F000, C-F020, C-F040, C-F05D Kyocera FS-1020MFP, 1025MFP, 1120MFP, 1125MFP, 1220MFP, 1320MFP, 1325MFP
Взято отсюда:
Коды ошибок Kyocera FS-1020MFP, 1025MFP, 1120MFP, 1125MFP, 1220MFP, 1320MFP, 1325MFP.
Отблагдарить автора статьи также можно переводом, +100 вам в карму!
Ошибки Kyocera ECOSYS M2030dn
Ошибки Kyocera ECOSYS M2030pn
Ошибки Kyocera ECOSYS M2035dn
Ошибки Kyocera ECOSYS M2040dn
Ошибки Kyocera ECOSYS M2135dn
Ошибки Kyocera ECOSYS M2530dn
Ошибки Kyocera ECOSYS M2535dn
Ошибки Kyocera ECOSYS M2540dn
Ошибки Kyocera ECOSYS M2540dw
Ошибки Kyocera ECOSYS M2635dn
Ошибки Kyocera ECOSYS M2635dw
Ошибки Kyocera ECOSYS M2640idw
Ошибки Kyocera ECOSYS M3040dn
Ошибки Kyocera ECOSYS M3040idn
Ошибки Kyocera ECOSYS M3145dn
Ошибки Kyocera ECOSYS M3145idn
Ошибки Kyocera ECOSYS M2735dw
Ошибки Kyocera ECOSYS M3540dn
Ошибки Kyocera ECOSYS M3540idn
Ошибки Kyocera ECOSYS M3550idn
Ошибки Kyocera ECOSYS M3560idn
Ошибки Kyocera ECOSYS M3645dn
Ошибки Kyocera ECOSYS M3645idn
Ошибки Kyocera ECOSYS M3655idn
Ошибки Kyocera ECOSYS M3660idn
Ошибки Kyocera ECOSYS M3860idn
Ошибки Kyocera ECOSYS M3860idn
Ошибки Kyocera ECOSYS M4125idn
Ошибки Kyocera ECOSYS M4132idn
Ошибки Kyocera ECOSYS M5521cdn
Ошибки Kyocera ECOSYS M5521cdw
Ошибки Kyocera ECOSYS M5526cdn
Ошибки Kyocera ECOSYS M5526cdw
Ошибки Kyocera ECOSYS M6026cdn
Ошибки Kyocera ECOSYS M6026cidn
Ошибки Kyocera ECOSYS M6030cdn
Ошибки Kyocera ECOSYS M6035cidn
Ошибки Kyocera ECOSYS M6230cidn
Ошибки Kyocera ECOSYS M6235cidn
Ошибки Kyocera ECOSYS M6526cdn
Ошибки Kyocera ECOSYS M6526cidn
Ошибки Kyocera ECOSYS M6530cdn
Ошибки Kyocera ECOSYS M6535cidn
Ошибки Kyocera ECOSYS M6630cidn
Ошибки Kyocera ECOSYS M6635cidn
Ошибки Kyocera ECOSYS M8124cidn
Ошибки Kyocera ECOSYS M8130cidn
Ошибки Kyocera ECOSYS P2035d
Ошибки Kyocera ECOSYS P2040dn
Ошибки Kyocera ECOSYS P2040dw
Ошибки Kyocera ECOSYS P2135d
Ошибки Kyocera ECOSYS P2135dn
Ошибки Kyocera ECOSYS P2235dn
Ошибки Kyocera ECOSYS P2235dw
Ошибки Kyocera ECOSYS P3045dn
Ошибки Kyocera ECOSYS P3050dn
Ошибки Kyocera ECOSYS P3055dn
Ошибки Kyocera ECOSYS P3060dn
Ошибки Kyocera ECOSYS P3145dn
Ошибки Kyocera ECOSYS P3150dn
Ошибки Kyocera ECOSYS P3155dn
Ошибки Kyocera ECOSYS P3160dn
Ошибки Kyocera ECOSYS P3260dn
Ошибки Kyocera ECOSYS P4035dn
Ошибки Kyocera ECOSYS P4040dn
Ошибки Kyocera ECOSYS P5021cdn
Ошибки Kyocera ECOSYS P5021cdw
Ошибки Kyocera ECOSYS P5026cdn
Ошибки Kyocera ECOSYS P5026cdw
Ошибки Kyocera ECOSYS P6021cdn
Ошибки Kyocera ECOSYS P6026cdn
Ошибки Kyocera ECOSYS P6030cdn
Ошибки Kyocera ECOSYS P6035cdn
Ошибки Kyocera ECOSYS P6130cdn
Ошибки Kyocera ECOSYS P6230cdn
Ошибки Kyocera ECOSYS P6235cdn
Ошибки Kyocera ECOSYS P7035cdn
Ошибки Kyocera ECOSYS P7040cdn
Ошибки Kyocera ECOSYS P7240cdn
Ошибки Kyocera ECOSYS P8060cdn
Ошибки Kyocera FS-C8600DN
Ошибки Kyocera FS-C8650DN
Ошибки Kyocera FS1016MFP
Ошибки Kyocera FS1018MFP
Ошибки Kyocera FS1020MFP
Ошибки Kyocera FS1024MFP
Ошибки Kyocera FS1025MFP
Ошибки Kyocera FS1028MFP
Ошибки Kyocera FS1030MFP
Ошибки Kyocera FS1035MFP
Ошибки Kyocera FS1040
Ошибки Kyocera FS1050
Ошибки Kyocera FS1060DN
Ошибки Kyocera FS1100
Ошибки Kyocera FS1110
Ошибки Kyocera FS1116MFP
Ошибки Kyocera FS1118MFP
Ошибки Kyocera FS1120
Ошибки Kyocera FS1120MFP
Ошибки Kyocera FS1124MFP
Ошибки Kyocera FS1125MFP
Ошибки Kyocera FS1128MFP
Ошибки Kyocera FS1130MFP
Ошибки Kyocera FS1135MFP
Ошибки Kyocera FS1200
Ошибки Kyocera FS1220MFP
Ошибки Kyocera FS1300D
Ошибки Kyocera FS1320D
Ошибки Kyocera FS1320MFP
Ошибки Kyocera FS1325MFP
Ошибки Kyocera FS1350DN
Ошибки Kyocera FS1370DN
Ошибки Kyocera FS1500
Ошибки Kyocera FS6020
Ошибки Kyocera FS6025MFP
Ошибки Kyocera FS6025MFPB
Ошибки Kyocera FS6030MFP
Ошибки Kyocera FS6500
Ошибки Kyocera FS6525MFP
Ошибки Kyocera FS6530MFP
Ошибки Kyocera FS6700
Ошибки Kyocera FS6900
Ошибки Kyocera FS6950DN
Ошибки Kyocera FS8000CD
Ошибки Kyocera FS8000CN
Ошибки Kyocera FS8100DN
Ошибки Kyocera TASKalfa 180
Ошибки Kyocera TASKalfa 1800
Ошибки Kyocera TASKalfa 1801
Ошибки Kyocera TASKalfa 181
Ошибки Kyocera TASKalfa 205c
Ошибки Kyocera TASKalfa 220
Ошибки Kyocera TASKalfa 2200
Ошибки Kyocera TASKalfa 2201
Ошибки Kyocera TASKalfa 221
Ошибки Kyocera TASKalfa 2420w
Ошибки Kyocera TASKalfa 2460ci
Ошибки Kyocera TASKalfa 2470ci
Ошибки Kyocera TASKalfa 250ci
Ошибки Kyocera TASKalfa 2510i
Ошибки Kyocera TASKalfa 2520i
Ошибки Kyocera TASKalfa 255
Ошибки Kyocera TASKalfa 2550ci
Ошибки Kyocera TASKalfa 2551ci
Ошибки Kyocera TASKalfa 2552ci
Ошибки Kyocera TASKalfa 2553ci
Ошибки Kyocera TASKalfa 255b
Ошибки Kyocera TASKalfa 255c
Ошибки Kyocera TASKalfa 265ci
Ошибки Kyocera TASKalfa 300ci
Ошибки Kyocera TASKalfa 300i
Ошибки Kyocera TASKalfa 3010i
Ошибки Kyocera TASKalfa 3011i
Ошибки Kyocera TASKalfa 305
Ошибки Kyocera TASKalfa 3050ci
Ошибки Kyocera TASKalfa 3051ci
Ошибки Kyocera TASKalfa 306ci
Ошибки Kyocera TASKalfa 307ci
Ошибки Kyocera TASKalfa 308ci
Ошибки Kyocera TASKalfa 3212i
Ошибки Kyocera TASKalfa 3252ci
Ошибки Kyocera TASKalfa 3253ci
Ошибки Kyocera TASKalfa 3500i
Ошибки Kyocera TASKalfa 3501i
Ошибки Kyocera TASKalfa 350ci
Ошибки Kyocera TASKalfa 3510i
Ошибки Kyocera TASKalfa 3511i
Ошибки Kyocera TASKalfa 3550ci
Ошибки Kyocera TASKalfa 3551ci
Ошибки Kyocera TASKalfa 3552ci
Ошибки Kyocera TASKalfa 3553ci
Ошибки Kyocera TASKalfa 356ci
Ошибки Kyocera TASKalfa 358ci
Ошибки Kyocera TASKalfa 4002i
Ошибки Kyocera TASKalfa 4003i
Ошибки Kyocera TASKalfa 400ci
Ошибки Kyocera TASKalfa 4012i
Ошибки Kyocera TASKalfa 4052ci
Ошибки Kyocera TASKalfa 4053ci
Ошибки Kyocera TASKalfa 406ci
Ошибки Kyocera TASKalfa 408ci
Ошибки Kyocera TASKalfa 420i
Ошибки Kyocera TASKalfa 4500i
Ошибки Kyocera TASKalfa 4501i
Ошибки Kyocera TASKalfa 4550ci
Ошибки Kyocera TASKalfa 4551ci
Ошибки Kyocera TASKalfa 4820w
Ошибки Kyocera TASKalfa 5002i
Ошибки Kyocera TASKalfa 5003i
Ошибки Kyocera TASKalfa 500ci
Ошибки Kyocera TASKalfa 5052ci
Ошибки Kyocera TASKalfa 5053ci
Ошибки Kyocera TASKalfa 508ci
Ошибки Kyocera TASKalfa 520i
Ошибки Kyocera TASKalfa 5500i
Ошибки Kyocera TASKalfa 5501i
Ошибки Kyocera TASKalfa 550c
Ошибки Kyocera TASKalfa 552ci
Ошибки Kyocera TASKalfa 5550ci
Ошибки Kyocera TASKalfa 5551ci
Ошибки Kyocera TASKalfa 6002i
Ошибки Kyocera TASKalfa 6003i
Ошибки Kyocera TASKalfa 6052ci
Ошибки Kyocera TASKalfa 6053ci
Ошибки Kyocera TASKalfa 620
Ошибки Kyocera TASKalfa 6500i
Ошибки Kyocera TASKalfa 6501i
Ошибки Kyocera TASKalfa 650c
Ошибки Kyocera TASKalfa 6550ci
Ошибки Kyocera TASKalfa 6551ci
Ошибки Kyocera TASKalfa 7002i
Ошибки Kyocera TASKalfa 7003i
Ошибки Kyocera TASKalfa 7052ci
Ошибки Kyocera TASKalfa 7353ci
Ошибки Kyocera TASKalfa 750c
Ошибки Kyocera TASKalfa 7550ci
Ошибки Kyocera TASKalfa 7551ci
Ошибки Kyocera TASKalfa 8000i
Ошибки Kyocera TASKalfa 8001i
Ошибки Kyocera TASKalfa 8002i
Ошибки Kyocera TASKalfa 8003i
Ошибки Kyocera TASKalfa 8052ci
Ошибки Kyocera TASKalfa 820
Ошибки Kyocera TASKalfa 8353ci
Ошибки Kyocera TASKalfa 9002i
Ошибки Kyocera TASKalfa 9003i


 Добрый день,может у кого- было подобное,возникает следующая ситуация с аппаратом, замятие бумаги в автоподатчике в районе регистрации, либо на выходе,когда лист почти весь вышел, Jam 9000,9110,либо 9410.При этом ролики захвата,подхвата, тормозной поменяны,прочищен тракт прохождения бумаги, проверены датчики, заменил клатчи захвата и регистрации,были загнуты в узле регистрации майларки,выправил их.Иногда автоподатчик может отработать без заминов, особенно при включении.Затем периодически возникают замины. Счетчик 136625 страниц
-

Alex12
- Увидел чернила
-

![]()

- Сайт
![]() Alex12 » Вт июл 28, 2020 12:34 pm
Alex12 » Вт июл 28, 2020 12:34 pm
Goldwater писал(а):Есть два варианта решения проблемы: японский подороже но побыстрее и русский подешевле но подольше.
Оба начинаются с обязательного обновления прошивки.
Вам который?
Прошивка не помогла, рассмотрю оба варианта.
-
Alex12
- Увидел чернила
-
![]()
- Сайт
-
-
Kyocera 1035 «бледная» печать
srMax в форуме Принтеры, МФУ, факсы, копиры формата A4
- 2
- 13963
srMax

Пт янв 23, 2015 2:49 pm
-
Kyocera 1035 «бледная» печать
-
-
Kyocera FS-1120d индикатор «Нет бумаги»
vs-dos в форуме Принтеры, МФУ, факсы, копиры формата A4
- 11
- 15148
СТРОНЦИЙ
Вт ноя 02, 2021 2:24 pm
-
Kyocera FS-1120d индикатор «Нет бумаги»
-
-
[SCANNER ERROR] Lamp Error Kyocera FS-1016
мастерчип в форуме Принтеры, МФУ, факсы, копиры формата A4
- 3
- 6646
Усатый Полосатый
Вс окт 28, 2018 11:08 pm
-
[SCANNER ERROR] Lamp Error Kyocera FS-1016
-
-
Kyocera Ecosys M2635dn «поворот» изображения
Искатель в форуме Принтеры, МФУ, факсы, копиры формата A4
- 10
- 6112
MatrixAgent
Ср апр 08, 2020 5:18 am
-
Kyocera Ecosys M2635dn «поворот» изображения
-
-
Стирание вала ведущей шестерни в «печке» Kyocera M2035dn
Грецкий орех в форуме Принтеры, МФУ, факсы, копиры формата A4
- 12
- 3479
СТРОНЦИЙ
Пн дек 13, 2021 3:35 pm
-
Стирание вала ведущей шестерни в «печке» Kyocera M2035dn
Вернуться в Принтеры, МФУ, копиры формата A3
Кто сейчас на форуме
Сейчас этот форум просматривают: нет зарегистрированных пользователей и гости: 23
10 Troubleshooting
This chapter explains the following topics:
Regular Maintenance ……………………………………………………………………………………………………………………… 10-2 Cleaning ………………………………………………………………………………………………………………………………. 10-2 Cleaning Glass Platen …………………………………………………………………………………………………………… 10-2
Cleaning Slit Grass ……………………………………………………………………………………………………………….. 10-3
Cleaning the inside of the Machine ………………………………………………………………………………………….. 10-4
Toner Container Replacement ………………………………………………………………………………………………… 10-7
Loading Paper ……………………………………………………………………………………………………………………. 10-10
Using the Maintenance Menu …………………………………………………………………………………………………………. 10-11
Troubleshooting …………………………………………………………………………………………………………………………… 10-12 Solving Malfunctions ……………………………………………………………………………………………………………. 10-12 Machine Operation Trouble ………………………………………………………………………………………………….. 10-12
Printed Image Trouble …………………………………………………………………………………………………………. 10-15
Responding to Messages …………………………………………………………………………………………………….. 10-18
Clearing Paper Jams ……………………………………………………………………………………………………………………. 10-30 Jam Location Indicators ……………………………………………………………………………………………………….. 10-30
Remove any jammed paper in Cassette 1 ………………………………………………………………………………. 10-31
Remove any jammed paper in Cassette 2 ………………………………………………………………………………. 10-33
Remove any jammed paper in Cassette 3 ………………………………………………………………………………. 10-35
Remove any jammed paper in the Multipurpose Tray ………………………………………………………………. 10-37
Remove any jammed paper inside of the Machine …………………………………………………………………… 10-38
Remove any jammed paper in Rear Cover ……………………………………………………………………………… 10-42
Remove any jammed paper in the Document Processor ………………………………………………………….. 10-46
10-1
Troubleshooting > Regular Maintenance
Regular Maintenance
Cleaning
Clean the machine regularly to ensure optimum printing quality.
CAUTION For safety, always unplug the power cord before cleaning the machine.
Cleaning Glass Platen
Wipe the inside of the document processor and the glass platen with a soft cloth dampened with alcohol or mild detergent.
IMPORTANT Do not use thinner or other organic solvents.
10-2
Troubleshooting > Regular Maintenance
Cleaning Slit Grass
When using the document processor, clean the slit glass surface and the reading guide with the soft cloth.
NOTE
Dirt on the slit glass or the reading guide may cause black streaks to appear in the output.
10-3
Troubleshooting > Regular Maintenance
Cleaning the inside of the Machine
To maintain optimum print quality, clean the interior of the machine each time you replace the toner container, and whenever vertical lines appear.
1 Open the front cover.
2 Lift the developer unit together with the toner container out of the machine.
A IMPORTANT Do not touch the developer unit or subject the developer unit to shock. Print quality will be degraded.
3 Place the developer unit together with the toner container flat on a clean, level surface.
IMPORTANT Do not place the developer unit together with the toner container on end.
10-4
Troubleshooting > Regular Maintenance
4 Remove the drum unit from the machine.
B B IMPORTANT Do not touch the drum or subject the drum to shock. Print quality will be degraded if the drum is exposed to direct sunlight or intense light.
5 Place the drum unit flat on a clean, level surface.
IMPORTANT Do not place the drum unit on end.
6 Use a clean, lint free cloth to clean dust and dirt away from the metal registration roller.
10-5
Troubleshooting > Regular Maintenance
7 On the drum unit, slide the main charger cleaner back and forth 2 or 3 times to clean the charger wire.
8 IMPORTANT • Before using the charger cleaner for the first time, remove the tape that holds the charger cleaner knob.
• After cleaning, make sure you restore the main charger cleaner to its home position (CLEANER HOME POSITION).
When cleaning is complete, return the drum unit to the original position.
9 Return the developer unit together with the toner container to its position, aligning the guides at both ends with the slots in the machine.
10 Close the front cover.
10-6
Troubleshooting > Regular Maintenance
Toner Container Replacement
When toner is empty, the following message will be displayed.
«Replace toner.» When toner runs low, the following message will be displayed. Make sure you have a new toner container available for replacement.
«Toner is low. (Replace when empty.)»
Frequency of Toner Container Replacement
The life of the toner containers depends on the amount of toner required to accomplish your printing jobs. According to ISO/IEC 19752 and EcoPrint switched off the toner container can print as follows (A4/Letter paper is assumed):
ECOSYS M2135dn/ECOSYS M2635dn/ECOSYS M2635dw Life of the Toner Container (Printable pages)
3,000 images
ECOSYS M2040dn/ECOSYS M2540dn/ECOSYS M2540dw Life of the Toner Container (Printable pages)
7,200 images
ECOSYS M2040dn/L Life of the Toner Container (Printable pages)
12,000 images
NOTE
• The average number of images that can be printed with the toner containers provided with the machine is as follows.
For ECOSYS M2135dn/ECOSYS M2635dn/ECOSYS M2635dw: 1,000 images For ECOSYS M2040dn/ECOSYS M2540dn/ECOSYS M2540dw/ECOSYS M2040dn/L: 3,600 images • To maintain quality, we recommend using genuine Kyocera toner containers, which must pass numerous quality inspections.
CAUTION Do not attempt to incinerate parts which contain toner. Dangerous sparks may cause burns.
10-7
Troubleshooting > Regular Maintenance
Replacing the Toner Container
1 Open the front cover.
2 Unlock the toner container.
3 Remove the toner container.
4 Put used toner containers into the plastic waste bag.
10-8
Troubleshooting > Regular Maintenance
5 Remove the new toner container from the box.
IMPORTANT Do not touch the points shown below.
6 Shake the toner container.
7 Install the toner container.
10-9
Troubleshooting > Regular Maintenance
8 Close the front cover.
NOTE
• If the front cover does not close, check that the new toner container is installed correctly.
• Return the exhausted toner container to your dealer or service representative. The collected toner container will be recycled or disposed in accordance with the relevant regulations.
Loading Paper
When Cassette # runs out of paper, the following messages will be displayed.
«Load paper in cassette #.» (# is a cassette number) «Load paper in MP tray.»
Loading Paper (page 3-2)
Loading Paper in the Multipurpose Tray (page 5-5)
NOTE
If [
Paper Setup Msg
] is set to [
On
], the confirmation screen for the paper setting will be displayed when a new paper is set. If a paper is changed, select [
Change
] and then change the settings of the paper.
Cassette 1 to 3 (page 8-22) MP Tray (page 8-22)
10-10
Troubleshooting > Using the Maintenance Menu
Using the Maintenance Menu
You can use the [
Maintenance Menu
] to adjust the print position and scan position, and maximize the print quality for the elevation of your location.
Maintenance Menu User Guide Adjust print position Item Printing start position Center Line Adjust scan position Platen Document Processor Adjust print quality Drum charge setting Altitude setting Drum refresh Scanning start position Center Line Scanning start position Scan end position Center Line Description
Enter or select the top margin start position for printing.
Value : 0 to 300 mm (in 5 mm increments)
Enter or select the left margin start position for printing for each available paper source. This setting is available for each cassette when optional paper feeders are installed.
Value : -25 to 25 mm (in 5 mm increments)
Enter or select the top margin scan start position for the platen.
Value : -45 to 45 mm (in 5 mm increments)
Enter or select the left margin scan start position for the platen.
Value : -50 to 50 mm (in 5 mm increments)
With a document processor installed, enter or select the top margin scan start positions for front and back.
Value : -25 to 25 mm (in 5 mm increments)
With a document processor installed, enter or select the bottom margin scan end positions for front and back.
Value : -25 to 25 mm (in 5 mm increments)
With a document processor installed, enter or select the left margin scan start positions for front and back.
Value : -50 to 50 mm (in 5 mm increments)
When print quality has deteriorated, the output of the main charger can be changed to restore print quality.
Value : 1 to 7
If you are using the machine at an altitude of 1,000 m or higher and print quality has deteriorated, the Altitude setting can be used to restore print quality.
Value : Normal, 1001 — 2000m, 2001 — 3000m, 3001 — 3500m
Perform Drum refresh when images show streaking with white lines.
10-11
Troubleshooting > Troubleshooting
Troubleshooting
Solving Malfunctions
The table below provides general guidelines for problem solving.
If a problem occurs with your machine, look into the checkpoints and perform procedures indicated on the following pages. If the problem persists, contact your Service Representative.
NOTE
When contacting us, the serial number will be necessary.
To check the serial number, refer to the following:
Checking the Equipment’s Serial Number (page i)
Machine Operation Trouble
When the following machine operation troubles occur, implement appropriate procedures.
Symptom
The screen does not respond when the power switch is turned on. Pressing the [
Start
] key does not produce copies.
Checkpoints
Check the power cord.
Corrective Actions
Connect both ends of the power cord securely.
Blank sheets are ejected. Paper often jams. 2 or more sheets are overlaps when ejected. (multi feed)
Reference Page
page 2-9
Is there a message on the screen?
Is the machine in Sleep mode?
Are the originals loaded correctly?
― Is the paper loaded correctly?
― Is the paper of the supported type? Is it in good condition?
Is the paper curled, folded or wrinkled?
Are there any loose scraps or jammed paper in the machine?
― Determine the appropriate response to the message and respond accordingly.
Select the [
Energy Saver
] key.
When placing originals on the platen, place them face-down and align them with the original size indicator plates.
When placing originals in the document processor, place them face-up.
Check that the settings of the application software.
Load the paper correctly.
Turn the orientation 180 degrees around in which the paper is positioned.
Remove the paper, turn it over, and reload it.
Replace the paper with new paper.
Remove any jammed paper.
Load the paper correctly.
page 10-18
page 2-26
page 5-2
page 5-3
―
page 3-4 page 3-4 page 3-4 page 3-4
page 10-30
page 3-2
10-12
Troubleshooting > Troubleshooting
Symptom
Printouts are wrinkled. Printouts are curled. ―
Checkpoints
Is the paper loaded correctly?
― Is the paper damp?
Is the paper damp?
Corrective Actions
Load the paper correctly.
Turn the orientation 180 degrees around in which the paper is positioned.
Replace the paper with new paper.
Reference Page
page 3-2 page 3-2 page 3-2
Turn the paper over in the cassette, or turn the orientation 180 degrees around in which the paper is positioned.
Replace the paper with new paper.
page 3-2 page 3-2
I can’t install the printer driver.
Cannot print. Cannot print with USB memory.
USB memory not recognized. While «Auto-IP» is set to [
On
], the IP address is not assigned automatically. Are you trying to install the driver using a host name with Wi-Fi or Wi-Fi Direct enabled?
Is the machine plugged in?
Is the machine powered on?
Are the USB cable and network cable connected?
Is the print job paused?
Is the USB host blocked?
― Is a value other than «0.0.0.0» entered for the IP address of TCP/IP(v4)?
Specify an IP address instead of a host name.
― Plug the power cord into an AC outlet.
Turn on the power switch.
Connect the correct USB cable and network cable securely.
Resume printing.
Select [
Unblock
] in the USB host settings.
Check that the USB memory is securely plugged into the machine.
Enter «0.0.0.0» for the IP address of TCP/IP(v4).
―
page 2-10
page 2-8
page 7-13
page 8-17
―
page 2-18
10-13
Troubleshooting > Troubleshooting
Symptom
Cannot send via SMB. Cannot send via the e-mail. The machine is emitting steam in the area around the paper ejection slot.
Checkpoints
Is the network cable connected?
Have the network settings for the equipment been configured properly?
Have the folder sharing settings been configured properly?
Has the SMB protocol been set to [ Has [
Host Name
] been entered properly? *1 Has [
Path
] been entered properly?
Has [
Login User Name
] been entered properly?
*1
*2 Has the same domain name been used for [
Host Name
] and [
Login User Name
]?
Has [
Login Password
] been entered properly?
Have exceptions for Windows Firewall been configured properly?
Do the time settings for the equipment, domain server, and data destination computer differ?
On
Is the screen displaying Send error?
Is the E-mail send size limit set in the SMTP server registered on the machine?
is low, or if damp paper was used.
]?
Check the room temperature to see if it name.
(«/») from [
Corrective Actions
Connect the correct network cable securely.
Configure the TCP/IP settings properly.
Check sharing settings and access privileges under the folder properties.
Set the SMB protocol setting to [
On
].
Check the name of the computer to which data is being sent.
Check the share name for the shared folder.
Check the domain name and login user Delete the domain name and backslash
Login User Name
Check the login password.
].
Configure exceptions for Windows Firewall properly.
Set the equipment, domain server, and data destination computer to the same time.
Refer to Responding to Send Error
.
Check the limit value is entered to «E mail Size Limit» of [
value as necessary. ] setting in Command Center RX and change the Depending on the printing environment and the paper’s condition, the heat generated during printing will cause the moisture in the paper to evaporate, and the steam emitted may look like smoke. This is not a problem, and you can continue printing. If the steam concerns you, raise the room temperature, or replace the paper with a newer, dryer paper.
*1 You can also enter a full computer name as the host name (for example, pc001.abcdnet.com).
*2 You can also enter login user names in the following formats: Domain_name/user_name (for example, abcdnet/james.smith) [email protected]_name (for example, [email protected])
Reference Page
page 2-8
page 8-10
page 3-10
page 8-13
page 5-16 page 5-16 page 5-16 page 5-16 page 5-16
page 3-13
―
page 10-27
page 2-51
― 10-14
Troubleshooting > Troubleshooting
Printed Image Trouble
When the following printed image trouble occurs, implement appropriate procedures.
Symptom
Printed images are totally too light.
Checkpoints
Is the paper damp?
Have you changed the density?
Corrective Actions
Replace the paper with new paper.
Select appropriate density level.
Reference Page
page 3-2
page 6-18
page 8-38
page 10-7
Printed images are too dark even though the background of the scanned original is white. Copies have a moire pattern (dots grouped together in patterns and not aligned uniformly). Is the toner distributed evenly within the toner container?
Is EcoPrint mode enabled?
Are the drum unit and developer unit installed correctly?
― ― Have you changed the density?
Shake the toner container from side to side several times.
Disable [
EcoPrint
] mode.
Correctly install the drum unit and developer unit.
Make sure the paper type setting is correct for the paper being used.
Select the [
System Menu/Counter
] key > [
Adjust/Maint.
] > [
Service Setting
] > [
Drum Refresh
], and then select [
Yes
].
Select appropriate density level.
― ― Is the original a printed photograph?
― ― Texts are not clearly printed. Did you choose appropriate image quality for the original?
― Select the [
System Menu/Counter
] key > [
Adjust/Maint.
] > [
Service Setting
] > [
Drum Refresh
], and then select [
Yes
].
Select the [
System Menu/Counter
] key > [
Adjust/Maint.
] > [
Service Setting
] > [
MC
] and increase the adjustment value. Increase the adjustment value 1 level at a time from the current value. If there is no improvement after the value is increased by 1 level, increase by 1 level again. If there is no improvement, lower in increments of 1 level from the original setting. If there is no improvement after the value is decreased by 1 level, decrease by 1 level again. If there is still no improvement, return the setting to the original value.
When making copies
Set the original image to [
Photo
].
When making copies
Set [
Sharpness
] to a value from [
-1
] to [
-3
].
When making copies
Select the [
System Menu/Counter
] key > [
Copy
] > [
DP Read Action
], and set to [
Quality Priority
].
Select appropriate image quality.
page 6-18
page 8-38
― ―
page 6-17
page 6-20
page 8-32
page 6-17
When making copies
Set [
Sharpness
] to a value from [
+1
] to [
+3
].
page 8-33
page 10-4
page 8-21
―
page 6-20
10-15
Troubleshooting > Troubleshooting
Symptom
Black points appear in white background parts of the image. Printed images are fuzzy. ― ―
Checkpoints
Is the original holder or the glass platen dirty?
Is the machine being used in conditions of very humid, or humidity or temperature rapidly changes?
―
Corrective Actions
Clean the original holder or the glass platen.
Select the [
System Menu/Counter
] key > [
Adjust/Maint.
] > [
Service Setting
] > [
Drum Refresh
], and then select [
Yes
].
Select the [
System Menu/Counter
] key > [
Adjust/Maint.
] > [
Service Setting
] > [
MC
] and increase the adjustment value. Increase the adjustment value 1 level at a time from the current value. If there is no improvement after the value is increased by 1 level, increase by 1 level again. If there is still no improvement, return the setting to the original value.
Use in an environment that has suitable humidity.
Reference Page
page 10-2
― ― ― Select the [
System Menu/Counter
] key > [
Adjust/Maint.
] > [
Service Setting
] > [
Drum Refresh
], and then select [
Yes
].
― Printed images are skewed. Are the originals placed correctly?
Irregular horizontal lines appear in the image. Is the paper loaded correctly?
― The altitude is 1000 m or higher and irregular horizontal white lines appear in the image. ― When placing originals on the platen, align them with the original size indicator plates.
When placing originals in the document processor, align the original width guides securely before placing the originals.
Check the position of the paper width guides.
Select the [
System Menu/Counter
] key > [
Adjustment/Maintenance
] > [
Service Setting
] > [
MC
] and increase the adjustment value. Increase the adjustment value 1 level at a time from the current value. If there is no improvement after the value is increased by 1 level, increase by 1 level again. If there is still no improvement, return the setting to the original value.
Select the [
System Menu/Counter
] key > [
Adjustment/Maintenance
] > [
Service Setting
] > [
Altitude Adjustment
], and set to an elevation one level higher than the current setting.
page 5-2
page 5-3
page 3-2
― ― 10-16
Troubleshooting > Troubleshooting
Symptom
The altitude is 1000 m or higher and dots appear in the image. ―
Checkpoints Corrective Actions
Select the [
System Menu/Counter
] key > [
Adjustment/Maintenance
] > [
Service Setting
] > [
Altitude Adjustment
], and set to an elevation one level higher than the current setting.
Reference Page
― Printouts have vertical lines. Is the slit glass dirty?
― Clean the slit glass.
Clean the charger inside of the machine.
page 10-3
page 10-4
Dirt on the top edge or back of the paper. Is the interior of the machine dirty?
Clean the interior of the machine.
page 10-4
Part of the image is periodically faint or shows white lines. ― ― ― The previous image remains and lightly printed. ― ― Open and then close the front cover.
Select the [
System Menu/Counter
] key > [
Adjust/Maint.
] > [
Service Setting
] > [
Drum Refresh
], and then select [
Yes
].
Select the [
System Menu/Counter
] key > [
Adjust/Maint.
] > [
Service Setting
] > [
MC
] and decrease the adjustment value. Decrease the adjustment value 1 level at a time from the current value. If there is no improvement after the value is decreased by 1 level, decrease by 1 level again. If there is still no improvement, return the setting to the original value.
Make sure the paper type setting is correct for the paper being used.
Select the [
System Menu/Counter
] key > [
Adjustment/Maintenance
] > [
Service Setting
] > [
MC
] and increase the adjustment value. Increase the adjustment value 1 level at a time from the current value. If there is no improvement after the value is increased by 1 level, increase by 1 level again. If there is still no improvement, return the setting to the original value.
― ― ―
page 8-20
― 10-17
Troubleshooting > Troubleshooting
Responding to Messages
If the message display or the computer displays any of these messages, follow the corresponding procedure.
A
NOTE
When contacting us, the serial number will be necessary. To check the serial number, refer to the following:
Checking the Equipment’s Serial Number (page i)
Checkpoints Message Access point was not detected.
Account error.
― ―
Corrective Actions Reference Page
Check if the access point has been set correctly.
Failed to specify Job Accounting when processing the job externally. The job is canceled. Select the [
OK
] key.
― —
C
Message Cannot connect to Authentication Server Check the connection with the server.
Cannot connect to Authentication Server Check the domain name.
Cannot connect to Authentication Server Check the host name.
Cannot connect to Authentication Server Set machine time to match server’s time.
Cannot connect to Server. Check the Connection Status.
Job is canceled.
Cannot connect.
— — — — — —
Checkpoints Corrective Actions
Check the connection status with the server.
Reference Page
— Check the domain name.
Check the host name.
Set machine time to match the server’s time.
page 9-2 page 9-2
page 2-17
Check the connection status with the server.
—
Cannot duplex print on this paper.
↑↓ (Displayed alternately) Press OK to continue using cassette #.
Did you select a paper size/type that cannot be duplex printed?
10-18 This appears when the Wi-Fi or Wi Fi Direct connection did not complete. Check the settings, and check the signal conditions.
Select [
Paper
] to select the available paper. Select [
OK
] to print without using Duplex function.
— ―
Troubleshooting > Troubleshooting
Message Checkpoints Cannot duplex print on this paper.
↑↓ (Displayed alternately) Press OK to using MP Tray.
Cannot read data in this ID Card.
Did you select a paper size/type that cannot be duplex printed?
―
Corrective Actions
Select [
Paper
] to select the available paper. Select the [
OK
] key to print without using Duplex function.
Reference Page
―
Cannot recognize.
Cannot use this function.
>> ##### Close # cover.
― ― Is there any cover which is open?
In registration process, the ID card information was not read correctly. Hold again the ID card over the ID card reading part.
If the same message still appears, the ID card may not be compatible with this product. Change it to another ID card.
Make sure your ID card has been registered.
This job is canceled because it is restricted by User Authorization or Job Accounting. Select the [
OK
] key.
―
Card Authentication Kit (B) Operation Guide
― Close the cover indicated on the screen.
Close the document processor.
― ―
Close the document processor and its cover.
Cooling… Please wait.
Is the document processor open?
― The machine is under the adjustment to maintain its quality. Please wait.
―
E
Message Error occurred. Turn the power switch off and on.
―
Checkpoints Corrective Actions
System error has occurred. Turn the power switch OFF and then ON.
Reference Page
―
F
Message Failed to store job retention data. Job is canceled.
FAX memory is full.
— —
Checkpoints Corrective Actions
The job is canceled. Select the [
OK
] key.
Reference Page
— FAX cannot be performed any more due to insufficient memory. The job is canceled. Select the [
OK
] key.
FAX Operation Guide
10-19
I
Troubleshooting > Troubleshooting
H
Message High temperature. Adjust room temp.
―
Checkpoints Corrective Actions
Adjust the temperature and the humidity of your room.
Reference Page
―
Message Incorrect account ID. Job is canceled.
Incorrect Login User Name or Password. Job is canceled.
*1
*1
— —
Checkpoints Corrective Actions
The account ID was incorrect when processing the job externally. The job is canceled. Select the [
OK
] key.
The login user name or password was incorrect when processing the job externally. The job is canceled. Select the [
OK
] key.
Reference Page
— —
Inner tray is full of paper. Remove the paper.
Insufficient memory. Cannot start the job.
— — Remove paper from the inner tray. Select [
Continue
] to resume printing. Select [
Cancel
] to cancel the job.
Job cannot be started. Try again later.
— — *1 When Auto Error Clear is set to [
On
], processing resumes automatically after a set amount of time elapses. For details on Auto Error Clear, refer to the following:
Auto Err. Clear (page 8-27)
J
Message Job Accounting restriction exceeded. Job is canceled.
Checkpoints
Is the acceptable printing count restricted by Job Accounting exceeded?
Corrective Actions
The printing count exceeded the acceptable count restricted by Job Accounting. Cannot print any more. This job is canceled. Select the [
OK
] key.
Reference Page
―
K
Message KPDL error. Job is canceled.
*1
―
Checkpoints Corrective Actions
PostScript error has occurred. The job is canceled. Select the [
OK
] key.
Reference Page
― *1 When Auto Error Clear is set to [
On
], processing resumes automatically after a set amount of time elapses. For details on Auto Error Clear, refer to the following:
Auto Err. Clear (page 8-27)
10-20
Troubleshooting > Troubleshooting
L
Message Checkpoints Load paper in cassette #.
↑↓ (Displayed alternately) Press OK to continue using cassette #.
Is the indicated cassette out of paper?
Load paper in cassette #.
↑↓ (Displayed alternately) Set selected size paper and press [OK].
Is the indicated cassette out of paper?
Load paper in MP tray.
↑↓ (Displayed alternately) Press OK to continue using MP tray.
Is the paper of the selected size loaded in the multipurpose tray?
Load paper in MP tray.
↑↓ (Displayed alternately) Set selected size paper and press [OK].
Is the paper of the selected size loaded in the multipurpose tray?
Low temperature. Adjust room temp.
―
M
Corrective Actions
Load paper.
Select [
Paper
] to select the other paper source. Select the [ selected paper source.
OK
] key to print on the paper in the currently Load paper.
Select [
Paper
] to select the other paper source. Select the [ selected paper source.
OK
] key to print on the paper in the currently Load paper.
Select [
Paper
] to select the other paper source. Select the [ selected paper source.
OK
] key to print on the paper in the currently Load paper.
Select [
Paper
] to select the other paper source. Select the [ selected paper source.
OK
] key to print on the paper in the currently Adjust the temperature and the humidity of your room.
Reference Page
page 3-2 page 3-2 page 3-2 page 3-2
―
Message Machine failure. Call service.
―
Checkpoints Maximum number of scanned pages. Job is canceled.
Memory card error.
Job is canceled.
Is the acceptable scanning count exceeded?
—
Corrective Actions
An error has occurred in the machine. Make a note of the error code displayed on the message display, and contact your service representative.
Cannot scan pages any more. Job is canceled. Select the [
OK
] key.
Reference Page
― — An error has occurred on the memory card. Job is canceled. Select [
End
].
04: Insufficient space on the memory card to complete this operation. Move data or delete unneeded data.
— 10-21
Troubleshooting > Troubleshooting
Message Memory is full. Job is canceled.
Memory is full.
Print job cannot be processed completely.
*1
— —
Checkpoints Corrective Actions
The process cannot be performed due to insufficient memory. If only [
End
] is available, select [
End
]. The job will be canceled.
Unable to continue the job as the memory is used up. Select [
Continue
] to print the scanned pages. The print job cannot be processed completely. Select [
Cancel
] to cancel the job.
The machine may reproduce the same originals by arranging the following settings: • • Select [
On
] of RAM Disk Mode in System Menu, and then decrease the RAM Disk Size.
Select [ Menu.
Printer Priority
] of Optional Memory in System
NOTE
Before changing the RAM Disk Mode or Optional Memory setting, contact your administrator.
Reference Page
—
page 8-30
*1 When Auto Error Clear is set to [
On
], processing resumes automatically after a set amount of time elapses. For details on Auto Error Clear, refer to the following:
Auto Err. Clear (page 8-27)
N
Message Non-genuine Toner. Press [Help].
Checkpoints
Is the installed toner container our own brand?
Corrective Actions
The manufacturer assumes no responsibility for damage caused by a non-genuine toner. We recommend that you only use genuine toner containers. When you want to use the toner container currently installed, select the [
OK
] key and the [ more.
Stop
] key simultaneously for 3 seconds or
Reference Page
—
P
Message Paper jammed above Cassette 1.
―
Checkpoints Corrective Actions
If a paper jam occurs, the machine will stop and the location of the jam will be indicated on the screen. Leave the machine on and select [
Help
paper.
] on the screen, and follow the instruction to remove the jammed
Reference Page
page 10-38
10-22
Troubleshooting > Troubleshooting
Message Paper jammed at MP tray.
Paper jammed in Cassette #.
Paper jammed in document processor.
― ―
Paper jammed in Rear cover.
―
Polling box limit exceeded. Job is canceled.
Print overrun. Job is paused.
—
Printing multiple copies is not allowed.
—
Checkpoints
Is [
OK
] displayed on the screen?
Corrective Actions
If a paper jam occurs, the machine will stop and the location of the jam will be indicated on the screen. Leave the machine on and follow the instruction to remove the jammed paper.
A paper jam has occurred in the document processor. Leave the machine on and select [
Help
remove the jammed paper.
] on the screen, and follow the instruction to If a paper jam occurs, the machine will stop and the location of the jam will be indicated on the screen. Leave the machine on and select [
Help
paper.
] on the screen, and follow the instruction to remove the jammed The specified box is full, and no further storage is available; Job is canceled. Select the [ box.
OK
] key. Try to perform the job again after printing or deleting data from the The job was paused because print processing is taking a long time. Select [
Continue
] to restart the job. To cancel the job, select [
Cancel
].
Only one copy is available. Select [
Continue
] to continue printing. Select [
Cancel
] to cancel the job.
Reference Page
page 10-30
page 10-46
page 10-42
FAX Operation Guide
— —
R
Message RAM disk error. Press [OK].
―
Refreshing drum…
Please wait.
―
Checkpoints Corrective Actions
An error has occurred on the RAM disk. Job is canceled. Select the [
OK
] key.
The possible error codes and their descriptions are as follows.
04: Insufficient space on the RAM disk. If the optional RAM dis is installed, increase the RAM Disk Size by changing RAM Disk Mode in System Menu.
NOTE
The range of RAM disk size can be increased by selecting [
Printer Priority
] in Optional Memory. The machine is under the adjustment to maintain its quality. Please wait.
Reference Page
page 8-30
― 10-23
Troubleshooting > Troubleshooting
Message Checkpoints Corrective Actions Reference Page Register with Google Cloud Print. Are you sure?
Removable Memory is full. Job is canceled.
document processor.
press Start key.
*1 Remove original from Replace all originals and
― ― Are there any originals left in the document processor?
― The message is displayed when this machine receives the register request for Google Cloud Print. Select the [
Yes
] key to register the printer as a Google Cloud Print device. Select the [
No
] key to cancel the registration.
Job is canceled. Select [
End
].
Insufficient free space in the removable memory. Delete unneeded files.
Remove originals from the document processor.
Remove originals from the document processor, put them back in their original order, and place them again. Select [
Cancel
] to cancel the job.
― ―
page 10-46
―
Replace MK.
Replace the toner.
Restricted by Job Accounting.
Cannot print.
― ― — Replacement of the parts in the maintenance kit is necessary at every 100,000 pages of printing and requires professional servicing. Contact your Service Representative.
Replace the toner container.
This job is canceled because it is restricted by Job Accounting. Select the [
OK
] key.
―
page 10-7
— *1 When Auto Error Clear is set to [
On
], processing resumes automatically after a set amount of time elapses. For details on Auto Error Clear, refer to the following:
Auto Err. Clear (page 8-27)
S
Message Scanner memory is full. Job is canceled.
Scheduled sending jobs exceeded.
Send Error.
*1
— — —
Checkpoints Corrective Actions
Scanning cannot be performed any more due to insufficient memory. The job is canceled. Select the [
OK
] key.
The number of jobs has exceeded the limit set for delayed transmission. Select the [
OK
] key.
An error has occurred during transmission. The job is canceled. Select the [
OK
] key.
Refer to Responding to Send Error for the error code and corrective actions.
Reference Page
page 8-30
—
page 10-27
*1 When Auto Error Clear is set to [
On
], processing resumes automatically after a set amount of time elapses. For details on Auto Error Clear, refer to the following:
Auto Err. Clear (page 8-27)
10-24
Troubleshooting > Troubleshooting
T
Message The device cannot be connected because allowed connections would be exceeded.
—
The phone receiver is off the hook. Hang Up.
—
Checkpoints Corrective Actions
Release the connection of an unused mobile device, or set an auto break time on the machine to break connections to mobile devices.
Put down the receiver.
Clean the slit glass.
Reference Page
—
FAX Operation Guide
page 10-3
The slit glass requires cleaning.
The toner container is improperly installed.
This ID Card is already registered.
This user account is locked out.
Contact administrator Job is canceled.
Toner is low.
(Replace when empty.)
— — Are the toner container and developer unit installed correctly?
— — Correctly install the toner container and developer unit.
Your ID card has already been registered. Change it to another ID card.
page 10-4
— Contact administrator.
The job is canceled. Select the [
OK
] key.
— It is almost time to replace the toner container. Obtain a new toner container.
—
U
Message Unknown Toner Installed. PC Checkpoints Corrective Actions
Does the installed toner container’s regional specification match the machine’s?
Install the specified toner container.
Reference Page
— 10-25
Troubleshooting > Troubleshooting
Message USB memory error.
Job is canceled.
Checkpoints
Is writing to a removable memory prohibited?
—
Corrective Actions
An error occurred in the removable memory. The job stopped. Select the [
OK
] key.
The possible error codes and their descriptions are as follows.
01: Connect a removable memory that can be written to.
An error occurred in the removable memory. The job stopped. Select [
OK
].
The possible error codes and their descriptions are as follows.
01: The amount of data that can be saved at once has been exceeded. Turn the power OFF/ON. If the error still occurs, the removable memory is not compatible with the machine. Use the removable memory formatted by this machine. If the removable memory cannot be formatted, it is damaged. Connect a compatible removable memory.
Reference Page
— — 10-26
Troubleshooting > Troubleshooting
Responding to Send Error
Error Code 1101 1102 Message
Failed to send the e-mail.
Failed to send via FTP.
Failed to send via SMB.
Failed to send via SMB.
Failed to send the e-mail.
Failed to send via FTP.
1103
Failed to send via SMB.
Failed to send via FTP.
1104
Failed to send the e-mail.
Corrective Actions
Check the host name of the SMTP server on the Command Center RX.
Check the host name of FTP.
Check the host name of SMB.
Check the SMB settings.
• Login user name and login password
NOTE
If the sender is a domain user, specify the domain name.
• Host name • Path Check the following on the Command Center RX.
• SMTP login user name and login password • POP3 login user name and login password • E-mail size limit Check the FTP settings.
• Login user name and login password
NOTE
If the sender is a domain user, specify the domain name.
• • Path Folder share permissions of the recipient Check the SMB settings.
• Login user name and login password
NOTE
If the sender is a domain user, specify the domain name.
• • Path Folder share permissions of the recipient Check the FTP settings.
• Path • Folder share permissions of the recipient Check the e-mail address.
NOTE
If the address is rejected by the domain, you cannot send the email.
Reference Page
page 2-51
page 5-18
page 5-16 page 5-16
page 2-51
page 5-18
page 5-16
page 5-18
page 5-15
10-27
Troubleshooting > Troubleshooting
Error Code 1105 1106 1131 1132 Message
Failed to send via SMB.
Failed to send the e-mail.
Failed to send via FTP.
Failed to send the e-mail.
Failed to send via FTP.
Failed to send the e-mail.
Failed to send via FTP.
2101
Failed to send via SMB.
Failed to send via FTP.
Failed to send the e-mail.
Corrective Actions
Select [
On
] of the SMB settings on the Command Center RX.
Select [
On
] of the SMTP settings on the Command Center RX.
Select [
On
] of the FTP settings on the Command Center RX.
Check the sender address of SMTP on the Command Center RX.
Select [
On
] of the secure protocol settings on the Command Center RX.
Check the following of the SMTP server.
• Is SMTP over SSL available?
• Is the encryption available?
Check the following of the FTP server.
• Is FTPS available?
• Is the encryption available?
• • • • Check the network and SMB settings.
• The network cable is connected.
The hub is not operating properly.
The server is not operating properly.
Host name and IP address Port number • • • Check the network and FTP settings.
• The network cable is connected.
• The hub is not operating properly.
The server is not operating properly.
Host name and IP address Port number • • • • Check the network and Command Center RX.
• The network cable is connected.
The hub is not operating properly.
The server is not operating properly.
POP3 server name of the POP3 user SMTP server name
Reference Page
page 8-13
page 2-51
page 8-12
page 2-51
page 8-16
Refer to the
Command Center RX User Guide
.
— — —
page 2-51
10-28
Troubleshooting > Troubleshooting
Error Code 2102 2103 Message
Failed to send via FTP.
Failed to send the e-mail.
2201 2202 2203 2231 2204 3101
Failed to send the e-mail.
Failed to send via FTP.
Failed to send via SMB.
Failed to send the e-mail.
Failed to send the e-mail.
Failed to send via FTP.
3201 0007 4201 4701 5101 5102 5103 5104 7101 7102 7103 720f 9181
Failed to send the e-mail.
— —
Corrective Actions
• • Check the network.
• The network cable is connected.
The hub is not operating properly.
The server is not operating properly.
Check the following of the FTP server.
• Is FTP available?
• The server is not operating properly.
Check the network.
• The network cable is connected.
• The hub is not operating properly.
• The server is not operating properly.
• • Check the network.
• The network cable is connected.
The hub is not operating properly.
The server is not operating properly.
Check the e-mail size limit of the SMTP settings on the Command Center RX.
Check the authentication methods of both the sender and the recipient.
Check the network.
• The network cable is connected.
• The hub is not operating properly.
• The server is not operating properly.
Check the SMTP user authentication method of the recipient.
Turn the power switch off and back on. If this error occurs several times, make a note of the displayed error code and contact your service representative.
Reference Page
— — — —
page 2-51
— — —
page 2-10
The scanned original exceeds the acceptable number of pages of 999. Send the excess pages separately.
— 10-29
Troubleshooting > Clearing Paper Jams
Clearing Paper Jams
If a paper jam occurs, the message display will display «Paper Jam.» and the machine will stop. Refer to these procedures to remove the jammed paper.
Jam Location Indicators
1 Shows the location of a paper jam.
2 Displays the Help screen.
1
Paper jammed in Cassette 1.
JAM****
2
Help
NOTE
For details on Help Screen, refer to the following:
Help Screen (page 2-14)
If a paper jam occurs, the location of the jam will be displayed on the message display as well as the clearing instructions.
Help Paper jammed in Cassette 1.
JAM****
G F E D A B C Paper Jam Location Indicator A B C D E F G Paper Jam Location
Cassette 1 Cassette 2 Cassette 3 Multipurpose Tray Inside the Machine Rear Cover Document Processor
Reference Page
page 10-31
page 10-33
page 10-35
page 10-37
page 10-38
page 10-42
page 10-46
10-30
Troubleshooting > Clearing Paper Jams
Remove any jammed paper in Cassette 1
CAUTION • Do not reuse jammed papers.
• If the paper tears during removal, be sure to remove any loose scraps of paper from inside the machine. Scraps of paper left in the machine could cause subsequent jamming.
1 Pull Cassette 1 out toward you until it stops.
2 Remove any jammed paper.
3 Push Cassette 1 back in.
10-31
Troubleshooting > Clearing Paper Jams
4 Open the front cover.
5 Close the front cover.
10-32
Troubleshooting > Clearing Paper Jams
Remove any jammed paper in Cassette 2
CAUTION • Do not reuse jammed papers.
• If the paper tears during removal, be sure to remove any loose scraps of paper from inside the machine. Scraps of paper left in the machine could cause subsequent jamming.
1 Pull Cassette 2 out toward you until it stops.
2 Remove any jammed paper.
3 Push Cassette 2 back in.
10-33
Troubleshooting > Clearing Paper Jams
4 Open the front cover.
5 Close the front cover.
10-34
Troubleshooting > Clearing Paper Jams
Remove any jammed paper in Cassette 3
CAUTION • Do not reuse jammed papers.
• If the paper tears during removal, be sure to remove any loose scraps of paper from inside the machine. Scraps of paper left in the machine could cause subsequent jamming.
1 Pull Cassette 3 out toward you until it stops.
2 Remove any jammed paper.
3 Push Cassette 3 back in.
10-35
Troubleshooting > Clearing Paper Jams
4 Open the front cover.
5 Close the front cover.
10-36
Troubleshooting > Clearing Paper Jams
Remove any jammed paper in the Multipurpose Tray
CAUTION • Do not reuse jammed papers.
• If the paper tears during removal, be sure to remove any loose scraps of paper from inside the machine. Scraps of paper left in the machine could cause subsequent jamming.
1 Remove any jammed paper.
2 Remove all the paper.
3 Reload the paper.
10-37
Troubleshooting > Clearing Paper Jams
Remove any jammed paper inside of the Machine
CAUTION • Do not reuse jammed papers.
• If the paper tears during removal, be sure to remove any loose scraps of paper from inside the machine. Scraps of paper left in the machine could cause subsequent jamming.
1 Pull Cassette 1 out toward you until it stops.
2 Remove any jammed paper.
3 Push Cassette 1 back in.
10-38
Troubleshooting > Clearing Paper Jams
4 Open the front cover.
5 Lift the developer unit together with the toner container out of the machine.
A IMPORTANT Do not touch the developer unit or subject the developer unit to shock. Print quality will be degraded.
6 Place the developer unit together with the toner container flat on a clean, level surface.
IMPORTANT Do not place the developer unit together with the toner container on end.
10-39
Troubleshooting > Clearing Paper Jams
7 Remove the drum unit from the machine.
B B IMPORTANT • The fuser unit inside the machine is hot. Do not touch it, as it may result in burn injury.
• Do not touch the drum or subject the drum to shock. Print quality will be degraded if the drum is exposed to direct sunlight or intense light.
8 Place the drum unit flat on a clean, level surface.
9 IMPORTANT Do not place the drum unit on end.
Open Feed Cover (C).
C
10-40
Troubleshooting > Clearing Paper Jams
10 Remove any jammed paper.
11 Push Feed Cover back in.
12 Return the drum unit to the original position.
13 Return the developer unit together with the toner container to its position, aligning the guides at both ends with the slots in the machine.
10-41
Troubleshooting > Clearing Paper Jams
14 Close the front cover.
Remove any jammed paper in Rear Cover
CAUTION The fixing unit is extremely hot. Take sufficient care when working in this area, as there is a danger of getting burned.
1 Open Rear Cover.
2 Remove any jammed paper.
10-42
Troubleshooting > Clearing Paper Jams
3 Open the fuser cover (D).
D 4 Remove any jammed paper.
5 Pull Cassette 1 out toward you until it stops.
6 Open Feed Cover.
10-43
Troubleshooting > Clearing Paper Jams
7 Remove any jammed paper.
8 Push Feed Cover back in.
9 Push Cassette 1 back in.
10 Push Rear Cover.
10-44
Troubleshooting > Clearing Paper Jams
11 Open the front cover.
12 Close the front cover.
10-45
Troubleshooting > Clearing Paper Jams
Remove any jammed paper in the Document Processor
CAUTION • Do not reuse jammed papers.
• If the paper tears during removal, be sure to remove any loose scraps of paper from inside the machine. Scraps of paper left in the machine could cause subsequent jamming.
1 Remove the originals from the Original Table.
2 Open the front cover and remove any jammed paper.
3 Remove originals inside the document processor.
10-46
Troubleshooting > Clearing Paper Jams
4 Push the cover.
10-47
|
0 / 0 / 0 Регистрация: 01.02.2018 Сообщений: 60 |
|
|
1 |
|
|
05.10.2020, 09:03. Показов 26518. Ответов 14
Отпечатывает когда как, когда полностью и на выходе застрянет, когда пол страницы застрянет, что можно сделать, почистить может что то
0 |

|
Programming Эксперт 94731 / 64177 / 26122 Регистрация: 12.04.2006 Сообщений: 116,782 |
05.10.2020, 09:03 |
|
Ответы с готовыми решениями: KYOCERA ECOSYS M6026cdn Kyocera Ecosys M5521 Бумага застревает в принтере Застревает бумага в HP 1018 В принтере HP 1018 застревает бумага, застревает не доходя до печки, останавливаясь… 14 |
|
Модератор
8716 / 3341 / 244 Регистрация: 25.10.2010 Сообщений: 13,601 |
|
|
05.10.2020, 09:24 |
2 |
|
Визуально осмотрите аппарат, мб кусочек зажеванной бумаги застрял где-нибудь?
0 |
|
0 / 0 / 0 Регистрация: 01.02.2018 Сообщений: 60 |
|
|
05.10.2020, 11:25 [ТС] |
3 |
|
Не, нигде нету ничего
0 |
|
374 / 248 / 64 Регистрация: 06.12.2015 Сообщений: 922 |
|
|
05.10.2020, 11:34 |
4 |
|
Пробег аппаратика какой? Пружинку на выходном датчике после печки усиливали?
0 |
|
2531 / 939 / 179 Регистрация: 03.03.2015 Сообщений: 6,552 |
|
|
05.10.2020, 13:12 |
5 |
|
Без указания пробега аппарата — разговор совершенно ни о чем. Если пробег от 30 тыщ — печку однозначно на ремонт.
0 |
|
0 / 0 / 0 Регистрация: 01.02.2018 Сообщений: 60 |
|
|
05.10.2020, 15:36 [ТС] |
6 |
|
Печки переставлял с других Добавлено через 2 минуты
0 |
|
2531 / 939 / 179 Регистрация: 03.03.2015 Сообщений: 6,552 |
|
|
05.10.2020, 16:31 |
7 |
|
Пружина тут ни при чем, хоть ее нахождение и описано выше достаточно точно. Через «просто почистить» вопрос точно не решится. Вы уверены, что хотите взяться за самостоятельную диагностику? Кроме больших затрат времени, это предполагает и базовые знания ро матчасти — они есть?
0 |
|
374 / 248 / 64 Регистрация: 06.12.2015 Сообщений: 922 |
|
|
05.10.2020, 16:33 |
8 |
|
Пружинка на флажке выходного датчика, надо чуток изогнуть кончик, чтоб флажок возвращался хорошо. Поищите в инете, есть видео про это. Хорошоб огласить последние ошибки из EVENT LOG. А печку то подкидывали точно рабочую?
0 |
|
2531 / 939 / 179 Регистрация: 03.03.2015 Сообщений: 6,552 |
|
|
05.10.2020, 16:39 |
9 |
|
Вова, какая пружина, если лист всегда останавливается при активированном датчике?
0 |
|
374 / 248 / 64 Регистрация: 06.12.2015 Сообщений: 922 |
|
|
05.10.2020, 17:27 |
10 |
|
А разве под описание это пружинка не подходит?
Отпечатывает когда как, когда полностью и на выходе застрянет
0 |

|
2531 / 939 / 179 Регистрация: 03.03.2015 Сообщений: 6,552 |
|
|
05.10.2020, 21:38 |
11 |
|
Нет, конечно. Наполовину.
0 |
|
374 / 248 / 64 Регистрация: 06.12.2015 Сообщений: 922 |
|
|
06.10.2020, 08:54 |
12 |
|
Топикстартер к сожалению не раскрывает подробностей замятий бумаги и что он имеет в виду под «на выходе застрянет» непонятно(это уже на выходном шашлыке иль при выходе из печки)!
0 |
|
0 / 0 / 0 Регистрация: 01.02.2018 Сообщений: 60 |
|
|
07.10.2020, 07:07 [ТС] |
13 |
|
В общем, печь поменял на какую но, может быть они обе дохные, первый лист распечатывается, текст весь присутствует но на выходе сверху застревает, а второй лист в печке застревает, в бесшумном режиме реже листы застревают.
0 |
|
374 / 248 / 64 Регистрация: 06.12.2015 Сообщений: 922 |
|
|
07.10.2020, 08:09 |
14 |
|
первый лист распечатывается, текст весь присутствует но на выходе сверху застревает Лист только с текстом иль всеж есть мазня на нем?
0 |
|
2531 / 939 / 179 Регистрация: 03.03.2015 Сообщений: 6,552 |
|
|
07.10.2020, 08:40 |
15 |
|
печь поменял на какую но, может быть они обе дохные, первый лист распечатывается, текст весь присутствует но на выходе сверху застревает, а второй лист в печке застревает, в бесшумном режиме реже листы застревают. Закономерный результат, лучшего было ждать неоткуда, могло быть много хуже. Какое отношение, такой и плод.
0 |