Модератор: central
Re: NCR SelfServ 6683
Добрый всем!
А кто может расшифровать 85 и 02 статусы по БРМ
С инкриптором по 18 и 38 вроде кривые ключи
Беда приходит после инкассаторов :))
Перехожу в разряд невидимок, скоро забанят :)) НАВСЕГДА
- Bura
- Ведущий специалист
- Сообщения: 927
- Зарегистрирован: 05 фев 2011, 18:40
- Откуда: Питер
- Авто: citrien c4 cedan
Re: NCR SelfServ 6683
![]() central » 15 авг 2017, 16:13
central » 15 авг 2017, 16:13
M Status: 85
Error: Too Many Consecutive Suspected Foreign Objects
1.
Possible Root Cause: Foreign object remains.
Isolation: Inspect feed unit for foreign objects.
Resolution: Remove foreign object.
2.
Possible Root Cause: Dirty camera lens.
Isolation: Inspect camera lens for dirt / debris.
Resolution: Clean camera lens.
3.
Possible Root Cause: Picking problem.
Isolation: Inspect picking mechanism for alignment and correct operation.
Resolution: Re‐align or repair pick mechanism.
TROUBLE-SHOOTER
-

central - Модератор

- Сообщения: 2083
- Зарегистрирован: 20 дек 2010, 03:59
- Авто: Майбах

Re: NCR SelfServ 6683
![]() olegka_n » 06 фев 2018, 16:20
olegka_n » 06 фев 2018, 16:20
А есть у кого нить описание RAS-команд и как в них зайти?
-

olegka_n - Нач. отдела
- Сообщения: 1347
- Зарегистрирован: 18 июн 2010, 17:21
- Откуда: Сибирь

Re: NCR SelfServ 6683
![]() Bura » 06 фев 2018, 16:39
Bura » 06 фев 2018, 16:39
Заходить просто, вынимаешь усб кабель и нажимаешь две ближних клавиши и вот ты в командах. А команды гугли, где то были здесь
Беда приходит после инкассаторов :))
Перехожу в разряд невидимок, скоро забанят :)) НАВСЕГДА
- Bura
- Ведущий специалист
- Сообщения: 927
- Зарегистрирован: 05 фев 2011, 18:40
- Откуда: Питер
- Авто: citrien c4 cedan
Re: NCR SelfServ 6683
![]() olegka_n » 06 фев 2018, 17:05
olegka_n » 06 фев 2018, 17:05
Зашел через отключение питания и переключение 8-го свича (аля BNA)
-
olegka_n - Нач. отдела
- Сообщения: 1347
- Зарегистрирован: 18 июн 2010, 17:21
- Откуда: Сибирь
Re: NCR SelfServ 6683
![]() siberian_diesel » 13 июн 2018, 18:35
siberian_diesel » 13 июн 2018, 18:35
Коллеги, подскажите куда копать? На 83 банкомате в ассистенте диспенсер тестирует, прием наличных работает, а при попытке в аптре сделать тестирование кассет (4-10) шумит средней частью, без диспенсера, а потом dispenser fault….
- siberian_diesel
- Прохожий
- Сообщения: 1
- Зарегистрирован: 13 июн 2018, 18:31
- Авто: Mini r50
Re: NCR SelfServ 6683
![]() Bazalin » 10 июл 2018, 06:34
Bazalin » 10 июл 2018, 06:34
Всем здравствуйте, назрел небольшой вопросик про «Вилку» Покета BRM, которая держит купюры и приподнимает при выдаче. Держится она на соплях, на мой взгляд это конструктивный недочет или ловушка производителя, чтобы развести на бабло. У нас в банке случаев 5 её поломки точно, NCR трактует как вандализм и выставляет счет на 50 килорублей для замены «Кармана» Покета целиком  . Очень интересно узнать такие аказии происходят ещё у кого? Особенно интересует «Сбер» и какова их судьба, свои решили пока клеить, моя попытка оказалась успешной.
- Bazalin
- Прохожий
- Сообщения: 1
- Зарегистрирован: 18 мар 2014, 04:27
- Откуда: Москва
Re: NCR SelfServ 6683
![]() Dan » 10 июл 2018, 16:37
Dan » 10 июл 2018, 16:37
siberian_diesel писал(а):шумит средней частью, без диспенсера, а потом dispenser fault….
Какой это частью шумит, без диспенсера?
Какой M-Status для dispenser fault?
Scientists study the world as it is, engineers create the world that never has been
-

Dan - Нач. отдела
- Сообщения: 2817
- Зарегистрирован: 28 окт 2010, 23:20

Re: NCR SelfServ 6683
![]() olegka_n » 12 июл 2018, 16:07
olegka_n » 12 июл 2018, 16:07
Bazalin писал(а):Всем здравствуйте, назрел небольшой вопросик про «Вилку» Покета BRM, которая держит купюры и приподнимает при выдаче. Держится она на соплях, на мой взгляд это конструктивный недочет или ловушка производителя, чтобы развести на бабло. У нас в банке случаев 5 её поломки точно, NCR трактует как вандализм и выставляет счет на 50 килорублей для замены «Кармана» Покета целиком
Это действительно вандализм. По крайней мере у нас. На видео видно , что клиенты пытаются достать мелочь из «пепельницы». Данную проблему решаем просто: на суперклей клеим сами ушки, снизу подклеиваем пластик от симкарты, чтоб он захватывал и само ушко и саму вилку. Пластик от симки гибкий и даже если ушко отваливается повторно от вилки, она все равно остается на месте.
Добавлено спустя 1 минуту 16 секунд:
siberian_diesel писал(а):Коллеги, подскажите куда копать? На 83 банкомате в ассистенте диспенсер тестирует, прием наличных работает, а при попытке в аптре сделать тестирование кассет (4-10) шумит средней частью, без диспенсера, а потом dispenser fault….
там же слева лампочки есть, где красная там и косяк искать надо.
-
olegka_n - Нач. отдела
- Сообщения: 1347
- Зарегистрирован: 18 июн 2010, 17:21
- Откуда: Сибирь
Re: NCR SelfServ 6683
![]() kvn77 » 11 авг 2018, 00:15
kvn77 » 11 авг 2018, 00:15
для siberian_diesel
Если это новый ATM? то в «пепельнице» транспортировочный уплотнитель, 4-10 шатер не отрывается.
- kvn77
- Прохожий
- Сообщения: 1
- Зарегистрирован: 11 авг 2018, 00:06
Re: NCR SelfServ 6683
![]() olegka_n » 15 авг 2018, 13:56
olegka_n » 15 авг 2018, 13:56
Сегодня ночью вандалы опять отломали ушки у нижней вилки. По видео — пытались что то достать. Снова заклеил. Но в добавок сломали рог у вилки, которая снаружи в карман входит, прижимает деньги сверху. В хлам.
-
olegka_n - Нач. отдела
- Сообщения: 1347
- Зарегистрирован: 18 июн 2010, 17:21
- Откуда: Сибирь
Re: NCR SelfServ 6683
![]() olegka_n » 17 сен 2018, 21:00
olegka_n » 17 сен 2018, 21:00
mishin220 писал(а):Добрый день . А есть партномер этой вилки заказать ?
У этой вилки нет, только модулем в сборе за конские деньги, а у втрой есть, но ее нет в России
-
olegka_n - Нач. отдела
- Сообщения: 1347
- Зарегистрирован: 18 июн 2010, 17:21
- Откуда: Сибирь
Re: NCR SelfServ 6683
![]() extra » 20 сен 2018, 19:36
extra » 20 сен 2018, 19:36
Доброго времени суток ,
Столкнулись с проблемой не могу понять проблема на уровне софта и на уровне железа . АТМ вкл. работает пару часов и вырубается системник а сам аппарат работает , Выкл и Вкл появляется значёк Виндовса и все перезагрузка . Выкл АТМ на пару часов он опять Вкл но работает пару часов и вырубается , в операторском отсеке мигают три зеленых индикатора , кто-то сталкивался с данной проблемой ?
NCR SelfServ 6683 AANDC 04.04.01
- extra
- Новичок
- Сообщения: 5
- Зарегистрирован: 27 окт 2017, 17:03
Re: NCR SelfServ 6683
![]() mikle » 20 сен 2018, 22:39
mikle » 20 сен 2018, 22:39
Проверяйте блок питания системника, или температурный контроль на материнке
- mikle
- Специалист
- Сообщения: 470
- Зарегистрирован: 09 июн 2010, 14:12
- Откуда: Из подмосковных лесов
- Авто: японский 4х4
Re: NCR SelfServ 6683
![]() Rasul » 21 сен 2018, 06:02
Rasul » 21 сен 2018, 06:02
pepper писал(а):Приветствую.
Saf, какие-либо проблемы были с запуском данной зверюги ? Мы уже третью неделю бьёмся в Тюмени и всё никакCASH_RECYCLER
NACC-01-USBBrunchRecycler
Sequence: 0000000068
14.07.2016 16:53:16
S-Data (Hex)
01
M-Status: 48,Upper control board error
M-Data (Hex):
05 44 2D 00
Добрый день!
Скажите, пожалуйста, как решилась данная проблема. У меня на 6687 такая же беда. Замена контроллера верхнего модуля не помогла.
Добавлено спустя 3 минуты 16 секунд:
Была у нас волна замен матплат реверсайдов. Бывало, что по несколько раз меняли. Наверно у вас тоже из этой серии..
- Rasul
- Новичок
- Сообщения: 14
- Зарегистрирован: 16 май 2011, 06:28
Re: NCR SelfServ 6683
![]() extra » 21 сен 2018, 16:13
extra » 21 сен 2018, 16:13
mikle писал(а):Проверяйте блок питания системника, или температурный контроль на материнке
Самое первое что делали это БП и на контроль перегрева процессора , в итоге ноль ……..
- extra
- Новичок
- Сообщения: 5
- Зарегистрирован: 27 окт 2017, 17:03
Re: NCR SelfServ 6683
![]() Dan » 21 сен 2018, 16:48
Dan » 21 сен 2018, 16:48
extra
Логи Windows что говорят?
Scientists study the world as it is, engineers create the world that never has been
-
Dan - Нач. отдела
- Сообщения: 2817
- Зарегистрирован: 28 окт 2010, 23:20
Re: NCR SelfServ 6683
![]() Trn » 21 сен 2018, 19:35
Trn » 21 сен 2018, 19:35
Добрый день, подскажите есть ли у кого инструкция по настройке кассет в плане магнитов? или там переключателями выставляется?
- Trn
- Прохожий
- Сообщения: 1
- Зарегистрирован: 21 сен 2018, 19:23
Re: NCR SelfServ 6683
![]() Dan » 21 сен 2018, 21:06
Dan » 21 сен 2018, 21:06
Trn Каких кассет?
Scientists study the world as it is, engineers create the world that never has been
-
Dan - Нач. отдела
- Сообщения: 2817
- Зарегистрирован: 28 окт 2010, 23:20
Вернуться в BNA/GBNA/GBRU
Кто сейчас на конференции
Сейчас этот форум просматривают: нет зарегистрированных пользователей и гости: 2
BNA HARD Информация (BNA)
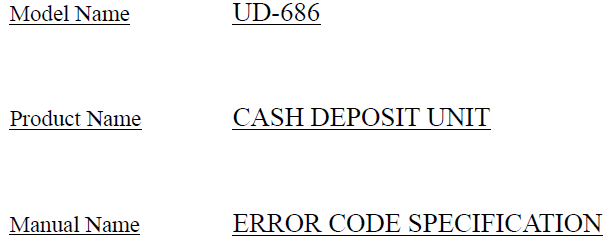
Cash Deposit Unit UD-686: Error Code Specification
08.11.202109.11.2021
Admin
0 Комментариев
BNA, English, error codes, UD-686, Информация, Спецификация
Депозитный модуль UD-686: расшифровка кодов ошибок Хотите первым получать уведомления о публикации новых материалов — подписывайтесь на рассылку! If you
Читать далее
BNA HARD Информация (BNA)
Cash Deposit Unit UD-50C: Error Code Specification
13.05.2017
Admin
0 Комментариев
BNA, error codes, personaS, UD-50C, Информация
Депозитный модуль UD-40: расшифровка кодов ошибок Хотите первым получать уведомления о публикации новых материалов — подписывайтесь на рассылку!
Читать далее
BNA HARD Информация (BNA)
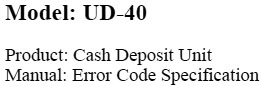
Cash Deposit Unit UD-40: Error Code Specifications
12.05.201713.05.2017
Admin
0 Комментариев
5873, BNA, error codes, personaS, UD-40
Депозитный модуль UD-40: расшифровка кодов ошибок Хотите первым получать уведомления о публикации новых материалов — подписывайтесь на рассылку!
Читать далее
-
Contents
-
Table of Contents
-
Bookmarks
Quick Links
All manuals and user guides at all-guides.com
5877 Personas ATM
Operator Manual
Publication ID: B006-6210-A000
Date: 0701
Related Manuals for NCR 5877
Summary of Contents for NCR 5877
-
Page 1
All manuals and user guides at all-guides.com 5877 Personas ATM Operator Manual Publication ID: B006-6210-A000 Date: 0701… -
Page 2
NCR, therefore, reserves the right to change specifications without prior notice. All features, functions, and operations described herein may not be marketed by NCR in all parts of the world. In some instances, photographs are of equipment prototypes. Therefore, before using this document, consult with your NCR representative or NCR office for information that is applicable and current. -
Page 3
All manuals and user guides at all-guides.com Federal Communications Commission (FCC) Radio Frequency Interference Statement Note: This equipment has been tested and found to comply with the limits for a Class A digital device, pursuant to Part 15 of the FCC Rules. -
Page 4
If this equipment does cause interference, which can be determined by turning the equipment off and on, the user is encouraged to consult an NCR service representative immediately. Caution NCR Corporation is not responsible for any radio or television… -
Page 5
All manuals and user guides at all-guides.com Revision Record Date Page Description of Change Jul 01 New Publication P77 ATM — Operator Manual… -
Page 6
All manuals and user guides at all-guides.com P77 ATM — Operator Manual… -
Page 7: About This Document
All manuals and user guides at all-guides.com About This Document Purpose And Audience This publication is intended for NCR customer personnel who are responsible for the day-to-day operation and maintenance of an NCR 5877 Personas ATM (P77). This manual shows operators how to maintain the P77 in an operational state by explaining the replenishment procedures.
-
Page 8: What This Manual Contains
If your application has not been migrated to ADI-2, your ATM’s error reporting and diagnostic system will be similar to previous generations of NCR ATMs, for example the 5070 or 5085. A list of the OES codes used in the previous generation of ATMs is included.
-
Page 9: Guide To Illustrations Used In This Manual
All manuals and user guides at all-guides.com About This Document Guide To Illustrations Used In This Manual Guide To Illustrations Used In This Manual The illustrations are used as follows: Solid or black outlined objects (highlighted) are the objects on which an action is to be performed Outlined arrows indicate the direction of movement for the closest highlighted object.
-
Page 10
All manuals and user guides at all-guides.com About This Document Guide To Illustrations Used In This Manual P77 ATM — Operator Manual… -
Page 11: Table Of Contents
All manuals and user guides at all-guides.com Table of Contents Contents About This Document Purpose And Audience ……………..vii What This Manual Contains …………… viii Guide To Illustrations Used In This Manual……..ix Chapter 1 An Introduction To The Personas 77 What is the P77 ………………1-1 Module Location………………1-3 Chapter 2…
-
Page 12
All manuals and user guides at all-guides.com Table of Contents Security Enclosures with Controlled Access Electronic Lock ..2-15 Opening the Mas-Hamilton Lock ……….2-15 Closing the Mas-Hamilton Lock ……….2-18 Activating The Mas-Hamilton Lock……….2-19 Mas-Hamilton Documentation ………… 2-22 Front Operator Interface ………….. -
Page 13
All manuals and user guides at all-guides.com Table of Contents Chapter 6 Journal Printer Replenishing Paper — Graphics Printer……….6-1 Clearing Jams — Graphics Printer …………6-13 Chapter 7 Maintenance What Is Required To Maintain The P77? ………..7-1 Daily Tasks ………………7-1 Weekly Tasks………………7-1 Emptying the Dip Reader Debris Bin ……….7-1 Replenishment ………………7-1 Cleaning Kit………………..7-2… -
Page 14
All manuals and user guides at all-guides.com Table of Contents P77 ATM — Operator Manual… -
Page 15: An Introduction To The Personas 77
All manuals and user guides at all-guides.com Table of Contents An Introduction To The Personas 77 Chapter 1 An Introduction To The Personas 77 What is the P77 1- 1 Module Location P77 ATM — Operator Manual…
-
Page 16
All manuals and user guides at all-guides.com Table of Contents An Introduction To The Personas 77 P77 ATM — Operator Manual… -
Page 17: What Is The P77
An Introduction To The Personas 77 What is the P77 What is the P77 The NCR 5877 Personas ATM (P77) is a PC-based self service ATM. The heart of the P77 is a PC, running self-service application software. This self-service application software manages transactions and controls the various devices, such as printers, card readers, monitor screens and keyboards.
-
Page 18
All manuals and user guides at all-guides.com An Introduction To The Personas 77 What is the P77 P77 With Bunch Presenter P77 ATM — Operator Manual… -
Page 19: Module Location
All manuals and user guides at all-guides.com An Introduction To The Personas 77 Module Location Module Location The external and internal locations of the modules which comprise the P77 are shown in the following illustrations. External Location Facia Display/Touchscreen Receipt Printer Functional Display Keys Dip Card Reader…
-
Page 20
All manuals and user guides at all-guides.com An Introduction To The Personas 77 Module Location Internal Location PC Core Floppy Disk Drive On/Off Switch CD Rom Supervisor/Operator Panel Receipt Printer Journal Printer Currency Dispenser Purge Bin Security Enclosure Door Cabinet Front Door I/O Panel Power Supply… -
Page 21: Getting Started
All manuals and user guides at all-guides.com Table of Contents Getting Started Chapter 2 Getting Started Opening/Closing The Exterior Of The P77 Top Cabinet — Opening Top Cabinet — Closing Security Enclosure — Opening Security Enclosure — Closing Switching Power On/Off Mains Power Switch Security Enclosure Interlock Switch Entering Supervisor Mode…
-
Page 22
All manuals and user guides at all-guides.com Table of Contents Getting Started Security Enclosures with Controlled Access Electronic Lock 2-15 Opening the Mas-Hamilton Lock 2-15 Closing the Mas-Hamilton Lock 2-18 Activating The Mas-Hamilton Lock 2-19 Mas-Hamilton Documentation 2-22 Front Operator Interface 2-23 Operator Panel 2-23… -
Page 23: Opening/Closing The Exterior Of The P77
All manuals and user guides at all-guides.com Getting Started Opening/Closing The Exterior Of The P77 Opening/Closing The Exterior Of The P77 The top cabinet and security enclosure of the P77 can be opened independently of each other. This enables the consumables in the top cabinet to be replenished without compromising the security of the cash dispenser.
-
Page 24
All manuals and user guides at all-guides.com Getting Started Opening/Closing The Exterior Of The P77 Using both hands, carefully pull the facia out of the top cabinet until the slides are fully extended. P77 ATM — Operator Manual… -
Page 25: Top Cabinet — Closing
All manuals and user guides at all-guides.com Getting Started Opening/Closing The Exterior Of The P77 Close the top cabinet as follows: Top Cabinet — Closing Caution Do not grip the facia when closing the top cabinet. With your hands flat, either side of the keypad, push the facia into the top cabinet until the lock locks.
-
Page 26: Security Enclosure — Opening
All manuals and user guides at all-guides.com Getting Started Opening/Closing The Exterior Of The P77 Open the security enclosure as follows: Security Enclosure — Insert the key, in the cabinet lock, and turn it clockwise. Opening Open the cabinet door. Unlock the safe door, in accordance with the relevant instructions detailed under “Open/Closing The Standard Security Enclosure”…
-
Page 27: Security Enclosure — Closing
All manuals and user guides at all-guides.com Getting Started Opening/Closing The Exterior Of The P77 Closing the security enclosure as follows: Security Enclosure — Close and lock the security enclosure door in accordance with Closing the relevant instructions detailed under “Open/Closing The Standard Security Enclosure”…
-
Page 28: Switching Power On/Off
All manuals and user guides at all-guides.com Getting Started Switching Power On/Off Switching Power On/Off There are two power switches fitted to the P77: Mains Power Switch — switches mains power On/Off. Security Enclosure Interlock Switch — switches power, to the cash dispenser located inside the security enclosure, On/Off.
-
Page 29: Security Enclosure Interlock Switch
All manuals and user guides at all-guides.com Getting Started Switching Power On/Off When the safe door is opened, power to the cash dispenser is Security Enclosure switched off by an isolator switch. The dispenser isolator switch is Interlock Switch located, behind a cover, on the bottom of the safe. Note: power is automatically restored to the cash dispenser when the safe door is closed.
-
Page 30: Entering Supervisor Mode
All manuals and user guides at all-guides.com Getting Started Entering Supervisor Mode Entering Supervisor Mode Entering Supervisor Mode depends on whether you are accessing the top cabinet or the security enclosure of the P77: top cabinet — manually security enclosure — automatically. When you access the top cabinet of the P77, you will have to enter Manually Supervisor Mode manually:…
-
Page 31: Auto-Supervisor
All manuals and user guides at all-guides.com Getting Started Entering Supervisor Mode The P77 is fitted with an Auto-Supervisor facility. However, this Auto-Supervisor only applies when accessing the security enclosure. The P77 will automatically enter Supervisor Mode when the safe door is opened. When the safe door is closed, the P77 automatically returns to the Normal Mode.
-
Page 32: Opening/Closing The Standard Security Enclosure
All manuals and user guides at all-guides.com Getting Started Opening/Closing The Standard Security Enclosure Opening/Closing The Standard Security Enclosure The standard security enclosure door will have a locking handle plus either: one lock (primary) or, two locks (primary and secondary). The make of lock (Standard, or Sargent and Greenleaf) fitted depends on the configuration of the P77.
-
Page 33
All manuals and user guides at all-guides.com Getting Started Opening/Closing The Standard Security Enclosure Position of Primary and Secondary Locks The following illustrations show the relative positions of primary and secondary locks. Primary Lock Locking Handle Secondary Lock Opening Sequence of the Primary and Secondary Locks If the P77 has a primary and a secondary lock fitted, the opening sequence is as follows: Unlock the secondary lock. -
Page 34: Keylocks
Keylocks a random factory-set combination. If one key should get lost, a new pair of keys should be obtained and the keylock setting changed..Refer to NCR publication, ATM Field Service Information (SAMM) FM0547, Chapter 20, for details. Unlock A Keylock To unlock a keylock, insert the key into the lock and turn it clockwise as far as it will turn.
-
Page 35
All manuals and user guides at all-guides.com Getting Started Opening/Closing The Standard Security Enclosure Opening Index Changing Index Dial Factory Set Combination — Unlocking If the combination lock is set at the original factory setting of 50, unlock it as follows, dialling on the opening index: If a keylock is fitted to the combination lock, insert the key into the lock and turn it clockwise. -
Page 36
All manuals and user guides at all-guides.com Getting Started Opening/Closing The Standard Security Enclosure Customer Set Combination — Unlocking If the combination has been set at a three-number combination, for example 36-82-44, unlock it as follows: If a keylock is fitted to the combination lock, insert the key into the lock and turn it clockwise. -
Page 37: Security Enclosures With Controlled Access Electronic Lock
All manuals and user guides at all-guides.com Getting Started Security Enclosures with Controlled Access Electronic Lock Security Enclosures with Controlled Access Electronic Lock This section describes how to operate the Mas-Hamilton lock to gain access to the security enclosure of the P77. Note: Before the Mas-Hamilton lock can be operated, it must be activated.
-
Page 38
Take note of the 6-digit access code (three pairs of two), allocated by the KMC. Unlock and open the exterior of the 5877. Spin the opening/closing knob of the lock counter clockwise, this charges the lock, until EC is displayed on the LCD. -
Page 39
All manuals and user guides at all-guides.com Getting Started Security Enclosures with Controlled Access Electronic Lock Hold the PI key against the key reader to charge the PI key: Keypad Key Reader Knob (Opening/Closing) 10 If the correct 6-digit code has been entered and a valid PI key has been pressed against the key reader, OPr will be displayed on the LCD. -
Page 40: Closing The Mas-Hamilton Lock
Note: Take a note of the close code as it is required by the KMC (Step 6). Close the exterior of the 5877 and remove the key. Phone the KMC. Note: Ensure that the lock/doors on the 5877 are locked/closed before contacting the KMC.
-
Page 41: Activating The Mas-Hamilton Lock
All manuals and user guides at all-guides.com Getting Started Activating The Mas-Hamilton Lock Activating The Mas-Hamilton Lock Activating the Mas-Hamilton Lock requires a coordinated effort between a Dispatcher at the Key Management Centre (KMC) and First Line Maintenance (FLM) or Route person (the term FLM will be used throughout the following instructions).
-
Page 42
All manuals and user guides at all-guides.com Getting Started Activating The Mas-Hamilton Lock The roles of the Dispatcher and FLM personnel are as follows: Dispatcher — activates: the Mas-Hamilton lock in the program and the Supervisor Audit (SA) key. FLM person physically goes to the Mas-Hamilton lock on the P77 to complete the activation where he/she will need the following: the initialized SA key… -
Page 43
All manuals and user guides at all-guides.com Getting Started Activating The Mas-Hamilton Lock Enter the factory combination 50 25 50. After the factory combination has been correctly entered, the ISA symbol will be displayed. Hold the SA key against the Mas- Hamilton lock’s key reader until POC is displayed. -
Page 44: Mas-Hamilton Documentation
All manuals and user guides at all-guides.com Getting Started Activating The Mas-Hamilton Lock Further details of how to set up and manage the Mas-Hamilton lock Mas-Hamilton operations are detailed in the following Mas-Hamilton Group Documentation publications: CENCON System 2000 Access Control System Getting Started Guide Supervisor Guide Special Supervisor Guide…
-
Page 45: Front Operator Interface
Function Display Keys (FDKs) and the cardholder keyboard to display any error messages or State Of Health (SOH) messages, and to access the various Supervisor Mode programs described in the NCR publication, Self Service Terminal Supervisor Functions Manual (B006-0000-4718). P77 ATM — Operator Manual…
-
Page 46: State Of Health Messages
All manuals and user guides at all-guides.com Getting Started Front Operator Interface The switches and indicator on the front operator panel are: Switch /Indicator Description Normal /Supervisor Used to enter the Supervisor Mode and return to Switch Normal Mode Comms Indicator Flashes to indicate that the P77 is communicating with a host system.
-
Page 47: Hardware Reset
All manuals and user guides at all-guides.com Getting Started Hardware Reset Hardware Reset A Reset switch is provided on the operator panel. When the Reset switch is pressed, the P77 executes its diagnostic procedures, reloads the system software and initialises the user application program.
-
Page 48: Inserting/Removing Diskettes
All manuals and user guides at all-guides.com Getting Started Inserting/Removing Diskettes Inserting/Removing Diskettes To insert or remove a diskettes from the disk drive proceed as follows. Open the top cabinet. If necessary, press in the button shown below to eject the current diskette from the disk drive.
-
Page 49
All manuals and user guides at all-guides.com Getting Started Inserting/Removing Diskettes Insert the new diskette into the disk drive as shown. Standard Enclosure Close and lock the top cabinet. P77 ATM — Operator Manual 2-27… -
Page 50: Inserting/Removing Compact Disks
All manuals and user guides at all-guides.com Getting Started Inserting/Removing Compact Disks Inserting/Removing Compact Disks To insert or remove a Compact Disk (CD) from the disk drive proceed as follows. Open the top cabinet. Press the button shown below to open the disk tray and, if necessary, remove the current CD.
-
Page 51
All manuals and user guides at all-guides.com Getting Started Inserting/Removing Compact Disks Either, re-press the button, or lightly push the end of the tray inwards until it retracts automatically. Close and lock the top cabinet. P77 ATM — Operator Manual 2-29… -
Page 52
All manuals and user guides at all-guides.com Getting Started Inserting/Removing Compact Disks 2-30 P77 ATM — Operator Manual… -
Page 53
All manuals and user guides at all-guides.com Table of Contents Error Reporting Chapter 3 Error Reporting Error Reporting — Using State Of Health How Errors In The PC Module Are Reported Error Reporting — Using OES Codes The OES Codes OES Codes — Structure OES Codes OES Codes — Qualifier Codes… -
Page 54: Error Reporting
All manuals and user guides at all-guides.com Table of Contents Error Reporting P77 ATM — Operator Manual…
-
Page 55: Error Reporting — Using State Of Health
The asterisks (*) indicate the skill level required to fix whatever problem is generating the current SOH message, and also indicate which VERIFY SOH option (see NCR publication, Self Service Terminal Supervisor Functions Manual, B006-0000-4718) should be selected to clear the SOH message.
-
Page 56
All manuals and user guides at all-guides.com Error Reporting Error Reporting — Using State Of Health Some SOH messages require to be acted upon immediately, others indicate you should be prepared to carry out a replenishment/ replacement procedure in the near future. If required, use the relevant VERIFY SOH option as described in the Supervisor Manual to clear the SOH message. -
Page 57: How Errors In The Pc Module Are Reported
All manuals and user guides at all-guides.com Error Reporting How Errors In The PC Module Are Reported How Errors In The PC Module Are Reported The SOH reporting system does not report on the operator panel if a fault has occurred on one of the boards in the PC module. The boards in the PC module are tested during power-up and at reset.
-
Page 58
All manuals and user guides at all-guides.com Error Reporting How Errors In The PC Module Are Reported The location of the LED, for the Pele board, is shown in the following illustrations. The LED for the Phantom board is located on the SSPA board. P77 ATM — Operator Manual… -
Page 59: Error Reporting — Using Oes Codes
All manuals and user guides at all-guides.com Error Reporting Error Reporting — Using OES Codes Error Reporting — Using OES Codes P77s which do not use the State of Health (SOH) reporting system run applications which have been written to the migrated Application Device Interface (ADI).
-
Page 60
All manuals and user guides at all-guides.com Error Reporting Error Reporting — Using OES Codes OES Codes The OES codes are shown in the following tables: Code Module Receipt Printer Journal Printer Currency Dispenser Currency Cassette Type 1 Currency Cassette Type 2 Currency Cassette Type 3 Currency Cassette Type 4 Magnetic card reader/writer… -
Page 61: Currency Dispenser
All manuals and user guides at all-guides.com Table of Contents Currency Dispenser Chapter 4 Currency Dispenser Replenishing Currency Cassettes Emptying The Currency Purge/Reject Bin Clearing Jams — Bunch Dispenser P77 ATM — Operator Manual…
-
Page 62
All manuals and user guides at all-guides.com Table of Contents Currency Dispenser P77 ATM — Operator Manual… -
Page 63: Replenishing Currency Cassettes
All manuals and user guides at all-guides.com Currency Dispenser Replenishing Currency Cassettes Replenishing Currency Cassettes To replenish the currency cassettes in your P77 proceed as follows: Open the security enclosure. Lift the catch on the right-hand side of the currency cassette you wish to replenish and pull the cassette out of the P77.
-
Page 64
Replenishing Currency Cassettes If the cassette is to be sent to a secure area for refilling, do so in accordance with your institute’s rules. Refer to NCR publication H-8015-STD1-01/02-08 Currency Cassette Owner’s Manual, D1- 1297-A for details of how to open and replenish the currency cassette. -
Page 65: Emptying The Currency Purge/Reject Bin
All manuals and user guides at all-guides.com Currency Dispenser Emptying The Currency Purge/Reject Bin Emptying The Currency Purge/Reject Bin To empty the standard currency purge/reject bin in your P77, proceed as follows: Open the security enclosure. P77 ATM — Operator Manual…
-
Page 66
All manuals and user guides at all-guides.com Currency Dispenser Emptying The Currency Purge/Reject Bin Lift the catch on the left-hand side of the bin and pull the bin out of your P77. Remove the currency from the bin. Slide the empty bin into your P77 until it locks in place. Close and lock the security enclosure. -
Page 67: Clearing Jams — Bunch Dispenser
All manuals and user guides at all-guides.com Currency Dispenser Clearing Jams — Bunch Dispenser Clearing Jams — Bunch Dispenser The indication of a currency dispenser jam will be a State Of Health (SOH) message. To clear a currency jam proceed as follows: Open the security enclosure.
-
Page 68
All manuals and user guides at all-guides.com Currency Dispenser Clearing Jams — Bunch Dispenser The procedures for clearing a jam depend on the cause and location of the jam. The SOH message will indicate where the jam is. If SOH indicates a bill jam at the pick sensor/ module, or a gulp feed failure, go to Step 4. -
Page 69
All manuals and user guides at all-guides.com Currency Dispenser Clearing Jams — Bunch Dispenser Bill jam at the pick sensor/module or a gulp feed failure — Lift the green catch on the right-hand side of the currency cassette indicated in the SOH message (cassette position 1 is the top cassette) and pull the cassette out of the P77. -
Page 70
All manuals and user guides at all-guides.com Currency Dispenser Clearing Jams — Bunch Dispenser Bill jam in the main transport — Turn the pulley on the side of the dispenser counter-clockwise until the bills enter the stacking area. P77 ATM — Operator Manual… -
Page 71
All manuals and user guides at all-guides.com Currency Dispenser Clearing Jams — Bunch Dispenser Insert your hand through the hole in the side of the dispenser as shown, and remove the bills. Proceed to Step15. P77 ATM — Operator Manual… -
Page 72
All manuals and user guides at all-guides.com Currency Dispenser Clearing Jams — Bunch Dispenser Bill jam at sensor 2 — Turn the large gear wheel on the side of the dispenser until the clamp arm, indicated below, is in its up position. -
Page 73
All manuals and user guides at all-guides.com Currency Dispenser Clearing Jams — Bunch Dispenser 10 Insert your hand through the hole in the side of the dispenser as shown, and remove the bills. Proceed to Step15. P77 ATM — Operator Manual 4-11… -
Page 74
All manuals and user guides at all-guides.com Currency Dispenser Clearing Jams — Bunch Dispenser 11 Bill jam at sensor 1 — Lift the catch on the left-hand side of the purge bin and pull the purge bin out of the dispenser. 4-12 P77 ATM — Operator Manual… -
Page 75
All manuals and user guides at all-guides.com Currency Dispenser Clearing Jams — Bunch Dispenser 12 Reach inside the hole vacated by the purge bin and remove any jammed bills. If you cannot reach the bills, turn the drums indicated below until the bills are in an accessible position and then remove them. -
Page 76
All manuals and user guides at all-guides.com Currency Dispenser Clearing Jams — Bunch Dispenser 14 Bill jam at sensor 4, 5 or 6 — If required, turn the drums in the top of the transport until the bills are in an accessible position. Reach into the transport and remove the bills. -
Page 77: Receipt Printer
All manuals and user guides at all-guides.com Table of Contents Receipt Printer Chapter 5 Receipt Printer Replenishing Paper Clearing Jams P77 ATM — Operator Manual…
-
Page 78
All manuals and user guides at all-guides.com Table of Contents Receipt Printer P77 ATM — Operator Manual… -
Page 79: Replenishing Paper
Receipt Printer Replenishing Paper Replenishing Paper The paper used to replenish your printer must meet the specification given in NCR publication Consumable Items For Self Service, (B006-4992-0000). To replace the printer paper proceed as follows: Open the top cabinet. Press the Normal/Supervisor switch, on the operator panel, to the Supervisor position.
-
Page 80
All manuals and user guides at all-guides.com Receipt Printer Replenishing Paper Open the print mechanism cover using the green locking lever — the cover will spring open. Lift out the paper roll core, spindle and any remaining paper. Pull out any paper from the paper entry slot. Discard the paper roll core and any remaining paper, but retain the spindle. -
Page 81
All manuals and user guides at all-guides.com Receipt Printer Replenishing Paper Close the print mechanism cover — push it down until it clicks shut. Remove sufficient paper from the new supply roll so that no traces of glue or tape remain on the roll. Tear off the end of the supply roll to make a reasonably straight edge without creases. -
Page 82
All manuals and user guides at all-guides.com Receipt Printer Replenishing Paper Manually guide the paper into the printer entry slot until it stops — approximately 75 mm (3 in.). P77 ATM — Operator Manual… -
Page 83
All manuals and user guides at all-guides.com Receipt Printer Replenishing Paper Press the paper feed button and continue to feed in the paper manually until it is gripped by the print mechanism. The printer will automatically feed the paper through the printer, print a test graphic and feed the receipt out of the transport. -
Page 84: Clearing Jams
All manuals and user guides at all-guides.com Receipt Printer Clearing Jams Clearing Jams The indication of a receipt printer jam will be a State Of Health message. To clear a jam within the receipt printer, proceed as follows: Open the top cabinet. Press the Normal/Supervisor switch, on the operator panel, to the Supervisor position.
-
Page 85
All manuals and user guides at all-guides.com Receipt Printer Clearing Jams Remove any jammed paper from the exit slot/end of the transport. Lift the transport, to align it with the exit slot, and slide the printer forwards until the plunger engages. Check that the transport is engaged correctly with the exit slot. -
Page 86
All manuals and user guides at all-guides.com Receipt Printer Clearing Jams Paper jammed in the printer transport — remove it carefully using your fingers. P77 ATM — Operator Manual… -
Page 87
All manuals and user guides at all-guides.com Receipt Printer Clearing Jams Paper jammed under the printer cover — open the print mechanism cover using the green locking lever — the cover will spring open. P77 ATM — Operator Manual… -
Page 88
All manuals and user guides at all-guides.com Receipt Printer Clearing Jams 10 Remove any torn or crumpled paper from under the cover. 11 Make sure that the receipt roll can turn freely by spinning the paper roll away from the front of the printer. If the roll does not turn freely, remove it from the printer and check that there are no foreign objects preventing the paper roll from rotating. -
Page 89
All manuals and user guides at all-guides.com Receipt Printer Clearing Jams 13 Close the print mechanism cover — push it down until it clicks. 14 If necessary, tear off the end of paper roll to make a reasonably straight edge. P77 ATM — Operator Manual 5-11… -
Page 90
All manuals and user guides at all-guides.com Receipt Printer Clearing Jams 15 Manually guide the paper roll into the printer entry slot until it stops — approximately 75 mm (3 in.). 5-12 P77 ATM — Operator Manual… -
Page 91
All manuals and user guides at all-guides.com Receipt Printer Clearing Jams 16 Press the paper feed button and continue to feed in the paper manually until it is gripped by the print mechanism. The printer will automatically feed the paper through the printer, print a test graphic and feed the receipt out of the transport. -
Page 92
All manuals and user guides at all-guides.com Receipt Printer Clearing Jams 5-14 P77 ATM — Operator Manual… -
Page 93
All manuals and user guides at all-guides.com Table of Contents Journal Printer Chapter 6 Journal Printer Replenishing Paper — Graphics Printer Clearing Jams — Graphics Printer 6-13 P77 ATM — Operator Manual… -
Page 94
All manuals and user guides at all-guides.com Table of Contents Journal Printer P77 ATM — Operator Manual… -
Page 95: Journal Printer
The paper used to replenish your printer must meet the specification given in NCR publication Consumable Items for Self Service, B006-0000-4992. If your ATM is configured with Electronic Journal, refer to the NCR publication NDC+ Supervisor’s Reference Manual, B006-0000-2487. To replace the journal paper roll proceed as follows: Open the top cabinet.
-
Page 96
All manuals and user guides at all-guides.com Journal Printer Replenishing Paper — Graphics Printer If there is any paper left on the supply roll, press the paper feed button to wind on a few turns of blank paper to protect the printed journal roll. -
Page 97
All manuals and user guides at all-guides.com Journal Printer Replenishing Paper — Graphics Printer Remove the printed journal roll by pushing it up from underneath. If necessary, tear off the paper against the serrated cutter. P77 ATM — Operator Manual… -
Page 98
All manuals and user guides at all-guides.com Journal Printer Replenishing Paper — Graphics Printer Remove the take-up spindle from the paper roll. P77 ATM — Operator Manual… -
Page 99
All manuals and user guides at all-guides.com Journal Printer Replenishing Paper — Graphics Printer Lift one of the green locking levers to open the print mechanism. P77 ATM — Operator Manual… -
Page 100
All manuals and user guides at all-guides.com Journal Printer Replenishing Paper — Graphics Printer Remove the paper roll core and any remaining paper from the printer. P77 ATM — Operator Manual… -
Page 101
All manuals and user guides at all-guides.com Journal Printer Replenishing Paper — Graphics Printer Remove sufficient paper from the new journal roll so that there are no traces of glue or tape. Place the new roll in the journal printer as shown. Tear the end of the paper to leave a reasonably clean and straight edge without creases. -
Page 102
All manuals and user guides at all-guides.com Journal Printer Replenishing Paper — Graphics Printer 10 Lifting the paper entry cover with one hand, feed the paper through until the end is visible. Release the paper entry cover. 11 Pull about 300 mm (12in.) of paper through the print mechanism. -
Page 103
All manuals and user guides at all-guides.com Journal Printer Replenishing Paper — Graphics Printer 12 Hold the take-up spindle so that the black end is at the same side of the printer as the black roll guide. Insert the folded edge of the paper into the slot on the take-up spindle and wind the paper around the core two or three times in the direction shown. -
Page 104
All manuals and user guides at all-guides.com Journal Printer Replenishing Paper — Graphics Printer 13 Making sure that the black end of the spindle is against the black roll guide, push the take-up spindle down between the roll guides until it clicks into place. (Starting with the spindle at an angle will make it easier to fit between the roll guides.) The paper should wind over the top of the spindle. -
Page 105
All manuals and user guides at all-guides.com Journal Printer Replenishing Paper — Graphics Printer 14 Close the print mechanism, making sure that it clicks shut. A test graphic will be printed automatically: A “smiley” graphic indicates correct operation. A picture of the printer showing a paper roll being removed indicates that the empty paper core was left in the printer and is still under the new paper roll. -
Page 106
All manuals and user guides at all-guides.com Journal Printer Replenishing Paper — Graphics Printer 15 Press the paper feed button to wind on the paper until all slack is taken up and the test graphic has disappeared onto the take- up roll. -
Page 107: Clearing Jams — Graphics Printer
All manuals and user guides at all-guides.com Journal Printer Clearing Jams — Graphics Printer Clearing Jams — Graphics Printer The indication of a journal printer jam will be a State Of Health message or overprinting. To clear a paper jam within the journal printer, proceed as follows: Open the top cabinet.
-
Page 108
All manuals and user guides at all-guides.com Journal Printer Clearing Jams — Graphics Printer Lift one of the green locking levers to open the print mechanism. Remove any torn or crumpled paper from within the print mechanism. If anything is printed on this paper, keep it with the printed take-up roll. -
Page 109
All manuals and user guides at all-guides.com Journal Printer Clearing Jams — Graphics Printer Check that the printed take-up roll is winding on evenly and that it is not being crumpled against one of the roll guides. If you cannot move the paper away from the guide, you should replace the journal roll as explained in the previous section. -
Page 110
All manuals and user guides at all-guides.com Journal Printer Clearing Jams — Graphics Printer 6-16 P77 ATM — Operator Manual… -
Page 111: Maintenance
All manuals and user guides at all-guides.com Table of Contents Maintenance Chapter 7 Maintenance What Is Required To Maintain The P77? Daily Tasks Weekly Tasks Emptying the Dip Reader Debris Bin Replenishment Cleaning Kit Looking After The P77 Weekly Maintenance Procedures Cleaning the Facia and Exterior Panels Cleaning Magnetic Heads on Dip Card Readers Printer Media Storage…
-
Page 112
All manuals and user guides at all-guides.com Table of Contents Maintenance P77 ATM — Operator Manual… -
Page 113: What Is Required To Maintain The P77
All manuals and user guides at all-guides.com Maintenance What Is Required To Maintain The P77? What Is Required To Maintain The P77? The P77 needs very little attention after installation. The following daily tasks are required: Daily Tasks Check that there are sufficient supplies in the P77. The following weekly tasks are required: Weekly Tasks Clean the facia and exterior panels…
-
Page 114: Cleaning Kit
Cleaning Kit The cleaning kit (Ref No.009-0004633) contains all the recommended materials for maintenance and cleaning of your ATM. The kit is obtainable from your local NCR Field Engineering organisation and contains the materials shown in the following list: Item…
-
Page 115: Looking After The P77
All manuals and user guides at all-guides.com Maintenance Looking After The P77 Looking After The P77 The weekly maintenance procedures are: Weekly Clean the facia and exterior panels Maintenance Clean the magnetic heads on the dip card reader. Procedures Clean the surfaces of the facia and exterior panels, using either the Cleaning the Facia general surface cleaner (refer «Cleaning Kit») or a dilute detergent and Exterior Panels…
-
Page 116: Cleaning Magnetic Heads On Dip Card Readers
Paint stripper of any kind. Keyboards vandalised by paint should not be cleaned. The keyboard should be replaced. To clean the heads you will require a cleaning card, NCR part Cleaning Magnetic number 998-0052929 or equivalent. Proceed as follows: Heads on Dip Card Open the top cabinet.
-
Page 117: Printer Media Storage
All manuals and user guides at all-guides.com Maintenance Printer Media Storage Printer Media Storage To get the best results from your printer, store spare paper supplies in a cool, dry, dust-free place. Leave the articles in their original packing material until required for use. P77 ATM — Operator Manual…
-
Page 118
All manuals and user guides at all-guides.com Maintenance Printer Media Storage P77 ATM — Operator Manual… -
Page 119: Index
All manuals and user guides at all-guides.com Index Index Activating The Mas-Hamilton Lock 2-19 An Introduction To The P77 Module Location 1-3 What is the P77 1-1 Auto-Supervisor 2-9 Changing Combination 2-14 Cleaning kit 7-2 Clearing Jams Journal printer (graphics) 6-13 Receipt Printer 5-6 Closing Mas-Hamiltonr Lock 2-18…
-
Page 120
All manuals and user guides at all-guides.com Index Currency purge bin Emptying 4-3 Customer set combination Unlocking 2-14 Daily maintenance tasks 7-1 Digital audio Front access volume control 2-24 Dip card reader Head cleaning 7-4 Documentation Mas-Hamilton Lock 2-22 Emptying debris bin 7-1 Entering supervisor mode 2-8 Error message identification number 3-1 Error Reporting… -
Page 121
All manuals and user guides at all-guides.com Index Getting Started Activating The Mas-Hamilton Lock 2-19 Closing The Security Enclosure 2-5 Closing The Top Cabinet 2-3 Controlled Access Electronic Lock 2-15 Entering Supervisor Mode 2-8 Front operator interface 2-23 Hardware reset 2-25 Inserting/Removing Compact Disks 2-28 Diskettes 2-26… -
Page 122
All manuals and user guides at all-guides.com Index Lock Types 2-10 Locking Combination Lock 2-14 Keylock 2-12 Looking after the P77 Cleaning Facia and exterior panels 7-3 Cleaning magnetic heads Dip card readers 7-4 Daily maintenance tasks 7-1 Weekly maintenance tasks 7-3 Magnetic head cleaning Dip card readers 7-4 Mains Power Switch 2-6… -
Page 123
All manuals and user guides at all-guides.com Index Closing 2-1 Opening 2-1 With Bunch Presenter 1-2 PC module Error reporting 3-3 Power Switching On/Off 2-6 Primary and Secondary Locks Closing Sequence 2-11 Opening Sequence 2-11 Position 2-11 Primary lock types Combination lock 2-10 With keylock 2-10 Keylock 2-10… -
Page 124
All manuals and user guides at all-guides.com Index Sargent and Greenleaf 2-10 Secondary lock types 2-10 Combination lock 2-10 Keylock 2-10 Security Enclosure Closing 2-5 Opening 2-4 Security Enclosure Interlock Switch 2-7 Standard security enclosure Change The Combination 2-14 Combination locks 2-12 Customer set combination 2-14 Factory set combination 2-13 Keylocks 2-12… -
Page 125
All manuals and user guides at all-guides.com Index Unlocking A keylock 2-12 Customer set combination 2-14 Factory set combination lock 2-13 Weekly maintenance tasks 7-1, 7-3 What is required to maintain your terminal? 7-1 What is the P77 1-1 What This Manual Contains viii P77 ATM — Operator Manual Index-7… -
Page 126: Index
All manuals and user guides at all-guides.com Index Index-8 P77 ATM — Operator Manual…
-
Page 127
NCR 5877 Personas ATM — Operator Manual Number: B006-6210- A000 Date: NCR welcomes your feedback on this publication. Your comments can be of great value in helping us improve our information products. You may send your comments, electronically, to the Information Solutions Department at Dundee. -
Page 128
Thank you for your evaluation of this publication. Fold the form where indicated, tape (please do not staple), affix stamp and drop in the mail. F 8763-0695 Fold Affix Postage Stamp Here NCR Financial Solutions Ltd. Information Solutions Kingsway West Dundee Scotland DD2 3XX…
Note: LED 1 is the first LED from the bottom of the Scan Adviser.
Error
Possible Cause
Code
1—
Out of range
2—
calibration error
3—
Calibration Switch is
4—
pressed for more
than 3 seconds
Possible scale error
Internal scale
4—
connection problem
or unit does not
have scale
5—
Scale drift
Failure to update
6—
program parameters
in EEPROM
Error reading
program parameters
7—
from EEPROM
Scale not
exercised properly
8—
Linearity problem
9—
Scale
Top Plate or
display
Produce Guard has
is
possible obstruction
blank
Corrective Action
1. Calibrate scale.
2. If error code persists, check:
Scale cables and Power Supply
Digital Board
Scale Assembly
1. Check for objects that interfere with the Calibration Switch.
2. Calibrate scale.
3. If error cod e persists, have scanner repaired.
1. Press Scale Zero button and retry.
2. Verify unit is a scanner/scale.
3. If unit does not have a scale, program for scanner only
( Progra m Mode, Hex 3, Hex 0, Hex 4, & Save and Reset)
4. If error code persists, have scanner repaired.
1. Verify that nothing is on the Top Plate.
2. Lift the Top Plate and verify that there are no objects
under it.
3. Verify that nothing interferes with the Produce Guard.
4. Press the Scale Zero button.
5. If error code persists, have scanner repaired.
1. Reset scanner.
2. Calibrate scale.
3. If error code persists, have scanner repaired.
1. Calibrate scale.
2. If error code persists, have scanner repaired.
1. Press on the scale during calibration process.
2. Keep pressing on the scale until all red LEDs turn to blue.
3. Repeat procedure.
1. Calibrate scale.
2. If error code persists, have scanner repaired.
1. Press Scale Zero button.
2. Remove interference around edge of Top Plate or
Produce Guard and Front Bezel.
3. Remove any fo reign objects from under the Top Plate.
Chapter 6: Troubleshooting
Scan Adviser
Patterns
Code 1:
LED 1 = blue
LED 2 = orange
LED 3 = orange
Code 2:
LED 1 = blue
LED 2 = orange
LED 3 = orange
LED 4 = orange
Code 3:
LED 1 = blue
LED 2 = orange
LED 3 = orange
LED 4 = orange
LED 5 = orange
LED 1 = blue
LED 2 = red
LED 1 = blue
LED 2 = red
LED 1 = blue
LED 2 = red
LED 3 = red
LED 1 = blue
LED 2 = red
LED 3 = red
LED 4 = red
LED 1 = blue
LED 2 = red
LED 3 = red
LED 4 = red
LED 5 = red
LED 1 = blue
LED 2 = green
LED 1 = blue
LED 2 = green
LED 3 = green
25686
6-3
Модератор: central
Re: NCR SelfServ 6683
Добрый всем!
А кто может расшифровать 85 и 02 статусы по БРМ
С инкриптором по 18 и 38 вроде кривые ключи
Беда приходит после инкассаторов :))
Перехожу в разряд невидимок, скоро забанят :)) НАВСЕГДА
- Bura
- Ведущий специалист
- Сообщения: 927
- Зарегистрирован: 05 фев 2011, 18:40
- Откуда: Питер
- Авто: citrien c4 cedan
Re: NCR SelfServ 6683
![]() central » 15 авг 2017, 16:13
central » 15 авг 2017, 16:13
M Status: 85
Error: Too Many Consecutive Suspected Foreign Objects
1.
Possible Root Cause: Foreign object remains.
Isolation: Inspect feed unit for foreign objects.
Resolution: Remove foreign object.
2.
Possible Root Cause: Dirty camera lens.
Isolation: Inspect camera lens for dirt / debris.
Resolution: Clean camera lens.
3.
Possible Root Cause: Picking problem.
Isolation: Inspect picking mechanism for alignment and correct operation.
Resolution: Re‐align or repair pick mechanism.
TROUBLE-SHOOTER
-
central - Модератор
- Сообщения: 2083
- Зарегистрирован: 20 дек 2010, 03:59
- Авто: Майбах
Re: NCR SelfServ 6683
![]() olegka_n » 06 фев 2018, 16:20
olegka_n » 06 фев 2018, 16:20
А есть у кого нить описание RAS-команд и как в них зайти?
-
olegka_n - Нач. отдела
- Сообщения: 1347
- Зарегистрирован: 18 июн 2010, 17:21
- Откуда: Сибирь
Re: NCR SelfServ 6683
![]() Bura » 06 фев 2018, 16:39
Bura » 06 фев 2018, 16:39
Заходить просто, вынимаешь усб кабель и нажимаешь две ближних клавиши и вот ты в командах. А команды гугли, где то были здесь
Беда приходит после инкассаторов :))
Перехожу в разряд невидимок, скоро забанят :)) НАВСЕГДА
- Bura
- Ведущий специалист
- Сообщения: 927
- Зарегистрирован: 05 фев 2011, 18:40
- Откуда: Питер
- Авто: citrien c4 cedan
Re: NCR SelfServ 6683
![]() olegka_n » 06 фев 2018, 17:05
olegka_n » 06 фев 2018, 17:05
Зашел через отключение питания и переключение 8-го свича (аля BNA)
-
olegka_n - Нач. отдела
- Сообщения: 1347
- Зарегистрирован: 18 июн 2010, 17:21
- Откуда: Сибирь
Re: NCR SelfServ 6683
![]() siberian_diesel » 13 июн 2018, 18:35
siberian_diesel » 13 июн 2018, 18:35
Коллеги, подскажите куда копать? На 83 банкомате в ассистенте диспенсер тестирует, прием наличных работает, а при попытке в аптре сделать тестирование кассет (4-10) шумит средней частью, без диспенсера, а потом dispenser fault….
- siberian_diesel
- Прохожий
- Сообщения: 1
- Зарегистрирован: 13 июн 2018, 18:31
- Авто: Mini r50
Re: NCR SelfServ 6683
![]() Bazalin » 10 июл 2018, 06:34
Bazalin » 10 июл 2018, 06:34
Всем здравствуйте, назрел небольшой вопросик про «Вилку» Покета BRM, которая держит купюры и приподнимает при выдаче. Держится она на соплях, на мой взгляд это конструктивный недочет или ловушка производителя, чтобы развести на бабло. У нас в банке случаев 5 её поломки точно, NCR трактует как вандализм и выставляет счет на 50 килорублей для замены «Кармана» Покета целиком . Очень интересно узнать такие аказии происходят ещё у кого? Особенно интересует «Сбер» и какова их судьба, свои решили пока клеить, моя попытка оказалась успешной.
- Bazalin
- Прохожий
- Сообщения: 1
- Зарегистрирован: 18 мар 2014, 04:27
- Откуда: Москва
Re: NCR SelfServ 6683
![]() Dan » 10 июл 2018, 16:37
Dan » 10 июл 2018, 16:37
siberian_diesel писал(а):шумит средней частью, без диспенсера, а потом dispenser fault….
Какой это частью шумит, без диспенсера?
Какой M-Status для dispenser fault?
Scientists study the world as it is, engineers create the world that never has been
-
Dan - Нач. отдела
- Сообщения: 2817
- Зарегистрирован: 28 окт 2010, 23:20
Re: NCR SelfServ 6683
![]() olegka_n » 12 июл 2018, 16:07
olegka_n » 12 июл 2018, 16:07
Bazalin писал(а):Всем здравствуйте, назрел небольшой вопросик про «Вилку» Покета BRM, которая держит купюры и приподнимает при выдаче. Держится она на соплях, на мой взгляд это конструктивный недочет или ловушка производителя, чтобы развести на бабло. У нас в банке случаев 5 её поломки точно, NCR трактует как вандализм и выставляет счет на 50 килорублей для замены «Кармана» Покета целиком
Это действительно вандализм. По крайней мере у нас. На видео видно , что клиенты пытаются достать мелочь из «пепельницы». Данную проблему решаем просто: на суперклей клеим сами ушки, снизу подклеиваем пластик от симкарты, чтоб он захватывал и само ушко и саму вилку. Пластик от симки гибкий и даже если ушко отваливается повторно от вилки, она все равно остается на месте.
Добавлено спустя 1 минуту 16 секунд:
siberian_diesel писал(а):Коллеги, подскажите куда копать? На 83 банкомате в ассистенте диспенсер тестирует, прием наличных работает, а при попытке в аптре сделать тестирование кассет (4-10) шумит средней частью, без диспенсера, а потом dispenser fault….
там же слева лампочки есть, где красная там и косяк искать надо.
-
olegka_n - Нач. отдела
- Сообщения: 1347
- Зарегистрирован: 18 июн 2010, 17:21
- Откуда: Сибирь
Re: NCR SelfServ 6683
![]() kvn77 » 11 авг 2018, 00:15
kvn77 » 11 авг 2018, 00:15
для siberian_diesel
Если это новый ATM? то в «пепельнице» транспортировочный уплотнитель, 4-10 шатер не отрывается.
- kvn77
- Прохожий
- Сообщения: 1
- Зарегистрирован: 11 авг 2018, 00:06
Re: NCR SelfServ 6683
![]() olegka_n » 15 авг 2018, 13:56
olegka_n » 15 авг 2018, 13:56
Сегодня ночью вандалы опять отломали ушки у нижней вилки. По видео — пытались что то достать. Снова заклеил. Но в добавок сломали рог у вилки, которая снаружи в карман входит, прижимает деньги сверху. В хлам.
-
olegka_n - Нач. отдела
- Сообщения: 1347
- Зарегистрирован: 18 июн 2010, 17:21
- Откуда: Сибирь
Re: NCR SelfServ 6683
![]() olegka_n » 17 сен 2018, 21:00
olegka_n » 17 сен 2018, 21:00
mishin220 писал(а):Добрый день . А есть партномер этой вилки заказать ?
У этой вилки нет, только модулем в сборе за конские деньги, а у втрой есть, но ее нет в России
-
olegka_n - Нач. отдела
- Сообщения: 1347
- Зарегистрирован: 18 июн 2010, 17:21
- Откуда: Сибирь
Re: NCR SelfServ 6683
![]() extra » 20 сен 2018, 19:36
extra » 20 сен 2018, 19:36
Доброго времени суток ,
Столкнулись с проблемой не могу понять проблема на уровне софта и на уровне железа . АТМ вкл. работает пару часов и вырубается системник а сам аппарат работает , Выкл и Вкл появляется значёк Виндовса и все перезагрузка . Выкл АТМ на пару часов он опять Вкл но работает пару часов и вырубается , в операторском отсеке мигают три зеленых индикатора , кто-то сталкивался с данной проблемой ?
NCR SelfServ 6683 AANDC 04.04.01
- extra
- Новичок
- Сообщения: 5
- Зарегистрирован: 27 окт 2017, 17:03
Re: NCR SelfServ 6683
![]() mikle » 20 сен 2018, 22:39
mikle » 20 сен 2018, 22:39
Проверяйте блок питания системника, или температурный контроль на материнке
- mikle
- Специалист
- Сообщения: 470
- Зарегистрирован: 09 июн 2010, 14:12
- Откуда: Из подмосковных лесов
- Авто: японский 4х4
Re: NCR SelfServ 6683
![]() Rasul » 21 сен 2018, 06:02
Rasul » 21 сен 2018, 06:02
pepper писал(а):Приветствую.
Saf, какие-либо проблемы были с запуском данной зверюги ? Мы уже третью неделю бьёмся в Тюмени и всё никакCASH_RECYCLER
NACC-01-USBBrunchRecycler
Sequence: 0000000068
14.07.2016 16:53:16
S-Data (Hex)
01
M-Status: 48,Upper control board error
M-Data (Hex):
05 44 2D 00
Добрый день!
Скажите, пожалуйста, как решилась данная проблема. У меня на 6687 такая же беда. Замена контроллера верхнего модуля не помогла.
Добавлено спустя 3 минуты 16 секунд:
Была у нас волна замен матплат реверсайдов. Бывало, что по несколько раз меняли. Наверно у вас тоже из этой серии..
- Rasul
- Новичок
- Сообщения: 14
- Зарегистрирован: 16 май 2011, 06:28
Re: NCR SelfServ 6683
![]() extra » 21 сен 2018, 16:13
extra » 21 сен 2018, 16:13
mikle писал(а):Проверяйте блок питания системника, или температурный контроль на материнке
Самое первое что делали это БП и на контроль перегрева процессора , в итоге ноль ……..
- extra
- Новичок
- Сообщения: 5
- Зарегистрирован: 27 окт 2017, 17:03
Re: NCR SelfServ 6683
![]() Dan » 21 сен 2018, 16:48
Dan » 21 сен 2018, 16:48
extra
Логи Windows что говорят?
Scientists study the world as it is, engineers create the world that never has been
-
Dan - Нач. отдела
- Сообщения: 2817
- Зарегистрирован: 28 окт 2010, 23:20
Re: NCR SelfServ 6683
![]() Trn » 21 сен 2018, 19:35
Trn » 21 сен 2018, 19:35
Добрый день, подскажите есть ли у кого инструкция по настройке кассет в плане магнитов? или там переключателями выставляется?
- Trn
- Прохожий
- Сообщения: 1
- Зарегистрирован: 21 сен 2018, 19:23
Re: NCR SelfServ 6683
![]() Dan » 21 сен 2018, 21:06
Dan » 21 сен 2018, 21:06
Trn Каких кассет?
Scientists study the world as it is, engineers create the world that never has been
-
Dan - Нач. отдела
- Сообщения: 2817
- Зарегистрирован: 28 окт 2010, 23:20
Вернуться в BNA/GBNA/GBRU
Кто сейчас на конференции
Сейчас этот форум просматривают: нет зарегистрированных пользователей и гости: 6
![]()
BNA HARD Информация (BNA)
Cash Deposit Unit UD-686: Error Code Specification
08.11.202109.11.2021
0 Комментариев
BNA, English, error codes, UD-686, Информация, Спецификация
Депозитный модуль UD-686: расшифровка кодов ошибок Хотите первым получать уведомления о публикации новых материалов — подписывайтесь на рассылку! If you
Читать далее
BNA HARD Информация (BNA)
Cash Deposit Unit UD-50C: Error Code Specification
13.05.2017
0 Комментариев
BNA, error codes, personaS, UD-50C, Информация
Депозитный модуль UD-40: расшифровка кодов ошибок Хотите первым получать уведомления о публикации новых материалов — подписывайтесь на рассылку!
Читать далее
BNA HARD Информация (BNA)
Cash Deposit Unit UD-40: Error Code Specifications
12.05.201713.05.2017
0 Комментариев
5873, BNA, error codes, personaS, UD-40
Депозитный модуль UD-40: расшифровка кодов ошибок Хотите первым получать уведомления о публикации новых материалов — подписывайтесь на рассылку!
Читать далее
-
Contents
-
Table of Contents
-
Bookmarks
Quick Links
All manuals and user guides at all-guides.com
5877 Personas ATM
Operator Manual
Publication ID: B006-6210-A000
Date: 0701
Related Manuals for NCR 5877
Summary of Contents for NCR 5877
-
Page 1
All manuals and user guides at all-guides.com 5877 Personas ATM Operator Manual Publication ID: B006-6210-A000 Date: 0701… -
Page 2
NCR, therefore, reserves the right to change specifications without prior notice. All features, functions, and operations described herein may not be marketed by NCR in all parts of the world. In some instances, photographs are of equipment prototypes. Therefore, before using this document, consult with your NCR representative or NCR office for information that is applicable and current. -
Page 3
All manuals and user guides at all-guides.com Federal Communications Commission (FCC) Radio Frequency Interference Statement Note: This equipment has been tested and found to comply with the limits for a Class A digital device, pursuant to Part 15 of the FCC Rules. -
Page 4
If this equipment does cause interference, which can be determined by turning the equipment off and on, the user is encouraged to consult an NCR service representative immediately. Caution NCR Corporation is not responsible for any radio or television… -
Page 5
All manuals and user guides at all-guides.com Revision Record Date Page Description of Change Jul 01 New Publication P77 ATM — Operator Manual… -
Page 6
All manuals and user guides at all-guides.com P77 ATM — Operator Manual… -
Page 7: About This Document
All manuals and user guides at all-guides.com About This Document Purpose And Audience This publication is intended for NCR customer personnel who are responsible for the day-to-day operation and maintenance of an NCR 5877 Personas ATM (P77). This manual shows operators how to maintain the P77 in an operational state by explaining the replenishment procedures.
-
Page 8: What This Manual Contains
If your application has not been migrated to ADI-2, your ATM’s error reporting and diagnostic system will be similar to previous generations of NCR ATMs, for example the 5070 or 5085. A list of the OES codes used in the previous generation of ATMs is included.
-
Page 9: Guide To Illustrations Used In This Manual
All manuals and user guides at all-guides.com About This Document Guide To Illustrations Used In This Manual Guide To Illustrations Used In This Manual The illustrations are used as follows: Solid or black outlined objects (highlighted) are the objects on which an action is to be performed Outlined arrows indicate the direction of movement for the closest highlighted object.
-
Page 10
All manuals and user guides at all-guides.com About This Document Guide To Illustrations Used In This Manual P77 ATM — Operator Manual… -
Page 11: Table Of Contents
All manuals and user guides at all-guides.com Table of Contents Contents About This Document Purpose And Audience ……………..vii What This Manual Contains …………… viii Guide To Illustrations Used In This Manual……..ix Chapter 1 An Introduction To The Personas 77 What is the P77 ………………1-1 Module Location………………1-3 Chapter 2…
-
Page 12
All manuals and user guides at all-guides.com Table of Contents Security Enclosures with Controlled Access Electronic Lock ..2-15 Opening the Mas-Hamilton Lock ……….2-15 Closing the Mas-Hamilton Lock ……….2-18 Activating The Mas-Hamilton Lock……….2-19 Mas-Hamilton Documentation ………… 2-22 Front Operator Interface ………….. -
Page 13
All manuals and user guides at all-guides.com Table of Contents Chapter 6 Journal Printer Replenishing Paper — Graphics Printer……….6-1 Clearing Jams — Graphics Printer …………6-13 Chapter 7 Maintenance What Is Required To Maintain The P77? ………..7-1 Daily Tasks ………………7-1 Weekly Tasks………………7-1 Emptying the Dip Reader Debris Bin ……….7-1 Replenishment ………………7-1 Cleaning Kit………………..7-2… -
Page 14
All manuals and user guides at all-guides.com Table of Contents P77 ATM — Operator Manual… -
Page 15: An Introduction To The Personas 77
All manuals and user guides at all-guides.com Table of Contents An Introduction To The Personas 77 Chapter 1 An Introduction To The Personas 77 What is the P77 1- 1 Module Location P77 ATM — Operator Manual…
-
Page 16
All manuals and user guides at all-guides.com Table of Contents An Introduction To The Personas 77 P77 ATM — Operator Manual… -
Page 17: What Is The P77
An Introduction To The Personas 77 What is the P77 What is the P77 The NCR 5877 Personas ATM (P77) is a PC-based self service ATM. The heart of the P77 is a PC, running self-service application software. This self-service application software manages transactions and controls the various devices, such as printers, card readers, monitor screens and keyboards.
-
Page 18
All manuals and user guides at all-guides.com An Introduction To The Personas 77 What is the P77 P77 With Bunch Presenter P77 ATM — Operator Manual… -
Page 19: Module Location
All manuals and user guides at all-guides.com An Introduction To The Personas 77 Module Location Module Location The external and internal locations of the modules which comprise the P77 are shown in the following illustrations. External Location Facia Display/Touchscreen Receipt Printer Functional Display Keys Dip Card Reader…
-
Page 20
All manuals and user guides at all-guides.com An Introduction To The Personas 77 Module Location Internal Location PC Core Floppy Disk Drive On/Off Switch CD Rom Supervisor/Operator Panel Receipt Printer Journal Printer Currency Dispenser Purge Bin Security Enclosure Door Cabinet Front Door I/O Panel Power Supply… -
Page 21: Getting Started
All manuals and user guides at all-guides.com Table of Contents Getting Started Chapter 2 Getting Started Opening/Closing The Exterior Of The P77 Top Cabinet — Opening Top Cabinet — Closing Security Enclosure — Opening Security Enclosure — Closing Switching Power On/Off Mains Power Switch Security Enclosure Interlock Switch Entering Supervisor Mode…
-
Page 22
All manuals and user guides at all-guides.com Table of Contents Getting Started Security Enclosures with Controlled Access Electronic Lock 2-15 Opening the Mas-Hamilton Lock 2-15 Closing the Mas-Hamilton Lock 2-18 Activating The Mas-Hamilton Lock 2-19 Mas-Hamilton Documentation 2-22 Front Operator Interface 2-23 Operator Panel 2-23… -
Page 23: Opening/Closing The Exterior Of The P77
All manuals and user guides at all-guides.com Getting Started Opening/Closing The Exterior Of The P77 Opening/Closing The Exterior Of The P77 The top cabinet and security enclosure of the P77 can be opened independently of each other. This enables the consumables in the top cabinet to be replenished without compromising the security of the cash dispenser.
-
Page 24
All manuals and user guides at all-guides.com Getting Started Opening/Closing The Exterior Of The P77 Using both hands, carefully pull the facia out of the top cabinet until the slides are fully extended. P77 ATM — Operator Manual… -
Page 25: Top Cabinet — Closing
All manuals and user guides at all-guides.com Getting Started Opening/Closing The Exterior Of The P77 Close the top cabinet as follows: Top Cabinet — Closing Caution Do not grip the facia when closing the top cabinet. With your hands flat, either side of the keypad, push the facia into the top cabinet until the lock locks.
-
Page 26: Security Enclosure — Opening
All manuals and user guides at all-guides.com Getting Started Opening/Closing The Exterior Of The P77 Open the security enclosure as follows: Security Enclosure — Insert the key, in the cabinet lock, and turn it clockwise. Opening Open the cabinet door. Unlock the safe door, in accordance with the relevant instructions detailed under “Open/Closing The Standard Security Enclosure”…
-
Page 27: Security Enclosure — Closing
All manuals and user guides at all-guides.com Getting Started Opening/Closing The Exterior Of The P77 Closing the security enclosure as follows: Security Enclosure — Close and lock the security enclosure door in accordance with Closing the relevant instructions detailed under “Open/Closing The Standard Security Enclosure”…
-
Page 28: Switching Power On/Off
All manuals and user guides at all-guides.com Getting Started Switching Power On/Off Switching Power On/Off There are two power switches fitted to the P77: Mains Power Switch — switches mains power On/Off. Security Enclosure Interlock Switch — switches power, to the cash dispenser located inside the security enclosure, On/Off.
-
Page 29: Security Enclosure Interlock Switch
All manuals and user guides at all-guides.com Getting Started Switching Power On/Off When the safe door is opened, power to the cash dispenser is Security Enclosure switched off by an isolator switch. The dispenser isolator switch is Interlock Switch located, behind a cover, on the bottom of the safe. Note: power is automatically restored to the cash dispenser when the safe door is closed.
-
Page 30: Entering Supervisor Mode
All manuals and user guides at all-guides.com Getting Started Entering Supervisor Mode Entering Supervisor Mode Entering Supervisor Mode depends on whether you are accessing the top cabinet or the security enclosure of the P77: top cabinet — manually security enclosure — automatically. When you access the top cabinet of the P77, you will have to enter Manually Supervisor Mode manually:…
-
Page 31: Auto-Supervisor
All manuals and user guides at all-guides.com Getting Started Entering Supervisor Mode The P77 is fitted with an Auto-Supervisor facility. However, this Auto-Supervisor only applies when accessing the security enclosure. The P77 will automatically enter Supervisor Mode when the safe door is opened. When the safe door is closed, the P77 automatically returns to the Normal Mode.
-
Page 32: Opening/Closing The Standard Security Enclosure
All manuals and user guides at all-guides.com Getting Started Opening/Closing The Standard Security Enclosure Opening/Closing The Standard Security Enclosure The standard security enclosure door will have a locking handle plus either: one lock (primary) or, two locks (primary and secondary). The make of lock (Standard, or Sargent and Greenleaf) fitted depends on the configuration of the P77.
-
Page 33
All manuals and user guides at all-guides.com Getting Started Opening/Closing The Standard Security Enclosure Position of Primary and Secondary Locks The following illustrations show the relative positions of primary and secondary locks. Primary Lock Locking Handle Secondary Lock Opening Sequence of the Primary and Secondary Locks If the P77 has a primary and a secondary lock fitted, the opening sequence is as follows: Unlock the secondary lock. -
Page 34: Keylocks
Keylocks a random factory-set combination. If one key should get lost, a new pair of keys should be obtained and the keylock setting changed..Refer to NCR publication, ATM Field Service Information (SAMM) FM0547, Chapter 20, for details. Unlock A Keylock To unlock a keylock, insert the key into the lock and turn it clockwise as far as it will turn.
-
Page 35
All manuals and user guides at all-guides.com Getting Started Opening/Closing The Standard Security Enclosure Opening Index Changing Index Dial Factory Set Combination — Unlocking If the combination lock is set at the original factory setting of 50, unlock it as follows, dialling on the opening index: If a keylock is fitted to the combination lock, insert the key into the lock and turn it clockwise. -
Page 36
All manuals and user guides at all-guides.com Getting Started Opening/Closing The Standard Security Enclosure Customer Set Combination — Unlocking If the combination has been set at a three-number combination, for example 36-82-44, unlock it as follows: If a keylock is fitted to the combination lock, insert the key into the lock and turn it clockwise. -
Page 37: Security Enclosures With Controlled Access Electronic Lock
All manuals and user guides at all-guides.com Getting Started Security Enclosures with Controlled Access Electronic Lock Security Enclosures with Controlled Access Electronic Lock This section describes how to operate the Mas-Hamilton lock to gain access to the security enclosure of the P77. Note: Before the Mas-Hamilton lock can be operated, it must be activated.
-
Page 38
Take note of the 6-digit access code (three pairs of two), allocated by the KMC. Unlock and open the exterior of the 5877. Spin the opening/closing knob of the lock counter clockwise, this charges the lock, until EC is displayed on the LCD. -
Page 39
All manuals and user guides at all-guides.com Getting Started Security Enclosures with Controlled Access Electronic Lock Hold the PI key against the key reader to charge the PI key: Keypad Key Reader Knob (Opening/Closing) 10 If the correct 6-digit code has been entered and a valid PI key has been pressed against the key reader, OPr will be displayed on the LCD. -
Page 40: Closing The Mas-Hamilton Lock
Note: Take a note of the close code as it is required by the KMC (Step 6). Close the exterior of the 5877 and remove the key. Phone the KMC. Note: Ensure that the lock/doors on the 5877 are locked/closed before contacting the KMC.
-
Page 41: Activating The Mas-Hamilton Lock
All manuals and user guides at all-guides.com Getting Started Activating The Mas-Hamilton Lock Activating The Mas-Hamilton Lock Activating the Mas-Hamilton Lock requires a coordinated effort between a Dispatcher at the Key Management Centre (KMC) and First Line Maintenance (FLM) or Route person (the term FLM will be used throughout the following instructions).
-
Page 42
All manuals and user guides at all-guides.com Getting Started Activating The Mas-Hamilton Lock The roles of the Dispatcher and FLM personnel are as follows: Dispatcher — activates: the Mas-Hamilton lock in the program and the Supervisor Audit (SA) key. FLM person physically goes to the Mas-Hamilton lock on the P77 to complete the activation where he/she will need the following: the initialized SA key… -
Page 43
All manuals and user guides at all-guides.com Getting Started Activating The Mas-Hamilton Lock Enter the factory combination 50 25 50. After the factory combination has been correctly entered, the ISA symbol will be displayed. Hold the SA key against the Mas- Hamilton lock’s key reader until POC is displayed. -
Page 44: Mas-Hamilton Documentation
All manuals and user guides at all-guides.com Getting Started Activating The Mas-Hamilton Lock Further details of how to set up and manage the Mas-Hamilton lock Mas-Hamilton operations are detailed in the following Mas-Hamilton Group Documentation publications: CENCON System 2000 Access Control System Getting Started Guide Supervisor Guide Special Supervisor Guide…
-
Page 45: Front Operator Interface
Function Display Keys (FDKs) and the cardholder keyboard to display any error messages or State Of Health (SOH) messages, and to access the various Supervisor Mode programs described in the NCR publication, Self Service Terminal Supervisor Functions Manual (B006-0000-4718). P77 ATM — Operator Manual…
-
Page 46: State Of Health Messages
All manuals and user guides at all-guides.com Getting Started Front Operator Interface The switches and indicator on the front operator panel are: Switch /Indicator Description Normal /Supervisor Used to enter the Supervisor Mode and return to Switch Normal Mode Comms Indicator Flashes to indicate that the P77 is communicating with a host system.
-
Page 47: Hardware Reset
All manuals and user guides at all-guides.com Getting Started Hardware Reset Hardware Reset A Reset switch is provided on the operator panel. When the Reset switch is pressed, the P77 executes its diagnostic procedures, reloads the system software and initialises the user application program.
-
Page 48: Inserting/Removing Diskettes
All manuals and user guides at all-guides.com Getting Started Inserting/Removing Diskettes Inserting/Removing Diskettes To insert or remove a diskettes from the disk drive proceed as follows. Open the top cabinet. If necessary, press in the button shown below to eject the current diskette from the disk drive.
-
Page 49
All manuals and user guides at all-guides.com Getting Started Inserting/Removing Diskettes Insert the new diskette into the disk drive as shown. Standard Enclosure Close and lock the top cabinet. P77 ATM — Operator Manual 2-27… -
Page 50: Inserting/Removing Compact Disks
All manuals and user guides at all-guides.com Getting Started Inserting/Removing Compact Disks Inserting/Removing Compact Disks To insert or remove a Compact Disk (CD) from the disk drive proceed as follows. Open the top cabinet. Press the button shown below to open the disk tray and, if necessary, remove the current CD.
-
Page 51
All manuals and user guides at all-guides.com Getting Started Inserting/Removing Compact Disks Either, re-press the button, or lightly push the end of the tray inwards until it retracts automatically. Close and lock the top cabinet. P77 ATM — Operator Manual 2-29… -
Page 52
All manuals and user guides at all-guides.com Getting Started Inserting/Removing Compact Disks 2-30 P77 ATM — Operator Manual… -
Page 53
All manuals and user guides at all-guides.com Table of Contents Error Reporting Chapter 3 Error Reporting Error Reporting — Using State Of Health How Errors In The PC Module Are Reported Error Reporting — Using OES Codes The OES Codes OES Codes — Structure OES Codes OES Codes — Qualifier Codes… -
Page 54: Error Reporting
All manuals and user guides at all-guides.com Table of Contents Error Reporting P77 ATM — Operator Manual…
-
Page 55: Error Reporting — Using State Of Health
The asterisks (*) indicate the skill level required to fix whatever problem is generating the current SOH message, and also indicate which VERIFY SOH option (see NCR publication, Self Service Terminal Supervisor Functions Manual, B006-0000-4718) should be selected to clear the SOH message.
-
Page 56
All manuals and user guides at all-guides.com Error Reporting Error Reporting — Using State Of Health Some SOH messages require to be acted upon immediately, others indicate you should be prepared to carry out a replenishment/ replacement procedure in the near future. If required, use the relevant VERIFY SOH option as described in the Supervisor Manual to clear the SOH message. -
Page 57: How Errors In The Pc Module Are Reported
All manuals and user guides at all-guides.com Error Reporting How Errors In The PC Module Are Reported How Errors In The PC Module Are Reported The SOH reporting system does not report on the operator panel if a fault has occurred on one of the boards in the PC module. The boards in the PC module are tested during power-up and at reset.
-
Page 58
All manuals and user guides at all-guides.com Error Reporting How Errors In The PC Module Are Reported The location of the LED, for the Pele board, is shown in the following illustrations. The LED for the Phantom board is located on the SSPA board. P77 ATM — Operator Manual… -
Page 59: Error Reporting — Using Oes Codes
All manuals and user guides at all-guides.com Error Reporting Error Reporting — Using OES Codes Error Reporting — Using OES Codes P77s which do not use the State of Health (SOH) reporting system run applications which have been written to the migrated Application Device Interface (ADI).
-
Page 60
All manuals and user guides at all-guides.com Error Reporting Error Reporting — Using OES Codes OES Codes The OES codes are shown in the following tables: Code Module Receipt Printer Journal Printer Currency Dispenser Currency Cassette Type 1 Currency Cassette Type 2 Currency Cassette Type 3 Currency Cassette Type 4 Magnetic card reader/writer… -
Page 61: Currency Dispenser
All manuals and user guides at all-guides.com Table of Contents Currency Dispenser Chapter 4 Currency Dispenser Replenishing Currency Cassettes Emptying The Currency Purge/Reject Bin Clearing Jams — Bunch Dispenser P77 ATM — Operator Manual…
-
Page 62
All manuals and user guides at all-guides.com Table of Contents Currency Dispenser P77 ATM — Operator Manual… -
Page 63: Replenishing Currency Cassettes
All manuals and user guides at all-guides.com Currency Dispenser Replenishing Currency Cassettes Replenishing Currency Cassettes To replenish the currency cassettes in your P77 proceed as follows: Open the security enclosure. Lift the catch on the right-hand side of the currency cassette you wish to replenish and pull the cassette out of the P77.
-
Page 64
Replenishing Currency Cassettes If the cassette is to be sent to a secure area for refilling, do so in accordance with your institute’s rules. Refer to NCR publication H-8015-STD1-01/02-08 Currency Cassette Owner’s Manual, D1- 1297-A for details of how to open and replenish the currency cassette. -
Page 65: Emptying The Currency Purge/Reject Bin
All manuals and user guides at all-guides.com Currency Dispenser Emptying The Currency Purge/Reject Bin Emptying The Currency Purge/Reject Bin To empty the standard currency purge/reject bin in your P77, proceed as follows: Open the security enclosure. P77 ATM — Operator Manual…
-
Page 66
All manuals and user guides at all-guides.com Currency Dispenser Emptying The Currency Purge/Reject Bin Lift the catch on the left-hand side of the bin and pull the bin out of your P77. Remove the currency from the bin. Slide the empty bin into your P77 until it locks in place. Close and lock the security enclosure. -
Page 67: Clearing Jams — Bunch Dispenser
All manuals and user guides at all-guides.com Currency Dispenser Clearing Jams — Bunch Dispenser Clearing Jams — Bunch Dispenser The indication of a currency dispenser jam will be a State Of Health (SOH) message. To clear a currency jam proceed as follows: Open the security enclosure.
-
Page 68
All manuals and user guides at all-guides.com Currency Dispenser Clearing Jams — Bunch Dispenser The procedures for clearing a jam depend on the cause and location of the jam. The SOH message will indicate where the jam is. If SOH indicates a bill jam at the pick sensor/ module, or a gulp feed failure, go to Step 4. -
Page 69
All manuals and user guides at all-guides.com Currency Dispenser Clearing Jams — Bunch Dispenser Bill jam at the pick sensor/module or a gulp feed failure — Lift the green catch on the right-hand side of the currency cassette indicated in the SOH message (cassette position 1 is the top cassette) and pull the cassette out of the P77. -
Page 70
All manuals and user guides at all-guides.com Currency Dispenser Clearing Jams — Bunch Dispenser Bill jam in the main transport — Turn the pulley on the side of the dispenser counter-clockwise until the bills enter the stacking area. P77 ATM — Operator Manual… -
Page 71
All manuals and user guides at all-guides.com Currency Dispenser Clearing Jams — Bunch Dispenser Insert your hand through the hole in the side of the dispenser as shown, and remove the bills. Proceed to Step15. P77 ATM — Operator Manual… -
Page 72
All manuals and user guides at all-guides.com Currency Dispenser Clearing Jams — Bunch Dispenser Bill jam at sensor 2 — Turn the large gear wheel on the side of the dispenser until the clamp arm, indicated below, is in its up position. -
Page 73
All manuals and user guides at all-guides.com Currency Dispenser Clearing Jams — Bunch Dispenser 10 Insert your hand through the hole in the side of the dispenser as shown, and remove the bills. Proceed to Step15. P77 ATM — Operator Manual 4-11… -
Page 74
All manuals and user guides at all-guides.com Currency Dispenser Clearing Jams — Bunch Dispenser 11 Bill jam at sensor 1 — Lift the catch on the left-hand side of the purge bin and pull the purge bin out of the dispenser. 4-12 P77 ATM — Operator Manual… -
Page 75
All manuals and user guides at all-guides.com Currency Dispenser Clearing Jams — Bunch Dispenser 12 Reach inside the hole vacated by the purge bin and remove any jammed bills. If you cannot reach the bills, turn the drums indicated below until the bills are in an accessible position and then remove them. -
Page 76
All manuals and user guides at all-guides.com Currency Dispenser Clearing Jams — Bunch Dispenser 14 Bill jam at sensor 4, 5 or 6 — If required, turn the drums in the top of the transport until the bills are in an accessible position. Reach into the transport and remove the bills. -
Page 77: Receipt Printer
All manuals and user guides at all-guides.com Table of Contents Receipt Printer Chapter 5 Receipt Printer Replenishing Paper Clearing Jams P77 ATM — Operator Manual…
-
Page 78
All manuals and user guides at all-guides.com Table of Contents Receipt Printer P77 ATM — Operator Manual… -
Page 79: Replenishing Paper
Receipt Printer Replenishing Paper Replenishing Paper The paper used to replenish your printer must meet the specification given in NCR publication Consumable Items For Self Service, (B006-4992-0000). To replace the printer paper proceed as follows: Open the top cabinet. Press the Normal/Supervisor switch, on the operator panel, to the Supervisor position.
-
Page 80
All manuals and user guides at all-guides.com Receipt Printer Replenishing Paper Open the print mechanism cover using the green locking lever — the cover will spring open. Lift out the paper roll core, spindle and any remaining paper. Pull out any paper from the paper entry slot. Discard the paper roll core and any remaining paper, but retain the spindle. -
Page 81
All manuals and user guides at all-guides.com Receipt Printer Replenishing Paper Close the print mechanism cover — push it down until it clicks shut. Remove sufficient paper from the new supply roll so that no traces of glue or tape remain on the roll. Tear off the end of the supply roll to make a reasonably straight edge without creases. -
Page 82
All manuals and user guides at all-guides.com Receipt Printer Replenishing Paper Manually guide the paper into the printer entry slot until it stops — approximately 75 mm (3 in.). P77 ATM — Operator Manual… -
Page 83
All manuals and user guides at all-guides.com Receipt Printer Replenishing Paper Press the paper feed button and continue to feed in the paper manually until it is gripped by the print mechanism. The printer will automatically feed the paper through the printer, print a test graphic and feed the receipt out of the transport. -
Page 84: Clearing Jams
All manuals and user guides at all-guides.com Receipt Printer Clearing Jams Clearing Jams The indication of a receipt printer jam will be a State Of Health message. To clear a jam within the receipt printer, proceed as follows: Open the top cabinet. Press the Normal/Supervisor switch, on the operator panel, to the Supervisor position.
-
Page 85
All manuals and user guides at all-guides.com Receipt Printer Clearing Jams Remove any jammed paper from the exit slot/end of the transport. Lift the transport, to align it with the exit slot, and slide the printer forwards until the plunger engages. Check that the transport is engaged correctly with the exit slot. -
Page 86
All manuals and user guides at all-guides.com Receipt Printer Clearing Jams Paper jammed in the printer transport — remove it carefully using your fingers. P77 ATM — Operator Manual… -
Page 87
All manuals and user guides at all-guides.com Receipt Printer Clearing Jams Paper jammed under the printer cover — open the print mechanism cover using the green locking lever — the cover will spring open. P77 ATM — Operator Manual… -
Page 88
All manuals and user guides at all-guides.com Receipt Printer Clearing Jams 10 Remove any torn or crumpled paper from under the cover. 11 Make sure that the receipt roll can turn freely by spinning the paper roll away from the front of the printer. If the roll does not turn freely, remove it from the printer and check that there are no foreign objects preventing the paper roll from rotating. -
Page 89
All manuals and user guides at all-guides.com Receipt Printer Clearing Jams 13 Close the print mechanism cover — push it down until it clicks. 14 If necessary, tear off the end of paper roll to make a reasonably straight edge. P77 ATM — Operator Manual 5-11… -
Page 90
All manuals and user guides at all-guides.com Receipt Printer Clearing Jams 15 Manually guide the paper roll into the printer entry slot until it stops — approximately 75 mm (3 in.). 5-12 P77 ATM — Operator Manual… -
Page 91
All manuals and user guides at all-guides.com Receipt Printer Clearing Jams 16 Press the paper feed button and continue to feed in the paper manually until it is gripped by the print mechanism. The printer will automatically feed the paper through the printer, print a test graphic and feed the receipt out of the transport. -
Page 92
All manuals and user guides at all-guides.com Receipt Printer Clearing Jams 5-14 P77 ATM — Operator Manual… -
Page 93
All manuals and user guides at all-guides.com Table of Contents Journal Printer Chapter 6 Journal Printer Replenishing Paper — Graphics Printer Clearing Jams — Graphics Printer 6-13 P77 ATM — Operator Manual… -
Page 94
All manuals and user guides at all-guides.com Table of Contents Journal Printer P77 ATM — Operator Manual… -
Page 95: Journal Printer
The paper used to replenish your printer must meet the specification given in NCR publication Consumable Items for Self Service, B006-0000-4992. If your ATM is configured with Electronic Journal, refer to the NCR publication NDC+ Supervisor’s Reference Manual, B006-0000-2487. To replace the journal paper roll proceed as follows: Open the top cabinet.
-
Page 96
All manuals and user guides at all-guides.com Journal Printer Replenishing Paper — Graphics Printer If there is any paper left on the supply roll, press the paper feed button to wind on a few turns of blank paper to protect the printed journal roll. -
Page 97
All manuals and user guides at all-guides.com Journal Printer Replenishing Paper — Graphics Printer Remove the printed journal roll by pushing it up from underneath. If necessary, tear off the paper against the serrated cutter. P77 ATM — Operator Manual… -
Page 98
All manuals and user guides at all-guides.com Journal Printer Replenishing Paper — Graphics Printer Remove the take-up spindle from the paper roll. P77 ATM — Operator Manual… -
Page 99
All manuals and user guides at all-guides.com Journal Printer Replenishing Paper — Graphics Printer Lift one of the green locking levers to open the print mechanism. P77 ATM — Operator Manual… -
Page 100
All manuals and user guides at all-guides.com Journal Printer Replenishing Paper — Graphics Printer Remove the paper roll core and any remaining paper from the printer. P77 ATM — Operator Manual… -
Page 101
All manuals and user guides at all-guides.com Journal Printer Replenishing Paper — Graphics Printer Remove sufficient paper from the new journal roll so that there are no traces of glue or tape. Place the new roll in the journal printer as shown. Tear the end of the paper to leave a reasonably clean and straight edge without creases. -
Page 102
All manuals and user guides at all-guides.com Journal Printer Replenishing Paper — Graphics Printer 10 Lifting the paper entry cover with one hand, feed the paper through until the end is visible. Release the paper entry cover. 11 Pull about 300 mm (12in.) of paper through the print mechanism. -
Page 103
All manuals and user guides at all-guides.com Journal Printer Replenishing Paper — Graphics Printer 12 Hold the take-up spindle so that the black end is at the same side of the printer as the black roll guide. Insert the folded edge of the paper into the slot on the take-up spindle and wind the paper around the core two or three times in the direction shown. -
Page 104
All manuals and user guides at all-guides.com Journal Printer Replenishing Paper — Graphics Printer 13 Making sure that the black end of the spindle is against the black roll guide, push the take-up spindle down between the roll guides until it clicks into place. (Starting with the spindle at an angle will make it easier to fit between the roll guides.) The paper should wind over the top of the spindle. -
Page 105
All manuals and user guides at all-guides.com Journal Printer Replenishing Paper — Graphics Printer 14 Close the print mechanism, making sure that it clicks shut. A test graphic will be printed automatically: A “smiley” graphic indicates correct operation. A picture of the printer showing a paper roll being removed indicates that the empty paper core was left in the printer and is still under the new paper roll. -
Page 106
All manuals and user guides at all-guides.com Journal Printer Replenishing Paper — Graphics Printer 15 Press the paper feed button to wind on the paper until all slack is taken up and the test graphic has disappeared onto the take- up roll. -
Page 107: Clearing Jams — Graphics Printer
All manuals and user guides at all-guides.com Journal Printer Clearing Jams — Graphics Printer Clearing Jams — Graphics Printer The indication of a journal printer jam will be a State Of Health message or overprinting. To clear a paper jam within the journal printer, proceed as follows: Open the top cabinet.
-
Page 108
All manuals and user guides at all-guides.com Journal Printer Clearing Jams — Graphics Printer Lift one of the green locking levers to open the print mechanism. Remove any torn or crumpled paper from within the print mechanism. If anything is printed on this paper, keep it with the printed take-up roll. -
Page 109
All manuals and user guides at all-guides.com Journal Printer Clearing Jams — Graphics Printer Check that the printed take-up roll is winding on evenly and that it is not being crumpled against one of the roll guides. If you cannot move the paper away from the guide, you should replace the journal roll as explained in the previous section. -
Page 110
All manuals and user guides at all-guides.com Journal Printer Clearing Jams — Graphics Printer 6-16 P77 ATM — Operator Manual… -
Page 111: Maintenance
All manuals and user guides at all-guides.com Table of Contents Maintenance Chapter 7 Maintenance What Is Required To Maintain The P77? Daily Tasks Weekly Tasks Emptying the Dip Reader Debris Bin Replenishment Cleaning Kit Looking After The P77 Weekly Maintenance Procedures Cleaning the Facia and Exterior Panels Cleaning Magnetic Heads on Dip Card Readers Printer Media Storage…
-
Page 112
All manuals and user guides at all-guides.com Table of Contents Maintenance P77 ATM — Operator Manual… -
Page 113: What Is Required To Maintain The P77
All manuals and user guides at all-guides.com Maintenance What Is Required To Maintain The P77? What Is Required To Maintain The P77? The P77 needs very little attention after installation. The following daily tasks are required: Daily Tasks Check that there are sufficient supplies in the P77. The following weekly tasks are required: Weekly Tasks Clean the facia and exterior panels…
-
Page 114: Cleaning Kit
Cleaning Kit The cleaning kit (Ref No.009-0004633) contains all the recommended materials for maintenance and cleaning of your ATM. The kit is obtainable from your local NCR Field Engineering organisation and contains the materials shown in the following list: Item…
-
Page 115: Looking After The P77
All manuals and user guides at all-guides.com Maintenance Looking After The P77 Looking After The P77 The weekly maintenance procedures are: Weekly Clean the facia and exterior panels Maintenance Clean the magnetic heads on the dip card reader. Procedures Clean the surfaces of the facia and exterior panels, using either the Cleaning the Facia general surface cleaner (refer «Cleaning Kit») or a dilute detergent and Exterior Panels…
-
Page 116: Cleaning Magnetic Heads On Dip Card Readers
Paint stripper of any kind. Keyboards vandalised by paint should not be cleaned. The keyboard should be replaced. To clean the heads you will require a cleaning card, NCR part Cleaning Magnetic number 998-0052929 or equivalent. Proceed as follows: Heads on Dip Card Open the top cabinet.
-
Page 117: Printer Media Storage
All manuals and user guides at all-guides.com Maintenance Printer Media Storage Printer Media Storage To get the best results from your printer, store spare paper supplies in a cool, dry, dust-free place. Leave the articles in their original packing material until required for use. P77 ATM — Operator Manual…
-
Page 118
All manuals and user guides at all-guides.com Maintenance Printer Media Storage P77 ATM — Operator Manual… -
Page 119: Index
All manuals and user guides at all-guides.com Index Index Activating The Mas-Hamilton Lock 2-19 An Introduction To The P77 Module Location 1-3 What is the P77 1-1 Auto-Supervisor 2-9 Changing Combination 2-14 Cleaning kit 7-2 Clearing Jams Journal printer (graphics) 6-13 Receipt Printer 5-6 Closing Mas-Hamiltonr Lock 2-18…
-
Page 120
All manuals and user guides at all-guides.com Index Currency purge bin Emptying 4-3 Customer set combination Unlocking 2-14 Daily maintenance tasks 7-1 Digital audio Front access volume control 2-24 Dip card reader Head cleaning 7-4 Documentation Mas-Hamilton Lock 2-22 Emptying debris bin 7-1 Entering supervisor mode 2-8 Error message identification number 3-1 Error Reporting… -
Page 121
All manuals and user guides at all-guides.com Index Getting Started Activating The Mas-Hamilton Lock 2-19 Closing The Security Enclosure 2-5 Closing The Top Cabinet 2-3 Controlled Access Electronic Lock 2-15 Entering Supervisor Mode 2-8 Front operator interface 2-23 Hardware reset 2-25 Inserting/Removing Compact Disks 2-28 Diskettes 2-26… -
Page 122
All manuals and user guides at all-guides.com Index Lock Types 2-10 Locking Combination Lock 2-14 Keylock 2-12 Looking after the P77 Cleaning Facia and exterior panels 7-3 Cleaning magnetic heads Dip card readers 7-4 Daily maintenance tasks 7-1 Weekly maintenance tasks 7-3 Magnetic head cleaning Dip card readers 7-4 Mains Power Switch 2-6… -
Page 123
All manuals and user guides at all-guides.com Index Closing 2-1 Opening 2-1 With Bunch Presenter 1-2 PC module Error reporting 3-3 Power Switching On/Off 2-6 Primary and Secondary Locks Closing Sequence 2-11 Opening Sequence 2-11 Position 2-11 Primary lock types Combination lock 2-10 With keylock 2-10 Keylock 2-10… -
Page 124
All manuals and user guides at all-guides.com Index Sargent and Greenleaf 2-10 Secondary lock types 2-10 Combination lock 2-10 Keylock 2-10 Security Enclosure Closing 2-5 Opening 2-4 Security Enclosure Interlock Switch 2-7 Standard security enclosure Change The Combination 2-14 Combination locks 2-12 Customer set combination 2-14 Factory set combination 2-13 Keylocks 2-12… -
Page 125
All manuals and user guides at all-guides.com Index Unlocking A keylock 2-12 Customer set combination 2-14 Factory set combination lock 2-13 Weekly maintenance tasks 7-1, 7-3 What is required to maintain your terminal? 7-1 What is the P77 1-1 What This Manual Contains viii P77 ATM — Operator Manual Index-7… -
Page 126: Index
All manuals and user guides at all-guides.com Index Index-8 P77 ATM — Operator Manual…
-
Page 127
NCR 5877 Personas ATM — Operator Manual Number: B006-6210- A000 Date: NCR welcomes your feedback on this publication. Your comments can be of great value in helping us improve our information products. You may send your comments, electronically, to the Information Solutions Department at Dundee. -
Page 128
Thank you for your evaluation of this publication. Fold the form where indicated, tape (please do not staple), affix stamp and drop in the mail. F 8763-0695 Fold Affix Postage Stamp Here NCR Financial Solutions Ltd. Information Solutions Kingsway West Dundee Scotland DD2 3XX…
ATMdesk аппарат, имеющий низкую стоимость наряду с полной функциональной диагностикой, предназначенной для всех банкоматов NCR Persona и Selfserv — терминалов самообслуживания. Он был разработан для того, чтобы облегчить диагностику неполадок банкоматов. ATMdesk уже используют сотни IAD и ISO по всему миру. Система признана лидером независимым решением специалистов по диагностике неполадок банкоматов компании NCR.
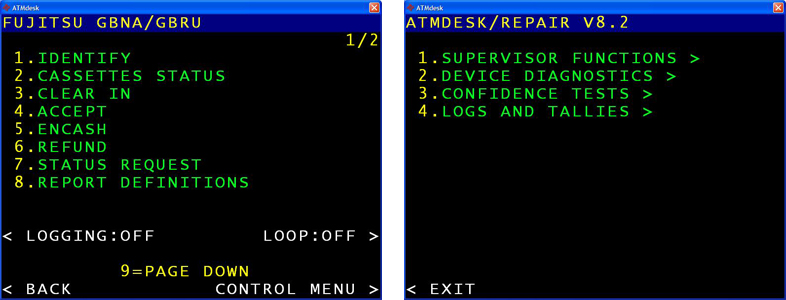
Удобства
ATMdesk был разработан «с нуля» для того, чтобы его использование было несложным даже для лиц с минимальной подготовкой.
Благодаря использованию загрузочных дисков, ATMdesk может быть настроен и запущен в течение нескольких секунд, мгновенно предоставляя пользователям простую и интуитивно понятную структуру меню. Управлять меню можно с помощью кнопок или сенсорного экрана на передней или задней панелях (если оно поддерживается устройством АТМ). После завершения работы сразу же можно напечатать подробные отчёты о тестировании, с указанием найденных ошибок, с перечнем работ, которые были сделаны на банкомате, без необходимости для разработчиков писать отчёт от руки.
Коды статуса
Одна из наиболее затратных по времени задач при использовании софтвера АТМ для диагностики программного обеспечения банкомата — перевод кодов с главного статуса NCR на проприетарный диагностический код NCR. С моделью ATMdesk эта необходимость отпадает, на экране мгновенно отображается название и описание ошибки рядом с кодом без потребности поиска, тем самым экономя время и исключая вероятность ошибки.
Безопасность
Система ATMdesk запускается со специализированного загрузочного диска или USB, а не с внутреннего диска банкомата. Это означает, что в банкомате не осталось никаких следов программы и что нет необходимости в каких-либо программных изменениях в банкомате. Это позволяет инженерам использовать программное обеспечение в безопасной среде без необходимости доступа к информации, хранящейся на жёстком диске.
Лицензирование
ATMdesk подходит к лицензированию просто, предоставляя выбор из двух моделей лицензирования ограничения по времени и загрузке. Оба варианта являются многоуровневыми, Вы будете платить лишь за необходимые Вам лицензии — и не более.
Поддерживаемые модели АТМ
- NCR 53XX
- NCR 56XX
- NCR Persona 58XX
- NCR Selfserv 66XX
(Новые устройства поставляются на регулярной основе)
Выгоды
- Существенно экономически эффективнее, чем другая диагностика
- Мультифункциональное программное обеспечение, которое имеет регулярные бесплатные обновления
- Гибкая лицензионная политика, которая позволяет Вам приобрести только то, что нужно
- Нет необходимости быть связанным контрактом с отделом сервиса
Слайд 1Диагностика состояния устройств с помощью утилит
Курс экспертного
уровня
Э-002
v.1.0

Слайд 2Для чего используются диагностические утилиты
Диагностические утилиты
необходимы для осуществления тестирования и проверки работоспособности
различных устройств в устройстве самообслуживания. Диагностические утилиты могут быть предоставлены как вендором (производителем) так и сторонним разработчиком.
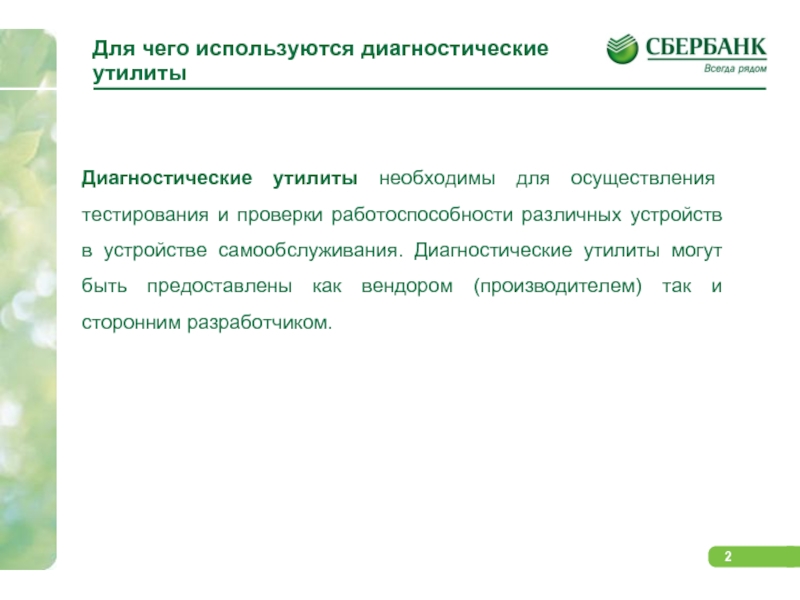
Слайд 3Диагностическая утилита банкоматов NCR
Sys App (Aptra)
Диагностическая
утилита банкоматов NCR
ATMDesk
Диагностическая утилита банкоматов НАУТИЛУС
Moni
Plus VDM (NHWDM)
Диагностическая утилита терминалов ДОРС,
ATMCheck
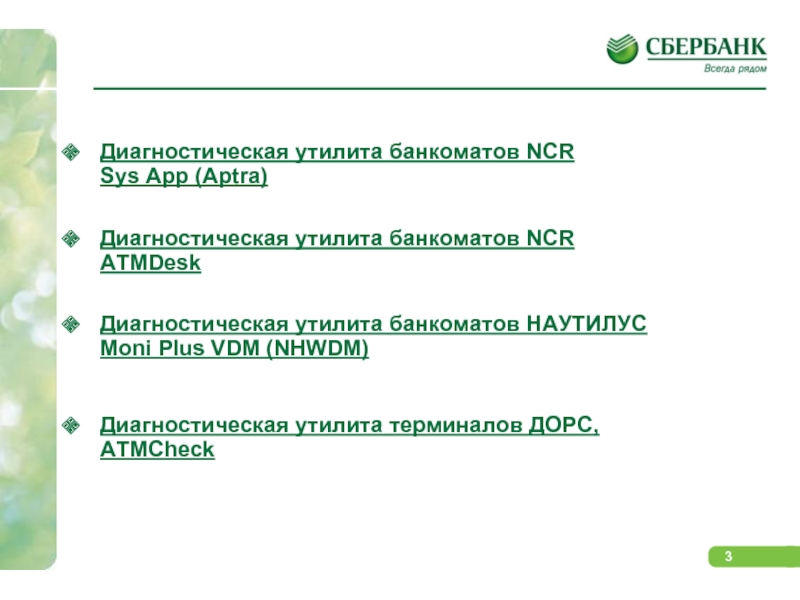
Слайд 4Диагностическая утилита банкоматов NCR
Sys App (Aptra)

Слайд 5Для чего используется Sys App
Sys App разработана
для сообщения о состоянии всех модулей или
«устройств» банкомата. Состояние устройств варьируется от исправного и предупреждений о необходимости пополнения расходных материалов (например, необходимости заправить в принтер бумагу) до ошибок, требующих вмешательства инженера по эксплуатации.

Слайд 6Информация о состоянии отображается на панели оператора,
а также на дополнительном удаленном индикаторе состояния.
Банкомат оснащен или текстовой панелью оператора, или графической панелью оператора, на которой также отображается пошаговое руководство с текстовыми и видеоинструкциями по устранению состояний ошибки.

Слайд 7Текстовая панель оператора
Текстовая панель оператора отображает список
сообщений, выданных системой отчетов
об ошибках (Системное приложение
(«Sys App») и предоставляет доступ к меню Sys App.
Слайд 8Индикаторы с правой стороны панели оператора:
● In-service
(в процессе обслуживания) – горит, когда банкомат
доступен для транзакций.
● Supervisor (администратор) – горит, когда банкомат находится в режиме администратора и недоступен для транзакций.
● Power (питание) – горит, когда панель оператора получает питание от банкомата.
● Error (ошибка) – горит, если произошла неисправимая ошибка программного обеспечения
● Comm. (связь) – горит, когда банкомат осуществляет передачу данных с базовой компьютерной системой.
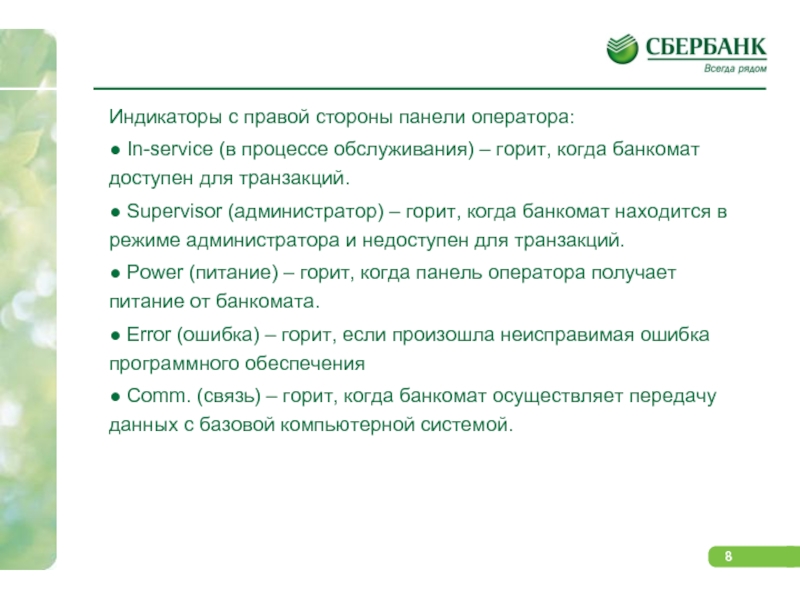
Слайд 9Два переключателя в центральной части панели:
● Переключатель
Normal/supervisor (обычный/администратор) – для входа/выхода
из режима администратора,
в котором можно войти в меню для тестирования устройств
или отчитаться при необходимости об устранении ошибок физического характера.
● Переключатель Reset (сброс) – для возврата к настройкам банкомата по умолчанию.

Слайд 10
Вход в системное приложение («Sys App») осуществляется
через приложение администратора (запускаемого нажатием кнопки supervisor
на панели оператора). В главном меню Sys App выберите функцию Device Status List (список состояния устройств), чтобы отобразить список всех модулей или устройств, требующих внимания.
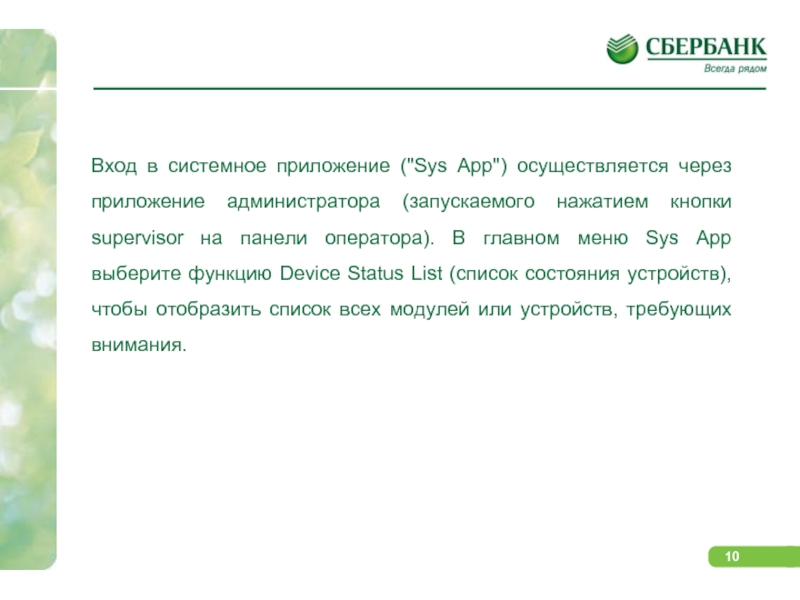
Слайд 11Очистка состояния устройства
Очистка состояния отдельного устройства
Для очистки
состояния одного из устройств выполните следующие операции:
1.
Выберите номер в списке состояний устройства, соответствующий состоянию устройства, которое надо очистить.
2. Если очистка выбранного устройства выполняется не за одно действие, появится экран с указанием действий, которые нужно выполнить.
3. Если очистка выбранного устройства выполняется не за одно действие, появится экран с указанием действий, которые нужно выполнить.
4. Произойдет самотестирование устройства.
5. Вернитесь к списку состояний устройств, выбрав параметр Назад
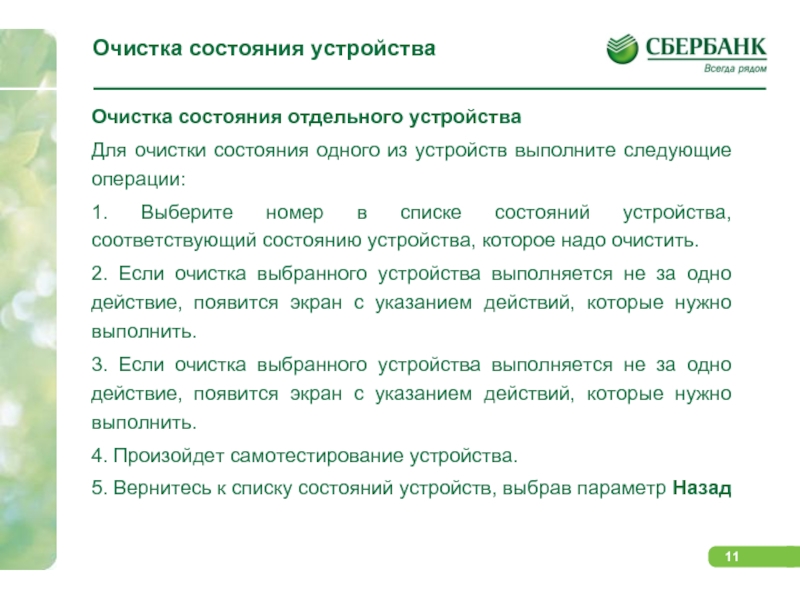
Слайд 12Очистка состояний всех устройств
Если ни одно из
состояний устройств не имеет категории пользователя Требуется
наладчик, можно сразу очистить все состояния. Для этого выполните следующие действия:
1. Выберите параметр Очистить все в списке состояний устройств.
2. Произойдет самотестирование устройств.
3. Вернитесь к списку состояний устройств, выбрав параметр Назад.
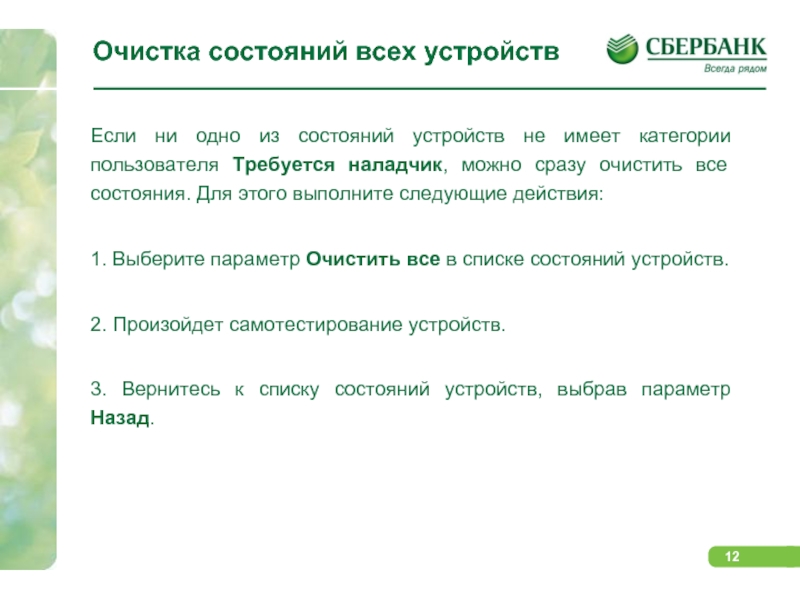
Слайд 13Графическая панель оператора
На графической панели оператора отображается
состояние всех устройств банкомата в графической форме,
а также текстовые и видеоинструкции по очистке сообщенных состояний ошибок. Панель также позволяет проверить выполняемые действия и сообщить об устранении ошибки.
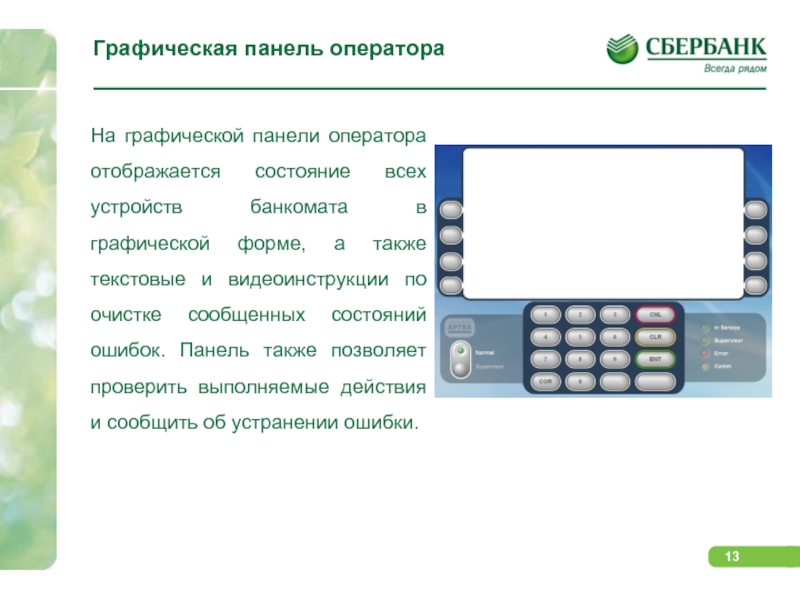
Слайд 14РАБОТА С ГРАФИЧЕСКИЙ ПАНЕЛЬЮ ОПЕРАТОРА
Индикаторы на правой
стороне панели оператора означают следующее.
● In-service (в
процессе обслуживания) – горит, когда банкомат доступен для транзакций.
● Администратор (Supervisor) – горит, когда банкомат находится в режиме администратора и недоступен для транзакций.
● Error (ошибка) – горит, если произошла неисправимая ошибка программного обеспечения
● Comm. (связь) – горит, когда банкомат осуществляет передачу данных с базовой компьютерной системой.
На корпусе панели оператора также находится индикатор питания.
Переключатель supervisor/normal (обычный/администратор) используется для входа в режим администратора, в котором можно просмотреть экран ATM Status.

Слайд 15Устранение неисправностей
На экране Состояние банкомата представлен обзор
состояния всех устройств банкомата. Они отображаются зеленым
(нормальное состояние), желтым (в ближайшем времени будет необходимо обслуживание) или красным (необходимо обслуживание) цветами.
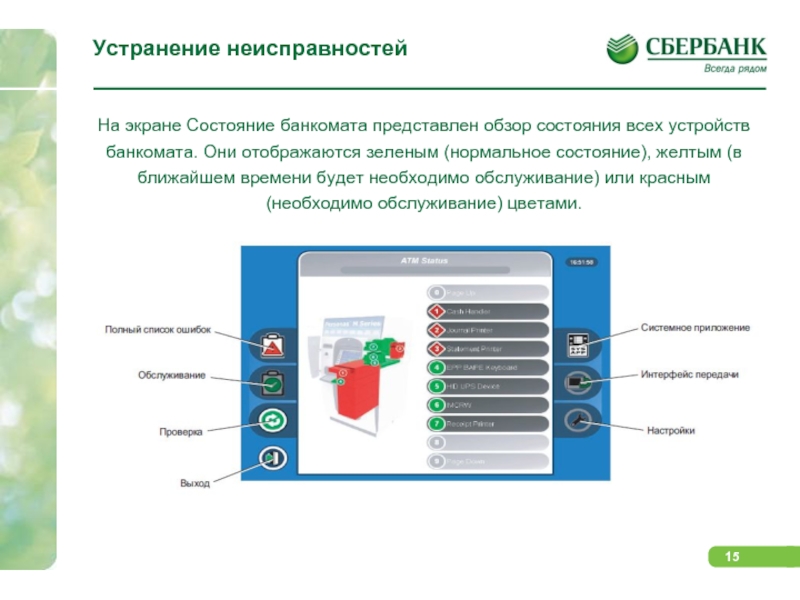
Слайд 16Сенсорные «кнопки» на экране оператора
НЕИСПРАВНОСТИ – отображение
полного списка неисправностей и краткого описания каждой
из них. Если неисправность описана как «Требуется наладчик», то для ее устранения необходима техническая помощь и следует позвать наладчика
ОБСЛУЖИВАНИЕ – отображение списка действий по обслуживанию и ремонту устройства, которые необходимы, но автоматически не определяются, например, замена ленты принтера
ТЕСТ – используется для подтверждения устранения физических ошибок устройств, а также для обновления списка состояния банкомата
SYS APP – доступ ко всем меню и опциям системного приложения. Сведения о меню системного приложения см. в публикации NCR Инструкции пользователя системного приложения поддержки самообслуживания (B006-6167).
ИНТЕРФЕЙС ПЕРЕДАЧИ – отображение сведений об ошибке на экране клиента на лицевой панели банкомата, а не на панели оператора
НАСТРОЙКИ – настройка следующих опций: Язык, тип банкомата, серийный номер, идентификационный номер, код завода и передний/задний доступ
ВЫХОД – возврат в приложение администратора, из которого можно вернуться в обычный режим банкомата. При выходе из окна Состояние банкомата автоматически будут проверены все устройства, для которых было сообщено об ошибке.

Слайд 17Список действий с устройством
На экране Список действий
с устройством отображается нумерованный список текущих необходимых
действий для выбранного устройства. Номера в списке соответствуют номерам на иллюстрации, обозначающим расположение неисправности в устройстве.
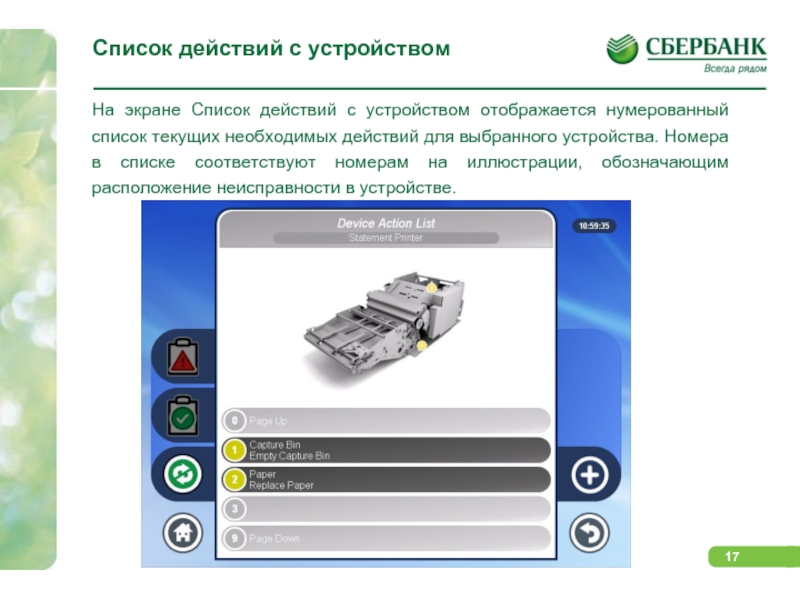
Слайд 18На обзорном экране перечислены необходимые пошаговые действия.
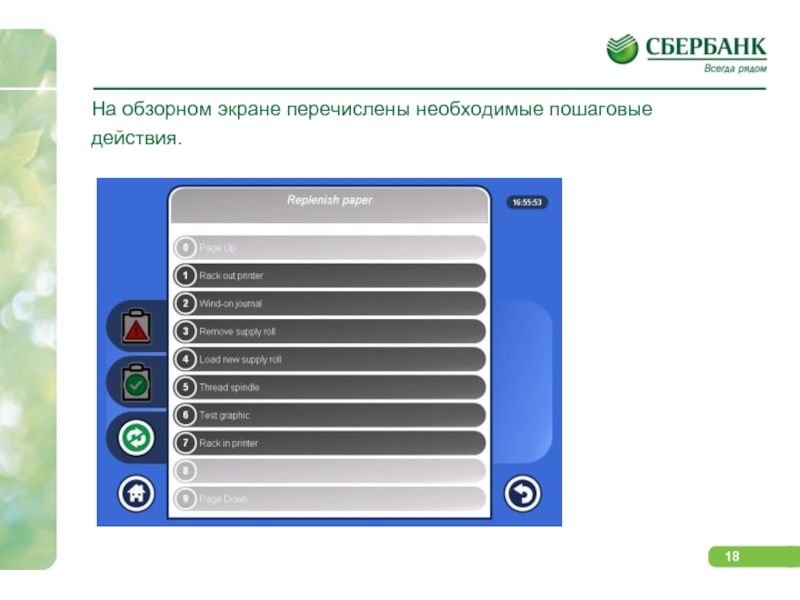
Слайд 19После выполнения действия для устройства в соответствии
с инструкциями необходимо вернуться к экрану Список
действий для устройства и нажать кнопку проверки (зеленая кнопка с круглыми стрелками) для выполнения проверки устройства. Это необходимо делать после выполнения каждого действия, или по крайней мере после выполнения всех действий для устройства. После проверки будет выдан отчет о выполнении всех действий, экран Состояние банкомата будет обновлен. Во время проверки на экране могут появляться запросы: например, на установку конверта, извлечения пробной распечатки или подтверждения выполненного действия. В инструкциях может быть предусмотрено нажатие кнопки проверки в определенный момент, для проверки выполнения процедуры. После завершения проверки Список действий для устройства обновляется. Кнопка проверки также появляется на экране Состояние банкомата. Здесь при нажатии кнопки проверки будут проверены все устройства банкомата, ошибка которых еще не устранена; это необходимо делать, только если вы уверены, что все неисправности устранены.

Слайд 20Полный список ошибок
Инструкции также доступны в окне
Полный список ошибок, в котором приводится список
всех текущих ошибок для всех устройств. Это позволяет быстро устранить неисправности, одну за другой, не возвращаясь в окно Состояние банкомата после устранения каждой ошибки. Список ошибок является динамичным, т.е. при выполнении действия, в результате которого устраняются несколько неисправностей, список сразу же обновляется при определении отсутствия ошибки. На этом экране также находится кнопка проверки, с помощью которой можно проверить все устройства.

Слайд 22Список обслуживания администратором
В списке Список обслуживания администратором
содержатся инструкции по выполнению заданий регулярного, планового
предупредительного обслуживания, например, очистки. Для эксплуатации банкомата важно, чтобы эти задания выполнялись регулярно. Сведения о необходимых заданиях и регулярности их выполнения смотрите в обзорном руководстве к банкомату.
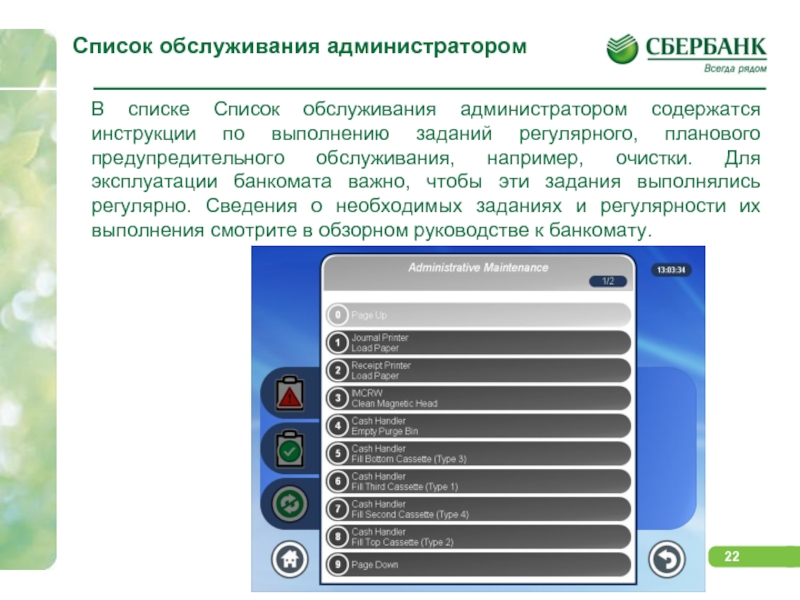
Слайд 23ОТЧЕТЫ ОБ ОШИБКАХ МОДУЛЯ ПК
Отчеты об ошибках
плат модуля ПК не появляются на панели
оператора. Проверка плат осуществляется во время включения питания и перезагрузки. При обнаружении ошибки какого-либо компонента светодиод на модуле ПК загорится красным цветом. В следующей таблице приводится обзор значений цветового кода светодиода.
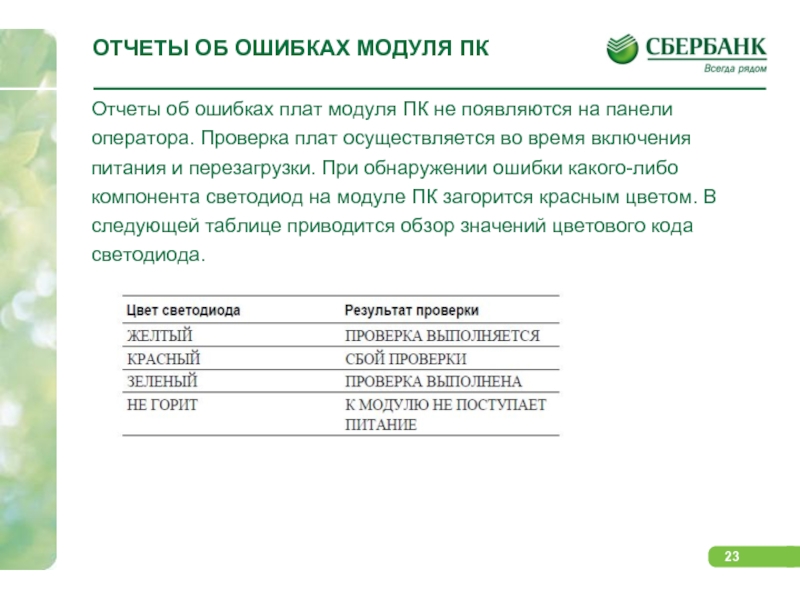
Слайд 24СБРОС ОШИБОК
Для запуска последовательно выполнить следующие действия:
Появится
главное меню Системной утилиты:
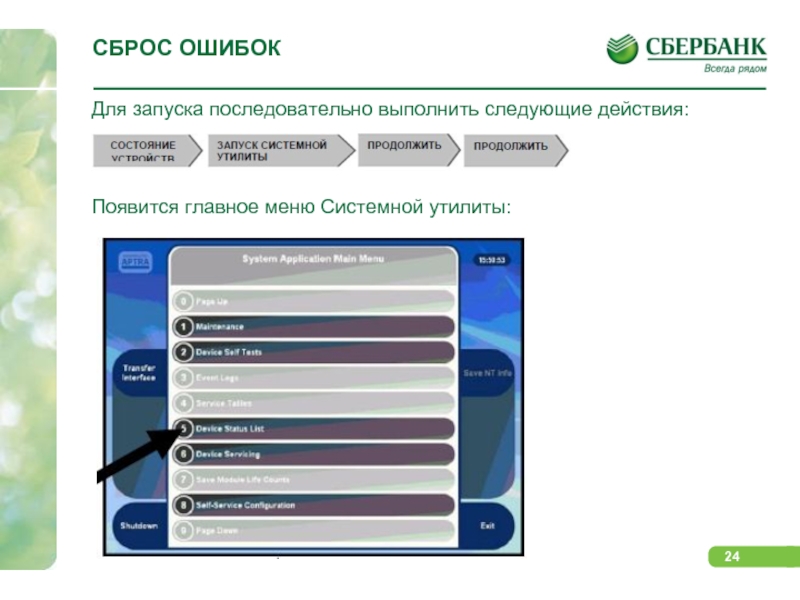
Слайд 25Если такое меню не появилось необходимо нажать
один, либо два раза клавишу Cancel (справа
внизу). Далее выбрать Device Status List — (≪Список статусов устройств≫) нажать клавишу 5 (Рис.4), если есть ошибки нажать кнопку Clear All (≪Обнуление ошибок≫ —
справа вверху). При положительном результате на экране появляется надпись: «The following self-test have passed:…» — (≪Следующий тест прошел успешно≫) на экране все поля очищены, выполнить последовательно команды:
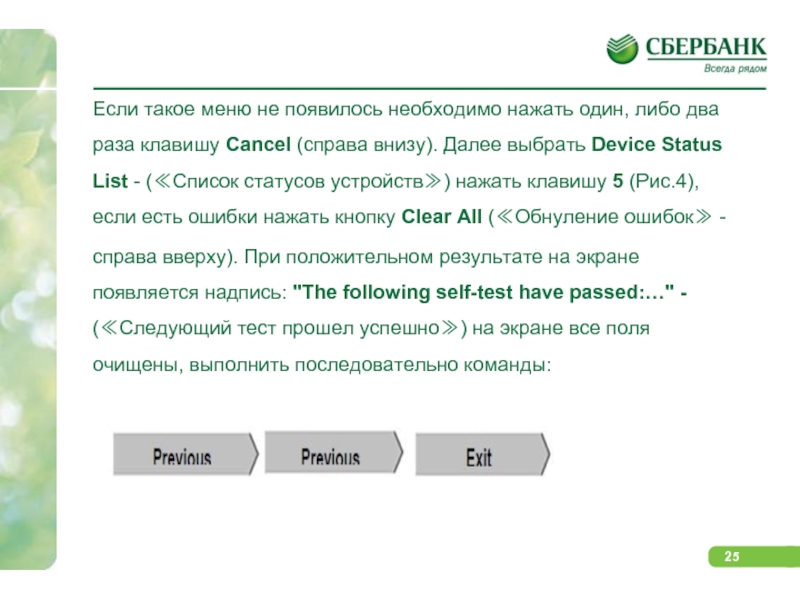
Слайд 26Диагностическая утилита банкоматов NCR
ATMDesk
Слайд 27Для чего используется ATMDesk
Программное обеспечение ATMdesk предназначено
для тестирования банкоматов NCR 53xx (Easypoint), 56xx,
58xx (Personas) и 66xx (SelfServ). Впервые выпущенное в 2007 году, сегодня оно успешно работает на десятках тысяч банкоматов NCR.
Слайд 28Запуск приложения
Для запуска ATMdesk необходимо завершить работу
Aptra и Windows, вставить компакт-диск с программным
обеспечением ATMdesk или выбрать при перезапуске системы ЗАГРУСКА С ATMdesk. После старта Linux и ATMdesk вам будет предложено вставить ключ ATMdesk.
Далее необходимо вставьте свой ключ ATMdesk в USB-порт вашего банкомата. Он покажет срок действия лицензии и дату следующей обязательной «регистрации» ключа ATMdesk на нашем сайте.
Слайд 31Основные функции ATMdesk.
Функции супервизора
Диагностика модулей
Комплексные тесты
Журналы
ошибок и счетчики событий
Слайд 33Меню DEVICE DIAGNOSTICS
Диагностика модулей
Показывает все найденные на
банкомате устройства. При большом числе устройств они
будут показаны на нескольких экранах.
Слайд 35Тестирование ДИСПЕНСЕРА
Тест DISPENSE доступен только после подтверждения
инженером физического доступа к внутреннему содержимому сейфа. Это
предотвращает несанкционированную выдачу денежных средств.

Слайд 36После завершения теста, успешного или нет, ATMdesk
отобразит его результаты (M-Status) и все соответствующие
показатели датчиков (M-Data) в расшифрованном виде.
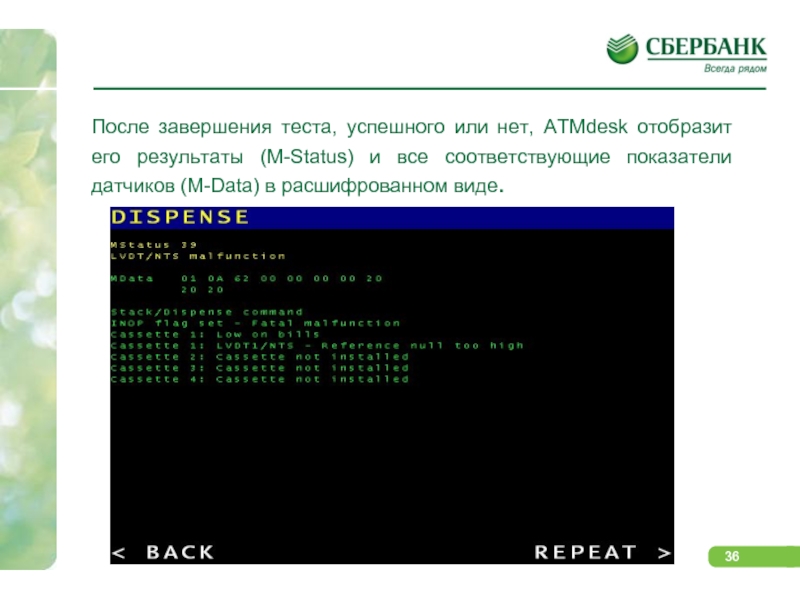
Слайд 37После возобновления нормальной работы можно проверить наличие
признаков неисправностей устройств в журналах ошибок и
в счетчиках событий. Это может избавить вас от необходимости повторного обслуживания банкомата в ближайшем будущем

Слайд 38
В журнале аппаратных ошибок в данном случае
имеются указания на вероятную неисправность LVDT/NTS (датчика
сдвоенных банкнот). Возможно, следует обратить внимание на эту проблему, предотвратив возможную поломку устройства выдачи банкнот в ближайшее время.

Слайд 40В целях документирования также можно напечатать все
результаты диагностики, результаты всех тестов, все журналы
ошибок и счетчики событий или сохранить их на флэш-накопителе.

Слайд 41Диагностическая утилита банкоматов НАУТИЛУС
Moni Plus VDM (NHWDM)

Слайд 42Диагностическая утилита Moni Plus VDM позволяет протестировать:
устройство
рециркуляции банкнот;
устройство выдачи наличных;
устройство приема банкнот;
чековый принтер;
устройство
считывания карт;
датчики;
лампы;
клавиатуру EPP;
считывающее устройство RF;
Позволяет определить неисправность по коду ошибки.
Слайд 43Подготовка к запуску и запуск диагностической утилиты
VDM.
Для тестирования устройств необходимо обеспечить корректное подсоединение
устройств к электронной аппаратуре управления (CE) посредством USB-кабеля или кабеля последовательного интерфейса.
Если VDM не запускается необходимо убедиться в правильности и надежности соединения тестируемых устройств.
Распространенные сообщения утилиты при появлении ошибки:
Запуск утилиты VDM:
Запуск утилиты осуществляется
из меню оператора:
Слайд 44Главное меню диагностической утилиты Moni Plus VDM.
Главное
меню позволяет выбрать устройства для диагностики.
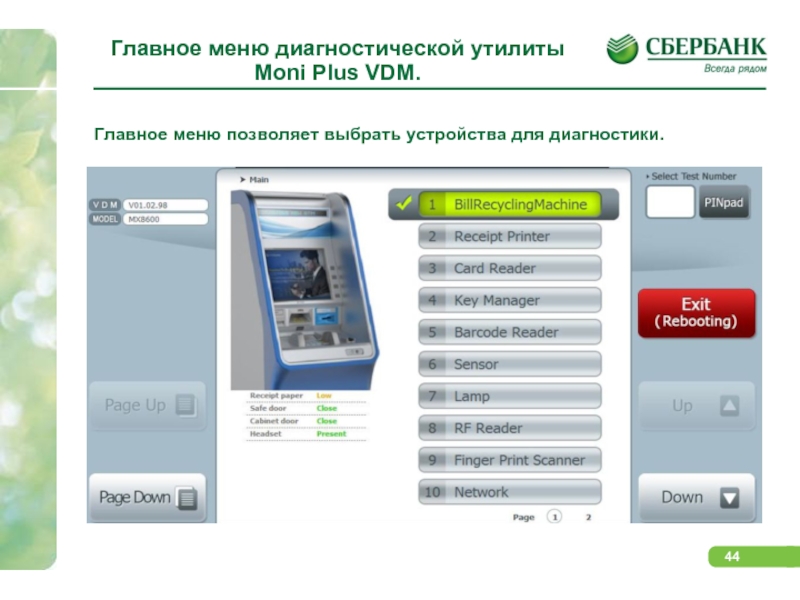
Слайд 45Тестирование устройств.
Выбрав устройство в главном меню, используя
кнопку прокрутки и кнопку [Выполнить] («Execute») переходим
в меню устройства.
В меню выбранного устройства будет отображена информация:
Имя выбранного устройства и версию прошивки.
Список действий (функций) для данного устройства.
Клавиша перехода к предыдущему экрану.
Окно со списком запрашиваемых команд и результатами теста.
В качестве примера выбрано устройство рециркуляции банкнот.
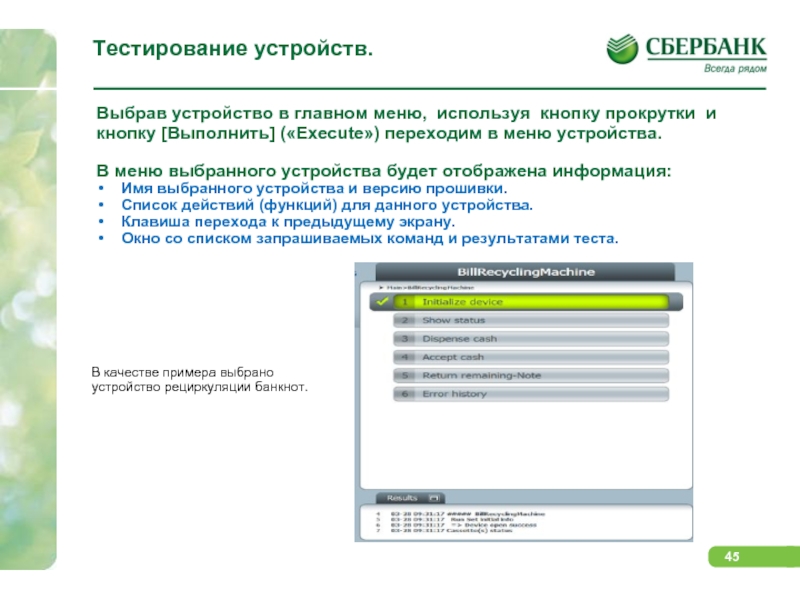
Слайд 46Тестирование устройства рециркуляции банкнот.
Главное меню
Устройство рециркуляции банкнот (BRM).
Инициализация
устройства. Функция служит для сброса ошибки и позволяет вернуть устройство в рабочее состояние.
Отображение статуса. Функция служит для отображения состояния устройства. На экране будет отображена схема устройства с критичными датчиками. Для отображения датчиков использованы три цвета: красный, желтый, зеленый. Красный и желтый цвет сигнализирует о наличии проблемы. Желтый цвет сигнализирует о необходимости чистки датчика, а красный о блокировке датчика.
Выдача наличных. Позволяет перейти в меню «Выдача наличных».
Прием наличных. Позволяет перейти в меню «Прием наличных».
Возврат остальных банкнот.
Журнал ошибок. Для отображения журнала должно произойти не менее 30 ошибок.
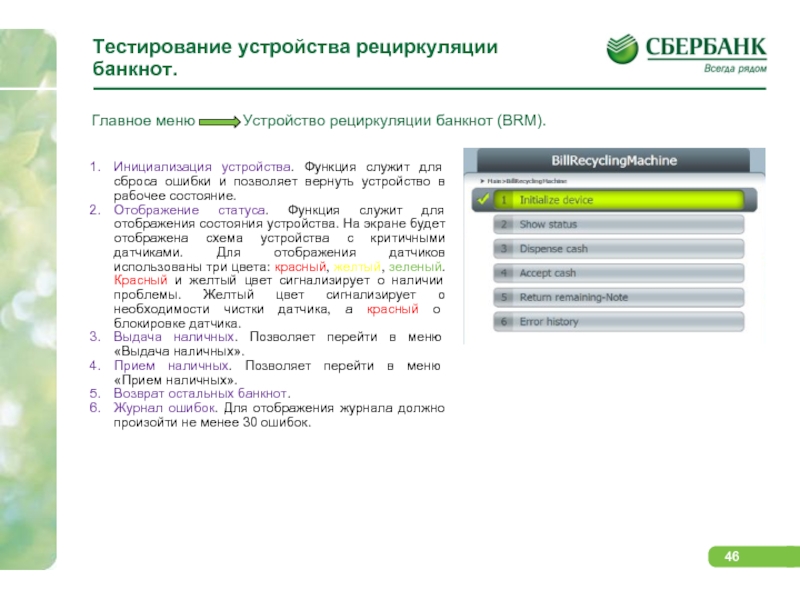
Слайд 47Тестирование устройства выдачи наличных
Главное меню
Устройство выдачи наличных.
Функция позволяет:
инициализировать устройство (сброс ошибки);
набрать и выдать наличные;
протестировать створки (шатр).
Пункт 2 (Dispense cash) или (Устр.выд.нал.) осуществляет переход в подменю «Выдача наличных», где необходимо выбрать количество купюр к снятию по кассетам.
Пункт 3 (Delivery cash) (Доставка наличных) происходит открытие шатра и выдвижение банкнот для изъятия.
Пункт 4 (Retract cash) (Возврат наличных) происходит сброс набранных банкнот в реджект кассету.
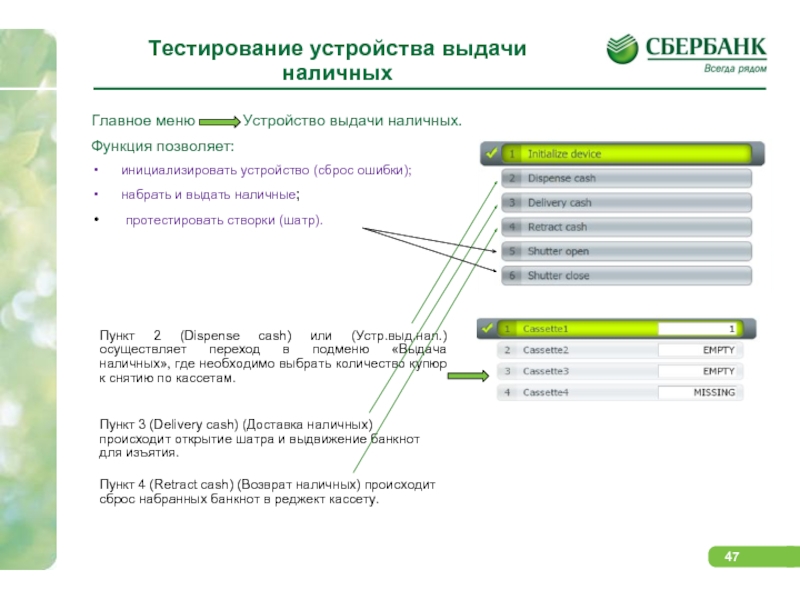
Слайд 48Тестирование устройства приема
банкнот
Главное меню
Устройство приема наличных.
Функция позволяет:
инициализировать устройство (сброс ошибки);
протестировать прием наличных;
протестировать створки (шатр).
Пункта 2 (Accept cash) открывается шатр для вкладывания банкнот.
Пункт 3 (Escrow cash) шатр закрывается и вставленные банкноты доставляются в модуль Escrow.
Пункт 4 (RollBack cash) банкноты из Escrow направляются в кассеты.
Пункт 5 (Stack cash) банкноты из Escrow направляются в отсек возврата наличных.
Пункт 6 (Reject cash) банкноты из Escrow направляются в отсек отказа наличных.
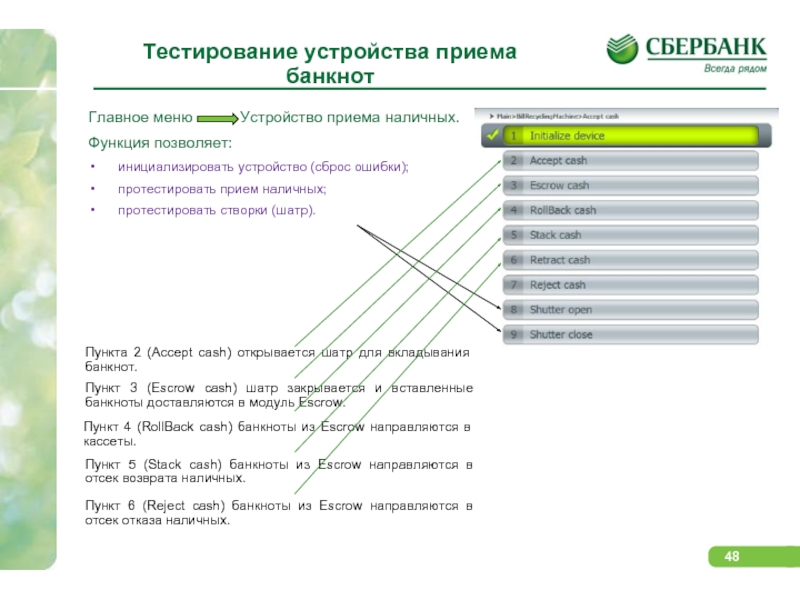
Слайд 49Тестирование чекового принтера
Главное меню
Чековый принтер
Функция позволяет:
инициализировать устройство (сброс ошибки);
отобразить состояние устройства;
протестировать чековый принтер.
Пункт 3 (Test Print) происходит тестовая печать. В случае ошибки отображается код ошибки.
Пункт 4 (Eject Receipt) печатается и отрезается пустой чек.
При выборе пункта 2 (Show Status) отображается схема чекового принтера с состоянием датчиков. Используется двухцветовая раскраска состояния датчика: красный и зеленый. Красный цвет сигнализирует о блокировке датчика.
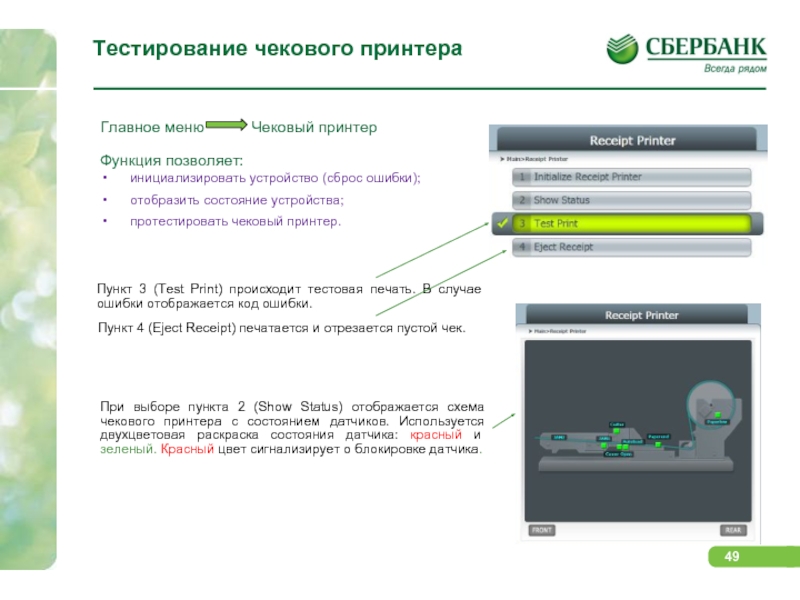
Слайд 50Тестирование кардридера
Главное меню
Устройство считывания карт
Функция позволяет:
протестировать кардридер;
произвести
чистку кардридера;
отобразить состояние устройства;
включить анти-скимминговый датчик.
При выборе пункта 1 происходит переход в подменю функции считывания MS.
Данная функция позволяет считывать и отображать информацию с вставленной в кардридер магнитной карты.
Пункт 1 инициализация устройства позволяет сбросить ошибку.
Пункт 2 (Show Status) отображается состояние кардридера.
Пункт 3 (Insert Enable) разрешить введение карты.
Пункт 4 (Insert Disable) запретить введение карты.
Пункт 5 (Eject Card) вывод карты из кардридера.
Пункт 6 (Retract Card) втягивание карты в кардридер.
Пункт 7 (Read MS) считывание информации с 1 – 3 дорожек карты.
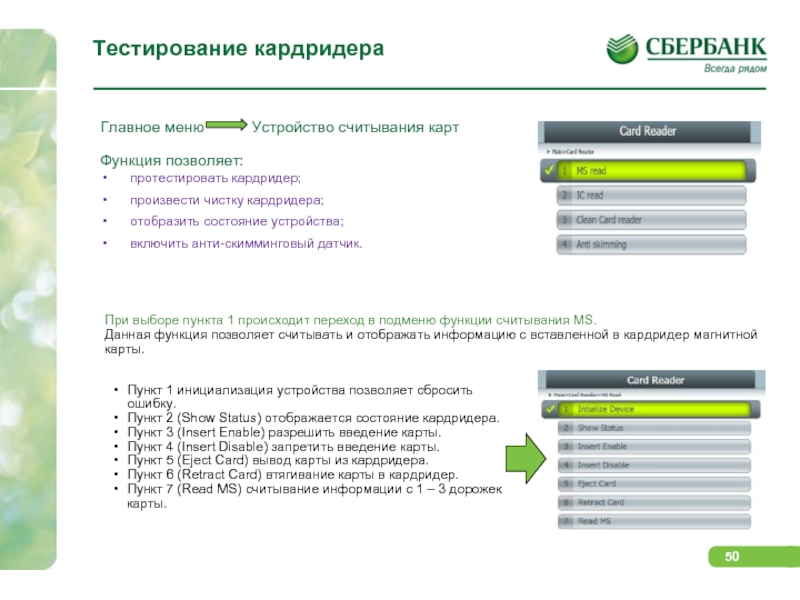
Слайд 51Тестирование кардридера (продолжение)
При выборе пункта 2 происходит
переход в подменю функции считывания IC.
Данная функция
позволяет считывать IC на карте и отключать питание устройства считывания карт.
Пункт 1 инициализация устройства позволяет сбросить ошибку.
Пункт 2 (Show Status) отображается состояние кардридера.
Пункт 3 (Insert Enable) разрешить введение карты.
Пункт 4 (Power Off) отключение питания устройства считывания карт.
Пункт 5 (Eject Card) вывод карты из кардридера.
Пункт 6 (Retract Card) втягивание карты в кардридер.
Пункт 7 (Read IC) считывание данные ISO с вставленной карты с чипом.
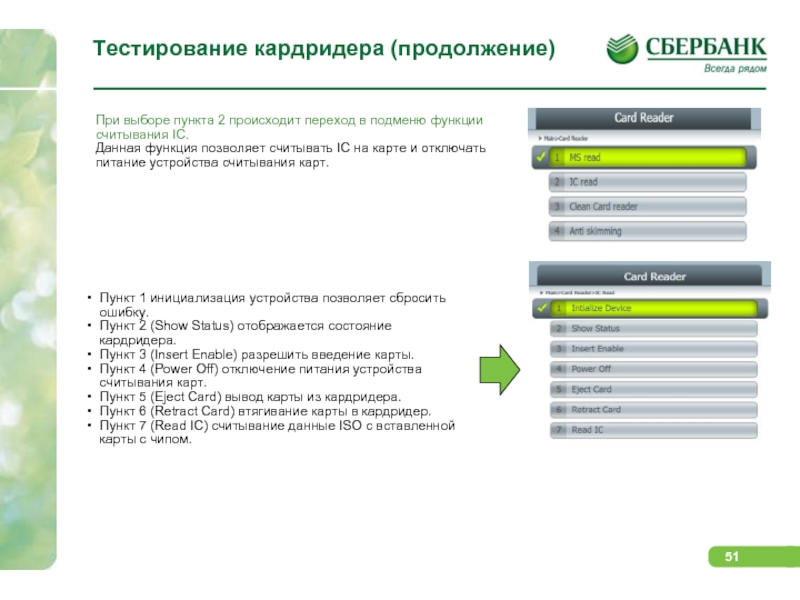
Слайд 52Управление ключами
Главное меню
Админ.упр.ключ.(Key Manager)
Функция управления ключами используется
для конфигурации устройства шифрования EPP.
Доступ к функции управления ключами может быть
ограничен путем создания шестизначного пароля.
Пароль должен быть введен в течение 30 секунд. Если в течение 30 секунд пароль не введен или введен неверно, то появится сообщение и все кнопки, кроме кнопки [Предыдущий вид] будут заблокированы на 30 секунд. Возможность повторного ввода пароля появится по истечении 30 секунд.
Пункт 1 позволяет изменить пароли на доступ в меню.
Пункт 2 (Device test) позволяет протестировать функциональные клавиши и клавиши EPP.
Пункт 3 (Enter Key) позволяет ввести шифровальные ключи в EPP.
Пункт 4 (Check key status) позволяет просмотреть информацию о статусе всех ключей кодирования зарегистрированных в EPP.
Пункт 5 (Remote key info) позволяет просмотреть информацию о серийном номере EPP и состоянии ключей.
Пункт 6 (Clear EPP) удаляются значения прогруженных в EPP ключей.

Слайд 53Тестирование устройства считывания штрих кода
Главное меню
Устройство считывания штрих кода.
Функция
позволяет включать, выключать устройство считывания штрих кода, считывать и отображать на экране штрих код.
Функция пункта 3 позволяет считать штрихкод и вывести информацию на экран.
При успешном завершении считывания штрих кода появляется сообщение «Успешно» (Success) и на экране выодится информация о содержимом штрих кода.

Слайд 54Тестирование датчиков и ламп.
Главное меню
Датчик.
Функция позволяет отображать состояние каждого
датчика банкомата.
Значение статуса CLOSE соответствует состоянию закрыто.
Значение статуса OPEN соответствует состоянию открыто.
Значение статуса OFF соответствует состоянию выключено или переключатель в состоянии управления.
Значение статуса normal соответствует состоянию норма.
Главное меню Лампа.
Функция позволяет протестировать, имеющиеся в банкомате световые указатели.
При выборе пункта [Выбрать все] [Select all] включаются все имеющиеся лампы.

Слайд 55Поиск кода ошибки
Главное меню
Поиск кода ошибки.
Функция позволяет получить описание
ошибки при вводе оператором кода ошибки.
Для ввода значения кода ошибки можно использовать как EPP клавиатуру так и массив клавиатуры ввода.
При нажатии кнопки [Выполнить] [Execute] появится экран с описанием ошибки и схемой устройства, где будет указана проблемная зона.

Слайд 56Завершение утилиты VDM.
Для завершения утилиты необходимо нажать
кнопку [Exit (To Application)] [Выход (из Приложения)].
Реакцией утилиты будет появление в меню вопроса «Вы действительно хотите покинуть приложение?» и предложение выбора кнопками [Yes] [Да] и [No] [Нет].
![Завершение утилиты VDM. Для завершения утилиты необходимо нажать кнопку [Exit (To Application)]](https://thepresentation.ru/img/tmb/1/78786/f2ab24a54b1f62ecd25aaf55422632bb-800x.jpg)
Слайд 57Диагностическая утилита терминалов ДОРС,
ATMCheck

Слайд 58Диагностическая утилита ATMCheck позволяет протестировать:
устройство приема наличных;
чековый
принтер;
устройство считывания карт;
клавиатуру EPP;
спец. электронику;
сканер штрих –
кодов;
сенсорный экран;
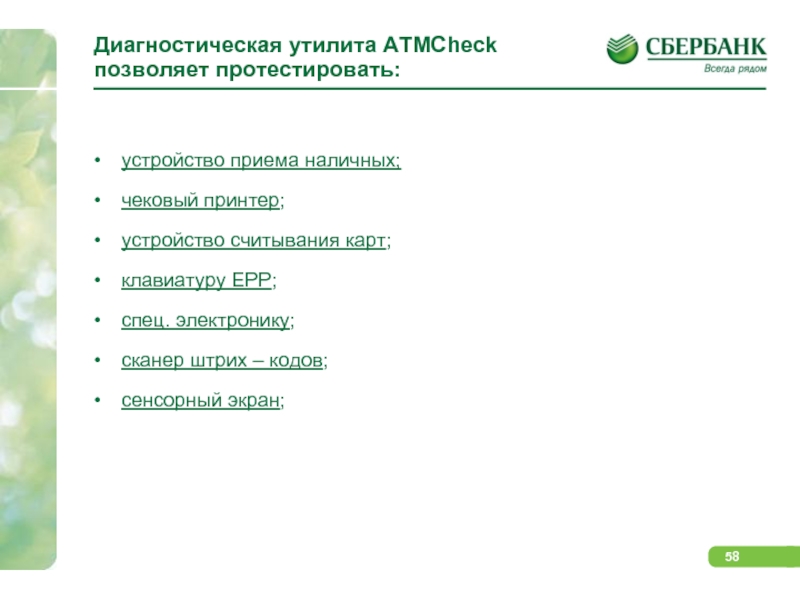
Слайд 59Подготовка к запуску и запуск диагностической утилиты
ATMCheck .
Для тестирования устройств необходимо обеспечить корректное
подсоединение устройств к электронной аппаратуре управления посредством USB-кабеля или кабеля последовательного интерфейса.
ПО ATMCheck запускается со сменного носителя информации либо с жесткого диска УС.
Для запуска ПО ATMCheck следует дважды щелкнуть левой кнопкой мыши по значку исполняемого модуля ПО ATMCheck – ATMCheck.exe.
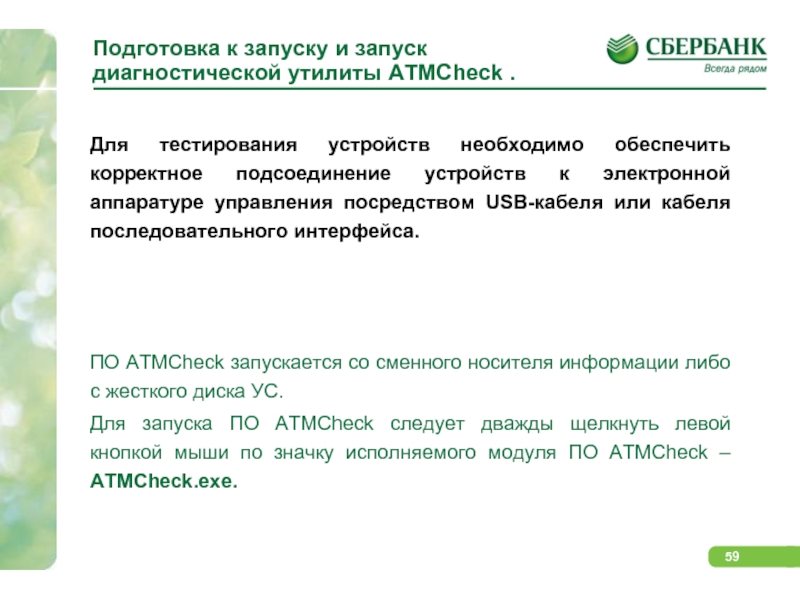
Слайд 60Главное меню диагностической утилиты ATMCheck
Главное меню
позволяет выбрать устройства для диагностики.
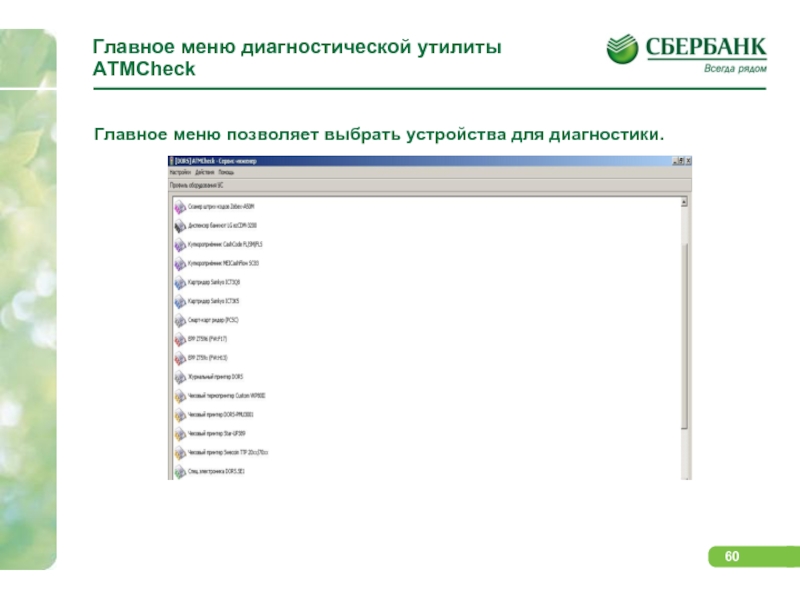
Слайд 61Окно тестирования
После выбора устройства открывается окно тестирования,
содержащее все элементы управления, позволяющие управлять процессом
тестирования выбранного устройства.
Элементы управления.
Для перехода к тестированию другого устройства следует вернуться к списку устройств нажатием кнопки
Нажатием кнопки можно произвести принудительное обновление статуса устройства.
Запуск тестирования производится нажатием кнопки
Остановка тестирования производится нажатием кнопки
В колонке «Результат», выводится результат выполнения соответствующего теста.
В колонке «Событие», выводятся сообщения о выполнении тестов, в том числе о действиях ПО, оператора и
результаты выполнения тестов.

Слайд 62Тестирование устройства считывания карт
Главное меню
Картридер ICT3Q8
Главное меню
Картридер ICT3K5
Выбор установленного на УС устройства считывания карт.
После выбора устройства открывается основное окно тестирования.

Слайд 63Тестирование устройства считывания карт (продолжение)
В окне «Настройка
параметров» производится настройка параметров профиля устройства и
параметров теста.
Параметры устройства (обязательно):
PORT_NAME – параметр задает имя COM-порта, к которому подключено устройство. Возможны два варианта установки COM-порта:
при нажатии кнопки [Автопоиск] ПО автоматически определит порт подключения выбранного устройства, а также некоторых других параметров;
самостоятельно оператор назначает порт устройству (в этом случае оператор знает значение COM — порта устройства).
Параметры тестов:
CARD_READ_FUNCTION – комплексное тестирование кардридера в режиме полоса/чип. Тест производит проверку функции считывания дорожек магнитной полосы банковской карты.
CLEAN_READER – чистка магнитной головки кардридера.
Название теста:
Комплексное тестирование картридера производит проверку функции считывания дорожек магнитной полосы банковской карты.
Тест считывания карт MIFARE® проверяет считывание карт MIFARE.
Тест захвата карты запрашивает вставку карты и захватывает ее.
Чистка магнитной головки картридера. Тест запрашивает вставку чистящей карты, после вставки выполняет её движение в картридере заданное количество раз. По завершении чистки, карта возвращается оператору.
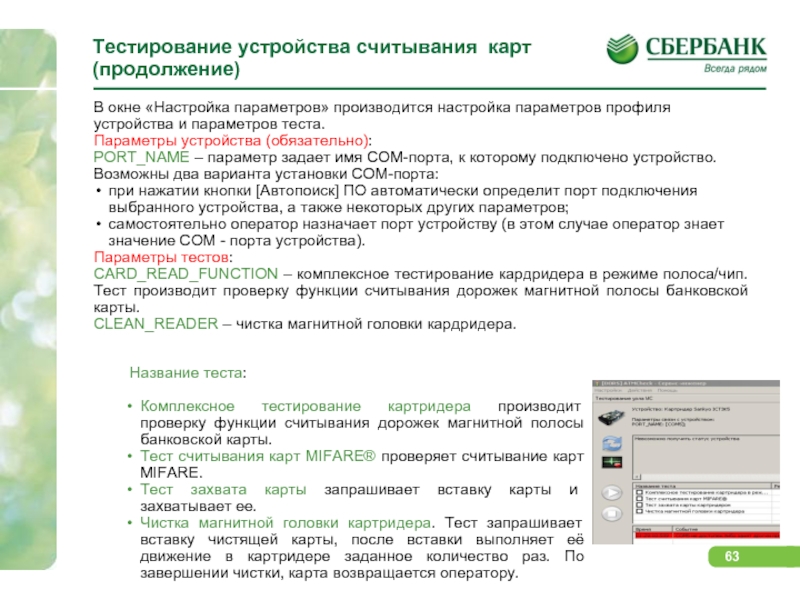
Слайд 64Тестирование устройства приема
наличных
Выбор установленного на УС
устройства приема банкнот.
Главное меню
Купюроприемник CashCode FL/SM/FLS
Главное меню Купюроприемник MEICashFlow SC83
После выбора устройства открывается основное окно тестирования, содержащее все элементы управления, позволяющие управлять процессом тестирования и сразу же открывается окно настройки параметров.
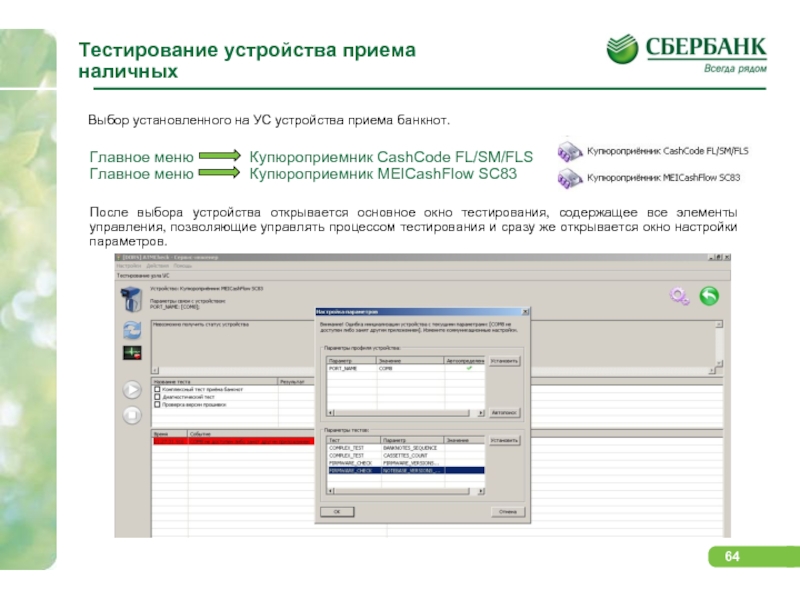
Слайд 65Тестирование устройства приема
наличных (продолжение)
В окне «Настройка
параметров» производится настройка параметров профиля устройства и
параметров теста.
Параметры устройства (обязательно):
PORT_NAME – параметр задает имя COM-порта, к которому подключено устройство. Возможны два варианта установки COM-порта:
при нажатии кнопки [Автопоиск] ПО автоматически определит порт подключения выбранного устройства, а также некоторых других параметров;
самостоятельно оператор назначает порт устройству (в этом случае оператор знает значение COM — порта устройства).
Параметры тестов:
COMPLEX_TEST – комплексный тест приема наличных – комплексное тестирование кардридера в режиме полоса/чип. Тест производит проверку функции считывания дорожек магнитной полосы банковской карты. В тесте есть выбор параметров теста:
CASSETTES_COUNT – число кассет, которые необходимо проверить. Тест запрашивает кассету заданное количество раз.
BANKNOTES_SEQUENCE – последовательность вносимых банкнот. Через точку с запятой указываются номиналы, а также направление движения после распознавания: сейф / возврат.
Успешность прохождения теста подтверждается сообщением о необходимости извлечь кассету и извлечь из нее деньги
FIRMWARE_CHECK — проверка версии прошивки. Данный тест позволяет оценить, что версия прошивки и версия баз данных банкнот устройства не старше указанной для данной модели.
Слайд 66Тестирование устройства приема
наличных (продолжение)
Диагностический тест —
предоставляет интерфейс для проверок функций купюроприемника в
произвольном порядке и в произвольном объеме.
В колонке «Номинал» представлен список доступных для приема валют и номиналов. Установив флаг слева от соответствующего значения, можно разрешить или запретить прием соответствующей банкноты.
Элементы управления окна (Диагностический тест):
Кнопка [Разрешить прием] подает команду на ожидание внесения банкноты. Внесена может быть любая банкнота разрешенная к приему соответствующим флагом.
Кнопка [Запретить прием] подает команду на запрет вставки банкнот.
Кнопка [Удержание банкноты] позволяет продлить время пребывания банкноты на позиции удержания.
Кнопка [Возврат банкноты] подает команду на возврат вставленной банкноты оператору.
Кнопка [Складирование в сейф] подает команду на укладку банкноты в сейф купюроприемника.
Кнопка [Сброс устройства] позволяет осуществить аппаратный сброс устройства.
Тест считается успешно пройденным если
выполнены все действия, заданные оператором.
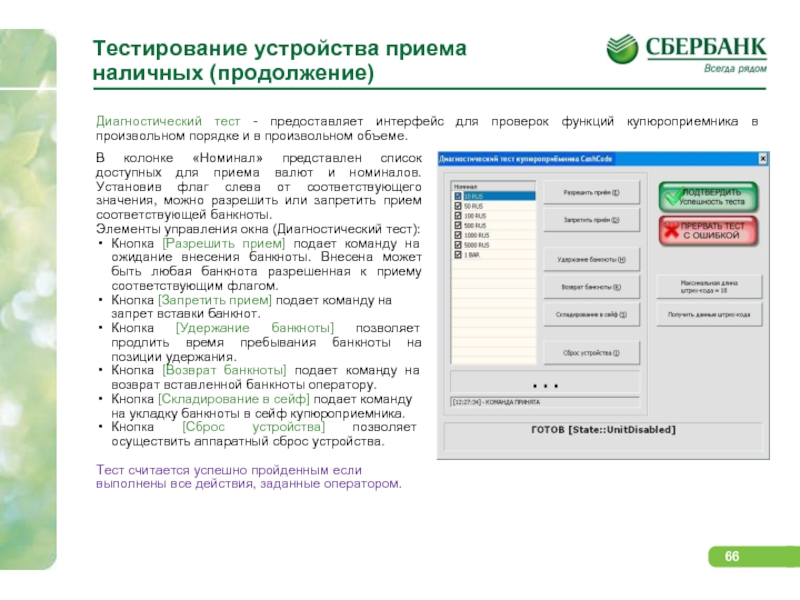
Слайд 67Тестирование чекового принтера
Выбор установленного на УС устройства
приема банкнот.
Главное меню
Чековый термопринтер Custom VKP80II
Главное меню Чековый принтер DORS-PMU3001
Главное меню Чековый принтер Star-UP389
Главное меню Чековый принтер Swecoin TTP 20xx/70xx
После выбора устройства открывается основное окно тестирования, содержащее все элементы управления, позволяющие управлять процессом тестирования и сразу же открывается окно настройки параметров.
Параметр тестов:
PRINTED_MESSAGE – текст для вывода на печать. В случае выбора значения default text принтер печатает тестовый чек по умолчанию. При выборе значения по умолчанию, принтер печатает два чека: первый содержит чек с текстом по умолчанию, второй – текст с тестом ESC-команд.
Тест считается пройденным если в чеке присутствуют все заданные строки и текст читается без затруднений.
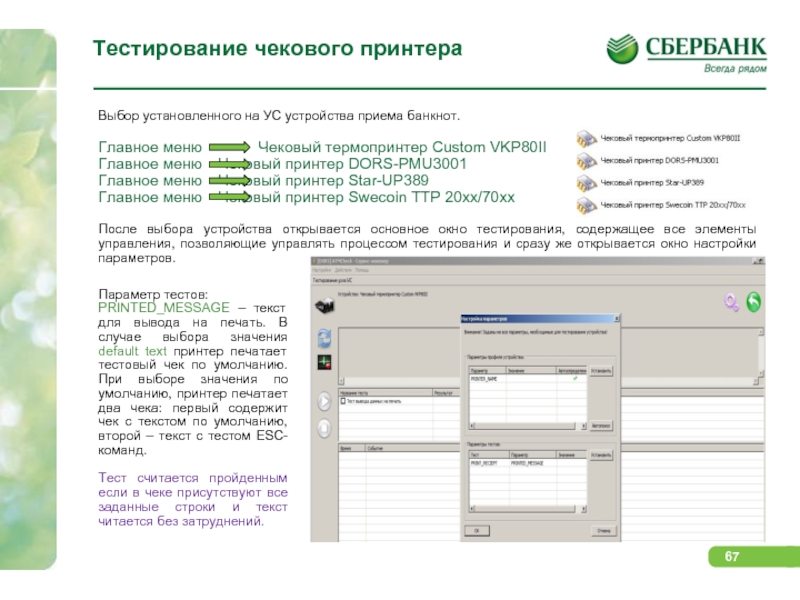
Слайд 68Тестирование сканера штрих – кодов
Выбор установленного на
УС устройства сканера штрих-кодов.
Главное меню
Сканер штрих-кодов на базе HH5180
Главное меню Сканер штрих-кодов Metrologic
Главное меню Сканер штрих-кодов Zebex-A50M
После выбора устройства открывается основное окно тестирования.
Тест BAR_CODE_READ позволяет проверить работоспособность устройства считывать штрих-коды заданных кодировок.
Тест считается пройденным если: на экране отображено сообщение об успешности считывания штрих-кода; на экране отображено сообщение с информацией о штрих-коде; был услышан звуковой сигнал от сканера в момент считывания.
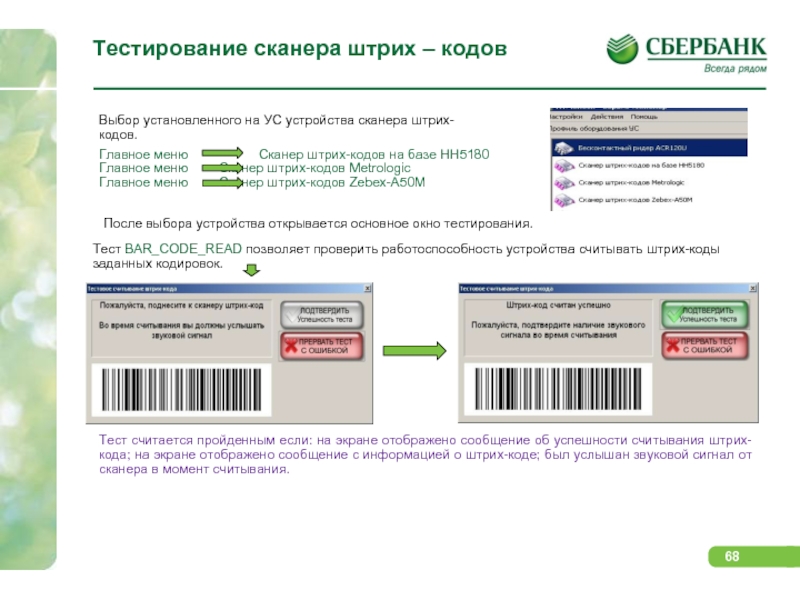
Слайд 69
Тестирование EPP клавиатуры
Главное меню EPP ZT596
Главное
меню EPP ZT59x
После выбора устройства открывается основное
окно тестирования.
Название теста:
Графический тест клавиш EPP -предусматривает нажатие клавиш PIN -клавиатуры и отображает эти нажатия на экране. После нажатия всех клавиш тест предлагает нажать клавишу ESC на алфавитно-цифровой клавиатуре (либо нажать крестик в правом верхнем углу окна).
Тест криптографических функций EPP — тест полностью автоматический. Об успешном прохождении теста свидетельствует сообщение об успешном выполнении теста.
Тест звуковых сигналов EPP. Звуковой сигнал при нажатии кнопки свидетельствует об успешном прохождении теста.
Тестирование памяти ключей – тест ячеек памяти ключей. Об успешном прохождении теста свидетельствует сообщение об успешном выполнении теста.

Слайд 70Тестирование сенсорного экрана
Главное меню
Сенсорный экран
После выбора устройства открывается основное
окно тестирования.
Название теста:
Тест калибровки сенсорного экрана — оператору предлагается нажать на пронумерованные области экрана в заданном порядке. Если порядок нажатий будет нарушен, тест автоматически признается проваленным.
Тест выявления нечувствительных областей экрана — оператору предлагается провести одним пальцем по линии между мерцающими областями. Если оператору удалось соединить все области в конфигурации на экране будет отображено сообщение с указанием нажать клавишу [S] на клавиатуре для завершения теста. Если на экране имеется нечувствительная область, то при проведении линии через эту область линия с экрана исчезнет и будет предложено провести линию заново. При повторении обрыва линии в одном и том же месте несколько раз подряд следует считать тест проваленным.
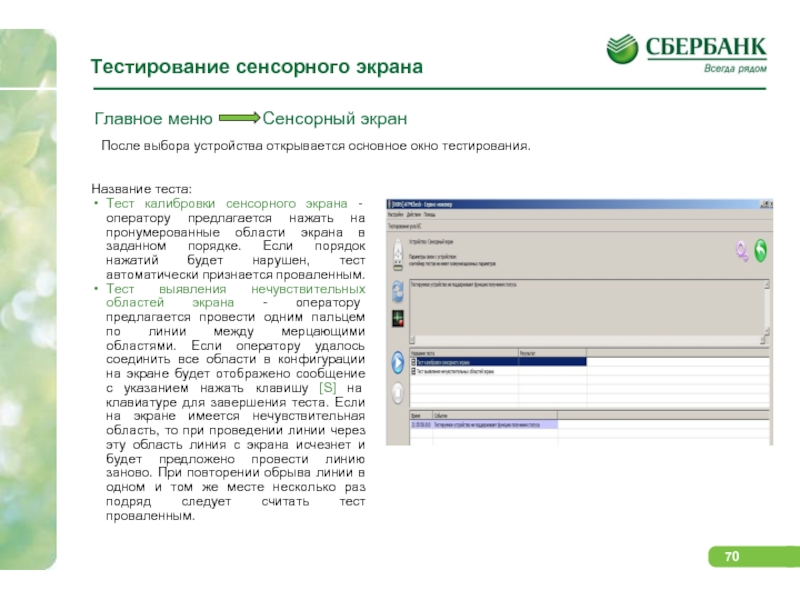
Слайд 71Главное меню Спец.
электроника DORS
После выбора устройства открывается основное окно
тестирования.
Параметры профиля устройства:
PORT_NAME — задает имя COM-порта, к которому подключено устройство;
DOOR_1_PRESENCE — указывает наличие датчика двери 1;
DOOR_2_PRESENCE — указывает наличие датчика двери 2;
DOOR_1_NAME — название двери 1;
DOOR_2_NAME — название двери 2;
IDC_LED_PRESENCE — наличие светового индикатора карт-ридера;
CIM_LED_PRESENCE — наличие светового индикатора купюроприемника.
Тестирование спец. электроники
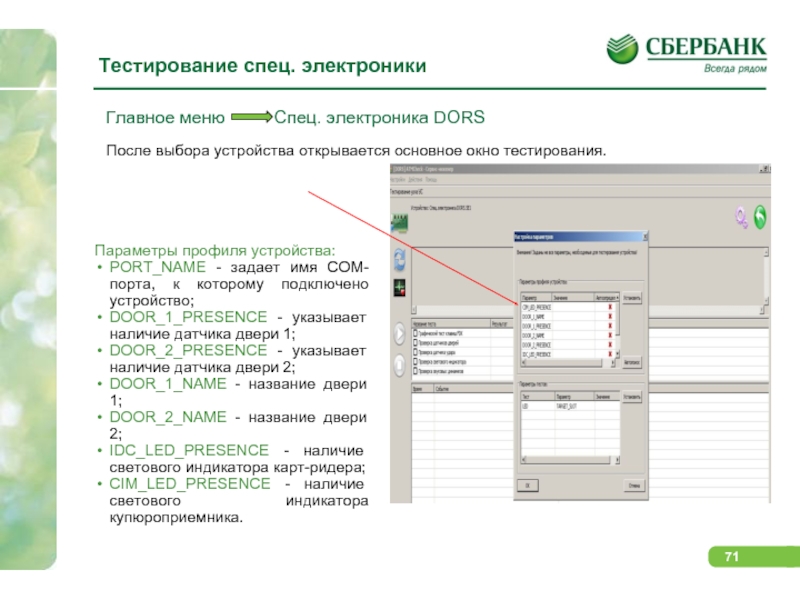
Слайд 72Название теста:
Графический тест FDK-клавиш. После того как
ПО зафиксирует нажатие всех клавиш, станет активна
кнопка [Подтвердить успешность теста]. В случае наличия дефектов (перепутаны кнопки и пр.) нажмите [Прервать тест с ошибкой].
Проверка датчиков дверей. После запуска теста на экран выводится окно с отображением состояния дверей. Следует открыть и закрыть соответствующие двери УС, наблюдая за состоянием изображений на экране.
Проверка светового индикатора. Индикаторы будут загораться в соответствии с картинкой на экране
Проверка звуковых динамиков. На экран выводится окно, визуализирующее воспроизведение звукового файла. При этом через УС воспроизводит звук Left – Right, соответственно в левом и правом динамике. Оператор должен проверить факт наличия звука, а также корректность подключения динамиков. В случае дефекта – провалить тест.
Тестирование спец. электроники (продолжение)
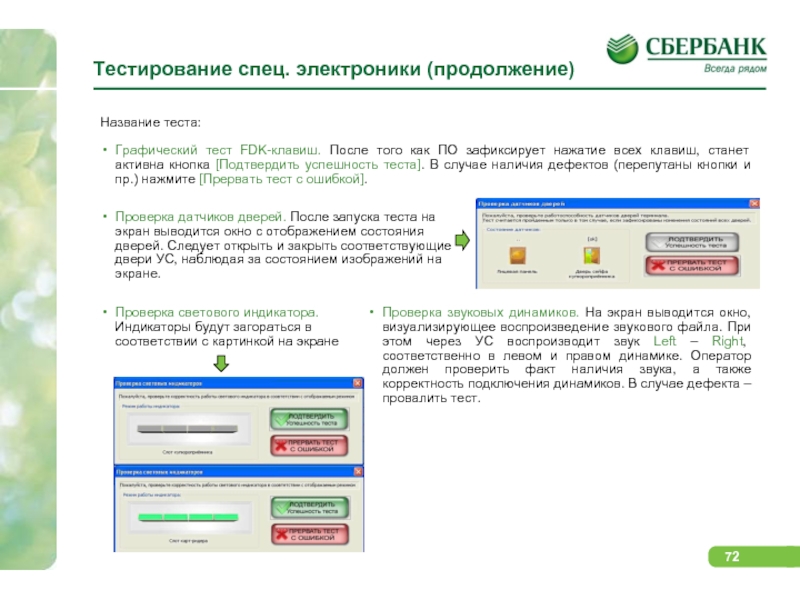
Слайд 73Завершение утилиты ATMCheck.
Для завершения работы с ПО
ATMCheck следует щелкнуть левой кнопкой мыши на
стандартной для
Windows-приложений кнопке с изображением крестика, расположенной в правом верхнем углу окна
приложения.
Слайд 74СПАСИБО ЗА ВНИМАНИЕ!
ДЛЯ ПРОДОЛЖЕНИЯ ОБУЧЕНИЯ ВАМ НЕОБХОДИМО
ПРОЙТИ ТЕСТ ПО КУРСУ «Э-002» НА ПОРТАЛЕ