
KTM MOTORCYCLE ERROR CODES DTC
DTC (Code) — Blink code — Signal / Component — Description of error Engine
P0201 33 Injection valve, rear cylinder Malfunction Stalls
P0202 34 Injection valve, front cylinder Malfunction Stalls
P0351 37 Ignition coil, rear cylinder Malfunction Stalls
Р0З52 38 Ignition coil, front cylinder Malfunction Stalls
Р0З35 02 Pick up Malfunction Stalls
P0032 45 Lambda probe heater Short circuit to positive Continues to run
P0031 45 Lambda probe heater Kurzschluß nach Masse Continues to run
P0130 17 Lambda probe, rear cylinder Malfunction Continues to run
P0052 46 Lambda probe heater, front cylinder Short circuit to positive Continues to run
P0051 46 Lambda probe heater, front cylinder Short circuit to ground Continues to run
P0150 18 Lambda probe heater, front cylinder Malfunction Continues to run
P0122 06 Throttle position sensor Output signal too low (interruption) Continues to run
P0123 06 Throttle position sensor Output signal too high (short circuit) Continues to run
P0107 09 Manifold air pressure sensor, rear cylinder Output signal too low (interruption) Continues to run
P0108 09 Manifold air pressure sensor, rear cylinder Output signal too high (short circuit) Continues to run
P1106 68 Manifold air pressure sensor, rear cylinder Hose pulled off/defective, no vacuum Continues to run
P1687 11 Manifold air pressure sensor, front cylinder Output signal too low (interruption) Continues to run
1688 11 Manifold air pressure sensor, front cylinder Output signal too high (short circuit) Continues to run
P1105 69 Manifold air pressure sensor, front cylinder Hose pulled off/defective, no vacuum Continues to run
P1107 14 Ambient air pressure sensor Output signal too low (interruption) Continues to run
P1108 14 Ambient air pressure sensor Output signal too high (short circuit) Continues to run
P0112 13 Air temperature sensor Output signal too low (interruption) Continues to run
P0113 13 Air temperature sensor Output signal too high (short circuit) Continues to run
P0117 12 Coolant temperature sensor Output signal too low (interruption) Continues to run
P0118 12 Coolant temperature sensor Output signal too high (short circuit) Continues to run
P1232 41 Fuel pump relay Short circuit to positive Stalls
P1231 41 Fuel pump relay Short circuit to ground Stalls
P0413 54 Secondary air valve Short circuit to positive Continues to run
P0414 54 Secondary air valve Short circuit to ground or interruption Continues to run
P0222 07 Sensor for 2nd throttle valve Output signal too low (interruption) Continues to run
P0223 07 Sensor for 2nd throttle valve Output signal too high (short circuit) Continues to run
P0638 72 Stepper motor for 2nd throttle valve Malfunction Continues to run
P0505 49 Idle speed control motor Malfunction Continues to run
P1631 15 Roll angle sensor Output signal too low (interruption) Continues to run
P1632 15 Roll angle sensor Output signal too high (short circuit) Continues to run
P0560 24 Control unit voltage supply Malfunction Continues to run
P1590 25 Side stand switch Output signal too low (short circuit to ground) Continues to run
P0603 65 EEPROM error Malfunction Continues to run
- Manuals
- Brands
- KTM Manuals
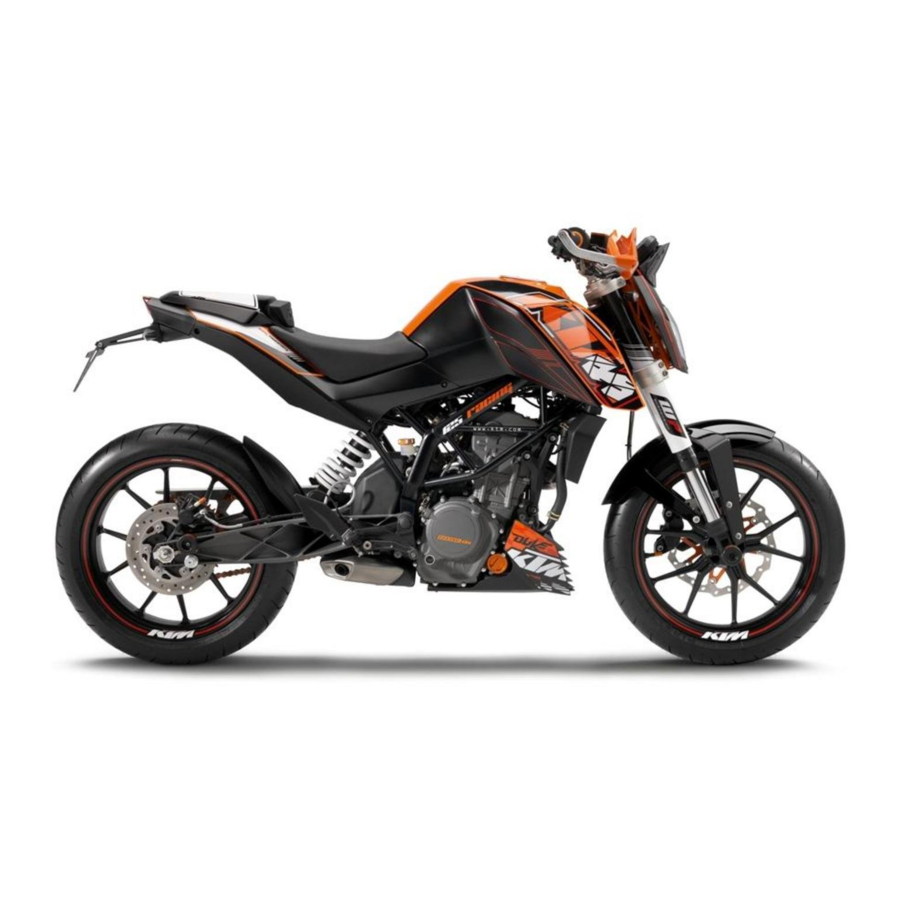
- Motorcycle
- 125 DUKE EU
- Repair manual
-
Contents
-
Table of Contents
-
Bookmarks
Quick Links
REPAIR MANUAL
2012
125 Duke EU
125 Duke DE
200 Duke EU
200 Duke 2013 COL
Art. no. 3206127en
Related Manuals for KTM 125 DUKE EU
Summary of Contents for KTM 125 DUKE EU
-
Page 1
REPAIR MANUAL 2012 125 Duke EU 125 Duke DE 200 Duke EU 200 Duke 2013 COL Art. no. 3206127en… -
Page 3
KTM accepts no liability for delivery options, deviations from illustrations and descriptions, as well as misprints and other errors. -
Page 4: Table Of Contents
TABLE OF CONTENTS 11 FUEL TANK, SEAT, TRIM ……….. 38 TABLE OF CONTENTS MEANS OF REPRESENTATION ……..6 11.1 Opening the filler cap……..38 Symbols used ……….. 6 11.2 Closing the filler cap ……..38 Formats used………… 6 11.3 Removing the seat ………. 38 SAFETY ADVICE…………
-
Page 5
TABLE OF CONTENTS 14.11 Adding rear brake fluid ……..74 16.3.38 Removing the spark plug (200 Duke)..105 14.12 Changing the rear brake fluid ……74 16.3.39 Removing the clutch cover (200 Duke) ..105 15 LIGHTING SYSTEM, INSTRUMENTS ……76 16.3.40 Setting the engine to ignition top dead center (200 Duke) …….. -
Page 6
TABLE OF CONTENTS 16.4.16 Checking the oil pressure regulator valve 16.5 Assembling the engine ……..158 (125 Duke) ……….127 16.5.1 Installing the crankshaft (125 Duke) ..158 16.4.17 Checking the clutch (125 Duke)….128 16.5.2 Installing the balancer shaft (125 Duke) ..158 16.4.18 Preassembling the clutch (125 Duke) .. -
Page 7
TABLE OF CONTENTS 16.5.50 Installing the gear position sensor (200 22.2 Checks and maintenance steps for winter Duke) …………181 operation…………212 16.5.51 Installing the balancer shaft drive wheel 23 STORAGE …………..213 (200 Duke) ……….182 23.1 Storage …………213 16.5.52 Installing the starter drive (200 Duke) .. -
Page 8: Means Of Representation
MEANS OF REPRESENTATION Symbols used The meaning of specific symbols is described below. Indicates an expected reaction (e.g. of a work step or a function). Indicates an unexpected reaction (e.g. of a work step or a function). Indicates a page reference (more information is provided on the specified page). Indicates information with more details or tips.
-
Page 9: Safety Advice
Read this Repair Manual carefully and thoroughly before beginning work. It contains useful information and tips that will help you repair and maintain your vehicle. This manual assumes that the necessary special KTM tools and KTM workplace and workshop equipment are available. Safety advice A number of safety instructions need to be followed to operate the vehicle safely.
-
Page 10: Important Notes
Guarantee, warranty The work prescribed in the service schedule must be carried out by an authorized KTM workshop only and confirmed in the customer’s Service & Warranty Booklet and in the KTM dealer.net; otherwise, all warranty claims will be void. No warranty claims can be consid- ered for damage resulting from manipulations and/or alterations to the vehicle.
-
Page 11: Serial Numbers
SERIAL NUMBERS Chassis number/type label The chassis number is stamped on the right of the steering head. The type label is on the right of the frame behind the steering head. B00699-10 Key number can be found on the KEYCODECARD. The key number Info You need the key number to order a spare key.
-
Page 12: Motorcycle
MOTORCYCLE Raising the motorcycle with the rear wheel stand Note Danger of damage The parked vehicle may roll away or fall over. – Always place the vehicle on a firm and even surface. – Mount the support of the wheel stand. –…
-
Page 13: Taking The Motorcycle Off Of The Front Wheel Stand
MOTORCYCLE – Move the handlebar to the straight-ahead position. Attach the lifting gear to the steering stem. Adapter (61029955620) ( p. 254) Front wheel stand (61029055500) ( p. 253) Info Always raise the rear of the motorcycle first. – Raise the front of the motorcycle. C00197-01 Taking the motorcycle off of the front wheel stand Note…
-
Page 14: Removing The Motorcycle From The Work Stand
MOTORCYCLE – Mount special tool on the right side of the vehicle. Work stand (62529055000) ( p. 254) 307318-10 – Remove screw 307319-10 – Mount special tool on the left side of the vehicle. Work stand (62529055000) ( p. 254) 307320-10 –…
-
Page 15: Starting
MOTORCYCLE – Mount and tighten screws Guideline Screw, engine bearer on frame 30 Nm (22.1 lbf ft) 307322-10 Starting Danger Danger of poisoning Exhaust gases are toxic and inhaling them may result in unconsciousness and/or death. – When running the engine, always make sure there is sufficient ventilation, and do not start or run the engine in an enclosed space without an effective exhaust extraction system.
-
Page 16: Starting The Motorcycle To Make Checks
MOTORCYCLE Starting the motorcycle to make checks Danger Danger of poisoning Exhaust gases are toxic and inhaling them may result in unconsciousness and/or death. – When running the engine, always make sure there is sufficient ventilation, and do not start or run the engine in an enclosed space without an effective exhaust extraction system.
-
Page 17: Fork, Triple Clamp
FORK, TRIPLE CLAMP Cleaning the dust boots of the fork legs – Push dust boot of both fork legs downwards. Info The dust boots should remove dust and coarse dirt particles from the fork tubes. Over time, dirt can penetrate behind the dust boots. If this dirt is not removed, the oil seals behind can start to leak.
-
Page 18: Installing The Fork Legs
FORK, TRIPLE CLAMP – Loosen screws . Remove the fork legs from the bottom. 304860-10 Installing the fork legs Warning Danger of accidents Modifications to the suspension settings can seriously alter the vehicle’s ride behavior. – Following modifications, ride slowly at first to get the feel of the new ride behavior. Main work –…
-
Page 19: Disassembling The Fork Legs
FORK, TRIPLE CLAMP – Clean screw and the wheel spindle. – Lift the front wheel into the fork, position it, and insert the wheel spindle. – Mount and tighten screw Guideline Screw, front wheel spindle 30 Nm (22.1 lbf ft) 304858-11 –…
-
Page 20
FORK, TRIPLE CLAMP – Loosen the screw cap Info The screw cap cannot be removed yet. 201506-10 – Empty the fork oil. 201507-10 – Release the fork leg and clamp it with the fork stub. Info Use soft jaws. 201508-10 –… -
Page 21: Checking The Fork Legs
FORK, TRIPLE CLAMP – Clamp the outer tube in the area of the lower triple clamp. Clamping stand (T612S) ( p. 260) – Remove dust boot 201512-10 – Remove lock ring Info The lock ring has a beveled end where a screwdriver can be applied. 201513-10 –…
-
Page 22: Assembling The Fork Legs
FORK, TRIPLE CLAMP – Measure the outside diameter of the inner tube in several places. External diameter of inner tube 42.975… 43.005 mm (1.69193… 1.69311 in) » If the measured value is less than the specified value: – Change the fork leg. 200684-10 –…
-
Page 23
FORK, TRIPLE CLAMP – Slide on lock ring – Grease and slide on seal ring Lubricant (T511) ( p. 250) Info Mount with the sealing lip facing down and the open side facing up. – Slide on support ring – Sand the edges of sliding bushing with 600-grit sandpaper, then clean and grease. -
Page 24: Removing The Lower Triple Clamp
FORK, TRIPLE CLAMP – Mount screw cap onto the piston rod. Info must be turned all the way down. – Hold the screw cap and tighten the nut. Guideline Nut, piston rod on screw cap M12x1 30 Nm (22.1 lbf ft) 202097-10 –…
-
Page 25
FORK, TRIPLE CLAMP – Detach connectors 304866-10 – Detach connectors 304867-10 – Disconnect connector 304868-10 – Remove the combination instrument. 304869-10 – Remove screws – Remove the headlight mask. 304870-10 – Remove screw with the washer. 304871-10… -
Page 26: Installing The Lower Triple Clamp
FORK, TRIPLE CLAMP – Remove the upper triple clamp with the handlebar and set aside. Info Protect the vehicle and its attachments from damage by covering them. 304872-10 – Remove nut Castle nut wrench; ½» drive (90129050100) ( p. 258) 304873-10 –…
-
Page 27
FORK, TRIPLE CLAMP Castle nut wrench; ½» drive (90129050000) ( p. 258) – Position the upper triple clamp with the handlebar. 304872-10 – Mount screw with the washer but do not tighten it yet. Guideline Screw, top steering head M16x1.5 52 Nm (38.4 lbf ft) Holding lugs… -
Page 28: Checking The Steering Head Bearing Play
FORK, TRIPLE CLAMP – Fold the headlight mask up. – Mount and tighten screws Guideline Screw, headlight mask 11 Nm (8.1 lbf ft) 304865-11 – Mount expanding rivets on both sides. – Install the fork legs. ( p. 16) 304864-11 –…
-
Page 29: Adjusting The Steering Head Bearing Play
FORK, TRIPLE CLAMP » If click positions are noticeable: – Adjust the play of the steering head bearing. ( p. 27) – Check the steering head bearing and change if necessary. Finishing work – Remove the motorcycle from the work stand. ( p.
-
Page 30: Handlebar, Controls
HANDLEBAR, CONTROLS Checking the play in the throttle cable – Check the throttle grip for smooth operation. – Move the handlebar to the straight-ahead position. Move the throttle grip back- wards and forwards to ascertain the play in the throttle cable. Throttle cable play 3……
-
Page 31: Adjusting The Clutch Cable Play
HANDLEBAR, CONTROLS Adjusting the clutch cable play – Move the handlebar to the straight-ahead position. – Push back sleeve – Loosen lock nut – Adjust the play in the clutch level by turning adjusting screw Guideline Clutch lever play 1… 3 mm (0.04… 0.12 in) –…
-
Page 32: Shock Absorber, Swingarm
SHOCK ABSORBER, SWINGARM Adjusting the spring preload of the shock absorber Warning Danger of accidents Modifications to the suspension settings can seriously alter the vehicle’s ride behavior. – Following modifications, ride slowly at first to get the feel of the new ride behavior. Info The spring preload defines the initial situation of the spring process on the shock absorber.
-
Page 33: Removing The Spring
SHOCK ABSORBER, SWINGARM – Lift the link fork. – Mount and tighten screw Guideline Screw, top shock absorber M10x1.25 50 Nm (36.9 lbf ft) – Tighten fitting Guideline Fitting, bottom shock absorber M10x1.25 45 Nm 304841-11 (33.2 lbf ft) Finishing work –…
-
Page 34
SHOCK ABSORBER, SWINGARM Alternative 1 – Tension the spring to the prescribed position by turning the adjusting ring. Guideline Spring preload Standard 3 clicks Full payload 6 clicks Hook wrench (T106S) ( p. 259) Alternative 2 201698-10 Warning Danger of accidents Modifications to the suspension settings can seri- ously alter the vehicle’s ride behavior. -
Page 35: Exhaust
EXHAUST Removing the exhaust manifold Warning Danger of burns The exhaust system gets very hot when the vehicle is driven. – Allow the exhaust system to cool down. Do not touch hot components. – Remove the nuts – Swing the radiator forward slightly. 304843-10 –…
-
Page 36: Installing The Exhaust Manifold
EXHAUST – Remove the exhaust manifold toward the front. 304848-10 Installing the exhaust manifold – Position the exhaust manifold. 304848-10 – Mount nuts but do not tighten them yet. Guideline Nut, exhaust flange (125 Duke) 22 Nm (16.2 lbf ft) Nut, exhaust flange (200 Duke) 22 Nm (16.2 lbf ft)
-
Page 37: Removing The Main Silencer
EXHAUST – Position the radiator. – Mount and tighten nuts Guideline Nut, radiator 5 Nm (3.7 lbf ft) 304843-11 Removing the main silencer Preparatory work – Remove the exhaust manifold. ( p. 33) – Remove the front spoiler. ( p. 47) Main work –…
-
Page 38: Installing The Main Silencer
EXHAUST Installing the main silencer Main work – Position the main silencer. 304852-10 – Mount and tighten screw Guideline Screw, main silencer 23 Nm (17 lbf ft) Info Make sure the sleeves are seated correctly. 304851-11 – Mount and tighten screw with the washers.
-
Page 39: Air Filter
AIR FILTER 10.1 Removing the air filter Note Engine failure Unfiltered intake air has a negative effect on the service life of the engine. – Never ride the vehicle without an air filter since dust and dirt can get into the engine and result in increased wear. Preparatory work –…
-
Page 40: Fuel Tank, Seat, Trim
FUEL TANK, SEAT, TRIM 11.1 Opening the filler cap Danger Fire hazard Fuel is highly flammable. – Never refuel the vehicle near open flames or burning cigarettes, and always switch off the engine first. Be careful that no fuel is spilt, especially on hot vehicle components. Clean up spilt fuel immediately. –…
-
Page 41: Mounting The Seat
FUEL TANK, SEAT, TRIM 11.4 Mounting the seat Main work – Attach seat recesses at screws and lower at the rear. – Mount and tighten screws Guideline Screw, seat 11 Nm (8.1 lbf ft) B00727-10 Finishing work – Mount the passenger seat. ( p.
-
Page 42
FUEL TANK, SEAT, TRIM Warning Danger of poisoning Fuel is poisonous and a health hazard. – Fuel must not come into contact with the skin, eyes, or clothing. Do not breathe in the fuel vapors. If contact occurs with the eyes, rinse with water immediately and contact a physician. Immediately clean contaminated areas on the skin with soap and water. -
Page 43
FUEL TANK, SEAT, TRIM – Remove screw – Mount and tighten another special screw – Open the filler cap. ( p. 38) 304824-10 – Remove filler cap 304825-10 – Remove screws with the washers. 304826-10 – Remove screws – Remove screws 304827-10 –… -
Page 44: Installing The Fuel Tank Cover
FUEL TANK, SEAT, TRIM – Lift the fuel tank cover. – Detach the side covers on both sides. 304830-10 – Push back hose clamp – Pull off the vent hose. – Remove the fuel tank cover. 304831-10 – Close the fuel tank with a suitable plug. 304832-10 11.8 Installing the fuel tank cover…
-
Page 45
FUEL TANK, SEAT, TRIM – Mount the vent hose. – Position hose clamp 304831-11 – Position the fuel tank cover. – Attach the side cover on both sides. 304830-10 – Mount and tighten screws Guideline Remaining screws, chassis 5 Nm (3.7 lbf ft) 304829-11 –… -
Page 46: Removing The Fuel Tank
FUEL TANK, SEAT, TRIM – Mount plug of the compensating tank. 304835-10 – Mount and tighten screws with the washer. Guideline Screw, fuel tank 11 Nm (8.1 lbf ft) 304836-10 – Mount and tighten screws Guideline Screw, fuel tank trim 5 Nm (3.7 lbf ft) –…
-
Page 47
FUEL TANK, SEAT, TRIM Main work – Remove screw – Hang the EFI control unit to one side. Info Protect the frame and attachments from damage. 304878-10 – Remove screws 304879-10 – Take off the holder 304880-10 – Detach connector 304881-10 –… -
Page 48: Installing The Fuel Tank
FUEL TANK, SEAT, TRIM 11.10 Installing the fuel tank Danger Fire hazard Fuel is highly flammable. – Never refuel the vehicle near open flames or burning cigarettes, and always switch off the engine first. Be careful that no fuel is spilt, especially on hot vehicle components. Clean up spilt fuel immediately. –…
-
Page 49: Removing The Front Spoiler
FUEL TANK, SEAT, TRIM – Mount and tighten screws Guideline Screw, fuel tank 11 Nm (8.1 lbf ft) 304879-11 – Position the EFI control unit. – Mount and tighten screws Guideline Screw, EFI control unit 4 Nm (3 lbf ft) 304878-11 Finishing work –…
-
Page 50: Dismounting The Front Fender
FUEL TANK, SEAT, TRIM – Mount and tighten screws Guideline Remaining screws, chassis 10 Nm (7.4 lbf ft) – Tighten screw Guideline Remaining screws, chassis 10 Nm (7.4 lbf ft) B00771-10 11.13 Dismounting the front fender – Remove screws . Remove the front fender. 304853-10 11.14 Installing the front fender…
-
Page 51
FUEL TANK, SEAT, TRIM – Detach the fuel line with a suitable tool. – Push back hose clamp and pull off the fuel line. 304895-10 – Mount special tool 0 0 3 Pressure testing tool (61029094000) ( p. 254) – Mount special tool with the nozzle code 0,45. -
Page 52: Changing The Fuel Filter
FUEL TANK, SEAT, TRIM 11.16 Changing the fuel filter Danger Fire hazard Fuel is highly flammable. – Never refuel the vehicle near open flames or burning cigarettes, and always switch off the engine first. Be careful that no fuel is spilt, especially on hot vehicle components. Clean up spilt fuel immediately. –…
-
Page 53: Replacing The Fuel Pump
FUEL TANK, SEAT, TRIM – Position fuel filter in the holder. 304887-10 Finishing work – Install the fuel tank. ( p. 46) – Install the fuel tank cover. ( p. 42) – Mount the seat. ( p. 39) – Mount the passenger seat. ( p.
-
Page 54
FUEL TANK, SEAT, TRIM – Position the fuel pump with the gasket. – Install the screws and tighten them diagonally. Guideline Screw, fuel pump 5 Nm (3.7 lbf ft) 304889-10 Finishing work – Install the fuel tank. ( p. 46) –… -
Page 55: Wheels
Danger of accidents Uncontrollable handling characteristic due to non-approved and/or non-recommended tires/wheels. – Only tires/wheels approved by KTM and with the corresponding speed index should be used. Info The type, condition and air pressure of the tires all have a major impact on the riding behavior of the motorcycle.
-
Page 56: Checking The Brake Discs
WHEELS » If a tire is more than 5 years old: – Change the tires. 12.3 Checking the brake discs Warning Danger of accidents Reduced braking efficiency due to worn brake disc(s). – Change the worn brake disc(s) without delay. – Check the thickness of the front and rear brake discs at several places on the disk to see if it conforms to measurement Info…
-
Page 57: Removing The Brake Disc Of The Front Brake
WHEELS Main work – Check the wheel bearing for damage and wear. » If the wheel bearing is damaged or worn: – Change the wheel bearing. – Clean and grease the shaft seal rings and mating surfaces of the spacers. Long-life grease ( p.
-
Page 58: Rear Wheel
WHEELS 12.5 Rear wheel 12.5.1 Removing the rear wheel Preparatory work – Raise the motorcycle with the rear wheel stand. ( p. 10) Main work – Remove nut and the washer. Remove chain adjuster – Holding the rear wheel, withdraw wheel spindle –…
-
Page 59: Removing The Brake Disc Of The Rear Brake
WHEELS – Pull the rear wheel back and mount wheel spindle Info Mount the left and right chain adjusters in the same position. – Mount nut and washer. – Push the rear wheel forward so that the chain adjusters are on the screws, and tighten nut Guideline In order for the rear wheel to be correctly aligned, the markings on the left and…
-
Page 60: Checking The Chain Tension
WHEELS 12.5.5 Checking the chain tension Warning Danger of accidents Danger caused by incorrect chain tension. – If the chain is too taut, the components of the secondary power transmission (chain, engine sprocket, rear sprocket, bear- ings in the transmission and in the rear wheel) will be under additional load. In addition to premature wear, this can cause the chain or the countershaft of the transmission to break in extreme cases.
-
Page 61: Checking The Chain, Rear Sprocket, And Engine Sprocket
WHEELS Main work – Loosen nut – Loosen nuts – Adjust the chain tension by turning adjusting screws on the left and right. Guideline Chain tension 5… 7 mm (0.2… 0.28 in) Turn adjusting screws on the left and right so that the markings on the left and right chain adjuster are in the same position in relation to reference marks…
-
Page 62: Cleaning The Chain
WHEELS – Remove screws and release screw . Push the chain guard aside. C00198-10 – Check the chain sliding guard for wear. » If drill hole becomes visible on the chain sliding guard in area – Change the chain sliding guard. –…
-
Page 63: Checking The Rear Hub Rubber Dampers
WHEELS Warning Environmental hazard Hazardous substances cause environmental damage. – Oil, grease, filters, fuel, cleaners, brake fluid, etc., should be disposed of as stipulated in applicable regulations. Info The service life of the chain depends largely on its maintenance. – Clean the chain regularly. –…
-
Page 64: Wiring Harness, Battery
WIRING HARNESS, BATTERY 13.1 Removing the battery Warning Risk of injury Battery acid and battery gases cause serious chemical burns. – Keep batteries out of the reach of children. – Wear suitable protective clothing and goggles. – Avoid contact with battery acid and battery gases. –…
-
Page 65: Disconnecting The Negative Cable Of The Battery
– Do not discard batteries with the household waste. Dispose of faulty batteries in an environmentally compatible manner. Give the battery to your authorized KTM dealer or dispose of it at a collection point for used batteries. Info Even when there is no load on the battery, it still loses power steadily.
-
Page 66: Checking The Charging Voltage
WIRING HARNESS, BATTERY Preparatory work – Switch off all power consumers and switch off the engine. – Remove the passenger seat. ( p. 39) – Remove the seat. ( p. 38) – Disconnect the negative cable of the battery to avoid damage to the motorcycle’s electronics.
-
Page 67: Changing The Fuses Of Individual Power Consumers
WIRING HARNESS, BATTERY 13.7 Changing the fuses of individual power consumers Info The fuse box with the main fuse and the fuses of the individual power consumers is located under the passenger seat. Preparatory work – Switch off all power consumers and switch off the engine. –…
-
Page 68: Brake System
Brake linings available from accessory suppliers are often not tested and approved for use on KTM vehicles. The construc- tion and friction factor of the brake linings and therefore the brake power can differ considerably from the original KTM brake linings. If brake linings are used that differ from the originals, there is no guarantee that they comply with the origi- nal license.
-
Page 69
BRAKE SYSTEM – Move the brake fluid reservoir mounted on the handlebar to a horizontal position. – Remove screws – Remove cover with membrane 304811-10 – Remove locking clip 304812-10 – Remove bolts – Take off springs 304813-10 – Remove brake linings –… -
Page 70: Checking The Brake Fluid Level Of The Front Brake
BRAKE SYSTEM – Position springs The arrow on the spring points in the direction of travel. – Mount bolts Info Make sure the springs are seated correctly. – Activate the hand brake lever until there is a firm pressure point. 304813-10 –…
-
Page 71: Changing The Front Brake Fluid
BRAKE SYSTEM Warning Environmental hazard Hazardous substances cause environmental damage. – Oil, grease, filters, fuel, cleaners, brake fluid, etc., should be disposed of as stipulated in applicable regulations. Info Avoid contact between brake fluid and painted parts. Brake fluid attacks paint! Use only clean brake fluid from a sealed container.
-
Page 72: Checking The Rear Brake Linings
BRAKE SYSTEM – Open shut-off valve Info Follow the operating instructions of the bleeding device. – Ensure that the filling pressure is set on pressure gauge . Correct the filling pres- sure on the pressure regulator if necessary. Guideline Filling pressure 2……
-
Page 73: Changing The Rear Brake Linings
Brake linings available from accessory suppliers are often not tested and approved for use on KTM vehicles. The construc- tion and friction factor of the brake linings and therefore the brake power can differ considerably from the original KTM brake linings. If brake linings are used that differ from the originals, there is no guarantee that they comply with the origi- nal license.
-
Page 74: Checking The Free Travel Of Foot Brake Lever
BRAKE SYSTEM – Position brake linings – Mount bolts 304810-10 – Mount locking clips 304808-11 – Operate the foot brake lever repeatedly until the brake linings are in contact with the brake disc and there is a pressure point. – Adjust the brake fluid level to the MAX mark.
-
Page 75: Adjusting The Free Travel Of The Foot Brake Lever
BRAKE SYSTEM 14.9 Adjusting the free travel of the foot brake lever Warning Danger of accidents Brake system failure. – If there is no free travel on the foot brake lever, pressure builds up on the rear brake circuit. The rear brake can fail due to overheating.
-
Page 76: Adding Rear Brake Fluid
BRAKE SYSTEM 14.11 Adding rear brake fluid Warning Danger of accidents Failure of the brake system. – If the brake fluid level falls below the MIN mark, this indicates a leakage in the brake system or worn-out brake linings. Check the brake system and do not continue riding. Warning Skin irritation Brake fluid can cause skin irritation on contact.
-
Page 77
BRAKE SYSTEM – Cover the painted parts. – Remove screw cap with membrane. – Draw the old brake fluid out of the brake fluid reservoir using a syringe and fill with fresh brake fluid. Bleed syringe (50329050000) ( p. 252) Brake fluid DOT 4 / DOT 5.1 ( p. -
Page 78: Lighting System, Instruments
LIGHTING SYSTEM, INSTRUMENTS 15.1 Setting kilometers or miles Info Make the country-specific setting. Condition The ignition is on. The motorcycle is stationary. – Press the MODE button briefly and repeatedly until ODO appears on the display. – Press the MODE button for 5 — 10 seconds. The display changes from km/h to mph or from mph to km/h.
-
Page 79: Setting The Time
LIGHTING SYSTEM, INSTRUMENTS – Do not activate the two buttons for approx. 15 seconds. The display RPM 2 goes out and the set speed is stored. 15.4 Setting the time Condition The ignition is on. The motorcycle is stationary. – Press the MODE button briefly and repeatedly until ODO appears on the display.
-
Page 80: Adjusting The Headlight Range
LIGHTING SYSTEM, INSTRUMENTS 15.7 Adjusting the headlight range Main work – Remove expanding rivets 601915-10 – Remove screws – Lift the headlight mask slightly and swing forward. 601914-10 – Adjust the beam distance of the headlight by turning screw Guideline For a motorcycle with rider, and with luggage and a passenger if applicable, the light/dark boundary must be exactly on the lower mark (applied in: Checking headlight adjustment).
-
Page 81: Changing The Parking Light Bulb
LIGHTING SYSTEM, INSTRUMENTS 15.8 Changing the parking light bulb Note Damage to reflector Reduced brightness. – Grease on the lamp will evaporate due to the heat and be deposited on the reflector. Clean the lamp and keep it free of grease before mounting.
-
Page 82: Changing The Headlight Bulb
LIGHTING SYSTEM, INSTRUMENTS – Position cover – Mount and tighten screws B00762-10 – Fold the headlight mask up. – Mount and tighten screws Guideline Screw, headlight mask 11 Nm (8.1 lbf ft) 304865-10 – Mount expanding rivets on both sides. –…
-
Page 83
LIGHTING SYSTEM, INSTRUMENTS – Take off protection cap – Disconnect plug-in connector B00760-10 – Detach retaining clamp – Remove headlight bulb – Position the new headlight bulb in the headlight housing. Headlight (H4/socket P43t) ( p. 207) Info Insert the headlight bulb so that the catches latch into the recesses. –… -
Page 84: Engine
ENGINE 16.1 Removing the engine Preparatory work – Raise the motorcycle with the rear wheel stand. ( p. 10) – Remove the front spoiler. ( p. 47) – Remove the passenger seat. ( p. 39) – Remove the seat. ( p.
-
Page 85
ENGINE – Remove screws – Remove screw – Take off the engine sprocket cover. 304901-10 – Remove screws and take off the lock washer. 304902-10 – Remove nut with washer. – Remove chain adjuster – Push the rear wheel into the foremost position. 304903-10 –… -
Page 86
ENGINE – Expose the cable and detach connectors 304907-10 – Expose the cable and detach connector 304908-10 – Loosen hose clip – Push the throttle valve body upward out of the intake flange. 304909-10 – Remove screws – Remove fitting –… -
Page 87: Installing The Engine
ENGINE – Remove screws – Pull off the radiator pipe and hang it to one side. 304913-10 – Position the floor jack under the engine and fix it using the special tool. Floor jack attachment (75029055000) ( p. 255) 304914-10 –…
-
Page 88
ENGINE Main work – Position the engine in the frame. Info Watch out for clutch lever You should have an assistant for this step. Protect the frame and attachments from damage. 304916-11 – Position the ground wire – Mount fitting but do not tighten yet. -
Page 89
ENGINE – Mount the radiator hose. – Position hose clamp 304911-11 – Tighten fitting Guideline Fitting, engine mounting bracket 55 Nm (40.6 lbf ft) 304917-10 – Position both engine fixing arms. – Mount and tighten screws Guideline Screw, engine bearer on frame 30 Nm (22.1 lbf ft) –… -
Page 90
ENGINE – Mount and tighten nut with the washer. Guideline Remaining nuts, chassis 3 Nm (2.2 lbf ft) – Position the rubber cap. 304906-11 – Position the shift linkage. – Mount and tighten screw Guideline Screw, shift activation 11 Nm Loctite ®… -
Page 91
ENGINE – Mount spark plug connector 304900-11 – Mount the vent hose. – Position hose clamp 304899-11 – Plug in connector 304898-11 – Attach the clutch cable. – Secure the clutch cable with lock washer 304897-11 – Mount and tighten nut with the washers. -
Page 92: Disassembling The Engine
– Fit the front spoiler. ( p. 47) – Take a short test ride. – Read out the fault memory using the KTM diagnostics tool. – Check the engine for leakage. – Check the engine oil level. ( p. 198) –…
-
Page 93: Removing The Chain Securing Guide
ENGINE 16.3.3 Removing the chain securing guide (125 Duke) – Remove screws – Take off the chain securing guide. 304422-10 16.3.4 Removing the valve cover (125 Duke) – Remove screws with the gasket. – Take off the valve cover with the valve cover seal. 304729-10 16.3.5 Removing the spark plug (125 Duke)
-
Page 94: Setting The Engine To Ignition Top Dead Center (125 Duke)
ENGINE – Remove dowels – Take off clutch cover gasket 304733-10 16.3.7 Setting the engine to ignition top dead center (125 Duke) – Remove screw plug 304734-10 – Turn the crankshaft counterclockwise until markings align with the edge of the cylinder head.
-
Page 95: Removing The Timing Chain Tensioner
ENGINE 16.3.9 Removing the timing chain tensioner (125 Duke) – Remove screw with the O-ring. 305040-10 – Turn the timing chain tensioner screw clockwise. The timing chain tensioner is locked. – Remove screw – Remove the timing chain tensioner with the gasket. 305039-10 16.3.10 Removing the camshaft (125 Duke) –…
-
Page 96: Removing The Cylinder Head (125 Duke)
ENGINE 16.3.11 Removing the cylinder head (125 Duke) – Remove screws 304444-10 – Release screws in a crisscross pattern and remove them with the washers. – Take off the cylinder head. 304739-10 – Take off the cylinder head gasket – Remove dowels 304740-10 –…
-
Page 97: Removing The Water Pump Wheel
ENGINE – Take off cylinder base gasket – Remove dowels 304744-10 – Slip out timing chain Info If the timing chain is to be reused, mark the direction of travel. 304745-10 – Remove screw – Take off the timing chain tensioning rail from above. 304746-10 16.3.13 Removing the water pump wheel (125 Duke) –…
-
Page 98: Removing The Alternator Cover (125 Duke)
ENGINE 16.3.14 Removing the alternator cover (125 Duke) – Remove screws – Take off the alternator cover. 304754-10 – Remove dowels – Take off alternator cover gasket 304755-10 16.3.15 Removing the rotor (125 Duke) – Lock the clutch basket and primary gear using special tool Gear segment (90129081100) ( p.
-
Page 99: Removing The Starter Drive (125 Duke)
ENGINE 16.3.16 Removing the starter drive (125 Duke) – Remove screw – Remove the retaining bracket. 304759-10 – Remove screws – Hang the ignition pulse generator to one side. 304760-10 – Remove freewheel gear 304761-10 – Take off torque limiter –…
-
Page 100: Removing The Gear Position Sensor
ENGINE – Remove nut with washer. Castle nut wrench; ½» drive (90129022000) ( p. 257) 304763-10 – Remove screw with the washer. 304764-10 – Remove balancer shaft gear with a wedge. – Take off drive wheel of the balancer shaft. –…
-
Page 101: Removing The Spacer (125 Duke)
ENGINE 16.3.19 Removing the spacer (125 Duke) – Remove the spacer of the countershaft. 304773-10 16.3.20 Removing the clutch basket (125 Duke) – Lock the clutch basket and primary gear using special tool Gear segment (90129081100) ( p. 259) – Remove screws –…
-
Page 102: Removing The Primary Gear (125 Duke)
ENGINE – Remove collar sleeve 304778-10 16.3.21 Removing the primary gear (125 Duke) – Remove timing chain sprocket 304781-10 – Take off primary gear 304782-10 – Remove spring washer – Take off spacer ring 304783-10 16.3.22 Removing the oil pump (125 Duke) –…
-
Page 103: Removing The Shift Shaft (125 Duke)
ENGINE – Remove screws – Take off oil pump – Remove dowels. 304785-10 16.3.23 Removing the shift shaft (125 Duke) – Push sliding plate away from the shift drum locating . Remove shift shaft with the washer. 304786-10 16.3.24 Removing the shift drum locating (125 Duke) –…
-
Page 104: Removing The Left Engine Case
ENGINE – Pull oil filter out of the oil filter housing. Circlip pliers reverse (51012011000) ( p. 252) 304492-10 16.3.27 Removing the left engine case (125 Duke) 304790-10 – Remove screws – Swing the left section of the engine case up and remove the fitting of the engine fixing arm. –…
-
Page 105: Removing The Shift Rails (125 Duke)
ENGINE – Remove dowels – Remove the engine case gasket. 305903-10 16.3.28 Removing the shift rails (125 Duke) – Remove shift rail together with upper spring and the lower spring. – Remove shift rail 305904-10 16.3.29 Removing the shift drum (125 Duke) –…
-
Page 106: Removing The Balancer Shaft (125 Duke)
ENGINE 16.3.32 Removing the balancer shaft (125 Duke) – Remove screw – Take off the lock washer. – Remove balancer shaft 304799-10 16.3.33 Removing the crankshaft (125 Duke) – Mount special tool Protecting sleeve (90129019000) ( p. 257) – Position the section of the engine case in a press. –…
-
Page 107: Removing The Chain Securing Guide
ENGINE 16.3.36 Removing the chain securing guide (200 Duke) – Remove screws – Take off the chain securing guide. 305803-10 16.3.37 Removing the valve cover (200 Duke) – Remove screws with the gasket. – Take off the valve cover with the valve cover seal. 305804-10 16.3.38 Removing the spark plug (200 Duke) –…
-
Page 108: Setting The Engine To Ignition Top Dead Center (200 Duke)
ENGINE – Remove dowels – Take off clutch cover gasket 305809-10 16.3.40 Setting the engine to ignition top dead center (200 Duke) – Remove screw plug 305810-10 – Turn the crankshaft counterclockwise until markings align with the edge of the cylinder head.
-
Page 109: Removing The Timing Chain Tensioner
ENGINE 16.3.42 Removing the timing chain tensioner (200 Duke) – Remove screw with the O-ring. 305813-10 – Turn the timing chain tensioner screw clockwise. The timing chain tensioner is locked. – Remove screw – Remove the timing chain tensioner with the gasket. 305814-10 16.3.43 Removing the camshaft (200 Duke) –…
-
Page 110: Removing The Cylinder Head (200 Duke)
ENGINE 16.3.44 Removing the cylinder head (200 Duke) – Remove screws 305825-10 – Release screws in a crisscross pattern and remove them with the washers. – Take off the cylinder head. 305826-10 – Take off the cylinder head gasket – Remove dowels 305827-10 –…
-
Page 111: Removing The Water Pump Wheel
ENGINE – Take off cylinder base gasket – Remove dowels 305831-10 – Slip out timing chain Info If the timing chain is to be reused, mark the direction of travel. 305832-10 – Remove screw – Take off the timing chain tensioning rail from above. 305833-10 16.3.46 Removing the water pump wheel (200 Duke) –…
-
Page 112: Removing The Alternator Cover
ENGINE 16.3.47 Removing the alternator cover (200 Duke) – Remove screws – Take off the alternator cover. 305840-10 – Remove dowels – Take off alternator cover gasket 305841-10 16.3.48 Removing the rotor (200 Duke) – Lock the clutch basket and primary gear using special tool Gear segment (90129081100) ( p.
-
Page 113: Removing The Starter Drive (200 Duke)
ENGINE 16.3.49 Removing the starter drive (200 Duke) – Remove screw – Remove the retaining bracket. 305845-10 – Remove screws – Hang the ignition pulse generator to one side. 305846-10 – Remove freewheel gear 305847-10 – Take off torque limiter –…
-
Page 114: Duke)
ENGINE – Remove nut with washer. Castle nut wrench; ½» drive (90129022000) ( p. 257) 305850-10 – Remove screw with the washer. 305851-10 – Remove balancer shaft gear with a wedge. – Take off drive wheel of the balancer shaft. –…
-
Page 115: Removing The Spacer (200 Duke)
ENGINE 16.3.52 Removing the spacer (200 Duke) – Remove the spacer of the countershaft. 305857-10 16.3.53 Removing the clutch basket (200 Duke) – Lock the clutch basket and primary gear using special tool Gear segment (90129081100) ( p. 259) – Remove screws –…
-
Page 116: Removing The Primary Gear (200 Duke)
ENGINE – Remove collar sleeve 305862-10 16.3.54 Removing the primary gear (200 Duke) – Remove timing chain sprocket 305865-10 – Take off primary gear 305866-10 – Remove spring washer – Take off spacer ring 305867-10 16.3.55 Removing the oil pump (200 Duke) –…
-
Page 117: Removing The Shift Shaft (200 Duke)
ENGINE – Remove screws – Take off oil pump – Remove dowels. 305869-10 16.3.56 Removing the shift shaft (200 Duke) – Push sliding plate away from the shift drum locating . Remove shift shaft with the washer. 305872-10 16.3.57 Removing the shift drum locating (200 Duke) –…
-
Page 118: Removing The Left Engine Case
ENGINE – Pull oil filter out of the oil filter housing. Circlip pliers reverse (51012011000) ( p. 252) 305877-10 16.3.60 Removing the left engine case (200 Duke) 305878-10 – Remove screws – Swing the left section of the engine case up and remove the fitting of the engine fixing arm. –…
-
Page 119: Removing The Shift Rails (200 Duke)
ENGINE – Remove dowels – Remove the engine case gasket. 305881-10 16.3.61 Removing the shift rails (200 Duke) – Remove shift rail together with upper spring and the lower spring. – Remove shift rail 305882-10 16.3.62 Removing the shift drum (200 Duke) –…
-
Page 120: Removing The Balancer Shaft (200 Duke)
ENGINE 16.3.65 Removing the balancer shaft (200 Duke) – Remove screw – Take off the lock washer. – Remove balancer shaft 305887-10 16.3.66 Removing the crankshaft (200 Duke) – Mount special tool Protecting sleeve (90129019000) ( p. 257) – Position the section of the engine case in a press. –…
-
Page 121: Work On The Right Section Of The Engine Case (125 Duke)
ENGINE – Press in shaft seal ring of the shift shaft with the open side facing inward so that it is flush. – Press in shaft seal ring of the countershaft with the open side facing inward so that it is flush. –…
-
Page 122: Removing The Main Bearing (125 Duke)
ENGINE – Remove shaft seal ring 304543-10 – Remove shaft seal ring – Press the new shaft seal ring in all the way with the open side facing inward. Mounting sleeve (90129043000) ( p. 258) 304544-10 – Press shaft seal ring all the way in with the open side facing outward.
-
Page 123: Checking The Radial Play Of The Lower Conrod Bearing (125 Duke)
ENGINE – Clamp the crankshaft. – Mount special tool Pressure screw for crankshaft (90129020000) ( p. 257) 304524-10 – Mount special tool Puller for main bearing (90129018000) ( p. 256) Holding arms engage in the outer bearing race. – Tension the holding arms by turning nut –…
-
Page 124: Changing The Conrod Bearing (125 Duke)
ENGINE 16.4.6 Changing the conrod bearing (125 Duke) – Clamp the connecting rod with soft jaws. – Remove the nuts – Remove the conrod bearing cover and crankshaft. Remove the bearing shells. 304561-10 – Measure the crank pin diameter. Guideline Crankshaft –…
-
Page 125: Changing The Balancer Shaft Bearing
ENGINE 16.4.7 Changing the balancer shaft bearing (125 Duke) – Mount special tools Disassembly tool, balancer shaft bearing (90129056000) ( p. 259) 304566-10 – Position the balancer shaft with special tool in the press. Separator plate (77229032000) ( p. 255) –…
-
Page 126: Work On The Cylinder Head (125 Duke)
ENGINE – Remove the spacer – Take off bearing – Oil the new bearing and slide it onto the camshaft. Lubricated with engine oil – Mount the spacer. 304547-10 – Mount camshaft gear Holding lug engages in the recess of the camshaft. –…
-
Page 127: Checking The Cylinder Head (125 Duke)
ENGINE – Pretension the valve spring using the special tool. Valve spring compressor (59029019000) ( p. 252) Insert for valve spring lever (90129060000) ( p. 259) – Mount valve keys. Relax the valve spring. Info When mounting the valve keys, check that they are seated correctly; prefer- ably, fix the valve keys to the valve with a little grease.
-
Page 128: Checking The Piston Ring End Gap
ENGINE – Check the sealing area of the cylinder head for distortion using a straight edge and the special tool. Feeler gauge (59029041100) ( p. 253) ≤ 0.10 mm (≤ 0.0039 in) Cylinder/cylinder head — distortion of sealing area » If the measured value does not equal the specified value: –…
-
Page 129: Checking The Piston/Cylinder Mounting Clearance (125 Duke)
ENGINE – Measure the piston at the piston skirt, at right angles to the piston pin, at a distance Guideline Distance 9 mm (0.35 in) Piston — diameter 57.963… 57.975 mm (2.282… 2.28248 in) 304538-10 16.4.14 Checking the piston/cylinder mounting clearance (125 Duke) –…
-
Page 130: Checking The Clutch (125 Duke)
ENGINE » If there is damage or wear: – Change the control piston. – Check the control piston bore in the oil pump housing for damage and wear. » If there is damage or wear: – Change the oil pump housing. –…
-
Page 131: Preassembling The Clutch (125 Duke)
ENGINE » If there is discoloration or scoring: – Change all clutch lining discs. – Check the thickness of clutch facing discs Clutch facing discs – thickness of total package ≥ 21.30 mm (≥ 0.8386 in) » If the clutch facing discs do not meet specifications: –…
-
Page 132: Checking The Shift Mechanism
ENGINE 16.4.19 Checking the shift mechanism (125 Duke) 304513-10 – Check the shift forks (see ) for damage and wear (visual check). » If there is damage or wear: – Change the shift fork and gear wheel pair. – Check shift grooves of shift drum for wear.
-
Page 133: Preassembling The Shift Shaft (125 Duke)
ENGINE – Preassemble the shift shaft. ( p. 131) – Check the play between the sliding plate and the shift quadrant. Shift shaft – play in sliding plate/shift 0.15… 0.45 mm (0.0059… quadrant 0.0177 in) » If the measured value does not equal the specified value: –…
-
Page 134: Dismantling The Countershaft (125 Duke)
ENGINE 16.4.22 Dismantling the countershaft (125 Duke) 305900-10 – Fix the countershaft in the vise with the geared end facing downward. Guideline Use soft jaws – Remove stop disk and the 1st-gear idler gear – Remove collar bushing – Remove the 6th-gear sliding gear –…
-
Page 135: Assembling The Main Shaft (125 Duke)
ENGINE 305902-10 – Check collar bushings for damage and wear. » If there is damage or wear: – Change the collar bushings. – Check the pivot points of main shaft and countershaft for damage and wear. » If there is damage or wear: –…
-
Page 136: Assembling The Countershaft (125 Duke)
ENGINE Preparatory work – Oil all parts carefully before assembling. – Check the transmission. ( p. 132) 305899-11 Main work – Fix the main shaft in the vise with the geared end facing downward. Guideline Use soft jaws – Mount stop disk –…
-
Page 137
ENGINE 305901-10 Main work – Fix the countershaft in the vise with the geared end facing downward. Guideline Use soft jaws – Install lock ring and stop disk – Mount 2nd-gear idler gear – Mount collar bushing – Mount lock ring –… -
Page 138: Checking The Timing Assembly
ENGINE 16.4.26 Checking the timing assembly (125 Duke) 304529-10 – Check timing chain for damage and wear. » If there is damage or wear: – Change the timing chain. – Let the timing chain hang down freely. Check that the timing chain links move easily. »…
-
Page 139: Checking The Electric Starter Drive
ENGINE – Remove screws – Remove the stator. 304554-10 – Position the new stator. – Mount and tighten screws Guideline Screw, stator 8 Nm Loctite ® 243™ (5.9 lbf ft) – Position cable guide in the alternator cover. 304555-10 – Position the cable retainer.
-
Page 140: Checking The Freewheel (125 Duke)
ENGINE » If there is damage or wear: – Replace the freewheel gear and/or the bearing. – Check toothing of the starter motor for damage and wear. » If there is damage or wear: – Replace the starter motor. – Replace the O-ring of the starter motor.
-
Page 141: Work On The Right Section Of The Engine Case (200 Duke)
ENGINE – Press in shaft seal ring of the countershaft with the open side facing inward so that it is flush. – Mount lock ring – Mount and tighten oil nozzle Guideline Oil nozzle 6 Nm Loctite ® 243™ (4.4 lbf ft) –…
-
Page 142: Removing The Main Bearing (200 Duke)
ENGINE – Remove shaft seal ring 304543-10 – Remove shaft seal ring – Press the new shaft seal ring in all the way with the open side facing inward. Mounting sleeve (90129043000) ( p. 258) 304544-10 – Press shaft seal ring all the way in with the open side facing outward.
-
Page 143: Checking The Radial Play Of The Lower Conrod Bearing (200 Duke)
ENGINE – Clamp the crankshaft. – Mount special tool Pressure screw for crankshaft (90129020000) ( p. 257) 305892-10 – Mount special tool Puller for main bearing (90129018000) ( p. 256) Holding arms engage in the outer bearing race. – Tension the holding arms by turning nut –…
-
Page 144: Changing The Conrod Bearing (200 Duke)
ENGINE 16.4.35 Changing the conrod bearing (200 Duke) – Clamp the connecting rod with soft jaws. – Remove screws – Remove the conrod bearing cover and crankshaft. Remove the bearing shells. 305894-10 – Measure the crank pin diameter. Guideline Crankshaft – diameter, crank pin Crankshaft classification A 29.995……
-
Page 145: Changing The Balancer Shaft Bearing
ENGINE 16.4.36 Changing the balancer shaft bearing (200 Duke) – Mount special tools Disassembly tool, balancer shaft bearing (90129056000) ( p. 259) 304566-10 – Position the balancer shaft with special tool in the press. Separator plate (77229032000) ( p. 255) –…
-
Page 146: Work On The Cylinder Head (200 Duke)
ENGINE – Remove the spacer – Take off bearing – Oil the new bearing and slide it onto the camshaft. Lubricated with engine oil – Mount the spacer. 304547-10 – Mount camshaft gear Holding lug engages in the recess of the camshaft. –…
-
Page 147: Checking The Cylinder Head (200 Duke)
ENGINE – Pretension the valve spring using the special tool. Valve spring compressor (59029019000) ( p. 252) Insert for valve spring lever (90129060000) ( p. 259) – Mount valve keys. Relax the valve spring. Info When mounting the valve keys, check that they are seated correctly; prefer- ably, fix the valve keys to the valve with a little grease.
-
Page 148: Checking The Piston Ring End Gap
ENGINE – Check the sealing area of the cylinder head for distortion using a straight edge and the special tool. Feeler gauge (59029041100) ( p. 253) ≤ 0.10 mm (≤ 0.0039 in) Cylinder/cylinder head — distortion of sealing area » If the measured value does not equal the specified value: –…
-
Page 149: Checking The Piston/Cylinder Mounting Clearance (200 Duke)
ENGINE – Measure the piston at the piston skirt, at right angles to the piston pin, at a distance Guideline Distance 9 mm (0.35 in) Piston — diameter 71.965… 71.977 mm (2.83326… 2.83373 in) 304538-10 16.4.43 Checking the piston/cylinder mounting clearance (200 Duke) –…
-
Page 150: Checking The Clutch (200 Duke)
ENGINE » If there is damage or wear: – Change the control piston. – Check the control piston bore in the oil pump housing for damage and wear. » If there is damage or wear: – Change the oil pump housing. –…
-
Page 151: Preassembling The Clutch (200 Duke)
ENGINE » If there is discoloration or scoring: – Change all clutch lining discs. – Check the thickness of clutch facing discs Clutch facing discs – thickness of total package ≥ 27.00 mm (≥ 1.063 in) » If the clutch facing discs do not meet specifications: –…
-
Page 152: Checking The Shift Mechanism
ENGINE 16.4.48 Checking the shift mechanism (200 Duke) 304513-10 – Check the shift forks (see ) for damage and wear (visual check). » If there is damage or wear: – Change the shift fork and gear wheel pair. – Check shift grooves of shift drum for wear.
-
Page 153: Preassembling The Shift Shaft (200 Duke)
ENGINE – Preassemble the shift shaft. ( p. 151) – Check the play between the sliding plate and the shift quadrant. Shift shaft – play in sliding plate/shift 0.15… 0.45 mm (0.0059… quadrant 0.0177 in) » If the measured value does not equal the specified value: –…
-
Page 154: Dismantling The Countershaft (200 Duke)
ENGINE 16.4.51 Dismantling the countershaft (200 Duke) 305900-10 – Fix the countershaft in the vise with the geared end facing downward. Guideline Use soft jaws – Remove stop disk and the 1st-gear idler gear – Remove collar bushing – Remove the 6th-gear sliding gear –…
-
Page 155: Assembling The Main Shaft (200 Duke)
ENGINE 305902-10 – Check collar bushings for damage and wear. » If there is damage or wear: – Change the collar bushings. – Check the pivot points of main shaft and countershaft for damage and wear. » If there is damage or wear: –…
-
Page 156: Assembling The Countershaft (200 Duke)
ENGINE Preparatory work – Oil all parts carefully before assembling. – Check the transmission. ( p. 152) 305899-11 Main work – Fix the main shaft in the vise with the geared end facing downward. Guideline Use soft jaws – Mount stop disk –…
-
Page 157
ENGINE 305901-10 Main work – Fix the countershaft in the vise with the geared end facing downward. Guideline Use soft jaws – Install lock ring and stop disk – Mount 2nd-gear idler gear – Mount collar bushing – Mount lock ring –… -
Page 158: Checking The Timing Assembly
ENGINE 16.4.55 Checking the timing assembly (200 Duke) 304529-10 – Check timing chain for damage and wear. » If there is damage or wear: – Change the timing chain. – Let the timing chain hang down freely. Check that the timing chain links move easily. »…
-
Page 159: Checking The Electric Starter Drive
ENGINE – Remove screws – Remove the stator. 304554-10 – Position the new stator. – Mount and tighten screws Guideline Screw, stator 8 Nm Loctite ® 243™ (5.9 lbf ft) – Position cable guide in the alternator cover. 304555-10 – Position the cable retainer.
-
Page 160: Checking The Freewheel (200 Duke)
ENGINE » If there is damage or wear: – Replace the freewheel gear and/or the bearing. – Check toothing of the starter motor for damage and wear. » If there is damage or wear: – Replace the starter motor. – Replace the O-ring of the starter motor.
-
Page 161: Duke)
ENGINE – Mount balancer shaft with the bearing. Info If necessary, heat the engine case. – Position the retaining bracket. – Mount and tighten screw Guideline Screw, bearing retainer 12 Nm Loctite ® 243™ 304799-11 (8.9 lbf ft) – Remove the special tool. Mounting sleeve (90129005000) ( p.
-
Page 162: Installing The Shift Rails (125 Duke)
ENGINE 16.5.6 Installing the shift rails (125 Duke) – Oil all parts carefully before assembling. – Mount shift rail together with upper spring and the lower spring. – Mount shift rail 305904-10 16.5.7 Installing the left engine case (125 Duke) –…
-
Page 163: Installing The Oil Filter (125 Duke)
ENGINE – Mount the fitting of the engine fixing arm. 16.5.8 Installing the oil filter (125 Duke) – Tilt the engine sideways and fill the oil filter housing approx. ⅓ full with engine oil. – Fill oil filter with engine oil and insert it in the oil filter housing. 304492-11 –…
-
Page 164: Installing The Shift Shaft (125 Duke)
ENGINE 16.5.11 Installing the shift shaft (125 Duke) – Slide shift shaft with the washer into the bearing seat. – Push sliding plate away from the shift drum locating . Insert the shift shaft all the way. – Let the sliding plate engage in the shift drum locating. –…
-
Page 165: Installing The Primary Gear (125 Duke)
ENGINE 16.5.13 Installing the primary gear (125 Duke) – Position spacer ring – Mount spring washer 304783-11 – Mount primary gear 304782-11 – Mount timing chain sprocket 304781-11 16.5.14 Installing the clutch basket (125 Duke) – Mount collar sleeve 304778-11 –…
-
Page 166: Installing The Spacer (125 Duke)
ENGINE – Lock the clutch basket and primary gear using special tool Gear segment (90129081100) ( p. 259) – Mount and tighten nut with the washer. Guideline Nut, primary gear 55 Nm (40.6 lbf ft) Castle nut wrench; ½» drive (90129021000) ( p.
-
Page 167: Installing The Balancer Shaft Drive Wheel (125 Duke)
ENGINE – Install the gear position sensor. – Mount and tighten screws Guideline Screw, gear sensor 6 Nm Loctite ® 243™ (4.4 lbf ft) – Position the cable guide in the engine case. – Position the retaining bracket. Info 304771-11 Ensure that the cable is correctly routed.
-
Page 168: Installing The Starter Drive (125 Duke)
ENGINE – Mount and tighten nut Guideline Nut, drive wheel for balancer shaft 60 Nm (44.3 lbf ft) Castle nut wrench; ½» drive (90129022000) ( p. 257) – Remove the special tool. Gear segment (90129081100) ( p. 259) 304763-11 16.5.18 Installing the starter drive (125 Duke) –…
-
Page 169: Installing The Rotor (125 Duke)
ENGINE 16.5.19 Installing the rotor (125 Duke) – Lock the clutch basket and primary gear using special tool Gear segment (90129081100) ( p. 259) 304756-10 – Mount the spring washer. – Mount the rotor. Info Turn the freewheel gear counterclockwise to simplify assembly. –…
-
Page 170: Installing The Piston (125 Duke)
ENGINE – Mount locating pins 304748-11 – Mount the water pump cover with the seal ring. – Install the screws and tighten them diagonally. Guideline Screw, water pump cover 12 Nm (8.9 lbf ft) 304747-11 16.5.22 Installing the piston (125 Duke) –…
-
Page 171: Installing The Cylinder Head (125 Duke)
ENGINE – Mount dowels and cylinder base gasket 304744-11 – Thread the timing chain through the chain shaft. Mount piston pin 304743-11 – Cover the engine case opening with a cloth. – Position piston pin retainer – Insert the special tool and firmly press it toward the piston. Insertion for piston ring lock (90129030000) ( p.
-
Page 172: Installing The Camshafts (125 Duke)
ENGINE – Mount dowels – Put on cylinder head gasket – Mount the cylinder head. 304740-11 – Mount screws with the washer and tighten in a crisscross pattern. Guideline Cylinder head screw Step 1 Thread is oiled, head flat is 20 Nm (14.8 lbf ft) greased…
-
Page 173: Installing The Timing Chain Tensioner
ENGINE – Clean all oil nozzles thoroughly and blow out with compressed air. – Mount the dowels. – Position the camshaft bearing bridge. – Mount screws and tighten from the inside to the outside. Guideline Screw, camshaft bearing bridge 11 Nm (8.1 lbf ft) 304735-11 16.5.25 Installing the timing chain tensioner (125 Duke) –…
-
Page 174: Checking The Valve Clearance (125 Duke)
ENGINE 16.5.26 Checking the valve clearance (125 Duke) – Crank the engine several times. Castle nut wrench; ½» drive (90129021000) ( p. 257) – Set the engine to ignition top dead center. ( p. 92) 304431-10 – Check the valve clearance at all valves between the camshaft and cam lever. Guideline Valve clearance, exhaust, cold 0.13……
-
Page 175: Installing The Clutch Cover (125 Duke)
ENGINE 16.5.29 Installing the clutch cover (125 Duke) – Mount dowel and clutch cover gasket 304733-11 – Position the clutch cover. Info Pivot the clutch lever. 304732-10 – Mount and tighten screws Guideline Screw, clutch cover 12 Nm (8.9 lbf ft) 304731-11 16.5.30 Installing the spark plug (125 Duke) –…
-
Page 176: Installing The Valve Cover (125 Duke)
ENGINE 16.5.31 Installing the valve cover (125 Duke) – Degrease the sealing areas and thinly coat with sealant in areas Loctite ® 5910 – Position the gasket in the valve cover. 304803-10 – Position the valve cover with the gasket. –…
-
Page 177: Removing The Engine From The Engine Assembly Stand (125 Duke)
ENGINE – Mount and tighten oil drain plug with the O-ring. Guideline Oil drain plug M24x1.5 15 Nm (11.1 lbf ft) 304420-11 16.5.34 Removing the engine from the engine assembly stand (125 Duke) – Remove the fitting from special tools Engine fixing arm (90129002060) ( p.
-
Page 178: Installing The Transmission Shafts
ENGINE – Mount balancer shaft with the bearing. Info If necessary, heat the engine case. – Position the retaining bracket. – Mount and tighten screw Guideline Screw, bearing retainer 12 Nm Loctite ® 243™ 305887-11 (8.9 lbf ft) – Remove the special tool. Mounting sleeve (90129005000) ( p.
-
Page 179: Installing The Shift Rails (200 Duke)
ENGINE 16.5.40 Installing the shift rails (200 Duke) – Oil all parts carefully before assembling. – Mount shift rail together with upper spring and the lower spring. – Mount shift rail 305882-10 16.5.41 Installing the left engine case (200 Duke) –…
-
Page 180: Installing The Oil Filter (200 Duke)
ENGINE – Mount the fitting of the engine fixing arm. 16.5.42 Installing the oil filter (200 Duke) – Tilt the engine sideways and fill the oil filter housing approx. ⅓ full with engine oil. – Fill oil filter with engine oil and insert it in the oil filter housing. 305877-11 –…
-
Page 181: Installing The Shift Shaft (200 Duke)
ENGINE 16.5.45 Installing the shift shaft (200 Duke) – Slide shift shaft with the washer into the bearing seat. – Push sliding plate away from the shift drum locating . Insert the shift shaft all the way. – Let the sliding plate engage in the shift drum locating. –…
-
Page 182: Installing The Primary Gear (200 Duke)
ENGINE 16.5.47 Installing the primary gear (200 Duke) – Position spacer ring – Mount spring washer 305867-11 – Mount primary gear 305866-11 – Mount timing chain sprocket 305865-11 16.5.48 Installing the clutch basket (200 Duke) – Mount collar sleeve 305862-11 –…
-
Page 183: Installing The Spacer (200 Duke)
ENGINE – Lock the clutch basket and primary gear using special tool Gear segment (90129081100) ( p. 259) – Mount and tighten nut with the washer. Guideline Nut, primary gear 55 Nm (40.6 lbf ft) Castle nut wrench; ½» drive (90129021000) ( p.
-
Page 184: Installing The Balancer Shaft Drive Wheel (200 Duke)
ENGINE – Install the gear position sensor. – Mount and tighten screws Guideline Screw, gear sensor 6 Nm Loctite ® 243™ (4.4 lbf ft) – Position the cable guide in the engine case. – Position the retaining bracket. Info 305855-11 Ensure that the cable is correctly routed.
-
Page 185: Installing The Starter Drive (200 Duke)
ENGINE – Mount and tighten nut Guideline Nut, drive wheel for balancer shaft 60 Nm (44.3 lbf ft) Castle nut wrench; ½» drive (90129022000) ( p. 257) – Remove the special tool. Gear segment (90129081100) ( p. 259) 305850-11 16.5.52 Installing the starter drive (200 Duke) –…
-
Page 186: Installing The Rotor (200 Duke)
ENGINE 16.5.53 Installing the rotor (200 Duke) – Lock the clutch basket and primary gear using special tool Gear segment (90129081100) ( p. 259) 305842-10 – Mount the spring washer. – Mount the rotor. Info Turn the freewheel gear counterclockwise to simplify assembly. –…
-
Page 187: Installing The Piston (200 Duke)
ENGINE – Mount locating pins 305838-11 – Mount the water pump cover with the seal ring. – Install the screws and tighten them diagonally. Guideline Screw, water pump cover 12 Nm (8.9 lbf ft) 305837-11 16.5.56 Installing the piston (200 Duke) –…
-
Page 188: Installing The Cylinder Head (200 Duke)
ENGINE – Mount dowels and cylinder base gasket 305831-11 – Thread the timing chain through the chain shaft. Mount piston pin 305830-11 – Cover the engine case opening with a cloth. – Position piston pin retainer – Insert the special tool and firmly press it toward the piston. Insertion for piston ring lock (90129030000) ( p.
-
Page 189: Installing The Camshafts (200 Duke)
ENGINE – Mount dowels – Put on cylinder head gasket – Mount the cylinder head. 305827-11 – Mount screws with the washer and tighten in a crisscross pattern. Guideline Cylinder head screw Step 1 Thread is oiled, head flat is 20 Nm (14.8 lbf ft) greased…
-
Page 190: Installing The Timing Chain Tensioner (200 Duke)
ENGINE – Clean all oil nozzles thoroughly and blow out with compressed air. – Mount the dowels. – Position the camshaft bearing bridge. – Mount screws and tighten from the inside to the outside. Guideline Screw, camshaft bearing bridge 11 Nm (8.1 lbf ft) 305820-11 16.5.59 Installing the timing chain tensioner (200 Duke) –…
-
Page 191: Checking The Valve Clearance (200 Duke)
ENGINE 16.5.60 Checking the valve clearance (200 Duke) – Crank the engine several times. Castle nut wrench; ½» drive (90129021000) ( p. 257) – Set the engine to ignition top dead center. ( p. 106) 305816-10 – Check the valve clearance at all valves between the camshaft and cam lever. Guideline Valve clearance, exhaust, cold 0.13……
-
Page 192: Installing The Clutch Cover (200 Duke)
ENGINE 16.5.63 Installing the clutch cover (200 Duke) – Mount dowel and clutch cover gasket 305809-11 – Position the clutch cover. Info Pivot the clutch lever. 305808-10 – Mount and tighten screws Guideline Screw, clutch cover 12 Nm (8.9 lbf ft) 305807-11 16.5.64 Installing the spark plug (200 Duke) –…
-
Page 193: Installing The Valve Cover (200 Duke)
ENGINE 16.5.65 Installing the valve cover (200 Duke) – Degrease the sealing areas and thinly coat with sealant in areas Loctite ® 5910 – Position the gasket in the valve cover. 305805-10 – Position the valve cover with the gasket. –…
-
Page 194: Removing The Engine From The Engine Assembly Stand (200 Duke)
ENGINE – Mount and tighten oil drain plug with the O-ring. Guideline Oil drain plug M24x1.5 15 Nm (11.1 lbf ft) 305801-11 16.5.68 Removing the engine from the engine assembly stand (200 Duke) – Remove the fitting from special tools Engine fixing arm (90129002060) ( p.
-
Page 195: Shift Mechanism
SHIFT MECHANISM 17.1 Adjusting the shift lever Info The adjustment range of the shift lever is limited. – Loosen nuts – Adjust the shift lever by turning shift rod Guideline Shift rod adjustment range 100… 112 mm (3.94… 4.41 in) Info Make the same adjustments on both sides.
-
Page 196: Water Pump, Cooling System
WATER PUMP, COOLING SYSTEM 18.1 Draining the coolant Warning Danger of scalding During motorcycle operation, the coolant gets very hot and is under pressure. – Do not remove the radiator cap, radiator hoses or other cooling system components when the engine is hot. Allow the engine and cooling system to cool down.
-
Page 197: Checking The Antifreeze And Coolant Level
WATER PUMP, COOLING SYSTEM – Fill the radiator completely with coolant. Mount the radiator cap. – Rest the vehicle on the side stand. Danger Danger of poisoning Exhaust gases are toxic and inhaling them may result in unconsciousness and/or death. – When running the engine, always make sure there is sufficient ventila- tion, and do not start or run the engine in an enclosed space without an effective exhaust extraction system.
-
Page 198: Checking The Coolant Level
WATER PUMP, COOLING SYSTEM – Screw off radiator cap – Check the coolant antifreeze. −25… −45 °C (−13… −49 °F) » If the coolant antifreeze does not meet specifications: – Correct the coolant antifreeze. – Check the coolant level in the radiator. The radiator must be completely filled.
-
Page 199
WATER PUMP, COOLING SYSTEM » If you had to add more coolant than the specified amount: > 0.20 l (> 0.21 qt.) – Fill/bleed the cooling system. ( p. 194) – Mount the radiator cap. -
Page 200: Lubrication System
LUBRICATION SYSTEM 19.1 Oil circuit 304938-60 Oil drain plug and oil screen Oil pump Oil filter Oil pressure regulator valve Oil pressure sensor Oil nozzle for piston cooling Oil nozzle for cam follower lubrication Oil nozzle, clutch 19.2 Checking the engine oil level Condition The engine is at operating temperature.
-
Page 201
LUBRICATION SYSTEM Main work – Place a suitable container under the engine. – Remove screws . Take off the oil filter cover with the O-ring. 304892-10 – Remove oil filter Circlip pliers reverse (51012011000) ( p. 252) 304893-10 – Position the special tool with the O-ring. Mount and tighten the screws. Guideline Screw, oil filter cover (125 Duke) 8 Nm (5.9 lbf ft) -
Page 202: Changing The Engine Oil And Oil Filter, Cleaning The Oil Screen
LUBRICATION SYSTEM – Oil the O-ring of the oil filter cover. Mount the oil filter cover. – Mount and tighten the screws. Guideline Screw, oil filter cover (125 Duke) 8 Nm (5.9 lbf ft) Screw, oil filter cover (200 Duke) 8 Nm (5.9 lbf ft) Finishing work –…
-
Page 203: Adding Engine Oil
LUBRICATION SYSTEM – Remove the oil filler plug with the O-ring from the clutch cover and fill up with engine oil. Engine oil First filling 1.5 l (1.6 qt.) External temper- Engine oil ature: 0… 50 °C (SAE 15W/50) (32… 122 °F) p.
-
Page 204: Ignition System
IGNITION SYSTEM 20.1 Alternator — checking the stator winding Stator winding, measurement I — check the resistance – Measure the resistance between the specified points. Stator, connector HB pin 1 – Stator, connector HB pin 2 Alternator ≤ 1 Ω Resistance of stator winding at: 20 °C (68 °F) »…
-
Page 205: Technical Data
TECHNICAL DATA 21.1 Engine 21.1.1 125 Duke Design 1-cylinder 4-stroke engine, water-cooled Displacement 125 cm³ (7.63 cu in) Stroke 47.2 mm (1.858 in) Bore 58 mm (2.28 in) Compression ratio 12.8:1 Control DOHC, 4 valves controlled via cam lever, chain drive Valve diameter, intake 22.5 mm (0.886 in) Valve diameter, exhaust…
-
Page 206: Engine Tolerance, Wear Limits
TECHNICAL DATA Piston rings 1 L-ring, 1 tapered compression piston ring, 1 oil scraper ring Engine lubrication Pressure circulation lubrication with one rotary pump Primary transmission 22:72 Clutch Clutch in oil bath/mechanically activated Transmission 6-gear, claw shifted Transmission ratio 1st gear 12:34 2nd gear 15:31…
-
Page 207: 200 Duke
TECHNICAL DATA 21.2.2 200 Duke Valve — sealing seat width Intake 0.90… 1.10 mm (0.0354… 0.0433 in) Exhaust 0.90… 1.10 mm (0.0354… 0.0433 in) ≤ 0.10 mm (≤ 0.0039 in) Cylinder/cylinder head — distortion of sealing area Cylinder — bore diameter 72.016……
-
Page 208: Capacities
TECHNICAL DATA ® Screw, oil pump 12 Nm (8.9 lbf ft) Loctite 243™ ® Screw, retaining bracket, shaft seal 11 Nm (8.1 lbf ft) Loctite 243™ ring, clutch cover ® Screw, shift drum locating 12 Nm (8.9 lbf ft) Loctite 243™…
-
Page 209: Chassis
TECHNICAL DATA Fuel reserve, approx. 1.5 l (1.6 qt.) 21.5 Chassis Frame Lattice frame of steel tubes, powder-coated Fork WP Suspension Shock absorber WP Suspension Brake system Front Disc brake with four-pot brake caliper Rear Disc brake with single-piston brake caliper, floating Suspension travel Front 150 mm (5.91 in)
-
Page 210: Tires
Front tires Rear tires 110/70 R 17 M/C 54S TL 150/60 R 17 M/C 66S TL MRF revz FC MRF revz C Additional information is available in the Service section under: http://www.ktm.com 21.8 Fork Fork part number 90101000044 Fork WP Suspension Fork length 736 mm (28.98 in)
-
Page 211
TECHNICAL DATA – Screw, air filter box 6 Nm (4.4 lbf ft) – Screw, bottom of rear part 11 Nm (8.1 lbf ft) – Screw, brake fluid reservoir of rear 9 Nm (6.6 lbf ft) brake ® Screw, cable holder, side stand switch 9 Nm (6.6 lbf ft) Loctite 243™… -
Page 212
TECHNICAL DATA ® Screw, side stand bracket M10x1.25 25 Nm (18.4 lbf ft) Loctite 243™ – Screw, top shock absorber M10x1.25 50 Nm (36.9 lbf ft) – Nut, rear wheel spindle M14x1.5 60 Nm (44.3 lbf ft) – Nut, swingarm pivot M14x1.5 140 Nm (103.3 lbf ft) –… -
Page 213: Cleaning/Protective Treatment
CLEANING/PROTECTIVE TREATMENT 22.1 Cleaning the motorcycle Note Material damage Damage and destruction of components by high-pressure cleaning equipment. – When cleaning the vehicle with a pressure cleaner, do not point the water jet directly onto electrical components, connectors, cables, bearings, etc. Maintain a minimum distance of 60 cm between the nozzle of the pressure cleaner and the component. Excessive pressure can cause malfunctions or destroy these parts.
-
Page 214: Checks And Maintenance Steps For Winter Operation
CLEANING/PROTECTIVE TREATMENT 22.2 Checks and maintenance steps for winter operation Info If the motorcycle is used in the winter, salt can be expected on the roads. Precautions need to be taken against road salt corro- sion. If the vehicle was operated in road salt, clean it with cold water after riding. Warm water would enhance the corrosive effects of salt.
-
Page 215: Storage
– Store the vehicle in a dry location that is not subject to large fluctuations in tem- perature. Info KTM recommends jacking up the motorcycle. – Raise the motorcycle with the rear wheel stand. ( p. 10) –…
-
Page 216: Service Schedule
Final check: Check the vehicle for roadworthiness and take a test ride. ○ ● ● Read out the fault memory using the KTM diagnostics tool after a test ride. ○ ● ● Make the service entry in KTM DEALER.NET and in the service record.
-
Page 218: Wiring Diagram
WIRING DIAGRAM 25.1 Page 1 of 8 (125 Duke, 200 Duke EU) bl-ye ye-rd wh-bl ye-bu ye-bu wh-gn wh-gn ye-rd ye-rd wh-or ye-rd wh-or rd-gr rd-gr wh-or gn-rd wh-br wh-gn rd-gr wh-or gn-rd gn-rd bl-ye gn-rd gn-rd wh-or bu-gr bu-gr wh-or wh-or 308041-01…
-
Page 219
WIRING DIAGRAM Components: EFI control unit Alarm system (optional) Vehicle control unit Fuse Fuse Battery Start auxiliary relay 1 Start auxiliary relay 2 Start auxiliary relay 3 Starter relay Starter motor Combination instrument Emergency OFF switch, electric starter button… -
Page 220: 125 Duke, 200 Duke Eu)
WIRING DIAGRAM 25.2 Page 2 of 8 (125 Duke, 200 Duke EU) wh-rd wh-bl wh-rd bu-gn bu-gn wh-rd wh-br wh-br wh-br wh-bu wh-bu wh-rd bu-or bl-ye bu-or wh-bl wh-br gn-pk gn-pk ye-gr bl-ye ye-gr wh-bl wh-bl bu-br bu-br bu-br 308042-01…
-
Page 221
WIRING DIAGRAM Components: EFI control unit Alarm system (optional) Fuse Fuse Fuse Power relay Fuel pump relay Radiator fan relay Fuel pump Radiator fan Ignition/steering lock… -
Page 222: 125 Duke, 200 Duke Eu)
WIRING DIAGRAM 25.3 Page 3 of 8 (125 Duke, 200 Duke EU) wh-bl wh-bl wh-bl HC/3 HB/3 bl-ye ye-bu ye-bu bu-gn bu-gn bl-ye bl-ye 308043-01…
-
Page 223
WIRING DIAGRAM Components: EFI control unit Alarm system (optional) Alarm system switch (optional) Fuse Alternator Combination instrument CAN bus terminating resistor 1 Voltage regulator X295 Diagnostics connector… -
Page 224: 125 Duke, 200 Duke Eu)
WIRING DIAGRAM 25.4 Page 4 of 8 (125 Duke, 200 Duke EU) wh-bl wh-bl wh-br wh-br wh-br bu-br bu-br ye-bu ye-bu wh-br bl-gn bl-gn bl-gn ye-gn ye-gn bl-rd bl-rd bl-ye bl-ye bu-rd bu-rd br-gn br-gn bl-ye gn-gr gn-gr bl-ye bu-rd bu-rd wh-rd wh-rd…
-
Page 225
WIRING DIAGRAM Components: EFI control unit Throttle position sensor circuit A Rollover sensor Side stand switch Fuel tank sensor Temperature and manifold absolute pressure sensor Lambda sensor (cylinder 1) Injection valve (cylinder 1) Combination instrument… -
Page 226: 125 Duke, 200 Duke Eu)
WIRING DIAGRAM 25.5 Page 5 of 8 (125 Duke, 200 Duke EU) wh-or wh-or ye-gn ye-gn gn-rd gn-rd wh-gr wh-gr bl-bu bl-bu wh-rd wh-rd bl-ye bl-ye wh-ye bu-pk bu-pk ye-gn wh-ye wh-ye wh-ye wh-bu wh-bu wh-bu wh-or wh-bu wh-bu bl-ye wh-bu bl-ye ye-gn…
-
Page 227
WIRING DIAGRAM Components: EFI control unit Vehicle control unit Engine coolant temperature sensor (cylinder 1) Gear position sensor Ignition pulse alternator Clutch switch Front wheel speed sensor Idle speed actuator Combination instrument Ignition coil (cylinder 1) -
Page 228: 125 Duke, 200 Duke Eu)
WIRING DIAGRAM 25.6 Page 6 of 8 (125 Duke, 200 Duke EU) bl-ye wh-br ye-rd bl-rd bl-rd bl-rd bl-rd bl-rd ye-rd ye-rd bl-ye ye-rd bl-ye bl-rd bl-ye bl-ye bl-ye wh-br FG/1 FG/1 bl-ye bl-ye bl-ye 308046-01…
-
Page 229
WIRING DIAGRAM Components: Vehicle control unit Front brake light switch Brake light switch, rear Low beam, high beam License plate lamp Combination instrument Horn Parking light Brake/tail light Emergency OFF switch, electric starter button Light switch, horn button, headlight flasher switch, turn signal switch… -
Page 230: 125 Duke, 200 Duke Eu)
WIRING DIAGRAM 25.7 Page 7 of 8 (125 Duke, 200 Duke EU) bl-ye bl-ye bl-ye bl-ye bl-ye bl-ye bl-ye bl-ye bu-pk bu-pk br-pk br-pk 308047-01…
-
Page 231
WIRING DIAGRAM Components: Alarm system (optional) Vehicle control unit Oil pressure sensor Combination instrument Turn signal, front left Turn signal, front right Turn signal, rear left Turn signal, rear right Light switch, horn button, headlight flasher switch, turn signal switch… -
Page 232: 125 Duke, 200 Duke Eu)
WIRING DIAGRAM 25.8 Page 8 of 8 (125 Duke, 200 Duke EU) bl-ye bl-ye bl-ye bl-ye wh-gn bl-ye bl-ye wh-gr wh-gr bl-ye bl-ye bl-ye bl-ye bl-ye bl-pu wh-ye bl-ye br-rd bu-or bl-ye bl-ye bl-ye bu-or br-rd bl-ye wh-ye bl-pu wh-gn bl-ye bl-ye bl-ye…
-
Page 233
WIRING DIAGRAM Components: EFI control unit Alarm system (optional) Vehicle control unit Combination instrument Cable colors: Black Brown Blue Green Gray Light blue Orange Pink Violet White Yellow… -
Page 234: 200 Duke 2013 Col)
WIRING DIAGRAM 25.9 Page 1 of 8 (200 Duke 2013 COL) bl-ye ye-rd wh-bl ye-bu ye-bu wh-gn wh-gn ye-rd ye-rd wh-or ye-rd wh-or rd-gr rd-gr wh-or gn-rd wh-br wh-gn rd-gr wh-or gn-rd gn-rd bl-ye gn-rd gn-rd wh-or bu-gr bu-gr wh-or wh-or 308051-01…
-
Page 235
WIRING DIAGRAM Components: EFI control unit Alarm system (optional) Vehicle control unit Fuse Fuse Battery Start auxiliary relay 1 Start auxiliary relay 2 Start auxiliary relay 3 Starter relay Starter motor Combination instrument Emergency OFF switch, electric starter button… -
Page 236: 200 Duke 2013 Col)
WIRING DIAGRAM 25.10 Page 2 of 8 (200 Duke 2013 COL) wh-rd wh-bl wh-rd bu-gn bu-gn wh-rd wh-br wh-br wh-br wh-bu wh-bu wh-rd bu-or bl-ye bu-or wh-bl wh-br gn-pk gn-pk ye-gr bl-ye ye-gr wh-bl wh-bl bu-br bu-br bu-br 308052-01…
-
Page 237
WIRING DIAGRAM Components: EFI control unit Alarm system (optional) Fuse Fuse Fuse Power relay Fuel pump relay Radiator fan relay Fuel pump Radiator fan Ignition/steering lock… -
Page 238: 200 Duke 2013 Col)
WIRING DIAGRAM 25.11 Page 3 of 8 (200 Duke 2013 COL) wh-bl wh-bl wh-bl HC/3 HB/3 bl-ye ye-bu ye-bu bu-gn bu-gn bl-ye bl-ye 308053-01…
-
Page 239
WIRING DIAGRAM Components: EFI control unit Alarm system (optional) Alarm system switch (optional) Fuse Alternator Combination instrument CAN bus terminating resistor 1 Voltage regulator X295 Diagnostics connector… -
Page 240: 200 Duke 2013 Col)
WIRING DIAGRAM 25.12 Page 4 of 8 (200 Duke 2013 COL) wh-bl wh-bl wh-br wh-br wh-br bu-br bu-br ye-bu ye-bu wh-br bl-gn bl-gn bl-gn ye-gn ye-gn bl-rd bl-rd bl-ye bl-ye bu-rd bu-rd br-gn br-gn bl-ye gn-gr gn-gr bl-ye bu-rd bu-rd wh-rd wh-rd bl-ye…
-
Page 241
WIRING DIAGRAM Components: EFI control unit Throttle position sensor circuit A Rollover sensor Side stand switch Fuel tank sensor Temperature and manifold absolute pressure sensor Lambda sensor (cylinder 1) Injection valve (cylinder 1) Combination instrument… -
Page 242: 200 Duke 2013 Col)
WIRING DIAGRAM 25.13 Page 5 of 8 (200 Duke 2013 COL) wh-or wh-or ye-gn ye-gn gn-rd gn-rd wh-gr wh-gr bl-bu bl-bu wh-rd wh-rd bl-ye bl-ye wh-ye bu-pk bu-pk ye-gn wh-ye wh-ye wh-ye wh-bu wh-bu wh-bu wh-or wh-bu wh-bu bl-ye wh-bu bl-ye ye-gn ye-gn…
-
Page 243
WIRING DIAGRAM Components: EFI control unit Vehicle control unit Coolant temperature sensor (cylinder 1) Gear position sensor Ignition pulse generator Clutch switch Wheel speed sensor, front Idle speed actuator Combination instrument Ignition coil (cylinder 1) -
Page 244: 200 Duke 2013 Col)
WIRING DIAGRAM 25.14 Page 6 of 8 (200 Duke 2013 COL) bl-ye wh-br ye-rd bl-rd bl-rd bl-rd bl-rd bl-rd ye-rd ye-rd bl-ye ye-rd bl-ye bl-rd bl-ye bl-ye bl-ye wh-br FG/1 FG/1 bl-ye bl-ye bl-ye 308056-01…
-
Page 245
WIRING DIAGRAM Components: Vehicle control unit Brake light switch, front Brake light switch, rear Low beam, high beam License plate lamp Combination instrument Horn Parking light Brake/tail light Emergency OFF switch, electric starter button Light switch, horn button, high beam flasher button, turn signal switch… -
Page 246: 200 Duke 2013 Col)
WIRING DIAGRAM 25.15 page 7 of 8 (200 Duke 2013 COL) bl-ye bl-ye bl-ye bl-ye bl-ye bl-ye bl-ye bl-ye bu-pk bu-pk gr-or gr-or 308057-01…
-
Page 247
WIRING DIAGRAM Components: Alarm system (optional) Vehicle control unit Oil pressure sensor Combination instrument Turn signal, front left Turn signal, front right Turn signal, rear left Turn signal, rear right Light switch, horn button, high beam flasher button, turn signal switch… -
Page 248: 200 Duke 2013 Col)
WIRING DIAGRAM 25.16 Page 8 of 8 (200 Duke 2013 COL) bl-ye bl-ye bl-ye bl-ye wh-gn bl-ye bl-ye wh-gr wh-gr bl-ye bl-ye bl-ye bl-ye bl-ye bl-pu wh-ye bl-ye br-rd bu-or bl-ye bl-ye bl-ye bu-or br-rd bl-ye wh-ye bl-pu wh-gn bl-ye bl-ye bl-ye bl-ye…
-
Page 249
WIRING DIAGRAM Components: EFI control unit Alarm system (optional) Vehicle control unit Combination instrument Cable colors: Black Brown Blue Green Gray Light blue Orange Pink Violet White Yellow… -
Page 250: Substances
Brake fluid DOT 4 / DOT 5.1 According to – Guideline – Use only brake fluid that complies with the specified standard (see specifications on the container) and that possesses the corre- sponding properties. KTM recommends Castrol and Motorex ® products. Supplier Castrol –…
-
Page 251
SUBSTANCES Fork oil (SAE 4) (48601166S1) According to – SAE ( p. 261) (SAE 4) Guideline – Use only oils that comply with the specified standards (see specifications on the container) and that possess the corresponding properties. Super unleaded (ROZ 95/RON 95/PON 91) According to –… -
Page 252: Auxiliary Substances
AUXILIARY SUBSTANCES Chain cleaner Guideline – KTM recommends Motorex ® products. Supplier Motorex ® – Chain Clean Chain lube for road use Guideline – KTM recommends Motorex ® products. Supplier Motorex ® – Chainlube Road Cleaning and preserving materials for metal, rubber and plastic Guideline –…
-
Page 253
AUXILIARY SUBSTANCES Lubricant (T152) Guideline – KTM recommends Bel‑Ray ® products. Supplier Bel‑Ray ® – Molylube ® Anti‑Seize Motorcycle cleaner Guideline – KTM recommends Motorex ® products. Supplier Motorex ® – Moto Clean 900 Paint cleaner and polish for high-gloss and matte finishes, bare metal and plastic surfaces Guideline –… -
Page 254: Special Tools
SPECIAL TOOLS Bleeder cover Art. no.: 00029013000 201490-10 Bleeding device Art. no.: 00029013100 201491-10 Bleed syringe Art. no.: 50329050000 400058-01 Circlip pliers reverse Art. no.: 51012011000 400059-01 Valve spring compressor Art. no.: 59029019000 400101-01…
-
Page 255
SPECIAL TOOLS Feeler gauge Art. no.: 59029041100 400110-01 Plastigauge measuring strips Art. no.: 60029012000 400122-01 Adapter Art. no.: 61029055130 C00194-01 Rear wheel stand Art. no.: 61029055400 500077-01 Front wheel stand Art. no.: 61029055500 B00756-01… -
Page 256
SPECIAL TOOLS Testing hose Art. no.: 61029093000 201314-01 Pressure testing tool Art. no.: 61029094000 400149-01 Adapter Art. no.: 61029955620 B00757-01 Engine assembly stand Art. no.: 61229001000 200306-01 Work stand Art. no.: 62529055000 400151-01… -
Page 257
SPECIAL TOOLS Floor jack attachment Art. no.: 75029055000 400184-01 Oil pressure adapter Art. no.: 75029094000 400169-01 Separator plate Art. no.: 77229032000 302922-10 Spark plug wrench Art. no.: 77229172000 304549-10 Engine fixing arm Art. no.: 90129002050 304419-10… -
Page 258
SPECIAL TOOLS Engine fixing arm Art. no.: 90129002060 304418-10 Mounting sleeve Art. no.: 90129005000 201612-01 Extractor Art. no.: 90129009000 304569-10 Holding spanner Art. no.: 90129012000 304548-10 Puller for main bearing Art. no.: 90129018000 304528-10… -
Page 259
SPECIAL TOOLS Protecting sleeve Art. no.: 90129019000 304526-10 Pressure screw for crankshaft Art. no.: 90129020000 304527-10 Castle nut wrench; ½» drive Art. no.: 90129021000 304430-10 Castle nut wrench; ½» drive Art. no.: 90129022000 304469-10 Limit plug gauge Art. no.: 90129026000 305035-10… -
Page 260
SPECIAL TOOLS Insertion for piston ring lock Art. no.: 90129030000 305036-10 Mounting sleeve Art. no.: 90129043000 304541-10 Case separating tool Art. no.: 90129048000 304570-10 Castle nut wrench; ½» drive Art. no.: 90129050000 305037-10 Castle nut wrench; ½» drive Art. no.: 90129050100 305037-10… -
Page 261
SPECIAL TOOLS Key for steering head bearing Art. no.: 90129051000 304951-10 Disassembly tool, balancer shaft bearing Art. no.: 90129056000 304565-10 Insert for valve spring lever Art. no.: 90129060000 305038-10 Gear segment Art. no.: 90129081100 304453-10 Hook wrench Art. no.: T106S 301085-01… -
Page 262
SPECIAL TOOLS Spring compressor Art. no.: T14050S 201648-10 Mounting tool Art. no.: T528S 200634-10 Clamping stand Art. no.: T612S 200638-10… -
Page 263: Standards
STANDARDS JASO T903 MA Different technical development directions required a new specification for 4-stroke motorcycles – the JASO T903 MA Standard. Ear- lier, engine oils from the automobile industry were used for 4-stroke motorcycles because there was no separate motorcycle specifi- cation.
-
Page 264: Index
INDEX Brake discs INDEX checking ……. . . 54 Accessories ……..8 Brake fluid front brake, adding .
-
Page 265
INDEX piston, removing ……94, 108 Engine oil level preparations ……90, 104 checking . -
Page 266
INDEX Kilometers or miles Shift speed RPM 1 adjusting ……. . . 76 adjusting . -
Page 267
*3206127en* 3206127en 07/2013 KTM-Sportmotorcycle AG 5230 Mattighofen/Austria Photo: Mitterbauer/KTM http://www.ktm.com…
Содержание
- KTM Duke speedometer problem solved
- Не работает спидометр ктм дюк 200
- Не работает спидометр ктм дюк 200
- KTM 200 Duke 2013 → Штуки с Алиэкспресса
- Не работает спидометр ктм дюк 200
KTM Duke speedometer problem solved

KTM Duke 390 Meter Problem 😩Speedometer Problem Of DukeПодробнее
Solving the Meter shell problem in KTM bikes.Подробнее
MAJOR ISSUE!! KTM DUKE 200 / 390 SPEEDOMETER | ZEDMOTOPHПодробнее
KTM RC/DUKE SPEEDOMETER REPAIR IN JUST ₹300Подробнее
ktm duke 200 | Any suggestions to fix this problemПодробнее
KTM 200/390 speedometer/odo meter water Condensation solutions and mistakes.Подробнее
HOW TO FIX KTM CONSOLE | INSTRUMENT CLUSTER | DIY !Подробнее
KTM Duke speedometer button problem solution in TeluguПодробнее
KTM DUKE 390 | METER PROBLEM | WATER DAMAGE | RAJPUTANA RIDER.Подробнее
KTM Duke || Display Speedometer Not Working || KTMПодробнее
KTM DUKE SpeedoMeter Upper Cover Replacement | TRINITY VLOGSПодробнее
KTM — Solve Speedometer Cover Issue !! — DIY — KTM Meter console Problem Solved — KrrishПодробнее
KTM Service Not Reset Indicator/Notification problem solution #Ktm #Duke #RcПодробнее
KTM High Coolant Temperature Issues. Problem Solved By #DivineMotorbikeПодробнее
2016 Duke 390 Idle/Stalling Problem Solved!Подробнее
Ktm Duke display problem solved!!Подробнее
How To Repair Speedometer KTM DUKE 200| Duke125 | Duke 200 | Duke 250 | water drop issue | solvedПодробнее
Speedometer KTM DUKE 200 Display ProblemПодробнее
How To Repair Speedometer KTM DUKE 200_Part 2: Do It Yourself (DIY)Подробнее
Источник
Не работает спидометр ктм дюк 200
Злобный дальнобойщег 
Группа: Свои
Сообщений: 7563
Регистрация: 20.4.2012
Вставить ник Цитата Из: Москва, Митино, Эндуро-зона
Мотоцикл: Beta 300 RR 2019
EXC 300 Tpi 2019
Репутация:  163
163 
![]()
Итак, КТМ ЕХС 125 09. Штатная катумовская приборка.
При запуске мота не включается сама. батарейка скорее жива.
Подробное описание подключения:

Разъём 1. От датчика вращения на переднем колесе.
Разъём 2 и 4. Очень похожи друг на дружку, предполагаю, что на поворотники(?)
Разъём 3. На фару(на снимке она отключена и отодвинута, работает)
Разъём 5. Два пина, предположительно ответный для разъёма 1, выходит из общего разъёма панельки
Разъём 6. Четыре пина, не подключены ни к чему. выходит из общей оплётки собственно панельки
Разъём 7, Три пина, провода красного, коричневого и черного цветов, также из общего разъёма панельки, подключены к ответному разъёму и уходят в дебри мота.
кто подскажет, что не так, по какому проводу приходит сигнал на включение панельки?
Источник
Не работает спидометр ктм дюк 200
KTM 200 Duke 2013
Дюк Нюкем мой бывший
KTM 200 Duke 2013 → Штуки с Алиэкспресса
После покупки мота назаказал всякого с али, что-то нужное, что-то, может быть, не очень.
Как известно, у Дюков 125, 200 и 390 одна база и разные двигатели, и на Али в разделе применимости пишут обычно все три мотоцикла. На самом деле всё не совсем так.
Начнём по порядку:
1. Грузики руля (точнее в такие как у меня работают только как слайдеры, защищают ручки).
На Дюках 125 и 200 грузиков изначально нет и под них нужно в ручках вырезать дырки. У меня правая ручка пострадала в результате падения и грузики частично скрыли эту проблему.
Материал — алюминий.
Качество изготовления — хорошее.
Подходит — хорошо.
Функциональность — надеюсь не пригодятся)
2. Защита радиатора.
Судя по всему защита изготовлена для Дюка 390, предполагаю, что у него радиатор пошире и с левой стороны выпирает больше. Для Дюка 200 защиту пришлось немного отпилить, просто не люблю когда что-то выпирает)
Материал — нержавеющая сталь.
Качество — хорошее.
Подходит — я дорабатывал, но можно поставить и так.
Функциональность — думаю хорошая, вероятно выдержит даже если долбануть молотком.
3. Слайдеры.
Тоже видимо на Дюк 390, т.к. один длиннее другого на сантиметра два за счёт кольцевой вставки. Так как мне нужны были одинаковые, убрал вставку и отпилил центральный болт. Также под площадку крепления слайдеров нужно изготовить 4 шайбы, китайцы пожадничали и ножки у пластины слишком короткие, хотя держится и так.
Материал — алюминий.
Качество — хорошее.
Подходит — требуется доработка.
Функциональность — надеюсь не пригодятся)
4. Защита цепи.
Не было при покупке, почему не знаю.
Материал — алюминий.
Качество — хорошее.
Подходит — хорошо.
Функциональность — работает.

5. Ветровик.
Штатный ветровик… нууу… его считай что нет. Хотел немного побольше и вот купил. Сильно лучше конечно не стало, но вроде бы хотя бы в пузо меньше дует, ну и смотрится норм.Крепится просто на штатное место штатными болтиками.
Материал — оргстекло.
Качество — хорошее.
Подходит — хорошо.
Функциональность — средняя.
6. USB + прикуриватель.
В городе конечно можно и без этого, но решил пусть будет, и колеса удобно подкачивать автомобильным насосом.
Материал — пластик.
Качество — хорошее.
Подходит — хорошо.
Функциональность — пока работает.
7. Расширитель подножки.
Подарил мотобрат на ДР. На грунте с ней поудобнее конечно.
Материал — алюминий.
Качество — хорошее.
Подходит — хорошо.
Функциональность — реально работает.
8. Пинлок.
Это правда не совсем к мотоциклу относится, скорее к снаряжению, но напишу всё-таки здесь. Заказал просто попробовать, крепежа под фирменный пинлок у меня нет, а этот крепится на самоклейке. Оказалось вполне работающая вещь, а при такой цене можно менять раз в год. И сейчас он мне очень пригодился.
Материал — не знаю.
Качество — хорошее.
Подходит — хорошо.
Функциональность — реально работает.
Цены здесь писать не буду, да и не все уже помню, скажу лишь, что самое дорогое это слайдеры, и стоили они около 1700р, остальное дешевле, либо сильно дешевле. При заказе имеет смысл ловить всякие акции, так те же слайдеры стоили больше 3000р у всех остальных продавцов, это без акций. Ну вы знаете)
Источник
Не работает спидометр ктм дюк 200

18500.
Поскольку мот — одноцилиндровый, достаточно сильные вибрации, как следствие, нужно уделить внимание болтам — у меня открутился один из болтов, который крепит маятник, в общем это было увлекательноу утро, поиск гайки и ключа, который поможет это все закрутить.
Показать полностью.
Точно так же, под кожухом ведущей звезды нужно проверять несколько шурупов, особенно если цепь немного ослаблена — парочку их мне просто «срезало» цепью.
у некоторых первых 390х была неправильно поставлена ведущая звезда, как следствие, на ослабленной цепи звезда могла вылететь с места(была отзывная кампания, проверяли/меняли в байкленде). Лично у меня все было хорошо.
Уровень антифриза со временем уменьшается, но это не болячка(в отличие от 200 у которых он тек)
390й- слабый аккумулятор, особенно на околонулевых температур. Так же, у некоторых, на горячую плохо заводится. Но заводится. Есть проблема с клеммами у аккумулятора, иногда они отваливаются
При лобовых столкновениях деформация может дойти до ГБЦ, и она может сместиться на почти невидимые, но все же величины, в таком случае под болтами может быть видно немного алюминиевой стружки и/или следов от неё. Есть стойкое ощущение, что найдутся умельцы, которые даже сломанную раму могут вытянуть, а рама сложная и скорее всего не все так там просто. Как проверить — не знаю, но, думаю, стоит обратить внимание на сваршные швы и покраску в районе рулевой колонки
В остальном — за 2 года никаких проблем, только меняй масло, цепь и резину, очень сбалансированный, легкий и предсказуемый мотоцикл.


системных болячек несколько: родные сальники вилки первых поколений (впоследствии поменяли состав резины), лопающийся фильтр бокс (лечится самостоятельно герметиком), подтекающий антифриз, их общий бич — датчики (чек загорающийся и затухающий без причины и какой либо зависимости например)
Долговечность таких вещей как вентилятор, клеммы итд зависит больше от эксплуатации и ухода: так в первом случае нужно его изредка мыть )). В моем дюке аккум не был закреплен (кто-то из 3-х предыдущих владельцев зажал резинку) и даже в условиях дачной эксплуатации (по кочкам, по кочкам, по маленьким кусточкам), когда аккум летал под седлом, с клеммами проблем не возникало.


как владелец duke 200
Вилка перевертыш + не самые качественные сальники + жидкое с завода масло + наши дороги = течь сальника в первый сезон либо после первой зимы, меняют сальники + льют масло погуще, вилка становится жестче приятнее на ровной дороге, но на кочках не успевает отыгрывать рельеф. говорят после 2014 года сальники поменяли возможно для России и масло стало гуще.
Показать полностью.
Новый, только с салона очень резкое сцепление и очень дерганный на низких оборотах первые 500 км ездить на 1ой передачи просто не удобно, ближе к 1000 км всё прирабатывается + привыкаешь и становится лучше, но остается дерганный характер на 1ой передаче (7-15км/ч), в плотных пробках когда даже меся в междурядье нет ездить не удобно.
Из-за вибраций, не раз слышал про обламывание клеммы аккумулятора на 390, на 125/200 такого не встречал.
Как и у всех современных нейкидов короткое переднее крыло и отсутствующее заднее, в результате постоянное засирание радиатора охлаждения, особенно неприятно когда попадаешь на дорожные работы отмыть радиатор потом от битума по сути не реально.
При мойке радиатора охлаждения часто мокнет вентилятор что приводит к его досрочному выходу из строя.
Заводские дуги безопасности имеют не достаточную защиту, даже при не больших заваливаниях страдают лапки тормоза и переключения кпп, и при определенных обстоятельствах и зеркала заднего вида, у меня лично на стоянке завалился на бок по инерции перевалился через дугу и клюнул зеркалом в землю, забавно что без дуг зеркало бы не пострадало бы, связано с тем что при опоре на дугу центр тяжести мотоцикла достаточно близко к слайдеру и легко переворачивается.
Уход антифриза, в никуда. в один прекрасный момент просто стал ниже уровня. ни потёков ни последующего ухода жидкости ничего. просто долил.
Проблема с офф дилером в Саратове, он был у его вдруг не стало, т.к. ktm достаточно много напичканы электроникой есть вещи которые без офф дилера и спец оборудования нельзя сделать, для младших дюков до 2016 года это не так критично, а вот для моделей 2017 года это станет актуально.
В данный момент дюк продан (по семейным обстоятельствам), и за свои 1.5 сезона и 5к км в целом меня радовал, лёгкий, резвый я бы сказал даже удобный. Хотя многие за эти деньги предпочтут старого японца.
Мои советы тем кто собирается купить и смотрит в сторону младших дюков.
1. 125 для тех кому меньше 18 и есть только категория А1, для остальных только 390, 200 да дешевле и позволяет шалить на дороге но его быстро становится мало, да и на трассе его не хватает, хотя как городской мот для тех кому много ненужно вполне подойдет
2. КТМ это техника на грани, это максимум за свои деньги, КТМ это не про ресурс, это про езду, так что будьте готовы что вы не получите японского качества, и что-то придется делать.
3. Есть слух что те кто ездил на КТМ больше не могут ездить на других марках
Купил бы снова KTM? 690 duke с радостью, но на него нет денег даже на б.у. 🙂
390 2017 года очень интересная модель(но без офф дилера обслуживать её будет вероятно сложновато), буду активно следить за этой моделью пока коплю деньги.
Источник
Страницы: 1, 2, 3, 4, 5, 6, 7, 8, 9, 10, 11, 12, 13, 14, 15, 16, 17, 18, 19, 20, 21, 22, 23, 24, 25, 26, 27, 28, 29, 30, 31, 32, 33, 34, 35, 36, 37, 38, 39, 40, 41, 42, 43, 44, 45, 46, 47, 48, 49, 50, 51, 52, 53, 54, 55, 56, 57, 58, 59, 60, 61, 62, 63, 64, 65, 66, 67, 68, 69, 70, 71, 72, 73, 74, 75, 76, 77, 78, 79, 80, 81, 82, 83, 84, 85, 86, 87, 88, 89, 90, 91, 92, 93, 94, 95, 96, 97, 98, 99, 100, 101, 102, 103, 104
Re: KTM 990 Adventure Автор: Overload Дата: 19 Июля 2012, 18:02:42
после замены топливного шланга и ковыряний в мотоцикле появился сигнал об ошибке — индикатор Fl мигает 8 раз, первый раз длинное мигание и 7 коротких. что бы это значило??? где можно почитать об индикации ошибок?
Ваша ошибка на 179-й странице мануала (должен быть выдан вместе с документами,сертификатами и папкой для них).
Неисправность лямда-зонда первого цилиндра.Могли прищемить кабель к раме,когда после снятия бензобака ставили защитную дугу (задняя клешня с левой стороны).
П.С. Мот создан для путешествий по зажопинским местам. Как можно ездить без кодов ошибок? Советую распечатать их в столбик,заламинировать и положить в бардачок между баками.
Re: KTM 990 Adventure Автор: santaspy007 Дата: 19 Июля 2012, 18:40:57
Твоя ошибка на 179-й странице мануала (должен быть выдан вместе с документами,сертификатами и папкой для них).
Неисправность лямда-зонда первого цилиндра.Могли прищемить кабель к раме,когда после снятия бензобака ставили защитную дугу (задняя клешня с левой стороны).
П.С. Мот создан для путешествий по зажопинским местам. Как можно ездить без кодов ошибок? Советую распечатать их в столбик,заламинировать и положить в бардачок между баками.
спасибо. в моем мануале на стр.180 написано- defect in fuel injection system. read out the fault memory using KTM diagnostics tool. похоже, те, кто купил в этом году, подразумевается, намного тупее тех, кто покупал ранее, и им только на сервис путь заказан) никакого самообслуживания)
Re: KTM 990 Adventure Автор: Overload Дата: 19 Июля 2012, 19:45:41
М-да.У меня такой ошибки в списке нет (11-й год). А какой номер ошибки (цифра перед Warning Lamp FI (MIL) )? Что снимали — насос? Кабель не подломали,пока крутили? И мот как работает?
Re: KTM 990 Adventure Автор: Den77 Дата: 19 Июля 2012, 19:47:50
Overload, у меня такая всегда лежит) А так большинство даже не знает, что такое ремкомплект для шин, и проколов колесо стоят часами жуют сопли, а потом описывают, как они героически стояли на солнцепеке и жевали сопли итп…
Re: KTM 990 Adventure Автор: santaspy007 Дата: 19 Июля 2012, 20:49:21
М-да.У меня такой ошибки в списке нет (11-й год). А какой номер ошибки (цифра перед Warning Lamp FI (MIL) )? Что снимали — насос? Кабель не подломали,пока крутили? И мот как работает?
Мот работает четко. Вроде ничего не сломали. Снимали баки, эл.разъемы. В модели 12 года, видимо, другая приборов??? Код ошибки перед Fl не пишется.
Re: KTM 990 Adventure Автор: santaspy007 Дата: 19 Июля 2012, 20:57:51
Все. Нашли. Действительно кабель лямда-зонда закусили пока дугу ставили.. перетерся на второй день.
Re: KTM 990 Adventure Автор: Overload Дата: 19 Июля 2012, 21:30:38
Ну что за люди? Вы спросите их,откуда у них руки растут? Потом бы у Вас выскочила ошибка «Неисправность нагрева лямбда-зонда»,а потом короткое замыкание и остановка двигателя прямо на дороге,возможно во время обгона перед встречкой. Скажите им об этом.
Код ошибки перед Fl не пишется.
Значок просто моргает.И из морганий мы определяем номер кода.Я просто подзабыл об этом. Он не пишется нигде на панели. То есть,если моргает 4 длинных и 5 коротких,то в книжке обозначается как ошибка номер 45. И так далее. И там идёт расшифровка.
Re: KTM 990 Adventure Автор: kirillsh Дата: 30 Июля 2012, 23:20:09
Гдеб камеру 18ю в Мск прикупить? что то нет нигде… 
Re: KTM 990 Adventure Автор: mazepa crew Дата: 30 Июля 2012, 23:22:32
Для честности добавляю косячёк КТМ- у приятеля накрячился датчик подножки. Итог- эвакуатор, слава Богу датчик был в БАЙК ЛЭНДЕ 
Невиданный случай 
Вот по этому поводу имею вопрос- НАХЕРА в датчике подножки стоит электронная схема!!!!!!!!!!!!!!!!!! 
Неужели нельзя просто ВКЛ-ВЫКЛ?
Ваше мнение?
Добавлено : 31 Июля 2012, 00:20:14
kirillsh, сегодня у приятеля на 990 рванула передняя камера- скорость за 100, что творилось с мотиком неописуемо((((
метров 300 неуправляемой езды между машин. Со слов Сашки мотоцикл как знал куда ехать между машин. Потерял тапочек, шел за ним метров 200. Вот, блин(( камер в Москве нет, подарил ему Мишелин ХАРД ЮЗ, толшина стенок 4 мм- пусть испытывает)))
Re: KTM 990 Adventure Автор: bluesman Дата: 30 Июля 2012, 23:32:21
Как раз обсуждали в ветке про тайгер что мол зачем сделали механический когда можно как КТМ.
У тайгера если накрывается выключатель тупо скручиваешь два провода и вперед.
А в Катоше неа…
Re: KTM 990 Adventure Автор: kirillsh Дата: 30 Июля 2012, 23:39:44
Жесть!!! Хорошо что без последствий!
А по поводу датчика… Может Ден77 подскажет как быть в пампасах в таком случае…
Re: KTM 990 Adventure Автор: kirillsh Дата: 30 Июля 2012, 23:54:23
А вот еще вопрос созрел!
Когда я купил свой 990й, а было это 8тысяч км назад, он отказывался ехать на ниже 5000 оборотов. Эластичности ноль, низов ноль. Далее моим другом был куплен и обкатан 990й и я обратил внимание что эластичности в нем сильно больше, но ездить ниже 5000 не комфортно.
Доливали мы в оба мотоцикла масло и тк 10w50 не нашлось, долили 10w60, долили от 600 — 900 мл в мотоцикл.
Оба мотоцикла стало просто не узнать! Крейсерка сместилась с 5000 на 4000, появились низы без рывков. Вот что это за бред? Ну не может же нас обоих глючить…
Апд.
Или все же +30 тому виной?
Re: KTM 990 Adventure Автор: bluesman Дата: 30 Июля 2012, 23:56:45
Насколько мне известно единственный способ обойти свитч- возить с собой байпасс кит производства того же КТМа для супердюка или афтермаркет
http://www.dualsportwarehouse.com/CJ-DESIGNS-KTM-SIDE-STAND-ELIMINATOR-KIT-CJD-SEK.htm
Это не касается 950го. Там все просто.
Re: KTM 990 Adventure Автор: kirillsh Дата: 31 Июля 2012, 00:03:56
Это же еще запчасть возить с собой!
Интересно, а программно это никак не глушится?
Re: KTM 990 Adventure Автор: bluesman Дата: 31 Июля 2012, 00:15:23
будешь возить с собой ноутбук, кабель с разьемом и спец софт с риском грохнуть фирмварь или поставишь дизэйбл кит — выбери
20
Faults
Engine does not crank when the elec-
tric starter button is pressed
Engine turns only if the clutch lever is
drawn
Engine turns but does not start
Engine has too little power
Engine overheats
Possible cause
Operating error
Battery discharged
Fuse 1, 3, 4, or 8 is blown
No ground connection present
The vehicle is in gear
The vehicle is in gear and the side
stand is folded out
Operating error
Defect in fuel injection system
Air filter is very dirty
Fuel filter is very dirty
Defect in fuel injection system
Too little coolant in cooling system
Radiator fins very dirty
Foam formation in cooling system
Thermostat defective
Fuse 5 blown
Action
–
Go through the steps of starting the engine.
(
p. 60)
–
Recharge the battery.
x
–
Change the fuses of individual power consumers.
(
p. 119)
–
Check the ground connection.
–
Shift gear to neutral.
–
Shift gear to neutral.
–
Go through the steps of starting the engine.
(
p. 60)
–
Read out the fault memory using the KTM diag-
nostics tool.
x
–
Change the air filter.
–
Check the fuel pressure.
–
Read out the fault memory using the KTM diag-
nostics tool.
x
–
Check the cooling system for leakage.
–
Check the coolant level. (
–
Clean the radiator fins.
–
Drain the coolant.
(
x
–
Fill/bleed the cooling system.
–
Check the thermostat.
x
–
Change the fuses of individual power consumers.
(
p. 119)
155
(
p. 115)
x
p. 135)
p. 137)
x
(
p. 138)