
Нередко пользователи сталкиваются с проблемой доступа к сети в Chrome или другом браузере, появляющейся разово или систематически. Страницы не открываются, а вместо этого обозреватель выдаёт сообщение об ошибке «Доступ в интернет закрыт» с кодом ERR_NETWORK_ACCESS_DENIED. Встречается сбой как в ОС Windows 10, 7 так и других сборках. Кроме того, ошибка подключения может появляться с сообщением «Соединение прервано. Похоже, вы подключились к другой сети» и кодом ERR_NETWORK_CHANGED. Почему браузер не заходит на запрашиваемый сайт и как устранить проблему доступа к интернету, мы и рассмотрим. Устранить неисправность можно при наличии прав администратора на компьютере.

Причины возникновения ERR_NETWORK_CHANGED ошибки
Чтобы решить проблему, необходимо выяснить, почему браузеру было отказано в доступе к сетевому подключению. Ошибка с кодом ERR_NETWORK_ACCESS_DENIED может возникать по следующим причинам:
- Сетевое подключение блокируется антивирусом, брандмауэром (встроенным, сторонним) или другим софтом.
- Воздействие вредоносных программ.
- Некорректная работа роутера, модема, выход из строя сетевого оборудования.
- Проблемы с физически подключением по кабелю.
- Неисправность на стороне провайдера.
- Повреждённые, устаревшие драйверы устройств.
- Сбои в работе браузера, некорректные настройки профиля и другие причины.
Ошибка с кодом ERR_NETWORK_CHANGED обусловлена изменением параметров сети, которые были заданы и использованы браузером ранее. Нередко соединение прерывается, когда устройство подключается к другой сети во время запроса перехода на сайт, после перезагрузки маршрутизатора и повторного подключения, а также, если операционная система стала использовать подключение через другой сетевой адаптер. Тогда сбой проявляется разово и больше не тревожит. Сложнее искать причину, когда неисправность носит систематический характер. Спровоцировать проблему прерванного соединения может любой из вышеперечисленных факторов, вызывающих ошибку запрета доступа. Кроме того, причинами могут быть также:
- Нестабильное функционирование или конфликт установленных виртуальных сетевых адаптеров, а также софта для VPN.
- Некорректная работа протокола IPv6.
- Подключение устройства к новому роутеру, наличие нескольких сетей в зоне доступа.
Не стоит забывать, что если речь идёт о корпоративной сети, ошибка ERR_NETWORK_ACCESS_DENIED может быть обусловлена запретом доступа к интернету, установленного администратором, тогда обойти его будет сложнее.
Методы решения ERR_NETWORK_ACCESS_DENIED
Часто проблемы доступа к сети решаются обыкновенной перезагрузкой страниц, но если после этого неисправность всё ещё проявляется, с ней придётся бороться другими методами. Исправление ошибки ERR_NETWORK_ACCESS_DENIED заключается в устранении источника возникновения неприятности. Перед тем, как заниматься поисками программных причин, нужно проверить физическое подключение к сети, поскольку провод мог просто отойти, быть перебит или плохо обжат, что нередко приводит к ошибкам подключения.

Выявить виновного сразу удаётся нечасто, поэтому обычно решение приходит уже в ходе мероприятий. Рассмотрим, как исправить ошибку ERR_NETWORK_ACCESS_DENIED в зависимости от провоцирующего фактора.
Проверка работающего ПО на вашем компьютере
Для начала следует проверить, подгружаются ли страницы в других обозревателях. Если да, то сетевое подключение заблокировано каким-либо ПО на компьютере. Часто становится причиной ограничения доступа к интернету встроенный брандмауэр Windows, сторонний Firewall, антивирус или прочий защитный софт. Это можно выяснить, перейдя к настройкам программы и проверив правила сетевых подключений.
Параметры брандмауэра Windows можно проверить следующим образом:
Выполнив эти действия, проверяем, исчезла ли ошибка ERR_NETWORK_ACCESS_DENIED. Можно также сбросить настройки встроенного межсетевого экрана Windows, для чего в левом меню Защитника нужно выбрать опцию «Восстановить значения по умолчанию» и подтвердить действие.
Если на компьютере установлены какие-либо сторонние фаерволлы, проверяем, не является ли данный софт виновником блокировки доступа к сети и устраняем проблему аналогичным путём.
Проверка сетевого соединения или роутера
Ещё одна частая причина ошибки доступа к сети – отсутствие соединения. Проблема может быть связана как с неполадками подключения, так и со сбоем сетевого оборудования или аппаратными неисправностями. Чтобы исправить ошибку ERR_NETWORK_ACCESS_DENIED, выполняем следующие действия:
- Идём в настройки подключения и проверяем параметры сети.
- Перезапускаем маршрутизатор (если используется) и проверяем, исчезла ли проблема.

- Поскольку не исключена вероятность неполадки на уровне провайдера, решить вопрос самостоятельно не удастся, так что необходимо связаться с оператором поставщика услуг для прояснения ситуации.

Удаление профиля Google Chrome
Если проблема заключается в настройках профиля для браузера, ошибку ERR_NETWORK_ACCESS_DENIED поможет исправить его удаление. Для этого поступаем следующим образом:
- Открываем консоль «Выполнить» (жмём Win+R).
- Вводим в строку %LOCALAPPDATA%GoogleChromeUser Data (или %USERPROFILE%Local SettingsApplication DataGoogleChromeUser Data для Windows XP).

- Ищем каталог с названием Default и переименовываем его на Default.old.

Если источником ошибки были некорректные настройки профиля, данный способ станет решением проблемы.
Другие методы устранения
Если вышеописанные способы не помогли, можно попробовать выполнить следующее:
- Устраняем неполадки сети средствами Windows (идём в Панель управления – Устранение неполадок – Подключение к интернету или жмём по значку сети в трее ПКМ и выбираем «Диагностика неполадок»).

- Исключаем вероятность заражения компьютера вредоносным софтом и наличия рекламного ПО, просканировав устройство специальными инструментами. Удаляем нежелательные программы при их обнаружении.
- Проверяем IP-адрес в панели управления роутера, а также открываем свойства подключения (Панель управления – Сетевые подключения, жмём ПКМ на значке вашего соединения или запускаем окно командой cpl из консоли «Выполнить»), затем выделяем протокол IP версии 4 (TCP/IPv4) и нажимаем кнопку «Свойства». Здесь должны быть активны параметры получения IP-адреса и DNS-сервера автоматически.
- Ошибку прерванного соединения ERR_NETWORK_CHANGED и многих других проблем подключения нередко помогает исправить сброс и очистка кэша DNS Windows.

- Отключаем или удаляем установленные виртуальные сетевые адаптеры, а также программное обеспечение для VPN.
- Отключаем IPv6 для подключения, для чего переходим к его свойствам, находим в списке компонентов IP версии 6 (TCP/IPv6) и снимаем галочку напротив, подтверждаем действие нажатием кнопки «ОК». После этого отключаемся от сети и подключаемся снова.
- Отключаем прокси-серверы для браузеров. Универсальный способ для Windows 10, 8, 7 предполагает перейти в Панель управления и открыть «Сеть и интернет», затем выбрать «Свойства браузера». Здесь на вкладке «Подключения» жмём кнопку «Настройка сети», в новом окне убираем галочки напротив пунктов «Использовать прокси-сервер для локальных подключений» и «Автоматическое определение параметров», после чего применяем изменения.


Каждый из этих способов будет эффективен в том или ином случае. Сложностью они не отличаются и могут выполняться не слишком продвинутыми пользователями, но иногда приходится перебрать несколько вариантов, прежде чем решить проблему.
 Если при попытке открыть сайт в Chrome вы видите сообщение об ошибке «Доступ в Интернет закрыт» с кодом ERR_NETWORK_ACCESS_DENIED, обычно это несложно исправить, при условии, что у вас есть права администратора на компьютере.
Как и сообщает страница с ошибкой, причиной того, что доступ в интернет закрыт обычно являются параметры брандмауэра Windows или стороннего антивирусного ПО со встроенным файрволлом. В этой инструкции — о том, как убрать запрет и включить доступ к Интернету, а также некоторая дополнительная информация, которая может оказаться полезной.
Исправление ошибки ERR_NETWORK_ACCESS_DENIED

Ошибка «Доступ в Интернет закрыт» с указанным кодом говорит о том, что какое-то ПО сообщило браузеру Google Chrome о том, что для него установлены ограничения доступа к Интернету (см. Как запретить программе доступ в Интернет). Как правило, это встроенный брандмауэр Windows 10, 8.1 или Windows 7 или же сторонний файрволл (иногда встроенный в антивирус).
Для проверки параметров брандмауэра вы можете выполнить следующие действия:
- Откройте Панель управления (в Windows 10 для этого можно использовать поиск в панели задач) и в ней откройте «Брандмауэр Защитника Windows» (или просто «Брандмауэр Windows»).

- В открывшемся окне вы можете нажать слева по пункту «Включение и отключение брандмауэра» и отключить брандмауэр полностью, после чего проверить, была ли исправлена проблема, но я бы рекомендовал использовать следующие шаги.
- Нажмите по пункту слева «Дополнительные параметры».

- Проверьте, есть ли в правилах для исходящего подключения какие-либо запреты (отмечены соответствующим знаком). По умолчанию их быть не должно. Если вы таковые нашли, нажмите по ним правой кнопкой мыши и выберите либо «Удалить», либо «Отключить правило», чтобы отключить его и проверить, вернуло ли это штатную работу Chrome.

- Проверьте, есть ли такие же правила для входящих подключений и проделайте с ними то же самое.


После выполнения этих шагов, можно посмотреть, появляется ли ошибка ERR_NETWORK_ACCESS_DENIED вновь или же была исправлена. Также вы можете полностью сбросить настройки брандмауэра Windows.
В случае, когда на вашем компьютере есть сторонний антивирус с функциями файрволла, попробуйте временно отключить его и, если это решило проблему, уже более внимательно изучить его параметры — вполне вероятно, что можно лишь отключить блокировку доступа к Интернету в Google Chrome, не отключая всего остального.
Дополнительная информация
Если предложенные выше методы не помогли, попробуйте:
- Если используются прокси или VPN, отключите их (см. Как отключить прокси-сервер в Windows и браузере).
- Используйте устранение неполадок сети (Панель управления — Устранение неполадок — Подключение к Интернету или правый клик по значку соединения в области уведомлений — Диагностика неполадок).
- В Windows 10 дополнительно зайдите в Параметры — Обновление и безопасность — Устранение неполадок и нажмите по пункту «Сетевой адаптер» в списке справа.
- В Windows 10, если предыдущие пункты не помогли — выполните сброс сетевых настроек.
Учитывайте, что если речь о корпоративной сети, то запрет может быть установлен системным администратором и простых способов снять его может не быть, особенно при отсутствии прав администратора на компьютере.
«Доступ в Интернет закрыт
Возможно, подключение заблокировано брандмауэром или антивирусным ПО».
ERR_NETWORK_ACCESS_DENIED — это ошибка Google Chrome, очень похожая на другие проблемы, такие как ERR_CONNECTION_REFUSED и ERR_INTERNET_DISCONNECTED. Все они препятствуют открытию определенных страниц в определенных браузерах. По сути, такие проблемы связаны с неполадками в Интернет соединении, ограничивающие должный доступ к веб-сайтам. К сожалению, не всегда предлагаемые решения помогают избавиться от появляющегося сообщения. Некоторым пользователям могут потребоваться и другие методы решения. Хотя при устранении подобных ошибок не существует одной панацеи, какое-то из решений, представленных в нашем руководстве ниже, должно в конечном итоге решить проблему. Пробуйте каждый метод, пока один из них не сможет устранить ошибку ERR_NETWORK_ACCESS_DENIED.

Скачать Advanced System Repair Pro

Чтобы исправить ошибку «ERR_NETWORK_ACCESS_DENIED» в Windows, мы рекомендуем вам использовать Advanced System Repair Pro. Он содержит инструменты для очистки данных браузера, исправления ошибок реестра, удаления нежелательных программ и вредоносных расширений.
Скачать Fix Tool для Mac
Скачать CleanMyMac
Чтобы исправить ошибку «ERR_NETWORK_ACCESS_DENIED» в MacOS, рекомендуем использовать CleanMyMac. Данная утилита содержит инструменты для очистки данных браузера, исправления ошибок реестра, удаления нежелательных программ и вредоносных расширений, а также сканирования Mac на наличие вирусов.
1. Отключите сторонний антивирус
Если на вашем компьютере установлен сторонний антивирус, попробуйте отключить его и проверить, получиться ли открыть нужную вам страницу. Даже законные и безопасные веб-сайты могут быть ограничены брандмауэрами для защиты от вредоносных программ из-за ложных угроз безопасности. Если после отключения антивируса все работает нормально, тогда вам удалось обнаружить причину. Если планируете посещать веб-сайт на регулярной основе и не хотите сталкиваться с той же ошибкой повторно, следует добавить веб-сайт в белый список вашего антивируса. В противном случае можно попробовать другое, менее конфликтное антивирусное ПО. Наш совет — MalwareBytes — доверенная и талантливая группа экспертов, постоянно поддерживающая свое программное обеспечение для борьбы как с незначительными, так и глобальными угрозами. Теперь он доступен и для Windows 11. Вы можете загрузить его сейчас, используя ссылку ниже, и попробовать 14-дневную пробную версию полноценной защиты от вредоносных программ бесплатно.

Главное окно Malwarebytes

Настройки Malwarebytes

Результаты сканирования Malwarebytes
Скачать Malwarebytes
2. Перезагрузите роутер.
Еще один простой и быстрый способ устранить ошибку ERR_NETWORK_ACCESS_DENIED — перезагрузить маршрутизатор (модем). Удерживайте кнопку питания на задней панели роутера в течение нескольких секунд, пока он не выключится. Затем нажмите на ту же кнопку, чтобы включить его снова. У меня самого была такая проблема, когда я не мог открыть ни один веб-сайт в своем браузере после опоздания с оплатой за интернет. Проблема решилась сразу же после перезагрузки роутера. Таким образом, попробуйте сделать то же, прежде чем переходить к другим альтернативам ниже.
3. Отключите расширения в Chrome
Некоторые включенные и активно работающие расширения могут оказаться причиной того возникновения проблем с доступом к определенным страницам. Мы советуем на время отключить сторонние расширения, чтобы проверить, поможет ли это. Следуйте шагам ниже:
- Откройте Chrome и нажмите на Значок с тремя точками в правом верхнем углу.
- Наведите указатель мыши на Дополнительные инструменты и Расширения.
- Отключите все сторонние расширения, нажав на синий переключатель.
После выполнения этих шагов откройте ту же страницу, с которой были проблемы.
5. Очистите данные браузера
Вот еще одно быстрое решение, которое может сработать у некоторых пользователей. Сообщалось, что такого рода ошибки могут быть вызваны избыточными файлами, такими как кеш. Некоторые элементы браузера, запоминаемые Chrome после просмотра различных страниц, могут создавать проблемы несовместимости при открытии определенных страниц. Очистка данных вашего браузера может не только решить проблему, но также освободить место и повысить производительность работы браузера. Обратите внимание, что очистка данных браузера может привести к выходу из аккаунтов на некоторых веб-сайтах. Таким образом, убедитесь, свои учетные данные для входа в ранее используемые аккаунты.
- Нажмите на Значок с тремя точками в правом верхнем углу, как мы делали выше.
- Перейдите в Дополнительные инструменты , а затем выбрать Удаление данных о просмотренных страницах….
- Вверху выберите временной диапазон. Чтобы удалить все, выберите Все время.
- Установите флажки рядом с Файлы cookie и другие данные сайтов и Кэшированные изображения и файлы.
- Затем нажмите Удалить данные.
Перезапустите браузер и попробуйте снова открыть страницу.
6. Отключите Прокси в Параметрах локальной сети (LAN).
Довольно распространенная причина возникновения ERR_NETWORK_ACCESS_DENIED и подобных ошибок связана с конфликтами, возникающими из-за включенного подключения к прокси-серверу. В 99% случаев включенные прокси-серверы не играют никакой роли для обычных пользователей, поэтому их следует отключать, чтобы предотвратить проблемы с подключением. Если вы помните, как включали подобную функцию намеренно, попробуйте отключить ее и посмотреть, избавит ли это вас от ERR_NETWORK_ACCESS_DENIED ошибки. Вот как:
- Откройте окно поиска рядом с Start меню и напишите Панель управления. Откройте ее.
- Установите Просмотр на Мелкие значки or Крупные значки в правом верхнем углу.
- Выберите Свойства обозревателя , а затем перейдите в Подключения и Настройка сети.
- Убедитесь, что включено только Автоматическое определение параметров . Снимите отметку с двух других опций, если они выбраны, и нажмите OK в конце.
- Теперь у вас должны быть правильно настроены параметры LAN. Зайдите в браузер и попробуйте открыть проблемную страницу снова.
7. Измените адрес в настройках DNS.
Неправильные настройки DNS могут привести невозможности открытия некоторых страниц. Эта конфигурация иногда может быть случайно изменена после непредвиденных сбоев или самоманипуляций. Какой бы ни была причина, воспользуйтесь нашими инструкциями ниже, чтобы правильно настроить параметры DNS:
Чтобы изменить DNS и IP:
- Перейдите на Панель управления > Сеть и Интернет > Сетевые подключения.
- Дважды щелкните на имя вашего подключения.
- Нажмите на Предложения.
- Дважды нажмите Internet Protocol Version 4 (TCP/IPv4).
- Отметьте Использовать следующий IP-адрес и Использовать следующие адреса DNS-серверов.
- Изменить IP-адрес, Маска подсети, Основной шлюз, и DNS согласно изображению внизу

8. Сбросьте Google Chrome
Проверьте, появляется ли та же проблема в других браузерах, помимо Chrome. Если другие браузеры не подвержены такой же точной ошибке, возможно проблема кроется в самом Chrome. Лучший способ убедиться, что никакие сторонние расширения или данные не вызывают конфликт, — это сбросить настройки Google Chrome до заводских. Это значит, что все данные, накопленные вашим браузером на протяжении всего времени пользования, например файлы cookie, пароли, учетные записи, конфигурация и другие элементы, будут удалены. Запомните какие учетные записи и пароли использовались в Chrome, чтобы вы могли войти в них после выполнения сброса. Чтобы сбросить настройки Google Chrome:
- Откройте Chrome браузер.
- В правом верхнем углу нажмите Еще (три вертикальные точки) , а затем Настройки.
- Посмотрите на левую панель и разверните Расширенный поиск.
- Нажмите Сброс настроек и удаление вредоносного ПО, и выберите Восстановление настроек по умолчанию. Подтвердите действие, нажав Сброс настроек.
- После сброса браузера, попробуйте открыть ту же страницу снова.
Итоги
Что бы ни было причиной возникшей проблемы, надеемся, вам удалось справиться с ней и избавить себя от появления ошибки ERR_NETWORK_ACCESS_DENIED в конечном итоге. Даже если в какой-то момент вы столкнетесь с этой проблемой, применяйте те же решения, которые помогли вам решить проблему в первый раз. Если вы когда-нибудь станете жертвой других ошибок или проблем, поищите их на нашем сайте, чтобы найти соответствующие решения. Наша команда ежедневно загружает множество новых статей.
ERR_ACCESS_DENIED is no stranger to Windows PC users. This error often crops up when we try to access a web application. The root cause of this Error Code ERR_ACCESS_DENIED has usually misconfigured system files.
When ERR_ACCESS_DENIED appears on our screen, it could mean that the web page we are trying to access is temporarily down or moved to a new address permanently.
If you face this issue, there is no need to worry about it. This article will explore some of the most effective methods to get rid of this “ERR_ACCESS_DENIED” error in your browser.
Let’s get started.
What Does “ERR_ACCESS_DENIED” Mean?
The cause of the “ERR_ACCESS_DENIED” error code in the browser is still unknown, but some factors can result in this error.
Some of the common causes are listed below:
- Android Device error problem
- Blocked Internet TCP/UDP Port
- Google Chrome Windows error issue
- Rogue software is still running in the background
Let’s take a quick look at each of these causes one by one:
- Android Device error problem: Sometimes, your Android device can cause this error. This is because some Android devices do not support HTML5 or newer technologies.
- Blocked Internet TCP/UDP Port: One of the common causes of this error is a firewall or other security program blocking the required port for accessing the website. You will need to add an exception for the website in your firewall or security program.
- Google Chrome Windows error issue: Another common cause of this error is due to a conflict with Google Chrome on Windows. This can be caused by an outdated Chrome version or by a third-party program incompatible with Chrome.
- Rogue software still running in the background: Sometimes, this error can be caused by rogue software that is still running in the background even after you have closed all browser windows. This can happen if you have recently installed a new program and it did not properly clean up after itself.
Related: How to Fix Error 0xc0000022
Below are some tips on fixing and resolving the ERR_ACCESS_DENIED Windows error from your computer permanently.
Method 1: Run A Full PC Scan Through Windows Security App
While working on your computer, you may have encountered the ERR_ACCESS_DENIED error. This can be frustrating, especially if you don’t know how to fix it.
However, there is a simple solution: run a full PC scan through the Windows Security app. This will help to identify any potential problems with your system and correct them. The full PC scan can also help improve your computer’s performance by removing junk files and unwanted programs.
So if you’re getting the ERR_ACCESS_DENIED error, don’t despair – simply run a full PC scan, and here are a few simple steps.
- Open the Windows Security app.
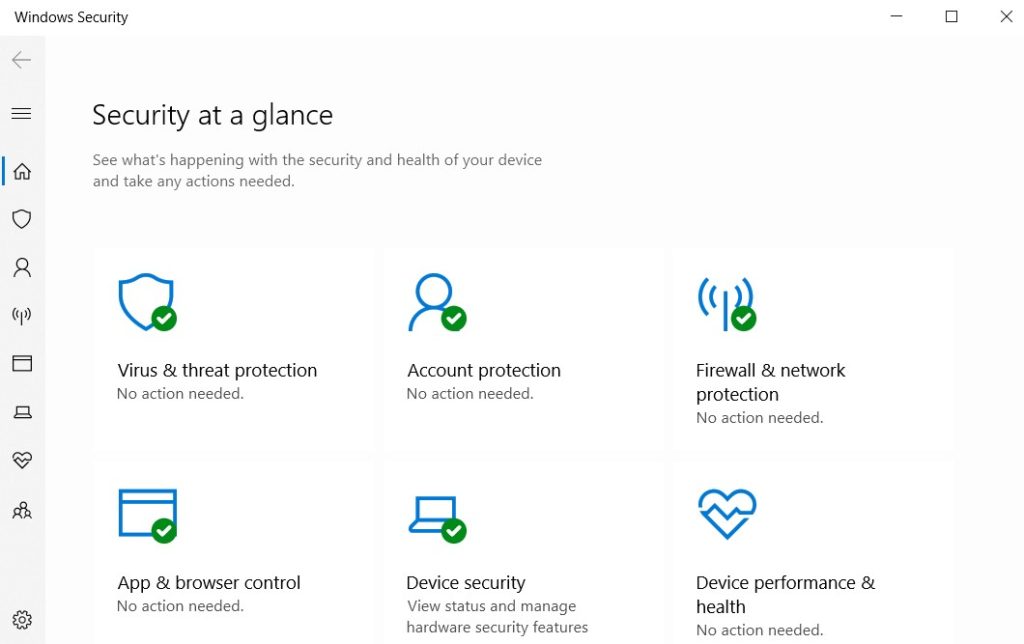
- Click on “Virus & threat protection.”
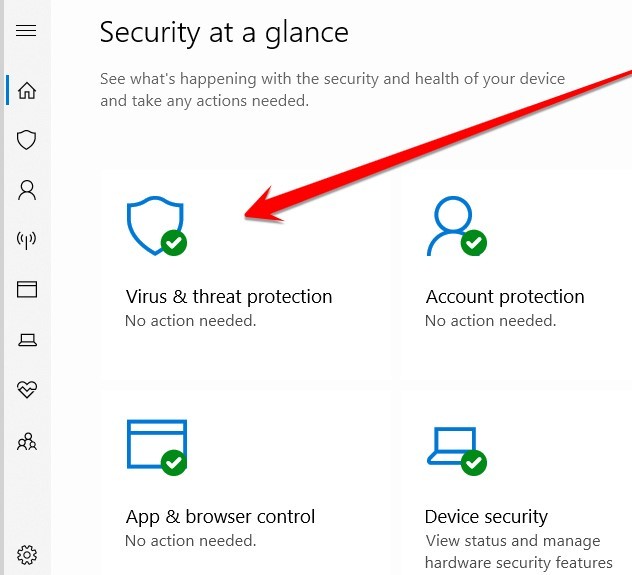
- Click “Scan Options.”
- Here, you see some scanning options. Select the “Full Scan” option.

- In the final step, click on the “Scan now” option and wait for the compilation of this process. When the scanning process is complete, you need to restart your PC and check if this issue is solved or not. If you are still facing this issue, then follow the second method.

Method 2: Clear Browser Cache And Cookies
We all know the feeling: you’re trying to access a website, and you get that dreaded “ERR ACCESS DENIED” message. It’s frustrating, especially if you know you have the correct URL. And if your computer giving you the ERR_ACCESS_DENIED error when you try to access a website?
If so, there’s a good chance that the problem can be fixed by clearing your browser cache and cookies. Here’s how to do it:
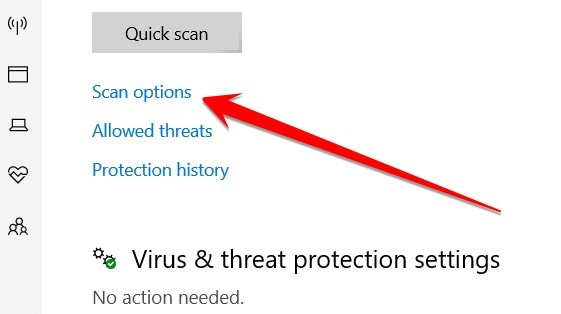
- First, open your browser and go to the settings menu. In most browsers, this can be done by clicking on the screen’s three dots in the top right-hand corner.

- From there, select “Settings” or “Preferences.”
- Once in the settings menu, type clear browser cache and cookies in the search bar.
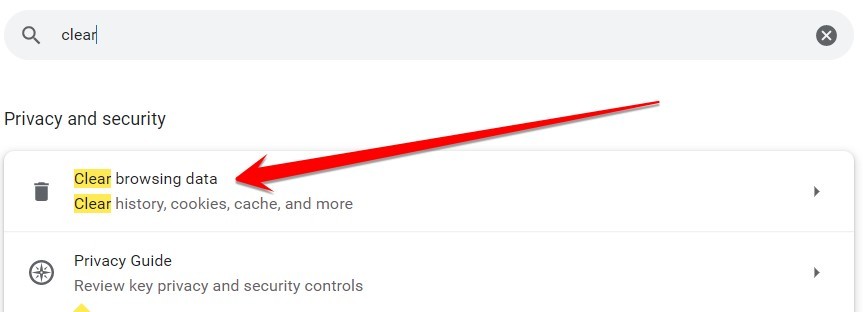
- This option is usually located under the privacy or security settings. Click on it, and then confirm that you want to clear your cache and cookies.

- This option is usually located under the privacy or security settings. Click on it, and then confirm that you want to clear your cache and cookies.
- After that, try accessing the website again. In most cases, this will fix the ERR_ACCESS_DENIED error and allow you to continue browsing without any problems.
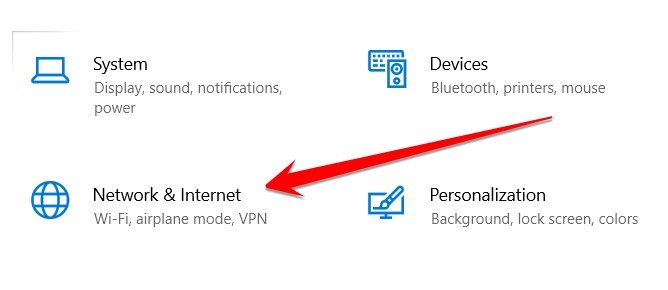
Method 3: Disable Proxy Servers
Are you having trouble accessing certain websites? Do you keep getting the dreaded ERR_ACCESS_DENIED error message? If so, your proxy server likely is to blame.
A proxy server is a computer that acts as an intermediary between your computer and the internet. It can be used to improve security and performance, but it can also cause problems if not configured correctly.
In this case, the best solution is to disable the proxy server and see if that fixes the problem. Here’s how to do it:
- Open the Settings app and go to Network & Internet.
- Scroll down and click on Proxy.
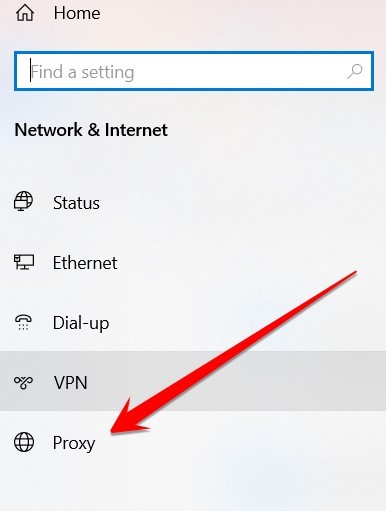
- Disable the Automatic proxy server.
- Scroll down and click on Proxy.
- Disable the Automatic proxy server.
- Restart your browser and try accessing the website again.
Method 4: Reset the Chrome Browser
You’ve been using Chrome for a while now, and everything has been going great. But all of a sudden, you start getting the ERR_ACCESS_DENIED error when trying to access certain websites.
You’ve tried restarting your computer and even resetting your router, but nothing seems to be working. Fortunately, there is a way to Reset Chrome Browser and fix the ERR_ACCESS_DENIED error. Here’s what you need to do:
- Open the Chrome menu (the three dots in the browser’s top-right corner).
- Click on “Settings.”

- Type reset in the search bar.
- Click on the “Reset” section, and then click on the “Reset setting” button.
- A confirmation message will appear – click on ” Reset” again.
- Once the reset is complete, restart your browser and try accessing the website again.
With any luck, this will Reset Chrome Browser and fix the ERR_ACCESS_DENIED error. If not, something else may be happening with your computer or network, causing the problem. In that case, you may need to consult with a professional for further assistance.
Related: Fix: Allow Chrome To Access The Network In Your Firewall Or Antivirus Settings
Frequently Asked Questions
How Do You Fix You Don’t Have Permission To Access On This Server?
This common error can be caused by several things, including incorrect file permissions, an outdated .htaccess file, or a misconfigured server.
However, there are a few simple steps that you can take to fix the problem.
- First, check the file permissions on the server. If the permissions are set incorrectly, you may need to contact your hosting provider to correct them.
- Next, check the .htaccess file for any errors. You can delete the file or contact your hosting provider for help if there are any.
- In the final step, if all else fails, you may need to contact your hosting provider to troubleshoot the issue further. With a little effort, you should be able to fix the “you don’t have permission to access this server” error and get your website up and running again.
Why Do I Keep Getting Access Denied On Websites?
There are several reasons why you might be getting access denied on websites. It could be that the website is down for maintenance, or there may be an issue with your internet connection. However, it could also be that your ISP or government has blocked the website.
If you’re in a country with strict internet censorship, such as China or Iran, you’ll likely encounter this problem frequently. Even if you’re not in a censored country, you may still get access denied on websites if the site uses geo-blocking to restrict access to certain countries.
In any case, if you keep getting access denied on websites, there are a few things you can try. First, try using a VPN to bypass any restrictions that may be in place. If that doesn’t work, you can try contacting the website directly to see if they can give you access. Finally, if all else fails, you can try using Google Translate to view the website’s content.
How Do I Fix Access Denied On Windows 10?
You may be surprised that you can fix this problem by logging into your computer as an administrator. This will give you the necessary permissions to access the files and folders that you need.
If you are still having trouble, you can try resetting your permissions.
To do this, follow these steps:
- Go to the “Start” menu and type “cmd” into the search box.
- Right-click on the “Command Prompt” and select “Run as administrator.“
- Once you are in the command prompt, type “reset permissions,” and press Enter. This should fix the problem.
You can try running a virus scan if you are still having trouble. Sometimes, malware can prevent you from accessing certain files and folders. Running a virus scan can help remove any malicious software causing the problem.
Will I Lose Everything If I Reinstall Chrome?
No, you won’t lose any of your bookmarks or passwords because your bookmarks and passwords attach to your google email account. However, you will lose your browsing history, extensions, and themes.
So, if you’re considering reinstalling Chrome, you should first export your bookmarks to an HTML file. This way, you can easily import them after the reinstall. Your passwords are stored in your Google account, so you can easily retrieve them by visiting passwords.google.com.
Finally, if you’re using any Chrome-specific apps (like Gmail or Google Docs), you’ll need to re-install them after the fact. So, there’s no need to worry about losing everything if you decide to reinstall Chrome. Just be sure to export your bookmarks first!
How Do I Reset My Chrome Browser?
Well, let me tell you! It’s quite simple.
- First, go to your Settings.
- Once you’re in your settings, find the ‘Advanced‘ tab and click on it.
- Next, scroll down to the ‘Reset‘ section and click on the ‘Reset‘ button.
That’s it! Your Chrome browser will now be reset to its default settings. Of course, if you want to customize your browser again, you can always go back into your settings and change things to suit your needs. So there you have it – a quick and easy guide to resetting your Chrome browser.
How Do I Reinstall Chrome Without Losing Bookmarks And Passwords?
First, you’ll need to export your bookmarks from Chrome. To do this, follow these steps:
- Click the three-dot menu in the top right corner of Chrome and select “Bookmarks.”
- Click the “three-dot menu” again and select “Export bookmarks.” This will save your bookmarks as an HTML file on your computer.
- Next, you’ll need to uninstall Chrome from your computer. To do this, go to the “Control Panel” and select “Add or Remove Programs.”
- Find Chrome in the list of programs and click “Uninstall.” Once Chrome has been uninstalled, you can reinstall it from the Google website.
- When you reinstall Chrome, make sure to import your bookmarks by going to the “three-dot menu,” selecting “Bookmarks,” and then clicking “Import bookmarks.”
- This will ensure you don’t lose your bookmarks or passwords when reinstalling Chrome.
How Do I Fix The Access Denied Website?
Several reasons you may be getting access denied errors on websites, and each one requires a different solution. However, a few general tips can help you fix this problem.
- First, check to see if the website you’re trying to access is up and running. If it’s not, there’s nothing you can do to fix the access denied error.
- Second, try accessing the website from a different browser or device. Sometimes, access-denied errors are caused by browser-specific issues. Clearing your cache and cookies may also help.
- Finally, contact the website’s customer support team for assistance if you’re still having trouble. With these tips in mind, you should be able to fix the Access Denied error and get back to browsing the web without any trouble.
Conclusion
I’ve walked you through four methods to try if you’re experiencing the ERR_ACCESS_DENIED error code. Hopefully, one of these solutions has worked for you, and your computer is running smoothly again.
As always, feel free to contact me if you need assistance. Thanks for reading!
Clear your browser of any cache and cookies for better connection
by Claire Moraa
Claire likes to think she’s got a knack for solving problems and improving the quality of life for those around her. Driven by the forces of rationality, curiosity,… read more
Updated on March 14, 2023
Reviewed by
Alex Serban
After moving away from the corporate work-style, Alex has found rewards in a lifestyle of constant analysis, team coordination and pestering his colleagues. Holding an MCSA Windows Server… read more
- If you’re seeing the ERR_NETWORK_ACCESS_DENIED error, you currently do not have access to view the site that is displaying it.
- Errors like this can happen for numerous reasons, and unfortunately, there is no one solution that fits all.
- Still, we attempt to narrow down the most successful solutions to this error in this article.
XINSTALL BY CLICKING THE DOWNLOAD FILE
This software will repair common computer errors, protect you from file loss, malware, hardware failure and optimize your PC for maximum performance. Fix PC issues and remove viruses now in 3 easy steps:
- Download Restoro PC Repair Tool that comes with Patented Technologies (patent available here).
- Click Start Scan to find Windows issues that could be causing PC problems.
- Click Repair All to fix issues affecting your computer’s security and performance
- Restoro has been downloaded by 0 readers this month.
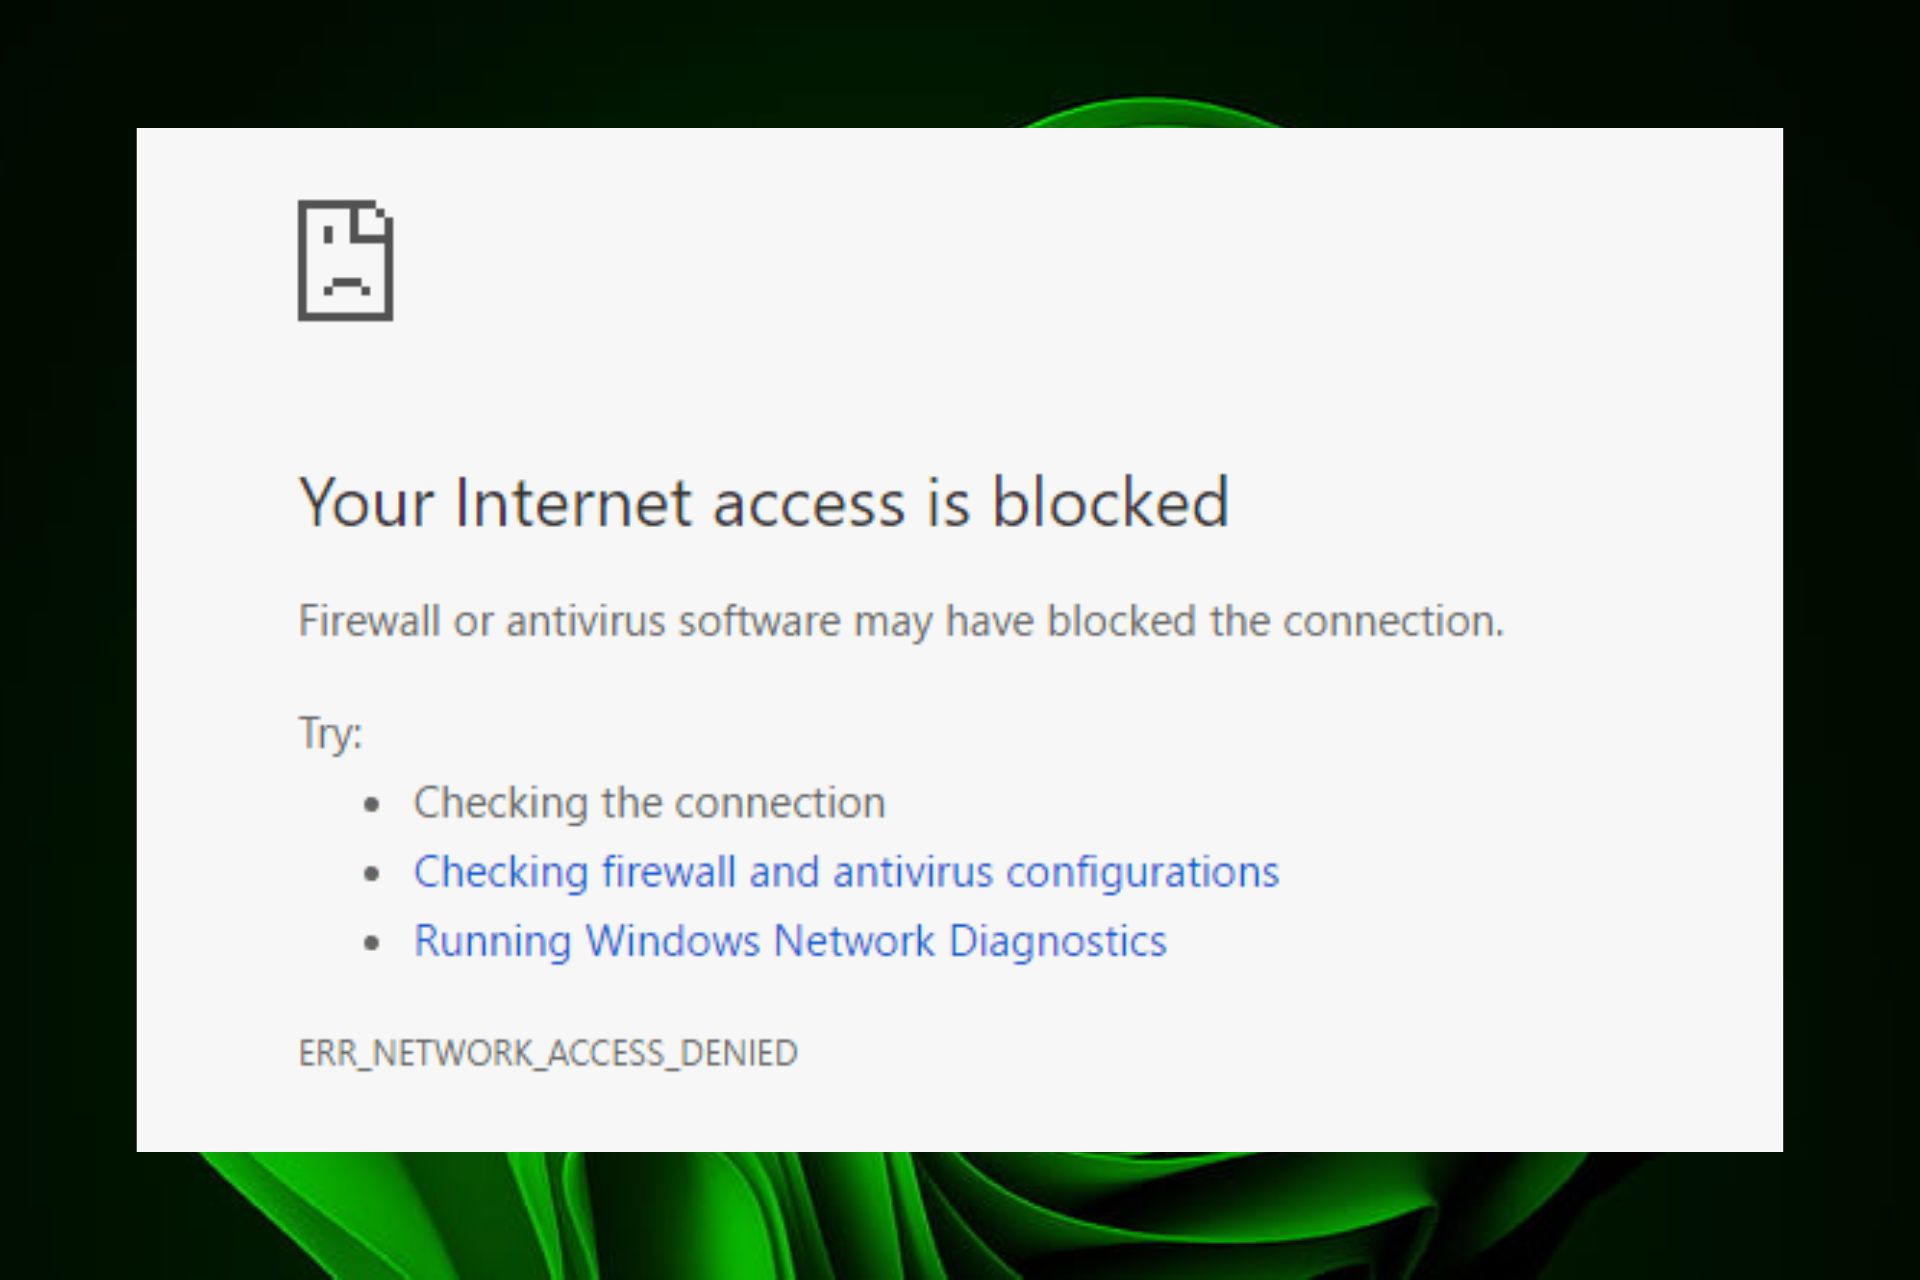
The ERR_NETWORK_ACCESS_DENIED error is a common message you may see when using a browser. This error occurs when your firewall blocks a connection to a website. It can also happen if there is an issue with your internet connection.
More specifically, it means the connection between your computer and the web server you’re trying to access was lost before any data could be transmitted. In this article, we will discuss what causes ERR_NETWORK_ACCESS_DENIED, why you might get it, and how you can fix it.
Why am I getting the ERR_NETWORK_ACCESS_DENIED error?
If you are getting an ERR_NETWORK_ACCESS_DENIED error on your computer, there could be several reasons behind it. These include:
- Firewall/antivirus restrictions – If you have antivirus software installed, there may be a chance that it has blocked access to whatever website or file you’re trying to open.
- Proxy server – You may be using a proxy server that requires authentication or authorization to send data through it.
- Virus infection – Your computer may be infected with malware or adware that prevents the website’s content from properly loading onto the browser window.
- Server overload – When your Internet provider’s servers are overloaded with requests from other users, it can take longer to process your request. This way, you get an access denied message.
- Connection issues – If your computer has a bad or unreliable internet connection, you may have trouble connecting to sites.
- Incorrect URL/credentials – You may have entered an incorrect URL in your browser or entered an invalid username or password when prompted for authentication information.
- Cookies and cache – Your browser may be set to not accept cookies from the website you are visiting or has them disabled for this website.
How do I fix the ERR_NETWORK_ACCESS_DENIED error?
Before you do anything else, try these basic workarounds:
- Check that the Ethernet cable is plugged in securely on both ends, and check to make sure the other end of the cable isn’t broken or damaged.
- Ensure you have a good internet connection and optimal network speeds.
- Verify that your network drivers are up-to-date.
- Clear your browser’s cache and cookies.
- Disable any extensions that may be causing the issue.
- Try opening the website using an incognito window or private browsing mode. Check out the differences between Chrome’s incognito mode and Firefox’s private mode.
- Reboot your router by unplugging it from its power source for 30 seconds and then plugging it back in.
- Switch to a different browser, such as Opera, and see if the error persists.
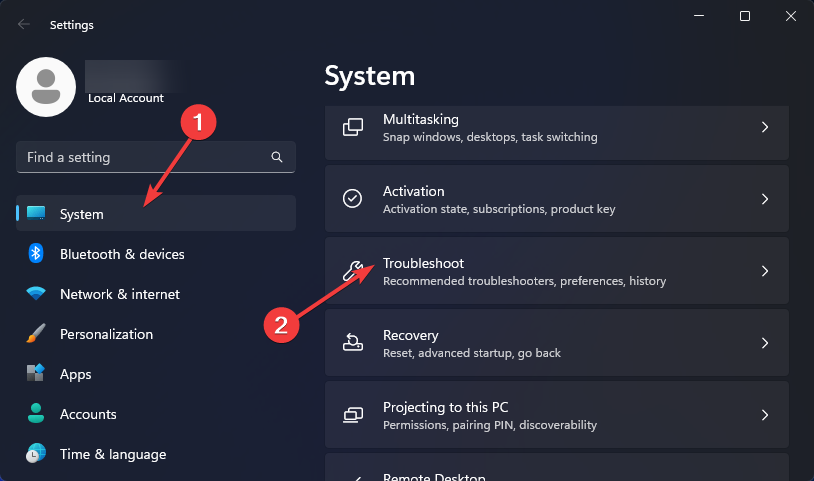
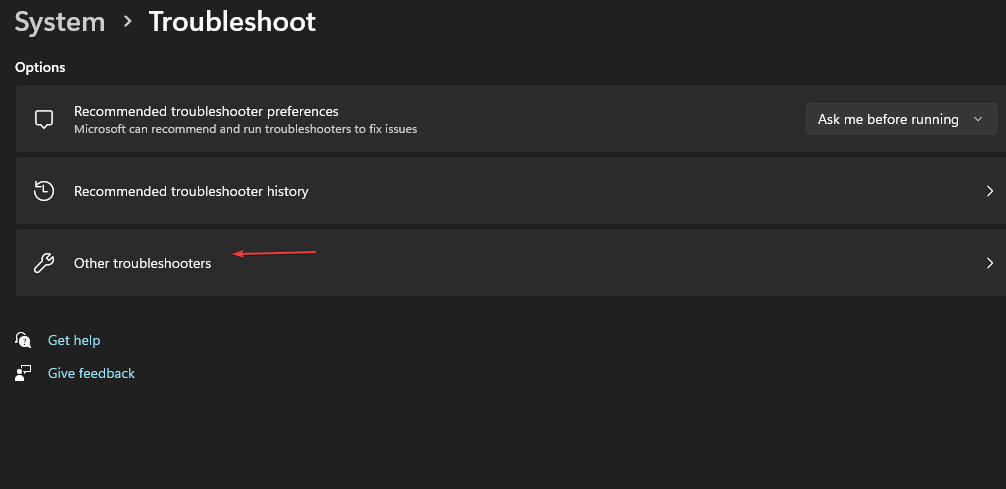
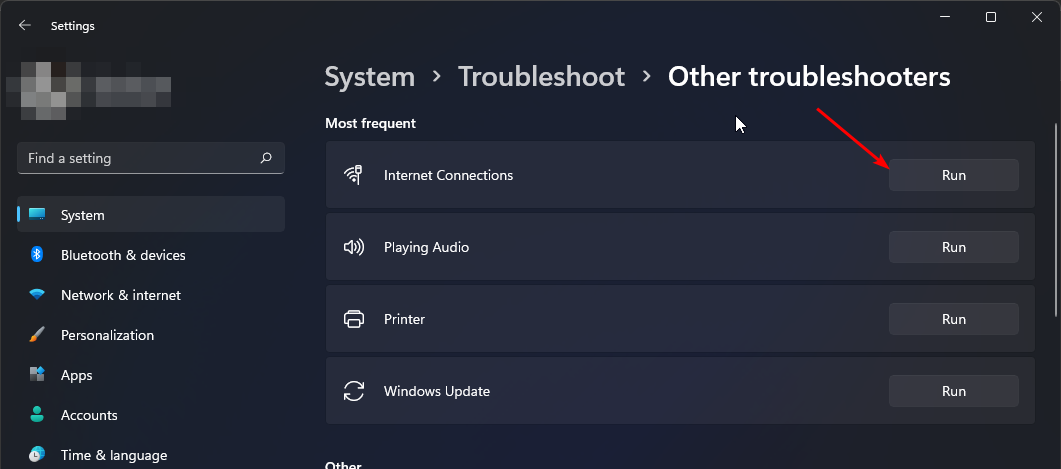
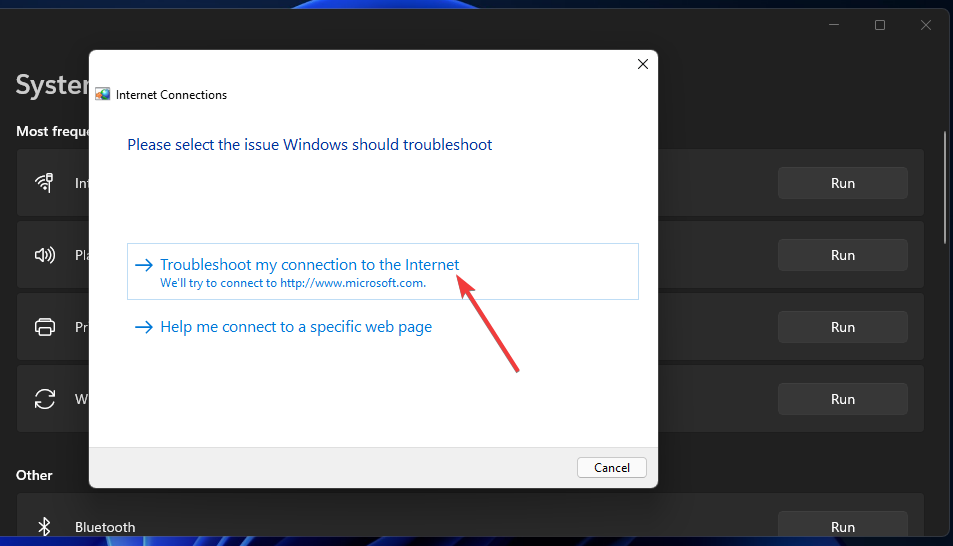
1. Run the internet troubleshooter
- Hit the Windows key, click on System, and select Troubleshoot.

- Navigate to Other troubleshooters.

- Press the Run button next to Internet Connections.

- Select Troubleshoot my connection to the Internet in the pop-up window and wait for Windows to identify the problem and recommend a fix.

2. Disable antivirus temporarily
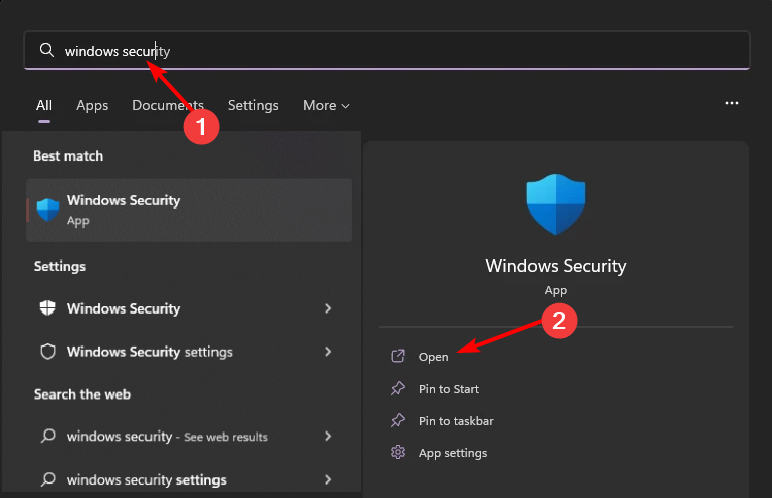
- Hit the Start menu icon, type Windows Security in the search bar, and click Open.

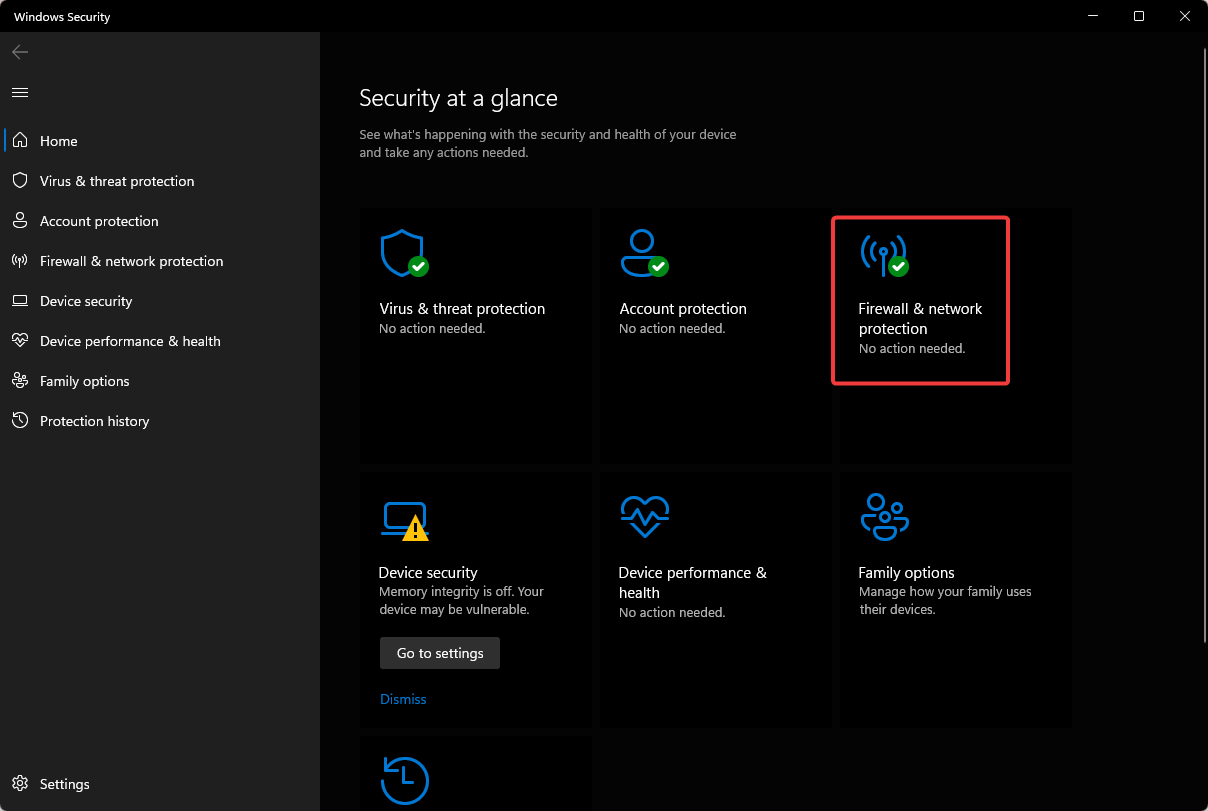
- Click on Firewall & network protection, then select Public network.

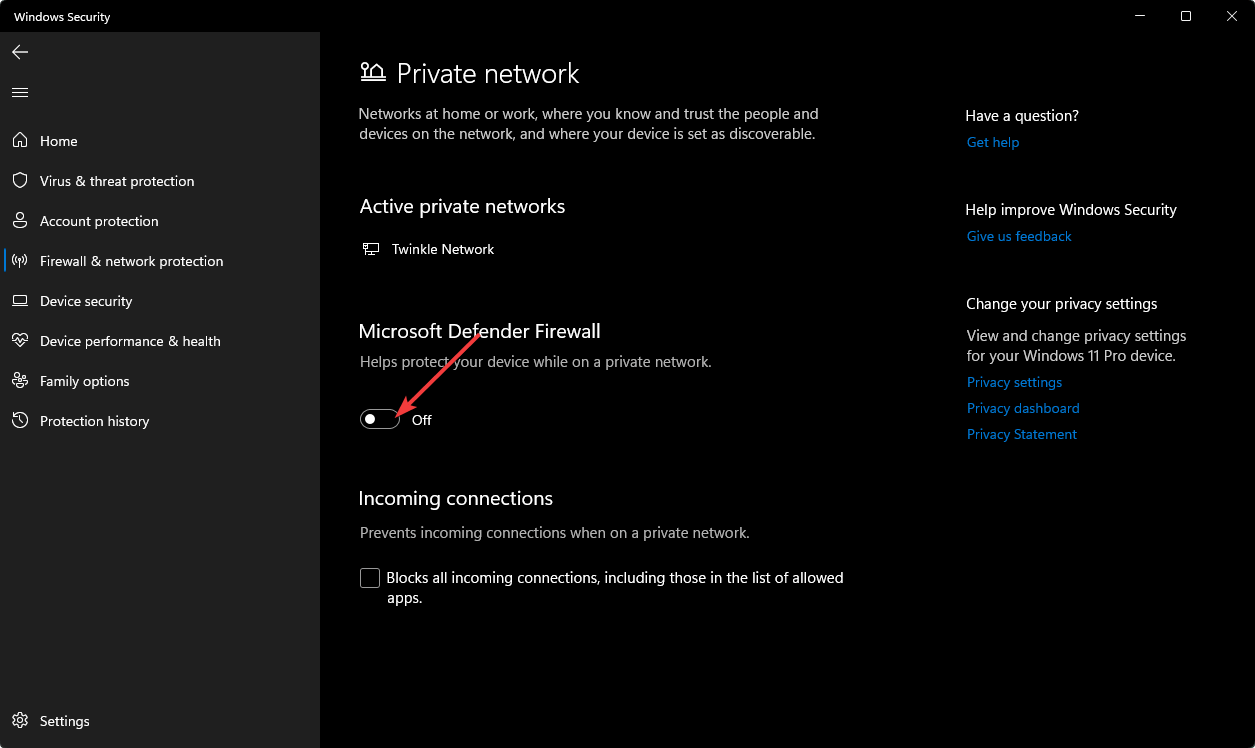
- Locate Microsoft Defender Firewall and toggle the off button.

Some PC issues are hard to tackle, especially when it comes to corrupted repositories or missing Windows files. If you are having troubles fixing an error, your system may be partially broken.
We recommend installing Restoro, a tool that will scan your machine and identify what the fault is.
Click here to download and start repairing.
Ensure you also disable any other third-party security software that may block certain ports or programs.
- Microsoft Edge for Chromebook: How to Download & Install
- The Video Cannot be Played Error Code: 102630 [Fix]
- Chrome Reader Mode: How to Enable & Use
- 0xa0430721 Error: Unable to Install Chrome or Edge [Fix]
3. Disable VPN
- Press the Windows key and select Settings.

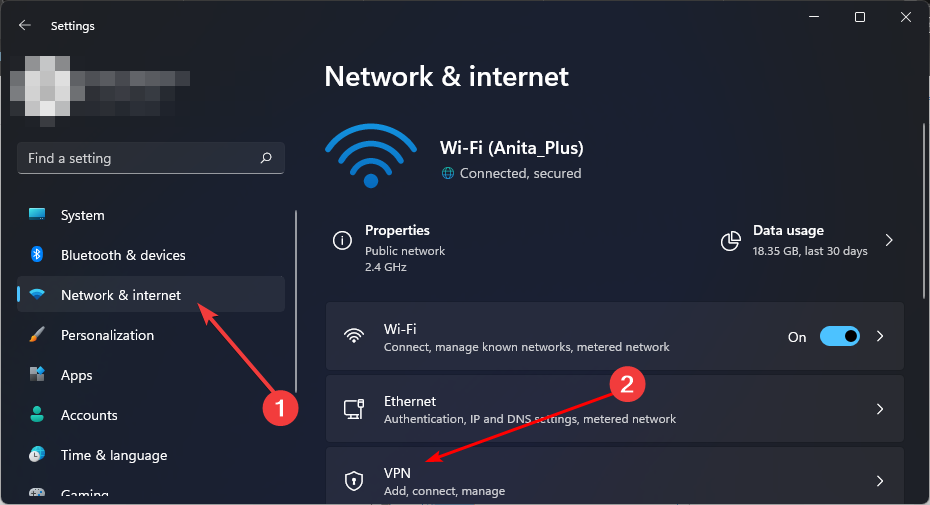
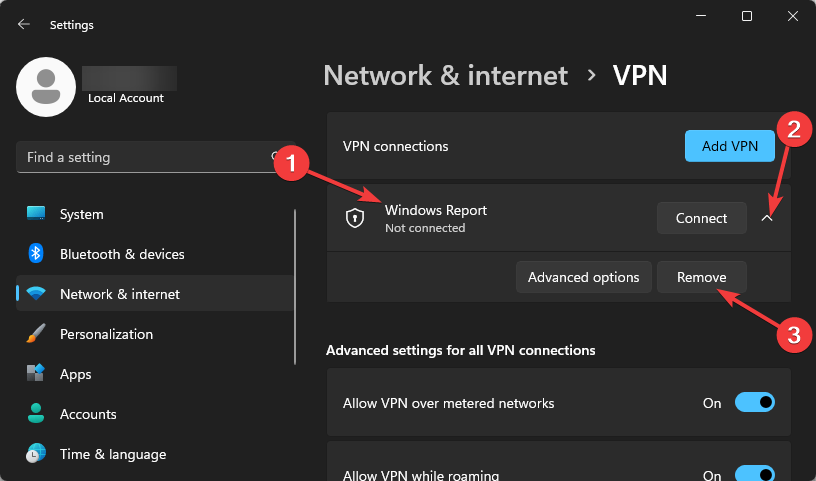
- Next, select Network & internet and select VPN in the right-side menu.

- Select the VPN connection you want to disable, click on the drop-down, and select Remove.

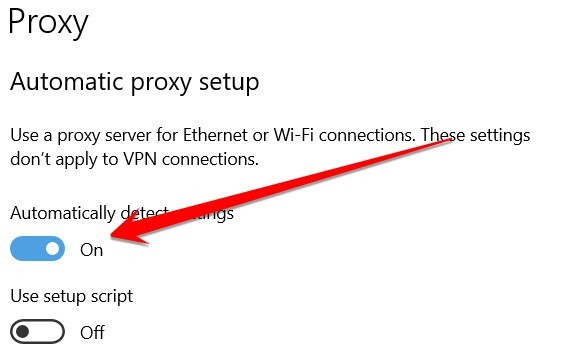
4. Disable the proxy server
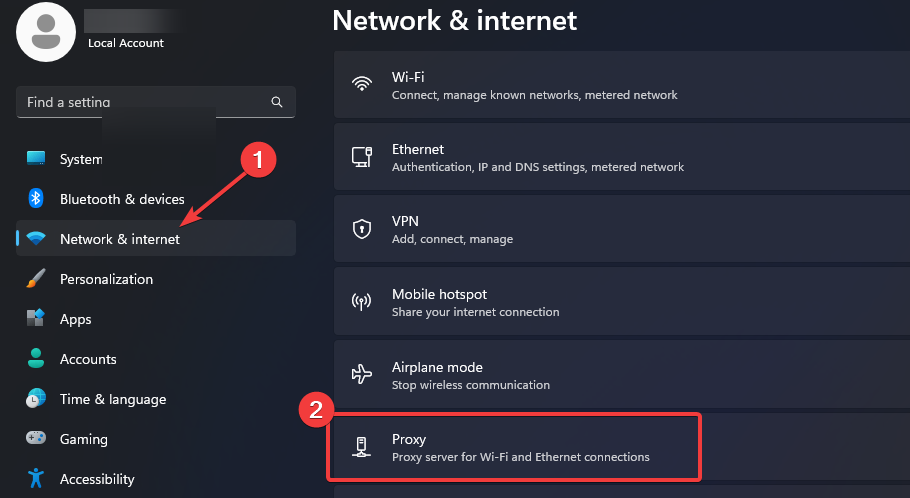
- Press the Start Menu icon and select Settings.
- Click on Network & Internet on the left pane, then scroll down and click Proxy on the right pane.

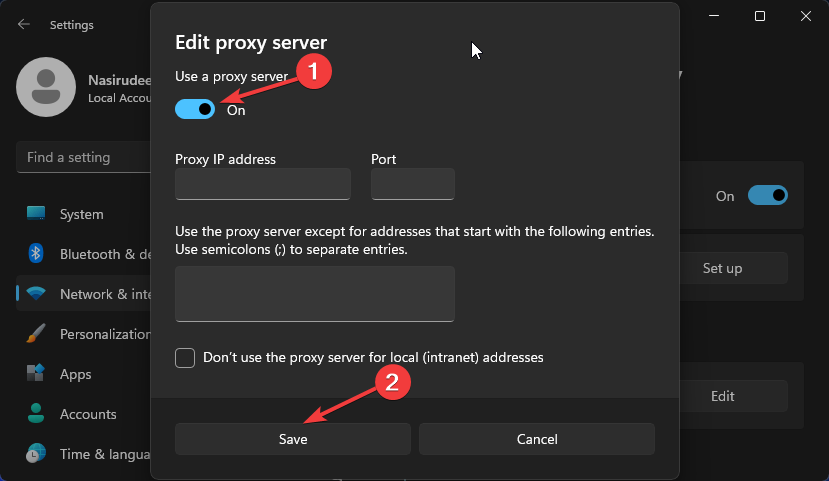
- Select Edit next to Use a proxy server option in the Manual proxy setup section, toggle off Use a proxy server and click on Save.

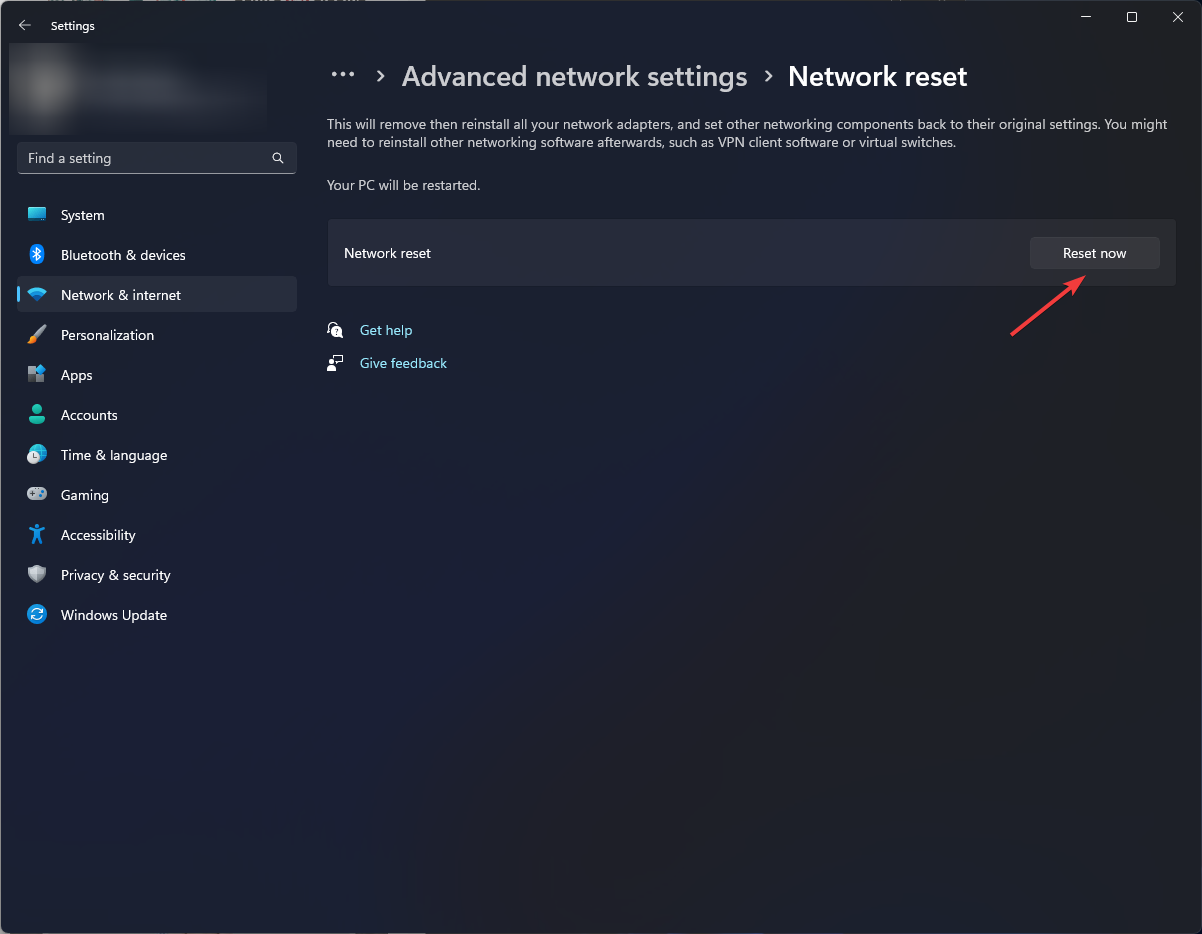
5. Reset the network
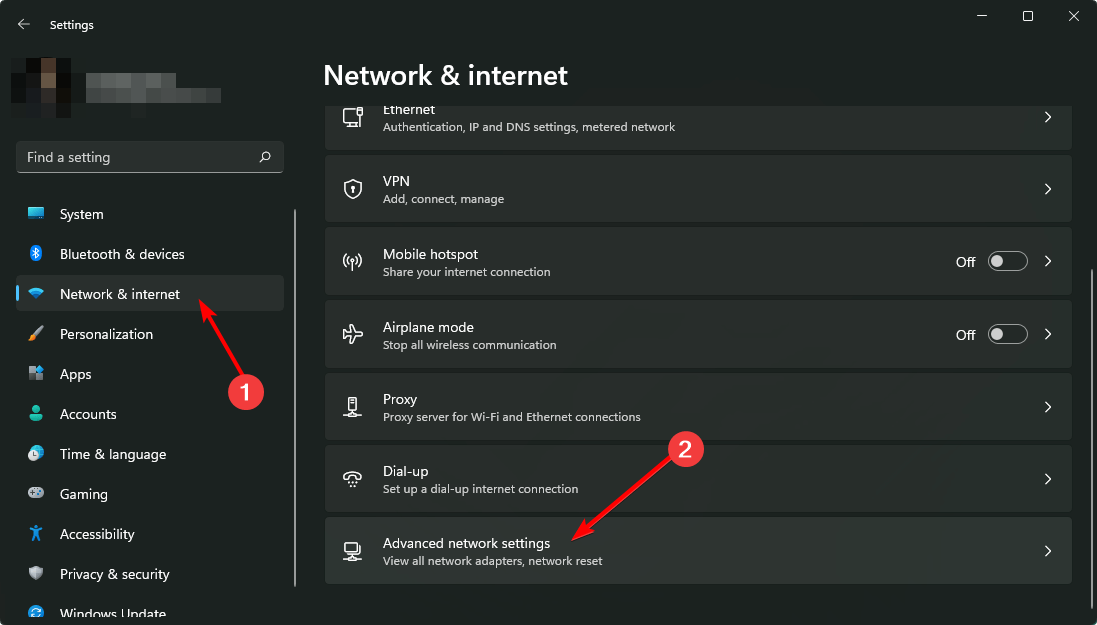
- Hit the Windows key and click on Settings.
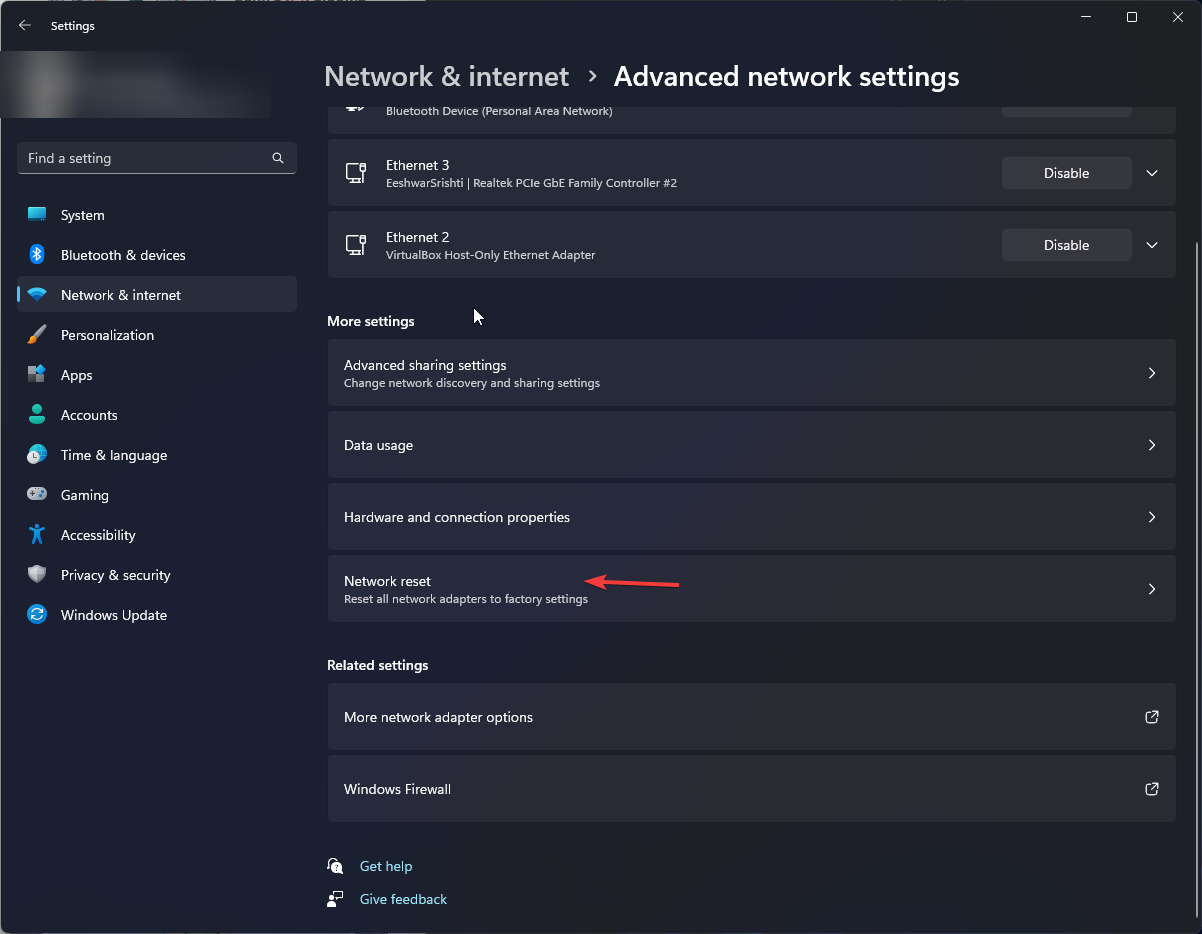
- Navigate to Network & internet and select Advanced network settings.

- Click on Network reset.

- Next, hit the Reset now button.
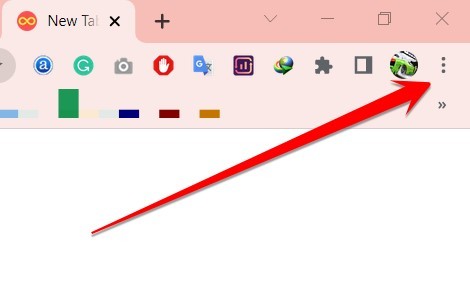
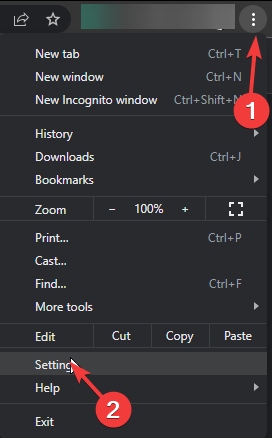
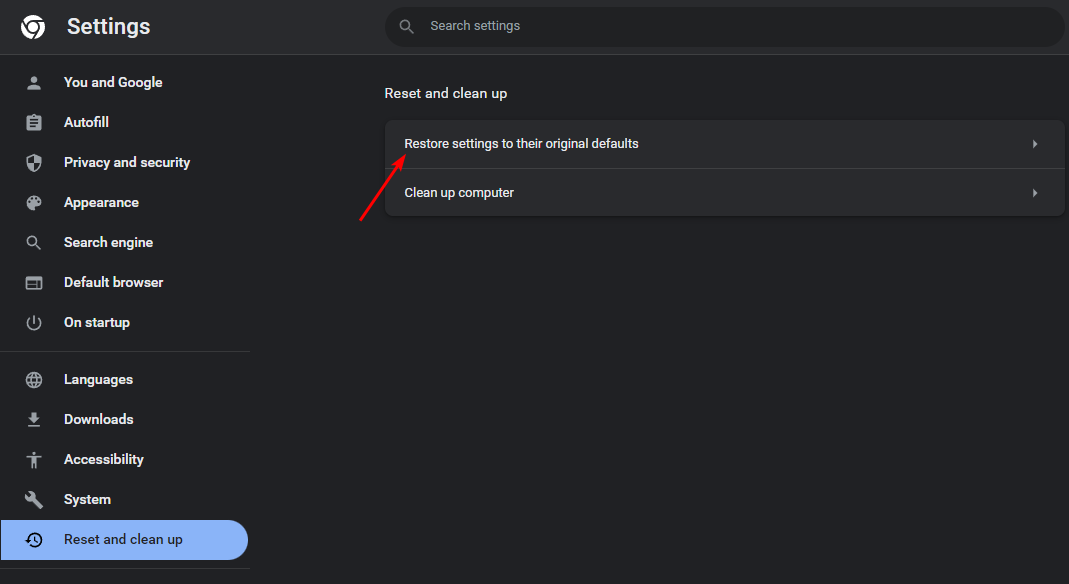
6. Reset your browser
- Open your browser and click on the three vertical ellipses at the top right corner. (We’ll be using Chrome for this step).
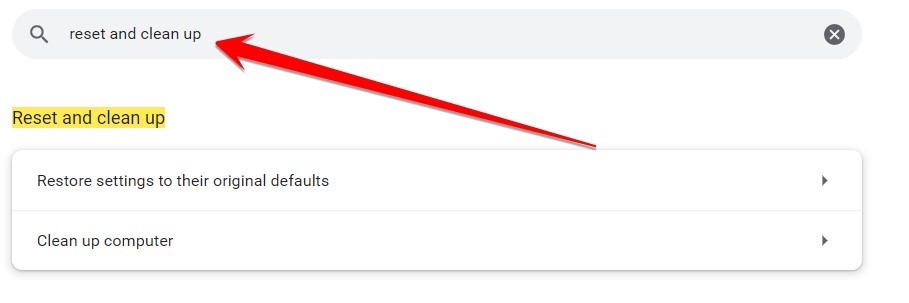
- Select Settings.

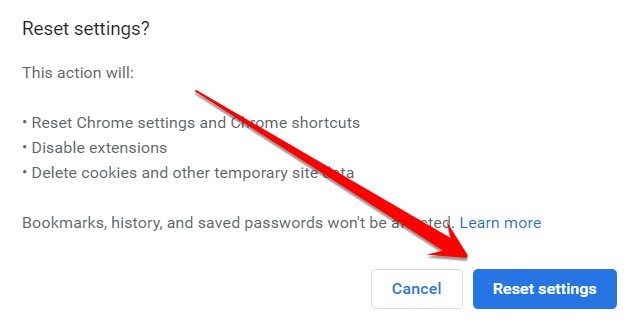
- Next, click on Reset and cleanup, then select Restore settings to their original defaults.

- Confirm Reset settings in the next dialog box.
In addition, some network admins might block specific ports to help restrict certain traffic through their network.
If you’re having a problem accessing a particular website and suspect it might have been blocked by your network administrator rather than the server. You can try connecting to the Internet via a different network, such as a mobile hotspot.
Hopefully, you could fix your problem by following the steps above. If not, please leave a comment below, and we will do our best to address it for you.
Still having issues? Fix them with this tool:
SPONSORED
If the advices above haven’t solved your issue, your PC may experience deeper Windows problems. We recommend downloading this PC Repair tool (rated Great on TrustPilot.com) to easily address them. After installation, simply click the Start Scan button and then press on Repair All.
![]()