
Всем доброго времени суток и прочих разностей, дорогие друзья, знакомые, читатели, почитатели и прочие личности.
Windows 10 не перестаёт радовать нас обновлениями и очередными проблемами вместе с ними, то уши ломит, то хвост отваливается, то драйвер Intel вылетает и вываливает проблему «Прекращена работа программы igfxHK Module или igfxTray» у всех и вся, то камеры на ноутах отвалятся, то появляется ошибка 0x80070422 с загрузкой самих пакетов обновления, то что-то еще.

В этот раз многие столкнулись с проблемой, которая заявлена в заголовке, а именно с ошибкой 0x800f0217 и/или с тем, что подключенный телефон/плеер/другой USB-девайс попросту отказывается определяться или нормально работать (у коллег, например, просто «моргал» в проводнике).
Сегодня я кратенько расскажу как, собственно, это лечить.
Поехали.
Лечим определение устройства по USB в Windows 10 и ошибку 0x800f0217 при обновлении
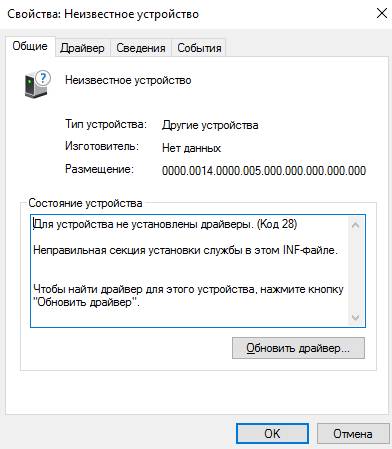
Собственно, проблема, традиционно для Miscrosoft, в драйвере MTP. Причем, сначала она его ломает, потом не может обновить и плюется в своём же обновняторе вышеупомянутой проблемой 0x800f0217 (скриншот кликабелен):

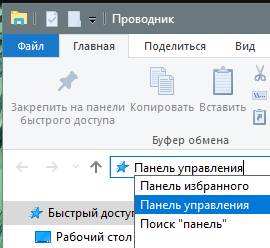
Лечится ручками, а именно, для начала, собственно, заходим в панель управления (для чего в проводнике вводим фразу «Панель управления»):
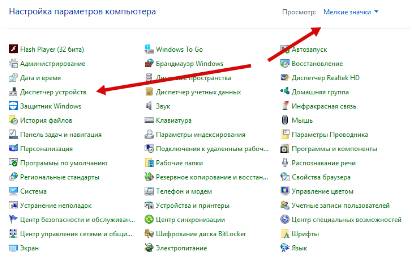
Далее переключаем вид в режим «Категория — Мелкие значки» и выбираем пункт «Диспетчер устройств» (можно конечно запустить его через Win+R, но в этот раз, в целях ознакомления где оно живет, пусть будет мышкой):
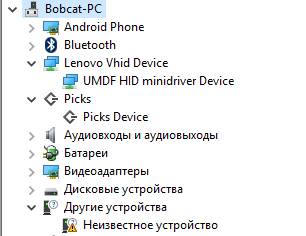
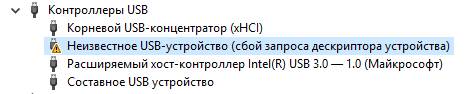
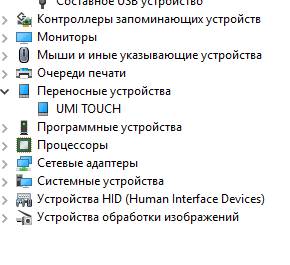
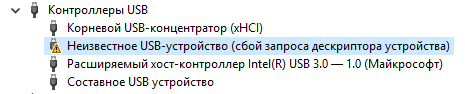
В диспетчере устройств, скорее всего, у Вас будет обозначено неизвестное устройство и/или имя вашего телефона/плеера/чего-то (смотря что подключили) с восклицательным знаком или же неизвестное USB-устройство:
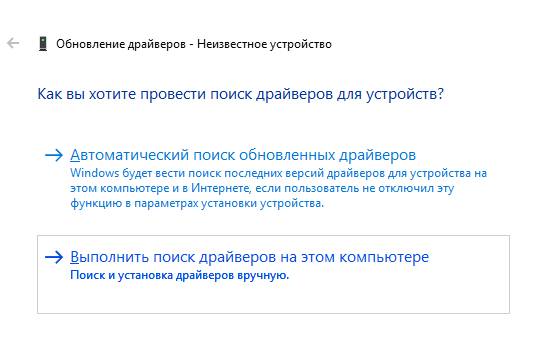
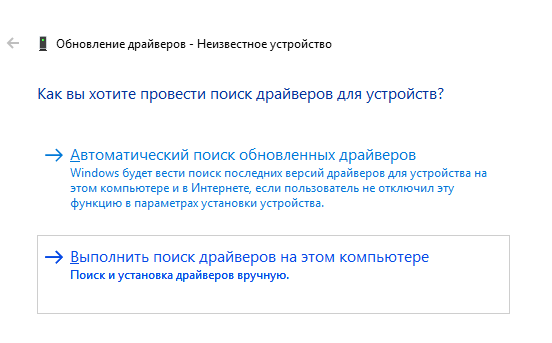
Собственно тыркаем в него пару раз кнопкой мыши, после чего выбираем пункт «Обновить драйвер«, где, на следующем этапе, выбираем пункт «Выполнить поиск драйверов на этом компьютере«:

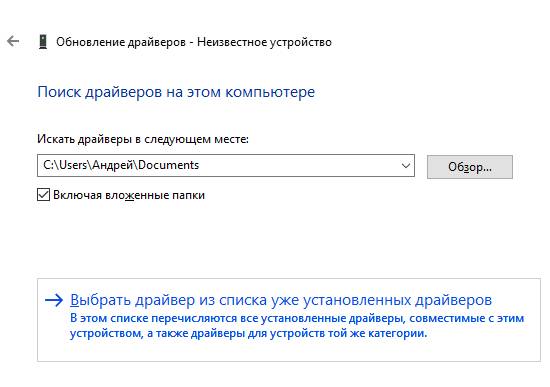
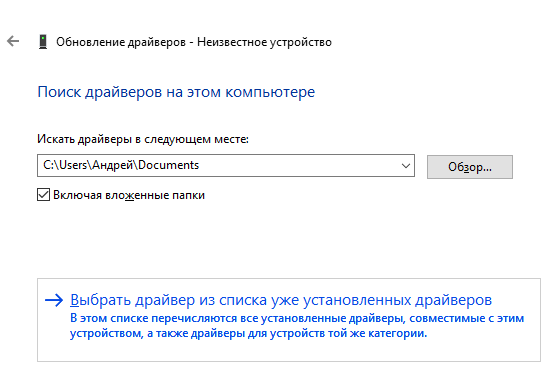
Далее будет предложено указать путь, чего нам не требуется и мы выбираем пункт «Выбрать драйвер из списка уже установленных драйверов«:
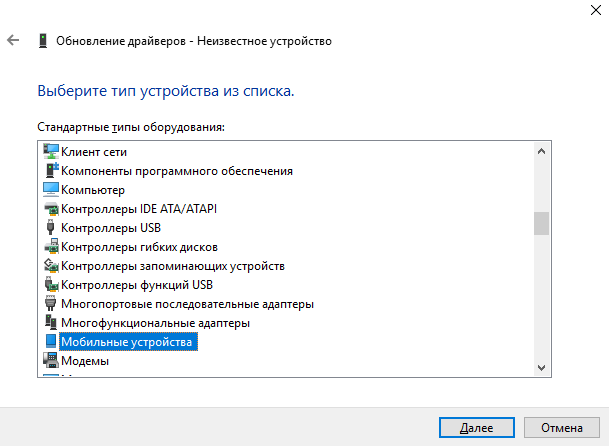
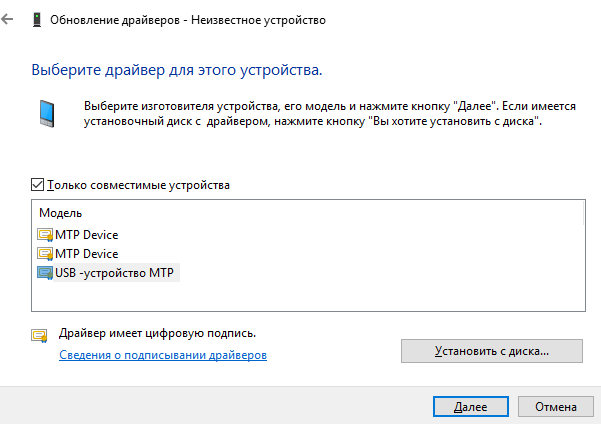
После чего нам, в появившемся списке, необходимо будет выбрать раздел «Мобильные устройства«, а следом «MTP-устройство USB«:

Остаётся нажать «Далее» и дождаться окончания процесса установки:
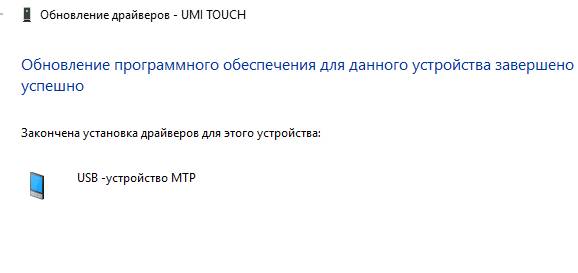
После чего телефон/плеер или что там у Вас, собственно, должно появится в списке устройств (и в проводнике Windows) под своим собственным названием:
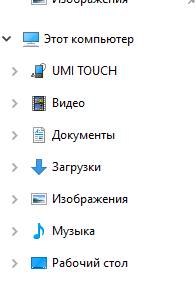
Ну или просто как подключенный диск/флешка (в зависимости от того с чем была проблема).
Кстати говоря, опять же, в зависимости от того с чем была проблема, на этапе где мы выбирали «Мобильные устройства» можно выбирать пункты типа «Контроллеры USB» или «Контроллеры функций USB» или «Android/iPhone device» и прочее, чем лечить проблемы системы сходного типа с другими девайсами (или всё с теми же, на случай, если описанный вариант не помог).
Такие дела.
Послесловие
В двух словах как-то оно вот так. Надеемся, что статья будет кому-то когда-то полезно и спасёт бесценное время, а так же не менее бесценные нервы. Кстати говоря, как ни крути, но апдейты десятки действительно идут ей на пользу, не смотря на безграничные глюки с драйверами.
Как и всегда, если есть какие-то вопросы, мысли, дополнения и всё такое прочее, то добро пожаловать в комментарии к этой записи.
Всем доброго времени суток и прочих разностей, дорогие друзья, знакомые, читатели, почитатели и прочие личности.
Windows 10 не перестаёт радовать нас обновлениями и очередными проблемами вместе с ними, то уши ломит, то хвост отваливается, то драйвер Intel вылетает и вываливает проблему «Прекращена работа программы igfxHK Module или igfxTray» у всех и вся, то камеры на ноутах отвалятся, то появляется ошибка 0x80070422 с загрузкой самих пакетов обновления, то что-то еще.
В этот раз многие столкнулись с проблемой, которая заявлена в заголовке, а именно с ошибкой 0x800f0217 и/или с тем, что подключенный телефон/плеер/другой USB-девайс попросту отказывается определяться или нормально работать (у коллег, например, просто «моргал» в проводнике).
Сегодня я кратенько расскажу как, собственно, это лечить.
Поехали.
Лечим определение устройства по USB в Windows 10 и ошибку 0x800f0217 при обновлении
Собственно, проблема, традиционно для Miscrosoft, в драйвере MTP. Причем, сначала она его ломает, потом не может обновить и плюется в своём же обновняторе вышеупомянутой проблемой 0x800f0217 (скриншот кликабелен):
Лечится ручками, а именно, для начала, собственно, заходим в панель управления (для чего в проводнике вводим фразу «Панель управления»):
Далее переключаем вид в режим «Категория — Мелкие значки» и выбираем пункт «Диспетчер устройств» (можно конечно запустить его через Win+R, но в этот раз, в целях ознакомления где оно живет, пусть будет мышкой):
В диспетчере устройств, скорее всего, у Вас будет обозначено неизвестное устройство и/или имя вашего телефона/плеера/чего-то (смотря что подключили) с восклицательным знаком или же неизвестное USB-устройство:
Собственно тыркаем в него пару раз кнопкой мыши, после чего выбираем пункт «Обновить драйвер«, где, на следующем этапе, выбираем пункт «Выполнить поиск драйверов на этом компьютере«:
Далее будет предложено указать путь, чего нам не требуется и мы выбираем пункт «Выбрать драйвер из списка уже установленных драйверов«:
После чего нам, в появившемся списке, необходимо будет выбрать раздел «Мобильные устройства«, а следом «MTP-устройство USB«:
Остаётся нажать «Далее» и дождаться окончания процесса установки:
После чего телефон/плеер или что там у Вас, собственно, должно появится в списке устройств (и в проводнике Windows) под своим собственным названием:
Ну или просто как подключенный диск/флешка (в зависимости от того с чем была проблема).
Кстати говоря, опять же, в зависимости от того с чем была проблема, на этапе где мы выбирали «Мобильные устройства» можно выбирать пункты типа «Контроллеры USB» или «Контроллеры функций USB» или «Android/iPhone device» и прочее, чем лечить проблемы системы сходного типа с другими девайсами (или всё с теми же, на случай, если описанный вариант не помог).
Такие дела.
Послесловие
В двух словах как-то оно вот так. Надеемся, что статья будет кому-то когда-то полезно и спасёт бесценное время, а так же не менее бесценные нервы. Кстати говоря, как ни крути, но апдейты десятки действительно идут ей на пользу, не смотря на безграничные глюки с драйверами.
Как и всегда, если есть какие-то вопросы, мысли, дополнения и всё такое прочее, то добро пожаловать в комментарии к этой записи.
Приветствую всех, кто заинтересовался этой статьей. Сегодня мы снова затрагиваем тему ошибок, которые случаются в операционной системе Windows 10. Хоть система и обновляется, вместе с этим возникает много новых ошибок, которые жестко мешают работе.
На этот раз многие пользователи Windows 10 столкнулись с такой проблемой, как ошибка 0x800f0217 и возникает она, когда мы подключаем к USB порту, например, смартфон или любое другое USB-устройство. После подключения устройства оно не определяется, бывали случаи, когда на короткое время появлялся в проводнике, а потом исчезал.
Это интересно: Что делать, если устройство USB не опознано?

Я сам хочу разобраться с этой проблемой и помочь решить ее вам, для этого я написал это руководство. Теперь приступим к рассмотрению способа.
Это интересно: Ошибка в Windows 10 — 0xc0000034 и как от неё избавиться
Как исправить определение USB-устройств с кодом ошибки 0x800f0217 на Windows 10?
Есть на компьютере такой драйвер – MTP, с которым проблемка эта и возникает. Драйвер каким-то образом крашиться и обновиться не может, а после подключения какого-либо устройства появляется ошибка 0x800f0217.
Эту напасть решить можно. Зайдите в Панель управления, а потом справа вверху переключитесь в режим просмотра «Мелкие значки» (это удобнее и быстрее), после этого перейдите в «Диспетчер устройств».

Возможно, в окне диспетчера, во вкладке «Другие устройства», или в «Контроллеры USB» вы найдете устройство, обозначенное восклицательным знаком, которое означает – устройство не найдено, либо неизвестно.
Теперь нажмите правой кнопкой мыши по неизвестному устройству и нажмите на вариант «Обновить драйвер», но делаем не через интернет, а щелкаем по пункту «Выполнить поиск драйверов на этом компьютере».
Это интересно: Ошибка 0xc000021a в Windows 10. Что делать?

Потом вы нажимаете на «Выбрать драйвер из уже установленных драйверов».
Дальше вы щелкаете по пункту «Мобильные устройства», а потом «USB-устройство MTP» и жмете по кнопке «Далее».
Начнется установка драйвера, который потом появится в диспетчере устройств. Восклицательный знак должен исчезнуть.
Это интересно: Ошибка inaccessible boot device при запуске Windows + создание загрузочной флешки с помощью Media Creation Tool
Теперь вы можете снова подключить то устройство, которое подключали.
Там, где вы выбираете вариант «Мобильные устройства», как вы понимаете, относится только к смартфонам и им подобным. Если вы пытались вставить другое устройство, например, мышь, клавиатура, внешний жесткий диск, то придется выбирать другие варианты.
Данная статья может вам помочь, поэтому внимательно все прочитайте и ничего не упустите. В итоге можно сказать следующее: Windows 10 обновляется и многие ошибки все же исправляются, конечно, до идеала ей еще очень далеко, но, когда-нибудь разработчики снизят появление вот таких неприятных моментов к минимуму.
Are you trying to install a Windows update or are you randomly getting the Windows Update error message ‘0x800F0217’?
Tech Support 24/7
Ask a Tech Specialist Online
Connect with the Expert via email, text or phone. Include photos, documents, and more. Get step-by-step instructions from verified Tech Support Specialists.

On this page, you will find more information about the most common causes and most relevant solutions for the Windows Update error ‘0x800F0217’. Do you need help straight away? Visit our support page.
Error information
What causes the 0x800F0217 error?
Microsoft’s answer: A service installation section in this INF is invalid
Do you think there is another cause for this error? Let others know in the comments below.
How to solve Windows Update error 0x800F0217
We’ve created a list of solutions which you can follow if you want to solve this Windows Update problem yourself. Do you need more help? Visit our support page if you need professional support with Windows Update right away.
Tech Support 24/7
Ask a Tech Specialist Online
Connect with the Expert via email, text or phone. Include photos, documents, and more. Get step-by-step instructions from verified Tech Support Specialists.
Have you found a solution yourself, but it is not in the list? Share your solution in the comments below.
Need more help?
Do you need more help?
Tech experts are ready to answer your questions.
Ask a question
|
MTP Device — ошибка 0x800f0217 |
|||||
|
|||||
|
|||||
|
|||||
|
|||||
|
|||||
|
|||||
|


|
|
| Windows 8.1 |
|
| Популярное |
|
- Remove From My Forums
-
Вопрос
-
I have been instaling and uninstalling Broadcom drivers for my HP tablet TC4200. I use Windows 7 Nothing has worked including drivers from the broadcom site. The HP site has Vista and XP drivers which too do not work. I stupidly fooled around with
the inf file and now when Windows Update downloads and tries to install the driver I get the following error: 800F0217 Grateful for any help
Ответы
-
-
Предложено в качестве ответа
2 сентября 2010 г. 12:17
-
Помечено в качестве ответа
Ed Price — MSFTMicrosoft employee
30 апреля 2012 г. 2:48
-
Предложено в качестве ответа
Приветствую всех, кто заинтересовался этой статьей. Сегодня мы снова затрагиваем тему ошибок, которые случаются в операционной системе Windows 10. Хоть система и обновляется, вместе с этим возникает много новых ошибок, которые жестко мешают работе.
На этот раз многие пользователи Windows 10 столкнулись с такой проблемой, как ошибка 0x800f0217 и возникает она, когда мы подключаем к USB порту, например, смартфон или любое другое USB-устройство. После подключения устройства оно не определяется, бывали случаи, когда на короткое время появлялся в проводнике, а потом исчезал.
Это интересно: Что делать, если устройство USB не опознано?
Я сам хочу разобраться с этой проблемой и помочь решить ее вам, для этого я написал это руководство. Теперь приступим к рассмотрению способа.
Это интересно: Ошибка в Windows 10 — 0xc0000034 и как от неё избавиться
Как исправить определение USB-устройств с кодом ошибки 0x800f0217 на Windows 10?
Есть на компьютере такой драйвер – MTP, с которым проблемка эта и возникает. Драйвер каким-то образом крашиться и обновиться не может, а после подключения какого-либо устройства появляется ошибка 0x800f0217.
Эту напасть решить можно. Зайдите в Панель управления, а потом справа вверху переключитесь в режим просмотра «Мелкие значки» (это удобнее и быстрее), после этого перейдите в «Диспетчер устройств».
Возможно, в окне диспетчера, во вкладке «Другие устройства», или в «Контроллеры USB» вы найдете устройство, обозначенное восклицательным знаком, которое означает – устройство не найдено, либо неизвестно.
Теперь нажмите правой кнопкой мыши по неизвестному устройству и нажмите на вариант «Обновить драйвер», но делаем не через интернет, а щелкаем по пункту «Выполнить поиск драйверов на этом компьютере».
Это интересно: Ошибка 0xc000021a в Windows 10. Что делать?
Потом вы нажимаете на «Выбрать драйвер из уже установленных драйверов».
Дальше вы щелкаете по пункту «Мобильные устройства», а потом «USB-устройство MTP» и жмете по кнопке «Далее».
Начнется установка драйвера, который потом появится в диспетчере устройств. Восклицательный знак должен исчезнуть.
Это интересно: Ошибка inaccessible boot device при запуске Windows + создание загрузочной флешки с помощью Media Creation Tool
Теперь вы можете снова подключить то устройство, которое подключали.
Там, где вы выбираете вариант «Мобильные устройства», как вы понимаете, относится только к смартфонам и им подобным. Если вы пытались вставить другое устройство, например, мышь, клавиатура, внешний жесткий диск, то придется выбирать другие варианты.
Данная статья может вам помочь, поэтому внимательно все прочитайте и ничего не упустите. В итоге можно сказать следующее: Windows 10 обновляется и многие ошибки все же исправляются, конечно, до идеала ей еще очень далеко, но, когда-нибудь разработчики снизят появление вот таких неприятных моментов к минимуму.
Are you trying to install a Windows update or are you randomly getting the Windows Update error message ‘0x800F0217’?
Tech Support 24/7
Ask a Tech Specialist Online
Connect with the Expert via email, text or phone. Include photos, documents, and more. Get step-by-step instructions from verified Tech Support Specialists.
On this page, you will find more information about the most common causes and most relevant solutions for the Windows Update error ‘0x800F0217’. Do you need help straight away? Visit our support page.
Error information
What causes the 0x800F0217 error?
Microsoft’s answer: A service installation section in this INF is invalid
Do you think there is another cause for this error? Let others know in the comments below.
How to solve Windows Update error 0x800F0217
We’ve created a list of solutions which you can follow if you want to solve this Windows Update problem yourself. Do you need more help? Visit our support page if you need professional support with Windows Update right away.
Tech Support 24/7
Ask a Tech Specialist Online
Connect with the Expert via email, text or phone. Include photos, documents, and more. Get step-by-step instructions from verified Tech Support Specialists.
Have you found a solution yourself, but it is not in the list? Share your solution in the comments below.
Need more help?
Do you need more help?
Tech experts are ready to answer your questions.
Ask a question
Causes of Error Code Error Code 800F0217 with error message Windows update error with Windows while updating: Error Code Error Code 800F0217 with error message Windows update error with Windows while updating is an issue caused due to illegitimate maintenance of the Windows and installed software. This Error Code Error Code 800F0217 with error message Windows update error with Windows while updating occurs when installing | opening | closing | updating | uninstalling | removing the application or Windows upgrade. Error Code Error Code 800F0217 with error message Windows update error with Windows while updating in Windows, Calendar, Moviemaker, Media, Visio, Exchange, Project, BSOD, Boot, .Net, Driver, Printer, Edge, Explorer, Scanner, Security, Microsoft Security Essentials, Live mail, Office, OneDrive, OneNote, Word, Excel, Outlook, PowerPoint, Defender, Store of version 2010, 2013, 2016, 2019 ,365 while downloading, installing, uninstalling, opening, loading, updating, closing, activating, syncing, logging in, downloading, printing.
![]()
How to Fix Error Code Error Code 800F0217 with error message Windows update error with Windows while updating?
SUMMARY: For Error Code Error Code 800F0217 with error message Windows update error with Windows while updating, like any mistake with a software, which is like a machine, it is investigated for overall errors and then fixed one by one. First, we check the list of software installed in Windows to relate if it can cause the problem. Then, we check the issue logs from the event viewer to see if we can relate it to any of the known errors or applications. Next, we can disable the applications we suspect in the first two steps and check if the fault is resolved. If the mistake is not fixed, we will then disable al the security software, clean up the junk files to overrule possibility of low space in the hard drive, try a quick repair first, then a normal repair and if still not resolved, we will perform a full uninstallation and then install it again.
PLEASE NOTE: SAVE OR BOOKMARK THIS WEB PAGE LINK OR URL, AS THIS INVOLVES RESTARTING THIS COMPUTER.
Steps to fix the Error Code Error Code 800F0217 with error message Windows update error with Windows while updating:
Table of Contents :
-
How to Cleanup Temp Files?
-
How To Disable Antivirus?
-
How To Disable Windows Defender
-
How To Turn off Kaspersky Antivirus
-
How To Turn off McAfee Antivirus
-
How To Disable Norton Antivirus
-
How To Disable Avast Antivirus
-
How To Disable Avira Antivirus
-
-
How to Check Windows Updates?
-
Basic Troubleshooting Steps
-
Additional Troubleshooting Steps
-
Using Update troubleshooter
-
-
How to Repair Microsoft Office?
-
Microsoft Office Installation
-
Microsoft Office Activation
-
Microsoft Office Repair
-
Microsoft Office Quick Repair / Online Repair
-
Microsoft Office uninstallation
-
![]()
How to Clean Temp Files? – Steps to fix Error Code Error Code 800F0217 with error message Windows update error with Windows while updating
Temp files are the files used to store non-permanent data. Most programs store such data, this will lead to shortage of disk space. To get rid of this the disk space, we can delete these temporary files. Usually the Computer itself removes these files, but we can also do this ourselves.
Following are a few methods used for temp file clean up
Method-1-Using Temp Folder
- We will get the Temp folder now, this folder containing all the Windows System temporary files and folders. At the top of the current window click on view and check Hidden items.

- To Permanently remove these data, hold down “Shift + Delete“, or simply right click the selected items and then press Delete to confirm the deletion and then empty Recycle Bin.

Method-2-Using Command Prompt
- Type cmd on the search bar at the left bottom corner of your PC, open command prompt in admin mode by pressing “Run as Administrator” and click Yes on the pop-up window.

- In the Command Prompt, type “del /q/f/s %TEMP%*” and then hit Enter.

- This will clean all temporary files in the “Temp” folder on Windows PC.
Method-3-With System Settings
- Click on the Windows key at the left bottom corner of your Computer and click Settings.

- From Settings Menu, press System tab and then press to open.

- From the System pane at the left side of window, press storage tab.

- Open storage tab and you will see available local disks. From that available local storage select the one you want to clean up.
- From storage options, press and open Temporary files.

- From the listed files, select items except Recycle Bin and Downloads to be deleted and click Remove files.
- The Temp files will be cleaned
![]()
How to Disable Antivirus? -Steps to fix Error Code Error Code 800F0217 with error message Windows update error with Windows while updating
Antivirus is kind of application used in computers or Laptop devices for the need of scanning, detection, prevention, protection and elimination virus or bad software. In the background, these software runs automatically and gives real-time protection.
There are two types of Antivirus software in Windows Operating System, one is in-built Windows Defender and others are developed by other firms and gives their own unique and advanced features. Few examples for other Antivirus software are the following:
Kaspersky, Norton, Trendmicro, Avg, Avira, Avast, McAfee, Zonealarm etc….
When installing any other applications or software, it might not be easy for Antivirus to find whether the application or software is legitimate or spiteful, So it is greate to disable Antivirus while installing any other needy software.
Each Antivirus software is different and you must be careful while disabling these, describing how to turn off few broadly using Antivirus softwares.
How to Turn off Windows Defender
Windows Defender is Default Antivirus software and we could easily and simply turn off this one. Below explained steps can be followed
Method-1-If The System Is Not Updated
- Click on the search bar at bottom corner of the PC and type Run or Press “Windows Key + R” to open command box.
- A command box will pop-up and type “gpedit.msc” and click OK.
- Local Group Policy Editor will open up, from that select on Administrative templates.
- From dropdown select Windows Components and scroll down to find Windows Defender Antivirus, click on that.
- Settings menu will show up, from that double click Turn off Windows Defender Antivirus.
- There will be three options like Not configured, Enabled & Disabled.
- Click on Enabled and select apply and then OK.
- Now, close all the Windows and restart Computer. Now, the default Antivirus Windows Defender will be turned off.
Method-2-Using Settings ( Temporary )
- Click on the windows icon on the left bottom corner of the PC.
- Select Settings tab and from that select Update & Security tab.
- In Update & Security menu from the options given on left side select Windows Security.
- In Windows Security , at the top click on open Windows security button.

- There on, this window we could see so many options from that select each one and turn them off.

- Click on Virus & threat protection and under Virus & threat protection settings, click on Manage Settings and disable Real-time Protection. Please note that this is temporary and once you have restarted your Computer, it will turn on automatically.


- Then on the left side given menus select Firewall & network protection from its menu you will see options like Domain network, Private Network, Public Network Select each one and turn them off.
- Now the default Antivirus Windows Defender would be disabled temporarily.


Method-3-Using Registry Editor ( Permanent )
- Click on the search bar at bottom corner of the Computer and type Run or Press Windows Key + R” to open command box.
- A command box will pop up and type “regedit” and click and then press YES on the pop-up, you will get Registry Editor.

- From Registry Editor, click on HKEY_LOCAL_MACHINE from drop down click on SOFTWARE and then click on policies and then click on Microsoft and then Windows Defender.
- You will see Default file on the right hand side of the window. In that window, right click on any empty space, you will get an option says New and from that select ” DWORD (32bit) bit ” and you will get an option to rename that , Rename that as ” DisableAntispyware “. It will listed under Default file as a new one.

- Once done creating DisableAntispyware click on that and will get a pop-up which will show options to change its values , so then change the value to ” 1 ” by removing ” 0 ” and then click ok and then restart Computer.
- Now, your Windows Defender will be turned off permanently.


How to Disable Kaspersky Antivirus

Method-1-From Taskbar
- On the taskbar, search for the Kaspersky symbol, it might be like green shield with a check mark
- If you are not able to find icon there, click on the icon tray which shows hidden icons at the right bottom corner of the PC
- Right Click on the Kaspersky icon , A menu will pop-up there from that select Pause Protection
- On Pause Protection, you will get three Pause options pause for particular time (here you could choose time), Pause until application restarts and Pause
- Now, you have successfully disabled the Kaspersky Antivirus .
Method-2-Using Main Application Window
- Click on the Kaspersky application main window to open it
- From the main menu, click on the Protection and Control tab and select Protection tab
- On Protection, right click and you will get another menu to select disable/enable Antivirus
- To disable Kaspersky Antivirus , select the Stop option from the menu.
- Now, you have successfully disabled the Kaspersky Antivirus .
Method-3-Using Application Settings Window
- Select Settings Window and click to open it.
- At the left end of the window, there will be Antivirus protection section, select Antivirus tab.
- At the right end of that window, there will be the File Antivirus section.
- Turn off Enable File Antivirus button and click on Save to save changes
- Now you have successfully disabled the Kaspersky Antivirus .
How to Disable McAfee Antivirus

Method-1-From Taskbar
- On the taskbar, search for the McAfee icon. It might be dark red in color
- If you are not able to find icon there, click on the icon tray which shows hidden icons at the right bottom corner of the PC
- Right Click on the McAfee icon, a menu will appear there from that click Change settings
- Click on Change settings you will get a Menu, from that click Real-time Scanning
- MacAfee Antivirus Application will open and pop-up with options to turn on or OFF Real-time Scanning
- At the right side of the window, click on Turn Off and another window will appear and, in that, at the left side of the window on a text box, you can choose when to resume Real-time scanning.
- After choosing the time at the right side of the window, there will be a blue Turn off button. Click on that and close the window.
- Then, repeat steps 2 and 3 below Real-time Scanning. You will get Firewall option, Click on that.
- Click on Turn Off button and choose time and turn off firewall.
- Now, you have successfully disabled the McAfee Antivirus .
Method-2-Using McAfee Application
- Click on the search bar at bottom corner of the PC and type McAfee the installed application will open.
- On main window of McAfee Antivirus software at the right top corner, you can see the Settings icon. Click on that.
- In Settings under the dropdown, select Real-time Scanning under PC Security Section.
- At the right side of the window, click on Turn Off and another window will appear. In that, at the left side of the window on a text box, choose when to resume Real-time scanning.
- After choosing the time at the right side of the window, there will be a blue Turn off button. Click on that and close the window.
- Then, select Firewall tab below Real-time Scanning tab under PC Security tab.
- At the right side of the window, click on Turn Off and another window will appear. In that at the left side of the window on a text box you can choose, when to resume Firewall.
- After choosing the time at the right side of the window, there will be a blue Turn off button. Click on that and close the window.
- Now, you have successfully turned off the McAfee Antivirus .
Method-3-Using System Configuration
- Click on the search bar at bottom corner of the PC and type Run or Press “Windows Key + R” to open command box.
- A command box will pop-up and type “msconfig” and click YES on the window, you will get System Configuration.
- From System Configuration at the Top menu bar, click on Services.
- At the bottom left corner of this window, check for ” Hide all Microsoft services“.
- Under Services, scroll down and deselect all the services related to McAfee and click OK, then click on Restart.
- Your Mcafee Antivirus will be turned off after the restart.
How to Disable Norton Antivirus
-
- On the taskbar, search for the Norton icon,
- If you are not able to find symbol there, click on the icon tray which shows hidden icons at the right bottom corner of the PC.
- Right Click on the Norton symbol , A menu will appear from that, click Disable Auto Protect.
- A menu will appear, choose the duration and then select OK.
- Again, right click on the symbol from the taskbar and select Disable Smart Firewall.
- A menu will appear, choose duration and then click OK.
- Now, Norton Antivirus will be disabled.
How to Disable Avast Antivirus ?

Method-1-From Taskbar
- On the taskbar, search for the Avast icon.
- If you can’t find icon there, click on the System tray, which shows hidden icons at the right bottom corner of the PC.
- Right Click on the Avast icon , a menu will appear from that click Avast Shield Control and then click on Disable Permanently
- Avast Antivirus will be turned off.
Method-2-From Main Application
- Click on the search bar at bottom corner of the PC and type Avast the installed application will open.
- On main window of Avast Antivirus software at the right top corner, you can see the Menu icon. Click on that.
- Click Settings tab at right side, click on Protection and then click on Core Shields.
- Scroll down and click on File Shield below Configure Shield Settings and deselecct Enable File Shield and choose the duration or Stop indefinitely from the pop-up.
- Click on next tab Behavioral shield and uncheck Enable File Shield and choose any duration or Stop indefinitely from the pop-up.
- Then Click on the next tabs Web shield and Mail shield and for both uncheck Enable File Shield and choose theduration or Stop indefinitely.
- Simply at the top of the window you can turn off Core shield and select theduration or select Stop indefinitely.
- Avast Antivirus will be turned off.
How to Disable Avira Antivirus

Method-1-From Taskbar
- On the taskbar, search for the Avaira icon.
- If you can’t find icon there, click on the icon tray, which shows hidden icons at the right bottom corner of the PC.
- Right Click on the Avaira icon, a menu will pop-up from that press Turn off real time protection and then select the duration.
- Give administrative permission by clicking yes on that pop-up.
- Avira Antivirus will be disabled.
Method-1-From Application
- Click on the search bar at bottom corner of the PC and type Avira, the installed application will open.
- Click on the Security tab on the left pane and choose Protection options .
- Click Turn off below Real time protection and from appearing window choose time and click on blue color Turn off tab.
- Do the same for all under Protection options.
- Avira Antivirus will be disabled.
How to Check Windows Updates? -Steps to fix Error Code Error Code 800F0217 with error message Windows update error with Windows while updating

To keep your Windows Gadget Sooth, Fast and Secure , The system has to be updated. Once in a while Microsoft provides Particular Updates.
Windows updates issues
while updating Windows , you might face some issues like Interruption, slowness, or it may end up with Some error codes. You can try these Troubleshooting steps.
- Basic Windows Troubleshooting Steps
- We need to clear some space first.
- Click on the Windows Key at the left bottom corner of your Pc and select Settings.
- From Settings Menu, choose System tab and click to launch.

- From the System window at the left side of window, choose storage tab.
- Open storage tab and you will see available Local disks, from that available local storage select the one one you want to clean up.
- From storage options, select and open Temporary files.

- From the listed files select items to be deleted and click Remove files.
- Save and Close all the finished and unfinished works and restart the Computer.

- Check for Windows updates , Restart the PC again.


-
Additional Troubleshooting Steps
- Keeping necessary hardware, unplug or disconnect unnecessary hardware.
- On search bar, type Device Manager and click to open it.
- Click on dropdown for each tab and check for Caution/warning symbol, it might be an exclamation mark inside a yellow triangle.
- If you could found any device with that , right click on that and choose Update driver
- Check for Windows updates , Restart the Computer again.
-
Using Windows updates troubleshooter
- To get the most updated troubleshooting tool, type “aka.ms/wudiag” on the search bar.
- Click Open and run the file, then click Next.
- From the pop-up window, click Apply this fix.
![]()
How to Repair Microsoft Office ? – Steps to fix Error Code Error Code 800F0217 with error message Windows update error with Windows while updating

Microsoft Office is a productivity software which contains applications like Microsoft Word, Microsoft Excel, Microsoft PowerPoint, Microsoft OneNote, Microsoft Outlook, Microsoft Publisher, Microsoft Access, Skype for Business, Microsoft InfoPath. Office applications Plays major part in creating, analysing and modifying various documents in our day to day life. It helps Home as well as Business users to improve or ease tasks as well as productivity.
Microsoft Office Applications

Microsoft Office Repair
Office applications may undergoes so many difficulties, We may face issues while installing or Running. We could try options like quick repair or online repair as a basic solution for such kind of issues.
Office Quick Repair / Online Repair
- Click on the Windows Icon on the left bottom corner of the Pc. fFom the left pane, click Settings.

- Click on Apps and choose Apps & Features from the left pane.

- Scroll down and select Microsoft Office version you have and click on “Modify“.
- Before modifying, do not forget to close all Office applications.
- A window will appear. From that, choose Quick repair (repairs without internet)/ Online Repair (repairs with internet).
- You cannot access any Office application while repairing.
- Once the repair is complete, you will get a message. Then, close all the window and restart your Computer.


Microsoft Office uninstallation
- To uninstall Office , we can use Office uninstall Support tool. Press on the download button to get the tool from Microsoft Official website.

- The tool will be downloaded and it will be available in the downloads folder. Right click on that and run it as administrator.
- Select the Office version and click Next.
- Few pop-up windows will appear, follow the instructions and then restart your Computer.
- Once restart is done, the uninstall tool launches again and finishes the final repair.
- Then choose the Office version you want to install or reinstall then close all the window.
Microsoft Office Installation
- Visit https://www.Office.com from your favorite browser or select here .
- Office available for both Home as well as Business use, you can compare the pricing and packages included on Official Ms Office Website mentioned above by clicking Get Office
- You will get Microsoft Office Home page, click Sign in if you already have Office subscription.
- Enter your Username and Password, click sign in. You will be redirected to authenticated window of Office . you will see a Install Office button over there, click on that.

- It will lead to Install page , click on Install Office button under Install Office on your computers tab.

- You will get a pop-up menu, there you can select language as well as versions by choosing other options, then select install. This is for MicrosoftOffice 365 and Microsoft Office 2021.
- If you are going to install Office versions like Microsoft Office, Office 2019, 2016, 2013 etc… with your Product key, Go to, https://setup.office.com/ or click here.
- There you can see three easy steps to complete the task.
- First, sign in to your Office account and then enter your product key. After that simply download Office Setup.
- The Setup file must be in downloads folder, right click on the file and choose Run as administrator.
- Click YES on prompt menu, for administrative permission. Allow the installation to run.

- Once the installation completes, you will get the message “You’re all set! Office is installed now” and click close.


Microsoft Office Activation
- Search and choose any Office Application. For Example launch Outlook.
- You could see a license agreement when the app opens for the first time, Accept that and your Office will be ready to use.
|
|
|
|