
5 Ways to Fix Microsoft SQL Server Error 233
| Workable Solutions | Step-by-step Troubleshooting |
|---|---|
| Fix 1. Enable TCP/IP |
Open MS SQL Server. Go to configuration tools, and then open «SQL Server Network Configuration»…Full steps |
| Fix 2. Enable Shared Memory |
Shared Memory Protocol is used for connecting SQL Server, if it is disabled, it may lead to SQL Server login failed error 233…Full steps |
| Fix 3. Enable Named Pipes Protocol |
Run MS SQL Server. Go to configuration tools, and then open «SQL Server Network Configuration»…Full steps |
| Fix 4. Check for Remote Connection |
Connect to SQL Server Instance in SSMS on a database server. Right-click on the Server instance…Full steps |
| Fix 5. Repair the MS SQL Database |
Launch EaseUS MS SQL Recovery. Select the corrupted database file. Then, click the «Repair» button…Full steps |
Overview of SQL Server Error 233
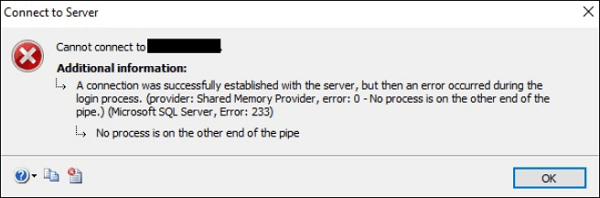
SQL Server error 233 was saying «No process is on the other end of the pipe». The error details are given as:
A connection was successfully established with the server, but then an error occurred during the login process. (provider: Shared Memory Provider, error: 0 – No process is on the other end of the pipe) (Microsoft SQL Server, Error: 233)
SQL Server Error Code 233 Causes
No process is on the other end of the pipe error 233 is often caused by two reasons:
- The client attempts to connect with only named pipes and the named pipes protocol is not enabled on the server.
- The client attempts to connect with any available protocol, but named pipes are listed before TCP in the client protocol order.
According to the two reasons above, you can fix error 233 easily.
Fix 1. Enable TCP/IP to Solve SQL Server Error 233
If the client is attempting to connect using named pipes, and the server is not configured to allow remote connections using named pipes, follow this:
Step 1. Open MS SQL Server.
Step 2. Go to configuration tools, and then open «SQL Server Network Configuration» in SQL Server Configuration Manager.
Step 3. Choose «TCP/IP» option and enable remote connections using named pipes.
If the client protocol order is attempting to connect with the named pipes protocol before trying the TCP protocol, and named pipes are not enabled on the server, solve this problem by following this:
Using SQL Server Configuration Manager on the client computer, move TCP before named pipes in the protocol order list.
Fix 2. Enable Shared Memory
Shared Memory Protocol is used for connecting SQL Server, if it is disabled, it may lead to SQL Server login failed error 233.
Step 1. Open MS SQL Server in your system.
Step 2. Choose «Configuration Tools» and «SQL Server Network Configuration».
Step 3. Then, find and right-click «Shared Memory». Choose «Enable».
Fix 3. Enable Named Pipes Protocol to Solve SQL Error 233
SQL Server error 233 occurs because the SQL Server client cannot connect to the server and is not configured to accept remote connections. To fix this issue, except for enabling Shared Memory and TCP/IP, we still need to activate Named Pipe protocols with SQL Server Configuration Manager tool.
Step 1. Run MS SQL Server.
Step 2. Go to configuration tools, and then open «SQL Server Network Configuration» in SQL Server Configuration Manager.
Step 3. Launch the Properties windows of Named Pipes Protocol then click «Enable».
Step 4. Click «Apply» and «OK» to apply this change on SQL Server.
You have required to restart SQL Server services from the SQL Server Configuration Manager. Once the server is online, try to reconnect to your SQL Server instance. Then, the error 233 may not appear and you will be able to make a successful database connection.
Fix 4. Check for Remote Connection
After these workarounds, if you are still facing Microsoft SQL Server error 233 no process is on the other end of the pipe, then you will need to allow remote connection for SQL Server.
Step 1. Connect to SQL Server Instance in SSMS locally on a database server.
Step 2. Right-click on the Server instance name and choose «Properties».
Step 3. At the left tab, select «connection» then check the option «Allow remote connections to this server».
Fix 5. Repair Corrupted MS SQL Database to Resolve SQL Error 233
If you are still facing the same issue, the cause might be the database itself. MS SQL Server is vulnerable to different threats and errors (823/824/825). Repairing the database can do you a favor. EaseUS MS SQL Recovery is a very professional and reliable SQL repair tool. It can recover database components (tables, triggers, indexes, keys, rules, and stored procedures) as well as recover deleted records from the SQL database. It supports MS SQL Server 2016, 2014, 2012, 2008, and older versions. Follow the details below and fix your database error.
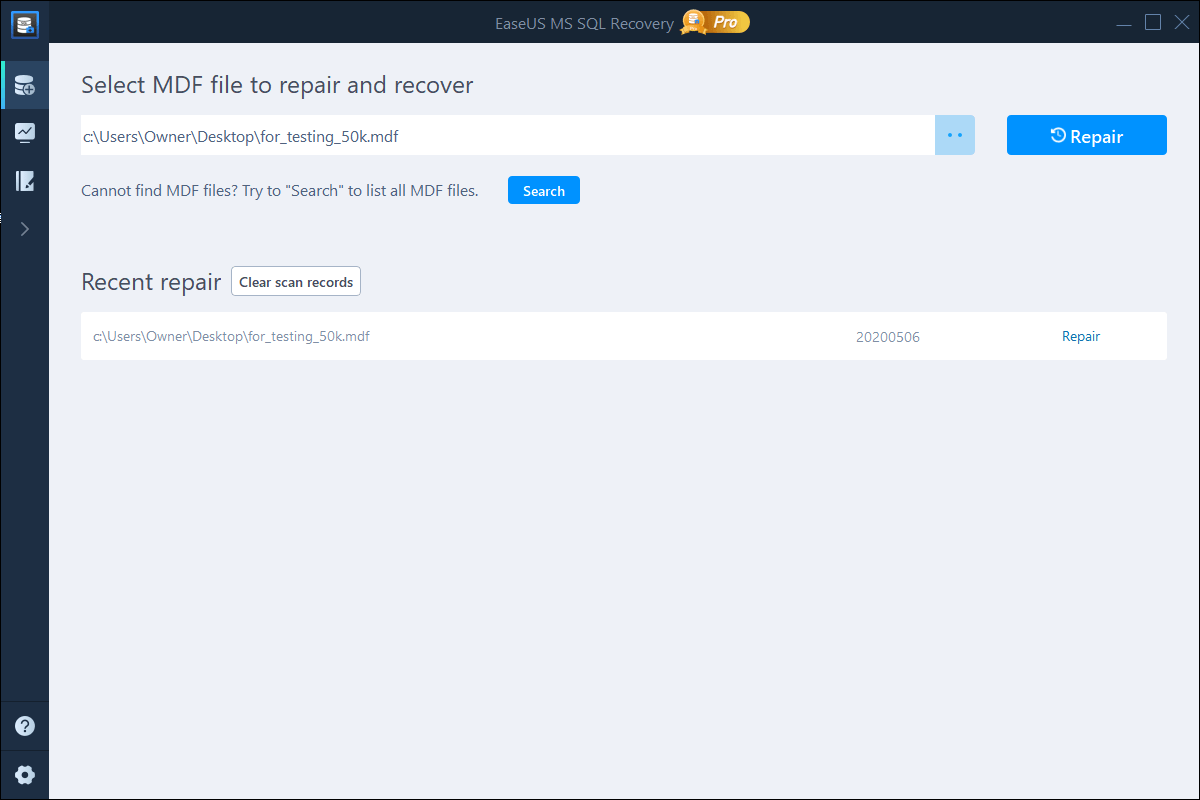
Step 1: Select the corrupted database for recovery
- Launch EaseUS MS SQL Recovery.
- Select the corrupted database file by clicking «Browse» (the two dots) or «Search».
- After selecting the file, click the «Repair» button to start the Analyzing process.
SQL Server Error Code 233 Causes
No process is on the other end of the pipe error 233 is often caused by two reasons:
- The client attempts to connect with only named pipes and the named pipes protocol is not enabled on the server.
- The client attempts to connect with any available protocol, but named pipes are listed before TCP in the client protocol order.
According to the two reasons above, you can fix error 233 easily.
Fix 1. Enable TCP/IP to Solve SQL Server Error 233
If the client is attempting to connect using named pipes, and the server is not configured to allow remote connections using named pipes, follow this:
Step 1. Open MS SQL Server.
Step 2. Go to configuration tools, and then open «SQL Server Network Configuration» in SQL Server Configuration Manager.
Step 3. Choose «TCP/IP» option and enable remote connections using named pipes.
If the client protocol order is attempting to connect with the named pipes protocol before trying the TCP protocol, and named pipes are not enabled on the server, solve this problem by following this:
Using SQL Server Configuration Manager on the client computer, move TCP before named pipes in the protocol order list.
Fix 2. Enable Shared Memory
Shared Memory Protocol is used for connecting SQL Server, if it is disabled, it may lead to SQL Server login failed error 233.
Step 1. Open MS SQL Server in your system.
Step 2. Choose «Configuration Tools» and «SQL Server Network Configuration».
Step 3. Then, find and right-click «Shared Memory». Choose «Enable».
Fix 3. Enable Named Pipes Protocol to Solve SQL Error 233
SQL Server error 233 occurs because the SQL Server client cannot connect to the server and is not configured to accept remote connections. To fix this issue, except for enabling Shared Memory and TCP/IP, we still need to activate Named Pipe protocols with SQL Server Configuration Manager tool.
Step 1. Run MS SQL Server.
Step 2. Go to configuration tools, and then open «SQL Server Network Configuration» in SQL Server Configuration Manager.
Step 3. Launch the Properties windows of Named Pipes Protocol then click «Enable».
Step 4. Click «Apply» and «OK» to apply this change on SQL Server.
You have required to restart SQL Server services from the SQL Server Configuration Manager. Once the server is online, try to reconnect to your SQL Server instance. Then, the error 233 may not appear and you will be able to make a successful database connection.
Fix 4. Check for Remote Connection
After these workarounds, if you are still facing Microsoft SQL Server error 233 no process is on the other end of the pipe, then you will need to allow remote connection for SQL Server.
Step 1. Connect to SQL Server Instance in SSMS locally on a database server.
Step 2. Right-click on the Server instance name and choose «Properties».
Step 3. At the left tab, select «connection» then check the option «Allow remote connections to this server».
Fix 5. Repair Corrupted MS SQL Database to Resolve SQL Error 233
If you are still facing the same issue, the cause might be the database itself. MS SQL Server is vulnerable to different threats and errors (823/824/825). Repairing the database can do you a favor. EaseUS MS SQL Recovery is a very professional and reliable SQL repair tool. It can recover database components (tables, triggers, indexes, keys, rules, and stored procedures) as well as recover deleted records from the SQL database. It supports MS SQL Server 2016, 2014, 2012, 2008, and older versions. Follow the details below and fix your database error.
Step 1: Select the corrupted database for recovery
- Launch EaseUS MS SQL Recovery.
- Select the corrupted database file by clicking «Browse» (the two dots) or «Search».
- After selecting the file, click the «Repair» button to start the Analyzing process.
Note: To use this software, you need to stop the SQL Server service.
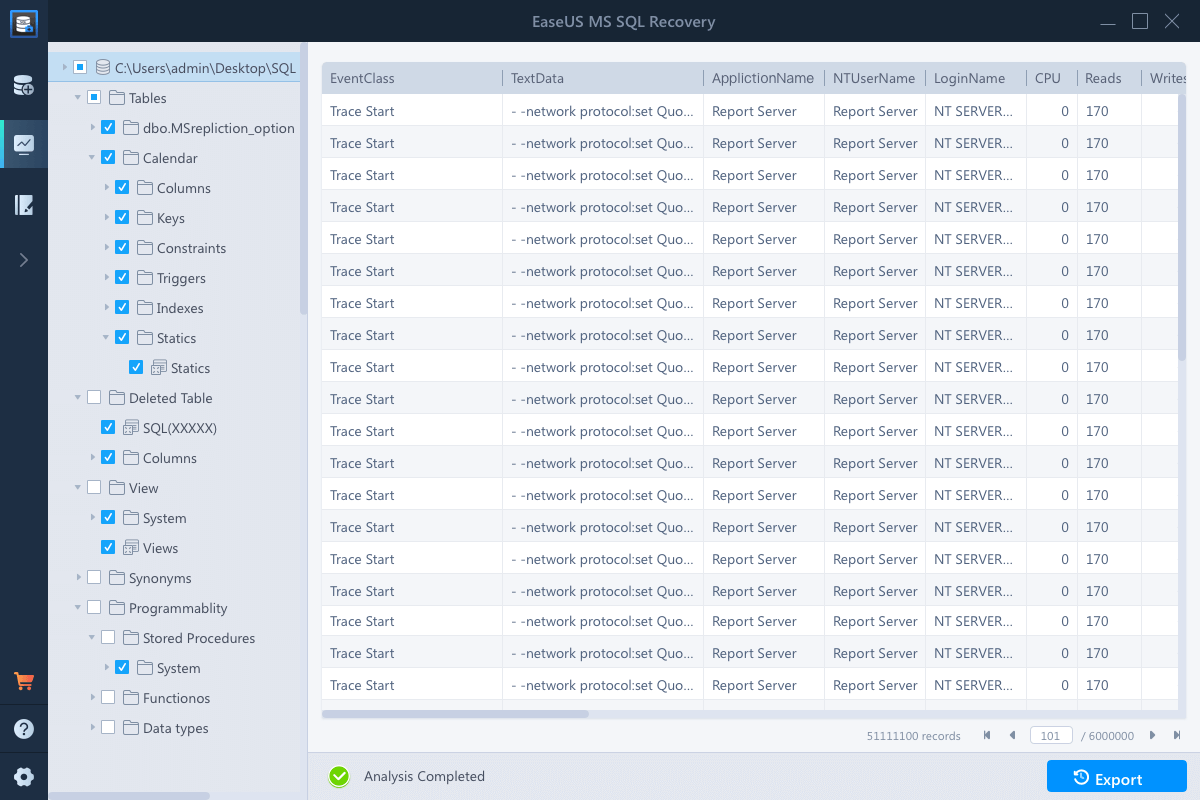
Step 2: Repair the corrupted database
- The software displays all the recoverable items in a tree-like structure. The items are shown in a left pane.
- Select the desired component to be recovered. From the window, click the «Export» button.
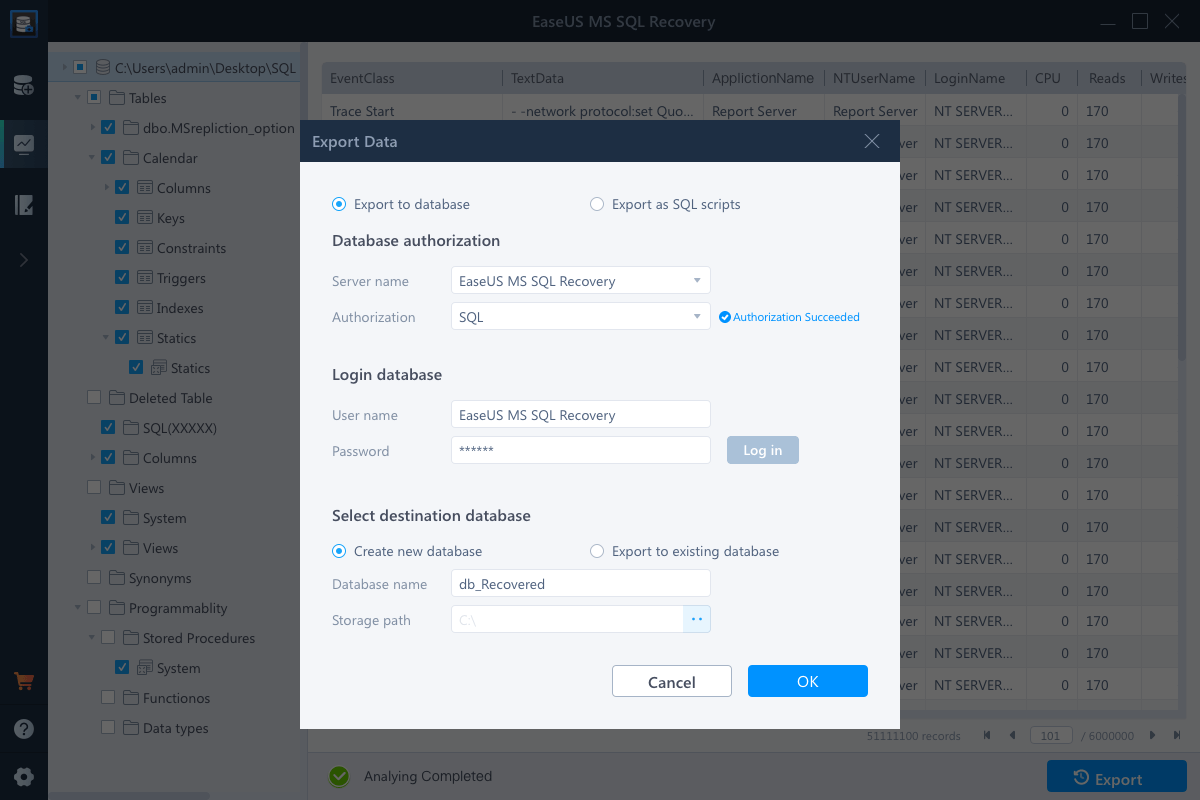
Step 3: Export to the database or as scripts
- Choose to export the database objects to database or export the items as scripts
- If you choose «Export to database», enter the information required and choose the target database.
Step 3: Export to the database or as scripts
- Choose to export the database objects to database or export the items as scripts
- If you choose «Export to database», enter the information required and choose the target database.
- A window appears up asking you to provide credentials to connect to the server and the destination to save the recovered items. In order to begin the repairing process, click «OK».
Note: Before clicking «OK», you need to restart the SQL Server service.
Though the EaseUS SQL repair tool should succeed in resolving the error, in the rare event that it can’t, you should then contact Microsoft customer support for professional assistance.
Conclusion
In this article, we have discussed SQL Server error 233 no process is on the other end of the pipe in detail, including error explanation, causes, and all the feasible solutions. If you run into this error, don’t panic, utilize any methods above, i.e. enable Shared Memory, TCP/IP, and Named Pipe protocols to let SQL Server client connect to the server or use a reliable SQL recovery software to restore (.mdf and.ndf) files, fix database log files, or recover corrupted objects.
We hope this tutorial can help you to resolve the SQL login failed error 233.

Вчера весь день я провёл, пытаясь подключиться к локальной базе данных на MS SQL Server, но это опять больше напоминало какой-то квест (как во многих моментах в программировании): как только одна небольшая задачка оказывалась решена, впереди оказывалась ещё одна – не менее непонятная. В итоге я всё же справился и с сервером, и с кодом в Идее, поэтому решил законспектировать свои успехи.
Мне нужно было запустить у себя на компьютере приложение, которое уже неплохо работало на удалённом сервере. Для этого я был готов собрать проект из исходного кода, но для корректной работы необходимо было ещё и продублировать базу данных. Я поставил SQL Server, восстановил базу из дампа с рабочего сервера (правой кнопкой по Databases -> Restore Database -> в Device выбрать нужный файл с компьютера), но дальше всё не шло так уж гладко. Залогиниться из среды Intellij Idea не выходило, собранное приложение этого тоже не могло делать, поэтому просто крашилось при запуске. Тут я подумал, что наверно следовало бы настроить MS SQL Server – просто поставить его недостаточно.
Я статью начну с описания того, что следовало бы сделать изначально – как всё настроить, чтобы всё сразу работало, а потом уже перейду к ошибкам, которые я получал, потому что так не сделал.
Настройка SQL Server Configuration Manager
Такая проблема решается настройкой в Configuration Manager. Найти его можно по адресу C:WindowsSysWOW64SQLServerManager14.msc (мой менеджер для SQL Server 2017, для боле новой версии 2019 был бы SQLServerManager15, для старой – SQLServerManager11-13, но всё в той же папке).

Здесь нужно развернуть пункт меню SQL Server Network Configuration, выбрать нужную конфигурацию (у меня это SQLEXPRESS) и убедиться, что TCP/IP включён (Enabled) – исправить ситуацию можно правой кнопкой мыши – Enable.
Далее нужно просмотреть свойства (двойное нажатие мыши), убедиться, что на вкладке Prototocol -> Listen All – Yes, а на вкладке IP Adresses в самом низу в IPAll записан порт 1433.

Вообще порт можно выбрать и другой, но я в своей конфигурации остаюсь со стандартным вариантом.
Настройка в SQL Server Management Studio
Дла начала нужно создать юзера. Для этого я подключился к базе с проверкой подлинности Windows в навигаторе слева выбрал Security -> Logins -> щелчок правой кнопкой -> New Login.

В этом окне создаём логин с аутентификации SQL Server Authentication. Далее всё довольно просто: Login Name – имя пользователя, в password – его пароль. Снять галочку с Enforce password security policy и всё – готово.

Далее нужно отредактировать роли этого нового юзера (или уже существующего, если у вас уже есть логин и пароль, но с ними что-то идёт не так). Для этого в папке Logins выбираем эту новосозданную запись -> щелчок правой кнопкой -> Properties. На вкладке Server Roles отмечаем нужные роли. Я ткнул sysadmin, чтобы всё уж точно работало.

Ну и чтобы после всех этих настроек всё работало корректно, нужно перезапустить сервер. Я даже перезапустил службу SQL Server (SQLEXPRESS). Но вообще для остановки или запуска сервера можно и вбить в командной строке (конечно же от имени администратора):
net {stop|start} mssqlserverПроверьте, работает ли новый логин, отключившись и подключившись заново уже с новым типом аутентификации.

Если вы всё ещё получаете ошибку Microsoft SQL Server Error: 18456, или то проверьте, включена ли вообще аутентификация по логину и паролю. Правой кнопкой по экземпляру SQL Server -> Properties -> Security -> выберите SQL Server and Windows Authentication Mode. Также это должно решить проблему 233:
A connection was successfully established with the server, but then an error occurred during the login process
Error Number: 233
Теперь всё должно работать и можно подключаться к базе с помощью логина и пароля. Ну и дальше можно уже организовать подключение из IDE.
Подключение из Intellij Idea с помощью Windows Credentials
Для начала я решил проверить соединение с базой из Intellij Idea. Чтобы его создать нужно перейти в панель Database (у меня она справа, но также выбрать её можно через меню View -> Tool Windows -> Database). Нажимаем на плюсик и создаём новый источник (Data Source), у меня это Microsoft SQL Server с какой-то непонятной иконкой.

Внутри заполняем все нужные данные.
Название хоста – в моём случае название моего компьютера,
в Instance – SQLEXPRESS (или может у вас MSSQLSERVER?)
Стандартный порт 1433.
В Authentication выбираем Windows Credentials – начинаем с простого.
Database весьма очевидное поле – имя базы данных.

Не забудьте переключить драйвер на Microsoft SQL Server (jTds) – обычный Microsoft почему-то у меня работает некорректно (и, судя по stackoverflow, не у меня одного).
Ошибки подключения из Intellij Idea
Вроде бы всё должно работать, но при моих попытках подключиться из Intellij Idea я получал следующее сообщение об ошибке:
[08S01] The TCP/IP connection to the host localhost, port 1433 has failed. Error: "Connection timed out: no further information.. Verify the connection properties. Make sure that an instance of SQL Server is running on the host and accepting TCP/IP connections at the port. Make sure that TCP connections to the port are not blocked by a firewall.".Такая проблема решается настройкой в Configuration Manager (см выше — первый пункт).
Подчеркну, что я сначала создавал подключение, а лишь потом кинулся всё настраивать, поэтому я имел несчастье наблюдать эти ошибки. После настройки эта проблема разрешилась. Поэтому, если вы начали с настройки, то у вас этой проблемы быть и не должно.
Но далее у меня вылезла новая ошибка:
[08S01] The driver could not establish a secure connection to SQL Server by using Secure Sockets Layer (SSL) encryption. Error: "PKIX path building failed: sun.security.provider.certpath.SunCertPathBuilderException: unable to find valid certification path to requested target". ClientConnectionId:9a5.......
sun.security.provider.certpath.SunCertPathBuilderException: unable to find valid certification path to requested target.
С безопасностью я в принципе мало дружу, но гугл подказал, что всего лишь нужно в URL добавить пару новых параметров: encrypt=true и trustServerCertificate=true.
Тогда строка для подключения (URL) получилась такой:
jdbc:sqlserver://MYCOMPUTERSQLEXPRESS:1433;database=db_example;encrypt=true;trustServerCertificate=trueИ теперь в Intellij Idea я мог спокойно подключаться к базе с помощью Windows Credentials.
Подключение из Intellij Idea с помощью User & Password Authentication
Здесь настройка почти ничем не откличается. Только выбираем другой тип аутентификации и вводим логин и пароль, который недавно создавали (см. выше – Настройка в SQL Server Management Studio).

После этого можно жамкнуть Test Connection, чтобы убедиться, что всё работает.
Вот и всё! Всё должно работать. Теперь можно засунуть это подключение в Hibernate.
<hibernate-configuration>

<session-factory>

<property name="connection.driver_class">net.sourceforge.jtds.jdbc.Driver</property>

<property name="connection.url">jdbc:jtds:sqlserver://SALINGER:1433/db_example;instance=SQLEXPRESS;encrypt=true;trustServerCertificate=true</property>

<property name="connection.username">admin</property>

<property name="connection.password">{HIDDEN } </property>

<property name="connection.pool_size">100</property>

<property name="dialect">org.hibernate.dialect.SQLServerDialect</property>

<...>

</session-factory>

</hibernate-configuration>
Надеюсь эта статья кому-то помогла избежать мучений, какие я испытывал, гугля каждую из ошибок в уверенности, что вот теперь-то всё будет работать.
Microsoft SQL server error 233 triggers while users login to an existing database. It happens due to a number of reasons ranging from exceeding the connection limit to firewall restrictions.
As a part of our Server Management Services, we help our Customers to fix database-related errors regularly.
Let us today discuss the possible causes and fixes for this error.
What causes the SQL server error 233?
Users often experience that they are unable to connect to an existing database even after providing the correct login credentials. The error message that they notice may resemble the one given below:

The common reasons for the Microsoft SQL server error 233 include;
- SQL server not set for Mixed mode
- TCP/IP protocol disabled
- Shared Memory Protocol disabled
- Named Pipes Protocol disabled
- Virtual Interface Adapter disabled
- View Port in Windows Firewall
- Check for Remote Connection
- Exceeding the number of Connections
Let us now look into each of these reasons in detail and their fixes.
SQL Server is not set to Mixed Mode
Mixed Mode (SQL Authentication Mode) provides a System Administrator account using a separate user name and password that can also be used to connect to the SQL server in addition to the Windows account. The 233 error can trigger if it is disabled. You can verify the cause of this error by trying to log in to SQL Server Management Studio (SSMS) using the System Administrator account.
1. Log in to SSMS using Windows Authentication.
2. Right-click on the main entry for the server itself and select Properties.
3. In the Properties screen, select Security on the left.
4. Change the Server Authentication setting from Windows Authentication to 'SQL Server and Windows Authentication mode'. Click OK.
5. To apply these settings, restart the SQL Server services by right-clicking on the server's main entry and selecting Restart.
TCP/IP protocol disabled
For SQL Server to be connected properly, TCP/IP should be enabled. It can be enabled using the steps given below:
1. Open MS SQL Server in your system
2. Go to configuration tools, and then open SQL Server Configuration Manager in your system >> SQL Server Network Configuration.
3. Choose TCP/IP option and enable it with a right-click
Finally, restart the SQL Server for the changes to take effect.
Shared Memory Protocol disabled
SQL Server Shared Memory protocol is used by clients to connect to the SQL Server instance that is running on the same machine. Sometimes, the user faces an authentication error, when the Shared Memory protocol is disabled. It can be easily enabled with the steps discussed below:
1. Go to Start → All Programs → MS SQL Server → Configuration Tools → SQL Server Configuration Manager.
2. Choose SQL Server Network Configuration.
3. Then, right-click on the option Shared Memory → Choose Enable.
Named Pipes Protocol disabled
Named Pipes protocols are established for local area networks. In it, a part of memory is used by one procedure to pass the info to another process. It can be on the same system or on a networked system. The user faces this error when the Named Pipes are disabled.The steps to enable it includes:
- Open the SQL Server Configuration Manager and Navigate to SQL Server Network Configuration
- From the SQL Server Network Configuration go to Named Pipes Protocol and Enable it.
Virtual Interface Adapter disabled
VIA or Virtual Interface Adapter works with VIA hardware. Users face an SQL error when VIA is not enabled in the system. Thus. to remove an error issue, enable the VIA option from the SQL Server Network Configuration.
View Port in Windows Firewall
SQL Server ports running on the system, are added to exception, and firewall filters all traffic from those ports. SQL Server runs on 1433 port by default but if the default port is changed, then the new port is added to the exception. It can be done with the steps below:
1. First, open Control Panel in your system.
2. Now select Windows Firewall → Change Settings.
3. Click on Exceptions, and then select Add Port.
4. A window will appear, now fill the port number, and click on Ok button.
5. Then, enable the SQL.
Check for Remote Connection
Remote connection is important to connect to the SQL server remotely. Thus, it may trigger the error 233 error on a remote connection. To enable it, follow the steps below:
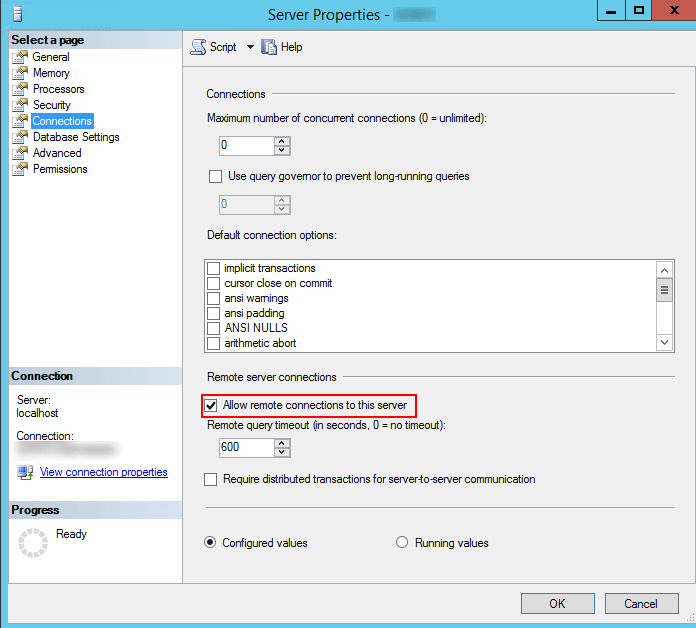
1. Click on Server node → choose Properties.
2. At left Tab select connection → check the option “allow remote connections to this server”
Exceeding the number of Connections
If the number of connections exceeds the limit, we won’t be able to connect until another connection becomes available. In such cases, it triggers the 233 error. This can be fixed with the following measures:
1. Set the user connections option to 0 to enable the maximum number of allowed connection (which is 32767)
2. Increase the value of user connections so that SQL Server can accept the new connections.
3. You can also close your existing connections so that new connections can be accepted by SQL Server. But this is not a permanent solution.
The changes to the maximum number of allowed connection can be performed from SQL Server Management Studio (SSMS) by following the below steps:
- First, connect to SQL Server Instance in SSMS.
- Next, right-click on SQL Server Instance in SSMS and choose properties. The Server Properties window will appear to make server-level changes.
- Click on the “Connections” tab from the left side pane. Set this value to 0 to accept the maximum number of allowed connections or increase the value to fix the error.
- Finally, restart the server to apply this change into effect.
[Need any further assistance in fixing database errors? – We’re available 24*7]
Conclusion
In short, Microsoft SQL server error 233 triggers while login to an existing database. It happens due to a number of reasons ranging from exceeding the connection limit to firewall restriction. Today, we saw how our Support Engineers fix this error.
PREVENT YOUR SERVER FROM CRASHING!
Never again lose customers to poor server speed! Let us help you.
Our server experts will monitor & maintain your server 24/7 so that it remains lightning fast and secure.
GET STARTED
var google_conversion_label = «owonCMyG5nEQ0aD71QM»;
ИТ База знаний
Полезно
— Узнать IP — адрес компьютера в интернете
— Онлайн генератор устойчивых паролей
— Онлайн калькулятор подсетей
— Калькулятор инсталляции IP — АТС Asterisk
— Руководство администратора FreePBX на русском языке
— Руководство администратора Cisco UCM/CME на русском языке
— Руководство администратора по Linux/Unix
Навигация
Серверные решения
Телефония
FreePBX и Asterisk
Настройка программных телефонов
Корпоративные сети
Протоколы и стандарты
Популярное и похожее
Пошаговый ввод в домен Windows 10

Погружение в Iptables – теория и настройка

Про операционную систему Cisco IOS

iVideon — ваша веб — камера для видеонаблюдения

Фиксируем проблему SQL Error 233
3 минуты чтения
Порой при попытке подключения к БД в режиме SQL аутентификации, вы можете получить следующую ошибку:
У нас есть пару способов, которые могут помочь в решение этой проблемы.
Включить TCP/IP стек
По умолчанию, SQL сервер использует порт 1433, которые использует в качестве транспорта TCP. Нам нужно включить TCP/IP в настройках Configuration Manager:
- Подключитесь к SQL серверу;
- Откройте SQL Server Configuration Manager. Перейдите в настройку SQL Server Network Configuration → Protocols for %название%;
- Проверяем, чтобы TCP/IP был включен (Enabled). Если выключен, то дважды левой кнопкой мыши нажмите на опцию и выберите Enabled = Yes;
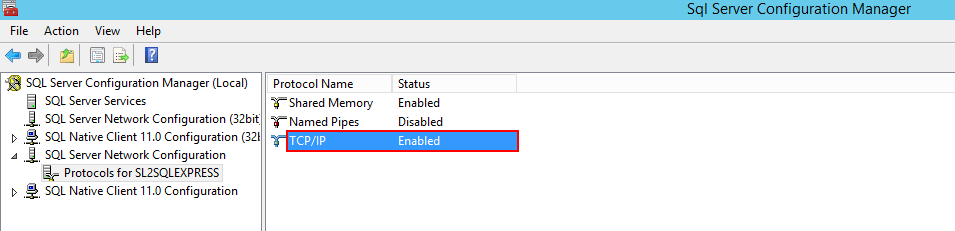
После указанного вида работ службу (сервис) SQL необходимо перезагрузить.
Named Pipes
Так называемый Named Pipes (именованный канал) обеспечивает взаимодействие между процессами на одной машине, без снижения производительности. Эту опцию нужно включить, если вы столкнулись с 233 ошибкой:
- Подключитесь к SQL серверу;
- Откройте SQL Server Configuration Manager. Перейдите в настройку SQL Server Network Configuration → Protocols for %название%;
- Проверяем, чтобы Named Pipes был включен (Enabled). Если выключен, то дважды левой кнопкой мыши нажмите на опцию и выберите Enabled = Yes;
Данная опция соседствует с параметром TCP/IP, который мы включали ранее (см. скриншот выше).
Гре***ый фаеравол!
На самом деле, фаервол это хорошо. Он защищает от атак наши системы. Но порой, из – за него у нас не работают нужные компоненты, и, в том числе, появляется ошибка 233.
Добавим 1433 порт в исключения. Для этого:
- Запустить службу WF.msc (открыв меню Пуск и набрав в поиске);
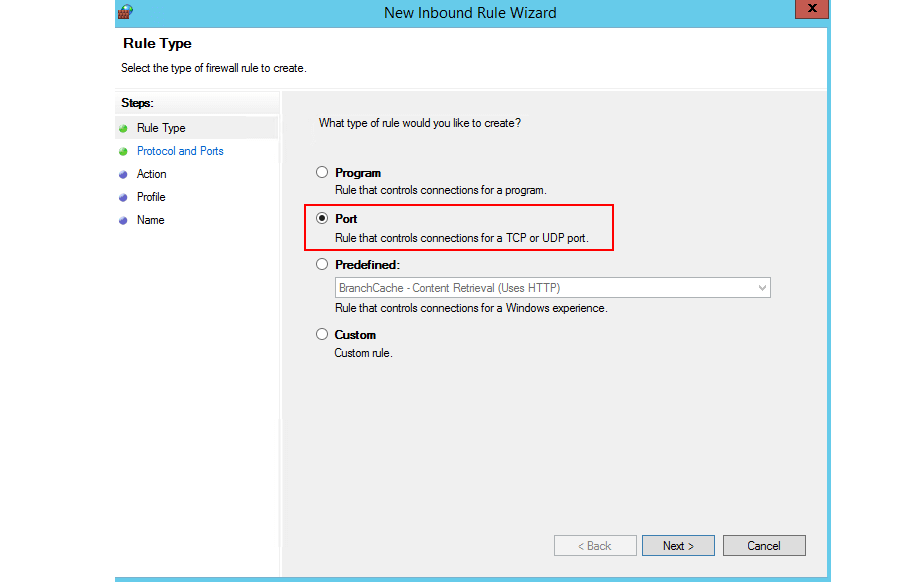
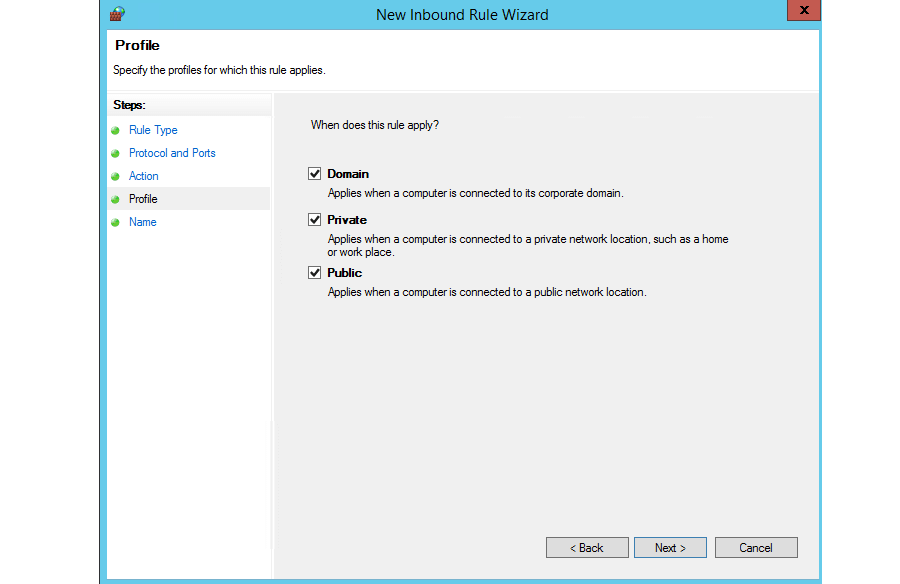
- В настройка Windows Firewall with Advanced Security, слева, нажмите на Inbound Rules, после чего нажмите на New Rule в открывшемся меню справа;
- В Rule Type выбираем Port, нажимаем Next;
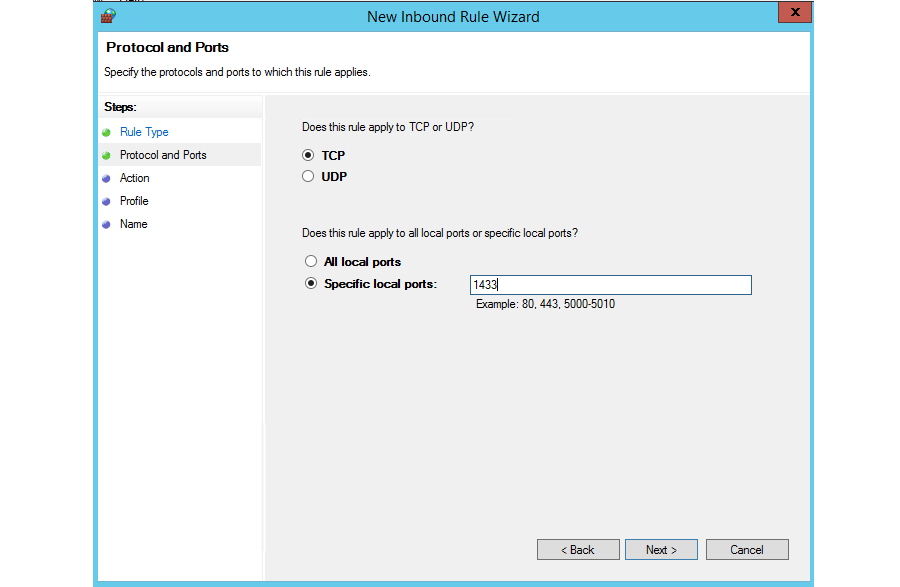
- В разделе Protocol and Ports, укажите TCP. В пункте Specific local ports указываем 1433. Нажмите Next;
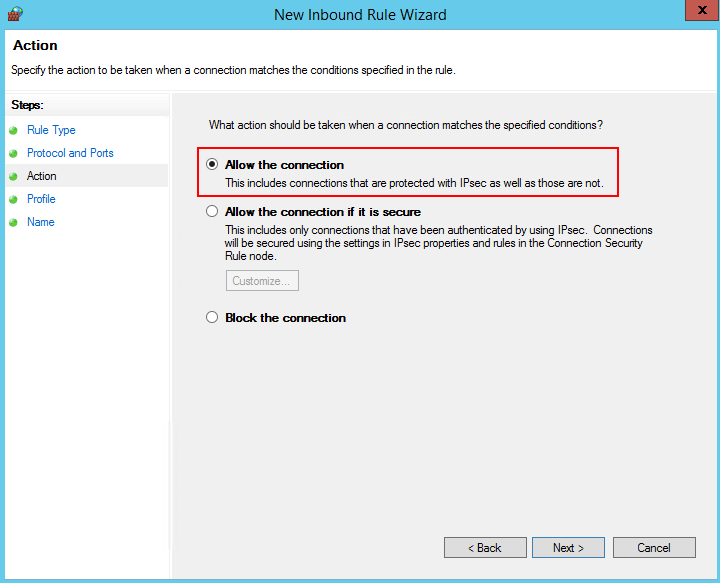
- В разделе Action (действия, что делать?), выбираем Allow the connection, и нажимаем Next;
- В разделе Profile применяем политику для всех видов (Domain, Private, Public). Важно! — настройка данного пункта зависит от ваших корпоративных политик безопасности и мы не рекомендуем открывать Public;
- В финальном окне даем имя нашему правилу, например, Allow inbound SQL;
Проверяем удаленные подключения
Важно не забыть разрешить удаленные подключения к серверу. Сделать это не трудно:
- Открываем SQL Server Management Studio и подключаемся (доменная или SQL аутентификация);
- Выбираем сервер (верхняя сущность в иерархии слева, в меню), нажимаем на него правой кнопкой мыши и выбираем пункт Properties;
- В открывшемся окне нажимаем на Connections. В меню настройки нажимаем на чекбокс Allow remote connections to this server;
- Нажимаем OK;
Перезагружаем сервис SQL, проверяем, пропала ли ошибка? 🙂
Полезна ли Вам эта статья?
Пожалуйста, расскажите почему?
 Нам жаль, что статья не была полезна для вас 🙁 Пожалуйста, если не затруднит, укажите по какой причине? Мы будем очень благодарны за подробный ответ. Спасибо, что помогаете нам стать лучше!
 Подпишитесь на нашу еженедельную рассылку, и мы будем присылать самые интересные публикации 🙂 Просто оставьте свои данные в форме ниже.
How to Fix Microsoft SQL Server error 233 – Login failed
When try to access the database sometimes on users appear ” Microsoft SQL Server error 233 “. This is very general connection error and to fix this you will need to test different solutions. The error 233 come with different messages. Below we will list all the solutions that need to be checked one by one.
Error 233 – Login failed
A connection was successfully established with the server, but then an error occurred during the login process. (provider: Shared Memory Provider, error: 0 – No process is on the other end of the pipe.) (Microsoft SQL Server, Error 233)
Fix Microsoft SQL Server error 233
The list to be checked:
- Enable SQL Server and windows authentication
- Check default database
- Max Allowed Connections
- SharedMemory, TCP/IP, Named Pipes
- Check if SQL Server Browser is started
- “Maximum Server Memory” to below the amount which could run the services
- Check for Remote Connection

Microsoft SQL Server error 233
Solution for Microsoft SQL Server error 233
Enable SQL Server and windows authentication
- Login to Microsoft SQL Server with windows authentication.
- Right-click onto the server name in Object Explorer and click Properties
- Click Security, select SQL Server and Windows Authentication
- Ok
- Close the SQL server management studio.
- start+run and write services.msc
- search for SQL there and restart all services.
Check default database
Check your default database and if that is online. More commonly this issues seen when the default database will be offline or not exists. If your default database other than master, You need to revert to master.
Max Allowed Connections
Open MSSMS and run the command below:
You can got this error for the reason that the user connections was reset to 1. Only one user was able to connect with the SQL server. Just a simple query and the error fixed. I hope this will work for others as well.
SharedMemory, TCP/IP, Named Pipes
Typically, to troubleshoot this, you go to SQL Server Configuration Manager (SSCM) and:
1. Check if Shared Memory protocol is enabled
2. Check if Named Pipes protocol is enabled
3. Check if TCP/IP is enabled, and s ahead of the Named Pipes in the settings
“Maximum Server Memory” to below the amount which could run the services
You can connect to your instance through SSMS.
Check if SQL Server Browser is started
To resolve this use one of the following
- Start > Run > type services.mscand press enter – find SQLBrowser and start it
- Use “net start” | Start > Run > CMD ; type net start SQLBrowser
Check for Remote Connection
Also important is to enable the remote connection. If this feature is turned off, then SQL Server will work properly on your system but if your feature is on then, follow the steps given below:
- Click on Server node → choose Properties.
- Select connection → check the “allow remote connections to this server”
In the above discussion, there are some relevant solutions discussed to remove the Authentication Microsoft SQL Server error 233 . Comment below if you have any other solution.
Check other errors on our specific category “SQL Server“
Фиксируем проблему SQL Error 233
Порой при попытке подключения к БД в режиме SQL аутентификации, вы можете получить следующую ошибку:
A connection was successfully established with the server but then an error occurred during login process. (Provider: Shared Memory Provider, error: 0 – No process is on the end of the pipe.) (Microsoft SQL Server, Error: 233).
У нас есть пару способов, которые могут помочь в решение этой проблемы.
ВКЛЮЧИТЬ TCP/IP СТЕК
По умолчанию, SQL сервер использует порт 1433, которые использует в качестве транспорта TCP. Нам нужно включить TCP/IP в настройках Configuration Manager :
- Подключитесь к SQL серверу;
- Откройте SQL Server Configuration Manager . Перейдите в настройку SQL Server Network Configuration → Protocols for %название% ;
- Проверяем, чтобы TCP/IP был включен (Enabled). Если выключен, то дважды левой кнопкой мыши нажмите на опцию и выберите Enabled = Yes ;
После указанного вида работ службу (сервис) SQL необходимо перезагрузить.
NAMED PIPES
Так называемый Named Pipes (именованный канал) обеспечивает взаимодействие между процессами на одной машине, без снижения производительности. Эту опцию нужно включить, если вы столкнулись с 233 ошибкой:
- Подключитесь к SQL серверу;
- Откройте SQL Server Configuration Manager . Перейдите в настройку SQL Server Network Configuration → Protocols for %название% ;
- Проверяем, чтобы Named Pipes был включен (Enabled). Если выключен, то дважды левой кнопкой мыши нажмите на опцию и выберите Enabled = Yes ;
Данная опция соседствует с параметром TCP/IP, который мы включали ранее (см. скриншот выше).
ГРЕ***ЫЙ ФАЕРАВОЛ!
На самом деле, фаервол это хорошо. Он защищает от атак наши системы. Но порой, из – за него у нас не работают нужные компоненты, и, в том числе, появляется ошибка 233.
Добавим 1433 порт в исключения. Для этого:
- Запустить службу WF.msc (открыв меню Пуск и набрав в поиске);
- В настройка Windows Firewall with Advanced Security , слева, нажмите на Inbound Rules , после чего нажмите на New Rule в открывшемся меню справа;
- В Rule Type выбираем Port , нажимаем Next ;
- В разделе Protocol and Ports , укажите TCP . В пункте Specific local ports указываем 1433 . Нажмите Next ;
- В разделе Action (действия, что делать?), выбираем Allow the connection , и нажимаем Next ;
- В разделе Profile применяем политику для всех видов (Domain, Private, Public). Важно! — настройка данного пункта зависит от ваших корпоративных политик безопасности и мы не рекомендуем открывать Public;
- В финальном окне даем имя нашему правилу, например, Allow inbound SQL ;
ПРОВЕРЯЕМ УДАЛЕННЫЕ ПОДКЛЮЧЕНИЯ
Важно не забыть разрешить удаленные подключения к серверу. Сделать это не трудно:
- Открываем SQL Server Management Studio и подключаемся (доменная или SQL аутентификация);
- Выбираем сервер (верхняя сущность в иерархии слева, в меню), нажимаем на него правой кнопкой мыши и выбираем пункт Properties ;
- В открывшемся окне нажимаем на Connections . В меню настройки нажимаем на чекбокс Allow remote connections to this server ;
- Нажимаем OK ;
Перезагружаем сервис SQL, проверяем, пропала ли ошибка? 🙂
Fix Error 233: No process is on the other end of the pipe
by Manvendra Deo Singh · Published February 15, 2018 · Updated April 16, 2018
Today, I got an error 233 while connecting to one of the SQL Server instance using SSMS client. Error 233 was saying “No process is on the other end of the pipe”. The error details are given as:
A connection was successfully established with the server, but then an error occurred during the login process. (provider: Shared Memory Provider, error: 0 – No process is on the other end of the pipe) (Microsoft SQL Server, Error: 233)
You can see the screenshot of this error that I had received while making a database connection.

Error 233 – Root Cause
As error suggests the provider name as Shared Memory Provider. We know Shared Memory is a protocol used in SQL Server along with TCP/IP and Named pipe. We decided to check the settings and values for all protocols in SQL Server Configuration Manager.
I launched SQL Server Configuration manager and expanded SQL Server Network Protocols from left side pane. Here, you can see an option “Protocols for MSSQLSERVER”. MSSQLSERVER is the name of SQL Server Instance as default instance has been installed there. If you have named instance installed on your machine then you might get “Protocols for .
Now click on this option “Protocols for MSSQLSERVER”, you can see all three protocols used in SQL Server in right side pane as shown in below image.

Here we can see Shared Memory protocol is set as Enabled but Named Pipes is set as Disabled that should be enabled to make successful database connection. This was the main reason for getting this error. Keep reading this article to fix this issue in next section.
I have also written another aspect for Error 233 in below article. You might get this error if your SQL Server Instance has exceeded the total number of user connections set in server configurations. Have a look at this article as well.
Error 233 – Solution
We get error 233 because SQL Server client cannot connect to the server. This error could occur because the server is not configured to accept remote connections. To fix this issue, we will use the SQL Server Configuration Manager tool to allow SQL Server to accept remote connections. Here, in our case one of the protocol Named Pipe was disabled that’s why we were getting error. We will go ahead and fix this issue by enable the Named Pipe protocol. You might get this issue due to any protocol being disabled.
Make sure to enable Shared Memory, TCP/IP and Named Pipe protocols. Launch SQL Server Configuration Manager. Expand SQL Server Network Configuration from left side pane and click on Protocols for MSSQLSERVER. MSSQLSERVER is SQL Server Instance name. Now you will see all protocols in to right side pane. Right click on given protocols that is disabled and select Enable button to enable that protocols.
Named Pipe protocol was disabled in my case so I have launched Properties window of this protocol and selected Enabled option as Yes from dropdown as shown in below screenshot. Now click on Apply and Ok button to apply this change on SQL Server. It will ask you to restart the SQL Server service to apply these changes in to effect. Restart SQL Server services from SQL Server Configuration manager. Once services will come online, try to connect to your SQL Server instance, this time you will not face error 233 and you will be able to make successful database connection.

If you are still facing same issue then you can also check “Allow Remote Connections” settings for this SQL Server instance. This setting must be enabled to connect to databases remotely. Connect to SQL Server Instance in SSMS locally on database server. Right click on SQL Server instance name in SSMS and choose Properties. You will get Server properties window. Click on Connections from left side pane and tick the check box on Allow remote connections to this server option from right side pane.
I hope you like this article. Please follow our Facebook page and Twitter handle to get latest updates.
Read More Articles on SQL Server Connection Issues:
SQL Server 2008 Ошибка 233
Я создаю новый логин в SQL Server 2008 со следующим скриптом sql:
Он успешно создает новый логин. Но когда я пытаюсь войти с ним, используя SQL Server Management Studio, это не удается.:
Соединение с сервером было успешно установлено, но затем произошла ошибка при входе в систему. (поставщик: поставщик общей памяти, Ошибка: 0-на другом конце канала нет процесса.) (Microsoft SQL Server, Ошибка: 233)
— Что случилось? Как мне решить эту проблему?
14 Ответов
Вот как я это сделал, может быть, это работает и для вас тоже.
войдите в систему Mirosoft SQL Server 2012 с авторизацией windows.
щелкните правой кнопкой мыши имя сервера в объекте Explorer и выберите пункт Свойства
На новой вкладке нажмите кнопку безопасность
выберите SQL сервер и Windows аутентификация
Закройте среду SQL server management studio.
найдите там SQL и перезапустите все службы.
это работает на меня.
Также возможно, что вы пытаетесь использовать проверку подлинности сервера SQL, не включив ее. Чтобы исправить это, щелкните правой кнопкой мыши Свойства на экземпляре сервера в среде SQL Server Management Studio и обновите параметры безопасности до «SQL Server and Windows Authentication mode».
Похоже, вы пытаетесь подключиться с помощью именованных каналов, но сервер SQL не прослушивает этот протокол. Смотрите MSDN.
Два исправления MSDN предлагает следующие:
- Подключитесь с помощью TCP/IP, или используйте SQL Диспетчер конфигурации сервера к включение удаленных подключений с помощью именованных трубы.
- Использование Конфигурации Сервера SQL Менеджер на клиентском компьютере, переместить TCP перед именованными каналами в список заказов протокола.
Логин с правами администратора на сервере SQL Перейдите в раздел ценные бумаги > > логины > > выберите имя пользователя и перейдите в раздел Свойства
Из состояния > > снимите флажок блокировка учетной записи пользователя Смена пароля для пользователя Перезагрузите сервер sql и войдите под своим именем пользователя.
Я столкнулся с той же самой ошибкой.
Я решил эту ошибку, выполнив следующие действия:
- Отключите именованные каналы и перезапустите службы sql.
- После перезапуска sql сервера я включил каналы имен и снова перезапустил sql сервер ( Ссылка для шага 1 и 2 )
- Подключитесь к серверу SQL через studio.
- Щелкните правой кнопкой мыши на SQL instance —> Properties —> Connections — > » установите максимальное число 5. одновременное подключение к ‘0’ «.
- Сохранять изменения.
- Перезагрузите сервер SQL, если это возможно. (Ссылка для шага 3-6 )
Я надеюсь, что это кому-то поможет
Это может быть не проблема подключения . Проверьте свою базу данных по умолчанию, и если это онлайн . Чаще всего это происходит, когда база данных по умолчанию находится в автономном режиме или не существует . Если ваша база данных по умолчанию отличается от master, лучше установите этот флажок.
У меня была похожая проблема: 1. войдите в систему как главный пользователь или windows аутентифицированный пользователь. 2. щелкните правой кнопкой мыши на базе данных — > свойства — > безопасность —> 3. измените режим аутентификации Windows на «SQL server and windows authentication mode», нажав на переключатель. (если это не так) 4. перезапустить сервер
У меня была та же проблема, когда я впервые установил SQL Server 2014 на своей локальной машине. В моем случае решение состояло в том, чтобы установить правильную базу данных defualt.
Я не использовал стиль скрипта, но войти через GUI я столкнулся с тем же кодом ошибки. Я ввел неверный user name и именно поэтому получил Sql Server, Error: 233 .
Чтобы решить эту проблему, необходимо ввести следующую информацию:
Имя Сервера: MachineNameSQLEXPRESS
Аутентификация: SqlServer Authentication
Имя пользователя: Assigned user-name или просто sa
Пароль: xyzpqr
NOTE: здесь я написал выше данные только для демонстрационной цели, фактические данные-это свойства вашей машины & программного обеспечения.
Я попробовал большую часть решения, но не смог решить его, пока не нашел этот URL , который говорит, чтобы сделать следующее:
Откройте SQL Server Management Studio и выполните следующие запросы:
Причина, по которой мы получили эту ошибку, заключается в том, что пользовательские соединения были сброшены до 1, поэтому только один пользователь смог подключиться к серверу SQL. просто простой запрос сработал. Я надеюсь, что это сработает и для других.
Перейти к —> ремот настройки
Перейдите на вкладку «Remote»
в разделе «удаленная помощь» поставьте галочку «Разрешить подключение удаленной помощи к этому компьютеру«, Нажмите кнопку «Advance» и поставьте галочку » Разрешить... «а в «Invitation» установите» 30 дней «
Затем в части «Remote Desktop»
Просто отметьте галочкой » разрешить удаленное подключение к этому компьютеру «
У меня есть способ обойти эту проблему.
- Откройте один экземпляр и войдите в систему, используя аутентификацию windows
- разрешить sql и windows auth оба путем правой кнопки мыши на сервере БД.
- Откройте второй экземпляр и войдите в систему, используя аутентификацию sql.
Бинго sql аутентифицированный экземпляр открыт .. 🙂
Фактически таким образом мы обманываем аутентифицированный экземпляр sql, когда он пытается найти уже запущенный экземпляр.. работал на меня.. удачи
После следования приведенным здесь примерам и все еще не входя в систему, я обнаружил, что мой логин sa был отключен. Следующее заставило меня войти:
«Соединение с сервером было успешно установлено, но затем произошла ошибка при входе в систему.»
Я получал эту проблему от sqllocaldb при использовании из Docker. Проблема заключалась в том, что образу Docker не было выделено достаточно памяти. Увеличение объема памяти фактически устранило проблему.
Похожие вопросы:
Я перемещаю приложение с SQL Server 2008 на SQL Server 2012 Express, и все хорошо, но несколько хранимых процедур говорят, что у меня есть синтаксическая ошибка. Я посмотрел в интернете и не нашел.
Я только что установил sql server 2008 . Когда я попытался его подключить . Он показывал это сообщение : *TITLE: подключение к серверу Не удается подключиться к SQLServer. ДОПОЛНИТЕЛЬНАЯ ИНФОРМАЦИЯ.
При попытке проверить недопустимую строку подключения к экземпляру SQL Server 2008 Express я обнаружил это странное поведение: указание недопустимого Initial Catalog вызывает SQLException , номер.
Я пытаюсь изменить пароль учетной записи sa через SQL Server Management Studio, но это не меняет его, я попробовал все методы, описанные здесь.
У меня есть проблема ,произошла ошибка при установлении соединения с SQL Server 2008. При подключении к серверу SQL Server 2008 я использую аутентификацию windows для подключения сервера ,
Не мог бы кто-нибудь объяснить мне, почему это вызывает синтаксическую ошибку в SQL Server 2008 R2? Он прекрасно работает в SQL Server 2014. SELECT CustomerId, RequestDate, SUM(InitialActualCount +.
У меня есть экземпляр SQL Server 2008 R2, установленный на моей машине. При выполнении любого действия, требующего подключения, я могу подключиться к серверу, но получить ошибку при входе в систему.
Я использую следующий запрос, чтобы проверить его на SQL Server 2008, ошибка, которую я получаю Msg 102, Уровень 15, состояние 1, строка 13 неверный синтаксис рядом ‘.’. Запрос: SELECT.
Я изменил свой windows. Но я не могу прикрепить файлы mdf,ldf и не могу переместить или скопировать их. Моя ошибка в том, что: Не удалось получить данные для этого запроса.
После глобальной атаки RansomeWare мы обновили наш Windows Server 2012 R2 только для того, чтобы узнать, что наша SQL Server Management Studio (SSMS) перестала работать. Всякий раз, когда мы.