Windows определяет ошибку с кодом 0x80004005 как «неуказанную». Ее отображение свидетельствует о получении доступа к папкам по сети, которые используются или закрыты. Иногда можно наблюдать проблему с virtualbox (виртуальной машиной) и при проверки подлинности RDP (Remote Desktop Protocol). Частичное определение 0х80000 — говорит нам место отображения, но не причину. К сожалению точно определить не получится и придется придерживаться базовой-последовательной инструкции по фиксам такого рода.
Содержание
- E_FAIL 0x80004005 (NS_ERROR_FAILURE) в VirtualBox
- Причины возникновения при работе с VirtualBox
- Решение ошибки через переименования файлов VirtualBox
- Исправляем код 0x80004005 в Windows 10 и Windows 11
- Метод очистки обновлений
- Метод проверки доступности сетевых папок
- NS_ERROR_FAILURE
E_FAIL 0x80004005 (NS_ERROR_FAILURE) в VirtualBox
Причины возникновения при работе с VirtualBox
В процессе работы с VBOX некоторые исполняющие файлы могут быть заблокированны или повреждены. Определить причину неисправности можно путём взаимоисключения. В случае корректной работы и выхода из строя в один момент, нам нужно убедится, что причина исходит от самой программы, а не системы.
Решение ошибки через переименования файлов VirtualBox
Согласно официальны форумам, решение довольно простое. Для начала нам нужно зайти в папку с программой и выбрать операционную систему с которой вы работаете. Если на виртуалку ставили Ubuntu (или чистый Linux), заходим в нее и ищем файлы с названием «Linux.vbox-prev«. Пометка «-prev» означает, что это резервная стабильная копия системы. Сохраните актуальный файл «Linux.vbox» в другое место и пробуйте запустить программу.
Исправляем код 0x80004005 в Windows 10 и Windows 11
Казалось бы идентичный номер с прошлой программой, а нет. Windows 10и Windows 11 сама по себе уникальная ОС, которая позволяет чинить и мониторить себя самостоятельно. Корень находится в обновлениях системы, при которых заменяется исходный код .dll файлов папки system32.
Метод очистки обновлений
Данный метод позволяет очистить систему от обновлений которые не смогли установится или причиной был сбой. Для удаления входим в командную строку:
- Нажимаем WIN+R. Появится окошко «выполнить».
- Вводим команду «%systemroot%SoftwareDistributionDownload«.
- Откроется проводник с папкой дистрибутивов обновлений.
- Выделяем все и удаляем.
- Перезагружаем компьютер и пытаемся заново установить обновы.
Метод проверки доступности сетевых папок
Каждый компьютер подключённый к локальной сети (беспроводная фактически считается локальной) имеет доступ к другим точкам. При выполнении подключения происходит обращение к IP-адресу и порту клиента. Маршрутизатор и ваш компьютер кеширую данные полученные при коннекте. Windows 10 и Windows 11 хранит права сетевых папок для более быстрого доступа. Нам придется обновить сетевой кеш вручную.
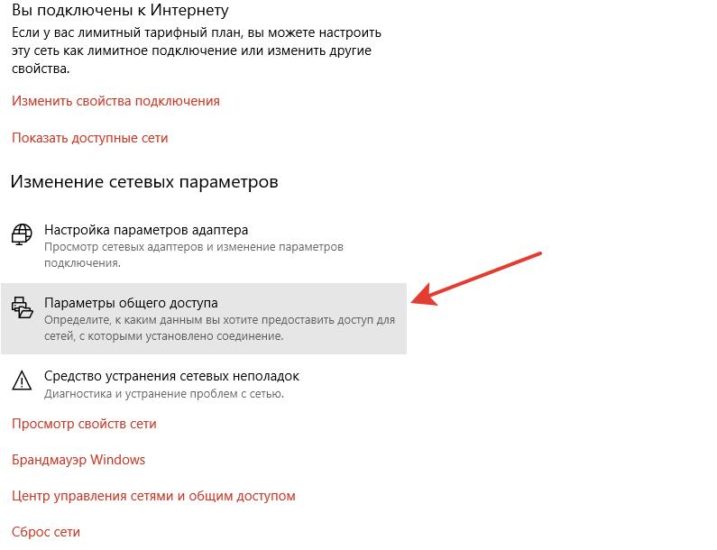
- Внизу справа нажимаем на подключение сети правой кнопкой и выбираем пункт «Параметры сети и Интернет».
- Следующим пунктом будет «Параметры общего доступа».
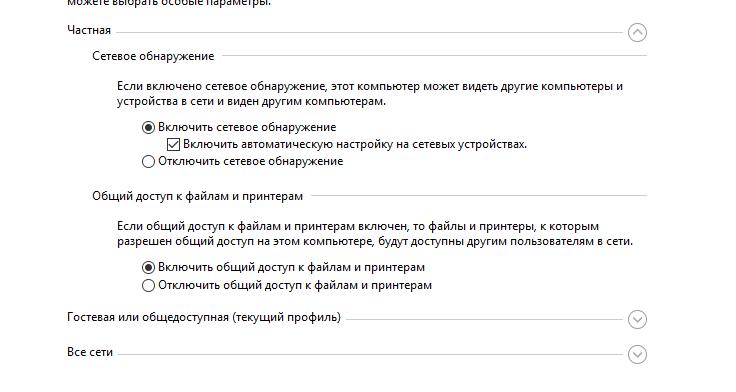
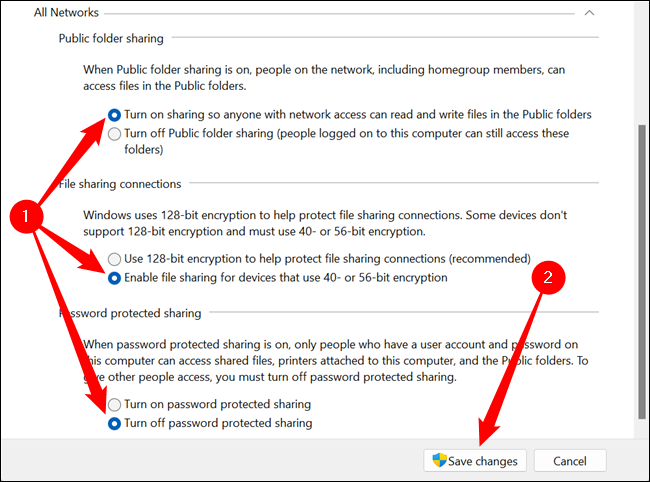
- В следующем окне, Вам необходимо выбрать тип сети. Частная, Гостевая или Все сети и выставить галочки как на скриншоте:
- Обратите внимание, что при гостевой сети, лучше не баловаться этими настройками.
Если все выполнено верно, Windows 10 и Windows 11 сбросит кешированные данные полученные по локальной сети и ошибка 0x80004005 должна исчезнуть.
NS_ERROR_FAILURE
Проблема может возникать сразу после установки и перезагрузки VBOX. Она не закрепляется за определенными моментами использования и сугубо индивидуальна.
Для начала вам следует полностью удалить VirtualBox и добавить репозиторий:
deb http://download.virtualbox.org/virtualbox/debian maverick contrib
deb http://download.virtualbox.org/virtualbox/debian lucid contrib
deb http://download.virtualbox.org/virtualbox/debian karmic contrib
deb http://download.virtualbox.org/virtualbox/debian jaunty contrib
deb http://download.virtualbox.org/virtualbox/debian intrepid contrib
deb http://download.virtualbox.org/virtualbox/debian hardy contrib
deb http://download.virtualbox.org/virtualbox/debian squeeze contrib
deb http://download.virtualbox.org/virtualbox/debian lenny contrib
deb http://download.virtualbox.org/virtualbox/debian etch contrib
Ключ:
wget -q http://download.virtualbox.org/virtualbox/debian/oracle_vbox.asc -O- | sudo apt-key add —
sudo apt-get update
sudo apt-get install virtualbox-4.0
Переустановка решает проблему с установленной к примеру XP. Причиной скорее всего была неправильная запись в WinXP.xml.
Еще одним способом решения будет следующее:
- Загружаем Ubuntu в режиме «Обычная загрузка».
- Загружаем консоль.
- Выбираем Memory Test.
- Ожидаем окончания тестирования памяти.
- Перезагружаемся и радуемся, что ошибка исправлена.
Всему виной обновление операционной системы при которой изменилось ядро. Драйвер затребовал перекомпиляции.

Пользователи сообщали об ошибке 0x80004005 в Windows 11 при попытке обновить свою ОС или даже активировать ее.
Причины этой проблемы могут варьироваться от несовместимости драйверов до других более сложных причин, которые могут быть обнаружены или не обнаружены средством устранения неполадок Центра обновления Windows.
Следуйте инструкциям, пока мы покажем вам, как устранить ошибку обновления и ошибку активации 0x80004005 в Windows 11, сразу после того, как мы увидим, почему так важно регулярно обновлять вашу операционную систему.
Почему важно обновлять ОС?
Вы, вероятно, знакомы с этими неприятными напоминаниями, которые отображаются на экране вашего компьютера. Каждый раз, когда вы открываете компьютер, они уведомляют вас о том, что ваши приложения и драйверы устарели.
Им всегда удается поднять свои уродливые головы в самый неподходящий момент, когда вы заняты чем-то важным. В результате вы должны следовать их инструкциям и поддерживать свой компьютер в актуальном состоянии.
Вопреки распространенному мнению, обновления программного обеспечения не должны причинять нам неудобства. Они не являются вредоносными, они предназначены для того, чтобы сделать наши системы более безопасными, препятствуя использованию хакерами уязвимостей.
В других случаях они могут исправить код, который позволяет хакерам устанавливать разрушительные вредоносные программы на наши компьютеры или стирать важные файлы на наших компьютерах. Если вы проигнорируете это сообщение, вещи, над которыми вы работали и которые, по вашему мнению, не успеют обновить программу, могут быть скомпрометированы.
Основным преимуществом установки обновлений является то, что для этого требуется всего несколько кликов, а если ваша система настроена правильно, вам даже не придется этого делать. Вы можете настроить свой ПК или Mac на автоматическую установку обновлений, если хотите.
Как исправить ошибку 0x80004005 в Windows 11?
1. Используйте средство устранения неполадок обновления
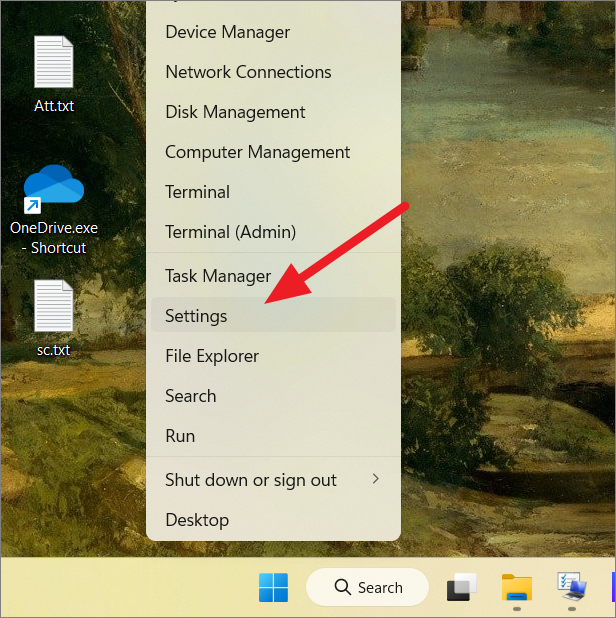
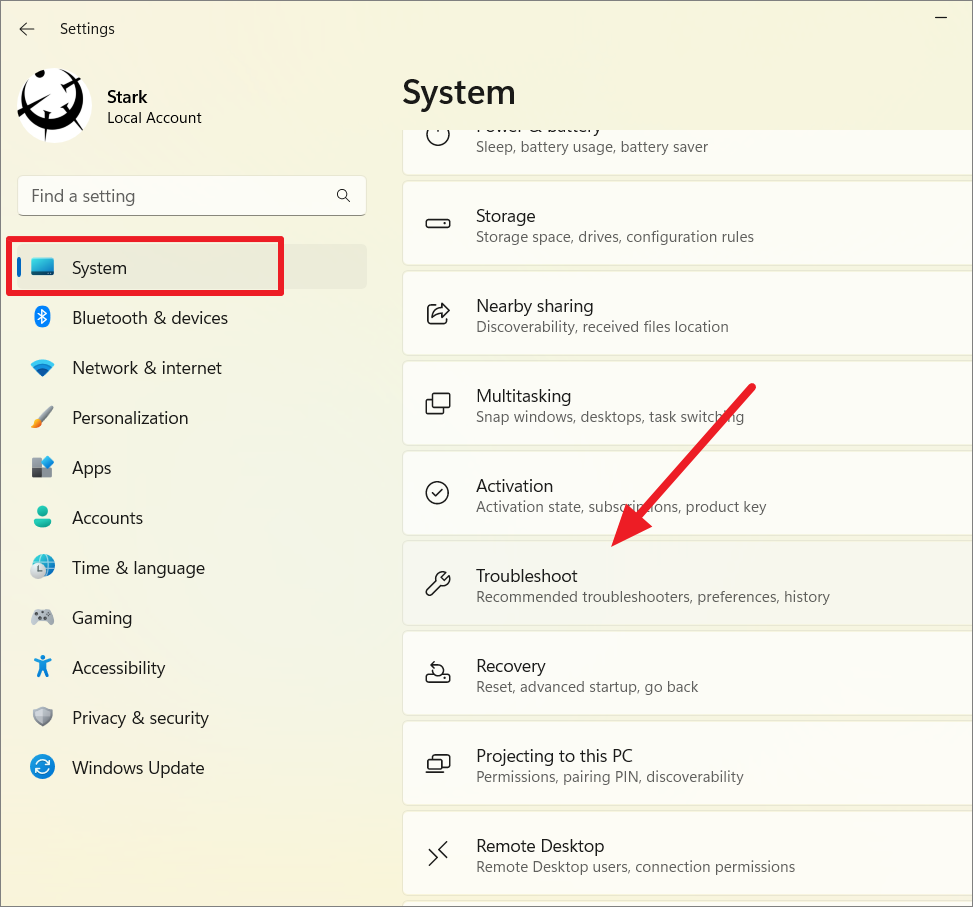
- Удерживайте Windows клавишу + I , чтобы открыть приложение « Настройки », и перейдите к « Система» , затем « Устранение неполадок » с правой стороны, как показано ниже.
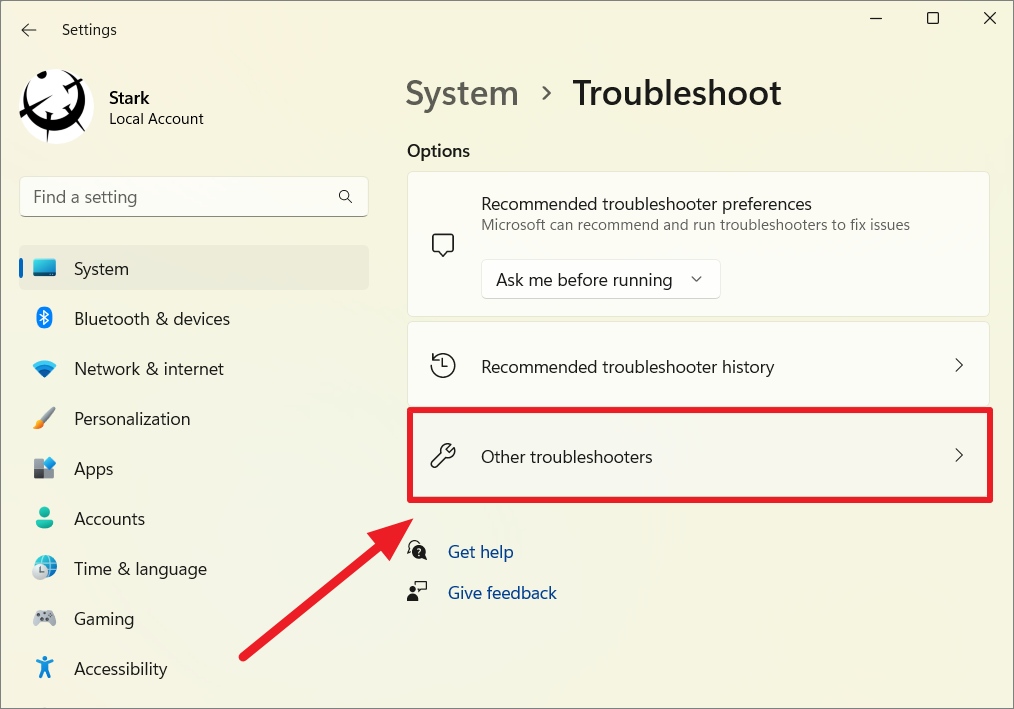
- Когда вы окажетесь в меню « Устранение неполадок », нажмите « Другие средства устранения неполадок», чтобы найти больше из них.
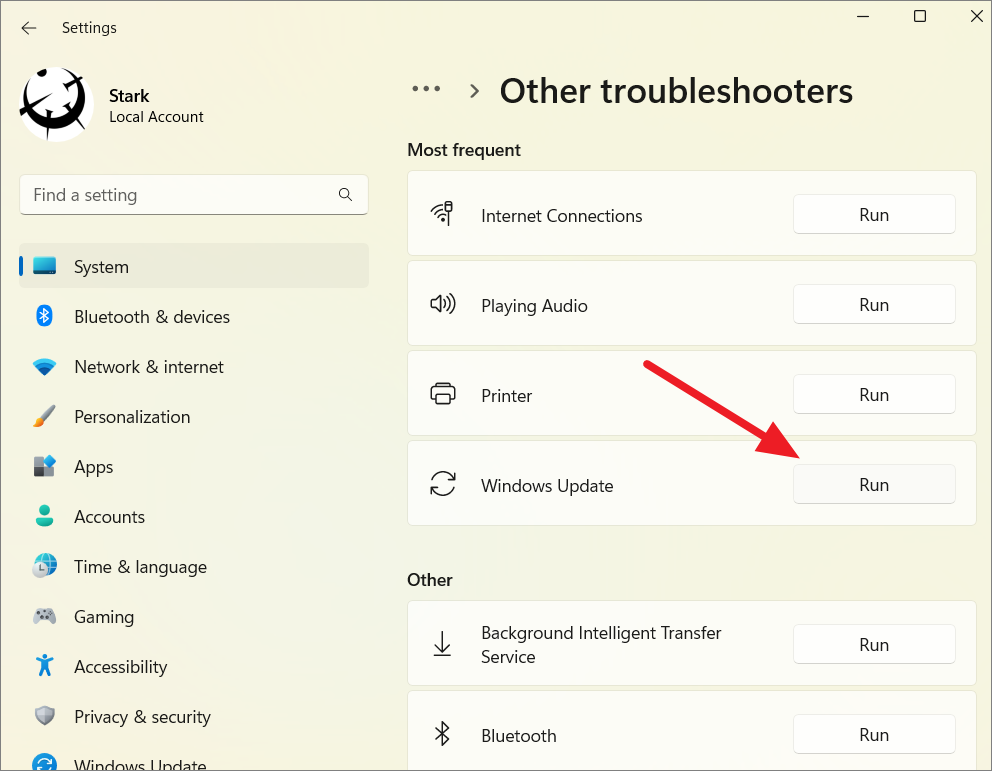
- Прокрутите вниз до средства устранения неполадок Центра обновления Windows и нажмите « Выполнить» рядом с ним.
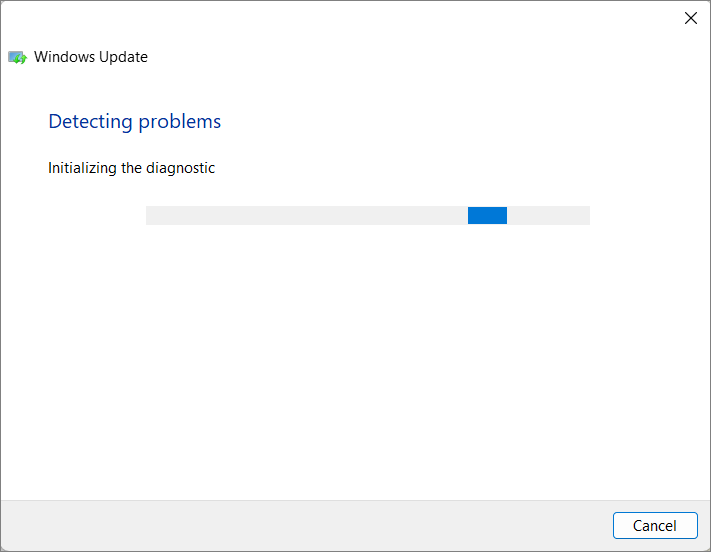
Когда средство устранения неполадок завершит поиск неисправностей, оно покажет вам конкретную возникшую ошибку и способы ее устранения. Обязательно следуйте представленным инструкциям шаг за шагом.
2. Проверьте драйверы вашего ПК
- Запустите приложение « Настройки » и перейдите на левую панель, чтобы выбрать « Центр обновления Windows » . Теперь нажмите Дополнительные параметры с правой стороны.
- Нажмите « Необязательные обновления » в разделе « Дополнительные параметры ».
- Теперь выберите « Обновления драйверов» в раскрывающемся меню и установите все флажки рядом с показанными вам обновлениями. Наконец, нажмите на кнопку « Загрузить и установить » . В моем конкретном случае их не осталось.
Хотя Windows обычно отвечает за обновления драйверов, если у вас возникли проблемы, вы можете вручную найти обновления и установить их. Тем не менее, мы настоятельно рекомендуем вам использовать специализированную программу, такую как DriverFix, для автоматического сканирования драйверов и экономии времени и возможных ошибок.
3. Начните с чистой загрузки
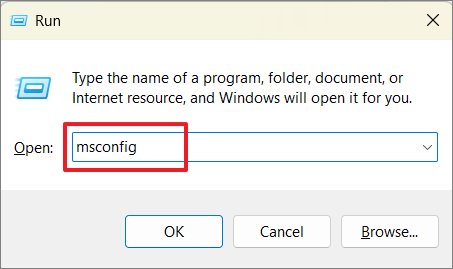
- Удерживая Windows клавишу + R, введите или вставьте msconfig , затем нажмите « ОК » .
- Затем перейдите на вкладку « Загрузка », чтобы проверить параметр « Безопасная загрузка ».
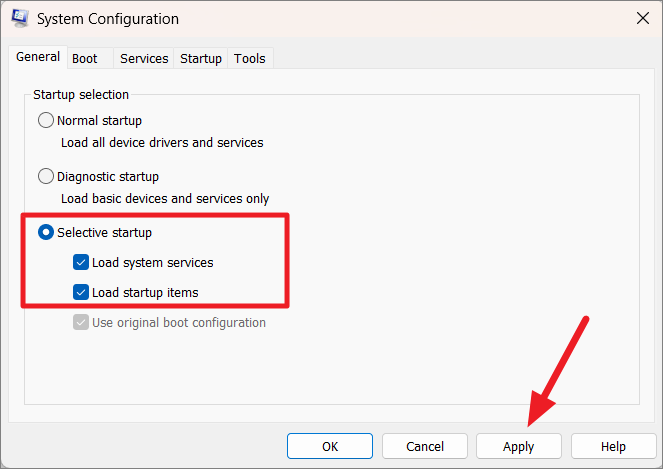
- Перейдите на вкладку с надписью « Общие » и убедитесь, что установлен переключатель « Выборочный запуск », и снимите флажок « Загрузить элементы запуска » .
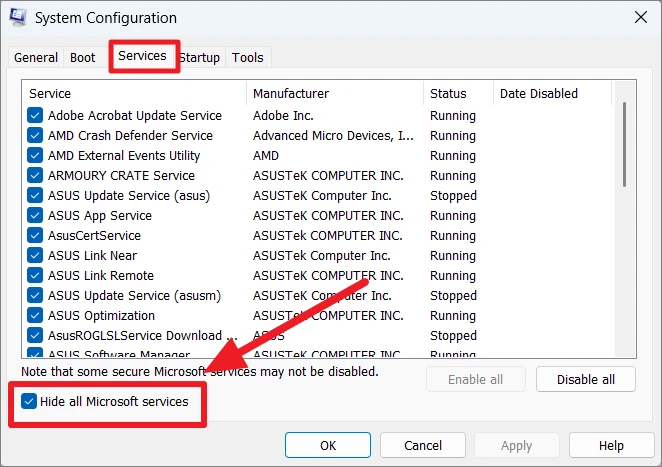
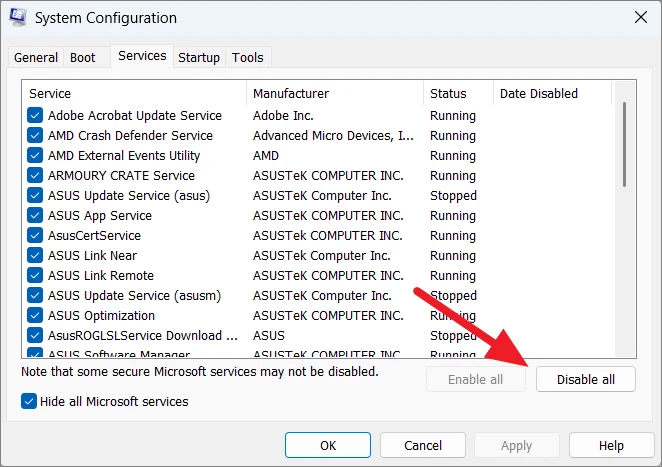
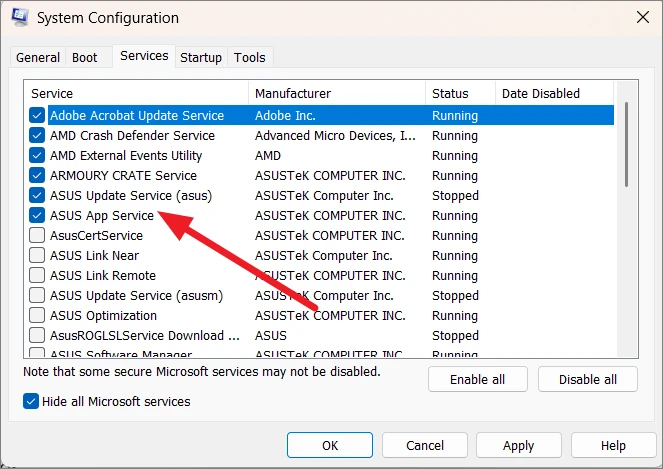
- Перейдите на вкладку « Служба » и установите флажок « Скрыть все службы Microsoft », затем нажмите « Отключить все » .
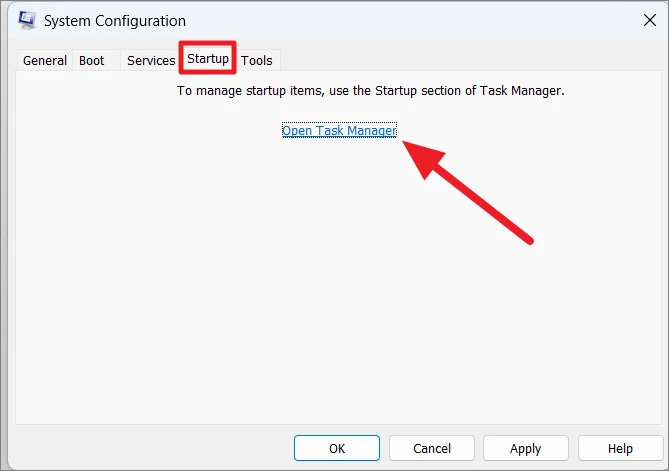
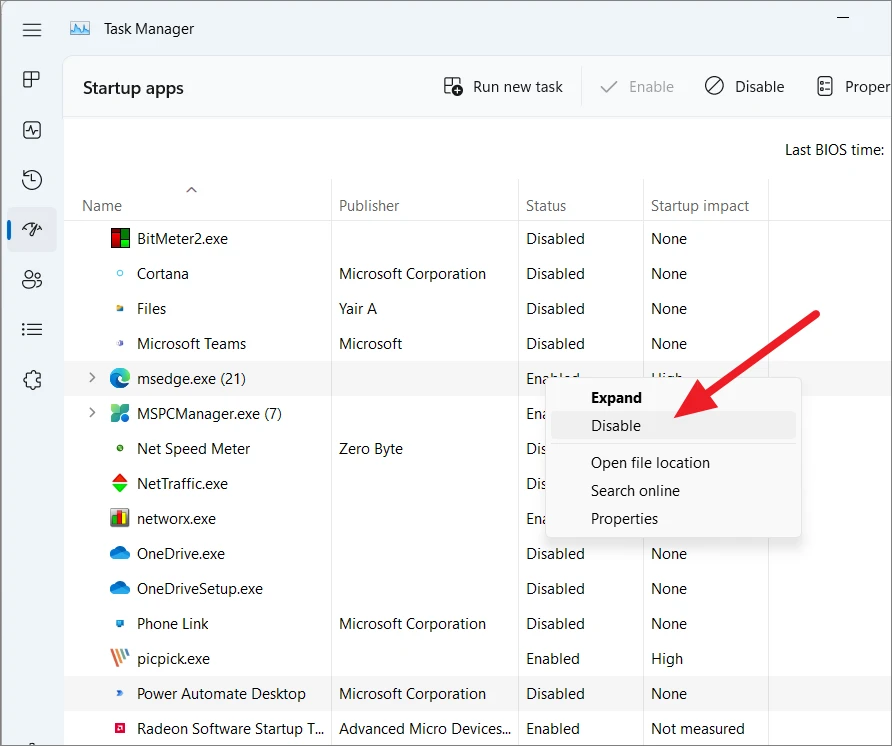
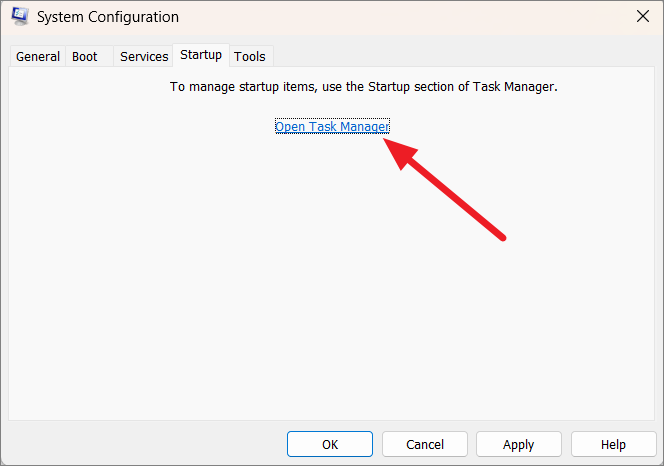
- На вкладке « Автозагрузка » нажмите « Открыть диспетчер задач » и отключите все элементы автозагрузки.
Чтобы узнать больше о том, как устранить сегодняшнюю ошибку, ознакомьтесь с нашей позицией о том, как исправить ошибку обновления 0x80004005.
Кроме того, мы также подготовили руководство о том, как исправить неуказанную ошибку 0x80004005, если ошибка появляется в других сценариях, помимо случаев обновления и активации.
Было ли это руководство полезным для вас? Дайте нам знать в разделе комментариев ниже и поделитесь им с друзьями, если они столкнутся с той же проблемой, что и вы. Спасибо за прочтение!
“Error Code 0x80004005: Unspecified error” is one of the most common errors that occur on several occasions such as when accessing shared folders or drives, using a specific application, moving or renaming files and folders, or installing Windows updates.
The ‘Unspecified Error’ usually means Windows doesn’t know the actual cause of the problem or cannot identify it. It usually appears on its own but occasionally with other error messages. Most of the time you will only get an Unspecified Error message, while in others, Windows will show you an additional text that may help you narrow down the source of the issue.
Although Windows does not specify the nature of the error, it doesn’t prevent us from deducing the potential reasons. Below are the most common causes behind error code 0x80004005:
- Problems with Windows Update.
- Issues accessing shared files and folders
- Corrupt Windows Update component
- Problems accessing or extracting compressed files and folders
- Hypervisor interfering with VirtualBox.
- Lack of ownership of the file.
- Misconfigured permission issues
- Accessing a shared network resource
- Problems with Outlook notifications
- System files missing or corrupted.
- Viruses and malware
In this article, we will discuss several potential troubleshooting methods that can help tackle the Error 0x80004005 in Windows 11. Some are general solutions but most troubleshooting methods are sepcific depending on which activity caused the error; so depending on why you’re seeing the error, apply that method.
1. Check for Windows Update
Most of the Windows issues can be fixed by Windows updates. Since Windows 11 is relatively new, bugs and security vulnerabilities are being discovered constantly. Windows updates help fix these new bugs, security vulnerabilities, or other problems in your Windows. So, check for any pending updates and install them.
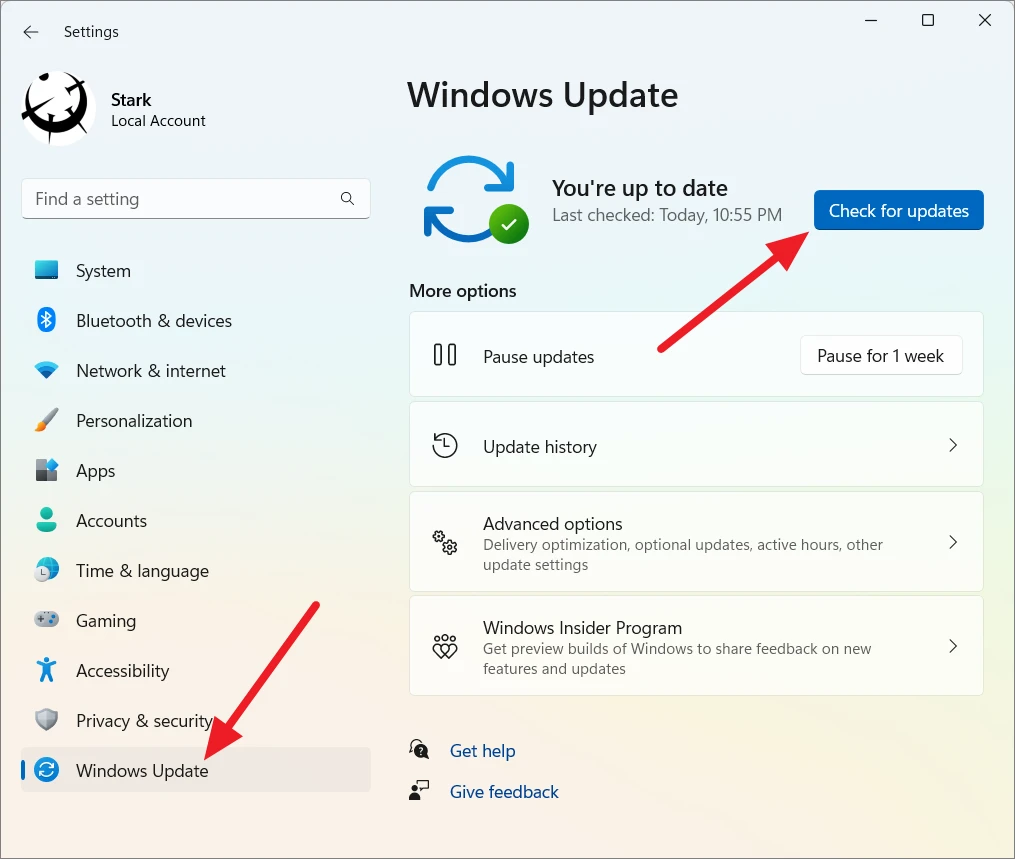
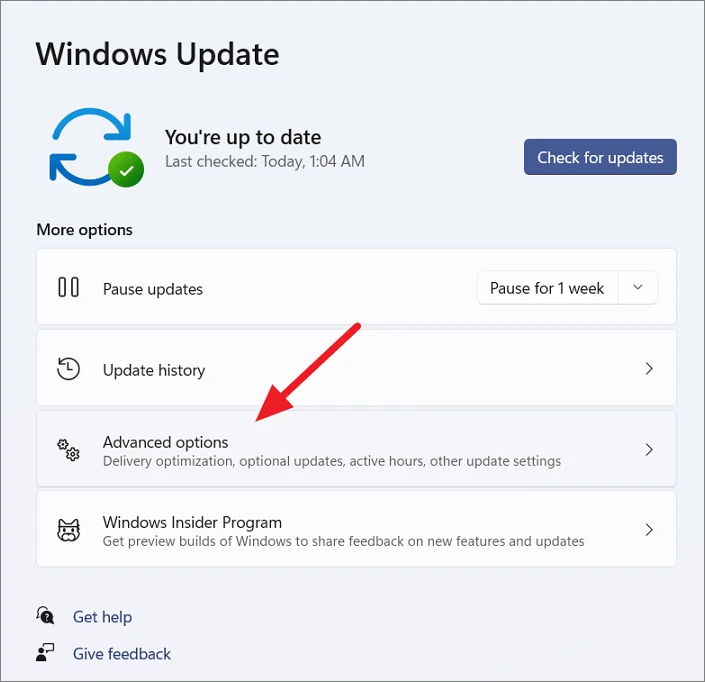
Open Windows Settings by pressing Windows+I and then head to ‘Windows Update’ from the left pane. Then, click the ‘Check for updates’ button.
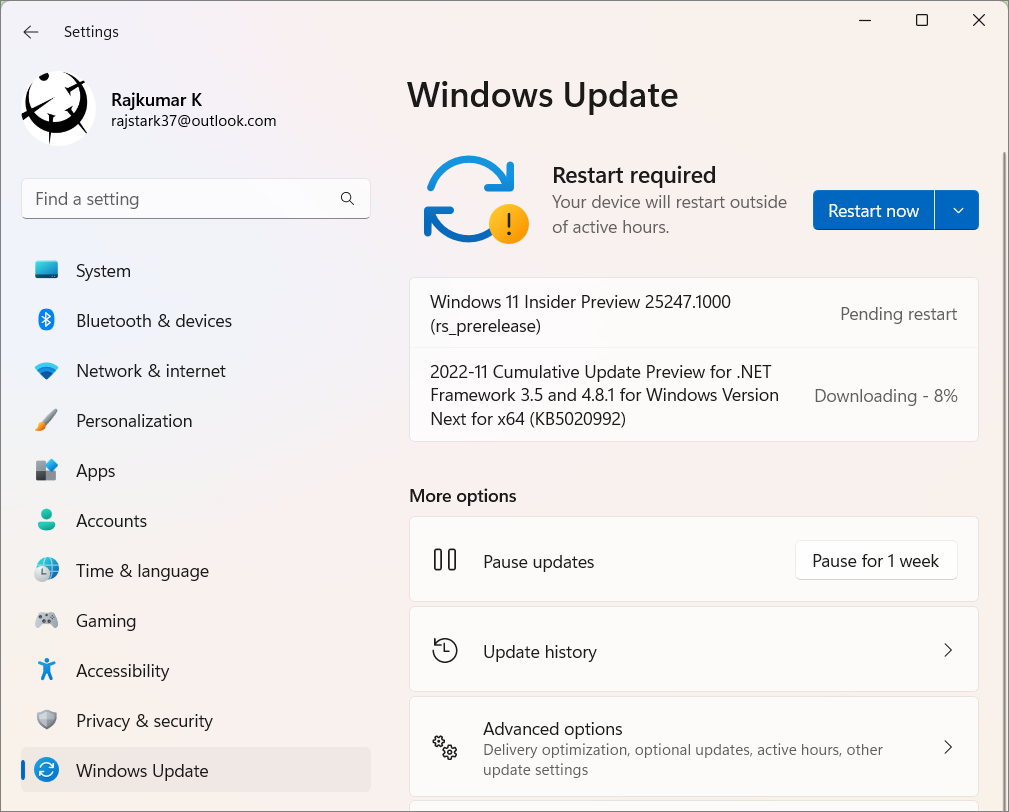
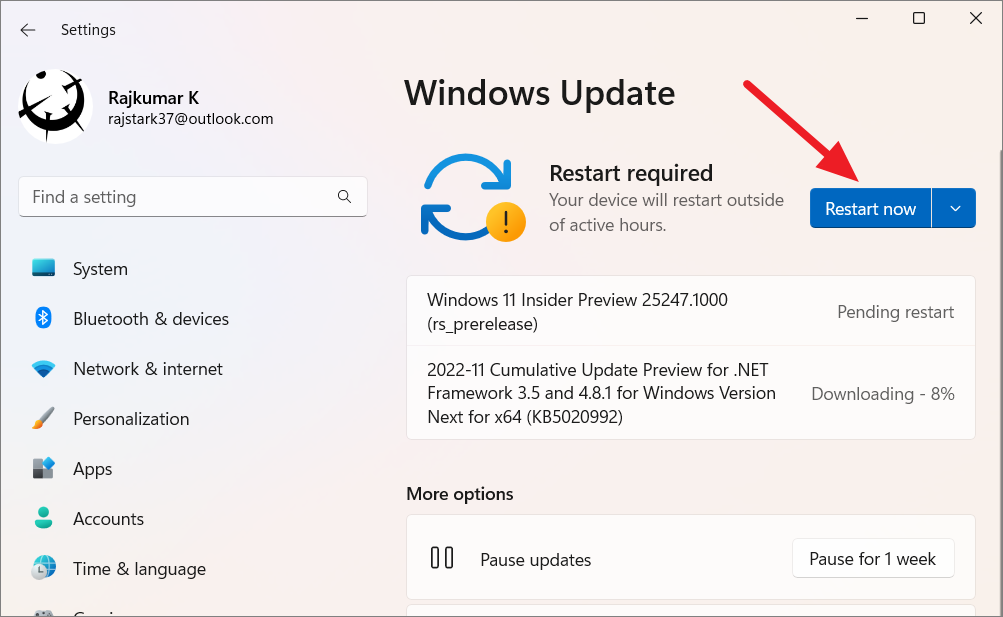
If there are any updates available, Windows will automatically download and install them. Sometimes, you may have to manually click the ‘Download & Install’ button to install the updates. Once the updates are installed, click the ‘Restart now’ button to apply them.
Install Optional Updates
Windows doesn’t automatically download optional updates like drivers, and features. You have to manually download and install them. Follow these steps to install optional updates:
In the Windows Update settings page, click the ‘Advanced options’ tile under More options.
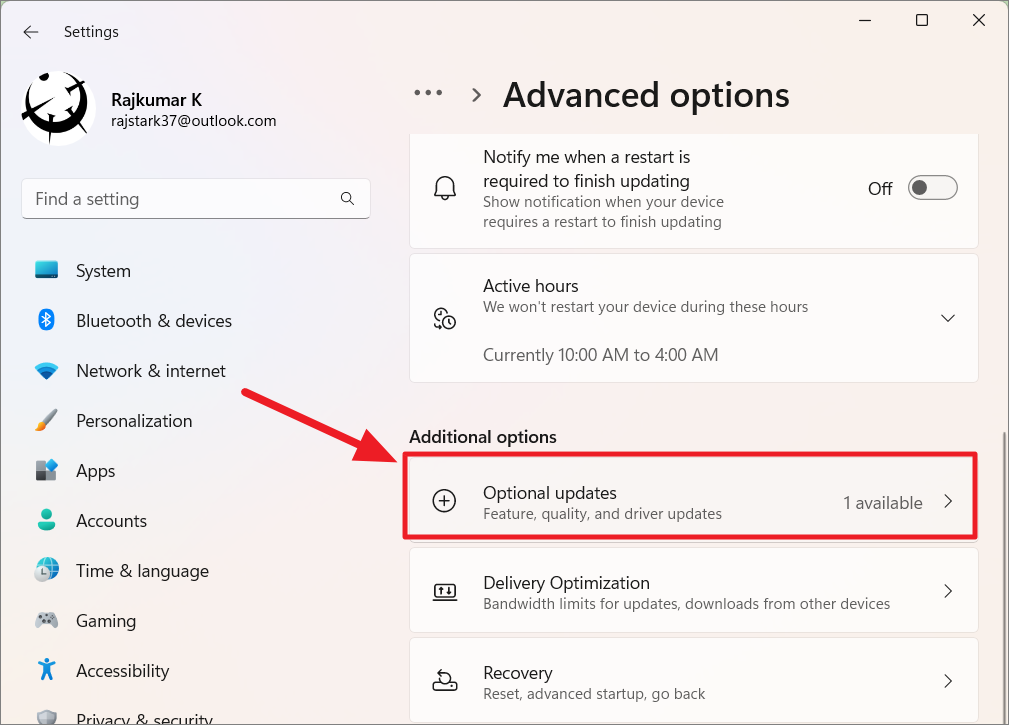
Click the ‘Optional updates’ option on the next page under the Additional options section.
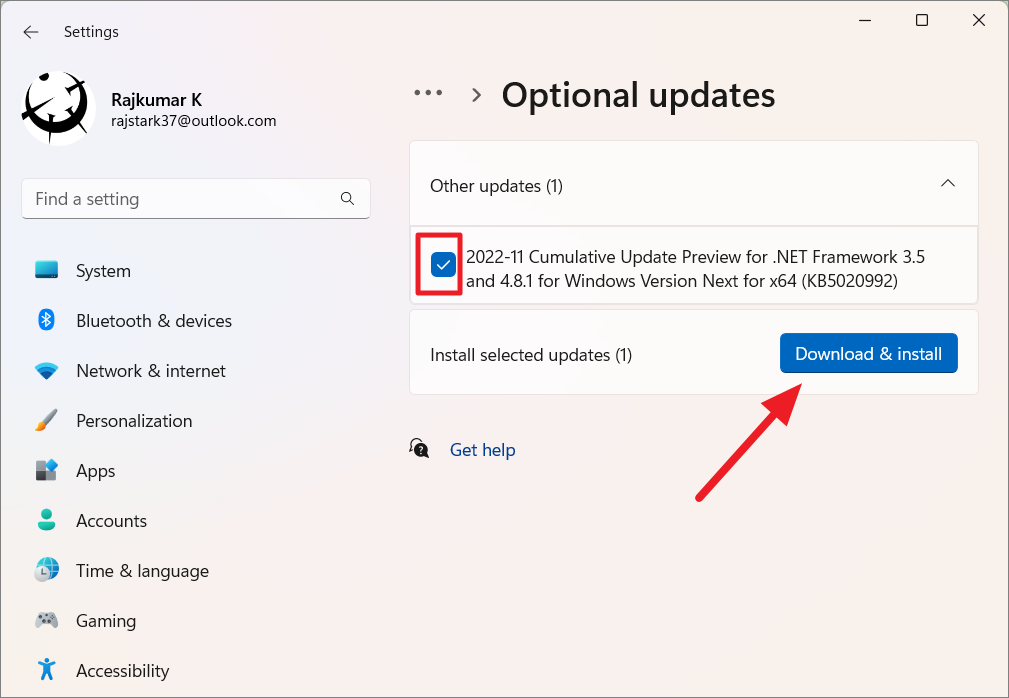
Windows will automatically find the optional updates for you but it doesn’t download them. Select all the available updates and click the ‘Download & install’ button.
Wait for the updates to finish downloading and installing, and then click the ‘Restart now’ button.
2. Run the Windows Update Troubleshooter
One of the most common reasons for Error Code 0x80004005 is a Windows update. If the Windows update is interrupted by a power outage, sudden shutdown, corrupted Windows update, or something like that, it can lead to an error. So running the dedicated Windows update troubleshooter can resolve the issue. Here is how you can do it:
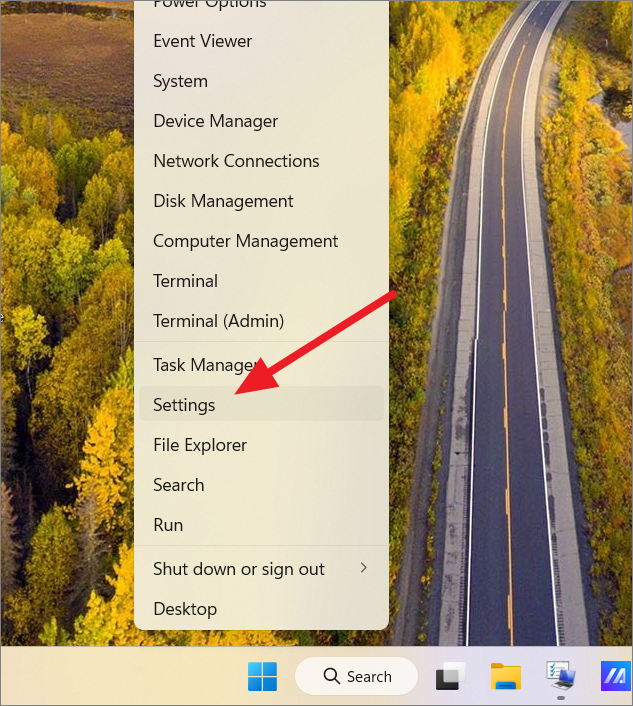
Right-click the Start menu and select ‘Settings’ or press Win+I to open Windows Settings.
Under the ‘System’ tab on the left, navigate to the ‘Troubleshoot’ option on the right pane.
On the Troubleshoot settings page, tap on the ‘Other troubleshooters’ tile.
Under Other troubleshooters, click on the ‘Run’ button next to ‘Windows Update’.
The troubleshooter will scan your system for any bugs or errors related to Windows updates and fix them automatically. It can also show you what is causing the issue and how to fix it. Follow the troubleshooting instructions to fix the problem.
3. Reset the Windows Update Services
If the Window Update Troubleshooter couldn’t find any problems, try resetting the Windows Update services and folders. If you encounter the 0x80004005 error when you are trying to download or install Windows updates, resetting the Windows Update services can also fix that. Here’s how you do this:
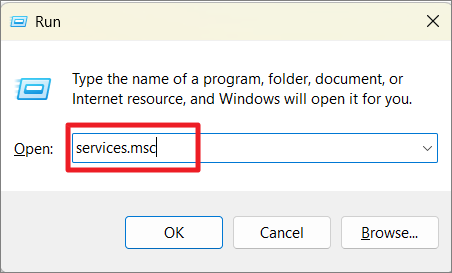
Press Win+R simultaneously to launch the Run command box, type services.msc and hit Enter.
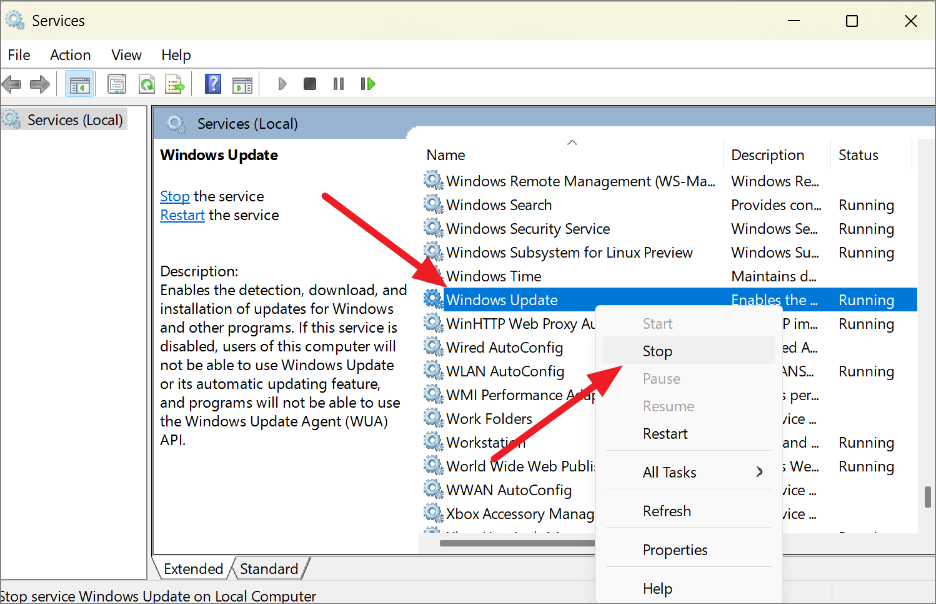
In the Services window, scroll down and locate the ‘Windows Update’ service. Then, right-click that service and select ‘Stop’.
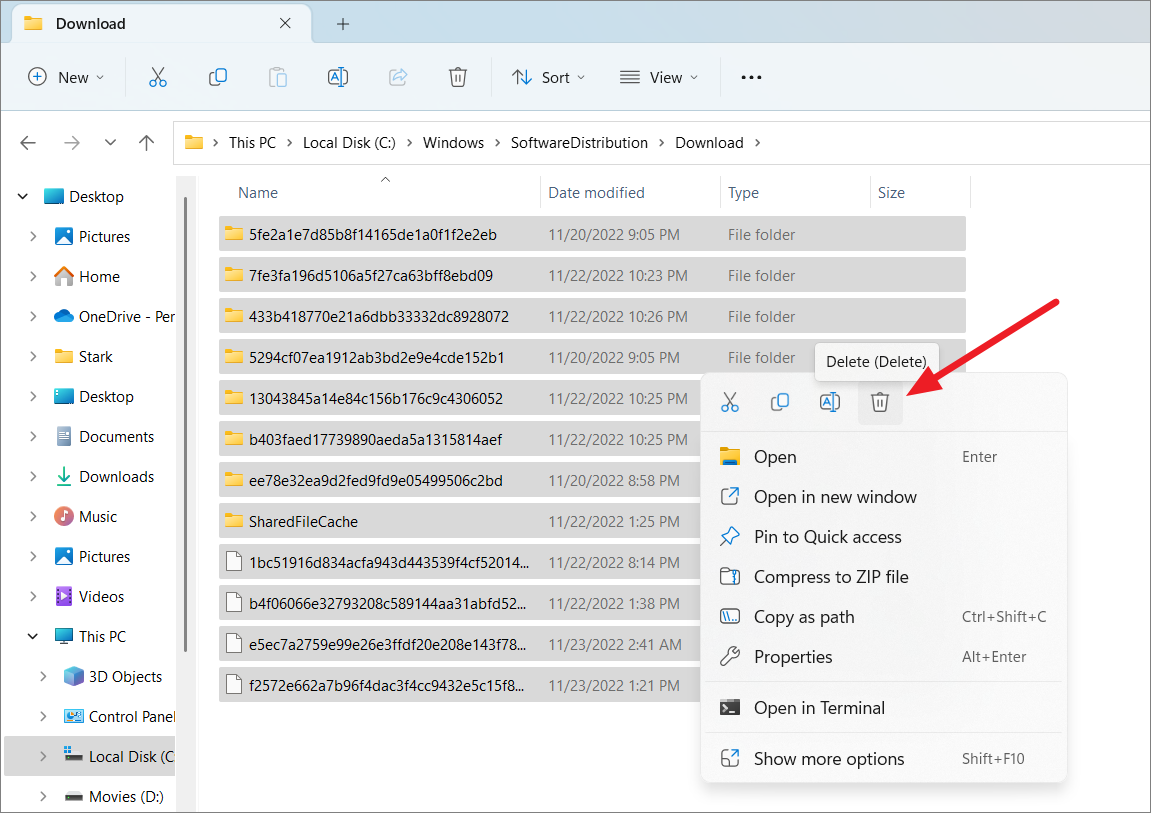
Next, open File Explorer and navigate to the following location and delete all the files inside the folder.
C:WindowsSoftwareDistributionDownloadIf you see the Folder Access Denied prompt, click ‘Continue’.
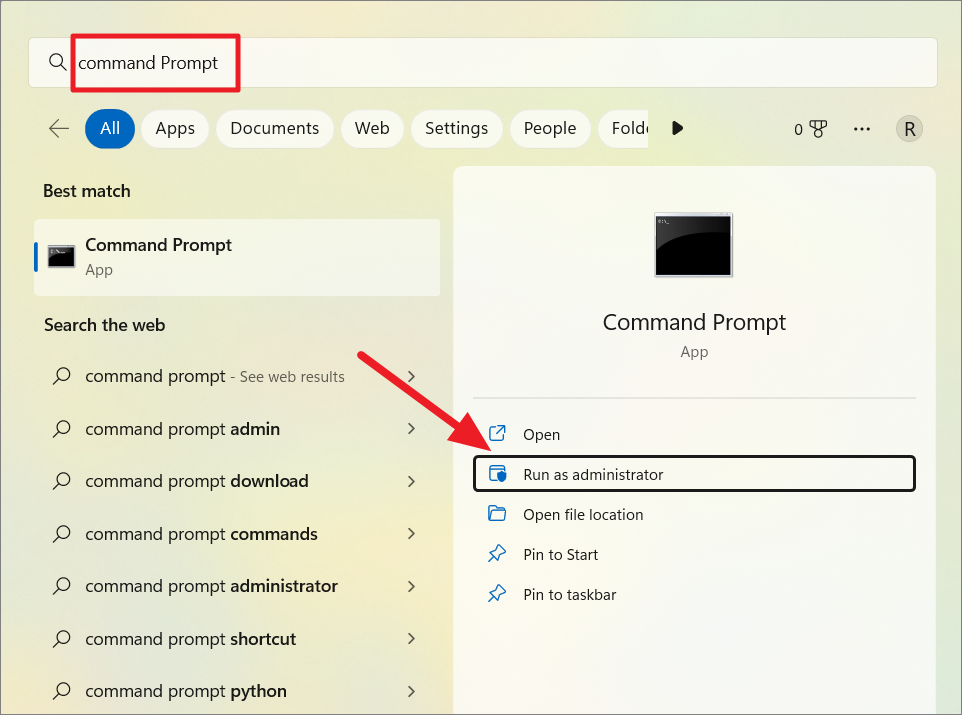
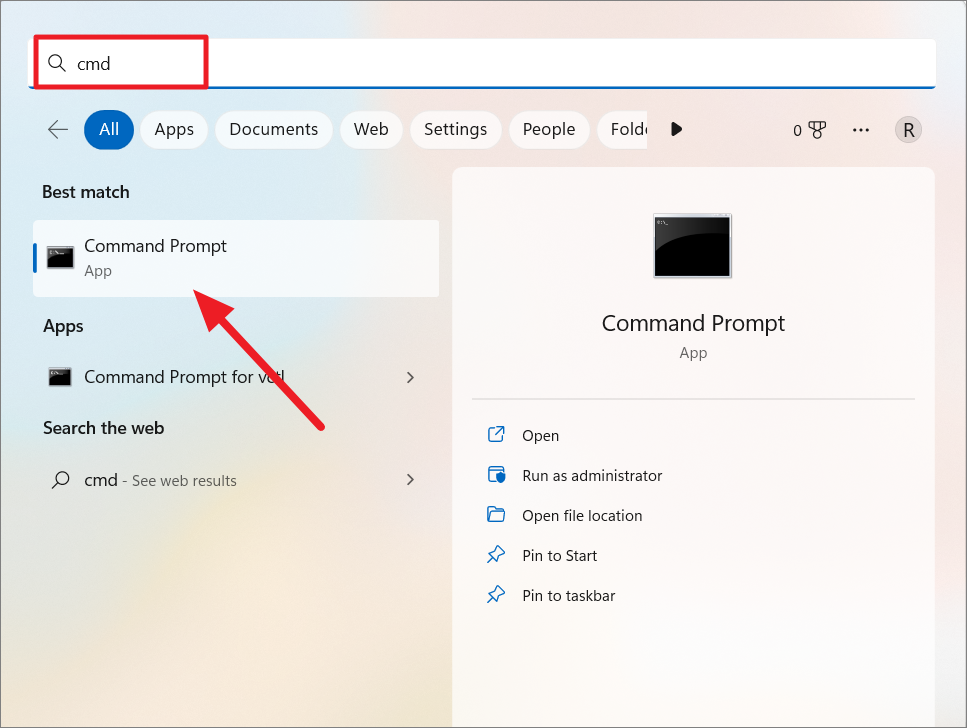
After that, open Command Prompt with administrative rights. Type ‘Command Prompt’ or ‘Cmd’ in the Windows search or the Start menu, and select ‘Run as administrator’ for the top result.
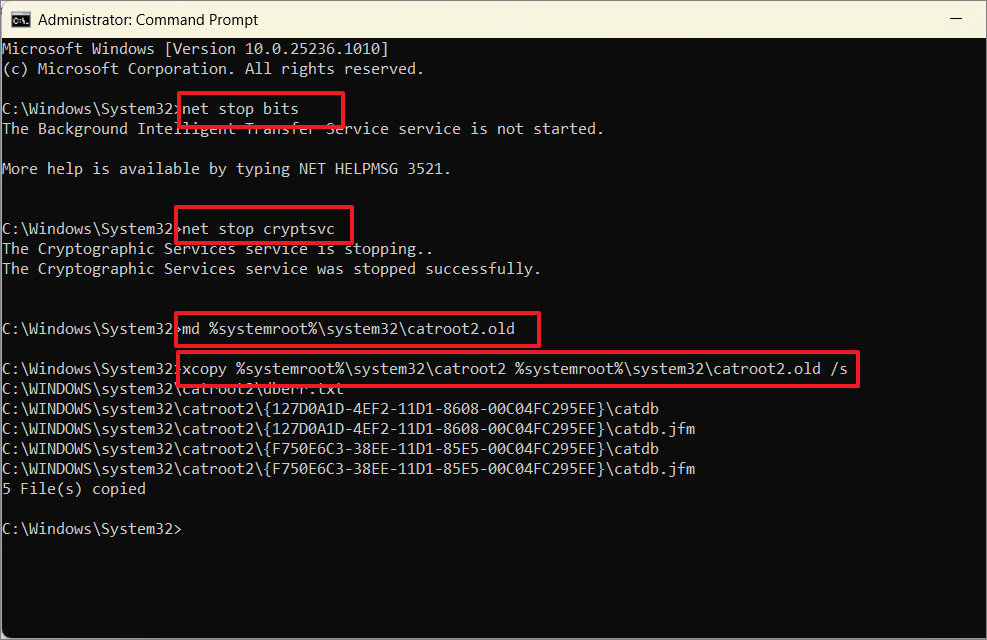
In the CMD windows, type the following commands one by one and press Enter for each command:
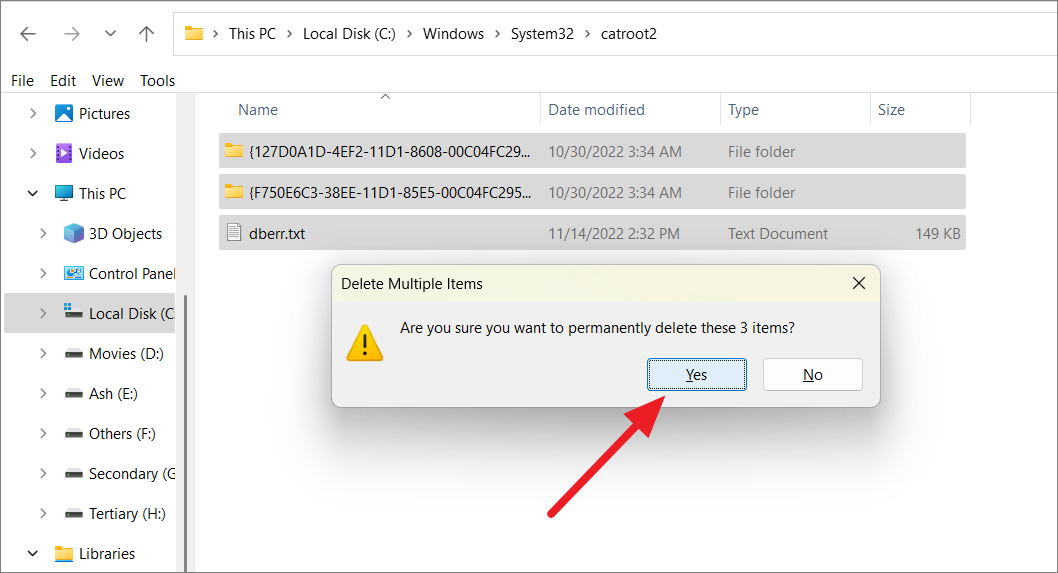
net stop bitsnet stop cryptsvcmd %systemroot%system32catroot2.oldxcopy %systemroot%system32catroot2 %systemroot%system32catroot2.old /sNow, open File Explorer again and go to this folder – C:WindowsSystem32catroot2. Select and delete all the files and folders inside the ‘catroot2’ folder.
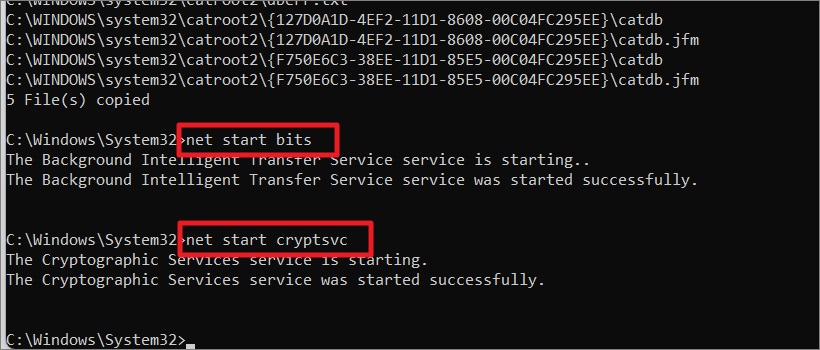
Then, go back to the command prompt and enter these commands one by one:
net start bitsnet start cryptsvcOnce you’re done, restart your computer and check for updates. This might fix the Unspecified error in the Windows update.
4. Reset Windows Update Components and Policies
If you encounter the error code 0x80004005 when trying to install Windows updates, you would be able to fix them by resetting Windows Components and policies. Resettings Windows Update not only fixes the 0x80004005 error but also the most common problems related to the Windows Update service.
To reset Windows Update Agent. you need to re-register BITS files and related DLL files, flush Software Distribution, and Catroot2 folders, reset all Windows update services, and more. Let us see how to reset the Windows Update service and component to the default state.
To start with, open Command Prompt with administrative privileges. Search for ‘cmd’ or ‘Command Prompt’ in Windows search, and select ‘Run as administrator’ from the right pane. Alternatively, you can launch Windows Terminal and open the Command Prompt tab.
Now, you have to execute the following commands one after the other and hit Enter after each command.
Stop all Windows Update, BITS, and cryptographic services
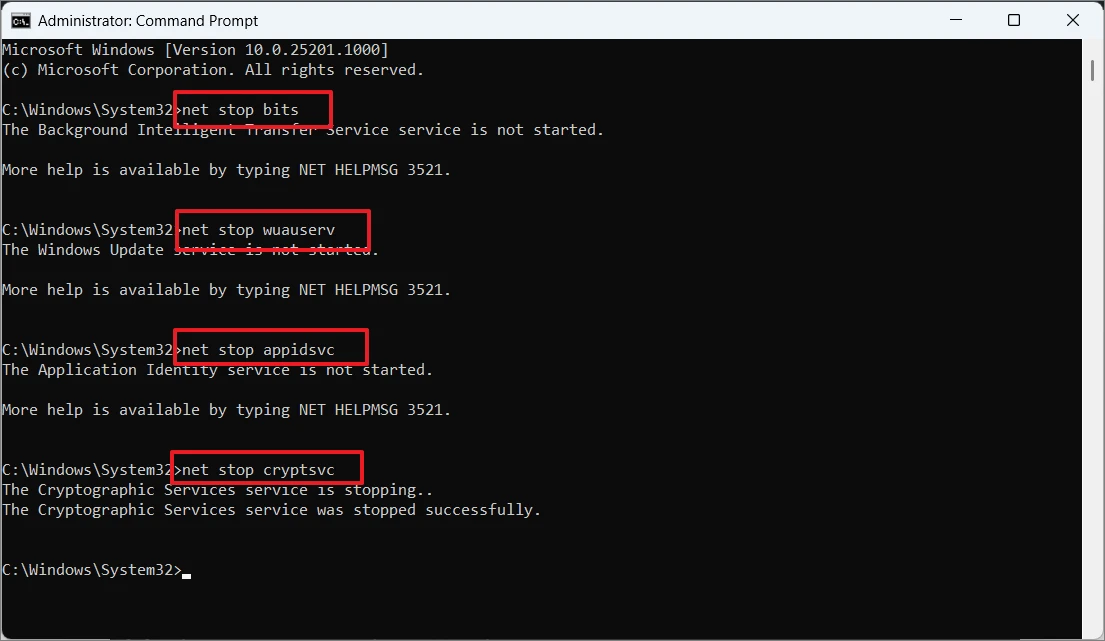
First, you need to stop BITS (Background Intelligent Transfer Service), Windows Update service, and Cryptographic services. Enter the following commands one by one and hit ENTER after each command to execute it.
net stop bitsnet stop appidsvcnet stop wuauservnet stop cryptsvcRemove all the ‘qmgr*.dat’ files created by BITS
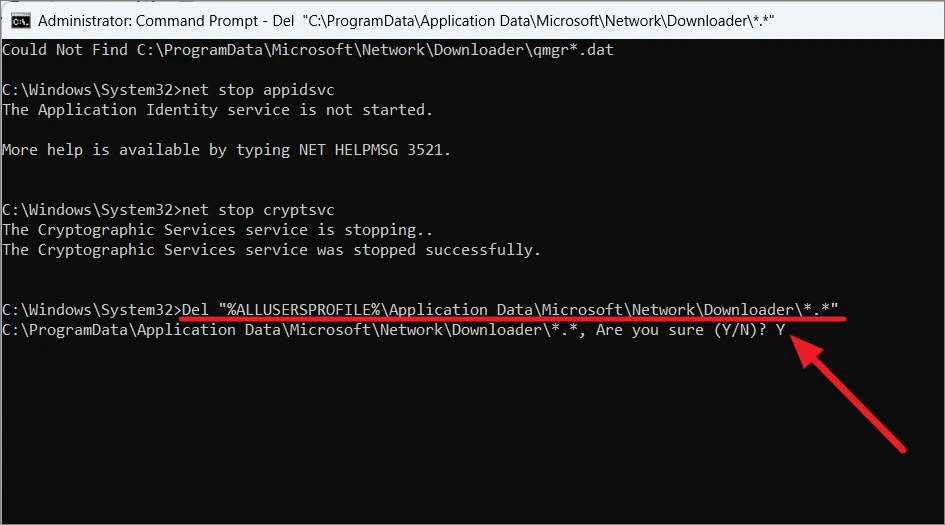
Next, delete service all files qmgr*.dat created by BITS from your device using the below commands:
Del "%ALLUSERSPROFILE%Application DataMicrosoftNetworkDownloader*.*"Then, type ‘Y’ and hit Enter to confirm the action.
Rename the SoftwareDistribution, Download, and catroot2 folders
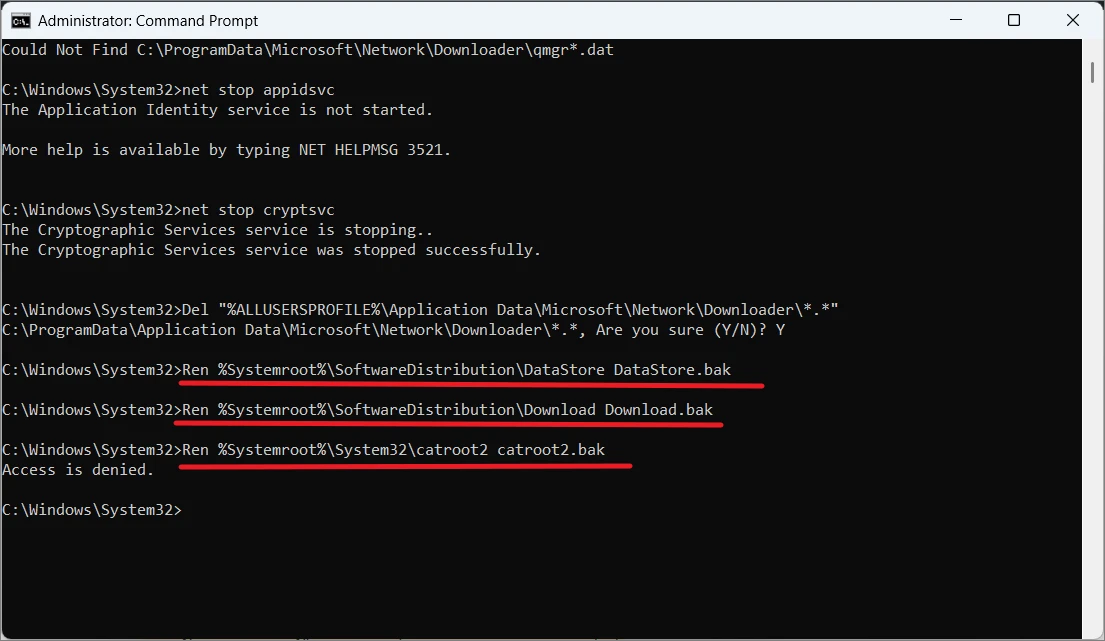
After that, rename the SoftwareDistribution and catroot2 directories on the system. These folders contain already downloaded updates that might be damaged (if anything happens they can also be used as backups). When we restart the Windows update service, these folders will automatically be recreated to store files. To rename the folders, enter the below code:
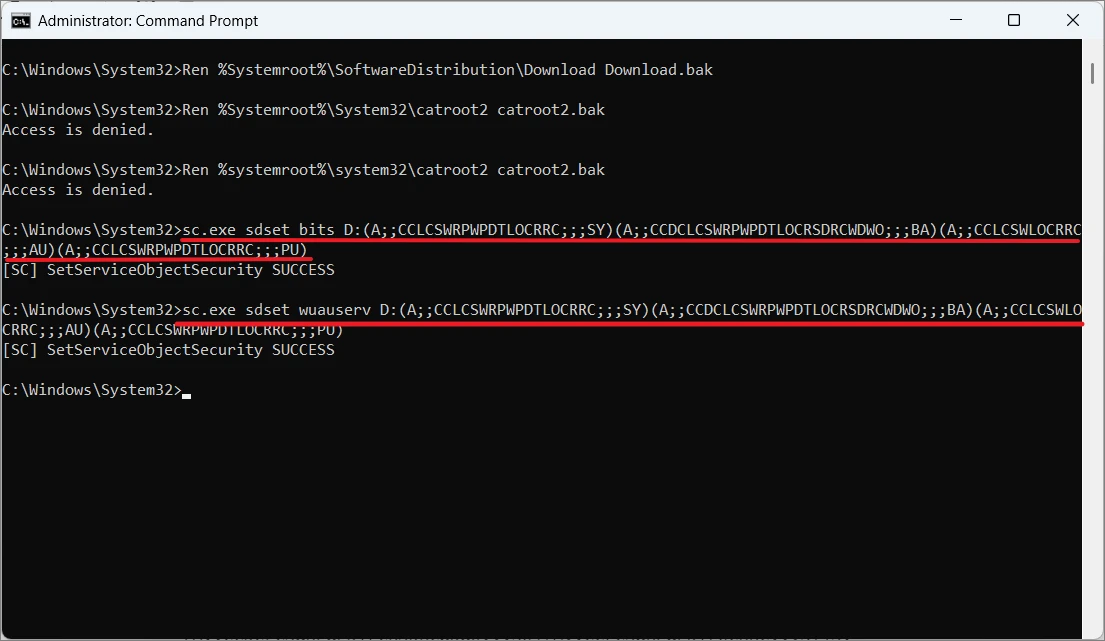
Ren %Systemroot%SoftwareDistributionDataStore DataStore.bakRen %Systemroot%SoftwareDistributionDownload Download.bakRen %systemroot%system32catroot2 catroot2.bakReset the BITS and Windows Update services
Now, you can reset the BITS and Windows Update services to their default security descriptor using the below commands:
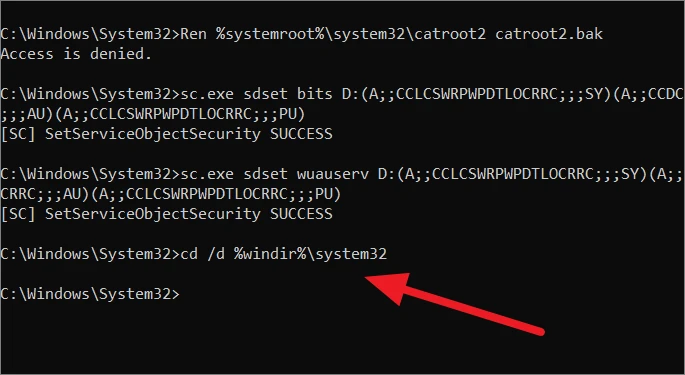
sc.exe sdset bits D:(A;;CCLCSWRPWPDTLOCRRC;;;SY)(A;;CCDCLCSWRPWPDTLOCRSDRCWDWO;;;BA)(A;;CCLCSWLOCRRC;;;AU)(A;;CCLCSWRPWPDTLOCRRC;;;PU)sc.exe sdset wuauserv D:(A;;CCLCSWRPWPDTLOCRRC;;;SY)(A;;CCDCLCSWRPWPDTLOCRSDRCWDWO;;;BA)(A;;CCLCSWLOCRRC;;;AU)(A;;CCLCSWRPWPDTLOCRRC;;;PU)sc.exe sdset cryptsvc D:(A;;CCLCSWLOCRRC;;;AU)(A;;CCDCLCSWRPWPDTLOCRSDRCWDWO;;;BA)(A;;CCDCLCSWRPWPDTLCRSDRCWDWO;;;SO)(A;;CCLCSWRPWPDTLOCRRC;;;SY)S:(AU;FA;CCDCLCSWRPWPDTLOCRSDRCWDWO;;WD)sc.exe sdset trustedinstaller D:(A;;CCLCSWLOCRRC;;;AU)(A;;CCDCLCSWRPWPDTLOCRSDRCWDWO;;;BA)(A;;CCDCLCSWRPWPDTLCRSDRCWDWO;;;SO)(A;;CCLCSWRPWPDTLOCRRC;;;SY)S:(AU;FA;CCDCLCSWRPWPDTLOCRSDRCWDWO;;WD)Next, type the below command to move to the System32 folder:
cd /d %windir%system32Re-register the BITS and the Windows Update-related DLL files
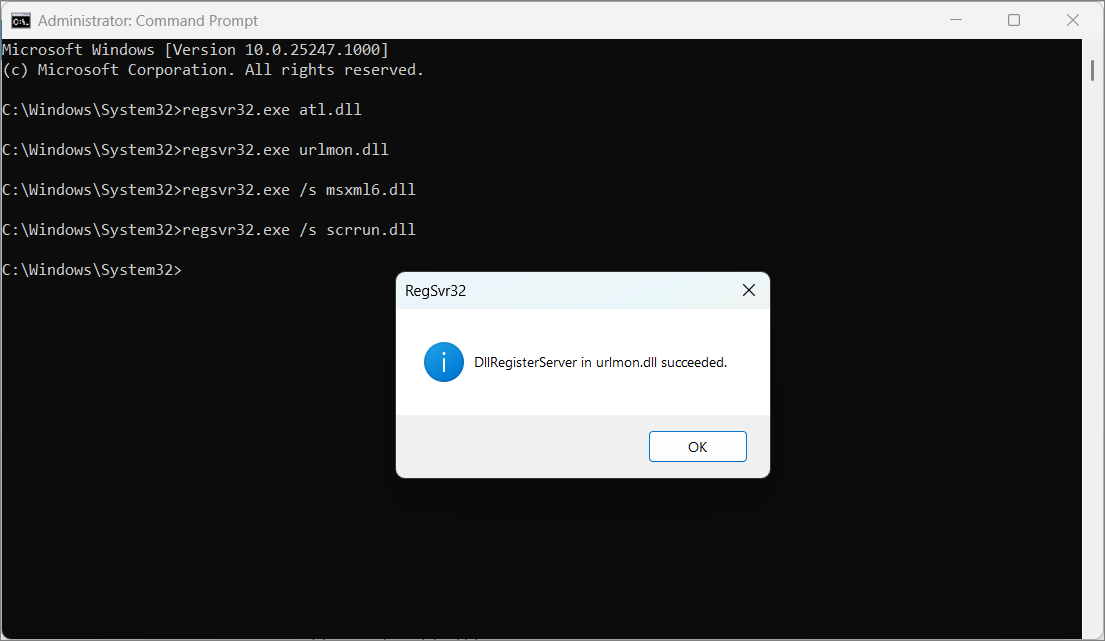
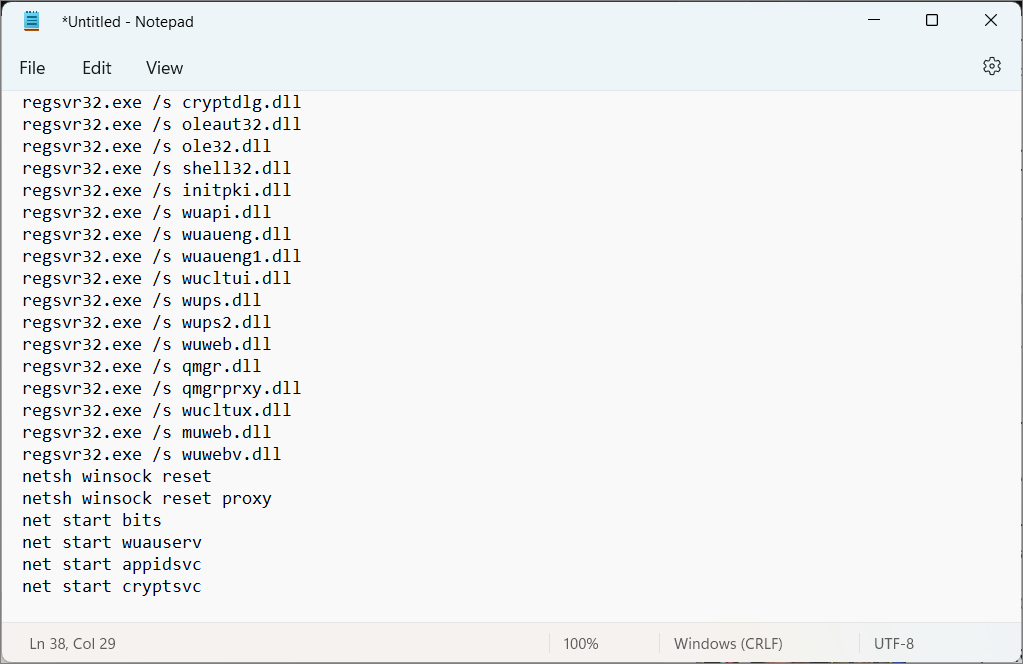
Now, re-register all the dynamic libraries (DLLs) related to BITS and Windows Update services by entering the commands one after the other and pressing Enter. Then, click ‘OK’ on the prompt that appears after each command.
regsvr32.exe /s atl.dll
regsvr32.exe /s urlmon.dll
regsvr32.exe /s mshtml.dll
regsvr32.exe /s shdocvw.dll
regsvr32.exe /s browseui.dll
regsvr32.exe /s jscript.dll
regsvr32.exe /s vbscript.dll
regsvr32.exe /s scrrun.dll
regsvr32.exe /s msxml.dll
regsvr32.exe /s msxml3.dll
regsvr32.exe /s msxml6.dll
regsvr32.exe /s actxprxy.dll
regsvr32.exe /s softpub.dll
regsvr32.exe /s wintrust.dll
regsvr32.exe /s dssenh.dll
regsvr32.exe /s rsaenh.dll
regsvr32.exe /s gpkcsp.dll
regsvr32.exe /s sccbase.dll
regsvr32.exe /s slbcsp.dll
regsvr32.exe /s cryptdlg.dll
regsvr32.exe /s oleaut32.dll
regsvr32.exe /s ole32.dll
regsvr32.exe /s shell32.dll
regsvr32.exe /s initpki.dll
regsvr32.exe /s wuapi.dll
regsvr32.exe /s wuaueng.dll
regsvr32.exe /s wuaueng1.dll
regsvr32.exe /s wucltui.dll
regsvr32.exe /s wups.dll
regsvr32.exe /s wups2.dll
regsvr32.exe /s wuweb.dll
regsvr32.exe /s qmgr.dll
regsvr32.exe /s qmgrprxy.dll
regsvr32.exe /s wucltux.dll
regsvr32.exe /s muweb.dll
regsvr32.exe /s wuwebv.dll
regsvr32.exe wudriver.dll
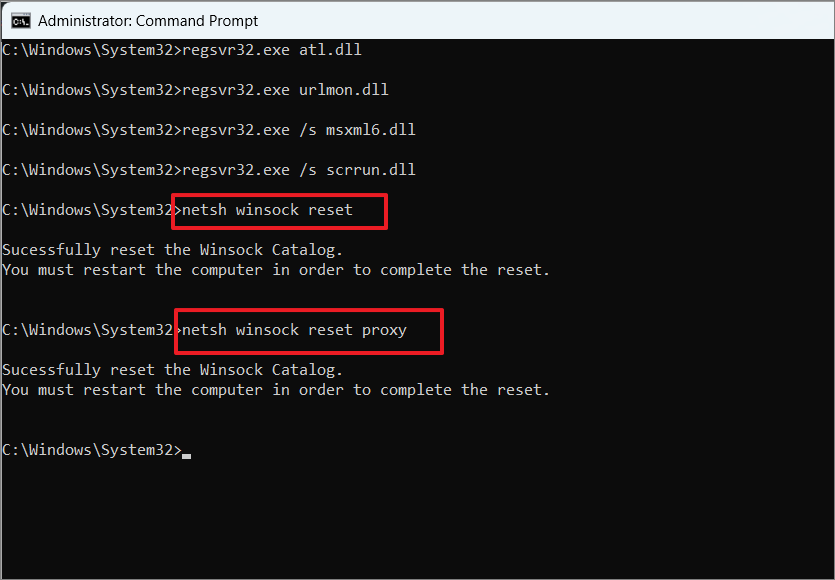
Reset Winsock
After re-registering all the DLL files, reset the network configurations (Winsock) that might be part of the problem. Press Enter on each line.
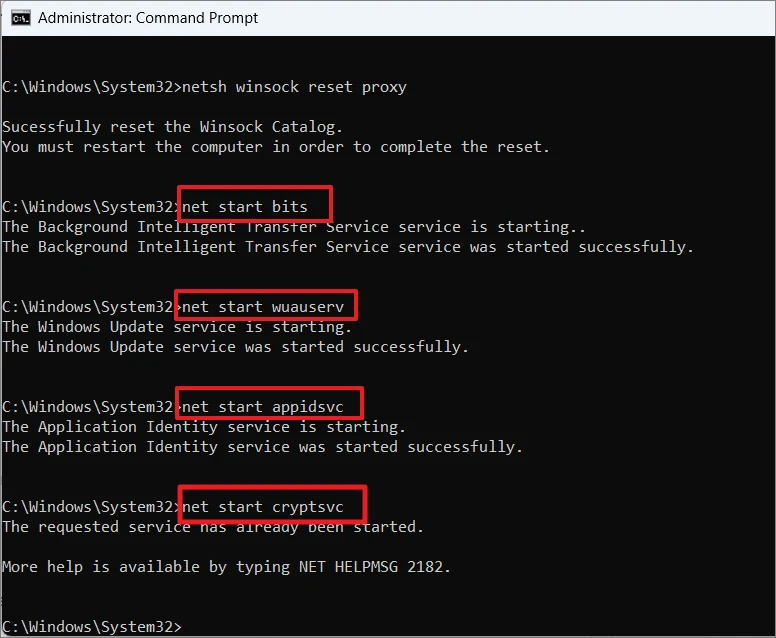
netsh winsock resetnetsh winsock reset proxyRestart the Previously Stopped Services
Finally, restart the BITS, Windows Update, and Cryptographic services that we stopped earlier using the below commands. Type the commands one by one and hit Enter:
net start bitsnet start wuauservnet start appidsvcnet start cryptsvcAfter executing all the above commands, restart your computer. Your Windows Update should be working again. If you have a problem running some of the above commands, you can also boot your computer in safe mode and try running the commands there.
If you feel this method takes too much time, you can just create a bat file with all these commands and then run them with a single click.
To do that copy each of the above commands, open Notepad, and paste them on each line.
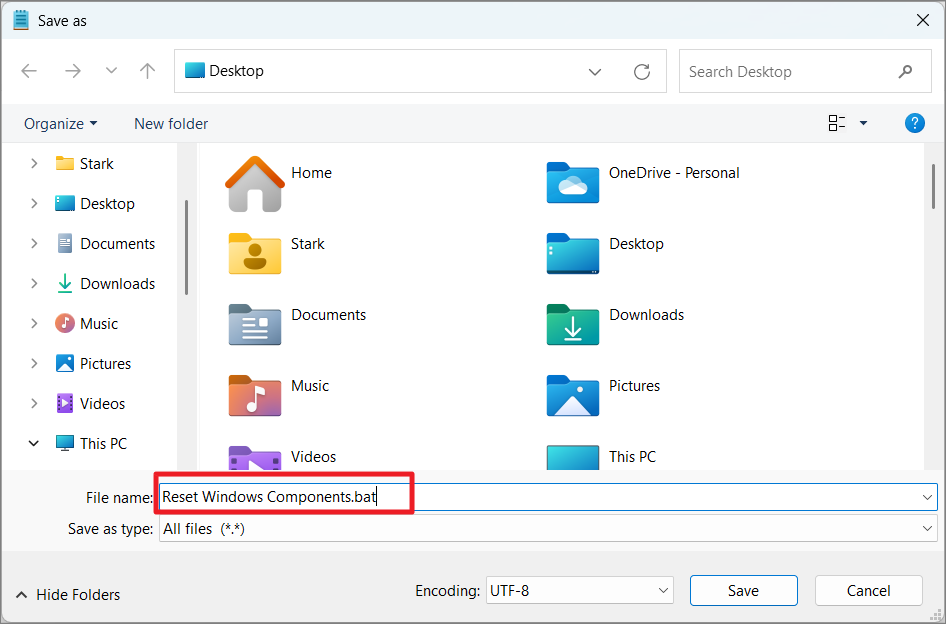
Then, save the file as a .bat file.
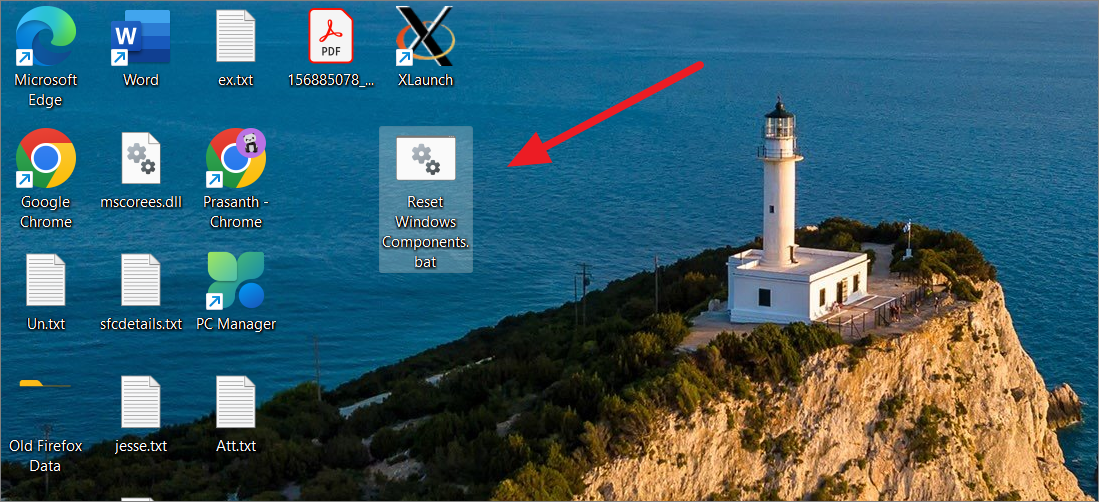
After that, double-click the .bat file to run it which will execute all the commands one by one.
5. Manually Install the Update using Microsoft Update Catalog
If the above methods did not resolve the issue for you, you can manually download and install the troublesome updates. Microsoft has a dedicated website called Microsoft Update Catalog which contains all the Windows updates that Microsoft releases for every Windows operating system and architecture. Let us see how to manually download and install updates on Windows 11.
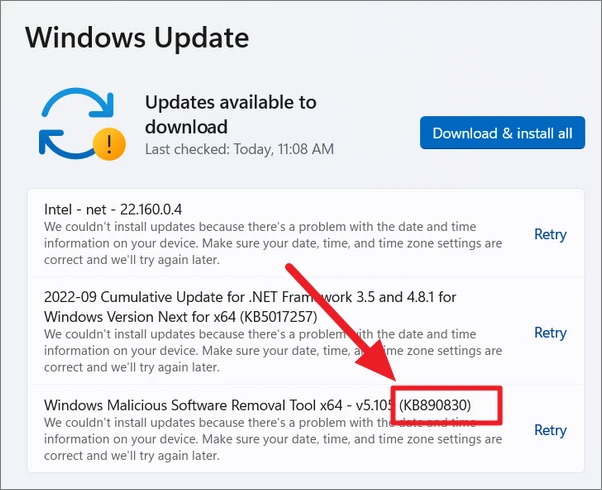
For this, you need to know the Knowledge Base reference (KB) number for the update(s) that is giving you the error. Each Windows update will have a specific Knowledge Base reference. You can find the KB number in the update failed error in the Windows update settings as shown below.
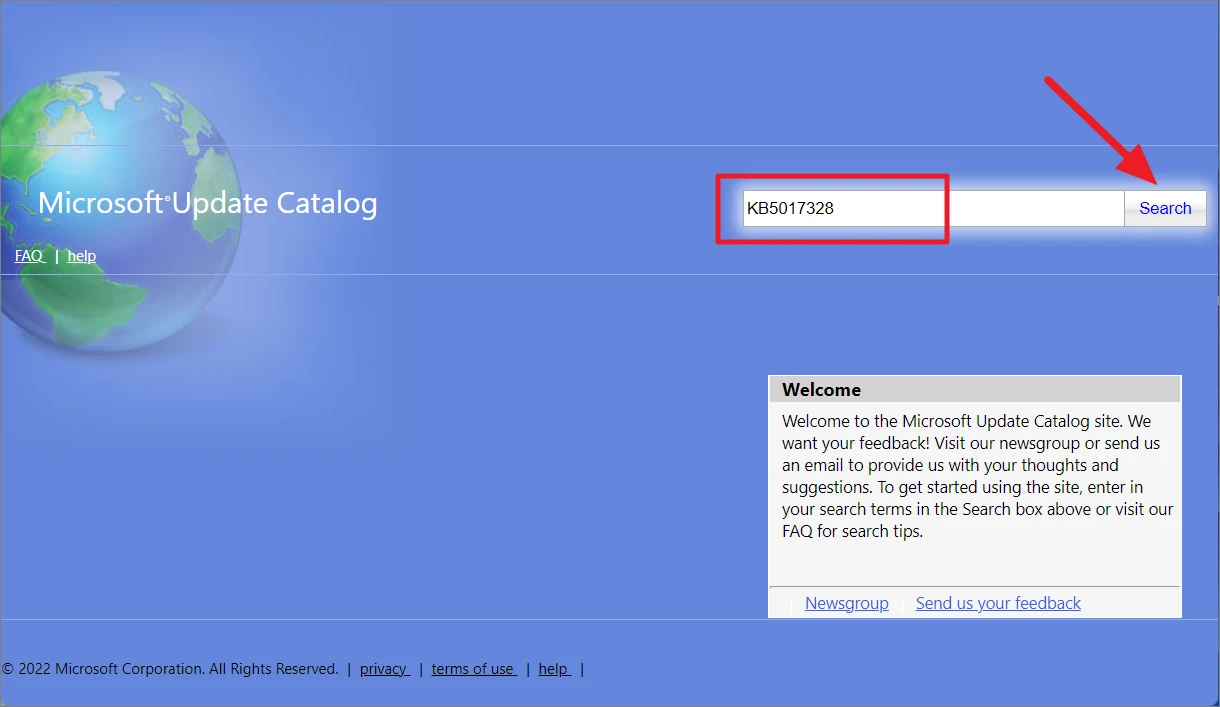
Now, open your browser and go to the Microsoft Update Catalog website. Once the website opens, type the KB reference number and hit ‘Search’.
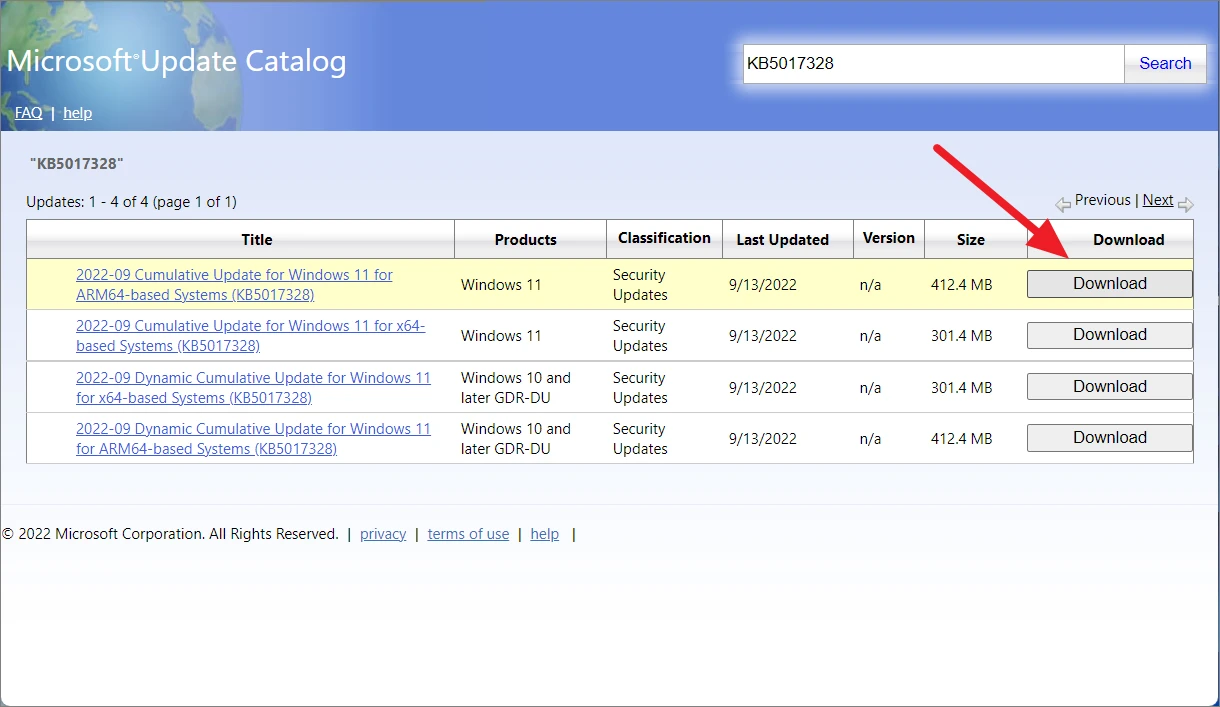
From the results shown, download the update you want by clicking on the ‘Download’ button associated with it. The results will be sorted by date (last updated).
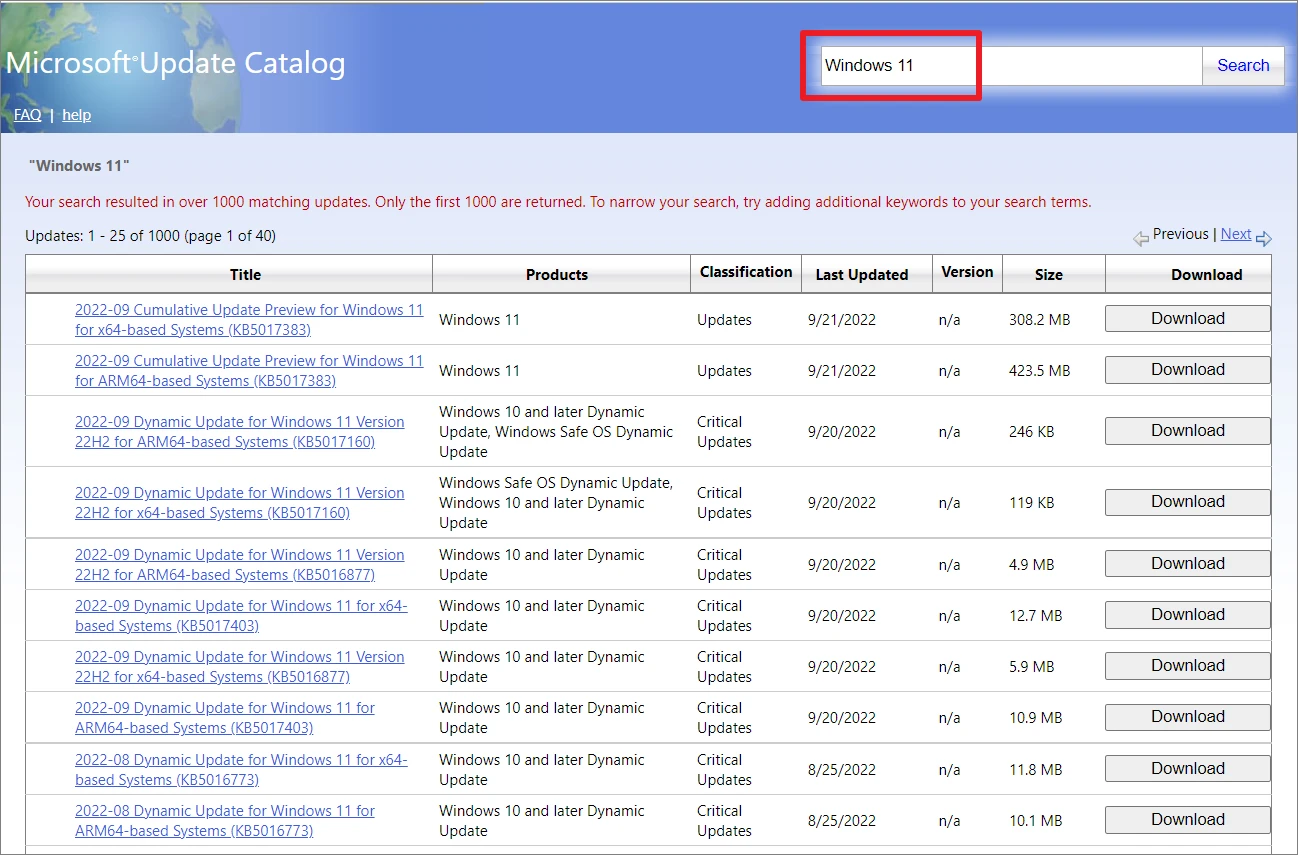
Alternatively, you can also search for ‘Windows 11’ in the search field to get the list of all the recent updates for Windows 11. You can also search for different types of updates like ‘Cumulative Update for Windows 11’, ‘Update Stack Package’, etc.
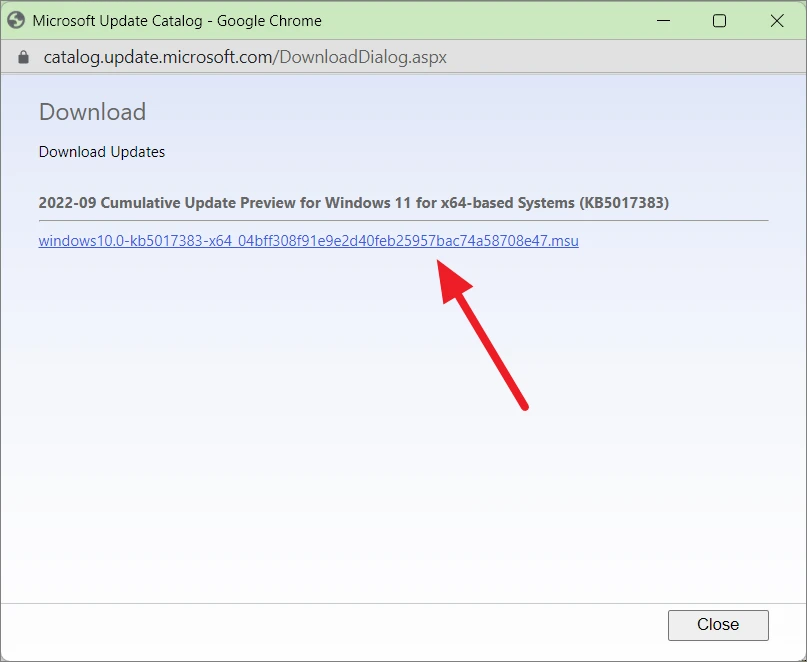
Once you click the Download button, another browser window will pop up. In that window, click the provided link to download the update file.
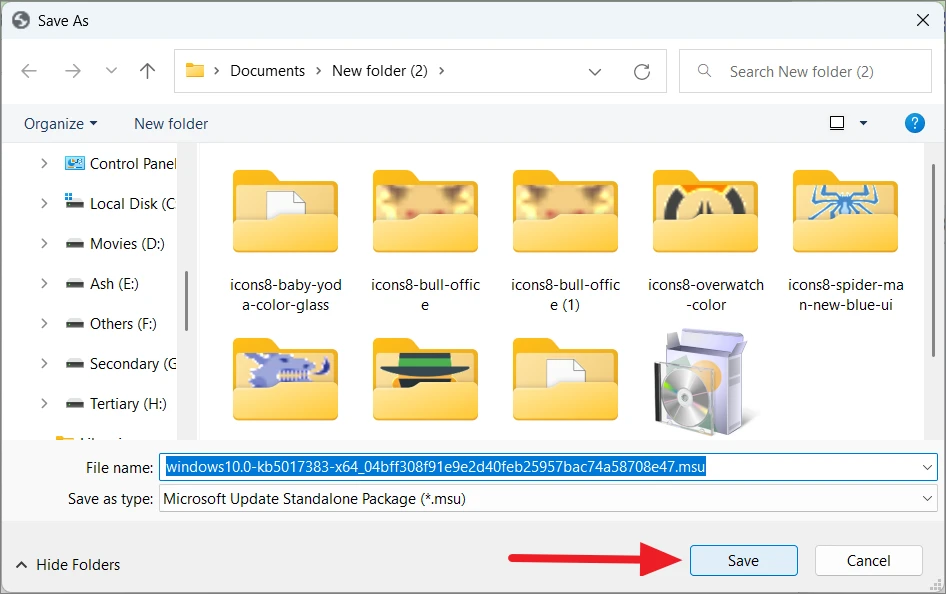
Then, choose where you want to store the file and click ‘Save’.
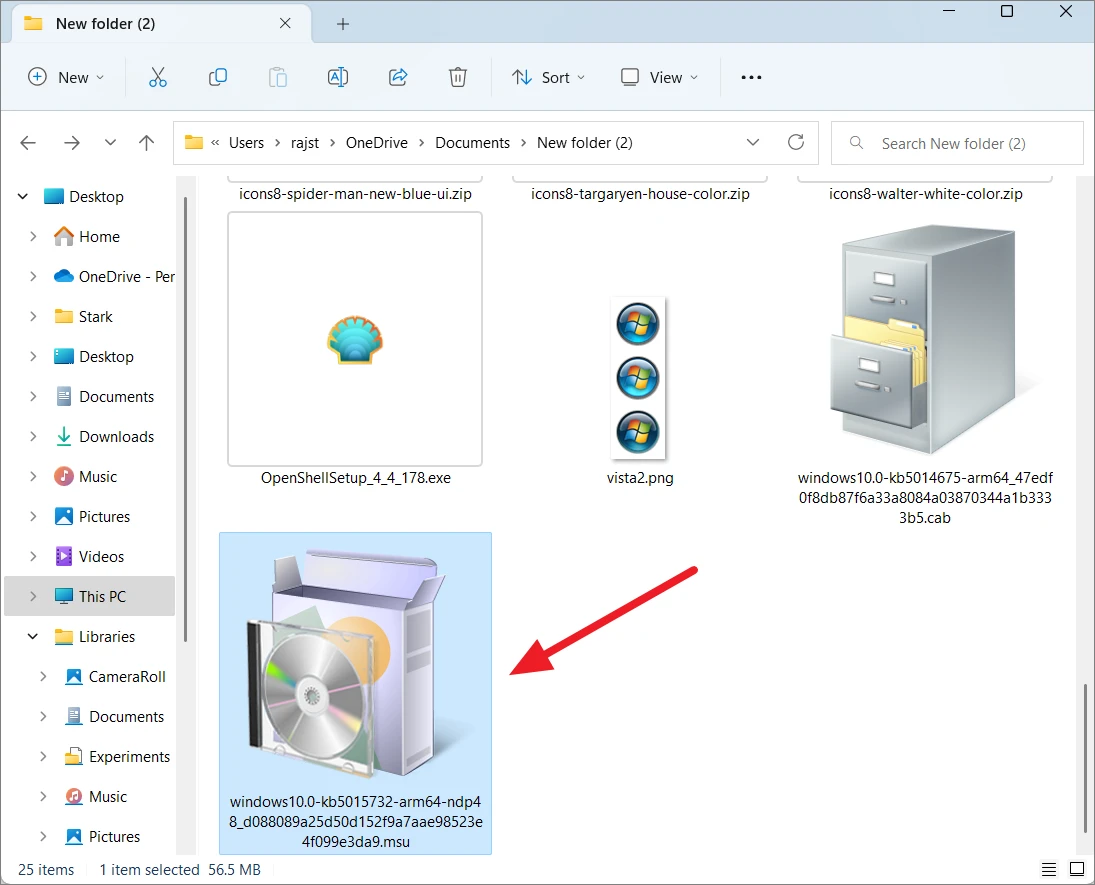
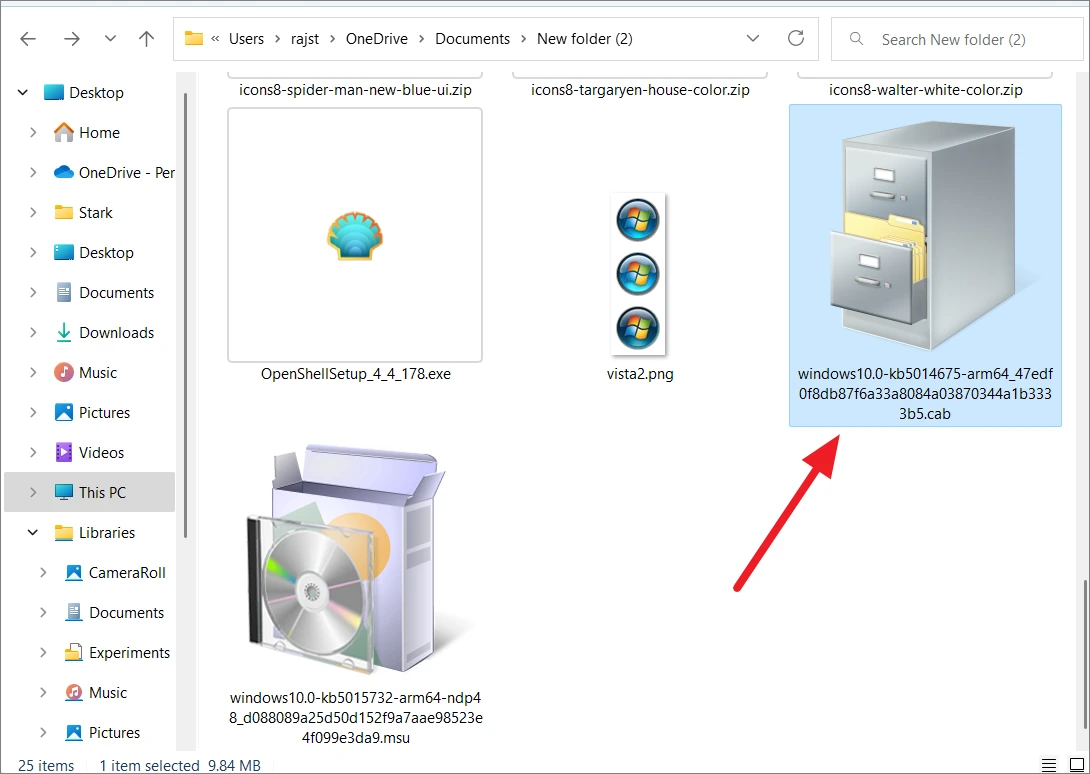
The update file can be either a ‘.msu’ file or a ‘.cab’ file. If the downloaded file is a ‘.msu’, you can install it directly by double-clicking on it and following the instructions on the installer.
However, if you got a ‘.cab’ (cabinet archiving file) file, they cannot be installed directly. They would have to be extracted first. To do that, double-click on the cab file to open it.
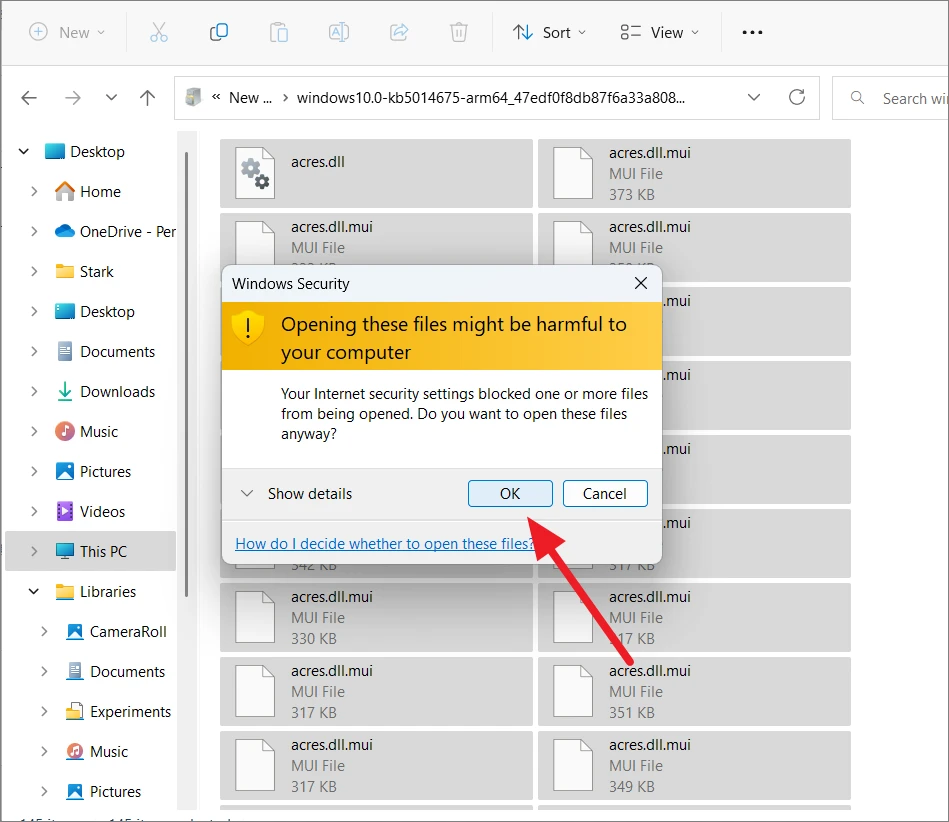
Next, select all the contents (Ctrl+A) and right-click on them. If you see a warning that says ‘Opening these files might be harmful to your computer’, click ‘OK’ to ignore it. Third-party cab files may contain malware but this is an update file from the Microsoft server, so you can safely ignore the warning.
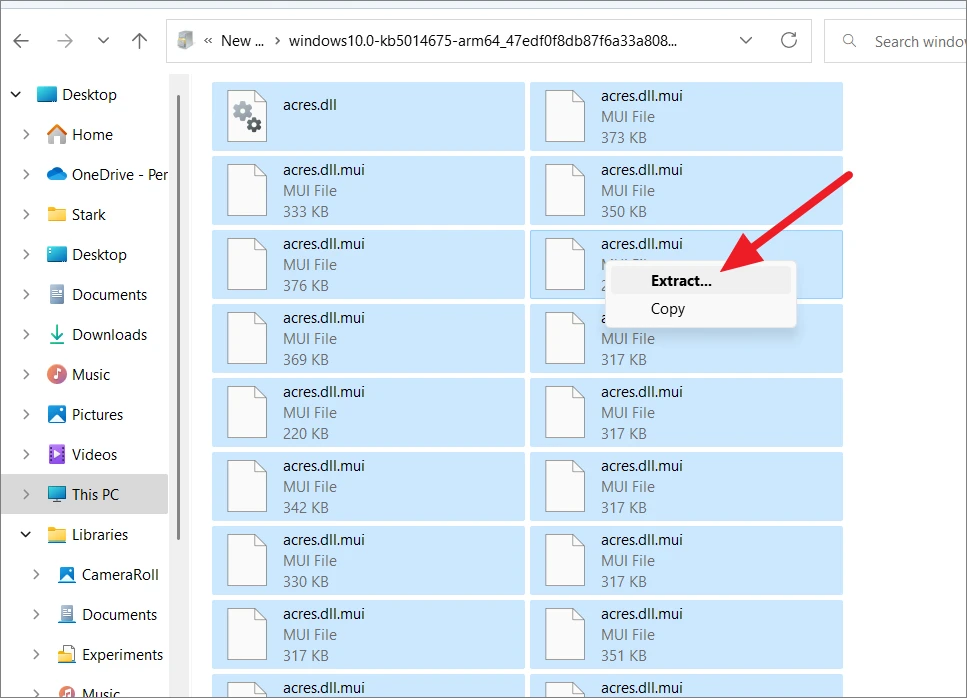
Then, select the ‘Extract…’ option and choose a destination for the extracted file.
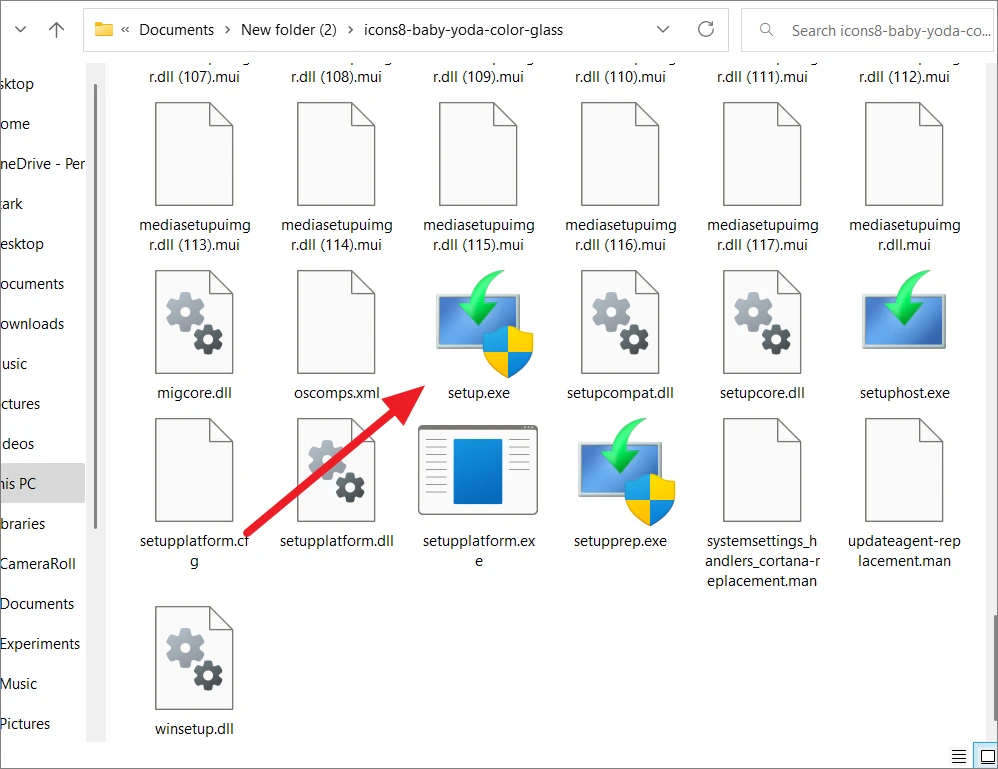
Once all the files are extracted, go to the destination folder and locate the ‘Setup’ file. Then, double-click on the ‘Setup.exe’ file and follow the on-screen instructions to install the update.
6. Edit Windows Registry Entries
If you encounter the 0x8004005 error while accessing shared files or folders or moving files from one location to another, you can fix this by adding a new registry value to Windows Registry.
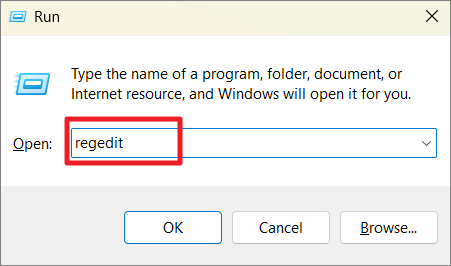
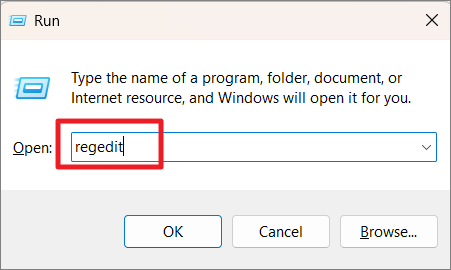
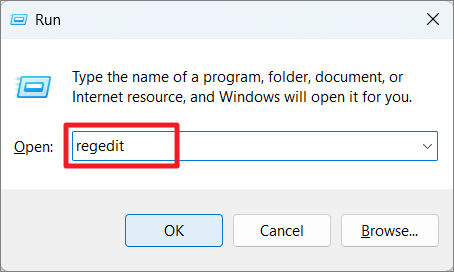
Open the Run command box (Win+R), type regedit and click ‘OK’ to launch the Windows Registry editor.
When the Registry Editor opens, navigate to the following location:
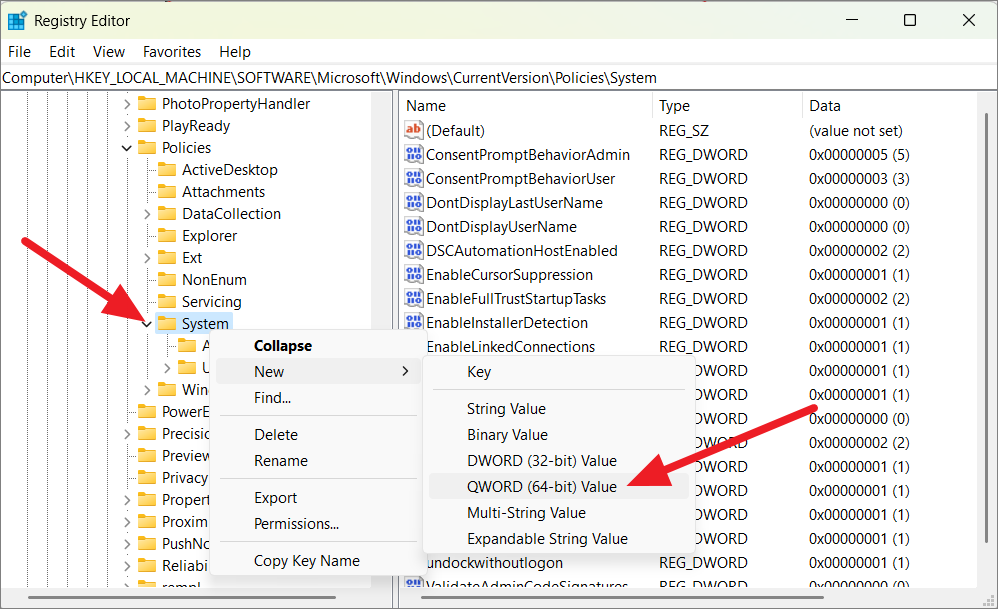
HKEY_LOCAL_MACHINESOFTWAREMicrosoftWindowsCurrentVersionPoliciesSystemNow, right-click the System key on the left pane or right-click on any part of the empty area in the right-side window, go to ‘New’, and then select ‘QWORD (64-bit) Value’.
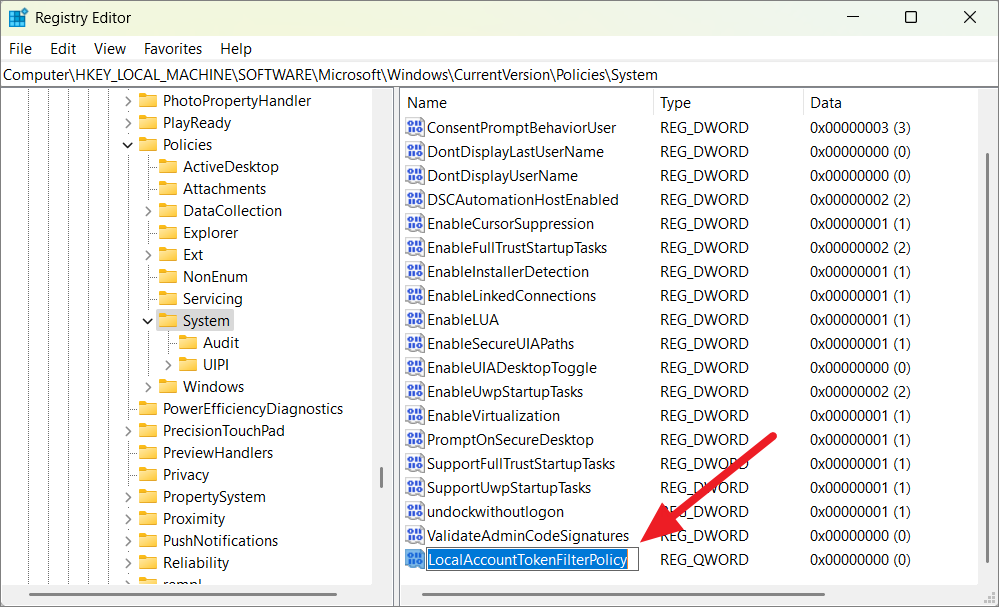
Then, change the name of the newly created entry to LocalAccountTokenFilterPolicy.
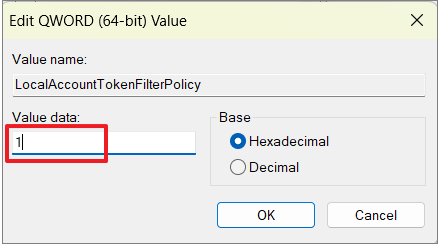
After that, double-click on the ‘LocalAccountTokenFilterPolicy’ and set the value to 1 and click ‘OK’.
Close the registry editor, restart your PC and check if the error code 0x80004005 is resolved.
7. Run File and Folder Troubleshooter
If you encountered “Error: 0x80004005 Unspecified Error” when you were trying to rename, copy, or move files, you can also fix it by running Microsoft’s Windows File and folder troubleshooter.
First, download the Windows File and Folder Troubleshooter from the Microsoft support page.
Once the file is downloaded, navigate to where you downloaded the file and run the ‘winfilefolder.DiagCab’ file to launch the troubleshooter.
When the File and Folder Troubleshooter appears, click the ‘Advanced’ link.
Then, select the ‘Apply repairs automatically’ option and click ‘Next’ to continue.
Next, select what kind of problems you are having with the files and folders using the checkboxes and click ‘Next’.
The troubleshooter will automatically diagnose and repair Windows file and folder issues.
8. Change Sharing Folder Permission
If the error occurred when you were trying to share files in the shared folders, you can fix the problem by adjusting sharing permissions:
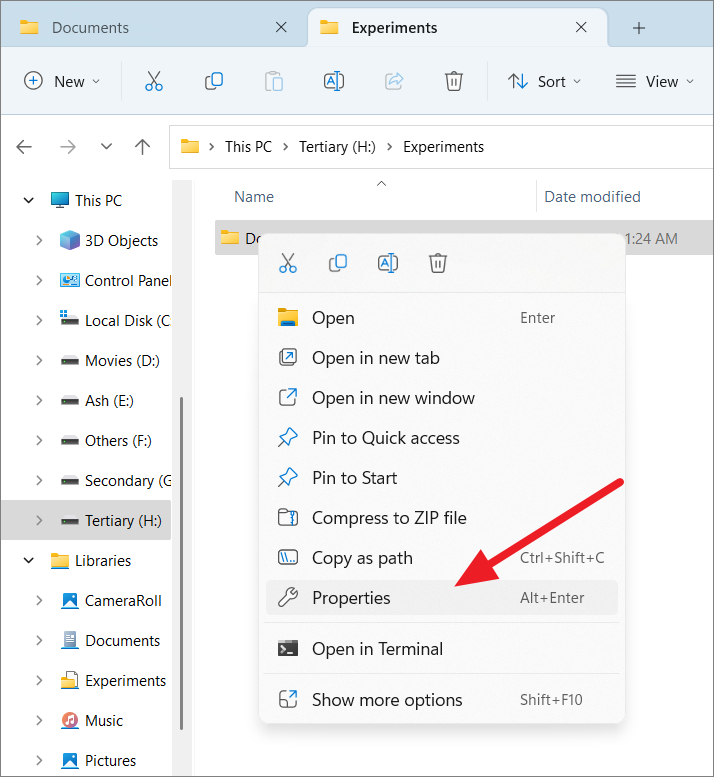
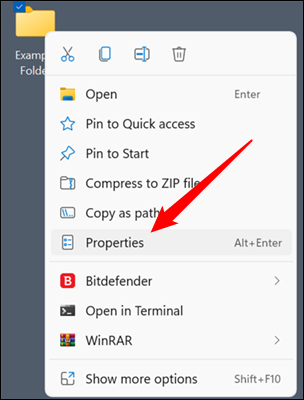
First, navigate to the drive or folder you were trying to share. Then, right-click the folder or drive and select ‘Properties’.
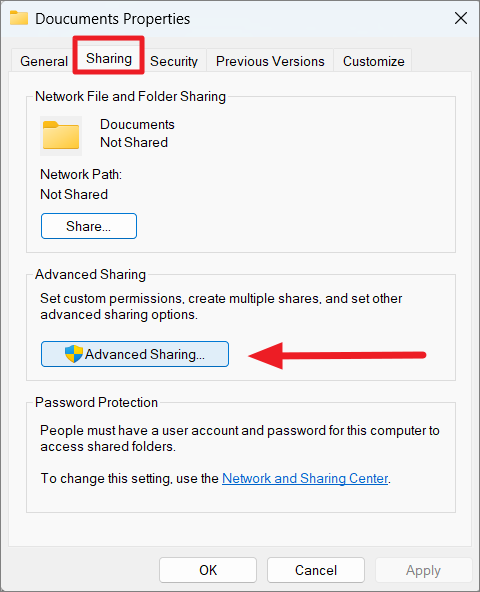
In the Properties dialog, move to the Sharing tab and click on ‘Advanced Sharing..’.
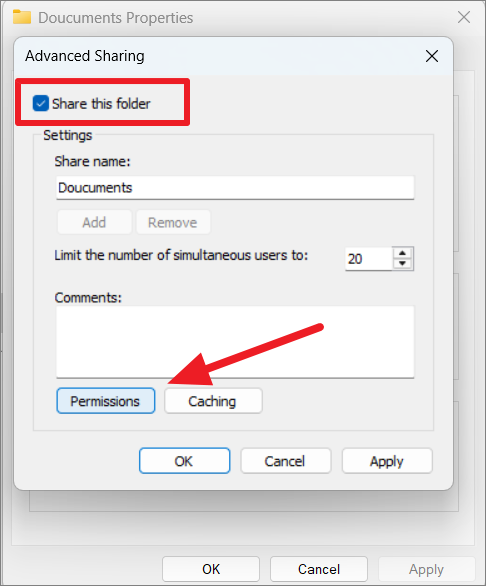
Check the ‘Share this folder’ option to share the folder and select the ‘Permissions’ button at the bottom.
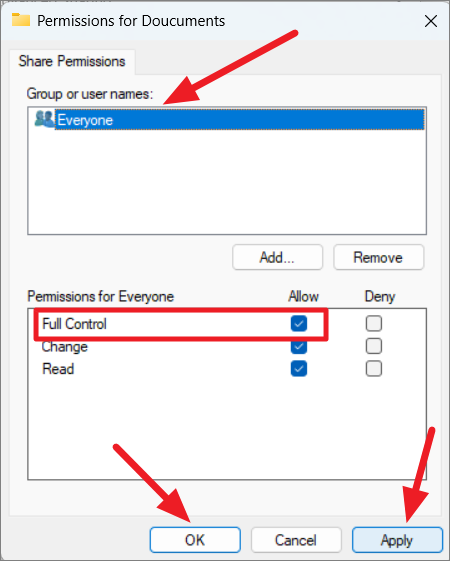
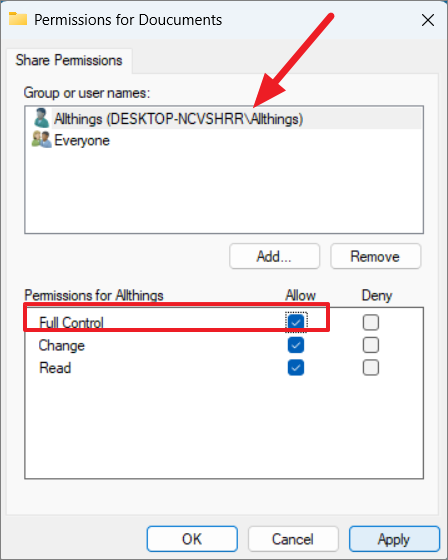
In the next window, select ‘Everyone’ under Group or user names section and check the ‘Full Control’ checkbox under ‘Permissions for Everyone’. Then, click ‘Apply’ and ‘OK’ buttons respectively.
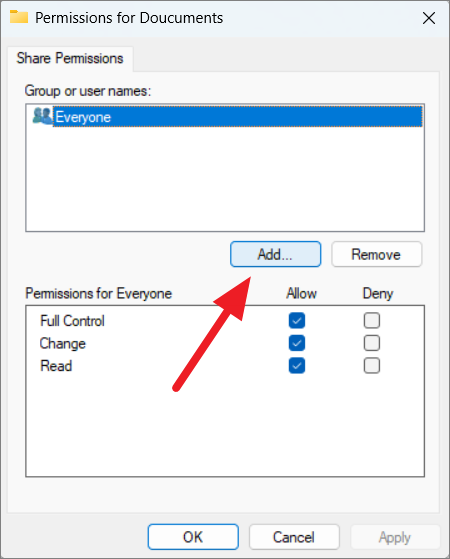
If you don’t see the ‘Everyone’ option from the list of users or if you are sharing only with a particular user(s), click the ‘Add’ button.
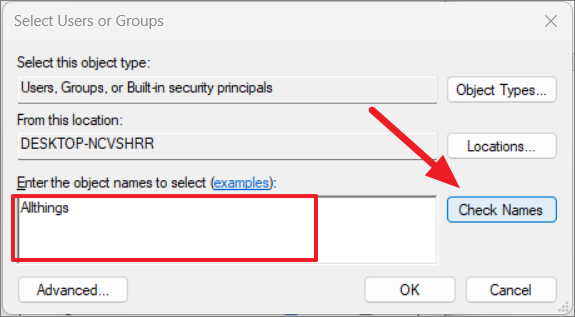
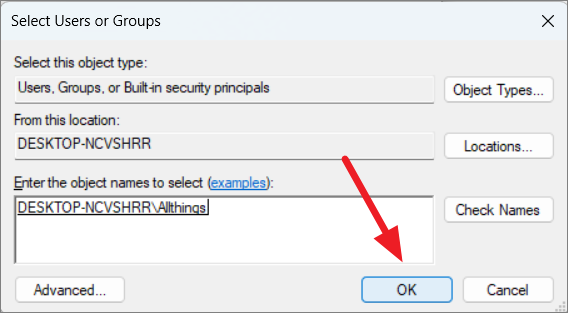
In the Select Users or Groups dialog, type the user name in the ‘Enter the object name to select:’ box, and click ‘Check Names’. If you wish to give permissions for every user, type ‘Everyone’ in the box and click ‘Check Names’.
Once the username is verified, click ‘OK’ to continue.
After that, select the added user, and tick the box beside ‘Full Control’. Then, click ‘Apply’ and then ‘OK’ three times to close all the dialog boxes.
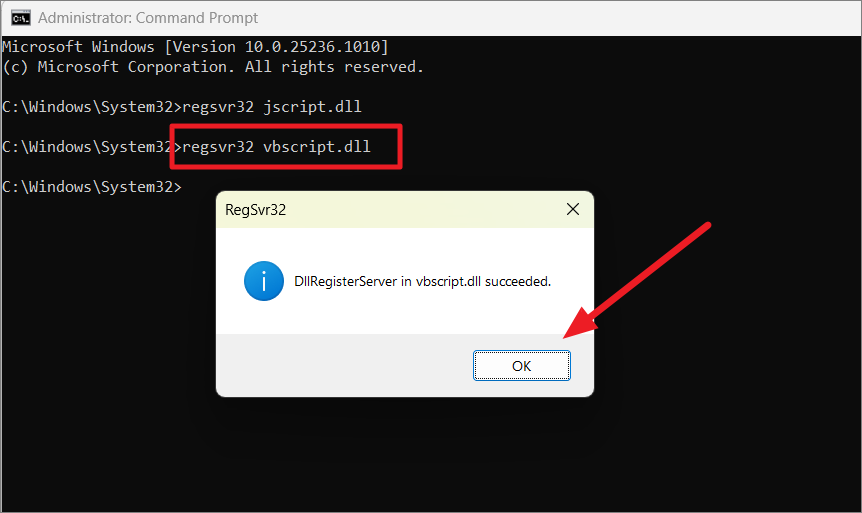
9. Re-Register Registry Files (jdscript.dll and vbscript.dll)
Another easy way to fix 0x80004005 errors in Windows 11 is to re-register the jdscript.dll and vbscript.dll files. If the error occurred while archiving or extracting files, then you could switch to a different archive software. If that doesn’t work, then you need to re-register the dscript.dll and vbscript.dll registry files.
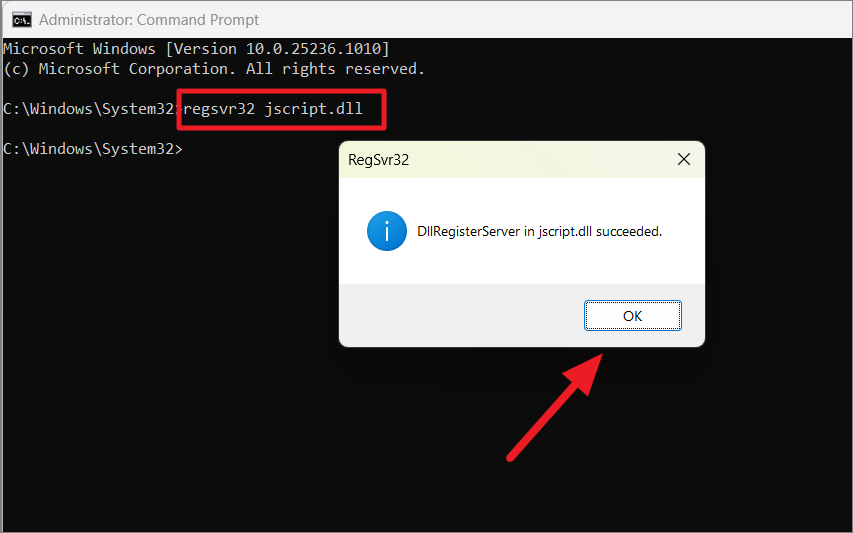
To do this, launch Command Prompt as administrator. When the Command prompt window opens, run these simple commands one after the other and click ‘OK’ on the prompt:
regsvr32 jscript.dllregsvr32 vbscript.dllThen, restart your computer and see if the error is fixed.
If you encounter the error code 0x80004005 while extracting or opening compressed files (like .zip or .rar files), you should try third-party archiving software. This error is usually associated with the Windows built-in extractor since it lacks the capacity to open password-protected files or other advanced archive file formats.
There are several free and paid alternatives such as WinRAR, 7Zip, WinZip, and PeaZip that you can use to get rid of the issue.
11. Run DISM and SFC Scans
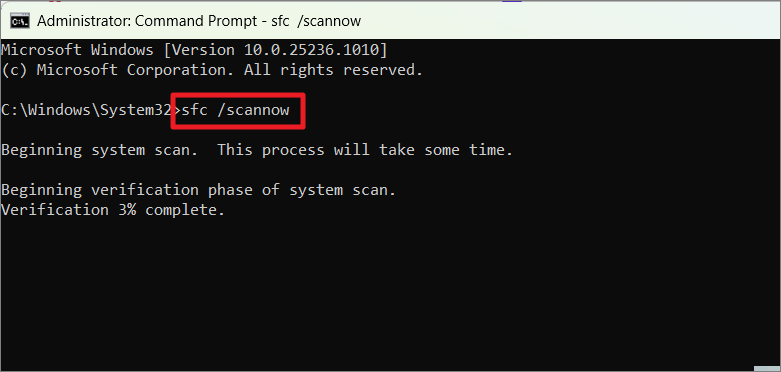
Sometimes the error is caused by missing or damaged system files on your system. So, you can use System File Checker (SFC) and the Deployment Image Servicing and Management (DISM) tools to scan your system for any errors and fix them.
System File Checker is a command-line utility built into Windows that scans important Windows files and replaces incorrect, corrupted, or damaged files. DISM tool allows administrators and experts to scan and repair Windows images including, Windows Recovery Environment, Windows Setup, and Windows PE (WinPE).
To start with, open Command Prompt as administrator. In the ‘Command Prompt’ window, enter the following command and then press ENTER to execute it.
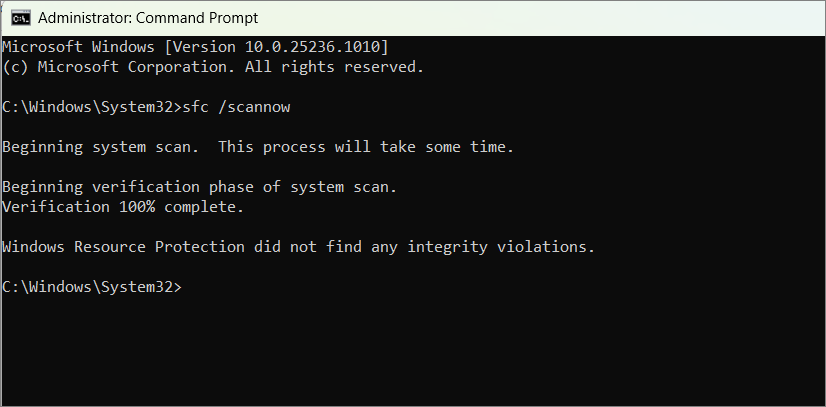
sfc /scannowIt will take a while to complete the scan. The system file checker will check for corrupt files and automatically replace them for you. Once it is complete, restart your computer and check if the error is fixed.
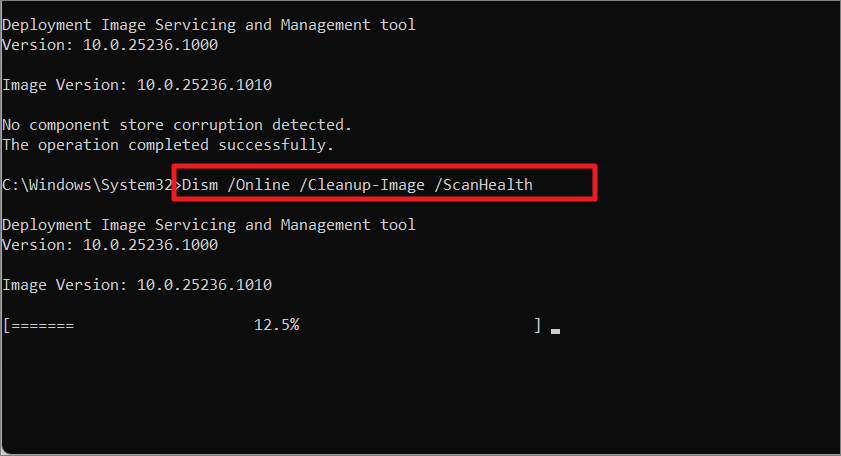
If Windows Resource Protection did not find any errors, you can run the DISM command-line tools.
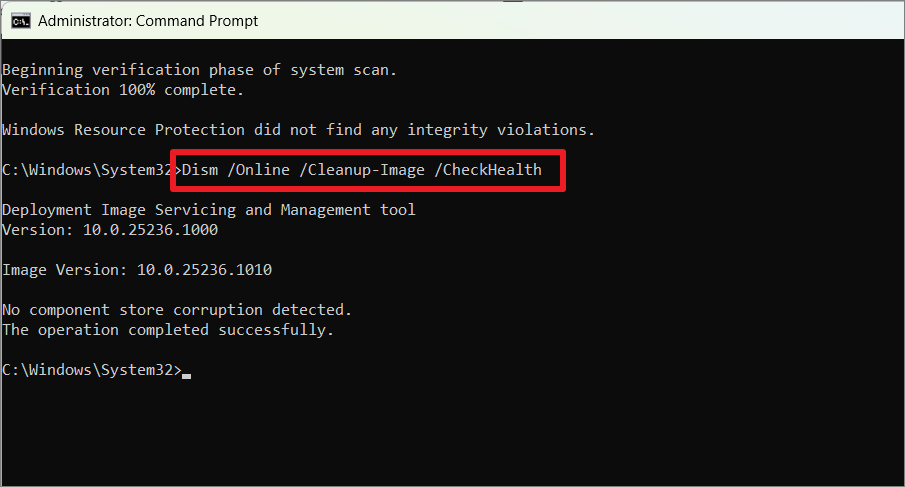
First, use the CheckHealth option with the DISM tool to determine any corruptions inside the local Windows image:
Dism /Online /Cleanup-Image /CheckHealthIf no corruption is detected, you can use the ScanHealth switch to perform a more advanced scan to find out whether the image has any problems:
Dism /Online /Cleanup-Image /ScanHealthIt will take a few minutes to complete the process.
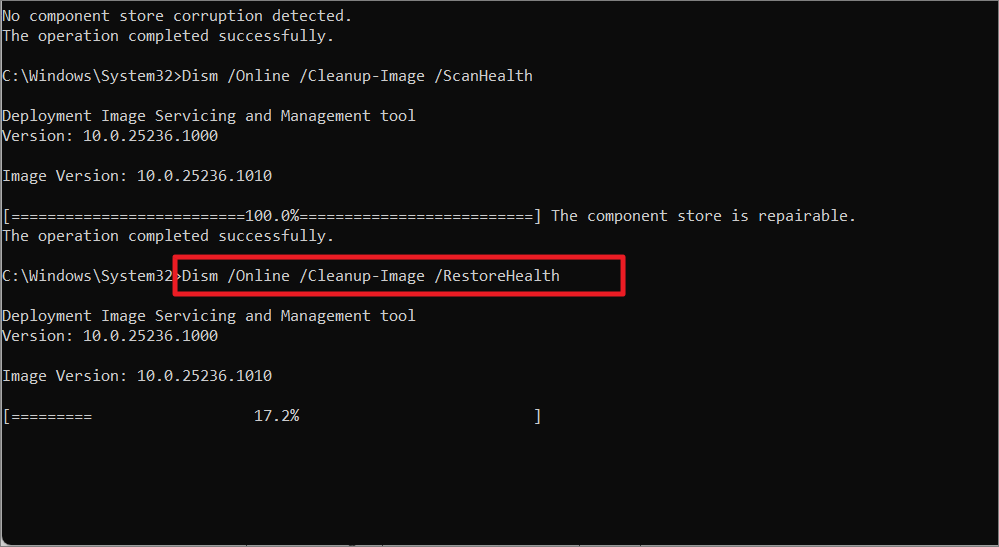
Finally, use the RestoreHealth option to download and replace the windows image using the Windows update:
Dism /Online /Cleanup-Image /RestoreHealthThis will take 15 mins or more to complete the process, depending on the level of corruption.
12. Delete Temporary Files
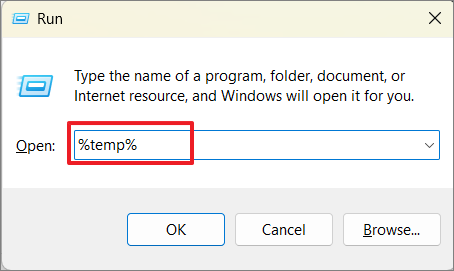
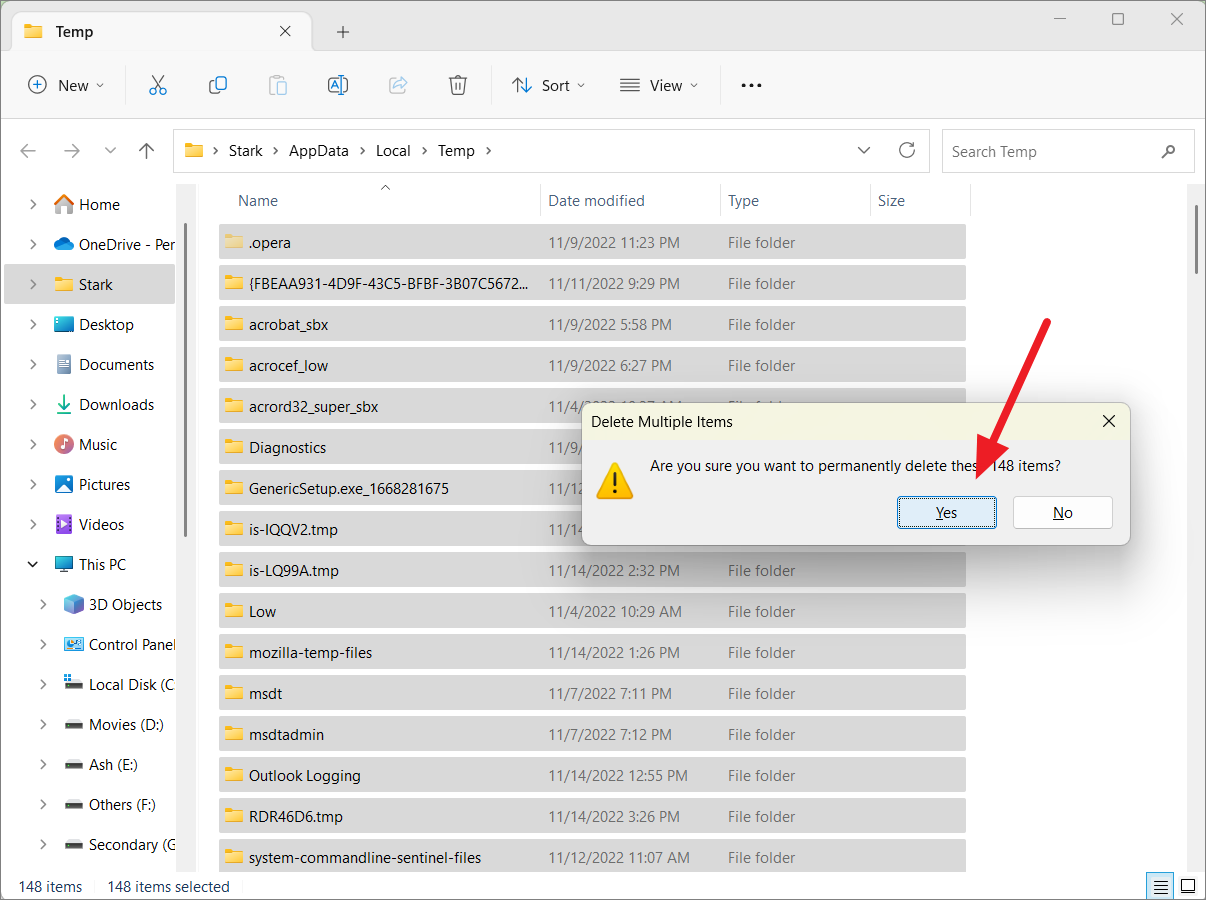
Sometimes temporary files can clog your system and if there are any corrupted files among them, they can also cause the error 0x80004005. You can either use the Windows Cleanup tool to clean your system or go to the Temp folder and delete its contents.
To do that, open the Run command box, type %temp% and hit ‘OK’ to open the Temp folder.
Select all the contents inside the folder (Ctrl+A), then press Shift+Delete and click ‘Yes’ to delete all the files.
13. Use Disk Cleanup to Clear Corrupted Temporary Files
If your system is bogged down with unnecessary files, including corrupted temporary files, Internet cache, unused apps, and other unwanted junk files, it can also cause the error code 0x80004005 on your PC. To fix this, you can the legacy Disk Cleanup tool or Microsoft’s PC Manager to clean your PC. Here’s how you use the Disk Cleanup tool to delete temporary files and unwanted files:
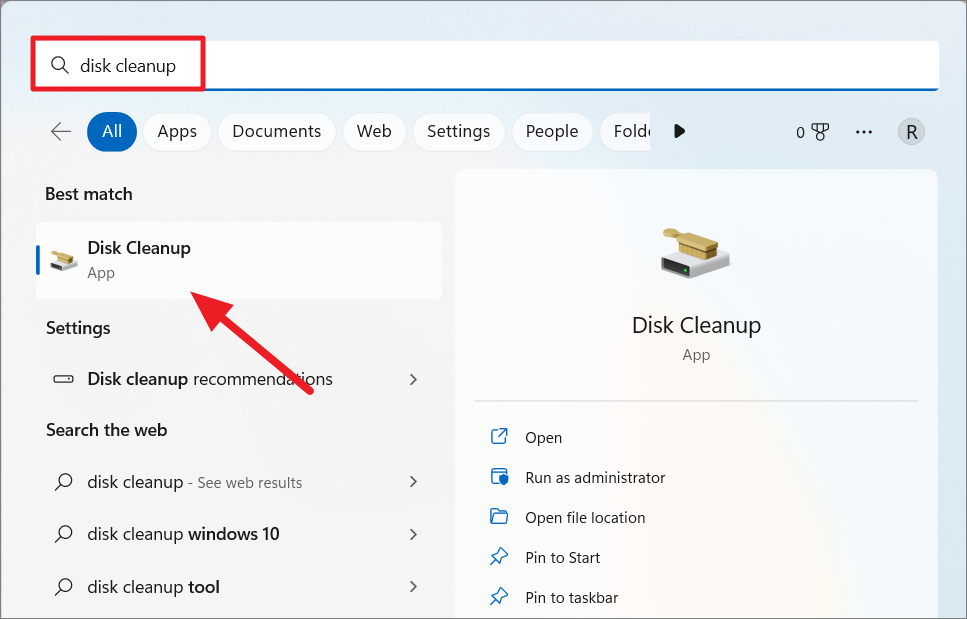
Open Windows search and type ‘Disk Cleanup’ and select the best match result.
Alternatively, you can press the Windows+R keyboard shortcut to open the Run command box. Then, type in cleanmgr and hit Enter.
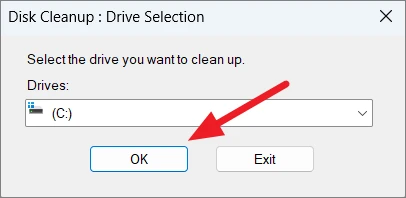
In the small pop-up window, select the drive to scan. By default, the Windows drive (C:_ will be selected, click ‘OK’ to scan the drive.
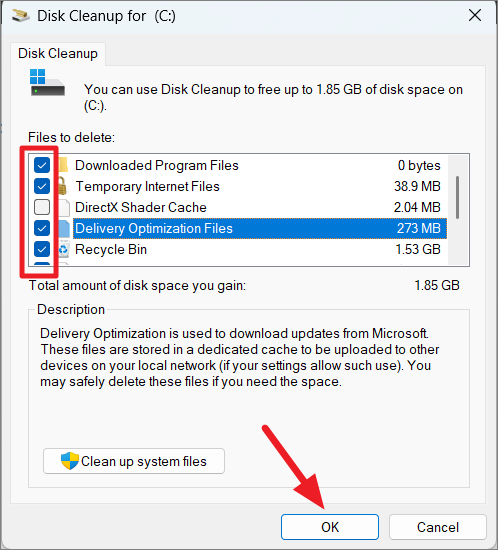
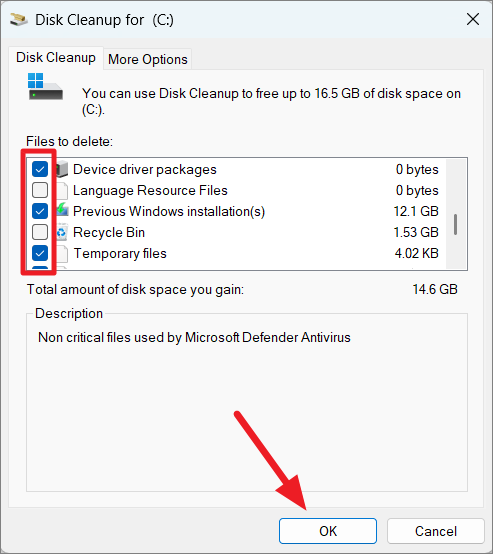
Inside the Files to delete box, you can see a list of unnecessary, temporary files you can delete from your system. The list includes Downloaded Program Files, Temporary Internet Files, Delivery Optimization Files, Temporary files, DirectX Shader Cache, Recycle Bin, and more. The downloaded program files, temporary internet files, and thumbnails are selected by default.
Now, check the Temporary files and other files you wish to remove and click ‘OK’ to delete them. To get a brief description of the file, click on the file name.
However, it doesn’t list all the unnecessary files you can delete to clean your system.
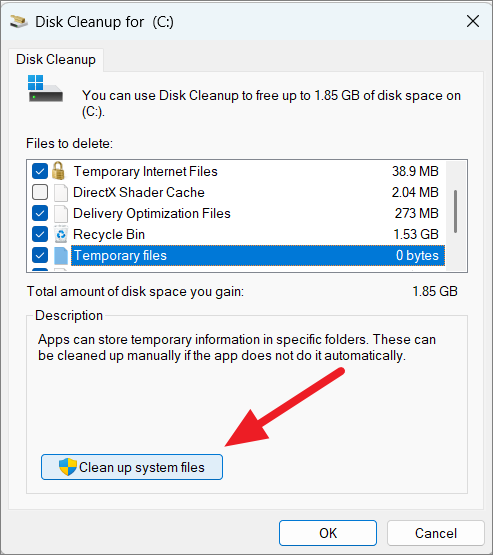
To deep clean your system and remove more unnecessary files such as large junk files, Previous Windows installation(s), System error memory dump files, and more, click the ‘Clean up system files’ button at the bottom.
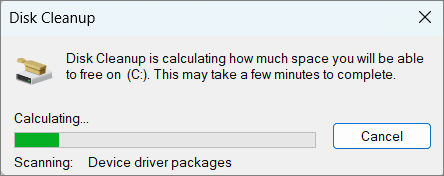
Then, select the Windows drive from the Drive Selection window again. It will take a few seconds to scan the files.
After the scan is complete, select the files you want to delete in the Files to delete box and click ‘OK’. As you select the files, you can see the total amount of disk space you gain from deleting those files.
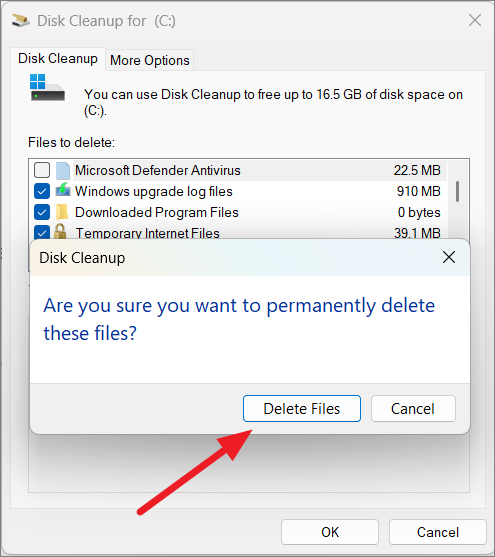
Then, click ‘Delete Files’ on the confirmation box to delete the selected files.
This should free up some disk space on your device and improve your system performance.
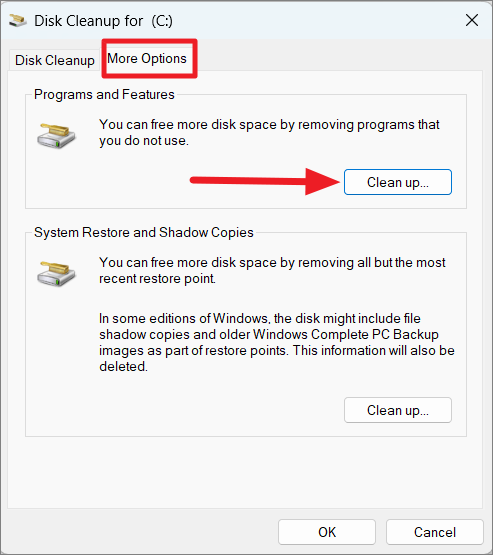
You can also free up space by clearing unused apps and system restore points from your system. To do this switch to the ‘More Options’ tab in the Disk Cleanup window.
This will take you to the Programs and Features control panel where you remove unused apps to free more space.
14. Disable IPv6 Protocol
The internet is slowly moving to Internet Protocol version 6, or IPv6 from IPv4 but many devices still use the legacy IPv4 protocol. When you try to access shared network resources like shared network hard drives that use IPv4, you may get the error code 0x80004005. So be sure to disable the IPv6 protocol on your device when you are connecting to a local network via Wi-Fi or Ethernet.
Open Windows Settings and go to the ‘Network & internet’ tab. Then, select the network adaptor you are connected to (Wi-Fi or Ethernet) on the right-side pane.
Then, select the ‘Hardware properties’ tile on the next page.
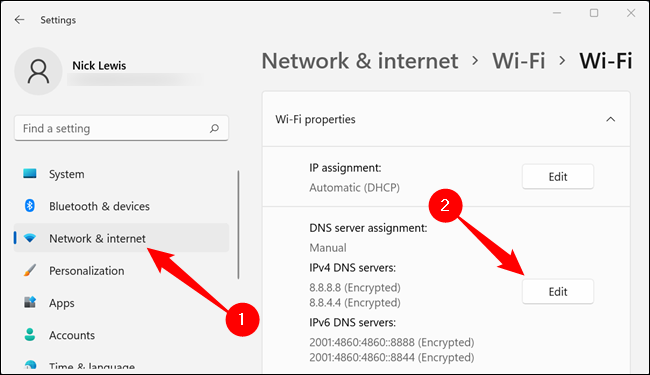
On the Properties settings page, click the ‘Edit’ button next to ‘DNS server assignment:’
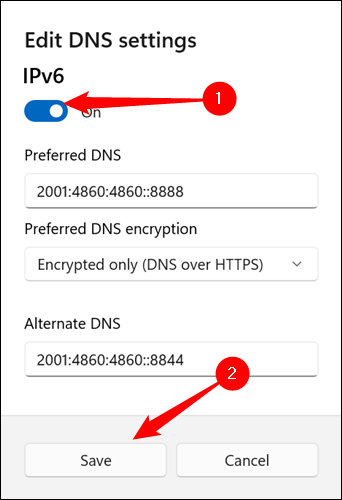
In the Edit DNS settings pop-up box, scroll down to the ‘IPv6’ option and click the switch to the off position. Then, click ‘Save’ to save the settings.
After that, reboot your PC and see if the error shows up again.
If you prefer the Control Panel to change the Network settings, follow these steps:
Open the Run command box, type ncpa.cpl, and click ‘OK’.
When the Network Connections control panel opens, right-click the network adaptor you use to connect to the network and select ‘Properties’ from the context menu.
Scroll down the list of items in the box, uncheck the ‘Internet Protocol Version 6 (TCP/IPv6)’ option, and click ‘OK’.
15. Uninstall Microsoft 6to4 Drivers
Microsoft 6to4 adapters are also known to cause the error. Microsoft 6to4 adapters are used to transmit IPv6 packets through the IPv4 network. So uninstalling all the Microsoft 6to4 adaptors may fix the problem. Here’s how you do this:
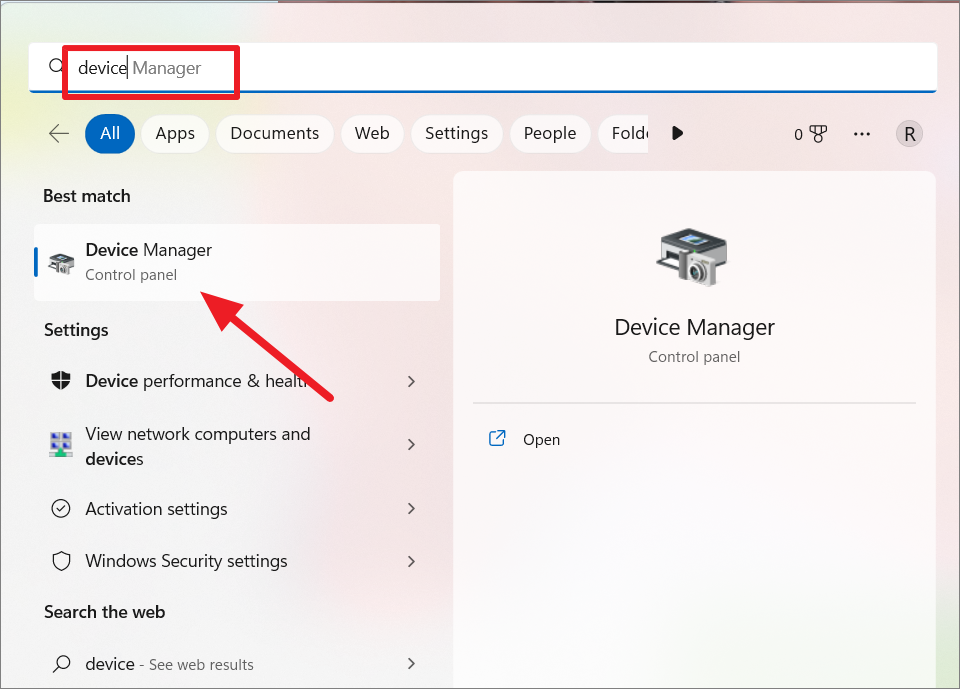
Click the Start menu, type ‘Device Manager’, and select the best match result to launch the tool. Alternatively, press Win+R simultaneously, type devmgmt.msc in the Run box, and press Enter.
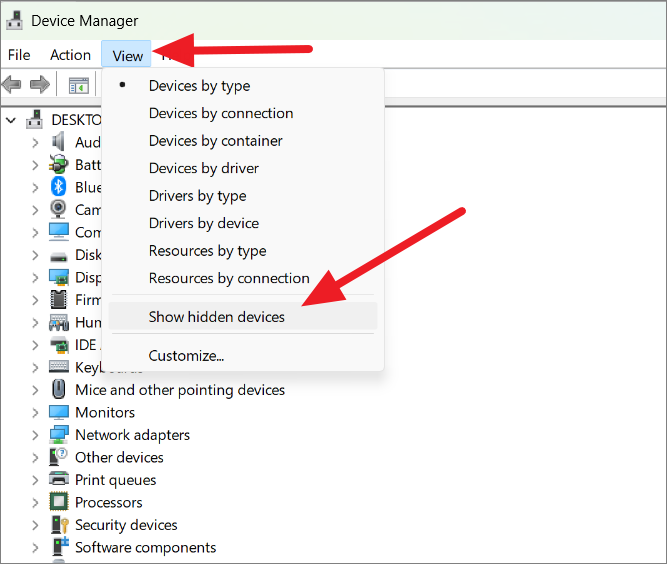
Since Microsoft 6to4 adaptors are hidden devices, they won’t be visible normally.
To view the hidden devices, click the ‘View’ menu and select the ‘Show hidden devices’ option.
Then, expand ‘Network Adaptors’ from the list. Under the Network adaptors tree, look for any Microsoft 6to4 devices. If there are any, right-click the ‘Microsoft 6to4 adaptor’ and select ‘Uninstall’. After that, close the device manager and restart your computer.
16. Restart the Windows Hypervisor (Hyper-V)
If you encounter the 0x80004005 error when starting or running VirtualBox software, it could be due to problems with the VirtualBox app, configuration files, or Hyper-V technology. In that case, you can update the Virtual box, restart the Hyper-V service, or re-install the Virtual box software.
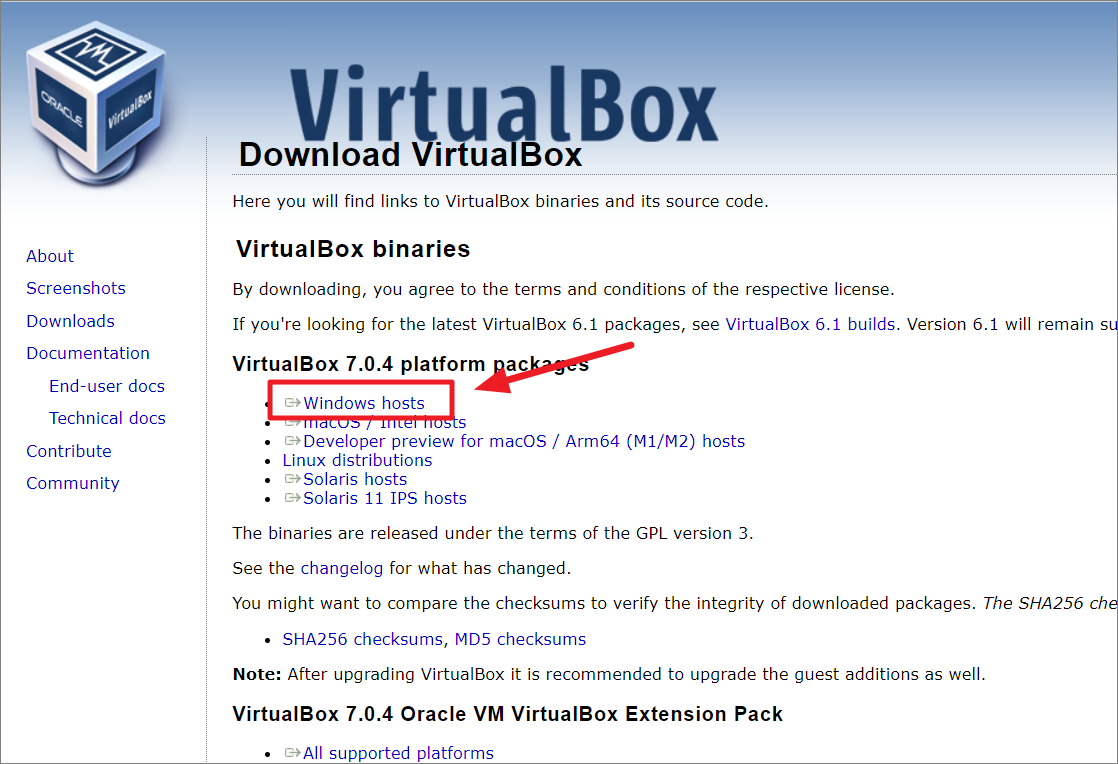
Some users have fixed the issue by installing the latest version of the VirtualBox software. You can go to the VirtualBox official website and click the ‘Windows hosts’ link to download the latest version setup file.
You could experience the error if the Hypervisor (Hyper-V)is not running properly. Restarting the Hyper-V feature can also help fix the issue.
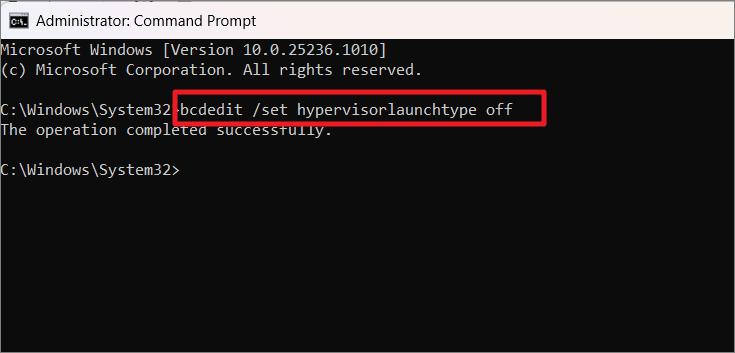
To do this, open the elevated Command Prompt and run the below command:
bcdedit /set hypervisorlaunchtype off The above command will turn off the Hyper-V on your PC.
If you are running multiple OSes on your device using VirtualBox, execute the following command to disable Hypervisor:
bcdedit /set {current} hypervisorlaunchtype offAfter that, restart your computer to apply the changes.
Open Command Prompt as administrator again and then execute the below command to restart the Hyper-V feature:
bcdedit /set hypervisorlaunchtype autoThen restart your computer again and check if the 0x80004005 error is resolved or not.
Delete the Corrupted VirtualBox Registry file
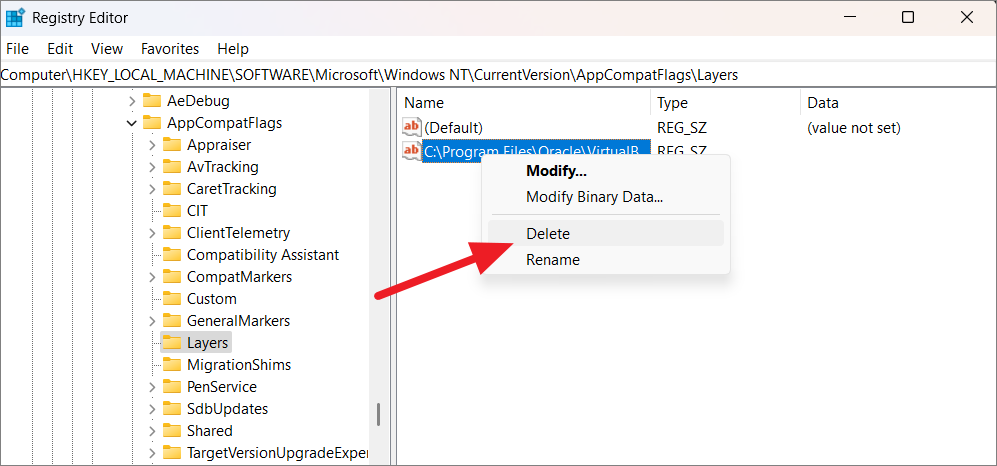
If restarting Hyper-V doesn’t fix the error, then you can try deleting the problematic registry entry.
Press Win+R simultaneously, type regedit, and click ‘OK’.
In the Registry Editor, navigate to the following registry path:
ComputerHKEY_LOCAL_MACHINESOFTWAREMicrosoftWindows NTCurrentVersionAppCompatFlagsLayersThen delete this string if it exists and restart your computer:
C:Program FilesOracleVirtualBoxVirtualBox.exe"="DISABLEUSERCALLBACKEXCEPTION17. Reconfigure BitLocker Encryption Service
Users have often reported encountering the 0x80004005 error while trying to use the BitLocker encryption service with the error message – “Failed to open the BitLocker control panel tool. Error code: 0x80004005”.
You need to set BitLocker Drive Encryption Service to startup automatically when Windows starts. To do that, open the Command box with Win+R, type services.msc, and click ‘OK’.
From the list of services, locate the ‘BitLocker Drive Encryption Service’ and double-click on it or right-click the service and select ‘Properties’.
In the BitLocker Drive Encryption Service Properties window, select ‘Automatic’ from the ‘Startup type’ drop-down menu. Then, click ‘Apply’.
After that, start the service by clicking the ‘Start’ button and then select ‘OK’.
Now try enabling the Bitlocker for the drive which earlier prompted the error and see if it is gone.
Add Additional BitLocker Authentication
If the above method doesn’t fix the issue, you need to configure additional BitLocker authentication when the system boots up in the Group Policy editor.
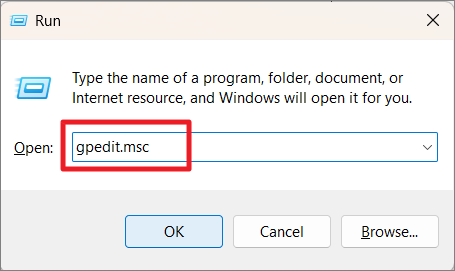
To open Local Group Policy Editor, type gpedit.msc in the Run Command box.
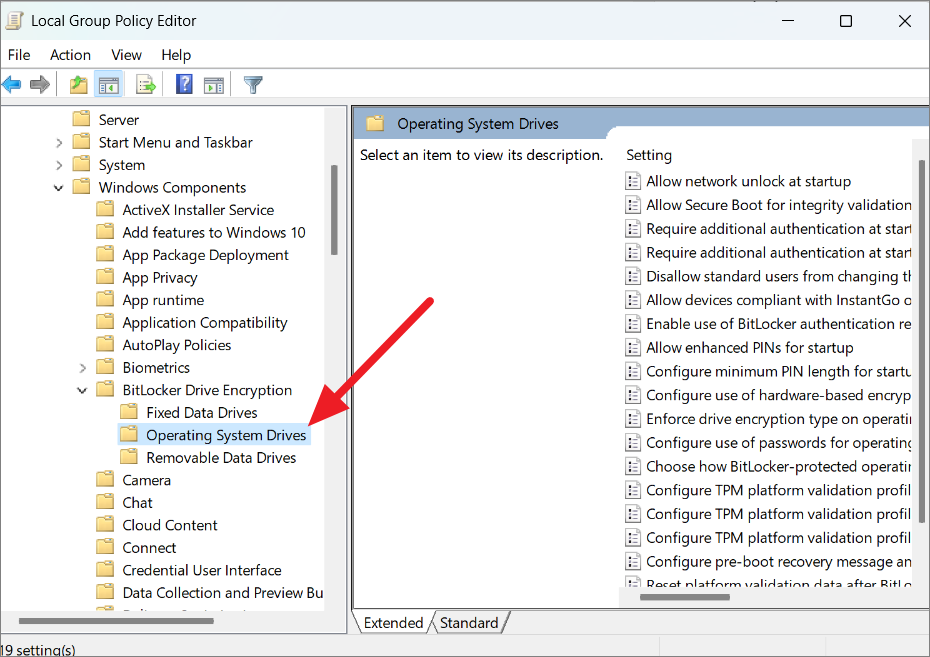
In the Group Policy Editor, navigate to the following location using the left pane:
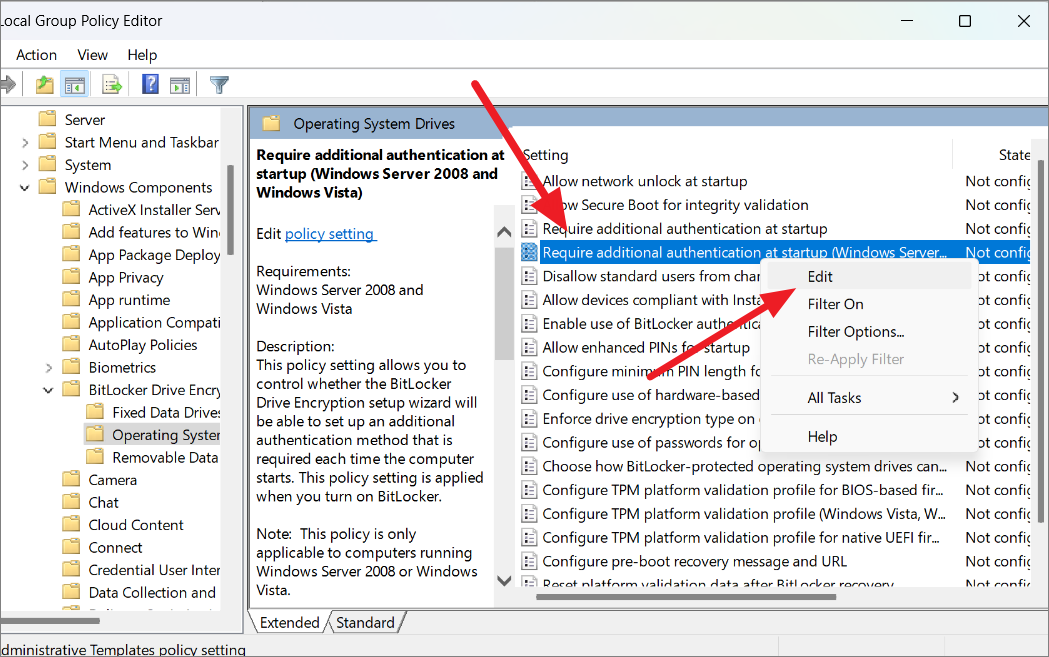
Computer Concifguration > Administrative Templates > Windows Components > BitLocker Drive Encryption > Operating System DrivesOn the right-side pane, right-click on the ‘Require additional authentication at startup (Windows Server 2008 and Windows Vista)’ policy and select ‘Edit’.
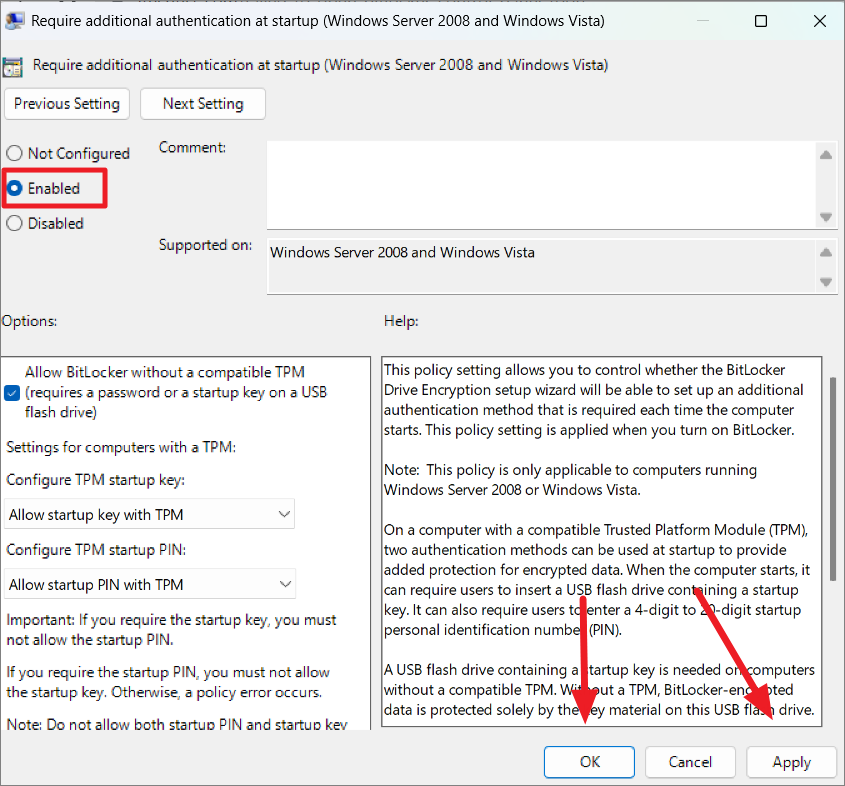
From the popup window, select the ‘Enabled’ option, click ‘Apply’, and then ‘OK’ to save the changes.
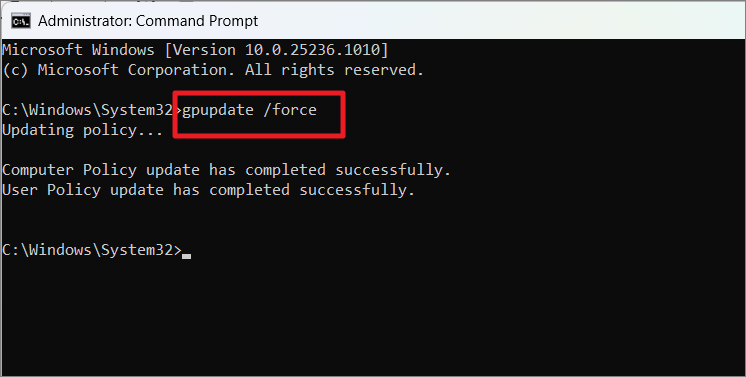
After that, open the elevated command prompt and run the below command to apply the changes:
gpupdate /force18. Clean Boot Windows 11
Sometimes, third-party programs and drivers can interfere with system functions leading to 0x80004005 errors. So you can perform a clean boot to eliminate third-party programs as the cause of the problem. Clean boot isolates errors by booting Windows with only crucial drivers and programs.
By booting your Windows in Clean boot, you can easily identify the program or service that is causing the problems. Here’s how you can Start Windows in clean boot.
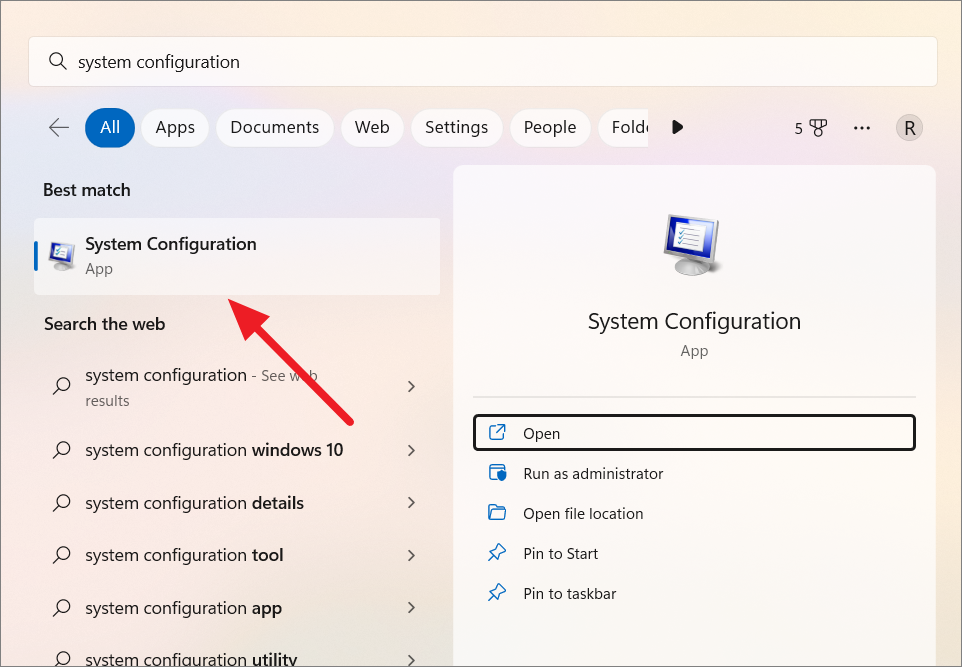
Open the Start menu and search for ‘System Configuration’ or ‘sysconfig’ and select the app under Best Match.
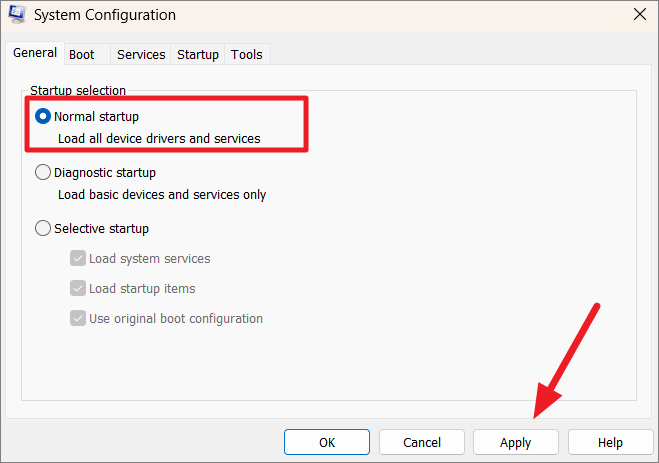
Under the ‘General’ tab, select the ‘Selective startup’ option and ensure that the ‘Load System Services’, ‘Load Startup Items’, and ‘Use Original boot configuration’ options are checked under it.
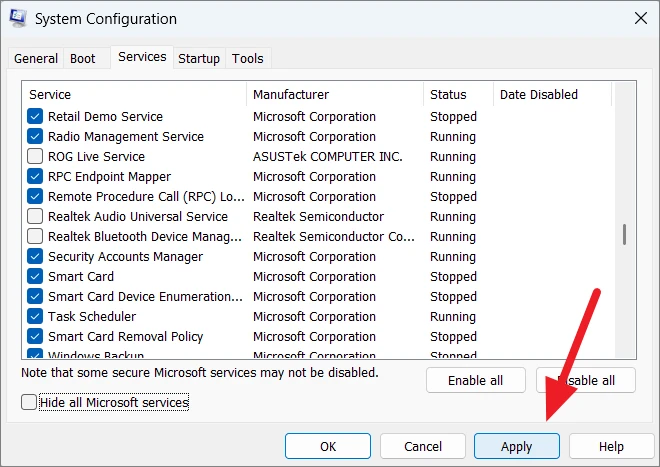
Then switch to the ‘Services’ tab and check the ‘Hide all Microsoft services’ box at the bottom left corner. This will hide all Microsoft services and drivers. Now, you can disable the non-essential services to isolate the cause of the problem.
Then, click the ‘Disable all’ button at the bottom right corner.
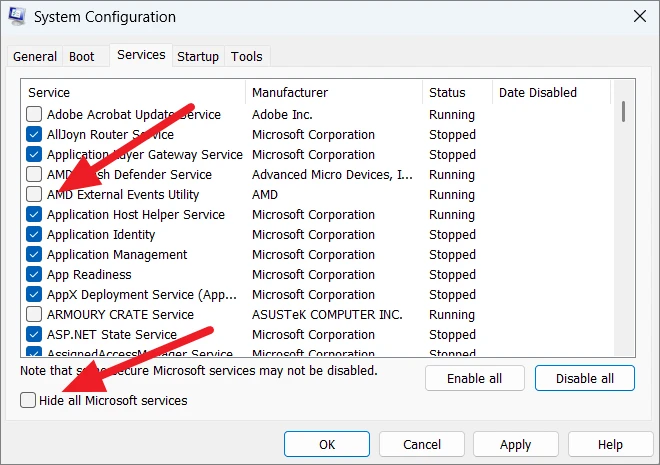
This will disable all third-party services. You can also choose to disable the Microsoft services you don’t need by unchecking the ‘Hide all Microsoft services’ box and deselecting Microsoft services that you don’t think necessary for the clean boot.
After disabling the services, click ‘Apply’.
Next, switch to the ‘Startup’ tab and click on ‘Open Task Manager’.
In the Task Manager window, right-click each startup app one by one and select ‘Disable’.
After that, close both Task Manager and System Configuration tools and restart your computer. Once your computer restarts, only the minimal set of drivers and startup programs will start.
While you are in clean boot mode, you should see if the error appears. Try using the computer as you normally would. If the problem persists while using Windows in the Clean boot mode, it could be caused by Windows system files and services.
If the error doesn’t appear, then it is time to narrow down the program or service that’s causing it. Try running or installing the program or service that caused the error last time, if the error appears again then you can be sure that it is the cause of the problem.
However, if the error doesn’t show up, you have to re-enable a few third-party services at a time and see if any of them cause the error. To do that, open the System Configuration tool again, go to the ‘Services’ tab, and check the ‘Hide all Microsoft services’ option. Then, re-enable only 5 or 10 non-Microsoft services at a time, apply and then restart your computer.
Then, test to see if the error is back. If it isn’t, go back to the System Configuration tool again and try re-enabling the next set of services. Repeat the process until you checked them all. This way you can easily narrow down the responsible service and remove it.
After testing all the programs, if the error doesn’t appear, you can rule out the services from the suspects.
Getting back to Normal Boot
After completing your troubleshooting process, you can get your PC back to running normally using the following steps:
Open the System Configuration tool by entering msconfig command in the Run box.
Select the ‘Normal startup’ option under the General tab, and click ‘Apply’.
Then, go to the ‘Startup’ and select ‘Open Task Manager’.
Now, re-enable the startup you want and then restart your computer to boot normally.
19. Check Server Message Block (SMB) Configuration
The Server Message Block protocol (SMB protocol) is a client-server protocol that lets computers on the same network share files, printers, and serial ports.
If you get the “Windows Cannot Access Computer Error Code 0x80004005”, it could be related to SMB settings. The SMB service is essential for a computer to connect to another computer and if the service is not running, this could lead to an error.
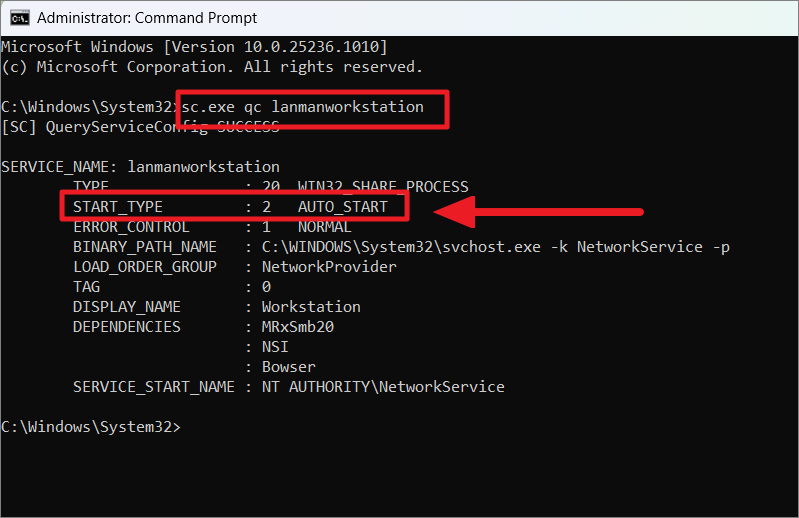
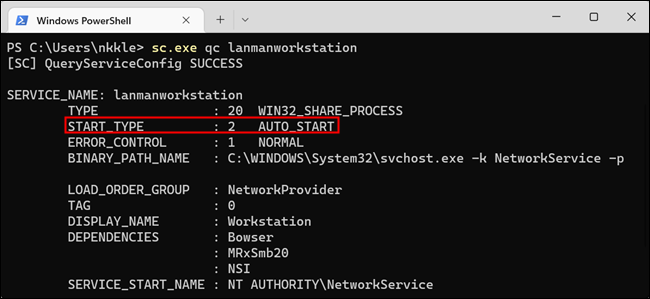
First, let’s check if the SMB service is running in the background. To do that, open Command Prompt or PowerShell as administrator and run the below command to check the SMB status:
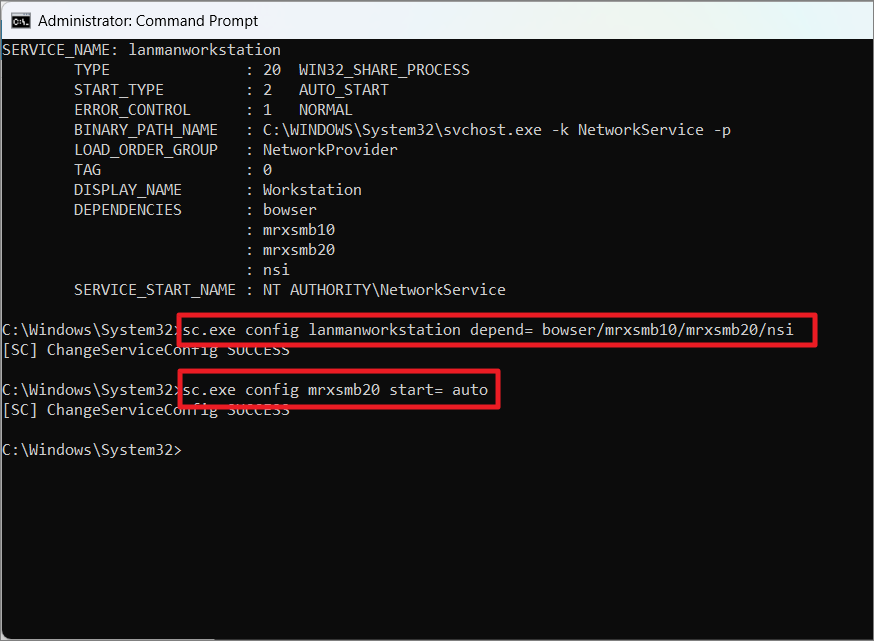
sc.exe qc lanmanworkstationFrom the returned information, check if the ‘START_TYPE’ is set to ‘AUTO_START’ which means the SMB service is running.
In case the ‘START_TYPE’ is not set to ‘AUTO_START’, then you can turn on the service by executing the below commands one after the other:
sc.exe config lanmanworkstation depend= bowser/mrxsmb10/mrxsmb20/nsisc.exe config mrxsmb20 start= autoOnce you receive the ‘[SC] ChangeServiceConfig SUCCESS’ message, the startup type is changed to auto. Now, restart your PC and check if the error appears again. If it does, move to the next step.
Allowing Insecure Guest Logins
By default, all the guest logins are blocked to network devices through SMB version 2. So, you need to enable the guest’s insecure logins using the Registry editor.
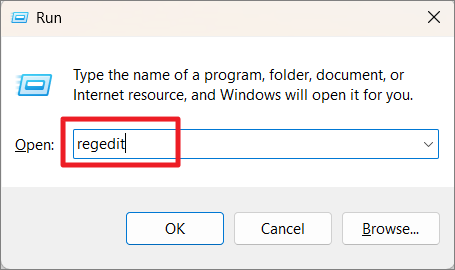
Launch the registry editor by opening the Run command box (Win+R), typing regedit, and clicking ‘OK’.
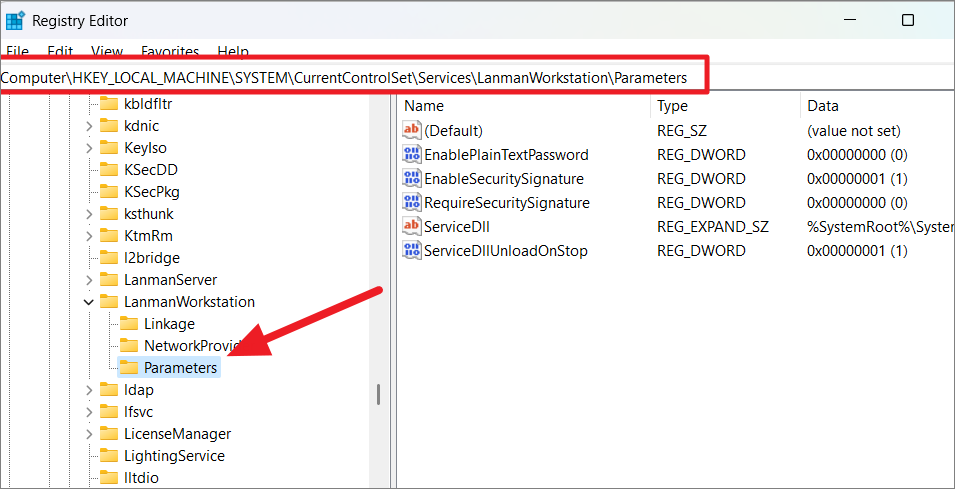
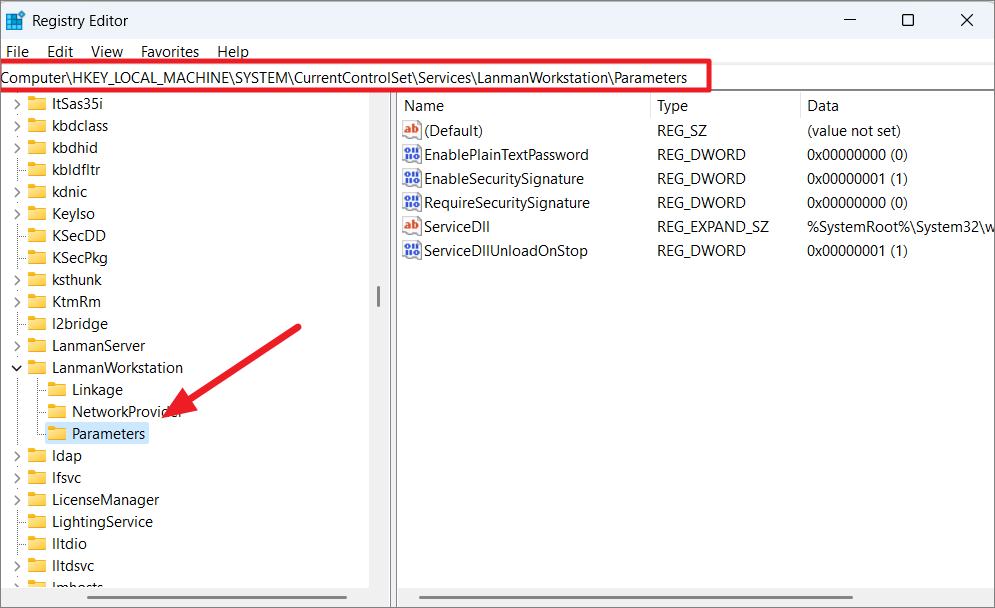
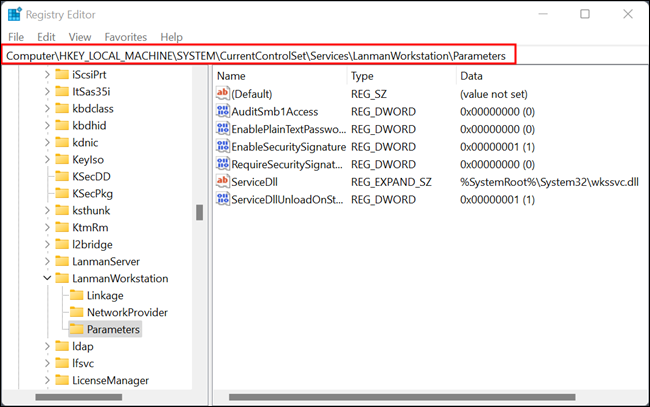
In the Registry Editor, navigate to the following location or just paste the path into the address bar:
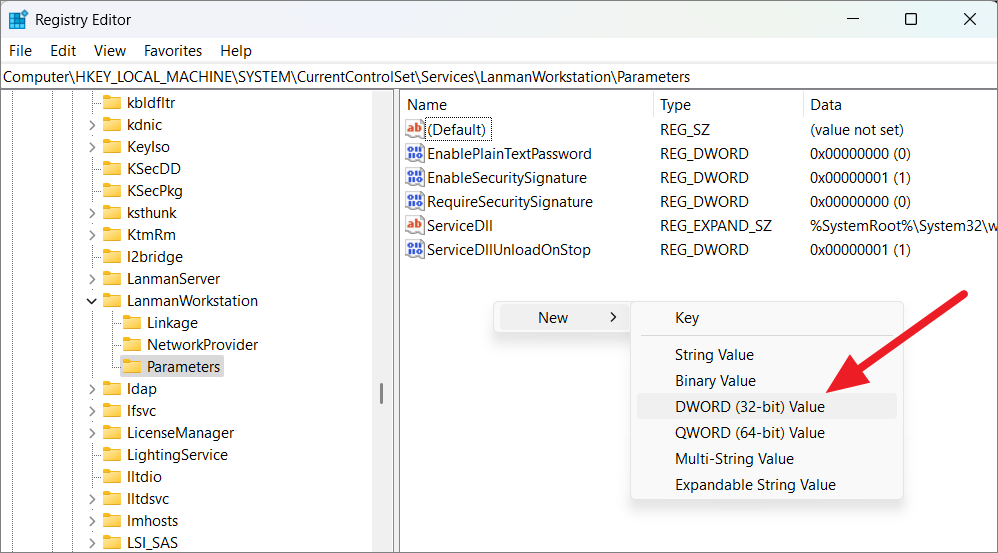
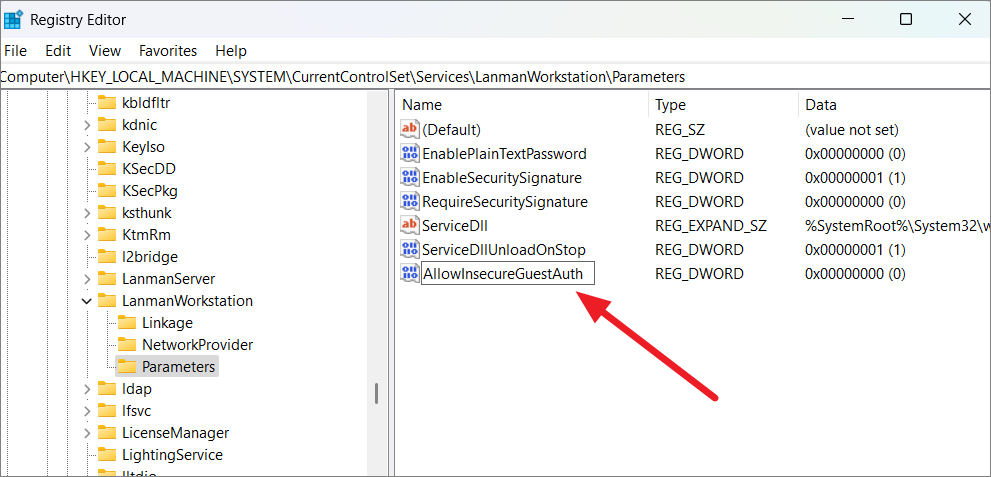
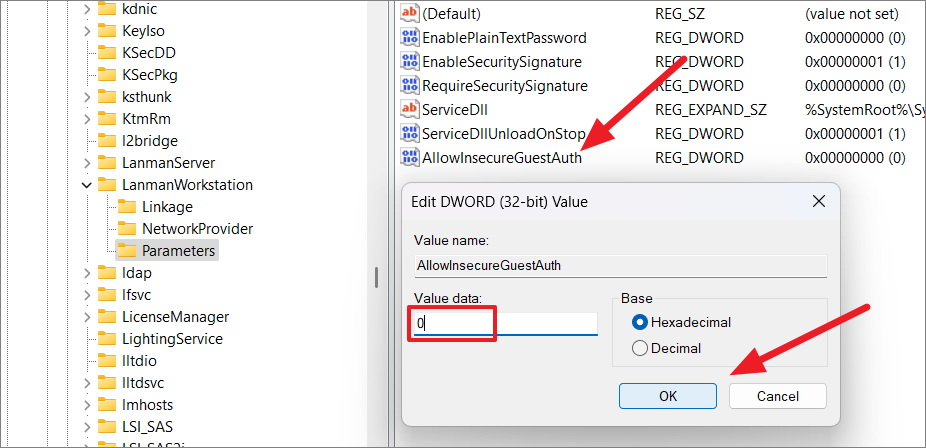
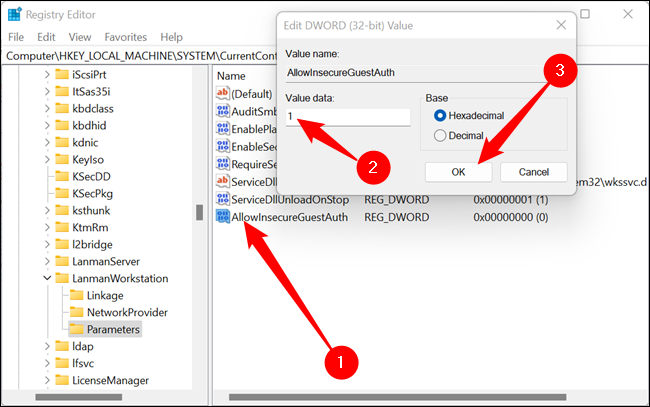
HKEY_LOCAL_MACHINESYSTEMCurrentControlSetServicesLanmanWorkstationParametersDouble-click on the ‘AllowInsecureGuestAuth’ DWORD in the right-side panel. If the DWORD doesn’t exist, you need to create it.
To do that, right-click any empty space on the right-side pane, go to ‘New’, and then select ‘DWORD (32-bit) Value’.
Then, rename the newly created DWORD to AllowInsecureGuestAuth.
Then, double-click the AllowInsecureGuestAuth DWORD and set the value to 1.
Restart your PC for changes to take effect and try doing whatever triggered the error in the first place to check if the error appears again.
20. Enable SMB 1.0/CIFS File Sharing feature
While Windows 11 and most devices use SMB version 2 (SMBv2) or SMB version 3 (SMBv3), some sharing devices and services still use the legacy version SMBv1. In Windows 11, SMBv1 is disabled by default. If the network device you are trying to connect or the application in the server computer use SMBv1, you may encounter the Error 0x80004005.
To fix this, you need to enable SMB version one or SMB 1.0 from Windows Optional features. Many of Windows legacy optional features are still available in the Windows Feature control panel.
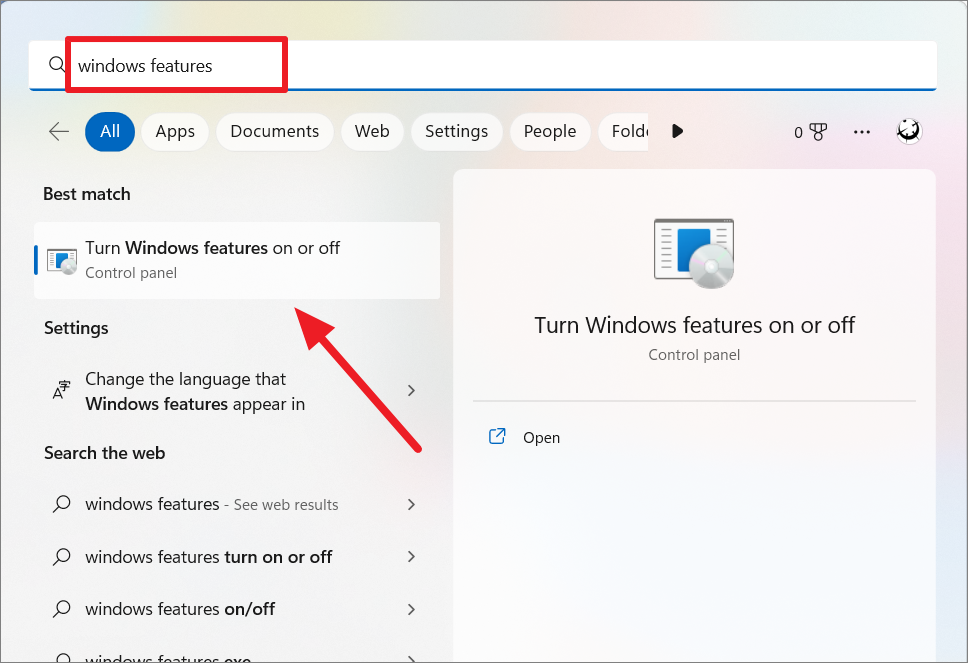
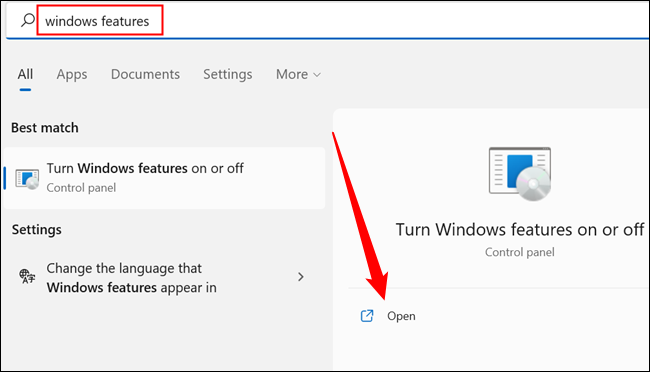
Open the Start menu, type ‘Windows features’, and select the ‘Turn Windows features on or off’ control panel option from the results.
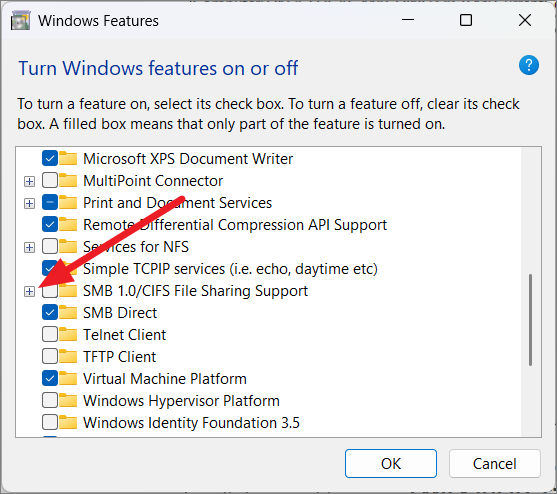
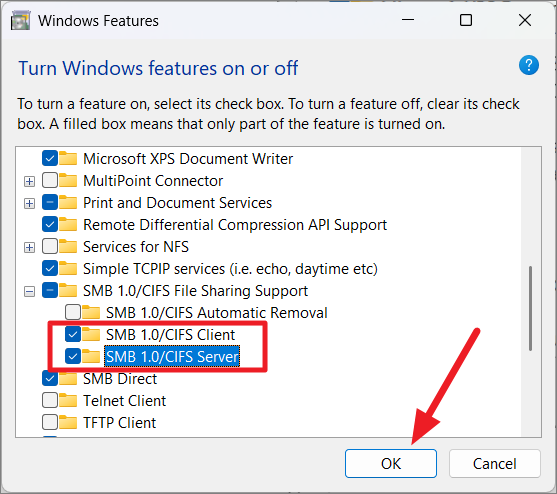
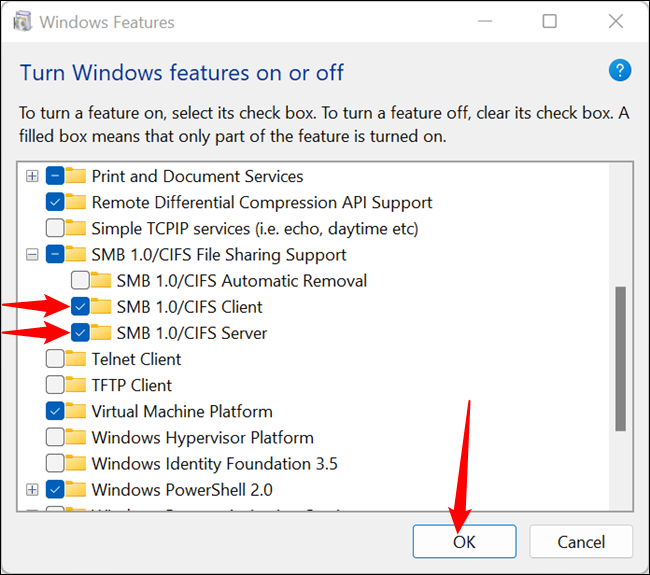
In the Windows Features window, scroll down until you see the ‘SMB 1.0/CIFS File Sharing Support’ option and click the little plus button before it to expand it.
Now, check the ‘SMB 1.0/CIFS Client’ and ‘SMB 1.0/CIFS Server’ options and click ‘OK’.
Windows will automatically gather the necessary files, install the feature and prompt you to restart. Restart your computer to apply the changes and check to see if it resolved the issue.
If the error is not fixed, proceed to the next method, but before that, make sure to disable the SMB 1.0/CIFS feature because it is vulnerable and full of known exploits.
Disable Auditing of SMB Version 1 Protocol
If enabling SMB 1.0 doesn’t fix the error, then you should disable the auditing process of the SMB version 1 protocol. This can be done with the Windows Registry Editor. Here’s how you do this:
Open the Run command box with Win+R, type regedit, and press Enter.
Once the Registry Editor opens, go to the below location using the left navigation panel:
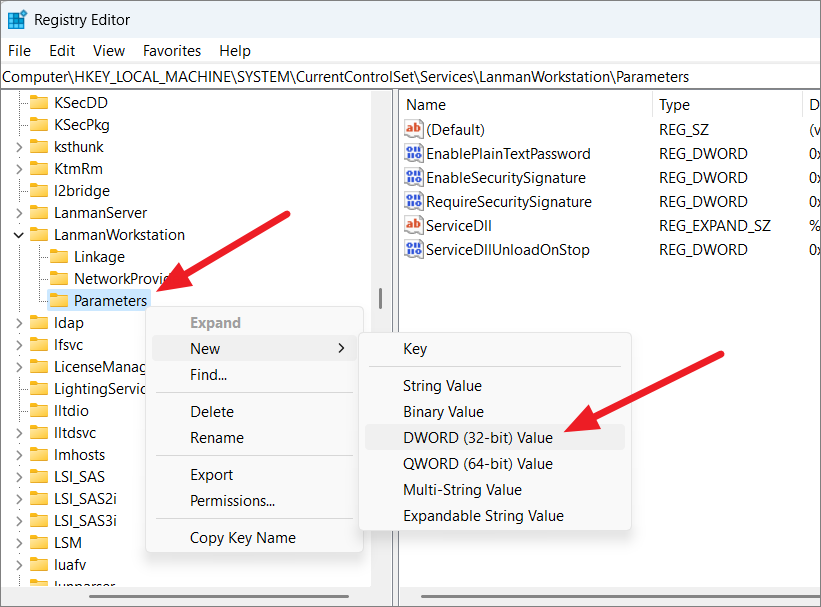
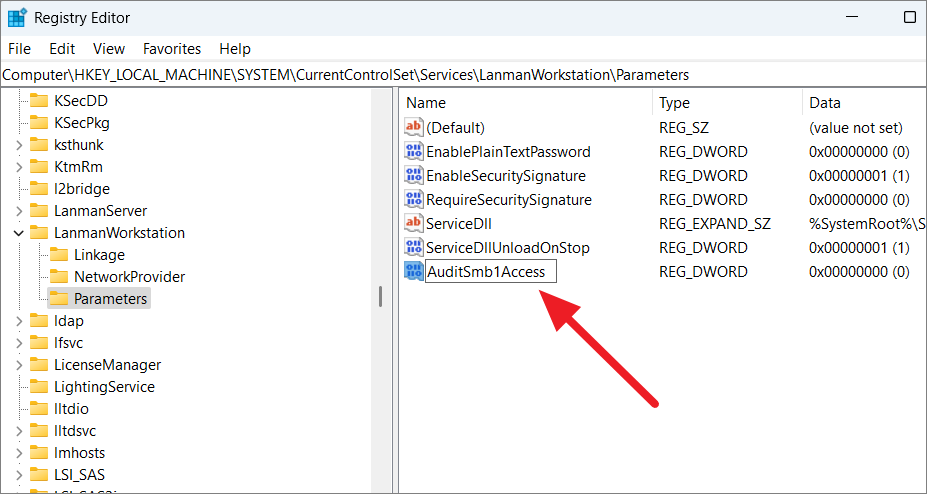
HKEY_LOCAL_MACHINESYSTEMCurrentControlSetServicesLanmanWorkstationParametersThen, locate the DWORD named ‘AuditSmb1Access’ in the right pane. If the registry entry is not found, create it. Right-click the ‘Parameters’ key on the left pane, move to New, and then select ‘DWORD (32-bit) Value’.
Then, rename the newly created DWORD as ‘AuditSmb1Access’.
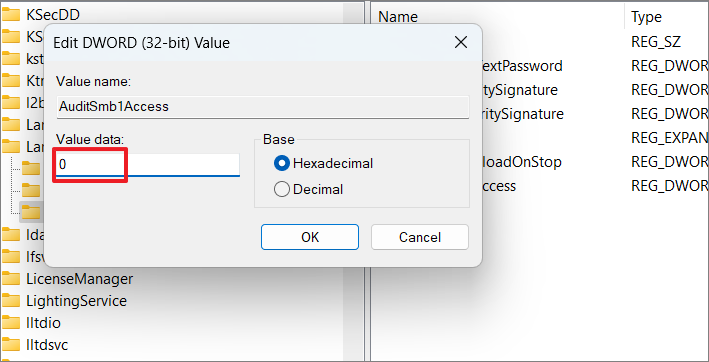
Double-click on it and make sure the value is set to 0.
After that, restart your computer and check to see if the error appears while connecting to a remote computer or sharing a file.
21. Set NetBIOS settings to Default settings
NetBIOS is another network feature that is known to cause Error 0x80004005 if it’s misconfigured. NetBIOS (Network Basic Input/Output System) is a network service that allows networked computers to share resources. If the error is related to network connections, you can try changing NetBIOS settings to default and see if it helps:
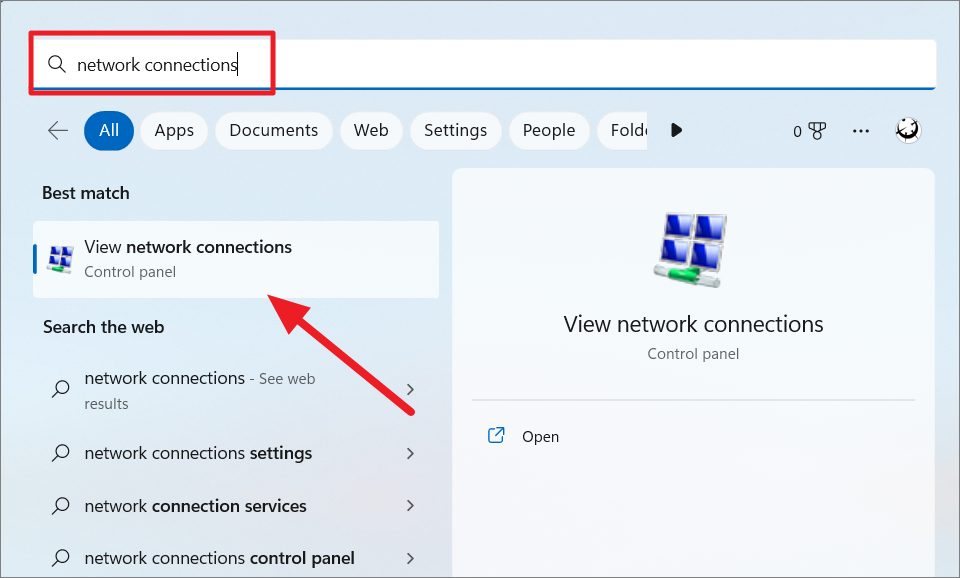
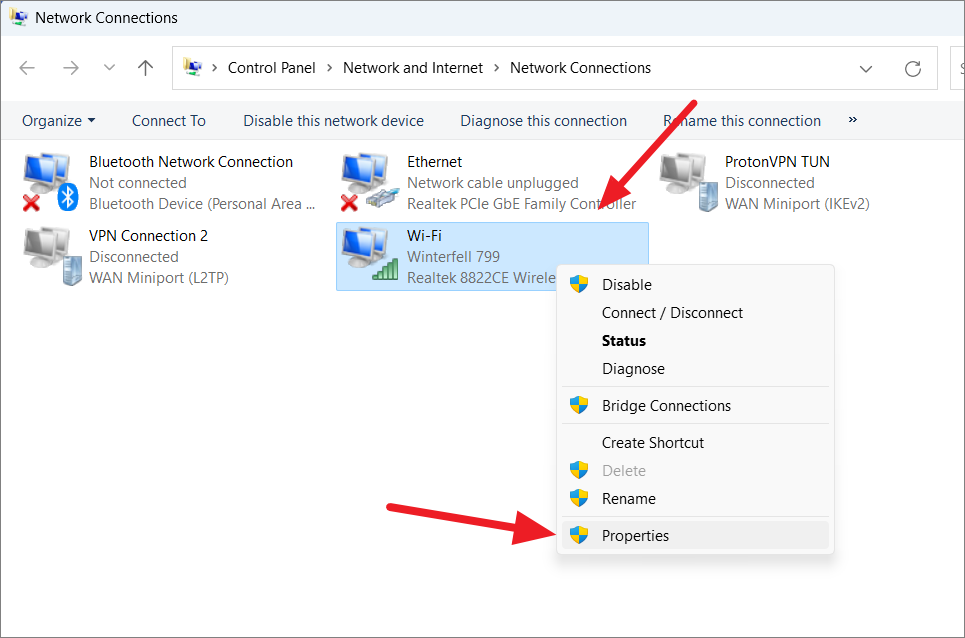
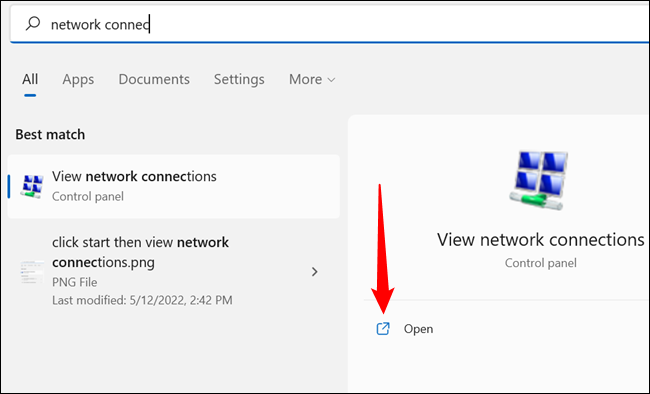
Click the Start menu, type ‘network connections’, and press Enter or click ‘Open’. Alternatively, type ncpa.cpl in the Run Command box and hit Enter.
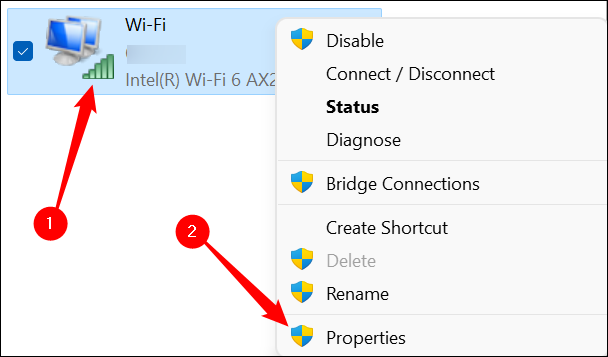
This will show you all your Network Connections. Now, right-click on the network adaptor that you use to connect to the network and select ‘Properties’. The network adaptor names will change between different computers. If it’s a LAN connection, the adaptor will say Ethernet in the name while the wireless connection will say Wi-Fi.
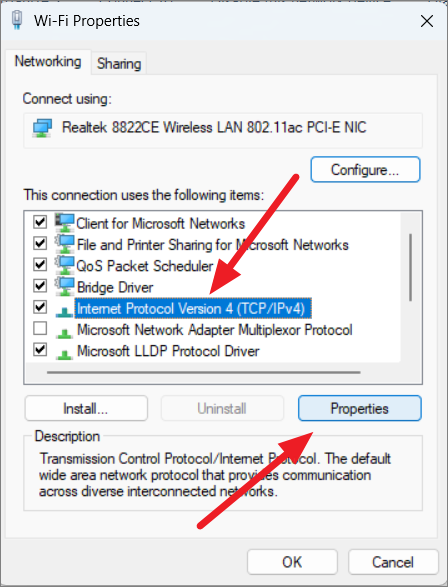
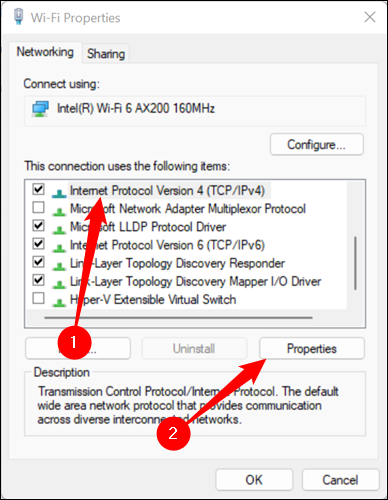
In the Properties window, select the ‘Internet Protocol Version 4 (TCP/IPv4)’ and click on ‘Properties’.
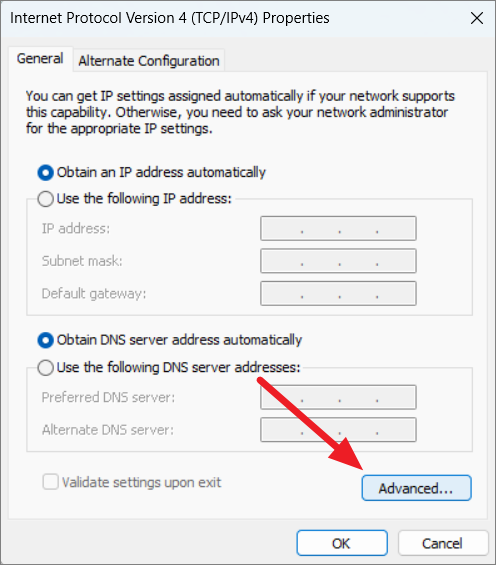
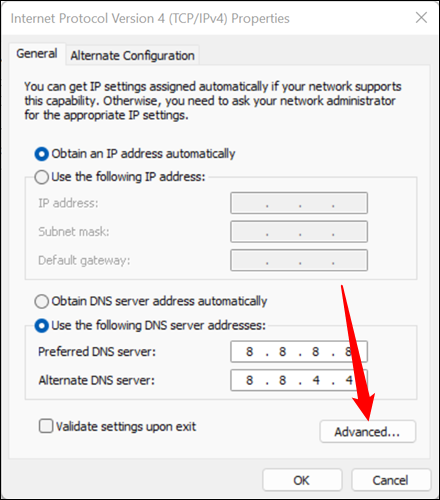
After that, click the ‘Advanced’ button in the TCP/IPv4 properties dialog window.
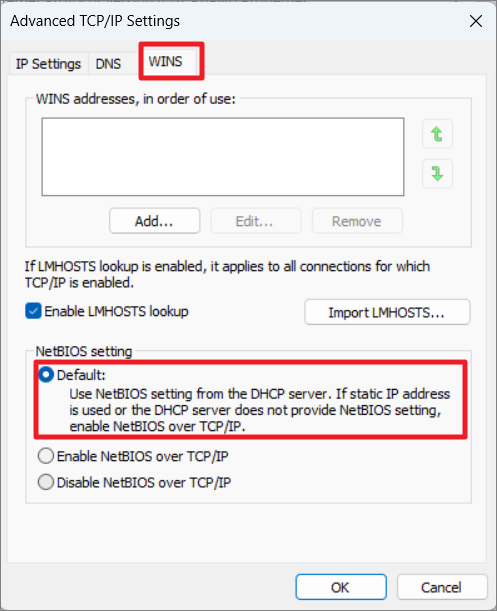
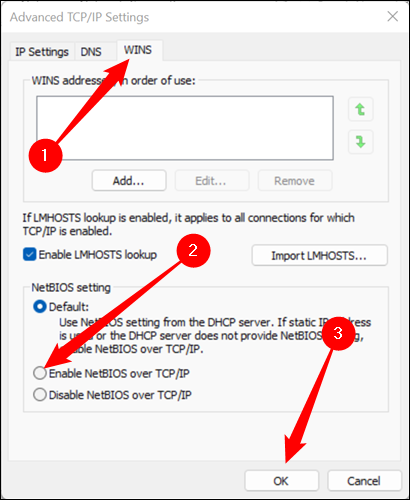
This will open another dialog window (Advanced TCP/IP settings). Now, switch to the ‘WINS’ tab and check the NetBIOS setting at the bottom. If the setting is set to ‘Disabled’, change the setting to ‘Default’. However, if you are still getting the error with the ‘Default’ setting, try changing it to ‘Enable NetBIOS Over TCP/IP’ instead. Then, click ‘OK’ to save the settings.
22. Modify the Network Discovery and Sharing Settings
Network devices like NAS and printers are often the common causes of the 0x80004005 errors. If your Network discovery or sharing settings conflict with the network device’s configuration, it can trigger the errors. Let us see how to change the network settings to avoid the problems:
Right-click the Start menu and select ‘Settings’.
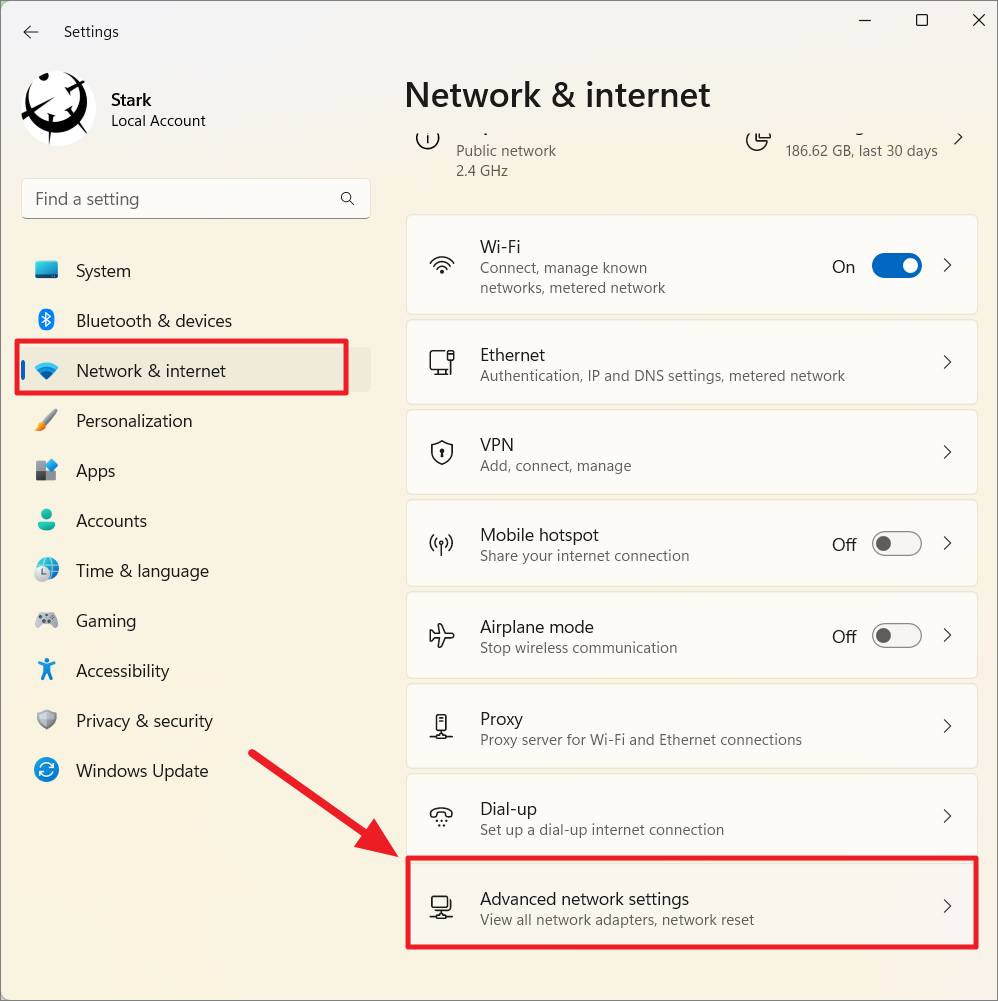
When Settings opens, move to the ‘Network & internet’ and select the ‘Advanced network settings’ option at the bottom of the right side pane.
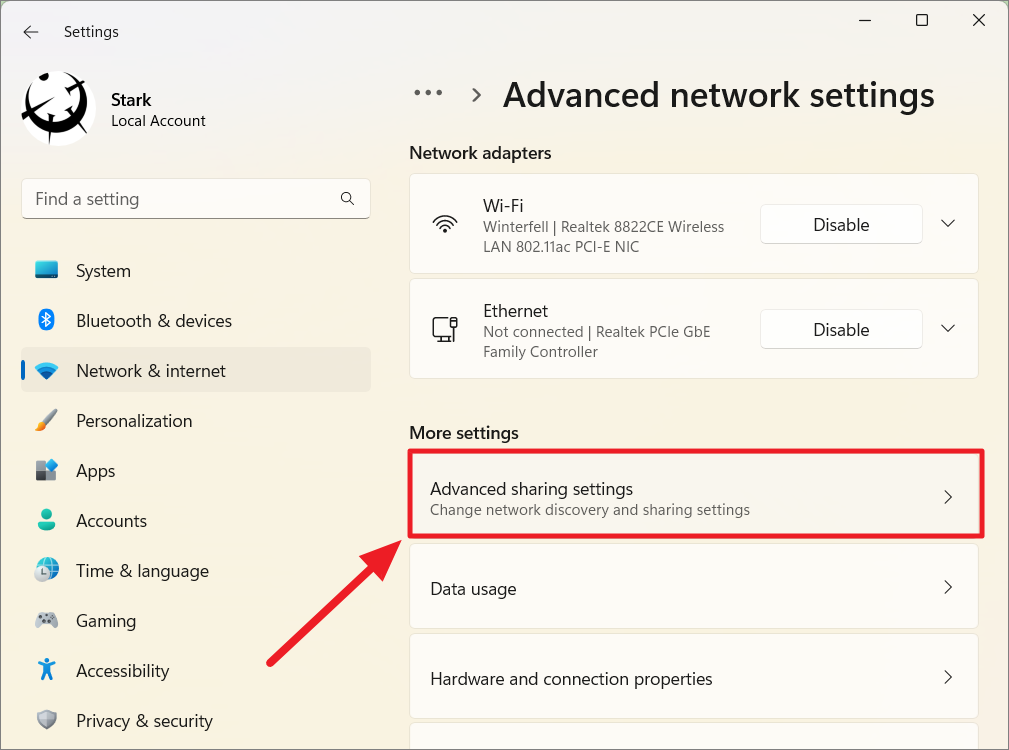
Next, choose ‘Advanced sharing settings’ under the More settings section.
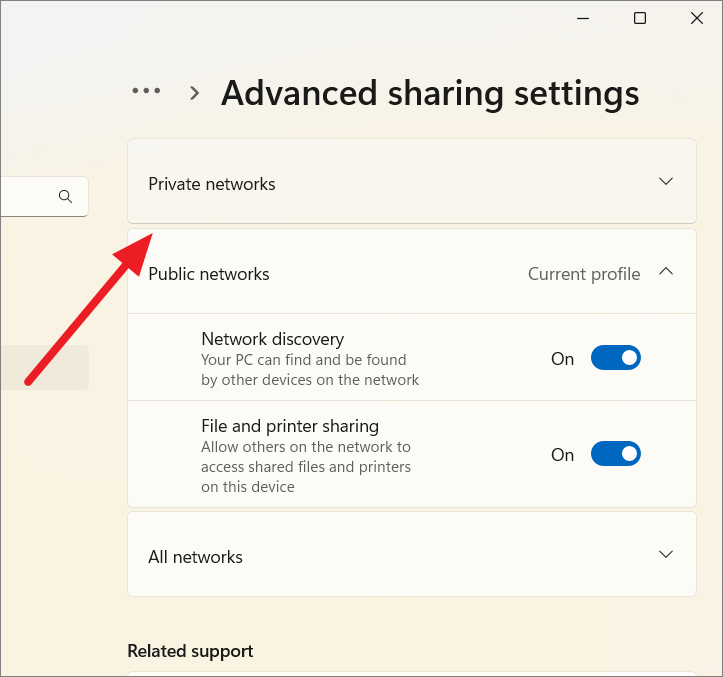
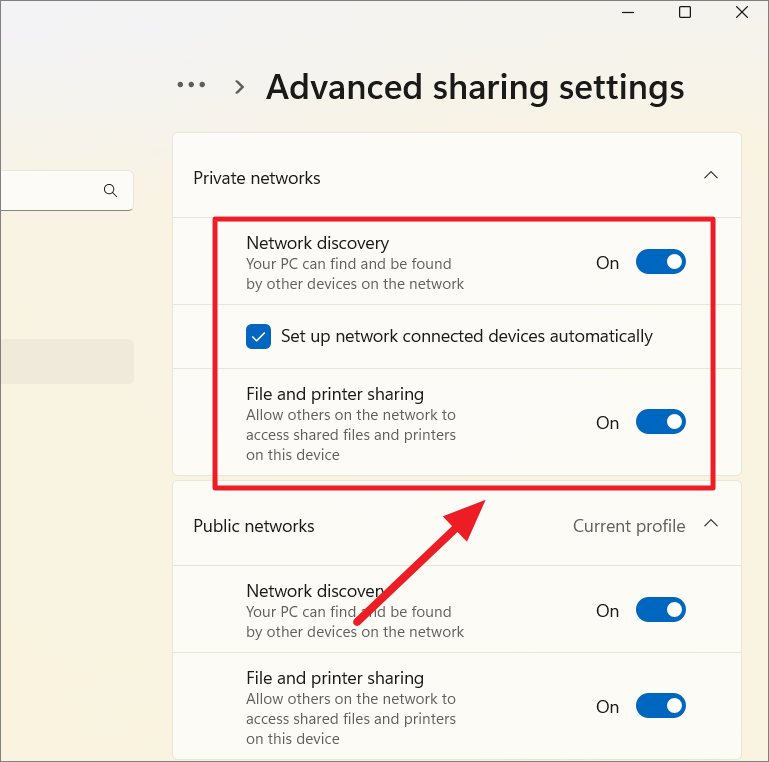
On the Advanced sharing settings page, you will have sharing settings for three types of network connections – Private, Public, and All networks.
First, click on the ‘Private networks’ drop-down to reveal its settings.
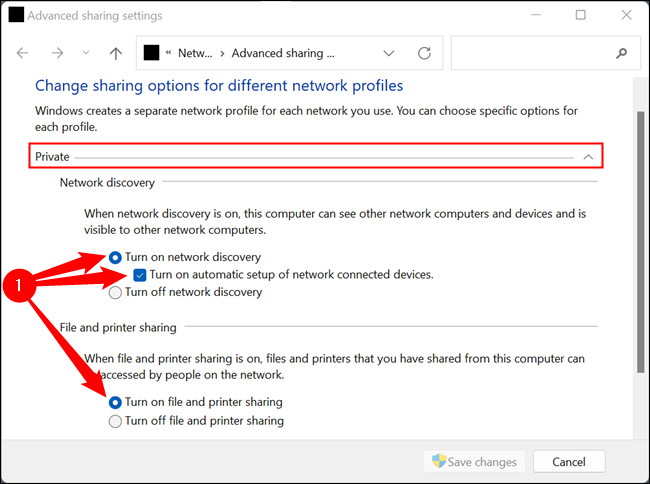
Now, turn on the toggle for both the ‘Network discovery’ and ‘File and printer sharing’ options. Then, tick the ‘Set up network connected devices automatically’ option.
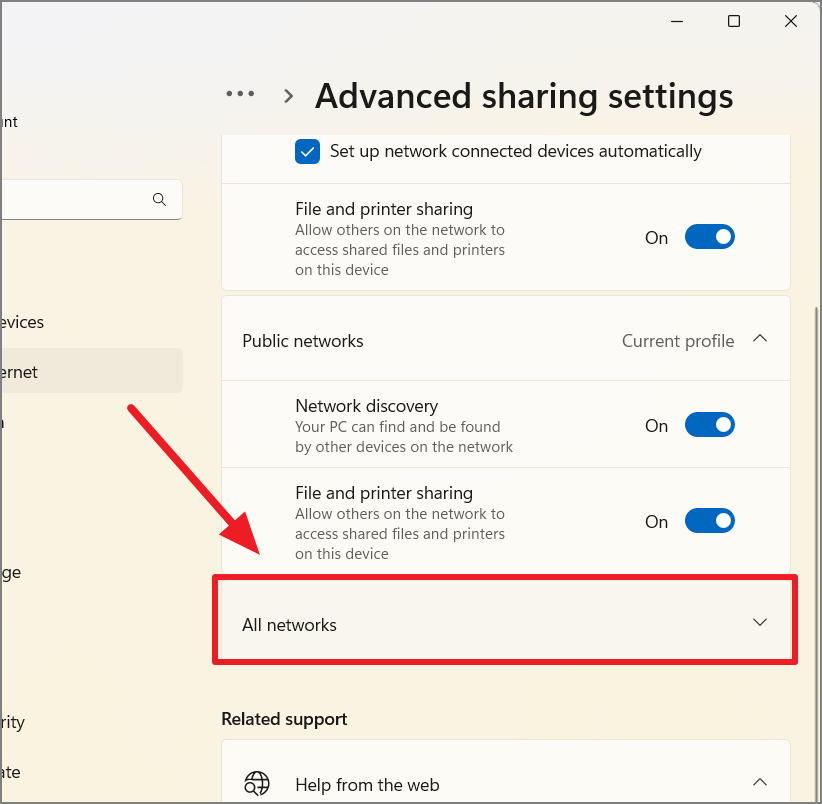
Next, move to the ‘All networks’ option and click on the option to expand it.
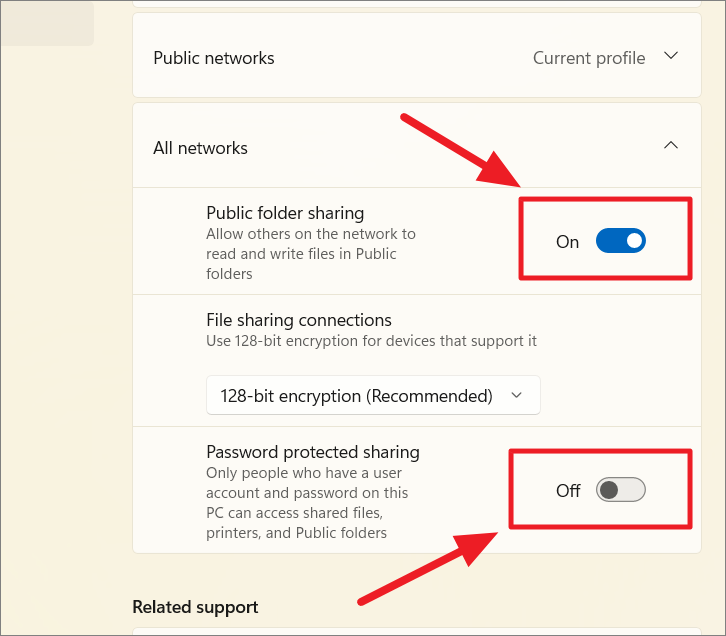
Under All networks, we have three settings. First, Turn On the ‘Public folder sharing’ setting, then Turn Off the ‘Password protected sharing’ setting.
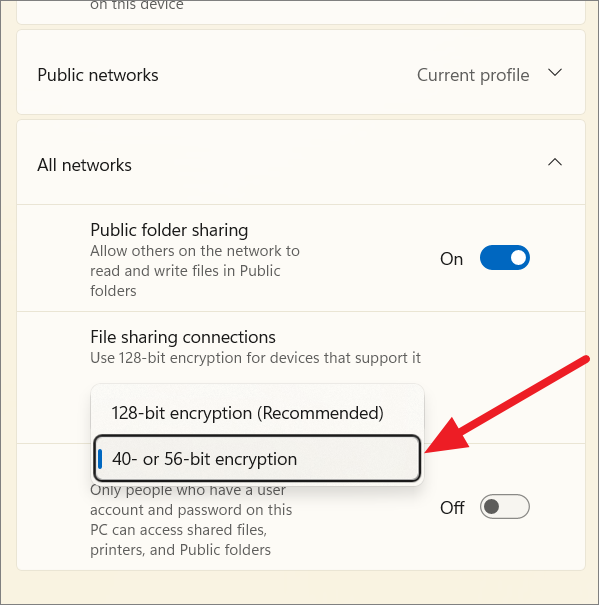
Finally, click the drop-down menu under ‘File sharing connections’ and choose ’40- or 56-bit encryption’.
Your device is vulnerable to security and privacy issues if you were to connect your computer to a public network with the above settings enabled under ‘All networks’. So, it is best to disable these settings before connecting to untrusted public networks. However, it is safe to use these settings in small trusted networks or home networks.
After changing the above settings restart your computer and check if the problem is resolved.
23. Disable Outlook Mail Notifications
Users have often reported that they receive error code 0x80004005 when the Outlook app tries to notify them of new emails or messages. If this is the case, disabling the notification from the outlook settings will do the trick. Here’s how you do this:
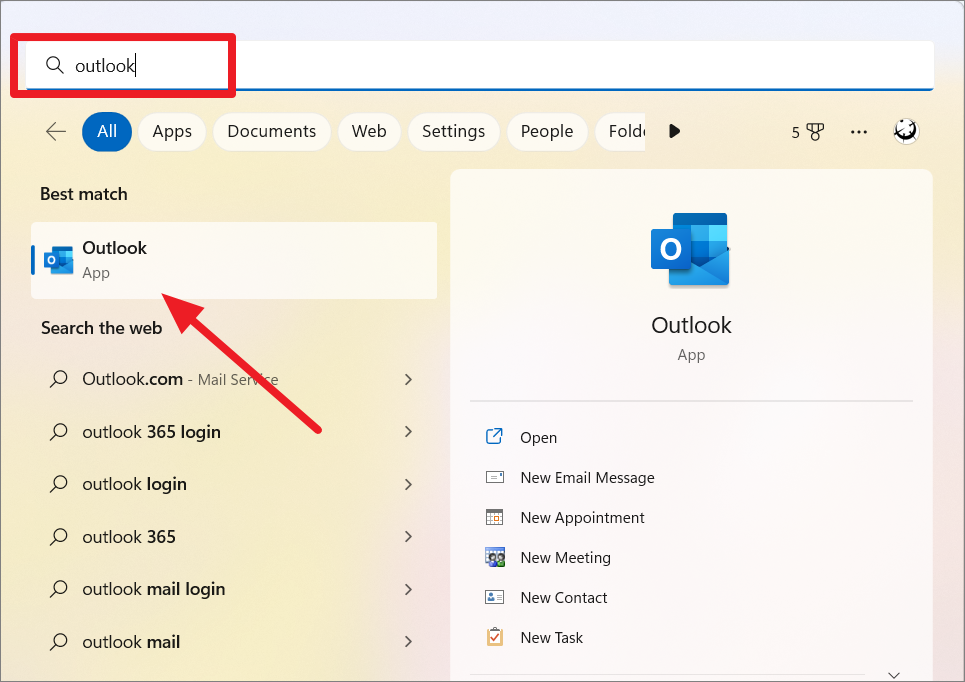
Click the Start menu, type ‘Outlook’, and launch the app.
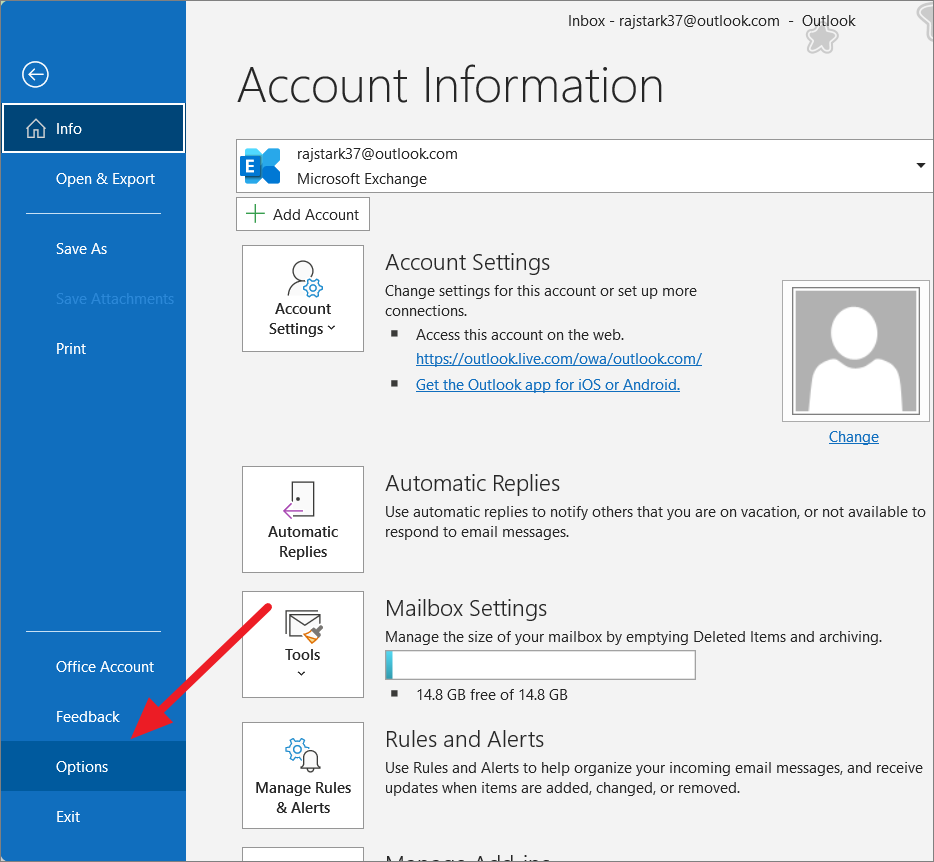
In the Outlook app, click the ‘File’ menu and then select ‘Options’.
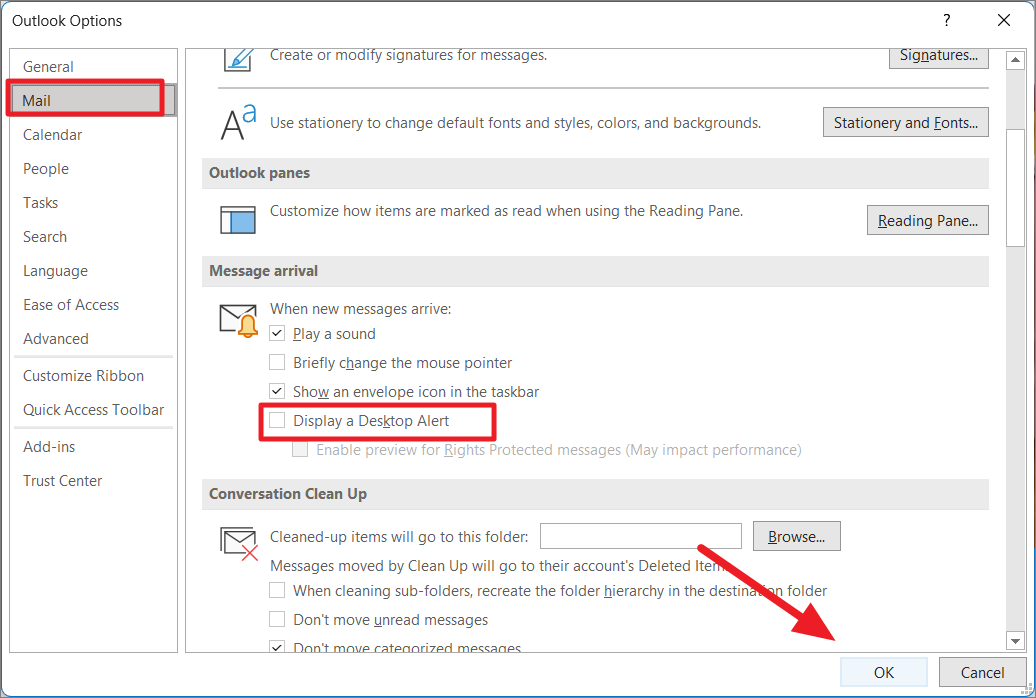
When the Outlook Options dialog opens, switch to the ‘Mail’ tab on the left pane and then scroll down to the ‘Message arrival’ section on the right pane. Then, clear the check box for the ‘Display a Desktop Alert’ option and click ‘OK’ to save the changes.
If the issue is fixed after disabling the outlook notification, try opening Outlook in safe mode. And if Outlook runs without showing any error in safe mode, then re-install the application.
24. Take ownership of the File or Folder
If a program or Windows didn’t have sufficient privileges to perform the requested operation on a file or folder, it will result in the ‘Error Code 0x80004005: Unspecified error’. To fix this, you have to take ownership of the concerned file or folder. Here’s how you do this:
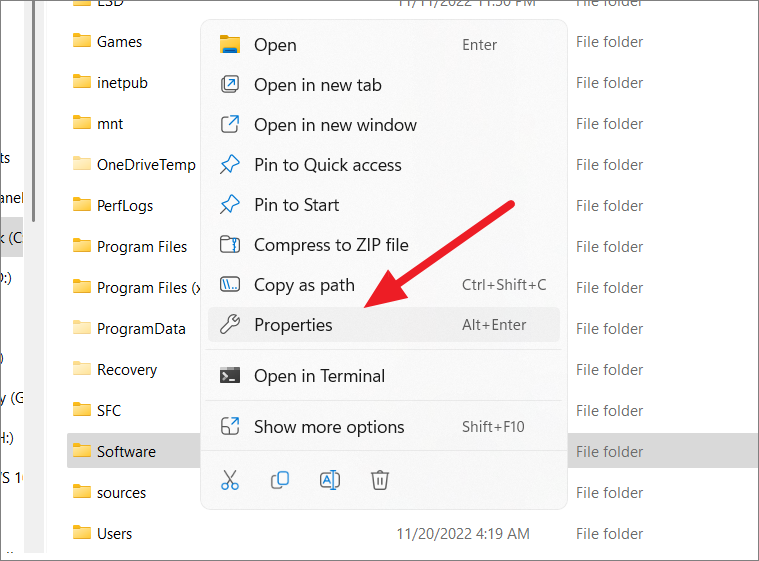
First, navigate to the folder that is giving you the error then right-click on it and select ‘Properties’.
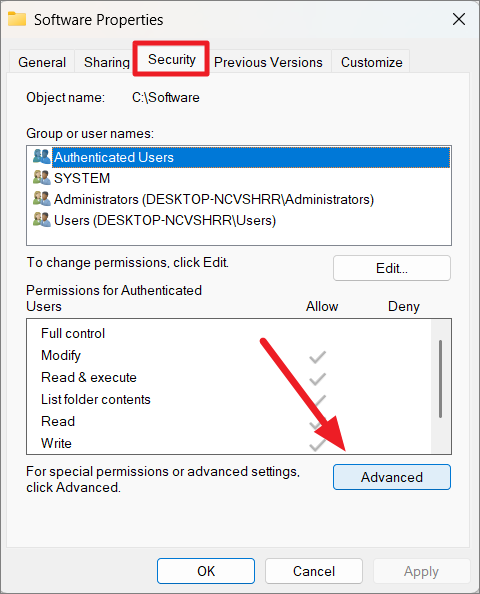
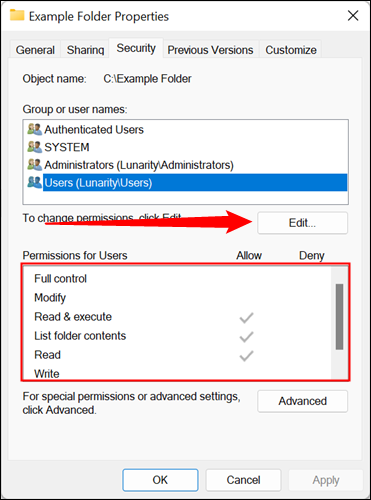
In the Properties dialog box, switch to the ‘Security’ tab and select the ‘Advanced’ button.
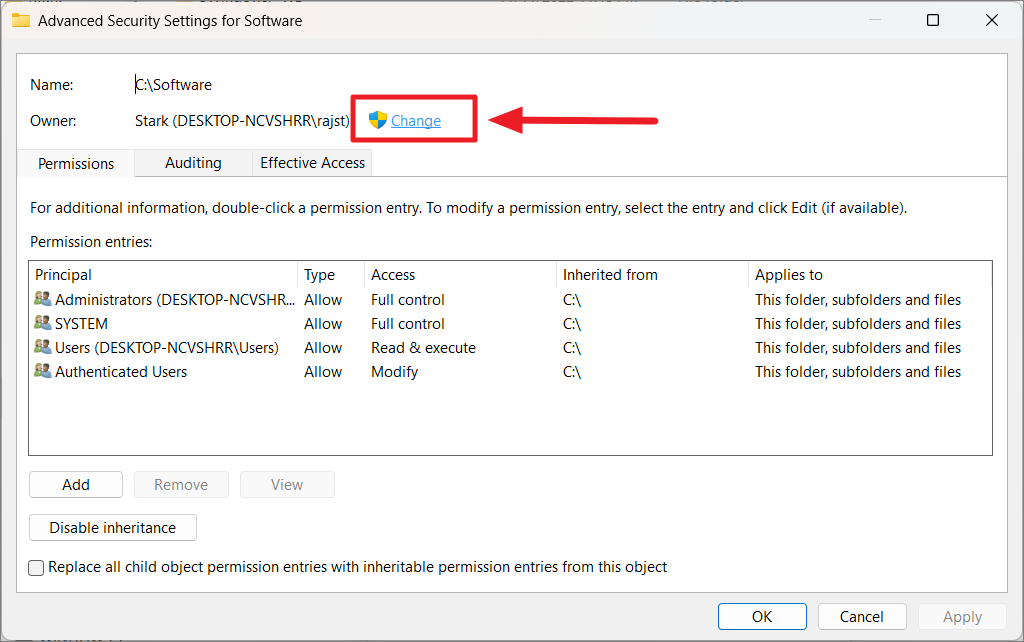
Then, click the ‘Change’ settings link in the Advanced Security Settings.
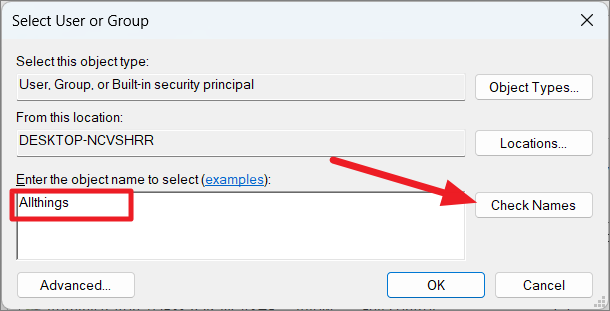
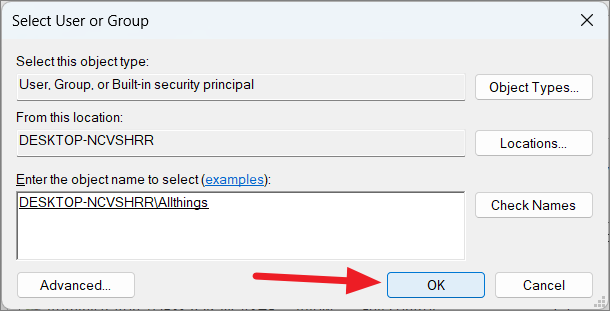
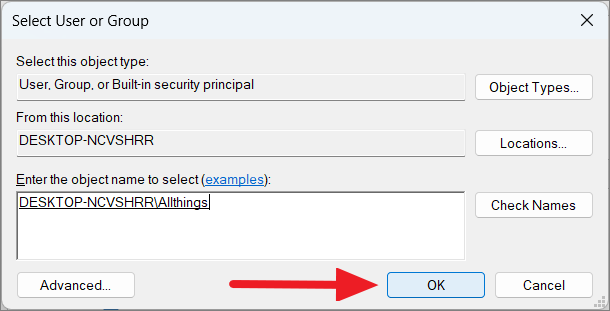
In the ‘Enter the object name to select enter’ the name of your user account, type the user name, and select ‘Check Names’.
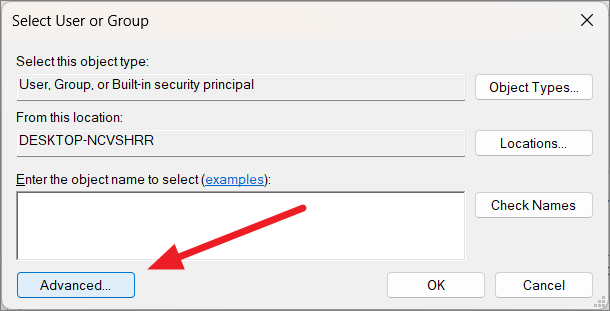
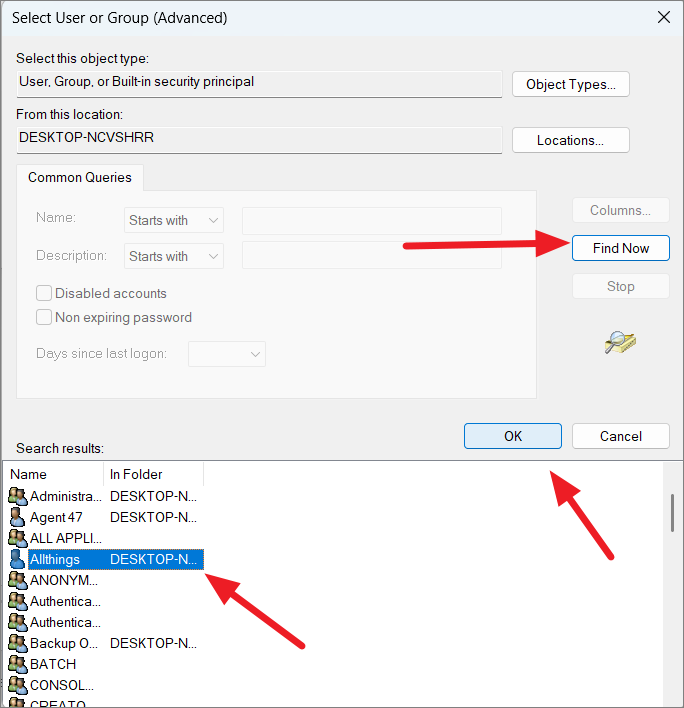
Alternatively, you can select the ‘Advanced..’ button at the bottom to select the users from the list.
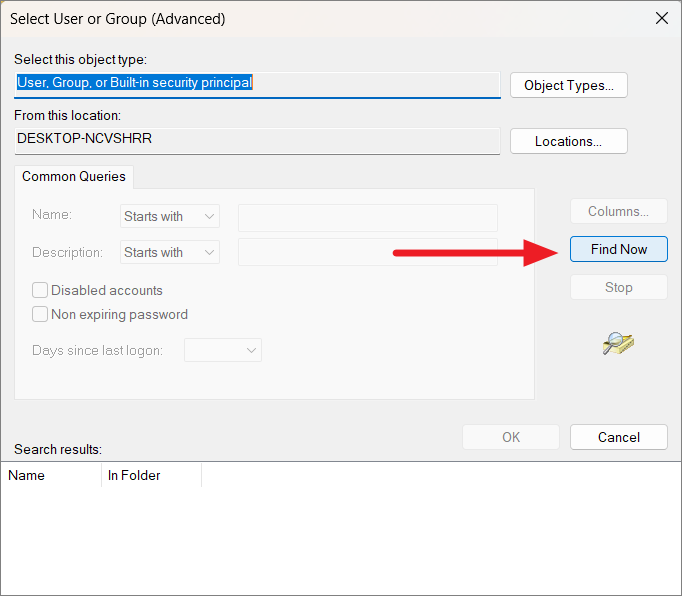
Next, click the ‘Find Now’ button to search users and groups.
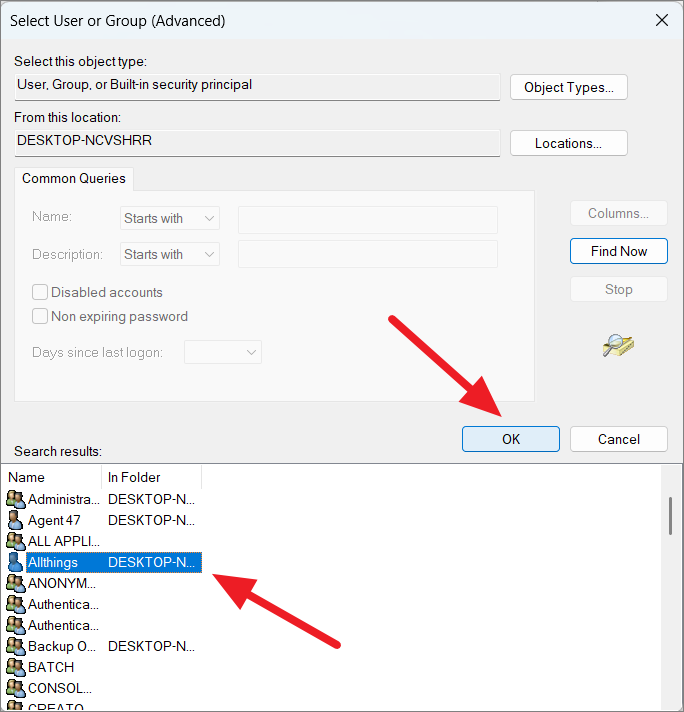
Now, select your username from the Search results box below.
Then, click ‘OK’ to continue.
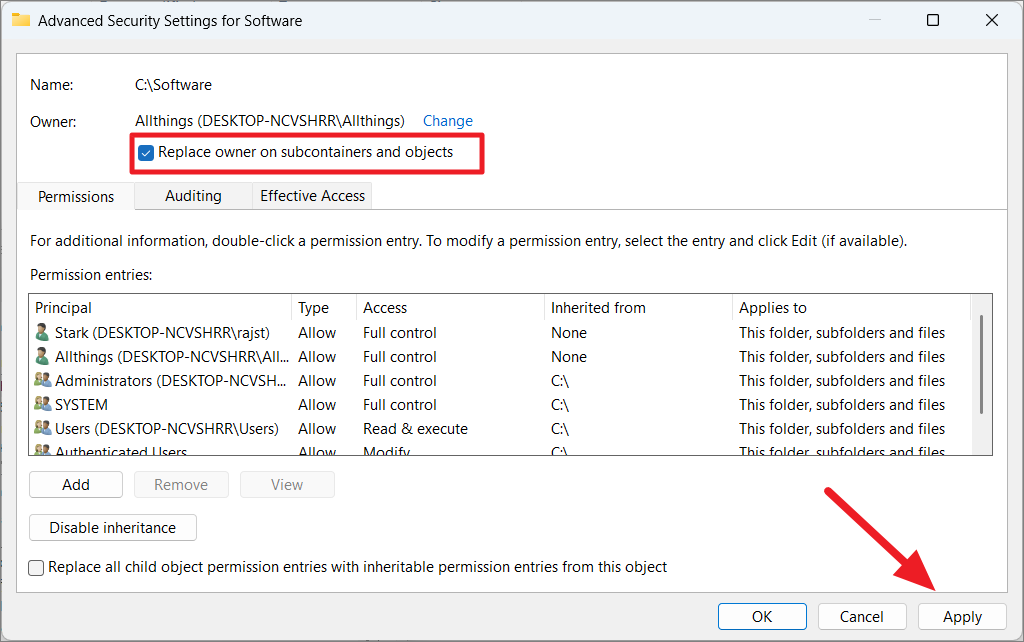
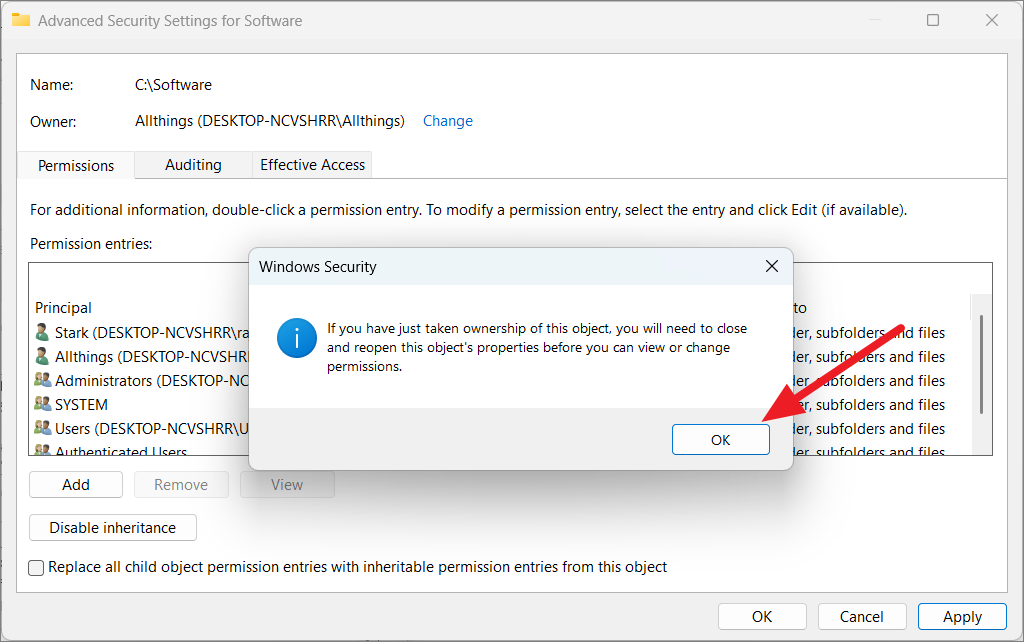
Then, check the box for the ‘Replace owner on subcontainers and objects’ option and click ‘Apply’, and then ‘OK’.
Finally, click ‘OK’ on the Windows Security message.
Now, we need to grant all kinds of permission to a particular user.
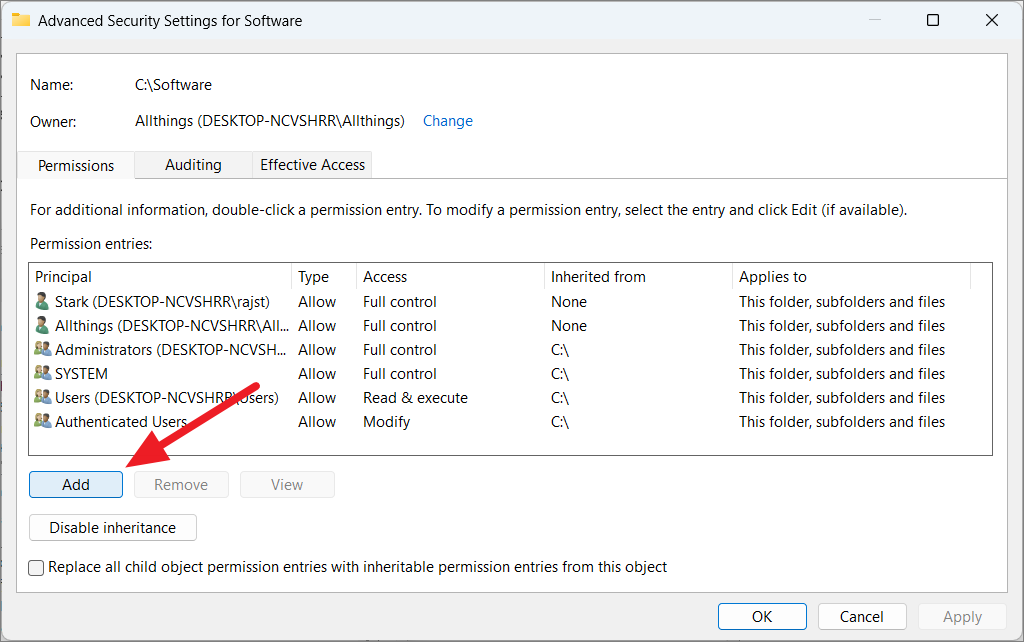
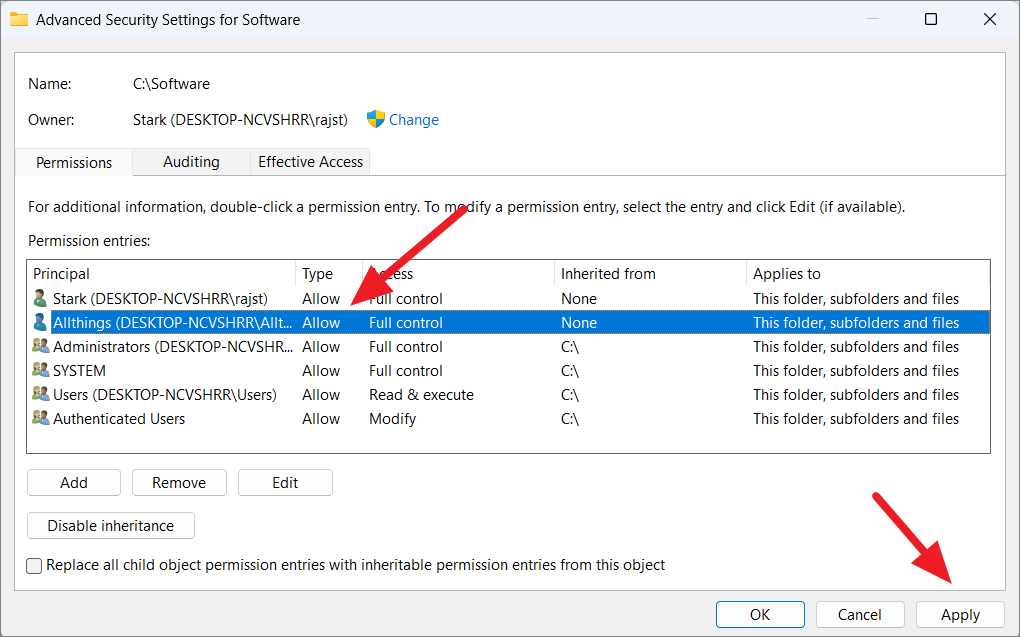
To do that, click the ‘Add’ button in the Advanced Security Settings dialog window.
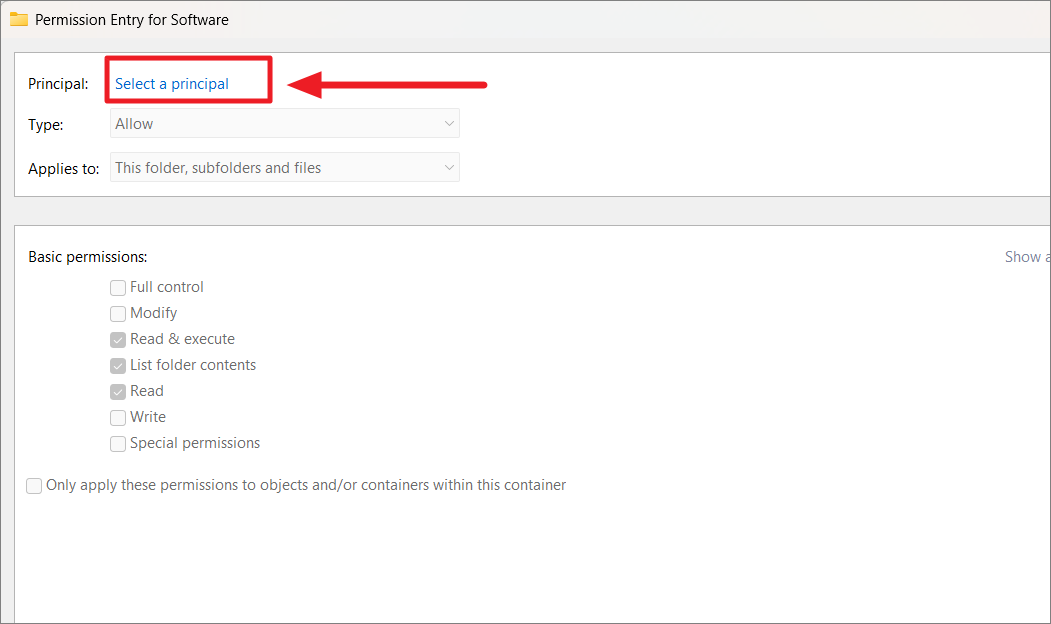
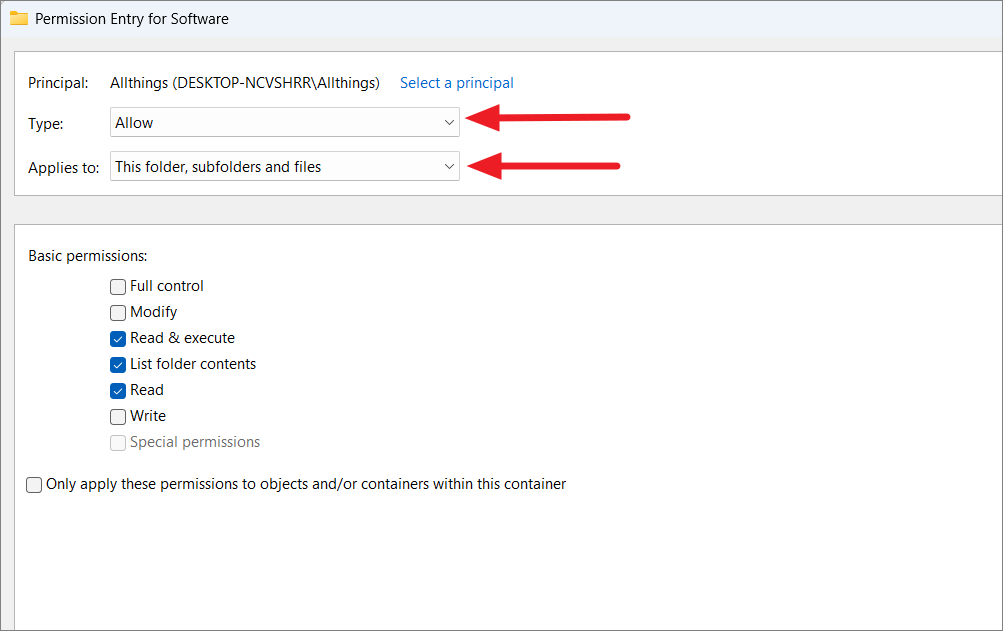
Then, click on the ‘Select a principal’ link in the Permission Entry for xxx (folder name) window.
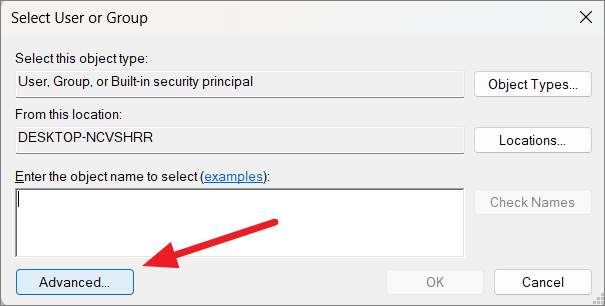
Next, select ‘Advanced’ again to choose the username.
Then, click on ‘Find Now’, select your username from the Search results below and click ‘OK’.
Then, click ‘OK’.
Now, select ‘Allow’ from the Type drop-down and choose ‘This folder, subfolders and files’ from the ‘Applies to’ drop-down menu.
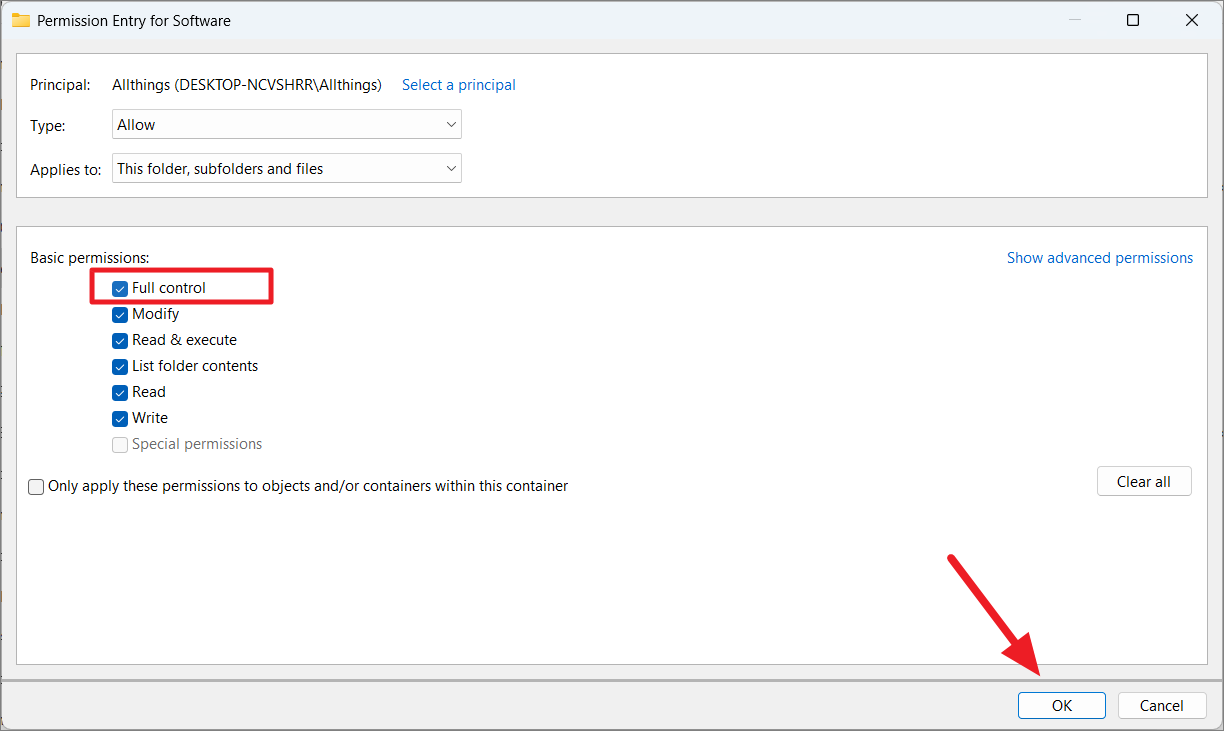
Then, check the box for ‘Full control’ and click ‘OK’ to grant all permissions to the users over the folder.
As you can see, your username will be added to the Permission entries list. Now, click ‘Apply’ and then ‘OK’.
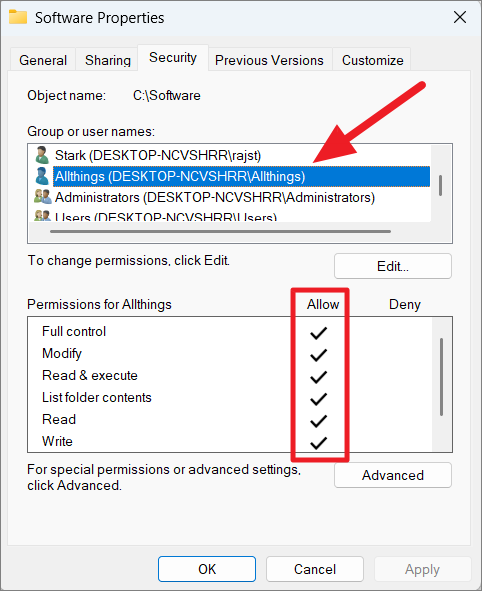
You can verify the permission by clicking the username. Now, you have taken ownership and full permissions for the folder.
This should solve your Error 0x80004005: Unspecified error related to files and folders.
Take Ownership of the Folder using Third-party software
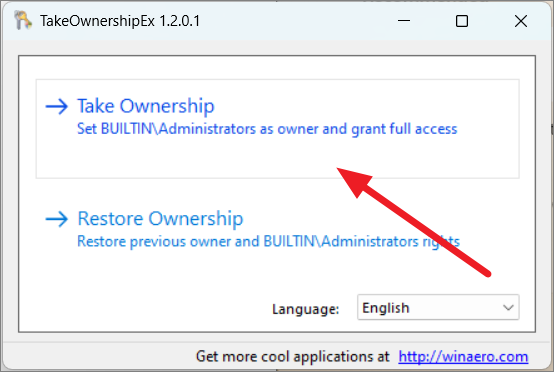
If you think the above method is too complicated, you can use a third-party app called ‘TakeOwnershipEx’ to take ownership of the folder. However, it doesn’t allow you to take ownership of the folder for a particular user instead, it grants ownership to all administrators.
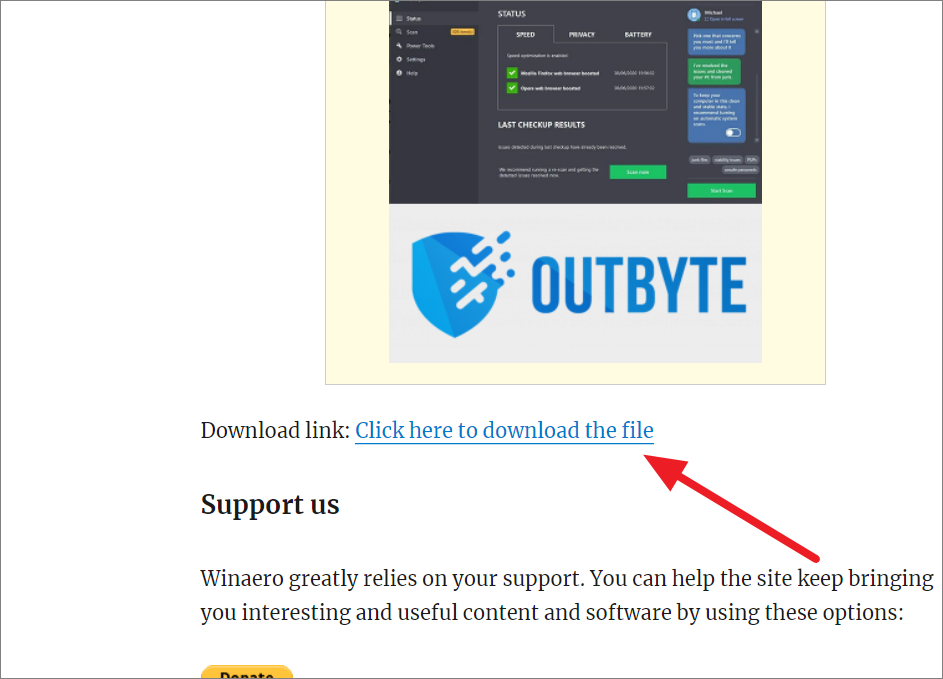
First, head to the TakeOwnerShipEx developer’s website and download the app.
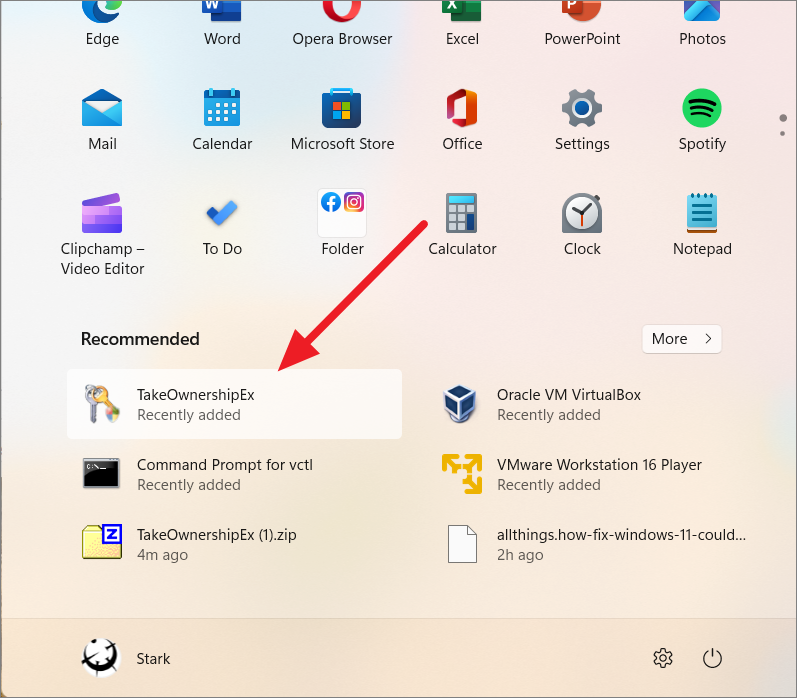
Once the zip file is downloaded, extract its contents and run the .exe file. Follow the on-screen instructions and install the app. Then, launch the ‘TakeOwnershipEx’ app.
Once the app opens, select the ‘Take Ownership’ option.
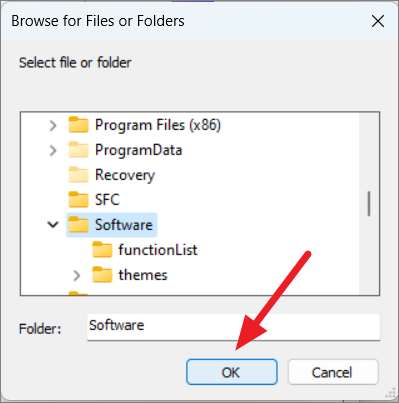
Now, browse and select the file or folder that shows the Unspecified error and click ‘OK’.
This will give full access and ownership of the folders to all administrators.
25. Recreate the CameraRoll folder and Reset the Camera
Sometimes, when you are trying to take pictures using the web camera app, you may get Error code 0xA00F424F (0x80004005), because the camera cannot save pictures or videos in the specified location. This error is triggered when the folder where you save the camera pictures (CameraRoll) lacks permission to read or write content. To fix this, you can delete and re-create the CameraRoll folder, reset the camera app, and change the camera save location:
Delete and Recreate the ‘Camera Roll’ Folder
First, we need to delete and re-create the Camera Roll folder as the default save location for pictures and videos.
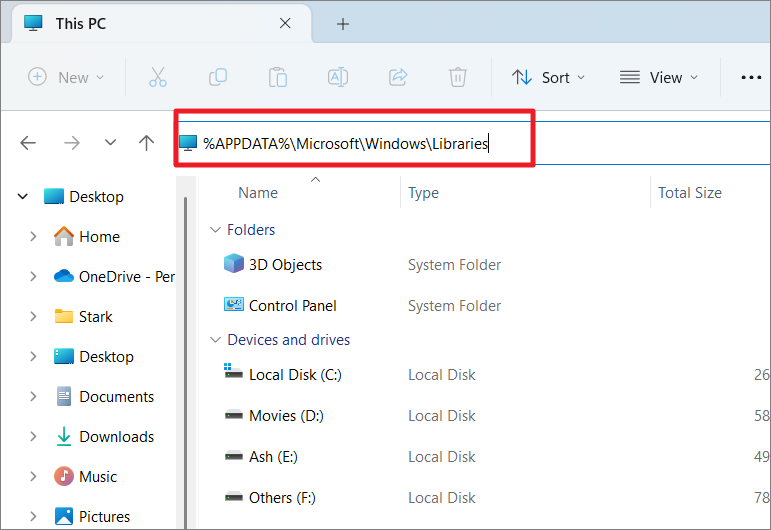
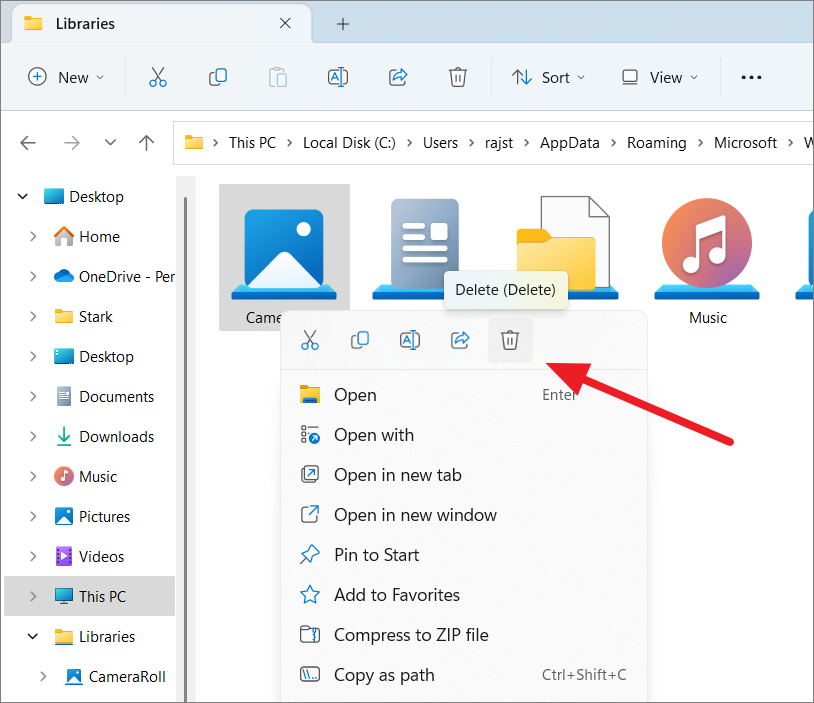
To do that, open File Explorer, type or copy-paste the below path, and hit Enter.
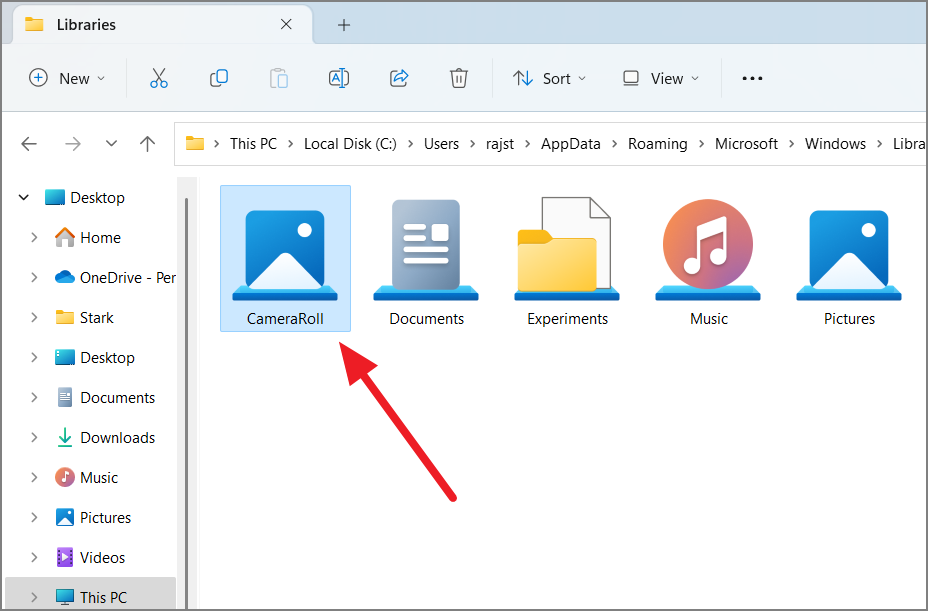
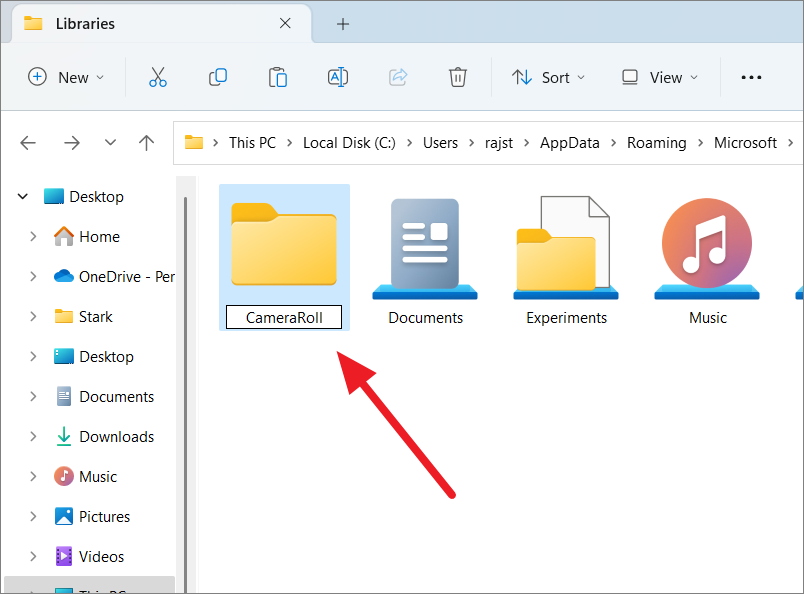
%APPDATA%MicrosoftWindowsLibrariesThen, open the CameraRoll folder and ensure it
Then, right-click the CameraRoll folder and select ‘Delete’ or press the Delete key.
After the folder is deleted, create a new folder and name it ‘CameraRoll’.
Reset the Camera App
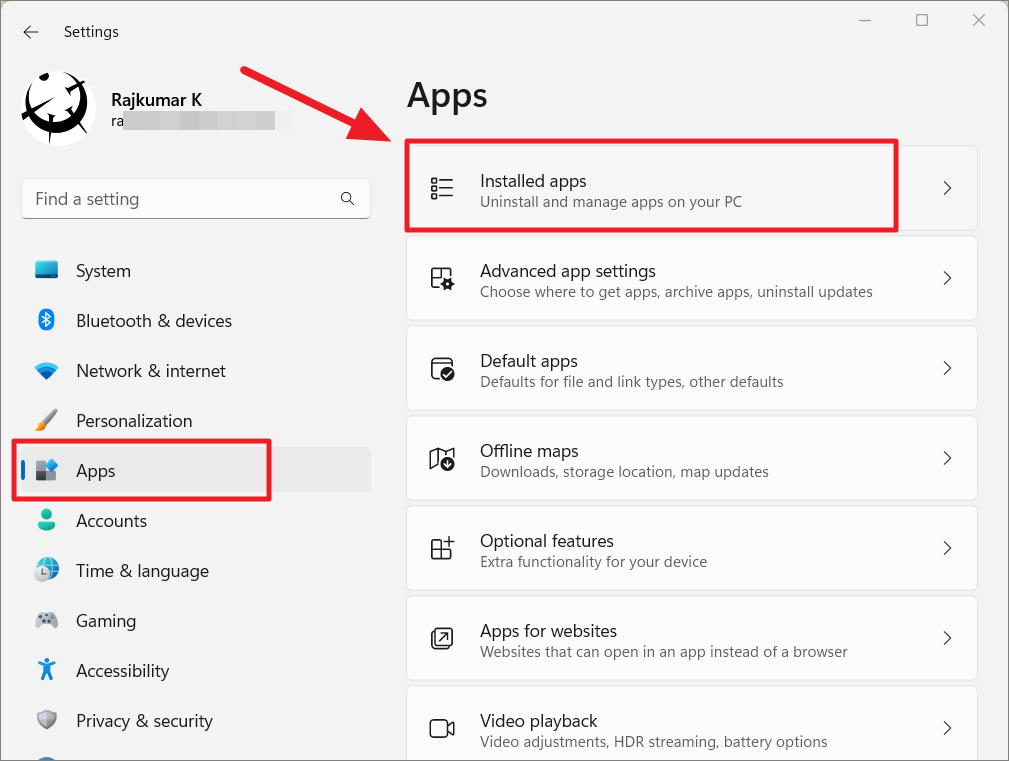
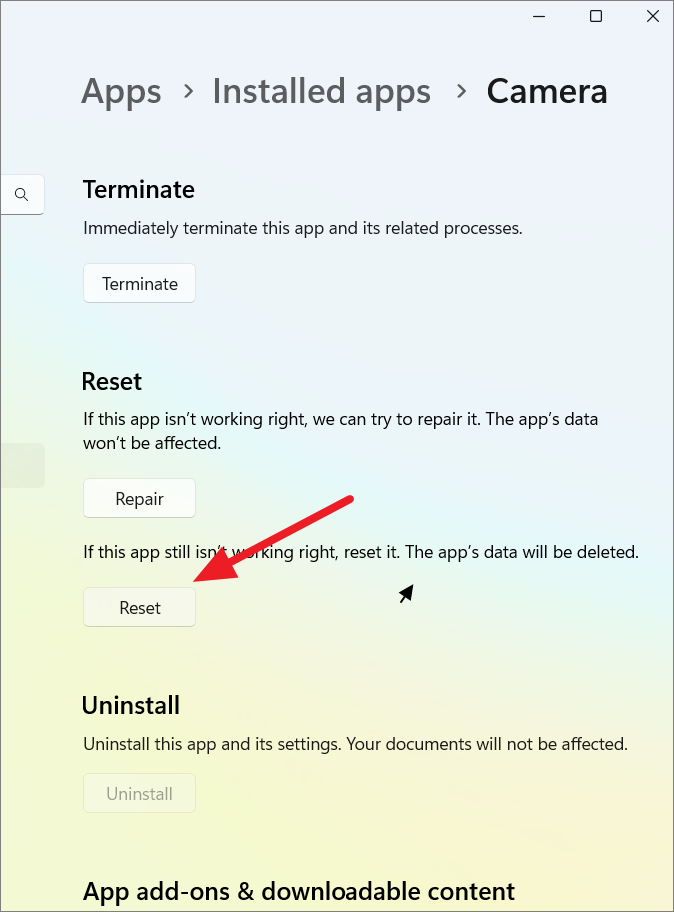
Next, we need to reset the Camera app to its default. Open the Windows Settings app with Win+I and go to the ‘Apps’ section. Then, select the ‘Installed apps’ option on the right.
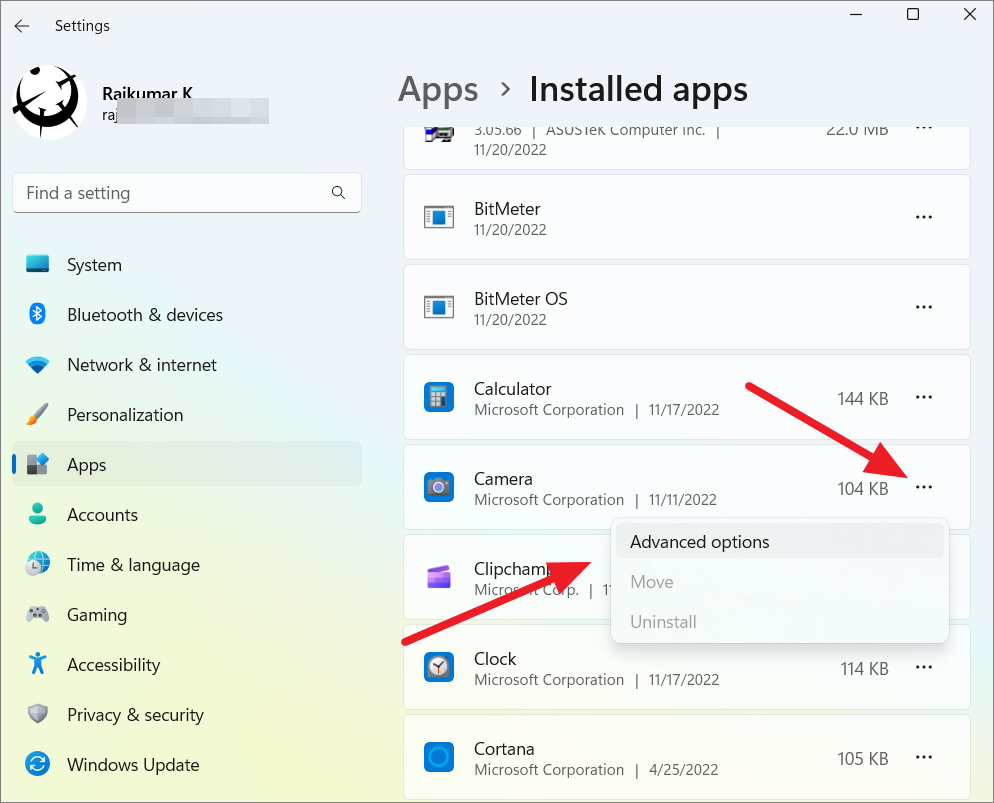
From the list of apps, locate ‘Camera’, click the three dots button, and select ‘Advanced options’.
After, scroll down the Camera settings page and select the ‘Reset’ button.
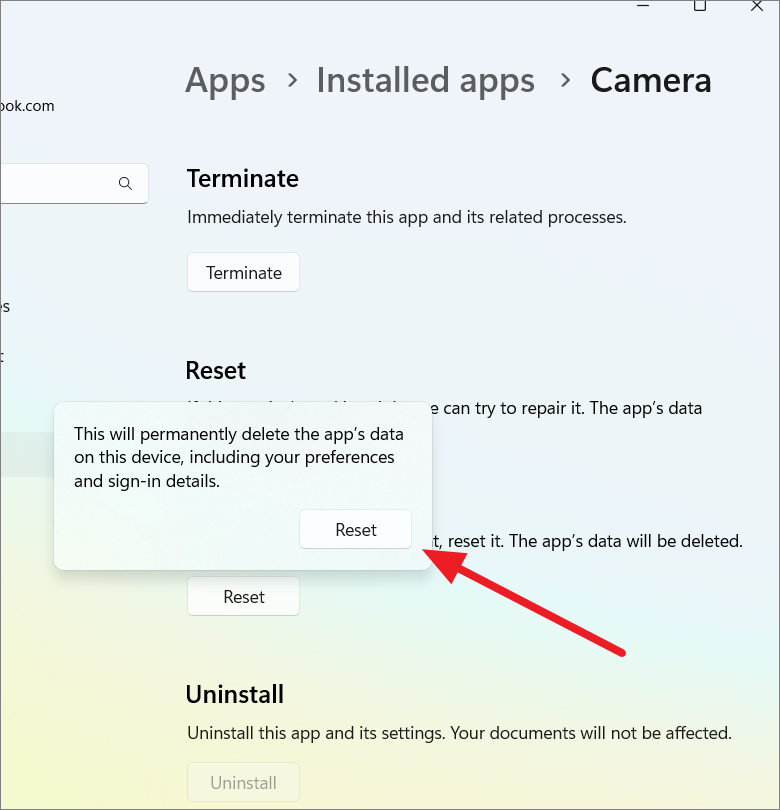
Click ‘Reset’ again to delete all the app data and preferences.
Re-Configure Save Location
Next, you need to ensure that the ‘Camera Roll’ folder is the default save location for the camera pictures and videos.
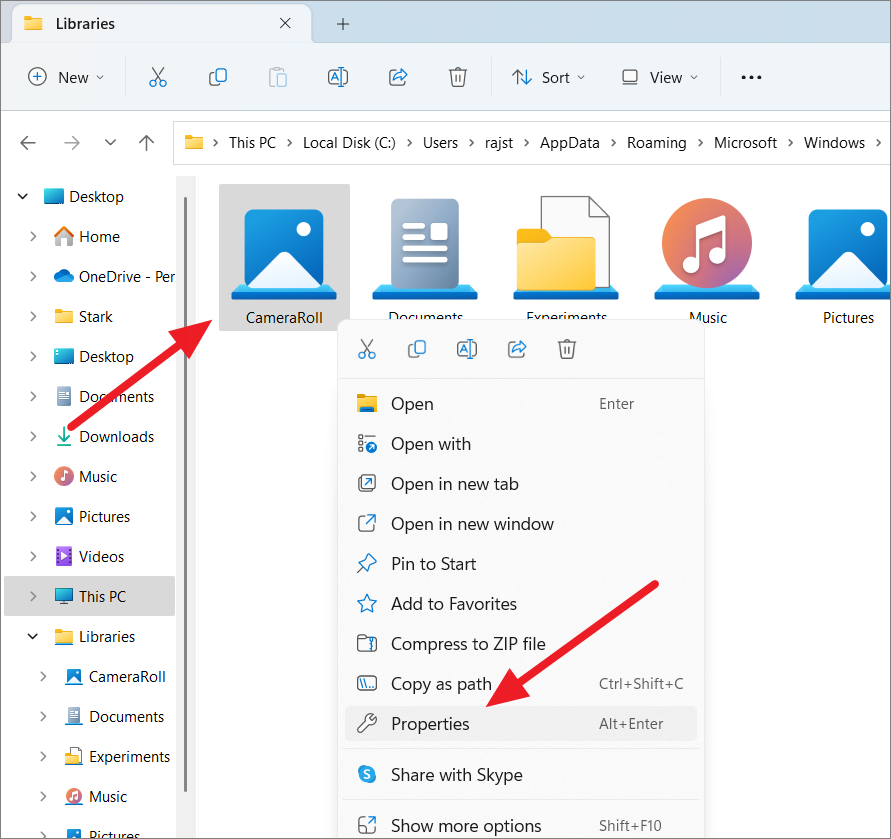
Open File Explorer again, type %APPDATA%MicrosoftWindowsLibraries in the address bar, and hit Enter. Then, right-click on the ‘Camera Roll’ folder and select ‘Properties’ from the context menu.
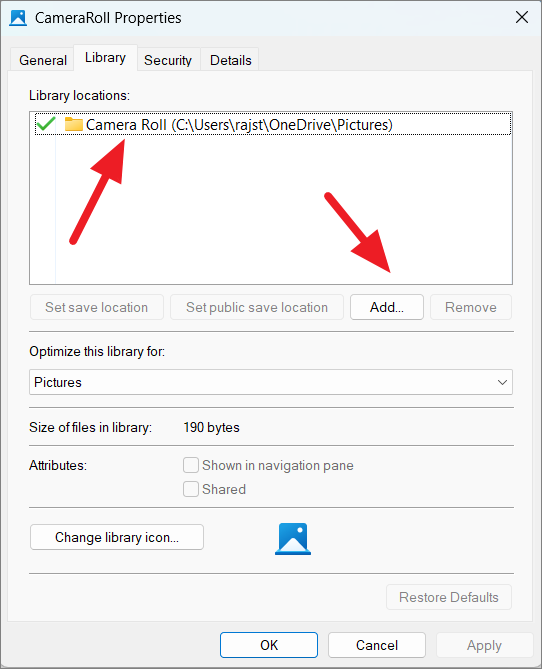
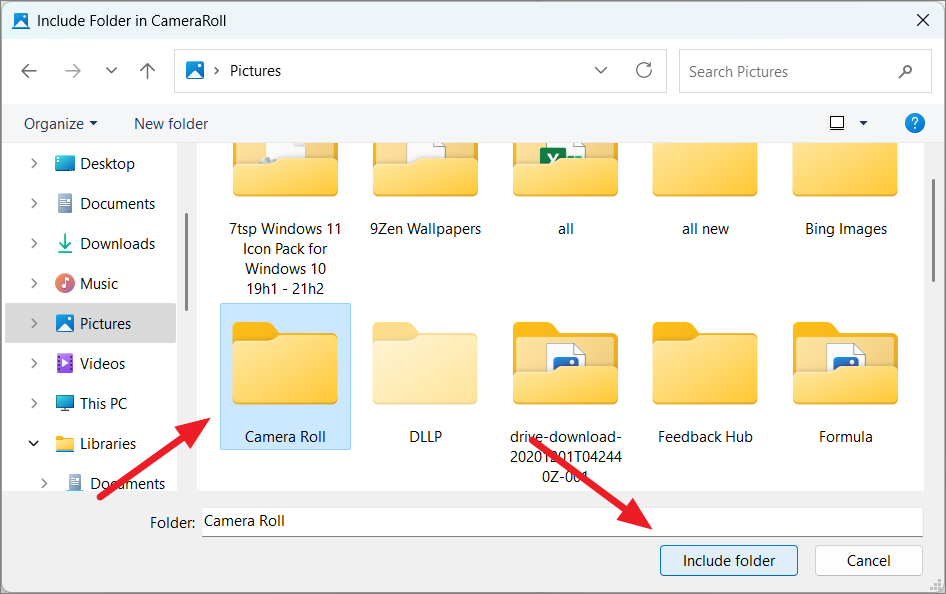
In the CameraRoll properties dialog box, switch to the ‘Library’ tab and check if the ‘Camera Roll’ is listed under the ‘Libraries locations:’. If the folder is not listed in the box, then, click the ‘Add’ button.
Then, go to the ‘Pictures’ library folder and then select the ‘Camera Roll’ folder.
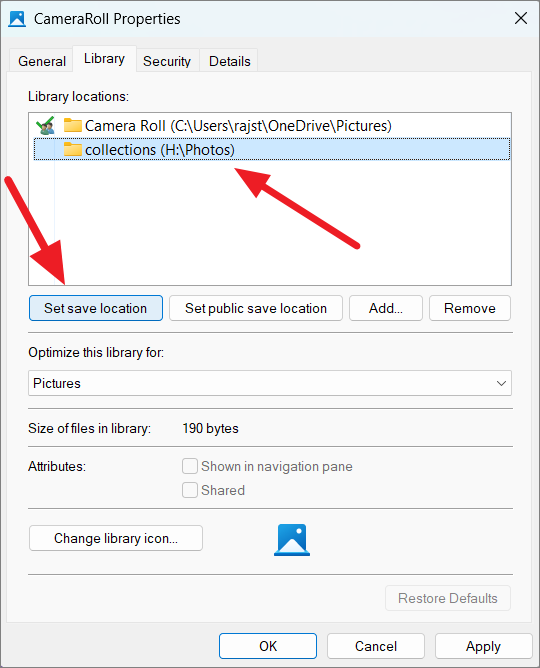
If the ‘Camera Roll’ folder is already present in the ‘Libraries locations’ box, you can choose to add a new folder as the default save location for the photos and videos.
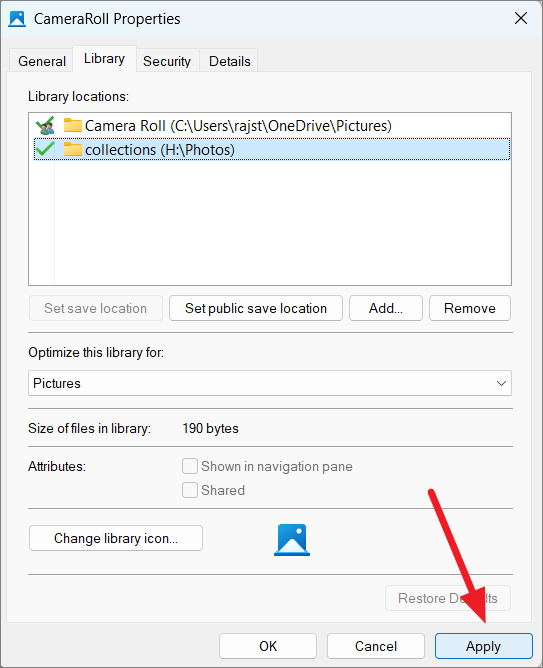
After adding a new folder, select the folder and click on ‘Set save location’ to set that folder as the default save location for the photos and videos.
Then, click ‘Apply’ and then ‘OK’.
Now, restart your PC, open the Camera app and try taking photos and see if the problem is resolved.
26. Disable Antivirus Program
Sometimes, the third-party antivirus or the Microsoft Defender antivirus can also be responsible for unspecified Error 0x80004005. You can try disabling the antivirus program and check if the error disappears.
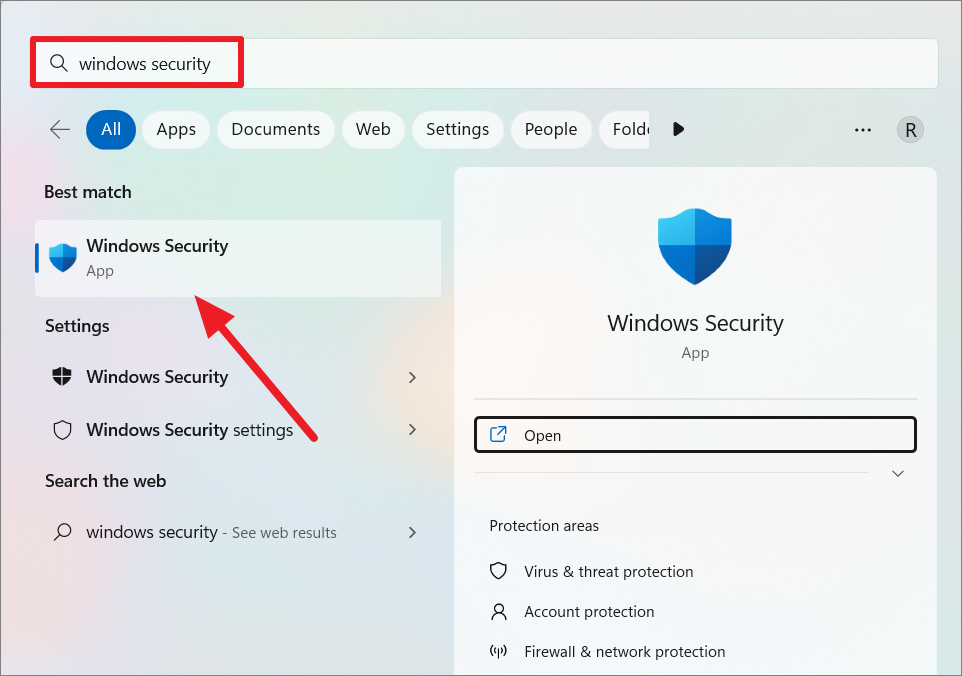
To disable Microsoft Defender antivirus, click the Start menu, type ‘Windows Security’, and select the app.
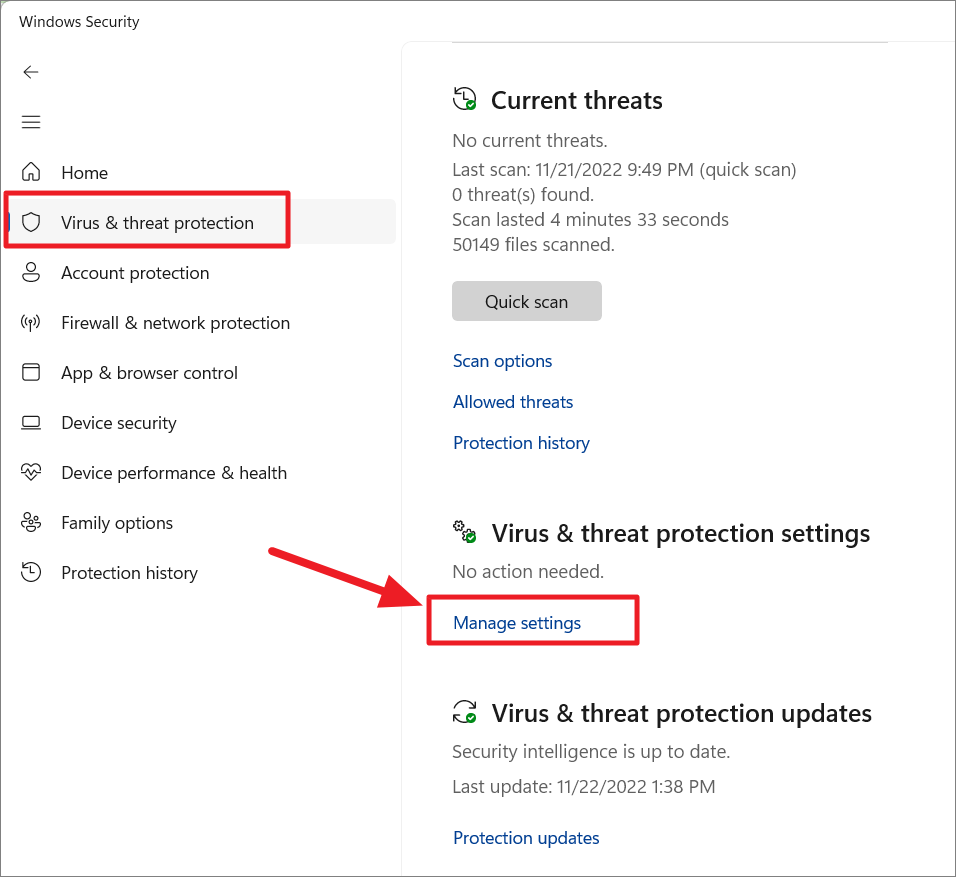
When the Windows Security app appears, move to the ‘Virus & threat protection’ tab and click on ‘Manage settings’ under Virus & threat protection settings section.
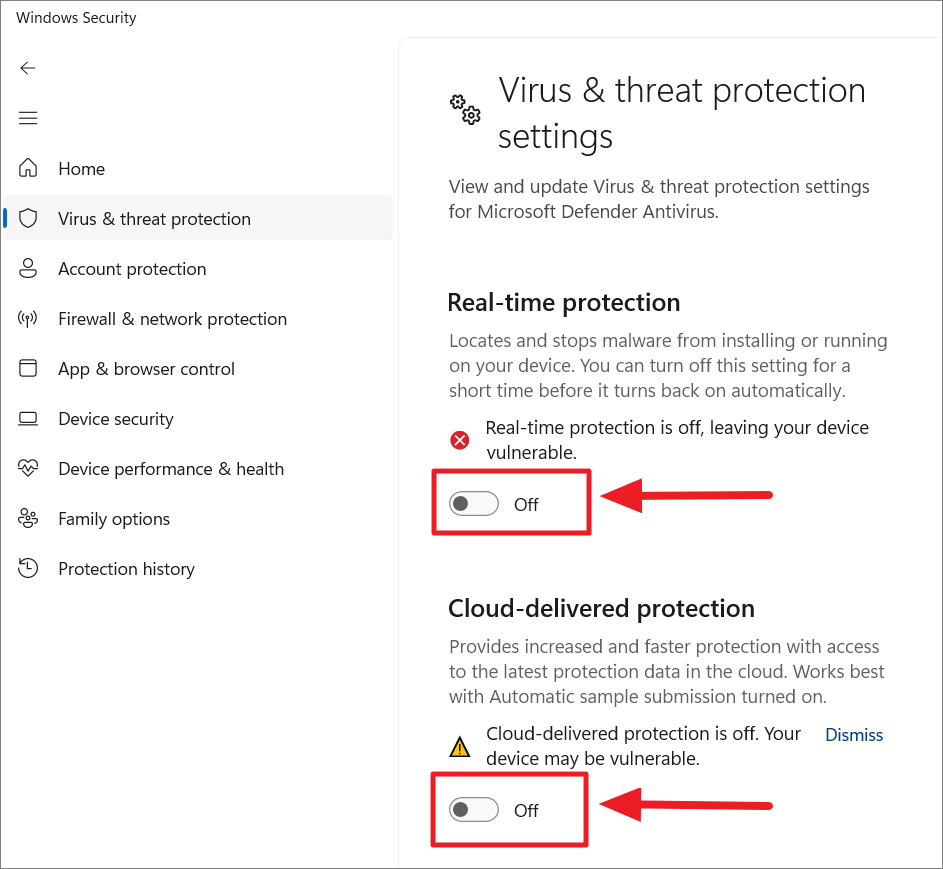
Now, turn Off the toggle under ‘Real-time protection’ to temporarily disable the Microsoft Defender antivirus before it turns back automatically after a while. Then, turn Off the ‘Cloud-delivered protection’ option as well.
You can follow similar steps to disable the third-party antivirus program.
If disabling the antivirus doesn’t work, you try uninstalling the antivirus software temporally and check if the error disappears. If disabling or uninstalling the antivirus solves the problem, then you should install a different antivirus software one that doesn’t conflict with the applications or the Windows. Leaving your system without antivirus will expose your device to malware and viruses.
27. Enable Network Essential Services
There are a few Windows services that are essential for network sharing. Make sure the following services are running in your system:
- DNS Client
- DHCP Client
- Function Discovery Provider Host (fdPHost)
- Function Discovery Resource Publication (fdResPub)
- Simple Service Discovery Protocol (SSDP)
- UPnP Device Host
Open the Run command box, type services.msc, and hit Enter.
When the Services app launches, click the ‘Name’ column at the top to list the services alphabetically.
Scroll down the list and check each service mentioned above is set to ‘Manual’ or ‘Automatic’ under the Startup type. The DHCP Client and DNS Client are essential services for internet connection and should both start automatically. If these services are set to ‘Manual’, double-click or right-click the service and select ‘Properties’.
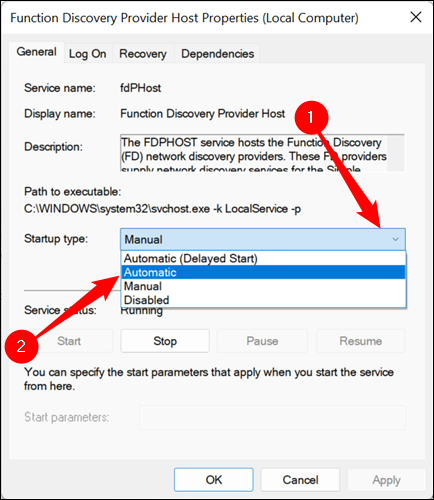
Then, click the ‘Startup type’ drop-down and select ‘Automatic’.
If Network Discovery is turned on your device, ‘Function Discovery Provider Host (fdPHost)’ and ‘Function Discovery Resource Publication (fdResPub)’ should be running in the background whether their startup is set to ‘Automatic’ or ‘Manual’. It can lead to Error code 0x80004005 if they are not running when Network Discovery is enabled. If there are not running, change their Start type to ‘Automatic’ and restart your computer.
If any of these services are ‘Disabled’, double-click that service and click the drop-down menu, select ‘Automatic’ or ‘Automatic (Delayed Start)’. Then, click ‘Apply’ and then ‘OK’.
You can put ‘DNS Client’ and ‘DHCP Client’ to Automatic while other services are set to ‘Automatic (Delayed start)’ so your computer doesn’t slow down while booting up.
28. Restore Your System using System Restore
In case the Unspecified Error 0x80004005 started appearing after a certain change in your system like a major update, software installation, or others, you can use system restore to restore your computer to a previous state. Here’s how you do this:
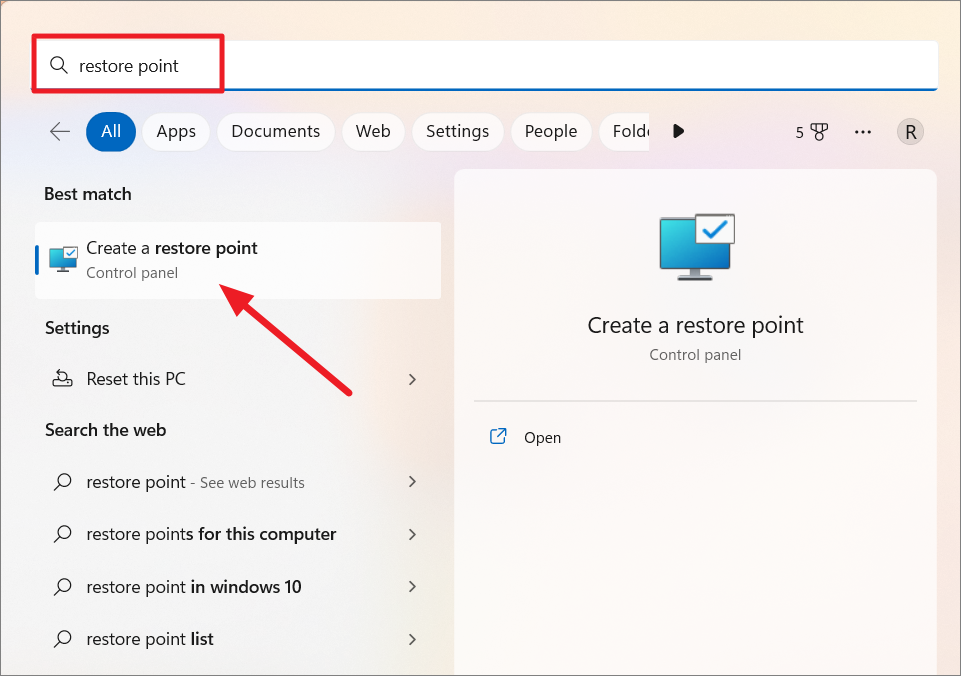
If you can boot Windows normally, open the Start menu and search for ‘System restore’, and choose the ‘Create a restore point’ control panel.
If you are not able to boot Windows normally, boot into Windows Recovery Environment to access the System Restore option.
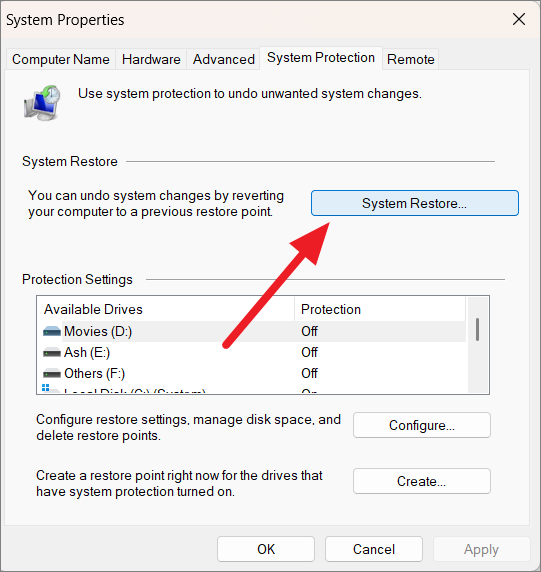
When the System Properties control panel opens, click the ‘System Restore’ button.
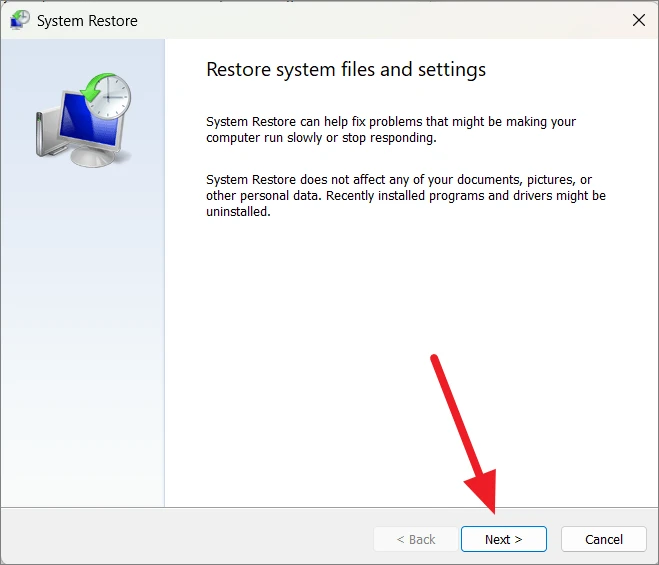
In the System Restore tool, click ‘Next’ to continue.
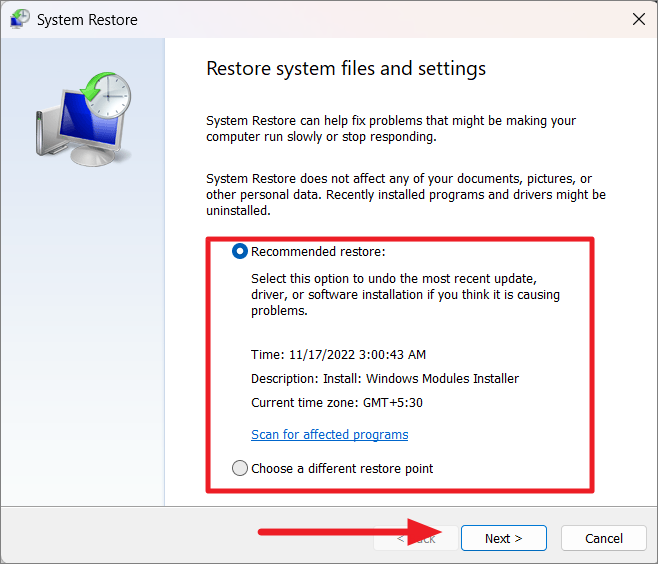
If you are asked to choose between ‘Recommended restore’ or ‘Choose a different restore point’, select ‘Choose a different restore point’ to see all the available restore points.
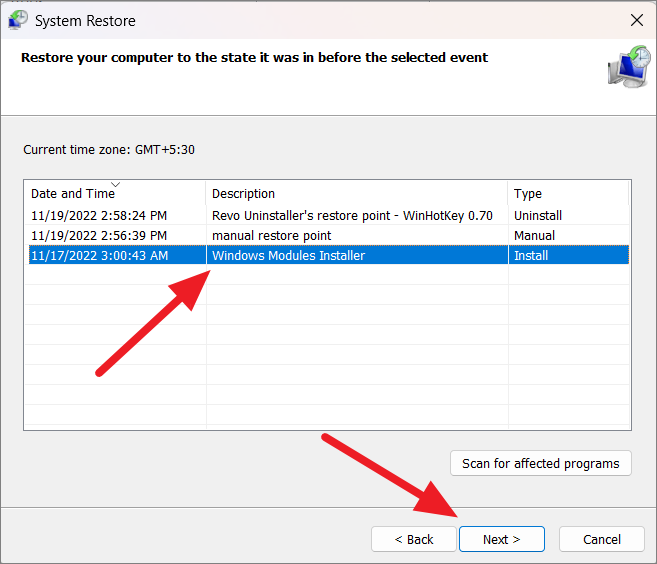
On the next screen, you will see a list of system restore points, choose the right one and select ‘Next’. If you have a manual or automatic restore point on or before the error, choose that restore point and click ‘Next’.
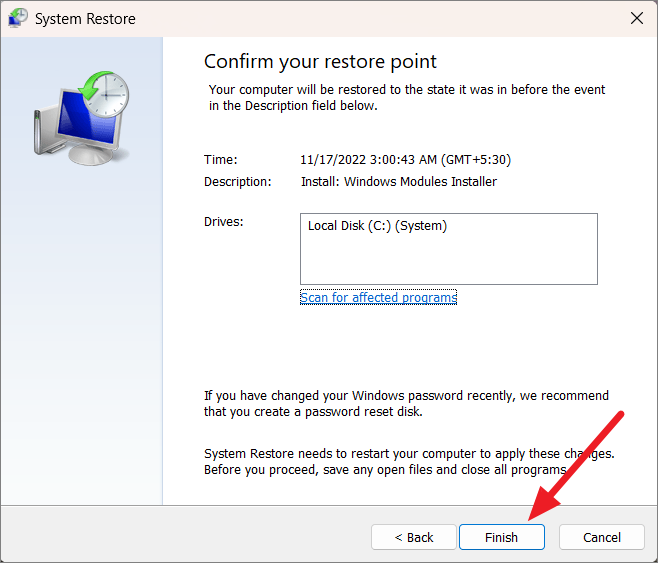
Finally, click ‘Finish’ to confirm the restore point.
29. Delete the User Account and Recreate it in Windows 11
Another way to fix the 0x80004005 error code is to remove the account in which you are experiencing the error and re-create a new account. However, removing an account from your PC will delete all its data, including files on the desktop, downloads, photos, music, apps, and other files. If you have backed up your library files on Cloud (like OneDrive), saved the files in a different location, or don’t have any important files in the library folders, you can just delete the user profile and create a new one. Here’s, how you can delete the user account in Windows 11.
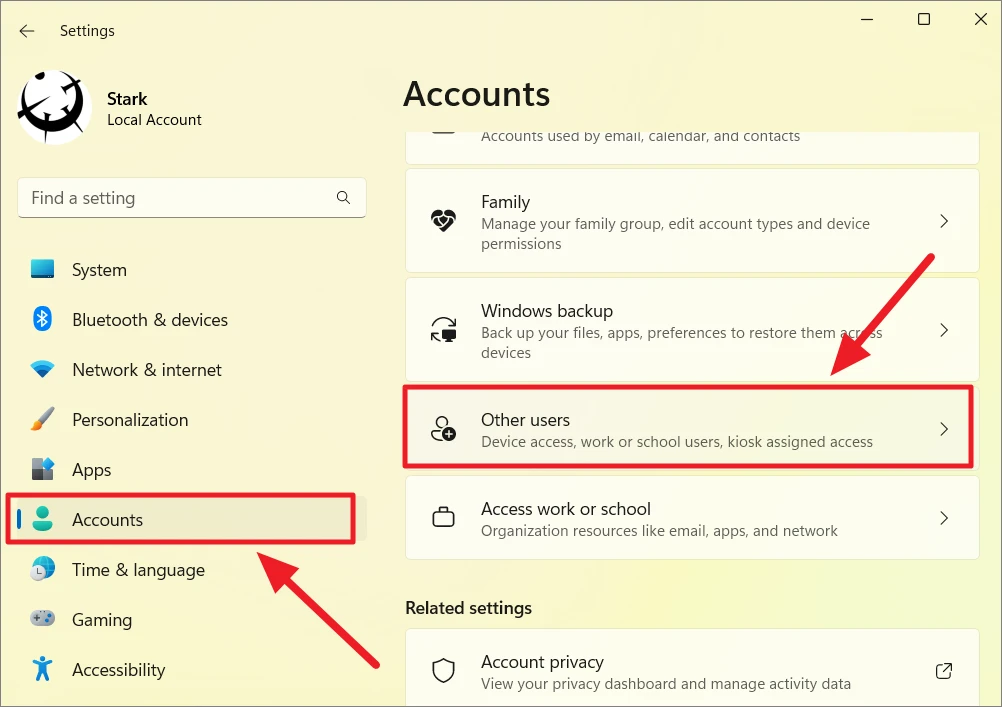
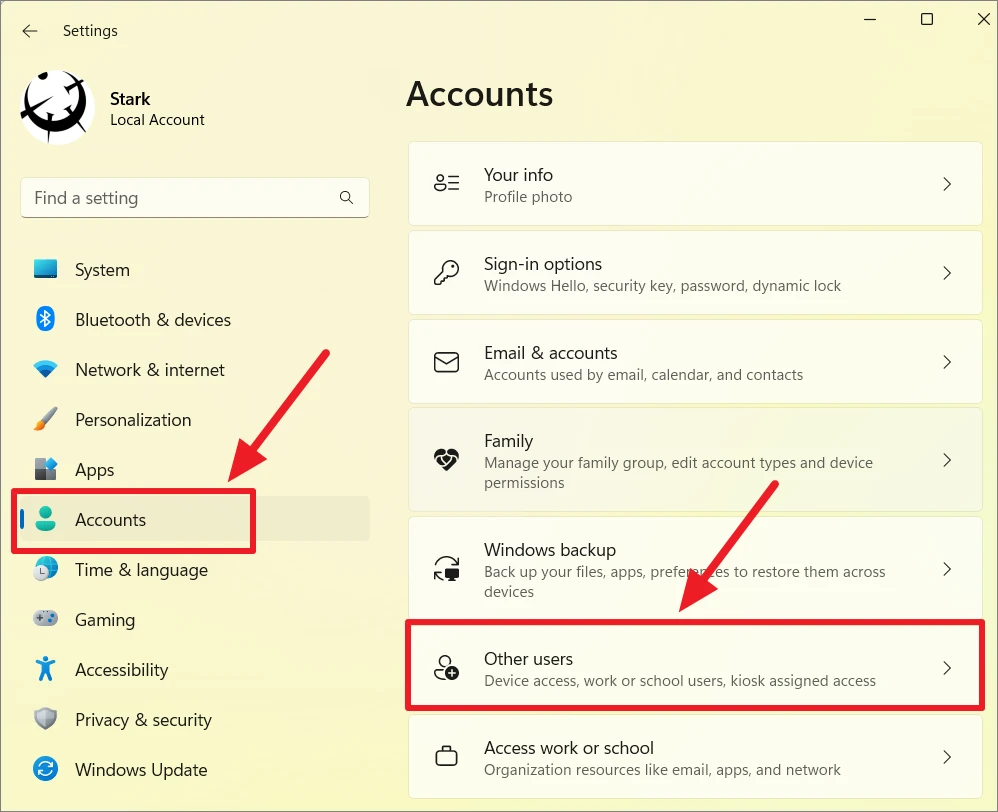
First, open Windows 11 settings by pressing Win+I. In the Settings app, go to the ‘Accounts’ section on the left and then scroll down and click on the ‘Other users’ option on the right pane.
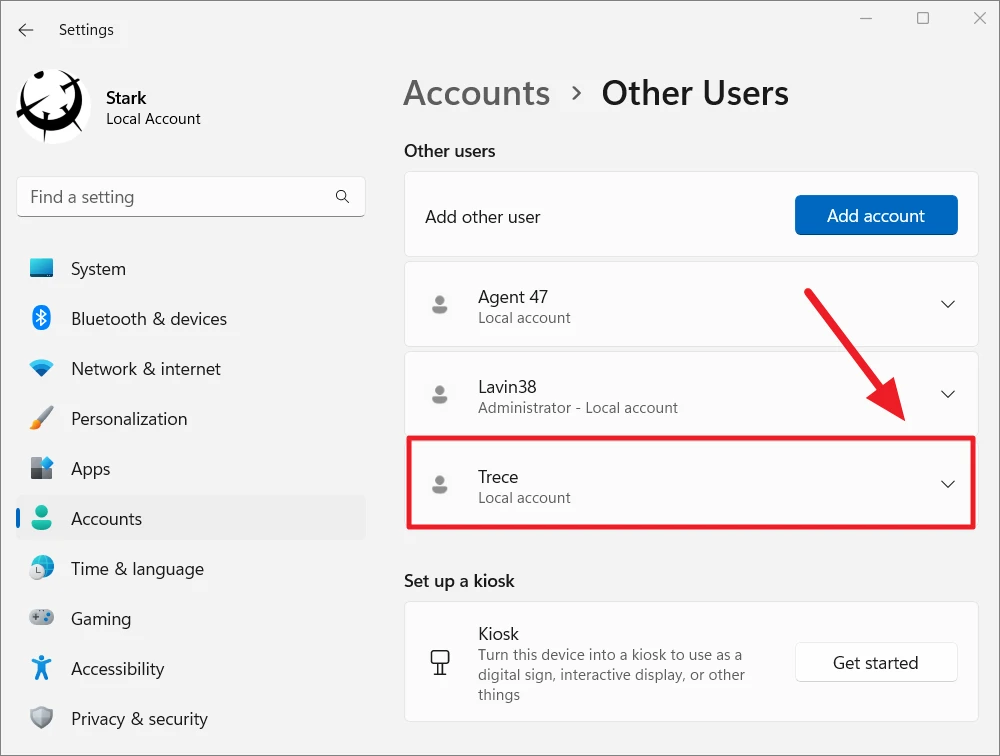
Under the Other Users section, click on the account you want to remove.
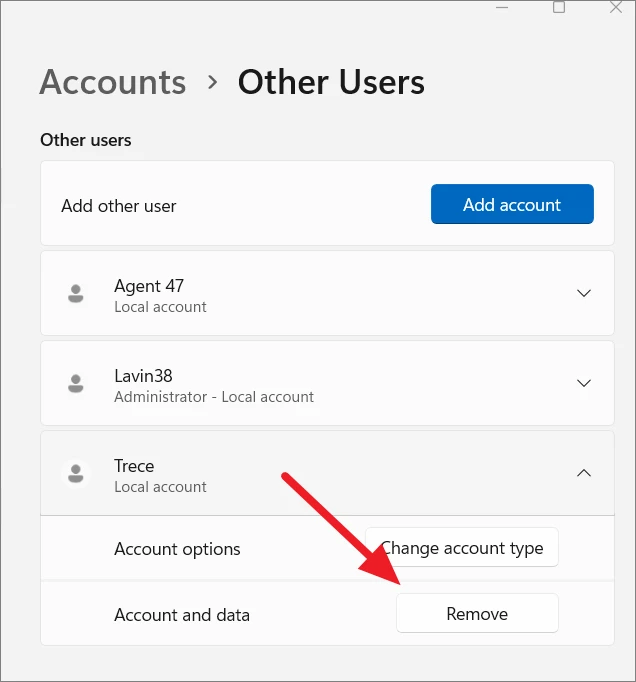
Then, click the ‘Remove’ button to delete the account.
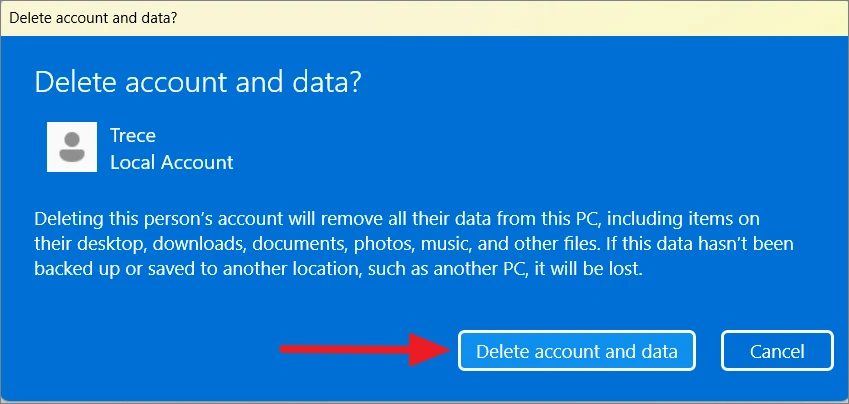
Click the ‘Delete account and data’ button in the blue prompt box.
Create A New User Account
Once the account is deleted, log in to a user account with administrative privileges and follow these steps to create a user account.
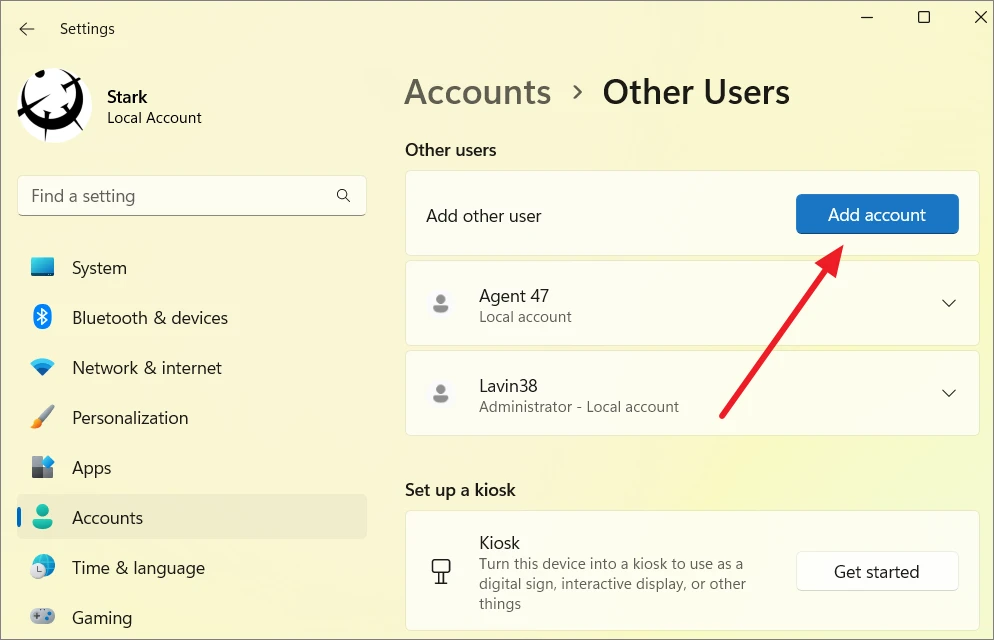
Open Windows 11 Settings, select ‘Accounts’ from the left pane and then click on ‘Other users’ on the right.
On the Other Users page, click the ‘Add account’ button at the top.
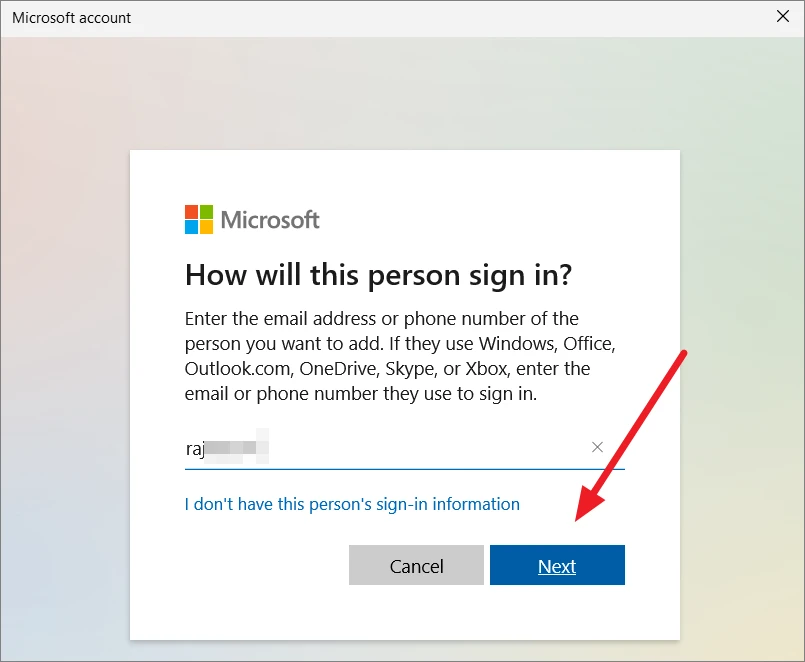
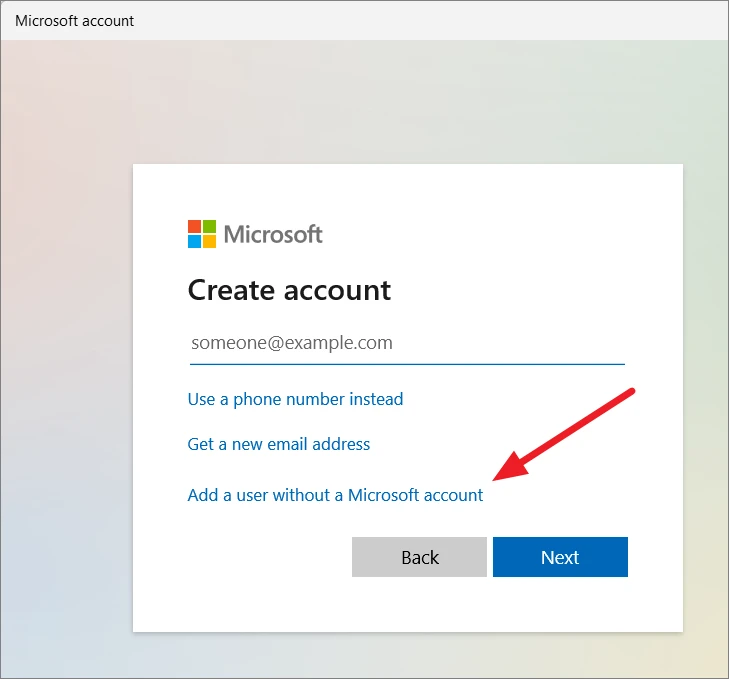
A Microsoft account pop-up window will appear. Here, enter an email address or phone number and click ‘Next’ to create an account. If you want to create a local account without an email address, click the ‘I don’t have this person’s sign-in information’ setting link.
On the next window, select ‘Add a user without a Microsoft account’.
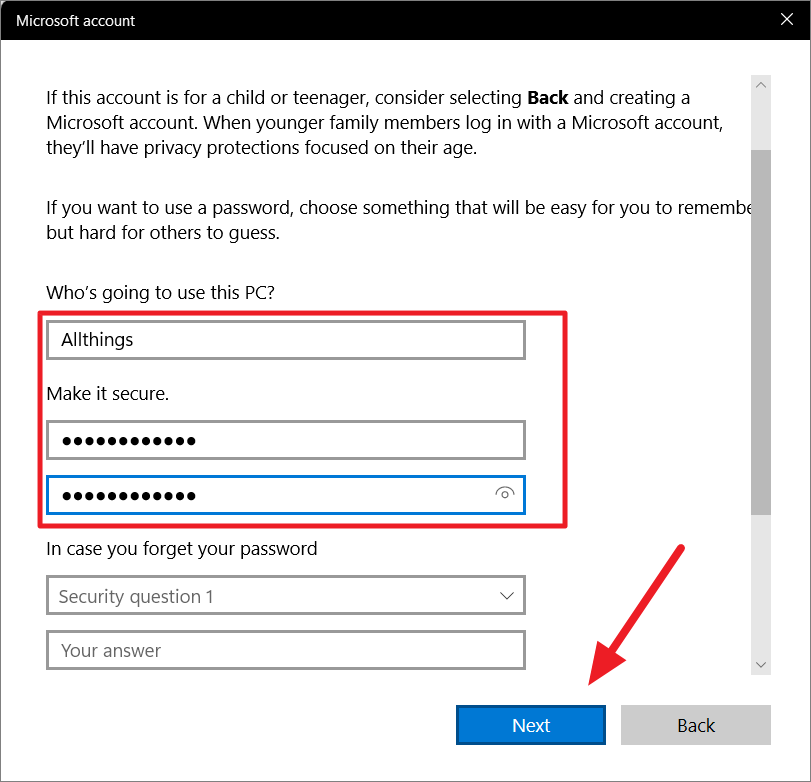
Next, enter the username in the ‘Who’s going to use this PC?’ field. If you want to create an account without a password, leave the ‘make it secure’ fields empty and click ‘Next’.
If you want to add passwords to the account, enter and re-enter the password under the ‘Make it secure’ field. Then, select three security questions and answers them below. Finally, click ‘Next’ to create the user account.
Now, you can restart your computer and sign in with the new account.
30. Re-install Windows 11
If none of the above troubleshooting methods worked and you really want to fix the issue no matter what, then you have no choice but to reset your Windows 11 PC. Resetting Windows will reinstall the Windows 11 operating system from the backup image or cloud service. When reinstalling Windows, you can choose to keep your personal files while removing all the apps and settings.
This method will remove all the third-party apps, drivers, and settings. The computer will be restored to the default state when you installed the OS. Here’s how you reset your Windows 11 computer:
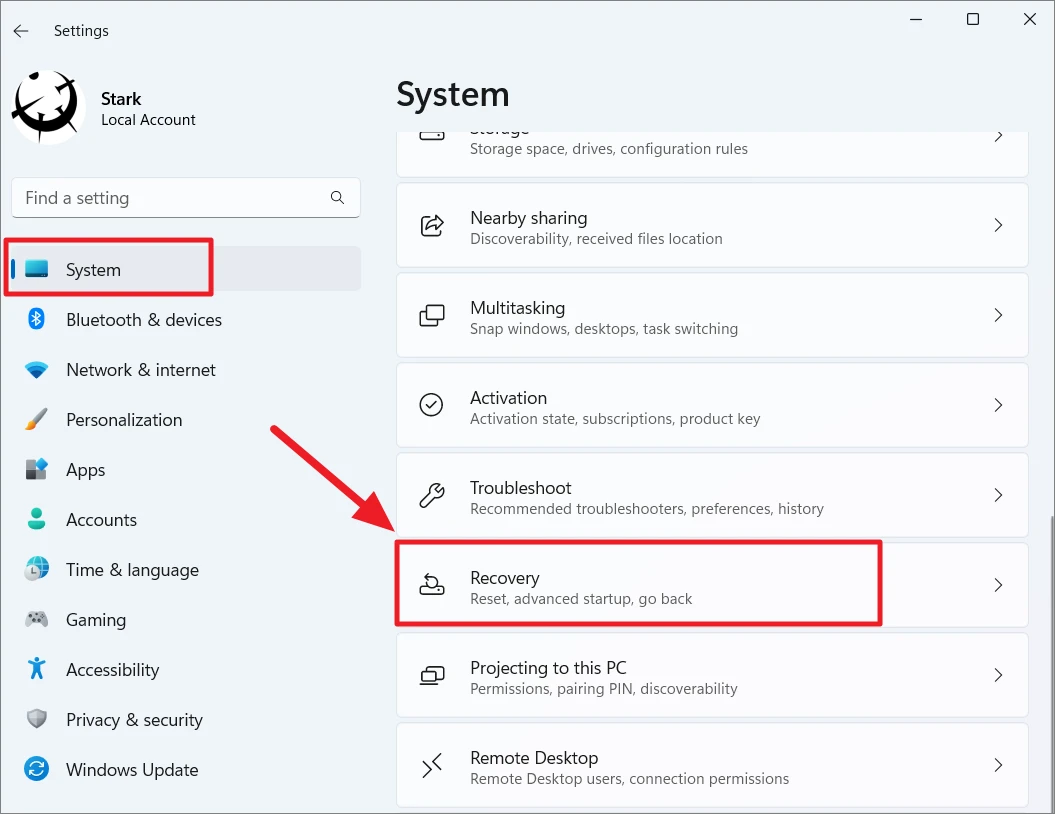
Open the Windows 11 Settings app by pressing Win+I. In the Settings app, choose the ‘System’ tab, and on the right, scroll down and click the ‘Recovery’ option.
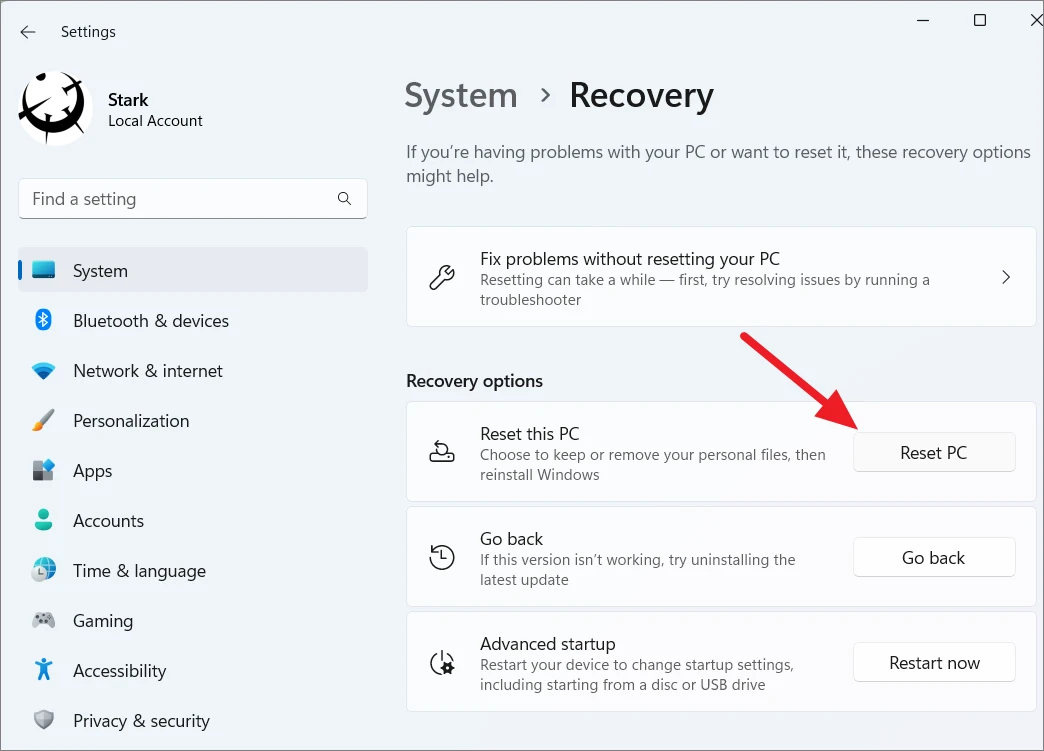
Under the Recovery options section, click the ‘Reset PC’ button.
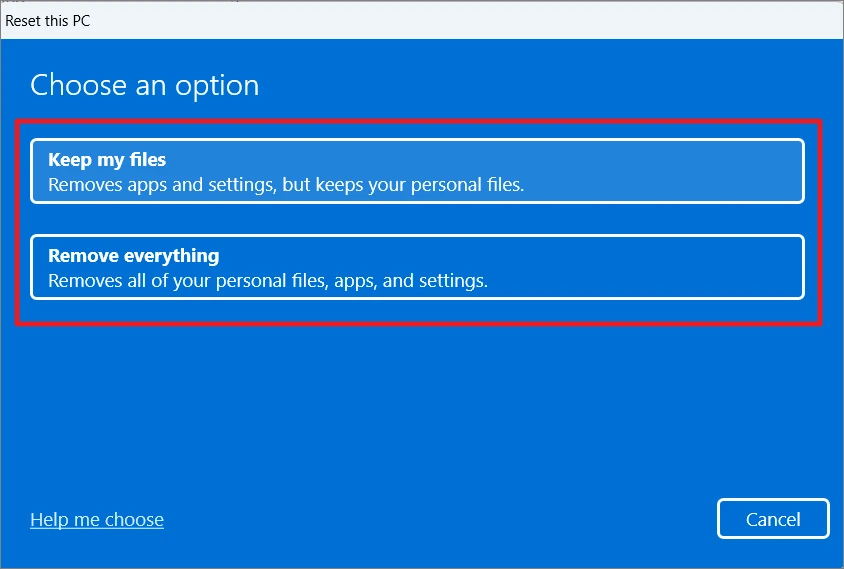
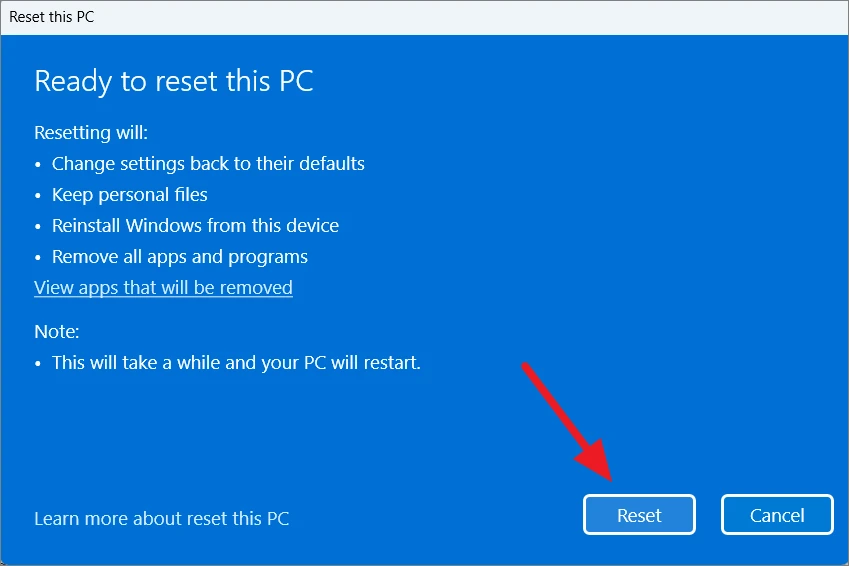
This opens the Reset this PC dialog box, where you can choose whether you want to ‘Keep your files’ but remove apps and settings or ‘Remove everything’ including your personal files from the libraries. Select an option out of the two.
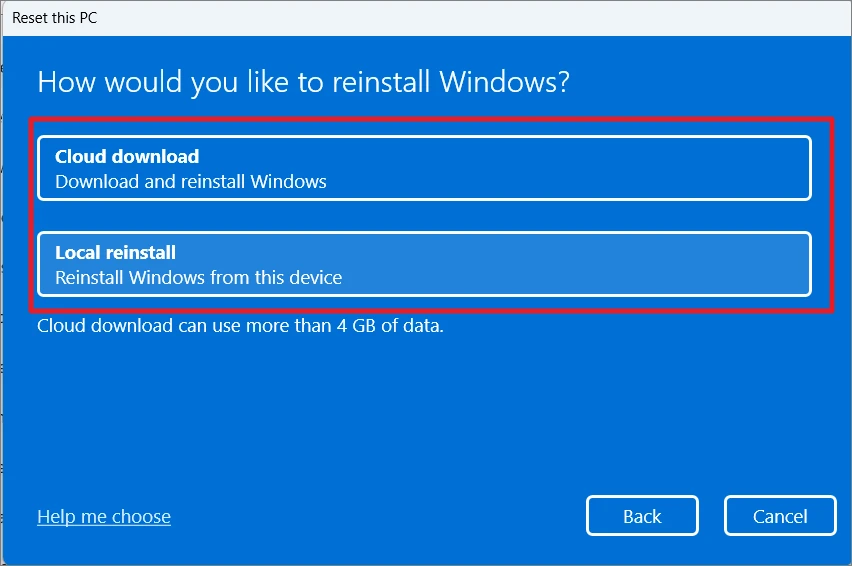
Next, choose how would you like to reinstall Windows – whether with a local backup image from your device or Cloud download and reinstall Windows.
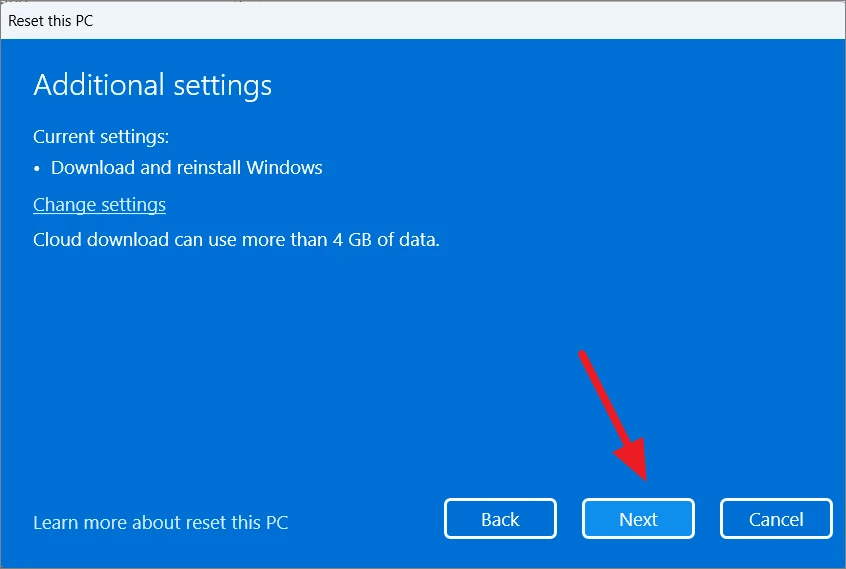
If you choose ‘Cloud download’, it will download and reinstall the latest build of Windows 11 but it will need internet and 4GB of data.
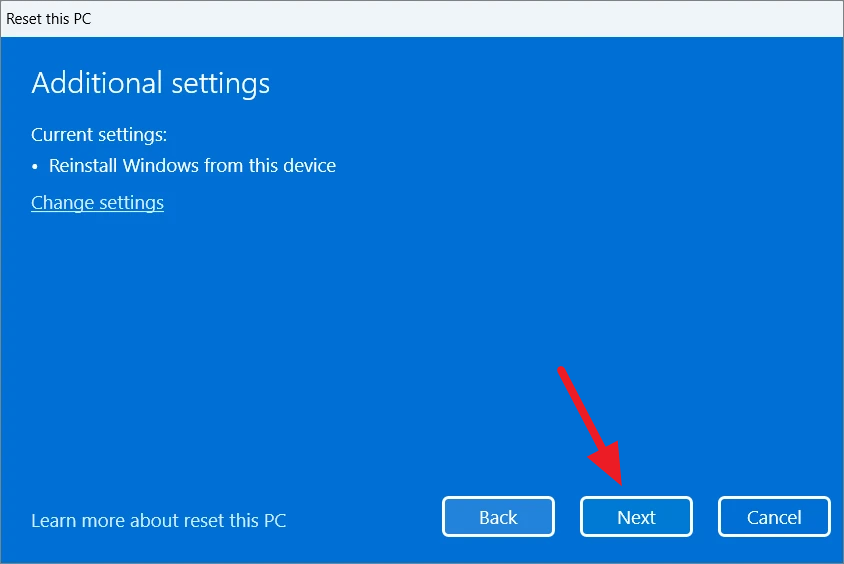
But if you choose ‘Local reinstall’, it will reinstall the same build of the OS from the backup image in the device.
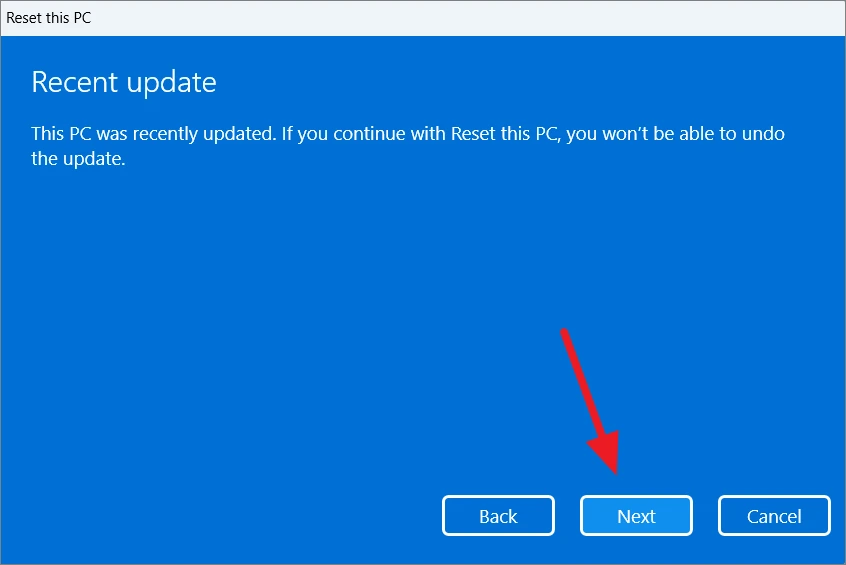
If you recently updated OS built recently, you won’t be able to undo the update. Click ‘Next’ to continue.
Finally, click the ‘Reset’ button to start the resetting process.
The process will take some to finish and will automatically restart the system to a fresh OS.
На чтение 15 мин Просмотров 1к. Обновлено 08.11.2022
Windows любит выдавать загадочные коды ошибок с миллионом возможных причин и, по крайней мере, столько же решений. Код ошибки 0x80004005 не является исключением, хотя у него есть несколько распространенных причин. Вот некоторые вещи, которые вы можете попытаться исправить в Windows 10 или Windows 11.
Содержание
- Что вызывает код ошибки 0x80004005?
- Избегайте ошибок в архивных файлах
- Устранение неполадок Центра обновления Windows
- Устранение причин, связанных с сетью
- Проверить Настройки блока сообщений сервера (SMB)
- Настройки сетевого обнаружения и общего доступа
- Essential Services
- NetBIOS
- Отключить IPv6
- Антивирус или брандмауэр Блокировка доступа
- Исправить ошибки локальных файлов
- Проблемы с правами доступа или владельцами
- Антивирус
- Проблемы с жестким диском, твердотельным накопителем или Windows
- Дополнительные шаги по устранению неполадок
Что вызывает код ошибки 0x80004005?
В общем случае код ошибки 0x80004005 возникает, когда Windows не может получить доступ к файлу или папке. Обычно это отображается как «Ошибка 0x80004005: неопределенная ошибка».
Вот неполный список возможных причин:
- У вашей учетной записи пользователя нет права собственности на файл или папку или прав доступа к ним.
- Вы пытаетесь извлечь или открыть зашифрованный архивный файл (например, ZIP-файл) с помощью программы, которая не поддерживает эти файлы.
- Ваш антивирус блокирует доступ к файлам.
- Неправильный параметр конфигурации сети или служба не запущена, и вы не можете подключиться к другому компьютеру или Сетевое запоминающее устройство (NAS) в сети
- Центр обновления Windows не работает из-за поврежденных файлов
Несмотря на то, что он более конкретен, чем большинство сообщений об ошибках Windows, код ошибки 0x80004005 по-прежнему имеет большое количество потенциальных причин и большое количество потенциальных исправлений.
Избегайте ошибок в архивных файлах
Архивные файлы позволяют делать всякие аккуратные вещи, хотя не все архивные файлы поддерживают одинаковые функции. Вы можете сжимать файлы, объединять несколько файлов, шифровать файлы или разделять большие файлы на несколько архивных файлов.
Проводник может открывать, создавать и извлекать ZIP-файлы сам по себе, но это все. Он не может обрабатывать большинство других форматов архивных файлов, таких как RAR, 7Z или Архиваторы. Кроме того, большинство архивных файлов поддерживают такие функции, как шифрование, которые блокирует доступ к файлу с помощью пароля. File Explorer не поддерживает ни одну из дополнительных функций, предлагаемых форматами архивных файлов. Вы получите “Ошибка 0x80004005: Unspecified Error” если вы попытаетесь извлечь зашифрованный ZIP-файл с помощью проводника.
Решение простое: используйте другую программу, которая поддерживает зашифрованные файлы.
Существует множество программ, доступных для управление архивными файлами. Некоторые из них — например, 7-Zip и PeaZip. — полностью бесплатны. Оба являются отличными вариантами, и вы не ошибетесь ни с одним из них.
WinZip и WinRAR два других выдающихся варианта, но ни один из них не является технически бесплатным. WinZip предлагает бесплатную 30-дневную пробную версию, после чего вам нужно купить ее, если вы хотите продолжать ее использовать. WinRAR также предлагает пробный период, но вы сможете использовать его неограниченное время после окончания пробного периода, хотя и с некоторыми неудобствами.
Устранение неполадок Центра обновления Windows
Ошибка 0x80004005 также может появиться при попытке запустить Центр обновления Windows. Обычно это происходит после того, как обновление Windows было прервано из-за чего-то вроде потери питания или отключения Интернета.
Первое, что нужно попробовать, это встроенное средство устранения неполадок. Средство устранения неполадок может автоматически решить причину ошибки.
Если это не удается, вы можете попробовать удаление всех файлов обновлений вручную и перезапуск службы обновлений — если ошибка возникает из-за поврежденной загрузки, это должно решить проблему.
Устранение причин, связанных с сетью
Код ошибки 0x80004005 чаще всего возникает, когда люди пытаются подключиться к Сетевое хранилище (NAS), хотя это происходит и при других обстоятельствах. Ошибка недостаточно конкретна, чтобы окончательно сказать, в чем проблема, но есть несколько вероятных виновников. Если вы используете два ПК с Windows, которые пытаетесь подключить через локальную сеть, вам следует проверить все эти настройки на обоих компьютерах.
Проверить Настройки блока сообщений сервера (SMB)
SMB — это протокол, который позволяет компьютерам в одной сети взаимодействовать и функционировать как клиент и сервер. Чаще всего он используется для обеспечения связи между компьютером и принтером или между компьютером и NAS, но его можно использовать и для других целей.
В настоящее время используется несколько версий SMB. Первая версия SMB, или SMBv1, является старейшим стандартом и больше не используется по соображениям безопасности. SMBv2 и SMBv3 до сих пор широко используются.
Если ошибка связана с проблемой SMB, есть несколько вариантов:
- Служба SMB не запущена
- AllowInsecureGuestAuth отключен, и вы используете NAS, для которого он требуется.
- Для устройства или службы, которые вы пытаетесь использовать, требуется SMBv1.
Начнем с проверки состояния службы SMB. Откройте командную строку с повышенными правами, PowerShell или Терминал Windows, а затем выполните следующую команду. :
sc.exe qc lanmanworkstation
Вы получите что-то очень похожее на приведенный ниже результат:
Если START_TYPE не установлено значение AUTO_START, вам необходимо включить его. Выполните следующие две команды в том же окне, что и последнюю команду.
sc.exe config lanmanworkstation depend= bowser/mrxsmb10/mrxsmb20/nsi
 sc.exe config mrxsmb20 start= auto
Вы увидите [SC] ChangeServiceConfig SUCCESS, если все прошло хорошо.
Если это не сработало, попробуйте разрешить небезопасный гостевой вход. Windows по умолчанию блокирует гостевой вход на сетевые устройства с помощью SMB2. Возможно, вам придется отключить этот параметр — это не идеально с точки зрения безопасности, но это довольно распространенная вещь для потребительского оборудования.
Запустите редактор реестра (RegEdit), а затем перейдите к HKLMSYSTEMCurrentControlSetServicesLanmanWorkstationParameters, используя меню слева, или просто вставьте путь в адресную строку.
DWORD, который вы ищете, называется AllowInsecureGuestAuth — если его там нет, вам нужно его создать.
Щелкните правой кнопкой мыши пустое место, выберите “Создать” затем нажмите “Значение DWORD (32-разрядное)” Назовите его “AllowInsecureGuestAuth” и установите значение 1.
Попробуйте сделать то, что изначально выдавало вам ошибку 0x80004005 после того, как вы установили значение 1. Есть еще одна вероятная возможность, связанная с SMB .
Возможно, сетевое устройство, к которому вы пытаетесь подключиться, требует использования SMBv1, самой старой версии стандарта. По умолчанию он отключен в Windows 10 и Windows 11, но его по-прежнему можно включить.
Нажмите кнопку «Пуск», введите “функции Windows” в поле поиска, затем нажмите Enter или нажмите “Открыть.” Окно «Функции Windows» еще не перенесено в приложение «Настройки», поэтому, если вы хотите перейти к нему, перейдите в раздел «Панель управления» > Программы > Включение или отключение компонентов Windows.
Прокрутите вниз, пока не увидите “Поддержка общего доступа к файлам SMB 1.0/CIFS.” Нажмите маленькую кнопку с плюсом, затем отметьте “Клиент SMB 1.0/CIFS” “Сервер SMB 1.0/CIFS” и снимите флажок «Автоматическое удаление SMB 1.0/CIFS». Затем нажмите “ОК.”
Windows автоматически загрузит файлы и предложит перезагрузить компьютер. Проверьте и посмотрите, сработало ли это — если это не так, не волнуйтесь. Есть и другие вещи, которые вы можете попробовать. Просто не забудьте снова отключить SMB 1.0/CIFS, прежде чем продолжить. Нет смысла оставлять его включенным, если он вам не нужен, и это потенциальная уязвимость системы безопасности.
Настройки сетевого обнаружения и общего доступа
Сетевые устройства — например, сетевое хранилище (NAS) или, что еще хуже, сетевой принтер — часто бывают довольно привередливы. Настройки сетевого обнаружения или общего доступа часто ошибаются. Вот что вам нужно сделать, чтобы исключить эти настройки как источник вашей проблемы.
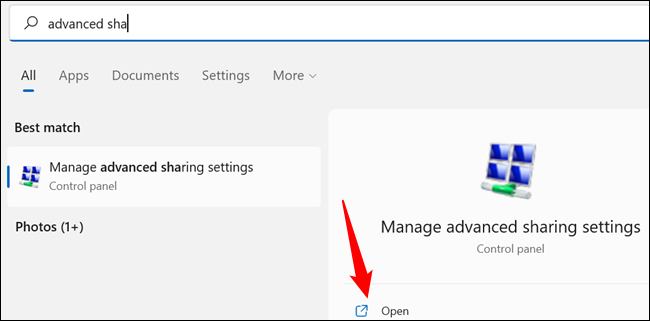
Откройте «Настройки сети». Нажмите кнопку «Пуск», введите “дополнительные параметры общего доступа” в строку поиска, затем нажмите “Открыть” или нажмите Enter. Вы также можете перейти туда из Панели управления, выбрав: Панель управления > Сеть и Интернет > Центр управления сетями и общим доступом > Расширенные настройки общего доступа.
Вы можете настроить параметры общего доступа в зависимости от типа сети, к которой вы подключены — как правило, ваша домашняя сеть должна быть частной. Если это не так, Windows 10 и Windows 11 позволяют изменить сеть с из общего в частное всего за несколько кликов.
Откройте раздел с пометкой “Личное” нажав на слово “Private” или маленький шеврон (он выглядит как стрелка вверх) справа. Отметьте пузыри или пузыри рядом с “Включить сетевое обнаружение” “Включить автоматическую настройку сетевых устройств” и “Включить общий доступ к файлам и принтерам”
После этого перейдите к разделу “Все сети”
Предупреждение. Некоторые из этих настроек могут представлять угрозу безопасности или уязвимость конфиденциальности, если вы подключаетесь к общедоступной сети, когда они включены. Если у вас два компьютера, которые никогда не переместятся из дома, это не проблема. Если вы используете ноутбук или другое портативное устройство, вам следует отключить их перед подключением к общедоступным сетям Wi-Fi.
Есть три параметра, которые вам нужно выбрать: “ Включите общий доступ, чтобы любой пользователь, имеющий доступ к сети, мог читать и записывать файлы в общедоступных папках” “Включить общий доступ к файлам для устройств, использующих 40- или 56-битное шифрование” и “Отключить общий доступ, защищенный паролем”
Примечание. Вам следует попробовать это на обоих компьютерах, если они оба Устройства Windows, но эти настройки скорее важны для сервера, чем для клиента, пытающегося подключиться.
Нажмите “Сохранить изменения” и перезагрузите компьютер. Если это не помогло’ Если это не работает, у вас другая проблема — она может быть связана с базовыми службами, которые позволяют устанавливать соединения между устройствами локальной сети.
Essential Services
SMB — это лишь одна из многих программные компоненты, которые позволяют вашему компьютеру взаимодействовать с другими устройствами в локальной сети. В Windows есть несколько служб, которые необходимы для работы общего доступа к сети:
- DNS-клиент
- Клиент DHCP
- Хост поставщика обнаружения функций (fdPHost)
- Публикация ресурсов обнаружения функций (fdResPub)
- Простой протокол обнаружения служб (SSDP)
- Узел устройства UPnP
DNS-клиент и DHCP-клиент должны запускаться автоматически и, вероятно, работают нормально. Они необходимы для доступа вашего компьютера к Интернету; если они не запустились, вы бы абсолютно заметили, поскольку ваш браузер (и большинство других приложений) не будет работать.
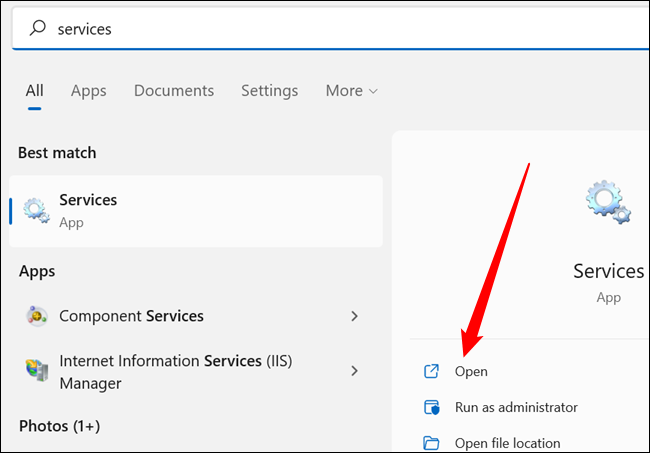
Остальные в совокупности обеспечивают возможность для вашего ПК видеть и взаимодействовать с другими устройствами в сети. Проверьте их статус, открыв приложение «Службы». Есть два быстрых способа сделать это. Вы можете ввести “услуги” в строку поиска меню «Пуск», а затем нажмите “Открыть” или нажмите Enter. Кроме того, вы можете нажать Win + R и ввести services.msc в поле запуска и нажмите Enter.
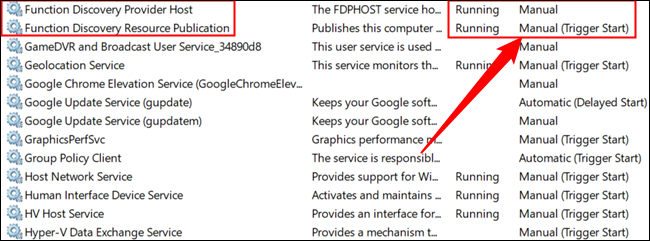
Список служб по умолчанию отсортирован по алфавиту, но если у вас нет, просто нажмите “Имя” колонка вверху. Прокрутите список вниз и убедитесь, что для всех перечисленных нами служб установлено значение “Вручную” или “Автоматически.”
Примечание. Если включено сетевое обнаружение, включен общий доступ и вы пытаетесь подключиться к устройству в вашей локальной сети, службы должны работать, даже если они настроены на ручной режим. Если их нет, значит, что-то пошло не так. Если ваши службы не работают, а они, вероятно, должны быть запущены, не стесняйтесь менять их с “Вручную” запуск на “Автоматический.”
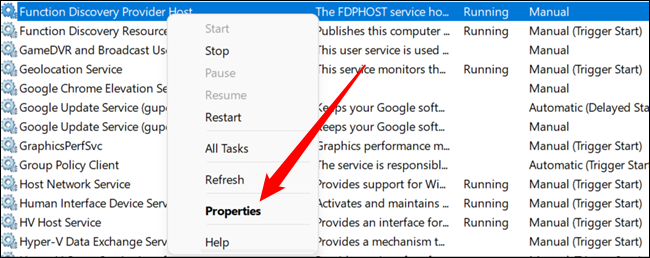
Если для какого-либо из них установлено значение “Отключено,” щелкните сервис правой кнопкой мыши и выберите “Свойства”
Щелкните раскрывающееся меню и выберите “Автоматически” или “Автоматический (отложенный запуск)” а затем нажмите “Применить” и “ОК” Служба запускается автоматически при загрузке Windows.
Совет. Если у вас старый компьютер или машина с низким энергопотреблением, вы можете установите отложенный запуск, чтобы не тормозить Windows, пока ваш компьютер пытается загрузиться.
Проверьте все перечисленные службы, перезагрузите компьютер и повторите попытку.
NetBIOS
NetBIOS — еще одна ключевая часть программного обеспечения, связанная с подключением устройств через локальную сеть. Известно, что если он не работает, он вызывает ошибку 0x80004005. Давайте еще раз проверим ваши настройки, чтобы убедиться, что проблема не в этом.
Нажмите кнопку «Пуск», введите “Сетевые подключения” в строку поиска, затем нажмите Enter или нажмите “Открыть.”
Щелкните правой кнопкой мыши сетевой адаптер, который вы используете для подключения к локальной сети, затем нажмите &# 8220;Свойства. Адаптеры будут различаться между компьютерами из-за разных конфигураций оборудования, но проводное соединение обычно имеет в названии Ethernet, а адаптеры Wi-Fi — Wi-Fi в названии.
Прокрутите вниз, пока не увидите “Протокол Интернета версии 4 (TCP/IPv4)” выберите его, затем нажмите “Свойства.”
Нажмите “Дополнительно”
Нажмите “WINS” ; вкладку, затем посмотрите в нижнюю часть окна. “По умолчанию” настройка должна работать. Если для NetBIOS установлено значение “Disabled,” продолжайте и включите настройку по умолчанию. Однако, если “По умолчанию” выбран, но вы по-прежнему получаете сообщение об ошибке, попробуйте изменить настройку на “Включено” вместо. Щелкните пробел рядом с “Включить NetBIOS через TCP/IP” затем нажмите “ОК.”
Закройте все остальные окна, которые вы ранее открывали, нажав “Ok, ” затем посмотрите, возникает ли ошибка по-прежнему.
Отключить IPv6
Интернет-протокол версии 6 или IPv6 — это будущее, и оно постепенно становится норма. Однако принятие нового стандарта не было быстрым или оптимизированным процессом. Обеспечение устаревшей поддержки устройств IPv4 иногда приводит к сбоям.
Возможно, что такой сбой является причиной ошибки “Ошибка: 0x80004005.” Решение, конечно, простое: выключите его. В большинстве случаев в этом нет необходимости.
Примечание. В Windows 10 окна выглядят немного иначе, но процесс, по сути, тот же.
Откройте приложение «Настройки», затем перейдите в раздел «Сеть и усилитель»; Интернет > (Ваше сетевое имя) > Свойства оборудования, а затем нажмите “Изменить” в области настроек DNS.
Примечание. Если вы подключаетесь к локальной сети, используя как Wi-Fi, так и Ethernet, обязательно отключите IPv6 для обоих .
Прокрутите вниз до IPv6 и установите переключатель в положение «Выкл.».
Еще раз перезагрузите компьютер и посмотрите, появляется ли ошибка по-прежнему.
Антивирус или брандмауэр Блокировка доступа
Это маловероятно, но вполне возможно, что виновато чрезмерно защищающее антивирусное программное обеспечение. Лучшие современные антивирусные программы обеспечивают защиту от широкого спектра атак, включая те, которые могут исходить от вашего локальная вычислительная сеть (LAN).Самый простой способ проверить, не в этом ли проблема, — временно отключить антивирус и брандмауэр.
Невозможно дать конкретные инструкции о том, как это сделать, поскольку существует так много разных антивирусных программ. Однако на веб-сайте компании, производящей программное обеспечение, есть инструкции, поэтому вам следует начать с него.
Если вы используете Microsoft Defender, отключить брандмауэр и антивирус довольно просто.
Исправить ошибки локальных файлов
Код ошибки 0x80004005 не ограничивается только сетевыми устройствами иногда он возникает на вашем ПК с Windows, когда вы пытаетесь получить доступ к файлу или папке или управлять ими локально. К счастью, список причин в этом сценарии.
Проблемы с правами доступа или владельцами
Проблема с разрешениями или владельцами, вероятно, является проблемой, если вы сталкиваетесь с ошибкой 0x80004005 при работе с с локальными файлами.
Во-первых, проверьте и убедитесь, что ваши учетная запись пользователя владеет файлом или папкой, которые доставляют вам проблемы. Если это не так, первое, что вы должны попробовать, это получение права собственности на файл или папку.
После того как вы станете владельцем файла, следующее, что вы должны попробовать, это вручную настроить ваши разрешения. Щелкните файл или папку правой кнопкой мыши и выберите “Свойства”
Перейдите на страницу “Безопасность” вкладку, выберите группу «Пользователи» и проверьте разрешения, перечисленные ниже. “Полный доступ” должен быть отмечен. Если это не так, нажмите “Изменить”
Отметьте “Полный доступ” в списке, и все остальные параметры также должны быть автоматически включены. Затем нажмите “Применить” и “ОК.”
Ваша учетная запись пользователя, вероятно, является частью как группы пользователей, так и группы администраторов, если на ПК есть только одна учетная запись пользователя. Проверьте разрешения для обоих в окне свойств — любая учетная запись пользователя в группе администраторов должна иметь “Полный доступ” но убедиться в этом никогда не помешает.
После того, как вы подтвердите, что являетесь владельцем и имеете полный доступ, проверьте, не возникает ли ошибка по-прежнему.
Антивирус
Большинство антивирусных программ можно настроить для защиты определенных файлов и папки от вредоносных программ. В редких случаях эта защита выходит за рамки нормы и может мешать нормальной работе вашего ПК.
Самый быстрый способ проверить, не является ли это причиной проблемы, — отключить антивирус. На веб-сайте антивируса есть инструкции, как именно это сделать.
Проблема вряд ли связана с Microsoft Defender Antivirus, но никогда не помешает исключить возможность.
Проблемы с жестким диском, твердотельным накопителем или Windows
Не существует простого способа полностью убедиться в том, что это аппаратный сбой или повреждение Windows, несет ответственность за ошибку. Самый удобный диагностический инструмент в этом случае — просто предположить наличие проблемы и попытаться ее устранить. Хуже вы точно ничего не сделаете.
Есть три основные команды, которые вы должны выполнить, чтобы исключить большинство проблем, которые могут вызвать это: Chkdsk, DISM и SFC.
Вам понадобится чтобы запустить Командную строку или PowerShell от имени администратора для запуска команд. Не планируйте спешить с сканирования — они могут занять некоторое время.
После завершения перезагрузите компьютер и проверьте, не появляется ли ошибка 0x80004005 по-прежнему.
Дополнительные шаги по устранению неполадок
К сожалению, код ошибки может также появляться в более неясных случаях, связанных с конкретными программами. трудно сказать конкретно, как решить проблему в таких случаях. При устранении неполадок помните о более общих причинах ошибки 0x80004005: не удается правильно получить доступ к файлу или папке.
Это означает, что ваши шаги по устранению неполадок должны начинаться с проверки того, что ваше приложение может правильно получить доступ к необходимым файлам и папкам, что все необходимые службы работают правильно и что ни один из основных файлов не исправен. вздернутый. На практике у вас остается три основных шага: отключить антивирус, запустить программу от имени администратора, полностью стереть и переустановить программу.
Содержание
- Причины возникновения
- Как исправить
- Запустите средство устранения неполадок
- Обновите Центр обновления Windows
- Восстановите поврежденные файлы
- Временно отключите антивирус
- Используйте инструмент извлечения файлов
- Перерегистрируйте jscript.dll и vbscript.dll
- Исправление ошибок во время обновления Windows
- Обращение к общим файлам
- Не удается начать работу виртуальной машины заново?
- Решение ошибки 0х80004005 виртуальной машины
- Новый сеанс
- Создайте значение для LocalAccountTokenFilterPolicy
В процессе использования компьютера многие часто сталкиваются с различными уведомлениями о неисправности, например, при открытии программы или включении ПК. Однако, даже у одного и того же кода бывают разные причины. Так происходит и с рассматриваемой ошибкой. Компьютеру не удается открыть зашифрованный файл, происходит сбой сетевого подключения принтера или программы и т. д. На этой странице представлены инструкции по решению кода ошибки 0x80004005.

Уведомление с кодом 0x80004005 пользователи Windows обнаруживают во время работы с общими папками, виртуальными машинами и при обновлении системы. Функция общего доступа к сети позволяет передавать файлы между разными компьютерами в одной сети. Однако этот процесс не является гладким. Во время обмена файлами могут возникать ошибки, такие как 0x80004005.
Причины возникновения
0x80004005 возникает в Windows в основном при работе с общим доступом к файлам и обновлениям. Ниже приведен список стандартных причин уведомлений.
- Проблемы с файловой системой: Вам приходится сталкиваться с кодом ошибки 0x80004005, при попытке переименовать или отредактировать папку. Это может завесить от вашей ОС.
- Обновление Windows: ошибка может возникнуть во время обновления Windows, когда загружаются и устанавливаются новые файлы.
- Вирусы и вредоносное ПО. Вирусы также могут повредить работу вашего компьютера. Из-за них вы можете столкнуться с данным кодом.
- Проблемы с политиками. Если на вашем компьютере отключены определенные политики, они могут помешать вам использовать общий доступ к файлам в вашей сети. В результате вы получаете код ошибки 0x80004005 при запуске общего доступа к файлам.
Как исправить
Для стандартных ошибок в системе Windows решение также является формализованным.
Запустите средство устранения неполадок
Проблемы с обновлением Виндовс являются одной из наиболее типичных причин этой ошибки.
- Нажмите в правом нижнем углу экрана на панели задач меню уведомлений.
- Зайдите в «Все параметры».
- Нажмите «Обновление и безопасность».
- Выберите «Устранение неполадок».
- Кликните по «Дополнительные средства устранения неполадок».
- Найдите строку «Центр обновления Windows».
- Клацните по «Запустить средство устранения неполадок».
- Перезагрузите компьютер.

Обновите Центр обновления Windows
Запуск Центра обновления Windows также является быстрым и простым способом исправить код ошибки 0x80004005. Кроме того, настоятельно рекомендуется поддерживать Windows в актуальном состоянии при любых обстоятельствах.
Восстановите поврежденные файлы
Неисправная файловая система или файловый реестр могут вызвать проблемы при обновлении Windows. В таких случаях вам необходимо восстановить поврежденные системные файлы. Чтобы восстановить поврежденные системные файлы и исправить код ошибки 0x80004005.
Введите команду «sfc /scannow» в командной строке, которую запустили от имени администратора и нажмите Enter.

Подождите, пока SFC выполнит свою работу. После этого перезагрузите компьютер и посмотрите, появляется ли по-прежнему код ошибки 0x80004005.
Временно отключите антивирус
Антивирусы и брандмауэры являются самыми большими препятствиями при передаче файлов. Они предотвращают копирование или совместное использование файлов из неизвестных источников.
Сталкиваясь с неопределенным кодом ошибки 0x80004005 в Windows, попробуйте временно отключить антивирусное программное обеспечение. Если это устранит ошибку, значит, ваш антивирус вызывает ошибку.
Используйте инструмент извлечения файлов
Пользователи упоминают о случаях, когда при извлечении сжатого файла архива появляется код ошибки 0x80004005.
Доступно несколько инструментов для извлечения файлов, включая WinRar, 7zip и WinZip. Если у вас возникли проблемы с одним экстрактором файлов, всегда полезно попробовать другие и посмотреть, не возникают ли проблемы по-прежнему.
Перерегистрируйте jscript.dll и vbscript.dll
На компьютерах с Windows есть два важных файла реестра. Они называются javascript.dll и vbscript.dll. Пользователи уже исправляли код ошибки 0x80004005, перерегистрировав эти файлы.
- Запустите командную строку. Вы можете открыть CMD, нажав клавиши «Win + R», чтобы открыть окно «Выполнить», и набрав cmd.
- Введите команду «regsvr32 vbscript.dll» и нажмите Enter
- Введите команду «regsvr32 jscript.dll» и нажмите Enter.
После этого перезагрузите систему. После этого, проблема должна исчезнуть.


Исправление ошибок во время обновления Windows
Если во время обновления возникает ошибка 0x80004005 , выполните следующие действия:
- Откройте командную строку через строку поиска или с помощью команды cmd.exe через диалог запуска.
- Убедитесь, что вы запускаете функцию от имени администратора.
- Теперь перезапустите службы обновления Windows. Для этого введите следующие 5 команд по отдельности и подтвердите нажатием Enter, чтобы завершить соответствующую службу: «net stop wuauserv», «net stop bits», «net stop trustinstaller», «net stop appidsvc», «net stop cryptsvc».
- Обязательно снова включите каждую из служб с помощью start вместо stop. Теперь ошибка должна быть исправлена.
Обращение к общим файлам
Как уже говорилось ранее, проблема с доступом к общим документам является одной из часто встречающихся при работе с виртуальными машинами. Основным источником некорректной работы является наличие целого списка сетевых адаптеров, которые созданы для работы в виртуальной среде. Чтобы с большой долей вероятности исправить, выполните:
- В поиске Windows введите «Диспетчер устройств» и нажмите Enter.
- Откройте шторку «Вид» и выберите «Показать скрытые устройства».
- Найдите и откройте ветку «Сетевые адаптеры».
- Удалите все, у которых в названии встречается «Microsoft 6to4».

Не удается начать работу виртуальной машины заново?
Иногда, при попытке создать новый сеанс виртуальной машины, тоже появляется ошибка 0x80004005. Что делать? Следуйте алгоритму:
- Нажмите одновременно «Win+ R», чтобы открыть окно «Выполнить».
- Введите «ncpa.cpl» и нажмите Enter.

- Теперь для всего списка адаптеров, которые показывает система сделайте следующее:
- Кликните правой кнопкой мыши и в выпадающем меню выберите «Свойства».
- Найдите и строку «VirtualBox NDIS6 Bridged Networking Driver» и поставьте галочку рядом с ней.
- Сохранитесь нажатием кнопки «ОК».


Решение ошибки 0х80004005 виртуальной машины
Данная ошибка чаще всего возникает при попытке пользователя открыть виртуальную машину приложений VirtualBox. Причиной этого является отсутствие файла предыдущей сессии. Сбой мог произойти в момент записи или повреждения секторов, на которых сохранились данные. В результате появляется ошибка с таким кодом и сбой запуска программ. Также уведомление может появляться при сетевом подключении обновления Windows, при повреждении временных файлов и так далее далее. Будет показано несколько способов, как исправить данную проблему.
Для начала попробуйте переименовать файлы виртуальной машины. При сбое работы приложения файл сессии в любом случае сохраняется, но к расширению vbox добавляется следующая приставка:

В таком случае исходный файл, который ищет программа при запуске отсутствует.
- Откройте папку по следующему пути(как на картинке).
- Затем перейдите в каталог с названием нужно виртуальной машины.
- Здесь, помимо файла с нормальным расширением, должен быть еще один документ с исправленным (vbox -tmp), но всякий случай рекомендуется сохранить основной файл vbox другое место.
- Затем исправить расширение второго файла, после чего ошибка с этим кодом должна исчезнуть.

Если дополнительного файла с исправленным расширение в данном каталоге нет. То причиной может быть запрет виртуализации в BIOS.
Для исправления вам нужно перезагрузить компьютер и открыть настройку BIOS, здесь найти раздел «Intel виртуализацию» (или что-то подобное) и установить значение и на «Включена».

Новый сеанс
Еще ошибка с таким кодом может появиться при попытке создать новый сеанс виртуальной машины.
- Для исправления откройте параметры сети интернет.
- Дополнительные сетевые параметры.
- Дополнительные параметры сетевого адаптера.
- В открывшемся окне сетевых подключений кликните по адаптеру VirtualBox правой кнопкой мыши и выберите Cвойства.

- Здесь проверьте установлена ли отметка на против пункта VirtualBox, если нет — установите и нажмите «ОК», чтобы сохранить настройки.

Если ничего не изменилось, проделайте то же самое со всеми сетевыми адаптерами, которые присутствуют в вашем списке.
Основной функции Windows при объединения компьютеров в сеть является передача файлов между системами. Но иногда, пытаясь передать файл или при попытке получения доступа к одному из них, может появиться запрет с рассматриваемым кодом ошибки. Исправить его можно с помощью редактора реестра.
Создайте значение для LocalAccountTokenFilterPolicy
Вы можете включить права доступа администратора, создав LocalAccountTokenFilterPolicy. Эти права отключены по умолчанию, что приводит к коду ошибки 0x80004005.
- Нажмите клавишу Windows + клавишу R, чтобы открыть окно «Выполнить».
- В окне «Выполнить» введите regedit и нажмите Enter.
- Зайдите в HKEY_LOCAL_MACHINESOFTWAREMicrosoftWindowsCurrentVersionPoliciesSystem.
- Оказавшись там, используйте New, чтобы создать запись значения QWORD (32-ух или 64-разрядная в зависимости от вашей системы) с именем LocalAccountTokenFilterPolicy.
- Установите для параметра «LocalAccountTokenFilterPolicy» значение 1.

- Если не помогло, то перейдите в реестре по такому пути: «КомпьютерHKEY_LOCAL_MACHINESYSTEMCurrentControlSetServicesLanmanWorkstationParameters».
- Здесь создайте параметр со следующим именем: «AllowInsecureGuestAuth».
- Присвойте ему значение 1.
- Сохраните и перезагрузите систему.


