
I got this issue with ubuntu 18.04, on upgrading my distro from 16.04 to 18.04, The boot process throws, Kernel Panic
e2fsck
sbin/init: No Such file or Directory
Kernel Panic - Not Syncing : Attempted to kill init !
In order to resolve this, I booted from Live Ubuntu 18.04 disk, then i replaced the contents of my filesystem directories
/bin & /sbin
with the corresponding content of the directories /bin & /sbin of stock filesystem of Live Ubuntu disk.
First find the disk partition which has the probelm in my case it was /dev/sda5 now boot from the live disk and mount /dev/sd5 with the Live Disk
open terminal and run the following commands to replace the contents
cp -r -i /bin /media/ubuntu/<name of your partition folder>
cp -r -i /sbin /media/ubuntu/<name of your partition folder>
example:
cp -r -i /bin  /media/ubuntu/cdfb882d-e33c-49b5-8965-fea541464686/bin/
cp -r -i /sbin /media/ubuntu/cdfb882d-e33c-49b5-8965-fea541464686/sbin/
shutdown the pc and reboot.
Done
Hope this may help!
I was trying to update libc in our Ubuntu server but it failed and now when I reboot the server I get a error message:
Kernel panic — not syncing — Attempted to kill init!
and it just hangs.
What is the solution to this problem? The server is used by 10 people so I don’t want to reinstall erasing their data.
![]()
RzR
3,05028 silver badges26 bronze badges
asked Oct 12, 2012 at 21:50
![]()
6
if the full message is:
kernel panic - not syncing: Attempted to kill inint !
PId: 1, comm: init not tainted 2.6.32.-279-5.2.e16.x86_64 #1
then you should have disabled selinux and after that you have rebooted the system.
The easier way is to use a live OS and re-enable it
vim /etc/selinux/config
    ...
    SELINUX=enforcing
    ...
Second choice is to disable selinux in the kernel arguments by adding selinux=0
vim /boot/grub/grub.conf
    ...
    kernel /boot/vmlinuz-2.4.20-selinux-2003040709 ro root=/dev/hda1 nousb selinux=0
    ...
source kernel panic — not syncing: Attempted to kill inint !
![]()
Henry Ecker♦
34.1k18 gold badges38 silver badges56 bronze badges
answered Nov 7, 2013 at 15:07
![]()
3
- Mount the centos live cd and boot
- Go into rescue mode and wait for it load up
- Read the terminal to see where it mounted the OS
- Go into OS
- vim or nano /etc/selinux/config
- Make sure SELINUX=enforcing or disabled
answered Apr 18, 2014 at 6:42
![]()
Michael MikhjianMichael Mikhjian
2,7324 gold badges35 silver badges51 bronze badges
Solution is :-
- Restart
- Go to advanced menu and then click on ‘e'(edit the boot parameters)
- Go down to the line which starts with linux and press End
- Press space
- Add the following at the end -> kernel.panic=1
- Press F10 to restart
This basically forces your PC to restart because by default it does not restart after a kernel panic.
answered Mar 1, 2016 at 7:04
![]()
3
Booting from CD to rescue the installation and editing /etc/selinux/config: changed SELINUX from enforcing to permissive. Rebooted and system booted
/etc/selinux/config before change:
SELINUX=enforcing and SELINUXTYPE=permissive
/etc/selinux/config after change:
SELINUX=permissive and SELINUXTYPE=permissive
![]()
cubbuk
7,8004 gold badges35 silver badges62 bronze badges
answered Dec 10, 2014 at 14:27
![]()
I just came across this problem when I replaced a failing disk. I had copied over the system files to the new disk, and was good about replacing the old disk’s UUID entry with the new disk’s UUID in fstab.
However I had not replaced the UUID in the grub.conf (sometimes menu.lst) file in /boot/grub. So check your grub.conf file, and if the «kernel» line has something like
kernel ... root=UUID=906eaa97-f66a-4d39-a39d-5091c7095987
it likely has the old disk’s UUID. Replace it with the new disk’s UUID and run grub-install (if you’re in a live CD rescue you may need to chroot or specify the grub directory).
answered Apr 27, 2015 at 1:01
![]()
Ethan BrownEthan Brown
6836 silver badges11 bronze badges
Mount remount the /
Eg.
mount -o remount,rw /dev/xyz /sed -i 's/1 1/0 0/' /etc/fstabsed -i 's/1 2/0 0/' /etc/fstab- reboot
![]()
benka
4,72235 gold badges47 silver badges58 bronze badges
answered Aug 17, 2015 at 16:41
![]()
At grub screen goto boot in recovery.
As booting hold ESC
It should take you into a gui menu. Open command and fix selinux.
Also I suggest run the clean broken packages
answered Jul 25, 2016 at 0:02
![]()
1
A “kernel panic” is an unrecoverable error condition in, or detected by, the Linux kernel. It represents a situation where Linux literally finds it impossible to continue running, and stops dead in its tracks.
Here are possible solutions:
- Check your hardware especially the RAM and Harddisk or Solid State drive connections.This means that you’ll have to physically open the laptop or desktop.It’s recommended you find a certified technician to handle this for you.Use trial and elimination method to find the root cause of the problem.
- Try booting from the previous version of the Linux kernel if a recent update to Linux somehow went wrong. .A menu of installed kernel versions usually appears briefly when you start the machine and can be chosen by clicking advanced options in the grub bootloader.
- The file system may be corrupt. You may need to try to boot the machine into a “recovery mode” or live boot from a DVD or flash drive.The startup/boot menu on the installation disk for most Linux distros contains a “recovery” option which will attempt to check for and fix errors on the boot drive.
Other solutions gathered from the web
1.
- Turn off the system completely.
- Turn system back on.
- Immediately after the System Manufacture Logo or Boot Message Press Shift to goto Grub options. Or You can force kill the system with power button and turn it back on, the Grub menu should appear.
- Choose Advance option For Linux.
- A selection menu should appear with list of kernels installed on the system, take note of the version number of the latest kernel ( Usually the First one) choose the recovery option of the old kernel (one with lower version number of the first one, normally the fourth 4th option).
- Another list of options should appear, choose root : Drop to to root shell option, if you set root account password enter that here else press enter.
- Execute the following commands:
-
mount -o remount,rw / -
mkinitramfs -o /boot/initrd.img-{kerner_version}-generic {kernel_version}-generic -
update-grub
Here {Kernel_version} is the kernel version number you take note of in step 5 (The Problematic kernel, latest installed one).
2.
You have to update via chroot environment
1. Boot using live-DVD/USB
2. Mount your root partition
sudo mount /dev/sda7 /mnt
sudo mount --bind /dev /mnt/dev
sudo mount --bind /sys /mnt/sys
sudo mount --bind /proc /mnt/proc
3. Go to the chroot environment
sudo chroot /mnt
apt-get update
apt-get upgrade
exit
4. Umount chroot environment
sudo umount /mnt/proc
sudo umount /mnt/sys
sudo umount /mnt/dev
sudo umount /mnt
NOTE :
If you get the error “32 bit relocation outside of kernel” or “uncompression error system halted “ when attempting to boot using a flash drive or DVD,then that’s a hardware issue mostly the ram is not in place or is faulty.
If you also dualboot with windows and get the error that “the operating system could not be loaded because a required file is missing”,when attempting to repair windows,then that’s most likely a hardware issue.Check you RAM connection.

Sources
![]() switchroot: mount failed: No such file or directory. Kernel panic — not syncing: Attempted to kill init! Pid: 1. comm: init Not tainted 2.6.32-400.33.2.el5uek #1 Восстановить загрузку Linux, восстановить журнал EXT3/EXT4 ФС.
switchroot: mount failed: No such file or directory. Kernel panic — not syncing: Attempted to kill init! Pid: 1. comm: init Not tainted 2.6.32-400.33.2.el5uek #1 Восстановить загрузку Linux, восстановить журнал EXT3/EXT4 ФС.
Когда становится скучно, то обычно чел. начинает искать себе каких-то приключений на свою пятую точку:) Вот мне на днях надоела стабильность моего локального сервера и мне захотелось какого-то «квеста» — и пошло поехало…
В линухах есть некая фича «Journaling Block Device layer» (ака JBD, процесс jbd2/sda2-8), которая на файловых системах EXT3/EXT4 занимается журналированием событий про данные с целью их дальнейшего восстановления в случае возможных сбоев в файловой системе.
На некоторых серверах, особенно со слабой скоростью доступа к диску (hdparm -t /dev/sda1), по показаниям iotop этот самый процесс jbd2/sda2-8 довольно часто дергает диск для записи в него параллельно с другими процессами выполняющими запись на диск, что вызывает всплески I/O Wait. Идея заключалась в том, чтобы полностью избавится от журнала и обслуживающего его процесса jbd2/sda2-8 (ps aux|grep jbd2).
Теоретически я знаю, что можно только сменить способ ведения журнала (data=journal, data=ordered, data=writeback), но полностью отключить журналирование и избавится от процесса jbd2/sda2-8 невозможно, но никогда не видел последствий этого замысла на практике — вот решил попробовать вовсе избавится от журнала и посмотреть чем это закончится;)
Долго ли коротко ли, вот нашелся рецепт:
Re: Resize journal on root filesystem
http://www.redhat.com/archives/ext3-users/2002-October/msg00026.html> I’ve remounted my root filesystem as ext2, but still when I ‘tune2fs -O
> ^has_journal’ I get
> —-
> The has_journal flag may only be cleared when the filesystem is
> unmounted or mounted read-only.
> —-Add the tune2fs command to rc.sysinit before the root filesystem fsck is run, then reboot the machine remotely.
В «рецепте» шла речь о изменении размера журнала на корневой файловой системе (Resize journal on root filesystem), для чего нужно его сначала удалить и создать заново с нужным размером, но создание нас не интересует — удаляем:)
 Только после полного отключения блокировщика скриптов и рекламы на этом месте появится полезная подсказка/ссылка/код/пример конфигурации/etc!
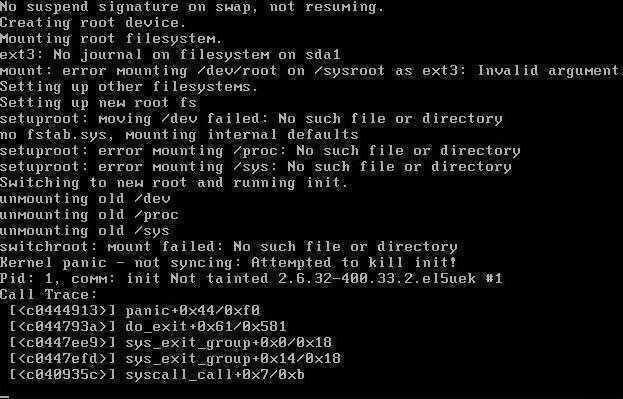
После перезагрузки всё было хорошо и CentOS работала стабильно, но вот после второго reboot-а загрузка CentOS накрылась медным тазом с сообщением «switchroot: mount failed: No such file or directory» и иже с ним «Kernel panic — not syncing: Attempted to kill init!«:
switchroot: mount failed: No such file or directory
Kernel panic — not syncing: Attempted to kill init!
Pid: 1. comm: init Not tainted 2.6.32-400.33.2.el5uek #1
CentOS перестала загружаться и в однопользовательском режиме (aka single user mode), но меня это ничуть не расстроило ибо ж за что боролись на то и напоролись. Итак.., приступим к восстановлению.
Чтобы восстановить загрузку CentOS нам потребуется восстановить журнал EXT3/EXT4, а для этого нужен загрузочный/установочный диск и его режим «Rescue mode», для входа в который набираем linux rescue и жмем <Enter>.
После запуска выбираем язык и клавиатуру по умолчанию EN, отказываемся от настройки сети, нажимаем «Continue» ради интереса или просто «Skip» чтобы сразу выйти в консоль ибо «Continue» нам здесь всё равно не поможет.
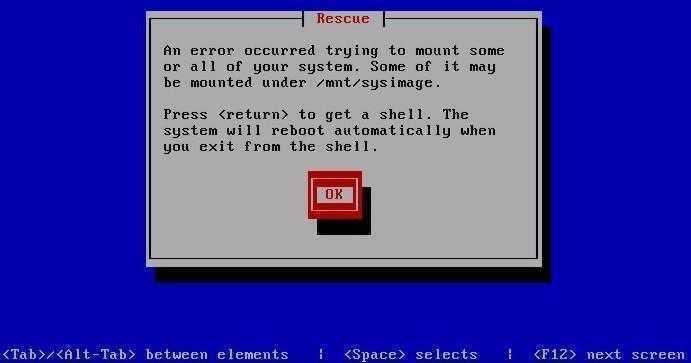
Теперь же, когда мы в консоли, выполняем набор команд:
Только после полного отключения блокировщика скриптов и рекламы на этом месте появится полезная подсказка/ссылка/код/пример конфигурации/etc!
Сбой в загрузке CentOS с сообщением «Kernel panic — not syncing: Attempted to kill init!» может иметь различную природу происхождения, но когда никак не получается восстановить запуск ОС, то как вариант нужно попробовать восстановить журнал EXT3/EXT4, т.е. удалить и создать заново.
Аналогичные последствия с результатом «Kernel panic — not syncing: Attempted to kill init!» будут иметь место на любых дистрибутивах Linux в случае полного удаления журнала EXT3/EXT4 или же его возможного повреждения, но в нашем случае это был CentOS GNU/Linux.
Приведённый здесь рецепт по восстановлению журнала для EXT3/EXT4 должен работать и других GNU/Linux дистрибутивах, различаться могут способы загрузки в «Rescue mode».
Ссылки по теме:
- Chapter 26. Basic System Recovery
- 26.2. Booting into Rescue Mode
- Ext3 Filesystem Documentation
- Ext4 Filesystem Documentation
This portion of the log only shows the CPU stopping after an error. The first error where you’ll see a stack trace and more addresses is actually above it. I know the errors may scroll by pretty quickly, but is it possible you can get a picture of the first error before it goes offscreen? Sometimes this comes about due to installing a new kernel module, and can be addressed by removing it. And even if the goal is to get your original system back, Aurora0001’s advice still holds. Testing a fresh image can identify whether this is a software or hardware issue.
Nov 7, 2017 at 17:51