
Вывод на экран отчета о состоянии диска в форме, зависящей от используемой файловой системы. Команда chkdsk также составляет список ошибок на диске и исправляет их. Выполненная без параметров команда chkdsk выводит информацию о состоянии текущего диска.
Синтаксис
chkdsk [том:][[путь] имя_файла] [/f] [ /v] [/r] [/x] [/i] [/c] [ /l[:размер]]
Параметры
- том:
- Указывает букву диска (с последующим двоеточием), точку подключения или имя тома.
- [путь] имя_файла
- Задает местонахождение и имя файла или имена множества файлов, для которых команда chkdsk проверит степень фрагментации. Для задания нескольких файлов можно использовать подстановочные знаки (* и ?).
- /f
- Задает исправление ошибок на диске. Диск должен быть заблокирован. Если диск не заблокирован командой chkdsk, отображается запрос на проверку диска при следующей перезагрузке компьютера.
- /v
- Выводит на экран имена проверяемых файлов и каталогов.
- /r
- Обнаруживает поврежденные сектора и восстанавливает ту часть данных, которая еще может быть прочитана. Диск должен быть заблокирован.
- /x
- Используйте только с файловой системой NTFS. При необходимости инициирует операцию отключения тома в качестве первого действия. Все открытые дескрипторы диска будут неверны. Параметр /x включает также функциональные возможности параметра /f.
- /i
- Используйте только с файловой системой NTFS. Выполняет менее тщательную проверку записей индекса, что уменьшает время, необходимое для работы команды chkdsk.
- /c
- Используйте только с файловой системой NTFS. Пропускает проверку циклов в структуре папок, что уменьшает время, необходимое для работы командыchkdsk.
- /l[:размер]
- Используйте только с файловой системой NTFS. Устанавливает указанный размер журнала. Если размер не указан, параметр /l выводит текущий размер.
- /?
- Отображение справки в командной строке.
Заметки
- Выполнение команды chkdsk
Чтобы выполнить команду chkdsk для жестких дисков, необходимо быть членом группы администраторов.
- Проверка заблокированных дисков при перезагрузке
Если требуется исправить ошибки на диске с помощью команды chkdsk, нельзя открывать файлы на этом диске. В противном случае выводится следующее сообщение о ошибке:
Невозможно выполнить команду Chkdsk, так как указанный том используется другим процессом. Следует ли выполнить проверку этого тома при следующей перезагрузке системы? [Y(да)/N(нет)]Если пользователь выберет эту возможность, команда chkdsk проверит диск и автоматически исправит ошибки при перезагрузке компьютера. Если проверяемый раздел диска является загрузочным, команда chkdskавтоматически перезагрузит компьютер после проверки этого диска.
- Отчет об ошибках
Команда chkdsk выполняет проверку дискового пространства и его использования для файловых систем таблица размещения файлов (FAT) и NTFS. Команда Chkdsk позволяет получить отчет о состоянии со сведениями по каждой файловой системе. Отчет о состоянии диска включает перечень найденных ошибок. Если команда chkdsk запущена без параметра /f в активном разделе, может быть получено сообщение о наличии серьезных ошибок, так как диск нельзя заблокировать. Для поиска ошибок командуchkdsk нужно запускать время от времени на каждом диске.
- Исправление ошибок
Если указан параметр командной строки /f, программа chkdsk исправляет ошибки на диске. При работе chkdsk должна обеспечиваться возможность блокирования диска для исправления ошибок. Поскольку при исправлении ошибок обычно изменяется таблица размещения файлов и иногда происходит потеря данных, программа chkdsk запрашивает подтверждение в следующем виде:
Потерянных кластеров: 10; цепочек: 3.Преобразовать потерянные цепочки кластеров в файлы [Y(да)/N(нет)]?Если ввести Y, Windows сохраняет каждую потерянную цепочку в корневом каталоге как файл с именем формата Filennnn.chk. После завершения выполнения chkdsk можно проверить эти файлы на наличие нужных сведений. Если ввести N, Windows исправляет ошибки на диске без сохранения данных из потерянных блоков.
Если параметр командной строки /f не используется, программа chkdskтолько выдает сообщение о наличие ошибок в файле, но не исправляет их.
Если команда chkdsk /f запущена на диске большого объема (например 70 Гб) или диск содержит большое количество файлов (например несколько миллионов), для завершения работы программы chkdsk может потребоваться очень много времени (возможно несколько дней). В течение всего этого времени компьютер будет недоступен для пользователей, так как chkdsk не возвращает управления до завершения работы.
- Проверка дисков с файловой системой FAT
Система Windows выводит отчет программы chkdsk о состоянии диска с файловой системой FAT в следующем формате:
Серийный номер тома: B1AF-AFBF72214528 байт всего на диске73728 байт в 3 скрытых файлах30720 байт в 12 каталогах11493376 байт в 386 пользовательских файлах61440 байт в поврежденных секторах60555264 байт доступно на диске2048 байт в каждом кластереВсего кластеров на диске: 35261.29568 кластеров на диске - Проверка дисков с файловой системой NTFS
Система Windows выводит отчет программы chkdsk о состоянии диска с файловой системой NTFS в следующем формате:
Тип файловой системы: NTFS.Проверка файлов...Проверка файлов завершена.Проверка индексов...Проверка индесков завершена.Проверка описателей защиты...Проверка описателей защиты завершена.12372 Кбайт всего на диске.3 Кбайт в 1 пользовательских файлах.2 КБ в 1 индексах.4217 КБ используется системой.8150 Кбайт свободно на диске.Размер кластера: 512 байт.Всего кластеров на диске: 24745.16301 кластеров на диске. - Использование chkdsk с открытыми файлами
Если указан параметр /f, команда chkdsk выводит сообщение об ошибке, если на диске найдены открытые файлы. Если же параметр /f не указан и на диске найдены открытые файлы, chkdsk может выводить сообщения о потерянных блоках на диске. Это произойдет в случае, когда открытые файлы еще не записаны в таблице размещения файлов. Если программа chkdsk сообщает о большом количестве потерянных блоков дискового пространства, должна быть рассмотрена возможность ремонта диска.
- Обнаружение физических ошибок диска
Используйте параметр командной строки /r для обнаружения физических ошибок диска в файловой системе. Для получения сведений о восстановлении физически поврежденных файлов с помощью команды recover щелкните ссылку.
- Отчет о поврежденных секторах диска
Испорченные сектора, о которых сообщает команда chkdsk, были маркированы при первом форматировании диска. Такие сектора не представляют опасности.
- Общие сведения о кодах завершения программы
В следующей таблице перечислены коды завершения, которые могут содержатся в отчете программы chkdsk после окончания ее выполнения.
Код выхода Описание 0 Не найдено ни одной ошибки. 1 Ошибки найдены и исправлены. 2 Была выполнена очистка диска, например удалены ненужные файлы, или очистка не была выполнена из-за отсутствия ключа /f. 3 Диск не может быть проверен, ошибки не могут быть исправлены или ошибки не были исправлены, так как не был задан ключ /f. - Команда chkdsk с другими параметрами доступна в консоли восстановления.
Примеры
Если требуется проверить диск в дисководе D и исправить все обнаруженные ошибки в Windows, введите следующую команду:
chkdsk d: /f
Если обнаружена ошибка, выполнение программы сhkdsk приостанавливается и выводятся соответствующие сообщения. По окончании выполнения команды chkdskна экран выводится отчет, содержащий сведения о текущем состоянии диска. До завершения работы chkdsk нельзя открывать какие-либо файлы на указанном диске.
Чтобы проверить фрагментацию всех файлов в текущем каталоге на диске с файловой системой FAT, введите следующую команду:
chkdsk *.*
Chkdsk выведет отчет о состоянии диска, а затем список фрагментированных файлов, удовлетворяющих шаблону команды.
| title | description | ms.topic | ms.assetid | author | ms.author | ms.date |
|---|---|---|---|---|---|---|
|
chkdsk |
Reference article for the chkdsk command, which checks the file system and file system metadata of a volume for logical and physical errors. |
reference |
62912a3c-d2cc-4ef6-9679-43709a286035 |
jasongerend |
alalve |
11/22/2022 |
Checks the file system and file system metadata of a volume for logical and physical errors. If used without parameters, chkdsk displays only the status of the volume and does not fix any errors. If used with the /f, /r, /x, or /b parameters, it fixes errors on the volume.
[!IMPORTANT]
Membership in the local Administrators group, or equivalent, is the minimum required to run chkdsk. To open a command prompt window as an administrator, right-click Command prompt in the Start menu, and then click Run as administrator.
[!IMPORTANT]
Interrupting chkdsk is not recommended. However, canceling or interrupting chkdsk should not leave the volume any more corrupt than it was before chkdsk was run. Running chkdsk again checks and should repair any remaining corruption on the volume.
[!NOTE]
Chkdsk can be used only for local disks. The command cannot be used with a local drive letter that has been redirected over the network.
Syntax
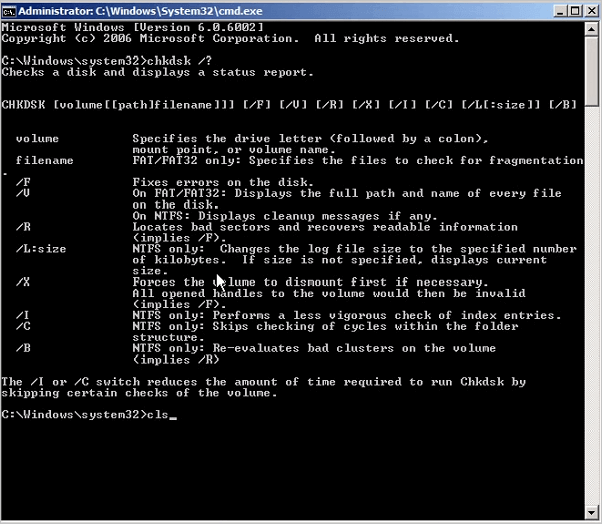
chkdsk [<volume>[[<path>]<filename>]] [/f] [/v] [/r] [/x] [/i] [/c] [/l[:<size>]] [/b]
Parameters
| Parameter | Description |
|---|---|
<volume> |
Specifies the drive letter (followed by a colon), mount point, or volume name. |
[ [<path>]<filename> |
Use with file allocation table (FAT) and FAT32 only. Specifies the location and name of a file or set of files that you want chkdsk to check for fragmentation. You can use the ? and * wildcard characters to specify multiple files. |
| /f | Fixes errors on the disk. The disk must be locked. If chkdsk cannot lock the drive, a message appears that asks you if you want to check the drive the next time you restart the computer. |
| /v | Displays the name of each file in every directory as the disk is checked. |
| /r | Locates bad sectors and recovers readable information. The disk must be locked. /r includes the functionality of /f, with the additional analysis of physical disk errors. |
| /x | Forces the volume to dismount first, if necessary. All open handles to the drive are invalidated. /x also includes the functionality of /f. |
| /i | Use with NTFS only. Performs a less vigorous check of index entries, which reduces the amount of time required to run chkdsk. |
| /c | Use with NTFS only. Does not check cycles within the folder structure, which reduces the amount of time required to run chkdsk. |
/l[:<size>] |
Use with NTFS only. Changes the log file size to the size you type. If you omit the size parameter, /l displays the current size. |
| /b | Use with NTFS only. Clears the list of bad clusters on the volume and rescans all allocated and free clusters for errors. /b includes the functionality of /r. Use this parameter after imaging a volume to a new hard disk drive. |
| /scan | Use with NTFS only. Runs an online scan on the volume. |
| /forceofflinefix | Use with NTFS only (must be used with /scan). Bypass all online repair; all defects found are queued for offline repair (for example, chkdsk /spotfix). |
| /perf | Use with NTFS only (must be used with /scan). Uses more system resources to complete a scan as fast as possible. This may have a negative performance impact on other tasks running on the system. |
| /spotfix | Use with NTFS only. Runs spot fixing on the volume. |
| /sdcleanup | Use with NTFS only. Garbage collect unneeded security descriptor data (implies /f). |
| /offlinescanandfix | Runs an offline scan and fix on the volume. |
| /freeorphanedchains | Use with FAT/FAT32/exFAT only. Frees any orphaned cluster chains instead of recovering their contents. |
| /markclean | Use with FAT/FAT32/exFAT only. Marks the volume clean if no corruption was detected, even if /f was not specified. |
| /? | Displays help at the command prompt. |
Remarks
-
The /i or /c switch reduces the amount of time required to run chkdsk by skipping certain volume checks.
-
If you want chkdsk to correct disk errors, you can’t have open files on the drive. If files are open, the following error message appears:
Chkdsk cannot run because the volume is in use by another process. Would you like to schedule this volume to be checked the next time the system restarts? (Y/N) -
If you choose to check the drive the next time you restart the computer, chkdsk checks the drive and corrects errors automatically when you restart the computer. If the drive partition is a boot partition, chkdsk automatically restarts the computer after it checks the drive.
-
You can also use the
chkntfs /ccommand to schedule the volume to be checked the next time the computer is restarted. Use thefsutil dirty setcommand to set the volume’s dirty bit (indicating corruption), so that Windows runs chkdsk when the computer is restarted. -
You should use chkdsk occasionally on FAT and NTFS file systems to check for disk errors. Chkdsk examines disk space and disk use and provides a status report specific to each file system. The status report shows errors found in the file system. If you run chkdsk without the /f parameter on an active partition, it might report spurious errors because it cannot lock the drive.
-
Chkdsk corrects logical disk errors only if you specify the /f parameter. Chkdsk must be able to lock the drive to correct errors.
Because repairs on FAT file systems usually change a disk’s file allocation table and sometimes cause a loss of data, chkdsk might display a confirmation message similar to the following:
10 lost allocation units found in 3 chains. Convert lost chains to files?-
If you press Y, Windows saves each lost chain in the root directory as a file with a name in the format File
<nnnn>.chk. When chkdsk finishes, you can check these files to see if they contain any data you need. -
If you press N, Windows fixes the disk, but it does not save the contents of the lost allocation units.
-
-
If you don’t use the /f parameter, chkdsk displays a message that the file needs to be fixed, but it does not fix any errors.
-
If you use
chkdsk /f*on a very large disk or a disk with a very large number of files (for example, millions of files),chkdsk /fmight take a long time to complete. -
Use the /r parameter to find physical disk errors in the file system and attempt to recover data from any affected disk sectors.
-
If you specify the /f parameter, chkdsk displays an error message if there are open files on the disk. If you do not specify the /f parameter and open files exist, chkdsk might report lost allocation units on the disk. This could happen if open files have not yet been recorded in the file allocation table. If chkdsk reports the loss of a large number of allocation units, consider repairing the disk.
-
Because the Shadow Copies for Shared Folders source volume cannot be locked while Shadow Copies for Shared Folders is enabled, running chkdsk against the source volume might report false errors or cause chkdsk to unexpectedly quit. You can, however, check shadow copies for errors by running chkdsk in Read-only mode (without parameters) to check the Shadow Copies for Shared Folders storage volume.
-
The chkdsk command, with different parameters, is available from the Recovery Console.
-
On servers that are infrequently restarted, you may want to use the chkntfs or the
fsutil dirty querycommands to determine whether the volume’s dirty bit is already set before running chkdsk.
Understanding exit codes
The following table lists the exit codes that chkdsk reports after it has finished.
| Exit code | Description |
|---|---|
| 0 | No errors were found. |
| 1 | Errors were found and fixed. |
| 2 | Performed disk cleanup (such as garbage collection) or did not perform cleanup because /f was not specified. |
| 3 | Could not check the disk, errors could not be fixed, or errors were not fixed because /f was not specified. |
Examples
To check the disk in drive D and have Windows fix errors, type:
If it encounters errors, chkdsk pauses and displays messages. Chkdsk finishes by displaying a report that lists the status of the disk. You cannot open any files on the specified drive until chkdsk finishes.
To check all files on a FAT disk in the current directory for noncontiguous blocks, type:
Chkdsk displays a status report, and then lists the files that match the file specifications that have noncontiguous blocks.
Viewing chkdsk logs
There are two methods that can be used to retrieve chkdsk log file(s) in Windows. View the methods described below:
Event Viewer
To view logs with Event Viewer, navigate to the following:
-
Start > Control Panel > Administrative Tools > Event Viewer.
Alternatively, press Win + R keys to bring up the run dialog box, type eventvwr.msc, and select OK.
-
Expand Windows Logs > right-click on Application > select Filter Current Log.
-
Within the Filter Current Log window, navigate to Event sources drop-down menu, select Chkdsk and Wininit.
-
Click OK to finish filtering for these two sources.
PowerShell
There are two source types when retrieving logs in PowerShell, chkdsk and wininit. Run one of the two commands in PowerShell to view the most current chkdsk log:
get-winevent -FilterHashTable @{logname="Application"} | ?{$_.providername -match "chkdsk"} | fl timecreated, message
get-winevent -FilterHashTable @{logname="Application"} | ?{$_.providername -match "wininit"} | fl timecreated, message
To export the log to a specific location, the following can be added to the end of the command | out-file "$env:userprofilelocationfilename.txt". Example:
get-winevent -FilterHashTable @{logname="Application"} | ?{$_.providername -match "chkdsk"} | fl timecreated, message | out-file "C:UsersAdministratorDesktopChkdsk_Log.txt"
get-winevent -FilterHashTable @{logname="Application"} | ?{$_.providername -match "wininit"} | fl timecreated, message | out-file "C:UsersAdministratorDesktopWininit_Log.txt"
Related links
- Command-Line Syntax Key
Команда CHKDSK предназначена для проверки и устранения логических ошибок на жестком диске. Ниже мы рассмотрим особенности её работы и другие функции утилиты.
![]()
Содержание
- Проверка жесткого диска в работающей Windows
- Проверка диска из командной строки
- Команды для работы с CHKDSK в командной строке
- Восстановление информации с проблемного жесткого диска
Команда CHKDSK является встроенной утилитой, основная функция которой заключается в проверке и исправлении ошибок жесткого диска. Помимо этого, при помощи CHKDSK можно быстро находить и исправлять поврежденные сектора, а также ошибки в файловой системе накопителя.
Таким образом, CHKDSK – важная утилита, позволяющая продлить строк службы жесткого диска, а также увеличить скорость его работы, поэтому абсолютно каждый пользователь ОС Windows должен уметь пользоваться и проверять свои носители встроенными средствами. Ниже будет представлено несколько способов проверки дисков из работающей ОС и командной строки.
Проверка жесткого диска в работающей Windows
Для проверки логических разделов жесткого диска при помощи CHKDSK в работающей Windows необходимо:
Шаг 1. Открыть каталог «Этот компьютер», нажать правой кнопкой мыши по необходимому логическому разделу и выбрать пункт «Свойства».

Шаг 2. В открывшемся окне перейти во вкладку «Сервис» и выбрать пункт «Проверить».

Шаг 3. Подтверждаем проверку диска и после ее завершения нажимаем по кнопке «Показать подробности».

Шаг 4. Вся информация и результаты проверки диска будут доступны в графе «Сведения».

Проверка диска из командной строки
В некоторых ситуациях пользователю может понадобиться запуск утилиты CHKDSK из командной строки. Такая возможность позволит проверить и восстановить диск в том случае, если система не запускается и графический интерфейс Windows остается недоступным.
Чтобы запустить командную строку из среды восстановления ОС, необходимо:
Шаг 1. Воспользоваться установочным диском или загрузочной флешкой Windows и после окна выбора языка нажать по пункту «Восстановление системы». Перейдя в среду восстановления, следует нажать по пункту «Поиск и устранение неисправностей».

Шаг 2. На следующем окне следует выбрать пункт «Дополнительные параметры», после чего можно обнаружить кнопку «Командная строка».

Также всегда остается возможность запустить утилиту проверки дисков через командную строку из работающей системы. Важно! Для использования полного потенциала CHKDSK следует производить запуск командной строки только с правами администратора. В ином случае утилита CHKDSK проведет проверку без устранения выявленных неполадок.
Запустить командную строку или Windows PowerShell от имени администратора можно, нажав правой кнопкой мыши по кнопке «Пуск» и выбрав пункт «Командная строка(администратор)».

Команды для работы с CHKDSK в командной строке
Находясь в командной строке, можно провести быструю проверку жесткого диска (аналогичная проверка была описана в начале) без перезагрузки системы. Для этого достаточно ввести команду «CHKDSK» и подтвердить действие кнопкой Enter.

Для проверки диска и исправления логических ошибок на нем необходимо воспользоваться командой «chkdsk C: /F /R», где С – имя необходимого диска.

Для подтверждения проверки диска после перезагрузки необходимо нажать клавишу «Y».
Помимо полного анализа и по возможности исправления поврежденных секторов, утилита может выполнять проверку и решение ошибок только файловой системы. Для этого следует воспользоваться командой «chkdsk C: /F» и подтвердить действие «Y».

С полным списком и описанием возможностей утилиты можно ознакомится, введя команду «chkdsk /?».

Стоит отметить, что проблемы с диском могут быть вызваны не только программными ошибками, но и физическим износом, механическими повреждениями поверхности и другими факторами, которые невозможно исправить при помощи встроенной утилиты CHKDSK.
Чтобы получить полную картину о состоянии носителя, можно воспользоваться бесплатной программой для проверки дисков Victoria. Узнать о том, как пользоваться, исправлять и проводить диагностику HDD с помощью Victoria Вы сможете в статье: «Используем программу Victoria для тестирования и исправления жесткого диска»
Восстановление информации с проблемного жесткого диска
Проблемы с жестким диском – всегда большая угроза для важной информации и документов, хранящихся на компьютере. Чтобы быть готовым к любым обстоятельствам, рекомендуем всегда иметь под рукой специальную программу для эффективного восстановления файлов RS Partition Recovery. Данная утилита поможет восстановить всю утерянную информацию даже в самых сложных случаях.

При помощи RS Partition Recovery можно восстанавливать:
- Случайно удаленные файлы и документы.
- Отформатированные фотографии и медиафайлы.
- Данные, удаленные вирусами.
- Информацию, которая была утеряна при изменении файловой системы и структуры диска.
Часто задаваемые вопросы
CHKDSK это системная утилита, которая предназначена для работы с дисками. CHKDSK не имеет графического интерфейса. Все команды выполняются в командной строке или Windows PowerShell.
Запустите режим Windows Recovery и выберите «Командная строка». Затем выполните командe: «chkdsk C: /F /R». Если нужно просканировать и исправить ошибки на любом другом диске — замените букву «С» на букву вашего диска.
В таких случаях лучше сразу же использовать RS Partition Recovery. Программа создана как раз для таких ситуаций и успешно восстанавливает данные в 99% случаев.
К сожалению нет. CHKDSK занимается поиском и исправлением логических ошибок на диске, в то время как ошибка RAW – это ошибка файловой системы. В таком случае лучше всего восстановить важные данные при помощи RS Partition Recovery, а затем отформатировать диск.
В поиске Windows впишите «Windows Event Viewer» и в открывшейся программе перейдите в Windows Logs -> Application. Затем щелкните правой кнопкой мыши и выберите «Найти». Введите «chkdsk» и нажмите «Enter». В открывшихся результатах поиска найдите последнее событие с Event ID 1001 и источником Wininit. Затем откройте вкладку «General». Там вы найдете подробный лог сканирования накопителя.
CHKDSK is a Windows utility that can check the integrity of your hard disk and can fix various file system errors.
CHKDSK (or chkdsk.exe) is short for “check disk”.
It’s recommended to use this utility when your computer shows various boot errors. The check disk utility can be run if you need a fix for the following errors:
- 0x00000024
- Various blue screen of death errors
- NTDETECT failed
- Fatal error reading boot.ini
- NTOSKRNL.EXE is missing or corrupt
- 0x0000007B
- 0xc0000001 on a Windows Vista computer
- 0xc000014C on a Windows 8 computer
- and others
The check disk utility can repair problems such as:
- bad sectors
- lost clusters
- cross-linked files
- directory errors
Screenshots
The check disk tool can be run via Command Prompt or, if you can boot into Windows from My Computer > Properties > Tools depending on the Windows version you installed on your PC.
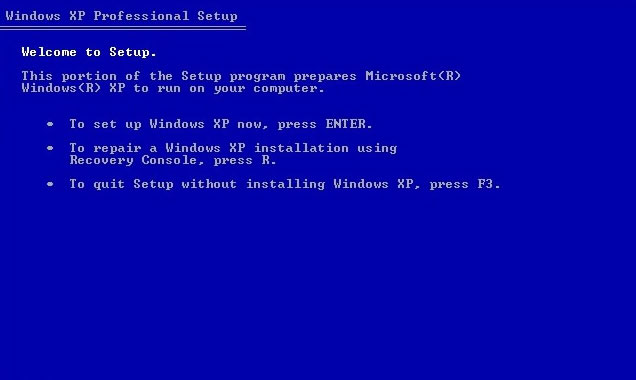
The command line tool can be ran on a Windows XP computer from within the Windows XP Recovery Console:
The utility from within Windows XP, from My Computer and not Command Prompt:
This is how you start a scan with the disk utility if you can boot into Windows Vista:
How to run CHKDSK in Windows
This utility is available for Windows XP, Windows Vista, Windows 7 and Windows 8 or 8.1.
If you can boot into Windows, you can run the check disk utility on each hard drive or partition you have available in My Computer.
If you can’t boot the operating system, you can run the tool from Command Prompt either by booting your computer into the Recovery Mode or by using the original installation disc to run Command Prompt.
CHKDSK in Windows XP
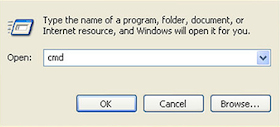
If you can boot into Windows XP, you can run the utility either from the Command Prompt or from My Computer.
From Command Prompt
If you can’t boot into Windows XP to run chkdsk, download Easy Recovery Essentials – our recovery disk for Windows XP – and run Automated Repair or Command Prompt directly. You can burn EasyRE on CDs, DVDs or USBs.
To run the utility from the Command Prompt, follow these steps:
- Boot your computer
- Go to Start
- Click Run
- Type
cmdin the box:

- Press Enter
- You can now type
chkdskto open the utility in a read-only mode

- Press Enter
- To repair errors, follow these instructions:
- To repair errors without scanning for any bad sectors, type
chkdsk volume: /fand press Enter, wherevolumeis the letter of the drive you’d like to run a scan for, e.g.C:orD:
Example of a command you need to type if your volume isC:chkdsk C: /f
- To repair errors and scan for bad sectors, type
chkdsk volume: /rand press Enter, where volume is the letter of the drive you’d like to repair, e.g.C:orD:
Example of command you need to type if the volume you want to scan isD:chkdsk D: /r
- To repair errors without scanning for any bad sectors, type

From My Computer
If you can’t boot into Windows XP to run chkdsk, download Easy Recovery Essentials – our recovery disk for Windows XP – and run Automated Repair or Command Prompt directly. You can burn EasyRE on CDs, DVDs or USBs.
To run CHKDSK from within Windows XP, but without Command Prompt, follow these steps:
- Boot your computer
- Go to on My Computer (double-click on the icon)
- Right-click on the hard disk you’d like to run the utility on
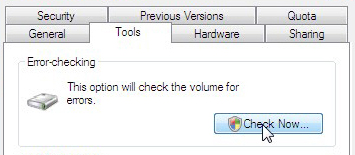
- Click Properties
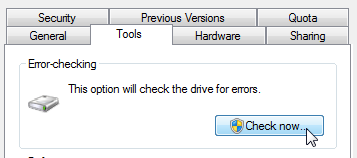
- Click Tools
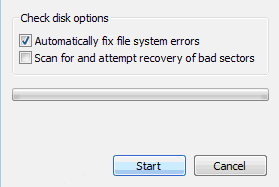
- At the Error-checking tab, select Check Now

- To run the utility in the read-only mode, simply click Start
- To repair errors, follow these instructions:
- To repair errors without scanning for bad sectors, select the Automatically fix file system errors box and click Start
- To repair errors and scan for bad sectors, select the Scan for and attempt recovery of bad sectors box and click Start
- Once finished, the utility will notify you if the scan reported errors (Errors were found and fixed.) or not (No errors were found.)

From the installation disc
If you don’t have the installation disc to run chkdsk, download Easy Recovery Essentials – our recovery disk for Windows XP – and run Automated Repair or Command Prompt directly. You can burn EasyRE on CDs, DVDs or USBs.
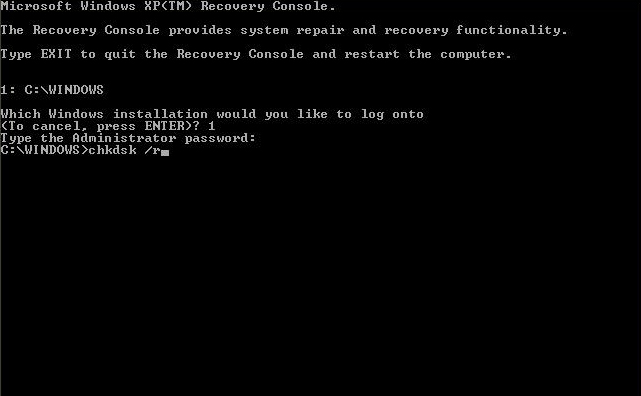
If you can’t boot into Windows XP to run the utility use your original Microsoft Windows XP installation disc to open Recovery Console.
To do so, follow these steps:
- Insert the installation CD in the disk tray
- Restart your computer to boot from the CD
- At the “Press any key” message, press any key to make sure you boot from the CD
- At the Windows Options menu, press R to open Recovery Console

- Enter the Administrator password
- When Command Prompt appears on your screen, type the command you need:
chkdsk C: /r
where
C:is the letter of the drive where Windows is installed and the/rparameter will try to repair errors and scan for bad sectors.
CHKDSK in Windows Vista
To run this utility on Windows Vista computer, you can choose any of the following methods:
- From Command Prompt, if you can boot into Windows Vista
- From My Computer
- From the Recovery Console of your original installation
disk
From Command Prompt
If you can’t boot into Windows Vista to run chkdsk, download Easy Recovery Essentials – our recovery disk for Windows Vista – and run Automated Repair or Command Prompt directly. You can burn EasyRE on CDs, DVDs or USBs.
If you can boot into your operating system, run Command Prompt:
- Open Windows Vista
- Go to Start > All Programs > Accessories > Command Prompt or in the search box type
Command Promptand double-click the Command Prompt item available in the search results list.

- When Command Prompt launches, type the command:
chkdsk C: /r
- If Windows Vista is installed on another drive that’s not labeled as
C:, replaceC:with the letter of your hard disk:chkdsk D: /r
- Press Enter
If Command Prompt shows errors, try to run the command again until it shows no errors.
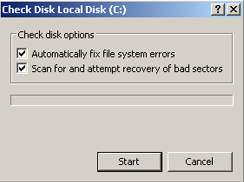
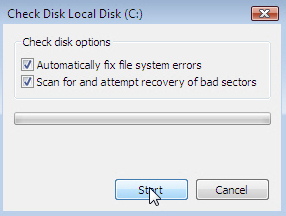
From My Computer
If you can’t boot into Windows Vista to run chkdsk, download Easy Recovery Essentials – our recovery disk for Windows Vista – and run Automated Repair or Command Prompt directly. You can burn EasyRE on CDs, DVDs or USBs.
You can also run the utility by going to Computer (My Computer):
- Click the Start button
- Go to Computer
- Right-click on the drive you want check
- Click Properties
- At the Tools tab, under the Error-checking section, click Check Now

- If prompted, enter the Administrator password
- You can now run the disk check tool:
- To automatically repair errors, select Automatically fix file system errors

- To perform a thorough check, select Scan for and attempt recovery of bad sectors
- You can also check both Automatically fix file system errors and Scan for and attempt recovery of bad sectors
- To automatically repair errors, select Automatically fix file system errors
- Click Start
Don’t use the computer until the disk check is done. It may take several minutes depending on the hard disk size.
From the installation disc
If you don’t have the installation disc to run chkdsk, download Easy Recovery Essentials – our recovery disk for Windows Vista – and run Automated Repair or Command Prompt directly. You can burn EasyRE on CDs, DVDs or USBs.
If you can’t boot into Windows Vista, use the original installation disc to open Command Prompt (the Recovery Console) and run the commands you need:
- Insert the install disc and restart your computer
- Press any key when the message appear to boot from the disk
- Click Repair your computer
- Select Command Prompt
- Enter the Administrator password, if prompted
- When Command Prompt appears, type the command:
chkdsk c: /r
where
C:is your hard disk drive’s letter (can be different fromC:used here). - Press Enter


CHKDSK in Windows 7
The steps to run this utility in Windows 7 are similar to those of Windows Vista.
From Command Prompt
If you can’t boot into Windows 7 to run chkdsk, download Easy Recovery Essentials – our recovery disk for Windows 7 – and run Automated Repair or Command Prompt directly. You can burn EasyRE on CDs, DVDs or USBs.
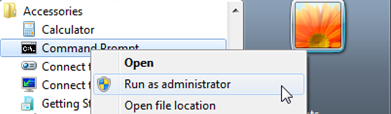
If you can boot into Windows 7, run the utility from Command Prompt directly:
- Click Start
- Type
cmdat the Search program and files search box - Right-click on cmd.exe
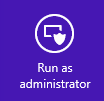
- Click Run as Administrator

- Type in your Administrator password
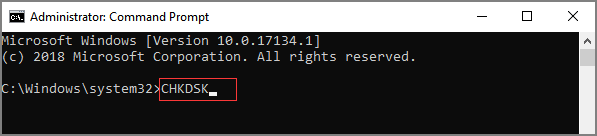
- When cmd.exe opens, type the command:
chkdsk
- Press Enter
- You can run the tool with more parameters, like this:
chkdsk c: /r
This will check the drive for errors and will automatically try to fix any found errors.
- If you receive the “Chkdsk cannot run because the volume is in use by another process.” message, type
Yto restart the computer and let the utility to run a scan at the next boot of your PC - After you typed
Y, close the Command Prompt - Restart the computer by going to Start > Shutdown > Restart
- At the next boot, the check disk utility will automatically run a scan

From My Computer
If you can’t boot into Windows 7 to run chkdsk, download Easy Recovery Essentials – our recovery disk for Windows 7 – and run Automated Repair or Command Prompt directly. You can burn EasyRE on CDs, DVDs or USBs.
The check disk utility can also be ran from My Computer to check for errors on your hard disk.
To do so, follow these instructions:
- Right-click on the Start icon
- Click Open Windows Explorer
- On the left side of the window, click Computer
- At the Hard Disk Drives section, right-click on the volume you want to check for errors
- Click Properties
- Go to the Tools Tab
- At the Error-checking section click Check now

- You can now run the check disk utility: select Scan for and attempt recovery of bad sectors to let the utility attempt to repair any hard drive errors found
- Click Start
If the volume you want to check is in use, e.g. C:/ where Windows Vista is installed, you may receive the following error message:
Windows can't check the disk while it's in use

 Do you want to check for hard disk errors the next time you start your computer?

 Schedule disk check | Cancel
If so, follow these steps:
- Click Schedule disk check
- Exit any open programs
- Restart your computer
- Your computer will now restart and automatically boot and the utility will perform a scan automatically
If you receive the “Do you want to dismount this volume first?” message, follow the steps below. This message appears if the volume you want to checked is locked, even if it’s not in use (e.g. the C:/ drive):
Windows can't check the disk while it's in use

 Do you want to dismount this volume first? Note: All opened handles to this volume will become invalid.

 Force a dismount | Cancel
If so, follow these steps:
- Click Force a dismount
- A scan will automatically start now
From the installation disc
If you don’t have the installation disc to run chkdsk, download Easy Recovery Essentials – our recovery disk for Windows 7 – and run Automated Repair or Command Prompt directly. You can burn EasyRE on CDs, DVDs or USBs.
Follow these steps:
- Insert the original Windows disc
- Restart your PC and boot from the disc
- Click Repair your computer
- Choose the operating system from the list
- Click Next
- Choose Command Prompt
- When it opens, type the command:
chkdsk C: /f /r
- Press Enter


CHKDSK in Windows 8 or 8.1
Windows 8 or 8.1 users can run this utility by choosing any of the following methods:
- From Command Prompt
- From My Computer
- From installation disc
From Command Prompt
If you can’t boot into Windows 8/8.1 to run chkdsk, download Easy Recovery Essentials – our recovery disk for Windows 8/8.1 – and run Automated Repair or Command Prompt directly. You can burn EasyRE on CDs, DVDs or USBs.
To run it from Command Prompt, here are the instructions:
- Log into Windows 8/8.1
- Press the and C key to open the Charm bar
- Select Search
- Type-in
cmd - Right-click on Command Prompt from the search results list

- Click Run as administrator

- Log in as an Administrator
- When Command Prompt launches, type the command:
chkdsk C: /f /r /x
The parameters for this command are:
/foption will attempt to fix any found errors/roption will locate for bad sectors and recovery any readable information/xoption will force the volume you’re about to check to be dismounted before the utility begins a scan If theC:drive is in use, typeYto run a scan at your PC’s next restart. If so, exit Command Prompt and restart the computer.

From My Computer
If you can’t boot into Windows 8/8.1 to run chkdsk, download Easy Recovery Essentials – our recovery disk for Windows 8/8.1 – and run Automated Repair or Command Prompt directly. You can burn EasyRE on CDs, DVDs or USBs.
To run the check disk utility from Computer (My Computer), follow these steps:
- Boot into Windows 8/8.1
- Double-click on Computer (My Computer) to open it
- Select the drive you want to run a check on, e.g.
C: - Right-click on the drive
- Click Properties
- Go to the Tools tab
- Select Check, at the Error checking section
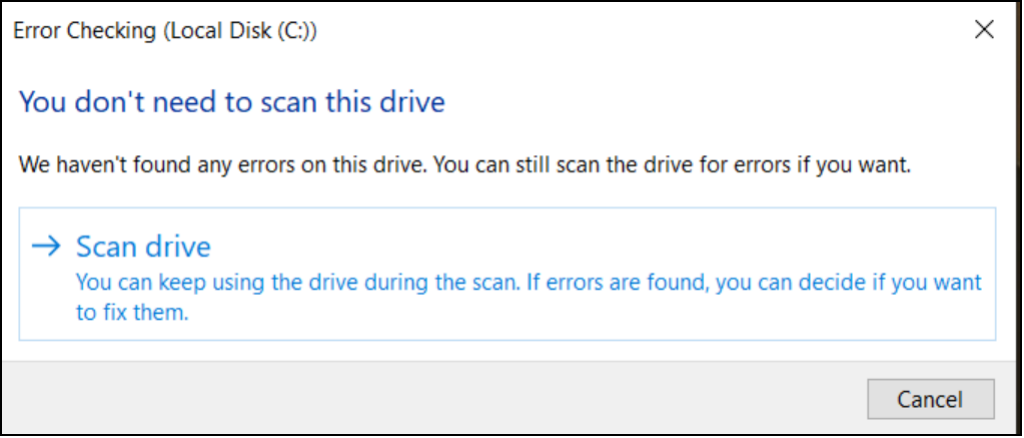
- If you receive the following message, click Scan drive to begin the scan:
You don't need to scan this drive We haven't found any errors on this drive. You can still scan the drive for errors if you want. Scan Drive
- You can keep using the drive during the scan. If errors are found, you can decide if you want to fix them. Depending on the results of this scan, the utility will report the results:
If no errors were found, you’ll see this message:
Your drive was successfully scanned Windows successfully scanned the drive. No errors were found.
If errors were found, you’ll see this message instead:
Restart your computer to repair file system. You can restart right away or schedule the error fixing on next restart.
From the installation disc
If you don’t have the installation disc to run chkdsk, download Easy Recovery Essentials – our recovery disk for Windows 8/8.1 – and run Automated Repair or Command Prompt directly. You can burn EasyRE on CDs, DVDs or USBs.
If you can’t boot into Windows 8/8.1 to run Command Prompt, you can use the original Windows 8/8.1 installation disc to run Command Prompt from there.
To do so, follow these instructions:
- Insert the installation disc
- Restart your computer
- Press any key to boot from the disc, at the “Press any key to boot from CD or DVD…” message
- Choose your keyboard layout
- Select your language, time and a keyboard method
- Click Next
- Click Repair your computer

- At the Choose an option screen, click Troubleshoot
- At the Troubleshoot screen, click Advanced options
- At the Advanced options screen, click Command Prompt
- When Command Prompt launches, type the command:
chkdsk C: /f /x /r
- Press Enter

CHKDSK in Windows 10
Windows 10 users can run this utility by choosing any of the following methods:
- From Command Prompt
- From My Computer
- From installation disc
From Command Prompt
If you can’t boot into Windows 10 to run chkdsk, download Easy Recovery Essentials – our recovery disk for Windows 10 – and run Automated Repair or Command Prompt directly. You can burn EasyRE on CDs, DVDs or USBs.
To run it from Command Prompt, here are the instructions:
- Log into Windows 10
- Press the key to open the Start Menu
- Select Search
- Type-in
cmd - Right-click on Command Prompt from the search results list

- Click Run as administrator
- Log in as an Administrator
- When Command Prompt launches, type the command:
chkdsk C: /f /r /x
The parameters for this command are:
/foption will attempt to fix any found errors/roption will locate for bad sectors and recovery any readable information/xoption will force the volume you’re about to check to be dismounted before the utility begins a scan If theC:drive is in use, typeYto run a scan at your PC’s next restart. If so, exit Command Prompt and restart the computer.

From My Computer
If you can’t boot into Windows 10 to run chkdsk, download Easy Recovery Essentials – our recovery disk for Windows 10 – and run Automated Repair or Command Prompt directly. You can burn EasyRE on CDs, DVDs or USBs.
To run the check disk utility from Computer (My Computer), follow these steps:
- Boot into Windows 10
- Double-click on Computer (My Computer) to open it
- Select the drive you want to run a check on, e.g.
C: - Right-click on the drive
- Click Properties
- Go to the Tools tab
- Select Check, at the Error checking section
- If you receive the following message, click Scan drive to begin the scan:
You don't need to scan this drive We haven't found any errors on this drive. You can still scan the drive for errors if you want. Scan Drive
- You can keep using the drive during the scan. If errors are found, you can decide if you want to fix them. Depending on the results of this scan, the utility will report the results:
If no errors were found, you’ll see this message:
Your drive was successfully scanned Windows successfully scanned the drive. No errors were found.
If errors were found, you’ll see this message instead:
Restart your computer to repair file system. You can restart right away or schedule the error fixing on next restart.
From the installation disc
If you don’t have the installation disc to run chkdsk, download Easy Recovery Essentials – our recovery disk for Windows 10 – and run Automated Repair or Command Prompt directly. You can burn EasyRE on CDs, DVDs or USBs.
If you can’t boot into Windows 10 to run Command Prompt, you can use the original Windows 10 installation disc to run Command Prompt from there.
To do so, follow these instructions:
- Insert the installation disc
- Restart your computer
- Press any key to boot from the disc, at the “Press any key to boot from CD or DVD…” message
- Choose your keyboard layout
- Select your language, time and a keyboard method
- Click Next
- Click Repair your computer

- At the Choose an option screen, click Troubleshoot


Commands and parameters
The check disk utility has several parameters that you can use:
/c – applicable to a NTFS volume only
/f – this option fixes errors on a volume
/i – applicable to a NTFS volume only. This option performs a check of index entries
/r – this option also implies the /f and /p option. This option locates the bad sectors of your hard drive and recovers any readable information
Depending if you run the utility from Command Prompt or Recovery Console, the following parameters are different:
/p – this fixes any errors on a volume. In your standard Command Prompt /p is only read-only
The mandatory requirement of this utility is the volume you’re about to check must not be locked. If a volume you’re about to scan is locked, you’ll receive this message:
Chkdsk cannot run because the volume is in use by another process. Would you like to schedule this volume to be checked
 the next time the system restarts? (Y/N)
If so, type Y and press Enter to perform a scan at the next boot of your system.
Download chkdsk
chkdsk can’t be downloaded as it’s a command available with Windows. You can use the original installation disc to run the utility tool.
You can download Easy Recovery Essentials and open Command Prompt to run specific chkdsk commands:
You can burn Easy Recovery Essentials to CDs, DVDs or USBs and run Command Prompt.
- Download Easy Recovery Essentials
- Burn the ISO Image. Follow our instructions on how to burn a bootable ISO image. If you’d like to have a recovery USB instead, follow our instructions on how to make a recovery USB.
- Boot into the recovery media
- Select Launch Command Line

Troubleshooting
Cannot continue in read-only mode
If you receive the “Errors found. CHKDSK cannot continue in read-only mode.” error message after running a check disk command, make sure you run the command with the /r parameter:
chkdsk /f
If the disk check utility must be ran on another volume, update the command with the letter of the drive you want to run a scan for:
chkdsk D: /f
Cannot run because the volume is in the use by another process
If you receive this error message when running the tool:
Chkdsk cannot run because the volume is in the use by another process. Would you like to schedule this volume to be checked the next time the system restarts.
You need to type Y to make sure the utility runs at the next boot. If so, type Y, restart the computer and let the tool to perform the scan.
Cannot lock current drive
If the check disk utility shows the “Cannot lock current drive.” error message, make sure the command you’re performing has the /r option:
chkdsk /r
If this doesn’t work, try disabling System Restore for the entire session you’re trying to run a scan and other protection software, such as: antivirus, firewall, spyware etc.
Another alternative command is:
chkdsk C: /f /r /x
stop chkdsk on every boot
If the utility runs a scan at every boot without stopping, you can try a few solutions.
Before you follow the instructions below, make sure you let the scan to be 100% completed and then restart your computer.
If the check disk runs again, even if the previous scan was 100% complete, continue with the steps below.
Fix #1: Check if there is a scheduled scan. To do so, follow these steps:
- Open Command Prompt
- Type
chkntfs c:, wherec:is the letter of the drive you ran a check - Press Enter
- If the message is the following, then a check scan is scheduled on the c: drive:
The type of file system is NTFS. Chkdsk has been scheduled manually to run on next reboot on volume C:.
- If there isn’t any scheduled scan, the message will be:
The type of the file system is NTFS. C: is not dirty.
- To cancel a scheduled scan, type:
chkntfs /x c:
Fix #2: Another option to fix this issue is to open the Registry Editor:
- Boot into Windows
- Open the Registry Editor
- Go to this key:
HKEY_LOCAL_MACHINESYSTEMCurrentControlSetControlSession Manager
- At the BootExecute key, check the value.If the value is
autocheck autochk * /., you need to change it toautocheck autochk *
chkdsk won’t finish
If the utility won’t finish a scan, make sure you run the command with the /r parameter, like this:
chkdsk /r
chkdsk won’t run at startup
If the check disk won’t run a scan at startup after being scheduled to do so, follow any of the following fixes.
Fix #1: Check the BootExecute key in the Registry Editor:
- Open Registry Editor
- Find this key:
HKEY_LOCAL_MACHINESYSTEMCurrentControlSetControlSession Manager key
- Check the value for the BootExecute key.If the value is
autocheck autochk * /., you need to change it toautocheck autochk *
Fix #2: Run sfc
You can also run the sfc /scannow command and then run chkdsk /r again:
- Open Command Prompt
- Type the command:
sfc /scannow
- Press Enter
- After the sfc process is complete, run the check disk utility.
More Information
Support Links
- Easy Recovery Essentials for Windows – our repair and recovery disk.
It’s an easy-to-use and automated diagnostics disk. It’s available for Windows 8, Windows 7 and Windows Vista. It’s also available for Windows XP and Windows Server.
Read more at Windows Recovery Disks.
- The NeoSmart Support Forums, member-to-member technical support and troubleshooting.
- Get a discounted price on replacement setup and installation discs: Windows XP, Windows Vista, Windows 7, Windows 8, Windows 10, Windows 11, Windows Server 2022.
Applicable Systems
This Windows-related knowledgebase article applies to the following operating systems:
- Windows XP (all editions)
- Windows Vista (all editions)
- Windows 7 (all editions)
- Windows 8 (all editions)
- Windows 8.1 (all editions)
- Windows 10 (all editions)
- Windows 11 (all editions)
- Windows Server 2003 (all editions)
- Windows Server 2008 (all editions)
- Windows Server 2012 (all editions)
- Windows Server 2016 (all editions)
- Windows Server 2019 (all editions)
- Windows Server 2022 (all editions)
Propose an edit
What does CHKDSK /F /R do? How to use CHKDSK to repair the hard drive errors on Windows 10/8/7? Here is the full guide.
| Workable Solutions | Step-by-step Troubleshooting |
|---|---|
| What is CHKDSK command | CHKDSK (Check Disk Utility) can be used to check and fix any errors on the targeted disk. You can run it from the Command Prompt/PowerShell…Full steps |
| What does CHKDSK /F /R /X mean | CHKDSK /F can fix disk errors. CHKDSK /R does the same thing as CHKDSK /F only it also checks for bad sectors on the disk and recovers any readable information…Full steps |
| CHKDSK Alternative — Run a partition tool to fix disk error (1 Step) | Download EaseUS partition tool for free and use it to check and repair the corrupted file systems with clicks. No need to type commands manually…Full steps |
| Use CHKDSK manually | Run CHKDSK /F /R /X from the Command Prompt/Power shell or via the Properties window…Full steps |
What Is CHKDSK Command
In computing, CHKDSK (short for «check disk») is a system tool and command in DOS, Digital Research FlexOS, IBM/Toshiba 4690 OS, IBM OS/2, Microsoft Windows and related operating systems. It verifies the file system integrity of a volume and attempts to fix logical file system errors. — explained by Wikipedia
CHKDSK, also known as Microsoft Check Disk, is a utility that can be used in almost all Windows versions. The CHKDSK command is used to scan through your entire hard drive to find and fix any errors. For example, when your computer freezes, you cannot access a certain disk due to a corrupted file system, then you can use the CHKDSK commands to check and fix the drive errors.
What Does CHKDSK /F /R /X Command Mean
What is CHKDSK /F /R /X? The primary function of CHKDSK /F /R /X is to scan the integrity of the file system and file system metadata on a disk volume and fix any logical file system errors that it finds. Besides, CHKDSK also can be used for detecting bad sectors on the target disk that occur because of physical damage. Then, it automatically fixes these errors as well.
CHKDSK /F VS CHKDSK /R VS CHKDSK /X, What’s The Difference
CHKDSK can fix two types of disk errors: logical errors and physical errors. Based on the disk error types, you can use the different CHKDSK commands and switches to fix hard drive errors. CHKDSK /F, CHKDSK /R, and CHKDSK /X are the most commonly used CHKDSK commands. What is the difference between CHKDSK /F /R and /X?
- CHKDSK /F: Check for disk errors, not bad sectors.
- CHKDSK /R: Locate the bad sectors on the target hard disk and try to recover the readable information from the bad sectors (implies /F).
- CHKDSK /X: Forces the volume to dismount first, if necessary. It also includes the functionality of /f.
When to use chkdsk /f, chkdsk /r, and chkdsk/x? You want to see existing errors, use CHKDSK /f command, you want recover readable information from back sectors, use CHKDSK /R, and dismount problematic disk, use CHKDSK /X.
If you feel like the provided information about CHKDSK, and it did help you have a better undersanding CHKDSK command lines, please share this guide to help more people around you!
What Does Each CHKDSK Parameter Means? Here Are the
The syntax of the CHKDSK command is:
chkdsk volume /f /v /r /x /i /c
If used without parameters, CHKDSK displays only the volume’s status and does not fix any errors. If used with the /f, /r, /x, or /b parameters, it fixes errors on the volume. What do the parameters ( /f /r /x… ) mean? Here are some common CHKDSK parameters and their meanings:
| Parameters | Details of the Parameters |
|---|---|
| /f | Fixes errors on the disk. The disk must be locked. If CHKDSK cannot lock the drive, a message appears that asks you if you want to check the drive the next time you restart the computer. |
| /r | Locates bad sectors and recovers readable information. The disk must be locked. It includes the functionality of /f, with the additional analysis of physical disk errors. |
| /x | Forces the volume to dismount first, if necessary. All open handles to the drive are invalidated. It also includes the functionality of /f. |
| /b | NTFS only. It clears the list of bad clusters on the volume and rescans all allocated and free clusters for errors. It includes the functionality of /r. Use this parameter after imaging a volume to a new hard disk drive. |
| /v | Displays the name of each file in every directory as the disk is checked. |
| /scan | NTFS only. It runs an online scan on the volume. |
| /i | NTFS only. It performs a less vigorous check of index entries, which reduces the amount of time required to run CHKDSK. |
| /c | NTFS only. It does not check cycles within the folder structure, which reduces the amount of time required to run CHKDSK. |
Run CHKDSK /F /R /X Alternative Tool to Fix and Repair Disk Errors
If you are not so tech-savvy and know little about computers, we highly recommend you try a professional CHKDSK /f /r /x alternative tool — EaseUS Partition Master to fix hard drive errors efficiently. It perfectly replaces CMD as reliable disk management tool and releases you from typing the commands manually.
EaseUS partition tool makes it effortless to repair disk errors. Follow the steps to check and repair your file system error:
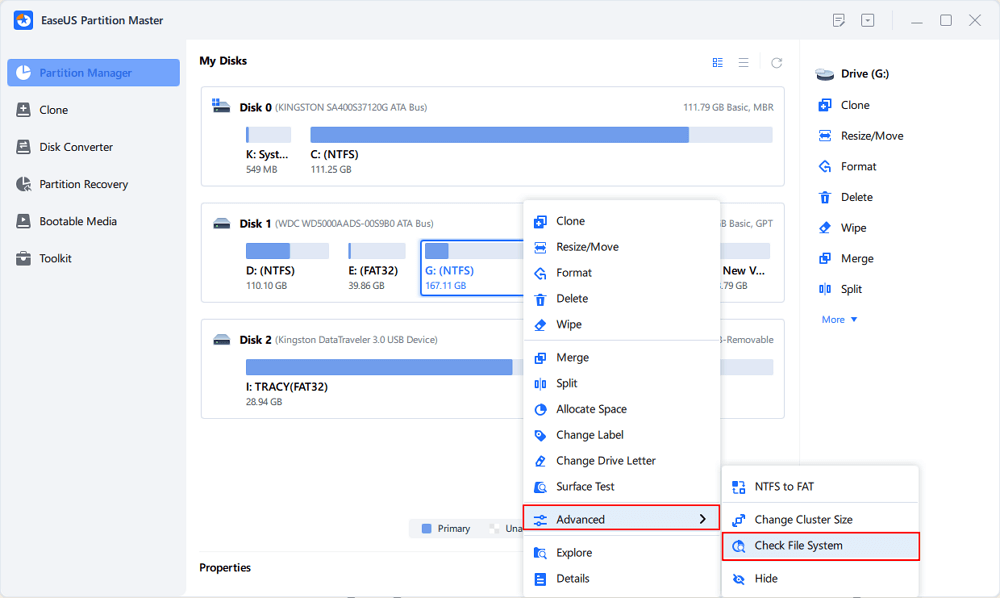
Step 1. Open EaseUS Partition Master on your computer. Then, locate the disk, right-click the partition you want to check, and choose «Advanced» > «Check File System».
| Parameters | Details of the Parameters |
|---|---|
| /f | Fixes errors on the disk. The disk must be locked. If CHKDSK cannot lock the drive, a message appears that asks you if you want to check the drive the next time you restart the computer. |
| /r | Locates bad sectors and recovers readable information. The disk must be locked. It includes the functionality of /f, with the additional analysis of physical disk errors. |
| /x | Forces the volume to dismount first, if necessary. All open handles to the drive are invalidated. It also includes the functionality of /f. |
| /b | NTFS only. It clears the list of bad clusters on the volume and rescans all allocated and free clusters for errors. It includes the functionality of /r. Use this parameter after imaging a volume to a new hard disk drive. |
| /v | Displays the name of each file in every directory as the disk is checked. |
| /scan | NTFS only. It runs an online scan on the volume. |
| /i | NTFS only. It performs a less vigorous check of index entries, which reduces the amount of time required to run CHKDSK. |
| /c | NTFS only. It does not check cycles within the folder structure, which reduces the amount of time required to run CHKDSK. |
Run CHKDSK /F /R /X Alternative Tool to Fix and Repair Disk Errors
If you are not so tech-savvy and know little about computers, we highly recommend you try a professional CHKDSK /f /r /x alternative tool — EaseUS Partition Master to fix hard drive errors efficiently. It perfectly replaces CMD as reliable disk management tool and releases you from typing the commands manually.
EaseUS partition tool makes it effortless to repair disk errors. Follow the steps to check and repair your file system error:
Step 1. Open EaseUS Partition Master on your computer. Then, locate the disk, right-click the partition you want to check, and choose «Advanced» > «Check File System».
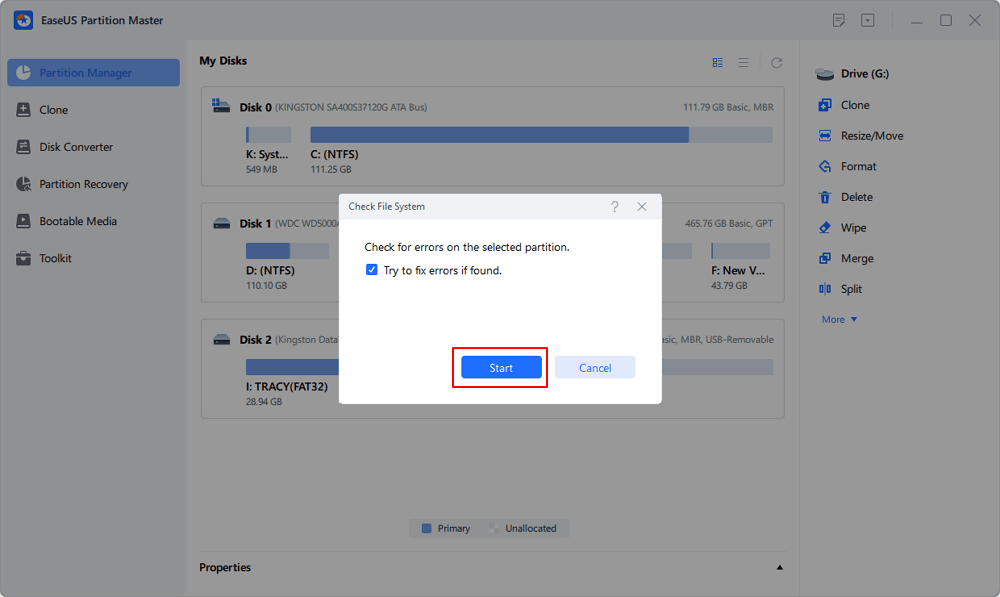
Step 2. In the Check File System window, keep the «Try to fix errors if found» option selected and click «Start».
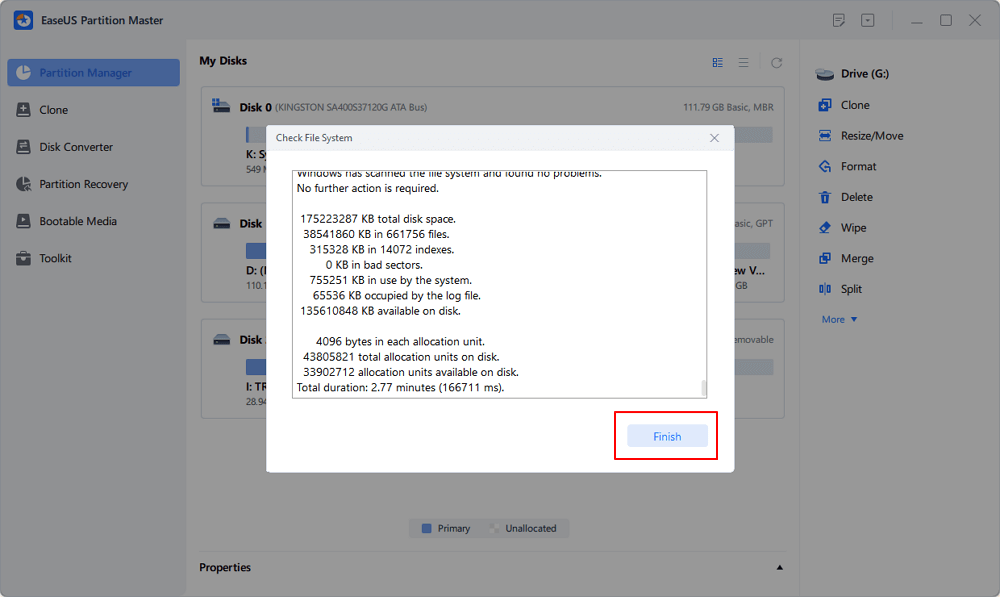
Step 3. The software will begin checking your partition file system on your disk. When it completes, click «Finish».
Step 3. The software will begin checking your partition file system on your disk. When it completes, click «Finish».
Fixing disk error and repair internal file system error with EaseUS Partitoin Master is so easy. Share this tip to help more of your friends to rescue their problematic storage devices now:
If you don’t like to use the simple third-party CHKDSK tool, you can run CHKDSK in a harder way via 3 methods: using Command prompt, Windows PowerShell, and disk check tool.
1. Run CHKDSK in Command Prompt
Whenever you find your hard drive performs poorly or Windows asks you to repair drive errors, you can try to run CHKDSK to do the job. Here’s how to run CHKDSK /f on Windows 10/8.1/8/7.
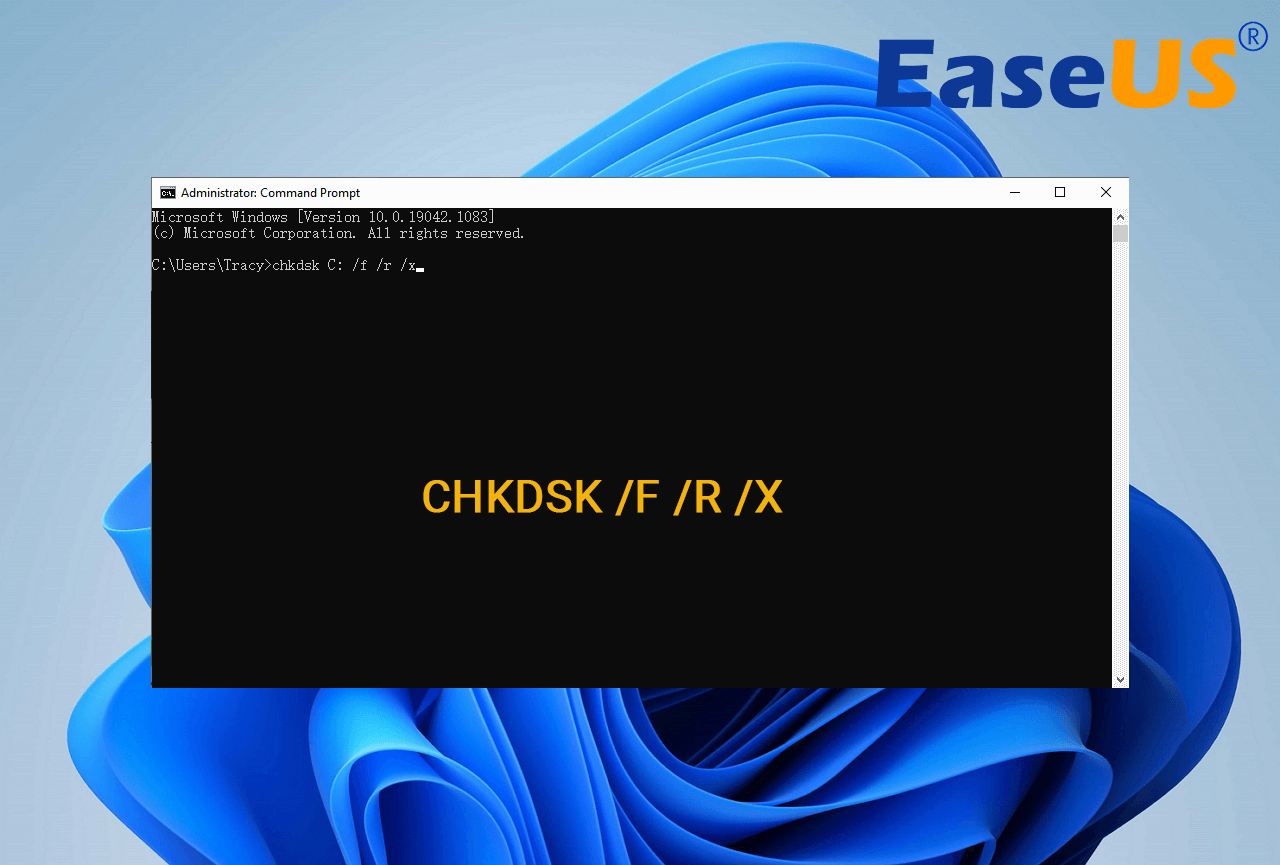
Use CHKDSK /F /R on Windows 10
Note: If you can’t boot into Windows 10 to run CHKDSK, fix the UEFI boot issue in Windows 10 with 5+ solutions.
Step 1. Press the Windows key and type cmd.
Step 2. Right-click «Command Prompt» and choose «Run as administrator».
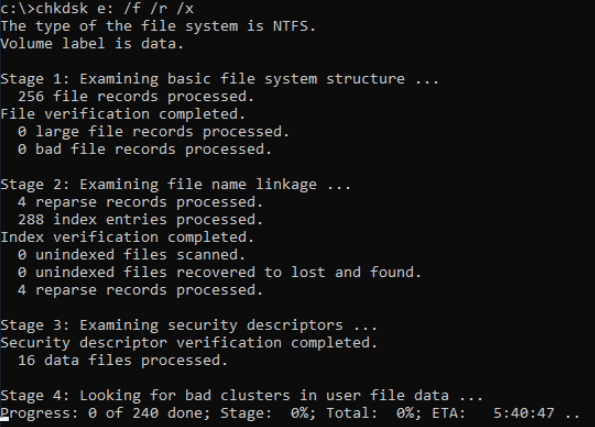
Step 3. Enter the following command and press Enter: chkdsk C: /f /r /x. Replace «C» with the drive letter of the partition you want to repair.

Do not interrupt CHKDSK and wait patiently for the process to end.
Aside from applying CHKDSK to fix disk errors, here are some tutorials that you may follow to learn more details about this command:
Run CHKDSK on Windows 8.1/8
To run the utility from Command Prompt for Windows 8.1/8 users, here are the instructions:
Step 1. Press the Windows and C key to open the Charm bar.
Step 2. Select «Search» and type cmd.
Step 3. Right-click on «Command Prompt» and click «Run as administrator.»
Step 4. When Command Prompt launches, type the command below and press «Enter»: chkdsk E: /f /r /x.
Run CHKDSK on Windows 7 CMD
If you are a Windows 7 user, you can run the CHKDSK command by the following steps:
Step 1. Click «Start». Type cmd at the search box.
Step 2. Right-click on cmd.exe and click «Run as Administrator». Enter your Administrator password if necessary.
Step 3. When cmd.exe opens, type the command below and press «Enter»: chkdsk c /f /r.
If you receive the «Chkdsk cannot run because the volume is in use by another process.» message, type Y to restart the computer and let the utility to run a scan at the next boot of your PC.
Extended Reading:
If you are looking for a guide to run CHKDSK to check and fix disk errors on Wnidows 11, try this recommended guide page and you’ll learn how to do so.
![]()
Check and Fix Disk Error in Windows 11
Are you looking to check disk errors in Windows 11? If yes, you might need a guide on checking and fixing disk errors in Windows 11. We have compiled the best methods for you.
Check and Fix Disk Error in Windows 11
Are you looking to check disk errors in Windows 11? If yes, you might need a guide on checking and fixing disk errors in Windows 11. We have compiled the best methods for you.
2. Use CHKDSK/F/R in Windows PowerShell
If the Command Prompt not working in Windows 10, you can also run the CHKDSK /F or /R command in Windows PowerShell to fix hard drive errors.
Step 1. Click the Search button and type PowerShell.
Step 2. Right-click the PowerShell and choose Run as administrator.
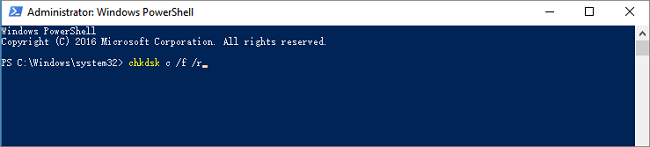
Step 3. Type chkdsk c /f /r to start fixing disk error. Replace C with the drive letter of the target disk.
3. Run CHKDSK Alternative — CheckDisk in Properties Window
Running the Check Disk tool from the Windows desktop is easy. Follow the steps below to run CHKDSK in Windows 10. It works the same way on Windows 8 and Windows 7.
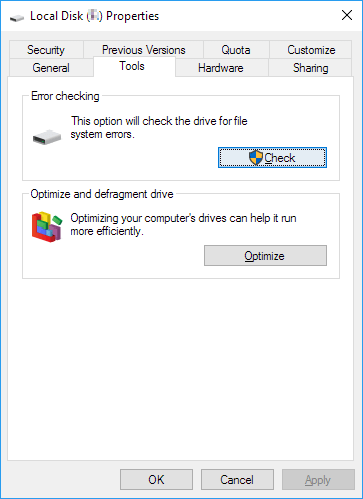
Step 1. Open This PC in File Explorer > right-click the HDD/SSD you want to scan > choose «Properties».
Step 2. Under the Tools tab > click the «Check» button under the Error-checking section.
Step 3. Next, you can choose to Scan drive if wanted or Repair drive if errors were found.
Step 4. When the scanning finishes, click on the Show Details link to see the CHKDSK log in Event Viewer.
3. Run CHKDSK Alternative — CheckDisk in Properties Window
Running the Check Disk tool from the Windows desktop is easy. Follow the steps below to run CHKDSK in Windows 10. It works the same way on Windows 8 and Windows 7.
Step 1. Open This PC in File Explorer > right-click the HDD/SSD you want to scan > choose «Properties».
Step 2. Under the Tools tab > click the «Check» button under the Error-checking section.
Step 3. Next, you can choose to Scan drive if wanted or Repair drive if errors were found.
Step 4. When the scanning finishes, click on the Show Details link to see the CHKDSK log in Event Viewer.
Conclusion
Any time you have hard drive errors or corrupted files, the CHKDSK can be a lifesaver. You can use the disk error checker that comes with every Windows version with the full guide above.
Or you can use the ultimate disk management tool — EaseUS Partition Master to repair organize your hard drive to enhance system performance easily.
FAQs About CHKDSK /F /R That You May Be Interested In
You may encounter CHKDSK related problems; what to do then? Here are the common issues of CHKDSK errors; read on to figure out the solutions.
1. Is CHKDSK R safe?
It’s safe to run the CHKDSK /R command under normal circumstances as long as you’re using the syntax properly. There are different parameters with CHKDSK; you can check the CHKDSK parameters and choose the one that suits your problem to fix disk errors.
2. How long does chkdsk /f /r take?
It depends.
- chkdsk -f should take under an hour on that hard drive.
- chkdsk -r will take some time. It could take over an hour, maybe two, three, or more, depending on your partitioning.
You can interrupt the scan, but not recommended. Canceling or interrupting CHKDSK should not leave the volume any more corrupt than it was before CHKDSK was run. You can start it again, and it will check and repair any remaining corruption on the volume.
3. What to do when CHKDSK is stuck or frozen?
- Restart your computer.
- Press Esc or Enter to stop chkdsk from running.
- Run the Disk Cleanup utility to clear out junk files.
- Open an elevated CMD, type sfc /scannow, and press Enter to run the System File Checker.
- Restart and exit chkdsk again during the startup by pressing Esc or Enter.
- Open CMD as admin, type Dism /Online /Cleanup-Image /RestoreHealth, and press Enter to repair the Windows image.
- Run CHKDSK again.
The scan should be able to run to completion this time.
4. CHKDSK /F /R VS CHKDSK /R /F on Windows
What’s the difference between CHKDSK /F /R and CHKDSK /R /F commands on Windows computer?
This is no much difference between chkdsk /f /r and chkdsk /r /f. The only difference is the sequence of two parameters /f and /r. /f means to fix errors on target disk and /r means to locate bad sectors and recover readable information. Mostly, the correct form should be chkdsk /f /r. Basically, when we don’t know if the target drive contains bad sectors, we would suggest that you run the overall CHKDSK command: chkdsk /f /r /x together.