
| title | description | author | ms.author | ms.date | ms.service | ms.subservice | ms.topic | f1_keywords | helpviewer_keywords | dev_langs | ||||||||||||||||||||
|---|---|---|---|---|---|---|---|---|---|---|---|---|---|---|---|---|---|---|---|---|---|---|---|---|---|---|---|---|---|---|
|
DBCC CHECKDB (Transact-SQL) |
DBCC CHECKDB checks the logical and physical integrity of all the objects in the specified database. |
rwestMSFT |
randolphwest |
12/05/2022 |
sql |
t-sql |
language-reference |
|
|
TSQL |
[!INCLUDE SQL Server SQL Database Azure SQL Managed Instance]
Checks the logical and physical integrity of all the objects in the specified database by performing the following operations:
- Runs DBCC CHECKALLOC on the database.
- Runs DBCC CHECKTABLE on every table and view in the database.
- Runs DBCC CHECKCATALOG on the database.
- Validates the contents of every indexed view in the database.
- Validates link-level consistency between table metadata and file system directories and files when storing varbinary(max) data in the file system using FILESTREAM.
- Validates the [!INCLUDEssSB] data in the database.
This means that the DBCC CHECKALLOC, DBCC CHECKTABLE, or DBCC CHECKCATALOG commands don’t have to be run separately from DBCC CHECKDB. For more detailed information about the checks that these commands perform, see the descriptions of these commands.
DBCC CHECKDB is supported on databases that contain memory-optimized tables but validation only occurs on disk-based tables. However, as part of database backup and recovery, a CHECKSUM validation is done for files in memory-optimized filegroups.
Since DBCC repair options aren’t available for memory-optimized tables, you must back up your databases regularly and test the backups. If data integrity issues occur in a memory-optimized table, you must restore from the last known good backup.
:::image type=»icon» source=»../../includes/media/topic-link-icon.svg» border=»false»::: Transact-SQL syntax conventions
Syntax
DBCC CHECKDB
    [ ( database_name | database_id | 0
        [ , NOINDEX
        | , { REPAIR_ALLOW_DATA_LOSS | REPAIR_FAST | REPAIR_REBUILD } ]
    ) ]
    [ WITH
        {
            [ ALL_ERRORMSGS ]
            [ , EXTENDED_LOGICAL_CHECKS ]
            [ , NO_INFOMSGS ]
            [ , TABLOCK ]
            [ , ESTIMATEONLY ]
            [ , { PHYSICAL_ONLY | DATA_PURITY } ]
            [ , MAXDOP = number_of_processors ]
        }
    ]
]
[!INCLUDEsql-server-tsql-previous-offline-documentation]
Arguments
database_name | database_id | 0
The name or ID of the database for which to run integrity checks. If not specified, or if 0 is specified, the current database is used. Database names must comply with the rules for identifiers.
NOINDEX
Specifies that intensive checks of nonclustered indexes for user tables won’t be performed. This choice decreases the overall execution time. NOINDEX doesn’t affect system tables because integrity checks are always performed on system table indexes.
REPAIR_ALLOW_DATA_LOSS | REPAIR_FAST | REPAIR_REBUILD
Specifies that DBCC CHECKDB repairs the errors found. Use the REPAIR options only as a last resort. The specified database must be in single-user mode to use one of the following repair options.
-
REPAIR_ALLOW_DATA_LOSS
Tries to repair all reported errors. These repairs can cause some data loss.
[!WARNING]
TheREPAIR_ALLOW_DATA_LOSSoption is a supported feature but it may not always be the best option for bringing a database to a physically consistent state. If successful, theREPAIR_ALLOW_DATA_LOSSoption may result in some data loss. In fact, it may result in more data lost than if a user were to restore the database from the last known good backup.[!INCLUDEmsCoName] always recommends a user restore from the last known good backup as the primary method to recover from errors reported by
DBCC CHECKDB. TheREPAIR_ALLOW_DATA_LOSSoption isn’t an alternative for restoring from a known good backup. It is an emergency last resort option recommended for use only if restoring from a backup isn’t possible.Certain errors, that can only be repaired using the
REPAIR_ALLOW_DATA_LOSSoption, may involve deallocating a row, page, or series of pages to clear the errors. Any deallocated data is no longer accessible or recoverable for the user, and the exact contents of the deallocated data cannot be determined. Therefore, referential integrity may not be accurate after any rows or pages are deallocated because foreign key constraints are not checked or maintained as part of this repair operation. The user must inspect the referential integrity of their database (usingDBCC CHECKCONSTRAINTS) after using theREPAIR_ALLOW_DATA_LOSSoption.Before performing the repair, you must create physical copies of the files that belong to this database. This includes the primary data file (
.mdf), any secondary data files (.ndf), all transaction log files (.ldf), and other containers that form the database including full text catalogs, file stream folders, memory optimized data, and so on.Before performing the repair, consider changing the state of the database to
EMERGENCYmode and trying to extract as much information possible from the critical tables and save that data. -
REPAIR_FAST
Maintains syntax for backward compatibility only. No repair actions are performed.
-
REPAIR_REBUILD
Performs repairs that have no possibility of data loss. This option may include quick repairs, such as repairing missing rows in nonclustered indexes, and more time-consuming repairs, such as rebuilding an index.
This argument doesn’t repair errors involving FILESTREAM data.
[!IMPORTANT]
SinceDBCC CHECKDBwith any of the REPAIR options are completely logged and recoverable, [!INCLUDEmsCoName] always recommends a user useDBCC CHECKDBwith any REPAIR options within a transaction (executeBEGIN TRANSACTIONbefore running the command) so that the user can confirm that they want to accept the results of the operation. Then the user can executeCOMMIT TRANSACTIONto commit all work done by the repair operation. If the user does not want to accept the results of the operation, they can execute aROLLBACK TRANSACTIONto undo the effects of the repair operations.To repair errors, we recommend restoring from a backup. Repair operations do not consider any of the constraints that may exist on or between tables. If the specified table is involved in one or more constraints, we recommend running
DBCC CHECKCONSTRAINTSafter a repair operation. If you must use REPAIR, runDBCC CHECKDBwithout a repair option to find the repair level to use. If you use theREPAIR_ALLOW_DATA_LOSSlevel, we recommend that you back up the database before you runDBCC CHECKDBwith this option.
ALL_ERRORMSGS
Displays all reported errors per object. All error messages are displayed by default. Specifying or omitting this option has no effect. Error messages are sorted by object ID, except for those messages generated from tempdb database.
EXTENDED_LOGICAL_CHECKS
If the compatibility level is 100, introduced in [!INCLUDEsql2008-md], this option performs logical consistency checks on an indexed view, XML indexes, and spatial indexes, where present.
For more information, see Perform logical consistency checks on indexes later in this article.
NO_INFOMSGS
Suppresses all informational messages.
TABLOCK
Causes DBCC CHECKDB to obtain locks instead of using an internal database snapshot. This includes a short-term exclusive (X) lock on the database. TABLOCK will cause DBCC CHECKDB to run faster on a database under heavy load, but will decrease the concurrency available on the database while DBCC CHECKDB is running.
[!IMPORTANT]
TABLOCKlimits the checks that are performed;DBCC CHECKCATALOGis not run on the database, and [!INCLUDEssSB] data is not validated.
ESTIMATEONLY
Displays the estimated amount of tempdb space that is required to run DBCC CHECKDB with all the other specified options. The actual database check isn’t performed.
PHYSICAL_ONLY
Limits the checking to the integrity of the physical structure of the page and record headers and the allocation consistency of the database. This check is designed to provide a small overhead check of the physical consistency of the database, but it can also detect torn pages, checksum failures, and common hardware failures that can compromise a user’s data.
A full run of DBCC CHECKDB may take considerably longer to complete than earlier versions. This behavior occurs because:
- The logical checks are more comprehensive.
- Some of the underlying structures to be checked are more complex.
- Many new checks have been introduced to include the new features.
Therefore, using the PHYSICAL_ONLY option may cause a much shorter run-time for DBCC CHECKDB on large databases and is recommended for frequent use on production systems. We still recommend that a full run of DBCC CHECKDB be performed periodically. The frequency of these runs depends on factors specific to individual businesses and production environments.
This argument always implies NO_INFOMSGS and isn’t allowed with any one of the repair options.
[!WARNING]
SpecifyingPHYSICAL_ONLYcausesDBCC CHECKDBto skip all checks of FILESTREAM data.
DATA_PURITY
Causes DBCC CHECKDB to check the database for column values that aren’t valid or out-of-range. For example, DBCC CHECKDB detects columns with date and time values that are larger than or less than the acceptable range for the datetime data type; or decimal or approximate-numeric data type columns with scale or precision values that aren’t valid.
Column-value integrity checks are enabled by default and don’t require the DATA_PURITY option. For databases upgraded from earlier versions of [!INCLUDEssNoVersion], column-value checks aren’t enabled by default until DBCC CHECKDB WITH DATA_PURITY has been run error free on the database. After this, DBCC CHECKDB checks column-value integrity by default. For more information about how CHECKDB might be affected by upgrading database from earlier versions of [!INCLUDEssNoVersion], see the Remarks section later in this article.
[!WARNING]
IfPHYSICAL_ONLYis specified, column-integrity checks are not performed.
Validation errors reported by this option can’t be fixed by using DBCC repair options. For information about manually correcting these errors, see Knowledge Base article 923247: Troubleshooting DBCC error 2570 in SQL Server 2005 and later versions.
MAXDOP
Applies to: [!INCLUDEssSQL14] Service Pack 2 and later versions
Overrides the max degree of parallelism configuration option of sp_configure for the statement. The MAXDOP can exceed the value configured with sp_configure. If MAXDOP exceeds the value configured with Resource Governor, the [!INCLUDEssDEnoversion] uses the Resource Governor MAXDOP value, described in ALTER WORKLOAD GROUP. All semantic rules used with the max degree of parallelism configuration option are applicable when you use the MAXDOP query hint. For more information, see Configure the max degree of parallelism Server Configuration Option.
[!WARNING]
IfMAXDOPis set to zero then [!INCLUDE ssnoversion-md] chooses the max degree of parallelism to use.
Remarks
DBCC CHECKDB doesn’t examine disabled indexes. For more information about disabled indexes, see Disable Indexes and Constraints.
If a user-defined type is marked as being byte ordered, there must only be one serialization of the user-defined type. Not having a consistent serialization of byte-ordered user-defined types causes error 2537 when DBCC CHECKDB is run. For more information, see User-Defined Type Requirements.
Because the Resource database is modifiable only in single-user mode, the DBCC CHECKDB command can’t be run on it directly. However, when DBCC CHECKDB is executed against the master database, a second CHECKDB is also run internally on the Resource database. This means that DBCC CHECKDB can return extra results. The command returns extra result sets when no options are set, or when either the PHYSICAL_ONLY or ESTIMATEONLY option is set.
Starting with [!INCLUDEssVersion2005] Service Pack 2, executing DBCC CHECKDB no longer clears the plan cache for the instance of [!INCLUDEssNoVersion]. Before [!INCLUDEssVersion2005] Service Pack 2, executing DBCC CHECKDB clears the plan cache. Clearing the plan cache causes recompilation of all later execution plans and may cause a sudden, temporary decrease in query performance.
Perform logical consistency checks on indexes
Logical consistency checking on indexes varies according to the compatibility level of the database, as follows:
- If the compatibility level is at least 100 (introduced in [!INCLUDEsql2008-md]):
- Unless
NOINDEXis specified,DBCC CHECKDBperforms both physical and logical consistency checks on a single table and on all its nonclustered indexes. However, on XML indexes, spatial indexes, and indexed views only physical consistency checks are performed by default. - If
WITH EXTENDED_LOGICAL_CHECKSis specified, logical checks are performed on an indexed view, XML indexes, and spatial indexes, where present. By default, physical consistency checks are performed before the logical consistency checks. IfNOINDEXis also specified, only the logical checks are performed.
These logical consistency checks cross check the internal index table of the index object with the user table that it is referencing. To find outlying rows, an internal query is constructed to perform a full intersection of the internal and user tables. Running this query can have a significant effect on performance, and its progress can’t be tracked. Therefore, we recommend that you specify WITH EXTENDED_LOGICAL_CHECKS only if you suspect index issues that are unrelated to physical corruption, or if page-level checksums have been turned off and you suspect column-level hardware corruption.
- If the index is a filtered index,
DBCC CHECKDBperforms consistency checks to verify that the index entries satisfy the filter predicate. - If the compatibility level is 90 or less, unless
NOINDEXis specified,DBCC CHECKDBperforms both physical and logical consistency checks on a single table or indexed view and on all its nonclustered and XML indexes. Spatial indexes aren’t supported. - Starting with [!INCLUDE sssql16-md], additional checks on persisted computed columns, UDT columns, and filtered indexes won’t run by default to avoid the expensive expression evaluations. This change greatly reduces the duration of
CHECKDBagainst databases containing these objects. However, the physical consistency check of these objects is always completed. Only whenEXTENDED_LOGICAL_CHECKSoption is specified, are the expression evaluations performed, in addition to the logical checks that are already present as part of theEXTENDED_LOGICAL_CHECKSoption (indexed view, XML indexes, and spatial indexes).
To learn the compatibility level of a database
- View or change the compatibility level of a database
Internal database snapshot
DBCC CHECKDB uses an internal database snapshot for the transactional consistency needed to perform these checks. This prevents blocking and concurrency problems when these commands are executed. For more information, see View the Size of the Sparse File of a Database Snapshot (Transact-SQL) and the DBCC Internal Database Snapshot Usage section in DBCC (Transact-SQL). If a snapshot can’t be created, or TABLOCK is specified, DBCC CHECKDB acquires locks to obtain the required consistency. In this case, an exclusive database lock is required to perform the allocation checks, and shared table locks are required to perform the table checks.
DBCC CHECKDB fails when run against the master database if an internal database snapshot can’t be created.
Running DBCC CHECKDB against tempdb doesn’t perform any allocation or catalog checks and must acquire shared table locks to perform table checks. This is because, for performance reasons, database snapshots aren’t available on tempdb. This means that the required transactional consistency can’t be obtained.
How DBCC CHECKDB creates an internal snapshot database beginning with SQL Server 2014
-
DBCC CHECKDBcreates an internal snapshot database. -
The internal snapshot database is created by using physical files. For example, for a database with
database_id = 10that has three filesE:Datamy_DB.mdf,E:Datamy_DB.ndf, andE:Datamy_DB.ldf, the internal snapshot database will be created usingE:Datamy_DB.mdf_MSSQL_DBCC11andE:Datamy_DB.ndf_MSSQL_DBCC11files. Thedatabase_idof the snapshot isdatabase_id + 1. Also note that the new files are created in the same folder using the naming convention<filename.extension>_MSSQL_DBCC<database_id_of_snapshot>. No sparse file is created for the transaction log. -
The new files are marked as sparse files at the file system level. The Size on Disk used by the new files will increase based on how much data is updated in the source database during the
DBCC CHECKDBcommand. The Size of the new files will be the same file as the.mdfor.ndffile. -
The new files are deleted at the end of
DBCC CHECKDBprocessing. These sparse files that are created byDBCC CHECKDBhave the «Delete on Close» attributes set.
[!WARNING]
If the operating system encounters an unexpected shutdown while theDBCC CHECKDBcommand is in progress, then these files will not be cleaned up. They will take up space, and can potentially cause failures on futureDBCC CHECKDBexecutions. In that case, you can delete these new files after you confirm that there is noDBCC CHECKDBcommand currently being executed.
The new files are visible by using ordinary file utilities such as Windows Explorer.
[!NOTE]
Prior to [!INCLUDE sssql14-md], named file streams were used instead to create the internal snapshot files. The named file streams used the format <filename.extension>:MSSQL_DBCC<database_id_of_snapshot>. Named file streams are not visible by using ordinary file utilities such as Windows Explorer. Therefore, in [!INCLUDE sssql11-md] and earlier versions, you may encounter error messages 7926 and 5030 when you run theDBCC CHECKDBcommand for database files located on an ReFS-formatted volume. This is because file streams cannot be created on Resilient File System (RefS).
Check and repair FILESTREAM data
When FILESTREAM is enabled for a database and table, you can optionally store varbinary(max) binary large objects (BLOBs) in the file system. When using DBCC CHECKDB on a database that stores BLOBs in the file system, DBCC checks link-level consistency between the file system and database.
For example, if a table contains a varbinary(max) column that uses the FILESTREAM attribute, DBCC CHECKDB will check that there is a one-to-one mapping between file system directories and files and table rows, columns, and column values. DBCC CHECKDB can repair corruption if you specify the REPAIR_ALLOW_DATA_LOSS option. To repair FILESTREAM corruption, DBCC will delete any table rows that are missing file system data.
Best practices
We recommend that you use the PHYSICAL_ONLY option for frequent use on production systems. Using PHYSICAL_ONLY can greatly shorten run-time for DBCC CHECKDB on large databases. We also recommend that you periodically run DBCC CHECKDB with no options. How frequently you should perform these runs depends on individual businesses and their production environments.
Check objects in parallel
By default, DBCC CHECKDB performs parallel checking of objects. The degree of parallelism is automatically determined by the query processor. The maximum degree of parallelism is configured just like parallel queries. To restrict the maximum number of processors available for DBCC checking, use sp_configure. For more information, see Configure the max degree of parallelism Server Configuration Option. Parallel checking can be disabled by using Trace Flag 2528. For more information, see Trace Flags (Transact-SQL).
[!NOTE]
This feature is not available in every edition of [!INCLUDEssNoVersion]. For more information, see parallel consistency check in the RDBMS manageability section of Editions and supported features of SQL Server 2022.
Understand DBCC error messages
After the DBCC CHECKDB command finishes, a message is written to the [!INCLUDEssNoVersion] error log. If the DBCC command successfully executes, the message indicates success and the amount of time that the command ran. If the DBCC command stops before completing the check because of an error, the message indicates that the command was terminated, a state value, and the amount of time the command ran. The following table lists and describes the state values that can be included in the message.
| State | Description |
|---|---|
| 0 | Error number 8930 was raised. This indicates a corruption in metadata that terminated the DBCC command. |
| 1 | Error number 8967 was raised. There was an internal DBCC error. |
| 2 | A failure occurred during emergency mode database repair. |
| 3 | This indicates a corruption in metadata that terminated the DBCC command. |
| 4 | An assert or access violation was detected. |
| 5 | An unknown error occurred that terminated the DBCC command. |
[!NOTE]
[!INCLUDEssNoVersion] records the date and time when a consistency check was run for a database with no errors (or «clean» consistency check). This is known as thelast known clean check. When a database is first started, this date is written to the EventLog (EventID-17573) and error log in the following format:
CHECKDB for database '<database>' finished without errors on 2022-05-05 18:08:22.803 (local time). This is an informational message only; no user action is required.
Error reporting
A dump file (SQLDUMP<nnnn>.txt) is created in the [!INCLUDEssNoVersion] LOG directory whenever DBCC CHECKDB detects a corruption error. When the Feature Usage data collection and Error Reporting features are enabled for the instance of [!INCLUDEssNoVersion], the file is automatically forwarded to [!INCLUDEmsCoName]. The collected data is used to improve [!INCLUDEssNoVersion] functionality.
The dump file contains the results of the DBCC CHECKDB command and additional diagnostic output. Access is limited to the [!INCLUDEssNoVersion] service account and members of the sysadmin role. By default, the sysadmin role contains all members of the Windows BUILTINAdministrators group and the local administrator’s group. The DBCC command doesn’t fail if the data collection process fails.
Resolve errors
If any errors are reported by DBCC CHECKDB, we recommend restoring the database from the database backup instead of running REPAIR with one of the REPAIR options. If no backup exists, running repair corrects the errors reported. The repair option to use is specified at the end of the list of reported errors. However, correcting the errors by using the REPAIR_ALLOW_DATA_LOSS option might require deleting some pages, and therefore some data.
Under some circumstances, values might be entered into the database that aren’t valid or out-of-range based on the data type of the column. DBCC CHECKDB can detect column values that aren’t valid for all column data types. Therefore, running DBCC CHECKDB with the DATA_PURITY option on databases that have been upgraded from earlier versions of [!INCLUDEssNoVersion] might reveal preexisting column-value errors. Because [!INCLUDEssNoVersion] can’t automatically repair these errors, the column value must be manually updated. If CHECKDB detects such an error, CHECKDB returns a warning, the error number 2570, and information to identify the affected row and manually correct the error.
The repair can be performed under a user transaction to let the user roll back the changes that were made. If repairs are rolled back, the database will still contain errors and must be restored from a backup. After repairs are completed, back up the database.
Resolve errors in database emergency mode
When a database has been set to emergency mode by using the ALTER DATABASE statement, DBCC CHECKDB can perform some special repairs on the database if the REPAIR_ALLOW_DATA_LOSS option is specified. These repairs may allow for ordinarily unrecoverable databases to be brought back online in a physically consistent state. These repairs should be used as a last resort and only when you can’t restore the database from a backup. When the database is set to emergency mode, the database is marked READ_ONLY, logging is disabled, and access is limited to members of the sysadmin fixed server role.
[!NOTE]
You cannot run theDBCC CHECKDBcommand in emergency mode inside a user transaction and roll back the transaction after execution.
When the database is in emergency mode and DBCC CHECKDB with the REPAIR_ALLOW_DATA_LOSS clause is run, the following actions are taken:
DBCC CHECKDBuses pages that have been marked inaccessible because of I/O or checksum errors, as if the errors haven’t occurred. Doing this increases the chances for data recovery from the database.DBCC CHECKDBattempts to recover the database using regular log-based recovery techniques.- If database recovery is unsuccessful because of transaction log corruption, the transaction log is rebuilt. Rebuilding the transaction log may result in the loss of transactional consistency.
[!WARNING]
TheREPAIR_ALLOW_DATA_LOSSoption is a supported feature of [!INCLUDEssNoVersion]. However, it may not always be the best option for bringing a database to a physically consistent state. If successful, theREPAIR_ALLOW_DATA_LOSSoption may result in some data loss.
In fact, it may result in more data lost than if a user were to restore the database from the last known good backup. [!INCLUDEmsCoName] always recommends a user restore from the last known good backup as the primary method to recover from errors reported byDBCC CHECKDB.
TheREPAIR_ALLOW_DATA_LOSSoption is not an alternative for restoring from a known good backup. It is an emergency last resort option recommended for use only if restoring from a backup is not possible.After rebuilding the log, there is no full ACID guarantee.
After rebuilding the log,
DBCC CHECKDBwill be automatically performed and will both report and correct physical consistency issues.Logical data consistency and business logic enforced constraints must be validated manually.
The transaction log size will be left to its default size and must be manually adjusted back to its recent size.
If the DBCC CHECKDB command succeeds, the database is in a physically consistent state, and the database status is set to ONLINE. However, the database may contain one or more transactional inconsistencies. We recommend that you run DBCC CHECKCONSTRAINTS to identify any business logic flaws and immediately back up the database.
If the DBCC CHECKDB command fails, the database can’t be repaired.
Run DBCC CHECKDB with REPAIR_ALLOW_DATA_LOSS in replicated databases
Running the DBCC CHECKDB command with the REPAIR_ALLOW_DATA_LOSS option can affect user databases (publication and subscription databases) and the distribution database used by replication. Publication and subscription databases include published tables and replication metadata tables. Be aware of the following potential issues in these databases:
- Published tables. Actions performed by the
CHECKDBprocess to repair corrupt user data might not be replicated: - Merge replication uses triggers to track changes to published tables. If rows are inserted, updated, or deleted by the
CHECKDBprocess, triggers don’t fire; therefore, the change isn’t replicated. - Transactional replication uses the transaction log to track changes to published tables. The Log Reader Agent then moves these changes to the distribution database. Some DBCC repairs, although logged, can’t be replicated by the Log Reader Agent. For example, if a data page is deallocated by the
CHECKDBprocess, the Log Reader Agent doesn’t translate this deallocation to a DELETE statement; therefore, the change isn’t replicated. - Replication metadata tables. Actions performed by the
CHECKDBprocess to repair corrupt replication metadata tables require removing and reconfiguring replication.
If you have to run the DBCC CHECKDB command with the REPAIR_ALLOW_DATA_LOSS option on a user database or distribution database:
- Quiesce the system: Stop activity on the database and at all other databases in the replication topology, and then try to synchronize all nodes. For more information, see Quiesce a Replication Topology (Replication Transact-SQL Programming).
- Execute
DBCC CHECKDB. - If the
DBCC CHECKDBreport includes repairs for any tables in the distribution database or any replication metadata tables in a user database, remove and reconfigure replication. For more information, see Disable Publishing and Distribution. - If the
DBCC CHECKDBreport includes repairs for any replicated tables, perform data validation to determine whether there are differences between the data in the publication and subscription databases.
Result sets
DBCC CHECKDB returns the following result set. The values might vary except when the ESTIMATEONLY, PHYSICAL_ONLY, or NO_INFOMSGS options are specified:
 DBCC results for 'model'.

 Service Broker Msg 9675, Level 10, State 1: Message Types analyzed: 13.

 Service Broker Msg 9676, Level 10, State 1: Service Contracts analyzed: 5.

 Service Broker Msg 9667, Level 10, State 1: Services analyzed: 3.

 Service Broker Msg 9668, Level 10, State 1: Service Queues analyzed: 3.

 Service Broker Msg 9669, Level 10, State 1: Conversation Endpoints analyzed: 0.

 Service Broker Msg 9674, Level 10, State 1: Conversation Groups analyzed: 0.

 Service Broker Msg 9670, Level 10, State 1: Remote Service Bindings analyzed: 0.

 DBCC results for 'sys.sysrowsetcolumns'.

 There are 630 rows in 7 pages for object 'sys.sysrowsetcolumns'.

 DBCC results for 'sys.sysrowsets'.

 There are 97 rows in 1 pages for object 'sys.sysrowsets'.

 DBCC results for 'sysallocunits'.

 There are 195 rows in 3 pages for object 'sysallocunits'.

 There are 0 rows in 0 pages for object "sys.sysasymkeys".

 DBCC results for 'sys.syssqlguides'.

 There are 0 rows in 0 pages for object "sys.syssqlguides".

 DBCC results for 'sys.queue_messages_1977058079'.

 There are 0 rows in 0 pages for object "sys.queue_messages_1977058079".

 DBCC results for 'sys.queue_messages_2009058193'.

 There are 0 rows in 0 pages for object "sys.queue_messages_2009058193".

 DBCC results for 'sys.queue_messages_2041058307'.

 There are 0 rows in 0 pages for object "sys.queue_messages_2041058307".

 CHECKDB found 0 allocation errors and 0 consistency errors in database 'model'.

 DBCC execution completed. If DBCC printed error messages, contact your system administrator.
DBCC CHECKDB returns the following result set (message) when NO_INFOMSGS is specified:
The command(s) completed successfully.
DBCC CHECKDB returns the following result set when PHYSICAL_ONLY is specified:
 DBCC results for 'model'.

 CHECKDB found 0 allocation errors and 0 consistency errors in database 'master'.

 DBCC execution completed. If DBCC printed error messages, contact your system administrator.
DBCC CHECKDB returns the following result set when ESTIMATEONLY is specified.
 Estimated TEMPDB space needed for CHECKALLOC (KB)

 -------------------------------------------------

 13

 (1 row(s) affected)

 Estimated TEMPDB space needed for CHECKTABLES (KB)

 --------------------------------------------------

 57

 (1 row(s) affected)

 DBCC execution completed. If DBCC printed error messages, contact your system administrator.
Permissions
Requires membership in the sysadmin fixed server role or the db_owner fixed database role.
Examples
A. Check both the current and another database
The following example executes DBCC CHECKDB for the current database and for the [!INCLUDEssSampleDBobject] database.
-- Check the current database.
DBCC CHECKDB;
GO
-- Check the AdventureWorks2019 database without nonclustered indexes.
DBCC CHECKDB (AdventureWorks2019, NOINDEX);
GO
B. Check the current database, suppressing informational messages
The following example checks the current database and suppresses all informational messages.
DBCC CHECKDB WITH NO_INFOMSGS;
GO
See also
- DBCC (Transact-SQL)
- View the Size of the Sparse File of a Database Snapshot (Transact-SQL)
- sp_helpdb (Transact-SQL)
- System Tables (Transact-SQL)
microsoft-sql-server:t-sql-script-samples:how-to-check-and-repair-ms-sql-server-database
Как проверить и восстановить базу данных SQL Server
1. На всякий случай делаем резервную копию базы данных
2. Выполняем проверку базы данных
Use MyDataBase
GO
DBCC CHECKDB
GO
Если в процессе проверки обнаружены ошибки переходим к п.3, если нет ошибок — к п.4
3. Переводим базу данных в однопользовательский режим и запускаем процедуру исправления ошибок
Use MyDataBase
GO
ALTER DATABASE MyDataBase SET SINGLE_USER
GO
DBCC CHECKDB('MyDataBase', REPAIR_REBUILD)
GO
Возможно скрипт придётся выполнять несколько раз до тех пор пока ошибки не исчезнут.
4. Возвращаем базу данных в многопользовательский режим
ALTER DATABASE MyDataBase SET MULTI_USER
GO
Дополнительная информация:
MSDN Library — DBCC CHECKDB (Transact-SQL)
Table of Contents
- SQL Server Database Integrity Check Best Practices Worth Considering
- 1. Run DBCC CHECKDB with subset commands
- 2. Offload logical consistency checks where possible
- 3. Run DBCC CHECKDB with other execution options
- 4. Restore backup on another server and run DBCC CHECKDB
- 5. Determine whether you should run DBCC CHEKCDB before or after backup
- End Note
- References
As SQL database administrators, running consistency checks against a database is crucial to ensure that the database is free from corruption. However, how you should run DBCC CHECKDB to perform integrity checks is often overlooked,
especially in an environment with several SQL Server instances and databases on each server. There are some best practices you need to follow to run database integrity checks optimally.
In this article, we will be discussing the SQL Server database integrity check best practices you should know.
SQL Server Database Integrity Check Best Practices Worth Considering
Here are some of the SQL Server database integrity check best practices you should be following, but not limited to:
1. Run DBCC CHECKDB with subset commands
Running DBCC CHECKDB command to perform database consistency checks can be a resource-intensive process and may take a long time to complete. Performing the integrity check on all the databases across multiple server instances
may not finish on time. Meaning, the process may exceed the maintenance window limit. In such a case, you need to do a full run of DBCC CHECKDB using the following subset commands:
- CHECKALLOC – It checks the disk space allocation structures consistency for a database.
- CHECKTABLE – It checks the integrity of all the pages and structures that make up the table or indexed view.
- CHECKCATALOG – The database must be online to check catalog consistency within a SQL database.
Executing DBCC CHECKDB with these options will help you perform integrity checks in phases.
2. Offload logical consistency checks where possible
A full run of integrity checks on a large database can take a long time to complete than earlier versions. Such behavior occurs due to the following reasons:
- By default, DBCC CHECKDB spends the majority of the time performing logical consistency checks on the data. So, the more data you have, the more time it will take to produce results.
- Complexity of some of the underlying database structures.
- New integrity checks have been introduced with new features.
To work around this, focus your efforts on checking the integrity of a page’s physical structure using the PHYSICAL_ONLY option. This check doesn’t find any logical issues; however, it can identify common hardware failures, torn
pages, and checksum failures that can corrupt a user’s data. Also, running DBCC CHECKDB using WITH PHYSICAL_ONLY check on the primary database can skip CPU-intensive checks.
3. Run DBCC CHECKDB with other execution options
Consider using other checks when running DBCC CHECKDB on large databases, such as:
- NO_INFOMSGS: Sometimes, running DBCC CHECKDB produces irrelevant output. You may see thousands of red lines with informational messages that
might not be of any use. Use the NO_INFOMSGS option to suppress informational messages.
DBCC CHECKDB(Database_Name) with NO_INFOMSGS;
- DATA_PURITY: By default, DBCC CHECKDB performs column-value integrity checks. However, when upgrading databases, you will need to use the DATA_PURITY check for checking the data integrity in a table column.
The syntax is as follows:
DBCC CHECKDB(Database_Name) with DATA_PURITY;
- EXTENDED_LOGICAL_CHECKS:
Run this check with DBCC CHECKDB when running missing critical databases. It performs logical checks on indexed views, spatial indexes, or XML indexes. Here’s the syntax:
DBCC CHECKDB(Database_Name) with EXTENDED_LOGICAL_CHECKS;
Note: Executing “DBCC CHECKDB with EXTENDED_LOGICAL_CHECKS” on a table in SQL Server 2016 with a “filtered nonclustered index (NCI) over a clustered columnstore index (CCI)” may fail. It may also lead
to SQL error 5297. This is a SQL bug. Refer to this link
for more information.
- TABLOCK: Run CHECKDB using the TABLOCK option when the database snapshot creation is failing. This option uses locks rather than database snapshots.
4. Restore backup on another server and run DBCC CHECKDB
Restore backup of your production database on another system (or a test server). After restoring the database, perform a full CHECKDB on it. Doing so helps offload the burden of running database integrity checks from the production system. It also helps validate backups. However, there are a couple of downsides to this practice. If your production database is 1 TB or more, you’ll need the same amount of space on the separate system. Another drawback is that if consistency errors are found, you might not know whether the production database is corrupt or there’s an issue with the test server.
5. Determine whether you should run DBCC CHEKCDB before or after backup
As long as you are running database integrity checks regularly, it doesn’t really matter when you should run DBCC CHECKDB. But, knowing whether you should run backup before or after executing the CHECKDB command can determine if
the backup is good or not.
Essentially, if performing consistency checks using DBCC CHECKDB fails, your subsequent backup might also fail. But, you would be less certain whether you have a good or bad backup if you decided to run backup before executing
the CHECKDB command; there’s a possibility that corruption occurred between the times running backup and then CHECKDB.
Note: If you can’t do a full run of DBCC CHECKDB in a maintenance window, execute backups
WITH CHECKSUM.
End Note
Following the best practices discussed in this post can help you run database integrity checks optimally. However, if you still find your database inconsistent, you may consider using third-party
SQL recovery tool to regain access to your database without downtime. Stellar Repair for MS SQL is an efficient and reliable tool you can use to restore the database and its data without any inconsistency.
References
-
DBCC CHECKDB (Transact-SQL)
-
How often should I run DBCC
CHECKDB?
Время на прочтение
12 мин
Количество просмотров 37K
Поврежденная база данных — это, наверное, один из худших ночных кошмаров большинства администраторов баз данных. Результатом повреждения являются простои, вопли менеджеров и всякие другие неприятные штуки.
В этой статье я объясню что нельзя делать с поврежденной базой данных и опишу кое-что из того, что должно быть сделано, некоторые виды повреждений и как их можно исправить.
Как обнаружить, что база данных повреждена
Обычно повреждения превосходно обнаруживаются при попытке доступа к поврежденной странице. Запросы, бэкапы или процедуры реиндексации завершаются ошибками с высокими уровнями серьезности.
Вот пара примеров системных сообщений при обнаружении повреждения БД:
SQL Server detected a logical consistency-based I/O error: incorrect checksum (expected: 0xfdff74c9; actual: 0xfdff74cb). It occurred during a read of page (1:69965) in database ID 13 at offset 0x0000002229a000 in file ‘D:DevelopDatabasesBroken1.mdf’.
Attempt to fetch logical page 1:69965 in database 13 failed. It belongs to allocation unit 72057594049069056 not to 281474980642816.
Основная проблема заключается в том, что если проверки целостности базы данных не производятся на постоянной основе, то повреждение может быть обнаружено спустя часы, дни и даже месяцы, после того, как оно образовалось, в тот момент, когда уже сложно будет что-то исправить.
Я не буду описывать ситуацию когда база данных перешла в состояние «suspect» («подозрительная» в русской редакции SQL Server — прим. переводчика). Описание всевозможных причин почему база данных может перейти в «suspect» и множества вариантов исправления этого — тема отдельной статьи, если не книги.
Что делать если база данных все-таки повреждена
- Не паниковать
- Не отсоединять (detach) ее
- Не перезапускать SQL Server
- Не начинать восстановление сразу
- Запустить проверку целостности
- Найти причину
Не паниковать
Самое важное, при обнаружении повреждения БД — это не паниковать. Любые принимаемые решения должны быть тщательно взвешаны, во внимание должны быть приняты все возможные факторы. Чертовски просто ухудшить ситуацию приняв не до конца обдуманное решение.
Не отсоединять базу данных
В большинстве случаев, когда SQL Server обнарживает повреждение базы данных, это означает, что в БД на самом деле есть поврежденные страницы. Попытка убедить SQL Server что это не так, путем отсоединения (detach) и повторного присоединения (attach) БД, бэкапа и последующего восстановления, перезапуска службы SQL Server, либо перезагрузки сервера, не приведет к тому, что ошибка исчезнет.
Если база данных повреждена и SQL Server обнаружит это при присоединении, он не сможет присоединить ее. Есть несколько способов заставить его увидеть эту БД, но намного лучше просто не отсоединять ее.
Не перезапускать SQL Server
Точно так же, как при отсоединении-присоединении, перезапуск службы SQL Server не сможет исправить обнаруженные ошибки (если они есть).
Перезапуск службы может сделать ситуацию хуже. Если SQL Server обнаружит ошибки во время выполнения фазы восстановления (recovery) БД после перезапуска, он пометит ее как «suspect», что сильно усложнит процесс восстановления БД.
Не начинать восстановление сразу
У вас может возникнуть соблазн просто запустить DBCC CHECKDB с одним из «восстановительных» параметров (обычно допускающими потерю данных) и надеяться, что все станет лучше (по моему опыту — первое что рекомендуют на «непрофильных» форумах по SQL Server — запустить DBCC CHECKDB REPAIR_ALLOW_DATA_LOSS — прим. переводчика). Во многих случаях запуск такого восстановления не рекомендуется. Он не гарантирует исправления всех ошибок и может привести к недопустимой потере данных.
Такое восстановление — это последний шаг при исправлении ошибок. Оно должно быть запущено только если у вас уже нет другого выбора, но никак не в первую очередь.
Запустить проверку целостности
Для того чтобы решить как исправить базу данных, мы точно должны знать что именно повреждено. Единственный способ, которым мы можем это выяснить — запустить DBCC CHECKDB с параметром All_ErrorMsgs (в SQL Server 2005 SP3, SQL Server 2008 SP1 и в более старших версиях, этот параметр включен по умолчанию, указывать его не обязательно). Помните, что если вы запустите DBCC CHECKDB без параметра No_InfoMsgs, в выводе этой процедуры будет информация о количестве строк и страниц в каждой таблице, что вряд ли будет вас интересовать при анализе ошибок.
DBCC CHECKDB может долго выполняться на больших БД, но необходимо дождаться пока эта процедура не закончит работу. Грамотная стратегия восстановления может быть построена только при наличии информации обо всех проблемах в БД.
Найти причину
После того как ошибки исправлены, работу нельзя считать законченной. Если причина этих ошибок не установлена, они могут возникнуть снова. Обычно, основной причиной ошибок являются проблемы с подсистемой ввода-вывода, но они также могут быть вызваны неправильной работой «низкоуровнего ПО» (вроде антивируса), действиями человека, либо багами самого SQL Server.
Что дальше
Дальнейшие действия по исправлению ошибок целиком и полностью зависят от результатов выполнения CheckDB. Чуть дальше я покажу несколько наиболее часто возникающих ошибок (учтите, что эта статья не претендует на звание полного описания всевозможных ошибок).
Описанные ошибки располагаются по возрастанию уровня серьезности — от наименее серьезных к наиболее серьезным. В общем-то, для наиболее серьезных ошибок, находимых CheckDB, есть описание доступных методов их резрешения.
Если у вас вдруг обнаружится ошибка не описанная в статье, обратите внимание на последний раздел — «Поиск помощи».
Неверная информация о свободном месте на странице
Msg 2508, Level 16, State 3, Line 1
The In-row data RSVD page count for object «Broken1», index ID 0, partition ID 76911687695381, alloc unit ID 76911687695381 (type In-row data) is incorrect. Run DBCC UPDATEUSAGE.
В SQL Server 2000, количество строк и страниц в таблице или индексе, хранящееся в метаданных, могло не соответствовать действительности (и даже быть отрицательным) и DBCC CHECKDB не видел в этом ничего плохого. В SQL Server 2005, это количество должно быть правильным и CheckDB выдаст предупреждение, если вдруг найдет несоответствие.
Это несерьезная прблема и очень легко разрешается. Как говорится в сообщении, нужно всего лишь запустить DBCC UPDATEUSAGE в контексте нужной БД и предупреждение исчезнет. Эта ошибка часто встречается в базах данных обновленных с SQL Server 2000 и не должна появляться в базах данных, созданных в SQL Server 2005/2008.
Msg 8914, Level 16, State 1, Line 1
Incorrect PFS free space information for page (1:26839) in object ID 181575685, index ID 1, partition ID 293374720802816, alloc unit ID 76911687695381 (type LOB data). Expected value 0_PCT_FULL, actual value 100_PCT_FULL.
Эта ошибка появляется, когда PFS-страница (Page Free Space), которая учитывает насколько заполнены страницы в БД, содержит некорректные значения. Эта ошибка, как и упомянутая ранее, не является серьезной. Алгоритм, по которому определялось насколько заполнены страницы, в SQL Server 2000 не всегда отрабатывал правильно. Для решения этой проблемы нужно запустить DBCC CHECKDB с параметром REPAIR_ALLOW_DATA_LOSS и, если это единственная ошибка в БД, никакие данные, на самом деле, не пострадают.
Повреждение только некластерных индексов
Если все ошибки, найденные CheckDB, относятся к индексам с ID = 2 и больше, это означет, что были повреждены только некластерные индексы. Поскольку информация, содержащаяся в некластерных индексах, является «избыточной» (те же самые данные хранятся в куче, либо в кластерном индексе — прим. переводчика), эти повреждения могут быть исправлены без потери каких-либо данных.
Если все ошибки, найденные CheckDB, относятся к некластерным индексам, рекомендуемый «уровень восстановления» для DBCC CHECKDB — REPAIR_REBUILD. Примеры таких ошибок (на самом деле ошибок такого типа намного больше):
Msg 8941, Level 16, State 1, Line 1
Table error: Object ID 181575685, index ID 4, page (3:224866). Test (sorted [i].offset >= PAGEHEADSIZE) failed. Slot 159, offset 0x1 is invalid.
Msg 8942, Level 16, State 1, Line 1
Table error: Object ID 181575685, index ID 4, page (3:224866). Test (sorted[i].offset >= max) failed. Slot 0, offset 0x9f overlaps with the prior row.
В этом случае, повреждение может быть полностью исправлено удалением поврежденных некластерных индексов и повторным их созданием. Перестроение индекса (ALTER INDEX REBUILD) в режиме on-line (и иногда в off-line) читает страницы старого индекса для создания нового и, следовательно, завершится с ошибкой. Поэтому, необходимо удалить старые индексы и создать их заново.
Именно это сделает DBCC CHECKDB с параметром REPAIR_REBUILD, но база данных при этом должна быть в однопользовательском режиме. Вот почему обычно лучше вручную выполнить эти операции, чтобы с базой данных можно было продолжать работать, пока индексы будут пересоздаваться.
Если у вас недостаточно времени на то, чтобы пересоздать нужные индексы и в наличии есть «чистый» (не содержащий в себе ошибок) полный бэкап и бэкапы журнала транзакций с неразорванной цепочкой журналов, вы можете восстановить поврежденные страницы из них.
Повреждение LOB-страниц
Msg 8964, Level 16, State 1, Line 1
Table error: Object ID 181575685, index ID 1, partition ID 72057594145669120, alloc unit ID 72057594087800832 (type LOB data). The off-row data node at page (1:2444050), slot 0, text ID 901891555328 is not referenced.
Ошибка говорит о том, что существуют LOB-страницы (Large OBject), на которые не ссылается ни одна страница с данными. Такое может произойти, если ранее был поврежден кластерный индекс (или куча) и его поврежденные страницы были удалены.
Если CheckDB говорит только о таких ошибках, то можно запускать DBCC CHECKDB с параметром REPAIR_ALLOW_DATA_LOSS — эти страницы будут уничтожены. Поскольку у вас все равно нет страниц с данными, которые ссылаются на эти страницы, бОльшей потери данных уже не будет.
Ошибки, связанные с выходом за пределы допустимого диапазона
Msg 2570, Sev 16, State 3, Line 17
Page (1:1103587), slot 24 in object ID 34, index ID 1, partition ID 281474978938880, alloc unit ID 281474978938880 (type «In-row data»). Column «modified» value is out of range for data type «datetime». Update column to a legal value.
Эти ошибки показывают, что в столбце есть значения выходящие за пределы допустимого диапазона. Это может быть значение типа datetime, предполагающее, что с полуночи прошло больше 1440 минут, строка-Unicode, в которой количество байт не делится на 2, или float/real с неверным значением точности.
Проверка на эти ошибки не выполняется по умолчанию, для баз данных обновленных с версии SQL Server 2000 или более ранних, если перед этим ни разу не выполнялась команда DBCC CHECKDB со включенным параметром DATA_PURITY.
CheckDB не сможет исправить эти ошибки, поскольку неизвестно какие значения поставить взамен неправильных. Исправление таких ошибок не требует особых усилий, но выполняется вручную. Неправильные значения должны быть заменены на что-нибудь приемлимое. Основная проблема — это поиск неверных значений. В этой статье базы знаний есть пошаговая инструкция.
Повреждение кластерного индекса или кучи
Если обнаруживается, что повреждены страницы кучи или листового уровня (leaf pages) кластерного индекса — это означает, что данные на них потеряны. Страницы листового уровня кластерного индекса содержат непосредственно страницы данных и для них избыточность никак не обеспечивается.
Если CheckDB сообщает о повреждении страниц листового уровня кластерного индекса, необходимый «уровень восстановления» для DBCC CHECKDB — REPAIR_ALLOW_DATA_LOSS.
Примеры таких ошибок:
Server: Msg 8976, Level 16, State 1, Line 2
Table error: Object ID 181575685, index ID 1, partition ID 76911687695381, alloc unit ID 76911687695381 (type In-row data). Page (1:22417) was not seen in the scan although its parent (1:479) and previous (1:715544) refer to it.
Server: Msg 8939, Level 16, State 1, Line 2
Table error: Object ID 181575685, index ID 0, page (1:168576). Test (m_freeData >= PAGEHEADSIZE && m_freeData <= (UINT)PAGESIZE — m_slotCnt * sizeof (Slot)) failed. Values are 44 and 8028.
Следует помнить, что если ошибки, возвращаемые CheckDB, относятся к index id = 0 или 1, это значит, что повреждены непосредственно данные.
Такой тип ошибок исправляется, но исправление заключается в уничтожении строк или целых страниц. Когда CheckDB удаляет данные для исправления ошибки, ограничения, налагаемые внешними ключами, не проверяются и никакие триггеры не срабатывают. Строки или страницы просто удаляются. В результате данные могут оказаться не согласованными, либо может быть нарушена логическая целостность (на LOB-страницы может больше не ссылаться ни одна строка, либо строки некластерного индекса могут указывать «в никуда»). Из-за таких последствий, подобное восстановление, не рекомендуется использовать.
Если у вас есть «чистый» бэкап, восстановление из него обычно является более предпочительным, для исправления таких ошибок. Если база данных находится в полной модели восстановления и у вас есть бэкапы журнала транзакций с неразорванной цепочкой журналов (начиная с последнего «чистого» полного бэкапа), вы можете сделать бэкап активной части лога и восстановить базу данных целиком (или только поврежденные страницы), в результате чего данные вообще не будут потеряны.
Если бэкапа с неповрежденными данными нет, у вас остается только один вариант — запуск DBCC CHECKDB с параметром REPAIR_ALLOW_DATA_LOSS. Это потребует перевода базы данных в однопользовательский режим на все время выполнения этой процедуры.
И хотя у вас нет возможности избежать потери данных, вы можете посмотреть какие данные будут удалены из кластерного индекса. Для этого, посмотрите этот пост Пола Рэнадала.
Повреждение метаданных
Msg 3853, Level 16, State 1, Line 1
Attribute (object_id=181575685) of row (object_id=181575685,column_id=1) in sys.columns does not have a matching row (object_id=181575685) in sys.objects.
Подобные ошибки, обычно, возникают в базах данных, обновленных с SQL Server 2000, когда кто-то ковырялся напрямую в системных таблицах.
В системных таблицах любой версии SQL Server внешние ключи не используются, поэтому в SQL Server 2000 была возможность удалить строку из sysobjects (например, таблицу) и оставить в таблицах syscolumns и sysindexes строки, ссылающиеся на удаленную строку.
В SQL Server 2000 CheckDB не проверял целостность системного каталога и такие проблемы зачастую висели незамеченными. В SQL Server 2005, CheckDB проверяет целостность системного каталога и такие ошибки могут проявиться.
Исправление этих ошибок дело не самое легкое. CheckDB не может их исправить, поскольку единственное что можно сделать — это удалить записи из системных таблиц, что, в свою очередь, может вызвать потерю большого количества данных. Если у вас есть бэкап этой БД, сделанный до обновления на SQL Server 2005 и обновление было совсем недавно, вы можете развернуть его на SQL Server 2000, на нем вручную подправить системные таблицы и снова перенести БД на SQL Server 2005.
Если у вас нет бэкапа БД на SQL Server 2000 или обновление прошло слишком давно и потеря данных неприемлима, есть два пути. Первый — отредактировать системные таблицы в SQL Server 2005, но следует учитывать, что это довольно сложный и рискованный процесс, поскольку системные таблицы не документированы и гораздо более сложны, чем в ранних версиях. В этом посте можно найти дополнительную информацию.
Второй путь — это заскриптовать все объекты БД и экспортировать все данные, после чего создать новую базу данных, восстановить объекты и залить данные. Этот вариант более предпочтителен.
Неисправимые повреждения
CheckDB не может исправить все. Любые ошибки вроде приведенных ниже неисправимы и единственный вариант — это восстановление базы данных из бэкапа, в котором нет этих повреждений. Если у вас есть полный бэкап и цепочка журналов не нарушена до текущего времени, вы можете забэкапить заключительный фрагмент журнала транзакций и база данных может быть восстановлена без потери каких-либо данных.
Если таких бэкапов нет, единственное что вы можете сделать — заскриптовать те объекты и выгрузить те данные, которые еще доступны. Вполне вероятно, что из-за повреждений не все данные будут доступны, и, скорее всего, не все объекты смогут быть заскриптованы без ошибок.
Повреждение системных таблиц
Msg 7985, Level 16, State 2, Line 1
System table pre-checks: Object ID 4. Could not read and latch page (1:358) with latch type SH.
Check statement terminated due to unrepairable error.
Msg 8921, Level 16, State 1, Line 1
Check terminated. A failure was detected while collecting facts. Possibly tempdb out of space or a system table is inconsistent.
CheckDB зависит от нескольких критически важных системных таблиц, для того чтобы получить представление о том, что должно быть в базе данных. Если сами эти таблицы повреждены, то CheckDB не может даже предположить что должно быть в базе данных и с чем сравнить текущее положение дел, не говоря уже о том, чтобы что-то исправить.
Повреждение «карт распределения»
Msg 8946, Level 16, State 12, Line 1
Table error: Allocation page (1:2264640) has invalid PFS_PAGE page header values. Type is 0. Check type, alloc unit ID and page ID on the page.
Msg 8998, Level 16, State 2, Line 1
Page errors on the GAM, SGAM, or PFS pages prevent allocation integrity checks in database ID 13 pages from (1:2264640) to (1:2272727)
В этом случае, одна или несколько страниц определяющих размещение данных в БД (карты распределения — прим. переводчика) повреждены. Эти страницы используются для того чтобы определять какие страницы и экстенты в БД используются, а какие свободны. CheckDB не может исправить такие ошибки, поскольку практически невозможно определить (без этих страниц) какие экстенты используются для размещения данных, а какие нет. Простое удаление такой «карты распределения» невозможно, поскольку удаление любой из них повлечет за собой удаление 4 GB данных.
Поиск помощи
Если вы не уверены в том что вам нужно сделать — обратитесь за помощью. Если вдруг вы получаете сообщение о повреждении БД, которое вам непонятно и которое не описано выше — обратитесь за помощью. Если вы не уверены в том, что выбрали наилучший метод восстановления — обратитесь за помощью.
Если у вас есть Senior DBA, обратитесь к нему. Если у вас есть «наставник» — спросите у него. Спросите совета на форумах, но помните, что не все советы полученные на форумах полезны. На самом деле, именно там время от времени публикуются абсолютно неправильные и даже опасные решения.
Обратитесь в службу поддержки Microsoft, наконец. Это будет небесплатно, но они действительно знают что можно сделать с поврежденной базой данных и вполне вероятно, что если ваша база данных критична для предприятия, то стоимость простоя во время самостоятельного поиска решения будет намного выше чем стоимость обращения в саппорт.
Заключение
В этой статье я дал несколько примеров того, что можно сделать при обнаружении поврежденной БД и, что даже важнее, того, что делать не надо. Надеюсь, что теперь вы лучше понимаете какие методы можно применять для решения описанных проблем и насколько важно иметь хорошие бэкапы (и правильно выбрать модель восстановления — прим. переводчика).
Примечание: это мой первый перевод, который, к тому же делался не за раз, а в несколько подходов, вечерами, когда появлялось свободное время, поэтому текст целиком, возможно, кому-то покажется несколько несогласованым. Если где-то я был излишне косноязычен и какая-то часть текста вдруг окажется трудной для понимания — с радостью выслушаю все замечания.
С уважением, unfilled.
P.S. Когда я уже собрался было нажать на кнопочку «Опубликовать», мне на почту свалилась рассылка от SQL Server Central с вот таким вот комиксом.

Summary:
Database Console Command (DBCC) CHECKDB is used to identify errors in the SQL Server database. The DBCC CHECKDB comes with three repair options to fix database-related errors. This article outlines how to use DBCC CHECKDB command to repair SQL database. Also, it will discuss about a specialized MS SQL repair software you can use when DBCC CHECKDB fails to repair the database.

Contents
- Steps to Use DBCC CHECKDB for Repairing SQL Database
- What To Do When DBCC CHECKDB Fails?
- Conclusion
DBCC CHECKDB is used to check the physical and logical integrity of database objects, index relationships, and other structural checks. The failure of any of these checks will report consistency errors as part of the database console command.
The best method to repair errors in the database, reported by DBCC CHECKDB, is to run the last known good backup as recommended by Microsoft. However, if the backup is not available or is corrupted, you can try accessing the database in Emergency state.
The Emergency state allows accessing a database marked as suspect. It also allows running DBCC CHECKDB repair options to resolve database corruption. Once the database becomes accessible, repair it using the minimum level of repair option.
Note: Repair operations exclude any constraints applied to or between tables. So, if any of the table has one or more constraints, you must run DBCC CHECKCONSTRAINTS following a repair operation.
How to Use DBCC CHECKDB Command?
Before using DBCC CHECKDB, let’s look at its syntax.
Syntax:
DBCC CHECKDB
[ ( db_name | db_id | 0
[ , NOINDEX
| , { REPAIR_ALLOW_DATA_LOSS | REPAIR_FAST | REPAIR_REBUILD } ]
) ]
[ WITH
{
[ ALL_ERRORMSGS ]
[ , EXTENDED_LOGICAL_CHECKS ]
[ , NO_INFOMSGS ]
[ , TABLOCK ]
[ , ESTIMATEONLY ]
[ , { PHYSICAL_ONLY | DATA_PURITY } ]
[ , MAXDOP = number_of_processors ]
}
]
]
There are a few options you can use to perform database consistency checks using DBCC CHECKDB. These options are as follows:
- database_name | database_id | 0: Specifies the name or ID of the database against which you need to run integrity checks. If the ‘database_name’ or ‘id’ is not specified and ‘0’ is specified, the current database will be used by default.
- NOINDEX: This argument performs only logical checks to reduce the total execution time. Also, it does not include non-clustered indexes in the checks.
- REPAIR_ALLOW_DATA_LOSS | REPAIR_FAST | REPAIR_REBUILD: To repair a database, you need to run the DBCC CHECKDB command with any of these repair options:
- REPAIR_ALLOW_DATA_LOSS: Use this repair option as a last resort to repair a SQL database, as it can lead to data loss.
- REPAIR_FAST: This repair option does not perform any repair actions. It helps maintain syntax for backward compatibility.
- REPAIR_REBUILD: The REPAIR_REBUILD option helps repair the database without any data loss. It can be used to repair missing rows in nonclustered indexes and for rebuilding an index.
- ALL_ERRORMSGS: This argument displays all the error messages for each object.
- EXTENDED_LOGICAL_CHECKS: Starting with SQL Server 2016, additional logical checks are not performed on filtered indexes and views. To perform the additional checks, you must use the EXTENDED_LOGICAL_CHECKS option.
- NO_INFOMSGS: DBCC output displays informational messages that are not related to the consistency errors. Running DBCC CHECKDB with NO_INFOMSGS can turn off the informational messages.
- TABLOCK: Uses locks rather than internal database snapshot to perform consistency checks on a database.
- ESTIMATEONLY: Specifies the estimated space required by the ‘tempdb’ database for executing the CHECKDB command.
- PHYSICAL_ONLY: It limits consistency checks on the physical structure of the database page, reducing run-time for DBCC CHECKDB on large databases.
- DATA_PURITY: It helps check a database for invalid or out-of-range column values.
Prerequisites to Run DBCC CHECKDB
You must ensure that your system meets the following prerequisites before you run DBCC CHECKDB to perform consistency checks on a database or repair it.
- SQL Server Management Studio (SSMS) must be installed on your machine.
- The user must have Administrator privileges.
Steps to Use DBCC CHECKDB for Repairing SQL Database
Open SSMS and follow these steps to repair SQL database by using DBCC CHECKDB:
Note: In below-mentioned steps, we will be using database_name as Dbtesting. Make sure to replace DBtesting with the name of your database.
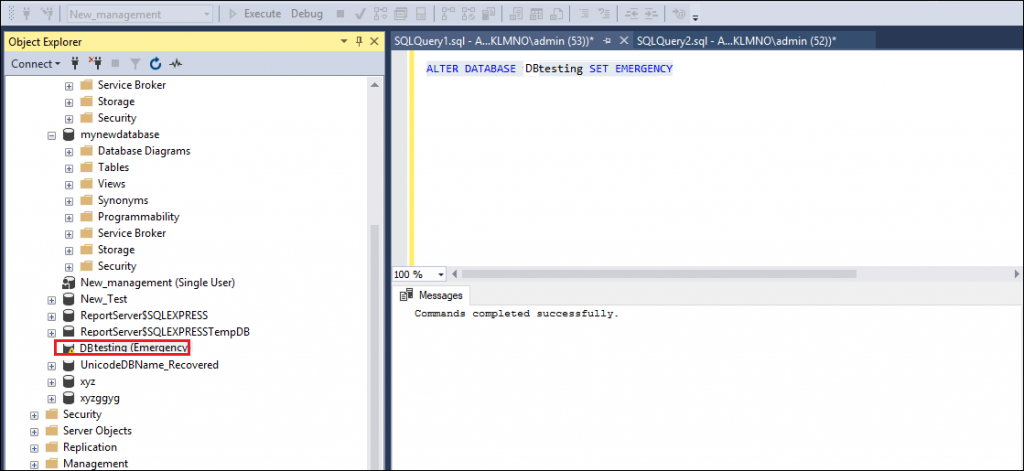
Step 1: Set Database to Emergency Mode
Change the database status to EMERGENCY mode, which provides a read-only access to the administrator. To put the database in EMERGENCY mode, run the following query in SSMS:
ALTER DATABASE [Dbtesting] SET EMERGENCY
Step 2: Check for Corruption Errors
Once the administrator is able to access the database, execute the following DBCC CHECKDB command to analyze corruption errors in the database:
DBCC CHECKDB (Dbtesting)
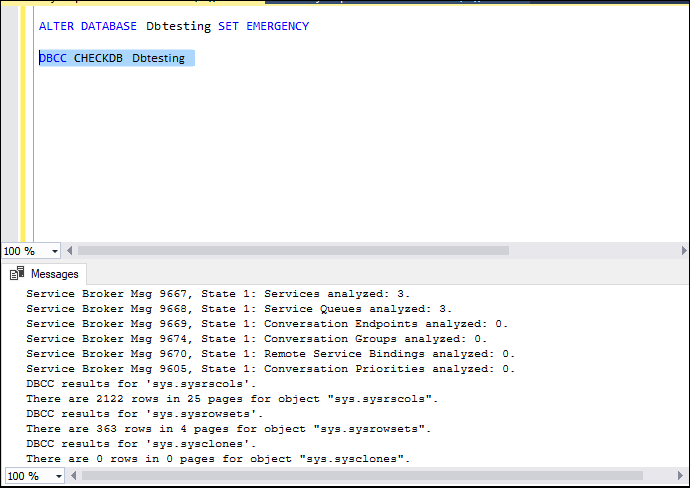
If DBCC CHECKDB detects any errors in the database, it will recommend appropriate repair options to fix the issue.
Step 3: Set SQL Server Database to SINGLE_USER Mode
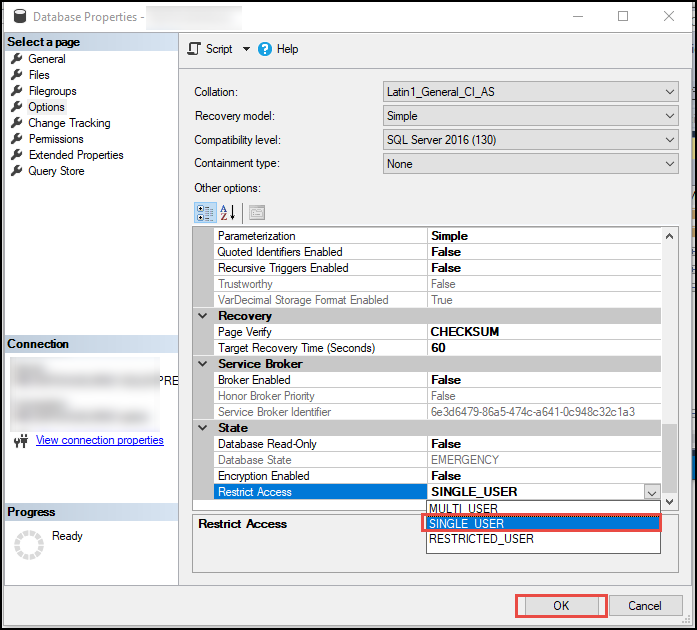
Before using the DBCC CHECKDB repair options, put the corrupt database in SINGLE_USER mode to prevent other users from modifying the data during the repair process. To set SQL database mode to SINGLE_USER, follow these methods:
Method 1: Using Graphical User Interface (GUI)
Open SSMS and perform these steps to set the database to SINGLE_USER mode:
- Right-click the database you want to repair, and then click Properties.
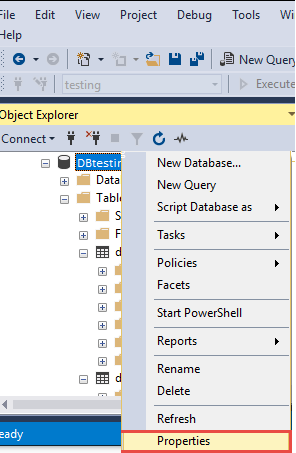
- In the Database Properties window, click Options.
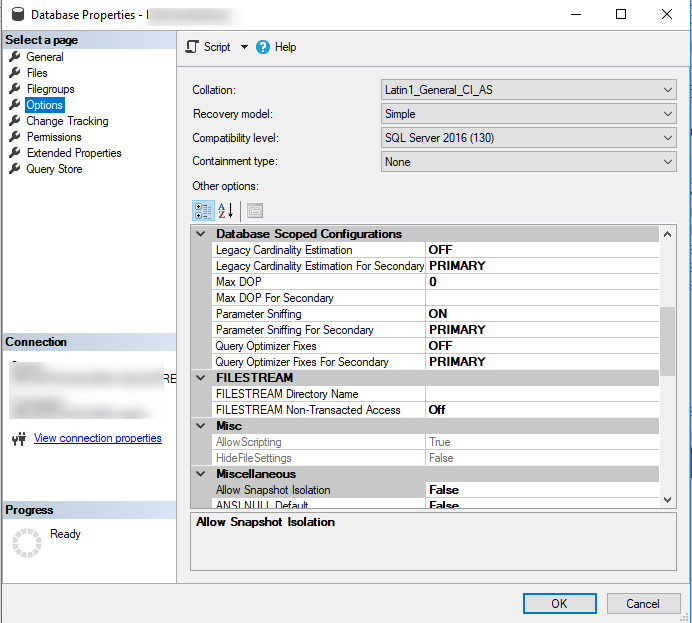
- Click the Restrict Access dropdown box under the State tab, select SINGLE_USER option, and then click OK.
Method 2: Using Transact-SQL (T-SQL) Commands
You can also set the database to SINGLE_USER mode, by running the following T-SQL query in SSMS:
ALTER DATABASE Dbtesting SET SINGLE_USER

Step 4: Repair the Database
Once you have changed the database mode to SINGLE_USER, run DBCC CHECKDB with the REPAIR_ALLOW_DATA_LOSS repair option to repair SQL server database.
DBCC CHECKDB (N ’Dbtesting’, REPAIR_ALLOW_DATA_LOSS) WITH ALL_ERRORMSGS, NO_INFOMSGS;
GO
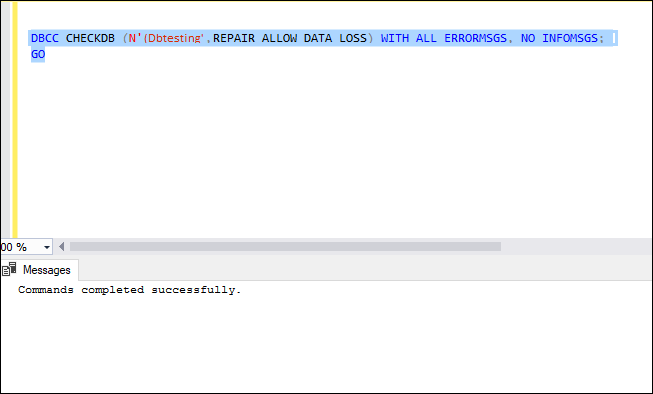
Note: While the REPAIR_ALLOW_DATA_LOSS repair option helps in repairing all reported errors in the SQL server database, it is not the best option for repairing database corruption. This repair option causes data loss. In fact, Microsoft recommends using the REPAIR_ALLOW_DATA_LOSS option as a last resort when you cannot restore a database from the backup. If you do not have a backup and cannot risk losing data, use a specialized MS SQL repair software to repair the database without any loss in database integrity.
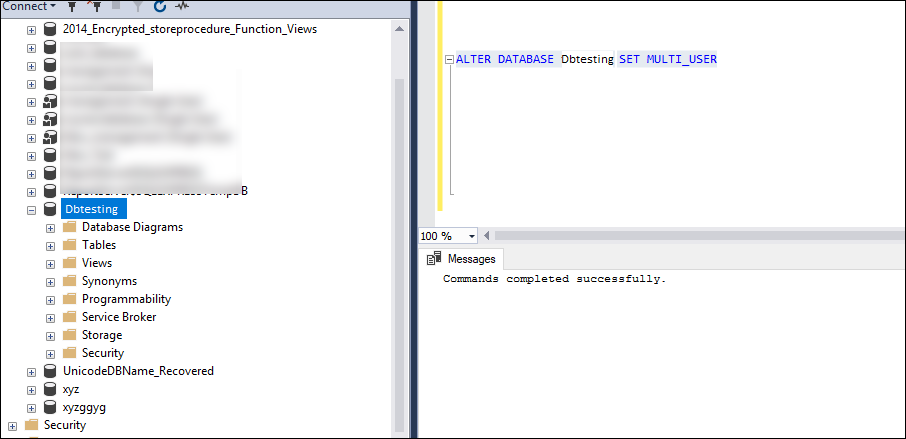
Step 5: Set Database Back to MULTI_USER Mode
After successfully repairing the database, set the database to MULTI_USER mode by executing the following command:
ALTER DATABASE Dbtesting SET MULTI_USER
What To Do When DBCC CHECKDB Fails?
Running the DBCC CHECKDB REPAIR_ALLOW_DATA_LOSS command might require deleting some database pages, resulting in loss of data. Also, DBCC CHECKDB commands might fail and return an error when dealing with severely corrupt SQL database files.
In such a case, use a specialized MS SQL repair software, such as Stellar Repair for MS SQL. The software repairs severely corrupt MS SQL database and restores all its components, while maintaining database integrity. The SQL recovery software helps reinstate access to the database with minimal manual efforts and time.
Key Features:
- Repairs both MDF and NDF database files
- Recovers all database components, including tables, keys, indexes, stored procedures, etc.
- Allows recovery of deleted records
- Recovers SQL tables with PAGE and ROW compression
- Supports selective recovery of database objects
- Previews recoverable database objects
To know the complete working process of the software, watch the video
Conclusion
A corrupt database could lead to unnecessary downtime and data loss. To overcome database-related errors, restore the database from the most recent backup. If current database backup does not exist or if the backup itself is corrupt, you can use DBCC CHECKDB ‘REPAIR_ALLOW_DATA_LOSS’ repair option to fix the database. But, this repair option involves risk of data loss. Also, DBCC CHECKDB might fail to fix the issue.
Use Stellar Repair for SQL software to repair MS SQL database and recover all its components with precision, maintaining database structure and integrity of database objects.
About The Author

Priyanka Chauhan
Priyanka is a technology expert working for key technology domains that revolve around Data Recovery and related software’s. She got expertise on related subjects like SQL Database, Access Database, QuickBooks, and Microsoft Excel. Loves to write on different technology and data recovery subjects on regular basis. Technology freak who always found exploring neo-tech subjects, when not writing, research is something that keeps her going in life.