
Throughout this answer I’ll assume, that a storage drive appears as a block device at the path /dev/sdc. To find the path of a storage drive in our current setup, use:
- Gnome Disks
 (formerly Gnome Disk Utility, a. k. a.
 palimpsest), if a GUI is available, or - on the terminal look at the output of
lsblkandls -l /dev/disk/by-idand try to find the right device by size, partitioning, manufacturer and model name.
Basic check
- only detects entirely unresponsive media
- almost instantaneous (unless medium is spun down or broken)
- safe
- works on read-only media (e. g. CD, DVD, BluRay)
Sometimes a storage medium simply refuses to work at all. It still appears as a block device to the kernel and in the disk manager, but its first sector holding the partition table is not readable. This can be verified easily with:
sudo dd if=/dev/sdc of=/dev/null count=1
If this command results in a message about an “Input/output error”, our drive is broken or otherwise fails to interact with the Linux kernel as expected. In the a former case, with a bit of luck, a data recovery specialist with an appropriately equipped lab can salvage its content. In the latter case, a different operating system is worth a try. (I’ve come across USB drives that work on Windows without special drivers, but not on Linux or OS X.)
S.M.A.R.T. self-test
- adjustable thoroughness
- instantaneous to slow or slower (depends on thoroughness of the test)
- safe
- warns about likely failure in the near future
Devices that support it, can be queried about their health through S.M.A.R.T. or instructed to perform integrity self-tests of different thoroughness. This is generally the best option, but usually only available on (non-ancient) hard disk and solid state drives. Most removable flash media don’t support it.
Further resources and instructions:
- Answer about S.M.A.R.T. on this question
- How can I check the SMART status of a drive on Ubuntu 14.04 through 16.10?
Read-only check
- only detects some flash media errors
- quite reliable for hard disks
- slow
- safe
- works on read-only media (e. g. CD, DVD, BluRay)
To test the read integrity of the whole device without writing to it, we can use badblocks(8) like this:
sudo badblocks -b 4096 -c 4096 -s /dev/sdc
This operation can take a lot of time, especially if the storage drive actually is damaged. If the error count rises above zero, we’ll know that there’s a bad block. We can safely abort the operation at any moment (even forcefully like during a power failure), if we’re not interested in the exact amount (and maybe location) of bad blocks. It’s possible to abort automatically on error with the option -e 1.
Note for advanced usage: if we want to reuse the output for e2fsck, we need to set the block size (-b) to that of the contained file system. We can also tweak the amount of data (-c, in blocks) tested at once to improve throughput; 16 MiB should be alright for most devices.
Non-destructive read-write check
- very thorough
- slowest
- quite safe (barring a power failure or intermittent kernel panic)
Sometimes – especially with flash media – an error only occurs when trying to write. (This will not reliably discover (flash) media, that advertise a larger size, than they actually have; use Fight Flash Fraud instead.)
-
NEVER use this on a drive with mounted file systems!
badblocksrefuses to operate on those anyway, unless you force it. -
Don’t interrupt this operation forcefully! Ctrl+C (SIGINT/SIGTERM) and waiting for graceful premature termination is ok, but
killall -9 badblocks(SIGKILL) isn’t. Upon forceful terminationbadblockscannot restore the original content of the currently tested block range and will leave it overwritten with junk data and possibly corrupt the file system.
To use non-destructive read-write checks, add the -n option to the above badblocks command.
Destructive read-write check
- very thorough
- slower
- ERASES ALL DATA ON THE DRIVE
As above, but without restoring the previous drive content after performing the write test, therefore it’s a little faster. Since data is erased anyway, forceful termination remains without (additional) negative consequence.
To use destructive read-write checks, add the -w option to the above badblocks command.
Неисправный жёсткий диск — одно из самых неприятных явлений в работе компьютера. Мало того что мы легко можем потерять очень много важной информации и файлов, так и замена HDD неслабо бьёт по бюджету. Прибавим к этому потраченное время и нервы, которые, как известно, не восстанавливаются. Чтобы не дать проблеме застать нас врасплох и заранее диагностировать её, стоит знать, как проверить жёсткий диск на ошибки в ОС Ubuntu. Программных средств, предоставляющих такие услуги, предостаточно.

Как в Ubuntu протестировать жесткий диск на ошибки.
Проверка с помощью встроенного ПО
Совсем необязательно качать программы, чтобы выполнить проверку диска в Ubuntu. Операционная система уже обладает утилитой, которая предназначена для этой задачи. Называется она badblocks, управляется через терминал.
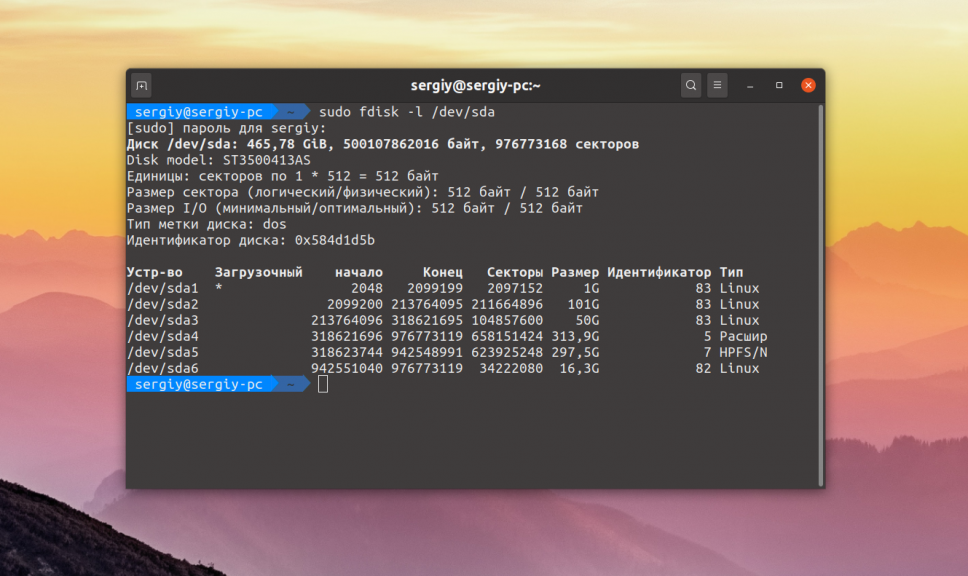
Открываем терминал и вводим:
sudo fdisk -l
Эта команда отображает информацию о всех HDD, которые используются системой.
После этого вводим:
sudo badblocks -sv /dev/sda
Команда служит уже для поиска повреждённых секторов. Вместо /dev/sda вводим имя своего накопителя. Ключи -s и -v служат для того, чтобы отображать в правильном порядке ход проверки блоков (s) и чтобы выдавать отчёт обо всех действиях (v).

Нажатием клавиш Ctrl + C мы останавливаем проверку жёсткого диска.
Для контроля за файловой системой можно также использовать две другие команды.
Для того чтобы размонтировать файловую систему, вводим:
umount /dev/sda
Для проверки и исправления ошибок:
sudo fsck -f -c /dev/sda
- «-f» делает процесс принудительным, то есть проводит его, даже если HDD помечен как работоспособный;
- «-c» находит и помечает бэд-блоки;
- «-y» — дополнительный вводимый аргумент, который сразу же отвечает Yes на все вопросы системы. Вместо него можно ввести «-p», он проведёт проверку в автоматическом режиме.
Программы
Дополнительное программное обеспечение также отлично справляется с этой функцией. А иногда даже лучше. Тем более что некоторым пользователям проще работать с графическим интерфейсом.
GParted
GParted как раз для тех, кому текстовый интерфейс не по душе. Утилита выполняет большое количество задач, связанных с работой HDD на Убунту. В их число входит и проверка диска на ошибки.

Для начала нам нужно скачать и установить GParted. Вводим следующую команду, чтобы выполнить загрузку из официальных репозиториев:
sudo apt-get install gparted
Установить программу легко и при помощи Центра загрузки приложений.
- Открываем приложение. На главном экране сразу же выводятся все носители. Если какой-то из них помечен восклицательным знаком, значит, с ним уже что-то не так.
- Щёлкаем по тому диску, который хотим проверить.
- Жмём на кнопку «Раздел», расположенную сверху.
- Выбираем «Проверка на ошибки».
Программа отсканирует диск. В зависимости от его объёма процесс может идти дольше или меньше. После сканирования мы будем оповещены о его результатах.
Smartmontools
Это уже более сложная утилита, которая выполняет более серьёзную проверку HDD по различным параметрам. Как следствие, управлять ей тоже сложнее. Графический интерфейс в Smartmontools не предусмотрен.

Качаем программу:
aptitude install smartmontools
Смотрим, какие накопители подключены к нашей системе. Обращать внимание нужно на строчки, оканчивающиеся буквой, а не цифрой. Именно в этих строках содержится информация о дисках.
ls -l /dev | grep -E ‘sd|hd’
Вбиваем команду для выведения подробной информации о носителе. Стоит посмотреть на параметр ATA. Дело в том, что при замене родного диска, лучше ставить устройство с тем же либо большим ATA. Так можно максимально раскрыть его возможности. А также посмотрите и запомните параметры SMART.
smartctl —info /dev/sde
Запускаем проверку. Если SMART поддерживается, то добавляем «-s». Если он не поддерживается или уже включён, то этот аргумент можно убрать.
smartctl -s on -a /dev/sde
После этого смотрим информацию под READ SMART DATA. Результат может принимать два значения: PASSED или FAILED. Если выпало последнее, можно начинать делать резервные копии и искать замену винчестеру.
Этим возможности программы не исчерпываются. Но для однократной проверки HDD этого будет вполне достаточно.
Safecopy
Это уже та программа, которую впору использовать на тонущем судне. Если мы осведомлены, что с нашим диском что-то не так, и нацелены спасти как можно больше выживших файлов, то Safecopy придёт на помощь. Её задача как раз заключается в копировании данных с повреждённых носителей. Причём она извлекает файлы даже из битых блоков.
Устанавливаем Safecopy:
sudo apt install safecopy
Переносим файлы из одной директории в другую. Выбрать можно любую другую. В данном случае мы переносим данные с диска sda в папку home.
sudo safecopy /dev/sda /home/
Бэд-блоки
У некоторых могут возникнуть вопросы: «что такое эти битые блоки и откуда они, вообще, взялись на моём HDD, если я его ни разу не трогал?» Bad blocks, или бэд-секторы — разделы HDD, которые больше не читаются. Во всяком случае так они по объективным причинам были помечены файловой системой. И скорее всего, с диском в этих местах действительно что-то не так. «Бэды» встречаются как на старых винчестерах, так и на самых современных, поскольку работают они практически по тем же самым технологиям.

Появляются же сбойные секторы по разным причинам.
- Прерывание записи из-за отключения питания. Вся информация, поступающая на жёсткий диск, разбивается в виде единиц и нулей на самые разные его части. Сбить этот процесс — значит сильно запутать винчестер. После такого сбоя может нарушиться загрузочный сектор и тогда система вообще не запускается.
- Некачественная сборка. Тут и говорить нечего. У дешёвого китайского устройства полететь может что угодно.
Теперь вы знаете, как сканировать HDD на ошибки. Проверка диска как на Ubuntu, так и на других системах довольно важная операция, которую стоит проводить хотя бы раз в год.
Одно из самых важных устройств компьютера — это жесткий диск, именно на нём хранится операционная система и вся ваша информация. Единица хранения информации на жестком диске — сектор или блок. Это одна ячейка в которую записывается определённое количество информации, обычно это 512 или 1024 байт.
Битые сектора, это повреждённые ячейки, которые больше не работают по каким либо причинам. Но файловая система всё ещё может пытаться записать в них данные. Прочитать данные из таких секторов очень сложно, поэтому вы можете их потерять. Новые диски SSD уже не подвержены этой проблеме, потому что там существует специальный контроллер, следящий за работоспособностью ячеек и перемещающий данные из нерабочих в рабочие. Однако традиционные жесткие диски используются всё ещё очень часто. В этой статье мы рассмотрим как проверить диск на битые секторы Linux.
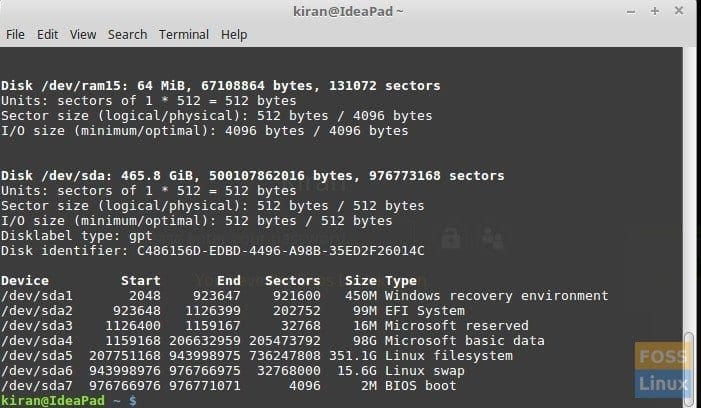
Для поиска битых секторов можно использовать утилиту badblocks. Если вам надо проверить корневой или домашний раздел диска, то лучше загрузится в LiveCD, чтобы файловая система не была смонтирована. Все остальные разделы можно сканировать в вашей установленной системе. Вам может понадобиться посмотреть какие разделы есть на диске. Для этого можно воспользоваться командой fdisk:
sudo fdisk -l /dev/sda1
Или если вы предпочитаете использовать графический интерфейс, это можно сделать с помощью утилиты Gparted. Просто выберите нужный диск в выпадающем списке:
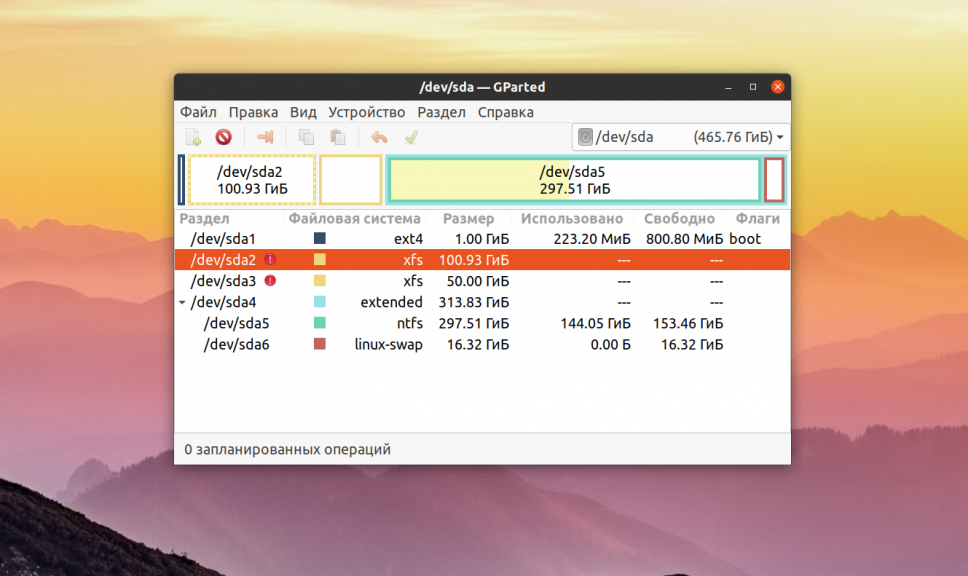
В этом примере я хочу проверить раздел /dev/sda2 с файловой системой XFS. Как я уже говорил, для этого используется команда badblocks. Синтаксис у неё довольно простой:
$ sudo badblocks опции /dev/имя_раздела_диска
Давайте рассмотрим опции программы, которые вам могут понадобится:
- -e — позволяет указать количество битых блоков, после достижения которого дальше продолжать тест не надо;
- -f — по умолчанию утилита пропускает тест с помощью чтения/записи если файловая система смонтирована чтобы её не повредить, эта опция позволяет всё таки выполнять эти тесты даже для смонтированных систем;
- -i — позволяет передать список ранее найденных битых секторов, чтобы не проверять их снова;
- -n — использовать безопасный тест чтения и записи, во время этого теста данные не стираются;
- -o — записать обнаруженные битые блоки в указанный файл;
- -p — количество проверок, по умолчанию только одна;
- -s — показывать прогресс сканирования раздела;
- -v — максимально подробный режим;
- -w — позволяет выполнить тест с помощью записи, на каждый блок записывается определённая последовательность байт, что стирает данные, которые хранились там раньше.
Таким образом, для обычной проверки используйте такую команду:
sudo badblocks -v /dev/sda2 -o ~/bad_sectors.txt
Это безопасно и её можно выполнять на файловой системе с данными, она ничего не повредит. В принципе, её даже можно выполнять на смонтированной файловой системе, хотя этого делать не рекомендуется. Если файловая система размонтирована, можно выполнить тест с записью с помощью опции -n:
sudo badblocks -vn /dev/sda2 -o ~/bad_sectors.txt
После завершения проверки, если были обнаружены битые блоки, надо сообщить о них файловой системе, чтобы она не пыталась писать туда данные. Для этого используйте утилиту fsck и опцию -l:
fsck -l ~/bad_sectors.txt /dev/sda1
Если на разделе используется файловая система семейства Ext, например Ext4, то для поиска битых блоков и автоматической регистрации их в файловой системе можно использовать команду e2fsck. Например:
sudo e2fsck -cfpv /dev/sda1
Параметр -с позволяет искать битые блоки и добавлять их в список, -f — проверяет файловую систему, -p — восстанавливает повреждённые данные, а -v выводит всё максимально подробно.
Выводы
В этой статье мы рассмотрели как выполняется проверка диска на битые секторы Linux, чтобы вовремя предусмотреть возможные сбои и не потерять данные. Но на битых секторах проблемы с диском не заканчиваются. Там есть множество параметров стабильности работы, которые можно отслеживать с помощью таблицы SMART. Читайте об этом в статье Проверка диска в Linux.
Обнаружили ошибку в тексте? Сообщите мне об этом. Выделите текст с ошибкой и нажмите Ctrl+Enter.

Статья распространяется под лицензией Creative Commons ShareAlike 4.0 при копировании материала ссылка на источник обязательна .
Об авторе
![]()
Основатель и администратор сайта losst.ru, увлекаюсь открытым программным обеспечением и операционной системой Linux. В качестве основной ОС сейчас использую Ubuntu. Кроме Linux, интересуюсь всем, что связано с информационными технологиями и современной наукой.
Common disk errors include physical failures, bad sectors or blocks, and inconsistent filesystems, which can lead to various problems. Diagnosing these issues in Linux can be done using built-in command line tools.

The disk must not be mounted when performing these tests. If it’s necessary to check the root filesystem and it cannot be unmounted due to logged-in users, you can boot into a live Linux system, such as the Ubuntu installer disk. This method is also helpful for recovering partition tables.
Steps to scan for disk error and bad sector in Linux:
-
Open the terminal application.
-
Display the list of available disks on your system.
$ lsblk
NAME   MAJ:MIN RM  SIZE RO TYPE MOUNTPOINT
loop0    7:0    0 55.4M  1 loop /snap/core18/1997
loop1    7:1    0  219M  1 loop /snap/gnome-3-34-1804/66
loop2    7:2    0 64.8M  1 loop /snap/gtk-common-themes/1514
loop3    7:3    0 32.3M  1 loop /snap/snapd/11588
loop4    7:4    0   51M  1 loop /snap/snap-store/518
loop5    7:5    0 65.1M  1 loop /snap/gtk-common-themes/1515
sda      8:0    0   20G  0 disk
├─sda1   8:1    0    1M  0 part
├─sda2   8:2    0  513M  0 part /boot/efi
└─sda3   8:3    0 19.5G  0 part /
sdb      8:16   0   20G  0 disk /mnt/data
sr0     11:0    1 1024M  0 rom
-
Ensure the disk you wish to examine is unmounted.
$ sudo umount /dev/sdb
[sudo] password for user:
-
Assess the disk’s S.M.A.R.T. (Self-Monitoring, Analysis, and Reporting Technology) health status using smartctl.
$ sudo smartctl -H /dev/sdb
smartctl 7.2 2020-12-30 r5155 [x86_64-linux-5.11.0-16-generic] (local build)
Copyright (C) 2002-20, Bruce Allen, Christian Franke, www.smartmontools.org

=== START OF READ SMART DATA SECTION ===
SMART Health Status: OK
-
Examine the filesystem consistency on the disk with fsck.
$ sudo fsck /dev/sdb
fsck from util-linux 2.36.1
e2fsck 1.45.7 (28-Jan-2021)
/dev/sdb: clean, 11/1310720 files, 126322/5242880 block
-
Inspect the disk for bad blocks or bad sectors using badblocks.
$ sudo badblocks -v /dev/sdb
Checking blocks 0 to 20971519
Checking for bad blocks (read-only test): done
Pass completed, 0 bad blocks found. (0/0/0 errors)

Discuss the article:
Comment anonymously. Login not required.
Hard disk failures are just a thing that’s bound to happen to every computer. But, time of complete failure is something that you should estimate based on the scan results. Presence of bad sectors is the beginning of the end of a hard disk drive. Bad sectors are hardware related and can’t be fixed. You can only monitor it and make your OS to not use the bad sectors for writing data.
In this session of Terminal Tuts, let’s learn how to find out the presence of bad sectors and errors in your computer’s hard disk. We had already published the GUI method of finding SMART status and errors using ‘Disks’ utility – just FYI.
Scan for Bad Sectors and Errors on the hard disk in Ubuntu, Linux Mint, and elementary OS
Note that if you want to scan your computer’s internal hard disk which is mounted, you should be using an Ubuntu Live USB drive and boot into it. Then launch ‘Terminal’ from the Live environment and follow these steps. If you are checking an external hard disk, you need to see that it is not mounted.
Step 1: First, let’s use the fdisk command to find out the hard disk partitions status.
sudo fdisk -l
Основатель и администратор сайта losst.ru, увлекаюсь открытым программным обеспечением и операционной системой Linux. В качестве основной ОС сейчас использую Ubuntu. Кроме Linux, интересуюсь всем, что связано с информационными технологиями и современной наукой.


