
Время на прочтение
3 мин
Количество просмотров 59K
Сегодня хотел бы поделиться своим анализом и способами лечением разных ошибок при разработке своего продукта в Android Studio. Лично я, не раз сталкивался с различными проблемами и ошибками при компиляции и/или тестировании мобильного приложения. Данный процесс, всегда однообразный и в 99% случаев и всегда нужно тратить n-колличество времени на его устранение. Даже, когда ты уже сталкивался с данной проблемой, ты все равно идешь в поисковик и вспоминаешь, как же решить ту или иную ситуацию.
Я для себя завел файлик, в котором отметил самые частые ошибки — потратив на это несколько часов и перечислил самые популярные ошибки (в дальнейшем планирую просто их запомнить), чтоб сократить свое время в дальнейшем.
Итак, начну по порядку с самой распространенной проблемы и дальше буду перечислять их по мере появления:
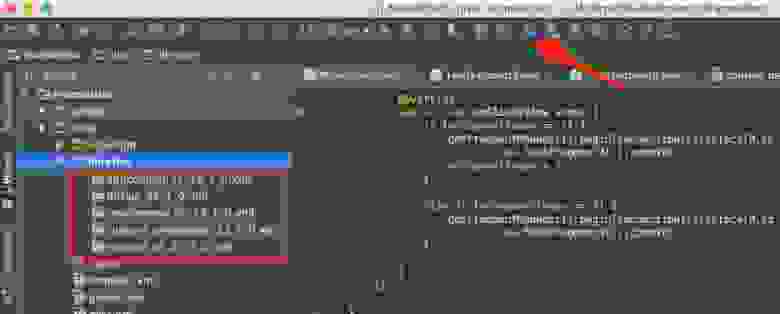
1) Если подчеркивает красным код, где используются ресурсы: R. — попробовать (но вероятно не поможет): Build -> Clean Project.
В принципе на Build -> Clean Project можно не терять времени, а лучше всего — слева переключиться на Project, открыть каталог .idea, затем каталог libraries и из него удалить все содержимое. Затем нажать кнопку Sync Project. А затем (если все еще красное, но скорее всего уже будет все ок ) Build -> Clean Project.
2) После внезапного выключения компьютера, после перезапуска может быть во всех проектах весь код красным. Перед этим может быть ошибка: Unable to create Debug Bridge: Unable to start adb server: Unable to obtain result of ‘adb version’. Есть три решения — первое помогло, второе нет (но может быть для другого случая), а третье — не пробовал:
а) File — Invalidate Caches/Restart — Invalidate and Restart
б) Закрыть студию. В корне папки проекта удалить файл(ы) .iml и папку .idea. Вновь запустить студию и импортировать проект.
в) Нажать Ctrl-Alt-O и запустить оптимизацию импорта.
Кстати, adb сервер можно проверить на версию (и работоспособность) и затем перезапустить:
adb version
adb kill-server
adb start-server
3) Если Android Studio выдает приблизительно такую ошибку: Error:Execution failed for task ‘:app:dexDebug’…
Решение:
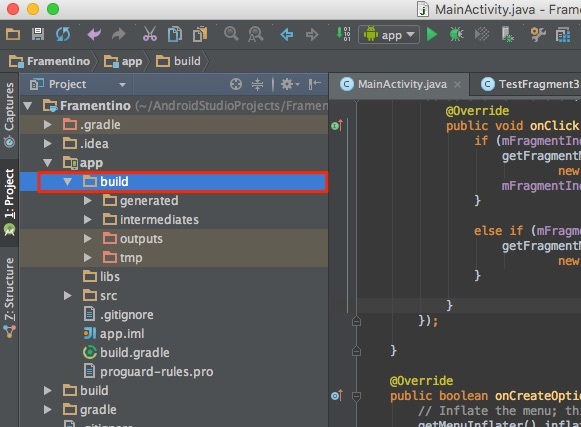
Надо слева переключиться на опцию Project, найти и удалить папку build которая лежит в папке app, т.е. по пути app/build. Затем перестроить весь проект заново: Build -> Rebuild Project.
Такое же решение если ошибка типа: «не могу удалить (создать) папку или файл» и указан путь, который в ведет в app/build. Тоже удаляем папку build и ребилдим проект.
4) В сообщении об ошибке упоминается heap — виртуальная память. А ошибка обычно вызвана ее нехваткой, т.е. невозможностью получить запрашиваемый объем. Поэтому этот запрашиваемый объем надо уменьшить, т.е. переписать дефолтное значение (обычно 2048 MB которое можно изменить в настройках), на меньшее 1024 MB.
В файле проекта gradle.properties пишем:
org.gradle.jvmargs=-Xmx1024m

5) Android Studio пришет примерно такую ошибку: Plugin is too old, please update to a more recent version, or set ANDROID_DAILY_OVERRIDE environment variable to «83648b99316049d63656d7276cb19cc7e95d70a5»
Возможные причины (кроме необходимости регулярного обновления SDK):
а) Загруженный проект был скомпилирован с помощью уже несовместимого старого gradle плагина. В этом случае надо найти и подключить в своем build.gradle проекта этот более старый плагин. т.е. попробовать более старые версии, например: 1.1.3 (часто именно 1.1.x и подходит).
com.android.tools.build:gradle:1.1.3
Найти все версии можно здесь.
б) Если в build.gradle проекта используется beta-версия плагина — это означает, что срок ее истек. Посмотреть последние релизы (продакшн и бета) можно также здесь:
6) Иногда при подключении сторонних библиотек могут дублироваться некоторые файлы (обычно связанные с лицензированием). В сообщении будет что-то содержащее слова: duplicate files. Решение — надо посмотреть в сообщении об ошибке или в документации подключенной сторонней библиотеки — какие именно файлы стали избыточными, и перечислить их в build.gradle модуля для исключения (exclude) из билда.
Это делается в директиве packagingOptions (которая, в свою очередь, находится в директиве android).
Например, при подключении библиотеки Firebase (облачный бек-енд сервис) в случае возникновения такой ошибки в build.gradle модуля (не проекта) добавляем packagingOptions в android (уже существующие там директивы оставляем) так:
android {
    ...
    packagingOptions {
        exclude 'META-INF/LICENSE'
        exclude 'META-INF/LICENSE-FIREBASE.txt'
        exclude 'META-INF/NOTICE'
        }
}

P.S.: Думаю, данная статья была полезна. Если у вас есть еще какие-то частные проблемы при работе с проектами в Android Studio, с удовольствием выслушаю их. Как по мне, 6 проблемных причин, которые я перечислил выше — это 99% всех случаев краха проекта. Конечно, если проблема не связана с вашим личным кодом.
While developing applications in Android Studio we might encounter many errors while writing code in the editor. We know that there’s an error since the editor automatically detects in real-time and highlights it in red color like this
Well, in the above image we can see that the error occurs due to a closing bracket after orderLists in Line 58. We can say that because the editor detects that in real-time and warns us with red underlining at that line. Now we can write error-less code and our app should run, right? Well, NO. Because the editor only helps in detecting the syntax error in the code. Whereas we have many other kinds of errors that might cause our app not to work the way we want it to be. Runtime and Logical errors are the common ones and cannot be detected in the editor.
Now the question is – We have written 100’s and 1000’s lines of error less codes or I should syntax error free code that compiles and runs without any problem. But my app still stops working or some features don’t work the way I want it to?
In this situation, the Logcat acts as our best friend. Logcat Window is the place where various messages can be printed when an application runs. Suppose, you are running your application and the program crashes, unfortunately. Then, Logcat Window is going to help you to debug the output by collecting and viewing all the messages that your emulator throws. So, this is a very useful component for the app development because this Logcat dumps a lot of system messages and these messages are actually thrown by the emulator. In Android Studio one of the most used tools is Logcat. Logcat window in Android Studio is used to display real-time system messages and messages that are added in the Log class of the app. To open Logcat Click View > Tool Windows > Logcat (Alt + 6 or from the toolbar window).
Most Common Types of Error
- NullPointerException – When expecting from null variables, objects, or classes.
- IOException – Exceptions produced by failed or interrupted I/O operations.
- OutOfMemoryError – When an object cannot be allocated more memory by its garbage collector.
Solutions to fix App Crash
1. Observe the App Crash
Suppose you have built an application with multiple activities or fragments or both then you need to observe and see which action causes the application to crash. This might sometimes help you automatically remember or recall what mistake was made and which part of the app is causing that.

2. Find the Stack Trace
It is best to look at the logcat to find the exact point of error. You can open the logcat and in the error section start reading the log error messages. Scroll to the bottom of the screen and look for the line that says Caused by. You may find the file name and line number in the logcat messages, which will lead you directly to the cause of the error. Look for elements to resolve the error.
- File Name
- Line Number
- Exception Type
- Exception Message
3. Investigation Techniques
There are times when you might not find the exact line of code or file name that’s causing the error. So you should following techniques to investigate by yourself –
- Toast – Toast messages are used to display alerts messages and in this case, you can use them to display failure messages.
- Logging – Logging is used to print messages in the logcat.
- Breakpoints – It can be used to investigate values at the points where breaks are applied.
4. Google for Solution
There will be times we cannot fix the bug by ourselves and that’s ok. That’s the time you should start searching for solutions on the internet. Try googling with the main query message like – java.lang.NullPointerException. Generally, try looking for links of StackOverflow with maximum matching keywords of your search in the google search results. Afterward, you can go for other portals if you do not find the solution in StackOverflow.
Last Updated :
30 Jun, 2021
Like Article
Save Article
Потеряно хранилище ключей
If you use the same keystore when updating AndroidAPS you do not have to uninstall the previous version on your smartphone. That’s why it is recommended to store the keystore in a save place.
If you try to install the apk, signed with a different keystore than before, you will get an error message that the installation failed!
In case you cannot find your old keystore or its password anymore, proceed as follows:
-
Export settings on your phone.
-
Copy or upload the settings file from your phone to an external location (i.e. your computer, cloud storage service…).
-
Generate signed apk of new version as described on the Update guide and transfer it to your phone.
-
Деинсталлируйте предыдущую версию AAPS на вашем телефоне.
-
Установите новую версию AAPS на свой телефон.
-
Import settings to restore your objectives and configuration.
-
Check your battery optimization options and disable them again.
If you can’t find them on your phone copy them from the external storage to your phone.
-
Keep on looping.
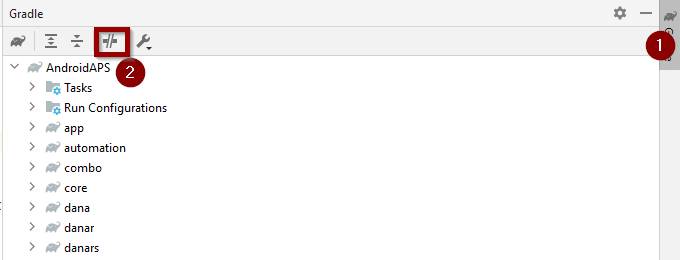
Gradle Sync failed
Gradle Sync can fail to various reasons. Wen you get a message saying that gradle sync failed, open the «Build» tab (1) at the bottom of Android Studio and check what error message (2) is displayed.

These are the usual gradle sync failures:
-
Неодобренные изменения
-
No cached version of … available
-
Android Gradle requires Java 11 to run
Important: After you have followed the instructions for your specific problem, you need to trigger the gradle sync again.
Неодобренные изменения
If you receive a failure message like

Step 1 — Check git installation
-
Open the terminal tab (1) at the bottom of Android Studio and copy the following text and paste or type into the terminal.

Note: There is a space and two hyphens between git and version!
-
You must receive a message saying what git version is installed, as you can see in the screenshot above. In this case, go to Step 2.
-
In case you get an message saying
your Git installation is not right.
-
Check git installation
-
if on Windows and git was just installed, you should restart your computer to make git globally available after the installation
-
If Git is installed, you have restarted (if on windows), and git still couldn’t found:
-
Search your computer for a file «git.exe».
Note for yourself, what directory it is in.
-
Go to the Environment variables in windows, select the variable «PATH» and click edit. Add the directory where you have found your git installation.
-
Save and close.
-
Restart Android Studio.

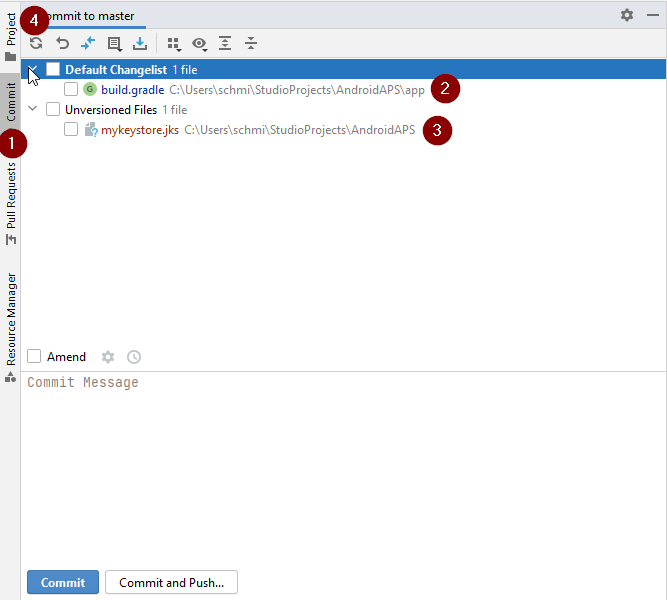
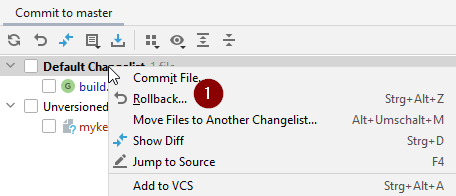
Step 2: Check for uncommitted changes.
-
In Android Studio, oben the «Commit» Tab (1) on the left-hand side.
-
You can see either a «Default changeset» (2) or «Unversioned files» (3):
-
For «Default changeset», you probably updated gradle or changed some of the file contents by mistake.
-
Right click on «Default Changeset» and select «Rollback»
-
The files are fetched again from the Git server. If there are no other changes in the commit tab, go to Step 3.
-
-
If you can see «Unversioned Files», you might have stored files in your sourecode directory which should be better places somewhere else, e.g. your keystore file.
-
Use your regular file explorer on your computer to move or cut and paste that file to a save place.
-
Go back to Android Studio and click the Refresh button (4) within the Commit tab to make sure the file is not stored in the AndroidAPS directory anymore.
If there are no other changes in the commit tab, go to Step 3.
-
Step 3: Resync Gradle (again)
Follow the instructions at Gradle Resync.
Android Gradle plugin requires Java 11 to run
You might experience this error message:

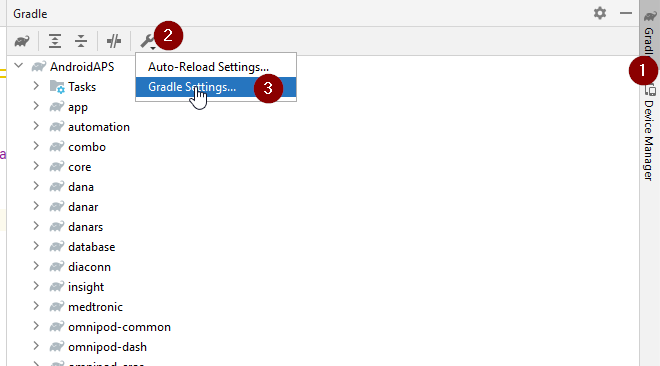
Click on «Gradle Settings» (1) to go to open the gradle settings.
If you don’t have the link to the «Gradle Settings», open the Gradle settings manually by selecting the Gradle Tab on the right border (1), select the tools icon (2) and there the item „Gradle Settings“ (3).
When you have opened the Gradle settings dialog, open the options (1) at «Gradle JDK» and selected the «Embedded JDK version» (2).
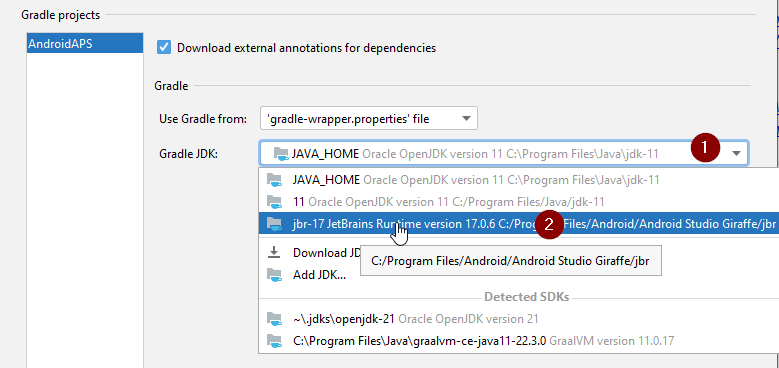
Press «OK» to save and close the settings dialog.
Important: If you don’t see the setting «Gradle JDK», you might have not updated Android Studio. Make sure you are using Android Studio 2021.1.1 Bumblebee) or newer.
Now you need to trigger a Gradle Resync
Could not resolve/No cached version
You might get this error message:

-
On the right side, open the Gradle tab (1).
Make sure the button shown at (2) is NOT selected.
-
Now you need to trigger a Gradle Resync
Не удается запустить демон процесс
If you see an error message like the one below you probably use a Windows 10 32-bit system. This is not supported by Android Studio 3.5.1 and above and unfortunately nothing the AAPS developer can do about.
If you are using Windows 10 you must use a 64-bit operating system.
There are a lot of manuals on the internet how to determine wether you have a 32-bit or 64-bit OS — i.e. this one.

Gradle Resync
If you can still see the message that the gradle sync failed, now select the Link «Try again». 
If you don’t see the a message anymore, you can still trigger this manually:
-
Open the Gradle tab (1) on the right border of Android Studio.
-
Right-click on AndroidAPS (2)
-
Click on «Reload Gradle Project» (3)

Generate Signed APK generated successfully with 0 build variants
When you generate the signed apk, you might get the notification that generation was successfully but are told that 0 build variants where generated:
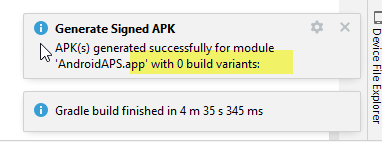
This is a false warning. Check the directory your selected as «Destination folder» for generation (step Generate Signed APK) and you will find the generated apk there!
App was created with compiler/kotlin warnings
If your build completed successfully but you get compiler or kotlin warnings (indicated by a yellow or blue exclamation mark) then you can just ignore these warnings.

Your app was build successfully and can be transferred to phone!
Key was created with errors
When creating a new keystore for building the signed APK, on Windows the following error message might appear

This seems to be a bug with Android Studio 3.5.1 and its shipped Java environment in Windows. The key is created correctly but a recommendation is falsely displayed as an error. This can currently be ignored.
No CGM data is received by AndroidAPS
-
In case you are using patched Dexcom G6 app: This app is outdated. Use the BYODA app instead.
-
In case you are using xDrip+: Identify receiver as described on xDrip+ settings page.
App not installed
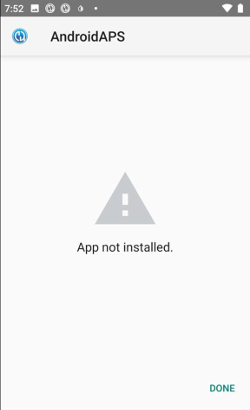
-
Make sure you have transferred the “app-full-release.apk” file to your phone.
-
If «App not installed» is displayed on your phone follow these steps:
-
Export settings (in AAPS version already installed on your phone)
-
Удалите AAPS с телефона.
-
Enable airplane mode & turn off bluetooth.
-
Установите новую версию («app-full-release.apk»)
-
Выполните импорт настроек
-
Снова включите Bluetooth и отключите режим самолета
App installed but old version
If you built the app successfully, transferred it to your phone and installed it successfully but the version number stays the same then you might have missed to update your local copy
None of the above worked
If non of the above tips helped you might consider building the app from scratch:
-
Export settings (in AAPS version already installed on your phone)
-
Подготовьте пароль ключа и пароль хранилища. In case you have forgotten passwords you can try to find them in project files as described here.
Или просто создайте новый файл хранения ключей.
-
Build app from scratch as described here.
-
Когда вы успешно собрали APK, удалите существующее приложение с телефона, перенесите новое приложение на ваш телефон и установите.
-
Import settings again to restore your objectives and settings.
-
You should check your battery optimization options and disable them again.
Worst case scenario
In case even building the app from scratch does not solve your problem you might want to try to uninstall Android Studio completely. Some Users reported that this solved their problem.
Make sure to uninstall all files associated with Android Studio. If you do not completely remove Android Studio with all hidden files, uninstalling may cause new problems instead of solving your existing one(s). Manuals for complete uninstall can be found online i.e.
https://stackoverflow.com/questions/39953495/how-to-completely-uninstall-android-studio-from-windowsv10.
Install Android Studio from scratch as described here.
Когда создаю новое приложение в Android Studio сразу возникает куча ошибок. Например:
1)Render problem:
Failed to find style ‘floatingActionButtonStyle’ in currnt theme2)Render problem:
Couldn`t reslove resource @style/Base.Widget.Design.CoordinatorLayout3)Using privet resources: The resource @string/appbar_scroling_view_behavior is maked as private in com.android.support.design
4)Missing styles. Is the crrect theme chosen for this layout?
5)Failed to instantiate one or more classes
values
styles.xml
<resources>

<!-- Base application theme. -->
<style name="AppTheme" parent="Base.Theme.AppCompat.Light.DarkActionBar">
    <!-- Customize your theme here. -->
    <item name="colorPrimary">@color/colorPrimary</item>
    <item name="colorPrimaryDark">@color/colorPrimaryDark</item>
    <item name="colorAccent">@color/colorAccent</item>
</style>

<style name="AppTheme.NoActionBar">
    <item name="windowActionBar">false</item>
    <item name="windowNoTitle">true</item>
    <item name="coordinatorLayoutStyle">@style/Base.Widget.Design.CoordinatorLayout</item>
</style>

<style name="AppTheme.AppBarOverlay" parent="Base.ThemeOverlay.AppCompat.Dark.ActionBar" />

<style name="AppTheme.PopupOverlay" parent="Base.ThemeOverlay.AppCompat.Light" />
styles.xml(v21)
<resources>

<style name="AppTheme.NoActionBar">
    <item name="windowActionBar">false</item>
    <item name="windowNoTitle">true</item>
    <item name="android:statusBarColor">@android:color/transparent</item>
    <item name="coordinatorLayoutStyle">@style/Base.Widget.Design.CoordinatorLayout</item>
</style>
Пробовал исправить ошибки этими ответами:
1)исправление ошибки #1
2)исправление ошибки #2
но не помогает.
При создании приложения activity_main сделал тип — Navigation Drawer Activity.
Все компоненты sdk загружены.
Почему так? Почему столько ошибок когда я, даже, строчки кода не написал, даже элемента не одного не добавил.
This page tracks known issues with
Android Studio
Flamingo and Android Gradle plugin
8.0.0. If you experience an issue not already included
here, please report a bug.
Upgrade to preview: Each release of Android Studio and the Android
Gradle plugin aims to improve stability and performance, and add new features.
To experience the benefits of upcoming releases now, download and install
Android Studio Preview.
Known Issues with Android Studio
This section describes known issues that exist in the latest stable version of
Android Studio.
Compose nodes are not all inspectable using Layout Inspector
If you notice that not all Compose nodes are inspectable when you’re using
Layout Inspector, this is likely due to a bug
that has been fixed in Compose version 1.5.0-alpha04. If you’re experiencing
this issue, make sure that you upgrade to Compose version 1.5.0-alpha04 or
higher.
Error when rendering Compose Preview
Starting with Android Studio Chipmunk, if you’re seeing
java.lang.NoSuchFieldError: view_tree_saved_state_registry_owner or
java.lang.ClassNotFoundException: androidx.savedstate.R$id in the issues panel,
make sure to include a debugImplementation dependency to
androidx.lifecycle:lifecycle-viewmodel-savedstate in your module.
If you’re seeing java.lang.NoSuchFieldError: view_tree_lifecycle_owner in the
issues panel, make sure to include a debugImplementation dependency to
androidx.lifecycle:lifecycle-runtime in your module.
If you’re seeing java.lang.NoClassDefFoundError: Could not initialize class androidx.customview.poolingcontainer.PoolingContainer or
java.lang.NoClassDefFoundError: androidx/customview/poolingcontainer/PoolingContainerListener
in the issues panel, make sure to include a debugImplementation dependency to
androidx.customview:customview-poolingcontainer in your module.
Error when using different passwords for key and keystore
Starting with version 4.2, Android Studio now runs on JDK 11. This update
causes an underlying behavior change related to signing keys.
When you navigate to Build > Generate
Signed Bundle / APK and attempt to configure app signing for an app bundle or
an APK, entering different passwords for the key and keystore may result in the
following error:
Key was created with errors:
Warning: Different store and Key passwords not supported for PKCS12 Key stores
To work around this issue, enter the same password for both the key and
keystore.
Android Studio doesn’t start after installing version 4.2
Studio tries to import previous
.vmoptions and sanitize them to work with the garbage collector used by
JDK 11. If that process fails, the IDE may not start for certain users who
set custom VM options in the .vmoptions file.
To work around this issue, we recommend commenting out custom options
in .vmoptions (using the “#” character). The .vmoptions file can be
found in the following locations:
Windows
C:UsersYourUserNameAppData[Local|Roaming]GoogleAndroidStudio4.2studio64.exe.vmoptions
macOS
~/Library/Application Support/Google/AndroidStudio4.2/studio.vmoptions
Linux
~/.config/Google/AndroidStudio4.2/studio64.vmoptions
If Studio still doesn’t start after trying this workaround,
see Studio doesn’t start after upgrade
below.
Apps using Database Inspector crash on Android 11 emulator
Apps using the Database Inspector may crash when running on the Android 11
emulator, with an error like the following appearing in logcat:
Fatal signal 11 (SIGSEGV), code 1 (SEGV_MAPERR)
To fix this issue, upgrade your Android 11 emulator to version 9 or higher by
navigating to Tools > SDK Manager. In the SDK Platforms tab, check
the box labeled Show Package Details and select revision 9 or higher of
the Android 11 emulator.

Studio doesn’t start after upgrade
If Studio doesn’t start after an upgrade, the problem may be due to an invalid
Android Studio configuration imported from a previous version of Android Studio
or an incompatible plugin. As a workaround, try deleting (or renaming, for
backup purposes) the directory below, depending on the Android Studio version
and operating system, and start Android Studio again. This will reset Android
Studio to its default state, with all third-party plugins removed.
For Android Studio 4.1 and later:
-
Windows:
%APPDATA%GoogleAndroidStudio<version>
Example:C:Usersyour_user_nameAppDataRoamingGoogleAndroidStudio4.1 -
macOS:
~/Library/Application Support/Google/AndroidStudio<version>
Example:~/Library/Application Support/Google/AndroidStudio4.1 -
Linux:
~/.config/Google/AndroidStudio<version>and~/.local/share/Google/AndroidStudio<version>
Example:~/.config/Google/AndroidStudio4.1and~/.local/share/Google/AndroidStudio4.1
For Android Studio 4.0 and earlier:
-
Windows:
%HOMEPATH%.AndroidStudio<version>config
Example:C:Usersyour_user_name.AndroidStudio3.6config -
macOS:
~/Library/Preferences/AndroidStudio<version>
Example:~/Library/Preferences/AndroidStudio3.6 -
Linux:
~/.AndroidStudio<version>/config
Example:~/.AndroidStudio3.6/config
Note that the configuration directory for Canary and Beta releases of Android
Studio is PreviewX.Y instead of X.Y for the
<version>. For example, Android
Studio 4.1 Canary builds use AndroidStudioPreview4.1, instead of the
AndroidStudio4.1 directory that is used for Release Candidates and Stable
releases.
Compilation issue in Kotlin multiplatform projects
Compilation errors may arise in Kotlin MPP code due to missing symbols.
Upgrading your Kotlin plugin to version 1.4 should resolve this issue.
Key mapping conflicts on Linux
On Linux, certain keyboard shortcuts conflict with default Linux keyboard
shortcuts and those of popular window managers, such as KDE and GNOME.
These conflicting keyboard shortcuts may not work as expected in Android Studio.
More information about this issue (including potential workarounds) can be found
in IntelliJ’s bug tracker.
Small UI text on ChromeOS
On ChromeOS, text might appear much smaller than in previous releases. To work
around this issue, do the following:
- Open the Settings window by clicking File > Settings
- Navigate to Appearance & Behavior > Appearance.
- Select Use custom font.
- Increase the font size.
- In the Settings window, navigate to Editor > Font.
- Increase the font size.
- Click OK.
Code editing
This section describes known issues related to the code editor.
Frozen keyboard input — «iBus» problems on Linux
There are some known
interactions between the iBus daemon on Linux and Android Studio. In some
scenarios, the IDE stops responding to keyboard input or starts inputting
random characters. This bug is triggered by some missing synchronization
between iBus and XLib + AWT, and has already been reported upstream to
JetBrains
and iBus. There are
three current workarounds for this issue:
- Workaround 1: Force iBus into synchronous mode. Before starting Android
Studio, run the following on the command line:$ IBUS_ENABLE_SYNC_MODE=1 ibus-daemon -xrd
- Workaround 2: Disable iBus input in Android Studio. To disable iBus input
for Android Studio only, run the following on the command line:$ XMODIFIERS= ./bin/studio.sh
This workaround only disables input methods for Android Studio, not
any other applications you may be running. Note that if you restart the
daemon while Android Studio is running (for example, by running
ibus-daemon -rd), you effectively disable the input methods for all
other applications and may also crash Android Studio’s JVM with a
segmentation fault. - Workaround 3: Double-check the shortcut bindings to make sure that the
Next input shortcut is not set to Control+Space, since this is also
the code completion shortcut in Android Studio. Ubuntu 14.04 (Trusty)
makes Super+Space the default shortcut, but settings from previous
versions may still be around. To check your shortcut bindings, run
ibus-setupon the command line to open the IBus Preferences window.
Under Keyboard Shortcuts, check the Next input method. If it is
set to Control+Space, change it to Super+Space, or another shortcut of
your choice.
Project configuration
This section describes known issues related to project configuration and Gradle
sync.
Gradle Sync Failed: Broken Pipe
The issue is that the Gradle daemon is trying to use IPv4 instead of IPv6.
- Workaround 1: On Linux, put the following in your
~/.profileor
~/.bash_profile:export _JAVA_OPTIONS="-Djava.net.preferIPv6Addresses=true" - Workaround 2: in Android Studio’s vmoptions
file,
change the line-Djava.net.preferIPv4Addresses=trueto
-Djava.net.preferIPv6Addresses=trueFor more information, see the
Networking IPv6 User
Guide.
«peer not authenticated» errors from Gradle sync or SDK Manager
The root cause of these errors is a missing certificate in
$JAVA_HOME/jre/lib/certificates/cacerts. To resolve these errors, proceed
as follows:
- If you’re behind a proxy, try to connect directly. If the direct
connection works, then in order to connect via the proxy you may need to
usekeytoolto add the proxy server’s certificate to the cacerts file. - Re-install a supported, unmodified JDK. There’s a
known issue
affecting Ubuntu users, which results in an empty
/etc/ssl/certs/java/cacerts. To work around this issue, execute the
following on the command line:sudo /var/lib/dpkg/info/ca-certificates-java.postinst configure
Deploying
This section describes known issues related to deploying your app to a connected
device.
[Mac OS only] Incremental updates are not applied due to an issue with Gradle file watching on projects saved under /System/Volumes/Data
Gradle issue 18149 affects
Android Gradle Plugin versions 7.0 and higher because they require Gradle version 7.0 and higher. Starting in Gradle 7.0, file watching is enabled by default.
If you are working on Mac OS and your project is saved under
/System/Volumes/Data, Gradle file watching will not properly track file changes.
This will cause the Build System to not see any file changes and it will
therefore not update the APK(s). The incremental deployment code will then do
nothing because the local APK state is the same as on the device.
To work around this issue you should move your project’s directory to your user
directory, that is, under /Users/username. The Build System will then be
properly notified about file changes by Gradle file watching and incremental
changes will be successfully applied.
Android Emulator HAXM on macOS High Sierra
The Android Emulator on
macOS High Sierra (10.13) requires HAXM 6.2.1+ for best
compatibility and stability with macOS. However, macOS 10.13 has a more
involved process to install kernel extensions such as HAXM. You need
to manually allow the kernel extension itself to be installed as follows:
- First, attempt to install the latest version of HAXM from the
SDK Manager. - In MacOS, go to System Preferences > Security and Privacy.
-
If you see an alert that System software from developer «Intel Corporation
Apps» was blocked from loading, click Allow:

For more information and workarounds, see
this Apple webpage and
issue 62395878.
Apply Changes
This section describes known issues that are related to Apply
Changes.
New app name not applied
If you rename your app and then try to apply that change, the updated name might
not be reflected. To work around this issue, click Run

to re-deploy your app and see your changes.
Issue in Android Runtime throws error
If you’re using a device that runs Android 8.0 or 8.1, you might encounter
«VERIFICATION_ERROR» messages when trying to apply certain types of changes
(especially if you’re using Kotlin). This message is caused by an issue with the
Android Runtime that is fixed in Android 9.0 and higher. Although the issue
causes Apply Changes to fail, you can still Run
your app again to see your changes. However, we recommend that you upgrade the
device to Android 9.0 or greater.
Debugging and testing
This section describes known issues related to debugging and testing your app.
JUnit tests missing resources in classpath when run from Android Studio
If you have specific resource folders in your Java modules, then those
resources won’t be found when running tests from the IDE. Running tests
using Gradle from the command line will work. Executing the Gradle check
task from the IDE will also work. See issue
64887 for more
details.
This issue occurs because as of IntelliJ 13, which requires that you only have
a single folder as the classpath. IntelliJ’s builder copies all resources
into that build folder, but Gradle doesn’t copy over the resources.
- Workaround 1: Run the Gradle
checktask from the IDE rather than
running a unit test. - Workaround 2: Update your build script to manually copy resources into
the build folder. See
comment #13
for more information.
Running JUnit tests may compile the code twice
When creating a new project, the template JUnit configuration might be created
with two «Before launch» steps: Make and Gradle-aware Make. This configuration
is then propagated to all created JUnit run configurations.
- To fix the issue for the current project, click Run > Edit
Configurations and change the default JUnit configuration to only
include the Gradle-aware Make step. - To fix the issue for all future projects, click File > Close
Project. You should see the welcome screen. Then click Configure >
Project Defaults > Run Configurations and change the JUnit
configuration to only include the Gradle-aware Make step.
Some test run configurations don’t work
Not all run configurations that
are available when right-clicking a test method are valid. Specifically, the
following configurations are not valid:
- Gradle run configurations (which have a Gradle logo as the icon) don’t
work. - JUnit run configurations (which have an icon without the green Android)
don’t apply to instrumentation tests, which cannot be run on the local JVM.
Android Studio also remembers the run configuration created in a given
context (for example, right-clicking a specific class or method), and will not
offer to run in a different configuration in the future. To fix this, click
Run > Edit Configurations and remove the incorrectly-created
configurations.
Adding Java breakpoints while debugging native code
While your app is paused at a breakpoint in your native
code, the Auto and Dual debuggers may not immediately recognize
new Java breakpoints that you set. To avoid this issue, add Java breakpoints
either before starting a debug session or while the app is paused on a Java
breakpoint. For more information, see issue
229949.
Stepping out of the native debugger
While using the Auto or Dual debugger to
debug Java and native code, if you step into a native function from
your Java code (for example, the debugger pauses execution at a line in your
Java code that calls a native function and you click Step Into
 ) and you want to return to your Java code, click
Resume Program  (instead of Step Out
  or Step Over
  ). Your app process will still be paused, so click Resume
Program in the your-module-java
tab to resume it. For more information, see issue
224385.
Native debugger hangs while loading libraries
While using the native debugger for the first time after upgrading to Android
Studio 4.2 and higher, the native debugger may stop responding while loading
libraries from the Android device. This issue is a sticky problem that continues
to happen even if you stop and restart the debugger. To fix this problem,
delete the LLDB cache at $USER/.lldb/module-cache/.
Native debugger crashes with «Debugger process finished with exit code 127»
This error occurs on Linux-based platforms when starting the
native debugger. It indicates that one of the libraries required by the native
debugger is not installed on the local system. The name of the missing
library may be already printed in the idea.log file. If not, you can use a
terminal to navigate to the Android Studio installation directory and execute
the bin/lldb/bin/LLDBFrontend --version command line to learn which libraries
are missing. Typically, the missing library is ncurses5 as some recent Linux
distributions have already upgraded to ncurses6.
Profilers
This section describes known issues with the Profilers.
Native Memory Profiler: Profiling not available during app startup
The Native Memory Profiler is currently unavailable during app startup. This
option will be available in an upcoming release.
As a workaround, you can use the Perfetto standalone command-line profiler
to capture startup profiles.
Timeout errors in CPU Profiler
You may experience «Recording failed to stop» errors in the Android Studio CPU
Profiler when you select the Sample Java Methods or Trace Java Methods
configurations. These are often timeout errors, especially if you see the
following error message in the idea.log file:
Wait for ART trace file timed out
The timeout errors tend to affect traced methods more than sampled methods and
longer recordings more than shorter recordings. As a temporary workaround, it
may be helpful to try shorter recordings to see if the error disappears.
If you experience timeout issues with the Profiler, please file a bug
that includes the make/model of your device(s) and any relevant entries from
idea.log and logcat.
ADB exception when debugging or profiling
When using Platform Tools 29.0.3, native debugging and the Android Studio
Profilers might not work properly, and you might see either
«AdbCommandRejectedException» or «Failed to connect port» in the idea.log
file when you select Help > Show Log. Upgrading the Platform Tools to
29.0.4 or higher fixes both issues.
To upgrade the Platform Tools, do the following:
- Open the SDK Manager from Android Studio by clicking Tools >
SDK Manager or click SDK Manager
in the toolbar. - Click the checkbox next to Android SDK
Platform-Tools so it shows a checkmark. A download icon
should appear in the left column.
- Click Apply or OK.

Plugin prevents Build Output window from working
Using the CMake simple highlighter plugin prevents content from appearing in the
Build Output window. The build runs and the Build Output tab appears, but
there is no output printed (issue #204791544).
Installation order prevents launch
Installing a newer version of Android Studio before an older version might
prevent the older version from launching. For example, if you first install the
canary version of Android Studio, and then try to install and launch the stable
version, the stable version might not launch. In cases like this, you must
clear the cache to get the stable (older) version to launch. On macOS, to clear
the cache delete the
Library/ApplicationSupport/Google/AndroidStudioversion_number
directory. On Windows, to clear the cache use
Disk Cleanup.
Espresso Test Recorder doesn’t work with Compose
The
Espresso Test Recorder
doesn’t work with projects that include Compose. To create UI tests for projects
that include Compose, see Testing your Compose layout.
Logcat shortcut conflicts with non-English keyboard layouts
If you’re using a non-English keyboard layout, a default Logcat keyboard
shortcut might conflict with the layout and prevent you from typing certain
characters when editing text in Android Studio. To work around this issue,
delete or re-map the conflicting Logcat keymap. To edit the Logcat keymaps in
Android Studio, go to Android Studio > Settings > Keymap and search for
Logcat in the list of keymaps. For more information, see
issue #263475910.
This issue will be resolved by the removal of the Logcat shortcut in Android
Studio Electric Eel Patch 1.
Known issues with the Android Gradle Plugin
This section describes known issues that exist in the latest stable version of
the Android Gradle plugin.
Not all dynamic-feature library dependencies are lint checked
When running lint with checkDependencies = true from an app module,
dynamic-feature library dependencies aren’t checked unless they’re also app
dependencies (issue #191977888).
As a workaround, the lint task can be run on those libraries.
Signing file named with carriage return characters
JAR signing (v1 scheme) does not support file names containing carriage
return characters
(issue #63885809).
Modifying variant outputs at build time might not work
Using the Variant API to manipulate variant outputs is broken with the new
plugin. It still works for simple tasks, such as changing the APK name during
build time, as shown below:
// If you use each() to iterate through the variant objects,
// you need to start using all(). That's because each() iterates
// through only the objects that already exist during configuration time—
// but those object don't exist at configuration time with the new model.
// However, all() adapts to the new model by picking up object as they are
// added during execution.
android.applicationVariants.all { variant ->
    variant.outputs.all {
        outputFileName = "${variant.name}-${variant.versionName}.apk"
    }
}
However, more complicated tasks that involve accessing outputFile objects
no longer work. That’s because variant-specific tasks are no longer created
during the configuration stage. This results in the plugin not knowing
all of its outputs up front, but it also means faster configuration times.
manifestOutputFile is no longer available
The processManifest.manifestOutputFile() method is no longer
available, and you get the following error when you call it:
A problem occurred configuring project ':myapp'.
   Could not get unknown property 'manifestOutputFile' for task
   ':myapp:processDebugManifest' of type
   com.android.build.gradle.tasks.ProcessManifest.
Instead of calling manifestOutputFile() to get the manifest file for each
variant, you can call processManifest.manifestOutputDirectory() to return the
path of the directory that contains all generated manifests. You can then
locate a manifest and apply your logic to it. The sample below dynamically
changes the version code in the manifest:
android.applicationVariants.all { variant ->
    variant.outputs.all { output ->
        output.processManifest.doLast {
            // Stores the path to the maifest.
            String manifestPath = "$manifestOutputDirectory/AndroidManifest.xml"
            // Stores the contents of the manifest.
            def manifestContent = file(manifestPath).getText()
            // Changes the version code in the stored text.
            manifestContent = manifestContent.replace('android:versionCode="1"',
                    String.format('android:versionCode="%s"', generatedCode))
            // Overwrites the manifest with the new text.
            file(manifestPath).write(manifestContent)
        }
    }
}
Issues with AGP 7.3.0 AIDL support and Kotlin 1.7.x
Using AGP 7.3.0 with KAPT in Kotlin 1.7.x causes the AIDL source sets for
specific build variants to be removed. You can still use the other AIDL source
sets, including those of main/, build types, product flavors, and combinations
of product flavors. If you need to use the variant-specific AIDL source sets,
continue to use Kotlin 1.6.21.
Fixed known issues
This section describes known issues that have been fixed in a recent release. If
you are experiencing any of these issues, you should update Android
Studio to the latest stable or preview version.
Fixed in Android Studio 2021.1.1
- Missing lint output: There is no lint text output printed to
stdoutwhen
the lint task isUP-TO-DATE
(issue #191897708). Fixed in
AGP 7.1.0-alpha05. - Problems with unit testing an app project that uses the Hilt plugin:
The unit test classpath contains the non-instrumented app classes, which means
Hilt does not instrument the app classes to handle dependency injection when
running unit tests
(issue #213534628).
Fixed in AGP 7.1.1.
Fixed in Android Studio 2020.3.1
- Lint exceptions in Kotlin projects: Kotlin projects that set
checkDependencies = truemay encounter null pointer exceptions or errors
(issue #158777858).
Fixed in Android Studio 4.2
- IDE freezes on macOS Big Sur: Android Studio 4.1 might freeze when you
open a dialog.
Fixed in Android Studio 4.1
- Restart to apply memory settings from previous version of IDE: After
updating Android Studio, you need to restart Android Studio to apply any
memory settings migrated from an earlier version of the IDE. - Manifest class with custom permission strings is no longer generated by
default: If you want to generate the class, set
android.generateManifestClass = true.
Fixed in Android Studio 3.6
-
APK installation error on LineageOS: Deploying your app to devices
running certain versions of LineageOS or CyanogenMod might fail and throw
anINSTALL_PARSE_FAILED_NOT_APKexception.On Android Studio 3.6 Beta 1 and higher, the IDE handles this exception by
performing a full app install when you deploy your app
to LineageOS or CyanogenMod devices, which might result in longer deploy
times.
Fixed in Android Studio 3.5.2
- Broken XML code style: When editing XML code, the IDE applied an
incorrect code style when you selected Code > Reformat Code from the
menu bar.
Fixed in Android Studio 3.3.1
-
Out of memory errors when scanning C++-based projects: When Gradle scans
a project that has C++ code in more than one location on the same drive, the
scan includes all directories below the first common directory. Scanning
a large number of directories and files may lead to out of memory errors.For more information on this issue, read
the bug associated with the
issue.