
by Madalina Dinita
Madalina has been a Windows fan ever since she got her hands on her first Windows XP computer. She is interested in all things technology, especially emerging technologies… read more
Updated on August 27, 2021

XINSTALL BY CLICKING THE DOWNLOAD FILE
This software will keep your drivers up and running, thus keeping you safe from common computer errors and hardware failure. Check all your drivers now in 3 easy steps:
- Download DriverFix (verified download file).
- Click Start Scan to find all problematic drivers.
- Click Update Drivers to get new versions and avoid system malfunctionings.
- DriverFix has been downloaded by 0 readers this month.
You might’ve noticed a strange Kaspersky notification prior to logging into Windows 10. The popup says Application databases not updated. Error resolving network name.
The message is loud and clear, yet trying to run an update doesn’t usually make any difference. It just gets stuck at 0 KB downloaded with a blank update-source waiting for an immediate fix.
The network name issue is common in antivirus software tools like yours and can be easily fixed by following the troubleshooting steps provided on this page.
What can I do when getting Error resolving network name in Kaspersky?
1. Reboot your computer
 Firstly, you can fix this problem by rebooting your PC. This procedure is often necessary to recover from an error, so don’t hesitate to press and hold down the Power button on the computer. After 10 seconds or so, the computer should turn off.
Once it is off, wait a few more seconds and then turn the computer back on. You could also enter this command to reboot it: shutdown /r. This will set a time out of 30 seconds to close the applications. After that, the windows reboot will start.
Then, wait around 15 minutes after the system boots up to see if the Error resolving network name will occur again.
2. Disable and re-enable wireless card

Another potential solution that users found is to disable the wireless card, then re-enable it. For that, go to the Start Menu, look for Control Panel in the search box on your desktop, and click Control Panel to open it.
Click the Network and Internet category and then select the Networking and Sharing Center. From the options on the left-hand side, select Change adapter settings. Right-click on the icon for Wireless Connection and click Disable.
If you find it from the start as Disabled, it’s possible that you may have accidentally used a certain keyboard combination (like Fn+F5). Finally, return to the same path and click Enable this time. Don’t forget to also restart your computer.
You can’t open Control Panel? Check this step-by-step guide to solve the issue quickly!
3. Delete temporary files and folders

Like any other program, Kaspersky creates temporary files on the computer while it is running. These files are supposed to be deleted once the program ends. However, sometimes there are exceptions and these temp files lead to an error in the program.
To correct that, open the Run window by pressing Win + R on the keyboard, enter %TEMP% and click OK. You may now press Ctrl + A on the keyboard to select all the files in the folder. Press Delete to get rid of the files.
4. Check system date/time
 A quick and easy way to fix the resolving network name error could also be to check system date/time. To do that, click on the date and time in the notification area of the taskbar and compare the date to the current one.
If you notice even the slightest difference, right-click the clock and select Adjust date/time. Put the switch Set time automatically in an off position, then click Change and feel free to select the right date now.
Need more help in fixing the incorrect date in Windows 10? Check this guide to solve the issue quickly!
5. Reconfigure proxy server settings

If the recommendations above did not help, reconfigure the client device to not use the proxy server for connections. To make it happen, enter into Settings > Additional > Network > Proxy server. While here, select Do Not use proxy server.
It’s also worthwhile checking that you’re not in Gaming Profile or taking a closer look at the Update Source. You can find it under Settings > Additional > Update > Select Update Sources.
Could you find this post as useful in getting rid of the network name error? Leave a comment below to let us know if this tutorial helped you fix the issue or if you need further assistance.
Still having issues? Fix them with this tool:
SPONSORED
Some driver-related issues can be solved faster by using a dedicated tool. If you’re still having problems with your drivers, just download DriverFix and get it up and running in a few clicks. After that, let it take over and fix all of your errors in no time!
![]()
by Madalina Dinita
Madalina has been a Windows fan ever since she got her hands on her first Windows XP computer. She is interested in all things technology, especially emerging technologies… read more
Updated on August 27, 2021
XINSTALL BY CLICKING THE DOWNLOAD FILE
This software will keep your drivers up and running, thus keeping you safe from common computer errors and hardware failure. Check all your drivers now in 3 easy steps:
- Download DriverFix (verified download file).
- Click Start Scan to find all problematic drivers.
- Click Update Drivers to get new versions and avoid system malfunctionings.
- DriverFix has been downloaded by 0 readers this month.
You might’ve noticed a strange Kaspersky notification prior to logging into Windows 10. The popup says Application databases not updated. Error resolving network name.
The message is loud and clear, yet trying to run an update doesn’t usually make any difference. It just gets stuck at 0 KB downloaded with a blank update-source waiting for an immediate fix.
The network name issue is common in antivirus software tools like yours and can be easily fixed by following the troubleshooting steps provided on this page.
What can I do when getting Error resolving network name in Kaspersky?
1. Reboot your computer
Firstly, you can fix this problem by rebooting your PC. This procedure is often necessary to recover from an error, so don’t hesitate to press and hold down the Power button on the computer. After 10 seconds or so, the computer should turn off.
Once it is off, wait a few more seconds and then turn the computer back on. You could also enter this command to reboot it: shutdown /r. This will set a time out of 30 seconds to close the applications. After that, the windows reboot will start.
Then, wait around 15 minutes after the system boots up to see if the Error resolving network name will occur again.
2. Disable and re-enable wireless card
Another potential solution that users found is to disable the wireless card, then re-enable it. For that, go to the Start Menu, look for Control Panel in the search box on your desktop, and click Control Panel to open it.
Click the Network and Internet category and then select the Networking and Sharing Center. From the options on the left-hand side, select Change adapter settings. Right-click on the icon for Wireless Connection and click Disable.
If you find it from the start as Disabled, it’s possible that you may have accidentally used a certain keyboard combination (like Fn+F5). Finally, return to the same path and click Enable this time. Don’t forget to also restart your computer.
You can’t open Control Panel? Check this step-by-step guide to solve the issue quickly!
3. Delete temporary files and folders
Like any other program, Kaspersky creates temporary files on the computer while it is running. These files are supposed to be deleted once the program ends. However, sometimes there are exceptions and these temp files lead to an error in the program.
To correct that, open the Run window by pressing Win + R on the keyboard, enter %TEMP% and click OK. You may now press Ctrl + A on the keyboard to select all the files in the folder. Press Delete to get rid of the files.
4. Check system date/time
A quick and easy way to fix the resolving network name error could also be to check system date/time. To do that, click on the date and time in the notification area of the taskbar and compare the date to the current one.
If you notice even the slightest difference, right-click the clock and select Adjust date/time. Put the switch Set time automatically in an off position, then click Change and feel free to select the right date now.
Need more help in fixing the incorrect date in Windows 10? Check this guide to solve the issue quickly!
5. Reconfigure proxy server settings
If the recommendations above did not help, reconfigure the client device to not use the proxy server for connections. To make it happen, enter into Settings > Additional > Network > Proxy server. While here, select Do Not use proxy server.
It’s also worthwhile checking that you’re not in Gaming Profile or taking a closer look at the Update Source. You can find it under Settings > Additional > Update > Select Update Sources.
Could you find this post as useful in getting rid of the network name error? Leave a comment below to let us know if this tutorial helped you fix the issue or if you need further assistance.
Still having issues? Fix them with this tool:
SPONSORED
If the advices above haven’t solved your issue, your PC may experience deeper Windows problems. We recommend downloading this PC Repair tool (rated Great on TrustPilot.com) to easily address them. After installation, simply click the Start Scan button and then press on Repair All.
![]()
Newsletter
Статья обновлена: 30 ноября 2022
ID: 15690
В таблице приведен текст сообщений, которые вы можете увидеть во время работы Kaspersky Update Utility 4.0 для Windows и Linux/FreeBSD.
| Текст сообщения | Причина возникновения |
|---|---|
| «Out of space»
(«Недостаточно свободного места на диске») |
Программа не может скопировать файлы в папку обновлений, потому что на диске недостаточно свободного места.
Освободите место на диске и запустите обновление заново. |
| «No source file»
(«Набор файлов обновлений поврежден») |
На источнике обновлений отсутствует запрошенный файл.
Запустите обновление заново. |
| «Bases corrupted»
(«Базы повреждены») |
На источнике обновлений отсутствуют нужные файлы баз.
Повторите загрузку обновлений. Повторите запуск обновления. |
| «All files are up-to-date»
(«Нет доступных обновлений») |
В папке Updates содержится набор баз, совпадающий с набором на источнике обновлений. |
| «Not all components are updated»
(«Обновлены не все компоненты») |
Программа скачала обновления не для всех компонентов.
Повторите загрузку обновлений. Если указан локальный источник, проверьте корректность размещенных баз. |
| «Invalid signature»
(«Набор файлов обновлений поврежден») |
Ошибка проверки подписи файла баз или патча.
Повторите загрузку обновлений. Повторите запуск обновления. Если указан локальный источник, обновите на нем базы с серверов «Лаборатории Касперского» и повторите запуск. |
| «Operation canceled»
(«Операция отменена пользователем») |
Работа программы была прервана пользователем. |
| «Invalid index»
(«Поврежден XML-индекс. Файл имеет неверную структуру или отсутствует») |
На источнике обновлений отсутствует запрошенный индексный файл.
Если указан локальный источник, проверьте корректность размещенных баз. Если указаны серверы «Лаборатории Касперского», повторите запуск загрузки обновлений. |
| «Something gone wrong»
(«Ошибка обновления») |
Проверьте канал связи и запустите загрузку обновлений заново.
Повторите запуск программы позже. |
| «Net error»
(«Сетевая ошибка при загрузке файлов обновлений») |
Сетевая ошибка при скачивании файлов обновлений.
Проверьте сетевые настройки, доступность источников обновлений, список источников в настойках программы. |
| «Operation timeout»
(«Истекло время ожидания сетевой операции») |
Большое количество подключений к источнику обновлений.
Повторите загрузку обновлений позже. |
| «Resolve error»
(«Ошибка разрешения сетевого имени») |
Проверьте настройки подключения к сети, разрешение имен, доступность DNS-сервера, доступ в интернет, адрес источника обновлений. |
| «Retranslation successful»
(«Копирование обновлений завершено успешно») |
Антивирусные базы и модули для заданных программ загружены успешно. |
| «Access denied»
(«Ошибка аутентификации») |
Учетная запись не прошла проверку подлинности на HTTP- или FTP-ресурсе.
Программа не поддерживает работу с HTTP- или FTP-ресурсами, требующими аутентификацию. Выберите другой источник обновлений. Предоставьте доступ к HTTP- или FTP-ресурсу без авторизации. |
| «Proxy error»
(«Проблемы с прокси-сервером») |
Проблемы с настройками прокси-сервера.
Проверьте сетевые параметры в настройках программы, адрес и доступность прокси-сервера, параметры сетевого подключения операционной системы. |
| «Update Utility system error occurred»
(«Произошла системная ошибка») |
Внутренняя ошибка приложения. |
Если при работе с утилитой у вас возникли проблемы, отправьте запрос с подробным описанием ситуации в техническую поддержку «Лаборатории Касперского» через Kaspersky CompanyAccount. К запросу приложите файл конфигурации Updater.ini и файлы трассировки.
Перед обращением ознакомьтесь с информацией, необходимой для создания запроса, в разделе базы знаний.
by Madalina Dinita
Madalina has been a Windows fan ever since she got her hands on her first Windows XP computer. She is interested in all things technology, especially emerging technologies… read more
Updated on August 27, 2021
XINSTALL BY CLICKING THE DOWNLOAD FILE
This software will keep your drivers up and running, thus keeping you safe from common computer errors and hardware failure. Check all your drivers now in 3 easy steps:
- Download DriverFix (verified download file).
- Click Start Scan to find all problematic drivers.
- Click Update Drivers to get new versions and avoid system malfunctionings.
- DriverFix has been downloaded by 0 readers this month.
You might’ve noticed a strange Kaspersky notification prior to logging into Windows 10. The popup says Application databases not updated. Error resolving network name.
The message is loud and clear, yet trying to run an update doesn’t usually make any difference. It just gets stuck at 0 KB downloaded with a blank update-source waiting for an immediate fix.
The network name issue is common in antivirus software tools like yours and can be easily fixed by following the troubleshooting steps provided on this page.
What can I do when getting Error resolving network name in Kaspersky?
1. Reboot your computer
Firstly, you can fix this problem by rebooting your PC. This procedure is often necessary to recover from an error, so don’t hesitate to press and hold down the Power button on the computer. After 10 seconds or so, the computer should turn off.
Once it is off, wait a few more seconds and then turn the computer back on. You could also enter this command to reboot it: shutdown /r. This will set a time out of 30 seconds to close the applications. After that, the windows reboot will start.
Then, wait around 15 minutes after the system boots up to see if the Error resolving network name will occur again.
2. Disable and re-enable wireless card
Another potential solution that users found is to disable the wireless card, then re-enable it. For that, go to the Start Menu, look for Control Panel in the search box on your desktop, and click Control Panel to open it.
Click the Network and Internet category and then select the Networking and Sharing Center. From the options on the left-hand side, select Change adapter settings. Right-click on the icon for Wireless Connection and click Disable.
If you find it from the start as Disabled, it’s possible that you may have accidentally used a certain keyboard combination (like Fn+F5). Finally, return to the same path and click Enable this time. Don’t forget to also restart your computer.
You can’t open Control Panel? Check this step-by-step guide to solve the issue quickly!
3. Delete temporary files and folders
Like any other program, Kaspersky creates temporary files on the computer while it is running. These files are supposed to be deleted once the program ends. However, sometimes there are exceptions and these temp files lead to an error in the program.
To correct that, open the Run window by pressing Win + R on the keyboard, enter %TEMP% and click OK. You may now press Ctrl + A on the keyboard to select all the files in the folder. Press Delete to get rid of the files.
4. Check system date/time
A quick and easy way to fix the resolving network name error could also be to check system date/time. To do that, click on the date and time in the notification area of the taskbar and compare the date to the current one.
If you notice even the slightest difference, right-click the clock and select Adjust date/time. Put the switch Set time automatically in an off position, then click Change and feel free to select the right date now.
Need more help in fixing the incorrect date in Windows 10? Check this guide to solve the issue quickly!
5. Reconfigure proxy server settings
If the recommendations above did not help, reconfigure the client device to not use the proxy server for connections. To make it happen, enter into Settings > Additional > Network > Proxy server. While here, select Do Not use proxy server.
It’s also worthwhile checking that you’re not in Gaming Profile or taking a closer look at the Update Source. You can find it under Settings > Additional > Update > Select Update Sources.
Could you find this post as useful in getting rid of the network name error? Leave a comment below to let us know if this tutorial helped you fix the issue or if you need further assistance.
Still having issues? Fix them with this tool:
SPONSORED
If the advices above haven’t solved your issue, your PC may experience deeper Windows problems. We recommend downloading this PC Repair tool (rated Great on TrustPilot.com) to easily address them. After installation, simply click the Start Scan button and then press on Repair All.
![]()
Newsletter
касперский
обновление базы программы не было выполнено,ошибка разрешения сетевого имени
Гость
![]()
3
![]()
0
Ответы на вопрос
(3)
![]()
0
![]()
1
20.04.2015, 13:24
![]()
0
![]()
0
07.06.2015, 10:55
Антивирус KIS обновляется до 24%, а потом зависает, хотя трафик работает вовсю. Через длительное время доходит до 100%, а при выключении опять показывает, что базы устарели (горит красным).
![]()
0
![]()
0
07.06.2015, 12:49
Галина Ямпольская
Антивирус KIS обновляется до 24%, а потом зависает, хотя трафик работает вовсю. Через длительное время доходит до 100%, а при выключении опять показывает, что базы устарели (горит красным).
Здравствуйте. Проверьте системную дату на ПК! Если она не корректна, установите правильную. Если дата правильная или данная рекомендация не помогла выполните рекомендации из этой статьи:
http://support.kaspersky.ru/9916
Так же убедитесь что используете актуальную версию антивируса, на данный момент это версия: 15.0.2.361 Если у Вас другая, обновите версию для этого: Удалите антивирус через «Установка -удаление программ» в окне сохранения объектов (УСТАНОВИТЕ ГАЛОЧКУ-СОХРАНИТЬ ИНФОРМАЦИЮ О ЛИЦЕНЗИИ!) . После удаления и перезагрузки ПК скачайте дистрибутив программы из этого сайта или сайта компании. Запустите установочный фаил и следуйте рекомендациям мастера установки. Лицензия подхватится автоматически.
В ответ на сообщение от Галина Ямпольская
#131669
Вопрос и ответы были вам полезны?

Да

Нет
Попробуйте также:

Похожие вопросы
:
На чтение 3 мин Просмотров 9.9к. Обновлено 20.01.2020
Всем привет! Буквально сегодня я столкнулся с неприятной проблемой. У меня никак не хотел обновляться Kaspersky Total Security. К слову, использую я лицензионный продукт. Никаких кряков или подобных пиратских обманок. На решение этой проблемы мне понадобилось полчаса. Однако не каждый сможет найти его так быстро. Именно поэтому я сейчас пишу эту статью, хочу помочь вам разобраться в ситуации.
Причины проблемы
Их может быть несколько: неправильная дата на компьютере, запрет на соединение с серверами антивируса от вашего провайдера или фаерволла, неправильно выставленные настройки прокси-серверов, повреждение баз при предыдущем обновлении. Давайте поговорим о каждой из этих проблем, а также выявим метод быстрого решения. Мы же не хотим, чтобы наши базы устаревали, верно?
Неправильная дата на ПК
Очень частое явление, которое приводит к проблемам с обновлением баз Касперского. Посмотрите на календарь вашей операционной системы, все ли там верно выставлено? Быть может, при обновлении вашей операционной системы произошел сброс данных, и сейчас у вас неактуальная дата.

Если дата неправильная, то просто перейдите в «Параметры даты и времени», и выставьте там нужные значения. Это делается очень просто. Для гарантии, при хорошем интернет-соединении, вы можете выставить галочку «Установить время автоматически». В этом случае будет происходить синхронизация даты и времени с серверами вашего часового пояса.

После установки верной даты — проблемы должны исчезнуть.
Проблемы с провайдером
В эпоху вездесущих блокировок даже такой вариант может оказаться правдивым. Скорее всего это не ваш случай, потому что вероятность блокировки серверов Касперского крайне мала. Тем не менее, я считаю, что нужно упомянуть о ней. Если вы видите, что все сегодняшние варианты вам не подходят, то скорее всего проблема именно в доступе к серверам с обновлениями. Обратитесь в техническую поддержку вашего провайдера, либо настройте прокси. С их помощью можно избежать.
Неправильные настройки прокси
Если вы ввели неправильные данные прокси, то о каком соединении может идти речь? Зайдите в настройки, чтобы проверить данные еще раз. Возможно используемый прокси-сервер перегружен, и вам надо поменять его. Это особенно актуально для бесплатных прокси-серверов.

Проверьте параметры, и при необходимости введите правильные данные.
Поврежденные базы
Если при обновлении баз вы выключили ПК или же прервали интернет-соединение, то там могла возникнуть ошибка, которая теперь и приводит к появлению новых проблем. Теперь мы должны заново загрузить все базы, чтобы такой ошибки больше не возникало. Для этого мы должны вручную удалить все существующие базы из папки. Делаем все в соответствии с последовательной инструкцией.
Кликаем правой кнопкой мыши по иконке антивируса в трее, выбираем «Настройка»:

Переходим во вкладку «Дополнительно», находим «Самозащита», кликаем и отключаем ее.

Теперь закрываем настройки, снова идем в трей, кликаем правой кнопкой по иконке — Выход. Программа должна быть закрыта, иначе система не даст нам удалить нужный поврежденный каталог. Как только самозащита и антивирус отключены — переходим к следующему шагу.
Идем по следующему пути: C:ProgramDataKaspersky LabAVPX.X.X (иксы — версия, могут быть любые цифры). Находим папку Bases и просто удаляем ее:

Теперь мы должны заново запустить антивирус Касперского, воспользовавшись ярлыком на рабочем столе или exe-шником в папке. После запуска программа сама начнет обновлять базы и восстановит свое актуальное состояние. Все. На этом исправление проблем завершено.
Заключение
Как видите, решить проблемы с обновлениями антивируса Касперского можно самостоятельно. Если ничего из этого вам не помогло, то стоит задуматься об обращении в техническую поддержку — там вам точно помогут.
( 2 оценки, среднее 5 из 5 )
Встреча с «Временный сбой в разрешении имен» показывает, что системы Linux не могут преобразовать имя веб-сайта в IP-адрес. Хотя причиной может быть потеря интернет-соединения, есть несколько других факторов, которые могут вызвать эту ошибку. Это руководство представлено, чтобы помочь вам устранить эту ошибку.
Предпосылки
Чтобы приступить к решениям, описанным ниже, убедитесь, что у вас есть права sudo или root и работающее подключение к Интернету.
- Пользователь должен иметь права sudo или root
- Стабильное и рабочее подключение к сети
Что такое временный сбой в ошибке разрешения имени
Когда мы обращаемся к веб-сайту, наш системный браузер отправляет запрос на DNS-сервер, который преобразует доменное имя в IP-адрес. Этот IP-адрес будет подключать сервер веб-сайта и загружать контент. Если DNS-сервер не может предоставить IP-адрес, «Временный сбой в разрешении именпоявляется сообщение об ошибке.
Например, если мы пропингуем веб-сайт из системы, вы можете столкнуться со следующей ошибкой:
пинг linuxhint.com
Здесь системе не удалось подключиться к DNS-серверу, что привело к ошибке.

Основные три основные причины возникновения этой ошибки включают в себя:
- Медленное или нет подключения к Интернету
-
Плохо сконфигурированный файл resolv.conf
- Неправильно настроенные права доступа к файлу resolv.conf
-
Ограничения брандмауэра
- Откройте порты в брандмауэре UFW.
Решение 1. Медленное подключение к Интернету или его отсутствие
Первое решение для устранения ошибки простое, поскольку пользователь может проверить подключение к Интернету в системе. Если интернет медленный или не подключен, вы можете столкнуться с этой ошибкой.
Решение 2. Неправильно настроенный файл resolv.conf
resolv.conf файл настраивает DNS-серверы в Linux. Открой решить конфигурационный файл в редакторе nano:
судонано/и т. д./resolv.conf

Убедитесь, что хотя бы один сервер имен присутствует внутри resolv.conf файл. Сервер имён выглядит так:
сервер имен 8.8.8.8
Здесь, в нашем случае, сервер имен:
сервер имен 127.0.0.53
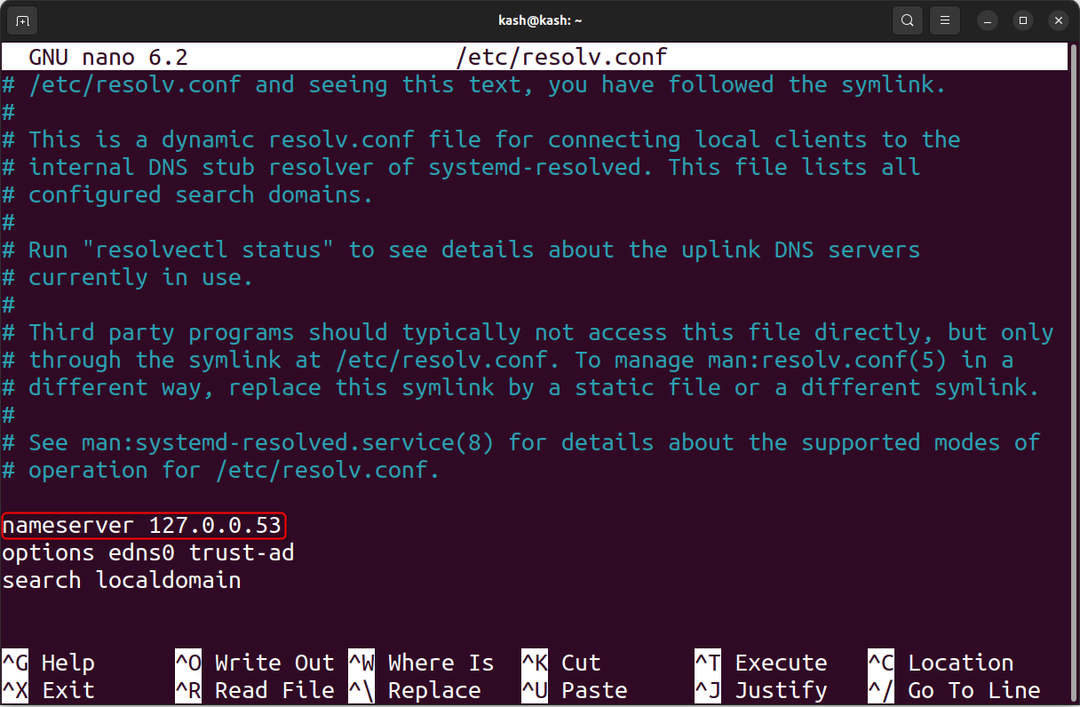
Если в системе нет сервера имен. Определен любой из серверов имен. Некоторые из известных серверов имен, принадлежащих Google, 8.8.8.8 и 8.8.4.4. Путем редактирования resolv.conf файл любой из серверов имен может быть определен.
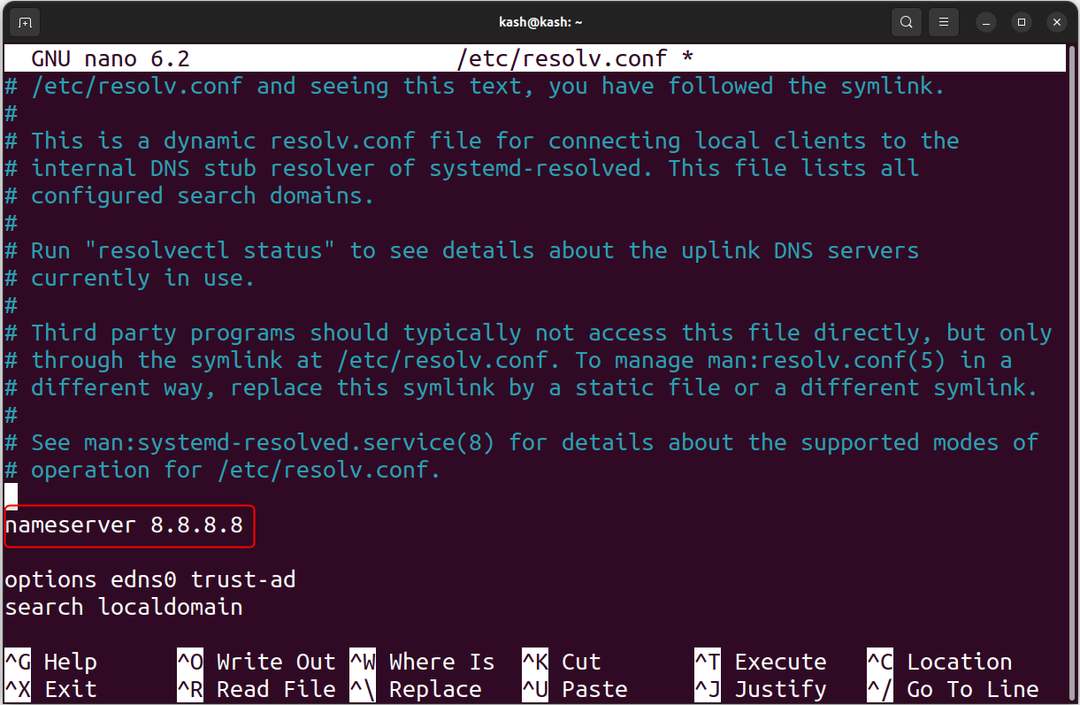
Сохраните файл и перезапустите службу DNS:
судо systemctl перезапустить systemd-resolved.service
Если DNS-сервер успешно перезапущен, вывод не будет возвращен.

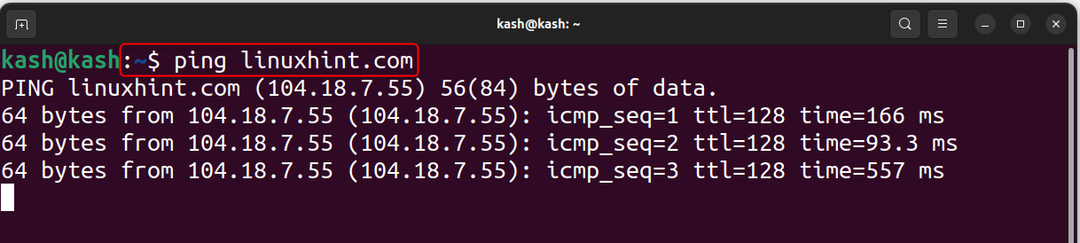
Вы также можете проверить DNS-сервер, снова пропинговав веб-сайт:
пинг linuxhint.com
Если связь с веб-сайтом установлена, это означает, что DNS-сервер теперь работает.

2.1. Неправильно настроенные права доступа к файлу resolv.conf
В некоторых случаях, несмотря на правильный DNS-сервер, определенный внутри resolv.conf файл, ошибка сохраняется. Это может быть связано с отсутствием прав доступа к файлу. Измените права собственности на пользователя root, выполнив данную команду:
судочаун корень: корень /и т. д./resolv.conf

Запустите данную команду, чтобы дать каждому пользователю разрешение на изменение resolv.conf файл:
судоchmod644/и т. д./resolv.conf

Теперь снова пропингуем сайт.
пинг linuxhint.com
Если ошибка связана с неправильным разрешением, приведенные выше команды решат ее.
Решение 3. Ограничения брандмауэра
Еще одна причина «Временный сбой в разрешении имен” возникает из-за того, что брандмауэр блокирует доступ к необходимым портам, включая порт 43 используется для поиска whois и порт 53 используется для разрешения доменного имени.
3.1. Откройте порты в брандмауэре UFW.
Если ошибка вызвана блокировкой порт 43, выполните приведенную ниже команду, чтобы разрешить трафик на этом порту:
судо UFW разрешить 43/TCP
Несложный брандмауэр (УФВ) подтверждает, что правила были успешно обновлены.

Точно так же мы можем также разрешить разрешение для порт 53 с использованием:
судо UFW разрешить 53/TCP
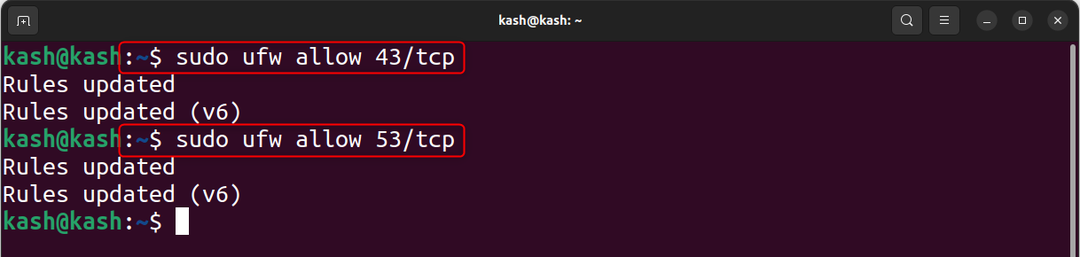
Примечание: Иногда наш брандмауэр UFW не включен по умолчанию, поэтому для его включения используйте:
судо уфв давать возможность

Теперь перезагрузите брандмауэр UFW, чтобы применить изменения:
судо перезагрузка

Заключение
Ошибка «Временный сбой в разрешении имени» может произойти из-за отсутствия подключения к Интернету, отсутствия DNS-сервера имен или разрешений файла resolv.conf или ограничений брандмауэра. Основное решение этой проблемы — решить проблему с Интернетом, разрешить доступ к файлу resolv.conf всем пользователям или разблокировать защиту брандмауэра UFW по адресу порт 43 и порт 53.
- 20/03/202320/03/2023
- 🕑 1 minute read
- 364 Views

Если вы столкнулись с истечением времени ожидания разрешения имени для имени wpad после того, как ни один из настроенных DNS-серверов не ответил на ошибку в средстве просмотра событий, это руководство может помочь!
Мы рассмотрим все доступные методы решения проблемы сразу после обсуждения причин. Давайте начнем!
Что вызывает разрешение имени для проблемы с тайм-аутом имени wpad?
Может быть несколько причин появления этого сообщения об ошибке в средстве просмотра событий; некоторые из распространенных упоминаются здесь:
- Неправильно установленный сетевой адаптер. Если установлена поврежденная или неполная установка драйвера сетевого адаптера, вы можете получить эту ошибку. Переустановка сетевого адаптера может помочь решить эту проблему.
- Поврежденный кеш DNS. Если кеш DNS неисправен, это может привести к ложным срабатываниям. Чтобы исправить это, вы можете очистить кеш DNS.
- DNS-сервер нестабилен. Если DNS-сервер нестабилен, вы можете получить это сообщение об ошибке. Вы можете заменить DNS на Google DNS, чтобы решить эту проблему.
- Поврежденное соединение TCP/IP. Если инструкции TCP/IP повреждены или прерваны, вы можете увидеть эту ошибку. Чтобы исправить это, вы можете обратиться к соединению TCP/IP.
- Разгрузка TCP/IP включена. Если включены автонастройка, RSS и разгрузка задач, вы можете получить это сообщение об ошибке. Вам нужно отключить их, чтобы решить проблему.
- Интернет-провайдер не поддерживает TCP/IP v6. Если ваш интернет-провайдер не поддерживает TCP/IPv6, вы можете столкнуться с этой ошибкой. Чтобы это исправить, отключите TCP/IP v6 в свойствах Интернета.
Что я могу сделать, чтобы исправить разрешение имени для проблемы с тайм-аутом имени wpad?
1. Запустите средство устранения неполадок сетевого адаптера.
- Нажмите Windows + I, чтобы открыть приложение «Настройки».
- Перейдите в «Система», затем нажмите «Устранение неполадок».

- Щелкните Другие средства устранения неполадок.
- Выберите «Сетевой адаптер» и нажмите «Выполнить».
- После сканирования выберите проблемный сетевой адаптер и нажмите «Далее».

- Следуйте инструкциям на экране, чтобы завершить процесс.


2. Переустановите сетевой адаптер.
- Нажмите Windows + R , чтобы открыть диалоговое окно «Выполнить».

- Введите devmgmt.msc и нажмите OK, чтобы открыть Диспетчер устройств.
- Выберите и разверните Сетевые адаптеры.
- Щелкните правой кнопкой мыши проблемный адаптер и выберите Удалить устройство.

- После удаления закройте диспетчер устройств и перезагрузите компьютер. Ваш компьютер автоматически установит лучший доступный драйвер.


3. Сбросьте соединение TCP/IP.
- Нажмите Windows клавишу, введите CMD и нажмите «Запуск от имени администратора».

- Скопируйте и вставьте следующую команду для сброса TCP/IP и нажмите Enter:
netsh int ip reset
- После выполнения команды перезагрузите компьютер.


4. Очистите кеш DNS
- Нажмите Windows клавишу, введите CMD и нажмите «Запуск от имени администратора».

- Скопируйте и вставьте следующие команды одну за другой и нажимайте Enter после каждой команды:
ipconfig /flushdnsipconfig /registerdnsipconfig /releaseipconfig /renew - После выполнения команды перезагрузите компьютер.

5. Измените DNS
- Нажмите Windows клавишу, введите Панель управления и нажмите Открыть.
- Выберите «Категория» как «Просмотр» и нажмите «Сеть и Интернет».

- Далее нажмите «Центр управления сетями и общим доступом».
- Теперь нажмите Изменить настройки адаптера.
- Щелкните сеть правой кнопкой мыши и выберите «Свойства».

- На вкладке Сеть дважды щелкните Протокол версии 4 (TCP/IPv4).

- Выберите «Использовать следующие адреса DNS-серверов», выберите «Предпочитаемый DNS-сервер» как 8.8.8.8 и выберите «Альтернативный DNS-сервер» — 8.8.4.4.

- Нажмите «ОК», затем нажмите «ОК».


6. Отключить TCP/IP
- Нажмите Windows + R , чтобы открыть диалоговое окно «Выполнить».

- Введите ncpa.cpl и нажмите OK, чтобы открыть окно сетевых подключений.
- Щелкните Сетевое подключение и выберите Свойства.
- Снимите галочку рядом с Интернет-протокол версии 6 (TCP/IPv6).
- Нажмите OK, чтобы подтвердить изменения.


7. Отключите автонастройку, RSS и Taskoffload.
7.1 Используйте командную строку
- Нажмите Windows клавишу, введите CMD и нажмите «Запуск от имени администратора».
- Введите следующую команду одну за другой и нажимайте Enter после каждой команды:
netsh interface tcp set global rss=disablednetsh interface tcp set global autotuninglevel=disablednetsh int ip set global taskoffload=disabled - Закройте командную строку.

7.2 Используйте редактор реестра
- Нажмите Windows + R , чтобы открыть диалоговое окно «Выполнить».
- Введите regedit и нажмите OK, чтобы открыть редактор реестра.
- Перейдите по этому пути:
ComputerHKEY_LOCAL_MACHINESYSTEMCurrentControlSetServicesTcpipParameters - Щелкните правой кнопкой мыши «Параметры» и выберите «Создать», затем «DWORD».

- Назовите DWORD EnableTCPChimney.
- Дважды щелкните DWORD и измените значение данных на 0.

- Выполните три вышеуказанных шага и создайте еще два DWORD (32-разрядных) и назовите их EnableTCPA и EnableRSS соответственно. Наконец, измените их данные Value на 0.
- Закройте редактор реестра и перезагрузите компьютер.


Итак, это методы исправления разрешения имени для ошибки времени ожидания имени wpad. Попробуйте их и сообщите нам, что сработало, в разделе комментариев ниже.
Quickly fix Windows 11, 10, 8 and 7 errors with Outbyte PC Repair
Take the bull by the horns: identify and fix performance issues that may be affecting your PC.
Outbyte PC Repair is a comprehensive computer repair tool designed to solve a number of different system problems, clean up your disk, optimize performance, and improve privacy and security.

- Compatible with: Windows 11, 10, 8 and 7
- Trial: Free trial by category for at least 2 days*
- Full version: from $29.95 (for a 3-month subscription)
*Free trial allows you to fix all detected items in each category
Related post
Пользователи Windows регулярно сталкиваются с программными сбоями, вызванными различными факторами. Ошибку 0x80070043 с пояснительным текстом «Не найдено сетевое имя…» юзеры встречают, пытаясь получить доступ к файлу, расположенному на другом девайсе в сети, или же при старте определённого софта (нередко ПО из пакета Microsoft Office). Происходить сбой может по разным причинам, но серьёзной угрозы он не представляет, а избавиться от него, следуя инструкциям, несложно.

Причины появления ошибки 0x80070043
Уведомление с кодом 0x80070043 и текстом «Не найдено сетевое имя…» появляется в результате следующих причин:
- Не настроено разрешение передачи файлов SMB. Источник проблемы – отключённая политика, участвующая в обеспечении передачи.
- Ошибка каталога Temp. Проблема решается удалением содержимого папки.
- Нарушена целостность системных файлов. В результате повреждения библиотек DLL или по причине неверных зависимостей открытие приложений не осуществляется.
- Конфликт ПО. Приложение или процесс не дают операционной системе выполнить установки InstallShield. Решение лежит в откате ОС к точке восстановления, сохранённой прежде, чем проблема стала актуальна.
Решение ошибки 0x80070043
Ошибка с описанием «Не найдено сетевое имя…» возникает при различных обстоятельствах по разным причинам, а потому и решение зависит от источника появления сбоя. Рассмотрим эффективные варианты устранения, позволяющие избавиться от проблемы, если вы столкнулись с неисправностью при попытке получения доступа к данным с другого компьютера сети, запуске софта или при других условиях.
Включение режима «Всегда ждать сеть при запуске и входе в систему»
В условиях появления сбоя в среде домена потребуется удостовериться, что в ОС установлено разрешение на передачу файлов SMB. Посмотреть, действует ли правило, или активировать политику можно следующим образом:
Очистка папки Temp в безопасном режиме
Если уведомление о сбое появилось по вине ошибки условия в каталоге временных файлов, решением является его очищение в безопасном режиме:
- Загружаемся в безопасном режиме любым удобным для вас способом, например, через окно конфигурации системы:
- Очищаем каталог временных файлов, для чего открываем консоль «Выполнить» (Win+R) и применяем команду %temp%, выделяем все находящиеся в папке временные файлы (Ctrl+A) и удаляем (Shift+Del).


Очистив каталог, перезагружаем компьютер и проверяем наличие сбоя.
Сканирование системы утилитами DISM и SFC
Поскольку ошибка 0x80070043 нередко обусловлена повреждением системных файлов или невозможностью отслеживания системой местоположение объектов, избавиться от неё получится с применением штатных инструментов Windows – утилит DISM и SFC, работающих из терминала.
Выполняем такие манипуляции:
СОВЕТ. При выполнении запроса /RestoreHealth утилитой DISM для загрузки файлов, предполагаемых на замену повреждённым элементам, используется Центр обновления Windows, поэтому следует позаботиться о стабильном соединении с интернетом.
Восстановление системы
Источник проблемы не всегда очевиден, но, если сбой начал проявляться не так давно, возможно, что его спровоцировали недавние изменения в системе. Универсальное решение – возврат ОС к ранее созданной точке восстановления, когда ошибка не возникала, поможет устранить неисправность:
Когда задача выполнена, можно пробовать запускать приложение, вызвавшее ошибку.
Рассмотренные способы эффективны в устранении сбоя с кодом 0x80070043, в зависимости от причин его возникновения, и помогают решить проблему в большинстве случаев.