
In a digital world hooked on instant gratification, one of the last things you want to experience when browsing is an error message, such as ERR_CONNECTION_REFUSED. This can be incredibly frustrating, and may even be a sign that something serious has gone wrong.
For average users, the really confusing errors are the ones where it can sometimes hard to distinguish between a problem with your site and something else, such as a networking or browser issue.
The “ERR_CONNECTION_REFUSED” message is an especially common and usually non-WordPress site related error message you’ll sometimes see in Chrome. Fortunately, it’s relatively easy to pinpoint the cause of this problem.
In this post, we’ll explain what the message means and how to fix it. Typically this involves the following steps:
- Check the Status of the Website
- Restart Your Router
- Clear Your Browser’s Cache
- Assess Your Proxy Settings and Adjust Them as Needed
- Disable Firewall and Antivirus Software Temporarily
- Clear Your DNS Cache
- Change Your DNS Address
- Disable Any Chrome Extensions
- Reinstall the Chrome Browser
But first, let’s take a deeper look into what this error actually means.
Check Out Our Video Guide To Fixing the ERR_CONNECTION_REFUSED Error:
What Is the ERR_CONNECTION_REFUSED Error?
The ERR_CONNECTION_REFUSED is a connection error that may appear in Google Chrome. It happens when the user tries to access a page, but the browser refuses to connect. This is a client-side issue that is likely to be caused by a poor internet connection.
Unfortunately, encountering errors like this comes hand-in-hand with using the internet. There are hundreds of possibilities, from the white screen of death to the classic 404 error , the ERR_CONNECTION_TIMED_OUT error or the ERR_CACHE_MISS.
Trust us, our support team deals with all sorts of errors on a daily basis. So this is nothing new for us.
| Error Code | ERR_CONNECTION_REFUSED |
| Error Type | Connection |
| Error Variations | This site can’t be reached Unable to connect Hmmm…can’t reach this page |
| Error Causes | Internet connection issues Cache issues Antivirus, firewall, or VPN interference Faulty Chrome extensions |
What Causes the ERR_CONNECTION_REFUSED Error?
Like we said, the cause for this issue can be quite simple. If you have a poor internet connection, you may be seeing this message in Google Chrome. But there are also other reasons for the ERR_CONNECTION_REFUSED error:
- Chrome extension issues
- Antivirus and firewall interference with browser
- Incorrect internet settings
- Cookies Issues
- DNS Cache Issues
- Outdated version of browser
What Are the Different Variations of the ERR_CONNECTION_REFUSED Error?
The ERR_CONNECTION_REFUSED Error appears differently depending on the browser. Here are some examples of the forms that this error can take:
- This site can’t be reached
- Unable to connect
- Hmmm…can’t reach this page
Google Chrome (This site can’t be reached)
In Google Chrome users may also be familiar with the ERR_CONNECTION_REFUSED page. You will see a message saying:
This site can’t be reached or This webpage is not available.
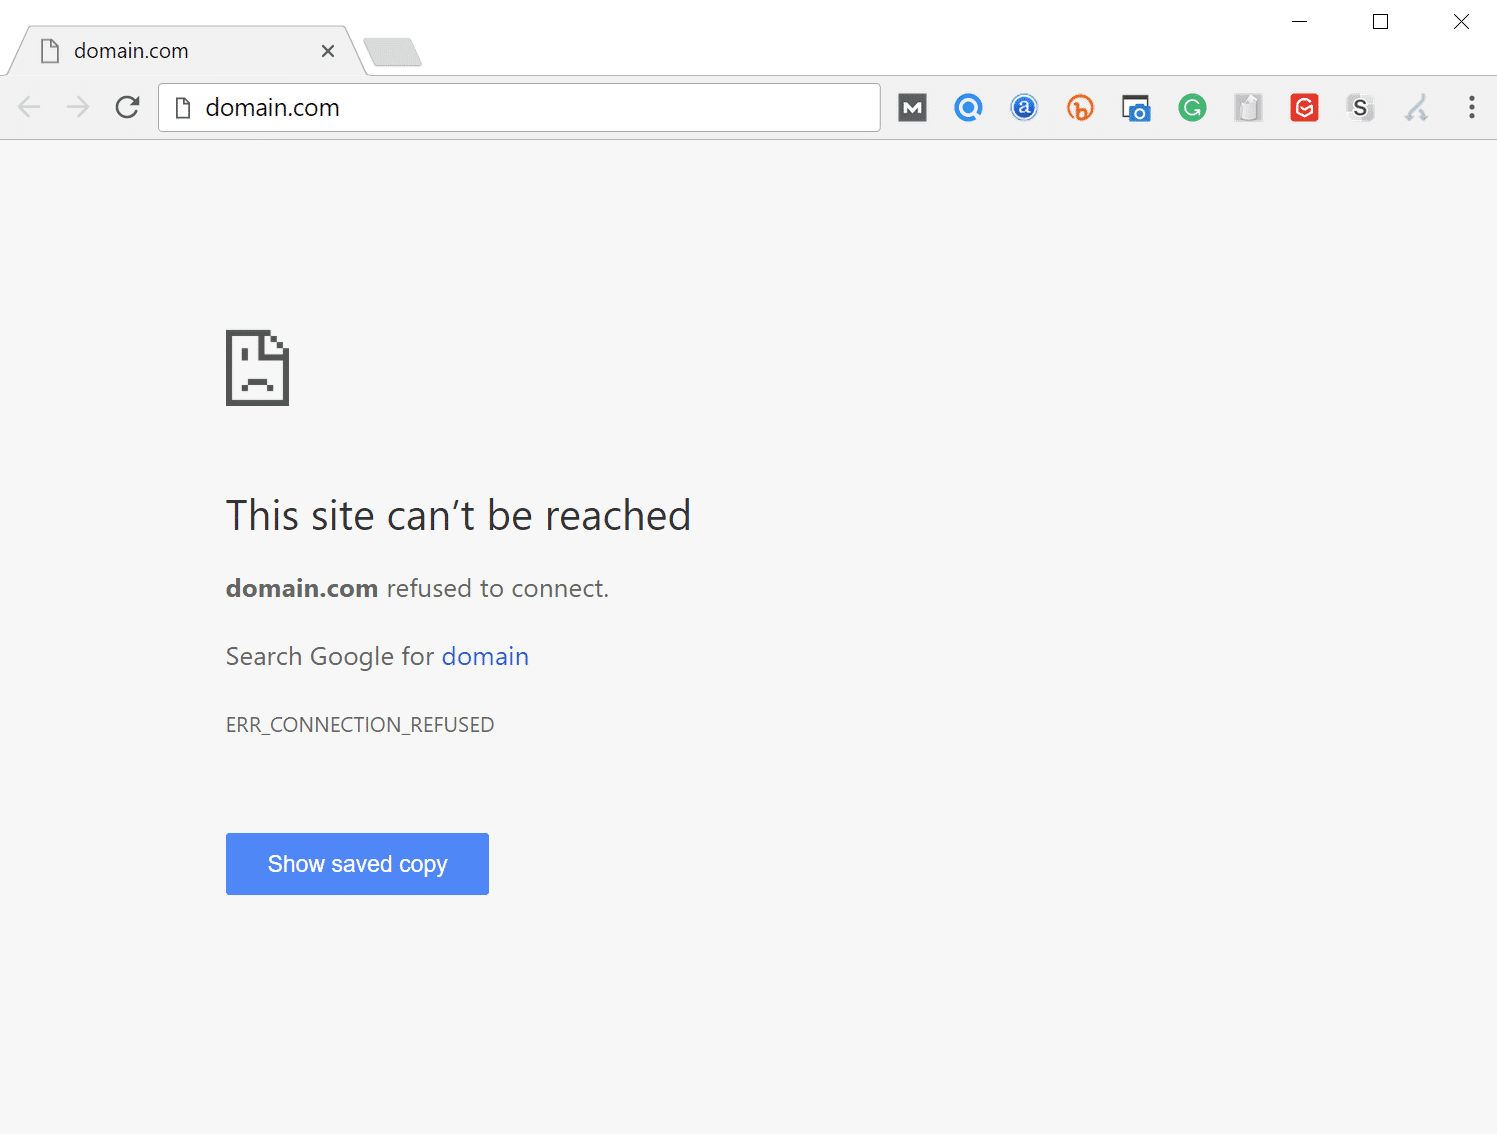
When you visit a website using Google Chrome and encounter this message, it means that your attempt to connect was refused. This error code also appears in other browsers, albeit in different forms.
A similar message that may also appear here is the DNS_PROBE_FINISHED_NXDOMAIN error, which is a DNS error which signals that the requested domain name does not exist.
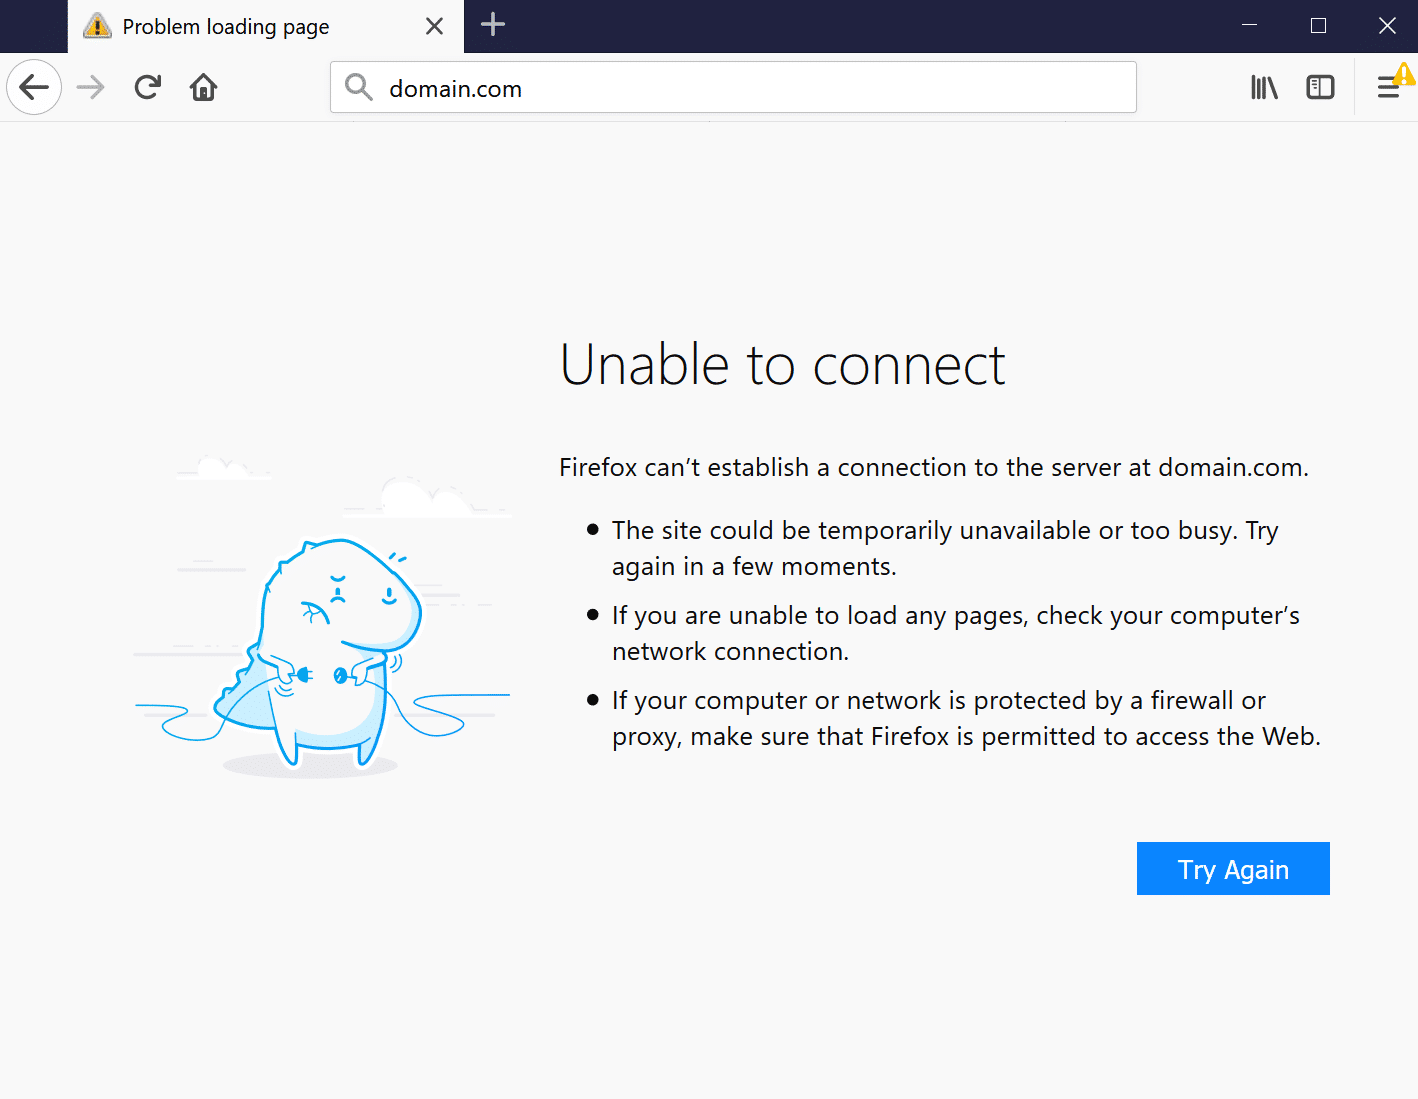
Mozilla Firefox (Unable to connect Error)
In Mozilla Firefox it will simply show as Unable to connect.
Firefox can’t establish a connection to the server at domain.com.
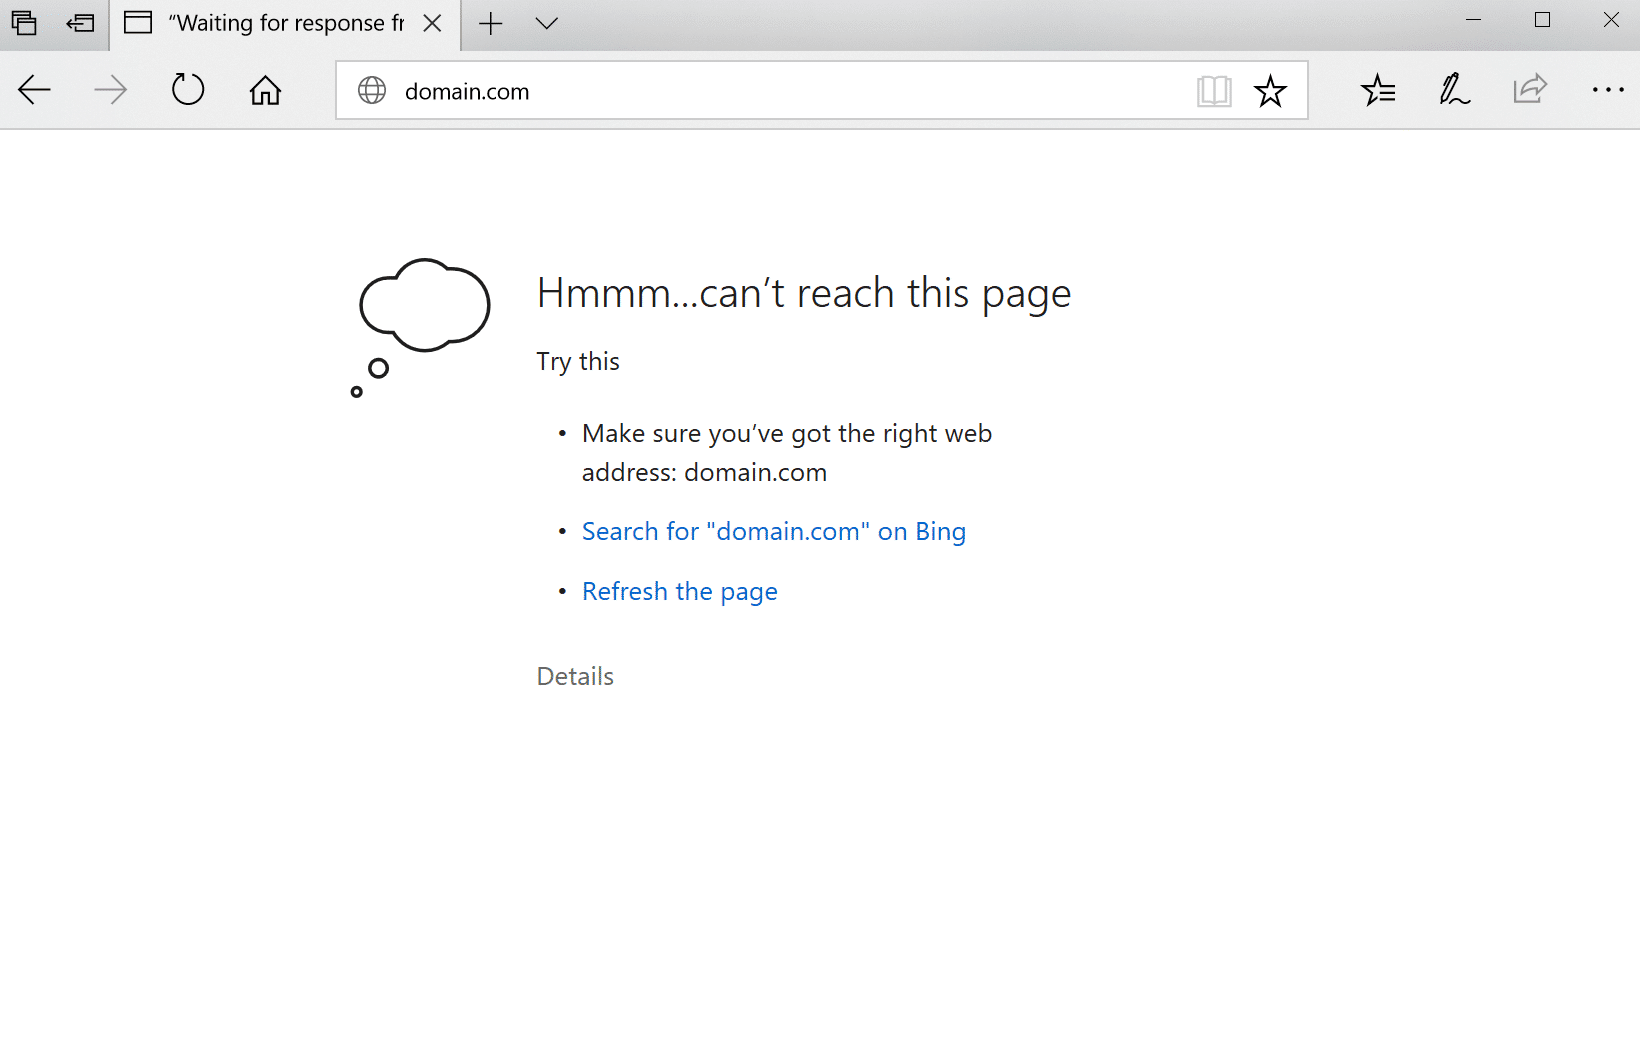
Microsoft Edge (Hmmm…can’t reach this page Error)
In Microsoft Edge, it will simply show as Hmmm… can’t reach this page. Which isn’t very helpful.
Make sure you’ve got the right web address: domain.com.
The ERR_CONNECTION_REFUSED error is sometimes caused by a server-side problem, rather than an issue with your individual attempt at connection. It’s usually nothing serious, and can simply be the result of incorrect firewall or server settings. However, it can also be a sign that something more significant has gone wrong – such as a malware attack, or unexpected downtime. An unreliable internet connection can also contribute.
As with most error messages, ERR_CONNECTION_REFUSED lets you know that something has gone wrong, without being kind enough to tell you why it’s happened. This means it’s up to you to find and resolve the root issue (if possible).
How to Fix the ERR_CONNECTION_REFUSED Error?
Although the range of potential causes can make troubleshooting tricky, it is possible to fix the ERR_CONNECTION_REFUSED error. Let’s walk through nine steps you can take, starting with the ones most likely to provide an answer.
1. Check the Status of the Website
Your first port of call should be to check the status of the website you’re trying to access. As we’ve already mentioned, the ERR_CONNECTION_REFUSED error can sometimes be caused by the site’s server, rather than your own internet connection.
A simple way to check whether this is the case is to visit another web page. If the error message occurs again, the problem most likely originates with your connection. If the second page loads correctly, however, the first site was probably at fault.
You can also use Down For Everyone Or Just Me:
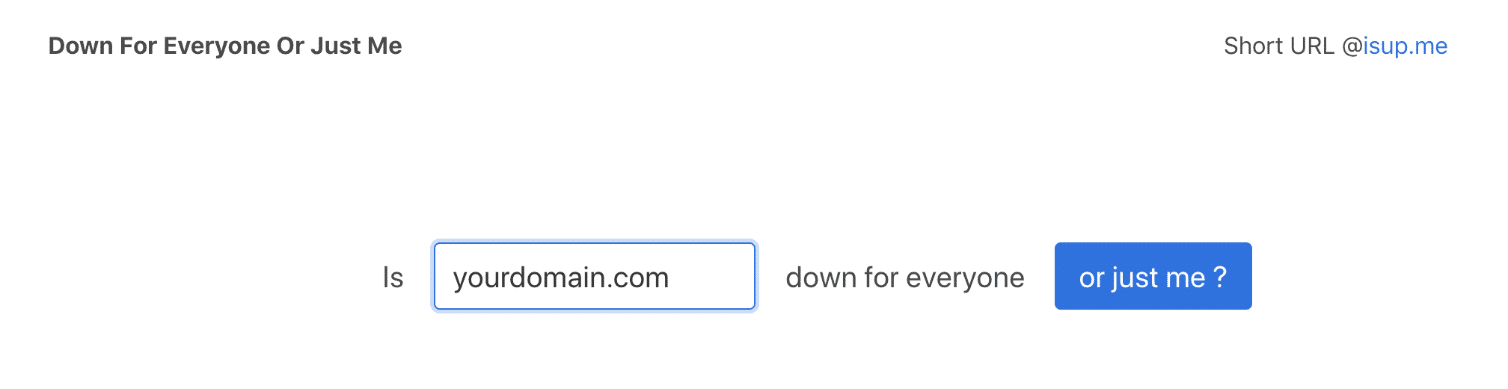
Enter the address of the non-functioning page, and click on Or just me?. This site will then assess whether the page is offline (down), or online (up). Unfortunately, when a page is down, the only thing you can do is wait for it to be fixed. However, if the page is up and is still not loading for you, it’s time to do some further troubleshooting.
2. Restart Your Router
As a tried-and-tested method for fixing many internet-related issues, your next step will be to try ‘turning it off and back on again’. Restarting your home or office router doesn’t come with a 100% success guarantee. However, the process takes just a few minutes, so it’s more than worth a try when you’re dealing with a potential connection issue.
To do this, disconnect the power supply to your router. You’ll then need to wait for about 30 seconds, before plugging it back in. Once the router has booted up again, try to access the page that returned an error. If it loads, then you’re good to go. If not, there’s likely another cause at play.
3. Clear Your Browser’s Cache
Like any good internet browser, Chrome will store information in its cache on your computer or device. This includes your browsing history, saved login data, and cookies – all of which are recorded in order to load the relevant pages more quickly the next time they’re visited.
Although they’re useful, caches can cause numerous issues when they become outdated. This is because the cached version of a page is likely to no longer match the current, live version. Fortunately, this problem is easily solved by clearing your cache.
But before you do that, you can easily check to see if it’s a browser cache issue by first opening up your browser in incognito mode. Or you can try a different browser. If you’re still seeing the error, then you will want to proceed with clearing your cache.
To do so, begin by opening up Chrome’s primary menu (in the top-right corner of your browser window). From there, select More Tools: You can then click on Clear browser data.
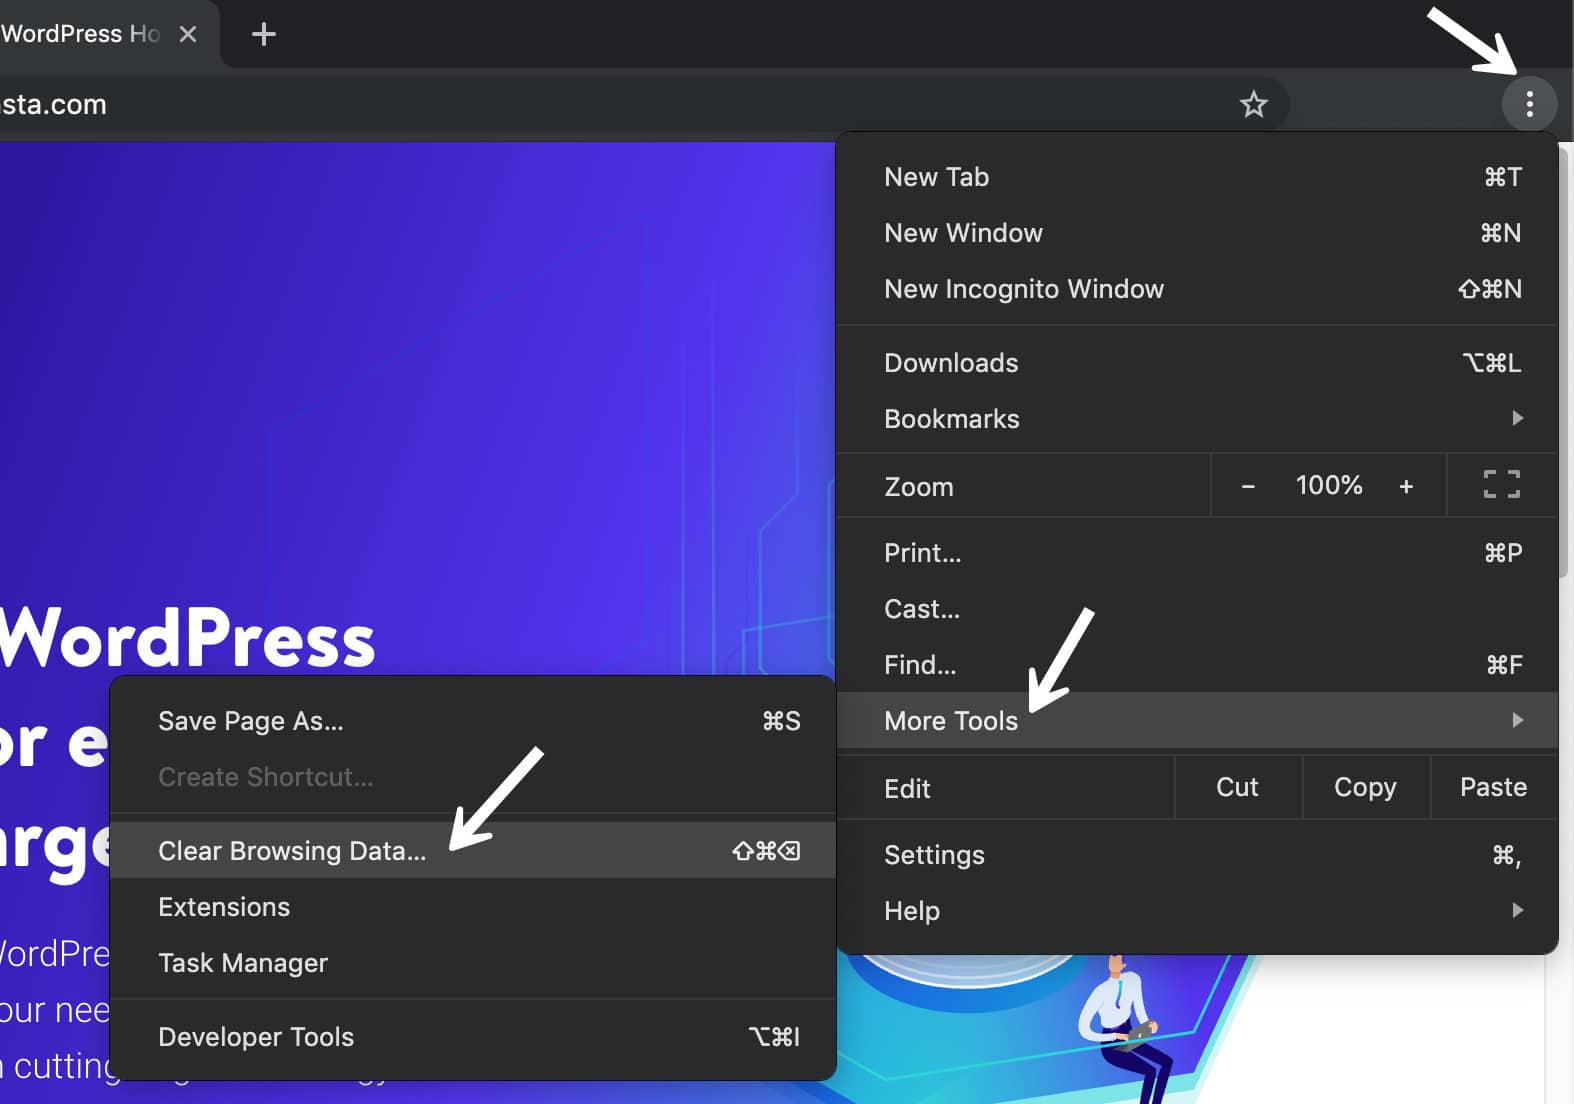
On the resulting page, you’ll need to make sure that all listed file categories are selected. If they aren’t, Chrome won’t be able to empty the entire cache. Instead, it will simply remove the most recent entries, which won’t result in the desired effect:

An alternative method of completing this process is to enter the following URL into your address bar:
chrome://settings/clearBrowserData
The resulting screen should grant you access to the same options we’ve outlined above. Here are some other helpful links for clearing cache.
- How to Force Refresh a Single Page for All Browsers
- How to Clear Browser Cache for Google Chrome
- How to Clear Browser Cache for Mozilla Firefox
- How to Clear Browser Cache for Safari
- How to Clear Browser Cache for Internet Explorer
- How to Clear Browser Cache for Microsoft Edge
- How to Clear Browser Cache for Opera
4. Assess Your Proxy Settings and Adjust Them as Needed
With security threats consistently on the rise, it’s no wonder that many people are now using individual solutions to protect their sensitive data. A popular way of doing this is through the use of proxy servers.
A proxy lets you go online under a different IP address, and acts as an intermediary between your browser and the websites you visit. As well as keeping your IP address private, it can also help to filter cache data and server communications.
Just as with caching, a proxy server can be useful, but it can also cause the ERR_CONNECTION_REFUSED message. For example, a web server might reject the IP address attached to a proxy server, and then reject the actual connection as a result.
It’s also possible that the proxy is offline, or incorrectly configured. In short, if the error message in question occurs, it’s worth checking out your proxy settings.
Chrome actually has its own proxy section, which can make this step a particularly simple process. After all, you won’t need to spend any time searching for the correct tools in your browser.
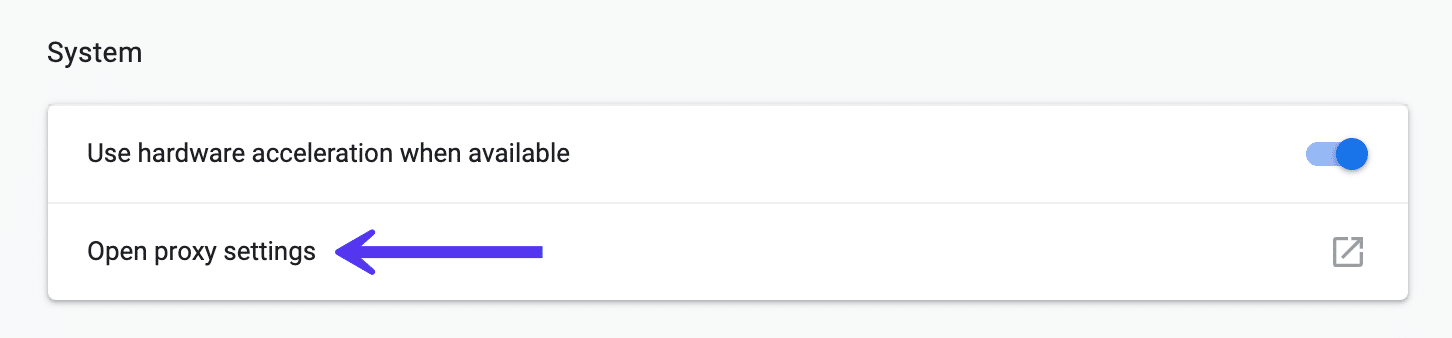
To get started, access the Settings menu in your Chrome browser. This will open up the complete menu of options. Under the System section (you’ll need to click Advanced at the bottom to see this), you should find an entry titled Open proxy settings. By selecting it, you’ll be taken to the corresponding menu:
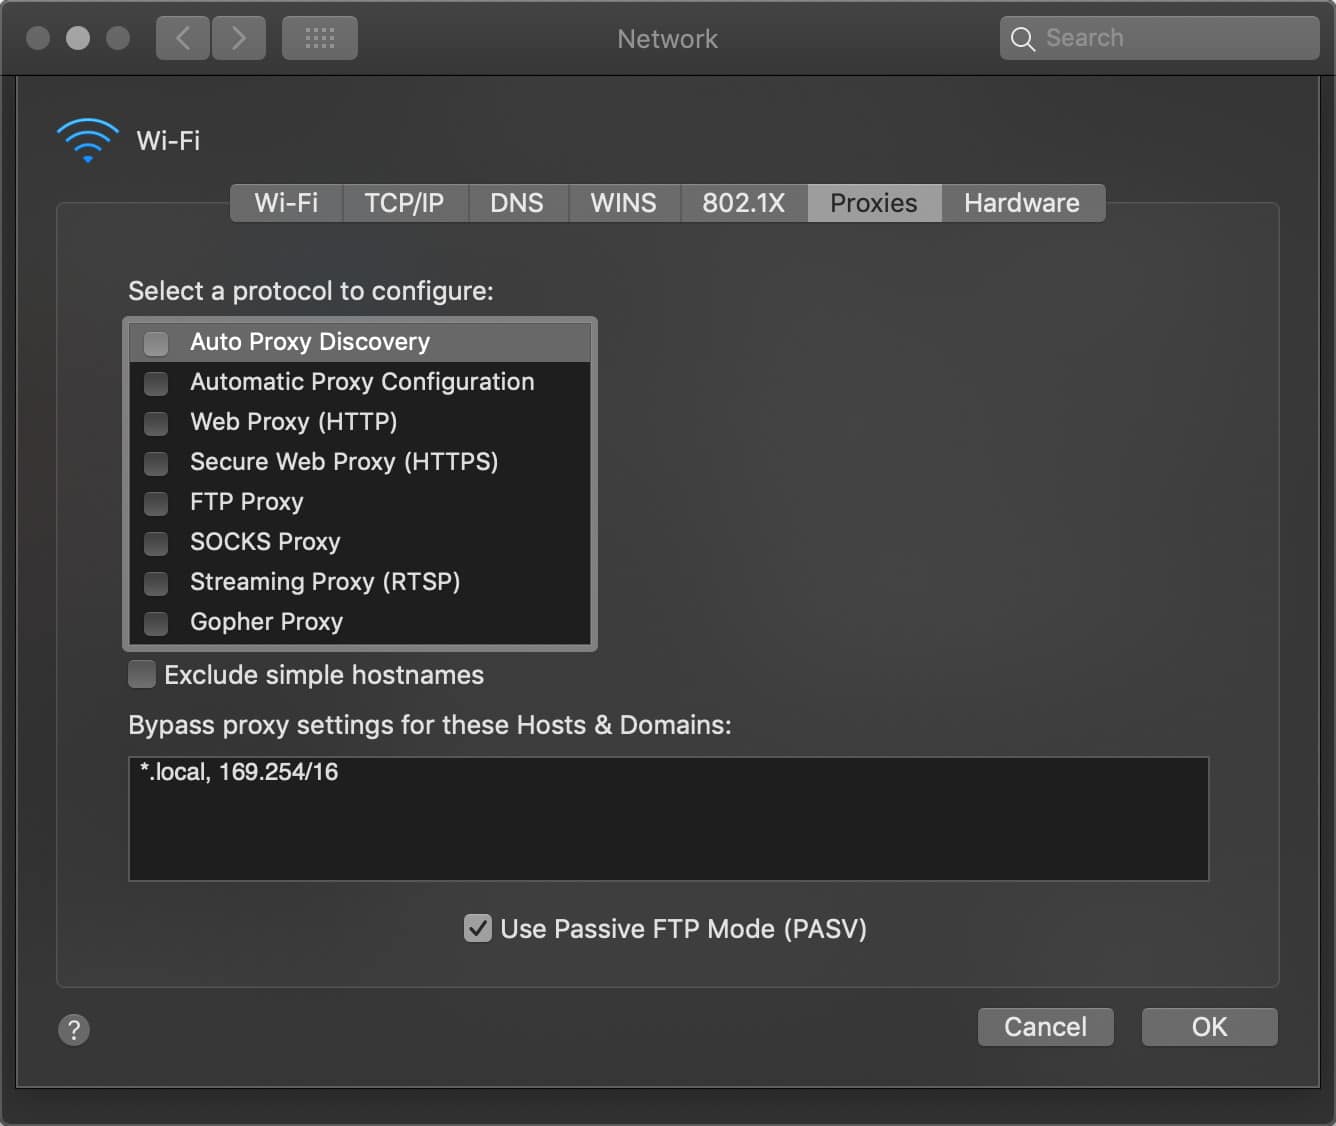
Your next step depends on the system you’re currently using. Windows users will want to click on LAN Settings, and uncheck the Use proxy server for LAN option. If you’re a Mac user, you should immediately find yourself in the relevant menu. You’ll then have to uncheck all selectable proxy protocols, and check to see if the ERR_CONNECTION_REFUSED message has been resolved.
5. Disable Firewall and Antivirus Software Temporarily
Firewalls and antivirus software are intended to protect users and their systems. They scan your device regularly, and automatically block any suspicious activity. You may start to notice a recurring theme here, however, since (much like with caching and proxy servers) this type of advanced security can at times lead to connection issues.
This is because firewalls can often block pages they don’t need to, or reject content that is completely safe. To check whether this is the case for you, try disabling your firewall and antivirus programs. Of course, this is only advised if you know for sure that the site you’re intending to visit is safe.
Additionally, you should only disable this kind of software temporarily. Switch it back on after you’ve finished checking to see whether the error has been resolved, so you don’t become vulnerable to attacks. If you repeatedly encounter errors because of your firewall or antivirus software, you may want to consider changing what you’re using.
6. Clear Your DNS Cache
As somewhat of an extension to an earlier troubleshooting step, your next task will be to clear your DNS cache. Although most people are aware that their browser creates a cache, not as many know that their operating system does the same thing.
For example, your DNS cache contains all of the temporary entries for pages you’ve accessed with your browser. These entries store key information related to the domain names and addresses of the pages you’ve visited.
The purpose of this feature is similar to that of other types of caches. It accelerates the loading process, as it eliminates the need to contact a site’s DNS server repeatedly. This will save you time in the long run. However, you may occasionally see some short-term issues.
If a stored entry no longer matches the current version of the website it refers to, technical errors like the ERR_CONNECTION_REFUSED message are not unusual. Fortunately, clearing your DNS cache is a quick and easy solution.
Again, how you’ll do this will depend on your operating system.
Windows
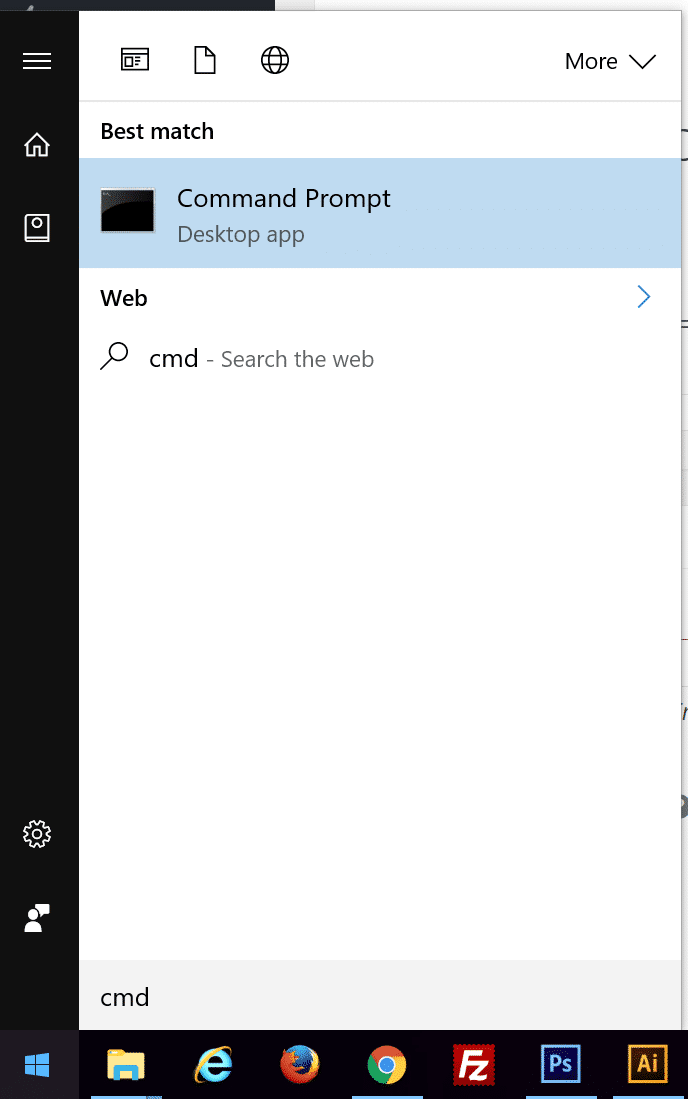
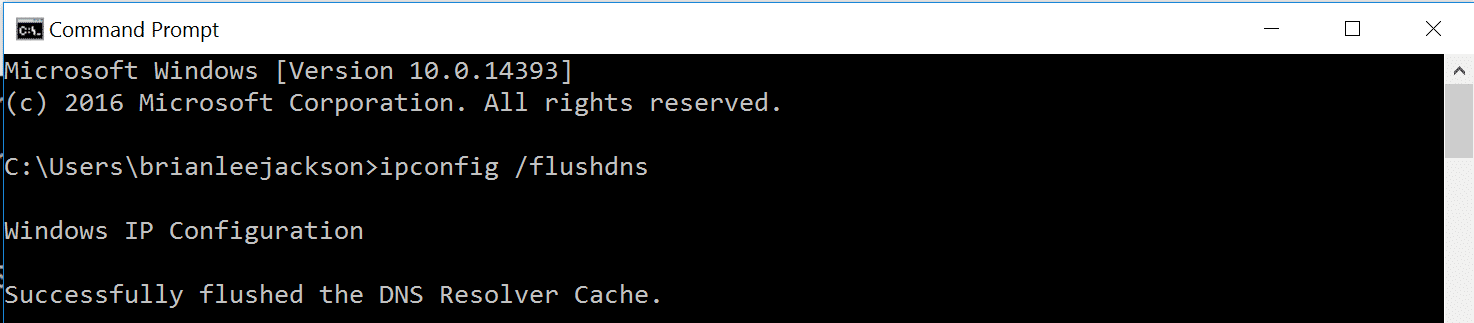
Launch the start menu by pressing the Windows key and search for “CMD.” This should return the command prompt.
In the command prompt run the following command:
ipconfig /flushdns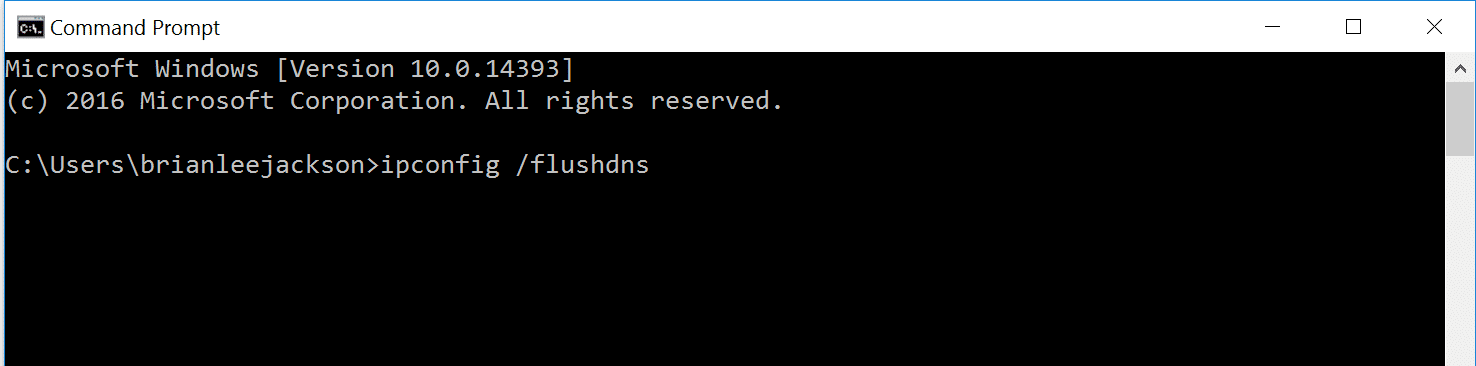
You will then see a confirmation that it has successfully flushed the DNS resolver cache.
For the purposes of this article, we’ll talk you through the process when you’re using a Mac – although you’ll be able to find numerous helpful resources online if you’re a Windows fan.
Mac
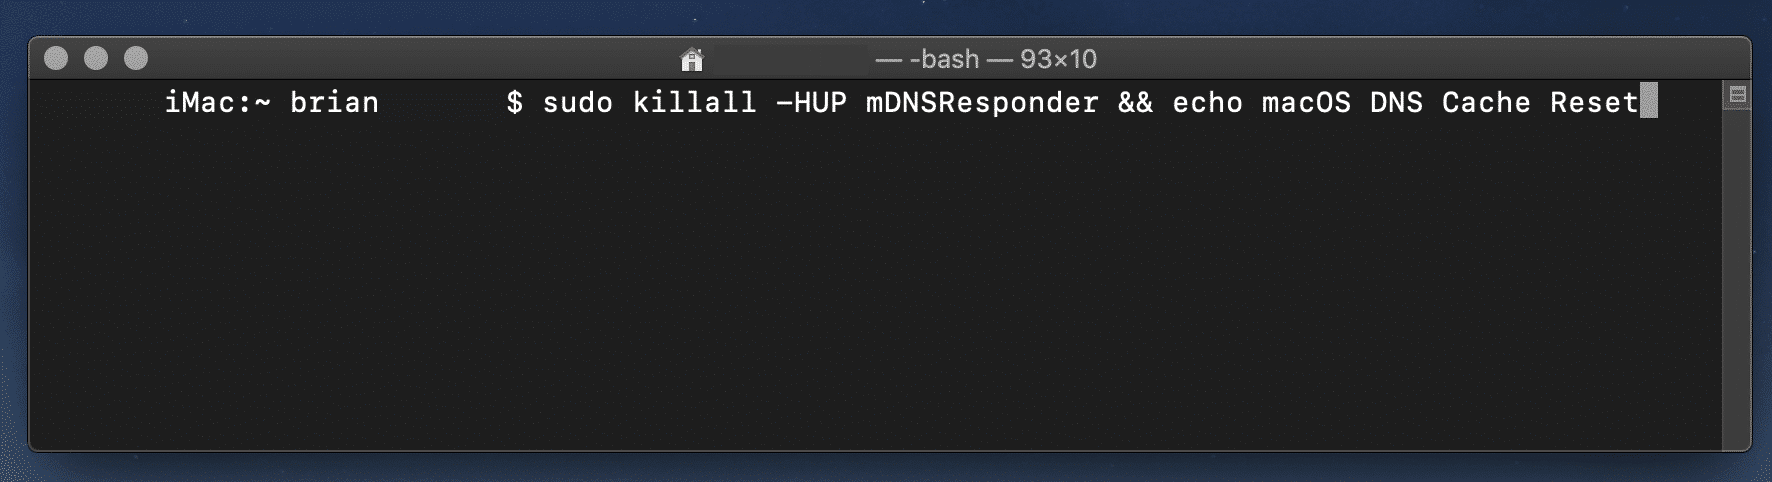
On a Mac, you’ll need to do the following:
Click “Go” up in the toolbar and then “Utilities.” (Shift-Command-U)
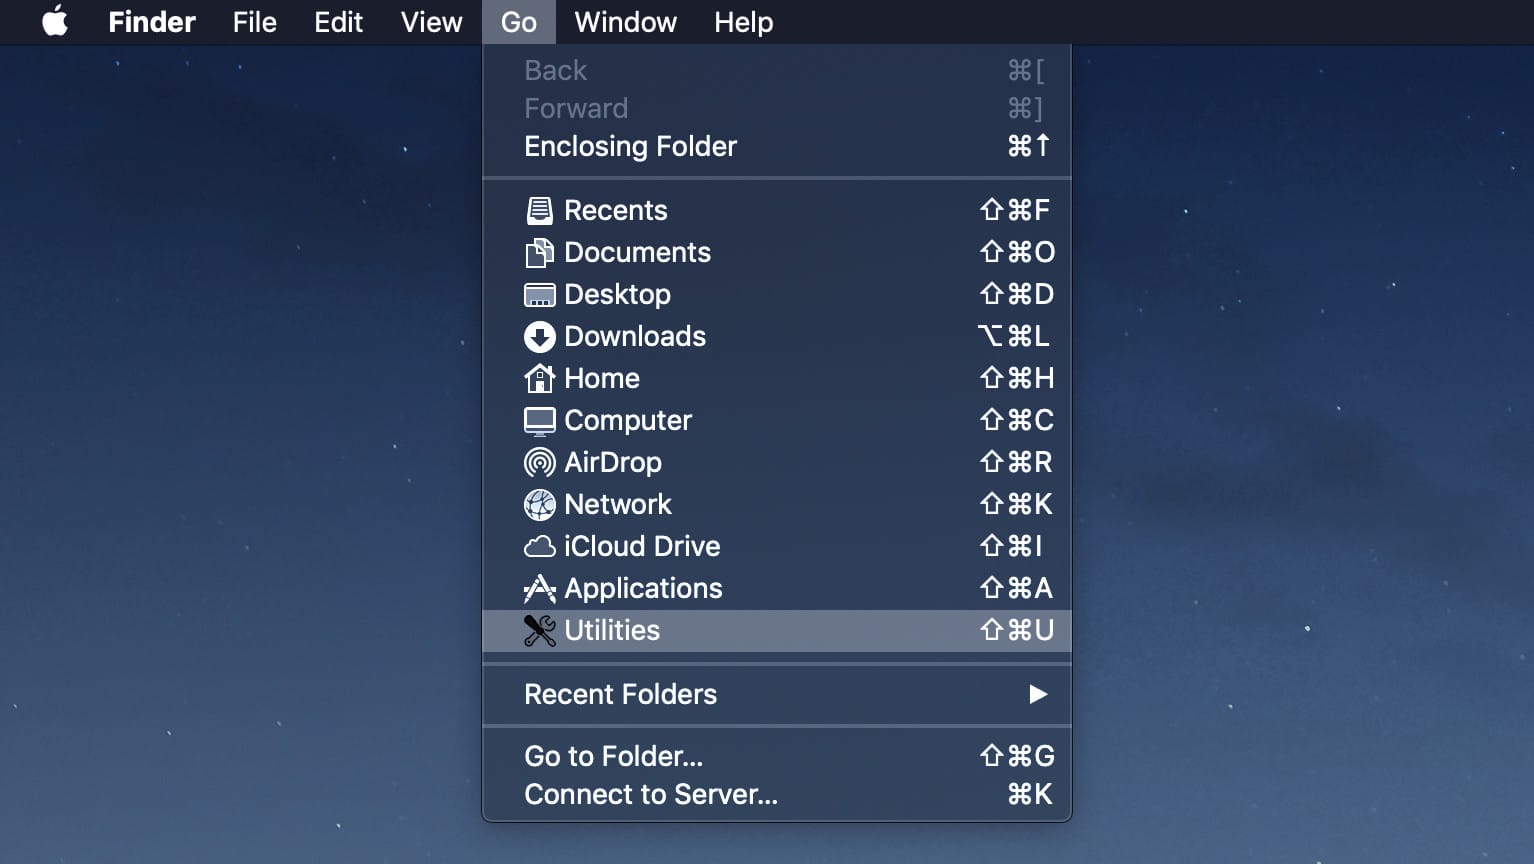
Open the Terminal.
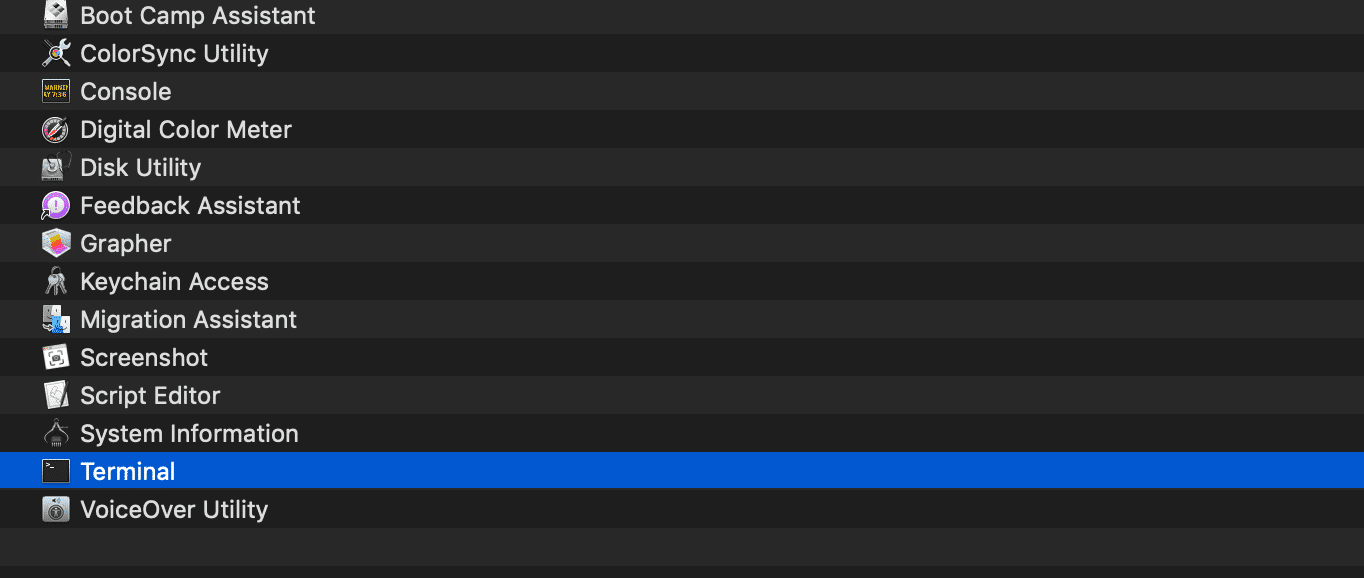
Run the following command. You will need administrator access to do this.
sudo killall -HUP mDNSResponder && echo macOS DNS Cache Reset
When you’ve done that, try accessing the problem site again. Hopefully, if you’ve followed all of our advice, it should be working by now. If not, your DNS may require some more attention.
7. Change Your DNS Address
As we discussed above, an outdated DNS cache entry is a potential source of issues like the ERR_CONNECTION_REFUSED message. However, the DNS address itself can also be responsible for these kinds of problems. This is because it can often become overloaded, or even go completely offline.
In the majority of cases, your DNS server address is automatically obtained from your internet provider. However, you can also change it if required. How you’ll do this will again depend on the operating system you’re using.
Let’s explore how Mac users can complete this process. First, you’ll need to open up System Preferences. On the resulting screen, select the option marked Network. You’ll then need to click on Advanced:
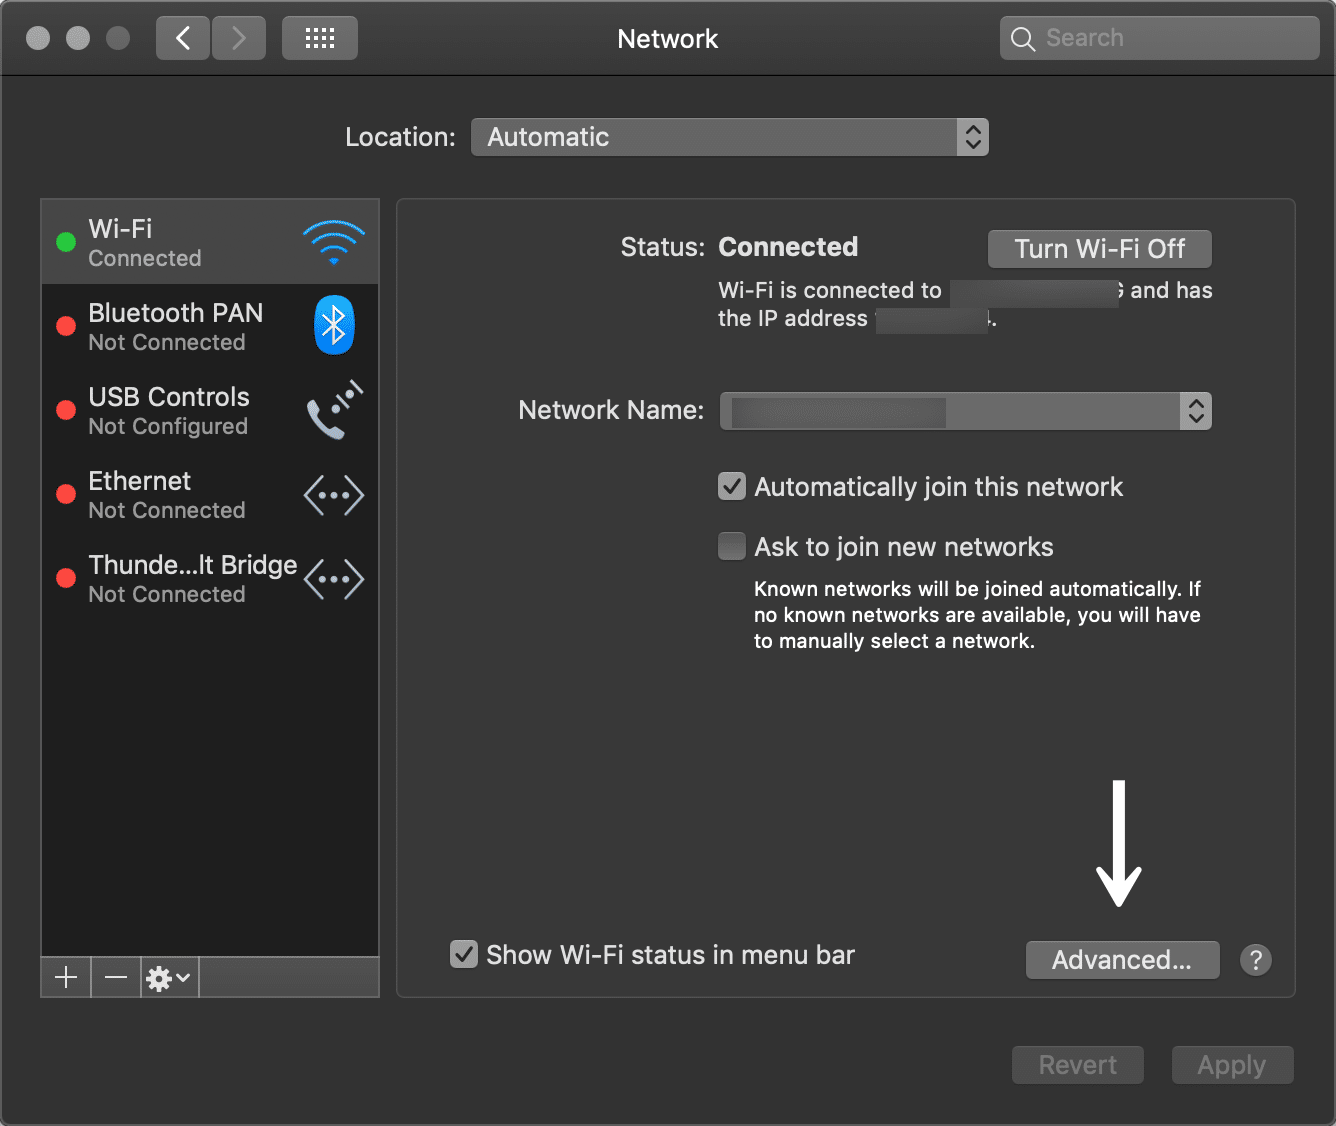
From there, select the DNS option found at the top of the screen. To add a new DNS server, click on the + button. To edit an existing DNS server instead, double-click on the DNS IP address you wish to adjust:
You can try temporarily changing these to a public DNS server, such as Google or Cloudflare.
- Some prefer to use Google’s public DNS (8.8.8.8 and 8.8.4.4) long-term due to them sometimes being more reliable.
- Cloudflare also offers its secure and blazing fast free DNS (1.1.1.1 and 1.0.0.1).
Tip: If you’re already using a free DNS server and having issues, removing it and defaulting back to your ISP’s DNS servers also sometimes fix things. Google and Cloudflare aren’t perfect 100% of the time and there have been a few instances where we’ve noticed switching back has resolved the issue.
You can then attempt to access the site again – and cross your fingers.
8. Disable Any Chrome Extensions
There’s no denying that installing extensions often contributes to a more well-rounded Google Chrome experience. The many extensions on offer can add key features, and even help to automate complex processes.
However, a large number of the extensions available for Google Chrome are not developed by the browser’s developers. Instead, they’re usually created by third parties. This can mean there’s no real guarantee they’ll work as you intended, or that they will be correctly updated over time.
Incorrect or outdated extensions are likely to cause numerous issues – including the ERR_CONNECTION_REFUSED error message. For this reason, it’s important to regularly audit the extensions that are attached to your browser.
To do that, first open the Extensions menu in your Chrome browser. You can then begin to assess each of your installed extensions in turn. Start by questioning whether you actually need each one. If an extension is no longer necessary, you can simply remove it.
Next, find out when each extension that you want to keep was last updated. Ideally, it should have been updated within the last three months. Anything longer than that could be a sign that the extension is being neglected by its developers. If possible, you’ll want to remove those extensions and replace them with newer alternatives.
Of course, new (and fully updated) extensions can still sometimes cause problems. If you suspect that this is the case, begin by disabling all of your attached extensions. If the site you’ve been trying to access loads after doing this, you’ll know that at least one of them is at fault. You can then reactivate one extension at a time, until you’ve honed in on the problem software.
9. Reinstall the Chrome Browser
As with any other application, Chrome itself is never going to be completely bug-free. Your installation of the browser can contain various issues, especially if it hasn’t been updated in a while. What’s more, problems between your browser and operating system are surprisingly common.
As a result, sometimes the only solution is to completely reinstall Chrome. You can do this by removing the current installation from your device. You can then download the most recent version of the browser by visiting the official Chrome website.
What to Do If None of These Solutions Work?
If none of the solutions we’ve walked you through fixes the ERR_CONNECTION_REFUSED message, it’s usually a sign that something more serious has gone wrong on the server-side (in other words, with the website itself).
Unfortunately, in this scenario, the only thing you can do is be patient. It’s likely that the website’s owners are working hard to resolve any issues, and it will resume business as usual before too long.
If accessing the site is a matter of urgency, you could try reaching out to its owners directly. There are numerous ways to do this, although social media and email are particularly effective – and unlikely to be affected by any website downtime.
Explain the problem you’re facing, and mention that you’ve tried several solutions to no avail. Hopefully, the team behind the website should get back to you and discuss the best course of action. You may even be doing them a favor, if you happen to make them aware of an issue they didn’t know was preventing access to their site.
If you’re a Kinsta client and it’s your own site that is having the issues, feel free to reach out to our support team. We are here to help 24/7.
Browser errors are never fun. 😩 Here are a few tips on how to fix the stubborn ERR_CONNECTION_REFUSED error.Click to Tweet
Summary
Although connection errors are endlessly frustrating, it’s important to remember that they can often be fixed. Your first port of call should always be to check whether the issue lies with the web page itself. If the problem is with your own connection, on the other hand, you’ll need to put in a little work to get things back up and running.
Do you have any more questions about this particular error message, or is there another commonly-encountered problem that you’d like us to explore? Let us know in the comments section below!
Как устранить ошибки, возникающие при загрузке страницы
Если вы видите сообщение об ошибке (например, «Опаньки…»), значит, у Chrome возникли проблемы при загрузке страницы. Сайт может работать медленно или не открываться совсем.
Если при загрузке страницы произошла ошибка, следуйте инструкциям ниже. Для начала попробуйте обновить страницу.
Обновите страницу
Как правило, достаточно обновить страницу.
Нажмите на значок «Обновить» ![]() в левом верхнем углу экрана.
в левом верхнем углу экрана.
Если проблему не удалось устранить
Шаг 1. Проверьте подключение к интернету
Убедитесь, что компьютер подключен к Wi-Fi или проводной сети.
Обновите вкладку с ошибкой.
Шаг 2. Очистите кеш
Загрузке веб-страниц могут препятствовать данные, хранящиеся в Chrome.
Откройте страницу в режиме инкогнито
- Запустите браузер Chrome на компьютере.
- В правом верхнем углу экрана нажмите на значок с тремя точками
 Новое окно в режиме инкогнито.
 - В окне инкогнито перейдите на нужную веб-страницу. Если она открывается, очистите кеш и удалите файлы cookie.
Как очистить кеш и удалить файлы cookie
- В правом верхнем углу экрана нажмите на значок с тремя точками Дополнительные инструменты Очистить историю.
- В меню «Временной диапазон» выберите Все время.
- Выберите Изображения и другие файлы, сохраненные в кеше и Файлы cookie и другие данные сайтов. Снимите остальные флажки.
- Нажмите Удалить данные.
- Обновите вкладку с ошибкой.
Шаг 3. Закройте другие вкладки, расширения и приложения
Возможно, они заняли много места в памяти компьютера, поэтому загрузить сайт не удается.
- Освободите память:
- Обновите вкладку с ошибкой.
Не удалось устранить проблему?
Шаг 5. Обновите Chrome
Шаг 6. Выполните поиск нежелательного ПО
Коды ошибок, возникающих при загрузке страницы
Следующие коды ошибок означают, что при загрузке веб-страницы возникла проблема:
- «Опаньки…» Chrome не может загрузить веб-страницу.
- ERR_NAME_NOT_RESOLVED. Несуществующий веб-адрес.
- ERR_INTERNET_DISCONNECTED. Устройство не подключено к интернету.
- ERR_CONNECTION_TIMED_OUT или ERR_TIMED_OUT. Для подключения к веб-странице потребовалось слишком много времени. Возможные причины: либо скорость соединения слишком низкая, либо страницу пытается открыть слишком много пользователей.
- ERR_CONNECTION_RESET. Соединение со страницей было прервано.
- ERR_NETWORK_CHANGED. При загрузке страницы устройство отключилось от сети или подключилось к новой.
- ERR_CONNECTION_REFUSED. Страница не позволила Chrome подключиться к ней.
- ERR_CACHE_MISS. Страница просит повторно отправить ранее введенные данные.
- ERR_EMPTY_RESPONSE. Сайт не отправил данные и, возможно, недоступен.
- ERR_SSL_PROTOCOL_ERROR. Страница отправила данные, непонятные для Chrome.
- ERR_BAD_SSL_CLIENT_AUTH_CERT. Не удается войти на сайт (например, банка или организации) из-за ошибки в сертификате клиента.
Все коды ошибок можно найти на странице chrome://network-errors/.
Могут также возникать следующие проблемы:
- Невозможно найти сайт.
- Сайт не открывается.
- HTTPS-сайт не открывается.
- Фотография не загружается.
- Новая вкладка не загружается.
Обратитесь за помощью
- Если открываются все сайты, кроме одного, скорее всего, ошибка возникла в работе именно этого сайта.
- Обновите страницу. Если она не откроется, напишите нам, нажав Отправить отзыв.
- Включите автоматическую отправку отчетов об ошибках, чтобы помочь нам быстрее справляться со сбоями, или сообщите о проблеме в Chrome.
- Свяжитесь с владельцем сайта и сообщите о проблеме.
- Получите совет от экспертов на справочном форуме Chrome.
Эта информация оказалась полезной?
Как можно улучшить эту статью?
Просмотров 55.7к. Опубликовано 23 июня, 2018 Обновлено 24 июня, 2019
Хотя Google Chrome является самым популярным веб-браузером, у него есть серьезные проблемы. Часто он показывает ошибку при просмотре любого веб-сайта. В это время вы узнаете « Как исправить соединение Err отказано ». Это очень знакомая проблема. Может появиться следующее сообщение.
Ошибка 102 (net :: ERR_CONNECTION_REFUSED): сервер отказался от соединения
В большинстве случаев несовпадения веб-сервера создают такие проблемы. В этом случае у Пользователей не будет возможности избавиться от него для этого конкретного веб-сайта. Только администратор веб-сайта сможет разрешить ошибочное соединение . Но это может быть результатом любых ошибок хром, сторонних расширений, рекламного ПО или вредоносных файлов cookie, программ или плагинов и т. Д. В этот раз пользователи должны предпринять необходимые шаги, чтобы определить главного виновника и решить его.
Обычно эта ошибка появляется, когда Google Chrome не открывает домен / веб-сайт. Эта ошибка является одной из самых популярных и распространенных ошибок в Google Chrome. Эта ошибка может возникнуть по следующим причинам, перечисленным ниже.
- Проблема с подключением к Интернету
- Если веб-сайт не работает или временно не работает.
- Веб-сайт также может быть заблокирован в системном файле Host
- Веб-сайт может быть заблокирован брандмауэром
- Вы получаете доступ к веб-сайту через прокси-сервер.
Исправить ERR_CONNECTION_REFUSED в браузере Chrome:
Теперь я попытаюсь дать некоторые рабочие решения, которые помогут вам избавиться от этой ошибки. Надеюсь, по крайней мере один из этих советов будет работать для вас. Прежде чем перейти к моему решению, очистите кеш браузера и посмотрите, работает ли он на вас.
Попробуйте режим инкогнито:
Если у вас есть несколько сторонних плагинов и расширений, установленных в хроме, вы можете просматривать их из режима инкогнито. Это облегчит выяснение плагина преступника. Если вы видите, что все идет хорошо в режиме инкогнито, попробуйте отключить все расширения и плагины и просматривать в обычном режиме. Теперь, вы не должны сталкиваться с ошибкой соединения отказались. В случае, если вы видите проблему и в режиме инкогнито, вам придется следовать следующим методам.
Использование командной строки
Откройте CMD (командная строка) от имени Администратора и запускайте команды по очереди.
ipconfig /release
ipconfig /all
ipconfig /flushdns
ipconfig /renew

netsh int ip set dns
netsh сброс winsock
Теперь перезагрузите компьютер, чтобы избавиться от ошибки ERR_CONNECTION_REFUSED.
Изменение адреса DNS
- Откройте Центр управления сетями и общим доступом (щелкните правой кнопкой мыши значок «Сеть») и выберите «Изменить параметры адаптера».

- Щелкните правой кнопкой мыши Сетевой адаптер (Wi-Fi, LAN, Ethernet) и выберите «Свойства».

- Теперь выберите Internet Protocol Version 4 (TCP / IPv4) и нажмите «Свойства».
- Теперь добавьте ниже DNS-адреса, как показано ниже.


- Предпочтительный DNS-сервер: 8.8.8.8
- Альтернативный DNS-сервер: 8.8.4.4

Вот и все. Задача решена.
Отключить брандмауэр и антивирус:
Иногда ваши брандмауэры или программы безопасности могут создавать проблемы с любым HTTP или https-сайтом. Если брандмауэр не доверяет SSL-сертификату, он может автоматически блокировать его.
В результате пользователь может столкнуться с ошибкой соединения между своим браузером и веб-сайтом. Таким образом, иногда отключение программ безопасности может исправить ошибочное соединение, отклоненное в google chrome.
Вы также можете настроить веб-безопасность в своей антивирусной или брандмауэрной программе, чтобы она запрашивала вас перед блокировкой любого сертификата SSL.
Очистка DNS и изменение или сброс настроек подключения:
Другая проблема, которая может вызвать err_connection_refused, — это настройки DNS и подключения. В большинстве случаев локальный провайдер по умолчанию предоставляет свой собственный DNS-сервер. У этого может быть проблема, которая вызывает ошибку, которую мы обсуждаем.
В качестве решения, сначала я рекомендую вам очистить DNS и сбросить настройки подключения . Затем измените IP-адрес DNS. Вы можете использовать DNS Google, DNS уровня 3, открыть DNS, поскольку они очень популярны и защищены.
Чтобы изменить настройки DNS, вы можете выполнять следующие действия.
- Откройте RUN, нажав Win + R.
- Введите ncpa.cpl и нажмите Enter.
- Теперь дважды щелкните соединение, которое вы используете для подключения к Интернету.
- Нажмите « Свойства» и дважды щелкните значок « Протокол Интернета 4» (TCP / IPv4) .
- Теперь выберите « Использовать» следующие адреса DNS-сервера .
- Установите DNS как 8.8.8.8 и 8.8.4.4. Это Google DNS. Вы можете использовать любые другие общедоступные DNS-адреса, если хотите.
- Теперь перезагрузите компьютер и убедитесь, что у вас исправлено err_connection_refused .
Очистка кэшей браузера и файлов cookie
В некоторых случаях очистка кешей и файлов cookie браузеров может сделать трюки. У каждого браузера есть разностные опции для очистки кешей и файлов cookie.
Чтобы очистить данные браузера в Internet Explorer, нажмите комбинацию клавиш, например Shift + Ctrl + Del . Он откроет новое окно с различными параметрами для выбора из списка. Убедитесь, что выбраны файлы Cookies и веб-сайты . Затем нажмите кнопку « Удалить» .

Чтобы очистить данные браузера FireFox, нажмите комбинацию клавиш, т.е. Shift + Ctrl + Del, и нажмите кнопку « Очистить сейчас» , чтобы удалить все кеши и файлы cookie.
Очистка файлов cookie и кешей в Google Chrome также такая же, как и в FireFox IE. Чтобы очистить их, нажмите клавиши Shift + Ctrl + Del на клавиатуре и нажмите кнопку « Очистить данные браузера» внизу меню, которое отображается сверху.
Проверьте настройки прокси для исправления Err_Connection_Refused:
Иногда настройки вашего прокси-сервера могут повлиять на работу в Интернете. Вы можете столкнуться с множеством ошибок в google chrome. Поэтому я хотел бы предложить вам проверить настройки прокси-сервера.
- Откройте RUN и введите inetcpl.cpl . Теперь нажмите «Ввод».

- Появится новое окно под названием «Свойства Интернета». Перейдите на вкладку подключения.
- Нажмите «Настройки локальной сети».
- Теперь убедитесь, что установлен флажок Автоматически определять настройки . Снимите отметку с других параметров и перезагрузите компьютер.

Я надеюсь, что он исправит ошибочное соединение . Если это вас разочарует, следуйте следующему методу.
Сброс настроек браузера
Ошибка ERR_CONNECTION_REFUSED также может возникнуть из-за неправильной настройки браузера или неправильных настроек браузера. Чтобы устранить эту проблему, вы можете сбросить настройки браузера до настроек по умолчанию, выполнив следующие простые шаги, приведенные ниже.
- Запустите настройки Google Chrome.
- Вы также можете скопировать и вставить chrome://settings/resetProfileSettings в панель поиска, чтобы запустить настройки браузера.
- Найдите « Показать дополнительные настройки » и нажмите «Сбросить настройки».
- Затем появится окно подтверждения. Просто нажмите « Сброс ».

- Это Он !. Настройки браузера Chrome сбрасываются до настроек по умолчанию .
- Проверьте, не появляется ли ERR_CONNECTION_REFUSED ошибка.

Попробуйте перезагрузить свой WiFi-маршрутизатор
Сброс вашего WiFi-маршрутизатора может устранить эту ошибку. Чтобы сбросить свой WiFi-маршрутизатор, нажмите и удерживайте кнопку питания на вашем Wi-Fi маршрутизаторе не менее 10 секунд. Дайте ему несколько секунд, прежде чем включать его и посмотреть, не появляется ли ошибка в вашем браузере Google Chrome.
Отключение антивирусного программного обеспечения
Отключение антивирусного программного обеспечения может помочь вам устранить эту проблему. Вот как отключить антивирус, чтобы исправить эту ошибку в Google Chrome.
- Найдите антивирусное программное обеспечение и запустите антивирусные настройки.
- Затем выполните поиск опции «Отключить защиту».
- Выберите параметр «Отключить защиту», затем примените изменения.
- Подтвердите выбор, нажав «ДА ОТКЛЮЧИТЬ ЗАЩИТУ».
- На всякий случай, если антивирус попросит вас установить таймер для отключения защиты, выберите минимальное возможное время.
Попробуйте другую сеть
Иногда у вашего интернет-провайдера может быть проблема. В результате вы можете столкнуться с той ошибкой, о которой мы говорим. Итак, просмотрите Интернет из другой сети. Вы можете использовать VPN и посмотреть, все ли вы столкнулись с проблемами. В случае, если у вас есть только трудности с вашим интернет-провайдером, свяжитесь с ними для лучшей помощи.
Проверьте работу сайта.
В большинстве случаев «err_connection_refused» принимается, потому что веб-сервер не принимает соединение. Ошибка может быть временной, и просто обновление веб-страницы может решить проблему.
Попробуйте открыть тот же сайт на другом устройстве или в сети. Например, вы можете открыть сайт с помощью сети 3G или 4G с телефона. Если сайт работает в разных сетях, проблема может быть связана с сетью Wi-Fi или Wi-Fi. Обратите внимание, что следующие варианты могут помочь.
В некоторых случаях err_connection_refused происходит из-за устаревшей версии браузера Chrome. Если вы хотите подтвердить, вызвана ли проблема внешним фактором, откройте веб-сайт с помощью телефона, приложения браузера Chrome и того же интернет-соединения. Если вы все еще сталкиваетесь с ошибкой err_connection_refused, то есть вероятность, что это вызвано неправильной настройкой маршрутизатора.
Сброс Wi-Fi-маршрутизатора
Часто ваш Wi-Fi-маршрутизатор работает без остановок в течение недель или месяцев. В конце концов, он начинает развиваться с ошибкой, и стоит попробовать сбросить Wi-Fi-маршрутизатор, хотя он может быть немного надуманным. Следуй этим шагам:
- Отключите маршрутизатор; помните, что выключение маршрутизатора нажатием кнопки питания может быть недостаточно.
- Подождите несколько минут и включите его снова. Проверьте, устранена ли проблема.
Изменение на статический IP-адрес
Одной из проблем с сетью является динамический IP-адрес, назначенный вашим интернет-провайдером. Вы можете обсудить с вашим интернет-провайдером, чтобы получить уникальный IP-адрес для вас. Назначьте этот IP-адрес на своем ПК и попробуйте загрузить страницу.
Отключить межсетевой экран
Брандмауэр Windows также может прекратить доступ к сайту в Chrome. Хотя для обеспечения безопасного просмотра необходимо включить брандмауэр, просто отключите его и попробуйте открыть страницу. Это поможет вам сузить проблему, если она связана с межсетевым экраном.
В Windows 10 вы должны разрешить каждому установленному приложению разрешать через брандмауэр Defender. Перейдите в окно поиска и введите «брандмауэр». Нажмите «Разрешить приложение через брандмауэр Windows», чтобы открыть Защитник Windows.
Убедитесь, что приложение Google Chrome разрешено через брандмауэр Defender.
Отключить настройки прокси-сервера.
С прокси-сервером у вас есть косвенный доступ к Интернету, и вы можете поддерживать анонимность. К сожалению, неисправный прокси-сервер может вызывать ошибки, в том числе err_connection_refused. Отключение вашего прокси-сервера может помочь в решении этой проблемы. Следуй этим шагам:
- Откройте URL-адрес команды Chrome «chrome: // settings /» и нажмите ссылку «Дополнительно».
- Перейдите в раздел «Система» и нажмите «Открыть настройки прокси».
- Перейдите на вкладку «Подключения» и нажмите кнопку «Настройки LAN».
- Убедитесь, что опция «Автоматически определять настройки» отключена.
- В разделе «Прокси-сервер» убедитесь, что опция «Использовать прокси-сервер для вашей локальной сети ……» отключена.
- Нажмите «ОК» и перезапустите браузер.
Проверьте, что проблема решена.
Flush DNS
Откройте командную строку с правами администратора. Выполните следующую команду. Для завершения потребуется секунда, и она сообщит вам, когда ваш DNS-кеш успешно очищен. Перезагрузите систему и снова попробуйте открыть домен. Если он все еще не работает, попробуйте следующее решение.
ipconfig /flushdns
Обновление IP и DHCP
- Откройте командную строку с правами администратора и выполните следующую команду «ipconfig /renew». Он обновит ваш IP-адрес и конфигурацию DHCP. Это может временно отключить вас от сети WiFi, но об этом не о чем беспокоиться.
- Запустите команду и подождите, пока Windows снова подключится к вашей сети.
- Проверьте, будет ли Chrome загружать домен.
ipconfig /renew
Исправить ERR_CONNECTION_REFUSED если вы являетесь веб-администратором:
Я объяснил, как обычные пользователи могут избавиться от этой ошибки. Но, если вы являетесь веб-администратором, и вы внезапно сталкиваетесь с этой проблемой на своем веб-сайте, вы можете исправить ее, следуя некоторым общим путям.
В большинстве случаев ваш сайт может показать эту проблему, когда вы обновляете свой сайт от HTTP до HTTPS. Вы можете подождать несколько минут и попытаться снова просмотреть. Тогда ты не столкнешься с этим снова. Если ваша конфигурация SSL имеет какие-либо проблемы, пользователи столкнутся с ошибочным соединением, отказавшимся нигде. Итак, попробуйте решить проблему с настройкой SSL. Не ищите бесплатный SSL. Всегда пытайтесь купить заплаченный.
Иногда настройки вашей зоны DNS могут создать эту проблему. Дважды проверьте его и исправьте ошибки. Если вы находитесь в бесплатном DNS-хостинге, попробуйте перейти в бесплатный план Cloudflare. Владельцы веб-сайтов, разместившие свой сайт на VPS или выделенном сервере, могут перезагрузить свой сервер. Он также перезапустит все службы, которые вы используете на своем веб-сервере. В результате у него будет очень хороший шанс исправить ошибочное сообщение об ошибке отказа .
Надеюсь, вы больше не столкнетесь с err_connection_refused, и мои методы будут полезны для вас. Пожалуйста, дайте мне знать все, что вы хотите знать, чтобы исправить эту ошибку. Вы также можете поделиться методом, который работал для вас в окне комментариев.
The “ERR_CONNECTION_REFUSED” error meaning is that your request to connect to a website’s server has been rejected due to some reasons.
The “ERR_CONNECTION_REFUSED” error is a common issue that many users encounter when trying to access a website. It signifies a connection failure between your device and the website’s server.
The err_connection_refused error is primarily considered a client-side error, which means that the main culprit generating this error is either your system or machine.
However, it is important to note that the “ERR_CONNECTION_REFUSED” error can also be triggered from the server end in rare cases. While it is primarily considered a client-side error, there are instances where the target server can be the source of the error.
Different browsers will show different error messages, for example
In the Chrome browser, “this site can’t be reached”.
 3")
In Mozilla Firefox the error message will display as “Unable to connect”.
 4")
Microsoft Edge displays the err_connection_refused error as “Hmmm…can’t reach this page”.
 5")
Resolving this error is crucial for seamless browsing and accessing the desired content. In this blog, we will walk you through the best troubleshooting methods you can try to fix the “ERR_CONNECTION_REFUSED” error.
Read: 🚩 15 Methods to Fix 502 Bad Gateway Error on Your Website
What Causes the ERR_CONNECTION_REFUSED Error?
Understanding the possible causes of this error is essential for effective troubleshooting. While a poor internet connection and speed are among the most common causes, there are also various other reasons for the “ERR_CONNECTION_REFUSED” error, such as:
- The website’s server is experiencing technical difficulties.
- Your local network is not properly configured or has connectivity issues.
- The website’s server may have blocked your IP address.
- There may be an issue with your browser settings or extensions.
- DNS caching issues
- Antivirus and Firewall conflict
- Browser cache and cookies issues
- Incorrect Internet configuration
- Outdated Browser
Apart from the list mentioned above, the “err_connection_refused” error can also occur due to server issues. Although it is not a severe case and can be caused by strong firewall or server settings, it can also indicate a more serious problem on the server side. This could be a sign of a malware attack or temporary server unavailability.
Like any other error message, the “err_connection_refused” error also does not provide sufficient information about the exact cause that triggers it. This means you have to identify the exact cause on your own and take the necessary steps accordingly.
How to fix the err_connection_refused error?
As you have already seen, there can be various possible causes for triggering this error. However, it is still possible to resolve this error by following the troubleshooting methods mentioned below.
- Refresh the webpage
- Troubleshooting Website-Specific Issues
- Clear browser cache and cookies
- Disable Browser extensions or add-ons temporarily
- Try accessing the website from a different browser
- Troubleshoot Local network issues
- Flush DNS cache and Renew IP address
- Adjust DNS settings to use alternative DNS servers
- Scan your computer for malware or malicious software
- Disable any proxy settings
- Troubleshooting Server or Hosting Issues
- Update or Reinstall your Chrome browser
- Additional Resources and Tips
Read: 🚩 How To Fix the DNS_PROBE_FINISHED_NO_INTERNET Error?
1. Refresh the webpage
The most basic and primary troubleshooting step you can take is to refresh the webpage. Sometimes, these errors are temporary and can be easily fixed by simply reloading or refreshing the webpage.
To refresh a webpage, you can follow these steps:
- On your computer, use the keyboard shortcut:
- For Windows: Press the F5 key.
- For Mac: Press the Command (⌘) key and the R key simultaneously.
- Alternatively, you can use the refresh button on your web browser. It is usually located near the address bar and looks like a circular arrow.
- Another option is to right-click anywhere on the webpage and select the “Refresh” or “Reload” option from the context menu.
By performing any of these actions, the webpage will be refreshed, and it may help resolve temporary errors or loading issues.
2. Troubleshoot Website specific issues
If the error persists, check out the status of the website. As we have already mentioned, sometimes, the err_connection_refused error can trigger due to server-side issues rather than your internet connection issues.
2.1. Check if the website is down for everyone or just for you:
Use online tools or check with other users to determine if the website is experiencing server issues or if the problem is isolated to your device.
Here you can use an online tool ” downforeveryoneorjustme“. Enter the website domain and check whether the website is down for you only or it is unavailable for everyone.
 6")
2.2. Contact the web admin or support for assistance
Reach out to the website’s administrator or support team to report the error. They can provide further guidance or resolve any server-side issues.
2.3. Consider using a virtual private network (VPN) to access the website
Using a VPN can help bypass certain restrictions or resolve regional connectivity problems. Try accessing the website through a VPN and see if the error is resolved.
3. Clear browser cache and cookies
Over time, cached data or cookies can become corrupted or outdated, leading to interference with the connection. Clearing your browser’s cache and cookies can potentially resolve the error.
To fix the err_connection_refused error, you need to clear the browser cache and cookies. If you are using Chrome browser, follow the steps given below:
Step 1: Depending on your browser, Go to the settings menu.
In Google Chrome, for example, you can find the settings menu by clicking on the three vertical dots located in the upper right corner of the window.
Step 2: To proceed, select “More tools” and then click on “Clear browsing data”.

Step 3: A pop-up window will be displayed, and you can choose all three options located under the “Basic” section as depicted in the picture below. These options consist of “Browsing history,” “Cookies and other site data,” and “Cached images and files.
Step 4: Click on “Clear data” to initiate the process.

4. Disable Browser extensions or add-ons temporarily
Certain browser extensions or add-ons may conflict with the website’s server, causing the error. Disable them temporarily to identify if any of these extensions are triggering the err_connection_refused error.
In the Chrome menu, click on Advanced Tools — Extensions. To disable them just uncheck the toggle on each of them. Make sure you disable all the extensions, it is very important to identify the reason.
Then, try to access the website again. If the error does not appear anymore, all you have to do is to find the extension causing the error. Turn on the installed extensions one by one and check the availability of the problem site after each one.
5. Try accessing the website from a different browser
Switching to a different browser can be helpful in identifying whether the error is specific to your current browser or a more widespread issue. By using a different browser, you can determine if the error persists across different platforms or if it is limited to your current browser only.
Switching to a different browser can help determine if the error is specific to your current browser or a more general issue.
6. Troubleshoot Local network issues
If the above troubleshooting steps didn’t resolve the error, it’s time to focus on your local network. Follow these steps:
6.1. Verify network connectivity by checking other websites
Ensure that your internet connection is stable and working by accessing other websites. If you can’t connect to any websites, there may be a problem with your network.
6.2. Restart your router and modem
Power cycling your router and modem is a simple yet effective method to resolve network-related issues. By turning them off, waiting for a few seconds, and then turning them back on, you can reset the network connection and potentially resolve connectivity problems. This process helps refresh the network settings and can often restore a stable and functional connection.
6.3. Disable firewall or security software temporarily
Firewalls and security software can block connections to certain websites. To check if this is the cause of an error, temporarily disable them and see if the problem persists. However, remember to re-enable them afterward to maintain system security.
7. Flush DNS cache and Renew IP address
Flushing the DNS cache can help resolve domain name-related problems. It is because an outdated DNS cache can store some corrupt files which can cause network issues, such as err_connection_refused error.
To resolve this issue, you can flush your DNS to reset it and restore everything to normal.
7.1. For Windows 10 and Windows 11 users:
Step 1: Open the Run command by pressing the Windows key and R. Alternatively, you can search for it in the Start menu.
Step 2: Type “cmd” and hit Enter to open the Command Prompt.

Step 3: Once the Command Prompt window is open, type “ipconfig/release” to release your current IP address.

Step 4: Next, type “ipconfig/flushdns” to release the DNS cache.
Step 5: Type “ipconfig /renew” to obtain a new IP address.

Step 6: Type “netsh int ip set dns” and hit Enter to reset your IP settings.
Step 7: Finally, type “netsh winsock reset” to restore the Winsock Catalog.

Step 8: After completing these steps, restart your computer to ensure the changes take effect.
7.2. For MacOS users:
Step 1: First of all, open the system preference options on your Mac. If you have Gas Mask installed, it can make searching for system-related tasks easier.
Step 2: Next, navigate to the Ethernet tab and click on the advanced options.
Step 3: Under the TCP/IP tab, you will find the option to release a DHCP lease. Clicking on this option will allow you to clear out the local DNS on your Mac.

Step 4: To clear the local DNS cache, go to Utilities > Terminal and enter the command.
Step 5: The command for flushing the local DNS cache is “dscacheutil -flushcache”.
Step 6: Once you have entered the command, there will be no separate success or failure message that pops up. However, in most cases, the cache will be cleared without any major issues.
8. Adjust DNS settings to use alternative DNS servers
If you want to fix any DNS network issues such as the err_connection_refused error, one of the most common solutions you can follow is to change the DNS address to either IPv4 or IPv6. However, it’s worth noting that while IPv6 is the newer version, IPv4 is still more commonly used. Follow these steps to change your DNS address:
8.1. For Windows 10 and Windows 11 users:
Step 1: If you are Windows 10 or 11 User, you have to open the control panel by simply typing “Control Panel” in the search bar.
Step 2: In the Control Panel select Network & Internet > Network and Sharing Center.
Step 3: From the menu on the left, select Change adapter settings.
Step 4: Right-click on your network and select Properties.
Step 5: In the window that opens, click on Internet Protocol Version 4 (TCP/IPv4) from the list, then select Properties again.
 7")
Step 6: Click on Use the following DNS server addresses.
Step 7: Enter “8.8.8.8” for the Preferred DNS server and “8.8.4.4” for the Alternate DNS server.
 8")
Step 8: Click on the OK button to save your changes.
Step 9: Close all the windows and try re-accessing the website to see if the error is still present.
If the problem persists, you may need to try other solutions. However, changing your DNS address can often resolve internet connection issues.
8.2. For MacOS users:
Step 1: First, navigate to the System Preferences on your Mac. You can find this by clicking on the Apple icon in the top-left corner of your screen, then selecting “System Preferences“.
 9")
Step 2: Once you’re in System Preferences, locate the “Network” icon and click on it. From there, select the network connection that you want to modify (e.g., Wi-Fi or Ethernet).
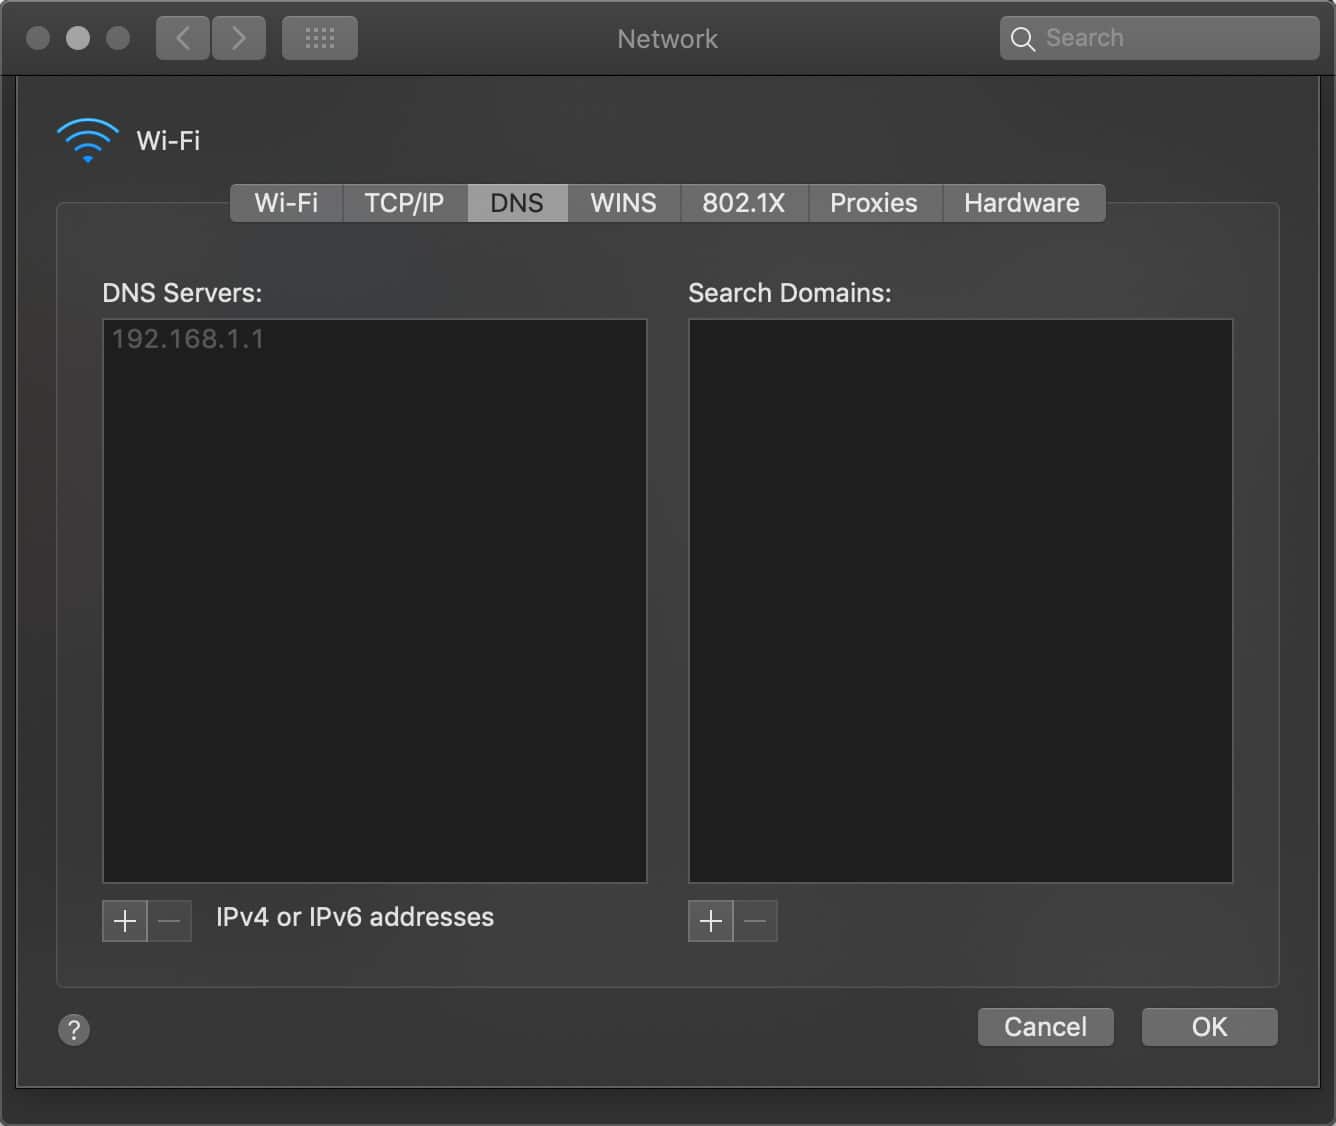
Step 3: In the Network settings, you should see a button labeled “Advanced“. Click on that, and then navigate to the “DNS” tab.
 10")
Step 4: Here’s where you’ll add the DNS server addresses. Click on the “+” button at the bottom-left of the DNS settings window, and then type in the IPv4 address for Cloudflare’s DNS servers: 1.1.1.1. Press enter, then repeat the process to add another address: 1.0.0.1.
Step 5: Finally, click “OK” to save the changes you’ve made. You should now be all set with your new DNS settings!
9. Scan your computer for malware or malicious software
Malware or malicious software can disrupt network connections. Running a thorough malware scan using reliable antivirus software can help you identify and remove any potential malware that may be causing the issue.
10. Disable any Proxy settings
Given the rise in security threats, many people are taking some safety steps to protect their sensitive data by using proxy servers.
You can consider it as a guardian angel that allows you to browse the web using a different IP address, acting as a helpful middleman between your browser and the websites you visit. Not only does it keep your real IP address hidden, but it also helps in filtering cache data and improving server communications.
However, just like any technology, proxy servers have their own limitations and downsides. Sometimes they can be the culprits behind the frustrating “ERR_CONNECTION_REFUSED” error.
For example, a web server might refuse the IP address associated with a proxy server, leading to the rejection of the actual connection.
It can be due to either your proxy server being incorrectly configured or it’s not available. Whatever the reason is, you must check whether the proxy is the culprit. To do so,

Read the guides on how to disable proxy on Windows and Mac.
10.1. For Windows users
Step 1: Go to your Chrome browser and click on the menu button “⋮” located at the top right corner and select “Settings”.
Step 2: Now scroll down and select the “system” section followed by “Open Proxy settings“.
Step 3: If you are a Windows 10 user or above it, this will open a separate proxy settings window.
Step 4: In the proxy settings window you will find two sections, Automatic proxy setup, and Manual proxy Setup.
Under Automatic Proxy Setup, Turn off: Automatically detect settings (Toggle button) and Use setup script (click on Set up > Turn off > Save)
Under Manual Proxy Setup, Turn off: Use a Proxy Server (Click on Setup button> Turn off > Save)
Under Manual Proxy Setup, Turn off: Use a Proxy Server (Click on Setup button> Turn off > Save)
For Mac Users, they can do the following steps to disable proxy settings:
Step 1: Go to the Apple menu or click on the Apple icon located at the top left of your Mac screen.
Step 2: Click on System Settings or System Preferences, whichever is applicable.
Step 3: Now click on the “Network” in the sidebar.
Step 4: From the right pane, Select a network service > click the Advanced button.
Step 5: Click on the Proxy tab and mark uncheck all the protocols under “Select a protocol to configure” and click on the “Ok” button when done.
11. Troubleshooting Server or Hosting Issues
11.1. Verify if the website’s server is running
Use online server status tools or contact the website’s administrator to check if the server is operational. If the server is down, you’ll need to wait for it to come back online.
11.2. Check server logs for any errors or issues
If you have access to server logs or error logs, review them for any indications of issues that could be causing the “ERR_CONNECTION_REFUSED” error. This information can help identify the root cause.
11.3. Contact your hosting provider for technical support
If you’re unable to resolve the issue on your own, reach out to your hosting provider’s technical support team. They can investigate the problem from their end and provide assistance in resolving the error.
12. Update or Reinstall your Chrome browser
Since nothing is perfect, neither are browsers. Like any web application, browsers are not completely bug-free. Therefore, they need to be updated with the latest available version from time to time. If an update is not available, an alternative method you can try is to completely reinstall the browser from its official website.
Additional Resources and Tips
Here are some additional resources and tips to help you further.
- Visit online forums or communities where users discuss similar errors and solutions.
- Check support articles or knowledge bases provided by browser developers, antivirus software vendors, or operating system providers.
- Keep your browser, operating system, and security software up to date to prevent compatibility issues.
- Consider seeking professional assistance from an IT expert or technician if you’re unable to resolve the error on your own.
Рассказываем, как исправить ошибку ERR_CONNECTION_REFUSED в браузере Chrome.
Проверяем, работает ли сайт
Первое, что нужно сделать — убедиться в том, что сайт, на который мы хотим зайти вообще работает. Может, проблема не на вашей стороне.
Чтобы проверить, работает ли ресурс:
- Открываем сайт Is It Down For Me?
- Вводим в поисковую строку название сайта.
- Затем нажимаем на кнопку Check.

Проверяем…
Если в ответ получите слово UP на зеленом фоне — значит, сайт в порядке и надо переходить к следующему шагу. А если DOWN, то остается только ждать, пока ресурс починят.

Как видите, Twitter доступен
Перезагружаем роутер
Банально, но иногда эффективно. Особенно, если вы встречаетесь с ошибкой на нескольких сайтах или интернет в целом работает как-то странно.
- Просто вытаскиваем блок питания роутера из розетки секунд на 60.
- Ну а потом просто включаем обратно.
Не помогло? Идем дальше.
![]() Загрузка …
Загрузка …
Очищаем куки и историю браузера
Иногда к проблемам с подключением приводят поврежденные файлы куки и кэш. Их можно удалить. Для этого:
- Открываем Google Chrome (или другой браузер на том же движке).
- Одновременно нажимаем клавиши Ctrl + Shift + Del, чтобы сразу перейти к нужному пункту настроек.
- Переключаемся на вкладку «Дополнительные».

Меняем настройки
- Выбираем временной диапазон, нажав на соответствующий пункт меню.
- Указываем период «Все время», чтобы стереть все подчистую.

Удаляем весь этот хлам
- Ставим галочки напротив пунктов: «История браузера», «Файлы cookie и другие данные сайтов», «Изображения и другие файлы, сохраненные в кэше».
- Затем нажимаем на кнопку ниже «Удалить данные».

На этом, собственно, все
![]() Загрузка …
Загрузка …
Это более радикальный метод, но все еще очень простой. К нему стоит прибегнуть, если вам кажется, что ошибка появляется из-за поврежденных файлов самого браузера.
Удаляется он так же, как и любая другая программа. Мы уже писали о том, как стереть с компьютера Яндекс.Браузер. Эта инструкция подойдет и для Google Chrome.
А потом заново устанавливаем браузер, как уже делали это до появления ошибки. Главное, скачивать программу только с официального сайта.
![]() Загрузка …
Загрузка …
Включаем или отключаем VPN
Из текста ошибки становится ясно, что сайт нам запрещает к нему подключаться. Возможно, это происходит из-за региональных ограничений. В таком случае может помочь какой-нибудь VPN-сервис.
При этом надо отметить, что некоторые VPN-сервисы могут давать сбой. Если вы уже используете какой-то «туннель», то стоит пойти от обратного. То есть отключить его и попробовать снова зайти на «поломанный» сайт.
![]() Загрузка …
Загрузка …
Отключаем прокси-сервер для локальной сети
- Одновременно жмем на клавиши Win + R.
- В появившейся строке вводим название программы inetcpl.cpl и кликаем по кнопке ОК.

Это короткий путь к свойствам подключения
- Появятся свойства сети. Переходим во вкладку «Подключения».

Нам нужны настройки текущего подключения
- Затем переходим в раздел «Настройка сети».

Переходим к расширенным параметрам
- А потом ставим галочку напротив пункта «Автоматическое определение параметров».

Здесь не должно быть никаких изменений
- Сохраняем выбранные настройки, перезапускаем сеть и заново пробуем зайти на «нерабочий» сайт.
![]() Загрузка …
Загрузка …
Меняем DNS
Ну и еще один вариант. Чтобы изменить DNS на системном уровне:
- Одновременно нажимаем клавиши Win + R
- Вводим туда слово control и нажимаем Enter
- Кликаем на кнопку справа от строчки «Просмотр» и выбираем пункт «Мелкие значки».
- Переходим в меню «Центр управления сетями и общим доступом».

Вот нужный пункт
- В списке доступных подключений находим сеть, к которой вы подключены в данный момент.
- Затем кликаем по кнопке «Свойства».

Может понадобиться пароль администратора
- В списке находим протокол IP четвертой версии и кликаем по нему два раза.

Настраиваем именно этот протокол
- Затем ставим отметку напротив строки «Использовать следующие адреса DNS-серверов».
- Указываем один DNS-адресов: 1.1.1.1 (это CloudFlare) или 8.8.8.8 (это Google).
![]() Загрузка …
Загрузка …

На этом все. Теперь сохраняем настройки и снова тестируем сеть
![]() Загрузка …
Загрузка …
Post Views: 5 851