
Здравствуйте
Вот все известные варианты решения по проблеме с входом на сервера на платформе RAGEMP 1.1
Если ниже указано отключение, это значит, отключать нужно средствами системы, а не с помощью твикеров «батников» реестра и т.п.
Со стороны сервера проблем нет
Дополнительных вариантов предложить не сможем
Перед выполнением действий — внимательно ознакомьтесь со всей информацией описанной здесь. Отталкивайтесь прежде всего от не радикальных методов решения проблем, после чего приступайте к глобальному устранению вашей проблемы.
Если в результате указанных ниже действий Вы добились экрана с надписью loading server resources, проверьте активность диска и сети для Grand Theft Auto V, если загрузка идет, значит нужно подождать. Если нет, то увы, проблема с соединением, выключите роутер на пару минут, если это не поможет, воспользуйтесь адекватным VPN для проверки.
(на данном скриншоте, активности уже нет, загрузка завершена)
В некоторых случаях, у определенных пользователей вне зависимости от Вашего интернет-соединения скорость скачивания может значительно уменьшиться, проверяйте скачивает ли файлы игры или нет в момент отображения loading server resources путем нажатия ПКМ на папку RAGEMP, ее размер должен увеличиваться — это означает, что файлы скачиваются, дополнительно можно убедиться через диспетчер задач, как указано выше. Как и говорилось, такое скачивание может затянуться к сожалению на длительное время, приблизительно ~30-60, а иногда и более минут.)
Удалите стороннее антивирусное ПО (Касперский, Аваст и т.п.), сам защитник Windows временно отключите для проверки (навсегда отключать не стоит), сторонние файрволы, Adguard, Wallpaper engine, MSI Afterburner, MSI Mystic light и аналогичные, для управления подсветкой и блокировки рекламы. Обязательно удалите Razer Synapse, если установлен. Также Process Lasso и Park Control, Memreduct, Advanced system care и подобные. Также отключите Xbox game bar и его оверлей, повтор xbox, оверлей дискорд, удалите betterdiscord,отключите оверлей стим и прочие оверлеи.
В настройках мультиплеера (RAGEMP), включите параметр “P2P”, или наоборот, выключите
В настройках брандмауэра Windows, удалите все правила для входящих и исходящих подключений, далее отключите его.
1. Нажмите по кнопке Пуск и в поисковой панели начните набирать «Командная строка».
2. Запустите классическое приложение с правами администратора (щёлкните по нему правой кнопкой мыши);
3. В открывшемся окне вводим команду netsh advfirewall set allprofiles state off и нажимаем Enter;
4. После этого из вы увидите уведомление из Центра безопасности и обслуживания об отключении системы безопасности.
Перезагрузите ПК, выключите роутер на пару минут.
Отключите облачные сохранения GTAV, удалите папку DocumentsRockstar GamesGTA VProfiles, если внутри игры появится диалоговое окно, куда сохранять — выберите “локально” Далее пройдите пролог в сюжетном режиме, т.е. первую миссию за Франклина, до сохранения. Чужие сохранения из интернета, 100% сохранения использовать НЕЛЬЗЯ
1. Установите/обновите Windows 10 последней сборки. (20H2) Корпоративная, LTSC, «сборки» не подходят. Если обновление не находит, перейдите по ссылке https://go.microsoft.com/fwlink/?LinkID=799445 . Если у Вас была установлена пиратская сборка системы, поможет только установка чистой Windows 10 версии 20Н2 с сайта Microsoft.
Если была установлена чистая система, но обновлялись со старой версии, например 1909, сначала попробуйте полную проверку системы, как указано в данной теме https://forum.gta5rp.com/threads/faq-proverka-celostnosti-windows-10.248742, затем чистую установку системы.
2. Воспользуйтесь VPN (NordVPN, ProtonVPN)
3. Отключите XBOX GAME BAR
4. Удалите файл settings.xml в папке DocumentsRockstar GamesGTA V
Если ранее использовали модификации, сделайте полную проверку файлов GTAV, если это не поможет, удалите папку update, файл gta5.exe из папки GTAV, затем снова сделайте полную проверку файлов, если это не помогает, поможет только чистая установка игры
1. Скачайте goodbye-dpi github.com/ValdikSS/GoodbyeDPI/releases/tag/0.1.6
2. Скачайте документ blacklist (https://dropmefiles.com/XD4uI )
3. Распакуйте, замените блэклист, запустите от имени администратора service_install_russia_blacklist.cmd и не удаляйте папку.
Если у вас запущена какая-либо игра Rockstar Games, выйдите из нее
Перейдите в установочную папку Rockstar Games Launcher
По умолчанию: C:Program FilesRockstar GamesLauncher
Дважды щелкните по файлу uninstall.exe и удалите Rockstar Games Launcher
Не ставьте отметку в поле «Удалить игровые данные» (Uninstall game data)
Удалите оставшиеся файлы Rockstar Games Launcher и Social Club
После того как процедура удаления будет завершена, удалите все нижеперечисленные папки:
ПРИМЕЧАНИЕ: не удаляйте другие папки или файлы, иначе вы можете потерять сохраненные игры или другие важные данные.
C:Users[имя пользователя]DocumentsRockstar GamesSocial Club
C:Users[имя пользователя]DocumentsRockstar GamesLauncher
C:Program FilesRockstar GamesLauncher
(установочная папка приложения)
C:Program FilesRockstar GamesSocial Club
C:Program Files (x86)Rockstar GamesSocial Club
Перезагрузите компьютер
Установите Rockstar Games Launcher заново
Удалите файлы сервера в RAGEMP/Client_resources, установите наш лаунчер — gta5rp.com/download
Либо наоборот, удалите наш лаунчер, установите лаунчер RAGEMP в другую папку или на другой диск https://cdn.rage.mp/public/files/RAGEMultiplayer_Setup.exe
Запустите по очереди, не закрывая предыдущие, следующие приложения: Steam или EGS, лаунчер (Gta 5 Launcher) или мультиплеер (RAGEMP)
1. Убедитесь, что ваша GTA V обновлена.
2. Запустите одиночную игру и GTA Online один раз
3. Перезагрузите игровой лаунчер (Steam/RGL/EGS)
4. Убедитесь что антивирусное программное обеспечение не заблокировало ни один из файлов RAGE MP
5. Перезагрузите компьютер и роутер
6. Удалите все сторонние моды, так как они могут быть несовместимы. (в том числе и REDUX)
7. Переустановите игру полностью, GTAV для использования с платформой RAGEMP 1.1 должна быть идеально чистой
8. Запустите мультиплеер с файла updater.exe(в папке RAGEMP) от имени Администратора
9. Радикальный метод: Установить Windows 10 последнего обновления (Home, Pro 20H2) с официального сайта
Seeing the Failed to reach any official servers error when searching for players and servers? This is a common CS: GO error. But luckily there has been some effective ways to fix this. Here we have listed these fixes for you:
Use the TCP protocol for your Steam client
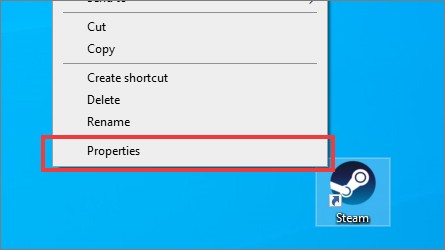
Step 1: Right click the Steam icon on your desktop, and then select Properties.
Step 2: Add ” -tcp” to the end of Target.
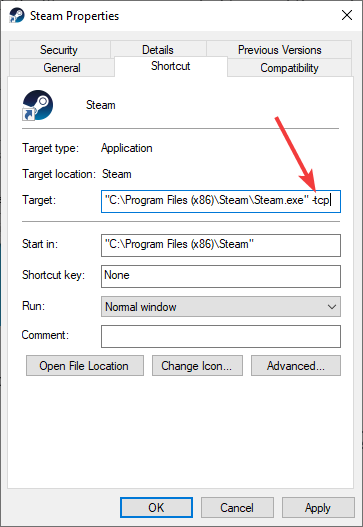
Step 3: Click OK.
Step 4: Launch your Steam client and your CS: GO game and see if the error is fixed.
Check your antivirus
Is your antivirus program or firewall interrupting your CS: GO connection? This is usually the reason why you’re having the failed to reach servers issue. You should check your antivirus to make sure it isn’t blocking your game. If it is, trying putting it in the whitelist, or disable the antivirus program temporarily (be careful for what you’re browsing when it’s off). Then see if this fixes the issue.
Restart your network connection
Step 1: Turn off your computer.
Step 2: Turn off your router and modem and disconnect them from the power source.
Step 3: Leave them for several minutes.
Step 4: Reconnect your router and modem as well as your computer to power, and turn them back on.
Step 5: Check to see if this helps fixing your CS: GO connection.
Try using a VPN
Using a VPN redirects your traffic to another servers, resolving problems such as extra routes or relays, which can sometimes be a fix for your CS: GO server connection issue.
Setting up a VPN usually requires some time and computer skills. If you want an easier option, you should try a VPN service. And we recommend using NordVPN.
NordVPN is an easy-to-use and fast VPN service. You’ll be able to set up a VPN connection with just a few mouse-clicks. And its fast speed servers at multiple locations offers you a comfortable and reliable experience.
To use NordVPN on your computer:
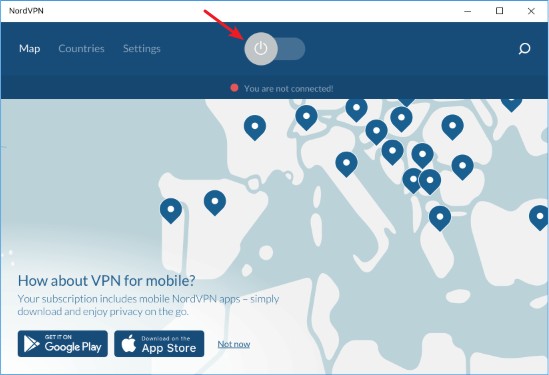
Step 1: Download and install NordVPN on your computer.
Step 2: Run NordVPN and sign in your account.
Note: If you don’t have a NordVPN account, you will have to sign up for one of its plans to use it.
Step 3: Click the Connect switch. This will automatically connect you to the VPN server recommended for your device.
Step 4: Check to see if your CS: GO is connecting properly.
Reset your network settings
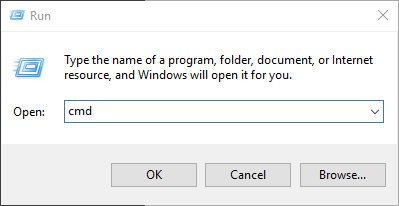
Step 1: Press Win + R on your keyboard.
Step 2: Type “cmd” and press Ctrl + Shift + Enter on your keyboard.
Step 3: Enter the following commands:
ipconfig /flushdns
ipconfig /renew
ipconfig /registerdns
Step 4: Close the window and restart your computer. Then test your CS: GO connection.
Has any of the fixes above worked for you? Or do you have other effective ways to fix your Failed to reach any official servers issue? Tell us by leaving a comment below!
After hours of searchs, I must bow dow and ask you some advices on my problem :
My backend (express + prisma + postgresql) is Dockerized, functionning BUT I can’t use npx prisma commands from my wsl2 zsh terminal.
Here is my .env
# Database settings
NODE_ENV=dev
DB_USER=user
DB_PASS=password
DATABASE_URL="postgresql://${DB_USER}:${DB_PASS}@postgres/chimere?schema=public"
Dockerfile :
FROM node:17-alpine3.14 as base

WORKDIR /user/src/app
COPY package*.json /user/src/app/
EXPOSE 5000

FROM base as dev
ENV NODE_ENV=development
RUN npm install -g nodemon && npm install
COPY . /user/src/app/
RUN npx prisma generate
CMD ["nodemon", "src/index.js"]

FROM base as production
ENV NODE_ENV=production
RUN npm ci
COPY . /user/src/app/
RUN npx prisma generate
CMD ["node", "src/index.js"]
docker-compose.yml :
version: '3.8'
services:
  postgres:
    image: postgres
    restart: always
    environment:
      - POSTGRES_USER=${DB_USER}
      - POSTGRES_PASSWORD=${DB_PASS}
    volumes:
      - postgres:/var/lib/postgresql/data
    ports:
      - '5432:5432'
  web:
      build:
        context: ./
        target: dev
      restart: always
      volumes:
        - .:/usr/src/app
        - uploaded-files:/usr/src/app/public/media/files
        - uploaded-pictures:/usr/src/app/public/media/pictures
      command: npm run start:dev
      ports:
        - "5000:5000"
      environment:
        NODE_ENV: development
        DEBUG: nodejs-docker-express:*

volumes:
    postgres:
    uploaded-files:
    uploaded-pictures:
and Prisma Schema :
generator client {
    provider      = "prisma-client-js"
    binaryTargets = ["native", "linux-musl"]
}

datasource db {
    provider = "postgresql"
    url      = env("DATABASE_URL")
}
Like you can see I’m prettry new to Docker and almost everything is an adjusted copypasta from Google (:
How can I get my app to work AND get my commands to work aswell ?
Thanks !
Эта тема была удалена. Только пользователи с правами управления темами могут ее видеть.
Сервер на котором Вы играете. Industrial №1
Ваш ник. Skeezek
Ваши Skype, для обратного ответа. egor4ik_frank
Описание проблемы. Сидел я на сервере смотрел фильм и тут ошибка time out захожу заново в лаунчер и там ошибка на первом сервере Can»t reach server
Приложенный скриншот, либо же иные формы подтверждающие проблему(ы).
Скриншот
Админы модеры ответе пожалуйста
@Skeezek Сервер временно не работает, необходимо немного подождать.
Не подскажите когда включиться сервер?
@Skeezek Не могу точно сказать.
Вы можете сказать это просто техработы или вайп? Просто у игроков паника что вайп
@Skeezek Сервер скорее всего просто лег по каким-то техническим причинам, я не могу ничего пока точно утверждать, просто ждите включения сервера.
Хорошо,спасибо вам за информацию . Мы верим в вашу команду.
|
Что означает «Can t reach server minecraft».У Вас опять появилось сообщение «can t reach server minecraft«. Это означает только одно: Ваш компьютер не может связаться с сервером Майнкрафт через Хамачи. Для того, чтобы сервер Minecraft нормально работал и что бы без проблем зайти на сервер Minecraft нужно его правильно настроить. О том что делать в таком случае и как настроить сервер Minecraft мы уже обсуждали этот вопрос здесь ранее. модератор выбрал этот ответ лучшим
Помощни к 8 лет назад Хм, значит, друг мой, не получится у вас зайти на сервер пир помощи Хамачи. Рекомендуется удалить эту штуковину и зайти на другой сервер либо самостоятельно создать свой. К сожалению, в этом вопросе мало смыслю, потому желаю удачи: ищите ответ дальше!
elena-kh 10 лет назад Если возникла ошибка «Can’t reach server minecraft hamachi», это значит, что у Вас не настроен сервер. После правильной настройки сервера майнкрафт через Minecraft Server все должно работать. Если же не работает, то необходимо временно отключить firewall на компьютере, вполне возможно, что он ограничивает.
[пользователь заблокирован] 7 лет назад При такой ошибке Вам необходимо настраивать сервер и подключение к нему в данной игре через приложение «Хамачи». Сначала отключите антивирус и попробуйте еще раз запустить игру, если не получилось — то создавайте заново сервер и правильно настраивайте его.
Lilka-g 9 лет назад Если вы играете в игру Майнкрафт (Minecraft) и во время игры у ва появляется такая ошибка «Can’t reach server minecraft hamachi» то это значит. что Ваш компьэтер не может связаться с сервером Майнкрафт через Хамачи. для этого, вы должны создать сервер.
Губка Боб 10 лет назад Чтобы поянть что значит фраза «can t reach server minecraft» достаточно перевести ее в любом онлайновом переводчике. У меня получился такой перевод это фразы: «нет доступа к серверу Майнкрафт». Если доступа нет, то надо думать как это исправить.
Megawolk 11 лет назад Ну в Хамачи не играю, а фраза значит, что комп не может достигнуть сервера. Что делать? Может файрвол на компе не настроен и не пускает. Может провайдер. А может просто вы что-то не так настроили. Например порты или каналы…
Проблема на стороне игрового сервера, либо он неправильно настроен, а может и не настроен вовсе. Знаете ответ? |


We host our web-service on a dedicated server.
Sometimes (I’d say 1 out of 20) a response is not received from the server.
That makes the browser fallback with time-out error.
An important detail: the request is not logged by Apache in this case.
There is no load on Apache, there are a lot of free memory and CPU power left.
[UPDATE]
I have profiled the problem case with tcpdump utility.
These are the good and bad sessions traced by tcpdump.
The request is the same in both experiments.
Good — server returns response.
Bad — no response, time-out error.
Do you see why the problem happens from these data?
How can I move further to get closer to the source of the error?
I’ve replaced my real ip address with 123.45.67.890
---- Bad ----
12:23:36.366292 IP 123.45.67.890.61749 > myserver.superbservers.com.www: S 2125316338:2125316338(0) win 8192 <mss 1460,nop,wscale 2,nop,nop,sackOK>
12:23:39.362394 IP 123.45.67.890.61749 > myserver.superbservers.com.www: S 2125316338:2125316338(0) win 8192 <mss 1460,nop,wscale 2,nop,nop,sackOK>
12:23:45.365567 IP 123.45.67.890.61749 > myserver.superbservers.com.www: S 2125316338:2125316338(0) win 8192 <mss 1460,nop,nop,sackOK>
--------

---- Good ----
12:27:07.632229 IP 123.45.67.890.63914 > myserver.superbservers.com.www: S 3581365570:3581365570(0) win 8192 <mss 1460,nop,wscale 2,nop,nop,sackOK>
12:27:10.620946 IP 123.45.67.890.63914 > myserver.superbservers.com.www: S 3581365570:3581365570(0) win 8192 <mss 1460,nop,wscale 2,nop,nop,sackOK>
12:27:10.620969 IP myserver.superbservers.com.www > 123.45.67.890.63914: S 2654770980:2654770980(0) ack 3581365571 win 5840 <mss 1460,nop,nop,sackOK,nop,wscale 6>
12:27:10.838747 IP 123.45.67.890.63914 > myserver.superbservers.com.www: . ack 1 win 4380
12:27:10.957143 IP 123.45.67.890.63914 > myserver.superbservers.com.www: P 1:213(212) ack 1 win 4380
12:27:10.957152 IP myserver.superbservers.com.www > 123.45.67.890.63914: . ack 213 win 108
12:27:10.965543 IP myserver.superbservers.com.www > 123.45.67.890.63914: P 1:630(629) ack 213 win 108
12:27:10.965621 IP myserver.superbservers.com.www > 123.45.67.890.63914: F 630:630(0) ack 213 win 108
12:27:11.183540 IP 123.45.67.890.63914 > myserver.superbservers.com.www: . ack 631 win 4222
12:27:11.185657 IP 123.45.67.890.63914 > myserver.superbservers.com.www: F 213:213(0) ack 631 win 4222
12:27:11.185663 IP myserver.superbservers.com.www > 123.45.67.890.63914: . ack 214 win 108
--------
Hosting: SuperbHosting
OS: Ubuntu
A common error that occurs when we try to browse the internet is the “Fix Site can’t be reached, Server IP could not be found” issue. This might happen due to a variety of reasons. It may be due to your internet connection issue related to ISP configuration or some settings interfering with the network resolution.
This might happen due to the DNS failing to fetch the correct IP address for the website that you are visiting. A website domain will be mapped to an IP address, and when the DNS server fails to translate this domain name to an IP address, the following error happens. Sometimes, your local cache might be interfering with the DNS lookup service and making the requests continuously.
Otherwise, the website might be down, or its IP configuration might be incorrect. This is a problem that we cannot fix, as the website admin configures it. However, we can check if the problem lies within our computer and fix them with the below-listed troubleshooting guide.

Table of Contents
1
Method 1: Check the Ping of your Network connection
Checking the Ping of your connection is a useful method as it can measure the time between a sent request and a received packet of data. This can be used to determine faults in the internet connection as servers usually close the connection if the requests are lengthy or the responses take more time than expected. You need to use the command prompt for performing this task.
1. Press Windows Key + S to bring up the Windows search, then type cmd or Command Prompt and click on Run as Administrator.

2. Type the following command “ping google.com” and press Enter. Wait until the command executes and the response is received.

3. If the results do not show an error and display 0% loss, your internet connection has no issues.
Method 2: Refresh the Website
Random DNS resolution errors might happen when you visit a website. Mostly, the issue might not be present once you refresh or reload the webpage. Press the Refresh button near the address bar and see if it fixes the problem. Sometimes you might need to close and reopen the browser to check if it works or not.
Method 3: Run Network Troubleshooter
Windows has a built-in network troubleshooting tool that is able to fix commonly occurring network issues by going through the system configuration. Issues like wrong IP address assignment or DNS resolution problems can be detected and fixed by the Network troubleshooter.
1. Press the Windows key + I to open Settings then click on the Update & Security option.

2. Go to the Troubleshoot tab and click on Advanced Troubleshooters.

3. Now click on the Internet Connections and follow the on-screen instructions to fix the issues that you are facing.

Method 4: Flush the DNS Resolver Cache to Re-initialize DNS
Sometimes, the local DNS resolver cache intervenes with its cloud counterpart and makes it difficult for new websites to load. The local database of frequently resolved websites prevents the online cache from storing new data on the computer. For fixing this issue, we have to clear the DNS cache.
1. Open the Command Prompt with admin privileges.
2. Now type ipconfig /flushdns and press Enter.
3. If the DNS cache is successfully flushed, it will show the following message: Successfully fetched DNS Resolver cache.

4. Now Reboot your Computer and check if you’re able to fix Site Can’t Be Reached, Server IP Could Not Be Found error.
Also Read: Fix Your DNS Server might be unavailable error
Method 5: Update Network Adapter Drivers
Updating the drivers might be another option to fix the “Site cannot be reached” issue. After a significant software update, incompatible network drivers might exist in the system, which interferes with the DNS resolution. It can be fixed by updating the device drivers.
1. Press Windows Key + R then type devmgmt.msc and hit Enter to open Device Manager.

2. Now scroll down and expand the Network adapter section. You can see the network adapter installed on your computer.
3. Right-click on your Network adapter and select Update Driver. Now follow the on-screen instructions to install the updated driver software.

4. Once done, Reboot the system to save changes.
Method 6: Clear Browser Cache and Cookies
It is possible that the browser is unable to receive the response from the server due to an excess cache in the local database. In that case, the cache must be cleared before opening any new website.
1. Open your web browser. In this case, we will be using Mozilla Firefox. Click on the three parallel lines (Menu) and select Options.

2. Now select Privacy & Security from the left-hand menu and scroll down to the History section.
Note: You can also directly navigate to this option by pressing Ctrl+Shift+Delete on Windows and Command+Shift+Delete on Mac.

3. Here click on the Clear History button and a new window will open.

4. Now select the time range for which you want to clear history & click on Clear Now.

Method 7: Use a different DNS server
Default DNS servers provided by the service provider might not be as advanced and regularly updated as Google DNS or OpenDNS. It is better to use Google DNS to offer faster DNS lookup and provide a basic firewall against malicious websites. For this, you need to change the DNS settings.
1. Right-click on the network (LAN) icon in the right end of the taskbar, and click on Open Network & Internet Settings.
![]()
2. In the Settings app that opens, click on Change adapter options in the right pane.

3. Right-click on the Network which you wish to configure, and click on Properties.

4. Click on Internet Protocol Version 4 (IPv4) in the list and then click on Properties.

5. Under the General tab, choose ‘Use the following DNS server addresses’ and put the following DNS addresses.
Preferred DNS Server: 8.8.8.8
Alternate DNS Server: 8.8.4.4

6. Finally, click OK at the bottom of the window to save changes.
7. Reboot your PC to save changes and see if you’re able to fix Site Can’t Be Reached, Server IP Could Not Be Found error.
Also Read: How to Switch to OpenDNS or Google DNS on Windows 10
Method 8: Reset Windows Socket Configuration
Windows Socket configuration (WinSock) is a collection of configuration settings used by the operating system to connect to the internet. It consists of some socket program code that sends a request and receives a remote server response. Using the netsh command, it is possible to reset every setting related to network configuration on Windows PC.
1. Press Windows Key + S to bring up the Windows search, then type cmd or Command Prompt and click on Run as Administrator.
2. Type the following commands and hit Enter:
netsh winsock reset

netsh int ip reset

3. Once the Windows Socket Catalog is reset, Restart your PC to apply these changes.
4. Again open the Command Prompt then type the following command and hit Enter:
netsh int ipv4 reset reset.log

Method 9: Restart DHCP Service
The DHCP Client is responsible for the resolution of DNS and mapping of IP addresses to the domain names. If the DHCP Client is not working correctly, the websites will not be resolved to their origin server address. We can check in the list of services if it is enabled or not.
1. Press the Windows key + R then type services.msc and hit Enter.

2. Find the DHCP Client service in the list of services. Right-click on it and select Restart.

3. Flush the DNS cache and reset Windows Socket configuration, as mentioned in the above method. Again try to open the webpages and this time you will be able to fix Site Can’t Be Reached, Server IP Could Not Be Found error.
Recommended:
- How To View Clipboard History On Windows 10
- Fix Black Desktop Background In Windows 10
- Where is the BSOD log file located in Windows 10?
- How to Repair or Fix Corrupted Hard Drive Using CMD?
If the error persists after trying all these methods, then it is likely that the issue lies in the website’s internal server configuration. If the problem was with your computer, these methods would help fix them and get your computer connected to the internet again. The problem is that this error occurs randomly and maybe due to the fault of the system or the server or both combined. Only by using trial and error, it is possible to fix this issue.
Здравствуйте
Вот все известные варианты решения по проблеме с входом на сервера на платформе RAGEMP 1.1
Если ниже указано отключение, это значит, отключать нужно средствами системы, а не с помощью твикеров «батников» реестра и т.п.
Со стороны сервера проблем нет
Дополнительных вариантов предложить не сможем
Перед выполнением действий — внимательно ознакомьтесь со всей информацией описанной здесь. Отталкивайтесь прежде всего от не радикальных методов решения проблем, после чего приступайте к глобальному устранению вашей проблемы.
Если в результате указанных ниже действий Вы добились экрана с надписью loading server resources, проверьте активность диска и сети для Grand Theft Auto V, если загрузка идет, значит нужно подождать. Если нет, то увы, проблема с соединением, выключите роутер на пару минут, если это не поможет, воспользуйтесь адекватным VPN для проверки.
(на данном скриншоте, активности уже нет, загрузка завершена)
В некоторых случаях, у определенных пользователей вне зависимости от Вашего интернет-соединения скорость скачивания может значительно уменьшиться, проверяйте скачивает ли файлы игры или нет в момент отображения loading server resources путем нажатия ПКМ на папку RAGEMP, ее размер должен увеличиваться — это означает, что файлы скачиваются, дополнительно можно убедиться через диспетчер задач, как указано выше. Как и говорилось, такое скачивание может затянуться к сожалению на длительное время, приблизительно ~30-60, а иногда и более минут.)
Удалите стороннее антивирусное ПО (Касперский, Аваст и т.п.), сам защитник Windows временно отключите для проверки (навсегда отключать не стоит), сторонние файрволы, Adguard, Wallpaper engine, MSI Afterburner, MSI Mystic light и аналогичные, для управления подсветкой и блокировки рекламы. Обязательно удалите Razer Synapse, если установлен. Также Process Lasso и Park Control, Memreduct, Advanced system care и подобные. Также отключите Xbox game bar и его оверлей, повтор xbox, оверлей дискорд, удалите betterdiscord,отключите оверлей стим и прочие оверлеи.
В настройках мультиплеера (RAGEMP), включите параметр “P2P”, или наоборот, выключите
В настройках брандмауэра Windows, удалите все правила для входящих и исходящих подключений, далее отключите его.
1. Нажмите по кнопке Пуск и в поисковой панели начните набирать «Командная строка».
2. Запустите классическое приложение с правами администратора (щёлкните по нему правой кнопкой мыши);
3. В открывшемся окне вводим команду netsh advfirewall set allprofiles state off и нажимаем Enter;
4. После этого из вы увидите уведомление из Центра безопасности и обслуживания об отключении системы безопасности.
Перезагрузите ПК, выключите роутер на пару минут.
Отключите облачные сохранения GTAV, удалите папку DocumentsRockstar GamesGTA VProfiles, если внутри игры появится диалоговое окно, куда сохранять — выберите “локально” Далее пройдите пролог в сюжетном режиме, т.е. первую миссию за Франклина, до сохранения. Чужие сохранения из интернета, 100% сохранения использовать НЕЛЬЗЯ
1. Установите/обновите Windows 10 последней сборки. (20H2) Корпоративная, LTSC, «сборки» не подходят. Если обновление не находит, перейдите по ссылке https://go.microsoft.com/fwlink/?LinkID=799445 . Если у Вас была установлена пиратская сборка системы, поможет только установка чистой Windows 10 версии 20Н2 с сайта Microsoft.
Если была установлена чистая система, но обновлялись со старой версии, например 1909, сначала попробуйте полную проверку системы, как указано в данной теме https://forum.gta5rp.com/threads/faq-proverka-celostnosti-windows-10.248742, затем чистую установку системы.
2. Воспользуйтесь VPN (NordVPN, ProtonVPN)
3. Отключите XBOX GAME BAR
4. Удалите файл settings.xml в папке DocumentsRockstar GamesGTA V
Если ранее использовали модификации, сделайте полную проверку файлов GTAV, если это не поможет, удалите папку update, файл gta5.exe из папки GTAV, затем снова сделайте полную проверку файлов, если это не помогает, поможет только чистая установка игры
1. Скачайте goodbye-dpi github.com/ValdikSS/GoodbyeDPI/releases/tag/0.1.6
2. Скачайте документ blacklist (https://dropmefiles.com/XD4uI )
3. Распакуйте, замените блэклист, запустите от имени администратора service_install_russia_blacklist.cmd и не удаляйте папку.
Если у вас запущена какая-либо игра Rockstar Games, выйдите из нее
Перейдите в установочную папку Rockstar Games Launcher
По умолчанию: C:Program FilesRockstar GamesLauncher
Дважды щелкните по файлу uninstall.exe и удалите Rockstar Games Launcher
Не ставьте отметку в поле «Удалить игровые данные» (Uninstall game data)
Удалите оставшиеся файлы Rockstar Games Launcher и Social Club
После того как процедура удаления будет завершена, удалите все нижеперечисленные папки:
ПРИМЕЧАНИЕ: не удаляйте другие папки или файлы, иначе вы можете потерять сохраненные игры или другие важные данные.
C:Users[имя пользователя]DocumentsRockstar GamesSocial Club
C:Users[имя пользователя]DocumentsRockstar GamesLauncher
C:Program FilesRockstar GamesLauncher
(установочная папка приложения)
C:Program FilesRockstar GamesSocial Club
C:Program Files (x86)Rockstar GamesSocial Club
Перезагрузите компьютер
Установите Rockstar Games Launcher заново
Удалите файлы сервера в RAGEMP/Client_resources, установите наш лаунчер — gta5rp.com/download
Либо наоборот, удалите наш лаунчер, установите лаунчер RAGEMP в другую папку или на другой диск https://cdn.rage.mp/public/files/RAGEMultiplayer_Setup.exe
Запустите по очереди, не закрывая предыдущие, следующие приложения: Steam или EGS, лаунчер (Gta 5 Launcher) или мультиплеер (RAGEMP)
1. Убедитесь, что ваша GTA V обновлена.
2. Запустите одиночную игру и GTA Online один раз
3. Перезагрузите игровой лаунчер (Steam/RGL/EGS)
4. Убедитесь что антивирусное программное обеспечение не заблокировало ни один из файлов RAGE MP
5. Перезагрузите компьютер и роутер
6. Удалите все сторонние моды, так как они могут быть несовместимы. (в том числе и REDUX)
7. Переустановите игру полностью, GTAV для использования с платформой RAGEMP 1.1 должна быть идеально чистой
8. Запустите мультиплеер с файла updater.exe(в папке RAGEMP) от имени Администратора
9. Радикальный метод: Установить Windows 10 последнего обновления (Home, Pro 20H2) с официального сайта