
What is the DISM? Why you receive the DISM error 87 when running DISM tool in Command Line Windows? How to fix the error 87 DISM? This post shows how to fix the DISM error 87 Windows 10/8/7. After solving this CMD error 87, it is recommended to use MiniTool software to keep your data safe.
What Is DISM?
DISM, whose full name is the Deployment Image Service and Management, is a built-in tool of Windows, first introduced in Windows 7 and Windows Server R2. It can perform servicing tasks on a Windows installation image, on an online or offline image within a folder, or on WIM files.
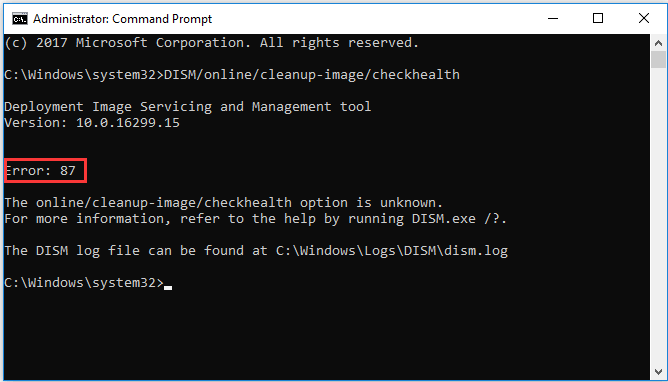
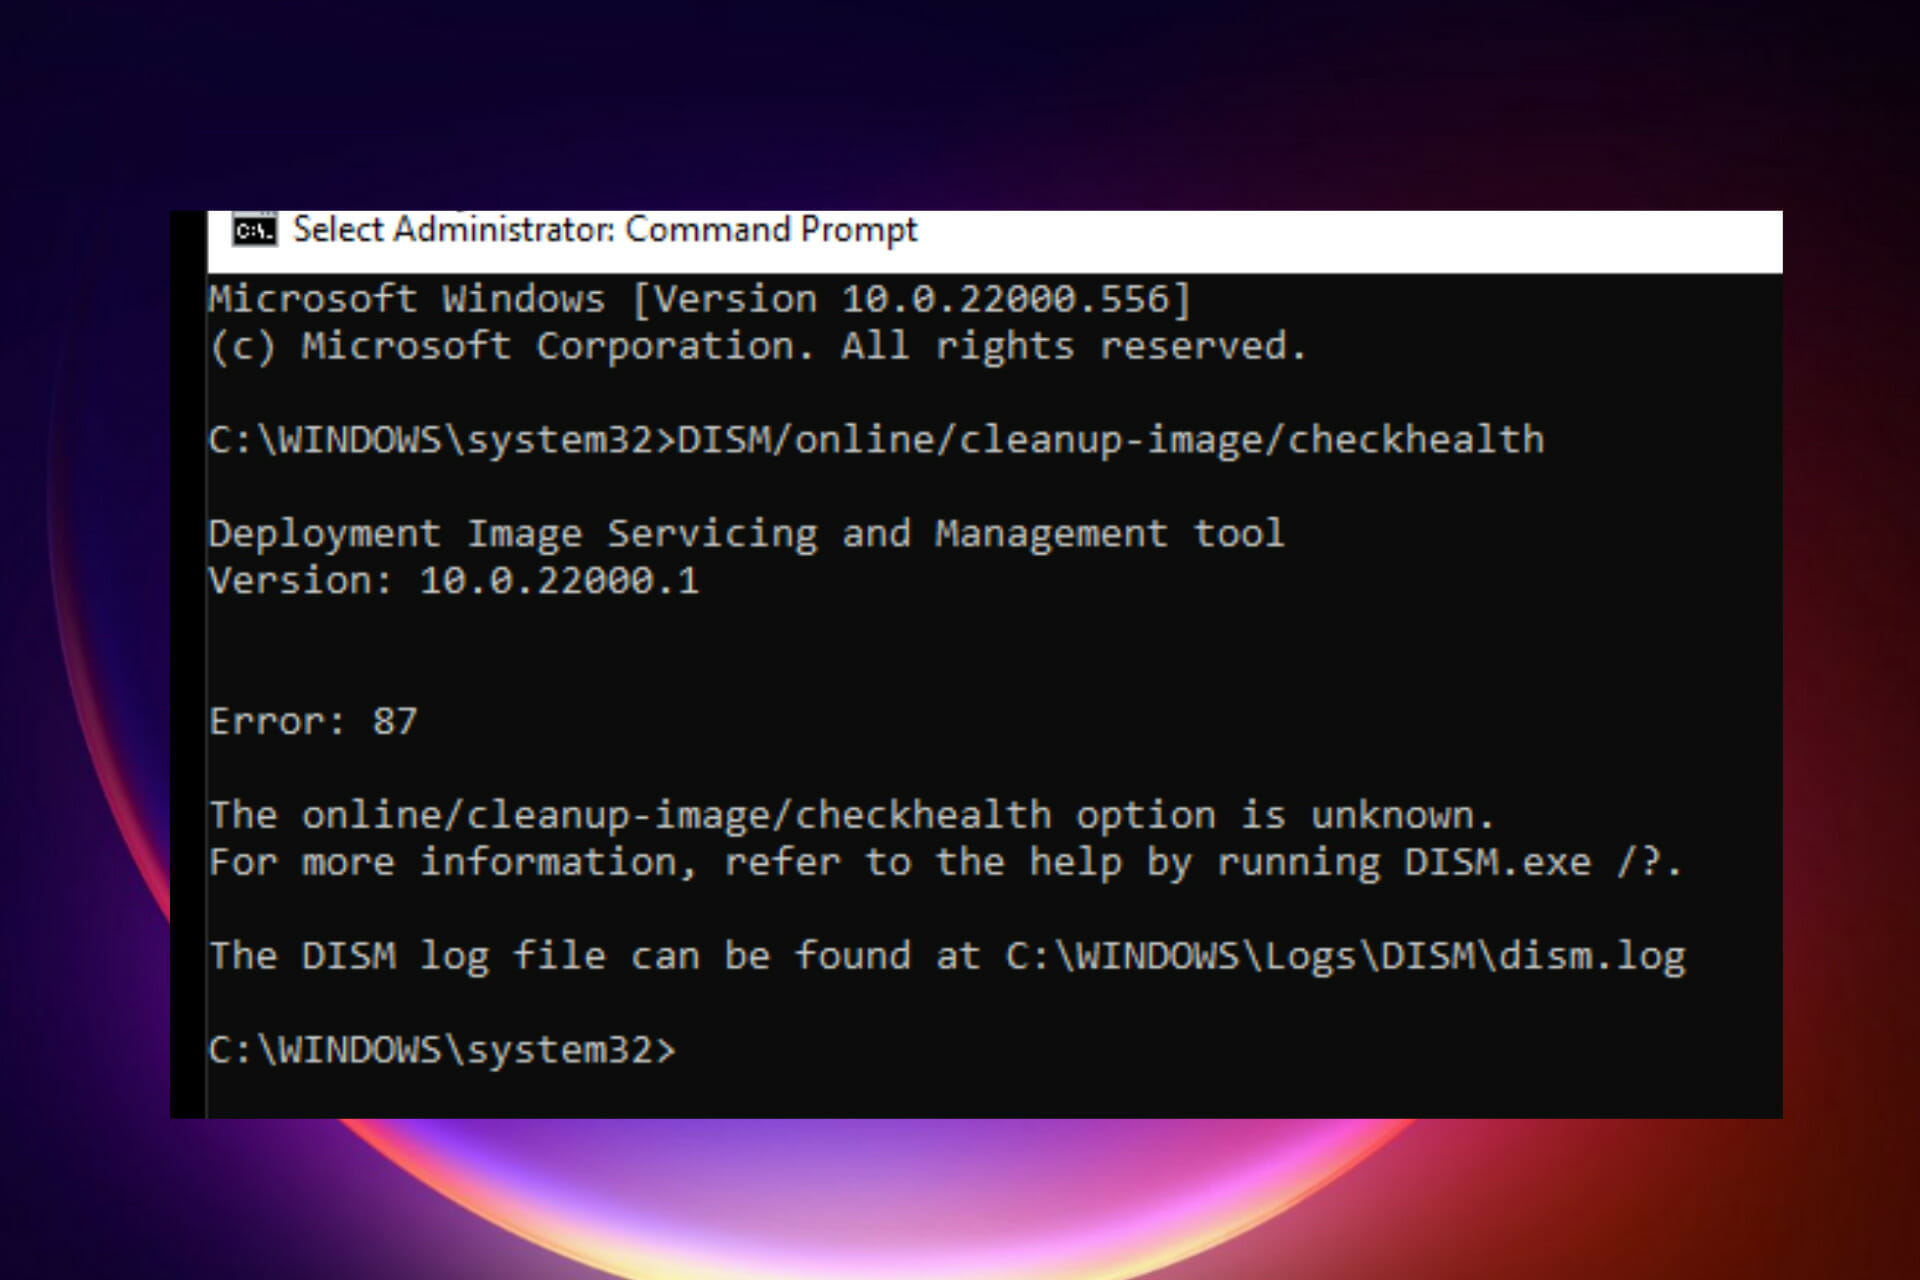
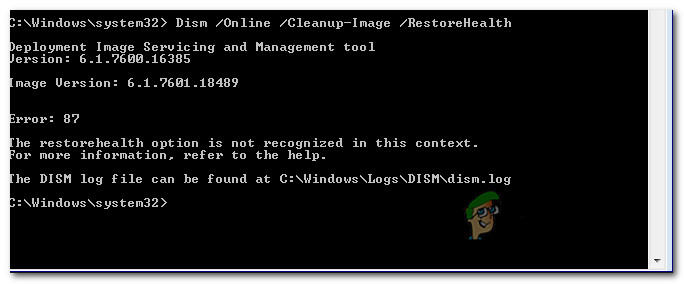
The DISM tool can be available from the Command Line or the Windows PowerShell. DISM tool can be used to update files and fix problems when a Windows image becomes unserviceable. However, when running the DISM tool, you may receive the error code 87 or some other codes like DISM error 50, DISM error 2, DISM error 3, DISM error 1639 and so on, as shown in the following picture:
These DISM error codes mean that you cannot proceed. Therefore, do you know what may cause the DISM error 87 or other DISM error codes?
What Causes DISM Error 87?
As a matter of fact, there are several reasons leading to the DISM error 87 Windows 10/8/7.
1. The command is not correct.
This is the common reason that leads to the DISM error 87 the parameter is incorrect. In most situations, users may forget to type a space before the slash when they type the command.
2. The command does not run into an elevated prompt.
The second cause for the DISM error 87 is that the command does not run into an elevated Command Prompt window. If users run this command in a regular Command Line window, they may receive the error 87 DISM.
3. The machine uses the wrong DISM version.
You may encounter the DISM error 87 if you use the wrong version of DISM when applying a Windows 10 image. Thus, to fix this problem, you need to use the correct DISM version.
Having known what may lead to the DISM restorehealth error 87, how to fix this DISM error?
How to Fix Dism Error 87?
- Use Correct DISM Command.
- Run this command using an elevated command prompt.
- Run Windows update.
- Run System File Checker.
- Use correct DISM version.
- Reinstall Windows.
6 Solutions to DISM Error 87 Windows 7/8/10
In the following section, we will list several solutions to DISM error 87. If you have the same trouble, try these solutions.
Solution 1. Use Correct DISM Command
As we have mentioned in the above section, the DISM error 87 may be caused by the incorrect command. For example, if you input the command without space before the slash like this DISM/online/cleanup-image/checkhealth, you will encounter the DISM/online/cleanup-image/restorehealth error 87.
So, in order to solve this DISM error code, please type the correct command. Please add the space before the slash, like these:
- DISM /Online /Cleanup-image /Scanhealth
- DISM /Online /Cleanup-image /Restorehealth
After that, you can check whether you still encounter the DISM error 87.
See what you can do if DISM /Online /Cleanup-image /Restorehealth is stuck.
Solution 2. Run This Command Using an Elevated Command Prompt
Some people say that they encounter the DISM error 87 when they do not run Command Prompt as administrator.
So in order to solve the error 87 DISM Windows 10, try to run Command Prompt as administrator.
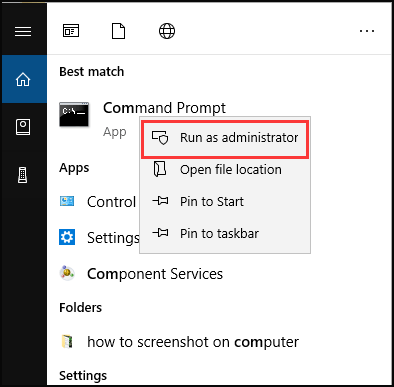
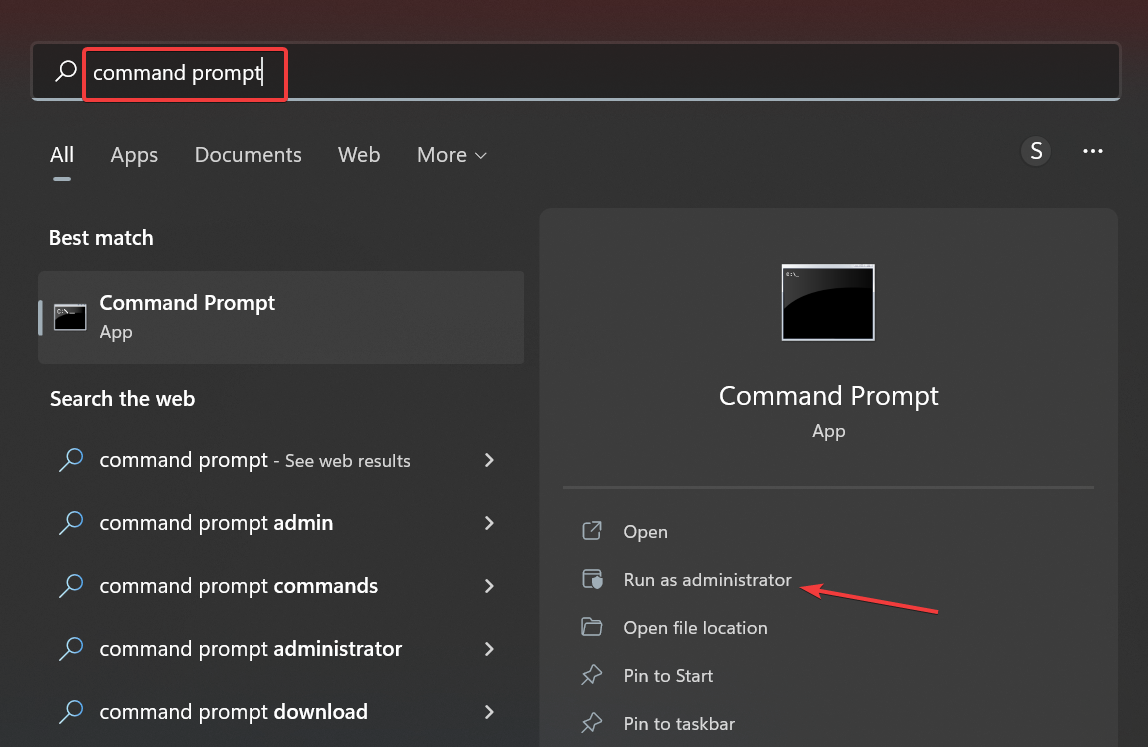
Step 1: Type command prompt in the search box of Windows 10 and choose the best matched one.
Step 2: Right-click it to choose Run as administrator to continue.
You can also refer to the post Command Prompt Windows 10: Tell Your Windows to Take Actions to know more ways to run Command Prompt as administrator.
After running Command Prompt as administrator, type the command to continue and check whether the issue DISM error 87 is solved.
Solution 3. Run Windows Update
The DISM restorehealth error 87 may be caused by the pending Windows update. So in order to solve this error 87 DISM, you need to install all pending updates.
Now, here is the tutorial.
Step 1: Open Windows Update
- Press Windows and I keys together to open Settings.
- In the pop-up window, choose Update & Security to continue.
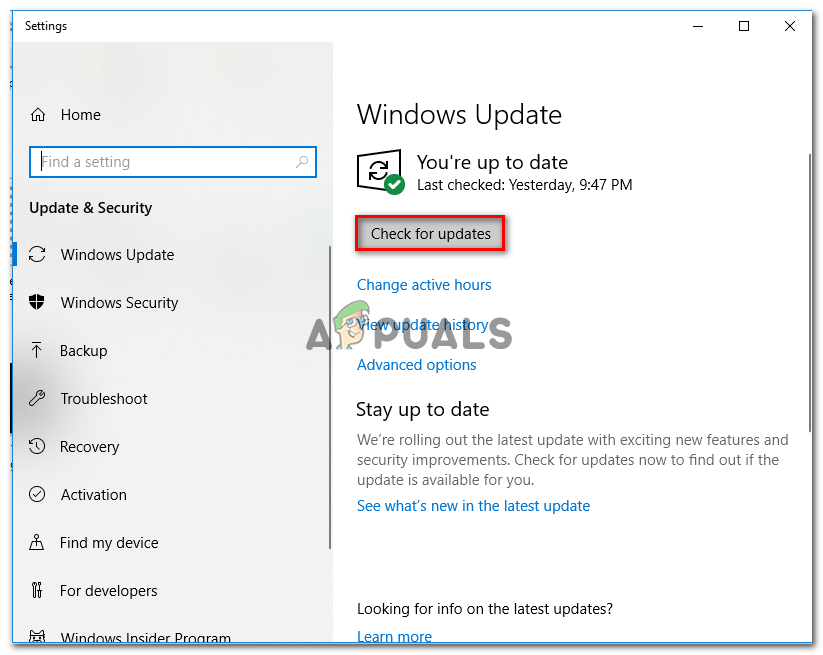
Step 2: Check for updates
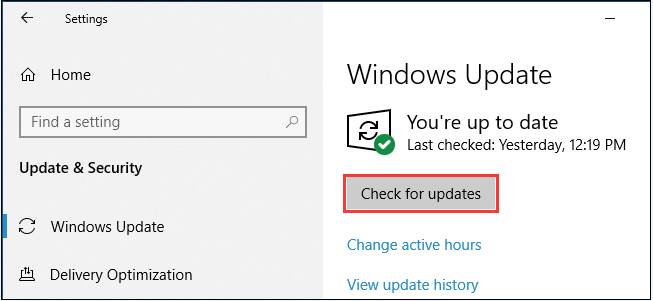
- In the pop-up window, go to Windows Update tab.
- Then choose Check for Updates to continue.
Tip: During the Windows Update process, you may need to restart your computer.
When the process is finished, you can run Command Prompt as administrator and input the command again to check whether the error 87 DISM is solved.
Solution 4. Run System File Checker
If there are corrupted system files on your computer, you may also encounter the error 87 DISM Windows 10/8/7. Thus, to fix this problem, you need to check and repair the corrupted system files firstly.
Hence, the Windows built-in tool System File Checker is a good choice to repair the corrupted system files.
Now, here is the tutorial on how to fix the corrupted system files so as to fix the DISM error 87 Windows 7/8/10.
Step 1: Open Command Prompt
- Type command prompt in the search box of Windows 10 and choose the best matched one.
- Right-click it to choose Run as administrator to continue.
Step 2: Type the command to continue
- In the pop-up window, type the command sfc /scannow and hit Enter to continue.
- Please do not close the command line windows until you see the message verification 100% completed.

When the process is finished, you will successfully repair the corrupted system files if there exists. Then open Command Prompt and run as administrator, type the command again, and check whether the DISM error 87 is solved.
If this sfc command does not work, you can refer to the post Quickly Fix – SFC Scannow Not Working (Focus on 2 Cases) to look for solutions.
Note: In addition to checking and repairing corrupted system files, you can also check whether there are bad sectors on hard drive and repair them.
Solution 5. Use the Correct DISM Version
Here, we will walk you through the fifth solution to fix the DISM error 87 Windows 10. If you are a Windows user, you need to run the Windows 10 version of DISM because this version requires the Wofadk.sys filter driver.
Note: The Wofadk.sys filter is contained in the Windows 10 Assessment and Deployment Kit. The driver must be installed and configured with Windows 10 DISM when the command runs on an earlier version of Windows host or Windows Preinstallation Environment.
So, in order to solve DISM error 87 Windows 10, you need to use the Windows 10 Version of DISM with the wofadk.sys filter driver. For more detailed information, you can see the DISM Supported Platforms and Install Windows 10 using a Previous version of Windows PE.
After that, you can reboot your computer and run Command Prompt as administrator again, then type the command to check whether the DISM error 87 Windows 10 is solved.
Solution 6. Reinstall Windows
Now, we will show you the last solution to DISM error 87. If none of the above methods works, there is no other choice for you except reinstalling Windows. Hence, you can reinstall the operating system to fix the DISM error 87and other system problems.
But one important thing is that reinstalling the operating system will lead to data loss. So before continuing, please back up all important files firstly.
After ensuring data safe, you can continue to reinstall the operating system.
I encountered the DISM error 87 when running DISM, but I successfully fixed this DISM error code after I read this post. Click to Tweet
What to Do After Solving DISM Error 87?
After you have fixed the DISM restorehealth error 87, what can you do?
It is strongly recommended to create a system image after fixing this issue. In this way, you can restore your computer to the normal state if you encounter the error 87 DISM again in later.
In addition, if you encounter some other OS problems during the using process, you can also restore your computer to a previous state with the system image created before.
Thus, do you know how to back up computer or create system image easily? To easily keep data safe, MiniTool ShadowMaker would be a good choice.
MiniTool ShadowMaker is a piece of professional Windows backup software which is specializing in backing up disks, partitions, files, folders and the operating system.
Besides backup feature, it is also a clone tool which can clone OS from HDD to SSD without data loss.
So, with so many features, download MiniTool ShadowMaker Trial from the following button immediately or choose to purchase an advanced edition.
Free Download
Now, we will show you how to back up computer with the step-by-step guide.
Step 1: Launch MiniTool ShadowMaker
- Download MiniTool ShadowMaker and install it on your computer.
- Launch it.
- Click Keep Trial to continue.
Step 2: Select the backup source
- MiniTool ShadowMaker chooses the operating system as the backup source by default. So, there is no need for you to choose it again.
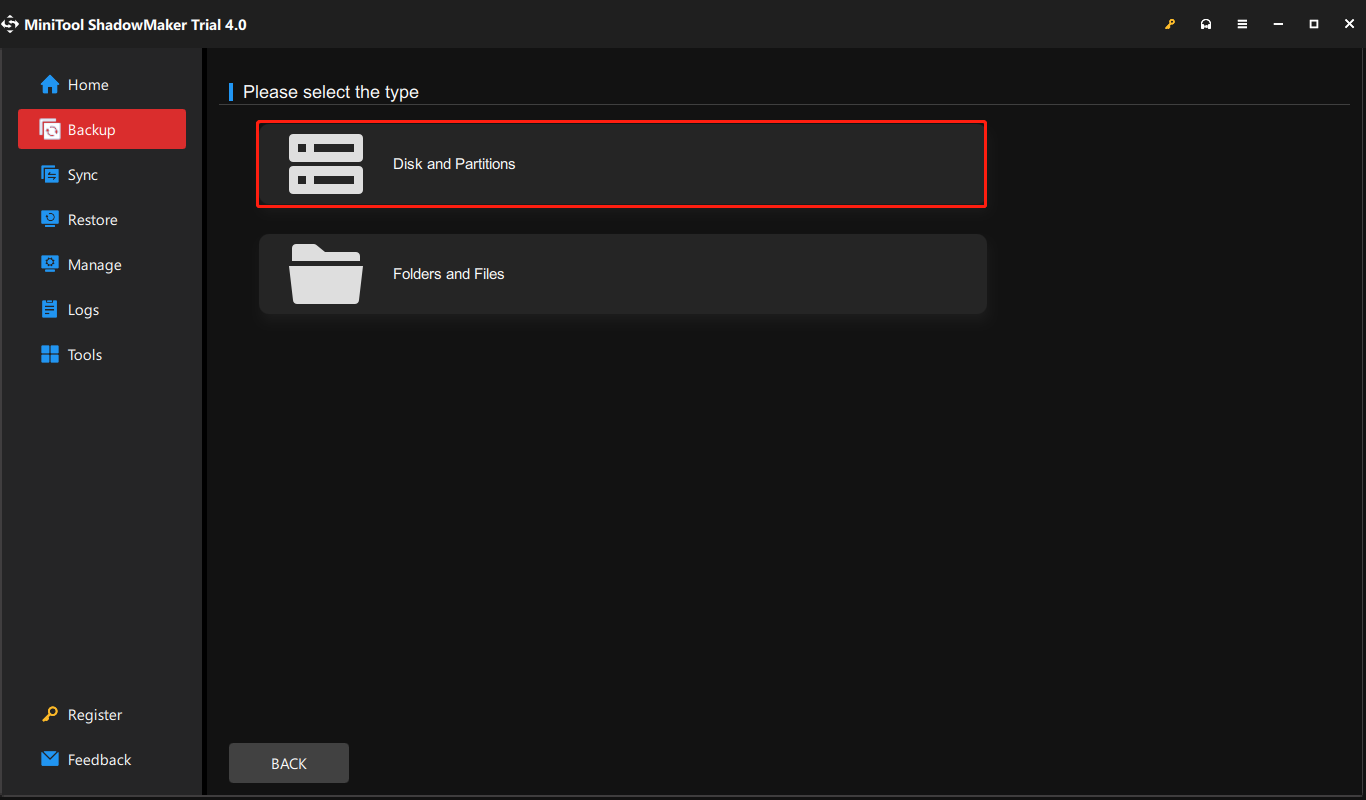
- However, if you want to select a backup source by yourself. Please go to the Backup page, click the Source module, and choose Disk and Partitions to select the system disk to continue. (If you want to back up files, choose Folders and Files.)
Step 3: Select the backup destination
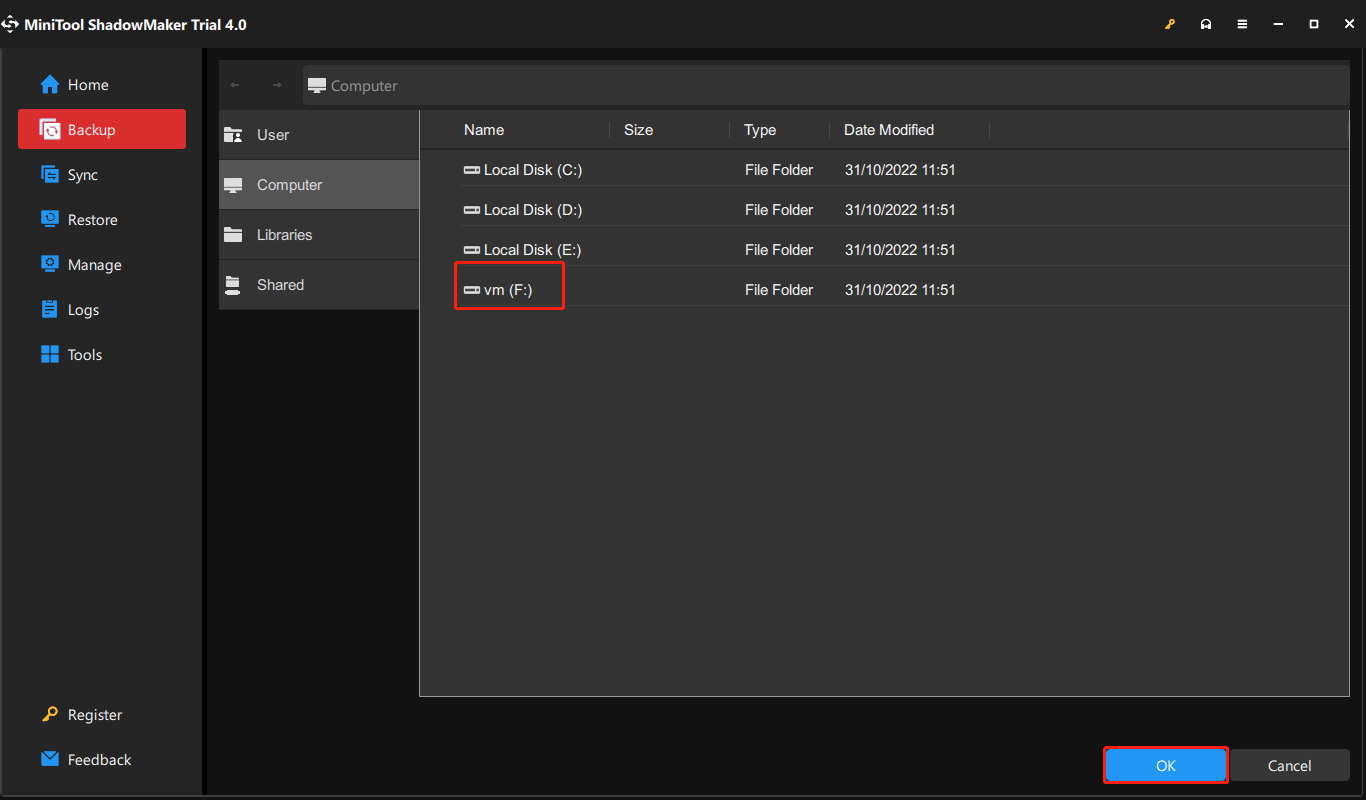
- After returning to the backup page, please click the DESTINATION module to choose a backup destination.
- Here are four available paths which are User, Computer, Libraries, and Shared. It is suggested to save the backup images on an external hard drive. So, click Computer, choose an external hard drive, and click OK to continue.
Here are three points you should pay attention to.
- MiniTool ShadowMaker enables you to create a regular backup. Just go to Options > Schedule Settings.
- MiniTool ShadowMaker provides three different backup schemes. Go to Options > Scheme Settings to change.
- You can also set some advanced backup parameters during the backup process, such as encrypting backup files, etc.
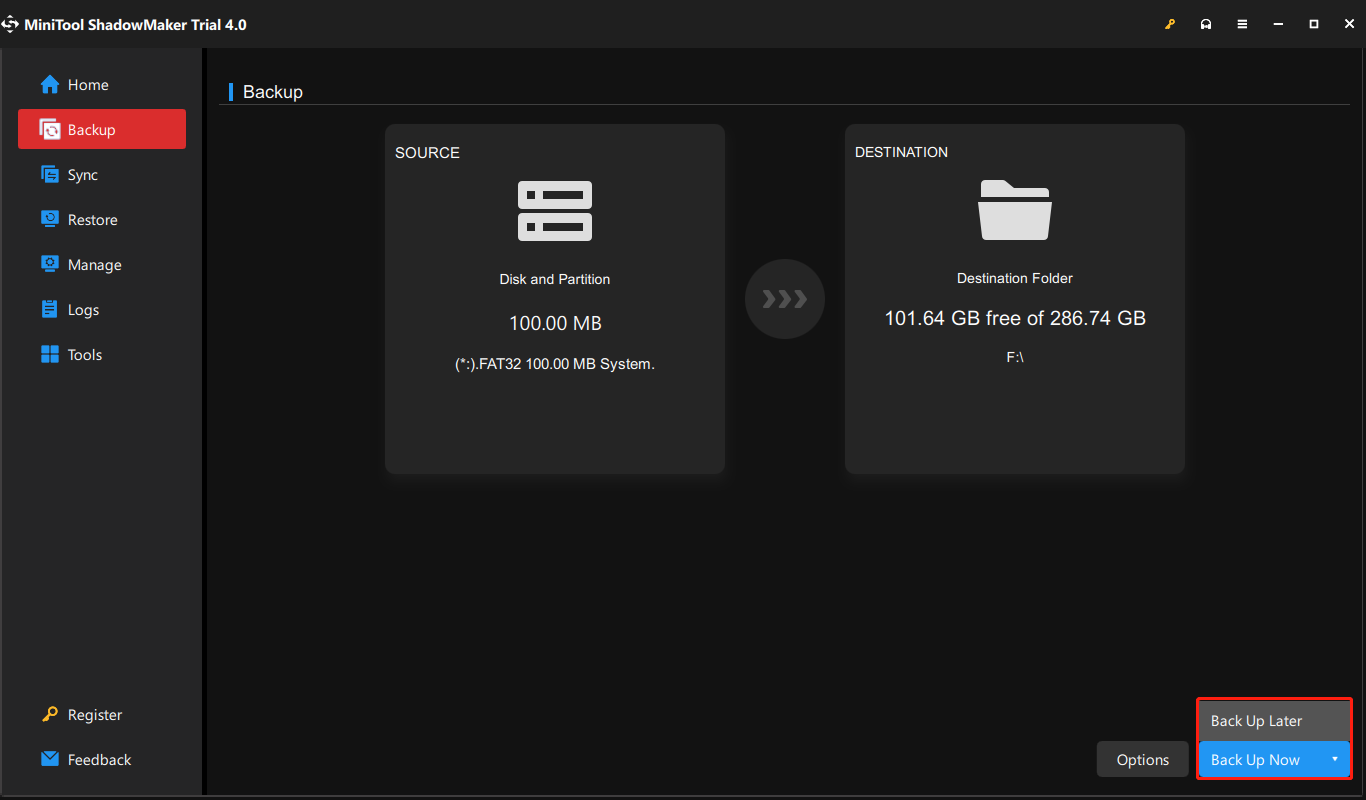
Step 4: Start to backup
- After selecting the backup source and destination, click Back Up Now to perform the backup task immediately.
- Or click Back Up Later to postpone the backup task and restart it on the Manage page.
When all steps have been finished, you have successfully created a system image. With this system image, you can feel relax even though you encounter the DISM error 87 again or some other system problems because you can restore computer to a previous state.
Free Download
MiniTool ShadowMaker is a powerful tool. With this software, I am assured as it can keep my computer and data safe.Click to Tweet
Bottom Line
To sum up, this post has introduced what the DISM is and what may cause the DISM error 87. Apart from that, this post has walked through 6 solutions to DISM error 87 Windows 7/8/10.
If you have any better solution to error 87 Windows 10, you can share it on the comment zone. Or if you have any problem with this post or MiniTool ShadowMaker, please contact us via the email [email protected] and we will reply to you as soon as possible.
DISM Error 87 FAQ
How do I fix error 87 DISM?
- Use Correct DISM Command.
- Run this command using an elevated command prompt.
- Run Windows update.
- Run System File Checker.
- Use correct DISM version.
- Reinstall Windows.
What is the DISM?
DISM, also called Deployment Image Service and Management, is a Windows built-in tool that can be used to service and prepare Windows image including the online or offline image within a folder or WIM file. Its features include mounting and unmounting images, querying installed device drivers in an offline image and adding a device driver to an offline image.
What does dism online cleanup image RestoreHealth do?
Dism /Online /Cleanup-Image /RestoreHealth attempts to scan and repair corrupted system files that found on your computer.
How do I fix corrupted files on Windows 10?
- Type Command Prompt in the search box of Windows and choose the best matched one.
- Right-click it to choose Run as administrator.
- Type the command sfc /scannow and hit Enter to continue.
- Wait for the process to be finished.
Learn to fix this error on Windows 10 & Windows 11
by Vladimir Popescu
Being an artist his entire life while also playing handball at a professional level, Vladimir has also developed a passion for all things computer-related. With an innate fascination… read more
Updated on May 30, 2023
Reviewed by
Vlad Turiceanu

Passionate about technology, Windows, and everything that has a power button, he spent most of his time developing new skills and learning more about the tech world. Coming… read more
- Most instances of Error 87 arise due to poor typing and spacing of commands.
- DISM is installed with Windows 11 and is helpful in maintenance and restoration practices.
- Updating the OS and eliminating any corruption with the system files can fix the error.
XINSTALL BY CLICKING THE DOWNLOAD FILE
This software will repair common computer errors, protect you from file loss, malware, hardware failure and optimize your PC for maximum performance. Fix PC issues and remove viruses now in 3 easy steps:
- Download Restoro PC Repair Tool that comes with Patented Technologies (patent available here).
- Click Start Scan to find Windows issues that could be causing PC problems.
- Click Repair All to fix issues affecting your computer’s security and performance
- Restoro has been downloaded by 0 readers this month.
Windows users have a problem dealing with many error codes caused by different issues. For example, DISM Error 87 is a command-line error that appears on Windows 11 and Windows 10.
This article will look at what causes and several ways of fixing the DISM Error 87.
Why am I getting Error 87 when trying to run DISM?
There are several causes of this error when you input any DISM command in the Command Prompt. These are some of the common ones:
- Mistype when entering the DISM command line, especially spellings and spacing. Most users perform simple mistakes like incorrect spacing between the commands, which raises the error.
- Improper installation of Windows causes this error due to problems with the Command Prompt.
- Users tend to block some essential updates when performing Windows updates, which raises bugs that throw that error.
- When using the wrong versions of DISM, it raises an error since the DISM version is old.
- You get an error if you use the standard Command Prompt (without administrative privileges). This is because it limits the user from accessing the administrative parts of the prompt.
Here are some of the related issues you might come across:
- Error 87 The parameter is incorrect
- DISM Error 87 The restorehealth option is not recognized in this context
- Error 87 the cleanup-image option is unknown
Now that you have a basic understanding of the DISM Error 87 problem in Windows 11 & Windows 10, let’s head to the solutions.
How can I fix the DISM Error 87?
- Why am I getting Error 87 when trying to run DISM?
- How can I fix the DISM Error 87?
- 1. Type the DISM command correctly
- 2. Update your Windows
- 3. Use a third-party tool
- 4. Run the command line as an administrator
- 5. Use the correct DISM version
- 6. Check for corrupt system files
- 7. Perform a disk check
- 8. Clear component store and revert the Windows update
- 9. Reinstall Windows
- How do I use DISM to repair an image in Windows 11?
- What is DISM?
1. Type the DISM command correctly
The first thing you have to verify is whether to commands are correct. For example, if you input the wrong command, make a spelling mistake, or add a space at the wrong point, DISM Error 87 might appear in Windows.
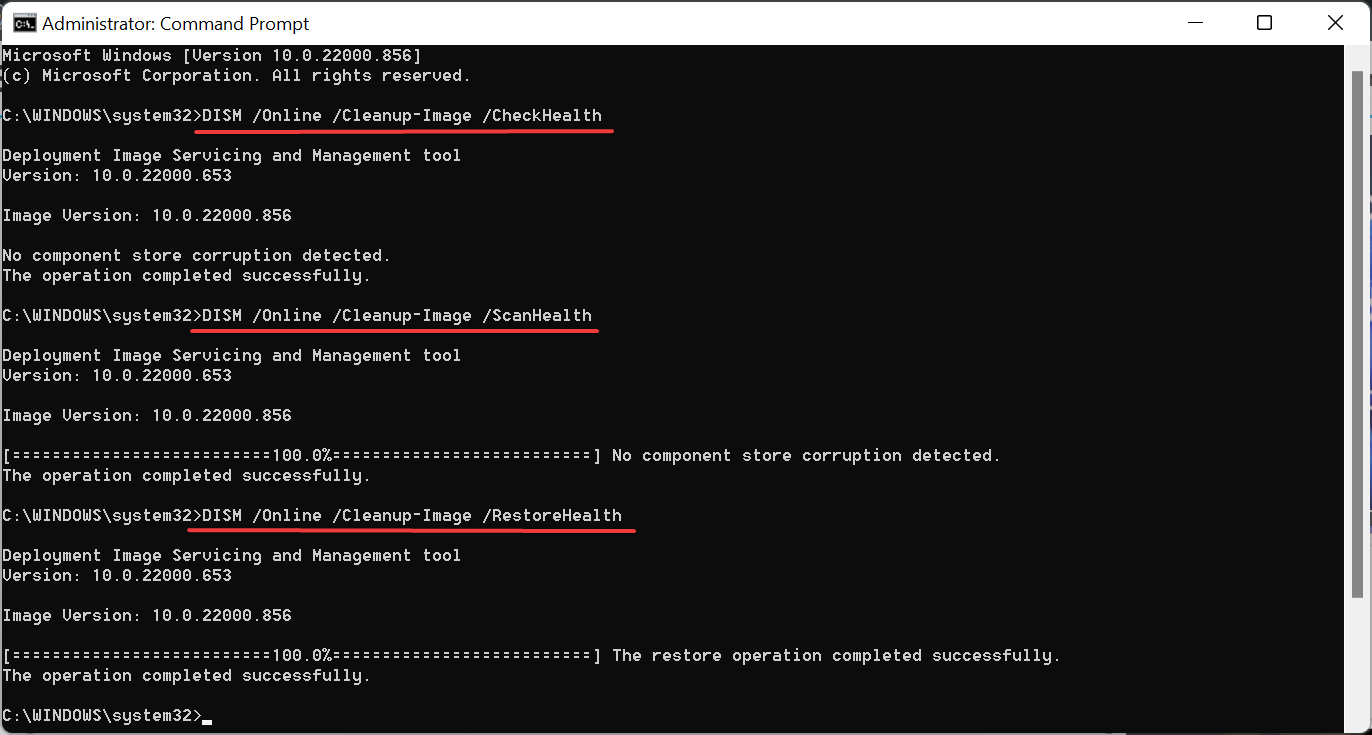
Here are the correct commands for the DISM tool:
DISM /Online /Cleanup-Image /CheckHealth DISM /Online /Cleanup-Image /ScanHealth DISM /Online /Cleanup-Image /RestoreHealth
There are other DISM commands as well, but these should provide you with a basic understanding of how to use them.
2. Update your Windows
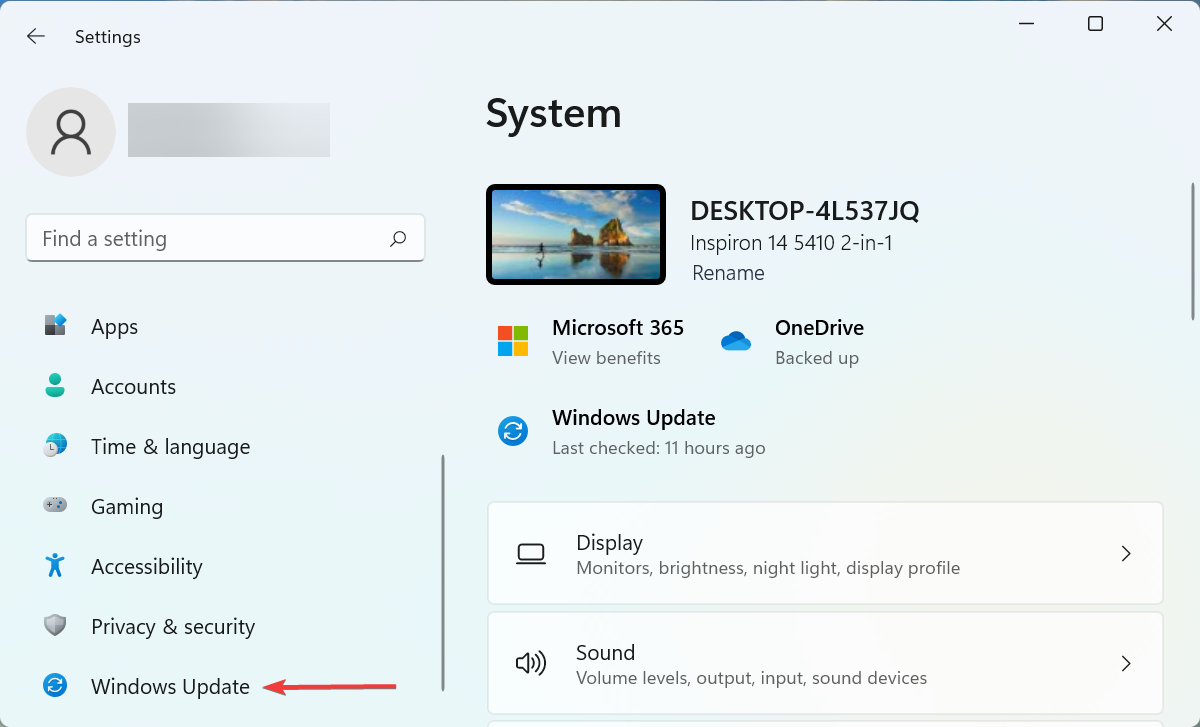
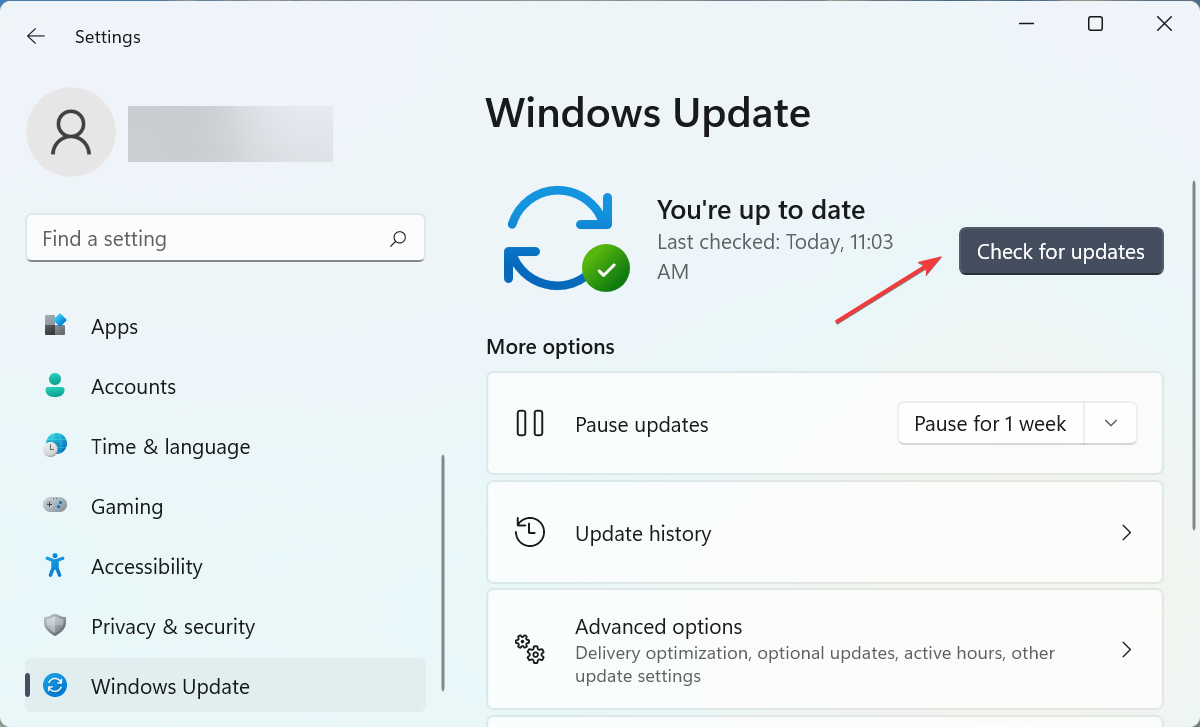
- Press Windows + I to open Settings and select Windows Update from the tabs on the left.

- Now, click on Check for updates.
- If an update is listed after the scan, click on Download & install to get it.


After updating the OS, verify if the DISM Error 87 is fixed in Windows 11. If it still appears while running the tool, head to the following method.
3. Use a third-party tool
Some system problems, such as TLS, can be highly frustrating, and the reason for these errors is often unknown.
The ideal solution is to use a reliable third-party application so the process would run efficiently and error-free.
Restoro, for example, is a great repair tool you can go for because it has advanced technology that detects all corrupt and malfunctioning Windows files and replaces them with new parts from its online database.

Restoro
Get this excellent app to repair your Windows system and boost its performance in no time.
4. Run the command line as an administrator
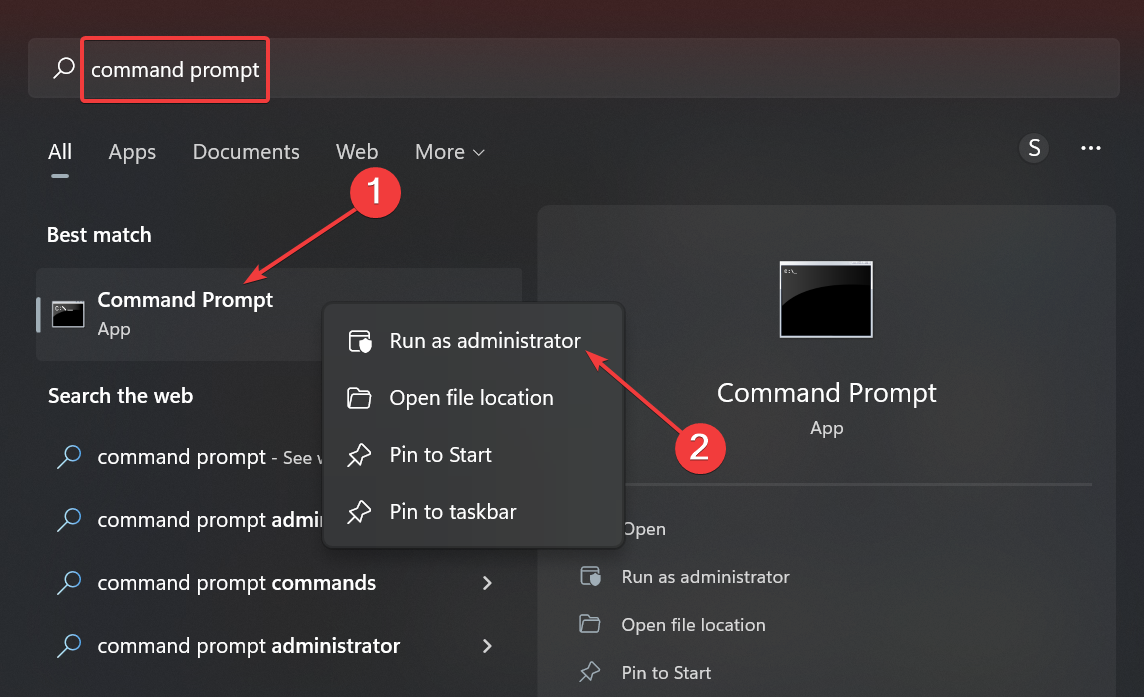
- Press Windows + S to open the Search menu, enter Command Prompt in the text field, and click on Run as administrator on the right.

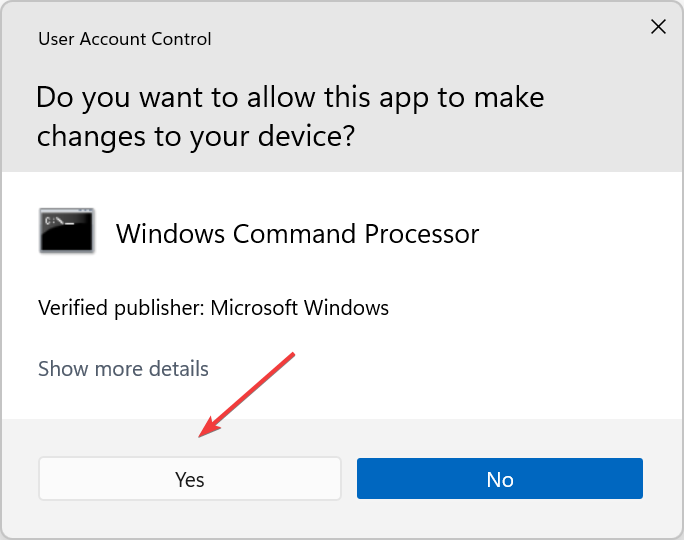
- Click Yes in the UAC prompt that appears.

- Now, try running the DISM tool.


Launching Command Prompt as an administrator will provide all the administrative rights to run the DISM tool and should fix Error 87 in Windows 11.
- How to quickly restore your Photos app in Windows 10
- What is Wininit.exe & Should You Remove it?
- Holocure has some issues on Windows 11, but there’s a fix
- What is Dashost.exe & How to Disable it
- How much storage will Starfield take up? [System requirements]
5. Use the correct DISM version
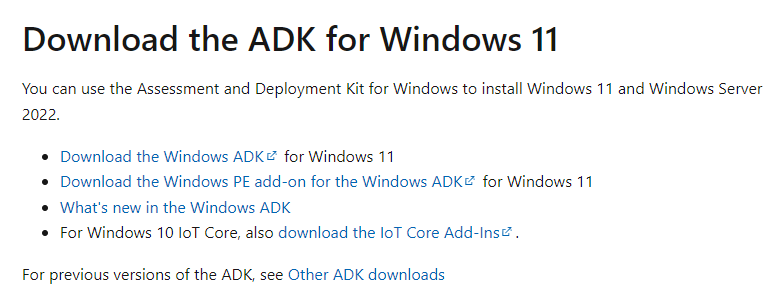
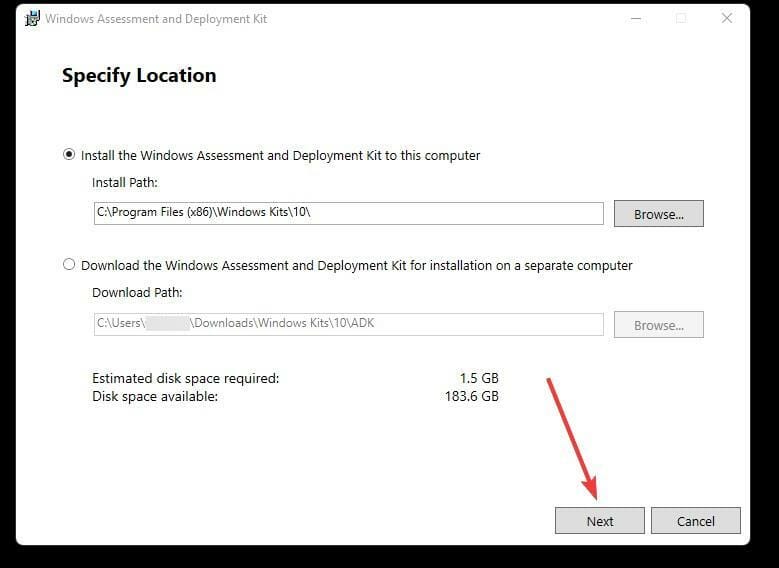
- Head to the official Windows Assessment and Deployment Kit(WADK) website and click Download the Windows ADK.

- Click Run to install the downloaded executable file. It has deployment tools that create the Deployment and Imaging Tools environment to make the running of DSIM commands successful.
- Click Next and follow the prompts to finish the installation.

6. Check for corrupt system files
- Press Windows + R to open the Run command, enter cmd in the text field, press the Ctrl + Shift keys, and then click OK.

- Click Yes in the UAC prompt.
- Type this command and hit Enter:
sfc /scannow
- Wait for the verification process, and check if any violations were found and resolved.

While it’s recommended that you first run the DISM tool and then SFC (System File Checker) scan, in this case, using just the latter might help. After completing the SFC scan, check if DISM Error 87 is fixed in Windows 11.
- How to quickly restore your Photos app in Windows 10
- What is Wininit.exe & Should You Remove it?
- Holocure has some issues on Windows 11, but there’s a fix
7. Perform a disk check
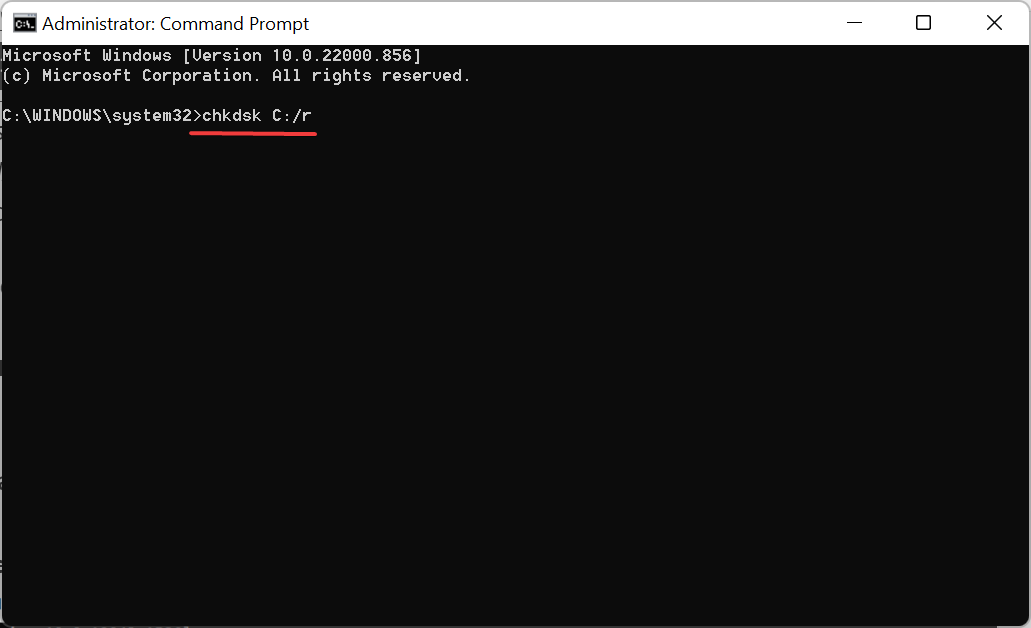
- Press Windows + S, enter Command Prompt in the text field, right-click on the relevant search result, and select Run as administrator.

- Click Yes in the UAC prompt.
- Type/paste the following command and press Enter:
chkdsk C:/r
- If you are asked to schedule the scan the next time the computer restarts, press Y, and then hit Enter.
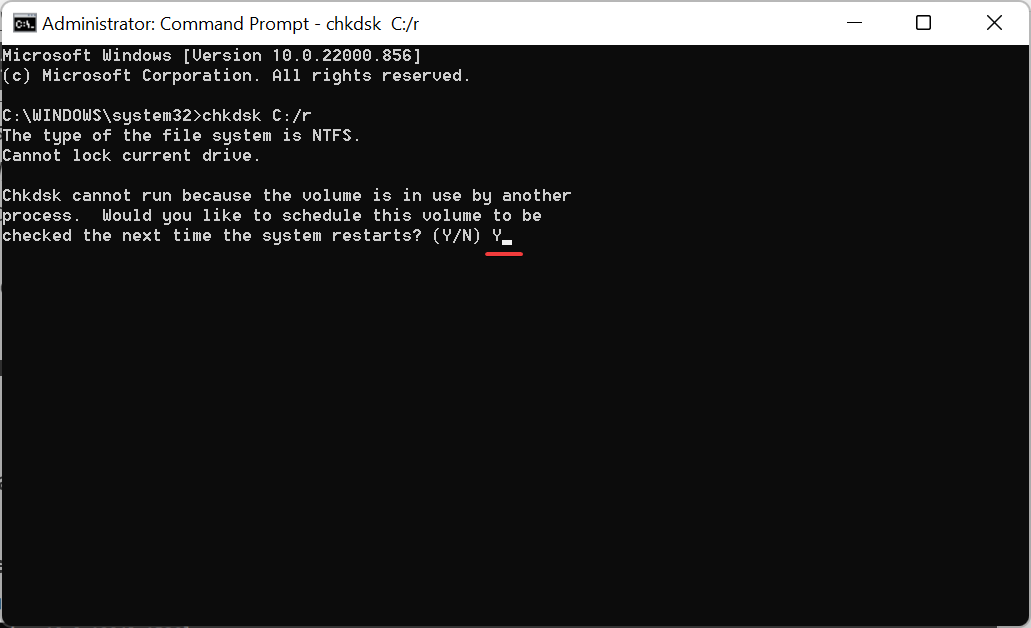
Let the Check Disk process run uninterrupted until it’s completed, and then verify if the DISM Error 87 is fixed in Windows 11.
8. Clear component store and revert the Windows update
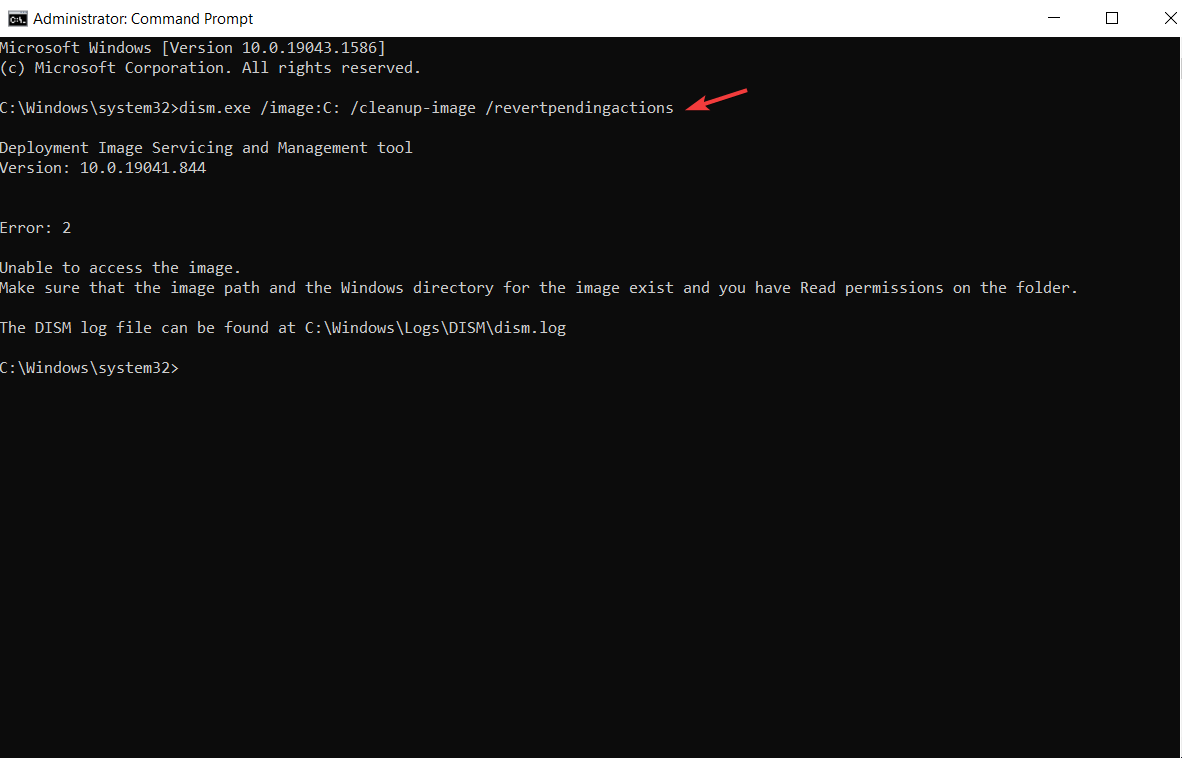
- Launch Command Prompt as an administrator.
- Type the following command and hit Enter:
dism.exe /image:C: /cleanup-image /revertpendingactions
- Once done, restart the computer.
- Again, launch Command Prompt with administrative privileges, paste the following command, and hit Enter:
dism.exe /online /cleanup-image /startcomponentcleanup
- After the two commands are run, restart the computer for the changes to effect.

9. Reinstall Windows
If none of the solutions listed previously fixed DISM Error 87, you are left with no option but to reinstall Windows.
There are two options: reset Windows 11 to factory settings or perform a clean install. Both are equally effective, though the latter requires much more effort, and you would need to create a bootable USB drive.
How do I use DISM to repair an image in Windows 11?
- Press Windows + S to open the Search menu, type Command Prompt, and click on Run as administrator.
- Click Yes in the UAC prompt.
- Now, paste the first of the following three commands, hit Enter, and after one is done running, execute the next until done with all three:
DISM /Online /Cleanup-Image /CheckHealthDISM /Online /Cleanup-Image /ScanHealthDISM /Online /Cleanup-Image /RestoreHealth
- Once done, restart the computer for the changes to effect, and the Windows 11 image will be repaired.
What is DISM?
DISM stands for Deployment Image Servicing and Management, and its main work is to help organize virtual disks. It manages split Windows Imaging Format (WIM) files, Full Flash Utility Files, Virtual Hard Disks(VHD), and other vital information.
You can access the tool from the Command Prompt or Windows PowerShell, which is used to fix problems with the Windows image.
Fixing the DISM error 87 in Windows 11 will correct all the system file errors and problems. It also helps in making the modification to the OS more seamless. If you have issues with Windows 11, fixing it addresses all the problems the user faces.
Also, please find out how to make Windows 11 faster and more responsive and boost its performance.
Most DSIM errors are temporary and quick to fix. Try all the methods, and let us know which one worked for you in the comments section.
Still having issues? Fix them with this tool:
SPONSORED
If the advices above haven’t solved your issue, your PC may experience deeper Windows problems. We recommend downloading this PC Repair tool (rated Great on TrustPilot.com) to easily address them. After installation, simply click the Start Scan button and then press on Repair All.
![]()
Одной из распространённых причин неполадок в работе Windows является повреждение системных файлов, например, вследствие внезапного отключения электропитания в момент перезаписывания файла. Для устранения таких неполадок в Windows предусмотрена специальная утилита SFC. Если запустить её с параметром SCANNOW, она просканирует систему на предмет повреждённых и/или удалённых файлов и восстановит их из хранилища компонентов WinSxS. Если SFC не справляется со своей задачей по причине повреждения хранилища, в ход идёт консольная утилита DISM, способная восстановить само хранилище.
Ошибка 87 в Windows при работе с DISM
 При этом сначала в командной строке обычно выполняется команда DISM /Online /Cleanup-Image /ScanHealth, а при обнаружении повреждений хранилища выполняется та же команда, но уже с параметром /RestoreHealth вместо /ScanHealth. Но было бы ошибочно считать DISM всесильной, утилита сама может завершить работу с ошибками. Таких ошибок у DISM существует около дюжины, и каждая из них имеет свой код и описание. Сегодня мы коснёмся распространённой ошибки с кодом 87, а заодно посмотрим, что можно предпринять в случае её возникновения.
Отсутствие привилегий
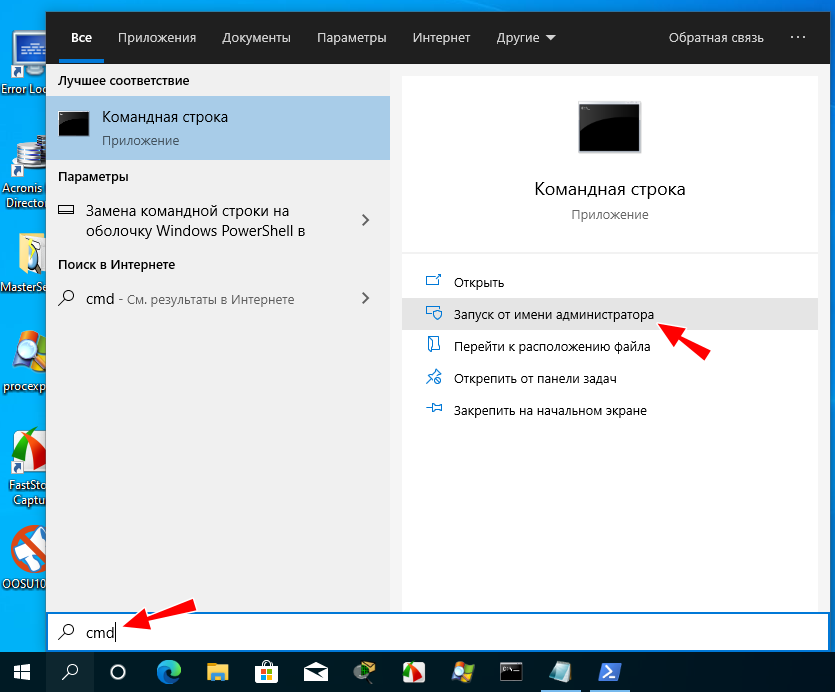
Ошибка 87 может возникнуть, когда пользователь выполняет команду в консоли, запущенной с правами обычного пользователя. Командную строку или PowerShell нужно запускать от имени администратора. Запустить PowerShell с повышенными правами в Windows 10 можно из контекстного меню кнопки Пуск, классическую командную строку — через поиск, так же выбрав в меню соответствующую опцию.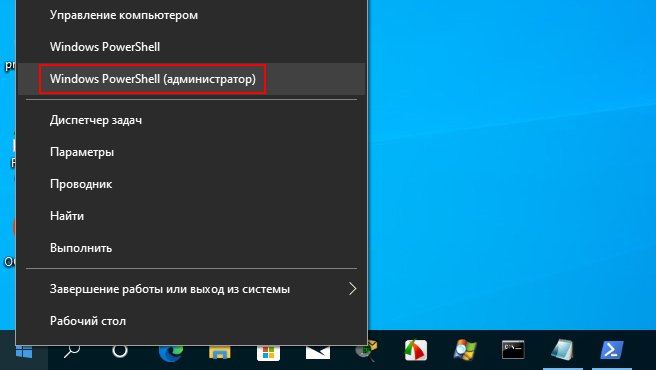
Ошибка синтаксиса
Очень часто причиной ошибки 87 становится банальная ошибка синтаксиса. Либо пользователь ошибается в момент ручного ввода, например, случайно пропускает пробел между передаваемыми параметрами, либо копирует команду DISM с веб-страницы, на которой в команде уже допущена ошибка. Понять, что причиной ошибки 87 стал именно синтаксис нетрудно: в описании ошибки будет указано «неизвестный параметр…» или «параметр не распознан в этом контексте». Проверьте корректность ввода команды, убедитесь, что между передаваемыми параметрами имеются пробелы. 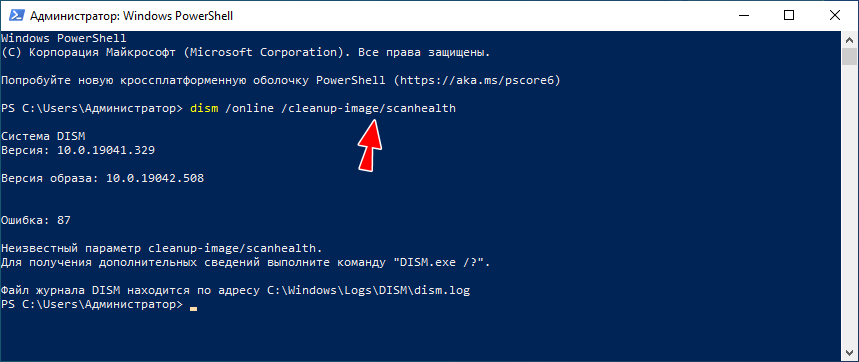
Остановка системных служб
Ошибка с кодом 87 и сообщением «параметр не распознан в этом контексте» может также возникнуть при попытке сжать каталог WinSxS. Для этого DISM передаются параметры /cleanup-image, /spsuperseded и /hidesp, и именно /spsuperseded чаще всего вызывает ошибку. В данном случае к ней приводит остановка системной службы «Установщик модулей Windows». Проверьте её состояние в оснастке управления службами, она должна иметь тип запуска «Вручную». Если она отключена, включите и запустите её, а затем выполните команду DISM.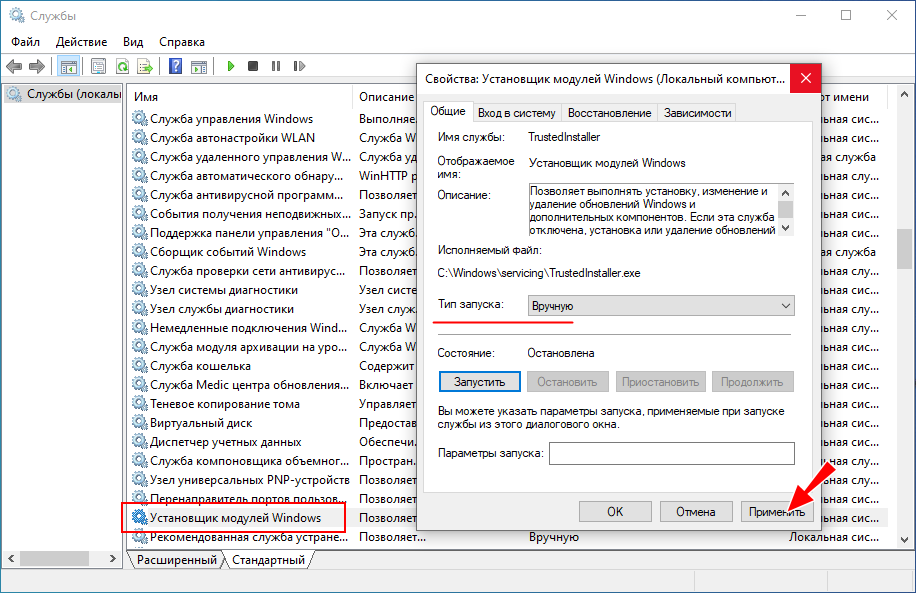
Отсутствие обновлений
В истории Windows 10, а именно в 2017 году, уже был прецедент с появлением ошибки 87 при работе с DISM. Тогда причиной ошибки была недоработка со стороны разработчиков Microsoft, которые вскоре после этого выпустили патч исправления. Нечто подобное может повториться и в будущем, и тогда вам нужно будет установить последние обновления Windows.
Ошибка 87 при применении образа
Появление ошибки 87 отмечалось и при попытке применения (использовании параметра /Apply-Image) образа Windows 10 в операционной системе более ранней версии. В таких случаях обычно рекомендуют «обновить» саму DISM, перенеся её с компьютера с более новой версией Windows, но это связано с целым рядом сложностей. Пожалуй, будет проще перейти на новую версию операционной системы или выполнить её сброс к исходному состоянию, чтобы восстановить нормальную работу инструмента.
Более или менее продвинутые пользователи нередко пользуются командной строкой, ведь через неё можно влиять на большинство системных процессов. При использовании строки DISM, которая есть в седьмой и следующих версиях Windows, время от времени могут появляться сообщения об ошибке.
Это норма для любой программы, но наша задача — избавиться от неполадки, чтобы выполнить необходимую команду. Ошибка 87 DISM возникает по нескольким причинам, и в каждом случае есть свои пути её устранения.

Иногда пользователи могут столкнуться с ошибкой 87 в строке DISM
Давайте выясним, при каких обстоятельствах обычно появляется такое сообщение и как избавиться от него без посторонней помощи.
С чем связана ошибка 87?
Как правило, она напрямую относится к любым действиям, выполняемым с директорией WinSxS. Если вдруг в Windows пропадёт любой системный файл, он тут же будет восстановлен рабочей копией из этой папки. То есть, WinSxS это очень важная папка с документами.
И вот ошибка 87 возникает в тот момент, когда пользователь пытается проделать какие-то операции с папкой через DISM. А теперь давайте конкретнее рассмотрим ситуации, когда возникает эта неполадка, чтобы в зависимости от них узнать способы избавления от неё.
Ошибка 87 при проверке целостности системных файлов
Время от времени Windows 7, 8, 8.1 и даже последняя версия начинает некорректно работать. Иногда компьютер внезапно перезагружается или попросту часто зависает. В такой ситуации обычно пользователям советуют не только проверить ПК на вирусы, но и выяснить, нет ли каких-либо повреждений в системных файлах.
Чтобы произвести такую проверку, используется командная строка, где вводится sfc /scannow. Если всё хорошо, то пользователь получает соответствующий текст. Однако в некоторых случаях вы получите сообщение о том, что система нашла повреждённые файлы, но ничего не может с ними сделать.

В этот момент в игру вступает DISM — следует открыть его от имени администратора и ввести такие команды:
- DISM /Online /Cleanup-image /ScanHealth — если у вас седьмая версия Windows;
- Та же команда + DISM.exe /Online /Cleanup-image /RestoreHealth — две команды для Windows 8, 10. Первая необходима для поиска повреждений, вторая команда запускает их исправление.
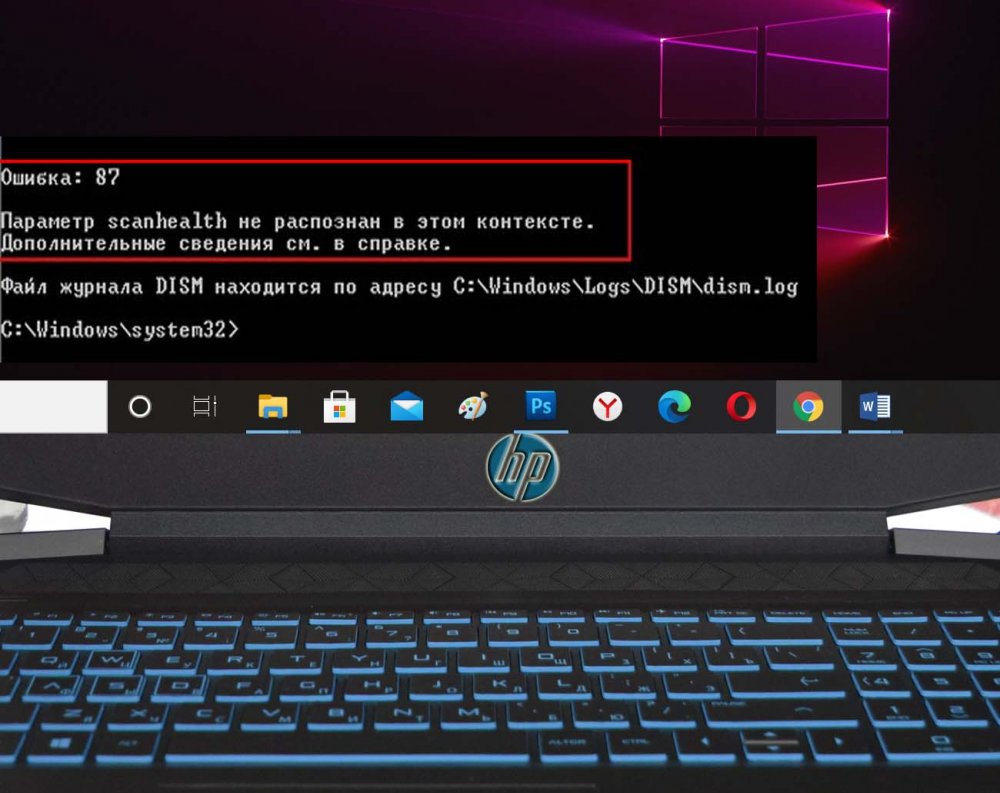
Именно после первой комбинации из списка, которая разработана для седьмой версии системы, всплывает ошибка 87 в командной строке DISM с сопутствующим текстом «Параметр ScanHealth не распознан в этом контексте».
Как её исправить? Первое очень простое решение — проверить правильность ввода комбинации. Поскольку эта командная строка очень требовательна к каждому знаку, убедитесь, что ставите только один пробел перед каждым слешем.
Не помогло? Тогда вам следует скачать обновление под названием KB2966583 на сайте Майкрософт и установить его на своём компьютере.
После успешной установки вы сможете снова запустить командную строку DISM и выполнить восстановление целостности файлов Windows.
Ошибка 87 и попытки почистить директорию WinSxS
Иногда вышеупомянутую директорию, которая работает страховкой для всех самых важных файлов, пытаются уменьшить. Для чего? В большинстве случаев папка WinSxS занимает много места на диске — 5,7 и даже 8 и больше ГБ, что может не нравиться пользователям, особенно если свободной памяти и так не хватает.
Поэтому чтобы немного сэкономить место, можно удалить бэкап папки таким образом:
- Открывается DISM.
- Вводиться текст dism /online /cleanup-image /spsuperseded /hidesp.
Часто именно после этой команды выбивает ошибку 87 с таким текстом: «Параметр spsuperseded не распознан в этом контексте».
Что делать в таком случае? Проверьте работоспособность сервиса «Установщик модулей Windows». Если он нерабочий, установите его, запустите, и затем повторите вышеуказанные действия.
Если же это не помогло, значит, команда для удаления бэкапа уже выполнялась, и больше места вы сэкономить не сможете.

Теперь вы знаете, по каким причинам появляется ошибка 87 в командной строке Windows, и знаете, что делать для её исчезновения. Советуем быть аккуратными при пользовании подобными программами и внимательно следить за тем, в какие процессы вы вмешиваетесь, чтобы не навредить компьютеру.
Several users are getting the “DISM Error: 87” when trying to run DISM on Windows 10 from an elevated Command Prompt. Although the issue is also encountered on previous Windows version, the frequency of reports on Windows 10 is much higher.
What is causing the DISM Error 87 on Windows 10?
We investigated this particular issue by looking at various user reports and the repair strategies that they used to get the issue resolved. Based on our findings, there are several fairly common scenarios that are known to trigger this particular error message:
- Command line isn’t typed correctly – This is the most common cause why this particular error occurs in the first place. Most of the time, it’s because of incorrect spaces before each ‘/’ character. In this case, the solution is as simple as using the correct spacing.
- Windows 10 bug – The apparition of this particular error when running the DISM scan is can also be the result of a Windows 10 bug that was resolved with the Fall Creators’s Update. If this scenario is applicable, the error can be resolved by installing every pending Windows update.
- The command is not run into an elevated prompt – Another common reason why this issue occurs is if the user tries to run the DISM command into a regular Command Prompt window. In this case, the solution is to run the correct command into an elevated Command Prompt.
- The machine is using the wrong version of DISM – This scenario is typically encountered in those situations where the user tries to apply a Windows 10 image using an older DISM version. In this case, the solution is to apply the Windows 10 image using the correct DISM version using the wofadk.sys filter driver.
If you’re currently looking for ways to resolve this particular error message, this article will provide you with a collection of verified troubleshooting steps. Down below, you have a collection of methods that other users in a similar situation have used to get the issue resolved.
For the best results, follow the methods below in the presented order until you encounter a fix that is effective in your particular situation. Let’s begin!
Method 1: Using the correct spacing
One of the most common reasons why this error occurs is due to incorrect spacing used when typing the DISM command. Typically, the error occurs due to incorrect spacing before each ‘/’. So instead of running a command like “DISM.exe/Online/Cleanup-image/Scanhealth“, you should ensure that you use one space before each ‘/’ character. The correct syntax of the command should be:
DISM.exe /Online /Cleanup-image /Scanhealth
or
DISM.exe /Online /Cleanup-image /Restorehealth
(depending on what you wish to accomplish)
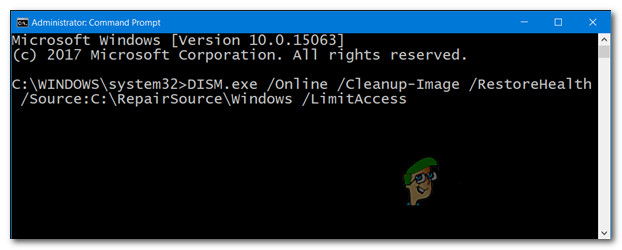
Once you ensure that you’re using the correct DISM syntax, hit Enter and see if the command is processed successfully.
If you’re still encountering the “DISM Error: 87” error, move down to the next method below.
Method 2: Using an elevated command prompt
Another common reason why this error message is encountered is when the user types the correct command but tries to run it into a regular Command Prompt. DISM commands (similar to SFC scans) need to be run into an elevated Command Prompt in order to work.
Here’s a quick guide on doing this:
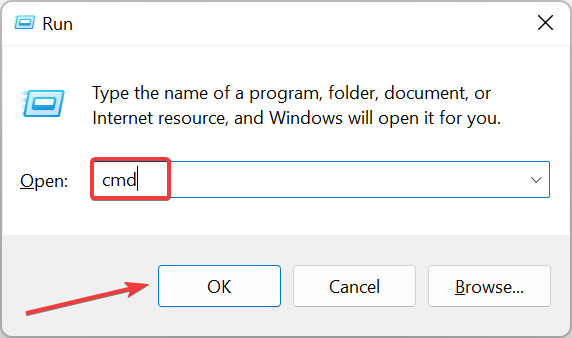
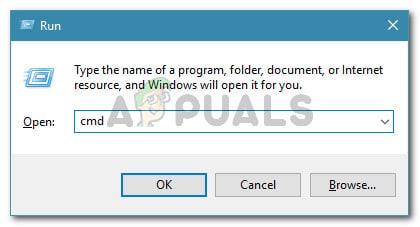
- Press Windows key + R to open up a Run dialog box. Then, type “cmd” and press Ctrl + Shift + Enter to open up a Run dialog box.

Run dialog: cmd - When prompted by the UAC (User Account Control), choose Yes to grant administrative privileges.
- Inside the elevated Command Prompt, type your command and press Enter to run it.
If you’re still encountering the “DISM Error: 87“, move down to the next method below.
Method 3: Installing every pending Windows update
The “DISM Error: 87” can also be caused by a Windows 10 bug that was finally resolved in October 2017, with the launch of the Fall Creator’s Update. If you’re using a pirated copy of Windows 10 or you’re using a software that actively blocks Windows updates from installing, you’ll need to bring your system up to date in order to resolve the bug.
If this scenario is applicable and you’re using a legitimate Windows 10 license, eliminate the roadblock that is preventing the updates from installing and follow the instructions below:
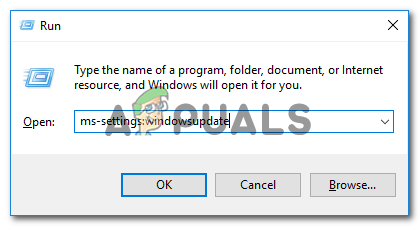
- Press Windows key + R to open up a Run dialog box. Then, type “ms-settings:windowsupdate” and press Enter to open the Windows Update screen of the Settings app.
Opening the Windows Update screen - Inside the Windows Update tab, click on Check for updates and follow the on-screen instructions to install every pending update.

Installing every pending Windows update Note: You might be prompted to restart between update installation. If prompted, restart whenever prompted and remember to return to this same screen once the next startup is complete to proceed with the installation of the remaining files. Do so until all pending updates are installed.
- Once every pending update is installed, restart your computer and trigger another DISM scan once the next startup is complete.
In the event that you’re still encountering the “DISM Error: 87“, move down to the next method below.
Method 4: Using the Windows 10 version of DISM (if applicable)
If you’re encountering the issue when you try to apply a Windows 10 image the DISM /Apply-Image command on an earlier version of DISM (Windows 8.1 or earlier), the issue occurs because you’re using the wrong version of DISM.
Several users finding themselves in the exact same scenario have reported that the error was no longer occurring once they started using the Windows 10 version of DISM with the Wofadk.sys filter driver.
Keep in mind that this procedure will be different depending on the platform that you’re planning to use with Windows PE. If this scenario is applicable to your current situation, consult the following Microsoft resources for specific steps on dealing with the issue in your particular scenario:
- DISM Supported Platforms
- How to copy DISM to another computer
If this method is not applicable to your current situation, move down to the final method below.
Method 5: Performing a repair install
If you performed the steps above to no avail, it’s very likely that some files belonging to DISM (or some different system files) are corrupted and need to be reinitiated. Since you can’t use DISM to scan and repair corrupted system files, you’ll need to use a different approach.
A clean install is always an option, but going this route will make you lose all your data (applications, personal files, personal settings, etc.)
A better approach would be to perform a repair install. This is a non-disruptive procedure that will allow you to reinitiate all Windows-related components without affecting your personal files and applications. This means that you’ll be spared from the trouble of reinstalling everything and reconfiguring your settings once the setup is complete. Follow this guide (here) to perform a repair install and repair the “DISM Error: 87“.

Kevin Arrows
Kevin Arrows is a highly experienced and knowledgeable technology specialist with over a decade of industry experience. He holds a Microsoft Certified Technology Specialist (MCTS) certification and has a deep passion for staying up-to-date on the latest tech developments. Kevin has written extensively on a wide range of tech-related topics, showcasing his expertise and knowledge in areas such as software development, cybersecurity, and cloud computing. His contributions to the tech field have been widely recognized and respected by his peers, and he is highly regarded for his ability to explain complex technical concepts in a clear and concise manner.