
Вам пришлось столкнуться с ошибкой 403 Forbidden на своем сайте на WordPress? Это одна из самых страшных ошибок, с которой может столкнуться новичок. В этой статье м покажем вам как легко исправить ошибку 403 Forbidden в WordPress.
![403forbiddenerror[1]](https://wpincode.com/wp-content/uploads/2016/12/403forbiddenerror1.jpg)
Что за ошибка 403 Forbidden – Access Denied Error в WordPress?
WordPress отображает коды и сообщения, когда ошибка возникает на сайте.
![403screenshot[1]](https://wpincode.com/wp-content/uploads/2016/12/403screenshot1.png)
Код ошибки 403 Forbidden показывается тогда, когда права, установленные на сервере, не позволяют получить доступ к определенной странице.
Именно поэтому ошибку часто можно видеть с текстом:
403 Forbidden – You don’t have permission to access ‘/’ on this server.

Additionally, a 403 Forbidden error was encountered while trying to use an ErrorDocument to handle the request.
Ошибку можно увидеть в различных ситуациях. Например:
- 403 Forbidden – Запрещен доступ к wp-admin или странице входа в WordPress.
- 403 Forbidden – во время установки WordPress.
- 403 Forbidden при попытке открыть любую страницу на сайте.
- Возможно, что вы получаете только сообщение ‘Access Denied’ вместо полного статуса 403 Forbidden.
- Также можно увидеть ‘Access to yourdomain.com was denied. You don’t have authorization to view this page.’
Теперь, когда мы определили различные типы ошибок 403, давайте поговорим о том, что приводит к этим ошибкам.
Что вызывает ошибку 403 Forbidden в WordPress?
Наиболее вероятной причиной возникновения ошибки 403 Forbidden в WordPress являются плохо настроенные плагины безопасности. Многие из них блокируют IP адреса (или даже всю подсеть), если считают, что они вредоносны.
Второй возможной причиной может быть поврежденный файл .htaccess или некорректные права доступа к файлу на вашем сервере.
Ваш хостер также может внести какие-то изменения в настройки сервера, что может привести к рассматриваемой ошибке.
Давайте же посмотрим как можно исправить ошибку 403 forbidden в WordPress.
Исправляем ошибку 403 Forbidden в WordPress
Прежде чем что-либо сделать, мы рекомендуем вам создать полный бекап сайта.
1. Исправляем ошибку 403 Forbidden, вызванную плагином WordPress
Для начала вам потребуется временно отключить все плагины WordPress, включая все плагины безопасности, которые вы устанавливали.
Если это решит проблему, тогда станет понятно, что один из плагинов вызывает ошибку.
Выяснить, какой именно, можно будет, если отключить все плагины, а затем включать по одному, пока не появится ошибка 403.
2. Исправляем ошибку 403 Forbidden, вызванную поврежденным файлом .htaccess
Часто ошибка 403 возникает из-за поврежденного .htaccess файла вашего сайта. Починить его очень просто.
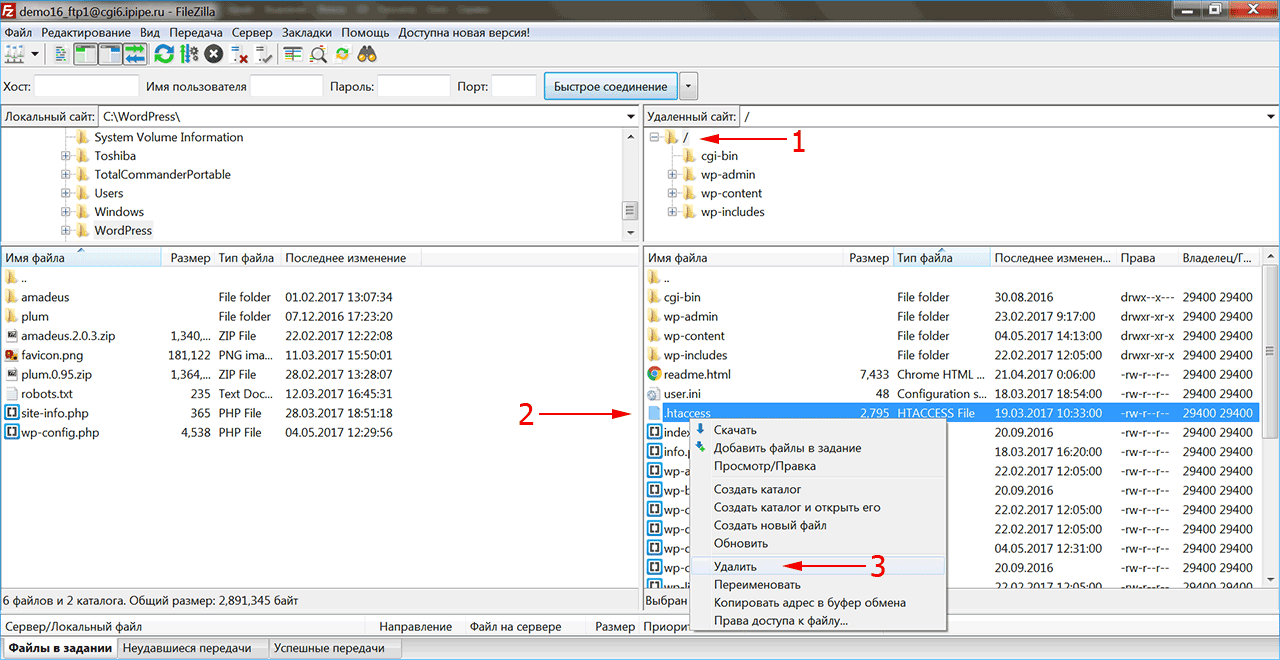
Подключаемся к сайту по FTP или через Менеджер файлов хостинга.
Находим файл .htaccess в корневой папке своего сайта.
Скачиваем файл на свой компьютер, чтобы у нас была свежая его копия. Далее, удаляем файл с сервера.
![delete-htaccess[1]](https://wpincode.com/wp-content/uploads/2016/12/delete-htaccess1.png)
Пытаемся открыть свой сайт. Если ошибка 403 пропала, значит ваш .htaccess файл был поврежден.
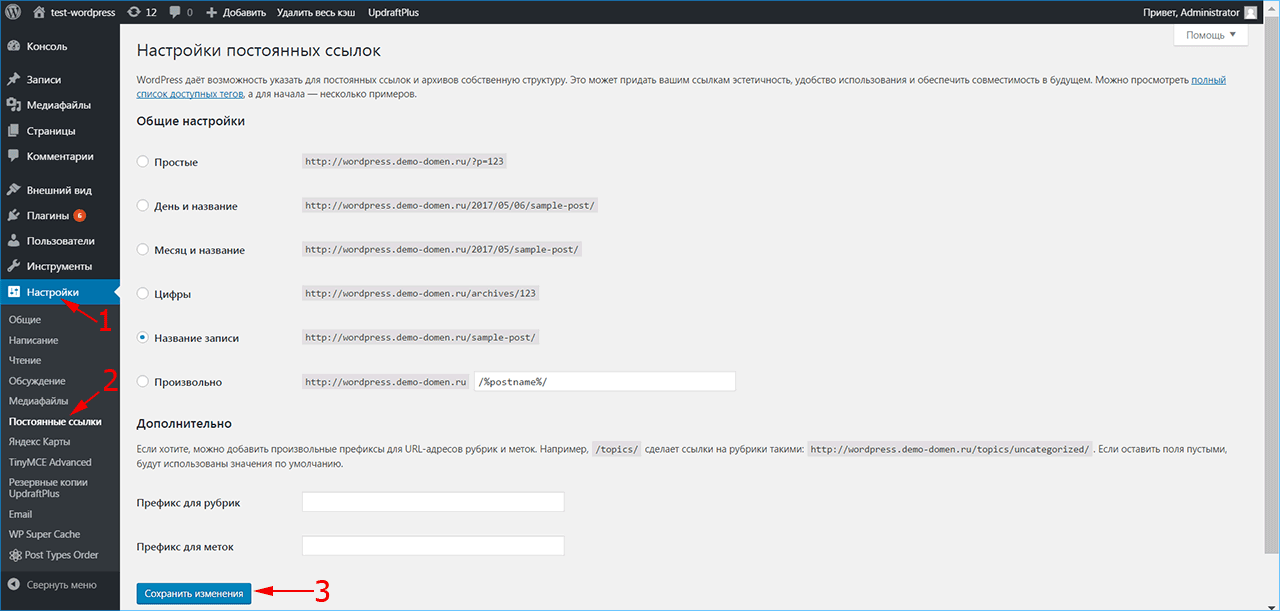
Сгенерировать новый можно в админке сайта, если перейти на страницу Настройки » Постоянные ссылки.
![regenerate-htaccess[1]](https://wpincode.com/wp-content/uploads/2016/12/regenerate-htaccess1.png)
Просто нажимаем на кнопку Сохранить изменения внизу страницы и WP сгенерирует свеженький файл .htaccess.
3. Исправляем ошибку 403 Forbidden, вызванную правами доступа к файлам в WordPress
Все файлы, хранимые на вашем сайте, имею права доступа. Эти права контролирует тот, у кого есть доступ к файлам и папкам сайта.
Некорректные права доступа могут вызывать ошибку 403, потому как ваш веб сервер начинает считать, что у вас нет прав на доступ к тем файлам.
Если два вышеуказанных решения не помогли с проблемой, тогда скорее всего дело в правах доступа.
Вы можете обратиться к своему хостеру для того, чтобы тот проверил сайт на предмет корректных прав доступа.
Изменение же прав самостоятельно может иметь негативные последствия. Если вы не слишком уверены в правильности своих действий, то лучше обратиться к знакомому или нанять профессионала.
Однако, если вы все-таки решите исправить проблему лично, то вот как можно проверить права доступа.
Просто подключаемся к своему сайту по FTP, а затем переходим в корневую директорию сайта, содержащую все файлы WordPress.
![check-file-permissions[1]](https://wpincode.com/wp-content/uploads/2016/12/check-file-permissions1.png)
Кликните на директорию для выбора, затем нажмите правой кнопкой мыши, после чего выберите File Permissions из меню.
Ваш FTP клиент отобразит вам диалог изменения прав доступа вроде такого:
![changefilepermissions[1]](https://wpincode.com/wp-content/uploads/2016/12/changefilepermissions1.png)
Все директории вашего сайта изменят права доступа с 744 на 755.
Все директории вашего сайта получат права доступа, изменив их с 644 на 644.
Можно изменить права доступа корневой директории с 744 на 755. Поставьте галочку рядом с ‘Recurse into subdirectories’, а затем отметьте опцию ‘apply to directories only’.
Нажимаем на кнопку ОК. Ваш FTP клиент начнет простановку прав доступа ко всем вложенным папкам в этой директории.
По окончанию процесса необходимо будет повторить проделанное для всех файлов. В этот раз вам нужно будет использовать права доступа 644 или 640 и не забыть выбрать опции ‘Recurse into subdirectories’ и ‘apply to files only’.
Нажимаем на кнопку ОК. Ваш FTP клиент обработает права доступа ко всем вложенным папкам в этой директории.
Попробуйте зайти на свой сайт, и ошибка 403 forbidden должна исчезнуть.
Мы надеемся, что эта статья помогла вам исправить ошибку 403 forbidden в WordPress.
По всем вопросам и отзывам просьба писать в комментарии ниже.
Не забывайте, по возможности, оценивать понравившиеся записи количеством звездочек на ваше усмотрение.
Rating: 3.0/5 (30 votes cast)

Ошибка WordPress 403 возникает из-за того, что запрещен доступ к страницам, которые пользователи пытаются посетить. Когда ваш сайт начинает отображать ошибку 403 Forbidden, это обычно означает, что запрос посетителя был отправлен и принят сервером, но сам сервер не дает доступ данному пользователю. Такая проблема довольно распространена – рассмотрим, почему она возникает и как восстановить доступ к сайту.
Причины появления ошибки 403 forbidden
Одна из частых причин образования ошибки 403 Forbidden связана с неудачной настройкой плагинов безопасности на сайте WordPress. Некоторые плагины, призванные обеспечить безопасность вашего сайта, могут заблокировать один или несколько IP-адресов, если посчитают их вредоносными.
Еще одна причина – ваша хостинговая компания может изменить настройки сервера. Это тоже способно вызвать на сайте ошибку 403 Forbidden.
Другой потенциальной причиной может оказаться некорректный файл .htaccess, а также неверные настройки доступа к каталогам и файлам сайта на удаленном сервере. В стандартно работающем файле .htaccess указаны настройки доступа через админку WordPress.
Если на третьей строке файла будет указано «Deny from all», эта команда установит запрет на посещение админпанели вашего сайта. В каких ситуациях может наблюдаться эта ошибка:
- Отказано в доступе на странице входа в админку wp-admin или wp-login.
- Ошибка обнаруживается в процессе установки WordPress.
- Ошибка показывается при посещении любых страниц вашего сайта.
При этом ошибка на экране сопровождается соответствующим текстом типа фразы «Отказано в доступе», «У вас нет разрешения на просмотр этой страницы» или указывается полный статус ошибки 403.
Поскольку причины, вызывающие ошибку 403 хорошо известны, избавиться от нее просто. Но , прежде чем предпринять что-либо, рекомендуется сделать резервную копию сайта. Вы также можете развернуть локальную копию сайта и на ней искать причины ошибки. Это актуально, если сайт посещаемый, а ошибка появляется только при входе в админпанель.
Если ошибку 403 вызывает плагин WordPress
Не каждый плагин, который вы используете в WordPress, совместим с настройками вашего сайта. Чтобы убедиться, вызвана ли ошибка 403 некорректно работающим плагином, отключите все установленные плагины. Активируя их по одному, можно выяснить, какой именно плагин спровоцировал ошибку.
- Деактивируйте все плагины, установленные на сайте.
- Повторно активируйте один из плагинов в списке.
- Посетите сайт, чтобы увидеть, отображается ли ошибка 403.
- Повторите шаги 2 и 3, пока не отобразится ошибка 403.
Если проблема появления ошибки разрешится, значит причиной послужил один из установленных плагинов. Возможно, вам придется изменить его параметры конфигурации или полностью удалить.
Если после деактивации всех плагинов ошибка 403 все еще воспроизводится, проблема не связана с плагином. В этом случае нужно выполнить дополнительную диагностику.
Если ошибку 403 вызывает файл .htaccess
Файл .htaccess способен спровоцировать множество осложнений в работе сайта при неправильной настройке. Некорректный или измененный файл помешает пользователям зайти на страницы сайта. Есть два способа проверить файл .htaccess на сайте: с использованием подходящего плагина для WordPress или с помощью FTP-доступа.
- Подключитесь к сайту на удаленном сервере с использованием файлового менеджера.
- В корне сайта найдите файл .htaccess.
- Загрузите файл .htaccess на локальный компьютер, чтобы сделать его резервную копию.
- Удалите этот файл из корня сайта на сервере.
После этого попробуйте войти на ваш интернет-ресурс. Если ошибка 403 больше не появляется, значит файл был поврежден. Для создания нового файла .htaccess войдите в админ-панель WordPress в меню «Настройки» и выберите пункт «Постоянные ссылки». Внизу страницы щелкните по кнопке «Сохранить изменения», WordPress автоматически сформирует обновленный файл .htaccess. Изменять какие-либо текущие настройки при этом не требуется.
Если ошибка 403 вызвана отказом в доступе к файлам
Файлы и каталоги, которые хранятся на вашем веб-ресурсе, обладают настройками прав на доступ. Неправильные настройки способны спровоцировать ошибку 403.
Вы можете воспользоваться техподдержкой хостинг-провайдера и попросить проверить ваш сайт на корректность доступов к каталогам и файлам. Это также можно выполнить самостоятельно.
- Подключитесь к удаленному серверу с помощью файлового менеджера.
- Зайдите в корневой каталог сайта, где находится все его содержимое.
- Выберите папку, щелкните по ней правой кнопкой и найдите в выпадающем меню пункт «Права доступа к файлу».
FTP-менеджер отобразит диалоговое окно с настройками прав доступа. Все каталоги на сайте снабжены значением 744 или 755. Остальные варианты могут помешать добавлению в папку нового содержимого и предотвратят обновления, дополнения или изменения, которые могут потребоваться в будущем. Поставьте флажок «Перенаправить во вложенные каталоги» и выберите пункт «Применить только к каталогам». Подтвердите нажатием «ОК», FTP-программа установит права доступа на все подпапки в этом каталоге.
Повторите это действие для всех файлов на сайте. Файлы снабжаются правами доступа со значением 644 или 640. Если эти числа установлены неверно, это даст злоумышленникам возможность редактировать файлы, что грозит добавлением вредоносного кода в файлы сайта.
После нажатия «OK», FTP-программа настроит доступ на указанные файлы. После этого попробуйте перейти на ваш сайт, ошибка 403 больше не должна возникнуть.
Улучшаем безопасность вордпресса
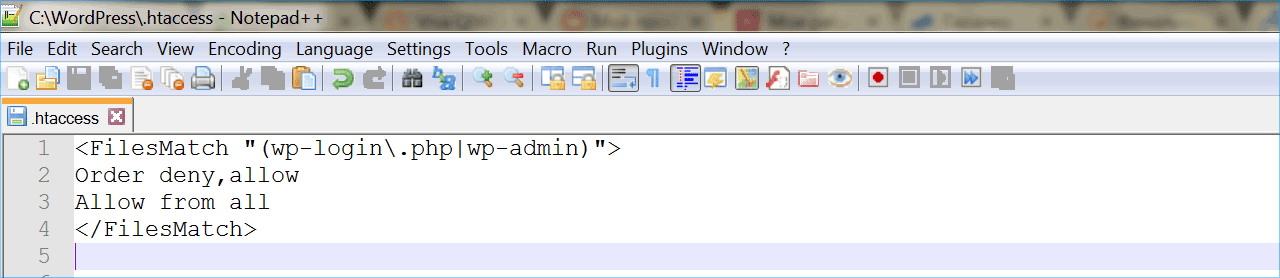
В целях повышения безопасности и ограничения доступа к сайту для посторонних, можно прописать специальную команду в файле .htaccess, которая запретит вход в административную панель WordPress со всех IP-адресов, отличающихся от вашего.
<FilesMatch "(wp-login.php|wp-admin)">

Order deny,allow

Deny from all

Allow from 255.255.255.255

</FilesMatch>
Вместо 255.255.255.255 укажите ваш IP-адрес. Если вы используете несколько динамических IP, в этом случае в файл .htaccess придется записать все подсети, с которых Вы заходите в админ-панель. Вы также можете защитить страницу входа, установив на нее дополнительный пароль.
iPipe – надёжный хостинг-провайдер с опытом работы более 15 лет.
Мы предлагаем:
- Виртуальные серверы с NVMe SSD дисками от 299 руб/мес
- Безлимитный хостинг на SSD дисках от 142 руб/мес
- Выделенные серверы в наличии и под заказ
- Регистрацию доменов в более 350 зонах
Being barred from your own site can be very frustrating, especially when you have no idea what is causing the problem. The 403 Forbidden error typically occurs when you’re trying to log in to WordPress or visit a specific page on your site.
Fortunately, there are a few simple fixes for this common WordPress error. Depending on your hosting plan, you may even be able to resolve the issue with help from your web host.
In this post, we’ll take a closer look at the 403 Forbidden error and its main causes. We’ll then show you five ways to fix it. Let’s get started!
Get Content Delivered Straight to Your Inbox
Subscribe to our blog and receive great content just like this delivered straight to your inbox.
What the 403 Forbidden Error Is (And What Causes It)
The 403 Forbidden error is one of several HTTP status codes used by servers to communicate with your browser. When the 403 status code shows up on your screen, it means that your server thinks you do not have the required permission to access that particular page.
The 403 Forbidden error typically appears when you’re trying to log in to your WordPress admin area or when you visit a specific page on your site. You may also encounter it while installing WordPress.
The error is usually accompanied by one of the following messages (or similar variations):
- “403 Forbidden – Access to this resource on the server is denied.”
- “Forbidden – You don’t have permission to access [directory name] on this server.”
- “You are not authorized to view this page.”
- “It appears you don’t have permission to access this page.”
- “403. That’s an error. Your client does not have permission to get URL [address] from this server.”
Instead of the “403 Forbidden” status, you might come across a simple notification that says “Access Denied.” It is also possible that you will get the following message: “Access to [domain name] was denied. You don’t have authorization to view this page.”
There are several possible causes of this 403 Forbidden error. The most likely one is an incorrect file permission on your server. However, this error can also be triggered by a faulty plugin or a corrupt .htaccess file:
What is .htaccess?
“.htaccess” is a configuration file used by the Apache web server software. The .htaccess file contains directives (instructions) that tell Apache how to behave for a particular website or directory.
Learn More
In most cases, you should be able to resolve the issue on your own. However, you might also need to get in touch with your hosting provider to access or change some settings on your site.
Skip the Permission Settings Stress
Avoid WordPress troubleshooting when you sign up for DreamPress. Our friendly experts are available 24/7 to help solve website problems — big or small.
How to Fix the 403 Forbidden Error in WordPress (5 Methods)
Now, let’s go through a few ways you can fix the 403 Forbidden error in WordPress. First, we recommend that you make a backup of your site just in case something goes wrong and you need to restore it to an earlier version.
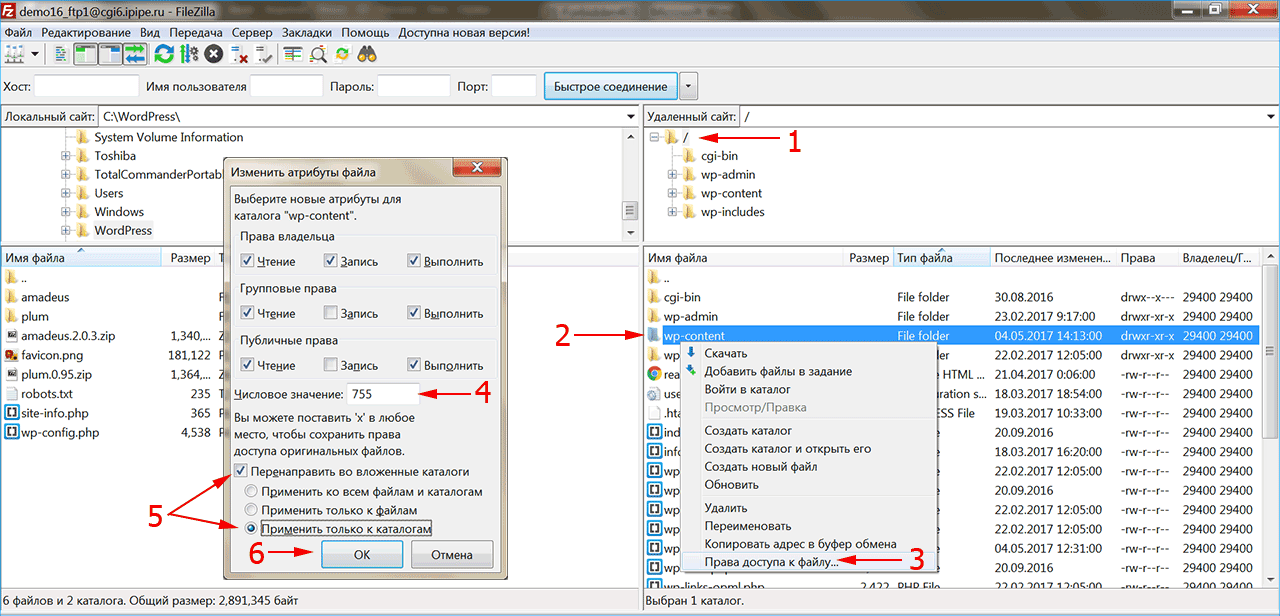
1. Change Your File Permissions
Every WordPress file on your site’s server has its own permissions. These settings control who can access and modify its contents. If these files have incorrect permissions, your server will stop you from accessing them.
If you want to check your file permissions, you can simply contact your hosting provider, and a technical expert should be able to take care of it. You can also do this yourself by connecting to your site with a Secure File Transfer Protocol (SFTP) client such as FileZilla.
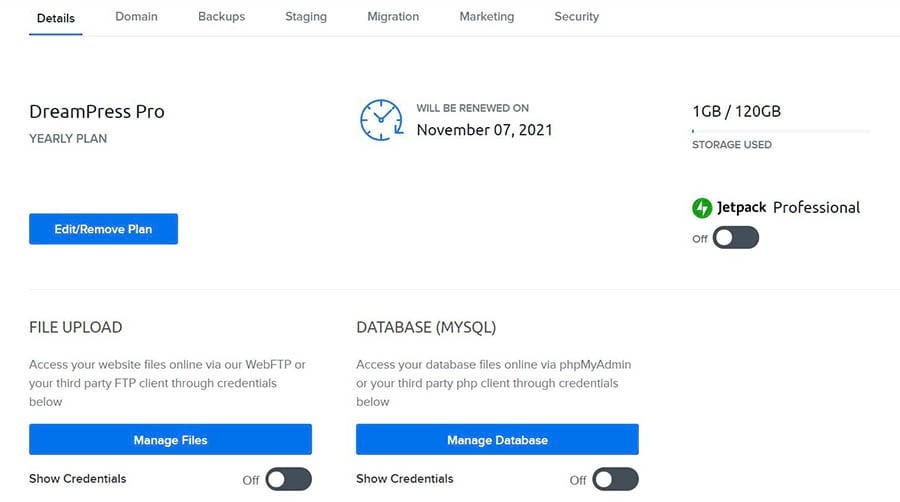
Alternatively, you can also access your site through the file manager in your hosting account. If you have a DreamHost account, you can navigate to WordPress > Managed WordPress in the sidebar. Then, find your domain and select Manage.
On the next page, click on the Manage Files button in the Details section.
You’re now in the file manager. Next, open the folder labeled with your domain name to access your site’s directory.
Inside your root directory, select the folder that contains all of your WordPress files. If you’re using FileZilla, this is the public_html folder. Then, right-click on it and choose File Attributes.
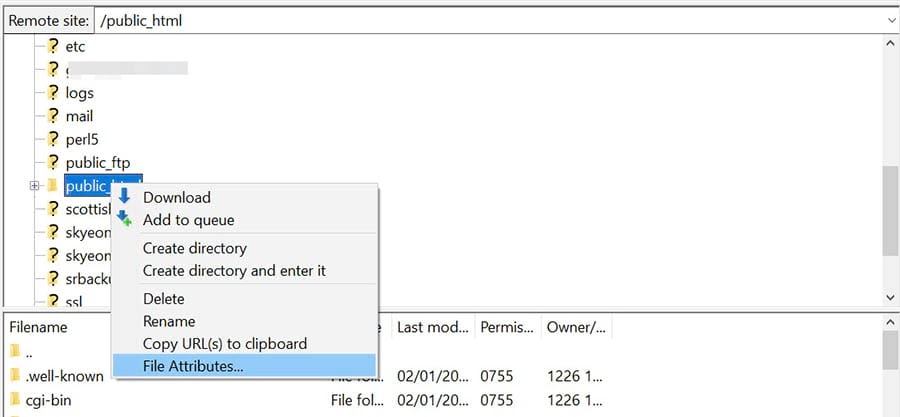
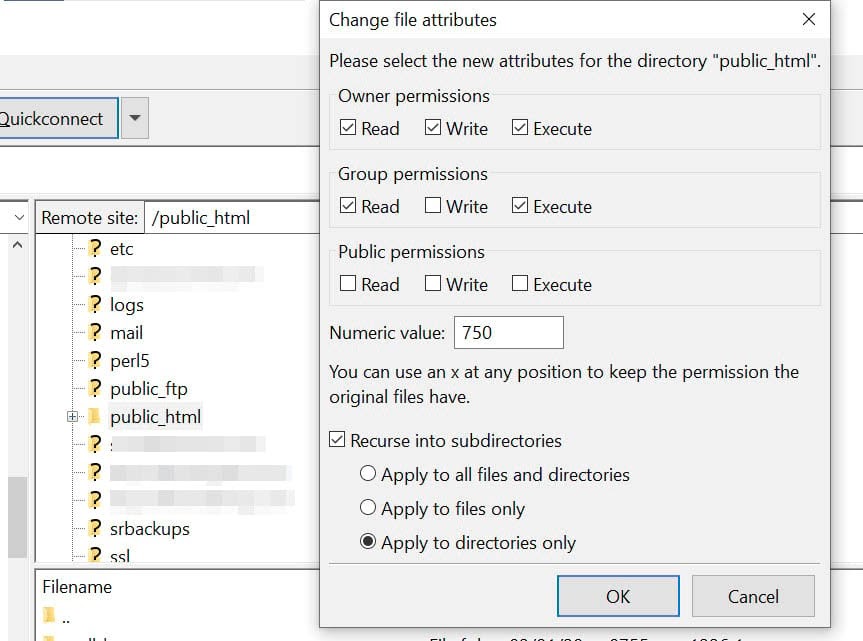
In the popup window, locate the Numeric field and enter “755” or “750” in the value box. Then select the Recurse into subdirectories and Apply to directories only options, and click on OK.
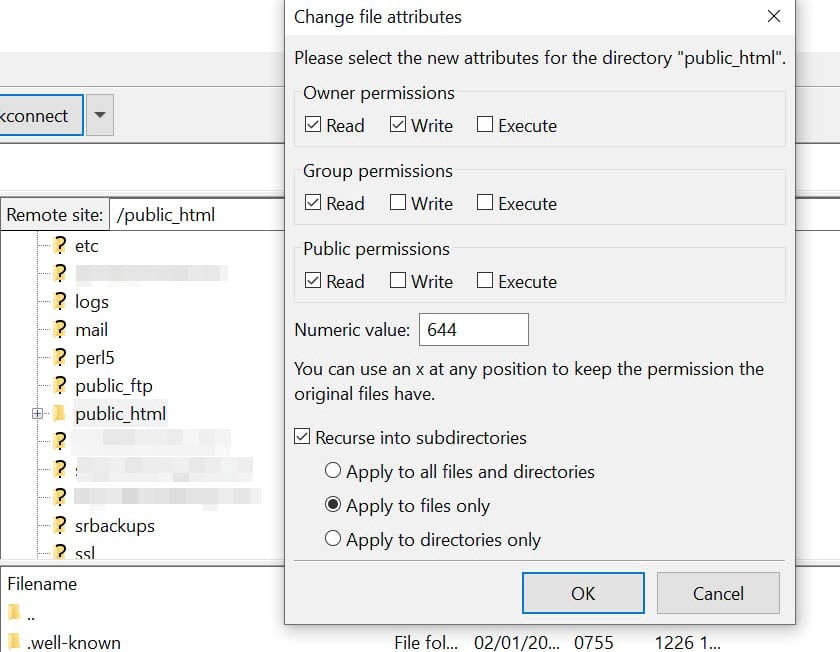
So far, you’ve applied the correct file permissions for your directories. You’ll now do the same thing for your files.
To start, right-click on your public_html folder and select File Attributes. This time, you’ll need to type “644” in the Numeric value field. Then choose Recurse into subdirectories, select Apply to files only, and click on OK.
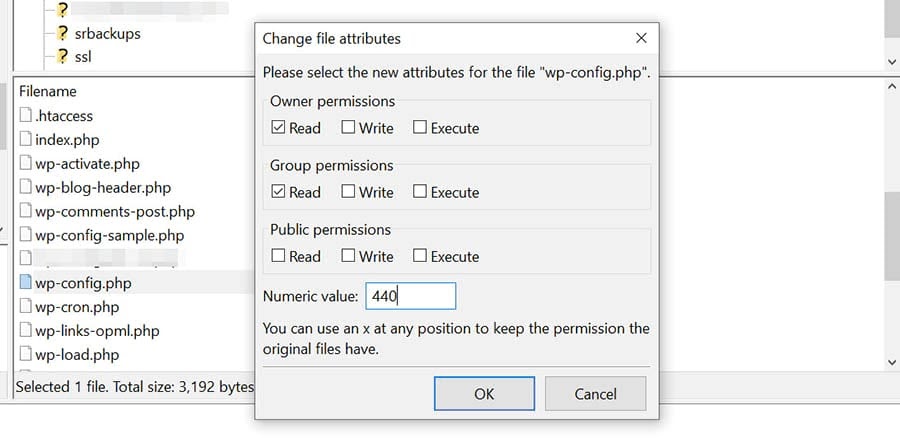
Note that your wp-config.php file requires a different numeric value than the ones stated above. This unique value prevents other users on your servers from accessing the file. Therefore, you’ll need to manually change its file permission.
In your root directory, find the wp-config.php file, right-click on it, and select File permissions. Next, set the numeric value to “440”, and click on OK.
Now, every one of your WordPress files and folders should have the correct permissions. Once you’ve completed the above steps, go back to your site and try to reproduce the 403 Forbidden error. If your site is working fine, you don’t need to do anything else.
However, don’t worry if you’re still facing the same problem. There are still a few more fixes to try, and some of them are very simple.
2. Deactivate Your Plugins
As we mentioned earlier, the 403 Forbidden error can also be caused by a faulty plugin. To find out if this is the case, you’ll need to deactivate your plugins and then reactivate them one by one.
To start, connect to your site via FileZilla or the file manager in your hosting account. Then, in your site’s root directory, open the wp-content folder and locate the plugins folder. Then right-click on the plugins folder and select Rename.
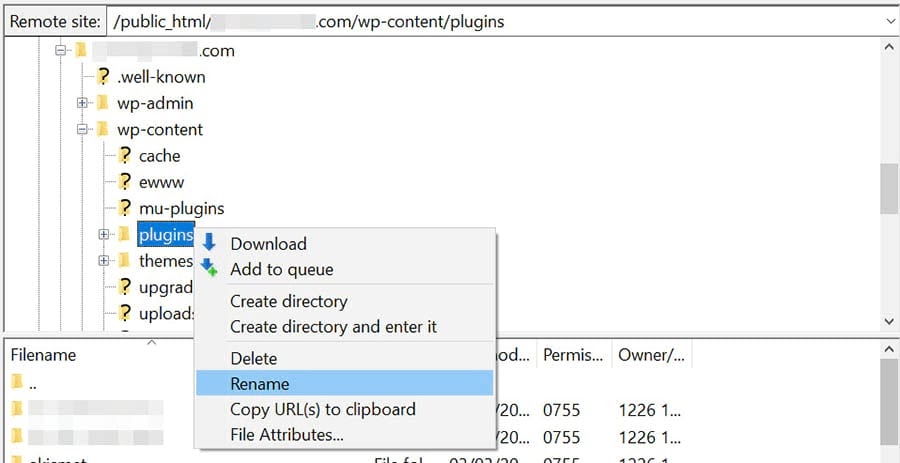
Next, give the folder a new name, for example, “plugins_test”. This will automatically deactivate all of your plugins.
If you can access your site after renaming the folder, then the 403 Forbidden error was caused by a glitchy plugin. Your next step is to find out which one it is.
First, return to your site’s root directory and rename the plugins folder back to “plugins”. Then navigate to the Plugins page in your WordPress dashboard and activate the plugins one at a time. Keep doing this until you are able to reproduce the error. Once you’ve identified the faulty plugin, you can either remove it or contact its developer for support.
3. Delete and Restore the .htaccess File
A corrupt .htaccess file can also trigger the 403 Forbidden error. This file is located in your site’s root directory and enables WordPress to interact with your server.
Inside your site’s root directory, locate the .htaccess file, right-click on it, and choose Delete.
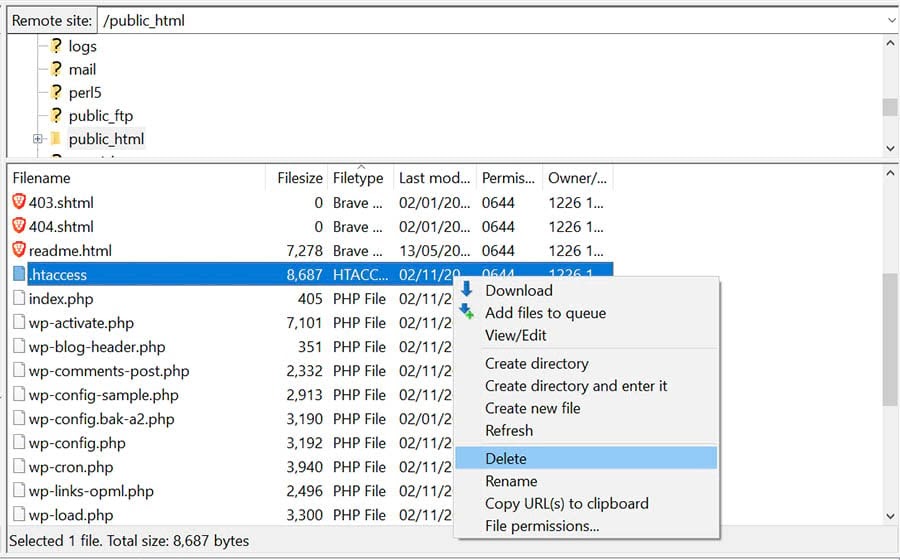
Now, try accessing your site again. If the 403 Forbidden error has disappeared, then your .htaccess file may have been corrupted. This means you’ll need to create a new one.
To do this, navigate to Settings in your WordPress dashboard and select Permalinks. Then click on the Save Changes button at the bottom of the page, and a new .htaccess file will be generated. You can look for the file in your site’s directory to ensure that it has been restored.
4. Deactivate Your CDN
If you’re still getting the 403 Forbidden error after completing the above steps, you may have a problem with your Content Delivery Network (CDN). This is a network of servers located in different parts of the world, with each server hosting a copy of your website. Many hosting plans come with a CDN to help boost your site’s performance.
To see if your CDN is the cause of the error, you’ll need to temporarily disable it. You can do this by logging into your hosting account and locating your CDN settings. If you’re unable to access your CDN, we recommend getting in touch with your hosting provider.
5. Check Your Hotlink Protection
Finally, you might want to check your site’s hotlink protection. Hotlinking is when someone embeds media files on their site by linking them directly from another site. Some individuals may do this to use another site owner’s bandwidth (rather than their own), which is effectively theft.
Some hosts and CDN providers offer hotlink protection. However, if this is not set up properly, it can trigger a 403 Forbidden error on your site. Therefore, you may want to contact your web host about this issue. While you may want to look into this yourself, it’s best to get help from a technical expert to ensure that your hotlink protection is configured correctly.
Additional WordPress Resources
If you’re new to WordPress, you’re bound to run into some technical issues while setting up your site. To help you fix some of the most common WordPress errors, we’ve put together several how-to guides:
- How to Fix Common WordPress Errors
- How to Troubleshoot the WordPress White Screen of Death
- How to Fix the 500 Internal Server Error in WordPress
- How to Fix Syntax Errors in WordPress
- How to Fix the WordPress Not Sending Email Issue
- How to Fix the Error Establishing a Database Connection in WordPress
- How to Fix WordPress Error 404 Not Found
- How to Fix White Text and Missing Buttons in the WordPress Visual Editor
- How to Fix the Sidebar Below Content Error in WordPress
- What to Do When You’re Locked Out of the WordPress Admin Area
- How to Fix the WordPress Memory Exhausted Error By Increasing Your Site’s PHP Memory Limit
- How to Fix the “Upload: Failed to Write File to Disk” Error in WordPress
Meanwhile, if you’re looking for more WordPress tips and hacks, check out our WordPress Tutorials. This collection of guides will help you set up and design your first WordPress site like a professional.
Bye, WordPress 403 Error
The 403 Forbidden error appears when your server denies you permission to access a page on your site. This is mainly caused by a faulty security plugin, a corrupt .htaccess file, or incorrect file permissions on your server.
In this post, we looked at five main ways you can fix the 403 Forbidden error using an SFTP client like FileZilla or the file manager in your hosting account:
- Change your file permissions.
- Deactivate your plugins.
- Delete and restore the .htaccess file.
- Deactivate your CDN.
- Check your hotlink protection.
If you want to receive expert help when encountering WordPress errors, you may want to consider a managed WordPress hosting plan. Our DreamPress plans come with 24/7 technical support for WordPress site owners, so you can spend less time troubleshooting and focus your efforts on growing your business.
Websites require continuous maintenance and updates to function optimally. Sometimes, changing things or even not changing them properly can result in errors on a website.
In this post, you’ll learn what a 403 forbidden error is and how to fix it quickly.
What Does a 403 Forbidden Error Mean?
Requests that you make to a server can return a variety of status codes. One such status code is the 403. The 403 forbidden error basically means that the server understands your request but is denying access to a certain resource on your website to users.
It is up to servers to provide more information about the reason for forbidding the request.
What Can Cause a 403 Forbidden Error?
There are many things that can cause a 403 error. However, the three most common reasons that can result in a 403 error are:
- a corrupted .htaccess file
- incorrect file permissions
- installed plugins
You should consider reading our post about understanding and configuring the .htaccess file in WordPress if you aren’t already familiar with it. In short, the .htaccess file is used by Apache web servers to determine how they should serve files to visitors. Any errors in the file can therefore stop the website from functioning.
Incorrect file permissions are another reason that can cause a 403 error. Files and directories on computer systems have certain permissions assigned to them. This prevents people from reading, writing, or executing a file they don’t have access to. It is important to keep sensitive files protected, but files and directories that are part of WordPress need permissions assigned to them in such a way that they meet the minimum basic requirements.
Fixing a 403 Forbidden Error
In this section, we will learn how to fix the 403 forbidden error either by restoring our .htaccess file or by setting up proper file permissions.
Fixing a Corrupt .htaccess File
The .htaccess file in your WordPress installation can be modified in three different ways. Sometimes, it is modified by the WordPress core, and other times some plugins make changes to this file. It is also possible that you might have manually made some changes to this file.
In any case, the most beginner-friendly way to get rid of a 403 error due to an .htaccess file is to remove the old version and force WordPress to create a new one.
Make sure that you take a fresh backup of the old .htaccess file before you remove it. Save it locally on your computer or somewhere else. If generating a new .htaccess file doesn’t resolve the error, you could just re-upload the fresh backup and move on to the next step.
You should see an .htaccess file once you have logged in to the root directory of your website on your FTP client. Right-click on it to first download a local copy and then delete the file.
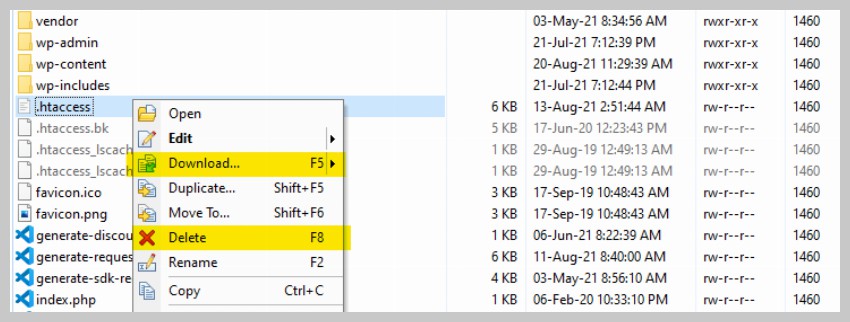


Try visiting your website now. If it opens properly, this means that some rule inside the .htaccess file was causing the error. In this case, you can generate a new .htaccess file by simply going to the WordPress Admin dashboard and then navigating to Settings > Permalinks and clicking on Save Changes.


Setting the Correct File Permissions
Specifying the right value for file permissions allows you to keep your website secure while still being able to provide access to users who need it to keep everything running smoothly. The general rule to keep in mind is to start with restrictive permissions and then relax them until things start working. Luckily, we don’t need to do all these tests to figure out the right permissions for our WordPress website.
Within your WordPress installation, you can set the permissions for all directories to 755 and the permissions for all files to 644. This should take care of any 403 errors arising out of incorrect file permissions. The meaning of permission numbers like 755 is explained in more detail in the official WordPress documentation.
There are free FTP clients like FileZilla or WinSCP that you can use to set these permissions for different files and directories recursively.
You can check the current permissions of a file or directory by right-clicking on its name and then selecting File Permissions from the context menu.


This should open up a dialog box, which will show you the currently applied permissions and ask if you want to apply them recursively to different files and sub-directories.


Disable All Plugins
Creating a new .htaccess file or properly setting up file permissions fixes the 403 forbidden error issue for the majority of users. One more thing that you can try in the unlikely scenario that you are still getting the error is to disable all plugins. A poorly coded plugin or incompatibility between different plugins, among other things, can also result in 403 errors.


Once all the plugins have been disabled, check if the website still returns a 403 error. If the website is loading now, this means that one of the plugins is causing the 403 forbidden error. Now start activating the plugins one by one to see when the error happens again. This will tell you which plugin is causing problems, and you can contact its developers to fix the issue or install an alternative plugin in its place.
Final Thoughts
In this post, we have covered the three most common issues that can result in a 403 forbidden error in WordPress. Hopefully, one of these will fix the issue for you. You should consider contacting your web host if you are still getting the error. They might suggest some other things that you could do. Just make sure that you make backups of anything that you change in case you want to revert to a previous version.
Did you find this post useful?

Freelancer, Instructor
I am a full-stack developer who also loves to write tutorials. After trying out a bunch of things till my second year of college, I decided to work on my web development skills. Starting with just HTML and CSS, I kept moving forward and gained experience in PHP, JavaScript, and Python.
I usually spend my free time either working on some side projects or traveling around.
You must have encountered some common errors while trying to access your WordPress site that shows a forbidden message. You likely came across a 403 forbidden error. In this guide, we will take you through how to fix the 403 error code. We will cover detailed information on how to resolve the issue so without any further delay let’s get started.
What does 403 Forbidden mean?
403 forbidden error or 403 forbidden access to this resource on the server is denied! is one of the HTTP errors that you face while working on WordPress. There are some HTTP status codes defined by Microsoft’s Internet Information Services which are considered standard internet codes.
These codes are used by web servers to communicate with your web browsers (like Chrome, Firefox, Opera, etc.). These codes are defined within the HTTP header. In normal circumstances when the website is working fine, the server sends Status Code as 200.

In case there is something wrong with the requested resource, it returns an error code. There are lots of error codes used by HTTP, for example, a 404 error is returned for a resource not found and a 500 error code signifies an internal server error. Another such HTTP response code is 403 which signifies that the user is prohibited or forbidden to access the requested web resource, which exists on the web server. We have tried to resolve all the common errors like 404 error, 504 gateway timeout error, 502 bad gateway error, etc faced while working on WordPress.
These types of errors are classified into two categories, they are either “client-side” errors or they are “server-side” errors.
Example of Client-Side Errors:
- 400 Bad Request
- 401 Unauthorized
- 403 Forbidden
- 404 Not Found, and
- 408 Request Timeout Error
Example of Server Side Errors:
- 500 Internal Server Error
- 502 Bad Gateway
- 503 Service Unavailable and
- 504 Gateway Timeout
To make the identification of these HTML errors easier 4xx are client-side errors, while 5xx are server-side errors.
In this article, we will learn about the reasons for 403 errors, and possible ways to troubleshoot them for your visitors to easily access your website or web application without any errors.
Different browsers show different messages for the 403 error :
- Forbidden: You don’t have permission to access / on this server.
- HTTP Error 403 – Forbidden
- 403 forbidden requests forbidden by administrative rules
- 403 Forbidden
- Access Denied You don’t have permission to access
- 403 – Forbidden: Access is denied
- Error 403 – Forbidden
- 403 forbidden nginx– You are not allowed to access this address 403 Forbidden – Nginx HTTP Error 403 – Forbidden – You do not have permission to access the document or program you requested
- 403 Forbidden – Access to this resource on the server is denied
- 403. That’s an error. Your client does not have permission to get URL / from this server
- You are not authorized to view this page
What are the Causes of 403 Forbidden Error?
- Incorrect File Permissions
- No Index file or Empty Folder
1. Incorrect File Permissions:
The most common reason behind this error is files and folder permissions on the webserver. This can be easily fixed by going into your File Manager under cPanel and checking the permission settings. We will discuss the issue in detail in the subsequent sections.
The ideal folder permissions on a web server should look like this:
- Permission Status for Folders: 755
- Static Content: 644
- Dynamic Content: 700
Understanding File Permissions
- 7 : Stands for full access (Read, Write, Execute)
- 6 : for the Only Read and Write Access
- 5 : Stands for Reading and Execute
- 4 : Only Read Access
- 0 : Stands for No Access Rights
The 3 digits in the permission codes specify Owner | Group | Public in that order
So, if a folder permission codes look like 7|5|4 it means the owner has full access (7), while Group can Read and Execute (5) while Public/Everyone else can only Read (4) the resource.
These codes can be changed under File Manager if you are using a Cpanel. File permissions can also be changed using an FTP tool like Filezilla.
What does the Read/Write/Execute means?
- Read – view the files and subfolders within the folder.
- Write – add, edit or delete the files and subfolders inside the folder
- Execute – process/execute the resources using a script or commands to change their value.
Setting File Permission using FTP Tool like Filezilla


Setting File Permission using File Manager in Cpanel


Folder permissions can also be changed using SSH under chmod commands.
2. No Index file or Empty Folder:
One of the other reasons for this error is the empty Http directory, or in other words, no website or web application files are uploaded to the server directory.
The default landing page for a website or web application is index.html or index.php. The server will return a 403 error status if none of the 2 exists on the server. Or you have defined some other file in Nginx config or .htaccess as the home page, and that file is not uploaded in the directory.
These are some of the common reasons behind the 403 Forbidden errors.
The other specific reasons and level of resource access forbidding can be determined by identifying the sub-status code, which is as follows (though they are not standard codes):
- 403.1 – Execute access forbidden.
- 403.2 – Read access is forbidden.
- 403.3 – Write access forbidden.
- 403.4 – SSL required
- 403.5 – SSL 128 required.
- 403.6 – IP address rejected.
- 403.7 – Client certificate required.
- 403.8 – Site access denied.
- 403.9 – Too many users.
- 403.10 – Invalid configuration.
- 403.11 – Password change.
- 403.12 – Mapper denied access.
- 403.13 – Client certificate revoked.
- 403.14 – Directory listing denied.
- 403.15 – Client Access Licenses exceeded.
- 403.16 – Client certificate is untrusted or invalid.
- 403.17 – Client certificate has expired or is not yet valid.
- 403.18 – Cannot execute request from that application pool.
- 403.19 – Cannot execute CGIs for the client in this application pool.
- 403.20 – Passport logon failed.
- 403.21 – Source access denied.
- 403.22 – Infinite depth is denied.
- 403.502 – Too many requests from the same client IP; Dynamic IP Restriction limit reached.
- 403.503 – Rejected due to IP address restriction
Based on one of the identified above sub-status error codes you can easily troubleshoot the error.
On WordPress, there can be additional events that can cause a temporary 403 Forbidden error in cases like:
- Access denied to WordPress Dashboard. In that case, you have to check the settings for the wp-admin directory.
- Access may be denied during WordPress installation
- Access may be denied during theme or plugin updates
How to Fix 403 Forbidden Error on Your WordPress Website?
Irrespective of the platform, most of the troubleshooting methods apply to all the websites. You can use these methods to resolve the “403 forbidden access to this resource on the server is denied!” Error –
First things first, before making any changes we recommend you take a backup of your files and database. In case you are using WordPress and can access the WordPress Dashboard you can take the help of a backup plugin. We recommend using a backup plugin that creates automatic backups at regular intervals.
Check Missing Core Files and Theme Files:
Please check that all WordPress Core Files are in place, you can upload the core files manually using a File Transfer tool.
Also, check that all these files are properly uploaded. Specially check the index.php files at root, inside wp-admin, theme folder, and individual plugin folders.

Check .htaccess file configuration:
.htaccess is a hidden file in the public_html directory of your Apache-based web server. The function of the .htaccess file is to define the web response to various queries, especially to set up the redirects, restrict access to various bots, etc. In some cases, there are differences .htaccess files for the root directory and subdirectories in WordPress like wp-admin and wp-includes.
To access this hidden file you can go to File Manager, and select the hidden checkbox in the options provided in the pop up as shown in the image below:

If a pop-up doesn’t appear you can go to Settings under File Manager at Top Right as shown below:

Once you have selected to show the hidden files you will be able to see the .htaccess file

You can download it to your local machine and edit using an editor, a Notepad, Dreamweaver, or any other similar editing tool.
You can also right-click on it and Edit it as shown below:

This will open up an editable file like this:

If a .htaccess file is not yet created on your system, you can create it as well. To create it go into your public_html folder, or the website-specific default folder if you have hosted multiple websites on your Cpanel, and click on Add New File:


So, if your WordPress website is facing a 403 forbidden error issue, and a .htaccess file exists, delete it and try to access the website or the specific page with the issue. If it works fine it means that your .htaccess file was not configured correctly. If you don’t want to delete the .htaccess file, you can just remove all the code and save the empty file instead.
You can regenerate the fresh .htaccess file now from your WordPress Dashboard. You will have to go to Permalinks under Settings, as shown below:

And Click on the Save Changes button. Please note, you don’t have to change the settings here unless you want to change the permalink settings or URL structure.
Directory Browsing and 403 Error:
Directory browsing simply means in absence of a default home page file (index.php or index.html) the server will display the directory content to the visitor. A visitor will be able to see files and subfolders of the main folder and certainly, you don’t want to display it, as shown below:

Most of the servers by default disallow directory browsing to hide the content of the folder. In such cases, if the default root file (index.html or index.php) is missing the server will return a 403 Forbidden error.
How to Disable Directory Browsing using the .htaccess file?
Open the editable .htaccess file, as described in the previous section. (Note: remember to back up the existing .htaccess file)
By default, the WordPress .htaccess file looks like this:
#BEGIN WordPress
RewriteEngine On
RewriteBase /
RewriteRule ^index.php$ - [L]
RewriteCond %{REQUEST_FILENAME} ! - f
RewriteCond %{REQUEST_FILENAME} ! - d
RewriteRule . /index.php [L]
#END WordPress
Just add this line of the code after the last line:
Options -Indexes
Update or Upload the edited .htaccess file, and refresh the page to see if the problem is resolved.
Check file and folder permissions:
The default file permission settings are applied to the core file and folders when WordPress is installed or a new file or folder is created in your Cpanel.
You can go to each folder and change the permission settings. You can do it for specific files as well. Some hosting providers also provide tools to reset the permission settings.
You can also edit permission settings using the FTP tool (Filezilla for example). It will give you additional options as follows:

- Permission settings to be only applied to selected directories or files
- It is to be applied in all subdirectories and files within the selected directory
- Also, it is to be applied only in all subdirectories within the selected directory
- Permissions settings are to be applied only in all files within the selected directory
Following are the default permission settings for WordPress Files:
- First of all change permission settings to 755 or 750 for all the directories
- Change permissions settings to 644 or 640 for all the files (select the “Apply to files only” option)
Note: There is an exception to the above rule for the wp-config.php file. The Wp Config file is used to connect WP files to the Database. It includes the necessary database name, DB username, and password. The file permission for wp-config should either be 440 or 400.
Changing the permission settings accordingly should resolve the 403 forbidden error issues.
Caution: Perform this step when you are sure about what you are doing. It is an expert job. Playing around with file permissions can lead to compromising your website or server’s security. Incorrectly configured file permissions can leave a gate open for hackers or malware.
Check Plugins:
If the issue is still not resolved you need to check if there is a plugin that is causing the issue.
To do this first deactivate and uninstall any of the recently installed plugins. If it resolves the issue you can identify the incompatible plugin.
If still, the problem persists, deactivate the other plugins one by one and check the website. You will be able to identify the problematic plugin, and you can replace it with another plugin that provides similar functionality.
- Deactivate all the plugins from your WordPress Dashboard
- Check the website if it works now.
- If it works Re-activate the plugins one by one to identify the problematic ones.
- Repeat steps two and three until the 403 error is shown.
- Congratulations, you have identified the plugin that is causing the problem.
- You may need to delete it entirely and replace it with another plugin with similar functionality.
One of the other lesser recommended methods of deactivating plugins is changing the name of the Plugins folder to something else. You can also change the name of individual plugin folders one by one If you follow this process of changing folder names, you will see several errors in your WordPress dashboard stating that “Plugin file doesn’t exist”. Don’t panic seeing this error message as it will be fine once the folder name is changed back to what it was originally. You will have to activate them again from WP Dashboard after changing them back to their original name.
Note: Most of the time the issue is found with either one of the caching plugins or the security plugins. So keep an eye on these plugins.
“403 forbidden access to this resource on the server is denied!” Error in WordPress Multisite
If you have WordPress Multisite installation and getting a 403 error the chances are you have created a wildcard subdomain.
Just change it to remove the wildcard setting for a subdomain, and it should resolve the issue.
You also need to check the subdomain redirects.

How to Fix 403 Forbidden Error on Google Chrome?

Sometimes your Chrome browser can also be the culprit to trigger 403 forbidden errors. So, you resolve this issue from the Chrome browser, there are certain methods you need to follow:
Some Quick and easy Solutions you must try at first:
- Refresh or Reload: Sometimes, the 403 forbidden error can trigger due to temporary glitches that can be eliminated by simply refreshing or reloading the webpage on Google Chrome. Just click on the refresh button on the Chrome browser and you are done.
- Try accessing the page after some time: sometimes, the server issue or the glitch can extend and might take a longer time than usual to resolve. If accessing the website is not on your priority list, you can wait for a few hours or even a day and try accessing it again. However, if you can’t wait and accessing the website is the utmost priority you can move on to other methods mentioned below:
- Incorrect Typed URL: It truly said, ” hurry-hurry spoils the curry”. Generally, users in a hurry type incorrect or misspelled URLs in the browser address bar, and the outcome result in these type of errors. So you must review your typed URL before pressing the enter key, and make sure the URL is 100% correct.
- Check on multiple devices or connections: You must also try to access the same website on multiple devices using the same network. If the error persists, move on to another internet connection and check if the error is due to the device or the internet connection.
- Reset to default settings: If none of the above methods work, try to reset everything from the browser to your wifi router to their default settings.
Clear Chrome Browser Cache and Cookies
If you are still seeing a 403 Forbidden error try deleting the specific cookies of your web browser. This is how website-specific cookies are deleted in Google Chrome:
- Open Chrome.
- Click on More Settings
- Next, click on Advanced.
- In this menu, find ‘Content settings’ Under “Privacy and Security”
- Click on ‘Cookies’.
- Under “All cookies and site data,” search for the website’s name.
- To the right of the site, click Remove
To clear all the cookies you can just go to Google Chrome History, and delete the Cache completely. A similar process can be followed in other leading web browsers.
Go to History, and click on Clear Browsing Data as shown below:


You can select the time range, select the option of Cookies and other site data, select Cached Images and files, and then click on the “Clear data” button.
Deactivate Chrome Browser Extensions
All the browsers have some extensions installed on them by the user. While troubleshooting the 403 Forbidden error it is recommended to deactivate browser extensions.
Check Firewall Settings
There is a possibility that due to one of your Firewall settings, the server is not displaying the requested page. You can momentarily disable the firewall while troubleshooting the 403 Forbidden error issue.
Effects of 403 Forbidden Error on Search Engine Rankings
If your website has started showing a 403 error page which is already ranked, then it is for sure that it will end up losing search engine rankings on prominent websites like Google, Bing, etc. As per the algorithm of search engines, they first downgrade the rankings and then eventually remove the pages from their index which are no more accessible to users or bots.
To avoid such a situation it is recommended that you keep a close watch on your website’s analytics, search console, and webmaster data, and see if there are no such errors.
You can simply log in to Google Search Console (previously known as Google Webmasters), Select your website, and click on Coverage under Index, as shown below:

It will display the number of errors as well as the type of errors faced by your visitors.
You can just keep an eye on it to keep your website Indexing healthy and avoid getting lower ranks on search engines.
In case if you have recently changed the URL of a page make sure to use a redirection plugin, and redirect the old URL to the new one. Also, update the XML sitemap in the search console.

We also recommend following the above-described troubleshooting methods under the guidance of a WordPress expert if you are a beginner.
Conclusion
Understanding it, in a nutshell, a 403 forbidden error means the resource or requested file exists on the server but is not accessible to the visitor due to one of the above-specified reasons.
Following the above-described method will most probably solve the issue quickly if you are still not able to troubleshoot using any of the above methods we suggest you contact the tech support of your hosting provider immediately and see what the problem is.
During maintenance or other phases, the server technical team possibly makes configuration changes accidentally. Also, there is a possibility that your IP has been blocked by the server. Ask the technical team to check and unblock your IP Address.
Hope you are enjoying our article. if you find anything missed or would like to add some value to it, please do let us know in the comment section below.
Poor web server performance and lack of proper maintenance can increase the risk of server errors such as 403 Forbidden Error. Host or migrate your website to a more reliable, sturdy, fastest, and reputed server instead. WPOven provides Linode’s powerful private servers with industry-leading features such as:
- Fastest Private Servers
- Fully WordPress optimized Servers
- Upto 100% server uptime guarantee
- Server stack
- FREE SSL Certificate
- FREE Daily malware Scanning & Offsite Backups
- Hardened Servers with high-end security
- 24X7 WordPress Expert support
- Datacentres around the world, etc.
You can have all these features and much more in a single plan with unlimited Free migrations, unlimited staging, and a 14-day risk-free guarantee. Check out our plans or Contact our support team that assists you to choose the right plan.
How do I fix 403 Forbidden error?
Here are some things you can try.
1. Refresh the Page.
2. Double Check the Address.
3. Clear Your Browser Cookies and Cache.
4. Check if You Have Permission to Access the URL.
5. Try Again Later.
6. Contact the Website.
7. Contact your ISP.
What causes a 403 Forbidden error?
The simple reason why we are seeing this error is that you are trying to access something you don’t have permission for. Throwing a 403 forbidden error is your website’s way of stating that you don’t have enough permissions to proceed further. This error is basically due to Incorrect file or folder permissions.
What does 403 Forbidden mean?
401 Unauthorized: If the request already included Authorization credentials, then the 401 response indicates that authorization has been refused for those credentials. 403 Forbidden: The server understood the request, but is refusing to fulfill it.