
XAMPP is a useful platform for WordPress developers who are looking for a localhost solution. However, some issues can show up when you’re using this tool. These errors could stall your workflow and leave you unsure how to get XAMPP running again, especially because everything may appear to be in order on the surface.
Fortunately, once you identify the reason XAMPP is not starting for you, it often takes just a few tweaks to fix it. You can then get right back to work on your latest development project.
In this article, we’ll provide a brief overview of what XAMPP is for those who are new to the platform. Then we’ll show you how to check your error logs and resolve three common problems that may keep your local server from starting. Let’s dive in!
A Brief Introduction to XAMPP
XAMPP is a free local development tool. It essentially functions as a server on your computer that you can use to host websites — much like DevKinsta, our own free local development app.
Note that these sites are not publicly available to users on the open Internet. Rather, they’re meant to be used locally for development and testing purposes. If you wish, you can migrate each project to a live server once it’s finished.
XAMPP is a handy solution because it prevents visitors from finding your project while it’s still in progress. Plus, since the site is hosted on your computer, its performance should top-notch and you can work offline.
You can use XAMPP on any major Operating System (OS), including Windows, macOS, and Ubuntu Linux. It uses the open source Apache server and MySQL, and comes with several built-in tools such as phpMyAdmin and FileZilla.
When it comes to WordPress in particular, XAMPP is one of the top localhost solutions because it meets all of the Content Management System’s (CMS’s) requirements. These include:
- PHP 7.4
- MySQL 5.6
- HTTPS support
- Apache or NGINX server
If you’re interested in installing XAMPP, you can check out our tutorial on installing WordPress locally, which includes directions for this task.
How to Check Your XAMPP PHP Error Log
In the event that you’re developing a WordPress site locally using XAMPP, and you can’t get the platform to start up, your first step should be to check your error logs. This may point you in the direction of the problem’s cause.
If you know why the issue is occurring, you should be able to resolve it much faster than troubleshooting it by trial and error. Logs are accessed using different paths, depending on your OS and version. Fortunately, there’s a simple way to find the path for your setup.
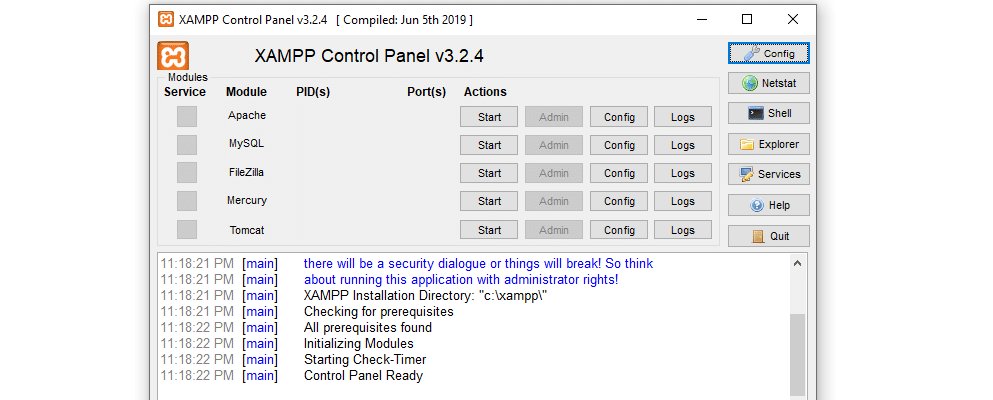
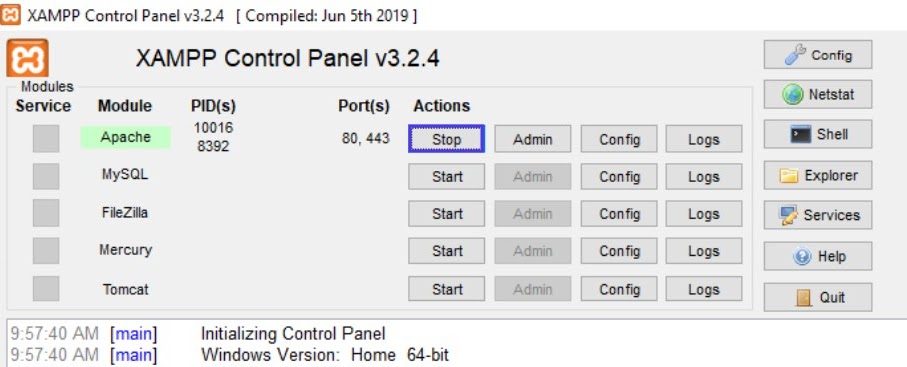
On Windows, the XAMPP activity log appears in the lower half of the control panel dialog box. You can also access the error log by by clicking on the Logs button next to the Apache Config button:
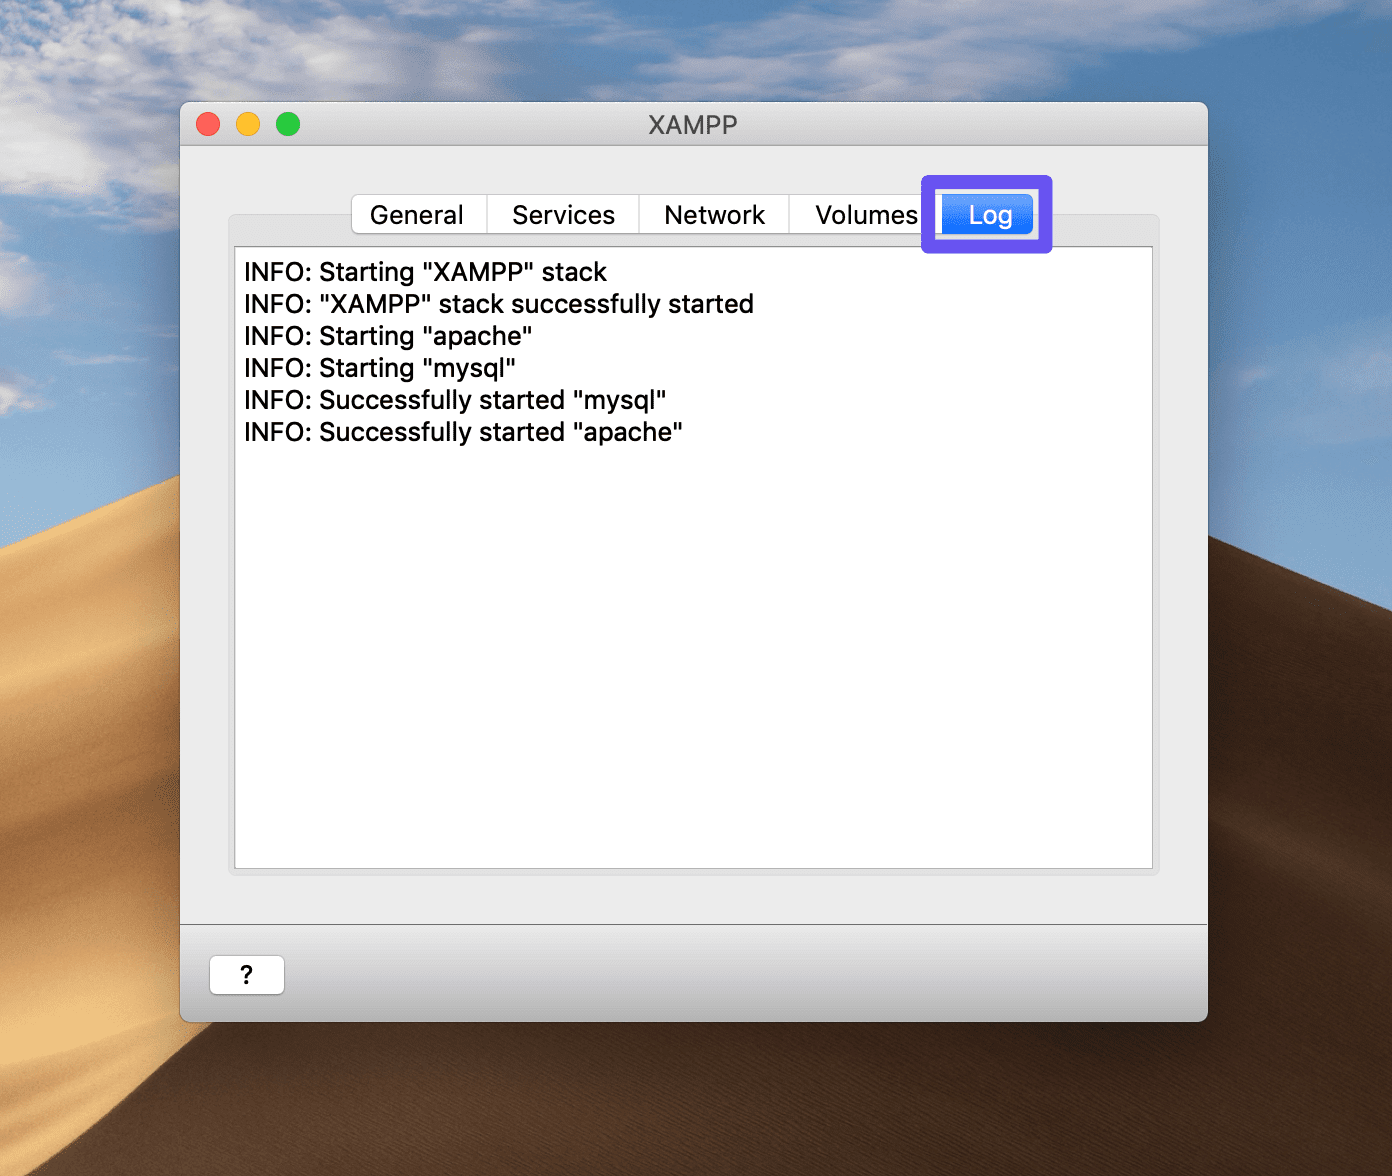
On macOS, click on the Log tab in the control panel to see the activity log:
You can then take a look through your logs to see if there’s anything suspicious and follow any directives provided to resolve the issue(s).
In some cases it may be beneficial to have access to your PHP log as well, although this is usually more helpful for troubleshooting WordPress errors than those for Apache or MySQL.
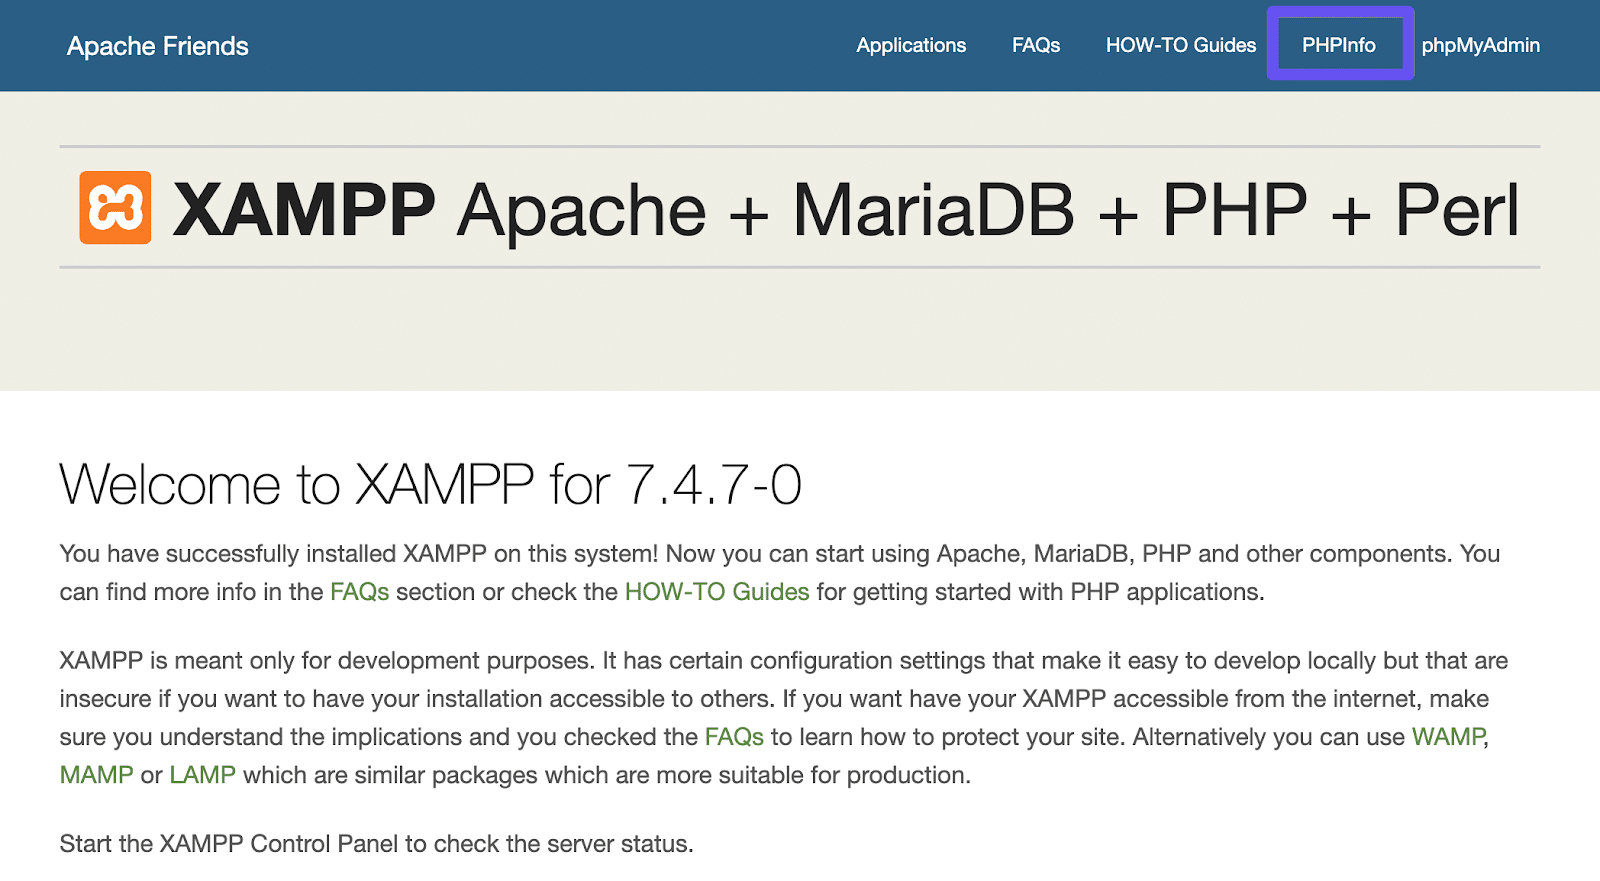
To locate your PHP error logs, open the XAMPP dashboard by typing http://localhost into your browser’s address bar. There, click PHPInfo at the top of the screen:
Then search for “error_log”. This will reveal the path you need to enter in your address bar to view the log:
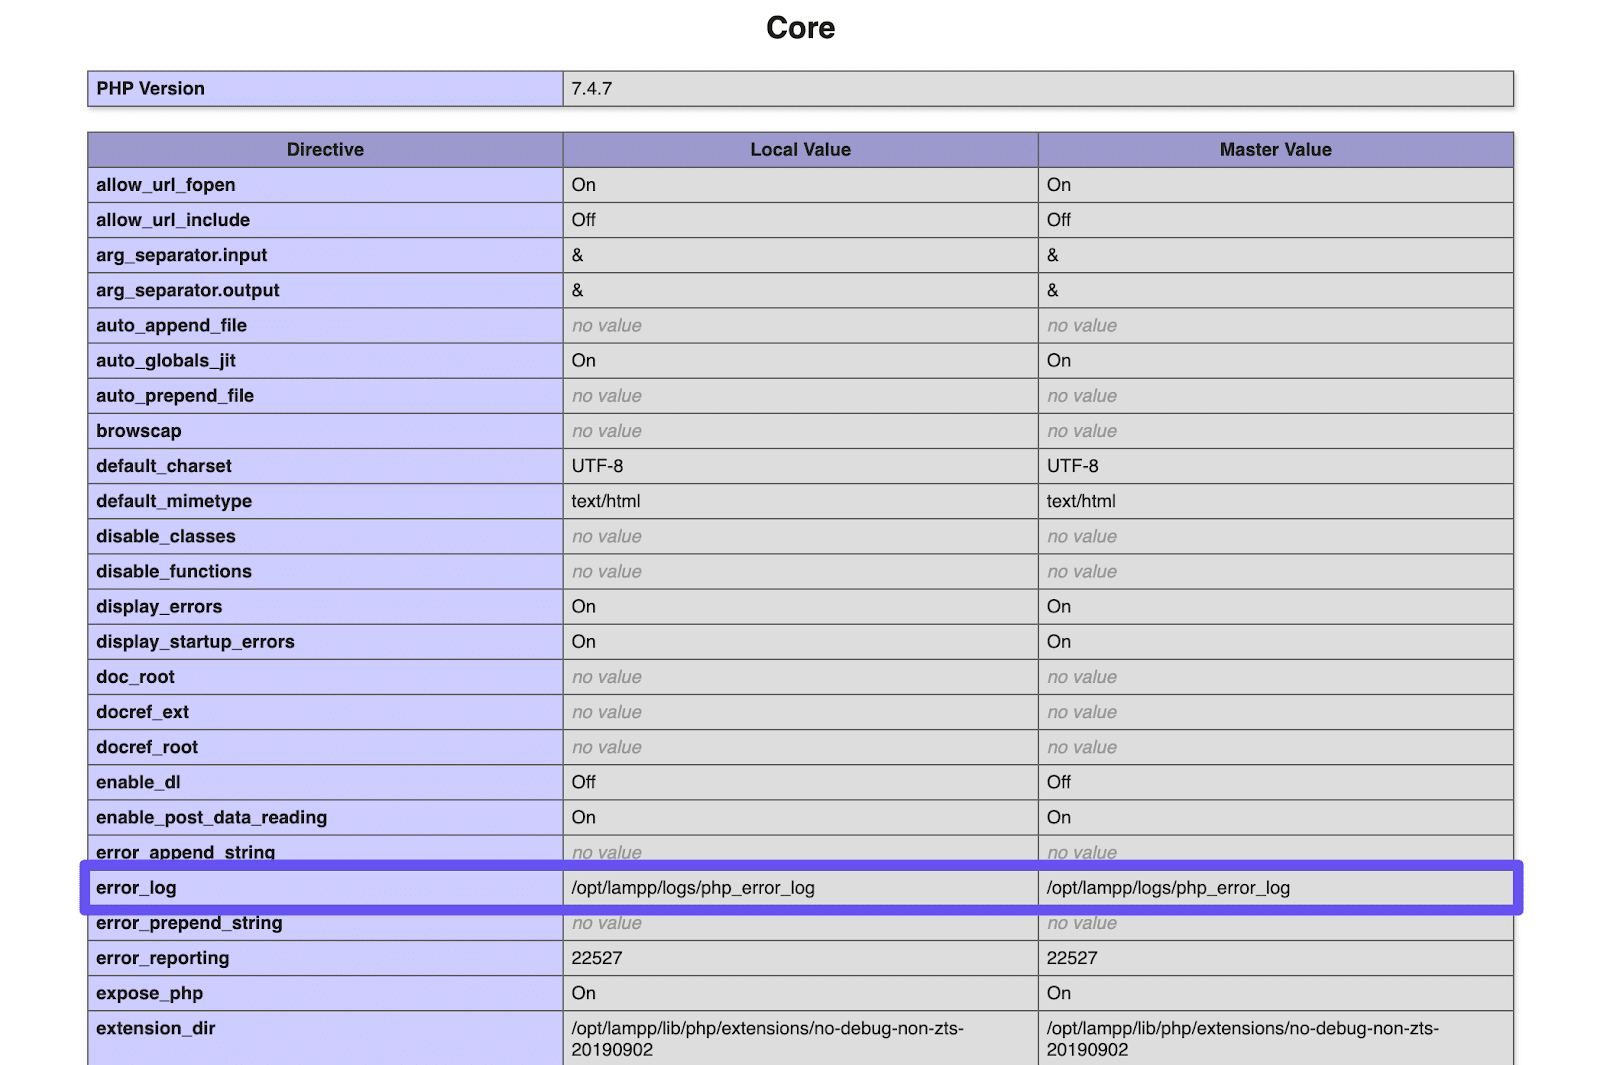
You should be able to simply type this path into your browser after http://localhost to view the PHP log.
Accessing Your XAMPP-VM for Mac PHP Logs
There are actually two versions of XAMPP for Mac users – “XAMPP for macOS” and “XAMPP-VM“. The latter enables you to run XAMPP for Linux on your Mac, using a virtual machine.
It’s important to know which version you’re using because it determines how you access key files we’ll be referencing throughout this post. For instance, if you’re using XAMPP for OS X, you can simply open Finder, go to Applications > XAMPP, and look for the logs folder to find your PHP log.
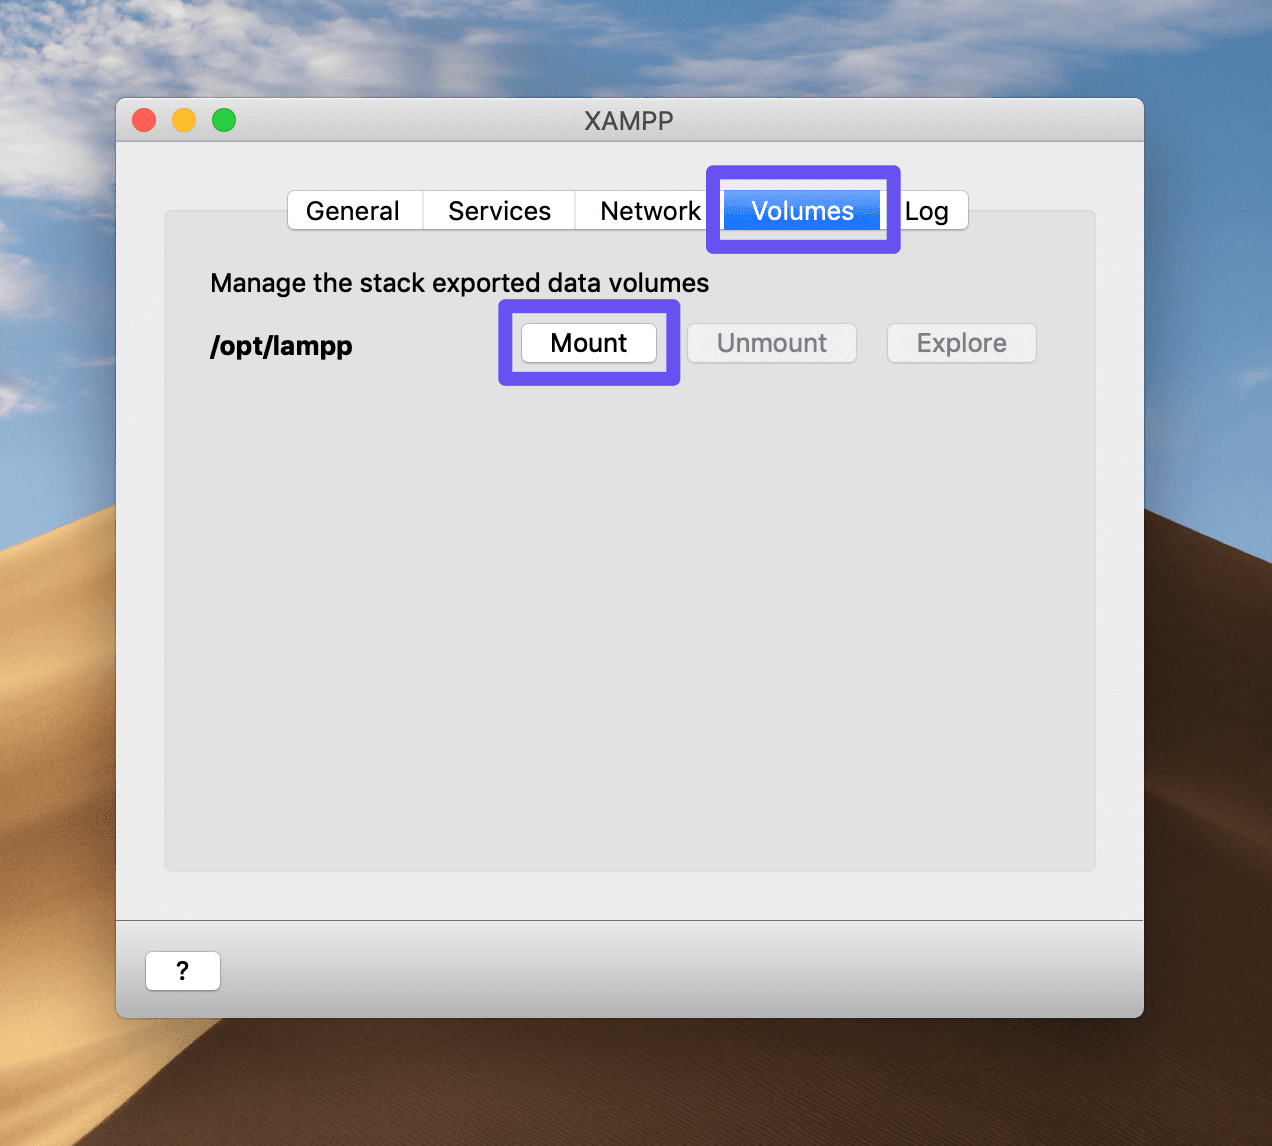
However, if you’re using XAMPP-VM, you first need to open the XAMPP control panel, click on the Volumes tab, and select Mount:
Then, when you launch Finder, click on your IP address in the left-hand menu and open the lampp folder. This is where you’ll find all your XAMPP files, including your PHP error logs.
How to Fix XAMPP If It’s Not Working (3 Common Solutions)
If your error logs are not forthcoming about the cause of the problem, you can try these solutions to get XAMPP working again. These tips also elaborate on some of the instructions your error log may be showing.
1. Resolve Apache Port Conflicts
If Apache cannot start, you won’t be able to access your XAMPP dashboard or any sites you have installed on the platform. A port conflict may be the underlying problem.
By default, Apache connects over port 80. If you see an error message that says this port is already in use, another application is blocking the connection (Skype is a frequent offender).
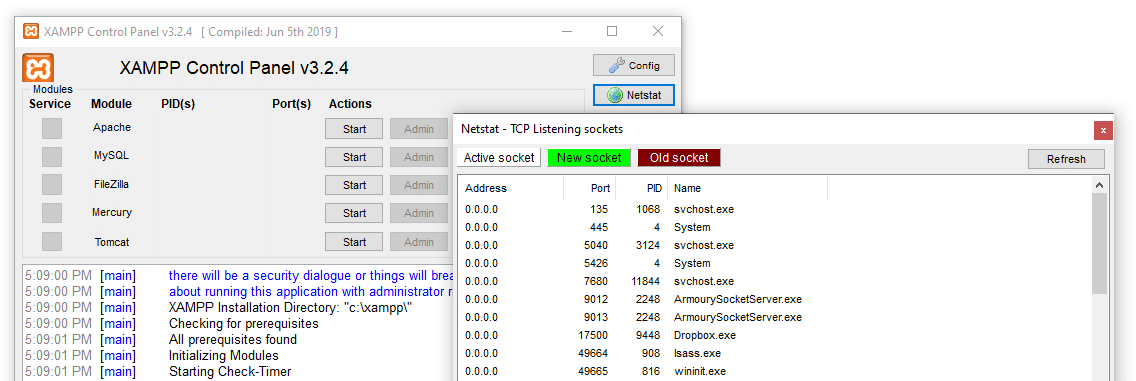
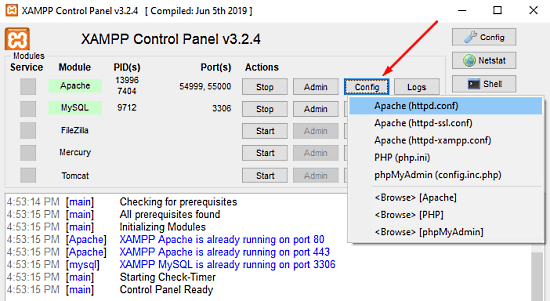
If you click on the Netstat button in the XAMPP control panel, it should show you all the ports that are currently in use, and which applications are using them. You may want to check this if XAMPP Apache is not starting:
If you know which program is the problem and can unblock the port by removing the application that’s in the way, this will solve the issue immediately. However, you can also change the Apache listening port for XAMPP, so that you connect while leaving your other platforms intact.
First, you’ll need to find your httpd.conf file. This process is slightly different depending on your OS and which version of XAMPP you’re using.
Changing Your XAMPP Apache Port on Windows
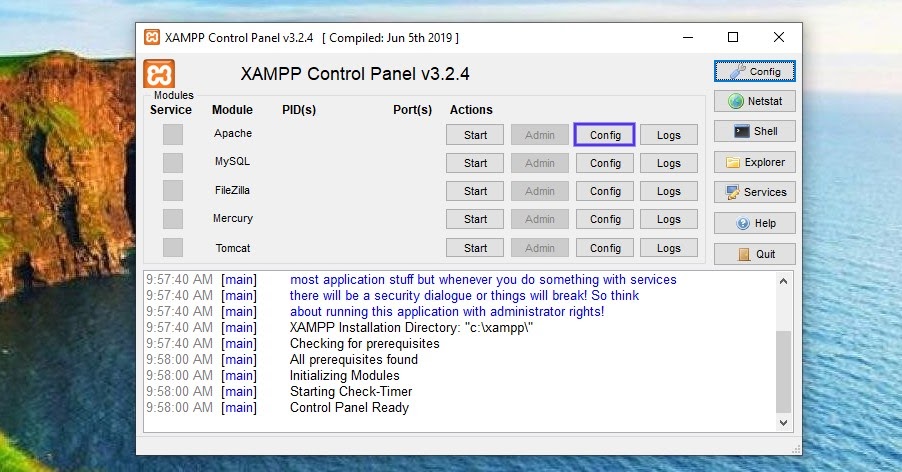
On Windows, open the XAMPP control panel and click on the Config button:
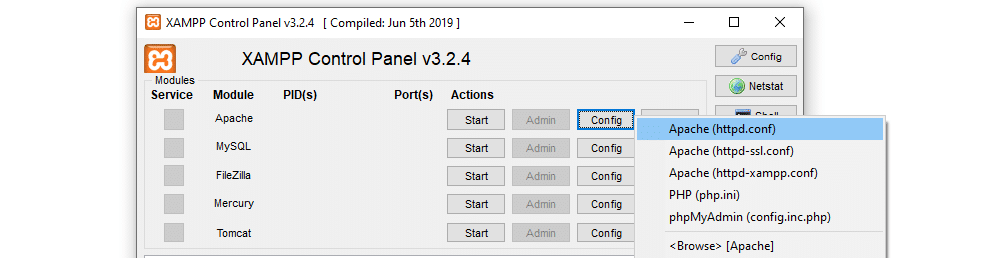
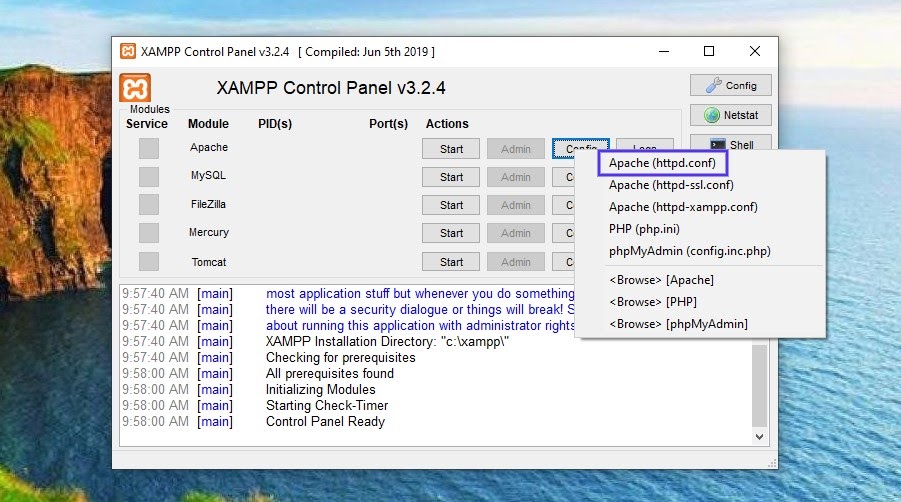
Then select httpd.conf. Search in this file for the line that reads “Listen 80”, and change it to “Listen 8080”. This will enable you to connect to Apache over port 8080 instead of the default option.
You’ll also need to look for the line that reads ServerName localhost:80, and change this to ServerName localhost:8080. Save and close the file.
Then try starting Apache again. If this was your only problem, the platform should run as intended. However, note that if you have a WordPress installation hosted via XAMPP, you’ll need to find and replace all mentions of “localhost” with “localhost:8080”, including those in your database.
Changing Your XAMPP Apache Port on Mac
If you’re running XAMPP for macOS, you can find your httpd.conf file by going to Applications > XAMPP in Finder. Once you find the file, you can carry out the same steps to change your port as we described for Windows users.
For those using XAMPP-VM, scroll back up to the section where we explained how to access your error logs to learn how to find your XAMPP files. Once you access the lampp directory, you’ll find httpd.conf in apache2 > conf.
2. Include the Listening Port in the Address When Accessing Localhost
Normally, you can simply type http://localhost into your browser’s address bar to access your XAMPP-hosted sites or dashboard. The platform automatically connects to Apache over its default listening port, 80.
However, if you’ve changed your XAMPP installation’s listening port (or someone else with access to your computer did so), it won’t be able to connect. You may also see this occur if there’s an Apache port conflict, as described above.
This problem can be quite confusing because the XAMPP control panel may show that Apache and MySQL are both running. However, you won’t be able to access your site or tools such as PHPInfo or phpMyAdmin.
This error can take a few different forms. If you’re trying to access your local WordPress site, you may see a 404 error page. Chrome users may see ERR_CONNECTION_REFUSED instead:
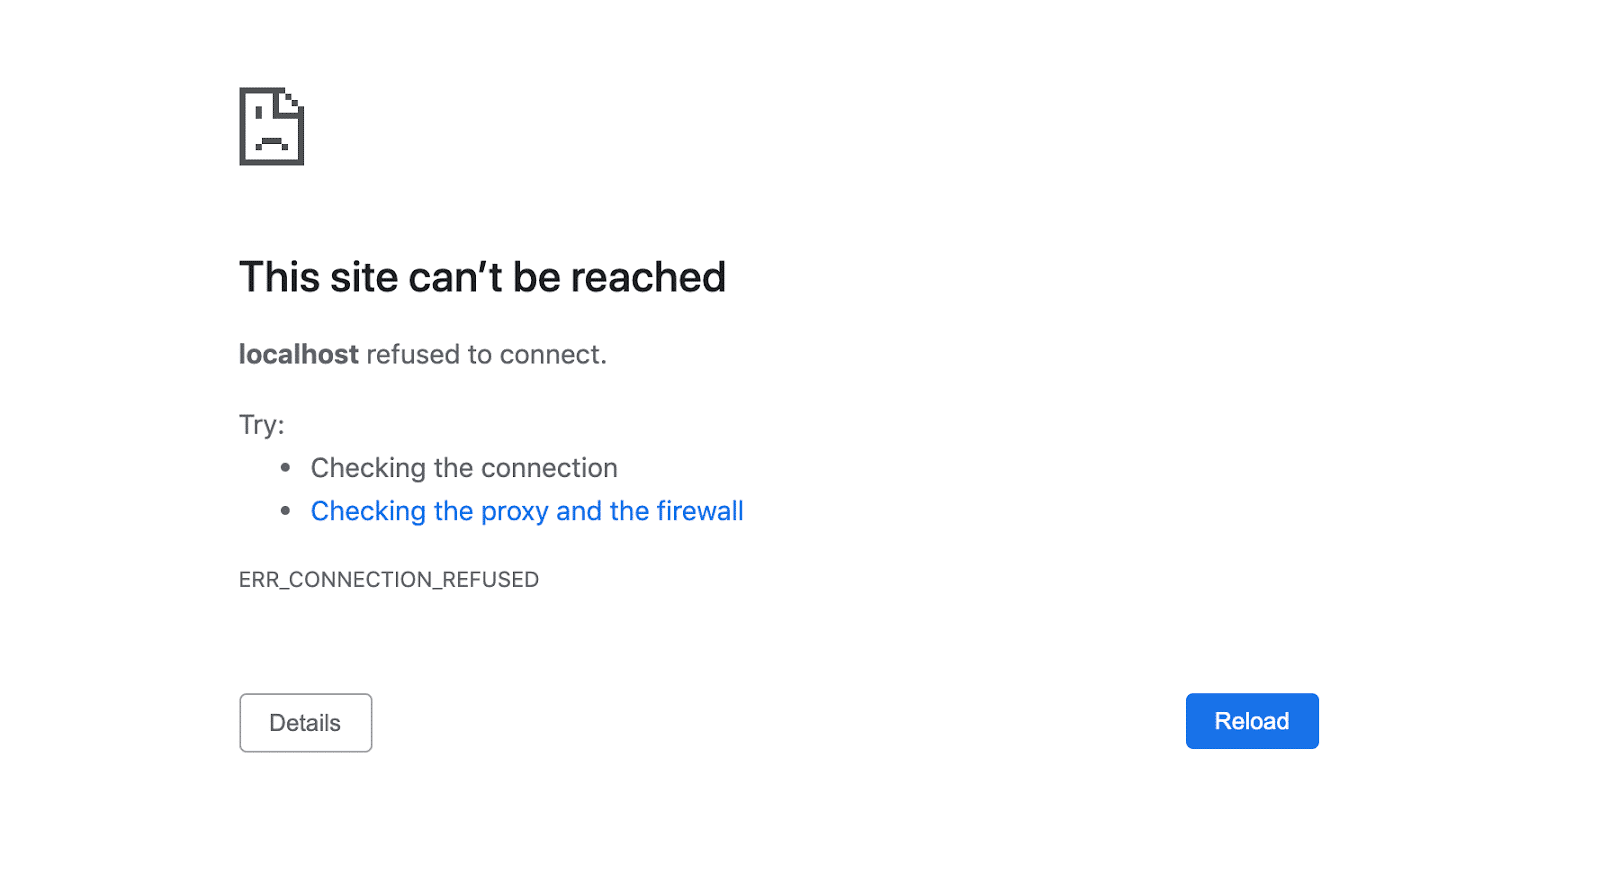
Fortunately, the solution is fairly simple. You simply need to append the listening port to the address. For example, if you’re using the most common alternative port, you would enter http://localhost:8080 instead of just http://localhost.
However, if you would like to be able to simply enter localhost even though you have changed your Apache listening port, you can do so.
Changing the Default Port on Windows
Windows users change the XAMPP Apache default port to their new listening port so that you don’t have to specify it in the address bar. To do so, click on Config > Service and Port Settings > Apache in the XAMPP control panel:
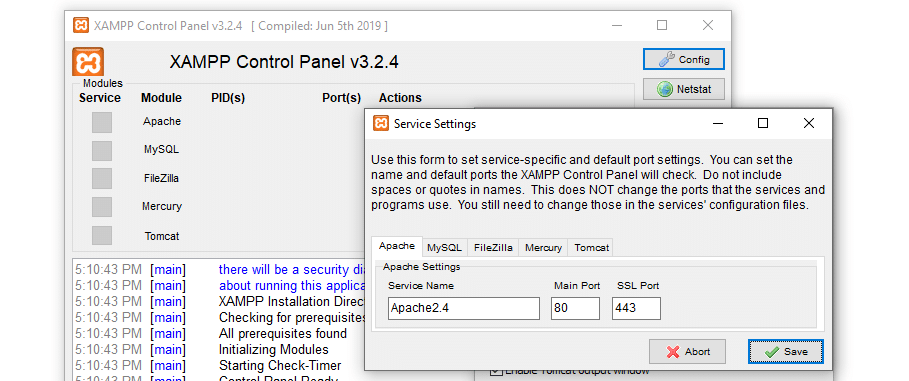
Then replace the Main Port value with the new Apache port you configured and save your changes.
Set Up Port Forwarding on macOS
On macOS the process is quite different. In your control panel, click on the Network tab. Here you can set up port forwarding rules:
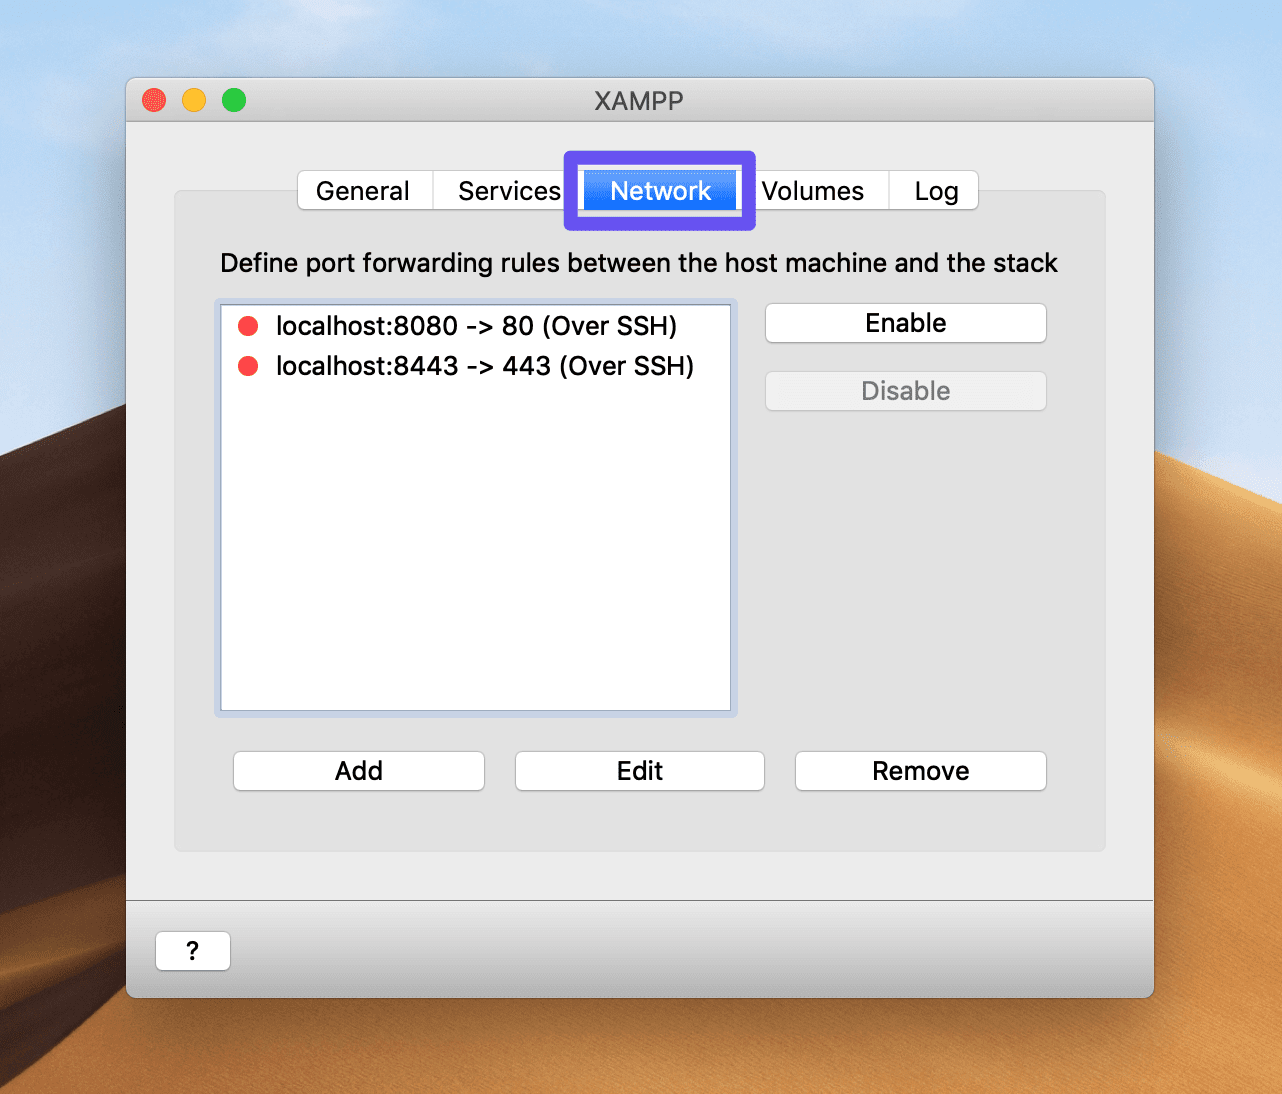
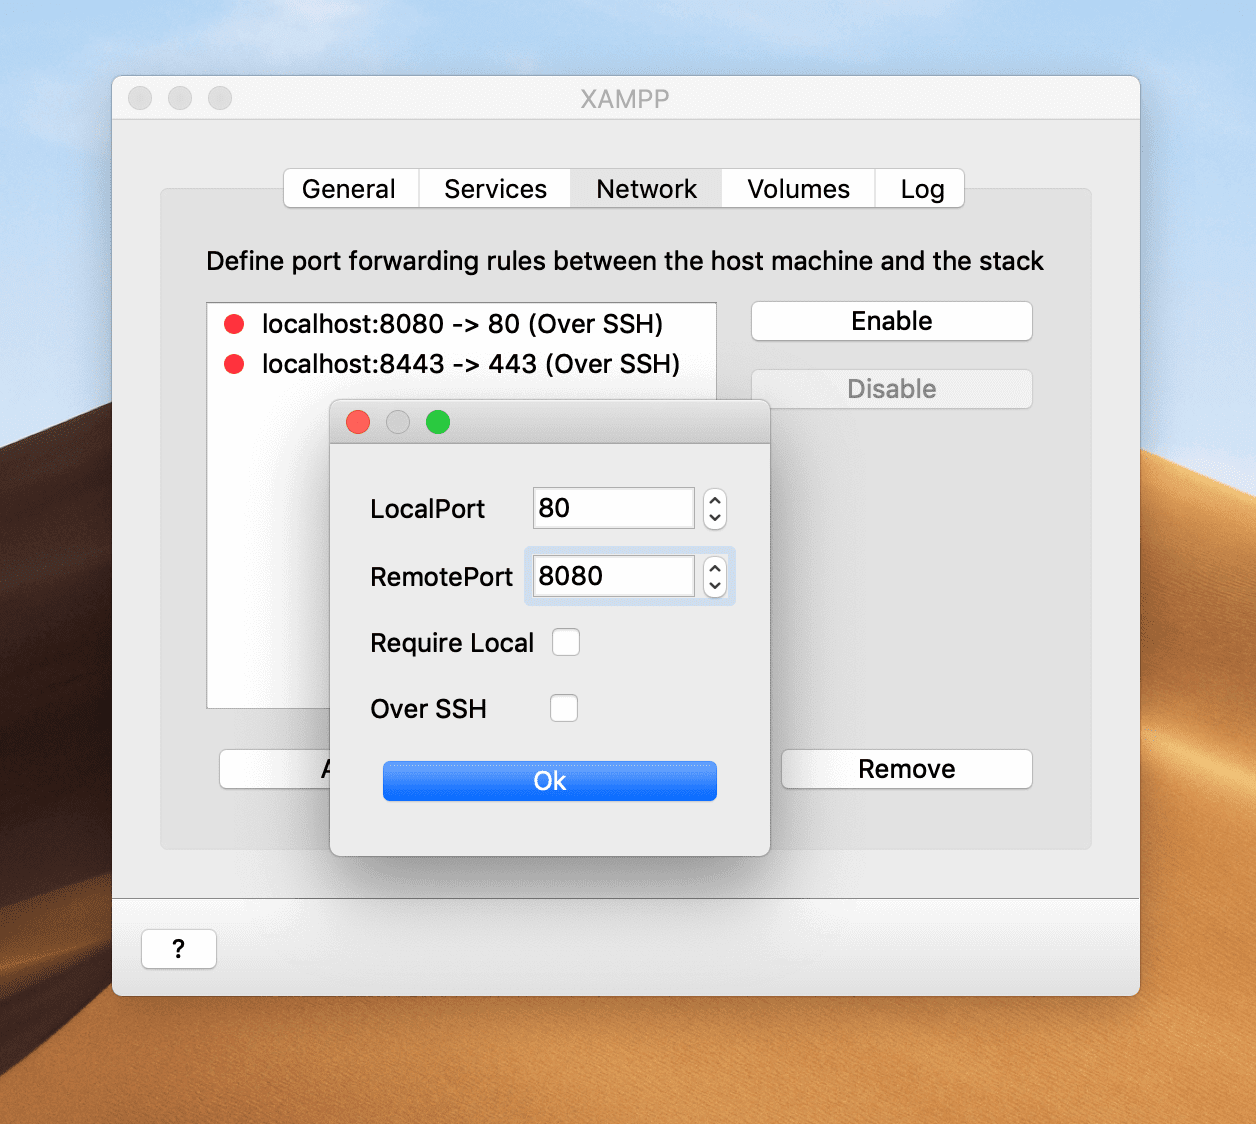
You’ll want to add a new rule that redirects traffic to the default port to your new Apache listening port. If you click on Add, you’ll be able to enter these values in the relevant fields:
Select the rule from the list and click on the Enable button to start using it.
3. Change Your MySQL Port
Finally, sometimes XAMPP is not working due to an issue with MySQL, rather than Apache. However, the problem is still often a port conflict, which means that by now you should have a good idea on how to fix it.
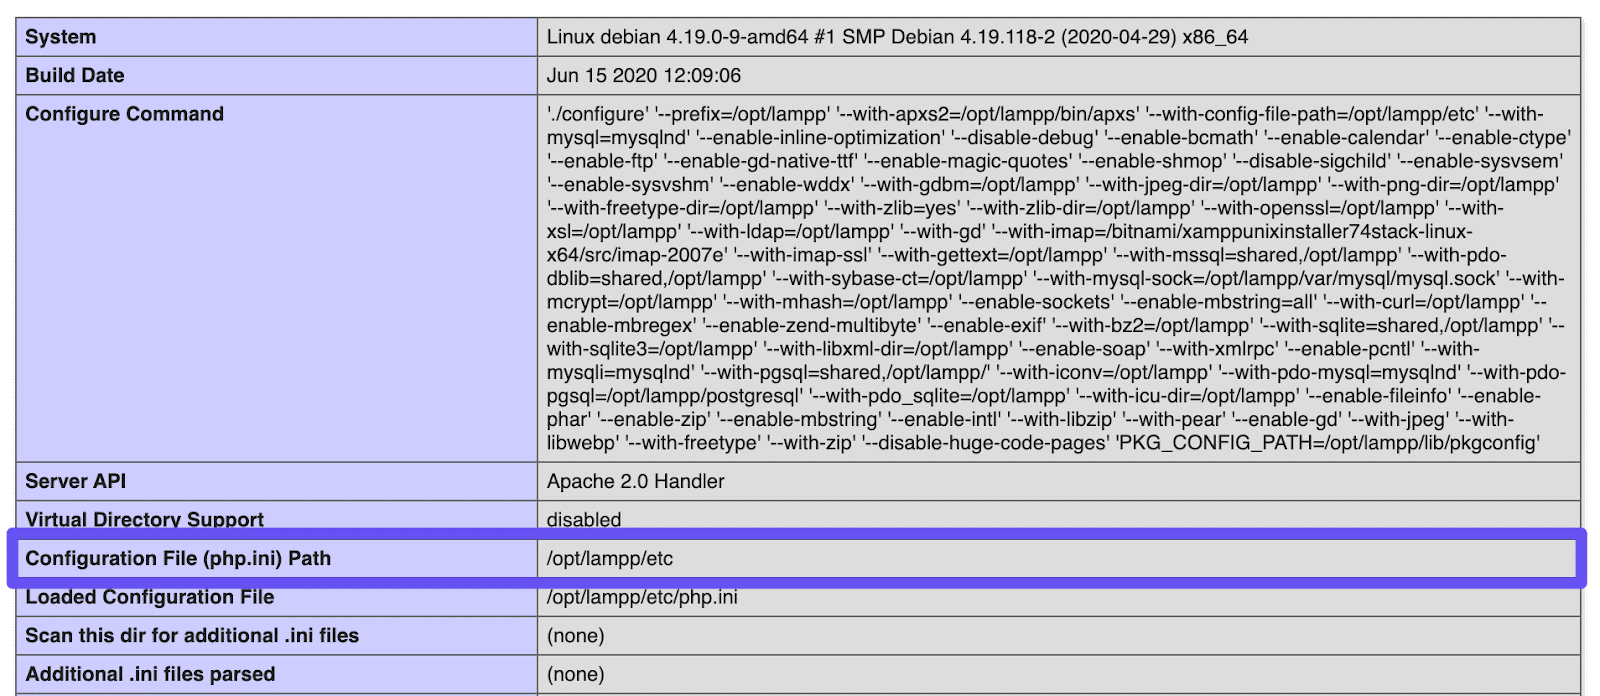
In this case, you’ll need to access your php.ini file instead of your configuration file. Navigating to your XAMPP dashboard and clicking on PHPInfo as we described earlier in this post will enable you to find the path to this file for your installation:
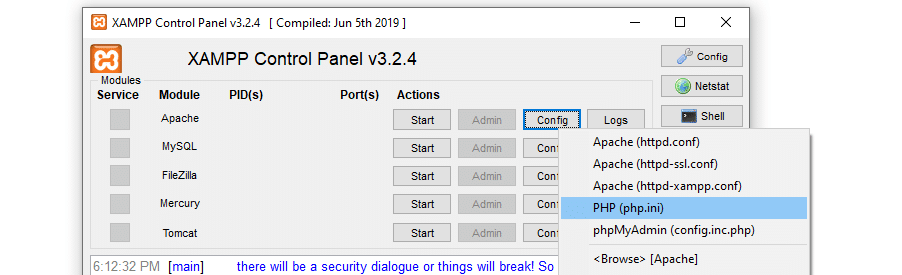
Alternatively, if you’re using XAMPP for Windows, you can access this file from the control panel by click on Config > PHP (php.ini):
Once you find and open php.ini, look for the lines that read port = 3306, and change them to read port = 3307. Save and close the file, and then restart MySQL.
Summary
XAMPP is a helpful tool to have in your corner, but it can be frustrating to troubleshoot certain errors that prevent you from accessing your local WordPress site. Fortunately, these are often port conflicts that you can quickly implement workarounds for.
In this article, we showed you what to do if XAMPP isn’t working due to a problem with Apache or MySQL:
- Resolve Apache port conflicts by changing your listening port to 8080.
- Include the listening port in the address when accessing localhost.
- Change your MySQL port to 3307 if another application is blocking the default port 3306.
Don’t forget to check out DevKinsta as an alternative to XAMPP.
Некоторые пользователи не могут запустить MySQL в XAMPP. По их словам, каждый раз, когда они запускают MySQL в XAMPP, они получают сообщение об ошибке, в котором говорится: «MySQL shutdown unexpectedly». Наиболее распространенной причиной этой проблемы являются поврежденные файлы базы данных XAMPP. Если у вас возникла такая проблема с MySQL, советы, представленные в этом посте, могут помочь вам решить проблему.

Перед выходом из XAMPP необходимо остановить MySQL. Если вы выйдете из XAMPP без остановки MySQL, это может привести к повреждению файлов данных MySQL. Из-за этого у вас могут возникнуть некоторые проблемы с MySQL, такие как неожиданное завершение работы MySQL. Если у вас возникла такая проблема, возможно, файлы данных MySQL в вашей системе повреждены. Мы описали некоторые методы устранения неполадок, которые могут помочь вам избавиться от этой проблемы.
Ошибка: неожиданное завершение работы MySQL
Попробуйте следующие решения, чтобы устранить проблему. Прежде чем продолжить, мы рекомендуем вам создать резервную копию папки XAMPP. Для этого скопируйте папку XAMPP и вставьте ее в другой раздел вашего жесткого диска или на внешний жесткий диск.
Давайте посмотрим на все эти решения в деталях. Прежде чем пробовать каждый метод, описанный ниже, убедитесь, что вы правильно закрыли XAMPP.
Запустите XAMPP от имени администратора
Рекомендуется всегда запускать XAMPP от имени администратора, чтобы избежать повреждения файла данных. Запустите XAMPP от имени администратора и посмотрите, решит ли это проблему. Если это поможет, вы сэкономите время на других методах устранения неполадок. Чтобы запустить XAMPP от имени администратора, выполните следующие действия:
- Нажмите «Поиск Windows» и введите XAMPP.
- Щелкните правой кнопкой мыши XAMPP и выберите «Запуск от имени администратора» .
- Нажмите « Да», если вы получили приглашение UAC.
Восстановить базу данных MySQL
Как описано выше в этой статье, основной причиной этой проблемы является повреждение файлов данных XAMPP. Если проблема возникает на вашем компьютере из-за этой проблемы, восстановление базы данных MySQL может решить проблему. Шаги по восстановлению базы данных MySQL приведены ниже:
Щелкните Поиск Windows и введите PowerShell. Выберите Windows PowerShell в результатах поиска.
Введите следующую команду: mysqld --console --skip-grant-tables --skip-external-locking и нажмите Enter.
Приведенная выше команда запустит сервер MySQL без загрузки таблиц грантов. Когда указанная выше команда будет выполнена успешно, введите следующую команду: mysqlcheck -r --databases mysql --use-frm и нажмите Enter.
Приведенная выше команда восстановит базу данных MySQL. После успешного выполнения вышеуказанных команд проверьте, сохраняется ли проблема.
Измените файл my.ini
Изменение порта путем изменения файла my.ini устранило проблему для некоторых пользователей. Вы также можете попробовать это. Откройте файл my.ini и измените порт 3306 на другой. По умолчанию файл my.ini находится в следующем месте: C:xamppmysqlbin

- Откройте Проводник.
- Скопируйте указанный выше путь и вставьте его в адресную строку Проводника. После этого нажмите Enter.
- Теперь прокрутите вниз и найдите файл my.ini.
- Как только вы найдете его, щелкните его правой кнопкой мыши и выберите «Открыть с помощью > Блокнот».
Если вы не найдете файл my.ini в указанном выше месте, вы можете следовать приведенным ниже инструкциям.

- Нажмите «Поиск Windows» и введите XAMPP.
- Щелкните правой кнопкой мыши XAMPP в результатах поиска и выберите «Запуск от имени администратора» .
- Нажмите «Да» в приглашении UAC. Это откроет панель управления XAMPP.
- Нажмите кнопку Config рядом с MySQL и выберите my.ini . Это откроет файл my.ini в текстовом редакторе по умолчанию.

После открытия файла my.ini в Блокноте нажмите клавиши Ctrl + F и введите 3306. Замените любой из портов 3306 другим номером порта. Вы можете ввести любой случайный номер порта, например 3307, 3308 и т. д. Для некоторых пользователей проблема устранена заменой порта 3306 на 2811.
- Сохраните файл my.ini и закройте Блокнот.
- Перезагрузите компьютер и запустите XAMPP.
- Проверьте, устранена ли проблема.
Если это не сработает, отмените изменения, внесенные в файл my.ini, и попробуйте следующее решение.
Удалите все файлы в папке «Данные»
Если приведенное выше решение не устранило вашу проблему, отмените изменения в файле my.ini, которые вы только что внесли. Теперь откройте проводник и перейдите по следующему пути: C:xamppmysqlданные

Приведенный выше путь открывает папку данных напрямую. Теперь удалите все файлы, кроме папок. После удаления файлов в папке Data перейдите по следующему пути в проводнике:
C:xamppmysqlbin

Найдите файл my.ini и откройте его с помощью Блокнота. Теперь введите port=8111 чуть ниже port=3306 (как показано на снимке экрана выше). Нажмите клавиши Ctrl + S , чтобы сохранить изменения, внесенные в файл my.ini, и закройте Блокнот. Теперь запустите XAMPP от имени администратора и запустите MySQL. На этот раз проблема не должна возникнуть.
Переименуйте файл aria_log_control.
Если приведенное выше решение не устранило вашу проблему, откройте папку XAMPP, которую вы скопировали на внешний жесткий диск или в другой раздел жесткого диска, и скопируйте все содержимое внутри нее. Теперь откройте XAMPP на диске C и вставьте туда скопированное содержимое. Замените файлы и папки, если вас попросят это сделать. Теперь перейдите по следующему пути: C:xamppmysqldata

Переименуйте aria_log_control в aria_log_control_old и запустите XAMPP. Запустите MySQL и посмотрите, внесет ли это какие-либо изменения. Если это не поможет, отмените изменения и попробуйте следующее решение.
Остановите все службы SQL и запустите их снова
Перезапуск служб SQL устранил проблему некоторых пользователей. Этот метод может работать и для вас. Откройте приложение «Службы», остановите все службы SQL и запустите их снова. Шаги для этого написаны ниже:
- Нажмите клавиши Win+R Это запустит окно команды «Выполнить».
- Введите
services.mscи нажмите ОК. Появится окно управления услугами. - В приложении «Службы» прокрутите вниз и найдите службы SQL. На вашем компьютере может быть несколько служб SQL.
- Остановите все службы SQL. Для этого щелкните правой кнопкой мыши службу SQL и выберите «Остановить».
- Теперь снова щелкните правой кнопкой мыши службы SQL и выберите «Пуск».

После перезапуска служб SQL закройте приложение «Службы» и запустите XAMPP от имени администратора. Запустите MySQL и посмотрите, возникает ли ошибка снова.
Скопируйте файлы из папки резервного копирования в папку данных
Еще одно эффективное решение этой проблемы — скопировать все данные из папки «Резервное копирование» и вставить их в папку «Данные». Для этого сначала скопируйте указанный ниже путь и вставьте его в адресную строку Проводника. После этого нажмите Enter.
C:xamppmysqlbackup
Это откроет папку резервного копирования XAMPP в вашем каталоге C. Теперь скопируйте оттуда все данные и перейдите по следующему пути:
C:xamppmysqldata
Вставьте туда скопированные данные. Если вам будет предложено заменить файлы, выберите Да. Запустите XAMPP от имени администратора и проверьте, можете ли вы запустить MySQL на этот раз. Если нет, попробуйте следующее решение.
Удалите файлы INFO из папки данных
Если проблема не устранена, удалите файл INFO и проверьте, помогает ли он. Файлы INFO находятся в следующем месте на вашем диске C:xamppmysqlbackup

Независимо от того, есть ли в указанном выше месте один или несколько файлов INFO, вы должны удалить их все. После удаления файлов INFO запустите XAMPP и запустите MySQL. MySQL должен запуститься без каких-либо ошибок.
Если это не сработает, скопируйте все файлы из папки XAMPP, которую вы создали в качестве резервной копии, на внешний жесткий диск или в другой раздел жесткого диска и вставьте скопированные файлы в папку XAMPP на диске C. Замените файлы и папки, если вас об этом попросят.
Переименуйте папку Data и скопируйте файл ibdata1 в папку Data
Это решение помогло многим пользователям. Если приведенные выше решения не помогли решить вашу проблему, этот метод должен вам помочь. Переименуйте папку Data и скопируйте файл ibdata1 в папку Data. Процесс, как это сделать, описан ниже:
- Откройте папку XAMPP, расположенную на диске C.
- Теперь откройте папку mysql.
- Переименуйте папку данных в data_old.
- Скопируйте папку резервной копии на другой раздел жесткого диска или на внешний жесткий диск. Теперь переименуйте папку резервной копии, расположенную внутри папки mysql на диске C, в data.
- Откройте папку data_old и скопируйте в нее все папки базы данных и файл ibdata1. Не копируйте папки mysql, performance_schema и phpmyadmin.
- Теперь откройте папку данных (которая раньше была папкой резервной копии) и вставьте туда скопированные данные. Замените файлы, если вас об этом попросят.
- Запустите панель управления XAMPP и запустите mysql.
Удалите и переустановите XAMPP
Если все вышеперечисленные решения не помогли решить вашу проблему, удалите и переустановите XAMPP. Вы можете удалить XAMPP из панели управления или из настроек Windows 11/10. После удаления Xampp загрузите его последнюю версию с официального сайта Apache и установите снова.
Что делать, если MySQL не открывается в XAMPP?
У вас могут возникнуть проблемы с XAMPP, если вы установите его в другом месте, а не в месте по умолчанию. Расположение по умолчанию для установки XAMPP — c:xampp. Поэтому, если вы установили XAMPP в другом месте, удалите его и установите в место по умолчанию. Если вы установили XAMPP в расположение по умолчанию, но MySQL по-прежнему не открывается или не работает в XAMPP, откройте приложение «Службы» в Windows 11/10, остановите все службы SQL и запустите их снова.
Другим эффективным решением этой проблемы является изменение порта 3306 на 3308. Для этого вам необходимо отредактировать файл my.ini, который находится по следующему адресу: C:xamppmysqlbin.
Надеюсь это поможет.
There are many possible answers for this problem. The most common and most likely is that you’re running another program which is blocking port 80 or 443. If you’ve installed Skype, then you’ve found your problem! Change apache’s port settings to 81 and apache will work. There’s a good tutorial on that To check this you can open up your command line by clicking the start menu, and typing ‘cmd’, and enter the command
netstat -nab
this wil return a list of programs that will vaguely resemble this pattern
    [someprogram.exe]
    UDP     [fe80::numbers:numbers:numbers:numbers%numbers]:portnumber
You need to find a line (or lines) ending in :80 and terminate them in order to start apache. If there is no line ending in :80, there are more things you can do.
First, navigate to xampp’s directory (default is c:xampp) and double click apache_start.bat. This will open up a comand line and return more detailed errors about why apache can’t run. Mostly, be looking for syntax errors that you could’ve created by editing your httpd.conf, or httpd-ssl.conf files. This is very easy to do if you’ve edited it and are a new user.
If still this fails, your last hope is to check the apache error log by clicking on the logs tab in apache’s row in the xampp control panel and clicking error log.
If none of this works, don’t give up! You got this!
Edit: If you change the port of apache, you will also have to go into httpd.conf (located in xampp/apache/conf) and near line 184, replace
ServerName localhost:80
with
ServerName localhost:81
It is also possible to specify port 81 in the url of your localhost, i.e.
localhost:81/my_project.php
After installing the XAMPP Control Panel on Windows, many users reported encountering an error while starting Apache. This issue commonly occurs when a process like World Wide Publishing Service keeps running in the 80 port of your device. Due to this, the Windows 11/10 operating system does not allow the Apache server to execute, and that way it causes the error.
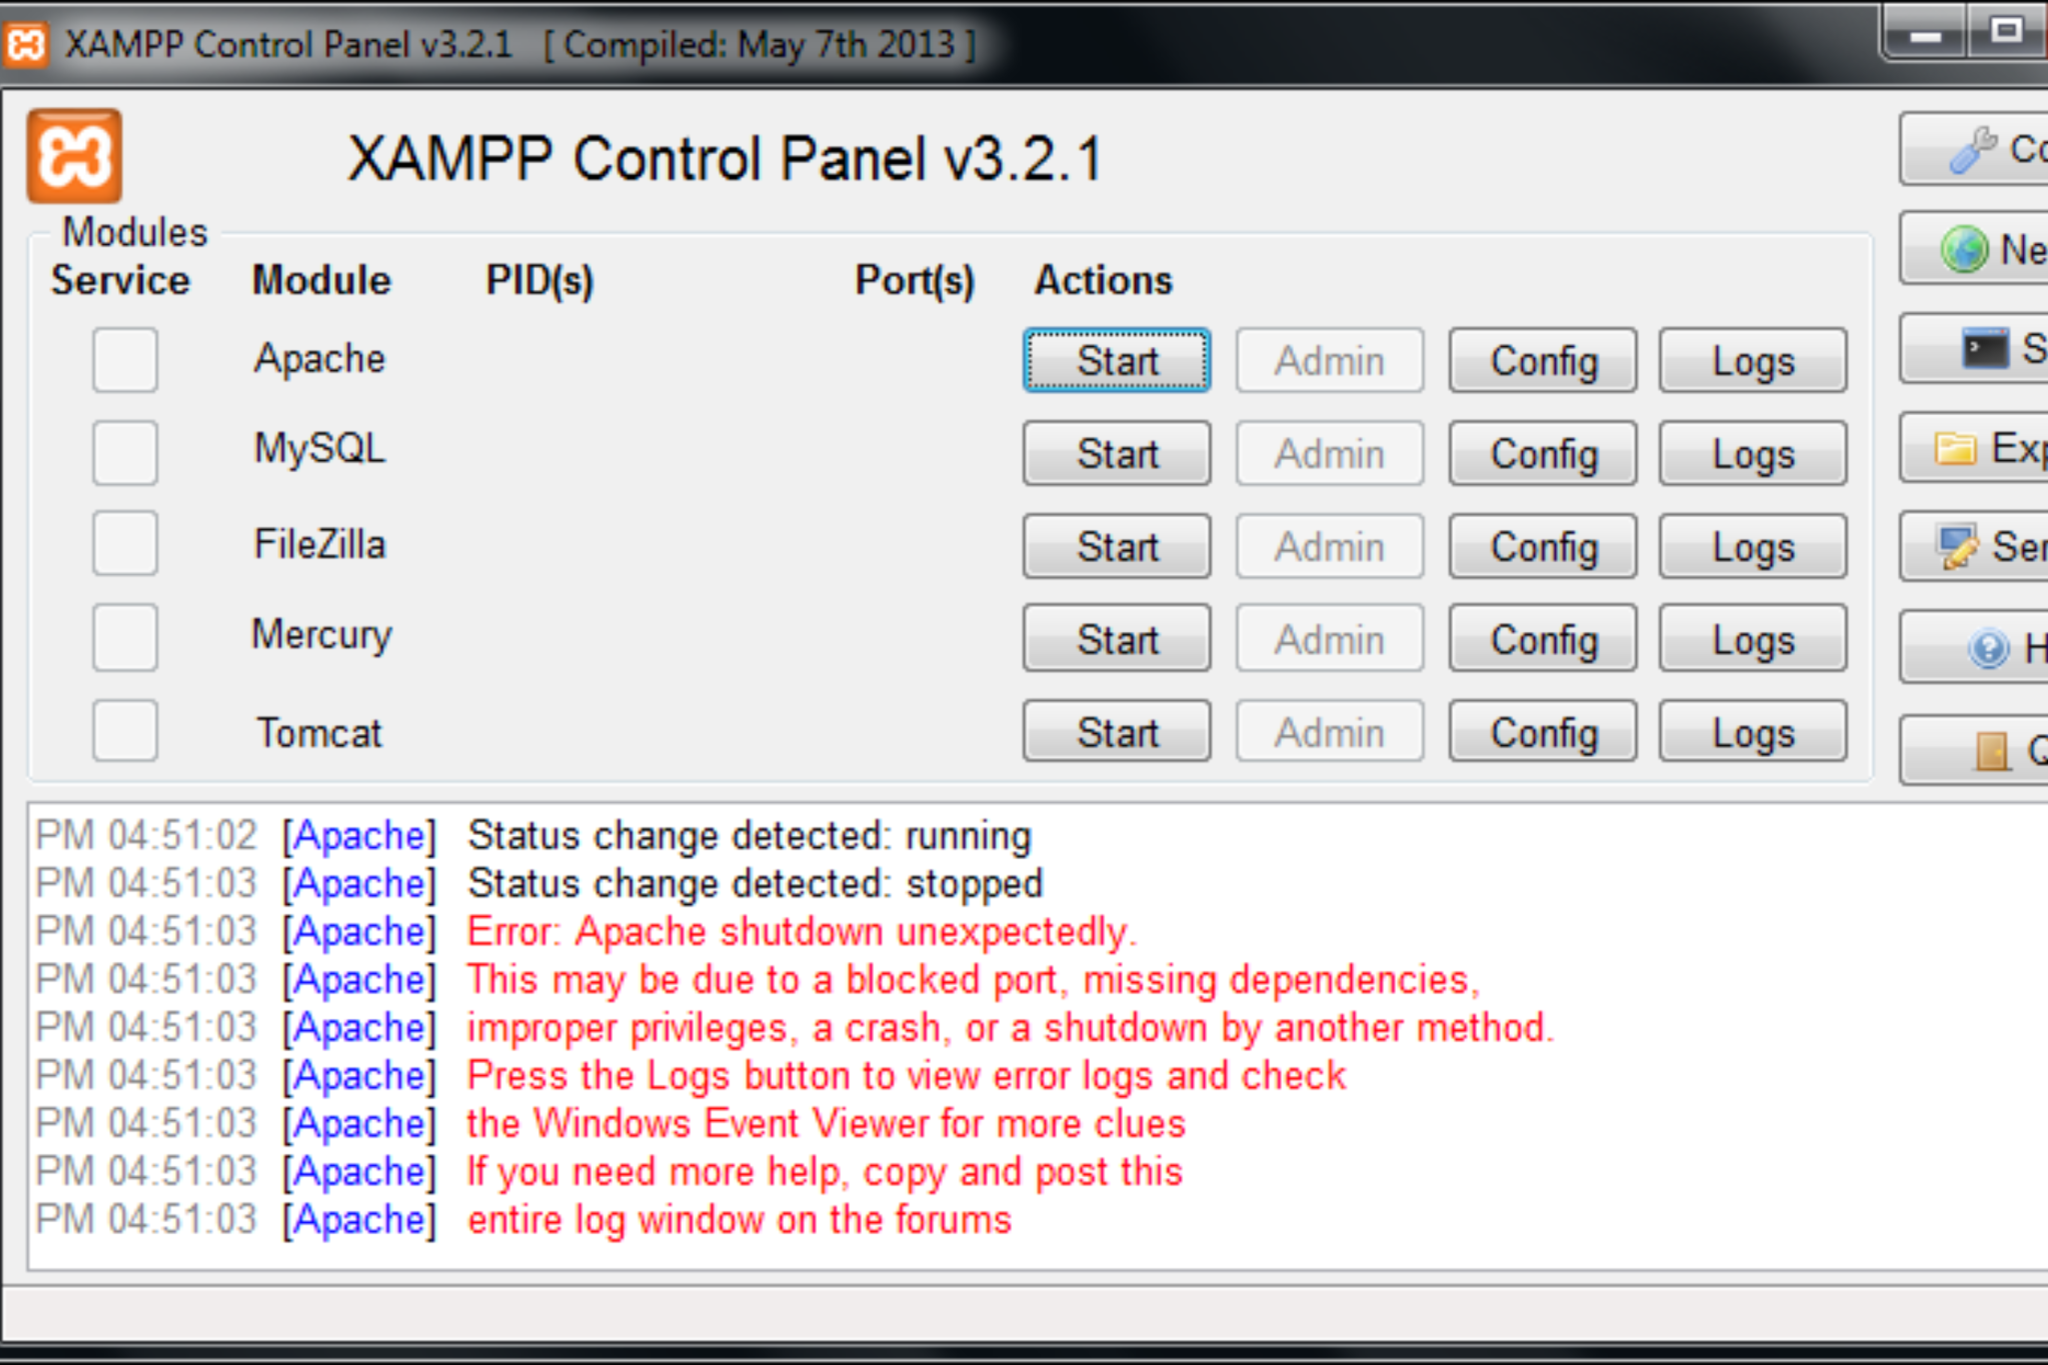
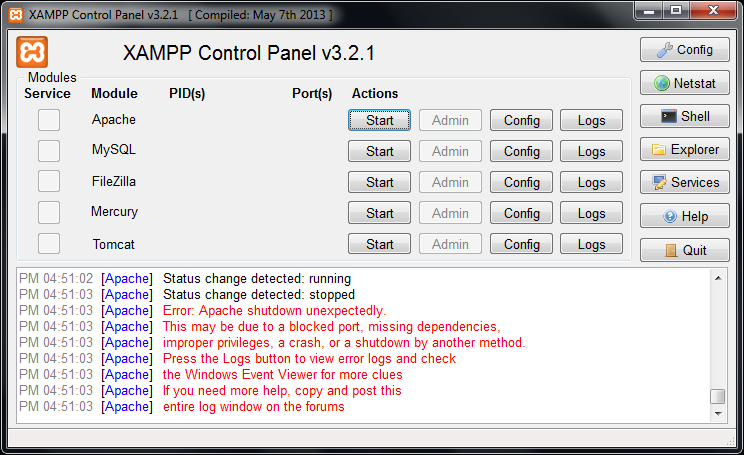
5:38:38 PM  [Apache]    Error: Apache shutdown unexpectedly.
5:38:38 PM  [Apache]    This may be due to a blocked port, missing dependencies,
5:38:38 PM  [Apache]    improper privileges, a crash, or a shutdown by another method.
5:38:38 PM  [Apache]    Press the Logs button to view error logs and check
5:38:38 PM  [Apache]    the Windows Event Viewer for more clues
5:38:38 PM  [Apache]    If you need more help, copy and post this
5:38:38 PM  [Apache]    entire log window on the forums
Actually, Port 80 on a computer also used to be the default TCP/IP port that Apaches module uses on XAMPP. And since two different applications can’t use the same networking port, therefore you must have to stop it before starting the XAMPP’s Apache server. If you’re also experiencing this issue on your device, there are a few easy workarounds that I have mentioned in this guide. So, let’s get started.
Clearing the World Wide Web Publishing Service would be the best approach to make start the Apache again. However, you can also get it by changing the TCP/IP port number or by stopping the service if needed. So, to fix Apache not starting on XAMPP Control Panel, follow these all possible methods:
- Clear World Wide Web Services
- Change the default Apache TCP/IP port
- Stop World Wide Web Publishing Service
Let us see them in detail.
1] Clear World Wide Web Services
In order to solve the starting problem of the Apache service, you must have to clear the world Wide Web Services from your device. But before begin, ensure that you don’t have any app relying on this service.
If everything seems to be okay, open the Control Panel on your Windows system.
Once it opens, select to view the Control Panel in either Large icons or Small icons option, so that you could see all the Control Panel items.

From the available items, select Programs and Features option.
In the left sidebar, there is a link named Turn Windows features on or off, click on it.

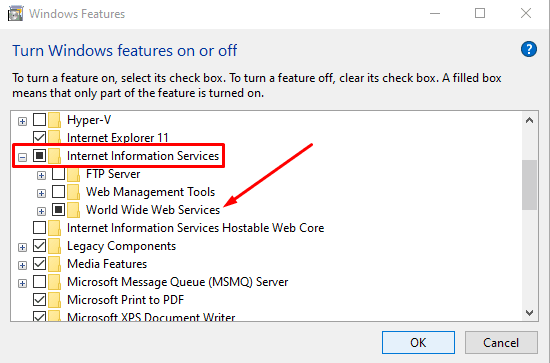
In the Windows Features dialog box, expand the Internet Information Services field.
Now, clear the checkbox regarding World Wide Web Services and then click on the OK button to save the changes.

Once you complete the above steps, reboot your device. After that, open the XAMPP Control Panel and click on the Start button on Apache. It should now run in port 80 on your computer.
2] Change the default Apache TCP/IP port
If due to any reason, the above method workaround doesn’t work for you, you need to configure Apache to execute on a different TCP/IP port. So, follow these suggestions:
Open the XAMPP Control Panel on your Windows device.
Click on the Config button of the Apache module.
Select Apache (httpd.conf) option from the list of the pop-up menu.

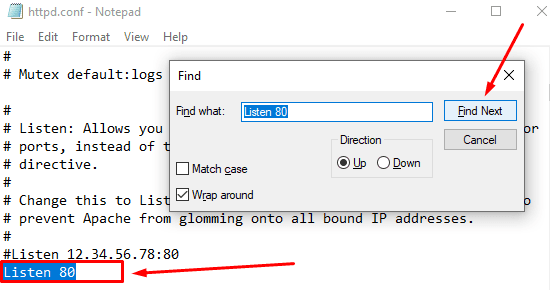
On the following notepad page, you need to find Listen 80.
To make the search easy, press the Ctrl+F shortcut key. In the pop-up menu, type what you want to search. Mark Wrap around checkbox, leave Match case unchecked, and then click on the Find Next button.

Once you find the respective line, change the port number with any arbitrary number of your choice.
For example, you can try port 121. Then the corresponding result for TCP/IP port number would be something like – Listen 121.
Press Ctrl+S shortcut key to save the changes in the Notepad.
Note: Please note that while using this configuration, you always need to append the TCP/IP port number on the URL you want to connect to your site. For instance, to access the Apache server on your browser, you will need to enter: localhost:121/dashboard rather than localhost/dashboard.
After performing the above steps properly, the starting problem of the Apache in XAMPP would be fixed.
3] Stop World Wide Web Publishing Service
In an alternative way, you need to stop the World Wide Web Publishing Service and change its settings so that the service can only be started manually. So, let’s get started:
In order to stop the World Wide Web Publishing Service, you first need to open Windows Services Manager on your Windows 10 PC.
On the Services screen, search for the World Wide Web Publishing Service option under the Name column.
Once you find, double-click on it to open the properties window.
In the properties window, the General tab opens by default.
On the General tab, locate Startup Type and switch it to Manual. This will let you start the service manually when it is required.
Moving ahead, stop the service running status and click on Apply > OK button.
Now, open the XAMPP Control Panel and click on the Start button to run the Apache server.
That’s it. I hope this guide would help you to fix the starting problem of the Apache service on the XAMPP Control Panel.
После установки панели управления XAMPP в Windows 10 многие пользователи сообщали об ошибке при запуске Apache . Эта проблема обычно возникает, когда такой процесс, как World Wide Publishing Service, продолжает работать на 80-м порту вашего устройства. Из-за этого операционная система Windows 10 не позволяет серверу Apache работать, и это вызывает ошибку.
5:38:38 PM  [Apache]    Error: Apache shutdown unexpectedly.
5:38:38 PM  [Apache]    This may be due to a blocked port, missing dependencies,
5:38:38 PM  [Apache]    improper privileges, a crash, or a shutdown by another method.
5:38:38 PM  [Apache]    Press the Logs button to view error logs and check
5:38:38 PM  [Apache]    the Windows Event Viewer for more clues
5:38:38 PM  [Apache]    If you need more help, copy and post this
5:38:38 PM  [Apache]    entire log window on the forums
Фактически, порт 80 на компьютере также был портом TCP / IP по умолчанию, который модуль Apache использует на XAMPP. А поскольку два разных приложения не могут использовать один и тот же сетевой порт, вам необходимо остановить его перед запуском сервера Apache XAMPP. Если вы также столкнулись с этой проблемой на своем устройстве, есть несколько простых способов, которые я упомянул в этом руководстве. Итак, начнем.
Очистка службы публикации в World Wide Web была бы лучшим подходом, чтобы снова запустить Apache. Однако вы также можете получить его, изменив номер порта TCP / IP или остановив службу, если это необходимо. Итак, чтобы исправить запуск Apache на панели управления XAMPP, выполните следующие возможные действия:
- Clear World Wide Web Services
- Изменить порт Apache TCP/IP по умолчанию
- Остановите World Wide Web Publishing Service
Давайте посмотрим на них подробно.
1] Clear World Wide Web Services
Чтобы решить начальную проблему службы Apache, вам необходимо очистить всемирную паутину от вашего устройства. Но прежде чем начать, убедитесь, что у вас нет приложений, использующих этот сервис.
Если все в порядке, откройте панель управления в вашей системе Windows.
После того, как он откроется, выберите для просмотра панели управления параметр «Большие значки» или «Маленькие значки», чтобы можно было видеть все элементы панели управления.
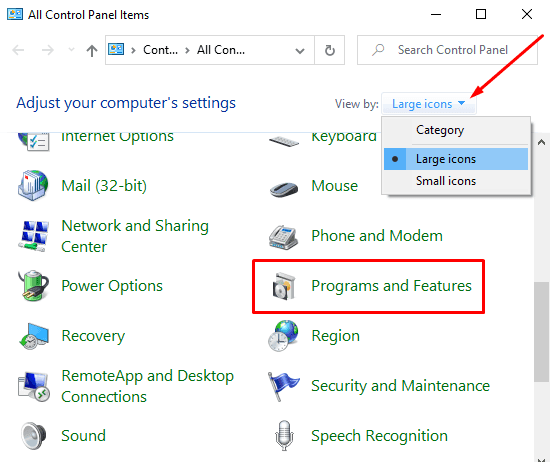
Из доступных элементов выберите Программы и компоненты.
В левой боковой панели есть ссылка «Включение или отключение функций Windows», нажмите на нее.

В диалоговом окне «Функции Windows» разверните Информационные службы Интернета.
Теперь снимите флажок «World Wide Web Services» и нажмите кнопку «ОК», чтобы сохранить изменения.
Выполнив вышеуказанные действия, перезагрузите устройство. После этого откройте панель управления XAMPP и нажмите кнопку «Пуск» в Apache. Теперь он должен работать в порту 80 на вашем компьютере.
2] Изменить порт Apache TCP/IP по умолчанию
Если по какой-либо причине вышеуказанный обходной путь не работает для вас, вам необходимо настроить Apache для выполнения на другом порту TCP/IP. Итак, следуйте этим советам:
Откройте панель управления XAMPP на вашем устройстве Windows.
Нажмите на кнопку Config модуля Apache.
Выберите пункт Apache (httpd.conf) в списке всплывающего меню.
На следующей странице блокнота вам нужно найти Listen 80.
Чтобы упростить поиск, нажмите сочетание клавиш Ctrl + F. Во всплывающем меню введите то, что вы хотите найти. Марк Wrap вокруг флажка, оставить дело Match бесконтрольно, а затем нажмите на Find Next кнопку.
Как только вы найдете соответствующую строку, измените номер порта на любой произвольный номер по вашему выбору.
Например, вы можете попробовать порт 121. Тогда соответствующий результат для номера порта TCP/IP будет что-то вроде — Listen 121.
Нажмите сочетание клавиш Ctrl + S, чтобы сохранить изменения в блокноте.
Примечание. Обратите внимание, что при использовании этой конфигурации вам всегда нужно добавить номер порта TCP/IP в URL, который вы хотите подключить к своему сайту. Например, чтобы получить доступ к серверу Apache в вашем браузере, вам нужно будет ввести: localhost:121/dashboard, а не localhost/dashboard.
После правильного выполнения вышеуказанных шагов, проблема запуска Apache в XAMPP будет исправлена.
3] Остановите издательский сервис World Wide Web
В качестве альтернативы вам необходимо остановить службу публикации в Интернете и изменить ее параметры, чтобы она могла быть запущена только вручную. Итак, начнем:
Чтобы остановить службу публикации в Интернете, сначала необходимо открыть диспетчер служб Windows на компьютере с Windows 10.
На экране «Службы» найдите параметр «Служба публикации в Интернете» в столбце «Имя».
Как только вы найдете, дважды щелкните по нему, чтобы открыть окно свойств.
В окне свойств по умолчанию открывается вкладка Общие.
На вкладке General найдите тип запуска и переключите его на Manual. Это позволит вам запустить службу вручную, когда это потребуется.
Продвигаясь вперед, остановите статус работающей службы и нажмите Apply > кнопку OK.
Теперь откройте панель управления XAMPP и нажмите кнопку «Пуск», чтобы запустить сервер Apache.
Вот и все. Я надеюсь, что это руководство поможет вам исправить проблему запуска службы Apache на панели управления XAMPP.
There are many possible answers for this problem. The most common and most likely is that you’re running another program which is blocking port 80 or 443. If you’ve installed Skype, then you’ve found your problem! Change apache’s port settings to 81 and apache will work. There’s a good tutorial on that To check this you can open up your command line by clicking the start menu, and typing ‘cmd’, and enter the command
netstat -nab
this wil return a list of programs that will vaguely resemble this pattern
    [someprogram.exe]
    UDP     [fe80::numbers:numbers:numbers:numbers%numbers]:portnumber
You need to find a line (or lines) ending in :80 and terminate them in order to start apache. If there is no line ending in :80, there are more things you can do.
First, navigate to xampp’s directory (default is c:xampp) and double click apache_start.bat. This will open up a comand line and return more detailed errors about why apache can’t run. Mostly, be looking for syntax errors that you could’ve created by editing your httpd.conf, or httpd-ssl.conf files. This is very easy to do if you’ve edited it and are a new user.
If still this fails, your last hope is to check the apache error log by clicking on the logs tab in apache’s row in the xampp control panel and clicking error log.
If none of this works, don’t give up! You got this!
Edit: If you change the port of apache, you will also have to go into httpd.conf (located in xampp/apache/conf) and near line 184, replace
ServerName localhost:80
with
ServerName localhost:81
It is also possible to specify port 81 in the url of your localhost, i.e.
localhost:81/my_project.php
XAMPP is a useful platform for WordPress developers who are looking for a localhost solution. However, some issues can show up when you’re using this tool. These errors could stall your workflow and leave you unsure how to get XAMPP running again, especially because everything may appear to be in order on the surface.
Fortunately, once you identify the reason XAMPP is not starting for you, it often takes just a few tweaks to fix it. You can then get right back to work on your latest development project.
In this article, we’ll provide a brief overview of what XAMPP is for those who are new to the platform. Then we’ll show you how to check your error logs and resolve three common problems that may keep your local server from starting. Let’s dive in!
A Brief Introduction to XAMPP
XAMPP is a free local development tool. It essentially functions as a server on your computer that you can use to host websites — much like DevKinsta, our own free local development app.
Note that these sites are not publicly available to users on the open Internet. Rather, they’re meant to be used locally for development and testing purposes. If you wish, you can migrate each project to a live server once it’s finished.
XAMPP is a handy solution because it prevents visitors from finding your project while it’s still in progress. Plus, since the site is hosted on your computer, its performance should top-notch and you can work offline.
You can use XAMPP on any major Operating System (OS), including Windows, macOS, and Ubuntu Linux. It uses the open source Apache server and MySQL, and comes with several built-in tools such as phpMyAdmin and FileZilla.
When it comes to WordPress in particular, XAMPP is one of the top localhost solutions because it meets all of the Content Management System’s (CMS’s) requirements. These include:
- PHP 7.4
- MySQL 5.6
- HTTPS support
- Apache or NGINX server
If you’re interested in installing XAMPP, you can check out our tutorial on installing WordPress locally, which includes directions for this task.
How to Check Your XAMPP PHP Error Log
In the event that you’re developing a WordPress site locally using XAMPP, and you can’t get the platform to start up, your first step should be to check your error logs. This may point you in the direction of the problem’s cause.
If you know why the issue is occurring, you should be able to resolve it much faster than troubleshooting it by trial and error. Logs are accessed using different paths, depending on your OS and version. Fortunately, there’s a simple way to find the path for your setup.
On Windows, the XAMPP activity log appears in the lower half of the control panel dialog box. You can also access the error log by by clicking on the Logs button next to the Apache Config button:
On macOS, click on the Log tab in the control panel to see the activity log:
You can then take a look through your logs to see if there’s anything suspicious and follow any directives provided to resolve the issue(s).
In some cases it may be beneficial to have access to your PHP log as well, although this is usually more helpful for troubleshooting WordPress errors than those for Apache or MySQL.
To locate your PHP error logs, open the XAMPP dashboard by typing http://localhost into your browser’s address bar. There, click PHPInfo at the top of the screen:
Then search for “error_log”. This will reveal the path you need to enter in your address bar to view the log:
You should be able to simply type this path into your browser after http://localhost to view the PHP log.
Accessing Your XAMPP-VM for Mac PHP Logs
There are actually two versions of XAMPP for Mac users – “XAMPP for macOS” and “XAMPP-VM“. The latter enables you to run XAMPP for Linux on your Mac, using a virtual machine.
It’s important to know which version you’re using because it determines how you access key files we’ll be referencing throughout this post. For instance, if you’re using XAMPP for OS X, you can simply open Finder, go to Applications > XAMPP, and look for the logs folder to find your PHP log.
However, if you’re using XAMPP-VM, you first need to open the XAMPP control panel, click on the Volumes tab, and select Mount:
Then, when you launch Finder, click on your IP address in the left-hand menu and open the lampp folder. This is where you’ll find all your XAMPP files, including your PHP error logs.
How to Fix XAMPP If It’s Not Working (3 Common Solutions)
If your error logs are not forthcoming about the cause of the problem, you can try these solutions to get XAMPP working again. These tips also elaborate on some of the instructions your error log may be showing.
1. Resolve Apache Port Conflicts
If Apache cannot start, you won’t be able to access your XAMPP dashboard or any sites you have installed on the platform. A port conflict may be the underlying problem.
By default, Apache connects over port 80. If you see an error message that says this port is already in use, another application is blocking the connection (Skype is a frequent offender).
If you click on the Netstat button in the XAMPP control panel, it should show you all the ports that are currently in use, and which applications are using them. You may want to check this if XAMPP Apache is not starting:
If you know which program is the problem and can unblock the port by removing the application that’s in the way, this will solve the issue immediately. However, you can also change the Apache listening port for XAMPP, so that you connect while leaving your other platforms intact.
First, you’ll need to find your httpd.conf file. This process is slightly different depending on your OS and which version of XAMPP you’re using.
Changing Your XAMPP Apache Port on Windows
On Windows, open the XAMPP control panel and click on the Config button:
Then select httpd.conf. Search in this file for the line that reads “Listen 80”, and change it to “Listen 8080”. This will enable you to connect to Apache over port 8080 instead of the default option.
You’ll also need to look for the line that reads ServerName localhost:80, and change this to ServerName localhost:8080. Save and close the file.
Then try starting Apache again. If this was your only problem, the platform should run as intended. However, note that if you have a WordPress installation hosted via XAMPP, you’ll need to find and replace all mentions of “localhost” with “localhost:8080”, including those in your database.
Changing Your XAMPP Apache Port on Mac
If you’re running XAMPP for macOS, you can find your httpd.conf file by going to Applications > XAMPP in Finder. Once you find the file, you can carry out the same steps to change your port as we described for Windows users.
For those using XAMPP-VM, scroll back up to the section where we explained how to access your error logs to learn how to find your XAMPP files. Once you access the lampp directory, you’ll find httpd.conf in apache2 > conf.
2. Include the Listening Port in the Address When Accessing Localhost
Normally, you can simply type http://localhost into your browser’s address bar to access your XAMPP-hosted sites or dashboard. The platform automatically connects to Apache over its default listening port, 80.
However, if you’ve changed your XAMPP installation’s listening port (or someone else with access to your computer did so), it won’t be able to connect. You may also see this occur if there’s an Apache port conflict, as described above.
This problem can be quite confusing because the XAMPP control panel may show that Apache and MySQL are both running. However, you won’t be able to access your site or tools such as PHPInfo or phpMyAdmin.
This error can take a few different forms. If you’re trying to access your local WordPress site, you may see a 404 error page. Chrome users may see ERR_CONNECTION_REFUSED instead:
Fortunately, the solution is fairly simple. You simply need to append the listening port to the address. For example, if you’re using the most common alternative port, you would enter http://localhost:8080 instead of just http://localhost.
However, if you would like to be able to simply enter localhost even though you have changed your Apache listening port, you can do so.
Changing the Default Port on Windows
Windows users change the XAMPP Apache default port to their new listening port so that you don’t have to specify it in the address bar. To do so, click on Config > Service and Port Settings > Apache in the XAMPP control panel:
Then replace the Main Port value with the new Apache port you configured and save your changes.
Set Up Port Forwarding on macOS
On macOS the process is quite different. In your control panel, click on the Network tab. Here you can set up port forwarding rules:
You’ll want to add a new rule that redirects traffic to the default port to your new Apache listening port. If you click on Add, you’ll be able to enter these values in the relevant fields:
Select the rule from the list and click on the Enable button to start using it.
3. Change Your MySQL Port
Finally, sometimes XAMPP is not working due to an issue with MySQL, rather than Apache. However, the problem is still often a port conflict, which means that by now you should have a good idea on how to fix it.
In this case, you’ll need to access your php.ini file instead of your configuration file. Navigating to your XAMPP dashboard and clicking on PHPInfo as we described earlier in this post will enable you to find the path to this file for your installation:
Alternatively, if you’re using XAMPP for Windows, you can access this file from the control panel by click on Config > PHP (php.ini):
Once you find and open php.ini, look for the lines that read port = 3306, and change them to read port = 3307. Save and close the file, and then restart MySQL.
Summary
XAMPP is a helpful tool to have in your corner, but it can be frustrating to troubleshoot certain errors that prevent you from accessing your local WordPress site. Fortunately, these are often port conflicts that you can quickly implement workarounds for.
In this article, we showed you what to do if XAMPP isn’t working due to a problem with Apache or MySQL:
- Resolve Apache port conflicts by changing your listening port to 8080.
- Include the listening port in the address when accessing localhost.
- Change your MySQL port to 3307 if another application is blocking the default port 3306.
Don’t forget to check out DevKinsta as an alternative to XAMPP.
Get all your applications, databases and WordPress sites online and under one roof. Our feature-packed, high-performance cloud platform includes:
- Easy setup and management in the MyKinsta dashboard
- 24/7 expert support
- The best Google Cloud Platform hardware and network, powered by Kubernetes for maximum scalability
- An enterprise-level Cloudflare integration for speed and security
- Global audience reach with up to 35 data centers and 275+ PoPs worldwide
Test it yourself with $20 off your first month of Application Hosting or Database Hosting. Explore our plans or talk to sales to find your best fit.
XAMPP is a helpful development tool. However, you may run into problems at some point, such as receiving the notification: “Apache shutdown unexpectedly”. This error might seem to come out of nowhere, so identifying the cause – let alone the solution – can be puzzling.
Fortunately, there is a common explanation for Apache’s sudden shutdown. With a few simple modifications, you should be able to fix the problem and get Apache up and running again. All you have to do is update some settings in the configuration files.
In this article, we’ll discuss the common cause of this Apache error in XAMPP and then walk you through four steps to fix it, both on Windows and macOS.
Let’s get started!
An Introduction to the XAMPP “Apache Shutdown Unexpectedly” Error
XAMPP is a free, open source server stack that includes the Apache server and MariaDB database:

It runs PHP and Perl scripts, and is used to develop and test dynamic websites on local machines. This means that if you are building a website, you can install WordPress locally on your computer. You can use XAMPP without having to upload your site’s files to your web hosting service.
If you’re reading this article, we’ll assume you’re already at least somewhat familiar with XAMPP. However, what may be new to you is the “Apache shutdown unexpectedly” error you’re seeing.
This message is most commonly caused by a blocked port. Usually, it means that another application installed on your computer, such as Skype, is using the same port as XAMPP. Additionally, you may notice that the error message indicates the problem may also be attributed to “missing dependencies, improper privileges, a crash, or a shutdown by another method.”
In any event, the easiest fix is to simply modify the XAMPP default settings. However, the method for resolving the error varies slightly between Windows and macOS. Also, the interface may look a bit different depending on the XAMPP version you’re using. We will provide instructions for both operating systems below, starting with Windows.
How to Fix the XAMPP Error “Apache Shutdown Unexpectedly” in Windows
If you’re using a Windows device, you can follow these four steps to update your default port settings in XAMPP.
Step 1: Open the Configuration Settings from the XAMPP Control Panel
The first step is, of course, to launch XAMPP. This will open the XAMPP control panel. From here, you can update the configuration settings for the server stack.
Since this error is related to Apache, we’ll focus on those settings. In the “Apache” row of options, click on the Config button.
This will open a drop-down menu of files. We’re going to be editing two of these files, starting with httpd.conf.
Step 2: Change the Default Port Settings of the httpd.conf File
From the menu of files, click on Apache (httpd.conf). Once you do, the file will open in your computer’s default text editor:
Within this file, there are three settings you’ll want to update. To get started, press Ctrl + F, then enter “80” in the search field:
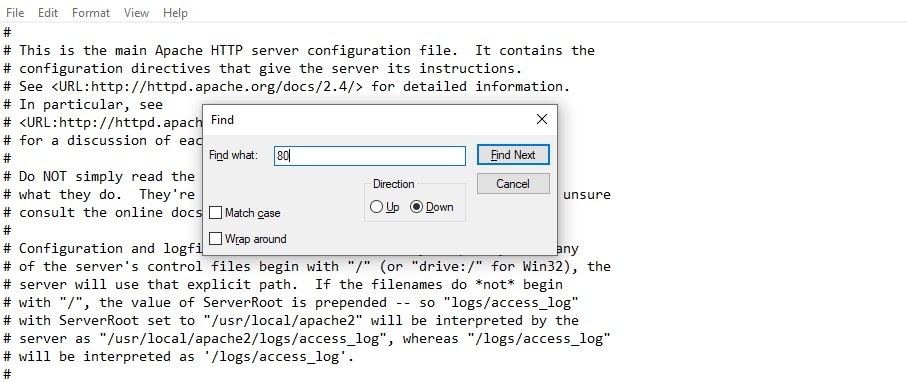
This will display all instances of the number 80 in the file. Locate “Port 80” and change it to “Port 8080”. Once the port setting is updated, search for “Listen 80” and update it to “Listen 8080”.
Finally, search for “servername localhost:80”. Once you find it, modify it to “servername localhost:8080”. When you’re finished, save and close the file.
Step 3: Update the Default Port Settings in the http-ssl.conf File
Now it’s time to move on to the second file. To do so, you can return to the XAMPP control panel, then select Config under the Apache settings again. This time, open the Apache (http-ssl.conf) file.
When the file opens in your text editor, press Ctrl + F, and then enter 443 in the search field. Locate “Listen 443” and update this to “Listen 4433”.
Next, search the file for the next instance of “443”. It should be “<VirtualHost _default_:443>”. Once you find it, you can go ahead and change it to “<VirtualHost _default_:4433>”. When you’re finished, remember to save and close the file.
Step 4: Restart Apache
Once you’ve updated the settings in both files, the final step is to stop Apache. You can do this by clicking on the Stop button along the same Apache row. After Apache has been stopped, click the Start button to complete the restart process.
That’s it! Your port numbers will be updated and Apache should now run without error.
How to Fix the XAMPP Error “Apache Shutdown Unexpectedly” in macOS
Depending on what version of macOS you’re running, you may already have Apache installed on your computer. This default application of Apache will use the same default port settings as the Apache server in XAMPP, so this may be the cause of the “Apache shutdown unexpectedly” error.
If you’re using macOS, you can follow these four steps to update the default port settings.
Step 1: Open the XAMPP Apache Configuration
To start, open the XAMPP Application Manager if you haven’t already done so:

Next, select the Manage Servers tab next to the Welcome tab at the top:

On this screen, you’ll find a list of options. You can click on Apache Web Server, followed by the Configure button.
Step 2: Open the Conf File
From the Configure Apache Web Server box, select Open Conf File:

A warning box will appear, stating that the file is for advanced users:

You can click on Yes to continue. This will open the httpd.conf file.
Step 3: Update the Port Settings
Once the file opens in your text editor, the next step is to update the port settings. To do so, you can hit Ctrl + F, and then enter “80” in the search field. This will display instances of the number 80:

Locate the these lines:
#Listen 12.34.56.78:80
Listen 80
Once you do, go ahead and change them to the following:
#Listen 12.34.56.78:8080
Listen 8080
When you’re done, you can save and close the file. In the Configure Apache Web Server box, click on OK.
Step 4: Restart Apache
The final step is to stop and restart Apache, which you can do from the XAMPP Application Manager’s Manage Servers tab. Once Apache is stopped, click on Start to restart:

That’s it! Your port numbers will be updated and Apache should now run without error.
Summary
The XAMPP error “Apache shutdown unexpectedly” is commonly caused by another program, such as Skype, using the default Apache port. While this can be frustrating, it usually has a simple resolution.
As we discussed in this article, the easiest way to fix this problem is to update XAMPP’s Apache configuration settings. You can do this by editing the httpd.conf file and the http-ssl.conf file (for Windows users). Once this is done, you should stop and restart Apache to resume normal operation.
Get all your applications, databases and WordPress sites online and under one roof. Our feature-packed, high-performance cloud platform includes:
- Easy setup and management in the MyKinsta dashboard
- 24/7 expert support
- The best Google Cloud Platform hardware and network, powered by Kubernetes for maximum scalability
- An enterprise-level Cloudflare integration for speed and security
- Global audience reach with up to 35 data centers and 275+ PoPs worldwide
Test it yourself with $20 off your first month of Application Hosting or Database Hosting. Explore our plans or talk to sales to find your best fit.
Есть много возможных ответов на эту проблему. Наиболее распространенным и, скорее всего, является то, что у вас запущена другая программа, которая блокирует порт 80 или 443. Если вы установили Skype, вы нашли свою проблему! Измените настройки порта apache на 81, и apache будет работать. Там есть хороший учебник по этому вопросу. Чтобы проверить это, вы можете открыть свою командную строку, щелкнув меню «Пуск» и набрав «cmd», и введите команду
netstat -nab
этот wil возвращает список программ, которые будут смутно напоминать этот шаблон
    [someprogram.exe]
    UDP     [fe80::numbers:numbers:numbers:numbers%numbers]:portnumber
Вам нужно найти строку (или строки), заканчивающуюся на: 80, и завершить их, чтобы запустить apache. Если строка не заканчивается на: 80, вы можете сделать больше вещей.
Сначала перейдите в каталог xampp (по умолчанию — c:xampp) и дважды щелкните apache_start.bat. Это откроет линию comand и вернет более подробные ошибки о том, почему apache не может работать. В основном, нужно искать синтаксические ошибки, которые вы могли бы создать, отредактировав файлы httpd.conf или httpd-ssl.conf. Это очень легко сделать, если вы отредактировали его и стали новым пользователем.
Если это не удается, ваша последняя надежда — проверить журнал ошибок apache, щелкнув вкладку журналов в строке apache на панели управления xampp и щелкнув журнал ошибок.
Если ничего из этого не получится, не сдавайтесь! Вы получили это!
Изменить: Если вы измените порт apache, вам также придется перейти в httpd.conf(расположенный в xampp/apache/conf) и около строки 184, замените
ServerName localhost:80
с
ServerName localhost:81
Также можно указать порт 81 в URL вашего локального хоста, т.е.
локальный: 81/my_project.php
Перейти к содержимому

Ошибка была вызвана двумя причинами:
1) Skype занимал 80 и 443 порт. Решается она так: Skype>Инструменты>Настройки…>Дополнительно>Соединение. Снять галочку напротив «Для дополнительных входящих соединений следует использовать порты 80 и 443». Другой путь решения проблемы — менять порты в настройках Xampp и apache
2) Синтаксические ошибки в httpd.conf. При этом файлы error.log и access.log были пустые. Ошибки удалось увидеть толко благодаря прямому запуску apache через консоль: C:xamppapachebinhttpd.exe
Полный текст ошибки:
15:58:23 [Apache] Error: Apache shutdown unexpectedly.
15:58:23 [Apache] This may be due to a blocked port, missing dependencies,
15:58:23 [Apache] improper privileges, a crash, or a shutdown by another method.
15:58:23 [Apache] Press the Logs button to view error logs and check
15:58:23 [Apache] the Windows Event Viewer for more clues
15:58:23 [Apache] If you need more help, copy and post this
15:58:23 [Apache] entire log window on the forums
Я успешно установил XAMPP (xampp-win32-1.8.2-0-VC9-installer.exe) в Windows 7. Но, к сожалению, во время запуска Apache из панели управления XAMPP была обнаружена следующая ошибка:
Есть много возможных ответов на эту проблему. Наиболее распространенным и, скорее всего, является то, что у вас запущена другая программа, которая блокирует порт 80 или 443. Если вы установили Skype, вы нашли свою проблему! Измените настройки порта Apache на 81, и apache будет работать. Там есть хороший учебник. Чтобы проверить это, вы можете открыть свою командную строку, щелкнув меню «Пуск» и набрав «cmd», и введите команду
netstat -nab
этот wil возвращает список программ, которые будут смутно напоминать этот шаблон
[someprogram.exe] UDP [fe80::numbers:numbers:numbers:numbers%numbers]:portnumber
Вам нужно найти строку (или строки), заканчивающуюся на: 80, и прекратить их, чтобы запустить apache. Если нет строки, заканчивающейся на: 80, есть больше вещей, которые вы можете сделать.
Сначала перейдите в каталог xampp (по умолчанию – c: xampp) и дважды щелкните apache_start.bat. Это откроет линию comand и вернет более подробные ошибки о том, почему apache не может работать. В основном, нужно искать синтаксические ошибки, которые вы могли бы создать, отредактировав файлы httpd.conf или httpd-ssl.conf. Это очень легко сделать, если вы отредактировали его и стали новым пользователем.
Если все же это не удается, ваша последняя надежда – проверить журнал ошибок apache, щелкнув вкладку журналов в строке apache на панели управления xampp и щелкнув журнал ошибок.
Если это не работает, не сдавайтесь! Ты получил это!
Изменить: если вы измените порт apache, вам также нужно будет перейти в httpd.conf (расположенный в xampp / apache / conf) и около строки 184, заменить
ServerName localhost:80
с
ServerName localhost:81
Также можно указать порт 81 в URL вашего локального хоста, т. Е.
локальный: 81 / my_project.php
1. Перейдите в xampp/apache/conf/httpd.conf и откройте его.
В файле httpd.conf в line 176 Заменить
ServerName localhost:80
с
ServerName localhost:81
Это будет работать.
2. Даже если вышеуказанная процедура не работает. Затем в том же файле ( httpd.conf ) в строке 45 замените
#Listen 0.0.0.0:80 #Listen [::]:80 Listen 80
с
#Listen 0.0.0.0:81 #Listen [::]:81 Listen 81
Я обнаружил, что панель управления XAMPP под Windows (Windows 7 в моем случае) не отражает то, что на самом деле происходит, если вы не запустили ее с помощью «Запуск от имени администратора».
Сопровождая ответ Тиммей, вам нужно сделать два изменения –
Слушайте 80 -> Слушайте 81 (около строки 58)
ServerName localhost: 80 -> ServerName localhost: 81 (около строки 218)
только что изменил 2 строки
Listen 80 to Listen 81 ServerName localhost:80 to ServerName localhost:81
и начать использовать привилегии администратора
Проверьте, установлен ли Skype на вашем компьютере.
Войдите в систему и выберите «Сервис» – «Параметры» – «Дополнительно» – установите и снимите флажок, в котором говорится, что порт использования 80
–
Проверьте, установлена ли служба Apache, запуская службу services.msc из командной строки запуска.
Как удалить службу из командной строки? sc удалить «serviceName»
Помните, что имя службы должно быть заменено точным именем службы Apache, как показано в списке услуг.
Проверьте, работает ли IIS и занимает порт 80. Если это так, отключите его.
–
Проверьте, запущен ли AVP (Kaspersky) и занимает порт 80. Если это так, добавьте httpd.exe в качестве исключения для разрешенных программ.
–
Надеюсь, поможет.
Вы выполнили сценарий «setup_xampp.bat»? Он находится внутри папки XAMPP и должен выполняться каждый раз при изменении папки XAMPP.
Я установил рабочую станцию VMWare. Таким образом, это вызывало ошибку.
Services.msc and stopped the 'Workstation' Services.
Это решило мои проблемы.
благодаря
Если вы установили Skype, проверьте этот параметр.

Другой случай – Windows 10
Проверь это:
- Перейдите в меню «Пуск», введите services.msc
- Прокрутите страницу вниз в окне «Службы», чтобы найти службу публикации World Wide Web.
- Щелкните его правой кнопкой мыши и выберите «Стоп» или «Отключить», если вы просто хотите использовать только XAMPP.

я обнаружил, что аналогичная проблема в моей системе, и это было из skype, установленного до установки xampp. У меня такая же ошибка. для исправления ошибки я следил за ними,
- вышли на скайп какое-то время,
- перезапустил apache с панели управления xampp,
- проверен на браузере, независимо от того, работал он или нет, по http: // localhost /
- это сработало,
- снова присоединился к скайпу,
- все работает отлично, так просто, как это
Мне не нужно было ничего устанавливать или удалять, и это работало для меня менее чем за 1 минуту.
ура
Если вы столкнулись с этой проблемой сразу после полной установки Windows :
Похоже, что программа установки уже запускает процесс http.exe и блокирует начальный порт 80, но не отражает это состояние на панели управления.
Чтобы проверить, просто проверьте наличие работающего сервера в своем браузере. Введите в адресную строку браузера:
локальный
Если это отображает панель управления XAMPP, все в порядке. Кроме того, проверьте диспетчер задач для запуска процесса «Apache HTTP Server» (httpd.exe).
Вы можете остановить процесс apache с помощью xampp_stop.exe в своей базовой папке xampp. Затем панель управления XAMPP должна работать должным образом.
В моем случае проблема заключалась в том, что оба порта 80 и 443 были использованы: шаги для его устранения:
- Откройте xampp и нажмите кнопку конфигурации
- Теперь нажмите (appache) httpd.conf (Откройте в блокноте или другом редакторе)
- Теперь нажмите ctrl + h .
- Найдите
80и замените на8080 - Теперь сохраните и нажмите «Appache» (httpd-ssl.conf).
- Теперь найдите
443и замените на4430. - Теперь ваш xampp должен работать нормально, поскольку оба этих кода никогда не используются другими программами в вашей системе.
Если вы установили SQL Express или любой .Net-сервер, вам необходимо остановиться. откройте cmd в режиме администратора и введите эту строку …
сетчатая остановка
теперь начинаем апач
$$$$$$$$ Лучший способ сделать это $$$$$$$$$
Другие методы, описанные выше, заставят вас застрять во многих местах. Не переходите на смену порта.
2 Step Process
1) Открыть командную строку в качестве администратора
2) введите «net stop http» (если он говорит, что он не идентифицирует ключевое слово, то это связано только с тем, что в PATH переменной среды окружающей среды нет пути к программным файлам / System32, которые вы можете найти, как это сделать) Нажмите Y на каждом месте, о котором вы просите, не беспокоитесь. Вы не останавливаете какой-либо важный процесс только на каком-то процессе, который взял ваш порт. Анн, этот процесс снова захватит ваш порт, если вы не работаете.
Наслаждаться !!
У меня есть решение. У меня была эта проблема и исследование решения, но мне это не удалось. Поэтому я загрузил новую версию XAMPP и нажал на опцию netstats внутри программы.
Там он дал мне список программ и порты, которые они использовали, и поэтому я посмотрел и не имел программы, использующей порт 80 , но apache за пределами 80 также использует порт 443 … и была эта программа под названием Pando Media Boster, эта дверь, я начал менеджер задач и завершил процесс pando Average boster. Надеюсь, это помогло :).
Возможно, вы изменили конфигурационный файл в «httpd-ssl.conf»
<VirtualHost _default_:443> DocumentRoot "D:/Server/xServer" ServerName xyz.abc.com SSLCertificateFile "conf/ssl.crt/xyz.crt" SSLCertificateKeyFile "conf/ssl.key/sftaps.in.key" </VirtualHost>
Может быть, вы меняете имя сертификата или что-то в папке Apache.
Могут быть много методов для решения этой проблемы, но здесь простейший:
Перейдите к управлению XAMPP и …
Запустить от имени администратора
Это все..
Это Золотая точка для любой такой ненормальности.
Концепция работы
На самом деле всем службам в Xampp нужна зависимость портов. Что происходит, когда нет специальных полномочий, предоставляемых xampp, он ищет только определенные предопределенные порты для запуска этих служб. И, если в случае, эти порты как-то уже заняты … eek! служба не может быть запущена.
Но если мы дадим сверхдержаву нашему Xampp-контролю (запустив его как администратор), он каким-то образом справится и, безусловно, на земле запустит службы на портах. И торжество! Ты сделал это.
Постоянный совет для моего дорогого брата и сестер
Чтобы сделать все возможное, выполните следующие действия:
- щелкните правой кнопкой мыши файл xampp-control.exe и перейдите к свойствам.
- Перейдите на вкладку Совместимость .
- В приведенных ниже настройках установите флажок Запустить эту программу в качестве администратора .
- Примените изменения. И все готово.
Теперь, каждый раз, когда вы запускаете приложение, оно запускается с статусом администратора, и вам вообще не нужно заботиться о портах.
Даже если вы настроили Apache для прослушивания на другом порту, вы все равно получите эту ошибку, если другая программа использует порт SSL по умолчанию 443.
Вам также нужно отредактировать файл http-ssl.conf и изменить строку Listen 443 и изменить номер порта там.
Я также столкнулся с той же проблемой. И я нашел легкое и быстрое решение.
Единственное, что вам нужно сделать, – это запускать XAMPP-сервер как администратор каждый раз.


введите описание изображения здесь


Салам,
Вам не нужно менять номер порта.
только перейдите в диспетчер задач и завершите работу с любыми другими запущенными программами.
и тогда вы можете НАЧАТЬ APACHE …….
С уважением,
Are you getting the error “Apache shutdown unexpectedly”? Well, this article will help you sort this problem and carry on with your work.
PM 04:22:16 [Apache] Attempting to start Apache app…
PM 04:22:18 [Apache] Status change detected: running
PM 04:22:20 [Apache] Status change detected: stopped
PM 04:22:20 [Apache] Error: Apache shutdown unexpectedly.
PM 04:22:20 [Apache] This may be due to a blocked port, missing dependencies,
PM 04:22:20 [Apache] improper privileges, a crash, or a shutdown by another method.
PM 04:22:20 [Apache] Press the Logs button to view error logs and check
PM 04:22:20 [Apache] the Windows Event Viewer for more clues
PM 04:22:20 [Apache] If you need more help, copy and post this
PM 04:22:20 [Apache] entire log window on the forums
First, check which process is running in your port 80. try the following command in your terminal
net stop http
The above command will stop the process which is using your port 80.
If you are not interested in stopping that process and you want it to be running. Then you have to change the port for apache server. Below are the steps to change the port of apache
STEP #1:
Open the XAMPP Control Panel as administrator.
STEP #2:
In the XAMPP Control Panel, Left click on the Config button corresponding to Apache
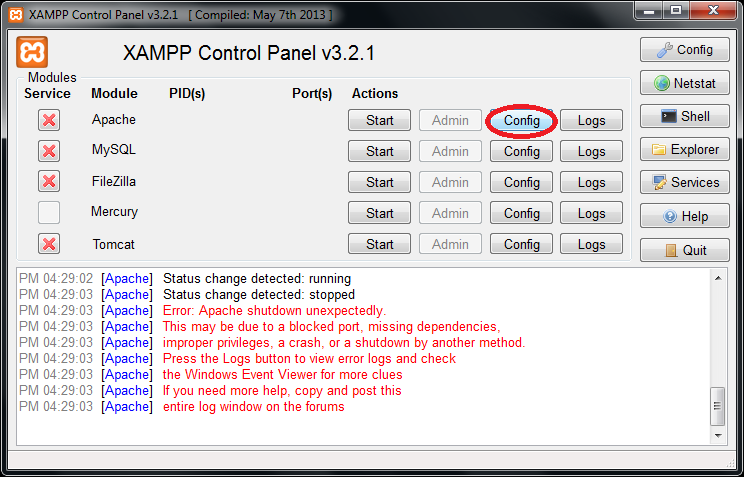
STEP #3:
Select ‘Apache (httpd.conf)’ from the drop-down menu. Notepad will open.
STEP #4:
Find Listen 80 and convert it to Listen 81.(or some other port number as per your wish)
NOTE: When you try to run xampp you should use “localhost:81/dashboard/” instead of “localhost/dashboard/”
STEP #5:
Find ServerName localhost:80 to ServerName localhost:81
STEP #6:
Save the notepad. Be sure that you can save the notepad file only if you open the XAMPP control panel as an Administrator. Now, start the Apache. It will run now.
If you have any problem regarding this, mention it in comments. I will try to solve your problem.
Update:
If you are using Skype, do the following steps:
Open Skype
Tools -> Options -> Advanced -> Connection
Uncheck the “Use port 80 and 443 for alternatives for incoming connections” checkbox
Sign Out and Close all Skype windows
Restart your Apache