
Hey Geeks, today we will see what NullPointerException means and how we can fix it in Android Studio. To understand NullPointerException, we have to understand the meaning of Null.
What is null?
“null” is a very familiar keyword among all the programmers out there. It is basically a Literal for Reference datatypes or variables like Arrays, Classes, Interfaces, and Enums. Every primitive data type has a default value set to it(Ex: True and False value for Boolean). Similarly, Reference Datatype Variables have Null value as default if it is not initialized during declaration.
Java
import java.util.Scanner;
public class Main
{
public static void main(String[] args) {
Scanner sc = null;
System.out.println(sc);
}
}
Output:
null
It is also important to note that we cannot directly store a null value in a primitive variable or object as shown below.
Java
import java.util.Scanner;
public class Main
{
public static void main(String[] args) {
int i = null;
System.out.println(i);
}
}
Output:
Main.java:5: error: incompatible types:  cannot be converted to int
        int i = null;
                ^
1 error
What is NullPointerException?
It is a run-time exception that arises when an application or a program tries to access the object reference(accessing methods) which has a null value stored in it. The null value gets stored automatically in the reference variable when we don’t initialize it after declaring as shown below.
Java
import java.util.Scanner;
public class Main
{
public static void main(String[] args) {
Scanner sc = null;
int input =sc.nextInt();
System.out.println(input);
}
}
Output:
Exception in thread "main" java.lang.NullPointerException
        at Main.main(Main.java:6)
Null Pointer Exception in Android Studio
NullPointerException in Android Studio highlighted in yellow color in the below screenshot

As you can observe from the above picture, it contains a Textview which is initialized to null.
TextView textview = null;
The TextView reference variable(i.e. textview) is accessed which gives a NullPointerException.
textview.setText("Hello world");

The App keeps stopping abruptly
Code
Java
import androidx.appcompat.app.AppCompatActivity;
import android.os.Bundle;
import android.widget.TextView;
import android.widget.Toast;
public class MainActivity extends AppCompatActivity {
@Override
protected void onCreate(Bundle savedInstanceState) {
super.onCreate(savedInstanceState);
setContentView(R.layout.activity_main);
TextView textview = null;
textview.setText("Hello World");
}
}
Handling the NullPointerException in Android Studio
To Handle the NullPointerException smoothly without making the app crash, we use the “Try – Catch Block” in Android.
- Try: The Try block executes a piece of code that is likely to crash or a place where the exception occurs.
- Catch: The Catch block will handle the exception that occurred in the Try block smoothly(showing a toast msg on screen) without letting the app crash abruptly.
The structure of Try -Catch Block is shown below

Code
Java
import androidx.appcompat.app.AppCompatActivity;
import android.os.Bundle;
import android.widget.TextView;
import android.widget.Toast;
public class MainActivity extends AppCompatActivity {
@Override
protected void onCreate(Bundle savedInstanceState) {
super.onCreate(savedInstanceState);
setContentView(R.layout.activity_main);
TextView textview = null;
try {
textview.setText("Hello world");
}
catch(Exception e){
Toast.makeText(this,e.getMessage(),Toast.LENGTH_SHORT).show();
}
}
}
Output:
Using Try Catch we can catch the exception on the screen

How to fix the NullPointerException?
To avoid NullPointerException we have to initialize the Textview component with the help of findviewbyid( ) method as shown below. The findViewbyId( ) takes the “id” value of the component as the parameter. This method helps locate the component present in the app.

Solving the NullPointerException

TextView with id textview
Code
Java
import androidx.appcompat.app.AppCompatActivity;
import android.os.Bundle;
import android.widget.TextView;
import android.widget.Toast;
public class MainActivity extends AppCompatActivity {
@Override
protected void onCreate(Bundle savedInstanceState) {
super.onCreate(savedInstanceState);
setContentView(R.layout.activity_main);
TextView textview = findViewById(R.id.textview);
try {
textview.setText("Hello world");
}
catch(Exception e){
Toast.makeText(this,e.getMessage(),Toast.LENGTH_SHORT).show();
}
}
}
Output:

Output after Solving NullPointerException
As you can see after initializing the text view component we have solved the NullPointerException. Hence in this way, we can get rid of NullPointerException in Android Studio.
Last Updated :
25 Jul, 2022
Like Article
Save Article
Когда вы объявляете переменную ссылочного типа, на самом деле вы создаете ссылку на объект данного типа. Рассмотрим следующий код для объявления переменной типа int:
int x;
x = 10;
В этом примере переменная x имеет тип int и Java инициализирует её как 0. Когда вы присвоите переменной значение 10 (вторая строка), это значение сохранится в ячейке памяти, на которую ссылается x.
Но когда вы объявляете ссылочный тип, процесс выглядит иначе. Посмотрим на следующий код:
Integer num;
num = new Integer(10);
В первой строке объявлена переменная num, ее тип не относится к встроенному, следовательно, значением является ссылка (тип этой переменной, Integer, является ссылочным типом). Поскольку вы еще не указали, на что собираетесь ссылаться, Java присвоит переменной значение Null, подразумевая «Я ни на что не ссылаюсь».
Во второй строке, ключевое слово new используется для создания объекта типа Integer. Этот объект имеет адрес в памяти, который присваивается переменной num. Теперь, с помощью переменной num вы можете обратиться к объекту используя оператора разыменования ..
Исключение, о котором вы говорите в вопросе, возникает, если вы объявили переменную, но не создали объект, то есть если вы попытаетесь разыменовать num до того, как создали объект, вы получите NullPointerException. В самом простом случае, компилятор обнаружит проблему и сообщит, что
nummay not have been initialized
Что говорит: «возможно, переменная num не инициализирована».
Иногда исключение вызвано именно тем, что объект действительно не был создан. К примеру, у вас может быть следующая функция:
public void doSomething(Integer num){
   // Работаем с num
}
В этом случае создание объекта (переменная num) лежит на вызывающем коде, то есть вы предполагаете, что он был создан ранее – до вызова метода doSomething. К сожалению, следующий вызов метода вполне возможен:
doSomething(null);
В этом случае значение переменной num будет null. Лучшим способом избежать данного исключения будет проверка на равенство нулю. Как результат, функция doSomething должна быть переписана следующим образом:
public void doSomething(Integer num){
    if (num != null) {
       // Работаем с num
    }
}
Как альтернативный вариант предыдущему примеру вы можете сообщить вызывающему коду, что метод был вызван с неверными параметрами, например, с помощью IllegalArgumentException.
public void doSomething(Integer num){
    if (num == null)
        throw new IllegalArgumentException("Num не должен быть null");
    // Работаем с num
}
Также, обратите внимание на вопрос «Что такое stack trace и как с его помощью находить ошибки при разработке приложений?».
Перевод ответа «What is a Null Pointer Exception, and how do I fix it?» @Vincent Ramdhanie.
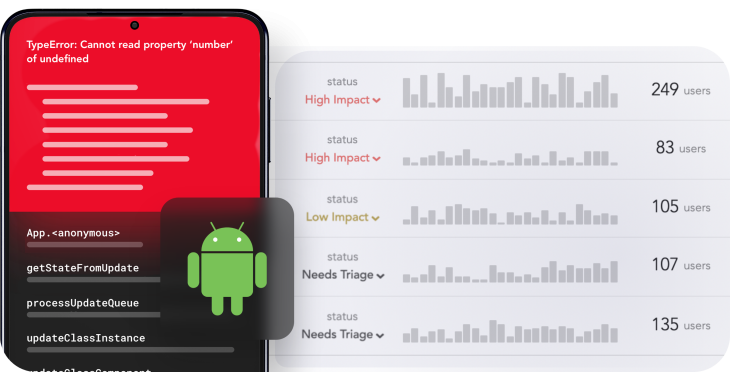
You have just finished creating an Android-based application and attempt to execute it. As far as you know, the application is fine, there are no syntax errors and the code should just work fine. But when you run it now, your application quits saying an uncaught RuntimeException was thrown. Attempting to dig up the cause, you find something that gives you a clue: a NullPointerException has occurred.
With this, you begin your journey into the world of exception handling with Android, in particular, handling NullPointerException. In this post, we’ll discuss how to fix NullPointerExceptions in Android apps.
Jump ahead:
- What is a
NullPointerException?- Why do
NullPointerExceptions occur?
- Why do
- Avoiding
NullPointerExceptions in Java- Using SmartCast
- Using the Elvis operator
- Avoiding
NullPointerExceptions in Kotlin - Using
logcatto detect and fix aNullPointerExceptionin Android Studio - Setting breakpoints to debug
NullPointerExceptions
What is a NullPointerException?
First, let’s quickly refresh ourselves on exceptions. They are events or abnormal conditions in a program that occur during execution and disrupt the normal flow of the program.
An exception can occur for different reasons, such as:
- A user enters invalid data to a field
- A file that must be opened cannot be found
- A network connection is lost in the middle of communication
- The JVM has run out of memory
When an error occurs inside a method, it throws an exception. A NullPointerException is one of the most common runtime exceptions.
In Java, null is a special value that represents the absence of a value. When you try to use a null value, you get a NullPointerException because the operation you are trying to perform cannot be completed on a null value.
In Kotlin, null is not a value, but a type of its own called nullable. By default, every object in Kotlin is non-null, which means it cannot have a null value.
Why do NullPointerExceptions occur?
You might encounter a NullPointerException when trying to access a view, resource, or data that hasn’t been properly initialized or loaded yet. Some of the situations in which a NullPointerException can occur in Java, according to the Java Language Specification, include:
- Attempting to access elements of a
nullarray - Using
switchwith a null expression - Accessing instance fields of
nullreferences - Invoking instance methods of a
nullreference - Using an integer or floating point operator that has one of its operands as a boxed
nullreference - Attempting an unboxing conversion with the boxed value as
null - Calling
superon anullreference
Avoiding NullPointerExceptions in Java
Below are some best practices to avoid NullPointerExceptions in Java:
- String comparison with literals
- Avoid returning null from your methods
- Keep checking arguments of methods
- Use
String.valueOf()rather thantoString() - Using primitives data types as much as possible
- Avoid chained method calls
- Use ternary operator
By contrast, Kotlin is a smarter, more modern language that has been designed to avoid NullPointerExceptions through several mechanisms, such as:
- Using nullable and non-nullable types
- Using the SmartCast feature
- Safe calls
- The Elvis operator
In Kotlin, all regular types are non-nullable unless you explicitly mark them as nullable with a question mark ?, e.g., String?.
Consider the below Kotlin code:
fun getlen(name: String) = name.length
The parameter name has a type of String, which means it must always contain a String instance and cannot contain null. This code ensures that a NullPointerException at runtime is unlikely to occur.
Instead, any attempt to pass a null value to the getlen(name: String) function will cause a compile-time error: Null cannot be a value of a non-null type String. This is because the compiler has enforced the rule that arguments of getlen() cannot be null.
Consider the below snippet, in which the code is obvious to us but may not be immediately obvious to the compiler:
class TestNPE {
    companion object {
        @JvmStatic
        fun main(args: Array<String>) {
        var m : String? // here, m is declared as nullable
println("m is : $m")
var x: Int
x = 150
if (x == 150)
    println("Value of m is : $m")
        }
    }
}
The compiler raises a compiler error because m is not initialized:
![]()
Thus, instead of proceeding to runtime and then raising an exception, it stops at the compilation stage with a compiler error.
Using SmartCast
In order to use nullable types, Kotlin has an option called safe cast, or smart cast. Through this feature, the Kotlin compiler will trace situations inside if and other conditional expressions. So, if the compiler finds a variable belonging to a non-null type, it will allow you to access this variable safely.
In certain cases, it is not possible for the compiler to cast types, in which case it will throw an exception; this is called unsafe casting. Consider a nullable string (String?) which cannot be cast to a non-nullable string (String). It will throw an exception.
Kotlin addresses this by providing a safe cast operator as? to cast safely to another type. If casting is not possible, it returns a null rather than throwing a ClassCastException.
Example:
val aInt: Int? = a as? Int
Using the Elvis operator ?:
Kotlin also has an advanced operator called the Elvis operator (?:) that returns either a non-null value or the default value, even if the conditional expression is null. It also checks the null safety of values.
Consider an example:
val count = attendance?.length ?: -1
This means:
val count: Int = if (attendance != null) attendance.length else -1
Despite this, an NullPointerException could still occur in Kotlin-based Android applications.
Consider the earlier example of class TestNPE. Now, the code is modified such that m is initialized but is used with a non-null assertion operator (!!), which converts a given value to a non-null type and throws an exception if the value is null.
class TestNPE {
companion object {
@JvmStatic
fun main(args: Array<String>) {
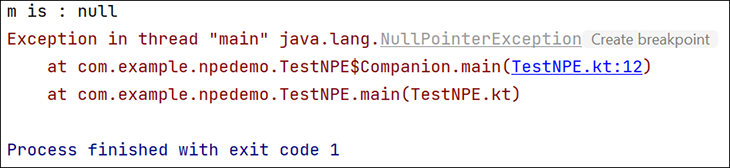
var m: String?=null // here, m is declared
//as nullable
var x: Int
x = 150
if (x == 150)
println("m is : $m")
var mlen = m!!.length
println("length of m is : $mlen")
}
}
}
In this case, a NullPointerException will be thrown, as shown here:
Avoiding NullPointerExceptions in Kotlin
A few causes of a NullPointerException in Kotlin are:
- Explicitly calling
throw NullPointerException() - Using the
!!operator - Data inconsistency with regard to initialization
- Java interoperation
To prevent NullPointerExceptions, you should always ensure that your variables and objects are properly initialized before you use them. You can also use null checks or try … catch blocks to handle possible null values and prevent your app from crashing.
An extremely simplified example of using try … catch is given below:
class TestNPE {
    companion object {
        @JvmStatic
        fun main(args: Array<String>) {
            var m: String?=null // here, m is declared
//as nullable
           try {
               var x: Int
               x = 150
               if (x == 150)
                   println("m is : $m")
               var mlen = m!!.length
               println("length of m is : $mlen")
           }catch( ne: NullPointerException)
           {
               println("Null Pointer Exception has
occurred. ")
           }
        }
    }
}
The code that is likely to cause a NullPointerException is enclosed in a try … catch block.
The advantage here is that the developer has control over what must be done when the exception is thrown. Here, a simple message is displayed. In practical scenarios, one can close any currently open resources, such as files, before terminating the program.
Using logcat to detect and fix a NullPointerException in Android Studio
Whenever an Android application crashes, a stack trace is written to the console that contains vital information that can help identify and solve the issue. There are two ways to get to this stack trace:
-
- Using Google’s
adbshell utility to obtain alogcatfile, which can help explain why the application crashed:adb logcat > logcat.txt
Open
logcat.txtand search for the application name. It will have information on why the application failed along with other details such as line number, class name, and so on - In Android Studio, either press
Alt + 6, or click the Logcat button in the status bar. Make sure your emulator or device is selected in the Devices panel, then locate the stack trace.
- Using Google’s
There may be a lot of stuff logged into logcat, so you may need to scroll a bit, or you can clear the logcat through the Recycle Bin option and let the app crash again to bring the most recent stack trace in the log to the top.
An important point of note is that if your app is already live, then you cannot use logcat.
Android Studio Electric Eel’s latest version has an updated logcat, which facilitates easier parsing, querying, and tracking of logs. The new logcat also:
- Formats logs for easy scanning for tags, messages, and other useful information
- Identifies various types of logs, such as warnings and errors.
- Makes it easier to track logs from your app across app crashes and restarts
When logcat notices that your app process has stopped and restarted. you’ll see a message in the output similar to below:
PROCESS ENDED
Or:
PROCESS STARTED
Developers can fine tune the command to give the message timestamp, for example:
adb logcat -v time
Using logcat, you can determine whether a widget or component is declared but not defined yet, or a variable is null and being used. Sometimes, it could happen that a context is null during navigation between screens, and you are attempting to use that context without realizing it’s null.
Setting breakpoints to debug NullPointerException
If you have a large application, it can be quite cumbersome to debug it. You can set breakpoints in your code that let you debug your code block by block.
A breakpoint serves as a stop sign for the marked piece of code. When a breakpoint is encountered during application debugging, it will pause execution, thus enabling allowing developers to examine in detail what’s happening and use other debugging tools as required.
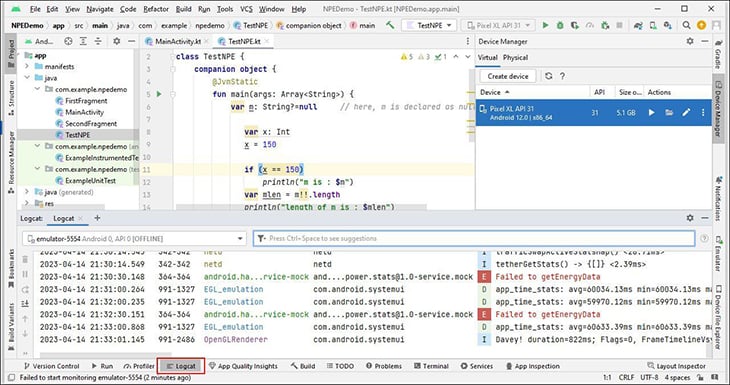
To use breakpoints, add a breakpoint by clicking the gutter in the code editor next to the line number where you want execution to pause. A dot will appear next to the line number, and the line will be highlighted. See below; two breakpoints are added:

Click Run > Debug ‘app’. The program halts at the first breakpoint and you can examine the values in the Debug window at the bottom of Android Studio:
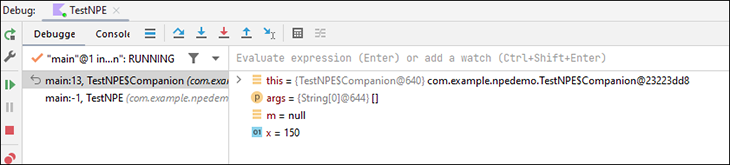
There are various buttons such as Step Over and Step Into that can help you navigate further:

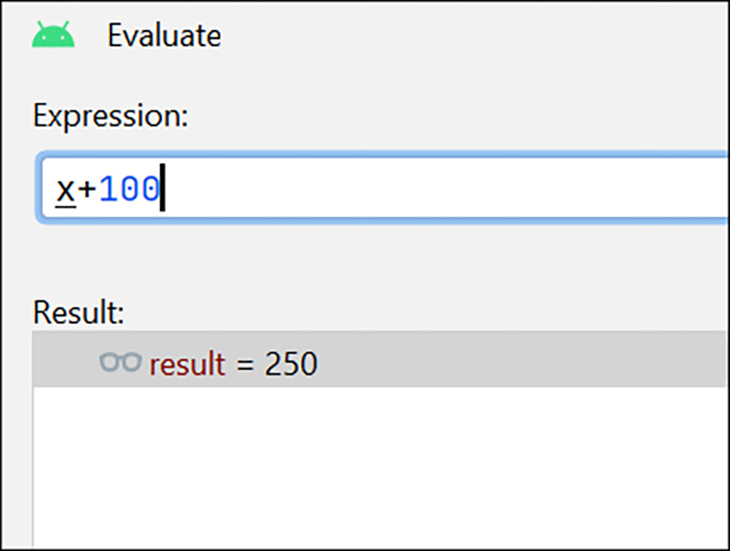
Besides examining the current values of certain operands and expressions, you can also evaluate expressions using the Evaluate option.
In the below example, I wanted to know what the value of x added to 100 would be. The window shows me the result based on the current value of x:
Here is a detailed explanation of various terms related to debugging in Android Studio.
Conclusion
To conclude, in Android development, there are various mechanisms available with Java and Kotlin that are designed to aid developers in avoiding NullPointerExceptions. In the cases these exceptions still occur, you should now have a variety of tools that help identify the cause and debug code.
LogRocket: Instantly recreate issues in your Android apps.
LogRocket is an Android monitoring solution that helps you reproduce issues instantly, prioritize bugs, and understand performance in your Android apps.
LogRocket also helps you increase conversion rates and product usage by showing you exactly how users are interacting with your app. LogRocket’s product analytics features surface the reasons why users don’t complete a particular flow or don’t adopt a new feature.
Start proactively monitoring your Android apps — try LogRocket for free.
In this post, we are going to talk about the NullPointerException in Java. We will discuss the main causes and solution to it. I will also discuss how to track down a NullPointerException in Android Studio. I will try to explain at a high level (no low-level explanations) so it can be easily understood.

What causes a NullPointerException?
A NullPointerException is usually thrown when you try to access a field or a method in a variable or an object that is null. This is simple to understand however, it might be a bit confusing for some programmers.
Now, the next question is:
What causes an object to be null?
When you create a variable or an object without instantiating it, then the value of that variable or object is null. So for example, when you have the following code:
The value of firstName in this case would be null.
Now if you try to call a method on the variable firstName, then the NullPointerException will be thrown.
For example:
|
String firstName; firstName.toLowerCase(); |
The above code will throw a null pointer exception on line 2.
Similarly, if you create an object without equating the object, the ugly null pointer exception will be thrown.
For example:
|
Game newGame; newGame.start(); |
The above code will throw the NullPointerException.
How to solve the NullPointerException.
To solve the NullPointerException, you simply need to assign a value to the variable involved. If it is an object, you need to instantiate that object with the new keyword.
For example:
|
String firstName = «Finco»; firstName.toLowerCase(); |
The above code will work swiftly.
For objects:
|
Game oldGame = new Game(); oldGame.start(); |
The above code will also work beautifully.
Debugging the NullPointerException in Android
There are times when even professional developers can swear that the object involved cannot just be null. Personally, I used to be guilty of this. There are times when it just seems impossible for the object in question to be null. However, what I would like to assure you is that when your IDE throws the null pointer exception, be sure your IDE is not mistaken :).
So I will list a couple of scenarios that could result in an object being null even when the object involved seems to be not null. Please note that there are hundreds of other scenarios, however, I would discuss just a couple of them.
For simplicity, we will use only objects as examples
Scenario 1:
Sometimes, you might have instantiated a class correctly, but later in your code, unknowingly assigned a null value to that object.
For example:
|
Game oldGame = new Game(); oldGame.start(); //some other portion of the code oldGame = null; //some further portion of the code oldGame.stop(); |
The above example is an illustration of how a NullPointerException can be caused by “programmer error”.
Scenario 2:
Calling findViewById()
This is one of the most common reasons developers encounter the NullPointerException when developing an Android App. Take a look at the code sample below.
|
public class SplashActivity extends BaseActivity { @Override protected void onCreate(Bundle savedInstanceState) { super.onCreate(savedInstanceState); setContentView(R.layout.activity_splash); ImageView pb = findViewById(R.id.imgHeartLoading); pb.setOnClickListener(new View.OnClickListener() { @Override public void onClick(View v) { //TODO: do something } }); } } |
The code above is valid and should not throw any exceptions under normal conditions. However, the id R.id.imgHeartLoading has to be present in the layout file R.layout.activity_splash. If the requested view is not present in the R.layout.activity_splash layout file, then the findViewById() method will return null. In a scenario where findViewById() returns null, then the next line pb.setOnClickListener(new View.OnClickListener() {...}); would throw the NullPointerException.
Basically, when you call the findViewById() method in an Activity class, the method tries to locate the requested view in whatever layout that was passed to setContentView(). Some developers assume that the findViewById() method goes through every single layout file in the project, however, this is very wrong.
So in a case like this:
- The variable pb is being equated to
findViewById(R.id.imgHeartLoading) R.id.imgHeartLoading- But the variable pb is still null.
NullPointerException can be avoided in programming by using the following
1. Check for null values before calling an object’s method:
This is a very simple solution. In the example above, we can avoid the NullPointerException by inserting an if statement just before calling setOnClickListener
For Example:
|
ImageView pb = findViewById(R.id.imgHeartLoading); if(pb != null){ pb.setOnClickListener(new View.OnClickListener() { @Override public void onClick(View v) { //TODO: do something } }); } |
In this case, the if(){} block will never be executed if the pb variable is null
2. Use a try{} catch(){} Block:
This solution simply involves wrapping your code in a try and catch block.
For Example:
|
ImageView pb = findViewById(R.id.imgHeartLoading); try{ pb.setOnClickListener(new View.OnClickListener() { @Override public void onClick(View v) { //TODO: do something } }); }catch(Exception ex){ ex.printStackTrace(); } |
Note:
The above solutions are just temporary solutions. These solutions only avoid the NullPointerException but they do nothing to solve the problem. As a good developer, you should track down the main reason for the exception.
And that’s all for now.
If you have any questions or contributions, feel free to post them in the comment box below :).
Related posts:
Время на прочтение
5 мин
Количество просмотров 270K
Эта простая статья скорее для начинающих разработчиков Java, хотя я нередко вижу и опытных коллег, которые беспомощно глядят на stack trace, сообщающий о NullPointerException (сокращённо NPE), и не могут сделать никаких выводов без отладчика. Разумеется, до NPE своё приложение лучше не доводить: вам помогут null-аннотации, валидация входных параметров и другие способы. Но когда пациент уже болен, надо его лечить, а не капать на мозги, что он ходил зимой без шапки.
Итак, вы узнали, что ваше приложение упало с NPE, и у вас есть только stack trace. Возможно, вам прислал его клиент, или вы сами увидели его в логах. Давайте посмотрим, какие выводы из него можно сделать.
NPE может произойти в трёх случаях:
- Его кинули с помощью throw
- Кто-то кинул null с помощью throw
- Кто-то пытается обратиться по null-ссылке
Во втором и третьем случае message в объекте исключения всегда null, в первом может быть произвольным. К примеру, java.lang.System.setProperty кидает NPE с сообщением «key can’t be null», если вы передали в качестве key null. Если вы каждый входной параметр своих методов проверяете таким же образом и кидаете исключение с понятным сообщением, то вам остаток этой статьи не потребуется.
Обращение по null-ссылке может произойти в следующих случаях:
- Вызов нестатического метода класса
- Обращение (чтение или запись) к нестатическому полю
- Обращение (чтение или запись) к элементу массива
- Чтение length у массива
- Неявный вызов метода valueOf при анбоксинге (unboxing)
Важно понимать, что эти случаи должны произойти именно в той строчке, на которой заканчивается stack trace, а не где-либо ещё.
Рассмотрим такой код:
 1: class Data {
 2:    private String val;
 3:    public Data(String val) {this.val = val;}
 4:    public String getValue() {return val;}
 5: }
 6:
 7: class Formatter {
 8:    public static String format(String value) {
 9:        return value.trim();
10:    }
11: }
12:
13: public class TestNPE {
14:    public static String handle(Formatter f, Data d) {
15:        return f.format(d.getValue());
16:    }
17: }
Откуда-то был вызван метод handle с какими-то параметрами, и вы получили:
Exception in thread "main" java.lang.NullPointerException
    at TestNPE.handle(TestNPE.java:15)
В чём причина исключения — в f, d или d.val? Нетрудно заметить, что f в этой строке вообще не читается, так как метод format статический. Конечно, обращаться к статическому методу через экземпляр класса плохо, но такой код встречается (мог, например, появиться после рефакторинга). Так или иначе значение f не может быть причиной исключения. Если бы d был не null, а d.val — null, тогда бы исключение возникло уже внутри метода format (в девятой строчке). Аналогично проблема не могла быть внутри метода getValue, даже если бы он был сложнее. Раз исключение в пятнадцатой строчке, остаётся одна возможная причина: null в параметре d.
Вот другой пример:
 1: class Formatter {
 2:     public String format(String value) {
 3:         return "["+value+"]";
 4:     }
 5: }
 6:
 7: public class TestNPE {
 8:     public static String handle(Formatter f, String s) {
 9:         if(s.isEmpty()) {
10:             return "(none)";
11:         }
12:         return f.format(s.trim());
13:     }
14: }
Снова вызываем метод handle и получаем
Exception in thread "main" java.lang.NullPointerException
	at TestNPE.handle(TestNPE.java:12)
Теперь метод format нестатический, и f вполне может быть источником ошибки. Зато s не может быть ни под каким соусом: в девятой строке уже было обращение к s. Если бы s было null, исключение бы случилось в девятой строке. Просмотр логики кода перед исключением довольно часто помогает отбросить некоторые варианты.
С логикой, конечно, надо быть внимательным. Предположим, условие в девятой строчке было бы написано так:
if("".equals(s))Теперь в самой строчке обращения к полям и методам s нету, а метод equals корректно обрабатывает null, возвращая false, поэтому в таком случае ошибку в двенадцатой строке мог вызвать как f, так и s. Анализируя вышестоящий код, уточняйте в документации или исходниках, как используемые методы и конструкции реагируют на null. Оператор конкатенации строк +, к примеру, никогда не вызывает NPE.
Вот такой код (здесь может играть роль версия Java, я использую Oracle JDK 1.7.0.45):
 1: import java.io.PrintWriter;
 2:
 3: public class TestNPE {
 4:     public static void dump(PrintWriter pw, MyObject obj) {
 5:         pw.print(obj);
 6:     }
 7: }
Вызываем метод dump, получаем такое исключение:
Exception in thread "main" java.lang.NullPointerException
	at java.io.PrintWriter.write(PrintWriter.java:473)
	at java.io.PrintWriter.print(PrintWriter.java:617)
	at TestNPE.dump(TestNPE.java:5)
В параметре pw не может быть null, иначе нам не удалось бы войти в метод print. Возможно, null в obj? Легко проверить, что pw.print(null) выводит строку «null» без всяких исключений. Пойдём с конца. Исключение случилось здесь:
472: public void write(String s) {
473:     write(s, 0, s.length());
474: }
В строке 473 возможна только одна причина NPE: обращение к методу length строки s. Значит, s содержит null. Как так могло получиться? Поднимемся по стеку выше:
616: public void print(Object obj) {
617:     write(String.valueOf(obj));
618: }
В метод write передаётся результат вызова метода String.valueOf. В каком случае он может вернуть null?
public static String valueOf(Object obj) {
   return (obj == null) ? "null" : obj.toString();
}
Единственный возможный вариант — obj не null, но obj.toString() вернул null. Значит, ошибку надо искать в переопределённом методе toString() нашего объекта MyObject. Заметьте, в stack trace MyObject вообще не фигурировал, но проблема именно там. Такой несложный анализ может сэкономить кучу времени на попытки воспроизвести ситуацию в отладчике.
Не стоит забывать и про коварный автобоксинг. Пусть у нас такой код:
 1: public class TestNPE {
 2:     public static int getCount(MyContainer obj) {
 3:         return obj.getCount();
 4:     }
 5: }
И такое исключение:
Exception in thread "main" java.lang.NullPointerException
	at TestNPE.getCount(TestNPE.java:3)
На первый взгляд единственный вариант — это null в параметре obj. Но следует взглянуть на класс MyContainer:
import java.util.List;

public class MyContainer {
    List<String> elements;

    public MyContainer(List<String> elements) {
        this.elements = elements;
    }

    public Integer getCount() {
        return elements == null ? null : elements.size();
    }
}
Мы видим, что getCount() возвращает Integer, который автоматически превращается в int именно в третьей строке TestNPE.java, а значит, если getCount() вернул null, произойдёт именно такое исключение, которое мы видим. Обнаружив класс, подобный классу MyContainer, посмотрите в истории системы контроля версий, кто его автор, и насыпьте ему крошек под одеяло.
Помните, что если метод принимает параметр int, а вы передаёте Integer null, то анбоксинг случится до вызова метода, поэтому NPE будет указывать на строку с вызовом.
В заключение хочется пожелать пореже запускать отладчик: после некоторой тренировки анализ кода в голове нередко выполняется быстрее, чем воспроизведение трудноуловимой ситуации.