
Время на прочтение
8 мин
Количество просмотров 24K
В этой статье мы с вами разберемся, что такое CORS, CORS-ошибки и из-за чего мы можем с ними сталкиваться. Я также продемонстрирую возможные решения и объясню, что такое предварительные (preflight) запросы, CORS-заголовки и в чем заключается их важность при обмене данными между сторонами. Эта статья рассчитана на тех, у кого уже есть базовые познания в области веб-разработки и некоторый опыт с протоколом HTTP. Я старался писать статью так, чтобы она была понятна и новичкам, будучи наполненной знаниями, но при этом стараясь избегать слишком большого количества технических нюансов, не связанных с темой CORS. Если вы заметите какие-либо ошибки или у вас будут предложения, не стесняйтесь писать мне. В некоторых местах я нарочно делал упрощения, говоря “служба”, подразумевая “сервер”, и наоборот.
Что такое CORS?
Cross-Origin Resource Sharing (CORS или “совместное использование ресурсов различными источниками”) — это контролируемый и применяемый в принудительном порядке клиентом (браузером) механизм обеспечения безопасности на основе HTTP. Он позволяет службе (API) указывать любой источник (origin), помимо себя, из которого клиент может запрашивать ресурсы. Он был разработан в соответствии с same-origin policy (SOP или “политика одинакового источника”), которая ограничивает взаимодействие сайта (HTML-документа или JS-скрипта), загруженного из одного источника, с ресурсом из другого источника. CORS используется для явного разрешения определенных cross-origin запросов и отклонения всех остальных.
В основном CORS реализуют веб-браузеры, но как вариант его также можно использовать в API-клиентах. Он присутствует во всех популярных браузерах, таких как Google Chrome, Firefox, Opera и Safari. Этот стандарт был принят в качестве рекомендации W3C в январе 2014 года. Исходя из этого, можно смело предполагать, что он реализован во всех доступных в настоящее время браузерах, которые не были перечислены выше.
Как это работает?
Все начинается на стороне клиента, еще до отправки основного запроса. Клиент отправляет в службу с ресурсами предварительный (preflight) CORS-запрос с определенными параметрами в заголовках HTTP (CORS-заголовках, если быть точнее). Служба отвечает, используя те же заголовки с другими или такими же значениями. На основе ответа на предварительный CORS-запрос клиент решает, может ли он отправить основной запрос к службе. Браузер (клиент) выдаст ошибку, если ответ не соответствует требованиям предварительной проверки CORS.
Предварительные CORS-запросы отправляются независимо от используемых для отправки запросов из браузера библиотек или фреймворков. Поэтому вам не нужно соответствовать требованиям CORS, когда вы работе с API из вашего серверного приложения.
CORS не будет препятствовать пользователям запрашивать или загружать ресурсы. Вы прежнему можете успешно запросить ресурс с помощью таких приложений, как curl, Insomnia или Postman. CORS будет препятствовать доступу браузера к ресурсу только в том случае, если политика CORS не разрешает этого.
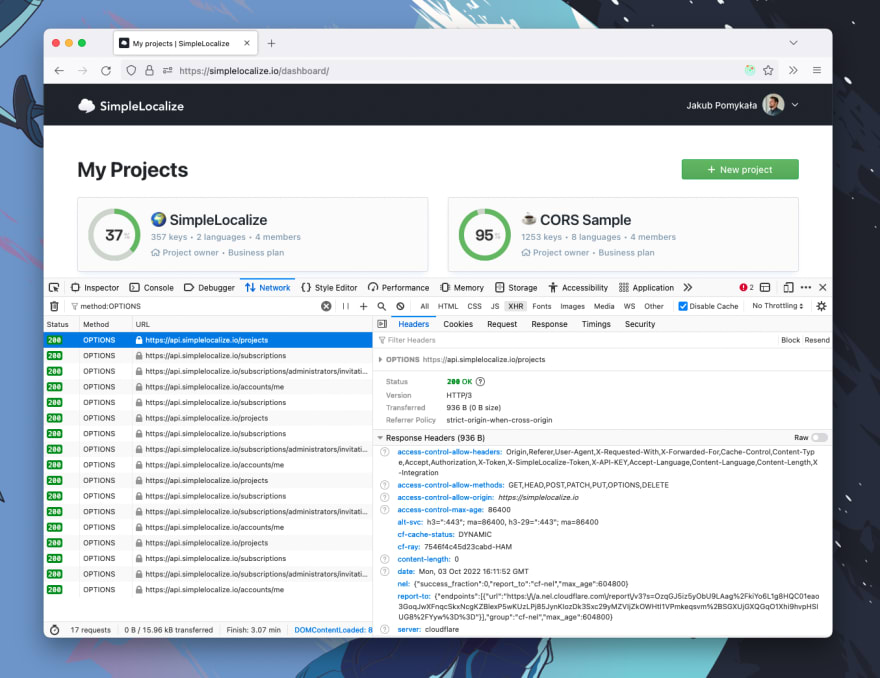
Что такое предварительная проверка CORS?
Когда браузер отправляет запрос на сервер, он сначала отправляет Options HTTP-запрос. Это и есть предварительным CORS-запрос. Затем сервер отвечает списком разрешенных методов и заголовков. Если браузеру разрешено сделать фактический запрос, то тогда он незамедлительно отправит его. Если нет, он покажет пользователю ошибку и не выполнит основной запрос.

CORS-заголовки
CORS-заголовки — это обычные заголовки HTTP, которые используются для контроля политики CORS. Они используются, когда браузер отправляет предварительный CORS-запрос на сервер, на который сервер отвечает следующими заголовками:
-
Access-Control-Allow-Originуказывает, какой источник может получать ресурсы. Вы можете указать один или несколько источников через запятую, например:https://foo.io,http://bar.io. -
Access-Control-Allow-Methodsуказывает, какие HTTP-методы разрешены. Вы можете указать один или несколько HTTP-методов через запятую, например:GET,PUT,POST. -
Access-Control-Allow-Headersуказывает, какие заголовки запросов разрешены. Вы можете указать один или несколько заголовков через запятую, например:Authorization,X-My-Token. -
Access-Control-Allow-Credentialsуказывает, разрешена ли отправка файлов cookie. По умолчанию:false. -
Access-Control-Max-Ageуказывает в секундах, как долго должен кэшироваться результат запроса. По умолчанию: 0.
Если вы решите использовать Access-Control-Allow-Credentials=true, то вам нужно знать, что вы не сможете использовать символы * в заголовках Access-Control-Allow-*. Необходимо будет явно перечислить все разрешенные источники, методы и заголовки.
Полный список CORS-заголовков вы можете найти здесь.

Почему запрос может быть заблокирован политикой CORS?
Если вы веб-разработчик, вы, вероятно, уже слышали или даже сталкивались с CORS-ошибками, имея за плечами часы, потраченные на поиски их причин и решений. Наиболее распространенная проблема заключается в том, что браузер блокирует запрос из-за политики CORS. Браузер выдаст ошибку и отобразит в консоли следующее сообщение:
Access to XMLHttpRequest at 'http://localhost:8080/' from origin
'http://localhost:3000' has been blocked by CORS policy:
Response to preflight request doesn't pass access control
check: No 'Access-Control-Allow-Origin' header is present
on the requested resource.
Приведенная выше CORS-ошибка уведомляет пользователя о том, что браузер не может получить доступ к ресурсу (https://localhost:8080) из источника (https://localhost:3000), поскольку сервер его не одобрил. Это произошло из-за того, что сервер не ответил заголовком Access-Control-Allow-Origin с этим источником или символом * в ответе на предварительный CORS-запрос.
Запрос может быть заблокирован политикой CORS не только из-за невалидного источника, но и из-за неразрешенных заголовка HTTP, HTTP-метода или заголовка Cookie.
Как исправить CORS-ошибку?
Фундаментальная идея “исправления CORS” заключается в том, чтобы отвечать на OPTIONS запросы, отправленные от клиента, корректными заголовками. Есть много способов начать отвечать корректными CORS. Вы можете использовать прокси-сервер или какое-нибудь middleware на своем сервере.

Помните, что заголовки Access-Control-* кэшируются в браузере в соответствии со значением, установленным в заголовке Access-Control-Max-Age. Поэтому перед тестированием изменений вам обязательно нужно чистить кэш. Вы также можете отключить кэширование в своем браузере.
1. Настройка вашего сервера
По умолчанию, если вы являетесь владельцем сервера, вам необходимо настроить на своем сервере CORS-ответы, и это единственный способ правильно решить проблему. Вы можете добиться этого несколькими способами из нескольких слоев вашего приложения. Самый распространенный способ — использовать обратный прокси-сервер (reverse-proxy), API-шлюз или любой другой сервис маршрутизации, который позволяет добавлять заголовки к ответам. Для этого можно использовать множество сервисов, и вот некоторые из них: HAProxy, Linkerd, Istio, Kong, nginx, Apache, Traefik. Если ваша инфраструктура содержит только приложение без каких-либо дополнительных слоев, то вы можете добавить поддержку CORS в код самого приложения.
Вот несколько популярных примеров активации CORS:
-
Apache: отредактируйте файл .htaccess
-
Nginx: отредактируйте файл конфигурации,
-
Traefik: используйте middleware,
-
Spring Boot: используйте аннотацию @EnableCORS,
-
ExpressJS: используйте app.use(cors()),
-
NextJS: используйте реквест-хелперы.
Здесь вы можете найти больше примеров активации CORS для разных фреймворков и языков: enable-cors.org.
Если вы не можете активировать CORS в службе, но все же хотите сделать возможными запросы к ней, то вам нужно использовать одно из следующих решений, описанных ниже.
2. Установка расширения для браузера
Использование расширения для браузера может быть быстрым и простым способом решения проблем с CORS в вашей среде разработки. Самым большим преимуществом использования расширения для браузера является то, что вам не нужно менять свой код или конфигурацию. С другой стороны, вам необходимо установить расширение в каждый браузер, который вы используете для тестирования своего веб-приложения.

Расширения для браузера изменяют входящий предварительный запрос, добавляя необходимые заголовки, чтобы обмануть браузер. Это очень удобное решение для локальной работы с производственным API, которое принимает запросы только из рабочего домена.
Вы можете найти расширения в Google Web Store или в библиотеке дополнений Mozilla. В некоторых случаях дефолтной конфигурации расширения может быть недостаточно; убедитесь, что установленное расширение корректно настроено. Вам также следует быть в курсе, что если держать подобное расширение включенным постоянно, то это может вызвать проблемы с некоторыми сайтами. Их рекомендуется использовать только в целях разработки.
3. Отключение CORS-проверок в браузере
Вы можете полностью отключить CORS-проверки в своем браузере. Чтобы отключить CORS-проверки в Google Chrome, нужно закрыть браузер и запустить его с флагами --disable-web-security и --user-data-dir. После запуска Google Chrome не будет отправлять предварительные CORS-запросы и не будет проверять CORS-заголовки.
# Windows
chrome.exe --user-data-dir="C://chrome-dev-disabled-security" --disable-web-security --disable-site-isolation-trials

# macOS
open /Applications/Google Chrome.app --args --user-data-dir="/var/tmp/chrome-dev-disabled-security" --disable-web-security --disable-site-isolation-trials

# Linux
google-chrome --user-data-dir="~/chrome-dev-disabled-security" --disable-web-security --disable-site-isolation-trials
Все команды, приведенные выше, запускают Google Chrome в изолированной безопасной среде. Они не затронут ваш основной профиль Chrome.

Список всех доступных флагов для Google Chrome можно найти здесь.
4. Настройка прокси-сервера
Если вы ищете решение, которое не требует от вас изменения настроек браузера, вам следует обратить внимание на прокси-сервера. Эта опция поможет вам избавиться от CORS-ошибок, ничего не меняя в самом браузере. Идея подхода заключается в том, чтобы отправлять все запросы на ваш сервер, который затем перенаправит запрос реальной службе, которую вы хотите использовать. Вы можете создать прокси-сервер самостоятельно с помощью языка и платформы по вашему предпочтению. Вам потребуется настроить CORS и реализовать функционал передачи полученных запросов в другую службу.

Прокси-сервер — хорошее решение, если у вас нет доступа к службе, которую вы собираетесь использовать. Существует множество готовых к использованию решений с открытым исходным кодом для создания прокси-серверов, но вам обязательно нужно следить за тем, чтобы они не пытались перехватить ваши запросы с заголовками авторизации и передать их какой-либо сторонней службе. Такие нарушения безопасности могут привести к катастрофическим последствиям как для вас, так и для потенциальных пользователей службы.
Ниже приведен список CORS сервисов с открытым исходным кодом, которые вы можете найти на просторах интернета:
-
https://github.com/Freeboard/thingproxy
-
https://github.com/bulletmark/corsproxy
-
https://github.com/Rob—W/cors-anywhere
Перед использованием любого из этих сервисов обязательно проверьте код самой последний версии версии.
Как протестировать CORS?
Использование браузера для проверки конфигурации CORS может оказаться на удивление утомительной задачей. В качестве альтернативы вы можете использовать такие инструменты, как CORS Tester, test-cors.org или, если вас не страшит командная строка, вы можете использовать curl для проверки конфигурации CORS.
curl -v -X OPTIONS https://simplelocalize.io/api/v1/translations
Остерегайтесь ложных CORS-ошибок
В некоторых случаях, когда сервис находится за дополнительным слоем защиты ограничителя частоты запросов, балансировщика нагрузки или сервера авторизации, вы можете получить ложную CORS-ошибку. Заблокированные или отклоненные сервером запросы должны отвечать статус кодами ошибки. Например:
-
401 unauthorized,
-
403 forbidden,
-
429 too many requests,
-
500 internal server error,
-
любые, кроме 2XX или 3XX.
Вы можете видеть, что запрос заблокирован из-за неудачного предварительного запроса, но на самом деле служба просто отклоняет его. Вы всегда должны проверять статус код и текст ответа, чтобы избежать излишней отладки. Браузер должным образом уведомляет вас о сбое в предварительном CORS-запросе, но причина сбоя может быть не связана с конфигурацией CORS.
Заключение
В этой статье я постарался объяснить, что такое CORS и каковы наиболее распространенные проблемы с ним. Я предложил четыре способа избавиться от проблемы с CORS и объяснил преимущества и недостатки каждого из них. Я также объяснил, как правильно настроить CORS-ответы и как их протестировать. Более того, я показал самые распространенные проблемы, с которыми вы можете столкнуться при распознавании ложных CORS-ошибок. Я постарался изложить все максимально простым языком и избежать мудреных технических подробностей. Cпасибо за внимание!
Полезные ссылки
-
https://developer.mozilla.org/en-US/docs/Web/HTTP/CORS/Errors
-
https://developer.mozilla.org/en-US/docs/Web/Security/Same-origin_policy
-
https://enable-cors.org/
-
https://stackoverflow.com/a/42024918/1133169
Материал подготовлен в преддверии старта онлайн-курса «JavaScript Developer. Professional». Недавно прошел открытый урок на тему «CSS-in-JS. Удобный способ управлять стилями», на котором рассмотрели Styled components, Linaria, Astroturf и другие инструменты упрощения работы со стилями. Посмотреть запись можно по ссылке.
I will assume that you’re a front-end developer only and that you don’t have access to the backend of the application (regarding the tags of the question).
Short answer on how to properly solve this in your case? You can’t, you’ll need somebody else.
What is this about?
You need to understand that CORS is a security thing, it’s not just here to annoy you just for fun.
It’s purpose is to mainly prevent the usage of a (malicious) HTTP call from a non-whitelisted frontend to your backend with some critical mutation.
You could give a look to this YouTube video or any other one really, but I recommend a visual video because text-based explanations can be quite hard to understand.
You also need to understand that if you use Postman or any other tool to try your API call, you will not get the CORS issue. The reason being that those tools are not Web frontends but rather some server-based tools.
Hence, don’t be surprised if something is working there but not in your Vue app, the context is different.
Now, how to solve this?
- Depending on the framework used by your backend team, the syntax may be quite different but overall, you’ll need to tell them to provide something like
Access-Control-Allow-Origin: http://localhost:3000(or any other port you’ll be using).
PS: Using Access-Control-Allow-Origin: * would be quite risky because it would allow anybody to access it, hence why a stricter rule is recommended.
- If you’re using a service, like an API to send SMS, payment, some Google console or something else really, you’ll need to allow your
localhostin the dashboard of the service. Ask for credentials to your manager or Tech Lead. - If you have access to the backend, you could it yourself as shown here (ExpressJS in this example): https://flaviocopes.com/cors/
How to hack it in a dirty way?
If you’re in a damn hurry and want to get something really dirty, you could use a lot of various hacks a listed in the other answers, here’s a quick list:
- use any extension who is able to create a middleware and forward the request to the backend (it will work because it’s not directly coming from your frontend)
- force your browser to disable CORS, not sure how this would actually solve the issue
- use a proxy, if you’re using Nuxt2, @nuxtjs/proxy is a popular one but any kind of proxy (even a real backend will do the job)
- any other hack related somehow to the 3 listed above…
In the end, solving the CORS issue can be done quite fast and easily. You only need to communicate with your team or find something on your side (if you have access to the backend/admin dashboard of some service).
I strongly recommend trying to get it right from the beginning because it’s related to security and that it may be forgotten down the road…
Many websites have JavaScript functions that make network requests to a server, such as a REST API. The web pages and APIs are often in different domains. This introduces security issues in that any website can request data from an API. Cross-Origin Resource Sharing (CORS) provides a solution to these issues. It became a W3C recommendation in 2014. It makes it the responsibility of the web browser to prevent unauthorized access to APIs. All modern web browsers enforce CORS. They prevent JavaScript from obtaining data from a server in a domain different than the domain the website was loaded from, unless the REST API server gives permission.
From a developer’s perspective, CORS is often a cause of much grief when it blocks network requests. CORS provides a number of different mechanisms for limiting JavaScript access to APIs. It is often not obvious which mechanism is blocking the request. We are going to build a simple web application that makes REST calls to a server in a different domain. We will deliberately make requests that the browser will block because of CORS policies and then show how to fix the issues. Let’s get started!
NOTE: The code for this project can be found on GitHub.
Table of Contents
- Prerequisites to Building a Go Application
- How to Build a Simple Web Front End
- How to Build a Simple REST API in Go
- How to Solve a Simple CORS Issue
- Allowing Access from Any Origin Domain
- CORS in Flight
- What Else Does CORS Block?
- Restrictions on Response Headers
- Credentials Are a Special Case
- Control CORS Cache Configuration
- How to Prevent CORS Issues with Okta
- How CORS Prevents Security Issues
Prerequisites to Building a Go Application
First things first, if you don’t already have Go installed on your computer you will need to download and install the Go Programming Language.
Now, create a directory where all of our future code will live.
Finally, we will make our directory a Go module and install the Gin package (a Go web framework) to implement a web server.
go mod init cors
go get github.com/gin-gonic/gin
go get github.com/gin-contrib/static
A file called go.mod will get created containing the dependencies.
How to Build a Simple Web Front End
We are going to build a simple HTML and JavaScript front end and serve it from a web server written using Gin.
First of all, create a directory called frontend and create a file called frontend/index.html with the following content:
<html>
    <head>
        <meta charset="UTF-8" />
        <title>Fixing Common Issues with CORS</title>
    </head>
    <body>
        <h1>Fixing Common Issues with CORS</h1>
        <div>
            <textarea id="messages" name="messages" rows="10" cols="50">Messages</textarea><br/>
            <form id="form1">
                <input type="button" value="Get v1" onclick="onGet('v1')"/>
                <input type="button" value="Get v2" onclick="onGet('v2')"/>
            </form>
        </div>
    </body>
</html>
The web page has a text area to display messages and a simple form with two buttons. When a button is clicked it calls the JavaScript function onGet() passing it a version number. The idea being that v1 requests will always fail due to CORS issues, and v2 will fix the issue.
Next, create a file called frontend/control.js containing the following JavaScript:
function onGet(version) {
    const url = "http://localhost:8000/api/" + version + "/messages";
    var headers = {}

    fetch(url, {
        method : "GET",
        mode: 'cors',
        headers: headers
    })
    .then((response) => {
        if (!response.ok) {
            throw new Error(response.error)
        }
        return response.json();
    })
    .then(data => {
        document.getElementById('messages').value = data.messages;
    })
    .catch(function(error) {
        document.getElementById('messages').value = error;
    });
}
The onGet() function inserts the version number into the URL and then makes a fetch request to the API server. A successful request will return a list of messages. The messages are displayed in the text area.
Finally, create a file called frontend/.go containing the following Go code:
package main

import (
	"github.com/gin-contrib/static"
	"github.com/gin-gonic/gin"
)

func main() {
	r := gin.Default()
	r.Use(static.Serve("/", static.LocalFile("./frontend", false)))
	r.Run(":8080")
}
This code simply serves the contents of the frontend directory on requests on port 8080. Note that JavaScript makes a call to port http://localhost:8000 which is a separate service.
Start the server and point a web browser at http://localhost:8080 to see the static content.
How to Build a Simple REST API in Go
Create a directory called rest to contain the code for a basic REST API.
NOTE: A separate directory is required as Go doesn’t allow two program entry points in the same directory.
Create a file called rest/server.go containing the following Go code:
package main

import (
	"fmt"
	"strconv"
	"net/http"

	"github.com/gin-gonic/gin"
)

var messages []string

func GetMessages(c *gin.Context) {
	version := c.Param("version")
	fmt.Println("Version", version)
	c.JSON(http.StatusOK, gin.H{"messages": messages})
}

func main() {
	messages = append(messages, "Hello CORS!")
	r := gin.Default()
	r.GET("/api/:version/messages", GetMessages)
	r.Run(":8000")
}
A list called messages is created to hold message objects.
The function GetMessages() is called whenever a GET request is made to the specified URL. It returns a JSON string containing the messages. The URL contains a path parameter which will be v1 or v2. The server listens on port 8000.
The server can be run using:
How to Solve a Simple CORS Issue
We now have two servers—the front-end one on http://localhost:8080, and the REST API server on http://localhost:8000. Even though the two servers have the same hostname, the fact that they are listening on different port numbers puts them in different domains from the CORS perspective. The domain of the web content is referred to as the origin. If the JavaScript fetch request specifies cors a request header will be added identifying the origin.
Origin: http://localhost:8080
Make sure both the frontend and REST servers are running.
Next, point a web browser at http://localhost:8080 to display the web page. We are going to get JavaScript errors, so open your browser’s developer console so that we can see what is going on. In Chrome it is *View** > Developer > Developer Tools.
Next, click on the Send v1 button. You will get a JavaScript error displayed in the console:
Access to fetch at ‘http://localhost:8000/api/v1/messages’ from origin ‘http://localhost:8080’ has been blocked by CORS policy: No ‘Access-Control-Allow-Origin’ header is present on the requested resource. If an opaque response serves your needs, set the request’s mode to ‘no-cors’ to fetch the resource with CORS disabled.
The message says that the browser has blocked the request because of a CORS policy. It suggests two solutions. The second suggestion is to change the mode from cors to no-cors in the JavaScript fetch request. This is not an option as the browser always deletes the response data when in no-cors mode to prevent data from being read by an unauthorized client.
The solution to the issue is for the server to set a response header that allows the browser to make cross-domain requests to it.
Access-Control-Allow-Origin: http://localhost:8080
This tells the web browser that the cross-origin requests are to be allowed for the specified domain. If the domain specified in the response header matches the domain of the web page, specified in the Origin request header, then the browser will not block the response being received by JavaScript.
We are going to set the header when the URL contains v2. Change the GetMessages() function in cors/server.go to the following:
func GetMessages(c *gin.Context) {
	version := c.Param("version")
	fmt.Println("Version", version)
	if version == "v2" {
		c.Header("Access-Control-Allow-Origin", "http://localhost:8080")
	}
	c.JSON(http.StatusOK, gin.H{"messages": messages})
}
This sets a header to allow cross-origin requests for the v2 URI.
Restart the server and go to the web page. If you click on Get v1 you will get blocked by CORS. If you click on Get v2, the request will be allowed.
A response can only have at most one Access-Control-Allow-Origin header. The header can only specify only one domain. If the server needs to allow requests from multiple origin domains, it needs to generate an Access-Control-Allow-Origin response header with the same value as the Origin request header.
Allowing Access from Any Origin Domain
There is an option to prevent CORS from blocking any domain. This is very popular with developers!
Access-Control-Allow-Origin: *
Be careful when using this option. It will get flagged in a security audit. It may also be in violation of an information security policy, which could have serious consequences!
CORS in Flight
Although we have fixed the main CORS issue, there are some limitations. One of the limitations is that only the HTTP GET, and OPTIONS methods are allowed. The GET and OPTIONS methods are read-only and are considered safe as they don’t modify existing content. The POST, PUT, and DELETE methods can add or change existing content. These are considered unsafe. Let’s see what happens when we make a PUT request.
First of all, add a new form to client/index.html:
<form id="form2">
    <input type="text" id="puttext" name="puttext"/>
    <input type="button" value="Put v1" onclick="onPut('v1')"/>
    <input type="button" value="Put v2" onclick="onPut('v2')"/>
</form>
This form has a text input and the two send buttons as before that call a new JavaScript function.
Next, add the JavaScript funtion to client/control.js:
function onPut(version) {
    const url = "http://localhost:8000/api/" + version + "/messages/0";
    var headers = {}

    fetch(url, {
        method : "PUT",
        mode: 'cors',
        headers: headers,
        body: new URLSearchParams(new FormData(document.getElementById("form2"))),
    })
    .then((response) => {
        if (!response.ok) {
            throw new Error(response.error)
        }
        return response.json();
    })
    .then(data => {
        document.getElementById('messages').value = data.messages;
    })
    .catch(function(error) {
        document.getElementById('messages').value = error;
    });
}
This makes a PUT request sending the form parameters in the request body. Note that the URI ends in /0. This means that the request is to create or change the message with the identifier 0.
Next, define a PUT handler in the main() function of rest/server.go:
r.PUT("/api/:version/messages/:id", PutMessage)
The message identifier is extracted as a path parameter.
Finally, add the request handler function to rest/server.go:
func PutMessage(c *gin.Context) {
	version := c.Param("version")
	id, _ := strconv.Atoi(c.Param("id"))
	text := c.PostForm("puttext")
	messages[id] = text
	if version == "v2" {
	    c.Header("Access-Control-Allow-Origin", "http://localhost:8080")
	}
	c.JSON(http.StatusOK, gin.H{"messages": messages})
}
This updates the message from the form data and sends the new list of messages. The function also always sets the allow origin header, as we know that it is required.
Now, restart the servers and load the web page. Make sure that the developer console is open. Add some text to the text input and hit the Send v1 button.
You will see a slightly different CORS error in the console:
Access to fetch at ‘http://localhost:8000/api/v1/messages/0’ from origin ‘http://localhost:8080’ has been blocked by CORS policy: Response to preflight request doesn’t pass access control check: No ‘Access-Control-Allow-Origin’ header is present on the requested resource. If an opaque response serves your needs, set the request’s mode to ‘no-cors’ to fetch the resource with CORS disabled.
This is saying that a preflight check was made, and that it didn’t set the Access-Control-Allow-Origin header.
Now, look at the console output from the API server:
[GIN] 2020/12/01 - 11:10:09 | 404 | 447ns | ::1 | OPTIONS "/api/v1/messages/0"
So, what is happening here? JavaScript is trying to make a PUT request. This is not allowed by CORS policy. In the GET example, the browser made the request and blocked the response. In this case, the browser refuses to make the PUT request. Instead, it sent an OPTIONS request to the same URI. It will only send the PUT if the OPTIONS request returns the correct CORS header. This is called a preflight request. As the server doesn’t know what method the OPTIONS preflight request is for, it specifies the method in a request header:
Access-Control-Request-Method: PUT
Let’s fix this by adding a handler for the OPTIONS request that sets the allow origin header in cors/server.go:
func OptionMessage(c *gin.Context) {
	c.Header("Access-Control-Allow-Origin", "http://localhost:8080")
}

func main() {
	messages = append(messages, "Hello CORS!")
	r := gin.Default()
	r.GET("/api/:version/messages", GetMessages)
	r.PUT("/api/:version/messages/:id", PutMessage)
	r.OPTIONS("/api/v2/messages/:id", OptionMessage)
	r.Run(":8000")
}
Notice that the OPTIONS handler is only set for the v2 URI as we don’t want to fix v1.
Now, restart the server and send a message using the Put v2 button. We get yet another CORS error!
Access to fetch at ‘http://localhost:8000/api/v2/messages/0’ from origin ‘http://localhost:8080’ has been blocked by CORS policy: Method PUT is not allowed by Access-Control-Allow-Methods in preflight response.
This is saying that the preflight check needs another header to stop the PUT request from being blocked.
Add the response header to cors/server.go:
func OptionMessage(c *gin.Context) {
	c.Header("Access-Control-Allow-Origin", "http://localhost:8080")
	c.Header("Access-Control-Allow-Methods", "GET, OPTIONS, POST, PUT")
}
Restart the server and resend the message. The CORS issues are resolved.
What Else Does CORS Block?
CORS has a very restrictive policy regarding which HTTP request headers are allowed. It only allows safe listed request headers. These are Accept, Accept-Language, Content-Language, and Content-Type. They can only contain printable characters and some punctuation characters are not allowed. Header values can’t have more than 128 characters.
There are further restrictions on the Content-Type header. It can only be one of application/x-www-form-urlencoded, multipart/form-data, and text/plain. It is interesting to note that application/json is not allowed.
Let’s see what happens if we send a custom request header. Modify the onPut() function in frontend/control.jsto set a header:
var headers = { "X-Token": "abcd1234" }
Now, make sure that the servers are running and load or reload the web page. Type in a message and click the Put v1 button. You will see a CORS error in the developer console.
Access to fetch at ‘http://localhost:8000/api/v2/messages/0’ from origin ‘http://localhost:8080’ has been blocked by CORS policy: Request header field x-token is not allowed by Access-Control-Allow-Headers in preflight response.
Any header which is not CORS safe-listed causes a preflight request. This also contains a request header that specifies the header that needs to be allowed:
Access-Control-Request-Headers: x-token
Note that the header name x-token is specified in lowercase.
The preflight response can allow non-safe-listed headers and can remove restrictions on safe listed headers:
Access-Control-Allow-Headers: X_Token, Content-Type
Next, change the function in cors/server.go to allow the custom header:
func OptionMessage(c *gin.Context) {
	c.Header("Access-Control-Allow-Origin", "http://localhost:8080")
	c.Header("Access-Control-Allow-Methods", "GET, POST, OPTIONS, PUT")
	c.Header("Access-Control-Allow-Headers", "X-Token")
}
Restart the server and resend the message by clicking the Put v2 button. The request should now be successful.
CORS also places restrictions on response headers. There are seven whitelisted response headers: Cache-Control, Content-Language, Content-Length, Content-Type, Expires, Last-Modified, and Pragma. These are the only response headers that can be accessed from JavaScript. Let’s see this in action.
First of all, add a text area to frontend/index.html to display the headers:
<textarea id="headers" name="headers" rows="10" cols="50">Headers</textarea><br/>
Next, replace the first then block in the onPut function in frontend/control.js to display the response headers:
.then((response) => {
    if (!response.ok) {
        throw new Error(response.error)
    }
    response.headers.forEach(function(val, key) {
        document.getElementById('headers').value += 'n' + key + ': ' + val;
    });
    return response.json();
})
Finally, set a custom header in rest/server.go:
func PutMessage(c *gin.Context) {
	version := c.Param("version")
	id, _ := strconv.Atoi(c.Param("id"))
	text := c.PostForm("puttext")
	messages[id] = text
	if version == "v2" {
	    c.Header("Access-Control-Allow-Origin", "http://localhost:8080")
	}
	c.Header("X-Custom", "123456789")
	c.JSON(http.StatusOK, gin.H{"messages": messages})
}
Now, restart the server and reload the web page. Type in a message and hit Put v2. You should see some headers displayed, but not the custom header. CORS has blocked it.
This can be fixed by setting another response header to expose the custom header in server/server.go:
func PutMessage(c *gin.Context) {
	version := c.Param("version")
	id, _ := strconv.Atoi(c.Param("id"))
	text := c.PostForm("puttext")
	messages[id] = text
	if version == "v2" {
        c.Header("Access-Control-Expose-Headers", "X-Custom")
	    c.Header("Access-Control-Allow-Origin", "http://localhost:8080")
	}
	c.Header("X-Custom", "123456789")
	c.JSON(http.StatusOK, gin.H{"messages": messages})
}
Restart the server and reload the web page. Type in a message and hit Put v2. You should see some headers displayed, including the custom header. CORS has now allowed it.
Credentials Are a Special Case
There is yet another CORS blocking scenario. JavaScript has a credentials request mode. This determines how user credentials, such as cookies are handled. The options are:
omit: Never send or receive cookies.same-origin: This is the default, that allows user credentials to be sent to the same origin.include: Send user credentials even if cross-origin.
Let’s see what happens.
Modify the fetch call in the onPut() function in frontend/Control.js:
fetch(url, {
    method : "PUT",
    mode: 'cors',
    credentials: 'include',
    headers: headers,
    body: new URLSearchParams(new FormData(document.getElementById("form2"))),
})
Now, make sure that the client and server are running and reload the web page. Send a message as before. You will get another CORS error in the developer console:
Access to fetch at ‘http://localhost:8000/api/v2/messages/0’ from origin ‘http://localhost:8080’ has been blocked by CORS policy: Response to preflight request doesn’t pass access control check: The value of the ‘Access-Control-Allow-Credentials’ header in the response is ‘’ which must be ‘true’ when the request’s credentials mode is ‘include’.
The fix for this is to add another header to both the OptionMessage(), and PutMessage() functions in cors/server.go as the header needs to be present in both the preflight request and the actual request:
c.Header("Access-Control-Allow-Credentials", "true")
The request should now work correctly.
The credentials issue can also be resolved on the client by setting the credentials mode to omit and sending credentials as request parameters, instead of using cookies.
Control CORS Cache Configuration
The is one more CORS header that hasn’t yet been discussed. The browser can cache the preflight request results. The Access-Control-Max-Age header specifies the maximum time, in seconds, the results can be cached. It should be added to the preflight response headers as it controls how long the Access-Control-Allow-Methods and Access-Control-Allow-Headers results can be cached.
Access-Control-Max-Age: 600
Browsers typically have a cap on the maximum time. Setting the time to -1 prevents caching and forces a preflight check on all calls that require it.
How to Prevent CORS Issues with Okta
Authentication providers, such as Okta, need to handle cross-domain requests to their authentication servers and API servers. This is done by providing a list of trusted origins. See Okta Enable CORS for more information.
How CORS Prevents Security Issues
CORS is an important security feature that is designed to prevent JavaScript clients from accessing data from other domains without authorization.
Modern web browsers implement CORS to block cross-domain JavaScript requests by default. The server needs to authorize cross-domain requests by setting the correct response headers.
CORS has several layers. Simply allowing an origin domain only works for a subset of request methods and request headers. Some request methods and headers force a preflight request as a further means of protecting data. The actual request is only allowed if the preflight response headers permit it.
CORS is a major pain point for developers. If a request is blocked, it is not easy to understand why, and how to fix it. An understanding of the nature of the blocked request, and of the CORS mechanisms, can easily overcome such issues.
If you enjoyed this post, you might like related ones on this blog:
- What is the OAuth 2.0 Implicit Grant Type?
- Combat Side-Channel Attacks with Cross-Origin Read Blocking
Follow us for more great content and updates from our team! You can find us on Twitter, Facebook, subscribe to our YouTube Channel or start the conversation below.
Cross-Origin Resource Sharing (CORS) is a mechanism based on HTTP headers that allows browsers to identify which request comes from allowed domain list, at the same time filter out unknown requests. Browsers make a “preflight” request to the server hosting the cross-origin resource in order to check that the server will permit the actual request. In that preflight, the browser sends information about the HTTP method and headers that will be used later in the actual request.
Fetching data from sites and APIs that enforced CORS policy without proper headers can lead to “Access to XMLHttpRequest has been blocked by CORS policy” error message in Chrome DevTools. The error comes in several forms, include useful information for debugging.
This article is going to show you how to fix “Access to XMLHttpRequest has been blocked by CORS policy” in various scenarios.

Just as what Chrome DevTools says, “No ‘Access-Control-Allow-Origin’ header is present on the requested response” error means the response does not have the proper Access-Control-Allow-Origin header in place.
In this case, you have a few options :
- Use a Chrome extension to add
Access-Control-Allow-Originheader into every response.To find one of them, just head over to Chrome Webstore and type in “CORS”, dozens will show up in the search result. Or you can install CORS Helper, CORS Unblock or dyna CORS right away.
- Redirect your request through a CORS proxy.
You can easily spin up your own proxy using open source code from https://github.com/Rob–W/cors-anywhere/. Deploying to Heroku takes only 2-3 minutes, or you can use the original developers demo for quick, one-time usage : https://cors-anywhere.herokuapp.com/.
To use the proxy, you have to prefix your request URL with the proxy URL so that it would look like this : https://cors-anywhere.herokuapp.com/https://example.com. The proxy will then forward your request to the original server, then grabs the response, adds
Access-Control-Allow-Originheader to the response before pass it to you.
Access to XMLHttpRequest has been blocked by CORS policy : Response to preflight request doesn’t pass access control check
“Response to preflight request doesn’t pass access control check” can comes with additional message about the actual error. If you encounter one of these, you may consider my recommended options in the next section.
The Access-Control-Allow-Origin header doesn’t allow for more than one origin to be specified by design. If you are a fellow web developer, my advice is to carefully review your code that involves setting up CORS headers. You may set the Access-Control-Allow-Origin twice, or adds too many values to it instead of replacing the value. Most of the time, the error is related to the source code.
If an opaque response serves your needs, set the request’s mode to ‘no-cors’ to fetch the resource with CORS disabled
An opaque response is for a request made for a resource on a different origin that doesn’t return CORS headers. With an opaque response we won’t be able to read the data returned or view the status of the request, meaning we can’t check if the request was successful or not.
In this situation, you need to modify your code so that the request to the different origin does not contain CORS headers. In JavaScript, the behaviour can be achieved by passing {mode: 'no-cors'} in fetch:
fetch('http://some-site.com/cors-disabled/some.json', {mode: 'no-cors'})Code language: JavaScript (javascript)Opaque responses can’t be accessed by JavaScript, but you can still cache them with the Cache API and respond with them in the fetch event handler in a service worker. So they’re useful for resources that you can’t control (e.g. resources on a CORS-less CDN) but still want to cache.
For a request that includes credentials, browsers won’t let your front-end JavaScript code access the response if the value of the Access-Control-Allow-Origin response header is set to *. Instead, the value of the header must exactly match your front-end origin, e.g http://where_you_send_request.com.
If you are using any “Easy CORS” Chrome extension like Allow CORS: Access-Control-Allow-Origin or CORS Unblock, disable it and the problem should disappear.
If you have access to the server, you can configure the server to grab the value of the Origin header the client sends, then echo it back to Access-Control-Allow-Origin response header. In nginx configuration language, the setting can be set by placing the line below into the config file.
add_header Access-Control-Allow-Origin $http_originCode language: PHP (php)You can find more details at Credentialed requests and wildcards in the MDN HTTP access control (CORS) article.
Have you ever had to load images in JavaScript using the CORS Header crossOrigin="Anonymous"?
In a recent project of ours, we’ve encountered an issue when fetching images with CORS headers in JavaScript. The error messages stated:
Access to image at ‘${url}’ from origin ‘${origin}’ has been blocked by CORS policy: No ‘Access-Control-Allow-Origin’ header is present on the requested resource.
Reproducing the error
TL;DR:
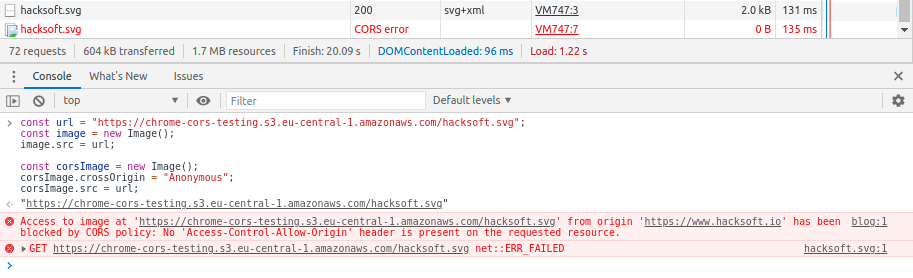
If you open a Google Chrome/Chromium/Microsoft Edge browser. Start the console in a random website (for example this one) and run this code in it — you should be able to see the error in the network tab.
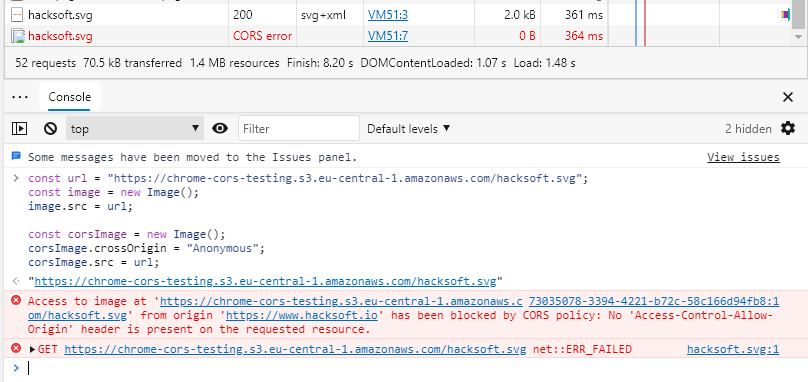
const url = "https://chrome-cors-testing.s3.eu-central-1.amazonaws.com/hacksoft.svg";
const image = new Image();
image.src = url;

const corsImage = new Image();
corsImage.crossOrigin = "Anonymous";
corsImage.src = url;
You can see in the network tab, that the first image, called without setting crossOrigin, loaded correctly, and the second image, called with crossOrigin=»Anonymous» has an error.
Just as what Chrome DevTools says, “No ‘Access-Control-Allow-Origin’ header is present on the requested response” error means the response does not have the proper Access-Control-Allow-Origin header in place.
In this case, you have a few options :
- Use a Chrome extension to add
Access-Control-Allow-Originheader into every response.To find one of them, just head over to Chrome Webstore and type in “CORS”, dozens will show up in the search result. Or you can install CORS Helper, CORS Unblock or dyna CORS right away.
- Redirect your request through a CORS proxy.
You can easily spin up your own proxy using open source code from https://github.com/Rob–W/cors-anywhere/. Deploying to Heroku takes only 2-3 minutes, or you can use the original developers demo for quick, one-time usage : https://cors-anywhere.herokuapp.com/.
To use the proxy, you have to prefix your request URL with the proxy URL so that it would look like this : https://cors-anywhere.herokuapp.com/https://example.com. The proxy will then forward your request to the original server, then grabs the response, adds
Access-Control-Allow-Originheader to the response before pass it to you.
Access to XMLHttpRequest has been blocked by CORS policy : Response to preflight request doesn’t pass access control check
“Response to preflight request doesn’t pass access control check” can comes with additional message about the actual error. If you encounter one of these, you may consider my recommended options in the next section.
The Access-Control-Allow-Origin header doesn’t allow for more than one origin to be specified by design. If you are a fellow web developer, my advice is to carefully review your code that involves setting up CORS headers. You may set the Access-Control-Allow-Origin twice, or adds too many values to it instead of replacing the value. Most of the time, the error is related to the source code.
If an opaque response serves your needs, set the request’s mode to ‘no-cors’ to fetch the resource with CORS disabled
An opaque response is for a request made for a resource on a different origin that doesn’t return CORS headers. With an opaque response we won’t be able to read the data returned or view the status of the request, meaning we can’t check if the request was successful or not.
In this situation, you need to modify your code so that the request to the different origin does not contain CORS headers. In JavaScript, the behaviour can be achieved by passing {mode: 'no-cors'} in fetch:
fetch('http://some-site.com/cors-disabled/some.json', {mode: 'no-cors'})Code language: JavaScript (javascript)Opaque responses can’t be accessed by JavaScript, but you can still cache them with the Cache API and respond with them in the fetch event handler in a service worker. So they’re useful for resources that you can’t control (e.g. resources on a CORS-less CDN) but still want to cache.
For a request that includes credentials, browsers won’t let your front-end JavaScript code access the response if the value of the Access-Control-Allow-Origin response header is set to *. Instead, the value of the header must exactly match your front-end origin, e.g http://where_you_send_request.com.
If you are using any “Easy CORS” Chrome extension like Allow CORS: Access-Control-Allow-Origin or CORS Unblock, disable it and the problem should disappear.
If you have access to the server, you can configure the server to grab the value of the Origin header the client sends, then echo it back to Access-Control-Allow-Origin response header. In nginx configuration language, the setting can be set by placing the line below into the config file.
add_header Access-Control-Allow-Origin $http_originCode language: PHP (php)You can find more details at Credentialed requests and wildcards in the MDN HTTP access control (CORS) article.
Have you ever had to load images in JavaScript using the CORS Header crossOrigin="Anonymous"?
In a recent project of ours, we’ve encountered an issue when fetching images with CORS headers in JavaScript. The error messages stated:
Access to image at ‘${url}’ from origin ‘${origin}’ has been blocked by CORS policy: No ‘Access-Control-Allow-Origin’ header is present on the requested resource.
Reproducing the error
TL;DR:
If you open a Google Chrome/Chromium/Microsoft Edge browser. Start the console in a random website (for example this one) and run this code in it — you should be able to see the error in the network tab.
const url = "https://chrome-cors-testing.s3.eu-central-1.amazonaws.com/hacksoft.svg";
const image = new Image();
image.src = url;

const corsImage = new Image();
corsImage.crossOrigin = "Anonymous";
corsImage.src = url;
You can see in the network tab, that the first image, called without setting crossOrigin, loaded correctly, and the second image, called with crossOrigin=»Anonymous» has an error.
Long version:
The steps to reproduce the issue are the following:
- Open a browser running on the Chromium core. The most widely used of those are Chromium, Google Chrome and Microsoft Edge. I’m going to use Google Chrome to demonstrate it.
- Open a random website. For example — this one.
- Open the console in your browser devtools.
- Chose an image url from a different host that has CORS specifications. It’s important to be from a different host, and to not return the
Access-Control-Allow-Origin: *header, so we can trigger the CORS check. This happens for almost all of the s3-hosted images. The example that I have is this url: https://chrome-cors-testing.s3.eu-central-1.amazonaws.com/hacksoft.svg - Load the image using JavaScript:
const url = "https://chrome-cors-testing.s3.eu-central-1.amazonaws.com/hacksoft.svg";
const image = new Image();
image.src = url;- Load the image again, but this time add a
Access-Control-Allow-Origin: *header. Do this by adding the image property.crossOrigin = "Anonymous"
const corsImage = new Image();
corsImage.crossOrigin = "Anonymous";
corsImage.src = url;
The result should look something like this:
Note that the second time we try to load the image — Chrome returns a CORS error instead of a response object.
The reason
So why does Google Chrome throw an error when the url is accessed with a CORS header?
Well, first, you should know why do websites use the CORS policy. There is a very good article explaining this.
Let’s explore how does the browser fetch images and resources.
It sends a GET request for the image with certain headers. It then downloads the image and then caches it for further use.
Before loading any image, it checks the cache first, to see if it already downloaded it at some point. If it finds the image there — the browser doesn’t send a GET request for the image, but rather just takes it from the cache and serves it back to you. This saves load time and network data when you often visit the same website.
The issue that we have here, is related to Chromium’s way of caching images, and it doesn’t appear to happen in browsers based on different engines:
Chrome:
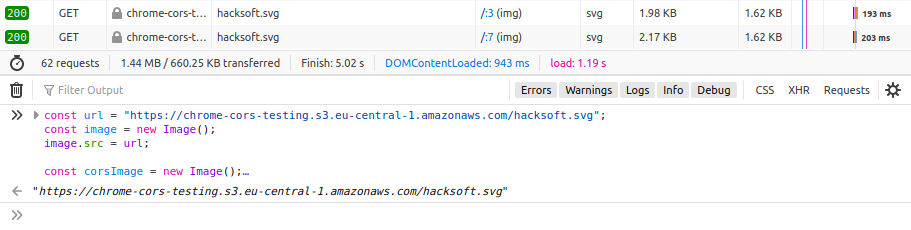
Firefox:
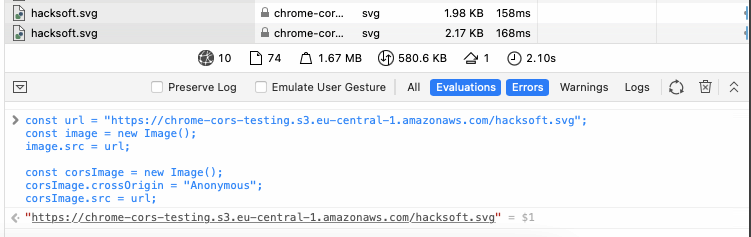
Safari:
Edge:
Note that Microsoft Edge also has this issue, because it’s based on the Chromium engine.
The issue comes from the way that Chromium caches the images. The way that the initial image is cached is — without the CORS headers. So next time when we want to fetch the image, with CORS headers — Chromium attempts to serve the image from the cache.
The issue is that the image didn’t have the CORS headers when we first fetched it (which could happen when you browse through the website and see the image rendered in an <img> tag).
And since the image didn’t have the CORS headers initially, and has them now — Chromium returns a CORS error.
It’s a well known issue in Chromium and has been described in the chromium bug tracking software: https://bugs.chromium.org/p/chromium/issues/detail?id=409090
The developer team working on Chromium however flagged the issue as WontFix(Closed) Because this is likely the intended behavior of the Chromium engine.
Solution
In order to solve this issue, we can simply add a dummy GET parameter in the url when fetching the required image. This will force the browser to not use the cached image from before, but to send a new GET request for the image because the URL is now different from the one that Chromium has cached.
const corsImageModified = new Image();
corsImageModified.crossOrigin = "Anonymous";
corsImageModified.src = url + "?not-from-cache-please";
Example:
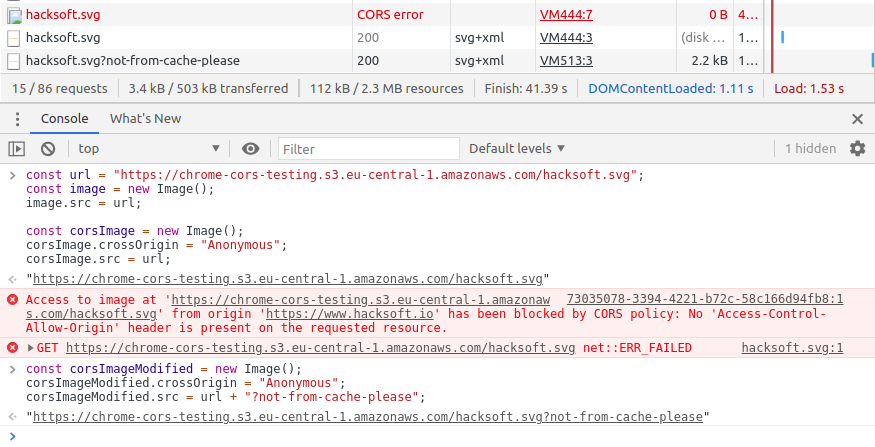
Note that here the image loaded correctly, and we just added one dummy GET parameter
The GET parameter you add doesn’t matter, as long as the resulting URL is different than the initial (cached) image URL.
By just adding a dummy GET parameter, you will get the same image that you need, but this time Chromium will send a new request for it, containing the CORS headers in it.
Another upside of this solution is that it doesn’t bother all of the other browsers as well. So it will fix the error that your users are getting in Chrome, Edge and Chromium, without affecting the experience that all of your other users are having.
When is this useful?
«But, hey, when will I need to fetch the same image with different headers?» you ask.
That’s a good question. And an example use case would be — when rendering that image in a canvas that you need to scrape later.
You see, when you render an image in a canvas, it becomes tainted. This is a security feature that stops you from reading what’s in the canvas after you’ve added that image.
In order to render an image, and use the information from the canvas later — the image should be loaded with the Access-Control-Allow-Origin header.
This is all well and good, but if that image was shown in an <img> tag before the user got to see it in the canvas — then Chrome cached it, and you hit the exact same issue that this article solves.
Note about caching
If we want to cache the image with the CORS header, we can always use the same dummy GET parameter when we call the image url.
Chromium will cache it with that «different» url that we created, and will use it when we call it next time without raising the error.
Example:

Note here, that the browser takes both the image without CORS and with CORS from the cache, because they were cached before.
TL;DR
Problem:
If you’ve loaded an image in Chrome, Edge, Chromium or other Chromium-based browser, and the browser cached that image. When you call for that same image with the Access-Controll-Allow-Origin header (or crossOrigin="Anonymous" if you’re doing it in JavaScript) — Chromium returns an error response because the initially cached image didn’t have that header.
Solution:
When calling the image url with the crossOrigin="Anonymous" header, add a dummy GET parameter at the end of the URL. This will essentially change the resource, so Chrome won’t look into the cache and will call the «new» url instead, giving you the image that you needed, but this time with the header that you wanted.
This solution not only fixes the issue in Chromium based browsers, but also doesn’t change the way Firefox, Safari and other browsers view your app.
✌️