
Error messages
Error messages
Shown on the display
E 01: LOW WATER LEVEL
ALARM
E 05: WORKING SENSOR
ALARM
E 06: SENSOR
DIFFERENCE ALARM
E 07: INTERNAL HARD-
WARE ERROR
36
The following table contains some of the possible
error messages with the associated warning messages
and resolutions.
All warning messages are indicated on the display and
accompanied by an audible signal. To mute the audible
signal, press
once. The error message will still be
visible.
When the following error messages appear, the unit
(heater and circulation pump) will shut off. You must
remove the cause of the problem before you can
switch the unit back on.
What should I do?
Not enough water in the bath tank.
Switch off the unit at the power switch, add
water, and switch it back on.
If there is enough water in the bath tank:
The float switch is defective (transport dam-
age, etc.). Sent the unit to an authorized fu-
sionchef by Julabo repair facility.
Please contact our service department.
Please contact our service department.
Please contact our service department.
-
Contents
-
Table of Contents
-
Bookmarks
Quick Links
Operating manual
premium sous vide collection
W
‘
pearl
English
:
>
‘
^
‘
d
&
,
Related Manuals for Julabo Fusion Chef Pearl

Summary of Contents for Julabo Fusion Chef Pearl
- Page 1
Operating manual English pearl premium sous vide collection > &… -
Page 2: Table Of Contents
Table of contents Table of contents Sous Vide basics …………….4 Safety………………… 6 Proper use…………… 6 Safety notices for your Pearl ……..6 Safety notices for Sous Vide cooking …….10 Description of your Pearl…………12 Front and rear views…………12 Display and keypad…………13 Accessories …………….14 Attachments…………..14 Accessories for cooking containers ……14…
- Page 3
Table of contents Enjoying the first results……….23 Improving the results………..23 Working with your Pearl …………25 Switching on and starting the unit ……25 Operating the unit …………25 Setting the desired temperature …….25 Working with the timer ……….26 Changing settings …………27 Care and maintenance…………30 Changing the water …………30 Decalcifying …………..31 Cleaning the unit …………31… -
Page 4: Sous Vide Basics
Sous Vide basics Sous Vide basics Important! Always exercise the greatest possible care and maintain hygienic conditions at all times. 1. Preparation Use only fresh ingredients of the highest pos- sible quality. Prepare raw ingredients prop- erly. 2. Vacuuming Place the raw, refrigerated ingredients into special bags suitable for Sous Vide.
- Page 5
Proper use 5. Refrigerated Remove the cooled bag from the ice water storage and store it at 3 °C (37 °F) or colder. 6. Regeneration Warm the cooled bag in a water bath shortly before serving. Complete the cooking proc- ess and serve the food. -
Page 6: Safety
Safety Safety Proper use This product is designed to control the tem- perature of water in a bath tank. The product is used to prepare food in this water bath according to the Sous Vide technique (low- temperature, slow cooking of food in vac- uum-sealed packaging).
- Page 7
Safety notices for your Pearl This device is not intended for use by persons (including children) with reduced physical, sensory or mental capabilities or lack of ex- perience and knowledge unless they have been given supervision or instruction con- cerning the use of the device by a person responsible for their safety. - Page 8
Do not attempt to use the unit if the po- wer cord is damaged! For safety reasons a damaged power cord may only be re- placed by the manufacturer, a fusionchef by Julabo service representative or a simi- larly qualified person. - Page 9
Safety notices for your Pearl Allow only authorized technicians to per- form service and repair tasks. Low bath fluid safety float This unit includes a low bath fluid safety float. Switching off this safety device (by blocking the float) can result in a hazard- ous situation. -
Page 10: Safety Notices For Sous Vide Cooking
Safety Safety notices for Sous Vide cooking Only trained experts should attempt the Sous Vide cooking technique. It is important to follow precise and uniform work steps and maintain a hygienic environment in order to ensure adequate safety during food prepa- ration.
- Page 11
Safety notices for Sous Vide cooking Observe HACCP It is also important that kitchen personnel regulations employ an appropriate HACCP (Hazards Analysis and Critical Control Points) system in order to monitor and document every step the food takes from delivery to serving. Monitor water Monitor the quality of the water in the Sous quality… -
Page 12: Description Of Your Pearl
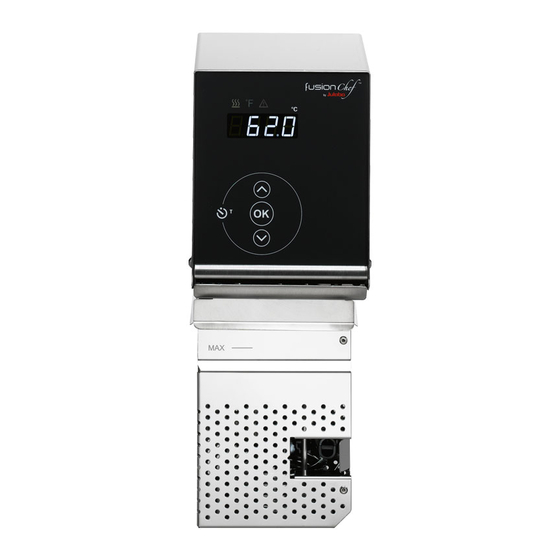
Description of your Pearl Description of your Pearl Front and rear views Front without protection grid Rear with protection grid LED display (see next Mains switch, illumi- page) nated Keypad (see next page) Micro fuses Safety float switch Power cord with plug Pump discharge Protection grid Heating coil…
-
Page 13: Display And Keypad
Display and keypad Display and keypad LED display for temperature and timer Control displays: Heating Alarm °F Temperature units Fahrenheit °C Temperature units Celsius Timer key Keypad: Arrow keys for setting the temperature and timer OK key for entering values…
-
Page 14: Accessories
Accessories Accessories The following accessories are available for your Pearl. Attachments Bath attachment clamp Use the bath attachment clamp to secure the Pearl to the wall of a cooking container. Max. wall Order No. thickness Attach. 60 mm 9FX1119 clamp Accessories for cooking containers Separation grid The separation grid is used to divide bath…
-
Page 15: Temperature Sensor
Temperature sensor Retaining grids Retaining grids are inserted into the bath tank from above and are used to keep vacuum bags underwater. They help ensure that the food is cooked evenly from all sides. Order No. 2 retaining grids for baths S, M 9FX1125 2 retaining grids for baths L, XL 9FX1126…
-
Page 16: Other Accessories
Accessories Order No. Handheld core temperature 9FX1151 sensor Adhesive sealing tape Place the adhesive sealing tape onto the vacuum bag before inserting the core tem- perature sensor. This will help maintain much of the vacuum. Order No. Adhesive sealing tape 4 m 9FX1141 Other accessories Travel case…
-
Page 17: Installation And Initial Operation
Unpacking and inspecting the unit Installation and initial operation Unpacking and inspecting the unit Unpack the unit and accessories and imme- diately check the items for any damage that may have occurred during transport. Even if only the packing has been damaged, please notify the freight forwarder, railway com- pany, or postal service so they can file a damage report.
-
Page 18: Adding Water To Tank
Installation and initial operation Fasten the unit in place Warning! Danger of electric shock! Carefully fasten the unit in place! If the unit is installed or fastened improperly, it may fall into the cooking container. If this happens: Pull the power plug from the power so- cket.
- Page 19
Adding water to tank 20 mm max. 60 mm 80 mm 86 mm Optionally: Bath attachment clamp for wall thickness to 60 mm (~ 2 ⅜ inches), Order No. 9FX119. -
Page 20: Beginning Initial Circulator Operation
Installation and initial operation Beginning initial circulator operation Caution! Compare the available power voltage and frequency with the specifications on the type label. This device may be attached only to power outlets with an earthing contact! The mains plug serves as a protective separator and must be easily accessible at all times.
-
Page 21: First Steps
Prep work First steps This chapter is intended for users with little or no experience with the Sous Vide cooking technique. If you are an experienced Sous Vide cook or professional chef, you may skip this chapter and continue on page 25 „Work- ing with your Pearl“.
-
Page 22: Starting The Unit
First steps Starting the unit After all preparations have been completed, you can begin the cooking process. 1. Make sure that the cooking container is properly filled and the Pearl is correctly in- stalled and connected. 2. Switch on the Pearl at the rear of the unit. The unit will go into Standby and display the OFF message.
-
Page 23: Enjoying The First Results
Enjoying the first results… ally return to the currently measured tem- perature. Enjoying the first results… 1. After the Pearl has heated the water bath to the desired temperature, place the meat into the cooking container. 2. Allow it to cook for at least 60 minutes. Use the timer function: Press the timer key, use the arrow keys to select the desired time, and confirm with OK.
- Page 24
First steps How did it For these reasons, it is unlikely that you will taste? achieve optimal results the first time you use the unit. To improve the results over time, you should ask your guests for their honest opin- What can I do ions and request their suggestions for im- better? -
Page 25: Working With Your Pearl
Switching on and starting the unit Working with your Pearl Switching on and starting the unit Caution! Never operate a damaged or leaking unit! Do not attempt to use the unit if the power cord is damaged! 1. Use the power switch on the rear of the unit to turn the unit on.
-
Page 26: Working With The Timer
Working with your Pearl 2. Confirm by pressing OK. The temperature will be adopted as the new target value and will remain in memory even after the unit is switched off. Working with the timer The Pearl has a programmable timer. The decimal point of the display will blink when- ever the timer is active.
-
Page 27: Changing Settings
Changing settings Displaying and correcting the timer To display the remaining running time while the unit is in operation, press the timer key once. The remaining time will be displayed and can be modified with the arrow keys. If no value is entered, the display will eventu- ally return to the measured current tempera- ture and the previously set remaining time will be active.
- Page 28
Working with your Pearl Setting the temperature units You can choose to display the temperature in either degrees Celsius or degrees Fahren- heit. Change the temperature units as fol- lows: 1. Switch off the unit. 2. Press the up-arrow and timer keys simul- taneously. - Page 29
Changing settings The selected units will be displayed: C or F. The unit will now convert all temperatures to the desired units. Reset to factory settings You can reset the unit’s settings to the original factory settings. This will clear all stored val- ues. -
Page 30: Care And Maintenance
Care and maintenance Care and maintenance The circulator is designed for continuous op- eration under normal conditions. Regular maintenance is not required. However, you should perform the following cleaning tasks each day. Changing the water The circulator is suitable only for use with sof- tened/decalcified water.
-
Page 31: Decalcifying
Decalcifying Draining bath tanks with single units Single units must be disassembled before draining the bath tank. 1. Switch off the unit and pull the mains plug. 2. Unscrew the bath attachment clamp and remove the unit from the bath tank. 3.
- Page 32
Care and maintenance Chlorine in drinking water can result in corrosion. Iron in drinking water will precipitate and result in rust formation. 1. Use water with a low surface tension (such as a soap solution) to rinse the stain- less steel bath tank and immersed func- tional parts of the unit (circulation pump, float switch, and heater). - Page 33
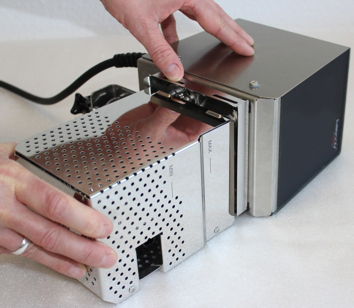
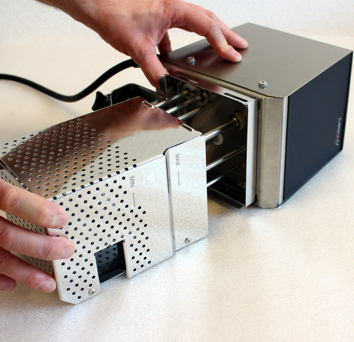
Cleaning the unit 4. Move the protection grid to the left. 5. Lift the protection grid Draw it over the float by turning it to the right by approx. 30° and slightly tilting backwards. 6. Turn the protection grid to the left back into the initial position and remove it. -
Page 34: Confirming Temperature Accuracy
Care and maintenance Confirming temperature accuracy Checking temperature accuracy Fusionchef by Julabo units are precisely cali- brated and inspected before leaving our factory. The units are designed for highly pre- cise temperature control in continuous op- eration. Even over long periods of time, the sensors will retain their accuracy or become only marginally inaccurate.
- Page 35
Confirming temperature accuracy Calibrating the unit Starting sensor calibration Calibrate the Pearl temperature sensor as follows: 1. Switch on the circulator and start the unit. 2. Start the calibration by pressing the timer key and OK simultaneously. Hold the keys down until the display’s decimal point starts blinking. - Page 36
Care and maintenance Deleting the most recent calibration If you have determined that a calibration is unnecessary or faulty, you can delete it. To do this, reset the unit to its factory condi- tion as described on page 29. -
Page 37: Error Messages
If there is enough water in the bath tank: The float switch is defective (transport damage, etc.). Sent the unit to an authorized fusionchef by JULABO re- pair facility. E 05: WORKING SENSOR Please contact our service depart- ALARM ment.
- Page 38
Error messages Shown on the display What should I do? E 12: TEMPERATURE Please contact our service depart- MEASUREMENT ALARM ment. CALL SECURE E 14: EXCESS TEMPERA- Please contact our service depart- TURE PROTECTOR ment. CALL SECURE ALARM E 33: SAFETY SENSOR Please contact our service depart- ALARM ment. -
Page 39: Information About The Unit
Technical data Information about the unit Technical data Unit type Pearl Pearl Z Pearl S Order No. 9FT1000 9FT1113 9FT1B20 Working temperature range 20 ° C…95 ° C(68 ° F …203 ° F) Operating temperature range 0 ° C…95 °C (32 ° F …203 ° F) Temperature stability +/- 0,03 K (+/- 0.05 °…
- Page 40
Information about the unit All data assume rated voltage and rated frequency Operating temperature: 70 °C (158 ° , ambient temperature: 20 °C (68 ° heat transfer fluid: water. Information subject to technical changes. Unit type Pearl M Pearl L Pearl XL Order No. -
Page 41: Ec Compliance
Fax: 07823 / 2491 Technical Service E-mail: service@fusionchef.de If sending a product to fusionchef by Julabo: Please clean the device in order to avoid endangering the service personnel. Prepare the device for shipment with ca- reful and proper packaging. Always include a brief description of the problem.
-
Page 42: Disposal
Information about the unit fusionchef by Julabo will not be liable for any damage caused by improper packaging. Notice During the repair process fusionchef by Ju- labo reserves the right to perform any tech- nical changes necessary to ensure flawless operation of the device.
-
Page 43: Warranty
Warranty Warranty fusionchef by Julabo warrants flawless func- tionality of this unit, assuming it has been insatlled and used properly and in accor- dance with the directives contained in these operating instructions. The warranty time period is two years. The warranty is limited to our choice of im- provement, no-charge repair, or replace- ment in response to customer complaint.
-
Contents
-
Table of Contents
-
Bookmarks
Quick Links
Operating manual
premium sous vide collection
W
‘
pearl
English
:
>
‘
^
‘
d
&
,
Related Manuals for Julabo Fusion Chef Pearl
Summary of Contents for Julabo Fusion Chef Pearl
- Page 1
Operating manual English pearl premium sous vide collection > &… -
Page 2: Table Of Contents
Table of contents Table of contents Sous Vide basics …………….4 Safety………………… 6 Proper use…………… 6 Safety notices for your Pearl ……..6 Safety notices for Sous Vide cooking …….10 Description of your Pearl…………12 Front and rear views…………12 Display and keypad…………13 Accessories …………….14 Attachments…………..14 Accessories for cooking containers ……14…
- Page 3
Table of contents Enjoying the first results……….23 Improving the results………..23 Working with your Pearl …………25 Switching on and starting the unit ……25 Operating the unit …………25 Setting the desired temperature …….25 Working with the timer ……….26 Changing settings …………27 Care and maintenance…………30 Changing the water …………30 Decalcifying …………..31 Cleaning the unit …………31… -
Page 4: Sous Vide Basics
Sous Vide basics Sous Vide basics Important! Always exercise the greatest possible care and maintain hygienic conditions at all times. 1. Preparation Use only fresh ingredients of the highest pos- sible quality. Prepare raw ingredients prop- erly. 2. Vacuuming Place the raw, refrigerated ingredients into special bags suitable for Sous Vide.
- Page 5
Proper use 5. Refrigerated Remove the cooled bag from the ice water storage and store it at 3 °C (37 °F) or colder. 6. Regeneration Warm the cooled bag in a water bath shortly before serving. Complete the cooking proc- ess and serve the food. -
Page 6: Safety
Safety Safety Proper use This product is designed to control the tem- perature of water in a bath tank. The product is used to prepare food in this water bath according to the Sous Vide technique (low- temperature, slow cooking of food in vac- uum-sealed packaging).
- Page 7
Safety notices for your Pearl This device is not intended for use by persons (including children) with reduced physical, sensory or mental capabilities or lack of ex- perience and knowledge unless they have been given supervision or instruction con- cerning the use of the device by a person responsible for their safety. - Page 8
Do not attempt to use the unit if the po- wer cord is damaged! For safety reasons a damaged power cord may only be re- placed by the manufacturer, a fusionchef by Julabo service representative or a simi- larly qualified person. - Page 9
Safety notices for your Pearl Allow only authorized technicians to per- form service and repair tasks. Low bath fluid safety float This unit includes a low bath fluid safety float. Switching off this safety device (by blocking the float) can result in a hazard- ous situation. -
Page 10: Safety Notices For Sous Vide Cooking
Safety Safety notices for Sous Vide cooking Only trained experts should attempt the Sous Vide cooking technique. It is important to follow precise and uniform work steps and maintain a hygienic environment in order to ensure adequate safety during food prepa- ration.
- Page 11
Safety notices for Sous Vide cooking Observe HACCP It is also important that kitchen personnel regulations employ an appropriate HACCP (Hazards Analysis and Critical Control Points) system in order to monitor and document every step the food takes from delivery to serving. Monitor water Monitor the quality of the water in the Sous quality… -
Page 12: Description Of Your Pearl
Description of your Pearl Description of your Pearl Front and rear views Front without protection grid Rear with protection grid LED display (see next Mains switch, illumi- page) nated Keypad (see next page) Micro fuses Safety float switch Power cord with plug Pump discharge Protection grid Heating coil…
-
Page 13: Display And Keypad
Display and keypad Display and keypad LED display for temperature and timer Control displays: Heating Alarm °F Temperature units Fahrenheit °C Temperature units Celsius Timer key Keypad: Arrow keys for setting the temperature and timer OK key for entering values…
-
Page 14: Accessories
Accessories Accessories The following accessories are available for your Pearl. Attachments Bath attachment clamp Use the bath attachment clamp to secure the Pearl to the wall of a cooking container. Max. wall Order No. thickness Attach. 60 mm 9FX1119 clamp Accessories for cooking containers Separation grid The separation grid is used to divide bath…
-
Page 15: Temperature Sensor
Temperature sensor Retaining grids Retaining grids are inserted into the bath tank from above and are used to keep vacuum bags underwater. They help ensure that the food is cooked evenly from all sides. Order No. 2 retaining grids for baths S, M 9FX1125 2 retaining grids for baths L, XL 9FX1126…
-
Page 16: Other Accessories
Accessories Order No. Handheld core temperature 9FX1151 sensor Adhesive sealing tape Place the adhesive sealing tape onto the vacuum bag before inserting the core tem- perature sensor. This will help maintain much of the vacuum. Order No. Adhesive sealing tape 4 m 9FX1141 Other accessories Travel case…
-
Page 17: Installation And Initial Operation
Unpacking and inspecting the unit Installation and initial operation Unpacking and inspecting the unit Unpack the unit and accessories and imme- diately check the items for any damage that may have occurred during transport. Even if only the packing has been damaged, please notify the freight forwarder, railway com- pany, or postal service so they can file a damage report.
-
Page 18: Adding Water To Tank
Installation and initial operation Fasten the unit in place Warning! Danger of electric shock! Carefully fasten the unit in place! If the unit is installed or fastened improperly, it may fall into the cooking container. If this happens: Pull the power plug from the power so- cket.
- Page 19
Adding water to tank 20 mm max. 60 mm 80 mm 86 mm Optionally: Bath attachment clamp for wall thickness to 60 mm (~ 2 ⅜ inches), Order No. 9FX119. -
Page 20: Beginning Initial Circulator Operation
Installation and initial operation Beginning initial circulator operation Caution! Compare the available power voltage and frequency with the specifications on the type label. This device may be attached only to power outlets with an earthing contact! The mains plug serves as a protective separator and must be easily accessible at all times.
-
Page 21: First Steps
Prep work First steps This chapter is intended for users with little or no experience with the Sous Vide cooking technique. If you are an experienced Sous Vide cook or professional chef, you may skip this chapter and continue on page 25 „Work- ing with your Pearl“.
-
Page 22: Starting The Unit
First steps Starting the unit After all preparations have been completed, you can begin the cooking process. 1. Make sure that the cooking container is properly filled and the Pearl is correctly in- stalled and connected. 2. Switch on the Pearl at the rear of the unit. The unit will go into Standby and display the OFF message.
-
Page 23: Enjoying The First Results
Enjoying the first results… ally return to the currently measured tem- perature. Enjoying the first results… 1. After the Pearl has heated the water bath to the desired temperature, place the meat into the cooking container. 2. Allow it to cook for at least 60 minutes. Use the timer function: Press the timer key, use the arrow keys to select the desired time, and confirm with OK.
- Page 24
First steps How did it For these reasons, it is unlikely that you will taste? achieve optimal results the first time you use the unit. To improve the results over time, you should ask your guests for their honest opin- What can I do ions and request their suggestions for im- better? -
Page 25: Working With Your Pearl
Switching on and starting the unit Working with your Pearl Switching on and starting the unit Caution! Never operate a damaged or leaking unit! Do not attempt to use the unit if the power cord is damaged! 1. Use the power switch on the rear of the unit to turn the unit on.
-
Page 26: Working With The Timer
Working with your Pearl 2. Confirm by pressing OK. The temperature will be adopted as the new target value and will remain in memory even after the unit is switched off. Working with the timer The Pearl has a programmable timer. The decimal point of the display will blink when- ever the timer is active.
-
Page 27: Changing Settings
Changing settings Displaying and correcting the timer To display the remaining running time while the unit is in operation, press the timer key once. The remaining time will be displayed and can be modified with the arrow keys. If no value is entered, the display will eventu- ally return to the measured current tempera- ture and the previously set remaining time will be active.
- Page 28
Working with your Pearl Setting the temperature units You can choose to display the temperature in either degrees Celsius or degrees Fahren- heit. Change the temperature units as fol- lows: 1. Switch off the unit. 2. Press the up-arrow and timer keys simul- taneously. - Page 29
Changing settings The selected units will be displayed: C or F. The unit will now convert all temperatures to the desired units. Reset to factory settings You can reset the unit’s settings to the original factory settings. This will clear all stored val- ues. -
Page 30: Care And Maintenance
Care and maintenance Care and maintenance The circulator is designed for continuous op- eration under normal conditions. Regular maintenance is not required. However, you should perform the following cleaning tasks each day. Changing the water The circulator is suitable only for use with sof- tened/decalcified water.
-
Page 31: Decalcifying
Decalcifying Draining bath tanks with single units Single units must be disassembled before draining the bath tank. 1. Switch off the unit and pull the mains plug. 2. Unscrew the bath attachment clamp and remove the unit from the bath tank. 3.
- Page 32
Care and maintenance Chlorine in drinking water can result in corrosion. Iron in drinking water will precipitate and result in rust formation. 1. Use water with a low surface tension (such as a soap solution) to rinse the stain- less steel bath tank and immersed func- tional parts of the unit (circulation pump, float switch, and heater). - Page 33
Cleaning the unit 4. Move the protection grid to the left. 5. Lift the protection grid Draw it over the float by turning it to the right by approx. 30° and slightly tilting backwards. 6. Turn the protection grid to the left back into the initial position and remove it. -
Page 34: Confirming Temperature Accuracy
Care and maintenance Confirming temperature accuracy Checking temperature accuracy Fusionchef by Julabo units are precisely cali- brated and inspected before leaving our factory. The units are designed for highly pre- cise temperature control in continuous op- eration. Even over long periods of time, the sensors will retain their accuracy or become only marginally inaccurate.
- Page 35
Confirming temperature accuracy Calibrating the unit Starting sensor calibration Calibrate the Pearl temperature sensor as follows: 1. Switch on the circulator and start the unit. 2. Start the calibration by pressing the timer key and OK simultaneously. Hold the keys down until the display’s decimal point starts blinking. - Page 36
Care and maintenance Deleting the most recent calibration If you have determined that a calibration is unnecessary or faulty, you can delete it. To do this, reset the unit to its factory condi- tion as described on page 29. -
Page 37: Error Messages
If there is enough water in the bath tank: The float switch is defective (transport damage, etc.). Sent the unit to an authorized fusionchef by JULABO re- pair facility. E 05: WORKING SENSOR Please contact our service depart- ALARM ment.
- Page 38
Error messages Shown on the display What should I do? E 12: TEMPERATURE Please contact our service depart- MEASUREMENT ALARM ment. CALL SECURE E 14: EXCESS TEMPERA- Please contact our service depart- TURE PROTECTOR ment. CALL SECURE ALARM E 33: SAFETY SENSOR Please contact our service depart- ALARM ment. -
Page 39: Information About The Unit
Technical data Information about the unit Technical data Unit type Pearl Pearl Z Pearl S Order No. 9FT1000 9FT1113 9FT1B20 Working temperature range 20 ° C…95 ° C(68 ° F …203 ° F) Operating temperature range 0 ° C…95 °C (32 ° F …203 ° F) Temperature stability +/- 0,03 K (+/- 0.05 °…
- Page 40
Information about the unit All data assume rated voltage and rated frequency Operating temperature: 70 °C (158 ° , ambient temperature: 20 °C (68 ° heat transfer fluid: water. Information subject to technical changes. Unit type Pearl M Pearl L Pearl XL Order No. -
Page 41: Ec Compliance
Fax: 07823 / 2491 Technical Service E-mail: service@fusionchef.de If sending a product to fusionchef by Julabo: Please clean the device in order to avoid endangering the service personnel. Prepare the device for shipment with ca- reful and proper packaging. Always include a brief description of the problem.
-
Page 42: Disposal
Information about the unit fusionchef by Julabo will not be liable for any damage caused by improper packaging. Notice During the repair process fusionchef by Ju- labo reserves the right to perform any tech- nical changes necessary to ensure flawless operation of the device.
-
Page 43: Warranty
Warranty Warranty fusionchef by Julabo warrants flawless func- tionality of this unit, assuming it has been insatlled and used properly and in accor- dance with the directives contained in these operating instructions. The warranty time period is two years. The warranty is limited to our choice of im- provement, no-charge repair, or replace- ment in response to customer complaint.
fusionchef by Julabo — Premium Sous Vide Collection
On this page we have some answers to the most important questions about sous vide in general, the process and fusionchef. Our cumulative questions and the answers provide a first look at the sous vide subject. Chefs can receive feedback on their very specific questions regarding their professional kitchens. If any questions should remain unanswered, please contact us and state your question.
Can foods with different cooking temperatures be cooked in a sous vide cooker at the same time?
We recommend using several fusionchef units when simultaniously working with different cooking temperatures and cooking various foods (e.g. meat, fish, vegetables). With the help of multiple fusionchef units, different temperatures can be controlled and a complete menu can be developed at the same time.
Another option is to use the core temperature sensor for the Diamond. The Diamond sous vide thermostat can be set to heat the water to the highest temperature needed for the first food, meanwhile another food requiring a lower temperature can be controlled by the core temperature sensor. When the desired core temperature of the second food is reached, immediately remove it from the sous vide water bath. It is ready.
Can foods with the same cooking temperature but different cooking times be cooked in the same fusionchef sous vide instrument?
fusionchef offers custom fitting separation grids for the XS, S, M, L and XL sous vide instruments in order to divide the water bath into sections. The cooking products can then be divided by time needed and easily identified to be taken out at different times.
Can I serve the food used with the fusionchef core temperature sensor?
If the core temperature sensor is used in conjunction with the special fusionchef adhesive sealing tape, then the puncture point in the vacuum bag is sealed and the vacuum will be maintained. It cannot be completely ruled out that water from the water bath does not come into contact with the food.
Does a fusionchef sous vide cooker need to be serviced?
fusionchef instruments are constructed for continuous use under normal circumstances. It is not necessary to service the units on a regular basis.
Does the fusionchef sous vide cooker need to be calibrated?
All fusionchef sous vide instruments are meticulously tested and calibrated before leaving our factory. They are designed for precise, continuous operation. It will take a long time for the instrument´s sensors to lose a very minimal amount of precision if any. Only after many years, can there be slight differences. Therefore it is not necessary to calibrate the fusionchef thermostat under normal conditions.
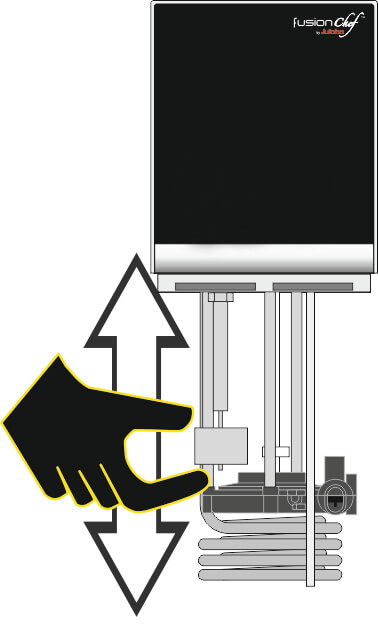
How can the protective grid that comes with the thermostat be removed and remounted?
The protective grid must be removed in order to carefully clean the functional parts (circulation pump, float, and the heater).
Important: The machine must be turned off and the electrical cord must be unplugged! Do not lay the sous vide thermostat on its head — doing so will allow water to seep into the machine!
Take the sous vide thermostat out of the sous vide water bath and diligently dry it. Do not allow any water to seep into the machine.
Turn the sous vide thermostat on its side and lightly push the edge of the metal housing to the side. Then pull the protective grid down. After cleaning the protective grid, remount it in the reverse order.
Can I serve the food used with the fusionchef core temperature sensor?
If the core temperature sensor is used in conjunction with the special fusionchef adhesive sealing tape, then the puncture point in the vacuum bag is sealed and the vacuum will be maintained. It cannot be completely ruled out that water from the water bath does not come into contact with the food.
Does a fusionchef sous vide cooker need to be serviced?
fusionchef instruments are constructed for continuous use under normal circumstances. It is not necessary to service the units on a regular basis.
Does the fusionchef sous vide cooker need to be calibrated?
All fusionchef sous vide instruments are meticulously tested and calibrated before leaving our factory. They are designed for precise, continuous operation. It will take a long time for the instrument´s sensors to lose a very minimal amount of precision if any. Only after many years, can there be slight differences. Therefore it is not necessary to calibrate the fusionchef thermostat under normal conditions.
How can the protective grid that comes with the thermostat be removed and remounted?
The protective grid must be removed in order to carefully clean the functional parts (circulation pump, float, and the heater).
Important: The machine must be turned off and the electrical cord must be unplugged! Do not lay the sous vide thermostat on its head — doing so will allow water to seep into the machine!
Take the sous vide thermostat out of the sous vide water bath and diligently dry it. Do not allow any water to seep into the machine.
Turn the sous vide thermostat on its side and lightly push the edge of the metal housing to the side. Then pull the protective grid down. After cleaning the protective grid, remount it in the reverse order.
After that, check the function of the low-level safety mechanism: test if the float can easily move by using a thin pin through the opening in the protective grid.
How is water in the fusionchef water bath correctly emptied?
Each fusionchef sous vide model (XS, S, M. L and XL) comes with a drain valve that needs to be inserted in place of the integrated screw plug before the first use. To empty the water bath, turn off the sous vide thermostat and unplug the machine. Place the sous vide machine over a drain or place the drain valve over a large enough vessel. Open the drain valve and let the water flow out.
How long does it take for a Pearl thermostat to pay for itself?
The sous vide cooking method reduces cooking food shrinkage to a minimum and the Pearl will already pay for itself with the savings on food shrinkage after sous vide cooking circa 170kg of beef tenderloin.
How much electricity does a fusionchef sous vide cooker consume while in continuous operation?
For example, a fusionchef Diamond M consumes ca. 6.5 kW while operating for 18 hours. The calculation is based on the following prerequisites:
The water´s stating temperature in the fusionchef sous vide water bath is between 15 ̊C and 20 ̊C
When the set temperature is reached, a kilogram of Sauerbraten (core temperature of +3 ̊C) is placed into the sous vide water bath and is cooked at 60 ̊C for 18 hours.
How much food can be cooked in the different bath sizes?
In order to maintain optimal water circulation and a constant temperature inside the sous vide water bath or external cooking vessel, we recommend, as a general rule of thumb, not to cook any more than about half of the water bath volume in kg of food.
XS Sous vide water bath by fusionchef or GN 1/2 200 mm (13 liters): up to circa 5 kg
S Sous vide water bath by fusionchef or GN 1/1 150 mm (19 liters): up to circa 8 kg
M Sous vide water bath by fusionchef or GN 1/1 200 mm (27 liters): up to circa 12 kg
L Sous vide water bath by fusionchef or GN 2/1 150 mm (44 liters): up to circa 20 kg
XL Sous vide water bath by fusionchef or GN 2/1 200 mm (58 liters): up to circa 27 kg
How often does the fusionchef sous vide cooker need to be descaled?
We recommend that you proactively descale your fusionchef on a regular basis before hard water deposits are visible. How often you need to descale will depend on the hardness of the water used in the machine. In order to protect your fusionchef from calcium deposits and for the safe removal of hard water deposits, we offer an effective descaler in our fusionchef line of accessories.
")
After that, check the function of the low-level safety mechanism: test if the float can easily move by using a thin pin through the opening in the protective grid.
How is water in the fusionchef water bath correctly emptied?
Each fusionchef sous vide model (XS, S, M. L and XL) comes with a drain valve that needs to be inserted in place of the integrated screw plug before the first use. To empty the water bath, turn off the sous vide thermostat and unplug the machine. Place the sous vide machine over a drain or place the drain valve over a large enough vessel. Open the drain valve and let the water flow out.
How long does it take for a Pearl thermostat to pay for itself?
The sous vide cooking method reduces cooking food shrinkage to a minimum and the Pearl will already pay for itself with the savings on food shrinkage after sous vide cooking circa 170kg of beef tenderloin.
How much electricity does a fusionchef sous vide cooker consume while in continuous operation?
For example, a fusionchef Diamond M consumes ca. 6.5 kW while operating for 18 hours. The calculation is based on the following prerequisites:
The water´s stating temperature in the fusionchef sous vide water bath is between 15 ̊C and 20 ̊C
When the set temperature is reached, a kilogram of Sauerbraten (core temperature of +3 ̊C) is placed into the sous vide water bath and is cooked at 60 ̊C for 18 hours.
How much food can be cooked in the different bath sizes?
In order to maintain optimal water circulation and a constant temperature inside the sous vide water bath or external cooking vessel, we recommend, as a general rule of thumb, not to cook any more than about half of the water bath volume in kg of food.
XS Sous vide water bath by fusionchef or GN 1/2 200 mm (13 liters): up to circa 5 kg
S Sous vide water bath by fusionchef or GN 1/1 150 mm (19 liters): up to circa 8 kg
M Sous vide water bath by fusionchef or GN 1/1 200 mm (27 liters): up to circa 12 kg
L Sous vide water bath by fusionchef or GN 2/1 150 mm (44 liters): up to circa 20 kg
XL Sous vide water bath by fusionchef or GN 2/1 200 mm (58 liters): up to circa 27 kg
How often does the fusionchef sous vide cooker need to be descaled?
We recommend that you proactively descale your fusionchef on a regular basis before hard water deposits are visible. How often you need to descale will depend on the hardness of the water used in the machine. In order to protect your fusionchef from calcium deposits and for the safe removal of hard water deposits, we offer an effective descaler in our fusionchef line of accessories.
How often does the water in the fusionchef sous vide cooker need to be changed?
Only use decalcified water in a fusionchef sous vide instrument. The water should be changed on a regular basis. We recommend it be changed daily.
Not changing the water on a regular basis
- can increase the concentration of minerals in the water from the continuous refilling, which will create a crust on the sous vide thermostat and the sous vide water bath.
- can result in contamination of the vacuum bags from particles in the water.
Is it possible that parts of the fusionchef sous vide cooker will corrode from improper handling?
Because stainless steel can corrode, please pay attention to the following instructions in order to prevent and protect the sous vide machine against rust and corrosion:
- Do not clean the sous vide thermostat and the sous vide water bath with steel wool.
- Do not add salt to the temperature regulated water.
- Chlorine in drinking water can cause corrosion.
- Iron containing drinking water can cause rust to form due to the flocculation of the iron when heated.
What needs to be taken into consideration when cleaning the sous vide cooker?
Always turn off and unplug the sous vide instrument before cleaning it. Be careful not to allow any water used in cleaning to seep into the machine.
Do not clean a fusionchef sous vide machine with a jet of water or submerge it into water. Do not lay the sous vide thermostat on its head — doing so will allow water to seep into the machine.

Wash the stainless steel water bath and the functional parts (circulation pump, float, and the heater) with a mild soap solution. Rinse the bath and parts with filtered water and diligently wipe all the parts dry with a soft towel. Do not lay the machine on its head! Rub down the outer sides with a towel and the mild soap solution.
Finally, check the low-level safety feature. Hold the sous vide thermostat perpendicular to the countertop and test the ease of movement of the float.
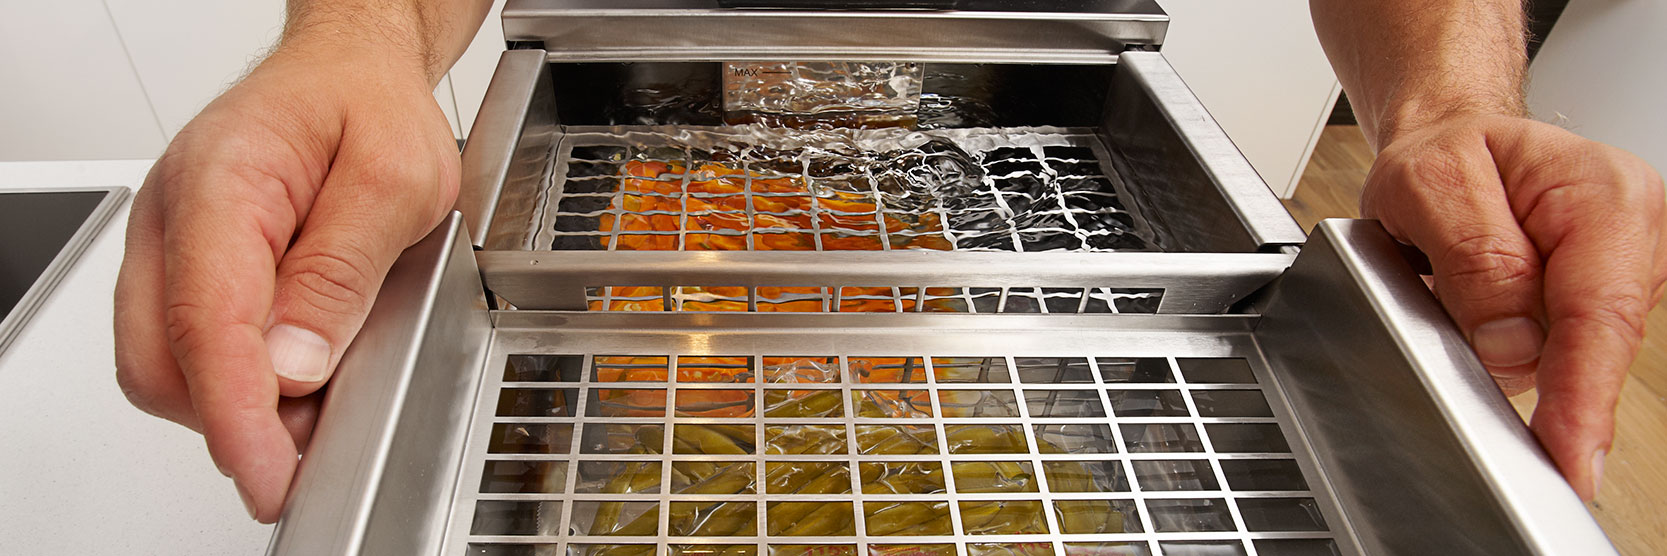
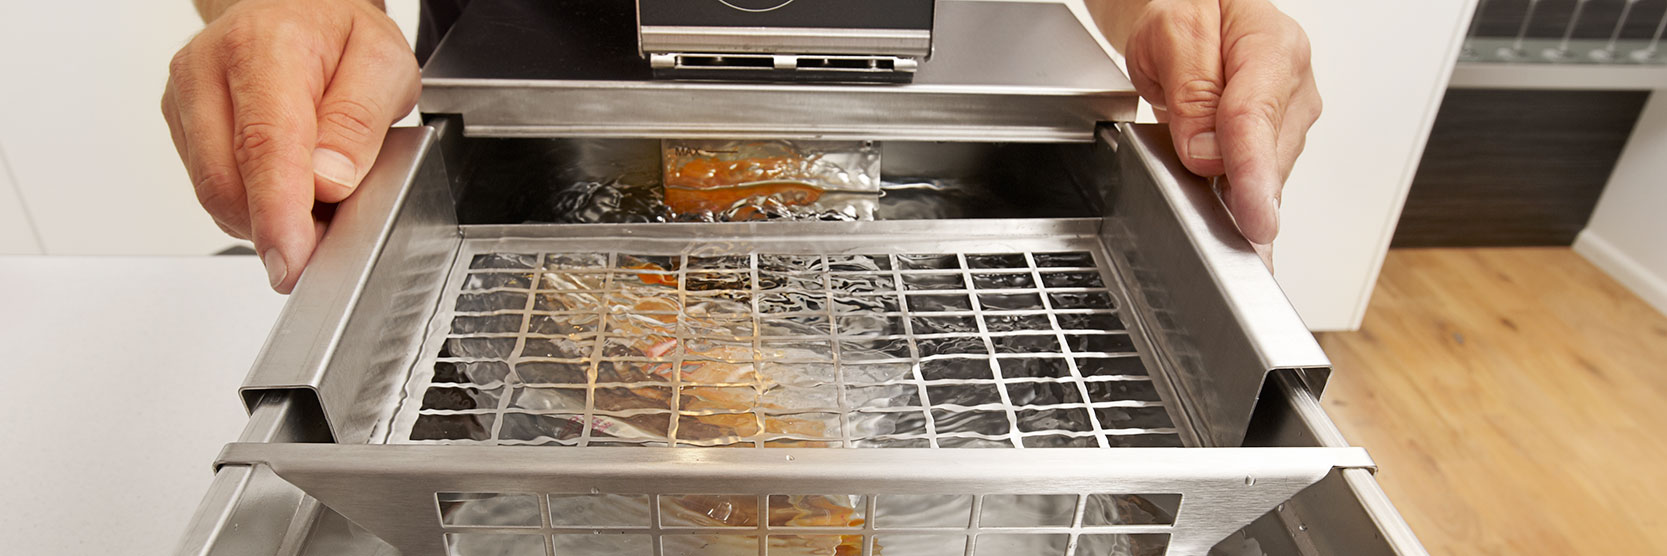
What preventative measures can be taken to stop the vacuum-sealed food from floating to the top of the sous vide water bath and thus cooking unevenly?
fusionchef offers custom fitting retaining grids for the XS, S, M, L and XL sous vide cooker in order to hold the vacuum bags under water. The retaining grids can be placed on top of the fusionchef sous vide water bath to guarantee the food is equally heated on all sides.
Why is it necessary to have a circulation pump in a sous vide instrument?
Every fusionchef comes with an integrated circulation pump with a capacity of 14l/min. It is responsible for the continuous circulation of water in the vessel and results in a constant temperature within ± 0.01°C of the set temperature in the entire sous vide water bath or external cooking vessel.
Немецкая компания JULABO почти полвека работает в сфере температурных технологий, а тема термостатирования в среде жидких теплоносителей является одним из основных направлений ее деятельности. Высокотехнологичные охлаждающие, нагревающие, калибровочные термостаты, водяные бани, охладители, высокодинамичные системы контроля температуры бренда работают в исследовательских лабораториях и производственных цехах разных областей мировой экономики от добычи нефти и газа до парфюмерной и пищевой промышленности. Не удивительно, что кулинарная технология sous vide, едва появившись, заинтересовала инженеров бренда и Julabo термостат, надежный и простой в управлении, стал основным инструментом нового метода.
Fusion chef Julabo: «высокая кухня» по-немецки
Возвышенная эмоциональность французов и спокойная прагматичность немцев – два полюса европейской культуры и европейского комфорта, тема шуток и предмет восхищения. Открыв почти случайно кулинарный метод су вид, французы возвели его в ранг элитарной «высокой кухни». Прагматичных же немцев заинтересовали практические преимущества революционной технологии тепловой обработки пищевых продуктов:
- сохранение и усиление натурального вкуса и аромата продуктов;
- сохранение цвета, текстуры и питательных свойств исходного пищевого сырья;
- сохранение естественной влаги продукта и, следовательно, минимизация весовых потерь при тепловой обработке;
- возможность продолжительного хранения полуфабрикатов и готовых блюд в вакуумной упаковке;
- сокращение издержек и увеличение прибыли благодаря рациональному использованию дорогостоящих продуктов и незначительным весовым потерям их при тепловой обработке и хранении.
Главное условие и секрет достижения перечисленных преимуществ состоит в продолжительной тепловой обработке упакованных в вакуум пищевых продуктов при стабильно постоянной температуре не выше 75-80°С. Самый доступный теплоноситель, соответствующий этому условию – вода. Вполне возможно, что именно водяная баня Julabo, известная высокой стабильностью температуры и простотой управления стала родоначальником линии су вид термостатов fusion chef Julabo, открывшей элитарную «высокую кухню» широкому кругу потребителей.
Почему Петрохладотехника рекомендует купить термостат Julabo
Интернет магазин Петрохладотехника подготовил достойный выбор термостатов су вид разных производителей и каждый наш клиент может подобрать аппарат исходя из своих планов и критериев, будь то цена, тип, производительность и периодичность использования. Если вы уже сделали свой выбор, оформляйте заказ, и мы его оперативно выполним.
Если вы еще не определились с выбором аппарата, но технологией sous vide увлеклись всерьез и надолго, Петрохладотехника рекомендует обратить внимание на оборудование немецкого производителя Julabo. Наличие у компании международных сертификатов соответствия качества продукции и менеджмента ИСО 9001 от 1994 году, и ISO EN DIN 9001:2000 от 2003 года – это не только честь, но и ответственность, и грамотная производственная политика:
- весь производственный процесс от исследований, проектирования, компьютерного моделирования до серийного производства оборудования происходит в Германии, в лабораториях и цехах главного подразделения компании;
- разработка и сборка электронных компонентов оборудования с использованием современных SMD-технологий выполняется исключительно специалистами компании на в подразделениях компании в Германии;
- изготовление механических узлов, корпусов, включая нанесение порошковых красителей, а также сборка готовых приборов тоже выполняется собственными силами;
- вся готовая продукция компании проходит полуавтоматический контроль качества, гарантирующий высокую степень защиты термостатов от отказов в работе;
- главный приоритет JULABO – тесный контакт с потребителями своей продукции, внимание к их пожеланием и замечаниям, а обеспечивает его компетентный менеджмент 10-ти дочерних компаний, более 100 дистрибьюторов и торговых партнеров по всему миру.
Поэтому купив термостат Julabo, вы получаете аппарат европейской сборки и европейского качества, который прослужит долго и безотказно и такие проблемы, как ремонт и запчасти вас не будут беспокоить.
Делайте выбор, оформляйте заказ, а своевременная доставка покупки по удобному адресу СПб, Ленобласти либо в любой город РФ от нашего интернет магазина гарантирована.
Термостат Julabo Diamond и Julabo Pearl: типы, сходство и отличия
Компания Julabo – лидер в производстве систем термостатирования и символ их высочайшего качества. Учитывая специфику сферы общепита, пожелания и ожидания своих клиентов, для технологии су вид известный бренд выпускает термостаты двух типов и двух модельных линий:
- водяная баня Julabo (ротационный кипятильник), модели Pearl и Diamond;
- погружной или циркуляционный термостат Julabo, модели Pearl и Diamond.
Водяная баня Julabo или ротационный кипятильник обеих модельных линий представляет собой герметичную емкость с панелью управления, встроенными нагревательным элементом и циркуляционным насосом. Буквенные обозначения S, M, L, XL означают объем ванны 19, 27, 44 и 58 л соответственно. Независимо от модели и объема ванны, циркуляционный насос соответствующей мощности обеспечивает высокую стабильность температуры по всему рабочему объему аппарата. Приборы обеих моделей оснащены светодиодными дисплеями, брызгозащитной клавиатурой, оптической и звуковой системами оповещения о перегреве теплоносителя.
Погружной или циркуляционный термостат Julabo моделей и Pearl, и Diamond компактен, надежен, не привязан к конкретному объему и рассчитан на термостатирование любых емкостей до 58 л объемом. Независимо от модели термостат погружной Julabo Pearl или Diamond обязательно оснащен циркуляционным насосом, непрерывно перемещающим теплоноситель и обеспечивающий тем самым его равномерное прогревание и стабильность температурного режима. Прибор также оснащен защитной решеткой, удобной системой крепления к емкости, светодиодным дисплеем, оптической и звуковой системами оповещения о снижении уровня теплоносителя или его перегреве.
Отличий между модельными линиями термостатов Julabo Pearl и Diamond всего два, и они следующие:
- Водяная баня и погружной термостат Julabo Pearl обеспечивают температурную стабильность ± 0,03°C, тогда как у обоих типов аппаратов модели Julabo Diamond этот показатель точнее и составляет ± 0,01°C.
- Система управления термостатирующего оборудования бренда на базе микропроцессорной электроники позволяет использовать все режимы приготовления технологии Sous Vide, однако в термостатах Julabo Diamond программы для мяса, рыбы и овощей уже заложены в памяти, а в аппаратах Julabo Pearl соответствующие временные и температурные показатели нужно задавать вручную.
Общих преимуществ всех типов и моделей термостатов Julabo намного больше и они выгодно характеризуют это оборудование:
- простое, понятное на интуитивном уровне управление, не требующее специальной подготовки персонала;
- удобный индикатор температур, который легко читается на расстоянии;
- отображение на дисплее 3-х значений температуры – заданной, фактической температуры теплоносителя и фактической температуры внутри продукта, — важная функция для контроля и коррекции процесса приготовления;
- система оптического и звукового оповещения о снижении уровня или повышении температуры теплоносителя;
- наличие мощных насосов, обеспечивающих равномерный прогрев теплоносителя и заданную температурную стабильность;
- могут работать с любой кухонной емкостью от стандартизированных гастроемкостей до котлов и кастрюль;
- компактны, мобильны, подходят для обслуживания выездных банкетов, фуршетов, кейтеринга;
- продуманные практичные аксессуары, повышающие удобство работы с оборудованием.
Error messages
Shown on the display
E 01: LOW WATER LEVEL
ALARM
E 05: WORKING SENSOR
ALARM
E 06: SENSOR
DIFFERENCE ALARM
E 07: INTERNAL HARD-
WARE ERROR
The following table contains some of the pos-
sible error messages with the associated
warning messages and resolutions.
All warning messages are indicated on the
display and accompanied by an audible
signal. To mute the audible signal, press OK
once. The error message will still be visible.
When the following error messages appear,
the unit (heater and circulation pump) will
shut off. You must remove the cause of the
problem before you can switch the unit back
on.
What should I do?
Not enough water in the bath tank.
Switch off the unit at the power switch,
add water, and switch it back on.
If there is enough water in the bath
tank:
The float switch is defective (transport
damage, etc.). Sent the unit to an
authorized fusionchef by JULABO re-
pair facility.
Please contact our service depart-
ment. CALL SECURE
Please contact our service depart-
ment. CALL SECURE
Please contact our service depart-
ment. CALL SECURE
Error messages
37
-
Contents
-
Table of Contents
-
Bookmarks
Quick Links
Operating manual
premium sous vide collection
W
‘
pearl
English
:
>
‘
^
‘
d
&
,
Related Manuals for Julabo Fusion Chef Pearl
Summary of Contents for Julabo Fusion Chef Pearl
-
Page 1
Operating manual English pearl premium sous vide collection > &… -
Page 2: Table Of Contents
Table of contents Table of contents Sous Vide basics …………….4 Safety………………… 6 Proper use…………… 6 Safety notices for your Pearl ……..6 Safety notices for Sous Vide cooking …….10 Description of your Pearl…………12 Front and rear views…………12 Display and keypad…………13 Accessories …………….14 Attachments…………..14 Accessories for cooking containers ……14…
-
Page 3
Table of contents Enjoying the first results……….23 Improving the results………..23 Working with your Pearl …………25 Switching on and starting the unit ……25 Operating the unit …………25 Setting the desired temperature …….25 Working with the timer ……….26 Changing settings …………27 Care and maintenance…………30 Changing the water …………30 Decalcifying …………..31 Cleaning the unit …………31… -
Page 4: Sous Vide Basics
Sous Vide basics Sous Vide basics Important! Always exercise the greatest possible care and maintain hygienic conditions at all times. 1. Preparation Use only fresh ingredients of the highest pos- sible quality. Prepare raw ingredients prop- erly. 2. Vacuuming Place the raw, refrigerated ingredients into special bags suitable for Sous Vide.
-
Page 5
Proper use 5. Refrigerated Remove the cooled bag from the ice water storage and store it at 3 °C (37 °F) or colder. 6. Regeneration Warm the cooled bag in a water bath shortly before serving. Complete the cooking proc- ess and serve the food. -
Page 6: Safety
Safety Safety Proper use This product is designed to control the tem- perature of water in a bath tank. The product is used to prepare food in this water bath according to the Sous Vide technique (low- temperature, slow cooking of food in vac- uum-sealed packaging).
-
Page 7
Safety notices for your Pearl This device is not intended for use by persons (including children) with reduced physical, sensory or mental capabilities or lack of ex- perience and knowledge unless they have been given supervision or instruction con- cerning the use of the device by a person responsible for their safety. -
Page 8
Do not attempt to use the unit if the po- wer cord is damaged! For safety reasons a damaged power cord may only be re- placed by the manufacturer, a fusionchef by Julabo service representative or a simi- larly qualified person. -
Page 9
Safety notices for your Pearl Allow only authorized technicians to per- form service and repair tasks. Low bath fluid safety float This unit includes a low bath fluid safety float. Switching off this safety device (by blocking the float) can result in a hazard- ous situation. -
Page 10: Safety Notices For Sous Vide Cooking
Safety Safety notices for Sous Vide cooking Only trained experts should attempt the Sous Vide cooking technique. It is important to follow precise and uniform work steps and maintain a hygienic environment in order to ensure adequate safety during food prepa- ration.
-
Page 11
Safety notices for Sous Vide cooking Observe HACCP It is also important that kitchen personnel regulations employ an appropriate HACCP (Hazards Analysis and Critical Control Points) system in order to monitor and document every step the food takes from delivery to serving. Monitor water Monitor the quality of the water in the Sous quality… -
Page 12: Description Of Your Pearl
Description of your Pearl Description of your Pearl Front and rear views Front without protection grid Rear with protection grid LED display (see next Mains switch, illumi- page) nated Keypad (see next page) Micro fuses Safety float switch Power cord with plug Pump discharge Protection grid Heating coil…
-
Page 13: Display And Keypad
Display and keypad Display and keypad LED display for temperature and timer Control displays: Heating Alarm °F Temperature units Fahrenheit °C Temperature units Celsius Timer key Keypad: Arrow keys for setting the temperature and timer OK key for entering values…
-
Page 14: Accessories
Accessories Accessories The following accessories are available for your Pearl. Attachments Bath attachment clamp Use the bath attachment clamp to secure the Pearl to the wall of a cooking container. Max. wall Order No. thickness Attach. 60 mm 9FX1119 clamp Accessories for cooking containers Separation grid The separation grid is used to divide bath…
-
Page 15: Temperature Sensor
Temperature sensor Retaining grids Retaining grids are inserted into the bath tank from above and are used to keep vacuum bags underwater. They help ensure that the food is cooked evenly from all sides. Order No. 2 retaining grids for baths S, M 9FX1125 2 retaining grids for baths L, XL 9FX1126…
-
Page 16: Other Accessories
Accessories Order No. Handheld core temperature 9FX1151 sensor Adhesive sealing tape Place the adhesive sealing tape onto the vacuum bag before inserting the core tem- perature sensor. This will help maintain much of the vacuum. Order No. Adhesive sealing tape 4 m 9FX1141 Other accessories Travel case…
-
Page 17: Installation And Initial Operation
Unpacking and inspecting the unit Installation and initial operation Unpacking and inspecting the unit Unpack the unit and accessories and imme- diately check the items for any damage that may have occurred during transport. Even if only the packing has been damaged, please notify the freight forwarder, railway com- pany, or postal service so they can file a damage report.
-
Page 18: Adding Water To Tank
Installation and initial operation Fasten the unit in place Warning! Danger of electric shock! Carefully fasten the unit in place! If the unit is installed or fastened improperly, it may fall into the cooking container. If this happens: Pull the power plug from the power so- cket.
-
Page 19
Adding water to tank 20 mm max. 60 mm 80 mm 86 mm Optionally: Bath attachment clamp for wall thickness to 60 mm (~ 2 ⅜ inches), Order No. 9FX119. -
Page 20: Beginning Initial Circulator Operation
Installation and initial operation Beginning initial circulator operation Caution! Compare the available power voltage and frequency with the specifications on the type label. This device may be attached only to power outlets with an earthing contact! The mains plug serves as a protective separator and must be easily accessible at all times.
-
Page 21: First Steps
Prep work First steps This chapter is intended for users with little or no experience with the Sous Vide cooking technique. If you are an experienced Sous Vide cook or professional chef, you may skip this chapter and continue on page 25 „Work- ing with your Pearl“.
-
Page 22: Starting The Unit
First steps Starting the unit After all preparations have been completed, you can begin the cooking process. 1. Make sure that the cooking container is properly filled and the Pearl is correctly in- stalled and connected. 2. Switch on the Pearl at the rear of the unit. The unit will go into Standby and display the OFF message.
-
Page 23: Enjoying The First Results
Enjoying the first results… ally return to the currently measured tem- perature. Enjoying the first results… 1. After the Pearl has heated the water bath to the desired temperature, place the meat into the cooking container. 2. Allow it to cook for at least 60 minutes. Use the timer function: Press the timer key, use the arrow keys to select the desired time, and confirm with OK.
-
Page 24
First steps How did it For these reasons, it is unlikely that you will taste? achieve optimal results the first time you use the unit. To improve the results over time, you should ask your guests for their honest opin- What can I do ions and request their suggestions for im- better? -
Page 25: Working With Your Pearl
Switching on and starting the unit Working with your Pearl Switching on and starting the unit Caution! Never operate a damaged or leaking unit! Do not attempt to use the unit if the power cord is damaged! 1. Use the power switch on the rear of the unit to turn the unit on.
-
Page 26: Working With The Timer
Working with your Pearl 2. Confirm by pressing OK. The temperature will be adopted as the new target value and will remain in memory even after the unit is switched off. Working with the timer The Pearl has a programmable timer. The decimal point of the display will blink when- ever the timer is active.
-
Page 27: Changing Settings
Changing settings Displaying and correcting the timer To display the remaining running time while the unit is in operation, press the timer key once. The remaining time will be displayed and can be modified with the arrow keys. If no value is entered, the display will eventu- ally return to the measured current tempera- ture and the previously set remaining time will be active.
-
Page 28
Working with your Pearl Setting the temperature units You can choose to display the temperature in either degrees Celsius or degrees Fahren- heit. Change the temperature units as fol- lows: 1. Switch off the unit. 2. Press the up-arrow and timer keys simul- taneously. -
Page 29
Changing settings The selected units will be displayed: C or F. The unit will now convert all temperatures to the desired units. Reset to factory settings You can reset the unit’s settings to the original factory settings. This will clear all stored val- ues. -
Page 30: Care And Maintenance
Care and maintenance Care and maintenance The circulator is designed for continuous op- eration under normal conditions. Regular maintenance is not required. However, you should perform the following cleaning tasks each day. Changing the water The circulator is suitable only for use with sof- tened/decalcified water.
-
Page 31: Decalcifying
Decalcifying Draining bath tanks with single units Single units must be disassembled before draining the bath tank. 1. Switch off the unit and pull the mains plug. 2. Unscrew the bath attachment clamp and remove the unit from the bath tank. 3.
-
Page 32
Care and maintenance Chlorine in drinking water can result in corrosion. Iron in drinking water will precipitate and result in rust formation. 1. Use water with a low surface tension (such as a soap solution) to rinse the stain- less steel bath tank and immersed func- tional parts of the unit (circulation pump, float switch, and heater). -
Page 33
Cleaning the unit 4. Move the protection grid to the left. 5. Lift the protection grid Draw it over the float by turning it to the right by approx. 30° and slightly tilting backwards. 6. Turn the protection grid to the left back into the initial position and remove it. -
Page 34: Confirming Temperature Accuracy
Care and maintenance Confirming temperature accuracy Checking temperature accuracy Fusionchef by Julabo units are precisely cali- brated and inspected before leaving our factory. The units are designed for highly pre- cise temperature control in continuous op- eration. Even over long periods of time, the sensors will retain their accuracy or become only marginally inaccurate.
-
Page 35
Confirming temperature accuracy Calibrating the unit Starting sensor calibration Calibrate the Pearl temperature sensor as follows: 1. Switch on the circulator and start the unit. 2. Start the calibration by pressing the timer key and OK simultaneously. Hold the keys down until the display’s decimal point starts blinking. -
Page 36
Care and maintenance Deleting the most recent calibration If you have determined that a calibration is unnecessary or faulty, you can delete it. To do this, reset the unit to its factory condi- tion as described on page 29. -
Page 37: Error Messages
If there is enough water in the bath tank: The float switch is defective (transport damage, etc.). Sent the unit to an authorized fusionchef by JULABO re- pair facility. E 05: WORKING SENSOR Please contact our service depart- ALARM ment.
-
Page 38
Error messages Shown on the display What should I do? E 12: TEMPERATURE Please contact our service depart- MEASUREMENT ALARM ment. CALL SECURE E 14: EXCESS TEMPERA- Please contact our service depart- TURE PROTECTOR ment. CALL SECURE ALARM E 33: SAFETY SENSOR Please contact our service depart- ALARM ment. -
Page 39: Information About The Unit
Technical data Information about the unit Technical data Unit type Pearl Pearl Z Pearl S Order No. 9FT1000 9FT1113 9FT1B20 Working temperature range 20 ° C…95 ° C(68 ° F …203 ° F) Operating temperature range 0 ° C…95 °C (32 ° F …203 ° F) Temperature stability +/- 0,03 K (+/- 0.05 °…
-
Page 40
Information about the unit All data assume rated voltage and rated frequency Operating temperature: 70 °C (158 ° , ambient temperature: 20 °C (68 ° heat transfer fluid: water. Information subject to technical changes. Unit type Pearl M Pearl L Pearl XL Order No. -
Page 41: Ec Compliance
Fax: 07823 / 2491 Technical Service E-mail: service@fusionchef.de If sending a product to fusionchef by Julabo: Please clean the device in order to avoid endangering the service personnel. Prepare the device for shipment with ca- reful and proper packaging. Always include a brief description of the problem.
-
Page 42: Disposal
Information about the unit fusionchef by Julabo will not be liable for any damage caused by improper packaging. Notice During the repair process fusionchef by Ju- labo reserves the right to perform any tech- nical changes necessary to ensure flawless operation of the device.
-
Page 43: Warranty
Warranty Warranty fusionchef by Julabo warrants flawless func- tionality of this unit, assuming it has been insatlled and used properly and in accor- dance with the directives contained in these operating instructions. The warranty time period is two years. The warranty is limited to our choice of im- provement, no-charge repair, or replace- ment in response to customer complaint.
Table of Contents for Julabo Fusion Chef Pearl:
-
Temperature sensor 15 Retaining grids Retaining grids are inserted into the bath tank from above and are used to keep vacuum bags underwater. They help ensure that the food is cooked evenly from all sides. Order No. 2 retaining grids for baths S, M 9FX1125 2 retaining grids for baths L, XL 9FX1126 Steam trapping balls To maximize insulation of the water bath, use these steam trapping balls. Distribute these balls on the surface of the water to minimize the amount of heat that is lost. Order N
-
Adding water to tank 19 80 mm 86 mm 20 mm max. 60 mm Optionally: Bath attachment clamp for wall thickness to 60 mm (~ 2 ⅜ inches), Order No. 9FX119.
-
Table of contents 3 Enjoying the first results………………………………………..23 Improving the results……………………………………………23 Working with your Pearl ……………………………………………………25 Switching on and starting the unit………………………..25 Operating the unit ……………………………………………….25 Setting the d
-
Sous Vide basics 4 Sous Vide basics Always exercise the greatest possible care and maintain hygienic conditions at all times. Use only fresh ingredients of the highest pos- sible quality. Prepare raw ingredients prop- erly. Place the raw, refrigerated ingredients into special bags suitable for Sous Vide. Vacuum them with a suitable vacuum machine. Fill the bath tank with hot water and use your Pearl to heat the water to the desired tem- perature. When the desired temperature has been reached, place the bag with the
-
First steps 24 For these reasons, it is unlikely that you will achieve optimal results the first time you use the unit. To improve the results over time, you should ask your guests for their honest opin- ions and request their suggestions for im- provement, for example: Was the meat too rare? Was it overcooked? You will have to experiment to achieve the best possible re-
-
Installation and initial operation 18 Fasten the unit in place Warning! Danger of electric shock! Carefully fasten the unit in place! If the unit is installed or fastened improperly, it may fall into the cooking container. If this happens: Pull the power plug from the power so- cket. Lift the unit from the cooking container only after pulling the plug. Ask an authorized service technician to inspect the unit before using
-
Safety notices for your Pearl 9 Allow only authorized technicians to per- form service and repair tasks. Low bath fluid safety float This unit includes a low bath fluid safety float. Switching off this safety device (by blocking the float) can result in a hazard- ous situation. Always inspect the low bath fluids safety float before using the unit. You can check the functionality of the float by manually holding down the unit’s float switch with a tool.
-
Safety notices for your Pearl 7 This device is not intended for use by persons (including children) with reduced physical, sensory or mental capabilities or lack of ex- perience and knowledge unless they have been given supervision or instruction con- cerning the use of the device by a person responsible for their safety. Caution! This device may be attached only to power supplies with proper grounding and FI fuses. If a grounded power supply is not avail- able, the customer is obligated to con- tract
-
Technical data 39 Information about the unit Technical data Unit type Pearl Pearl Z Pearl S Order No. 9FT1000 9FT1113 9FT1B20 Working temperature range 20 °C…95 °C(68 °F …203 °F) Operating temperature range 0 °C…95 °C (32 °F …203 °F) Temperature stability +/- 0,03 K (+/- 0.05 °F) Temperature adjustment digital Temperature display LED-Display Display resolution 0.1 °
-
Accessories 14 Accessories The following accessories are available for your Pearl. Attachments Bath attachment clamp Use the bath attachment clamp to secure the Pearl to the wall of a cooking container. Max. wall thickness Order No. Attach. clamp 60 mm 9FX1119 Accessories for cooking containers Separation grid The separation grid is used to divide bath tanks into smaller compartments in order to keep food items apart. They are particularly useful when cooking a variety of items that mu
Questions, Opinions and Exploitation Impressions:
You can ask a question, express your opinion or share our experience of Julabo Fusion Chef Pearl device using right now.
-
1, Operating manual English diamond premium sous vide collection fusionchef Julabo GmbH Gerhard-Juchheim-Strasse 1 77960 Seelbach / Germany Tel. +49 (0) 7823 / 51-170 Fax +49 (0) 7823 / 2491 [email protected] www.fusionchef.de Printed in Germany Changes without prior notification reserved 1.951.0550-V6 06/16 17.06.16
… -
2, Table of contents 2 Table of contents Sous Vide basics …………………………………………………………………. 5 Safety ………………………………………………………………………………… 7 Proper use …………………………………………………………….. 7 Safety notices for your Diamond ……..…
-
3, Julabo Fusion Chef diamond Table of contents 3 Improving the results …………………………………………… 28 Working with your Diamond ……………………………………………. 30 Gaining experience ……………………………………………… 30 Switching on and starting the unit ……………………………………….. 30 Operating the unit ………..…
-
4, Julabo Fusion Chef diamond Table of contents 4 Confirming temperature accuracy ……………………….. 59 Checking temperature accuracy ………………………………………….. 59 Calibrating the external sensor …………………………………………… 59 Calibrating the unit in an ice water bath …………………………….. 61 Error messages …..…
-
5, Julabo Fusion Chef diamond Proper use 5 Sous Vide basics Always exercise the greatest possible care and main- tain hygienic conditions at all times. Use only fresh ingredients of the highest possible quality. Prepare raw ingredients properly. Place the raw, refrigerated ingredients into special bags suitable for Sous Vide. Vacuum them with a suit- able vacuum device. Fill the bath tank with hot wat…
-
6, Julabo Fusion Chef diamond Sous Vide basics 6 Remove the cooled bag from the ice water and store it at 3 °C (37 °F) or colder. Warm the cooled bag in a water bath shortly before serving. Complete the cooking process and serve the food. Enjoy your meal! 5. Refrigerated storage 6. Regeneration
… -
7, Julabo Fusion Chef diamond Proper use 7 Safety Proper use This product is designed to control the temperature of water in a bath tank. The product is used to pre- pare food in this water bath according to the Sous Vide technique (low-temperature, slow cooking of food in vacuum-sealed packaging). This product is designed exclusively for com- mercial use. Carefully observe hygienic st…
-
8, Julabo Fusion Chef diamond Safety 8 This device is not intended for use by persons (includ- ing children) with reduced physical, sensory or mental capabilities, or lack of experience and knowledge unless they have been given supervision or instruction concerning the use of the device by a person respon- sible for their safety. Children should be supervised to ensure that they do not play with the ap…
-
9, Julabo Fusion Chef diamond Safety notices for your Diamond 9 It is essential that you read the operating instruc- tions before initial operation. Install the stainless steel bath tank indoors only and on a level, noncombustible surface. Do not use this unit outdoors! Never operate the unit without water! Depend- ing on the hardness of the water, we recommend the u…
-
10, Julabo Fusion Chef diamond Safety 10 Never allow water to penetrate inside the circu- lator. The appliance shall not be cleaned with water jet. Do not immerse the appliance under water. Never operate a damaged or leaking unit! Do not attempt to use the unit if the power cord is damaged! For safety reasons a damaged power cord may only be replaced by the manufacturer, a fusionchef by Julabo …
-
11, Julabo Fusion Chef diamond Safety notices for Sous Vide cooking 11 Safety notices for Sous Vide cooking Only trained experts should attempt the Sous Vide cooking technique. It is important to follow precise and uniform work steps and maintain a hygienic envi- ronment in order to ensure adequate safety during food preparation. It is critically important to follow procedures that minimize the risk of the growth o…
-
12, Julabo Fusion Chef diamond Safety 12 It is also important that kitchen personnel employ an appropriate HACCP (Hazards Analysis and Critical Control Points) system in order to monitor and doc- ument every step the food takes from delivery to serving. Monitor the quality of the water in the Sous Vide bath and change it regularly. Depending on the hardness of the water, we recommend decalcifying the u…
-
13, Julabo Fusion Chef diamond Front and rear views 13 Description of your Diamond Front and rear views Front without protection grid Rear with protection grid 1 VFD display (see next page) 7 RS232 interface for computer connection 2 Keypad (see next page) 8 Mains switch, illumi- nated 3 Safety float switch 9 Micro fuses 4 Pump discharge 10 Po…
-
14, Julabo Fusion Chef diamond Description of your Diamond 14 Display and keypad 1 VFD display 2 Status icons: Heating/Alarm 3 Datalogger activation indicator 4 Temperature unit display (°C or °F) and temperature sensor for current temperature: Int for temperature sensor in water bath Ext for attached core temperature sensor 5 Main display for current temperature value 6 Displ…
-
15, Julabo Fusion Chef diamond Display and keypad 15 9 Quick keys for MEAT, FISH, VEG 10 Core temperature sensor button 11 Keypad: Arrow keys to set temperature and timer key to confirm the values 12 Key to correct settings, stop functions or enter a menu (press together with key 10)
… -
16, Accessories 16 Accessories The following accessories are available for your Dia- mond. Attachments Bath attachment clamp Use the bath attachment clamp to secure the Dia- mond to the wall of a cooking container. Max. wall thickness Order No. Attach. clamp 30 mm 9FX1118 Accessories for cooking containers Separation grid The separati…
-
17, Julabo Fusion Chef diamond Accessories for cooking containers 17 Retaining grids Retaining grids are inserted into the bath tank from above and are used to keep vacuum bags underwater. They help ensure that the food is cooked evenly from all sides. Order No. 1 retaining grid for bath XS 9FX1127 2 retaining grids for baths S, M 9FX1125 2 retaining grids for baths L, XL 9FX1126 Steam trappi…
-
18, Julabo Fusion Chef diamond Accessories 18 Temperature sensor Core temperature sensor Use the core temperature sensor to achieve optimal results when cooking meat or fish. Refer to the chap- ter A closer look starting on page 37 for more de- tails on how to use the Diamond with the core tem- perature sensor. Order No. Core temperature sensor Pt100 9FX1150 Notice The foo…
-
19, Julabo Fusion Chef diamond Other accessories 19 Other accessories Travel case The travel case is designed to hold your Diamond and accessories. Order No. Travel case 9FX1190 Soft Travel case (Polyester) Sturdy soft travel case made of polyester, with carry- ing straps and removable shoulder strap. Order No. Soft Travel Case (Polyester) 9FX1191 Timer tape Place timer …
-
20, Accessories 20 RS232 interface cable Use the RS232 interface to connect the Diamond to a computer. Order No. RS232 interface cable 9FX1162 USB adapter cable Use the USB adapter to connect the Diamond to a computer. Order No. USB adapter cable 9FX1161
… -
21, Julabo Fusion Chef diamond Unpacking and inspecting the unit 21 Installation and initial operation Unpacking and inspecting the unit Unpack the unit and accessories and immediately check the items for any damage that may have oc- curred during transport. Even if only the packing has been damaged, please notify the shipping provider, railway company, or postal service so they can file…
-
22, Julabo Fusion Chef diamond Installation and initial operation 22 Fasten the unit in place Warning! Danger of electric shock! Carefully fasten the unit in place! If the unit is installed or fastened improperly, it may fall into the cooking container. If this happens: Pull the power plug from the power socket. Lift the unit from the cooking container only after pulling the plug. …
-
23, Julabo Fusion Chef diamond Adding water to tank 23 Please insert the enclosed distance sleeves (∅ 8 mm x 17 mm) into the combination units Diamond Edi- tion XS, S and L. Optionally Bath attachment clamp for wall thickness > 30 mm: max. wall thickness Order No. Attachm. 60 mm 9FX1119 clamp Adding water to tank Fill the bath tank with softened/de…
-
24, Installation and initial operation 24 Beginning initial circulator operation Caution! Compare the available power voltage and fre- quency with the specifications on the type label. This device may be attached only to power out- lets with an grounding contact! The power plug serves as a protective separator and must be easily accessible a…
-
25, Julabo Fusion Chef diamond Prep work 25 First steps This chapter is intended for users with little or no experience with the Sous Vide cooking technique. If you are an experienced Sous Vide cook or profes- sional chef, you may skip this and continue with page 30 „Working with your Diamond“. Prep work After installing, connecting, and turning on your Di- amond, you are proba…
-
26, First steps 26 Starting the unit After all preparations have been completed, you can begin the cooking process. 1. Make sure that the cooking container is properly filled and the Diamond is correctly installed and connected. 2. Switch on the Diamond at the rear of the unit. The unit will go into standby. During standby mode, two temperatures are displayed: The top…
-
27, Julabo Fusion Chef diamond Enjoying the first results… 27 5. When you have found the desired temperature, press in order to adopt it as the target tem- perature. We recommend starting at a tempera- ture of 62 °C (144 °F), but you can also select your own values. The following table provides a few guidelines. Temperature guidelines for beef English 56- 58 °C (132.8-136.4°F) Medium 58-60 °C (136.4�…
-
28, First steps 28 5. Sear the meat briefly at high temperature on both sides in order to achieve an attractive brown col- or. Then serve. Enjoy your meal! Improving the results The results of the cooking process are influenced by many factors, including: • The quality of the meat • The cut of meat • The thickness of the individual pieces …
-
29, Julabo Fusion Chef diamond Improving the results 29 Now that you know how to use your Diamond, careful manipulation of two major variables can influ- ence the cooking process: Cooking temperature Cooking time. The following chapter explains how to adjust the temperature and monitor cooking time. This infor- mation will allow you to gather a few initial experi- ences. We also recommend …
-
30, Julabo Fusion Chef diamond Working with your Diamond 30 Working with your Diamond Gaining experience Switching on and starting the unit Caution! Never operate a damaged or leaking unit! Do not attempt to use the unit if the power cord is damaged! 1. Use the power switch on the rear of the unit to turn the unit on. The unit will perform a self test and then begin operating in t…
-
31, Gaining experience 31 Setting the desired temperature You can change the target temperature from the main view while in standby or during regular operation. 1. Press the arrow keys in order to change the temperature. The whole digits will change first. Confirm your selection by pressing . 2. Then adjust the decimal points. Confirm your selection by pressing . Th…
-
32, Julabo Fusion Chef diamond Working with your Diamond 32 This displayed temperature will be adopted as the new set point. Changing the stored temperatures After you have more experience, you may wish to store your own temperature values. You can do this in two ways: Retrieve the stored values and adjust them or Store the current target value in the desired location, thereby overwritin…
-
33, Gaining experience 33 1. While in the main view, press and hold the de- sired quick key for at least two seconds (in this example: the Meat key). Quick key 1 will be displayed; only the number will blink. 2. Use the arrow keys to select the desired storage space and then press . The current temperature set point will be stored at the selected location. Wor…
-
34, Working with your Diamond 34 Setting the timers Proceed as follows to set one of the timer: 1. Press and hold the timer key for at least two seconds. The timer view will appear and the most recently set timer value will blink on the bottom line. The timer’s value is always preset with the most re- cently used time. A timer with no preset temper- ature will display bars. 2. …
-
35, Gaining experience 35 Adjusting a timer You can adjust a timer at any time while the unit is in operation, even if the signal has already triggered. 1. Press the desired timer key to display the timer. 2. Use the arrow keys to add (+) or sub- tract (-) minutes from the timer. The maximum adjustable time is 999 minutes. You can subtract up to…
-
36, Julabo Fusion Chef diamond Working with your Diamond 36 When the timer triggers An audible signal (loud beeping noise) is emitted when a timer has run out. The corresponding timer key blinks at the same time. The timer will continue to run even while the signal is active and display the number of minutes that have passed since the signal was triggered as a negative number. This shows you at a glance h…
-
37, Julabo Fusion Chef diamond A closer look 37 For example, let us assume that your filet has not been adequately cooked after the timer has run down and you wish to keep it in the water bath for another 10 minutes. 1. Press the timer key. 2. Use the arrow key to select the value +10M and then press . Starting at that moment, the timer will run for 10 additional minutes and reactivate the signal wh…
-
38, Julabo Fusion Chef diamond Working with your Diamond 38 The sensor alarm monitors the core temperature for you. You should set a separate alarm for the core temperature sensor: The alarm will be activated when the desired core temperature is reached; you can then continue preparing the cooked food. Connecting the core temperature sensor We recommend using only the fusionchef by Julabo core tem…
-
39, A closer look 39 Inserting the core temperature sensor Notice Although the core temperature sensor is inserted into the vacuum bag through the special adhesive sealing tape, we cannot exclude the possibility that the food will come into contact with liquid from the wa- ter bath. For reasons of hygiene, do not serve food from the bag into which the core tempera…
-
40, Working with your Diamond 40 2. Use the arrow keys to set the desired core temperature. The alarm will signal when the temperature reaches 1 °C (33.8 °F) below the target temperature. 3. Press to activate the temperature sensor alarm. As soon as the temperature sensor alarm is activated, the temperature sensor key will illuminate and the selected alarm value wi…
-
41, Julabo Fusion Chef diamond Automating processes 41 If the core temperature sensor’s plug is accidentally pulled out or the connection separated in any other way while the temperature sensor alarm is activated, the Diamond will display an alarm and error mes- sage. The unit will beep and display CODE 15: EXTERNAL SENSOR WARNING — CHECK EXTER- NAL SENSOR If this occurs, make sure the temperature sensor is prope…
-
42, Working with your Diamond 42 2. Use the arrow keys to select the CON- FIG menu entry and confirm with . 3. Select CDETECT (Cooking Time Detection) and confirm with . 4. Select ON and press . Automatic cooking time detection has been activated. Starting automatic cooking time detection Once automatic cooking time detection has been activated in the me…
-
43, Automating processes 43 1. When the food reaches its optimal temperature, trigger the alarm by pressing and holding the temperature sensor key for at least 2 sec- onds. As soon as the alarm has triggered, the unit will give you the option of storing the cooking time in whichever timer you choose. The message STORE C-TIME will appear on the disp…
-
44, Julabo Fusion Chef diamond Working with your Diamond 44 Retrieving the cooking time Retrieving a stored cooking time is very easy. 1. Press and hold the timer key with the desired time for at least two seconds. The timer view will appear and your preset cooking time will be dis- played. 2. Use the arrow keys to adjust the time desired. Then press and hold for at least two seconds in…
-
45, Automating processes 45 Consider the following example: 1. You activate automatic cooking time detection in the menu. 2. You set the temperature sensor alarm to the desired core temperature. 3. As soon as the core temperature is reached, the alarm activates. The time that passed between these two events is stored as your cook- ing time. 4. However, you deci…
-
46, Working with your Diamond 46 Special functions Automatic temperature monitoring Using automatic temperature monitoring Our units are designed to achieve a precise target temperature in the water bath. Temperature changes, like those caused by the addition of refrigerated food, are quickly compensated for. However, certain condi- tions such as the adding cold wat…
-
47, Special functions 47 5. Use the arrow keys to set the appropri- ate temperature limits. Then confirm your selec- tion by pressing . Temperature monitoring is now activated. Notice Guidelines for temperature limits: If using a larger cooking container, set the limit from 0.5 °C to 1 °C (33 °F to 34 °F (; in smaller containers, choose a larger range. Activat…
-
48, Working with your Diamond 48 EXCESS WATER TEMPERATURE WARNING — LOW WATER TEMPERATURE WARNING — You may also mute this alarm. Do this the same way you mute other alarms — by pressing once. The alarm message will still be visible. The alarm will switch off automatically as soon as the current temperature is back within the tolerance range. Record…
-
49, Julabo Fusion Chef diamond Special functions 49 Setting the date and time You must set the date and time in order for the data- logger to record the correct data. 1. Access the menu by pressing the Esc and sensor keys simultaneously. 2. Use the arrow keys to select the CON- FIG menu entry and confirm with . 3. Select TIME/DT and confirm with . 4. Set the time…
-
50, Working with your Diamond 50 Internal datalogger modes OFF Datalogger is switched off ALWAYS The datalogger will record at all times. When the memory is full, the oldest data will be overwritten. The memory space will not be displayed and the memory will not be deleted when the data is exported. MEMFULL The datalogger will record whenever a temperature sensor is…
-
51, Julabo Fusion Chef diamond Special functions 51 Adjusting the recording interval The datalogger records data at specified time inter- vals. This ensures that important data will be record- ed without unnecessarily filling up the memory. The factory default recording interval is five minute. You can adjust this interval if you require shorter recording intervals or if the memory fills up too fast. 1.…
-
52, Julabo Fusion Chef diamond Working with your Diamond 52 Delete the contents of the memory as follows: 1. Access the menu by pressing the Esc and sensor keys simultaneously. 2. Use the arrow keys to select the LOG- GER menu entry and confirm with . 3. Select CLR MEM and confirm with . The internal data memory will now be deleted. Exporting data from memory The Easy fus…
-
53, Julabo Fusion Chef diamond Special functions 53 3. Select ALDELAY and confirm with . 4. Set the desired alarm delay in seconds (10 to 999) and confirm with . The time delay that you set will now be adopted. Switching key tones on and off If desired, the unit will emit a short beep every time you press a key. You can select whether the unit will emit a beep every time you press a key or only…
-
54, Julabo Fusion Chef diamond Working with your Diamond 54 Setting the temperature units You can choose to display the temperature in either degrees Celsius or degrees Fahrenheit. Change the temperature units as follows: 1. Access the menu by pressing the Esc and sensor keys simultaneously. 2. Use the arrow keys to select the CON- FIG menu entry and confirm with . 3. Select UNIT and…
-
55, Julabo Fusion Chef diamond Changing the water 55 Care and maintenance The circulator is designed for continuous operation under normal conditions. Regular maintenance is not required. A particle filter protects the circulation pump from large contaminants in the thermal bath fluid. However, you should perform the following cleaning tasks each day. Changing the water The circulator is suitable only for us…
-
56, Julabo Fusion Chef diamond Care and maintenance 56 Draining bath tanks with single units Single units must be disassembled before draining the bath tank. 1. Switch off the unit and pull the power plug. 2. Unscrew the bath attachment clamp and remove the unit from the bath tank. 3. Now drain the bath tank. Decalcifying Depending on the hardness of the water, we recom- mend decalcifying th…
-
57, Julabo Fusion Chef diamond Cleaning the unit 57 Iron in drinking water will precipitate and result in rust formation . Removing/installing the protection grid To properly clean the unit and the particle filter and to check the low-level protection device, it is neces- sary to remove the protection grid. Do this as fol- lows: 1. Switch off the unit and pull the power plug. 2. R…
-
58, Care and maintenance 58 10. Then rinse well with water and dry the parts with a soft towel. Do not turn the unit upside down. When drying the unit, hold it in such away that the water does not run into the interior of the circulator. 11. Check the low-level protection float switch While cleaning the unit, make sure the low-level protection device is working. To do this, hold the …
-
59, Confirming temperature accuracy 59 Confirming temperature accuracy Checking temperature accuracy Fusionchef by Julabo units are precisely calibrated and inspected before leaving our factory. The units are designed for highly precise temperature control in continuous operation. Even over long periods of time, the sensors will retain their accuracy or become …
-
60, Care and maintenance 60 3. Access the menu by pressing the Esc and sensor keys simultaneously. 4. Use the arrow keys to select the SENSCAL menu entry and confirm with . 5. Select EXECUTE and confirm with . Sensor calibration will now start. The necessary steps will be shown on the display. Please follow these in- structions. Performing sensor calibra…
-
61, Julabo Fusion Chef diamond Confirming temperature accuracy 61 1. Access the menu by pressing the Esc and sensor keys simultaneously. 2. Use the arrow keys to select the SENSCAL menu entry and confirm with . 3. Select ERASE and confirm with . The most recent calibration of the temperature sen- sor will be deleted. Calibrating the unit in an ice water bath Notice Perform cal…
-
62, Julabo Fusion Chef diamond Care and maintenance 62 Starting calibration 1. Access the menu by pressing the Esc and sensor keys simultaneously. 2. Use the arrow keys to select the AU- TOCAL menu entry and confirm with . 3. Select EXECUTE and confirm with . Calibration will now start. During calibration, all func- tions will be blocked and the warning symbol will illuminate. Performing calibration …
-
63, Confirming temperature accuracy 63 Deleting the most recent calibration If you have determined that a calibration is unneces- sary or faulty, you can delete the most recent calibra- tion. 1. Access the menu by pressing the Esc and sensor keys simultaneously. 2. Use the arrow keys to select the AU- TOCAL menu entry and confirm with . 3. Select ERASE and confirm with . …
-
64, Error messages 64 Error messages The following table contains some of the possible error messages with the associated warnings messag- es and resolutions. All warning messages are indicated on the display and accompanied by an audible signal. To mute the audible signal, press once. The error message will still be visible. Basic troubleshooting You may enc…
-
65, Julabo Fusion Chef diamond Error messages 65 Error messages When the following error messages appear, the unit (heater and circulation pump) will shut off. You must remove the cause of the problem before you can switch the unit back on. Shown on the display What should I do? CODE 01: LOW WATER LEVEL ALARM Not enough water in the bath tank. Switch off the unit at the power switch, add water, and switc…
-
66, Information about the unit 66 Information about the unit Technical data Unit type Diamond Diamond Z Order No. 9FT2000 9FT2113 Working temperature range 20°C…95°C (68 °F …203 °F) Operating temperature range 0°C…95°C (32 °F …203 °F) Temperature stability +/- 0.01K Temperature setting digital Temperature display VFD-Display Display reso…
-
67, Technical data 67 Unit type Diamond XS Diamond S Order No. 9FT2B13 9FT2B20 Working temperature range 20°C…95°C (68 °F …203 °F) Operating temperature range 0°C…95°C (32 °F …203 °F) Temperature stability +/- 0.01K Temperature setting digital Temperature display VFD-Display Display resolution 0,01 °C Temperature control PID Conn…
-
68, Julabo Fusion Chef diamond Information about the unit 68 Unit type Diamond M Diamond L Diamond XL Order No. 9FT2B27 9FT2B44 9FT2B58 Working temperature range 20°C…95°C(68 °F …203 °F) Operating temperature range 0°C…95°C (32 °F …203 °F) Temperature stability +/- 0.01K Temperature setting Digital Temperature display VFD display Display resoluti…
-
69, Julabo Fusion Chef diamond EC compliance 69 EC compliance The products named in the operating instructions comply with the regulations of the following European directives: Low-voltage directive for harmonizing the legal regulations of the member states in terms of elec- trical equipment for use within certain voltage limitations. EMC directive for harmonizing the legal regula- tions of the…
-
70, Information about the unit 70 fusionchef by Julabo will not be liable for any damage caused by improper packaging. Notice During the repair process fusionchef by Julabo re- serves the right to perform any technical changes necessary to ensure flawless operation of the device. Disposal A European Community directive stipulates that elec- trical and electronic devices mus…
-
71, Julabo Fusion Chef diamond Warranty 71 Warranty fusionchef by Julabo warrants flawless functionality of this unit, assuming it has been installed and used properly and in accordance with the directives con- tained in these operating instructions. The warranty time period is two years. The warranty is limited to our choice of improve- ment, no-charge repair, or replacement in response to customer…