Поиск ошибок и различных проблем. Поможем решить и исправить
Following deviation is too large ошибка
Ошибка HTTP 413 Request Entity Too Large появляется, когда пользователь пытается загрузить на сервер слишком большой файл. Размер определяется относительно лимита, который установлен в конфигурации. Изменить его может только администратор сервера.
Что делать, если вы пользователь
Если вы видите ошибку 413, когда пытаетесь загрузить файл на чужом сайте, то вам нужно уменьшить размер передаваемых данных. Вот несколько ситуаций.
Если вы пытались загрузить одновременно несколько файлов (форма позволяет так делать), попробуйте загружать их по одному.
Если не загружается изображение, уменьшите его размер перед загрузкой на сервер. Можно сделать это с помощью онлайн-сервисов — например, Tiny PNG.
Если не загружается видео, попробуйте сохранить его в другом формате и уменьшить размер. Можно сделать это с помощью онлайн-сервисов — я использую Video Converter.
Если не загружается PDF-документ, уменьшите его размер. Можно сделать это с помощью онлайн-сервисов — я обычно использую PDF.io.
Универсальный вариант — архивация файла со сжатием. Ошибка сервера 413 появляется только в том случае, если вы пытаетесь одновременно загрузить слишком большой объем данных. Поэтому и выход во всех ситуациях один — уменьшить размер файлов.
Комьюнити теперь в Телеграм
Подпишитесь и будьте в курсе последних IT-новостей
Подписаться
Исправление ошибки сервера 413 владельцем сайта
Если вы владелец сайта, который при загрузке файлов выдает ошибку 413, то необходимо изменить конфигурацию сервера. Порядок действий зависит от используемых технологий.
Чтобы понять, что стало причиной ошибки, нужно посмотреть логи. Это поможет сэкономить время. Вот подробная инструкция, которая рассказывает, как посмотреть логи в панели управления Timeweb. В зависимости от того, какая информация будет в логах, вы поймете, как исправлять ошибку 413.
Увеличение разрешенного размера для загрузки файлов на Nginx и Apache
На Nginx максимально допустимый размер файла задан в параметре client_max_body_size. По умолчанию он равен 1 МБ. Если запрос превышает установленное значение, пользователь видит ошибку 413 Request Entity Too Large.
Параметр client_max_body_size находится в файле nginx.conf. Для его изменения нужен текстовый редактор — например, vi.
Подключитесь к серверу через SSH и выполните в консоли следующую команду:
Во встроенном редакторе vi откроется файл nginx.conf. В разделе http добавьте или измените следующую строку:
client_max_body_size 20M;
Сохраните и закройте файл. Затем проверьте конфигурацию файла:
Перезагрузите сервер следующей командой:
После перезагрузки будет действовать новая конфигурация с увеличенным лимитом на размер загружаемого файла.
На Apache опция, устанавливающая максимально допустимый размер загружаемого файла, называется LimitRequestBody. По умолчанию лимит не установлен (равен 0).
На CentOS главный конфиг располагается по адресу /etc/httpd/conf/httpd.conf. На Debian/Ubuntu — по адресу /etc/apache2/apache2.conf.
Значение задается в байтах:
LimitRequestBody 33554432
Эта запись выставляет максимально допустимый размер 32 МБ.
Изменить конфиги можно также через панель управления. Я пользуюсь ISPmanager, поэтому покажу на ее примере.
Раскройте раздел «Домены» и перейдите на вкладку «WWW-домены».
Выберите домен, на котором появляется ошибка, и нажмите на кнопку «Конфиг».
Появится вкладка с конфигами Apache и Nginx. Вы можете редактировать их вручную, устанавливая лимит на размер загружаемого файла.
Исправление ошибки на WordPress
На WordPress ошибку можно исправить двумя способами.
Способ первый — изменение разрешенного размера в файле functions.php. Этот файл отвечает за добавление функций и возможностей — например, меню навигации.
Откройте файловый менеджер.
Перейдите в папку public.html.
Откройте директорию wp-content/themes.
Выберите тему, которая используется на сайте с WordPress.
Скачайте файл functions.php и откройте его через любой текстовый редактор.
В панели управления на Timeweb можно также воспользоваться встроенным редактором или IDE — путь будет такой же, как указан выше: public.html/wp-content/themes/ваша тема/functions.php.
В конце файла functions.php добавьте следующий код:
Сохраните изменения и загрузите модифицированный файл обратно на сервер. Проверьте, появляется ли ошибка 413.
Второй способ — изменение файла .htaccess. Это элемент конфигурации, который способен переопределять конфигурацию сервера в плане авторизации, кэширования и даже оптимизации. Найти его можно через файловый менеджер в папке public.html.
Скачайте файл на компьютер, на всякий случай сделайте резервную копию. Затем откройте .htaccess в текстовом редакторе и после строчки #END WORDPRESS вставьте следующий код:
Сохраните файл и загрузите его обратно на сервер с заменой исходного файла. То же самое можно сделать через встроенный редактор или IDE в панели управления Timeweb.
Исправление ошибки при использовании PHP-скрипта
Если файлы загружаются с помощью PHP-скрипта, то для исправления ошибки 413 нужно отредактировать файл php.ini. В нем нас интересуют три директивы.:
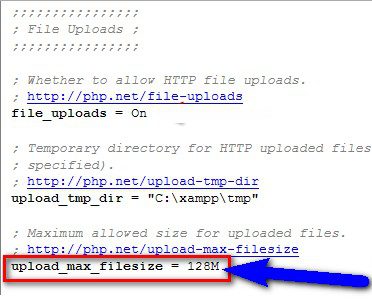
upload_max_filesize — в ней указан максимально допустимый размер загружаемого файла (значение в мегабайтах);
post_max_size — максимально допустимый размер данных, отправляемых методом POST (значение в мегабайтах);
max_execution_time — максимально допустимое время выполнения скрипта (значение в секундах).
Например, если я хочу, чтобы пользователи могли загружать файлы размером до 20 МБ, то я делаю так:
Если все значения указаны верно, то файлы с допустимым размером будут загружаться на сервер без ошибок.
То же самое можно сделать через панель управления. Например, в ISPmanager порядок будет такой:
Авторизуйтесь с root-правами.
В левом меню раскройте раздел «Настройки web-сервера» и перейдите на вкладку «PHP».
Выберите используемую версию и нажмите на кнопку «Изменить».
На экране появится список параметров. Они отсортированы по алфавиту. Установите необходимые значения для параметров max_execution_time, post_max_size и upload_max_filesize. Изменения применяются автоматически.
I have been getting this 413 response when trying to upload an ~20MB zip file with a home grown (but not by me) document library resource developed in PHP running on an Apache server with a MySQL database connected. Normally the max file size is limited to 5.2MB in a local PHP variable. So the first thing I did was to increase this value and try to upload the file. That’s the first time I encountered this error.
I tried everything mentioned here: Request Entity Too Large
And even changed the mod_security config settings mentioned in the bottom of that post. Even with all the limits I found raised far above what I should need — up to ~120MB, I still get this error.
So after posting this, I found another mod_security limit that needed to be raised appropriately.
SecRequestBodyLimit was too low (131072).
This is probably a corner case, but hope it helps someone else.
answered Oct 22, 2014 at 13:47
logofwoodlogofwood
311 silver badge3 bronze badges
1
None of the listed fixed my problem. They were all set much higher than needed. I was posting 100k-500k textarea fields. What did fix it for me was adding the following to the <form> tag.
enctype="multipart/form-data"
answered Jan 27, 2015 at 18:16
Иногда при загрузке больших файлов на какой-либо веб-сайт может возникнуть ошибка, которую возвращает веб-сервер Nginx — 413 Request Entity Too Large. Данная ошибка появляется, при попытке загрузить на сервер слишком большой файл чем это разрешено на сервере.
В данной небольшой статье будет рассмотрено описание ошибки 413 Request Entity Too Large а также методы её исправления на стороне веб-сервера Nginx.
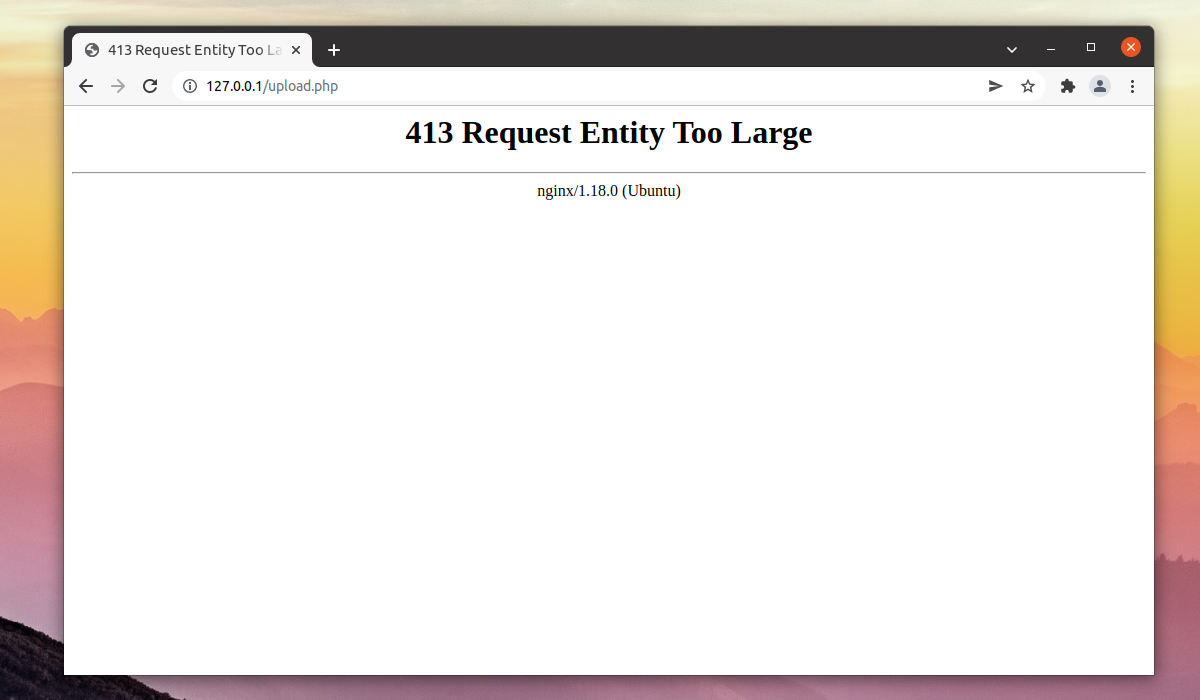
Ошибка 413 Request Entity Too Large дословно расшифровывается как объект запроса слишком велик или простыми словами объем передаваемых данных слишком большой. Данная ошибка возвращается в случае, если сервер не может обработать запрос по причине слишком большого размера тела запроса (или большого файла). Снимок экрана с ошибкой изображен ниже:
По умолчанию в Nginx установлен лимит на размер тела запроса который равен 1 МБ. Если запрос превышает установленное значение, вы увидите ошибку 413 Request Entity Too Large.
Как исправить ошибку 413 Request Entity Too Large
Для того чтобы исправить данную ошибку необходимо увеличить допустимый лимит. Чтобы увеличить размер тела запроса и соответственно, загружаемых файлов, необходимо использовать параметр client_max_body_size. Данную опцию можно использовать в директивах http, server или location в конфигурационном файле /etc/nginx/nginx.conf или в конфигурационном файле веб-сайта.
Для этого необходимо открыть конфигурационный файл nginx.conf при помощи любого текстового редактора (например nano):
sudo nano /etc/nginx/nginx.conf
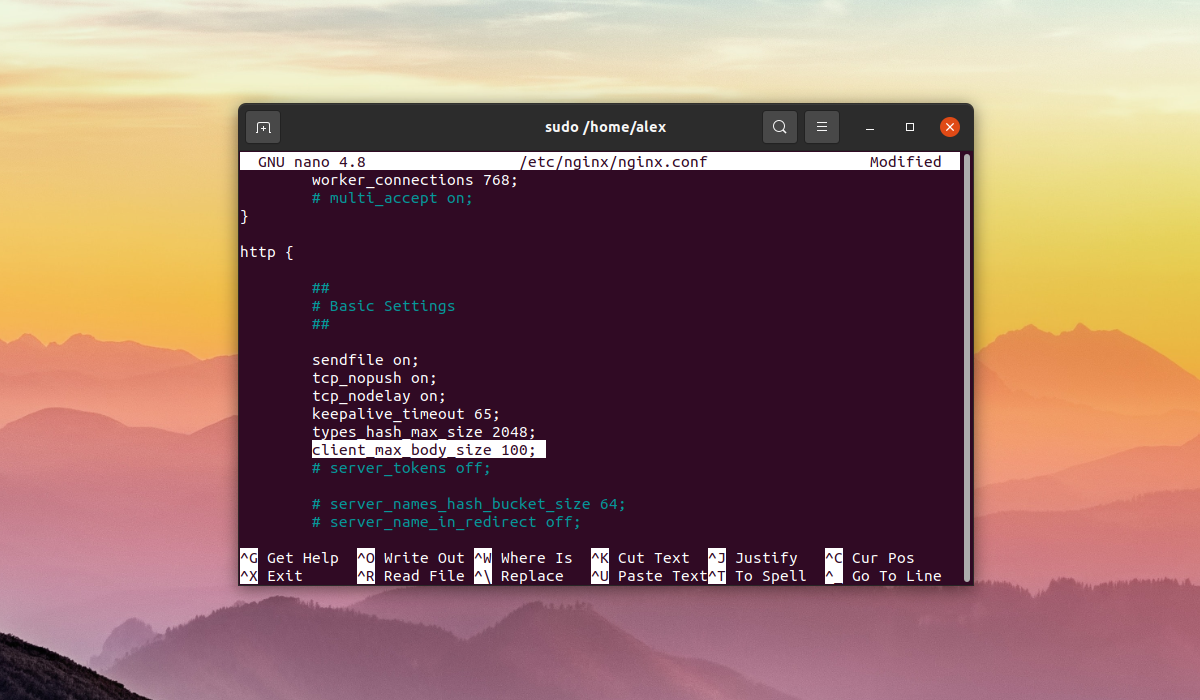
Далее впишите такую строчку в секцию http:
client_max_body_size 100M
Здесь 100 — это максимальный размер файла в мегабайтах который можно загрузить на веб-сайт, в данном случае — 100 мегабайт. Если в распоряжении имеется несколько веб-сайтов (серверные блоки в терминологии Nginx, они же виртуальные хосты в понимании другого веб-сервера — Apache) и необходимо чтобы ограничение на загрузку действовало на все сайты сразу, то строку client_max_body_size необходимо вписать в раздел блока http. Как было показано выше.
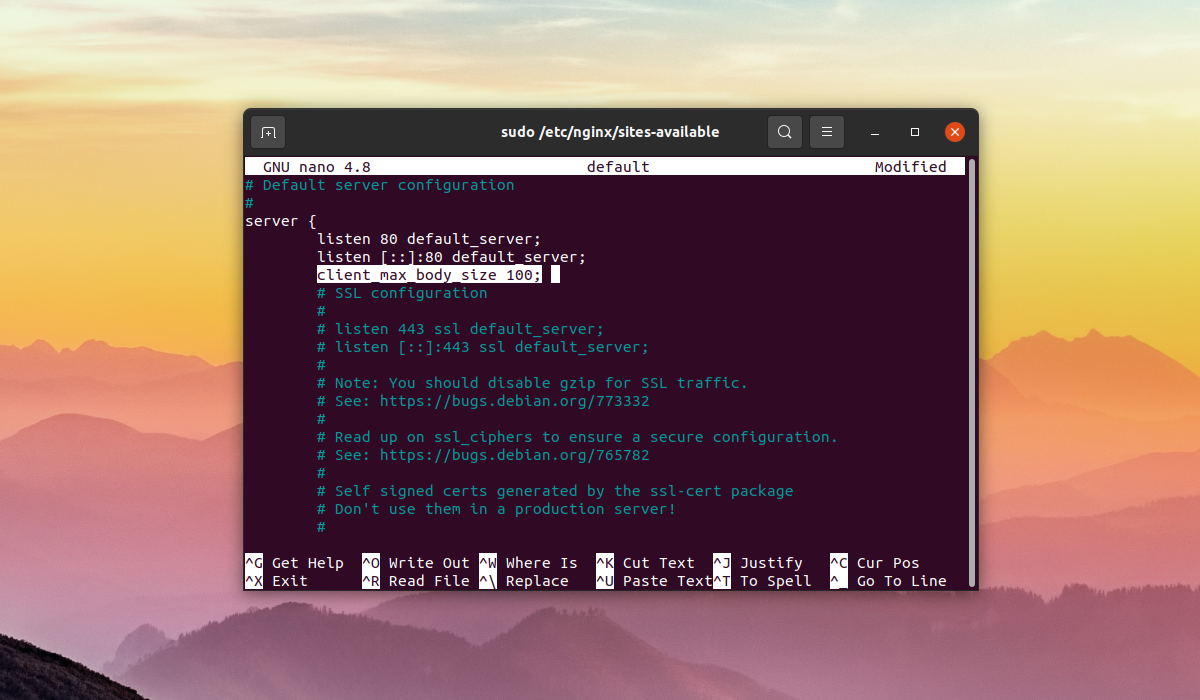
Если ограничение на загрузку необходимо выставить только для конкретного сайта, то строку client_max_body_size необходимо добавить в блок server конфигурационного файла сайта, который по умолчанию находиться в /etc/nginx/sites-available/имя_файла_с_конфигурацией:
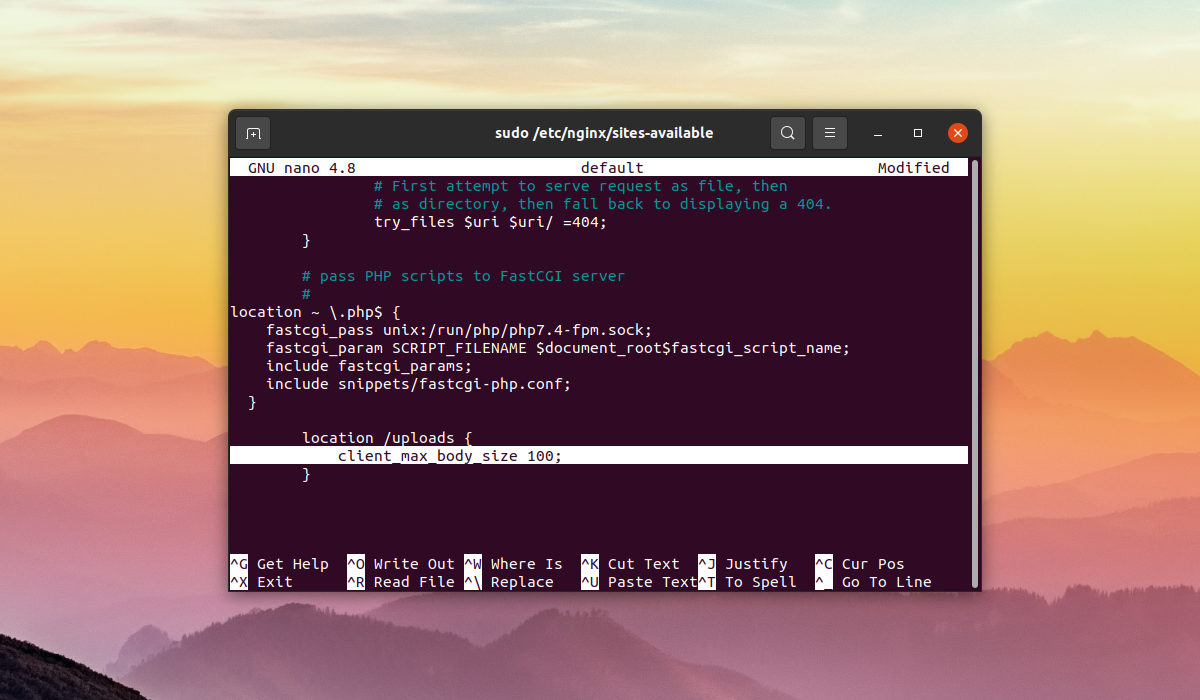
Если ограничение на загрузку необходимо выставить только для конкретного раздела на сайте, строку client_max_body_size необходимо вписать в директиву location конфигурационного файла сайта, который по умолчанию находиться в /etc/nginx/sites-available/имя_файла_с_конфигурацией:
После внесения изменений в конфигурационные файлы необходимо сохранить изменения, закрыть текстовый редактор и проверить синтаксис конфигурационных файлов на наличие ошибок при помощи команды:
sudo nginx -t
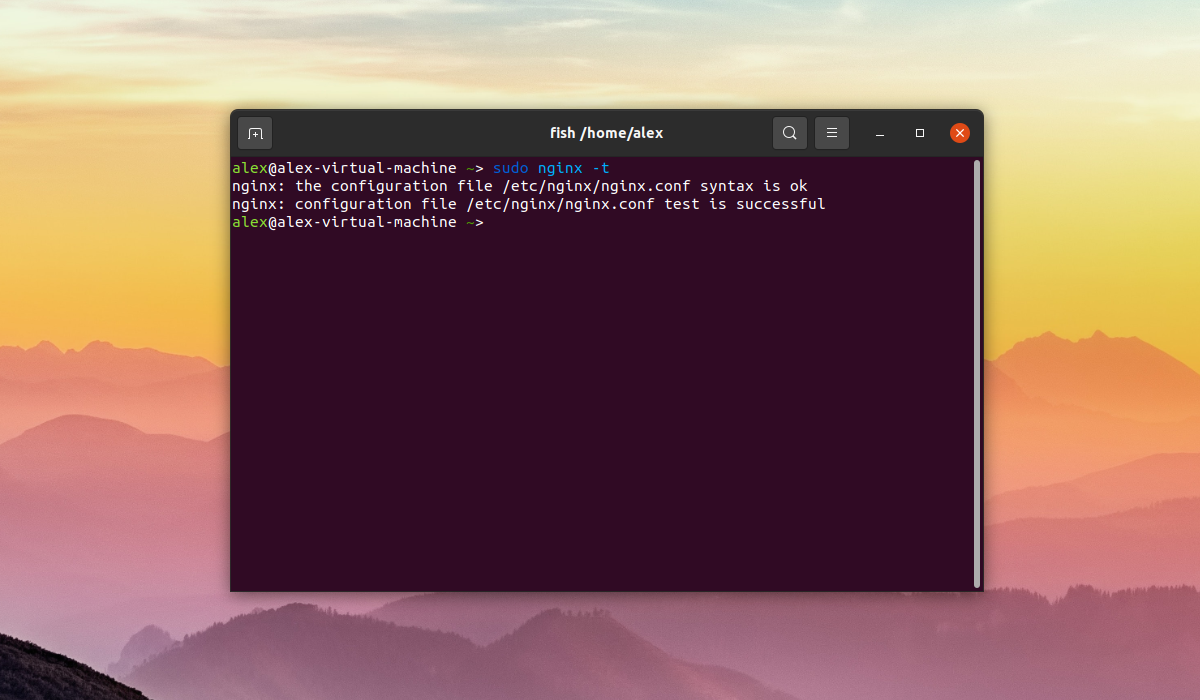
Если в выводе команды будут отображены следующие строки:
nginx: the configuration file /etc/nginx/nginx.conf syntax is ok

nginx: configuration file /etc/nginx/nginx.conf test is successful
Это означает что ошибок нет. В противном случае будет выведено описание ошибки, имя файла в котором найдена ошибка и номер строки. После внесения любых изменений в конфигурационные файлы Nginx их необходимо перезапустить при помощи команды:
sudo systemctl reload nginx
Выводы
В данной короткой статье была рассмотрена ошибка в Nginx под названием 413 Request Entity Too Large которая возникает при загрузке больших файлов на веб-сайт. Помимо описания самой ошибки также было описаны шаги по устранению ошибки путем редактирования конфигурационных файлов Nginx.
Статья распространяется под лицензией Creative Commons ShareAlike 4.0 при копировании материала ссылка на источник обязательна .
Об авторе
Бывший системный администратор и DevOps инженер. Ныне работаю по направлению DevSecOps. Использую Linux более 5 лет. Помимо Linux интересую языком программирования Python, базами данных и языком SQL а также информационной безопасностью.
WordPress errors come in all shapes and sizes. In most cases they’re easy to decipher; such is the accessibility of WordPress’ error reporting. Even so, when the “413 Request Entity Too Large” error pops up, it can leave you scratching your head.
Without realizing it, you already have everything you need to understand and diagnose the error within its name. The good news is you won’t need more than a standard Secure File Transfer Protocol (SFTP) client and administrator access to your server.
In this post, we’ll take a look at how to solve the “413 Request Entity Too Large” error. We’ll also give you a quick list of steps to take before you begin to solve the error, to make the process super straightforward.
Check out our video guide to fixing the “413 Request Entity Too Large” Error
What the “413 Request Entity Too Large” Error Is (And Why It Exists)
We noted that there’s a clue in the error name as to what the solution and problem are. Before you go sleuthing yourself, though, we’ll spoil the surprise: it’s in the adjective “large.”
In a nutshell, the “413 Request Entity Too Large” error is a size issue. It happens when a client makes a request that’s too large for the end server to process. Depending on the nature of the error, the server could close the connection altogether to prevent further requests being made.
Let’s break the error down into its parts:
“413”: This is one of the 4xx error codes, which mean there’s a problem between the server and browser.
“Request Entity”: The “entity” in this case is the information payload being requested by the client from the server.
“Too Large”: This is straightforward: the entity is bigger than the server is willing or able to serve.
In fact, this error has changed its name from what it originally was to be more specific and offer more clarity. It’s now known as the “413 Payload Too Large” error, although in practice, you’ll see the older name a lot more.
As for why the error occurs, the simple explanation is that the server is set up to deny explicit uploads that are too large. Think of times when you upload a file where there’s a maximum file size limit:
The TinyPNG home page.
In most cases, there will be some validation in place to stop the error… if you’re seeing the “413 Request Entity Too Large” error, those validation efforts may not be as watertight as you think.
What You’ll Need to Resolve the “413 Request Entity Too Large” Error
Fixing this error is all about raising the maximum file size for the server in question. Once that’s out of the way, you shouldn’t see the error anymore.
As such, to fix the “413 Request Entity Too Large” error, you’ll need the following:
Administrator access to your server.
A suitable SFTP client (we’ve covered many of these in the past).
The know-how to use SFTP — there’s a good guide to the basics on WordPress.org, and you won’t need more than that.
A text editor, though there’s no need for anything too complex.
A clean and current backup in case the worst happens.
As an aside, we mention SFTP throughout this article as opposed to FTP. In short, the former is more secure than the latter (hence the name). That said, while there are other differences you should investigate, the functionality remains the same for the vast majority of uses.
Also, it’s worth noting that the MyKinsta dashboard has plenty of functionality on hand to help you get onto your server. For example, each site displays SFTP connection information that’s easy to understand:
The SFTP panel in the MyKinsta dashboard.
This can help you get into your site without fuss. In some cases, you may be able to import the credentials straight to your chosen SFTP client.
3 “Pre-Steps” You Can Take Before Rectifying the “413 Request Entity Too Large” Error
Before you crack open your toolbox, there are some steps you can take to help resolve the “413 Request Entity Too Large” error. Here are two — and each one may give you a welcome workaround to the error.
1. Try to Upload a Large File to Your Server Through SFTP
Because the issue is related to the file sizes hitting your server, it’s a good idea to circumvent the frontend interface and upload a large file to the server yourself. The best way to do this is through SFTP.
This is because protocols such as SFTP are almost as “close to the bone” as you can get with regards to the way you access your server. Also, you can simultaneously rule out any issues with the frontend that may be causing the error.
To do this, log into your site through SFTP and find the wp-content folder. In here will be the uploads folder.
The uploads folder seen from an SFTP client.
Next, upload your file to this folder on the server and see what the outcome is. If the upload is successful, we suggest sending an email to the site’s developer, as they may want to investigate the issue further on the frontend.
2. Check for Server Permissions Errors
Of course, permissions errors will stop any server request from running. As such, you should check whether the user has sufficient permissions to upload files of any size. Once this is sorted, the error should disappear.
The first step is to determine whether this is an issue with a single user (in which case they may be restricted for a reason). If the “413 Request Entity Too Large” error is happening for multiple users, you can be more sure of something that needs your input.
We’d suggest two “pre-fixes” here:
Double-check your WordPress file permissions, just in case there’s an issue.
Remove and re-create your SFTP user (a general investigation is a great idea).
While they may not solve the error in the first instance, you’ll at least know that your file and user structure is as it should be.
How to Solve the “413 Request Entity Too Large Error” for Your WordPress Website (3 Ways)
Once you’ve gone through the pre-steps, you’re ready to tackle the error head-on.
The following three methods are listed from easiest to toughest, with the understanding that that the path of least resistance is the best one to take.
1. Edit Your WordPress functions.php File
First off, you can work with your functions.php file to help bump up the file upload size for your site. To do this, first log into your site through SFTP using the credentials found within your hosting control panel.
When you’re in, you’ll want to look for the file itself. The functions.php file should be in the root of your server. In many cases, this root is called www or public_html, or it could be the abbreviated name of your site.
Once you’ve found it, you can open it in your text editor of choice. If you don’t see the file, you can create it using your text editor.
In short, this increases the maximum file size of posts and uploads while boosting the time the server will spend trying to process the request. The numbers here could be anything you wish, but they should be large enough to make the error disappear. In practice, 64 MB is enough for all but the most heavy-duty of tasks.
The functions.php file.
When you’re ready, save your file and upload it to the server again. Then, check whether the “413 Request Entity Too Large” error still exists. If it does, head onto the next method.
2. Modify Your WordPress .htaccess File
Much like your functions.php file, your .htaccess file sits on your server. The difference here is that .htaccess is a configuration file for Apache servers. If you’re a Kinsta customer, you’ll know we run Nginx servers, so you won’t see this file in your setup.
Still, for those with an Apache server, this is the approach you’ll need. Much like with the guidance for functions.php, first log into your server through SFTP, then look in your root folder as before.
The .htaccess file should be within this directory, but if it’s missing, we suggest you get in touch with your host to determine where it is, and whether your server runs on Nginx instead.
Once you’ve found it, open it up again. You’ll see some tags, and the most important here is # END WordPress. You’ll want to paste the following after this line:
In short, this does almost the same thing as the code you’d add to the functions.php file, but it’s akin to giving the server direct instructions.
The .htaccess file.
When you’ve finished, save your changes, upload the file, and check your site again. If you’re still having trouble, we’d again suggest contacting your host, as they will need to verify some aspects of your setup that lie beyond the scope of this article.
3. Change Your Nginx Server Configuration
Our final method is specific to Nginx servers — those used at Kinsta. The purpose is the same as when working with the .htaccess file, in that you’re talking to the server, rather than going through WordPress.
We mentioned that for Apache servers you’ll use .htaccess. For Nginx servers, though, you’ll want to find the nginx.conf file. Rather than walk you through every step in the chain, we’ve gone over the full details in our post on changing the WordPress maximum upload size.
Remember that you’ll need to also alter the php.ini file based on the changes you make to nginx.conf. We’ve covered that in the aforementioned blog post too, so take a look there for the exact steps.
Summary
Despite WordPress being a rock-solid platform, you’ll see a lot of different WordPress errors over time. The “413 Request Entity Too Large” error is related to your server, though — not WordPress. As such, there’s a different approach to solving this error than other platform-specific issues.
If you have SFTP skills, there’s no reason you can’t fix this error quickly. It relates to the upload size specified in your server configuration files, so digging into your .htaccess or nginx.config files will be necessary. It’s a breeze to crack open your text editor and make the changes to these files, and if you’re a Kinsta customer, we’re on hand to support you through the process.
Get all your applications, databases and WordPress sites online and under one roof. Our feature-packed, high-performance cloud platform includes:
Easy setup and management in the MyKinsta dashboard
24/7 expert support
The best Google Cloud Platform hardware and network, powered by Kubernetes for maximum scalability
An enterprise-level Cloudflare integration for speed and security
Global audience reach with up to 35 data centers and 275 PoPs worldwide
Test it yourself with $20 off your first month of Application Hosting or Database Hosting. Explore our plans or talk to sales to find your best fit.
Linux, Программное обеспечение
21.01.2015
35 068
5
03.04.2020
22
21
1
Содержание статьи
Описание ошибки
nginx
Apache
httpd.conf
.htaccess
PHP
Комментарии к статье ( 5 шт )
Добавить комментарий
Описание ошибки
413 Request Entity Too Large
Данная ошибка может появиться в том случае, если вы загружаете какой-либо файл на сервер и размер этого файла превышает максимально разрешенный в конфиге в веб-сервера (например, в nginx по умолчанию установлено ограничение в 1 МБ). Для того, чтобы это исправить, необходимо внести определенные правки в файл конфигурации, который может быть разным, в зависимости от используемого веб-сервера. Ниже будут приведены примеры для самых популярных веб-серверов:
nginx
Максимальный размер файла указывается параметром client_max_body_size. Поэтому, достаточно прописать параметр и новое значение в любой конфиг, который использует nginx для сайта, на котором у вас появилась эта проблема. Получится должно что-то примерно следующее:
server {
    ...
    client_max_body_size 4m;
    ...
}
Где 4m — это 4 Мб. Для установки лимита в 32 Мб, надо соответственно написать client_max_body_size 32m, и т. д.
После изменения настроек нужно обязательно перезагрузить конфиг в nginx.
Apache
httpd.conf
Размер файла, допустимого для заливки, можно отрегулировать в главном конфиге Apache, который можно найти по адресу /etc/httpd/conf/httpd.conf (в CentOS) или /etc/apache2/apache2.conf (в Debian/Ubuntu). Задается он параметром LimitRequestBody, и ему можно прописать любое нужное значение в байтах. Например, так выглядит ограничение в 32 МБ:
LimitRequestBody 33554432
Для применения настроек нужно перезагрузить веб-сервер Apache.
.htaccess
Очень часто у веб-сервера Apache для настройки определенного сайта используется файл .htaccess, который лежит в корневой директории веб-сайта. Удобство данного метода в том, что Вы можете прописать нужные настройки, которые будут применяться только для данной директории и веб-сайта, который данную директорию использует.
Если используемый для загрузки скрипт находится в какой-то поддиректории, где имеется свой файл .htaccess, то его настройки будут иметь больший приоритет!
Для этого, нужно либо открыть уже существующий файл .htaccess (или создать, в случае отсутствия) и добавить туда следующие строки (32 МБ в байтах):
LimitRequestBody 33554432
Если для работы сайта и заливки файла используется PHP, то нужно добавить еще другую строчку:
php_value upload_max_filesize 32M
PHP
Если при заливке файла используется PHP скрипт, то для PHP имеются отдельные настройки максимального размера файла. Для их изменений потребуется внести правку в файл php.ini, который расположен по адресу /etc/<версия php>/fpm. Открываем его любым текстовым редактором и находим следующие строки:
upload_max_filesize
post_max_size
И выставляем им нужные значения, например 4M (т. е. 4 МБ).
После внесения правок просто перезагружаем php, и проверяем работу.
Are you also one of those who couldn’t find any right guide and solution for fixing HTTP Error 413? That’s an error. Your client issued a request that was too large. That’s all we know. Chrome Browser code problem. Then check out this post below to find the best guide and the right method for this error problem. So check out this once,
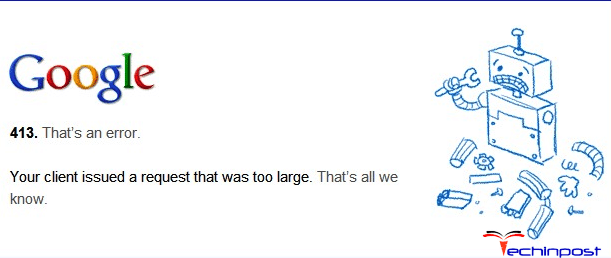
It shows an error code message like;
HTTP Error 413. That’s an error. Your client issued a request that was too large. That’s all we know.
This error indicates that the request was larger than the server could handle due to physical constraints or settings. It is a very common error in Nginx. The server may close the connection from this error to prevent the client from continuing the request. It can be fixed by increasing the memory limit in Nginx and the PHP configuration file. This Error 413 occurred in Windows PC users mostly.
Causes of HTTP Error 413 That’s an Error Chrome Issue:
Client NIL has too much post data
Request entity too large Apache
Visitor NIL large file
Google Chrome browser error issue
User authentication failed
HTTP error problem
So, here are some guidelines and the top best guide methods for getting rid of this type of HTTP Error 413. That’s an error. Your client issued a request that was too large. That’s all we know about Chrome Browser code problems for you permanently.
How to Fix HTTP Error 413 That’s an Error That’s all we know Chrome Issue
1. Modify the PHP.ini file for Upload limit –
If you are using PHP, use the following command, nano /etc/php.ini
If you are using PHP_FPM, use the following command, nano /etc/php5/fpm/php.ini
Now, find the following directions one by one upload_max_filesize post_max_size
& increase its limit to 100M (By default, they are 8M to 2M) upload_max_filesize = 100M post_max_size = 100M
Finally done, now save it
Restart PHP
**NOTE: (You can set any limit to Nginx & PHP configuration files)
By Modifying the PHP.ini file for Upload limit, you can quickly fix this Error 413. That’s an error. Your client issued a request that was too large. That’s all we know. The problem with you.
2. Modify the Nginx Configuration file on your Device –
Edit Nginx.Conf file nano /etc/Nginx/Nginx.conf
Search for this variable client_max_body_size
If you find it, increase its size to 100M,
If it doesn’t exist, then you can add it inside Http { … } block client_max_body_size 100M;
Restart Nginx to apply the changes sudo service Nginx restart
Modifying the Nginx Configuration file can quickly get rid of this Error 413. That’s an error. Problems.
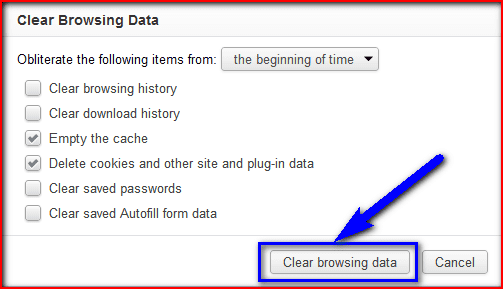
3. Clear the Browsing Data and History from your Internet Browser –
Go to the Internet Explorer browser
Click & open it
Click on the Tools button & move to safety
Then, click on the ‘Delete Browsing History.’
(Select the type of data that you want to remove)
Now, click on “Delete.”
That’s it, Done
By clearing the internet explorer browser browsing history, you can get back from this Dropbox Error 413 problem successfully.
” OR “
Go to the Google Chrome browser
Click on the (3 layer lines) on the upper right side
Click on the Settings button there
Go to the history option there
Click on ‘Clear Browsing History.’
Select the types of data you want to remove
Now, select ‘Clear Browsing History.”
That’s it, Done
Clearing the browsing history from the google chrome browser will fix this Error 413 request entity too large code problem quickly from you.
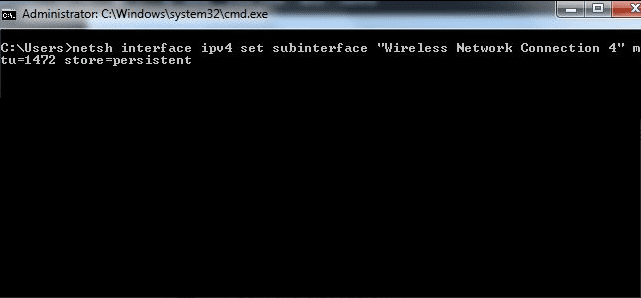
4. Setup the Maximum Transmission Unit (MTU) in CMD (Command Prompt) –
Go to the start menu
Type ‘run‘ there & click on it
Open it & type ” ncpa.cpl ” there
Click on the OK button or press enter there
A pop-up will open, and you will see the wireless networks there
Again go to the Run & open it
Type “cmd” there & press ok
In the Command prompt, type the following command netsh interface IPv4 set subinterface “Wireless Network Connection 4” mtu=1472 store=persitent
Replace the Local Area Connection with the name of your network adapter
Then, Press Enter
That’s it, Done
Running this (MTU) Maximum Transmission Unit command will fix this Error 413 entity too large problem.
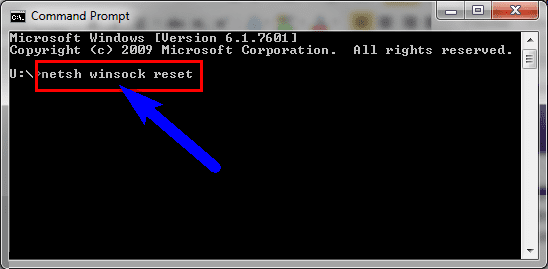
5. By netsh Winsock reset Method in Cmd (Command Prompt) –
Go to the start menu
Search or type cmd there
Go to the cmd & right-click on it
Then, click on ‘Run as administrator.’
Type ” netsh Winsock reset ” & press enter there
Restart your computer again
That’s it, done
By netsh Winsock reset command, it will fix this Error 413 google code problem.
6. Check the Internet Proxy Settings on your Windows PC –
Go to the start menu
Click on the control panel
Open it
Go to the Internet options there
Click on it & a pop-up will open
Go to the Connections tab there
Click on LAN setting there
deselect the “Use a proxy server for your LAN” option there if it is ticked
Then, Click on the OK button there
That’s it, done
Deselecting the settings will solve this Error 413 user authentication failed code problem.
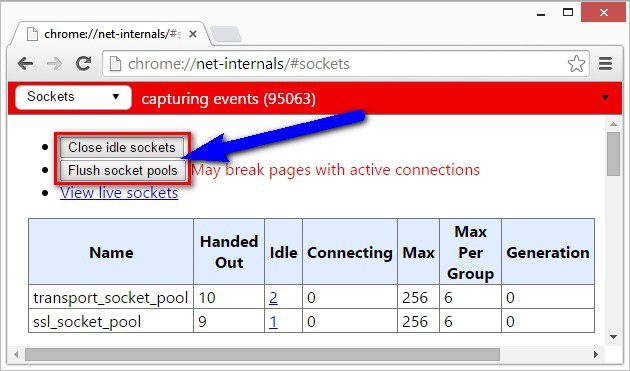
7. Flush the Socket Pools from your Google Chrome Browser –
Go to the start menu
Go to your browser
Clicks on it and opens it there
Type the following command there in their address bar ” chrome://net-internals “
Press Enter & click on the drop-down menu there
Select ‘Sockets‘ from the drop-down list
Click “Flush Socket Pools” on it there
After completing, close the tab
That’s it, done
By flushing the socket, pools can quickly fix and solve this Error 413, that’s an error your client issued a request that was too large. That’s all we know about code problems from your PC browser.
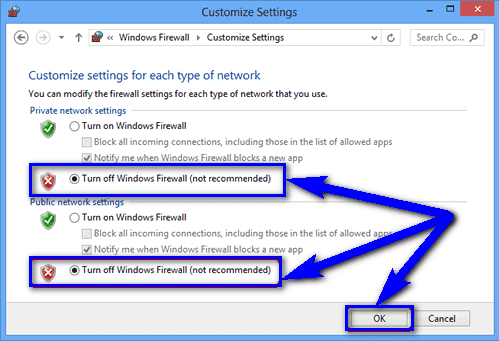
8. Turn OFF or Disable Windows Firewall Settings on your Windows PC –
Go to the Start Menu
Go to the Control Panel
Click on Windows Firewall there
Click on the ‘Turn Windows Firewall on or off feature there
Tick on “Turn off Windows Firewall (not recommended)” there
Now, Click on the ‘OK‘ button there
That’s it, Done
Turning off or disabling the windows firewall settings can fix this Error 413; that’s an error problem.
9. Reinstall Network Adapter on your Windows PC –
Go to the start menu
Search or go to the ‘RUN.’
Click on it and opens it.
After that, Type this below the following command there ” hdwwiz.cpl “
Press Ok there
Expand network adapters, locate your network adapter name
Note down the name,
Right-click on that adapter
Choose and click on the Uninstall option there
Reboot or restart your PC once
After resuming, reconnect to your network & test
If it is not installed, then download it from the manufacturer’s website
After that, run it and reinstall it
After that, test it
After completing, close the tab
That’s it, done
By reinstalling the network adapter, you can get rid of this Error 413 request entity too large code problems.
Conclusion:
These are some top best tricky ways and practical solutions for fixing and solving this HTTP Error 413. That’s an error. Your client issued a request that was too large. That’s all we know Chrome Browser code problem from your PC permanently. Hope it will help you eliminate this Error 413 code problem.
If you are facing this HTTP Error 413. That’s an error. Your client issued a request that was too large. That’s all we know about Chrome Browser code problems or any error problem while fixing Error 413; then comment down the problem below so that we can fix and solve it too by our tricky solution methods guides.
Решение вопроса с одной ошибкой BCS100 (или невмеру шустрых рук оператора)
На лазере оператор вместо того что-бы произвести калибровку емкостного датчика уровня на автомате понажимал и изменил параметры не в тех менюшках BCS-100.
В попытке исправить что-то еще наделал где-то. В итоге когда позвал на станке висит ошибка Z servo alarm, головка поднялась до самого верха — дошла до концевика и остановилась с ошибкой.
Координаты Z ушли в минус. На вопрос нафига он это делал — вразумительного ответа не дал. Думал что поправит самостоятельно…. больше напортачил.
Выключили станок — гаечным ключем опустили головку поворотом ходового винта — снять из зоны действия концевика — включили станок. Нажимаем вниз — он вместо того что-бы идти вниз идет рывком вверх.
Мы понимаем что координаты Z сбились, калибровка сервопривода не соотвествует. Попытка нажать калибровка сервопривода выдает Calibrate fail. Pos deviation large.
Связались с сервис инженером производителя станка.
после переписки входим меню F2 параметры, нажимаем 5, нажимаем Enter
Direction of servo стоит 1 меняем на 0 и нажимаем Enter что-бы сохранить
выходим из меню, головка начала слушаться и медленным опусканием опускаем головку до касания с листом — она начинает подниматься. Затем нажимаем Origin она встает в 0 позицию.
Z параметры становятся плюсовыми и легкое сумасшествие проходит. Лазер вернулся в строй.
Как потом оказалось вместо F1 калибровка оператор нажал F2 параметры и на автомате нажал 2 и сбросил значение скорости (200мм/c в нашем случае) на 2. Все делал на автомате — поэтому не запомнил что и где он делал. И при Edge seekeng скорость так сильно замедлилась что он решил что все сломалось. Ну и наделал делов. Провели внеочередной инструктаж операторам по параметрам BCS100. Куда лезть а куда не надо.
Кстати когда станок пришел я снял резервную копию компьютера станка, а резервную копию параметров BCS не делал. Понял что зря я об этом не подумал. На повторный запуск станка ушло пол дня. Рекомендую от шаловливых ручек сфотографировать все страницы параметров. Резервная копия параметров с BCS на usb флэшку у нас почему-то не работает. пишет USB initalizing и стоит.
fail2ban complains, probably because it can’t find the timestamp in the log line.
Any additional information
I have a suspicion that it’s a simple pattern matching issue: /etc/fail2ban/filter.d/murmur.conf has __prefix_journal = (?:S+s+%(_daemon)s[d+]:(?:s+<W>[d-]+ [d:]+.d+)?) and datepattern = ^<W>{DATE}, which means any other mumble-server log level (e.g. C or X, not W) won’t match the fail2ban’s line/timestamp expectations.
Configuration, dump and another helpful excerpts
Relevant parts of /var/log/fail2ban.log file:
2022-03-27 10:16:30,993 fail2ban.filter         [22254]: WARNING [murmur] Simulate NOW in operation since found time has too large deviation None ~ 1648376190.9936266 +/- 60
2022-03-27 10:16:30,994 fail2ban.filter         [22254]: WARNING [murmur] Please check jail has possibly a timezone issue. Line with odd timestamp: <C>2022-03-27 10:16:30.964 Caught SIGTERM, exiting
Relevant lines from monitored log files:
<C>2022-03-27 10:16:30.964 Caught SIGTERM, exiting
<W>2022-03-27 10:16:30.964 Killing running servers
<W>2022-03-27 10:16:30.971 1 => Stopped
<W>2022-03-27 10:16:30.972 Shutting down
<X>2022-03-27 10:16:31.022 SSL: OpenSSL version is 'OpenSSL 1.1.1n  15 Mar 2022'
<W>2022-03-27 10:16:31.022 Initializing settings from /etc/mumble-server.ini (basepath /etc)
<W>2022-03-27 10:16:31.706 ServerDB: Opened SQLite database /var/lib/mumble-server/mumble-server.sqlite
<W>2022-03-27 10:16:31.709 ServerDB: Using SQLite's default rollback journal.
<W>2022-03-27 10:16:31.780 Murmur 1.3.4 (1.3.4-1) running on X11: Debian GNU/Linux 11 (bullseye): Booting servers
<W>2022-03-27 10:16:31.787 1 => Server listening on 0.0.0.0:64738
<W>2022-03-27 10:16:32.422 1 => Not registering server as public
I’m running a LIN movement that was generated in RoboDK and getting the same error each time: «Precision Robot: Model Deviation too large».
I’m not able to find this error anywhere in the error manual or elsewhere online. Does anyone have some idea of what this error means and how to resolve?
Jump to the most helpful post
#2
Post your code and point value. Is your robot HA or ABS?
#3
I believe the robot is neither HA or ABS. It’s a KR 200-3 COMP. I think it might be a TCP issue though I’m not sure. Joint movements work fine but LIN movements get this issue.
I have been contending with the same issue, were you able to resolve this?
#5
This is an absolute accuracy issue. Deviation between non absolute accuracy transformation and absolute accuracy is too high. This is an intentional check to discover meddling with absolute accuracy files. This can happen e.g. if a absolute accuracy robot is mounted on ceiling or wall. Since absolute accuracy model is depending on gravity direction when its created you can not flip/tilt absolute accuracy robots.
To check you could deactivate absolute accuracy for testing purposes and see if problem disappears. How you can deactivate absolute accuracy is dependant on KSS release. Information you did not give. But its explained in this forum just need to use search function to find it.
Fubini
#6
I appreciate your response above, and I should elaborate on my issue and perhaps you might be able to help me better understand the problem. My robot came from a car assembly line, and I am currently in the process of setting it up for large scale 3D printing. I am trying to do some initial path planning/testing, and have generated code using Kuka PRC. However, when I attempt to use LIN moves, I am receiving the error ‘Precision Robot: Model deviation too large’. I have successfully run KRL that is comprised only of PTP moves, in T1 and Auto, but I am stumped with what to change to have it successfully run LIN moves. At this point I am not sure if I am missing something quite simple in the process or if it is beyond my experience. I have many years of running KRC4 robots, but this is my first KRC2, so I am still learning my way around the differences.
I have a KR-200 3 comp robot, and a KRC2 ed05 cabinet, KSS 5.6.10
The robot is floor mounted, and it is not a wall or ceiling mounted design. It is labeled ‘Absolutevermessen’
I am not sure that I understand how to change or adjust absolute accuracy — I did read through the thread: Absolute Accuracy Info KRC2 — KRC4 — but it seems that absolute accuracy has to be explicitly turned on for a KRC2 controller??
Below is the error message:
The code I am using is below. I am copying it out of my text editor as it has been generated from Kuka PRC:
&ACCESS RVP
&REL 1
&PARAM TEMPLATE = C:KRCRoboterTemplatevorgabe
&PARAM EDITMASK = *
DEF test90 ( )
;FOLD INI
;FOLD BASISTECH INI
GLOBAL INTERRUPT DECL 3 WHEN $STOPMESS==TRUE DO IR_STOPM ( )
INTERRUPT ON 3
BAS (#INITMOV,0 )
;ENDFOLD (BASISTECH INI)
;ENDFOLD (INI)
;FOLD STARTPOSITION — BASE IS 0, TOOL IS 0, SPEED IS 100%, POSITION IS A1 45,A2 -120,A3 110,A4 -80,A5 20,A6 80,E1 0,E2 0,E3 0,E4 0
Yes on KRC2 its active if $abs_accur is set to true. This variable is persistent so it stays true even after cold boot. So is it true on your machine? If so you could just for testing purposes set it to false and see if you no longer get the message.
Btw its not surprising you see it only in lin moves. For a ptp only once a absolute accuracy trafo needs to be calculated to transform cartesian target position into an axis position. For lin its different and you need an absolute accuracy backward transformation every 10 ms along the path to calculate the necessary axis position along the line. So according to probability laws chances are higher in lin.
Apart from mounting the biggest source of bad absolute accuracy is lousy load data. Is your load data set correct?
Fubini
#8
And also contact KUKA with robot serial number according to name plate and ask for the original pid file for your robot and install it. Maybe it was modified in the past. Some car manufacturers e.g. Daimler create their own pid files or change serial numbers freely and then use pid files from a originally different robot. These not really supported use cases exist out there even though KUKA is not very fond of them because you often loose a clear history for your robot and you never know what exactly you have in front of you. Unfortunatly such tweakings where much easier on krc2 generation robots than now with krc4 robots.
Do you have pid or xpid as absolute accuracy? In late krc 5.x releases this was an option. In 8.x only the newer and better xpid is available.
Fubini
#9
Fubini — thank you so much for your help.
Let me start by responding to your first message:
Yes on KRC2 its active if $abs_accur is set to true. This variable is persistent so it stays true even after cold boot. So is it true on your machine? If so you could just for testing purposes set it to false and see if you no longer get the message.
When I check the variable through the HMI, I can see that it is in fact set to True. However I was not able to overwrite this to False, either by changing the value on the pendant manually (variables<single) or by setting it to False as a line in my KRL. The controller responds with the message that the variable is write protected in both cases.
Perhaps I am not setting the value to False in the correct manner?
Apart from mounting the biggest source of bad absolute accuracy is lousy load data. Is your load data set correct?
Fubini
I do have the load data calculated — I used the Load Data Determination routine to calculate the mass, moment of inertia, etc.. The tool is stoutly bolted to the flange, and at 45kg is less than a quarter of the rated load. The tool has been taught properly and moves around its TCP as expected. So hopefully we can rule that out as a source of the issue.
And also contact KUKA with robot serial number according to name plate and ask for the original pid file for your robot and install it. Maybe it was modified in the past. Some car manufacturers e.g. Daimler create their own pid files or change serial numbers freely and then use pid files from a originally different robot. These not really supported use cases exist out there even though KUKA is not very fond of them because you often loose a clear history for your robot and you never know what exactly you have in front of you. Unfortunatly such tweakings where much easier on krc2 generation robots than now with krc4 robots.
Do you have pid or xpid as absolute accuracy? In late krc 5.x releases this was an option. In 8.x only the newer and better xpid is available.
Fubini
So, I have located the pid files in the archive that I pulled, and the serial numbers listed definitely do not match that on my robot arm. I do believe that this arm came out of a Daimler production line, so your assessment is likely correct. However, I do not see the $abs_accur variable declared in any of these files. Should I be expecting to see it declared as $ABS_ACCUR=TRUE or is this set through a different means?
I’ve given Kuka a call and have a case started, so ill see what they may be able to help me with. Thank you again for your help today — if you have any other suggestions, they will be greatly appreciated.
#10
take a picture of the robot label. also if it is absolute robot (HA or ABS) it is likely to have another smaller label «Absolut vermessen». Sometimes robots are measured in field and that extra label may not be there. if the robot serial number and PID file do not match something is wrong…
don’t recall details but if my memory is still good there is a function to deactivate absolute model by removing PID file from RDC (along with CHECKPIDONRDC and PIDTOHD). don’t have things at hand but would say ask KUKA or check Xpert.
#11
Thank you for the input.
The robot is in fact labeled «Absolutvermessen» — and the serial number listed does not match the serial number in the PID file or the serial number listed in the Robot Data on the HMI (however these serial numbers are the same). I apologize as I should have noticed the discrepancy in the Robot data sooner.
Does the PID file provide the serial number to the controller?
I contacted Kuka, and their first suggestion was to swap out the batteries in the cabinet before trying to troubleshoot error messages, considering that this robot is 12 years old. I did follow Fubini’s instruction to ask for an original PID file to match my robot, so hopefully that is something they can find and I can re-install.
I compared the various PID files that are saved on my controller, and found that some data/variables are different, but seem to have been used with robots of the same type/Trafoname as mine (pictured above). Manipulating this data is definitely beyond my experience at this time, so it is difficult for me to understand what the differences in the data I am looking at actually entails.
Kuka did explain the process to turn off $ABS_ACCUR through the windows interface on the controller, so I will test that.
If you have any further suggestions, please let me know. I greatly appreciate the support and direction.
#12
I wanted to also share an example of the differences in the PID files saved on my controller. The one on the right, 916628, is the one currently loaded on the machine. I highlighted one area in the file to show what I am seeing. The manipulator type is the same in both files.
What I dont have any clue about is how all of this is impacting my ability to run LIN moves!!
Thank you again for the help.
#13
you mention that you say the PID file in the archive… did YOU personally collect that archive on THIS robot? did you check serial number in the AM.INI of that archive? because it seems like you may be looking at file that does not belong to this robot. why not take a fresh archive ad check again?
#14
the content of PID that you are comparing is only small part of the PID file
#15
even slight changes in values have an effect. this is why when robot is mounted in different orientation (tilted, or on wall or ceiling) corrections applied by PID will be large enough to exceed some limits and robot will not be able to move. as a workaround one can turn of absolute accuracy and robot will work again — as a standard accuracy robot. to make it absolutely accurate again, it will need to be measured again and get new PID file. again, this file will be good only for current mounting position, any tilt to the surface that robot is mounted on will cause the same issue again. since your robot was factory measured, you should be able to get copy of original PID file from KUKA.
#16
Thank you Fubini and panic mode, I really appreciate the support and feedback. I turned off absolute accuracy and that solved my problem. Waiting on Kuka to send me the original PID file, but I am at least able to start test printing and moving on to the next hurdle.
I could not have done it without the help here on this forum. Feeling grateful for the internet!
#17
so how exactly did you turn it off?
Helpful
#18
Apologies for the delay.
I was able to turn off absolute accuracy by setting the variable $ABS_ACCUR to FALSE in the $option.dat file. This can be found in the KRCSTEUMada folder. In order to overwrite the variable it was necessary to hook up a mouse to the robot controller in order to minimize the HMI and work on the windows side. From there it is a matter of searching for the $option.dat file, changing the variable to false, saving the change and rebooting the controller. This file is write protected so it was not possible to change the variable through the Kuka HMI controls.
This screenshot shows the variables location in the file. This image was taken on my laptop, not the robot controller.
Create an account or sign in to comment
You need to be a member in order to leave a comment