
Java is one of the best development tools for creating games and applications and server-side programs. Games or apps written in Java need the Java Virtual Machine environment to run.
Games or applications developed with Java may crash unexpectedly or fail to open for various reasons, displaying the error «Could Not Create the Java Virtual Machine. Error: A fatal exception has occurred. Program will exit».

Below you will find several methods to resolve the Java Virtual Machine Launcher error «Could Not Create the Java Virtual Machine», in Windows 10/11 OS.
How to FIX: Could Not Create the Java Virtual Machine in Windows 10/11.*
* Suggestion: Before continuing with the following methods, try the following and see if the problem persists
-
- Install all Windows Updates.
- Press CTRL + SHIFT + ESC to open Task Manager and at Processes tab close all instances of Java Virtual Machine (right-click > End Task)
- 1. Install the Correct version of JAVA version for Java IDE app.
- 2. Increase Allocated Memory for JAVA Apps.
- 3. Launch JAVA with Admin rights.
- 4. Completely Remove and Reinstall JAVA.
Method 1. Install the Correct version of JAVA version for Java IDE app*
* Note: This method only applies to users using a JAVA IDE application for coding.
If you receive the mentioned error on a JAVA IDE application, you must ensure that the installed version of Java is compatible with the Java version (JRE or JDK) is running on JAVA IDE (Java Integrated Development Environment) application. So, proceed as follows:
Step 1. Check the JRE/JDK running version of JAVA IDE.
e.g. In the Eclipse IDE, check which version of the JRE or JDK it is running on by following the steps below:
1. From main menu, click Help > About Eclipse.
2. Click on Installation Details and choose the Configuration tab.
3. In the ‘Eclipse IDE Installation Details’ window, look at the line starting with -vm
4. The value at the line below will show you which JDK or JRE version on which Eclipse is running.
- e.g.: If the path contains “jre6”, that means that Eclipse is running JRE version 6
- e.g.:If the path contains «jdk1.8.0_05» means that Eclipse is running JDK version 8.
Step 2. Check which version of JRE or JDK is installed on Windows.
1. In the Search box type: cmd (or command prompt). Then select Run as administrator.

2. To find out the installed JAVA version give the following command and hit Enter:
- java –version

3. If the IDE does not support the Java version on your device, proceed to install the correct version of Java. *
* Note: In some cases the installed JRE & JDK versions may be different. So, if you JAVA IDE application running on JDK, proceed and check also if the installed JDK matches the running JDK of the JAVA IDE app. To find out the installed JDK version on Windows, give the following command:
- javac -version
Method 2. Increase Allocated Memory for JAVA Apps.
Launching an application that exceeds the maximum memory size of the Java virtual machine could result in the error «Could Not Create the Java Virtual Machine». To work around this problem, go ahead and increase the allocated system memory that JAVA can use as follows:
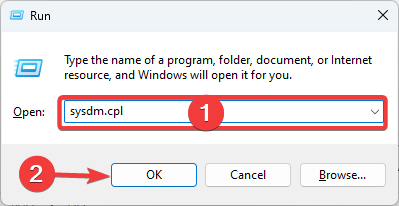
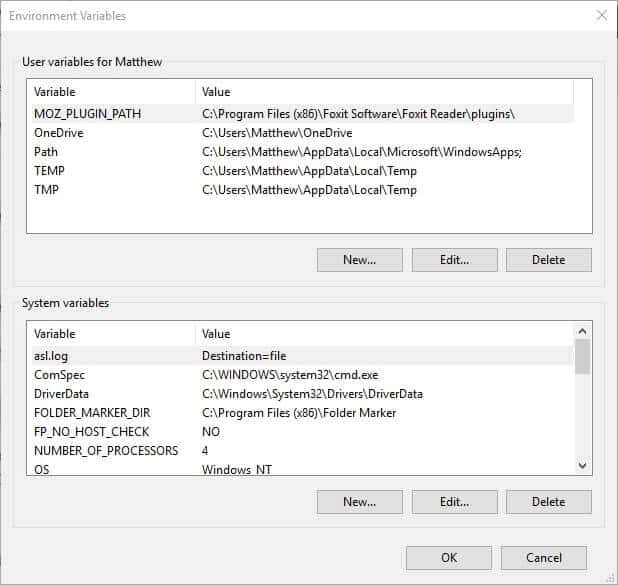
1. Click on the Start menu and type in search bar: view advanced system settings. Then click Open.
![image_thumb[8]](https://www.wintips.org/wp-content/uploads/2022/02/image_thumb8_thumb.png "image_thumb[8]")
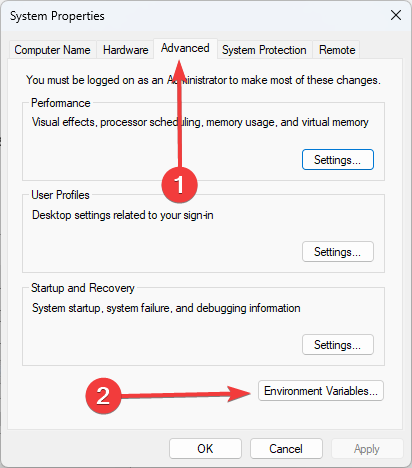
2. In the ‘System Properties’ window, select the Advanced tab and click Environment Variables.

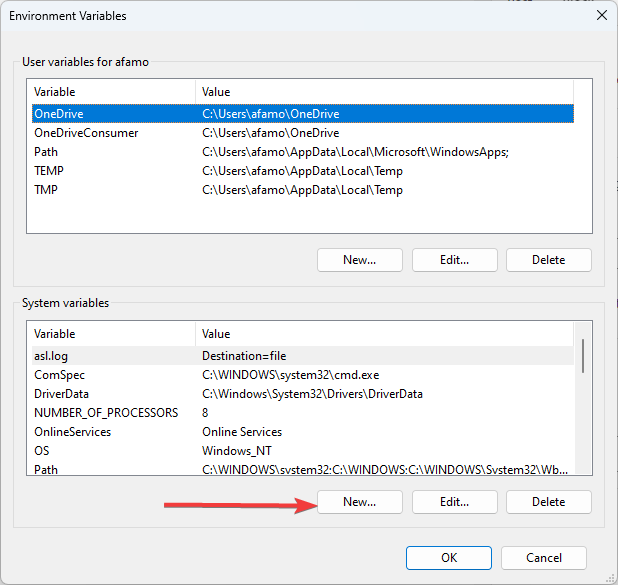
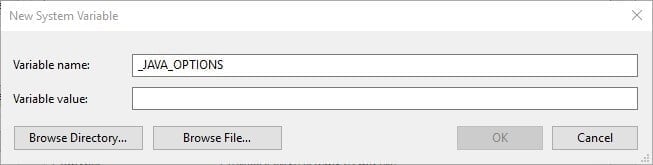
3. Below the System variables pane, select New.

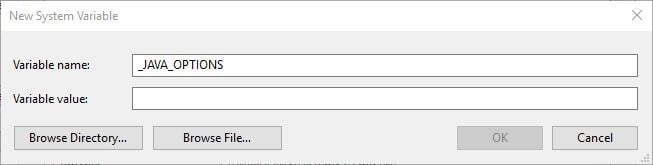
4. Set the Variable name as _JAVA_OPTIONS and the Variable value as -Xmx1024M. Then, click OK twice to save the change and close all open windows. *
* Info: This will adjust the allocated memory for Java to 1GB (1024MB).

5. Restart your machine to apply the change.
6. Finally try to open your game or app on Java Virtual Machine. The problem should be gone.
Method 3. Launch java.exe with Admin rights.
The Java error also appears when the user does not have the admin rights or permissions to launch certain executables. Configuring Java to always run as an Administrator could fix the problem.
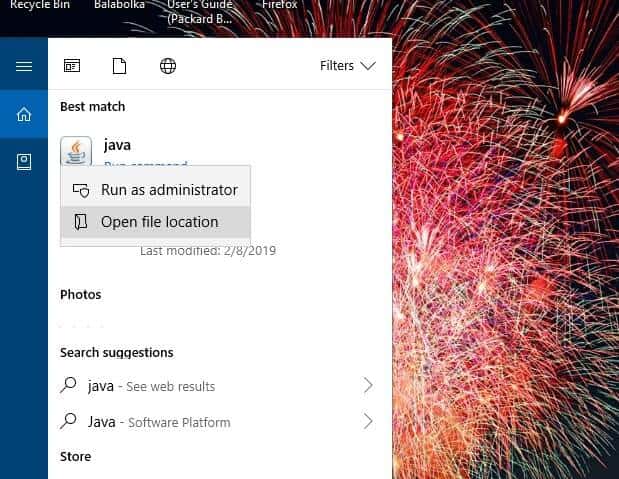
1. Press the Start menu and type Java in the search box.
2. Click Open file location.

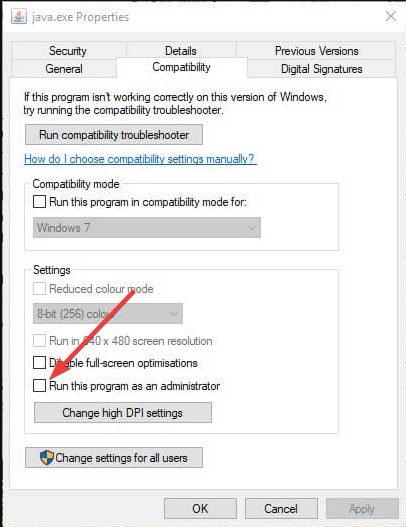
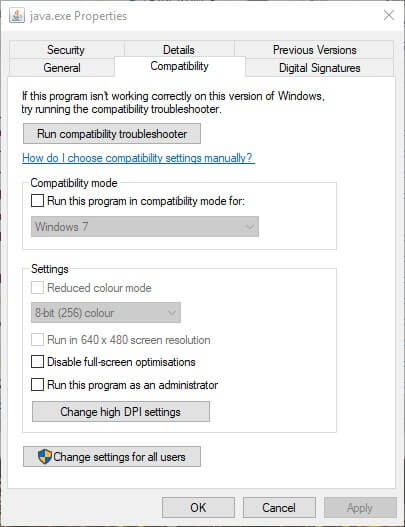
3. In the File Explorer window, right-click the Java executable file and select Properties.

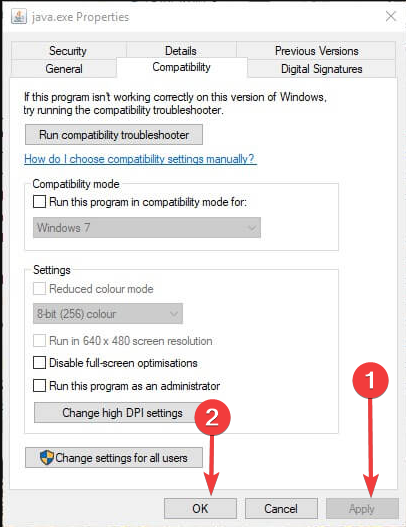
4. At ‘java Properties» window select the Compatibility tab and below the Settings pane, check the box Run this program as an administrator. Then click Apply and OK.

5. Finally, start the program that cannot run because of the «Could Not Create the Java Virtual Machine» error and see if the problem persists.
Method 4. Completely Remove and Reinstall JAVA.
In some cases, Java may be corrupted or missing components, causing games or applications you are trying to run to close. In this case, follow the instructions below to remove all versions of JAVA versions from your computer and reinstall it.
1. Download Java Uninstall tool.
2. Run the tool and select to remove all Java versions.

3. After removal, proceed and delete the Java folder(s) from the following locations on disk (if exist):
- C:Program Files
- C:Program Files (x86)
4. Restart your computer.
5. After reboot, visit Java official download page to download and install the latest version of Java.

That’s it! Which method worked for you?
Let me know if this guide has helped you by leaving your comment about your experience. Please like and share this guide to help others.
If this article was useful for you, please consider supporting us by making a donation. Even $1 can a make a huge difference for us in our effort to continue to help others while keeping this site free:

If you want to stay constantly protected from malware threats, existing and future ones, we recommend that you install Malwarebytes Anti-Malware PRO by clicking below (we
do earn a commision from sales generated from this link, but at no additional cost to you. We have experience with this software and we recommend it because it is helpful and useful):
Full household PC Protection — Protect up to 3 PCs with NEW Malwarebytes Anti-Malware Premium!
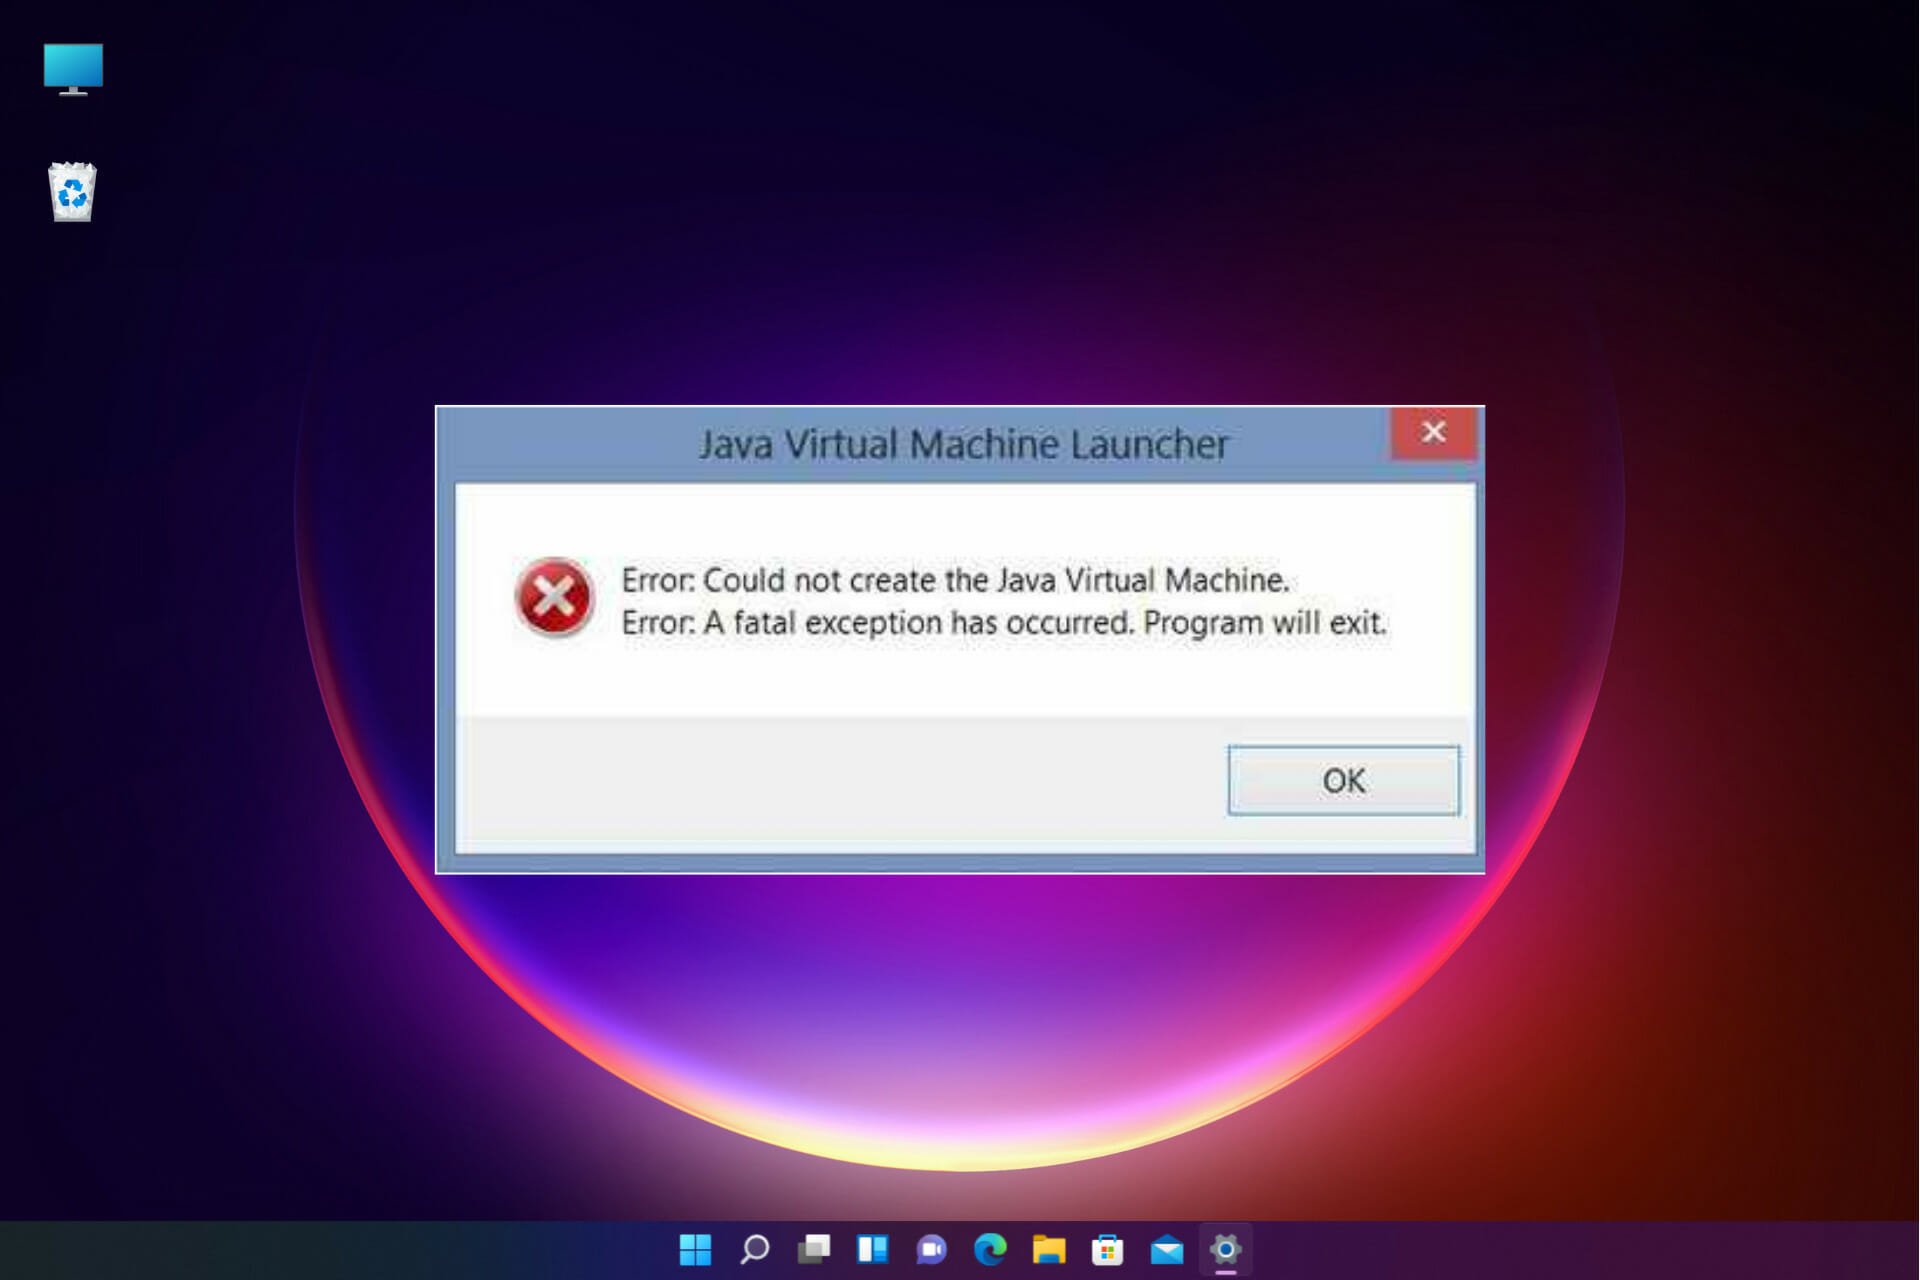
Some users are encountering the Could Not Create The Java Virtual Machine error when trying to launch an application that is using Java. This particular issue is reported to occur with Minecraft and several other applications that are built around Java.
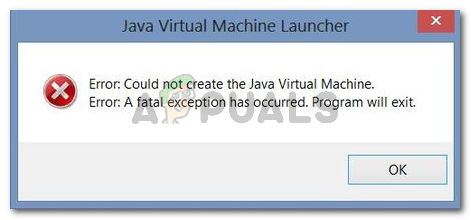
Error: A fatal exception has occurred. The program will exit.
What is causing the Could Not Create The Java Virtual Machine error?
We investigated this particular issue by looking at various user reports and the troubleshooting strategies that they used to resolve the same error message. Based on their conclusions, there are a couple of scenarios that will trigger this particular issue:
- Java is invoked by the wrong arguments or options – This can occur if you’re running a home-brewed application or you’re trying to open an open-source application that is known to cause system instability.
- Java global maximum heap memory is not high enough – One of the most common causes of why you can encounter this particular error is if you try to start a Java application with a maximum heap memory size larger than the one set as the System Variable.
- Java executable and/or application require administrative privileges – This might happen with applications that need admin access in order to function properly.
If you’re currently looking for a way to resolve the, Could Not Create The Java Virtual Machine error, this article will provide you with several verified troubleshooting strategies. Below you have a collection of methods that other users in a similar situation have used to get the issue resolved.
To ensure the best results, follow the methods below in the order that they are presented until you discover a method that is effective in resolving the error for your particular scenario.
Method 1: Adding the _JAVA_OPTIONS to System Variables
Most affected users have managed to get the issue resolved by creating a System Variable for Java called _JAVA_OPTIONS and setting it’s value to Xmx512M. What this essentially does is it sets the global maximum heap memory size for Java.
This will resolve any error message that occurs because the started Java application’s maximum heap memory size is larger than the one set as the System Variable. Several users encountering the same issue have reported that the issue was resolved entirely after they performed the steps below.
Here’s what you need to do to add a _JAVA_OPTIONS entry in System Variables to enlarge the global maximum heap memory size:
- Press Windows key + R to open up a Run dialog box. Then, type “sysdm.cpl” and press Enter to open up the System Properties screen.
- Inside the System Properties screen, go to the Advanced tab and click on Environment Variables.
- In the Environment Variables window, click on New (under System Variables).
- Inside the New System Variable window, set the Variable name to _JAVA_OPTIONS and the Variable value to –Xmx512M and click Ok to save the changes.
- Close the previously opened windows and restart your machine to enforce the changes.
- At the next startup, open the application that was previously showing you the Could Not Create the Java Virtual Machine error and see if is now functioning properly.

If you’re still seeing the same error message at the start of the application, try adding the Java Bin path which might be similar to “%USER PATHJavajdk1.6.0_39bin” to the environment variable as indicated in the above method and see if that works.
Method 2: Opening java.exe with admin rights
Several users struggling to resolve the same issue have managed to get the issue resolved after forcing the main Java executable (java.exe) to open with administrative privileges.
Some users reported that they were able to resolve the issue after applying this fix on both the main java executable and the executable of the application that is showing the error message.
Here’s a quick guide through the whole thing:
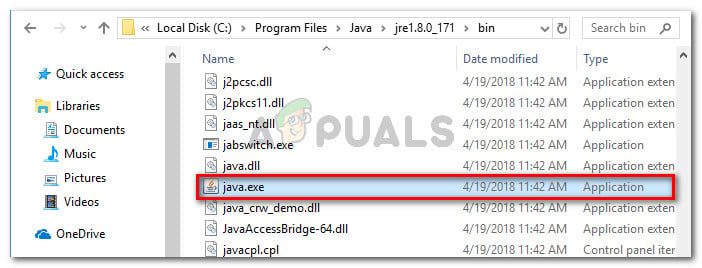
- Open File Explorer and navigate to the location of your java installation. We’ll need to arrive at the location of the main Java executable (java.exe). By default, you should find it in Program Files/Java/*JRE build version*/bin. The exact location will differ depending on which Java Runtime Environment you’re using.

Navigate to the location of java.exe Note: If you installed Java in a custom location, navigate the custom location instead.
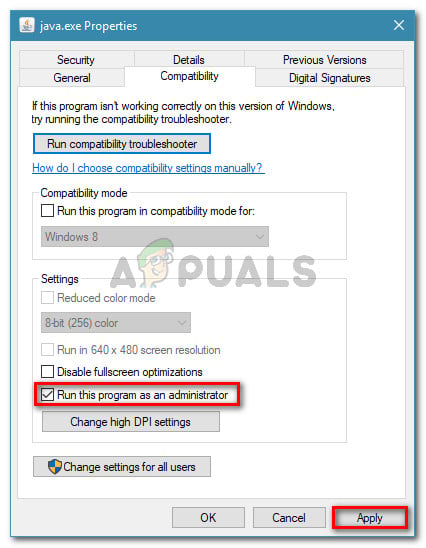
- Right-click on java.exe and choose Properties. Then, go to the Compatibility tab and check the box associated with Run this program as an administrator (under Settings). Click Apply to save the changes.

go to the Compatibility tab and enable Run this program as an administrator - Right-click on the application executable (the one that is triggering the error) and repeat the same procedure: Compatibility > Run this program as an administrator > Apply.
- Run the application and see if the error message is resolved.
Method 3: Reinstalling Java
In some cases, the error is triggered because Java might not be installed properly or its installation might have been corrupted over time. Therefore, in this step, we will be reinstalling Java after uninstalling it completely. For that:
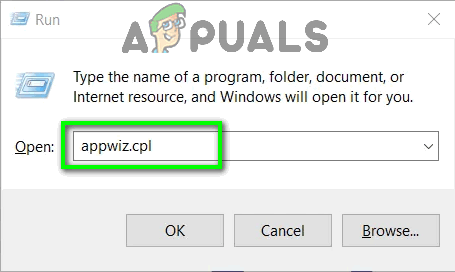
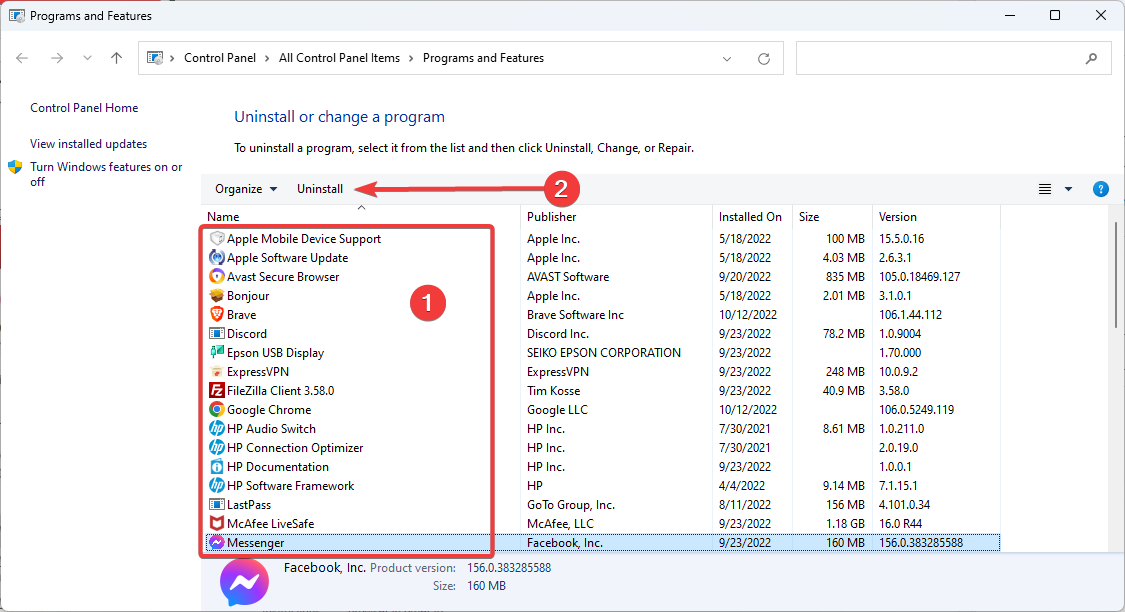
- Press Windows key + R to open up the Run prompt and type in “Appwiz.cpl”.

Type “appwiz.cpl” into the Run dialog and press Enter - Press “Enter” and the Programs and Features screen will open up.
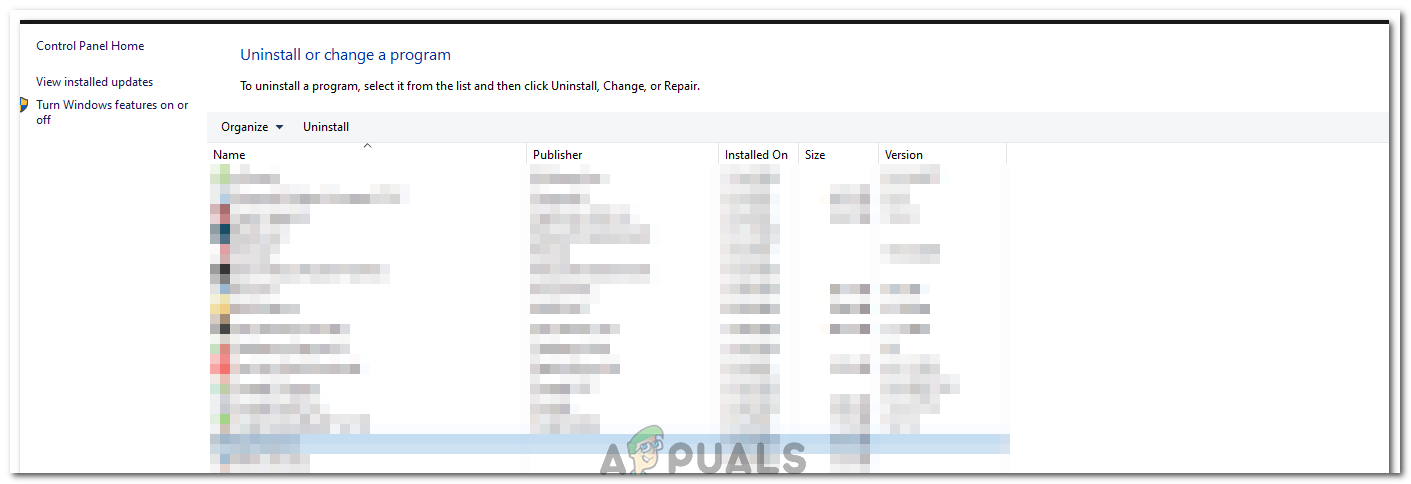
- At the Programs and Features screen, scroll through the installed application list until you find Java.

Checking the Programs and features screen - Right-click on it and select “Uninstall” to remove it completely from the system
- First, delete the primary Java installation and later you should also remove all other Java installations such as updates and other versions.
- After uninstalling all installation, restart your computer.
- After booting up, visit this link and download the latest version of JRE.
- Check to see if the issue persists.
- If the error still persists, download and install the latest version of JDK from here.
Note: If you are already using JDK, try changing its versions or uninstalling the JRE that has been installed along with it. - Verify if the issue still exists.
Method 4: Fixing Errors With Code
There are different reasons behind this error and some of them include if you have some particular errors with your code. We will highlight some below.
- Remove Hyphen: Some users noted that the error was fixed by changing the double hyphen “–” to a single one “-” in their code. For example:
Change the code
“sony@sony-VPCEH25EN:~$ java –version
Picked up JAVA_TOOL_OPTIONS: -javaagent:/usr/share/java/jayatanaag.jar
Unrecognized option: –version
Error: Could not create the Java Virtual Machine.
Error: A fatal exception has occurred. Program will exit.”
To
“sony@sony-VPCEH25EN:~$ java -version
Picked up JAVA_TOOL_OPTIONS: -javaagent:/usr/share/java/jayatanaag.jar
Unrecognized option: –version
Error: Could not create the Java Virtual Machine.
Error: A fatal exception has occurred. Program will exit.” - Also, Try removing the following line from your argument
-Djava.endorsed.dirs=”C:Program FilesApache Software FoundationTomcat 8.5endorsed” - Open your eclipse.ini file and make sure that you add the “-vm” entry above the vm args otherwise, JVM V6 will be selected in env vars.
- If on Ubuntu, you should know that Java 8 is the only version that is supported. Therefore, using the third method. Uninstall Java, and install the previous version.
Method 5: Editing Eclipse.ini File
We can also tweak things inside the Eclipes.ini File to get rid of this issue. There might be a couple of issues with its configuration that need to be addressed therefore, we have divided it into separate issues. Follow the one which suits your scenario the best.
Lowering Memory Use
- Open the Eclipse.ini file inside the Eclipse folder with notepad.
- Find the line similar to “-Xmx256m” (It might be -Xmx1024m or -Xmx 512m).
- Now change the default value to a more reasonable figure depending upon the RAM installed on your computer and add the version number to it as well. For Example:
-Xmx512m
-Dosgi.requiredJavaVersion=1.6
OR
-Xmx512m
-Dosgi.requiredJavaVersion=1.7
OR
-Xmx512m
-Dosgi.requiredJavaVersion=1.8
- Also, try removing the “256m” value from the “-launcher.XXMaxPermSize” line.
- Check to see if the issue persists.
Tinkering Around
- Try to remove the following lines from your file.
-vm P:Programsjdk1.6bin
- Also, change the following lines.
set -Dosgi.requiredJavaVersion=1.5
TO
set -Dosgi.requiredJavaVersion=1.6
- Also, try adding the following line above “-vmargs!” line.
-vm C:Program Files (x86)Javajre6binjavaw.exe
- Also, point to JVM.dll using the following line.
-vm
C:Program FilesJavajre7binclientjvm.dll
- Open the Eclipse file and replace “-vmargs” with the path of javaw.exe. For Example:
-startup
plugins/org.eclipse.equinox.launcher_1.3.0.v20120522-1813.jar
--launcher.library
plugins/org.eclipse.equinox.launcher.win32.win32.x86_1.1.200.v20120522-1813
-product
com.android.ide.eclipse.adt.package.product
--launcher.XXMaxPermSize
256M
-showsplash
com.android.ide.eclipse.adt.package.product
--launcher.XXMaxPermSize
256m
--launcher.defaultAction
openFile
**-vm “c:Program FilesJavajdk1.7.0_07binjavaw.exe”**
-Dosgi.requiredJavaVersion=1.6
-Xms40m
-Xmx768m
-Declipse.buildId=v21.1.0-569685
- Also, you can place the following line at the end and check if that works.
-vmargs
-Xms40m
-Xmx512m
-XX:MaxPermSize=256m
- Furthermore, try removing the following lines from the eclipse.ini and check if that works.
-XX:+UseStringDeduplication
-XX:+UseG1GC
- You can also try removing the eclipse.ini file if the issue still persists as that has reportedly fixed the issue for some but remember to back it up first just in case you need it. Also, try closing all the power-hungry applications before starting Java to make sure proper resources are available.
Checking for JDK Corruption
- Press “Windows” + “R” to open the Run prompt and type in “cmd”.
- Type in the following command and check if that gives an error.
c:> java -version
- If it does give an error, reinstall the JDK completely.

Kevin Arrows
Kevin Arrows is a highly experienced and knowledgeable technology specialist with over a decade of industry experience. He holds a Microsoft Certified Technology Specialist (MCTS) certification and has a deep passion for staying up-to-date on the latest tech developments. Kevin has written extensively on a wide range of tech-related topics, showcasing his expertise and knowledge in areas such as software development, cybersecurity, and cloud computing. His contributions to the tech field have been widely recognized and respected by his peers, and he is highly regarded for his ability to explain complex technical concepts in a clear and concise manner.
Don’t hesitate to take a closer look at our quick solutions
by Matthew Adams
Matthew is a freelancer who has produced a variety of articles on various topics related to technology. His main focus is the Windows OS and all the things… read more
Updated on January 27, 2023
Reviewed by
Alex Serban
After moving away from the corporate work-style, Alex has found rewards in a lifestyle of constant analysis, team coordination and pestering his colleagues. Holding an MCSA Windows Server… read more
- You should run the software as an administrator as the lack of rights can trigger the error.
- If you’re still experiencing this problem, it all comes down to reinstalling Java from scratch.
XINSTALL BY CLICKING THE DOWNLOAD FILE
This software will repair common computer errors, protect you from file loss, malware, hardware failure and optimize your PC for maximum performance. Fix PC issues and remove viruses now in 3 easy steps:
- Download Restoro PC Repair Tool that comes with Patented Technologies (patent available here).
- Click Start Scan to find Windows issues that could be causing PC problems.
- Click Repair All to fix issues affecting your computer’s security and performance
- Restoro has been downloaded by 0 readers this month.
The Java virtual machine fatal exception error pops up for some users when they try to launch software built on Java. Minecraft users are no strangers to this issue.
The full error message states: Could not create the Java Virtual Machine. Error: A fatal exception has occurred. Consequently, the Java program doesn’t run, yet we will share some simple fixes.
Why am I getting Could not create Java Virtual Machine?
The following are some of the possible causes that you should pay attention to:
- Memory size issues – The Java Virtual Machine error often arises when Java needs a larger global maximum heap memory size. The problem was resolved by users increasing the maximum RAM allotted to Java.
- Incorrect path settings – In this case, you need to set or modify the path as described below.
- Corrupted files – Such files may contribute to this error, so note that reinstallation of Java should fix this. This applies the Windows error 2 while loading the Java VM error message as well.
Do I need to install JVM?
Any machine on which you want to run Java code must have the Java Runtime Environment (JRE) installed. This is because Java does not run natively on a computer as C++ or C does; instead, someone must translate Java’s instructions into machine code, which the JVM does.
This error may come in different shades, including Could not create the Java Virtual Machine in Android Studio, Docker, Pentaho, Elasticsearch, Sonarqube, Minecraft, Eclipse, React Native, and IntelliJ, yet rest assured that you’ll find our solutions useful.
How do I fix Could not create the Java Virtual Machine error?
- Why am I getting Could not create Java Virtual Machine?
- Do I need to install JVM?
- How do I fix Could not create the Java Virtual Machine error?
- 1. Remove JDK (Java Development Kit)
- 2. Set up a new system variable for Java
- 3. Select the Run as administrator option for Java
- 4. Reinstall Java
1. Remove JDK (Java Development Kit)
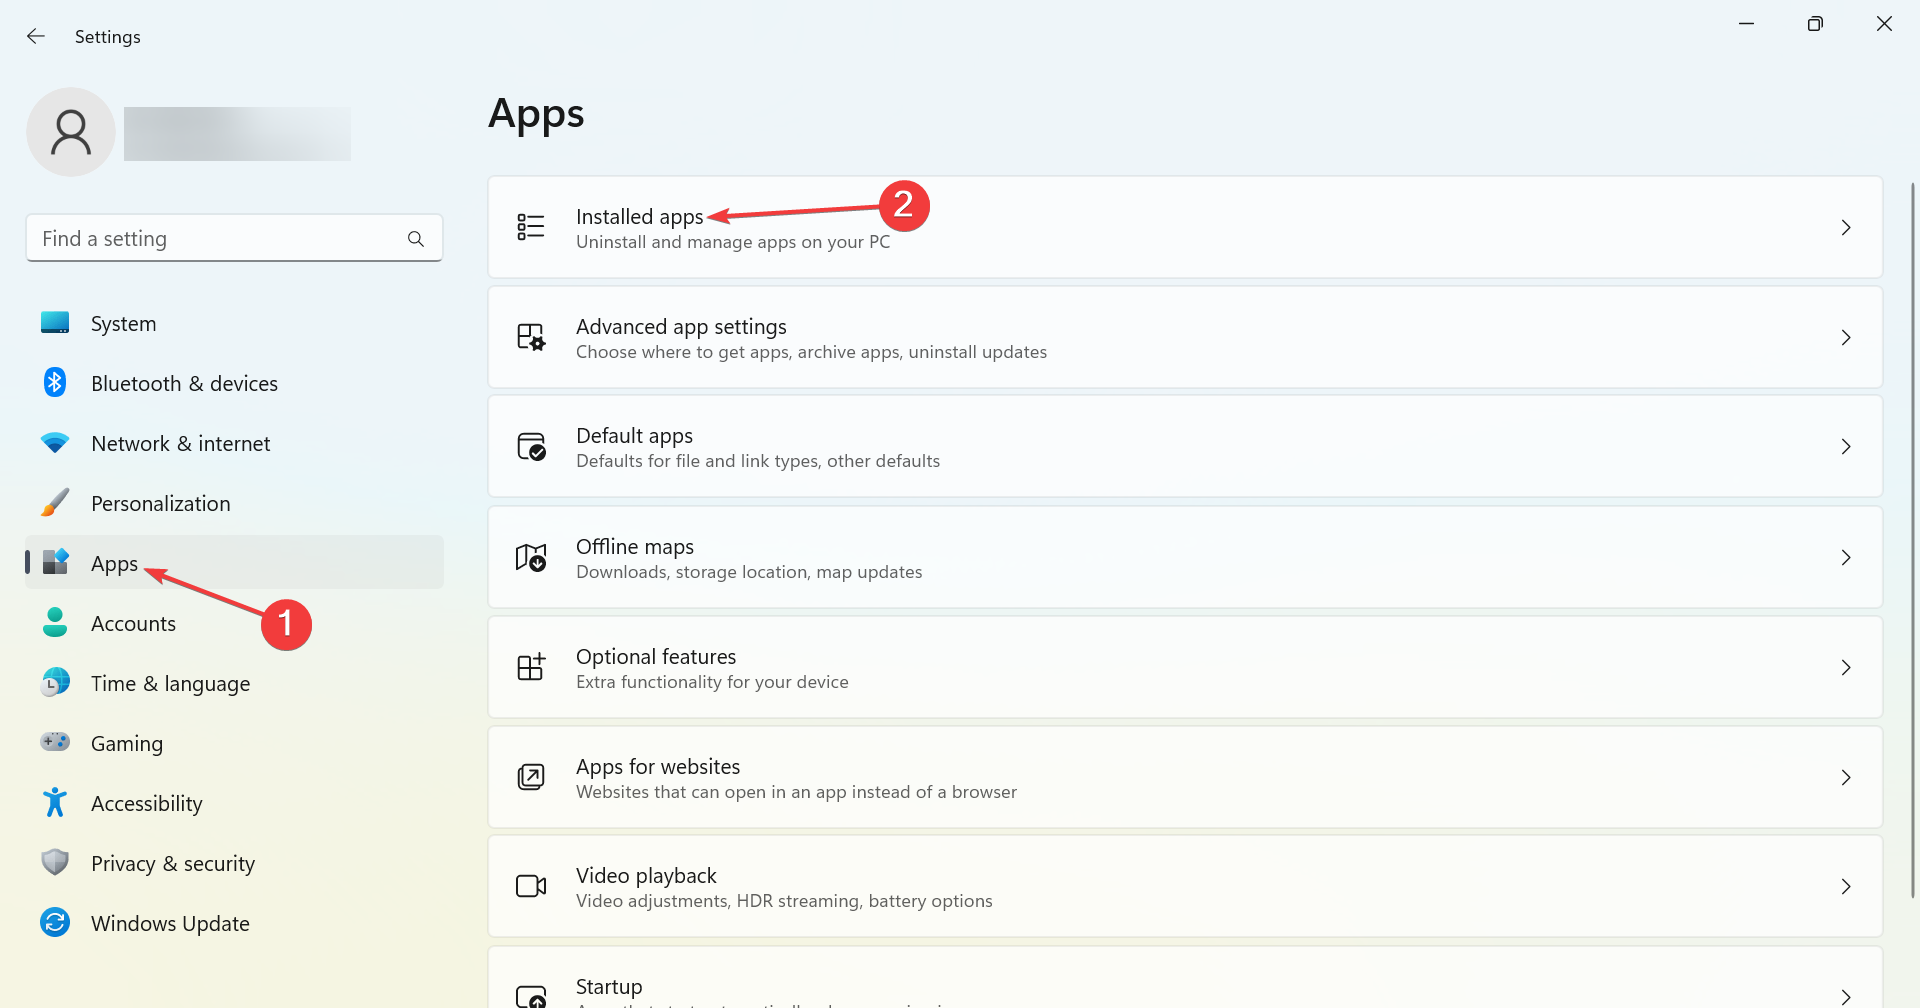
- Press Windows + I to open Settings, head to Apps from the navigation pane, and click on Installed apps.

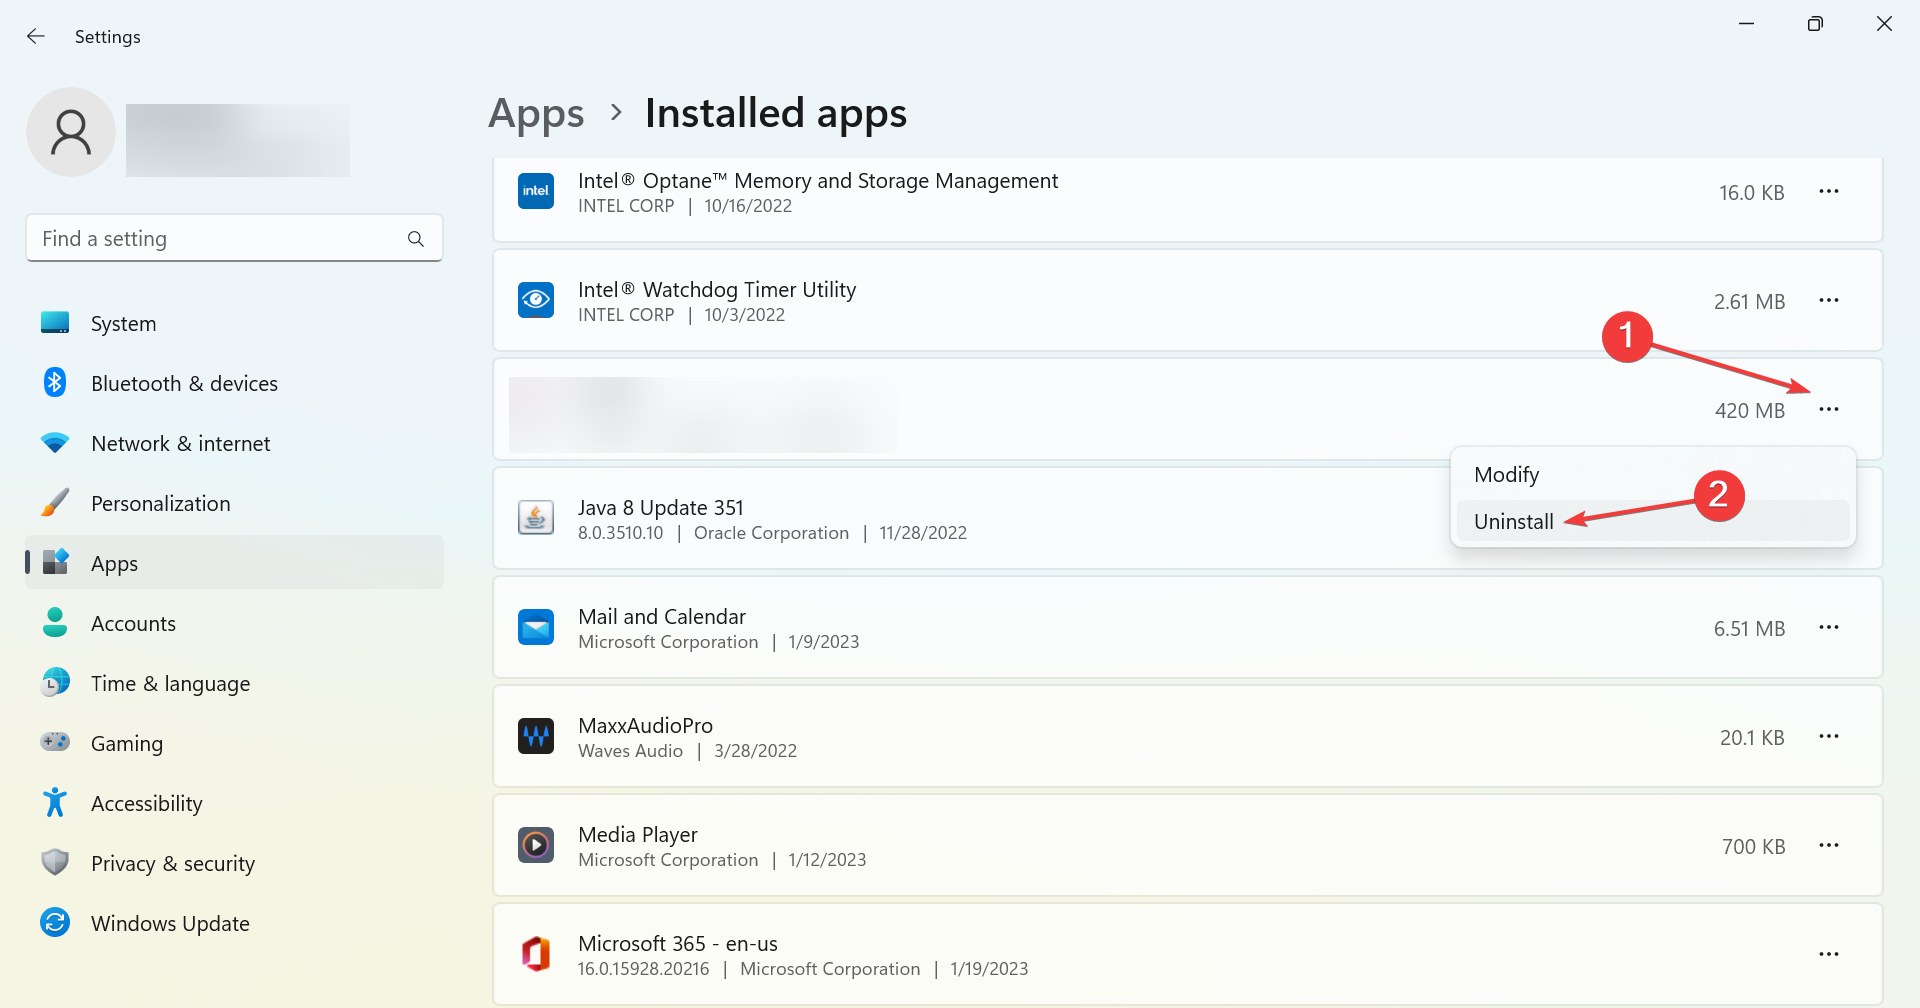
- Locate the Java Development Kit, click on the ellipsis next to it, and choose Uninstall.
- Follow the on-screen instructions to complete the process.
That’s it! Our readers pointed out that it was the development kit that conflicted with the process and led to the Could not create the Java Virtual Machine error, and uninstalling the program did the trick.
2. Set up a new system variable for Java
- Open Run with the Windows key + R keyboard shortcut, then enter sysdm.cpl in Run and click OK.

- Select the Advanced tab on that window, and click the Environment Variables button.

- Click the New button under the System variables box.

- Enter _JAVA_OPTIONS in the Variable name text box.

- Then, enter –Xmx512M in the Variable value text box, which increases RAM allocation to 512 megabytes.
- Click the OK button to close the window, then press the OK button on the Environmental window.

Importantly, note that instead of using a double hyphen in the Variable value as stated above, you can use a single hyphen (-Xmx512M) as this is often more effective, and would not spark up other complications.
- How to fix Windows error 2 while loading the Java VM
- Fit the Runtime error Java in just a few easy steps
- How to download Java 10 on your Windows PC
3. Select the Run as administrator option for Java
The Java Virtual Machine error can also be due to insufficient admin rights. Thus, some users might need to assign admin rights to Java. You can try the steps below to apply this solution.
Some PC issues are hard to tackle, especially when it comes to corrupted repositories or missing Windows files. If you are having troubles fixing an error, your system may be partially broken.
We recommend installing Restoro, a tool that will scan your machine and identify what the fault is.
Click here to download and start repairing.
1. Press the Windows key + S keyboard shortcut, and enter Java. Right-click on Java and select Open file location to open Java’s folder in File Explorer.
2. Right-click java.exe and select Properties.
3. Head to the Compatibility tab and select the Run this program as an administrator option.
5. Select the Apply option, and click OK to close the window.
4. Reinstall Java
- First, open the Run accessory by pressing the Windows key + R.
- Type the command below and hit Enter.
appwiz.cpl - Select Java from the program list and click Uninstall.

- Click Yes on any confirmation window that opens.
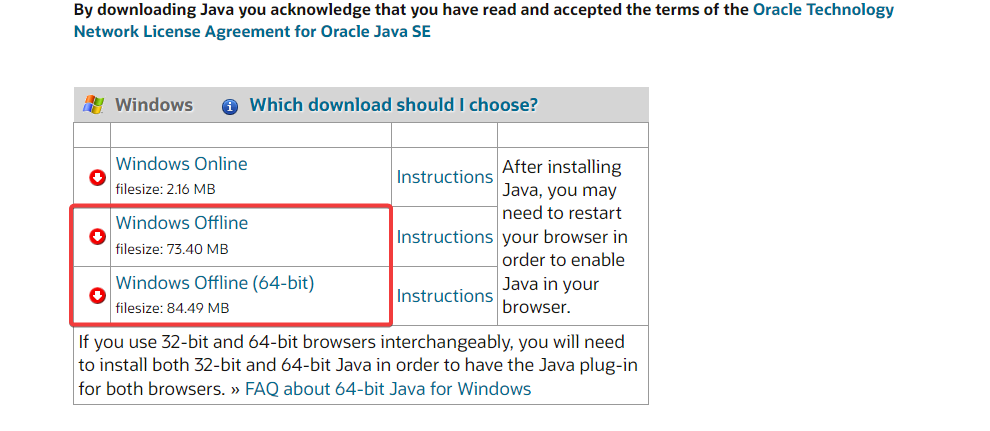
- Restart Windows, open the Java download page in a browser, and download either the 32 or 64-bit offline Windows versions.

- Users need 32-bit Java for 32-bit programs and 64-bit Java for 64-bit software. If in doubt, your best bet is to download and install both Java versions.
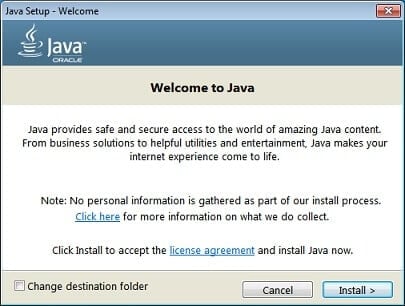
- Thereafter, open the Java setup wizard, and click the Install button.
That’s how users can fix this fatal error and get back to running the required Java software.
Any of the previously mentioned solutions may be successfully applied when getting a Java virtual machine launcher error which arises even if nothing has changed on your computer, and it’s most likely related to Java installation.
Things are no different when it comes to the Could not create the Java virtual machine a fatal exception has occurred error. This problem also seems to appear randomly. Make sure you aren’t using a 32-bit VM and a 64-bit Eclipse.
Minecraft could not create the Java virtual machine is an error that shows up when trying to launch Minecraft. The main reason is that it needs admin access in order to function properly. Also, read our detailed guide on how to install Java on Windows 11.
If you have any other questions or advice for other users to try, don’t hesitate to leave a comment below.
![]()
I have visited all existing questions which are related to my question but I still have a problem. All installations are correctly installed. I am using the newest Netbeans version. After executing program I have this error:
Error: Could not create the Java Virtual Machine.
Error occurred during initialization of VM
Could not reserve enough space for object heap
Error: A fatal exception has occurred. Program will exit.
And my Netbeans.conf is:
# ${HOME} will be replaced by JVM user.home system property
netbeans_default_userdir="${HOME}/.netbeans/7.1.2"
# Options used by NetBeans launcher by default, can be overridden by explicit
# command line switches:
netbeans_default_options="-J-client -J-Xss2m -J-Xms16m -J-XX:PermSize=16m -J-Dapple.laf.useScreenMenuBar=true -J-Dapple.awt.graphics.UseQuartz=true -J-Dsun.java2d.noddraw=true -J-Dsun.zip.disableMemoryMapping=true"
# Note that default -Xmx and -XX:MaxPermSize are selected for you automatically.
# You can find these values in var/log/messages.log file in your userdir.
# The automatically selected value can be overridden by specifying -J-Xmx or
# -J-XX:MaxPermSize= here or on the command line.
# If you specify the heap size (-Xmx) explicitly, you may also want to enable
# Concurrent Mark & Sweep garbage collector. In such case add the following
# options to the netbeans_default_options:
# -J-XX:+UseConcMarkSweepGC -J-XX:+CMSClassUnloadingEnabled J-XX:+CMSPermGenSweepingEnabled
# (see http://wiki.netbeans.org/FaqGCPauses)
# Default location of JDK, can be overridden by using --jdkhome <dir>:
netbeans_jdkhome="C:Arquivos de programasJavajdk1.7.0_07"
# Additional module clusters, using ${path.separator} (';' on Windows or ':' on Unix):
#netbeans_extraclusters="/absolute/path/to/cluster1:/absolute/path/to/cluster2"
# If you have some problems with detect of proxy settings, you may want to enable
# detect the proxy settings provided by JDK5 or higher.
# In such case add -J-Djava.net.useSystemProxies=true to the netbeans_default_options.
What do I have to do? I’ve been trying to resolve this error all day. My system Memory is 3Gb.
![]()
John Kugelman
347k67 gold badges524 silver badges574 bronze badges
asked Oct 9, 2012 at 21:33
![]()
3
Could not reserve enough space for object heap
This almost always means that your -Xmx is too high for the machine. There is a message above:
# Note that default -Xmx and -XX:MaxPermSize are selected for you automatically
Try to provide explicit value, start small. Note that -Xms must be less then or equal to -Xmx
answered Oct 9, 2012 at 21:52
![]()
1
I got the same error while starting Netbeans
Error: Could not create the Java Virtual Machine.
Error: A fatal exception has occurred. Program will exit.
I try to restart Netbeans many times. Same error was repeating. Later I found it was happening as some other application is already using JVM. So I looked for such an application which was Tomcat Server. I terminated Tomcat and tried starting Netbeans again and it was fine. So try looking for any application that uses JVM.
answered Sep 24, 2013 at 2:51
![]()
0
We have couple of solutions for the above Problem
Solution 1: You can re-install the all components. ie it means you have install the entire s/w.
for the Error: Could not create the Java Virtual Machine.
Solution 2: that maximum heap size varies based upon machine architecture e.g. 32 bit or 64 bit, JVM bit size e.g. 32 bit JVM or 64 bit JVM and operating system.
In 32 bit machine though theoretical limit of maximum heap size is 4GB, it varies on operating system to operating system e.g. on 32 bit windows XP maximum heap size limits upto 1.5G due to various reason while on 64 bit Solaris machine even with 32 bit JVM you can afford around 3.5GB. So when you run following java command in 32 bit Windows XP machine
Solution 3: One more worth noting syntax error while providing heap space is space between numeric literal and unit, as shown in below example:
Correct: ~/java java -Xmx1500 M
In-correct:   ~/java java -Xmx1500MB
In-Correct:  ~/java java -Xmx 1400M
![]()
answered Apr 12, 2013 at 10:13
![]()
1
-J-Xss2m -J-Xms16m -J-XX:PermSize=16m
Those are insufficient values. Try it increase from 16Mb to 512Mb (or 1Gb)
answered Oct 9, 2012 at 21:37
![]()
AnthonyAnthony
12.3k12 gold badges64 silver badges88 bronze badges
4
There are many computer applications developed based on Java. When users run these applications, they are supposed to run smoothly.
However, in some instances, errors can pop up and terminate the launch of the respective software. This is usually happening by displaying the error message that starts with ‘could not create the Java virtual machine …’.
If you see this message, the next thing you will experience is that the Java program is stopped. Well, have you ever experienced this error ‘could not create the Java virtual machine …’ error? If so, this article explains the fixes to it. So, read on.

What Causes the ‘Could Not Create The Java Virtual Machine’ Error?
There are several causes behind this issue. Mentioned below are some of those reasons.
- If Java is invoked with the wrong arguments
Or if you use unstable software (be it a game or any other app), this issue can occur. - If Java global maximum heap memory is not high enough
This is among the most common causes for sure. In this case, you will have to allocate more memory to resolve the issue. - If Java executable file and application is not granted administrative privileges
To solve this, you should provide administrative privileges.
Besides, if you are bothered by the issue of could not find or load the main class, click to fix it now.
How to Fix the ‘Could not create the Java virtual machine’ Error?
As emphasized in the first paragraph of this article, we are going to explain how to fix this error. In fact, there are multiple solutions to this error, so you should pick the most appropriate one for you. Let’s read on.
Fix 01: Configure a New System Variable
Configuring a new system variable for Java is our first solution to this error. The ‘Could not create the Java virtual machine’ error actually appear when there is not enough memory for it.
In other words, Java requires a substantial amount of memory, and when there is not enough memory, it stops. That means some of the machines that have larger memory capacity experience this issue rarer compared to other machines.
Some of the users have found a solution to this issue simply by expanding the RAM allocated to Java.
Well, to allocate more memory to Java, you may try the following steps and get it done. We use this option as the first method because it is a very easy process.
Steps to Configure a New System Variable
- As the first step, you should open the ‘Run’ command on your computer. To do this, there are a couple of ways. You can simultaneously hit the Window key and the ‘R’ key on the keyboard to get the ‘Run’ dialog box opened. If not, you can hit the Windows key and type ‘Run‘ in the search box, and select the ‘Run’ option.
- No matter which method you select, just go to ‘Run.’ Once the ‘Run‘ dialog box is opened, you will see a search bar as well. In this search bar, enter the text’ sysdm.cpl‘. Then, press the button labeled ‘OK.’ You will now see a different window. This Window will comprise the title ‘System Properties.’

- On this Window called ‘System Properties,’ you should select the ‘Advanced‘ tab. Under this option, you will find a button called ‘Environment Variables.’ This will lead you to another window.
- Click on the option ‘New,‘ located under ‘System variables.’
- Now, you should enter ‘_JAVA_OPTIONS.’ This should be entered inside the Variable name text box.
- Afterward, you should enter ‘_Xmx512M‘ within the Variable value text box. Well, this option will increase RAM allocation by 512 megabytes.

- To complete the process, you should click the ‘OK‘ button.
- You can also press the ‘OK‘ button on the ‘Environmental Windows.’
- That’s it, and 512MB RAM will be allocated.
Fix 02: Make ‘Run’ as an Administrator Option for Java
If the previous option doesn’t work for you, you will have to try a different option. If it doesn’t work, the error might be something else.
In fact, ‘Could not create the Java virtual machine …’ can occur due to insufficient admin rights to Java. Using Windows 10, you can fix the issue using the following steps.
- In Windows 10, you should open Cortana. To do this, you should hit Windows Key with the ‘Q’ key on the keyboard.
- Now, you will see a search box appearing. In this box, enter ‘Java.’
- Then, you will be able to see the ‘Java‘ option. Right-click on this option and then select the option called ‘Open File Location.’
- This option will open the folder of Java in the File Explorer window.
- You can now go to the java.exe file and then right-click on it. You will then be able to select the ‘Properties‘ option.

- Then select the tab labeled ‘Compatibility.’
- After selecting the ‘Compatibility‘ option, you should select ‘Run this program as an administrator.‘
- To complete the process, you should select the option ‘Apply.’
- Click ‘OK‘ so you can finish the process.
Fix 03: Install Java Once Again
If none of the above options have worked so far, the cause of the issue might be something different.
So, as another remedy, you should try reinstalling Java and check if it resolves the issue. After reinstalling Java, you can expect the ‘Could not create the Java virtual machine‘ error to be gone.
So, to get it done, you should first uninstall the existing version of Java. For that, you must go to the control panel of the machine. To access the control panel, there are several options you can consider.
For instance, you can either choose a long way or a shortcut. As we believe, entering the text ‘appwiz.cpl.’ within the ‘Run’ box is the most convenient way.

Steps to Reinstall Java
- Then, in the search box, you should enter ‘Java.’ If not, you can simply scroll down until you find the Java option.
- Now, select the ‘Java’ option and click on ‘Uninstall.’
- You may now click on ‘Yes’ on the confirmation box, which will pop up.
- Now, restart the Windows computer after the installation.
- Open a web browser of your preference and go to the Java download page.
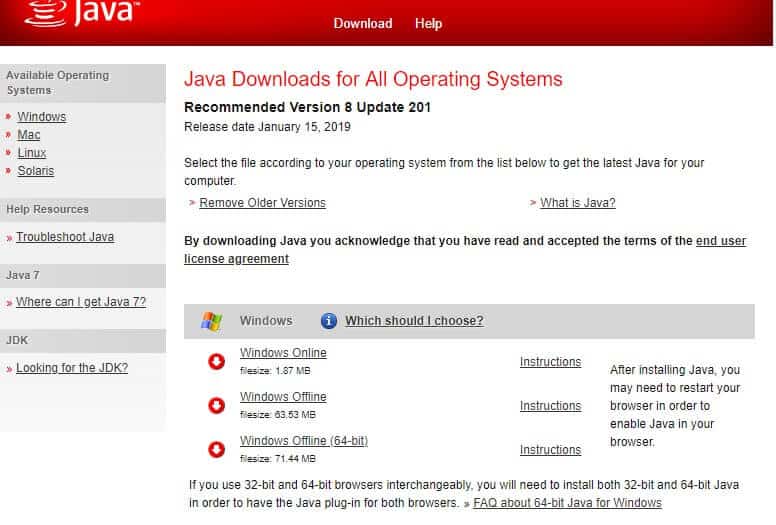
- Make sure you choose the appropriate software version for the operating system running on your computer. For instance, if you have a 32-bit Windows OS, you should choose the 32-bit Java file. However, if the operating system runs on 64-bit, you should choose the 64-bit version accordingly. If you are doubtful about the version, you may try installing both Java files. To do this, you should go to the Windows Offline file.
- Whether you have selected the 32-bit version or the 64-bit version, you must now open the Java setup wizard.
- Click on the option labeled ‘Install,’ which appears as a button on this setup wizard you have just launched.
That is exactly how to fix the ‘Could not create the Java virtual machine ….’ Issue. This is also known as Java Virtual Machine fatal error.
As we believe, the resolutions we have mentioned above can address this issue for good. Once the issue is fixed, you can run the required Java software without any issues.

Jack
Ten years of experience in information and computer technology. Passionate about electronic devices, smartphones, computers, and modern technology.