
Sound like a familiar trauma? Well, you’re in good company, this issue is commonly raised by our users. This article will explain how to solve WordPress not sending emails through your form and “server error” issues.
Well, there is a short answer and a long answer.
First, run a test on your WordPress site and see if it can even send emails.
To confirm email deliverability, you can use any SMTP plugin and select different SMTP server like SendGrid to check if it delivers correctly. If it works correctly with other and shows error with default SMTP then this needs to be reported to hosting.
Why does this Server Error occur?
Elementor uses WordPress’ wp_mail function to send emails. Your web host takes the sent email, processes it, and sends it. This is where 90% of the issues happen.
Sometimes, hosting servers disable the PHP function used for sending emails. They basically block your emails.
This is done usually to make sure you don’t send spam through your site (your host doesn’t want you to use its server as a spam server).
Technically speaking – the wp_mail function uses the PHP send_mail function by default. But if it is disabled on that server, then email sending fails. To get around this, either contact your hosting service and request them to enable it, or use an SMTP server instead.
What the heck is SMTP anyhow?
SMTP stands for “Simple Mail Transfer Protocol”. SMTP is an email server that routes your email in forms into the inbox of your listed customers. It is an external email server (e.g. Gmail can be used as an SMTP server) that helps ensure your emails get delivered faster and helps prevent your email from ending up in users’ spam folders.
Try using any popular SMTP plugin ( https://wordpress.org/plugins/search/SMTP/).
If that doesn’t work…
More Troubleshooting Tips for Server Errors
Besides contacting your host provider, here are several steps you can try to solve this issue:
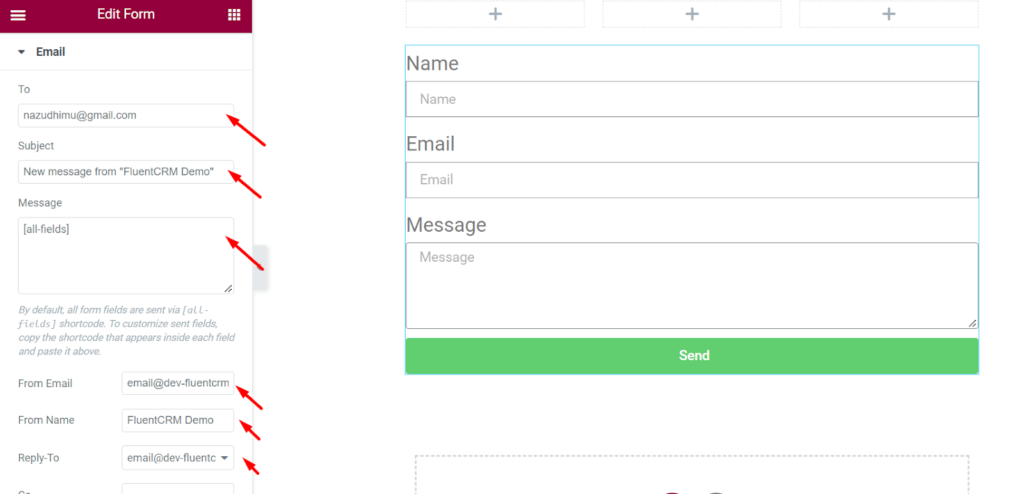
- The form’s From Email address usually needs to be from the same domain as your website. So if your site is example.com, then you would need to use a From Email address of [email protected] or [email protected], etc. You can use the Reply-To field to select the visitor’s email address for replying to the user’s request.
- You may use the Elementor Form Submissions feature to check that the form is functioning properly. To learn more about Form Submissions click here.
- Use another email address (it’s possible that your email is being registered as spam). To avoid being marked as spam try changing the length (shorter or longer) of your email subject line.
- If you are using any third-party integrations, try disabling them. For example, MailChimp or ActiveCampaign. If that did the trick, then read more in our integrations guide. Basically, you have to check the field mapping within your autoresponder account and within the Form widget. Make sure that you do not have the required fields set to “none” within the Form Widget. Also make sure also that you did not add an “address” field or a “birthday” field within your field mapping settings in your MailChimp account
- If the page refreshes after submitting a form, generally this is due to a plugin or a theme code conflict. In this case, deactivate all your plugins besides Elementor and Elementor Pro, and check if the emails are sent properly. If this didn’t work, switch to a default theme of WordPress and check if it solves the issue.
- Make sure that the form field’s ID (in the field’s Advanced tab) is populated; without a valid field ID, the form field value will not be seen in the email message sent to the receiver of the submissions if the “[all-fields]” shortcode is used.

- Make sure you use the correct shortcode as shown in the Advanced tab for each field within your email message box.

If the issue persists:
- Please send us your system info. You can find it under Elementor > System Info in your WP Dashboard.
- Send us also the web server and PHP error logs. You can find them in your hosting panel or you ask your hosting company to provide them for you.
Elementor Pro has a Form widget that you can use to create a wide range of form types. However, creating a form with this widget might is not as easy as it looks like especially if your website is hosted to a shared hosting service. When testing your form, you might see a “Server error. Form not sent” message like the following.

You will see the error message above if you set the button action to email (which means your form submissions will be sent to the specified email address). In this post, we will show you how to fix the error.
The Error Cause
There is a function called wp_mail in WordPress. Elementor uses this function to send emails. When you click the submit button on your form, your web hosting service takes the sent email, processes it, and sends it to the specified email address. Unfortunately, some web hosting providers disable the PHP function used to send emails.
The WordPress wp_mail function uses the PHP send_mail function by default. So, when this function is disabled by your hosting provider, WordPress unable to send emails.
How to Fix the Problem
There are two ways you can do to fix this problem. First, you can contact your web hosting provider and request to enable the PHP send_mail function. Alternatively, you can use an SMTP server.
In this post, we will show you how to fix this problem using the second method. No, you don’t need to install an SMTP server. We will use a plugin to add an SMTP feature to your WordPress. The plugin is Post SMTP and it’s completely free. This plugin allows you to use either an SMTP server of your own or SMTP server of services like Gmail, Mandrill, and SendGrid (via an API). We use Gmail in this case. You can use whether the free version of Gmail (gmail.com) or G Suite (Gmail with a custom domain).
- Get the Google app Client ID and Secret Key
Before installing and using the Post SMTP plugin, you need to create a Google app to get its Client ID and Secret Key. To do so, visit Google API Console and login with your Google account. Select a project from the dropdown menu on the top side.

If you have no project yet, create a new one by clicking NEW PROJECT.

Give your project a name and click the CREATE button.

Before getting the client ID and the Secret Key, you need to add your domain first. Make sure that your domain has been verified via Google Search Console (formerly Google Webmasters). Also make sure that you use the same Google account for the verified domain. To add your verified domain, click Domain verification on the left panel and click the Add Domain button.

Type your domain name (without http:// or https://) and click the ADD DOMAIN button. A little note, if you use “www” on your site, make sure to type it on the field.

Once your domain is added, click OAaut consent screen on the left panel, select the External option, and click the CREATE button.

Add Application name, select Support email and add Authorized domain. Then click on the Save button on the bottom.

Click Credentials on the left panel. Click the Create credentials button and select OAuth client ID.

On the Application type section, select Web application. Enter your domain on the Authorized JavaScript origins and the redirect page (https://www.yourdomain.com/wp-admin/options-general.php?page=postman) on the Authorized redirect URls section and click the Create button.

A popup will appear, showing your client ID as well as client secret.

- Install Post SMTP plugin
To install the Post SMTP plugin, login to your WordPress dashboard and go to Plugins -> Add New. Type “POST SMTP” on the search box and click the Install Now button once you found it.

Activate the plugin immediately once installed. You will see a new menu item on your WordPress dashboard called Post SMTP. Click this menu item and select Post SMTP.

Click the Start the Wizard button.

Type the email address you use on your Elementor form and click the Next button.

On the next page, click the Next button.

Select the socket and authentication method. Since we use Gmail, we recommend you to choose the SMTP – gmail.com:587 and the OAuth 2.0 (requires Client ID and Client Secret) options. Click the Next button once you make your choice.

Enther the client ID as well as the client secret you have just created above and click the Next button.

Select a notification service to notify you when an email is failed to deliver and click the Next button.

On the next page, click the Finish button.

You need to grant permission to the Post SMTP plugin to send the email. To do so, click the Grant permission with Google link.

On the next step, you will be asked to select your Google account. After selecting your account, big chances are you will see the following error message. If so, click the Advanced link followed by Go to yourdomain.com (unsafe).

On the appearing popup, click the Allow button.

Perform a test by clicking the Send a Test Email link.

If you see a Success message like the following, then everything has gone well.

Return to the Elementor editor to edit your form. Open the Email option and make sure that you have entered the same email address as the one you used on Google API Console we have covered at length above. Click the UPDATE button.

Alternatives to Post SMTP
In our example, we use Post SMTP to configure the SMTP server in WordPress. If you don’t the find the plugin suit you, there are some alternatives you can use. You can read this article to learn more.
Here are five of the alternatives you can replace Post SMTP.
- WP Mail SMTP
- SMTP Mailer
- Gmail SMTP
- WP Mail Bank
- Easy WP SMTP
The Bottom Line
WordPress comes with a built-in mail delivery function called wp_mail. The function requires the send_mail function belongs to PHP to work. Unfortunately, not all web hosting providers enable the send_mail function. As a result, the wp_mail function of WordPress unable to work. You can configure an SMTP to replace the job of wp_mail function to handle the mail delivery on your WordPress system. In the context of Elementor, you can set the form action to other options like Collect Submissions or Webhook instead of Email.
Are you frequently facing problems with Elementor form? Maybe it’s not correctly sending emails or causing server errors more than usual. We have got you the perfect solution to this problem below.

The most common reason behind not sending emails from your WordPress is that your website’s emails are being marked as spam. While your Elementor form sends an email, it is most likely using the wp mail() function. This function ultimately sends emails without any authentication process through your hosting provider. As a result, when the email is forwarded from one server to another, it is rejected or stored in the junk mail or spam folder.
Almost all WordPress websites and web servers have this issue. No matter which contact form plugin you might be using in your WordPress, this problem can appear at any time. However, there’s a simple fix that usually simply necessitates setting up SMTP (Simple Mail Transfer Protocol) on your website.
Another reason can be the hosting server that you are using disables the PHP function which is being used to send emails. In other words, your hosting server is blocking your emails. To prevent you from sending spam emails by using your hosting. As mentioned above, the mail solution can set up an SMTP to solve this problem immediately.
SMTP Server: How It Can Help To Solve Elementor Form Issues?
Simple Mail Transfer Protocol (SMTP) is an acronym for Simple Mail Transfer Protocol, which is a protocol used by email servers to send emails and transmit, collect, and/or redirect outgoing mail between the sender and the recipient. The address (or addresses) of an SMTP email system can be set by the mail client or application you’re using and is usually structured as smtp.serveraddress.com. Your SMTP email server address is generally found in your mail client’s account or settings area.
If you are wondering if the SMTP server is just like any other server or not, the answer is yes. Just like any different server, SMTP analyzes data, but its sole purpose is to handle data relating to email transmitting, collecting, and redirecting. SMTP is an application continually operating in the background, waiting to transmit new mail.
How To Solve Elementor Form Email & Server Errors
First, you must check if your Elementor contact form is installed correctly. After that, you will go step by step to see if everything is alright with your server or not. Let’s dive in and see which things you need to check to fix this problem.
1. Troubleshooting Elementor Contact Form
The first thing to check if your Elementor contact form isn’t delivering email is that it’s actually operating on your site. New plugins or themes can occasionally break your forms. New cache plugins, in particular, might cause issues with form submissions. The submit button may not work at all at times. Since the warning messages you get will vary depending on the form builder you’re using, we’ll go over the most typical ones.
2. Troubleshooting Form Builder
If you have Elementor PRO installed in your WordPress, you will see Server_error or Error occurred. These two errors indicate that the Elementor form builder you are using has the ‘Field ID’ missing in it. To solve this issue, navigate to your WordPress dashboard and open the form in Elementor Page builder. Next, go to the advanced tab section and check each field. Every other form must have a unique ID.

Another issue that might happen to this point is that the form plugin you’re using might be clashing with the page builder. In that case, you need to opt for other form plugins that do not have any issue with the page builder.
3. Check Form Notifications For Elementor
If you used the Elementor form builder to construct your form, go to your page in Elementor and click on the form you just built. Click on the form’s notification options in the left-hand sidebar. To see the email notification delivered with each form submission, go to Actions After Submit → Email.

Your notification should be switched on in this section. Your Send To Email Address is also crucial. If an admin email is selected, your form will send email alerts to the WordPress administrator’s default email address. If the administrator email is incorrect, you may either edit it in WordPress or manually write in an email address by deleting the admin email tag.
4. Install WP Mail SMTP Plugin
WP Mail SMTP is a WordPress plugin that alters how your WordPress site sends emails. WP Mail SMTP re-routes all of your emails through an independent email service instead of relying on your website to send emails. This will verify your emails, preventing them from being lost or classified as spam.

The provider you choose will be determined by a number of criteria, including free email providers are ideal for tiny websites, whereas paid email providers provide higher capacity. If you have an online store, you should look for a service specializing in transactional emails.
Once you finish the Settings Menu, you’ll get an automatic test email to ensure everything is working properly. Finally, WP Mail SMTP adds an email error log to your WordPress site by default. When using WP Mail SMTP with your mailer service, you may utilize this log to diagnose any potential email difficulties. That’s all there is to it! You’ve now resolved the issue with your Elementor form not sending emails.
Bonus: Best Resources To Get Elementor Support
When we think about the best website builders, Elementor is the finest one so far. It offers outstanding support to its users. However, you may also wish to seek assistance from the Elementor community. If you are interested you can explore different ways to get Elementor support from this detailed blog.

If you find this blog informative enough to solve your Elementor email sending or server errors, subscribe to our blog to read more blogs like this. Join our community to share your thoughts as well.
Post Views: 886

Most of the elementor users, searching a solution to fix the issues for “server error. form not send”. The main concept of these issues is the WordPress website doesn’t send the form data to mentioned mail and it results to lose your website online inquires, subscribers data, etc. This article helping to fix that elementor form issue quickly.
Reason for getting an error
Users are saying elementor form is not sending form data to my email. But the reality is elementor form will collect the entered data and send to WordPress dashboard. But your WordPress website won’t send the data to emails. Because the most popular reason is your WordPress hosting server is not configured to use PHP mail() function.
Solution for an error:
- Install WP Mail SMTP Plugin on WordPress Website.
- Enter the email address and click the tick box of the force from email option.
- Scroll down & a default mailer is PHP. Select the other SMTP mailer option.
- Then go to other SMTP section and fill the required information from CPanel data.
Follow Below Steps To Get Data From Cpanel
- Sign in to your Cpanel account.
- Go to the Email section and select the Email accounts option.
- Click the connect device for the email address, which mail id you are going to use to get the form data.
- Once you click the button you will get the mail client manual setting details.
- See the mail server name and fill in SMTP Host details (WP Mail SMTP Plugin | WordPress). It will look like mail.yourdomain.com.
- Choose the encryption details. For most servers, TLS is the recommended option. If your SMTP provider offers both SSL and TLS options. Plugin recommends TLS.
- Then enter the numeric value of SMTP outgoing server port.
- Turn on Auto TLS & authentication.
- Finally, enter the username & password, which mail id you are going to use to get the form data.
Once you finish the above steps. Click the save setting option and go to the Email test section on the same plugin. You can find it on top of the plugin interface. Enter any email id and check the mail is working or not?
Additional Solution
Install Elementor Contact Form Plugin on WordPress Website. you can able to see the entered form data on the WordPress dashboard with the help of this plugin. But your visitors will get the same message “Server Error. Form Not Send”.
Read More Articles on http://www.tuitewrits.com
Elementor is one of the most popular page builder plugins for WordPress. Elementor Pro offers a form widget that helps create a diverse range of forms to collect email subscribers. It usually triggers an email to both the WordPress admin and the user when a form submission happens.
Although Elementor Form is very reliable, sometimes users can face problems when using this feature. One common issue is Elementor forms not sending emails or email notifications.
If you’ve run into the same problem, you’re in the right place. In this article, we’ll tell you why Elementor form is not sending emails and how to fix this issue.
Let’s get started!
Why is Elementor form not sending emails?
Elementor Form is designed to send email notifications to both the WordPress admin and the user when a form is submitted. If your Elementor contact form is not sending emails, there can be two reasons:
- The form isn’t configured properly
- Form submission emails are going to spam
Reason 1: The form isn’t configured properly
Elementor form automatically adapts to the default configuration set by WordPress itself. This is why it is important to recheck the form configuration if the Elementor form is not sending emails. The possible misconfigurations are mentioned below:
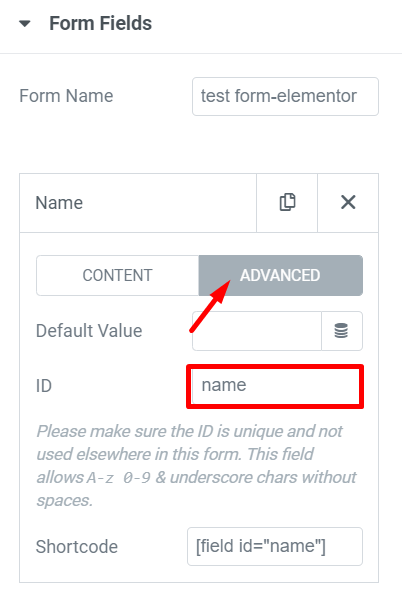
- Missing Field Id: If you notice a server_error or an error occurred message, it indicates that a field ID is missing in your Elementor form builder. In this case, you need to troubleshoot Elementor Form errors.
- Incorrect form notification setup: Another reason is incorrect email notification settings in your Elementor Form. This usually happens when the wrong From Email is set. So you need to check Elementor Form notification to solve the issue.
- Plugin conflict: Sometimes new themes or plugins can also break your forms. Notably, new caching plugins can cause issues with form submissions. In that case, you can troubleshoot Elementor Forms by removing plugins and themes you’ve installed recently.
Also, consider switching to a different form plugin. We recommend Fluent Forms, it’s a free yet extraordinary drag-n-drop form plugin with incredible features such as pre-built forms, conversational forms, visual reporting, conditional logic, spam protection, and many more!
The best part?
It works with Elementor!

Reason 2: Form submission emails are going to spam
While server errors and error messages indicate that form submissions aren’t going through, it’s also possible that your Elementor form submission emails are going to spam because of how WordPress handles email.
Maybe you know, or you don’t, WordPress doesn’t send emails to users. WordPress is a content management system, not an email server.
- WordPress emails are managed by the wp_mail() function, which is part of the core program of WordPress files. Plugins uses the wp_mail() function to send emails to WordPress.
- WordPress sends your hosting provider’s server this email request and processes the request using PHP email.
- Finally, PHP instructs the mail server at the hosting provider. Then your hosts’ email router pushes the emails to their correct recipients.
While many hosting providers do not have an email sending service, many block PHP emails by default. That’s why it’s ideal to install an SMTP plugin.
Elementor Form not sending email is a common yet frustrating issue for elementor users—but also one that you can also fix in three simple steps. Let’s get to it!
Step 1: Troubleshoot Elementor form errors
If you’re facing a Server_error or An error occurred issue, it’s probably because your form has a missing field ID. To troubleshoot if that’s causing the issue:
- Go to your WordPress dashboard and open the page containing your Elementor form.
- Then, click each form field and check the Advanced tab one by one. There must be an ID assigned to every form field.
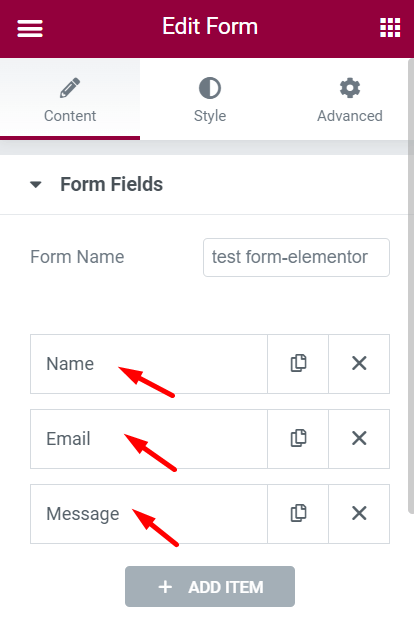
Check all the form fields and fix the ID issue if there are any.
Step 2: Check Elementor form notifications
The second step is to check that your contact form is set up correctly for email notifications. These steps vary based on how you’ve created your form.
- Open up your page with elementor page builder.
- Click Actions After Submit from the left-hand bar and check the action tags. Make sure that there is an email tag assigned.
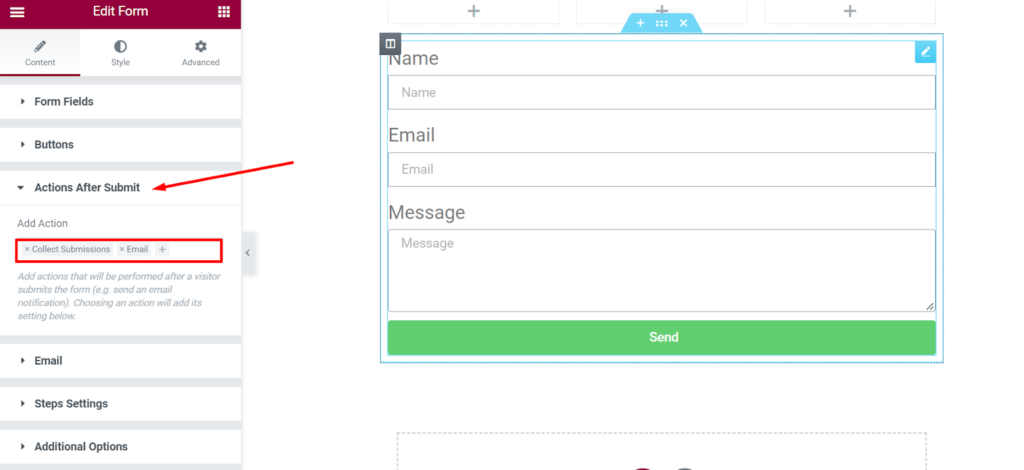
- Now scroll down once again to the Email tab to see the notification sent with each form submission.
Here, check all the information and check that your form notification is set up correctly. Setting the From email to an email address that matches your domain may help to avoid email delivery problems.
If you haven’t created an email that matches your domain, you can always create a custom domain email.
Step 3: Install an SMTP plugin
One of the easiest ways to define the solution and fix the email deliverability issue is by replacing the PHP mailing system with an SMTP plugin.
Simple Mail Transfer Protocol(SMTP) is the international standard communication protocol used for sending and receiving emails over the internet.
If your hosting provider doesn’t provide a hosting email facility on the server, you can use an SMTP plugin for sending WordPress emails reliably. SMTP plugins are relatively easy to install and use.
We recommend FluentSMTP, a free and open-source SMTP plugin for your WordPress. It can be paired with more than ten email sending services, including Sendgrid, AmazonSES, Google Workspace, Microsoft 365, etc.
Download the Most Powerful SMTP Plugin(100% Free)
Get the most powerful SMTP plugin for free and hit the recipient’s inbox with your WordPress emails

Setting up FluentSMTP in WordPress
Setting up FluentSMTP is a relatively easy task, even if you are a complete non-techy. You can easily set up FluentSMTP with these below steps.
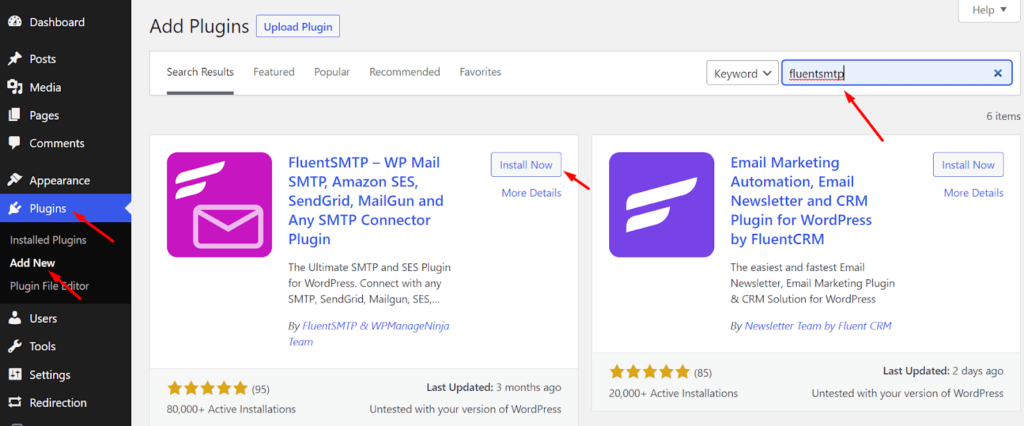
Go to your WordPress dashboard, roll down to the plugin section and click Add New button. Now search for the FluentSMTP plugin in the search box. Install and activate the plugin like the picture below.
Configuring FluentSMTP
To start configuring FluentSMTP, Follow the steps below,
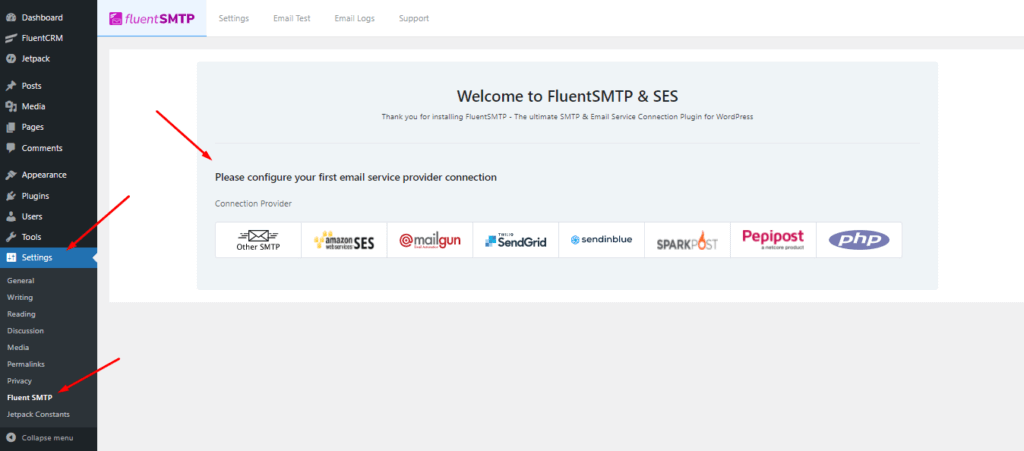
- Go to your WordPress dashboard. Click on Settings. Scroll down to FluentSMTP and click on it. Here you will be prompted to configure your email sending service.
If you haven’t signed up for an email sending service, you can check out some of the best transactional email sending services we recommend and sign up for one!
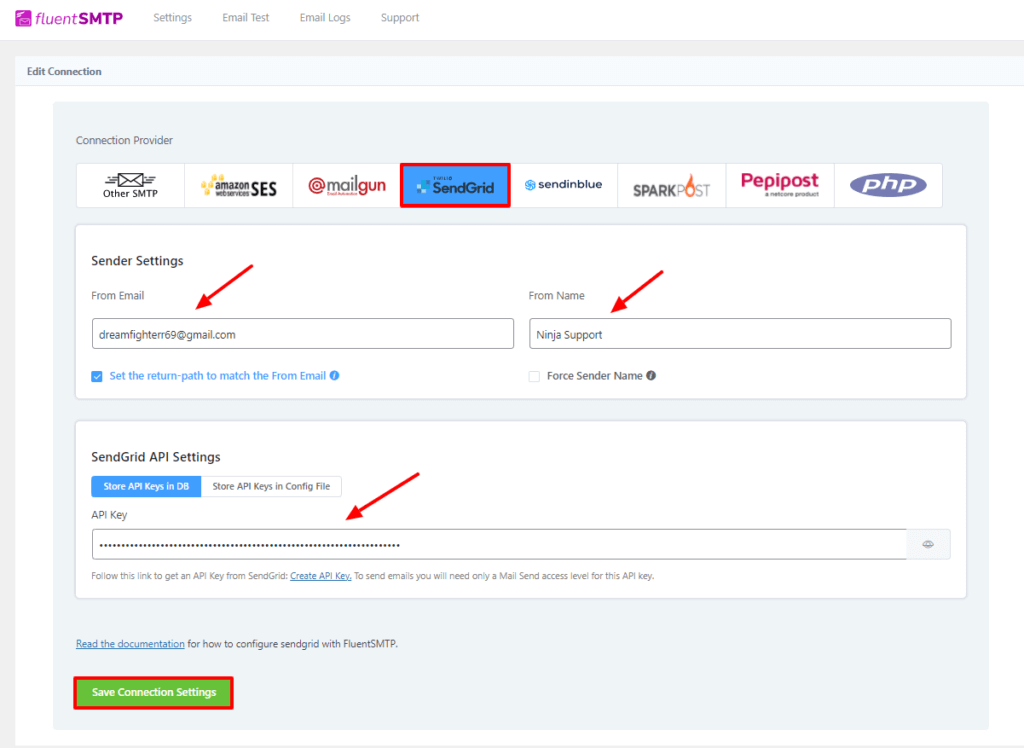
- Select your desired email service provider to configure it with FluentSMTP. Here, you’ll have to configure the sender details such as From Email and From Name.
The from name and from email have to be your verified email with your SMTP provider.
Also, don’t forget to check the box to set the return path to match the From email. The return path indicates where non-delivery receipts or bounce messages are sent. If unchecked, bounced emails will be lost.
After you’ve provided the credentials, click on Save Connection Settings!
Check email deliverability
The second step is to confirm that your emails get delivered. The log feature of the FluentSMTP plugin is the simplest approach to ensure the Elementor form’s email deliverability. This tool allows you to instantly log and view all of the emails that WordPress has sent.
To test whether your Elementor form’s emails are working or not:
- Go to the Settings of your WordPress dashboard and scroll down to FluentSMTP.
- Click on Setting from the bar in the FluentSMTP dashboard.
- Check Log all Emails for Reporting.
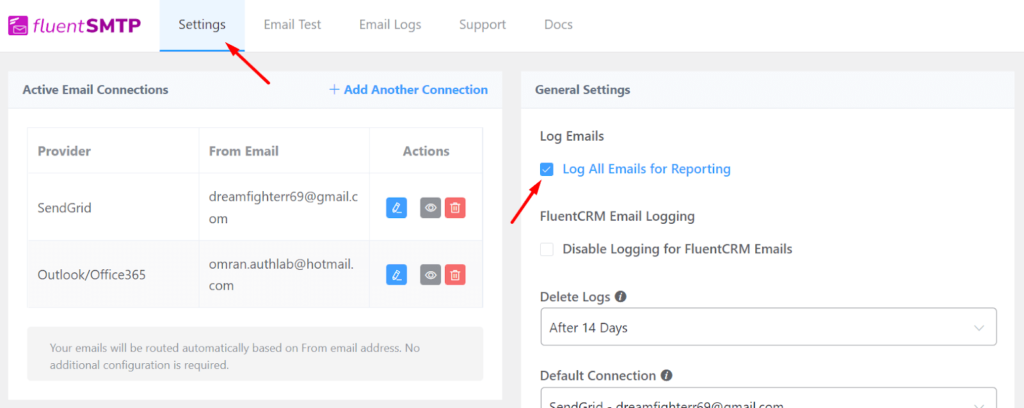
- Now click on the Email Test button on the upper bar. Select a From email, a To email, and send a test email to check email deliverability.
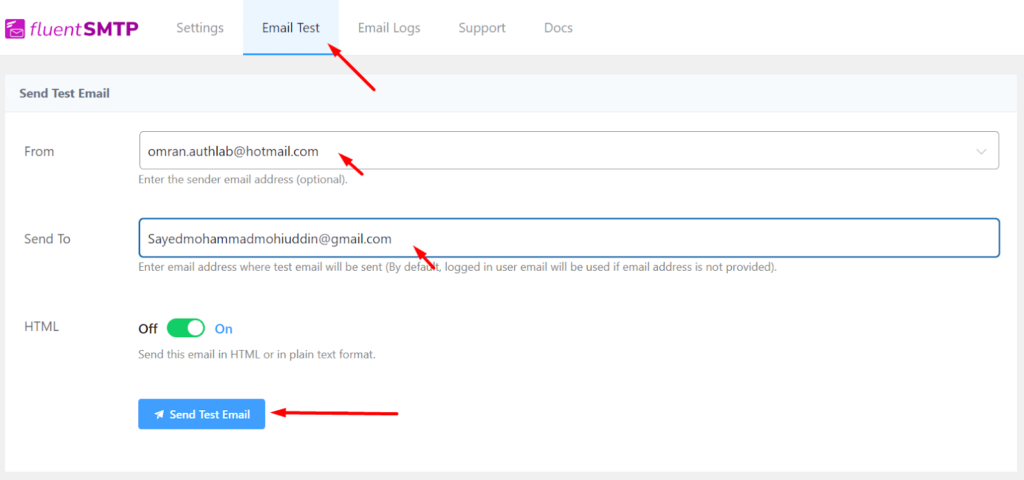
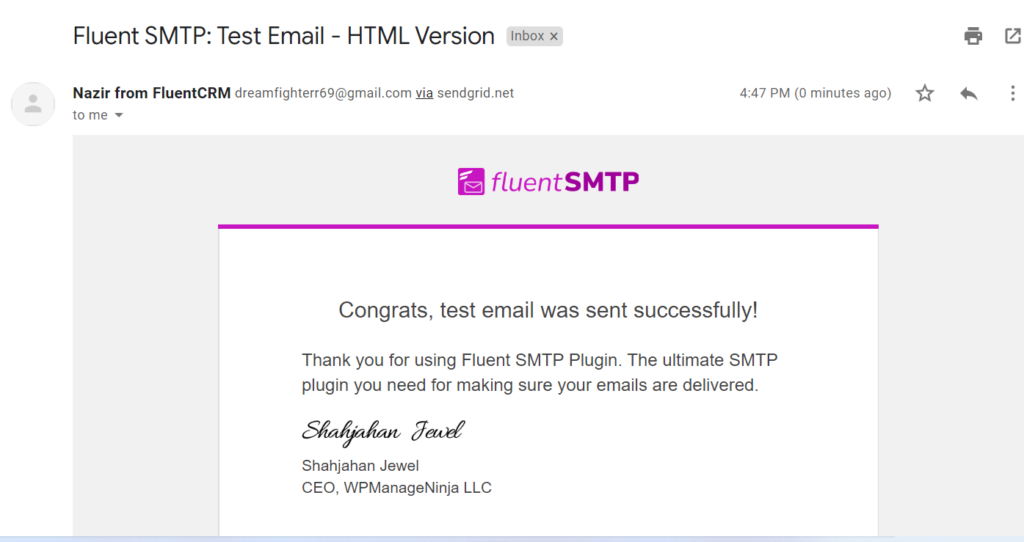
You can also check if the test email landed in your inbox successfully.
- Finally, click on Email Logs from the bar. Here you can see you sent emails with the email addresses. There are also resend, view, and delete buttons if needed.
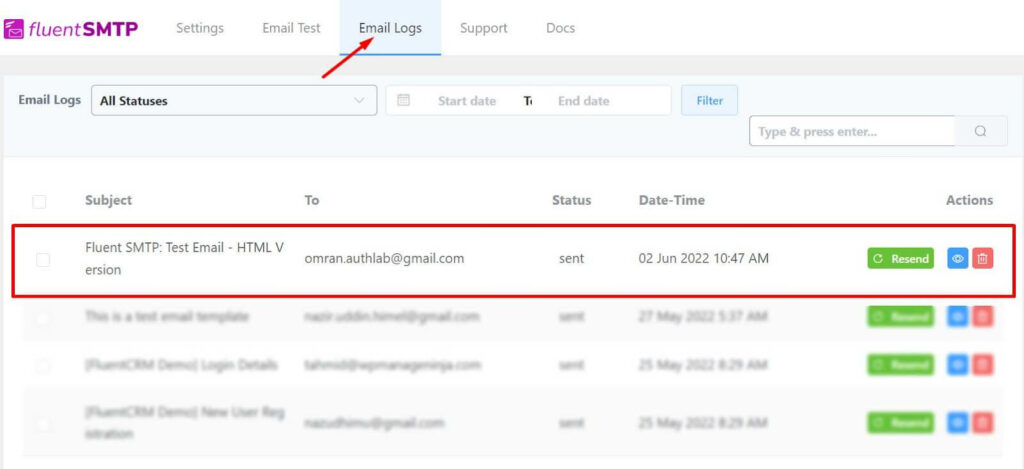
That’s how you can check your email deliverability from the FluentSMTP email log feature.
Wrapping up
Just in case you ever have any other issues with the Elementor Form submissions not arriving in your inbox, you should have a backup. The last thing you want to do is miss out on business because you didn’t get the form submission.
Elementor does not come with database integration for its contact form submissions. WP Fluent Forms can be a good course of action here for storage, all kinds of form building, and plenty of integration.
Subscribe to Our Newsletter
Get our blog articles, tutorials, and informations delivered to your inbox!

Hopefully, this article helped you understand why you’re having problems with Elementor Form not sending emails and how you can fix things easily. If you have any queries about t, feel free to comment!
Sound like a familiar trauma? Well, you’re in good company, this issue is commonly raised by our users. This article will explain how to solve WordPress not sending emails through your form and “server error” issues.
Well, there is a short answer and a long answer.
First, run a test on your WordPress site and see if it can even send emails.
To confirm email deliverability, you can use any SMTP plugin and select different SMTP server like SendGrid to check if it delivers correctly. If it works correctly with other and shows error with default SMTP then this needs to be reported to hosting.
Why does this Server Error occur?
Elementor uses WordPress’ wp_mail function to send emails. Your web host takes the sent email, processes it, and sends it. This is where 90% of the issues happen.
Sometimes, hosting servers disable the PHP function used for sending emails. They basically block your emails.
This is done usually to make sure you don’t send spam through your site (your host doesn’t want you to use its server as a spam server).
Technically speaking – the wp_mail function uses the PHP send_mail function by default. But if it is disabled on that server, then email sending fails. To get around this, either contact your hosting service and request them to enable it, or use an SMTP server instead.
What the heck is SMTP anyhow?
SMTP stands for “Simple Mail Transfer Protocol”. SMTP is an email server that routes your email in forms into the inbox of your listed customers. It is an external email server (e.g. Gmail can be used as an SMTP server) that helps ensure your emails get delivered faster and helps prevent your email from ending up in users’ spam folders.
Try using any popular SMTP plugin ( https://wordpress.org/plugins/search/SMTP/).
If that doesn’t work…
More Troubleshooting Tips for Server Errors
Besides contacting your host provider, here are several steps you can try to solve this issue:
- The form’s From Email address usually needs to be from the same domain as your website. So if your site is example.com, then you would need to use a From Email address of [email protected] or [email protected], etc. You can use the Reply-To field to select the visitor’s email address for replying to the user’s request.
- You may use the Elementor Form Submissions feature to check that the form is functioning properly. To learn more about Form Submissions click here.
- Use another email address (it’s possible that your email is being registered as spam). To avoid being marked as spam try changing the length (shorter or longer) of your email subject line.
- If you are using any third-party integrations, try disabling them. For example, MailChimp or ActiveCampaign. If that did the trick, then read more in our integrations guide. Basically, you have to check the field mapping within your autoresponder account and within the Form widget. Make sure that you do not have the required fields set to “none” within the Form Widget. Also make sure also that you did not add an “address” field or a “birthday” field within your field mapping settings in your MailChimp account
- If the page refreshes after submitting a form, generally this is due to a plugin or a theme code conflict. In this case, deactivate all your plugins besides Elementor and Elementor Pro, and check if the emails are sent properly. If this didn’t work, switch to a default theme of WordPress and check if it solves the issue.
- Make sure that the form field’s ID (in the field’s Advanced tab) is populated; without a valid field ID, the form field value will not be seen in the email message sent to the receiver of the submissions if the “[all-fields]” shortcode is used.
- Make sure you use the correct shortcode as shown in the Advanced tab for each field within your email message box.
If the issue persists:
- Please send us your system info. You can find it under Elementor > System Info in your WP Dashboard.
- Send us also the web server and PHP error logs. You can find them in your hosting panel or you ask your hosting company to provide them for you.
Elementor Pro has a Form widget that you can use to create a wide range of form types. However, creating a form with this widget might is not as easy as it looks like especially if your website is hosted to a shared hosting service. When testing your form, you might see a “Server error. Form not sent” message like the following.
You will see the error message above if you set the button action to email (which means your form submissions will be sent to the specified email address). In this post, we will show you how to fix the error.
The Error Cause
There is a function called wp_mail in WordPress. Elementor uses this function to send emails. When you click the submit button on your form, your web hosting service takes the sent email, processes it, and sends it to the specified email address. Unfortunately, some web hosting providers disable the PHP function used to send emails.
The WordPress wp_mail function uses the PHP send_mail function by default. So, when this function is disabled by your hosting provider, WordPress unable to send emails.
How to Fix the Problem
There are two ways you can do to fix this problem. First, you can contact your web hosting provider and request to enable the PHP send_mail function. Alternatively, you can use an SMTP server.
In this post, we will show you how to fix this problem using the second method. No, you don’t need to install an SMTP server. We will use a plugin to add an SMTP feature to your WordPress. The plugin is Post SMTP and it’s completely free. This plugin allows you to use either an SMTP server of your own or SMTP server of services like Gmail, Mandrill, and SendGrid (via an API). We use Gmail in this case. You can use whether the free version of Gmail (gmail.com) or G Suite (Gmail with a custom domain).
- Get the Google app Client ID and Secret Key
Before installing and using the Post SMTP plugin, you need to create a Google app to get its Client ID and Secret Key. To do so, visit Google API Console and login with your Google account. Select a project from the dropdown menu on the top side.
If you have no project yet, create a new one by clicking NEW PROJECT.
Give your project a name and click the CREATE button.
Before getting the client ID and the Secret Key, you need to add your domain first. Make sure that your domain has been verified via Google Search Console (formerly Google Webmasters). Also make sure that you use the same Google account for the verified domain. To add your verified domain, click Domain verification on the left panel and click the Add Domain button.
Type your domain name (without http:// or https://) and click the ADD DOMAIN button. A little note, if you use “www” on your site, make sure to type it on the field.
Once your domain is added, click OAaut consent screen on the left panel, select the External option, and click the CREATE button.
Add Application name, select Support email and add Authorized domain. Then click on the Save button on the bottom.
Click Credentials on the left panel. Click the Create credentials button and select OAuth client ID.
On the Application type section, select Web application. Enter your domain on the Authorized JavaScript origins and the redirect page (https://www.yourdomain.com/wp-admin/options-general.php?page=postman) on the Authorized redirect URls section and click the Create button.
A popup will appear, showing your client ID as well as client secret.
- Install Post SMTP plugin
To install the Post SMTP plugin, login to your WordPress dashboard and go to Plugins -> Add New. Type “POST SMTP” on the search box and click the Install Now button once you found it.
Activate the plugin immediately once installed. You will see a new menu item on your WordPress dashboard called Post SMTP. Click this menu item and select Post SMTP.
Click the Start the Wizard button.
Type the email address you use on your Elementor form and click the Next button.
On the next page, click the Next button.
Select the socket and authentication method. Since we use Gmail, we recommend you to choose the SMTP – gmail.com:587 and the OAuth 2.0 (requires Client ID and Client Secret) options. Click the Next button once you make your choice.
Enther the client ID as well as the client secret you have just created above and click the Next button.
Select a notification service to notify you when an email is failed to deliver and click the Next button.
On the next page, click the Finish button.
You need to grant permission to the Post SMTP plugin to send the email. To do so, click the Grant permission with Google link.
On the next step, you will be asked to select your Google account. After selecting your account, big chances are you will see the following error message. If so, click the Advanced link followed by Go to yourdomain.com (unsafe).
On the appearing popup, click the Allow button.
Perform a test by clicking the Send a Test Email link.
If you see a Success message like the following, then everything has gone well.
Return to the Elementor editor to edit your form. Open the Email option and make sure that you have entered the same email address as the one you used on Google API Console we have covered at length above. Click the UPDATE button.
Alternatives to Post SMTP
In our example, we use Post SMTP to configure the SMTP server in WordPress. If you don’t the find the plugin suit you, there are some alternatives you can use. You can read this article to learn more.
Here are five of the alternatives you can replace Post SMTP.
- WP Mail SMTP
- SMTP Mailer
- Gmail SMTP
- WP Mail Bank
- Easy WP SMTP
The Bottom Line
WordPress comes with a built-in mail delivery function called wp_mail. The function requires the send_mail function belongs to PHP to work. Unfortunately, not all web hosting providers enable the send_mail function. As a result, the wp_mail function of WordPress unable to work. You can configure an SMTP to replace the job of wp_mail function to handle the mail delivery on your WordPress system. In the context of Elementor, you can set the form action to other options like Collect Submissions or Webhook instead of Email.
При использовании сайта на cms WordPress совместно с плагином Contact Form 7, случается так, что у некоторых посетителей не отправляются веб-формы, созданные плагином. Текст ошибки выглядит так: «При отправке сообщения произошла ошибка. Пожалуйста, попробуйте ещё раз позже.»

Обычно такая ошибка возникает когда указан неверный исходящий адрес, либо плагин или скрипт вмешивается в работу плагина веб-форм. Первое, что необходимо проверить для решения проблемы, это адрес исходящий почты в настройках проблемной формы:
Адрес должен соответствовать домену сайта. Например, если у вас домен website.ru, то в поле «От кого» должен стоять ящик этого домена, например mail@website.ru. При этом исходящий адрес может даже не существовать, поэтому можете указать абсолютно любую почту, главное — чтобы она соответствовала домену сайта.
Если способ не помог, то проверьте настроен ли сервис Recaptcha. Для этого зайдите в админке по пути: Contact Form 7> Интеграция.

Если в блоке «ReCaptcha» написано «reCAPTCHA активна на этом сайте.», то нужно отключить привязку ключей. Для этого нажмите на кнопку «Настройка интеграции», а затем «Удаление ключей».
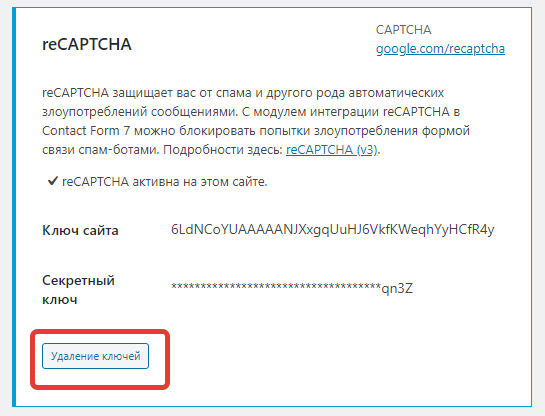
ReCaptcha — это сервис Google, который на основе своих алгоритмов определяет человек вы или бот. Иногда сервис ошибается и не дает отправлять формы на сайте. После удаления ключей ваш сайт не буден защищен от спама, но вы можете установить плагин «ReCaptcha v2 for Contact Form 7», где не будет проблемы с определением пользователей.
Что делать если способы не помогли?
В таком случае последовательность действий такая:
- Нужно отключить все плагины, кроме Contact Form 7, затем проверить работу форм. Если проблема решилась, то методом исключения включаете каждый плагин по отдельности и находите конфликтный.
- Если не помогло, то открываем файлы шаблона header.php и footer.php и удаляем подключение сторонних скриптов. Проверяем работу форм. Также, если формы заработали, применяете метод исключения.
Вышеописанные способы в 99% случаев должны помочь решить проблему. Если у вас осталась ошибка, то прошу связаться с нами любым доступным способом, указанным ниже, либо на странице контакты
Содержание
- — Как мне исправить отклоненные сервером формы Google?
- — Что значит сервер отклонен?
- — Почему сервер отклоняет мое вложение?
- — Как исправить ошибку сервера?
- — Почему я не могу использовать загрузку файлов в форме Google?
- — Почему мое электронное письмо отклоняется?
- — Можно получать, но не отправлять электронные письма?
- — Как мне исправить электронную почту, отклоненную сервером?
- — Как отправить файл больше, чем позволяет сервер?
- — Как отправить по электронной почте слишком большой файл?
- — Что вызывает ошибку сервера?
- — Что означает ошибка сервера?
Причина, по которой вы получаете эту ошибку, заключается в том, что ваша электронная почта сохраняет все эти элементы на вашем диске Google. Ваш диск Google — это пространство для хранения, которое ограничено максимум 15 ГБ, если вы не решите заплатить больше или не очистите 15 ГБ пространства, чтобы освободить место для того, что вы пытаетесь отправить дальше.
если он заполнен, вы не сможете загрузить ни один файл. Освободите место и попробуйте. Была аналогичная проблема — как только он отклонен, попробуйте вставить файл с помощью Google Диска — документ был загружен туда, несмотря на отклонение. Если вы перейдете к «недавнему», оно должно быть там.
Что значит сервер отклонен?
Когда вы отправляете электронное письмо и получаете сообщение об ошибке «адрес отклонен», это означает почтовый сервер не может проверить ваш адрес электронной почты, потому что в вашем почтовом клиенте отключена функция аутентификации SMTP-сервера.
Почему сервер отклоняет мое вложение?
Почтовые серверы может отклонять электронные письма, превышающие определенный порог размера из-за почтовых вложений которые включены в электронное письмо. … Проблема здесь в том, что это настраиваемая переменная, а это означает, что вы можете столкнуться с проблемами возвращенного электронного письма, потому что получающий провайдер электронной почты имеет более низкий порог размера, чем ваш.
Как исправить ошибку сервера?
Как исправить внутреннюю ошибку сервера 500
- Перезагрузите веб-страницу. …
- Очистите кеш вашего браузера. …
- Удалите файлы cookie вашего браузера. …
- Вместо этого устраните неисправность как ошибку 504 Gateway Timeout. …
- Другой вариант — связаться с веб-сайтом напрямую. …
- Вернуться позже.
Почему я не могу использовать загрузку файлов в форме Google?
Google пользователи не смогут отвечать или отправлять свои файлы на ваш форма. Файл Request Pro не накладывает таких ограничений. … Даже если у них нет Google аккаунт, они по-прежнему смогут использовать ваш загрузчик на Диске форма.
Почему мое электронное письмо отклоняется?
Это отклонение происходит когда провайдер электронной почты получателя думает, что ваша электронная почта является спамом (либо потому, что ваш адрес электронной почты / IP попал в список спама, содержание письма было сочтено спамом).
Можно получать, но не отправлять электронные письма?
Если вы можете получать электронные письма, но не можете отправлять электронные письма, это обычно означает аутентификация, требуемая исходящим (SMTP) сервером, не настроена. Если вы не можете отправлять или получать электронные письма, скорее всего, ваш IP-адрес был автоматически заблокирован, перейдите к этой статье.
Как мне исправить электронную почту, отклоненную сервером?
Шаг 1. Вы можете решить эту проблему, введя правильное имя пользователя и пароль учетной записи и указав правильную информацию о сервере входящей и исходящей почты при настройке. Шаг 2: Проверьте, выбран ли параметр SMTP в разделе Сервер исходящей почты при настройке.
Как отправить файл больше, чем позволяет сервер?
Как отправлять файлы размером более 20 МБ с помощью Outlook
- настройте реестр Windows, чтобы увеличить максимально допустимый размер файла Outlook (см. эту статью Microsoft);
- загрузить файл (ы) в общий доступ к файлам или облачную службу (например, DropBox, iCloud или SkyDrive) и отправить ссылку для загрузки по электронной почте вместо фактических файлов;
Как отправить по электронной почте слишком большой файл?
Сжать файл. Вы можете уменьшить размер большого файла, сжав его в заархивированная папка. В Windows щелкните правой кнопкой мыши файл или папку, перейдите к пункту «Отправить» и выберите «Сжатая (заархивированная) папка». Это создаст новую папку меньшего размера, чем исходная.
Что вызывает ошибку сервера?
Ошибка сервера может быть вызвана любое количество вещей от загрузки неправильного файла до ошибки в фрагменте кода. Этот ответ об ошибке является универсальным ответом на все запросы. Веб-сервер сообщает вам, что что-то пошло не так, но не совсем понимает, что именно.
Что означает ошибка сервера?
Ошибка сервера означает есть проблема с операционной системой, веб-сайтом или подключением к Интернету. Существует много различных типов ошибок сервера, но наиболее распространенной является «ошибка 500». … Если с сайтом нет известных проблем, очистите кеш браузера.
Интересные материалы:
Как использовать USB-накопитель на моем iPad?
Как использовать USB-ридер?
Как использовать усечение в предложении?
Как использовать в предложении?
Как использовать веб-интерфейс потопа?
Как использовать веб-камеру на MacBook Pro?
Как использовать веб-просмотрщик в PowerPoint?
Как использовать весеннюю реверберацию?
Как использовать видеорегистратор?
Как использовать виджет Discord?
На сайте сделал форму, к ней обработчик на php прикрутил, но письма не отправляются, на почту. В чем причина?
index.html
<div class="form-5 widget-3 vertical_mode widget-type-form_adaptive editorElement layer-type-widget s3-animator-fadeInLeft s3-animator" data-s3-animator="fadeInLeft">
<div class="form__header">Оставить заявку</div>
<div class="form__body">
<form class="contact_form" action="contact-form.php" method="post">
<input type="hidden" name="_form_item" value="5">
<div class="form-table">
<div class="form-tbody">
<div class="form-item-group group-text">
<div class="form-item form-text name"><div class="form-item__header"><span class="form-item__title">Ваше имя:</span> <span class="form-item__required">*</span></div><div class="form-item__body">
<input class="wm-input-default" type="text" size="1" maxlength="Array" value="" name="name" id="name">
</div></div><div class="form-item form-text phone"><div class="form-item__header"><span class="form-item__title">Телефон:</span> <span class="form-item__required">*</span></div><div class="form-item__body">
<input class="wm-input-default" type="text" size="1" maxlength="Array" value="" name="phone" id="phone"></div></div>
</div>
<div class="form-item-group group-textarea">
<div class="form-item form-textarea comments"><div class="form-item__header"><span class="form-item__title">Комментарии:</span></div><label class="form-item__body">
<textarea class="wm-input-default" cols="1" rows="1" name="message" id="message"></textarea></label>
</div>
</div>
</div>
<div class="form-tfoot">
<div class="form-item-group group-button">
<div class="form-item form-submit"><div class="form-item__header"><span class="form-item__title"> </span></div><div class="form-item__body"><button class="wm-input-default" type="submit"><span>Отправить</span></button></div></div>
</div>
</div>
</div>
</form>
</div>
</div>contact-form.php
<?php
$name = $_POST['name'];
$phone = $_POST['phone'];

$to = 'hel@mail.ru';// тут твой емайл
$message = 'Имя: '.$name.' Телефон: '.$phone;
$headers = 'Заказ' . "rn";

mail($to, $message, $headers); //Не трогаем.

if(@mail) {
echo "<center><img src='img/1.png'></center>";// тут ссылка на картинку или страницу, которая появиться после заполнения формы
} else {
echo "<center><img src='img/2.png'></center>";// тут ссылка на картинку или страницу, если будет ошибка отправки
}


?>Are you frequently facing problems with Elementor form? Maybe it’s not correctly sending emails or causing server errors more than usual. We have got you the perfect solution to this problem below.
The most common reason behind not sending emails from your WordPress is that your website’s emails are being marked as spam. While your Elementor form sends an email, it is most likely using the wp mail() function. This function ultimately sends emails without any authentication process through your hosting provider. As a result, when the email is forwarded from one server to another, it is rejected or stored in the junk mail or spam folder.
Almost all WordPress websites and web servers have this issue. No matter which contact form plugin you might be using in your WordPress, this problem can appear at any time. However, there’s a simple fix that usually simply necessitates setting up SMTP (Simple Mail Transfer Protocol) on your website.
Another reason can be the hosting server that you are using disables the PHP function which is being used to send emails. In other words, your hosting server is blocking your emails. To prevent you from sending spam emails by using your hosting. As mentioned above, the mail solution can set up an SMTP to solve this problem immediately.
SMTP Server: How It Can Help To Solve Elementor Form Issues?
Simple Mail Transfer Protocol (SMTP) is an acronym for Simple Mail Transfer Protocol, which is a protocol used by email servers to send emails and transmit, collect, and/or redirect outgoing mail between the sender and the recipient. The address (or addresses) of an SMTP email system can be set by the mail client or application you’re using and is usually structured as smtp.serveraddress.com. Your SMTP email server address is generally found in your mail client’s account or settings area.
If you are wondering if the SMTP server is just like any other server or not, the answer is yes. Just like any different server, SMTP analyzes data, but its sole purpose is to handle data relating to email transmitting, collecting, and redirecting. SMTP is an application continually operating in the background, waiting to transmit new mail.
How To Solve Elementor Form Email & Server Errors
First, you must check if your Elementor contact form is installed correctly. After that, you will go step by step to see if everything is alright with your server or not. Let’s dive in and see which things you need to check to fix this problem.
1. Troubleshooting Elementor Contact Form
The first thing to check if your Elementor contact form isn’t delivering email is that it’s actually operating on your site. New plugins or themes can occasionally break your forms. New cache plugins, in particular, might cause issues with form submissions. The submit button may not work at all at times. Since the warning messages you get will vary depending on the form builder you’re using, we’ll go over the most typical ones.
2. Troubleshooting Form Builder
If you have Elementor PRO installed in your WordPress, you will see Server_error or Error occurred. These two errors indicate that the Elementor form builder you are using has the ‘Field ID’ missing in it. To solve this issue, navigate to your WordPress dashboard and open the form in Elementor Page builder. Next, go to the advanced tab section and check each field. Every other form must have a unique ID.
Another issue that might happen to this point is that the form plugin you’re using might be clashing with the page builder. In that case, you need to opt for other form plugins that do not have any issue with the page builder.
3. Check Form Notifications For Elementor
If you used the Elementor form builder to construct your form, go to your page in Elementor and click on the form you just built. Click on the form’s notification options in the left-hand sidebar. To see the email notification delivered with each form submission, go to Actions After Submit → Email.
Your notification should be switched on in this section. Your Send To Email Address is also crucial. If an admin email is selected, your form will send email alerts to the WordPress administrator’s default email address. If the administrator email is incorrect, you may either edit it in WordPress or manually write in an email address by deleting the admin email tag.
4. Install WP Mail SMTP Plugin
WP Mail SMTP is a WordPress plugin that alters how your WordPress site sends emails. WP Mail SMTP re-routes all of your emails through an independent email service instead of relying on your website to send emails. This will verify your emails, preventing them from being lost or classified as spam.
The provider you choose will be determined by a number of criteria, including free email providers are ideal for tiny websites, whereas paid email providers provide higher capacity. If you have an online store, you should look for a service specializing in transactional emails.
Once you finish the Settings Menu, you’ll get an automatic test email to ensure everything is working properly. Finally, WP Mail SMTP adds an email error log to your WordPress site by default. When using WP Mail SMTP with your mailer service, you may utilize this log to diagnose any potential email difficulties. That’s all there is to it! You’ve now resolved the issue with your Elementor form not sending emails.
Bonus: Best Resources To Get Elementor Support
When we think about the best website builders, Elementor is the finest one so far. It offers outstanding support to its users. However, you may also wish to seek assistance from the Elementor community. If you are interested you can explore different ways to get Elementor support from this detailed blog.
If you find this blog informative enough to solve your Elementor email sending or server errors, subscribe to our blog to read more blogs like this. Join our community to share your thoughts as well.
Post Views: 892
Здравствуйте друзья! Недавно обнаружил, что у меня на сайте не работает обратная связь с посетителями и установленный плагин Contact Form 7 не отправляет письма. Причем о данной неприятности узнал случайно, из сообщения в VK от постоянного посетителя блога. До этого форма обратной связи работала исправно, без нареканий.
Изучение проблемы выявило ряд недостатков в работе плагина Contact Form 7, который перестает нормально отправлять письма. Давайте рассмотрим основные причины сбоя в работе плагина обратной связи сайта Contact Form 7 и как их можно устранить.

Проблема № 1. Ошибки в теме (шаблоне) сайта.
Не редко сбои в работе плагина могут появляться из-за ошибок в java скрипте самой темы. Которая мешает нормальной работе Ajax на ресурсе. Не секрет, что многие начинающие блогеры используют бесплатные темы, которые были скачаны из непонятных источников в интернете. Многие такие шаблоны имеют ошибки в коде и не всегда корректно работают в дальнейшем.
Для проверки работоспособности темы совместно с Contact Form 7, можно попробовать установить ваш шаблон сайта на тестовый домен и посмотреть как будет работать отправка писем. Если у вас нет экспериментального домена, то можно сделать следующее.
В панели управления перейдите “Внешний вид”=> “Темы”. Для шаблона которым вы пользуетесь, нажмите кнопку “Просмотреть”. В режиме тестового просмотра темы проверьте как работает форма обратной связи. Если все работает значит причина проблем в самой теме. Попытайтесь найти их самостоятельно, а лучше смените тему сайта.
Проблема № 2. Крутится значок загрузки (лоадер), но письмо не отправляется.

Причина, как и в первом случае. Создаются неправильные входные параметры из-за ошибок в теме или плагине. Обработчик форм на Java скрипте не получает json формат данных и не понимает, что нужно сделать. Решение проблемы в удалении ошибок и лишнего текста в коде.
Причина № 3. Конфликт Contact Form 7 с другими плагинами.
Довольно частая причина на wordpress, когда плагины перестают нормально работать. Поочередно отключаем все установленные плагины, обновляем страницу и проверяем работоспособность формы обратной связи.Таким образом находим конфликтный плагин. Часто такая проблема возникает при очередном обновлении темы или плагинов.
Причина № 4. Сообщения не приходят на почту.
Бывает, что форма вроде работает и вы получаете уведомление “Ваше сообщение отправлено”, но оно не доходит на почту. Есть несколько причин данной проблемы:
- Сообщения попадают в папку спам. Наблюдается, когда происходит частая отправка сообщений с одного и того же адреса и почтовый сервис расценивает их как спам. Для устранения данной причины вам следует пометить эти письма как “Не спам”.
- Проблемы со стороны хостинга. Довольно распространенная причина когда хостинг перестает отправлять сообщения. Это часто встречается при использовании бесплатных хостингов. Обращение в службу поддержки с текстом “Contact Form 7 не отправляет письма”, обычно помогает решить вопрос. Кстати на моем сайте приключилась именно эта беда. Как я с ней справился, чтобы не зависеть от хостеров я поведаю ниже.
sergeyneznamov.ru
7 отличных плагинов для расширения функционала Contact Form 7
WPRUSe · Финты WordPress
2 лет назад
Contact Form 7 — отличный плагин, но иногда не хватает нужного функционала в нем.
я расширения существуют дополнительные плагины 1. CF7 Customizer 1:13 http://bit.ly/2jEjuJ1 2. Conditional Fields for Contact Form 7 2:13 http://bit.ly/2ksIdRy 3. Contact Form 7 Honeypot 3:17 http://bit.ly/2kau4v9 4. Contact Form 7 Dynamic Text Extension 3:57 http://bit.ly/2jYgCb5 5. Contact Form Submissions 5:30 http://bit.ly/2kAzQ9I 6. Contact Form 7 Multi-Step Forms 6:33 http://bit.ly/2jYfiFi 7. Contact Form 7 — Success Page Redirects 7:36 http://bit.ly/2ksDEXz ********************************************************************* Хорошие темы и разработчики Divi http://bit.ly/ET_Divi WP-Puzzle http://bit.ly/wp-puzzle TemplateMonster http://bit.ly/TM_wpruse промокод на 10% wpruse ElegantThemes http://bit.ly/ArtElegantThemes ********************************************************************* Хорошие хостинги Fozzy http://bit.ly/fozzyhost купон на скидку 10% wpruse Beget http://bit.ly/BeGetArt EuroByte http://bit.ly/EuroByte ********************************************************************* Я в соцсетях Страница VK: https://vk.com/artikus13 Группа про WordPress https://vk.com/wpruse Канал на YouTube: https://www.youtube.com/user/wpdummy13 ********************************************************************* Мои сайты Блог о разном http://artabr.ru/ Блог в поддержку канала http://wpruse.ru/ ********************************************************************* Домены покупаю здесь http://fas.st/d8lQuw ********************************************************************* Хорошие хостинги Fozzy http://bit.ly/fozzyhost купон на скидку 10% wpruse Beget http://bit.ly/BeGetArt EuroByte http://bit.ly/EuroByte ********************************************************************* Поддержать канал PayPal https://www.paypal.me/artabr ЯКошелек и карточки http://yasobe.ru/na/wpruse **********************************************************************************
videosmotret.ru
Решение
Первый способ (быстрый)
Самый банальный, но подойдет тем, кому важно чтобы contact form 7 заработал, но копаться в коде своего сайта вы боитесь.
Вам достаточно убрать из формы возможность прикреплять файлы.

Именно так мы и поступили сразу, как узнали. Разбираться в проблеме днем, было некогда… Да и решение мы нашли не сразу… А люди днем активно пишут и надо чтобы письма отправлялись, хоть и без прикрепления дополнительных файлов.
А вот уже ночью, когда рабочий день закончился, мы во всем разобрались и все исправили. И делимся этим с вами.
Это полноценное решение, берите и пользуйтесь )
Второй способ (правильный)
Чтобы плагин Contact form 7 снова заработал у пользователей Safari, вам нужно отключить использование технологии Ajax.
Делается это не сложно.
Надо просто добавить в файл function.php вашей темы WordPress вот этот код:
function wpcf7_load_js_not_safari11() {
global $is_safari;
if($is_safari) {
return false;
} else {
return true;
}
}
add_filter( ‘wpcf7_load_js’, ‘wpcf7_load_js_not_safari11’ );
После добавления этой модификации в ваш шаблон WordPress, Contact form 7 снова будет отправлять сообщения обычным способом, с перезагрузкой страницы, без использования Ajax.
Надеюсь, с выходом нового обновления, в браузере Сафари пофиксят этот баг. А пока правим сами.
P.S. Если у ваших коллег, Contact form 7 тоже не отправляет письма, не жмотьтесь, дайте им ссылку на эту статью 😉
С уважением, Яна Ходкина и ее коллега веб-мастер, который не захотел писать свое имя 🙂
yanakhodkina.com
Настройка Contact Form 7
Тут нам придется разобраться в четырех вкладках — «Шаблон формы«, «Письмо«, «Уведомления при отправке формы» и «Дополнительные настройки«. Рассмотрим каждую в отдельности.
Шаблон формы
Пожалуй, самая важная из вкладок настроек плагина. Шаблон формы представляет из себя редактор кодов плагина. Тут уже находятся существующие короткие коды стандартной контактной формы. Можно их удалять или добавлять новые. Рассмотрим назначение всех кодов, доступных в редакторе.
1. text — текстовое поле для ввода короткого текста в одну стоку (имя, тема сообщения и т.д.).
2. email – поле для ввода адреса email. Письмо с некорректным адресом не удастся отправить, именно этим и отличается поле от простого текстового. (Оба этих поля обычно обязательны к заполнению, что исключает рассылку анонимных сообщений).
3. URL — адрес сайта или страницы.
4. tel — номер телефона, не надо объяснять что это такое.
5.1 number — число (spinbox), количество чего-либо, например заказываемого товара.
5.2 number — число (slider), что это за шляпа, я так и не понял. Скажу спасибо тому, кто мне объяснит в комментариях его назначение.
6. date — дата в формате дд.мм.гггг.
7. text area — текстовое поле, вмещает в себя текст большого объема, собственно само сообщение.
8. drop-down menu — выпадающее меню, создаст выпадающее меню.
9. Checkboxes – генерирует «чекбоксы». Пользователь выбирает нужное установкой галочек.
10. Radio buttons – в буквальном переводе «радиокнопки». Настройка, как и в выпадающем меню. Пользователь выбирает нужный вариант из предложенных.
11. Acceptance – по принципу «С правилами ознакомлен и согласен». Пока пользователь не поставит галочку, кнопка отправки сообщения будет не активна.
12. quiz — вопрос, защита от спам-роботов. Перед отправкой сообщения необходимо ответить на однозначный вопрос, который вы зададите в настройках. Перед вертикальным слешем пишется вопрос, а за ним правильный ответ.
13. reCaptcha – тоже защита от спама, но с помощью генерируемой картинки с символами, которые необходимо ввести в поле перед отправкой сообщения. (Спам через контактную форму рассылается очень редко. Советую не использовать защиту, чтобы не раздражать отправителя).
14. file — отправка файла, генерирует код для создания кнопки выбора файла и прикрепления его к письму.
15. submit — кнопка отправки, сама кнопка, нажатием на которую, сообщение отправляется.
!!! Для наглядности, ближе к концу статьи, я размещаю форму, созданную из всех вышеперечисленных тегов, кроме каптчи. Можете оценить их в действии. Ни одно поле в форме необязательно к заполнению! Разрешаю вам наслать мне разных анонимных сообщений ? ? :-). Цензура отсутствует.
Для примера рассмотрим процедуру добавления кода прикрепления файла «file» в контактную форму. Процесс этот довольно прост. Выполните следующие действия:
- — Поставьте курсор в то место редактора, куда должна встать кнопка прикрепления файла к письму.
- — Нажмите на кнопку «file» в верхней панели редактора шаблона формы. Откроется следующее окно.
- Если поставить тут галочку, пользователь не сможет отправить сообщение без прикрепленного файла. Обратите внимание, в коде кнопки за file появится звездочка. Эту опцию можно назначить любому полю вашей контактной формы.
- Тут итак все понятно. Скопируйте надпись в этом поле, вам она обязательно понадобится на следующей вкладке «Письмо«. Иначе прикрепленный файл просто не дойдет до адресата.
- Сюда впишите разрешенный размер файла. Если оставить поле пустым, то по умолчанию ограничитель будет равен 1 mb . Допускается вписывать только целые числа просто в байтах, в mb или в kb.
- Разрешенные типы файлов вписывайте через вертикальный слэш. Если ничего не писать, то по умолчанию будут разрешены файлы с расширениями jpg, jpeg, png, gif,pdf, doc, docx, ppt, pptx, odt, avi, ogg, m4a, mov, mp3, mp4, mpg, wav, wmv.
- Если не знаете для чего нужны поля Id attribute и Class attribute, то и заполнять их не следует. А завершающим действием останется только нажатие кнопки «Insert Tag«.
В редакторе формы можно дописать над кодом «Прикрепить файл«, чтобы посетители не ломали голову о назначении этой кнопки. И не забудьте вставить теги абзаца и переноса строки, о которых я упоминал выше.
Приступим к рассмотрению следующей вкладки — «Письмо«.
Письмо
Итак, после создания своей контактной формы перейдите на вкладку «Письмо». Эта часть настроек отвечает за доставку, внешний вид и информативность писем, пришедших адресату, то есть Вам.
- Обязательно впишите сюда адрес своей электронной почты, на который будут приходить сообщения. Иначе, почта просто не дойдет.
- Два коротких кода «[your-name]» и «<[your-email]>» сообщат имя отправителя и его E-mail.
- Тема сообщения, с которой к вам обращается посетитель.
- ——
- Само тело сообщения. Вы можете использовать для информативности любые коды, которые использовали в шаблоне (они представлены в шапке вкладки, сразу под надписью «In the following fields, you can use these mail-tags:«. Сопровождайте коды в теле сообщения понятными пояснениями, например От кого, Тема сообщения, Тело сообщения.
- Можно не получать пустые строки с полей, необязательных к заполнению, если отправитель их не заполнил. Попробуйте также опцию HTML формата письма.
- В поле «File Attachments» обязательно вставьте код для вложения, если вы поставили кнопку прикрепления файла. Об этом я говорил выше.
- Опцию «Письмо 2» активируют в качестве дополнительного почтового шаблона для автоответчика. Об этой опции и как ей пользоваться я напишу немного позже.
Уведомления при отправке формы
Тут все переведено и понятно, даже скриншот делать не буду. Всплывающие сообщения, написанные в полях вкладки, получит отправитель при неправильном заполнении формы, успешном или неуспешном отправлении сообщения.
С переводом на русский язык тут пока проблем нет. Однако, с каждым обновлением плагина картина может меняться, как на других вкладках. Если это произойдет, сообщите в комментариях, переведем.
Дополнительные настройки
Эта часть статьи еще не готова к публикации. Скажу лишь, что тут вы можете настроить отслеживание заполнения форм пользователями, например в Яндекс метрике.
Можно еще изменить размер полей в контактной форме. Размер текстового поля в одну строчку задается числовыми значениями в конце тега перед закрывающейся квадратной скобкой. Например, вот тег для имени с новыми размерами — [text* your-name 50/41]. Здесь 50 — длина текстового поля, а 41 — количество символов, которое можно в это поле прописать. Если ничего не прописывать, длина текстового поля по умолчанию равняется 40, а разрешенное количество символов до бесконечности.
Вот тег с измененными размерами для сообщения — [textarea your-message 80×10]. Здесь 80 — длина поля в символах, а 10 — его высота в строчках. Экспериментируйте с этими циферками пока размеры полей вашей контактной формы не будут гармонично вписываться в дизайн страницы. Ниже картинка для наглядности со стандартной контактной формой.
Вот и все настройки плагина Contact Form 7.
Ошибка при отправке сообщения. Попытайтесь позже или обратитесь к администратору сайта.
Вот такое сообщение всплывает под формой Contact Form 7 в некоторых случаях после попытки отправить сообщение администратору сайта.
1. Почти всегда ошибка кроется не в плагине, а в php функции mail() сервера. Либо эту функцию хостинг не поддерживает, либо функция не включена или работает с ошибками. Если функция php_mail() поддерживается хостингом, то очень часто причиной сбоя отправки сообщений является:
- — Тестовый период хостинга. В этот период функция отправки почты выключена по умолчанию. Решение – оплатить услуги хостинга;
- — Сбой функции на сервере. Решение – обратиться в службу поддержки хостинга. Часто, для восстановления функции, достаточно отлинковать домен, а затем прилинковать его обратно.
2. Намного реже ошибки в отправке сообщений возникают из-за конфликта Contact Form 7 с другим плагином. В этом случае помогает поочередная деактивация плагинов. После деактивации которого Contact Form 7 заработает, тот и является конфликтным.
P.S. Коллеги, проверяйте папку СПАМ вашего почтового ящика после отправки письма самому себе при тестировании работы плагина. Это самая распространенная причина «недоставки» писем адресату, особенно на gmail.
wordpress-book.ru
Приветствую вас дорогие друзья!
В этой статье я вам расскажу о том, почему Contact Form 7 не отправляет письма и как решить проблему с отправкой писем для плагина Contact Form 7 и для всего WordPress сайта в целом.
На самом деле, проблема с отправкой почты для Contact Form 7 возникает очень часто. В первую очередь, это зависит от того на каком хостинге размещен ваш сайт, а так же от того, какие плагины у вас установлены. Ну и, собственно говоря, от самого плагина Contact Form 7, потому что иногда у него, все-таки, случаются глюки.
Для устранения проблемы с отправкой писем Contact form 7 нам нужно будет настроить отправку почты через SMTP. Для WordPress существует множество различных плагинов для реализации данной задачи, но я, в основном работаю с плагином WP Mail SMTP потому как он достаточно прост в настройке, и он меня еще не разу не подводил. Поэтому давайте установим этот плагин и посмотрим, как его нужно настраивать.
Копируем название плагина и переходим в админку нашего сайта. Здесь переходим в «Плагины» => «Добавить новый» и устанавливаем его так же, как и другие плагины. После его активации в разделе «Настройки» появится новый пункт, который называется «email».
- 1.Первое что нам нужно сделать — это заполнить поле «From Email». Сюда вы вставляете адрес вашего почтового ящика размещенного на сервисе Яндекс или Gmail.
Для решения проблемы c отправкой писем Contact form 7 я создала специальный почтовый ящик на Яндекс, поэтому в этом поле я указываю его.
- 2.Далее, в поле «From name» можете написать свое имя или название сайта либо оставить его пустым.
- 3.В графе «Mailer» должна быть выбрана опция «Send all WordPress email via SMTP».
- 4.В разделе «SMTP Options», в параметре «SMTP Host», вместо значения localhost прописываем smtp.yandex.ru.
- 5.Значение «SMTP Port» оставляем по умолчанию. Если вы будите использовать почтовый ящик Gmail, то параметры SMTP Host и SMTP Port будут отличаться.
- 6.В параметре «Encryption» указываем «Use TLS encryption».
- 7.В параметре «Authentication», ставим «Yes: Use SMTP authentication»
- 8.Теперь, в поле «Login» вам нужно ввести адрес почтового ящика и в поле «Password» — пароль к нему. Т.е., у вас отправка письма будет осуществляться как бы через ваш почтовый ящик на сервисе.
- 9.После того, как все настройки заданы, нажимаем на кнопку «Сохранить изменения».
Теперь нам нужно проверить, правильно ли мы все настроили. Для этого воспользуемся опцией «Send test email». В этом поле я укажу свой почтовый ящик на Яндекс и отправлю тестовое сообщение.
Здесь нам нужно будет ввести адрес почтового ящика, на который вам бы хотелось получать все ваши письма, заявки, уведомления с данного сайта. Это не обязательно должен быть почтовый ящик, который вы использовали в настройке, это может быть любой другой. Желательно, что бы этот email находился не на mail.ru, потому, что они ужесточают свои спам-фильтры, и все письма, которые отправляются в автоматическом режиме с какого-то сайта, либо какого-то сервиса могут попадать в спам. Поэтому, лучше использовать тот же Яндекс или Gmail.
После нажатия на кнопку «Send Test» мы увидим сообщение о том, что наше письмо было отправлено, после чего мы можем перейти в почтовый ящик и проверить, дошло ли оно.
Итак, я получила вот такое сообщение:
В тексте написано, что данное сообщение было сгенерировано плагином WP Mail SMTP. Вверху, в адресе отправителя, мы видим данные, которые указывали в настройке плагина.
То есть email, который я указала в настройках плагина, указывается в качестве отправителя.
Теперь если я попробую отправить сообщение с формы Contact Form 7, то оно будет успешно доставлено.
Данный плагин так же можно использовать в том случае, если у вас не только с Contact Form 7 не приходят письма, а в целом, почта с сайта WordPress не доходит на ваш email. То есть, в этом случае, вы можете настроить отправку через SMTP, и таким образом решить эту проблему.
Я сталкивалась с такими хостингами, у которых возможность отправки через SMTP активировалась только на каких-то более дорогих тарифных планах, либо за отдельную плату.
Конечно, на большинстве хостингов эта функция есть, проблем с ней ник каких не возникает. Но если вдруг у вас, при настройке отправки писем, ни чего не получается, то есть смысл написать в техподдержку вашего хостинга и уточнить, осуществляется ли у них отправка почты через SMTP и в чем могут выть вызваны возникающие ошибки, возможно это проблема самого хостинга.
Вы также можете посмотреть видео инструкцию по данной теме:
Что же, на этом у меня все. Надеюсь, эта статья была для вас полезна, и теперь у вас не будут возникать проблемы с отправкой писем как для Contact form 7, так и для всего сайта WordPress в целом. Пишите комментарии, подписывайтесь на мою рассылку и не забудьте подписаться на новости блога и мой канал на YouTube чтобы не пропустить ничего интересного.
С уважением Юлия Гусарь
impuls-web.ru
Принцип действия плагина Contact Form 7
Данная форма располагается на любой странице вашего сайта (нужно лишь скопировать строчку и вставить ее в нужное место). Посетитель сайта заполняет обязательные поля (к примеру, свое имя, e-mail, сообщение), и плагин через один почтовый ящик (назовем его «отправитель») посылает письмо на другой ящик («получатель»).
Тоесть, вы должны зарегистрировать 2 почтовых ящика – отправитель и получатель. Отправитель лучше создать в Яндекс почте, а получатель – это официальный ящик вашего сайта.
Настройка плагина Contact Form 7. Инструкция
1) Регистрируем ящик отправитель на Яндекс почте (любой, без разницы какой, его название не важно для работы плагина и не будет видно посетителям). Он будет служить перевалочным пунктом для писем.
2) Настраиваем контактную форму плагина Contact Form 7. Нажмите «Изменить» и далее «Шаблон формы». Вот пример, как она должна выглядеть с обязательными полями: имя пользователя, его почта, сообщение и кнопка «отправить»:
3) Вкладка «Письмо» отвечает за внешний вид писем, которые вы получаете.
Кому – адрес ящика получатель
От кого – [your-name] <адрес ящика отправитель>
Тема – [your-subject]
Тело письма – [your-email] [your-message]
Итак, вы получаете письмо, где будут указаны все заполненные поля формы обратной связи. На этом настройка плагина Contact Form 7 завершена.
Настройка плагина WP-Mail-SMTP. Инструкция
From Email – адрес ящика отправитель
From Name – к примеру, название вашей организации или ваше имя
Mailer – функция отправки писем. Выберите «Send all WordPress emails via SMTP»
SMTP Options
SMTP Host – для Яндекс почты smtp.yandex.ru
SMTP Port – для Яндекс почты 465
Encryption – Use SSL encryption
Authentication – Yes: Use SMTP authentication
Username – логин на вашей почте отправитель
Password – пароль на вашей почте отправитель
Настройка завершена. Сохраните изменения.
buxrabota.com
Здравствуйте!
Многие, у кого на сайте есть контактные формы, созданные с помощью плагина Contact Form7, обнаружили, что с недавнего времени с этих контактных форм перестали отправляться письма.
С такой же проблемой столкнулся и я на своих сайтах и на сайтах своих клиентов. При попытке отправить форму вращается значок отправки, а письмо не отправлялось.
В этой короткой статье я расскажу, как сделать, чтобы письма снова стали отправляться.
Прежде всего, я выяснил причину, по которой не отправлялись письма. Дело оказалось в самом плагине Contact Form 7. В версии 4.7 всё прекрасно работает, а при обновлении до версии 4.8 письма перестают отправляться. Я надеялся, что с выходом следующего обновления ошибка устранится, но и после обновления до версии 4.9 письма по-прежнему не отправлялись.
Самое простое решение, которое я нашёл в этой ситуации, – сделать откат плагина Contact Form7 до последней рабочей версии, то есть до версии 4.7. Сделать это можно с помощью специальных плагинов. Я покажу, как сделать откат с помощью плагина WP Rollback. Этот плагин очень прост в работе.
Устанавливаем плагин WP Rollback из репозитория WordPress и активируем его. Открываем в консоли раздел меню Плагины и видим, что рядом с каждым плагином появился дополнительный пункт Rollback.
Нажимаем на Rollback рядом с плагином Contact Form 7. Появляется окно с возможностью выбрать версию, до которой нужно сделать сброс. Выбираем версию 4.7 и жмём Rollback.
В появившемся окне опять нажимаем на Rollback. Плагин обновится. Не забываем активировать плагин. Заходим на страницу с контактной формой и пробуем отправить письмо.
Теперь всё работает. В чём на самом деле причины такого сбоя в работе плагина Contact Form 7 надо ещё разбираться. Если выясню в чём причина, то обязательно напишу. А пока можно сделать откат до версии 4.7 и спокойно работать.
Таким же образом можно делать откат и других плагинов, которые позволяют это делать (такая возможность предусмотрена не у всех плагинов).
Надеюсь, что статья была вам полезна. Спасибо за внимание!
aleksderk.ru
Contact form 7 — известный плагин для WP, который позволяет делать самые разные формы. Но иногда случается такое, что он перестает отправлять письма на указанный в его настройках почтовый адрес.
На самом деле — почти всегда Contact form 7 тут не при чем, а всему виной спам-фильтры почтовиков, потому что они считают ваше письмо мега-спамом такого уровня, что оно даже в папку «Спам» не падает, а просто убивается на подлете. И очень редко глючит сам сервер, а именно функция PHP — mail.
Итак, поехали исправлять.
Первым делом нужно проверить работает ли у вас на хостинге этот самый mail, для этого создаем на хостинге файл testmail.php с таким содержимым
<?php var_dump(mail("yourmail@server.com","Test","Test")); ?>
Вместо yourmail@server.com нужно конечно же написать свою почту, и файл залить туда, где вы смождете открыть его браузером
И запускаем его, перейдя по например адресу http://вашсайт/testmail.php
Если будет написано bool(true) — то значит все в порядке и почта УХОДИТ (но не доходит), если же будет написано что-то другое — то скопируйте это и пишите в ТП хостера.
Итак mail работает, но почта не доходит.
Первый вариант — это повысить уровень доверия почтового сервера в вашему домену, гуглите что такое dkim
и SPF и действуйте.
Второй вариант — это просто завернуть все сообщения с вашего сайта через SMTP, как обычный почтовый клиент.
Для этого зарегистрируйте новый почтовый ящик, например для Яндексе (или используйте свой) и установите на WP плагин https://ru.wordpress.org/plugins/easy-wp-smtp/. Вот скрин его настроек, я думаю все должно быть понятно
После заполнения учетных данных, можно сразу проверить их корректность, введя в эти поля
E-mail адрес, тему и сообщение соответственно.
После этого, если все корректно настроено — то письма будут доходить.
P.S. В Сети также пишут, что необходимо чтоб адрес почты указанный в Contact form 7 совпадал с адресом указанным в From Email Address и SMTP username — этот момент я не проверял, т.к. у меня он совпадал изначально
P.S.2 Можно взять любой другой плагин схожей функциональности, для этого нужно искать в репозитории плагинов вот так https://ru.wordpress.org/plugins/search/wp+mail+smtp/ — там даже на русском можно найти варианты, однако у меня заработал именно этот, с первыми двумя Contact form 7 так и не заработал.
reset.name