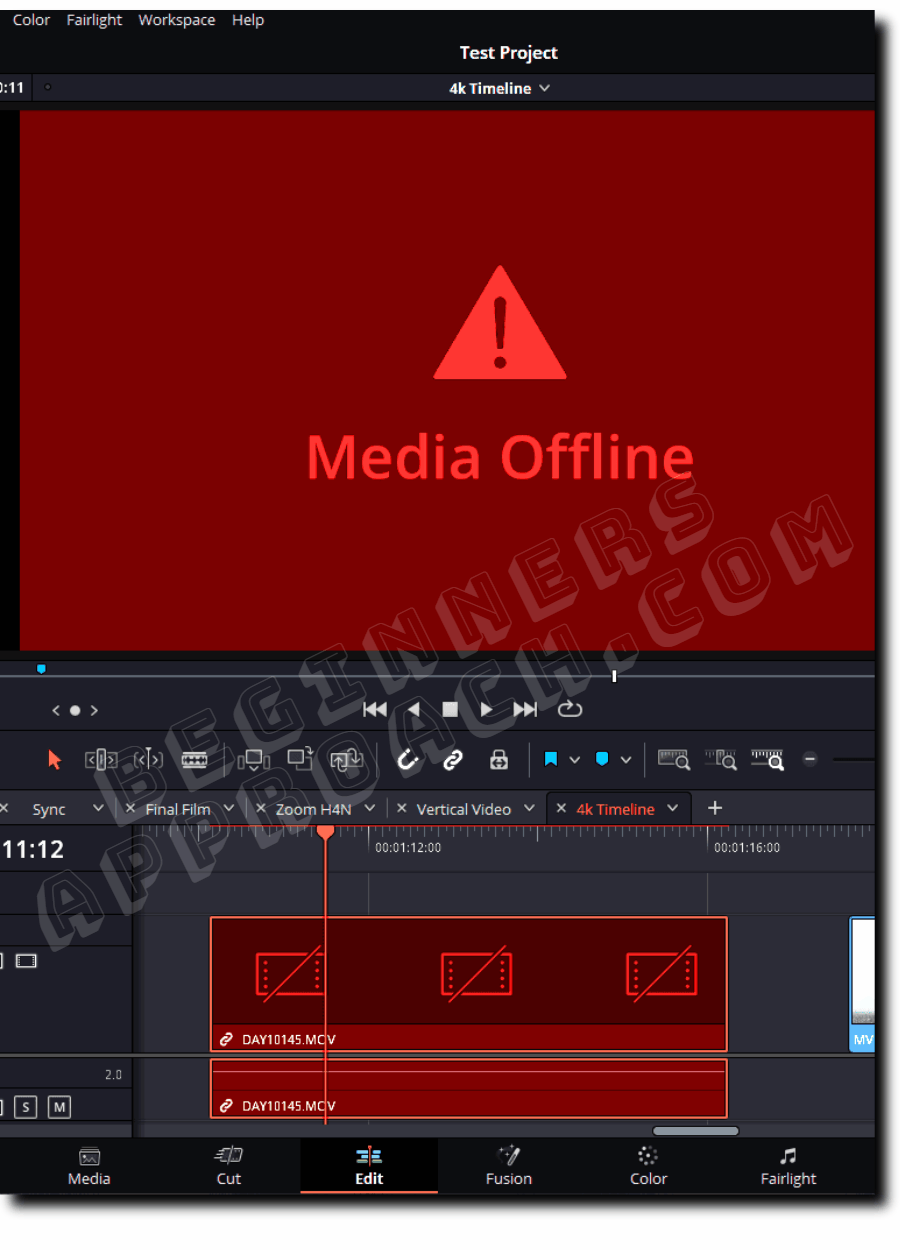
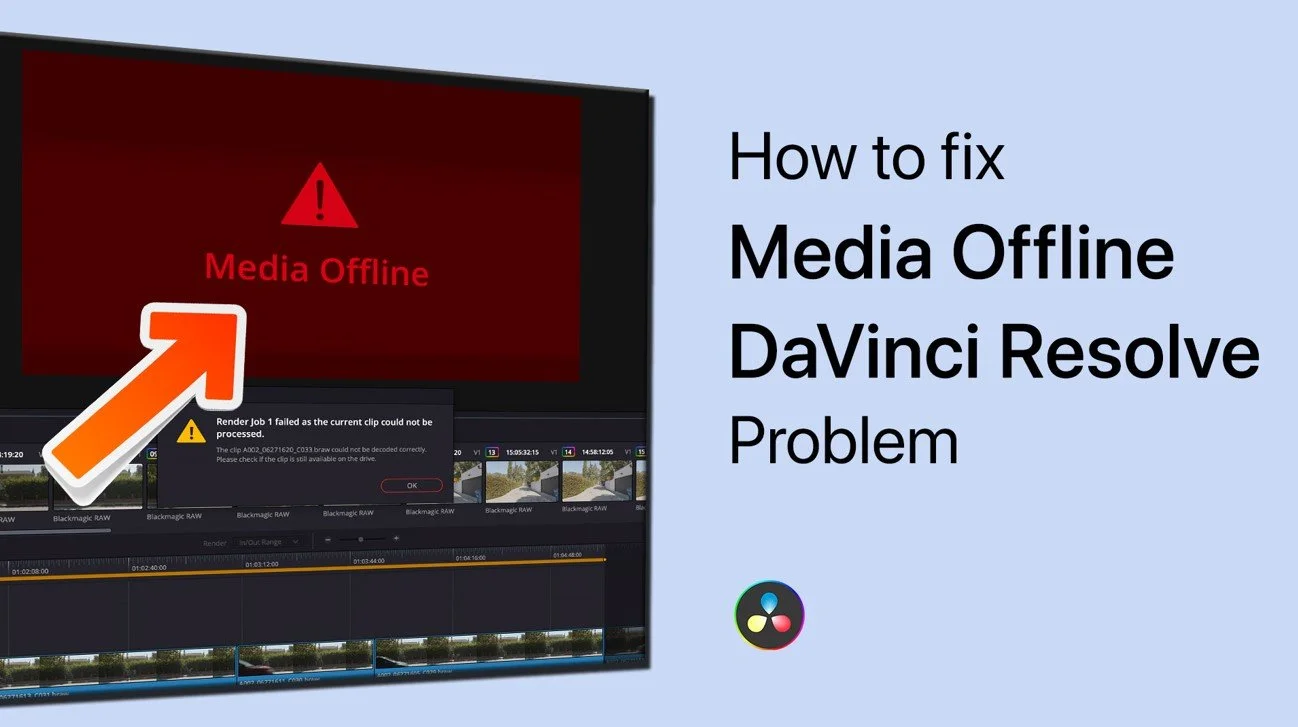
Don’t freak out. This has happened to most of us. We sit down after filming our project, stretch our fingers, and begin importing all of our footage. While we wait, we do a few extra things to our footage, grab a sandwich, start doing a light edit, and then realize we didn’t want a clip after all and delete it. Before you know it, you are met with a red screen of terror to tell you that your beloved footage is not currently present. But don’t worry. I’m here to tell you how to fix the DaVinci Resolve media offline issue.
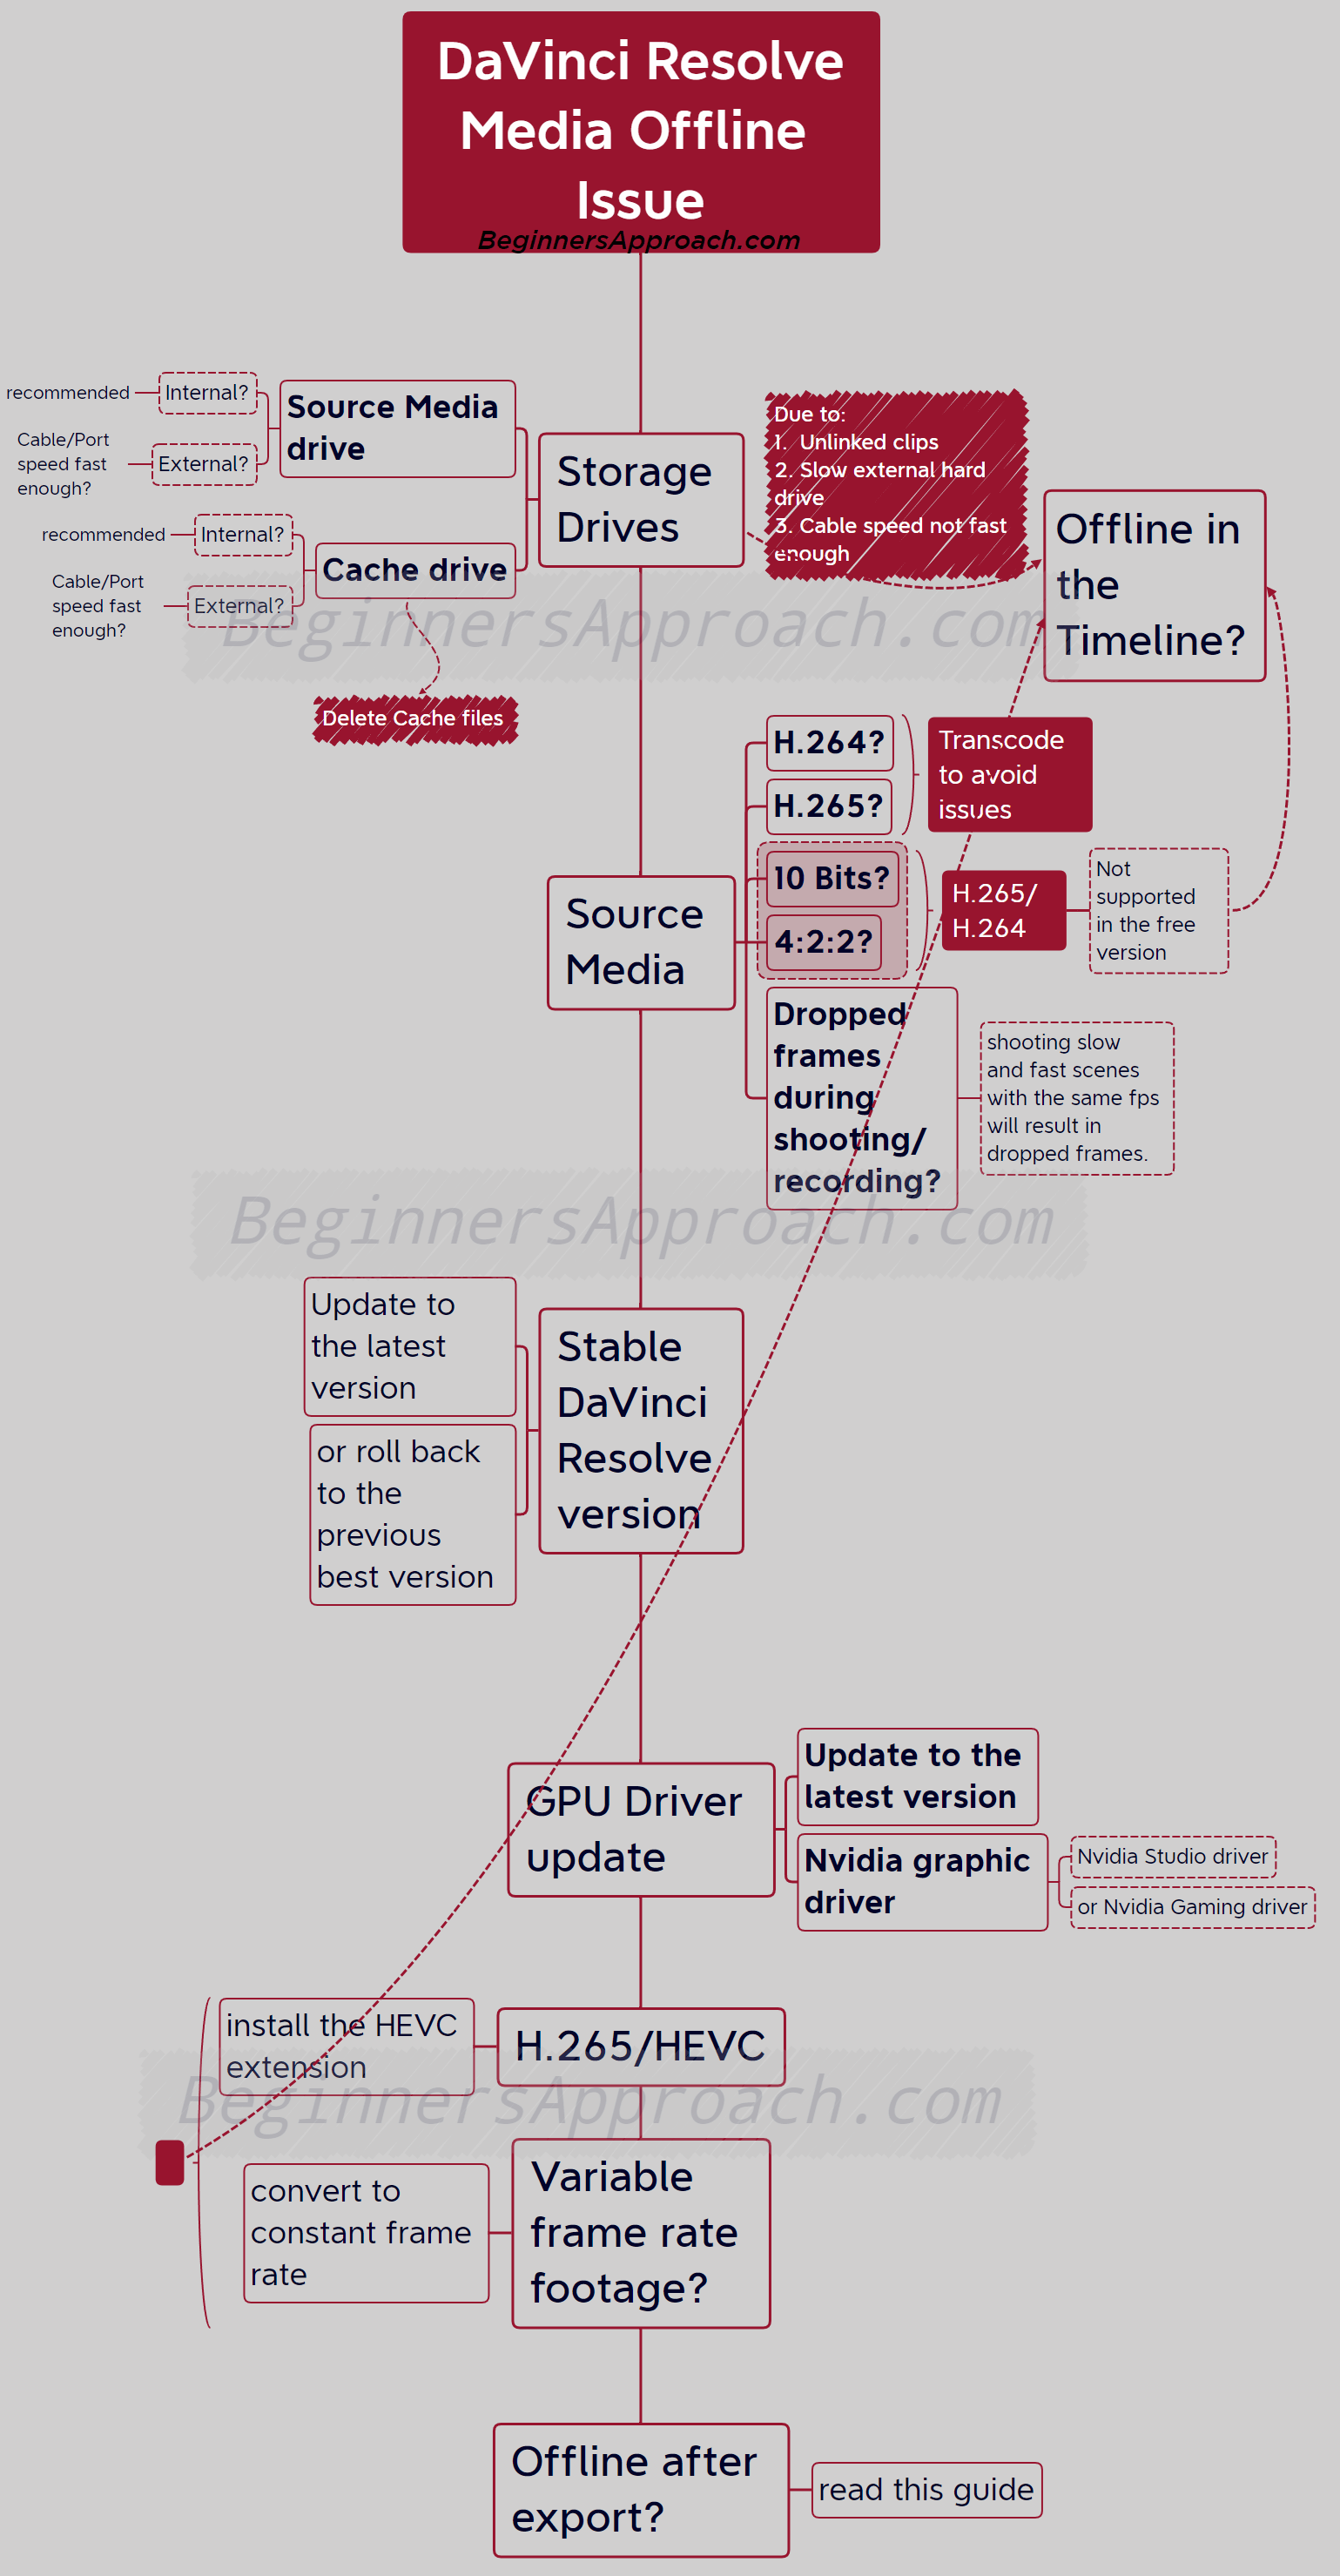
Why Does DaVinci Resolve say Media offline?
There are multiple reasons why this is happening. The most common is that a file you imported into your media pool is no longer linked to its source file outside. i.e.: you moved your files to a different drive or folder. I had also had this happen when I simply renamed files.
A few other reasons are as follows:
- Missing clips. This happens when you delete a file from your media pool, but the clip still exists in your timeline.
- H.265 or HEVC camera codecs.
- A very rare instance with using Sony cameras and XAVC camera codecs and renaming files on your drive as opposed to within DaVinci.
Unlinked Clips
Let’s first address unlinked clips. If you have moved your files to a new drive, new computer, or a new folder, then you will automatically need to relink it.
Next Step: Relink Clips
To relink your clips:
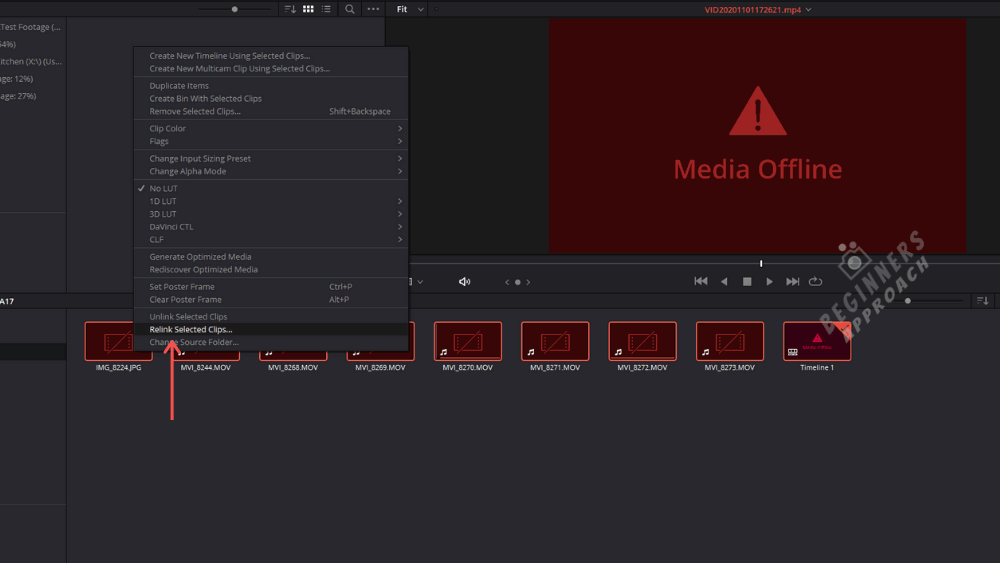
- Go into your media pool and select your missing clips.
- Right-click on one of the missing clips and click “relink selected clips.”
- Navigate to the folder that has your footage in it.

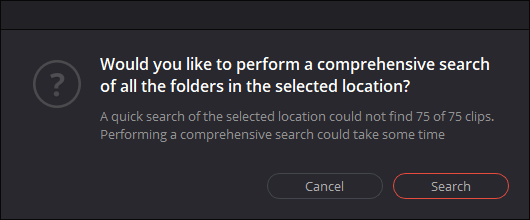
If different clips are in other folders, let’s say, scene 1 or scene 2, etc., then DaVinci will ask you to perform a comprehensive search which allows it to look in subfolders of bigger folders. This is helpful when you have a bunch of files missing, and the source files are in multiple folders. However, if you only have a few, I would recommend linking them one at a time and navigating to the exact folder it’s in so DaVinci can find them quickly. This shouldn’t be an issue if all of your files are in one folder.

Missing Clips From Media Pool
If your problem is a missing clip from your media pool, then you can reimport your media into the media pool from your source folder.
Next Step: Reimport Media Into Media Pool
To reimport your media into the Media Pool, go to File -> Import -> Media. Or simply drag and drop your clips into the Media Pool.

H.265 and HEVC Camera Codec
As our tech advances, we will need to do a little bit extra to be able to decode particular codecs so that DaVinci can work with them. Cameras like GoPros and certain drones use this codec because it allows them to film large file formats like 4k60fps at half the file size.
Next Step: Windows HEVC Extension
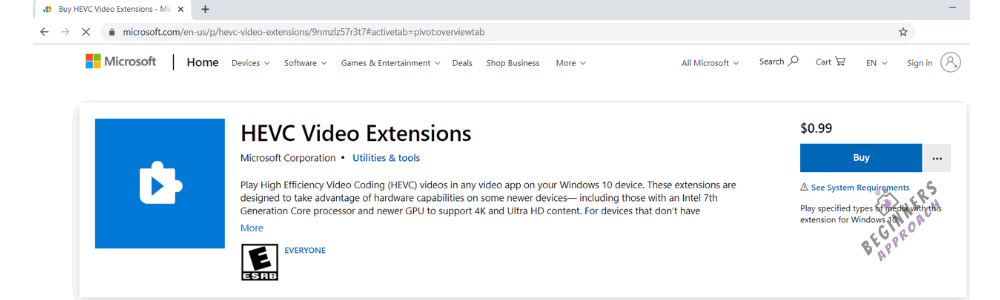
If you are on Windows, you can get a free extension by going to Free-codecs.com, clicking Download at the bottom of the screen, and then downloading whichever one pertains to your operating system. Microsoft also has an extension for $0.99 if the free codecs don’t work. Once you have downloaded and installed the extension, restart your PC.

While it is excellent that both DaVinci Resolve Free and Studio both support H.265 decoding, understanding all that goes into CPU and GPU decoding can be kind of a headache. Therefore, if you want to work with these files, the easiest way to get them compatible is to use the Optimize Media feature within DaVinci. This will give you smoother playback with less stress on your CPU or GPU.
Next Step: Optimize Media
To optimize your media, you must first decide what kind of media you want. You can do this by heading over to your project settings (shift 9 for both Mac and PC). Once you have chosen your preferred media type, which will change depending on your needs, change the storage location so your optimized media won’t be in the same folder as your source files.

You can then right-click on your files and click Generate Optimized Media. Depending on the original file size and the codec you are changing, this may take a few minutes. So now is the time to grab that sandwich. Once DaVinci has created the media, you can then go to “Playback” and check on “Use Optimized Media if Available.” This feature is nice because when you need to watch performance playback in real-time, the optimized media will be a better choice for smoothness. But then, if you are color grading, you might want to use the raw footage.

Sony Cameras and XAVC Codec
Let me preface this by saying it is a rare issue but is an issue nonetheless, and I would like you all to keep your hair because I certainly lost a lot of my own. If you are like me and have a specific way of labeling your footage, then listen up. Over the years, I have heard filmmakers talk about importing their footage into their editing software and then doing all of the sorting and labeling.
In my experience of working on a lot of 48 hour to 72 hour film festivals or just working in short turnarounds, that is an insane waste of time. Before I even open the editing program, I label my files, separate them into folders, mark the ones I plan to use, and then import those into the editing software.
Speaking of 72 hour film festivals, here is 5ive, a short we did for the Adrenaline Film Project.
Now back to our topic!
If this is also your process, your files are missing, and you are using Sony or the XAVC codec, this could be the reason why.

I say this with all of the enthusiasm in the world. Don’t touch, rename, move, or even look at those source folders. The minute one of those folders is renamed, or you have renamed a clip, there is no going back because that codec is labeled and placed in those folders the way it is for a reason.
Your media will forever be offline, and you will have to do another media dump of all of your cards. All while praying to the film gods that you haven’t reformatted the card with your files on it. Right now, your only step is to offload all of your footage again, reimport it into DaVinci, and then do all your renaming and sorting.
The best way to attack this issue is to be ahead of it in the first place. Think of my unfortunate experience as a cautionary tale.
After almost a year of not finding anything online about this issue, I was able to attend NAB, where I spoke to a Black Magic rep, bless this human, and they said this was something specific to that codec and Sony cameras. Now don’t worry. This isn’t all completely hopeless because I also spoke to a Sony rep at Cinegear this year, and they have said that is something they plan to address to make sorting their footage a little bit easier. We will all soon rejoice.
Finally, Verify The Files
You always want to make sure that you have relinked the correct clips. If for some reason, you have linked the wrong one, you can always right-click the clip in your Media Pool and relink it again.
Conclusion
Whether it’s a misplaced clip, moved file, or different camera codec, I hope you found this article helpful on how to fix DaVinci Resolve media offline. Always make sure you are keeping track of your clip locations to help prevent media from disappearing from your timeline.
I would love to hear your thoughts or tips and tricks regarding DaVinci Resolve Media Offline. Leave us a comment below, and happy filmmaking!
In the realm of sophisticated 8K editing, color grading, visual effects, and sound post-production, DaVinci Resolve 17 is the sole answer. With a single tap, you may switch between editing, color, filters, and audio. Whether you’re a solo artist or part of a huge team, it’s clear why DaVinci Resolve is the industry standard for high-end digital effects and finishes on more Hollywood motion pictures, television programs, and ads than any other program.
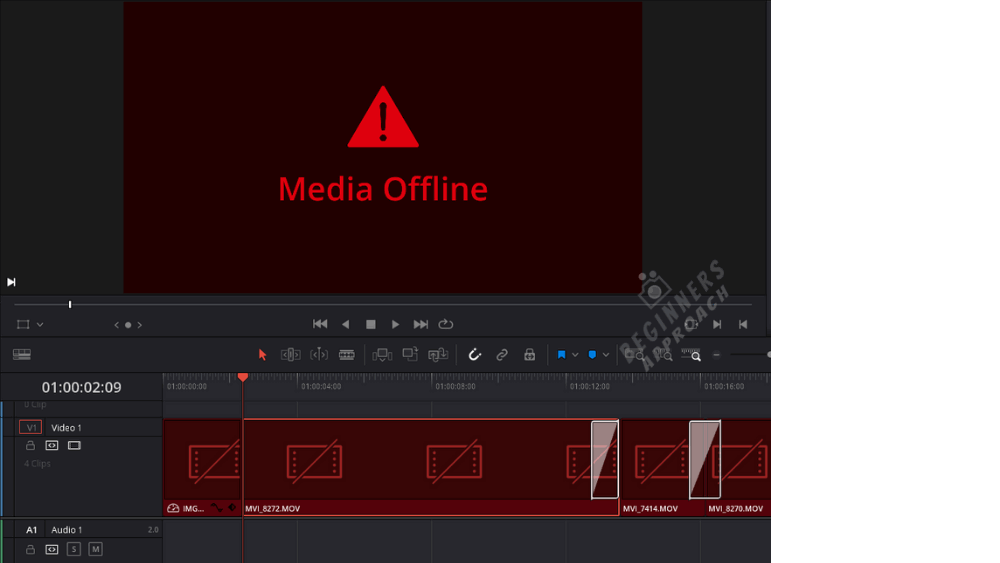
If you get an error warning in DaVinci Resolve claiming that your video is offline and you can’t assess your clips, don’t panic.
Get your adobe 60% student discount from here:
The most common explanation is that your records have been relocated or stored in a new place. Video files do not truly reside inside a DaVinci Resolve project file, and hence an error occurs as a result. Their position on your hard disc and the program uses them as a point of reference.
You’ll discover How to fix Davinci resolve media offline issue in this guide. Let’s get this party started, shall we?
DaVinci Resolve’s media offline problem may be fixed by following this step-by-step procedure. After a failed attempt to read your video, DaVinci Resolve will show you that it’s “Media Offline.”
Various factors, such as unlinked clips, VFR, and 4K 60 FPS H.265 video, might cause this. Fixing the problem is a piece of cake after you’ve located its source. Installing a few tools to remedy the problem may be necessary, depending on the underlying reason.
Let’s get this party started, shall we?
Common Media Offline Problems with DaVinci Resolver
When your imported videos within Resolve lose their connection with the primary footage stored on the hard drive, you may experience media offline as a consequence of unlinked clips.
In the course of exporting and importing your projects to a new machine, you may accidentally relocate your input footage to a separate folder or disc (laptop or desktop).
Problem-solving Steps:
- Visit the Media Pool
- Select all of your saved videos from your computer’s hard drive.
- After that, right-click on one of the chosen videos.
- Select “Relink Selected Clips” as the action to perform.
- The dialogue box will ask you to choose a location for the original footage.
- Click the Ok button to confirm your action.
Occasionally, DaVinci Resolve may ask for a “Comprehensive Search” in a dialogue box if certain clips aren’t discovered during a search.
When you click Search, Resolve will look for source files within the specified folder’s sub-folders. It may be necessary to restart the search if just a few clips are available due to a technical issue.
If you’re not bothered by broken links, go on to the next step.
Offline Media As Soon As It Is Imported
DaVinci Resolve may seem to indicate media as being offline when it isn’t. All of the imported clips in DaVinci Resolve go offline after you’re done. However, the audio is audible if you drag it into the timeline and attempt to play it. This is a problem with H.265 or HEVC codec video being played back.
HD video from GoPros and DJI Mavics (such 4K 60 FPS) is reduced to a smaller file size by using the H.265 encoding standard. Fujifilm’s XT4 and Sony’s A7S3 employ the H.265 codec, as do DSLRs.
Canon EOS 7D Mark III = XAVC HS (H.265) -> 10 bit 4:2:2 and 4:2:0 subsampling -> Ultra HD 120 FPS, Ultra HD 60 FPS, and other frame rates. In 10 bit 4:2:0 sub-sampling, Fuji XT3/XT4 = H.265 -> 4K 60 FPS, and so forth. The fundamental reason is a lack of HEVC or H.265 decoding capability.
It’s most likely a bug in Windows 10. To correctly decode H.265 video, it thus requires HEVC extensions
Solution:
- Then, either visit Microsoft Office or Google “Microsoft hevc video extensions” to get what you’re looking for.
- Select “Purchase” by clicking the “Buy” button. (You’ll be required to pay $0.99 for it.)
- Install the extension when it has been downloaded.
- Restart your computer to have changes take effect.
- That video should now be decoded in Resolve thanks to this fix.
Remember that H.265 decoding is supported by both the free and studio versions of DaVinci Resolve, but GPU acceleration is only available in the studio version.
Some random frames (not the full clip) exhibit media offline error during dragging or timeline playing after uploading the H.265 clips. Videos (4K 60 FPS) filmed using smartphones like the current iPhone models are more likely to have this issue. There are issues with inter-splicing media in offline frames that DaVinci Resolve Studio users must deal with.
Check to see whether your Resolve and GPU drivers are up-to-date. Then complete these steps if you don’t have them already:
Solution:
- If you’re a Studio user, you may adjust your GPU settings in DaVinci Resolve by going to the “Preferences” menu, then “System,” then “Memory and GPU.”
- “GPU Processing Mode” -> Select “Auto” rather than “CUDA” or “OpenCL.”
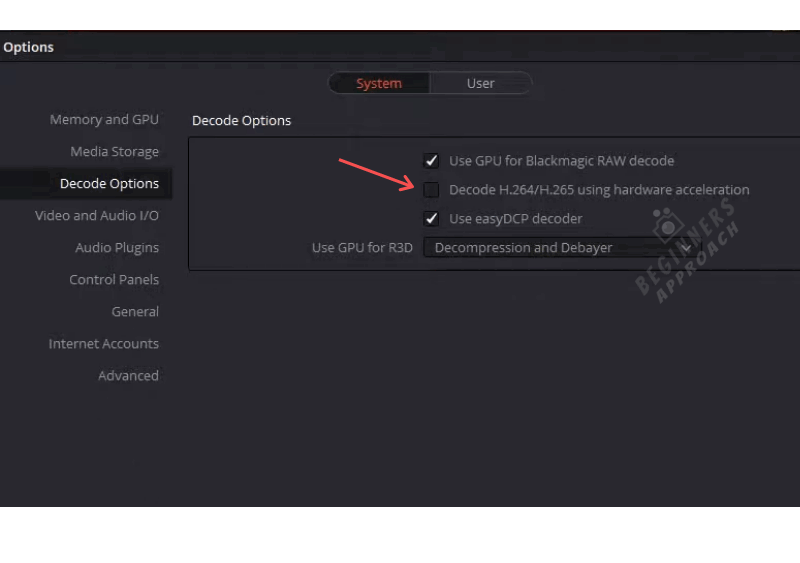
- Click “Decode Options” and then “H.265 utilising hardware acceleration” until they are both unchecked.
- Restart Decide on a solution and test it out.
Contrary to popular belief, consumers have reaped the benefits of this checking and unchecking. Don’t be afraid to give up on that idea.
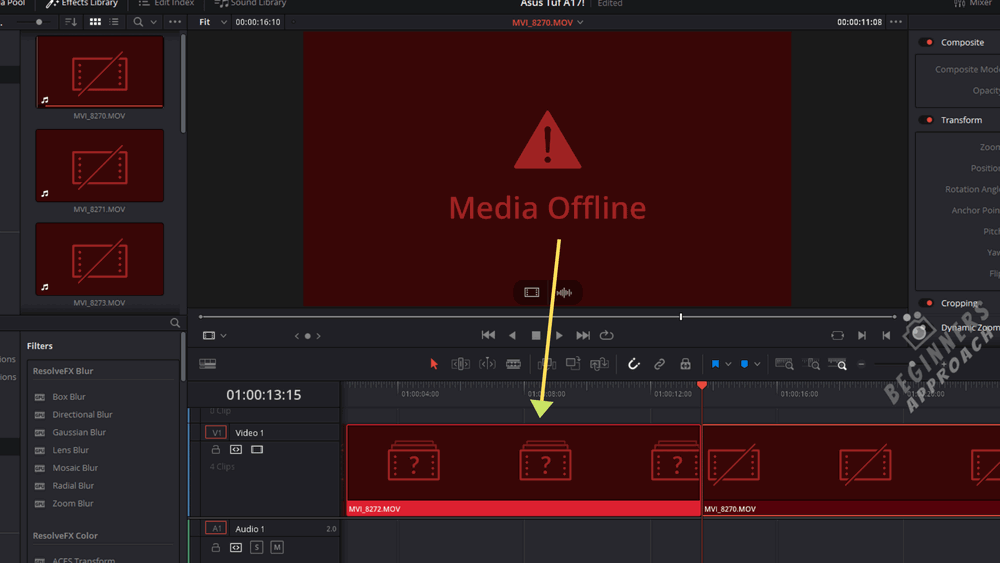
A question mark appears in the timeline when a clip is missing. If you remove a video from the Media Library by mistake, a clip from the timeline will be missing.
Solution:
- Re-import the deleted files from your original drive into the storage pool.
- Audio synchronization problems or media not available for playback
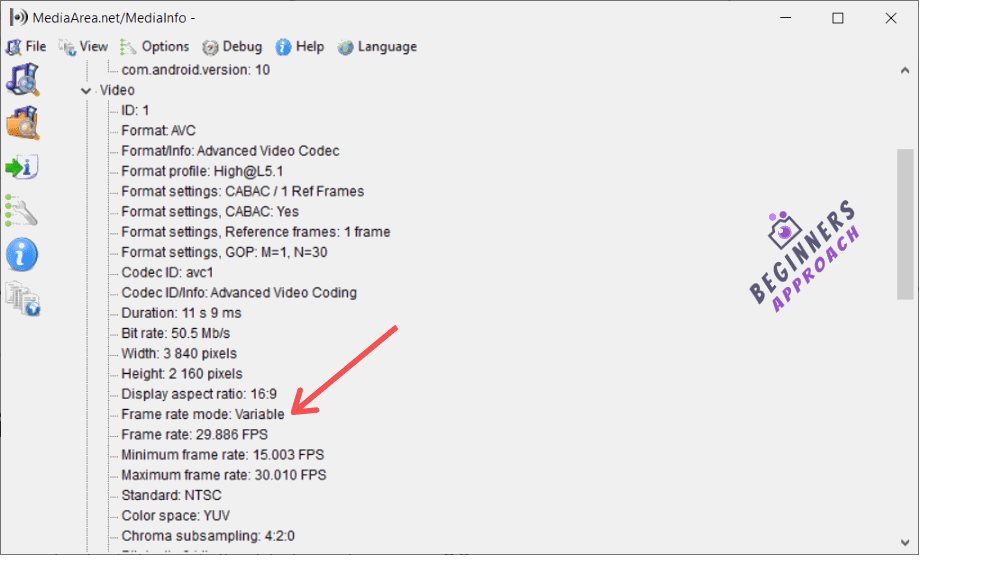
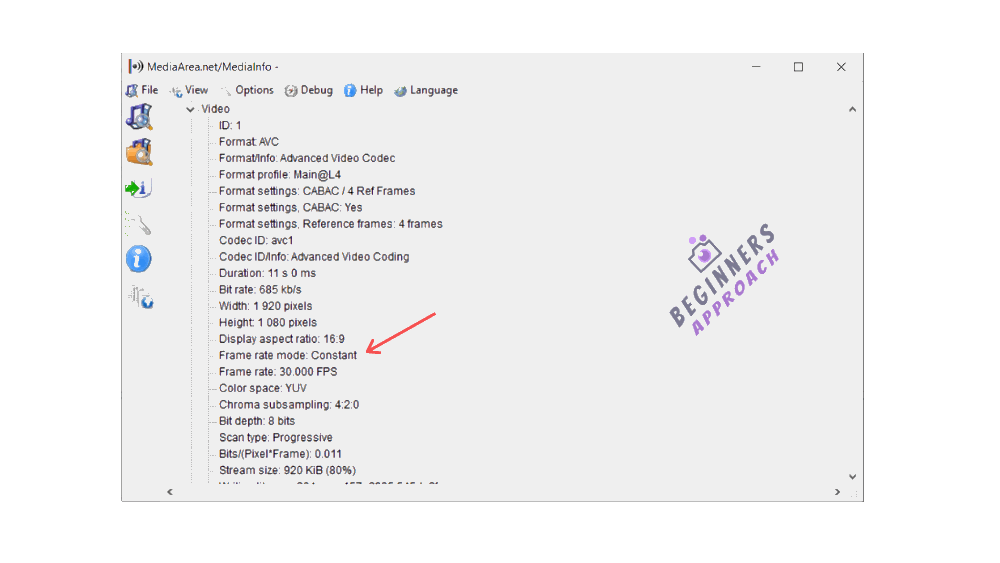
DaVinci Resolve turns all imported clips offline, although the audio still sounds OK. There are occasions when the video and audio are out of sync. This is a typical problem with film shots at a variable frame rate (VFR).
Games like NVIDIA ShadowPlay and Open Broadcaster Software (OBS) record their gameplay in VFR format. (Instead, a DSLR or mirrorless camera records movies at a consistent frame rate.) Any NLE, such as DaVinci Resolve or Premiere Pro, expects movies to have a consistent frame rate.
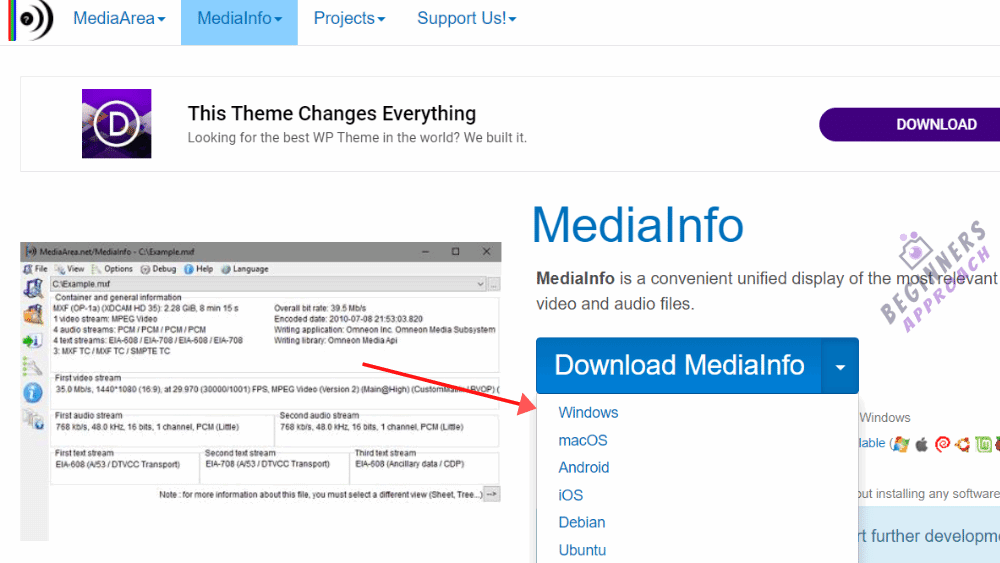
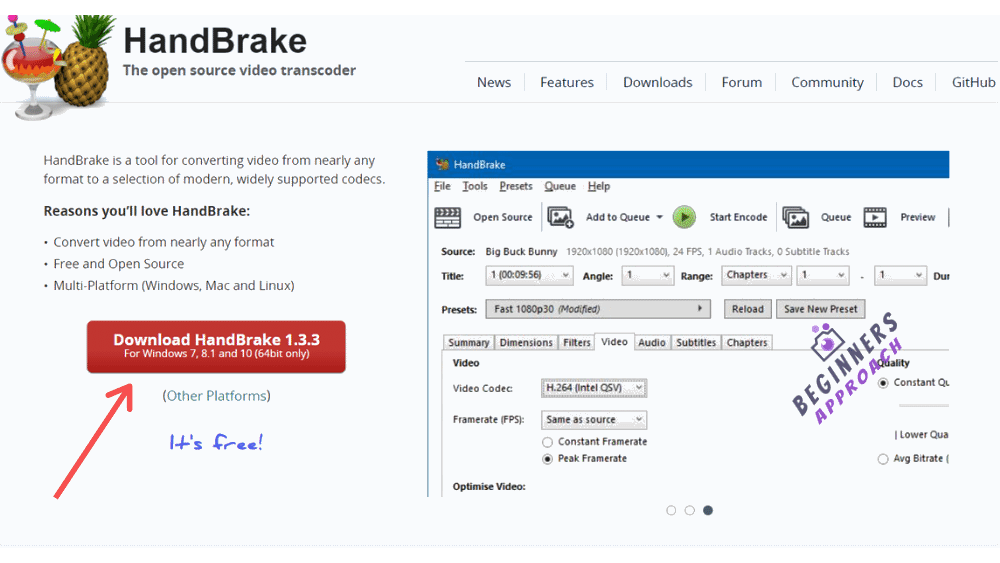
As a result, making the switch from a variable to uniform framete footage is an excellent idea. To determine the framerate, you’ll need to download and run Mediainfo. Afterward, add a Handbrake to transform VFR into CFR mode.
Are you still having difficulties? Use This Guaranteed Method Instead
However, if you’re still unable to repair the media offline problem after completing the preceding methods, your best bet is to…
Transcode the video you’ve shot.
It’s nothing more than converting your video to a different format, such as:
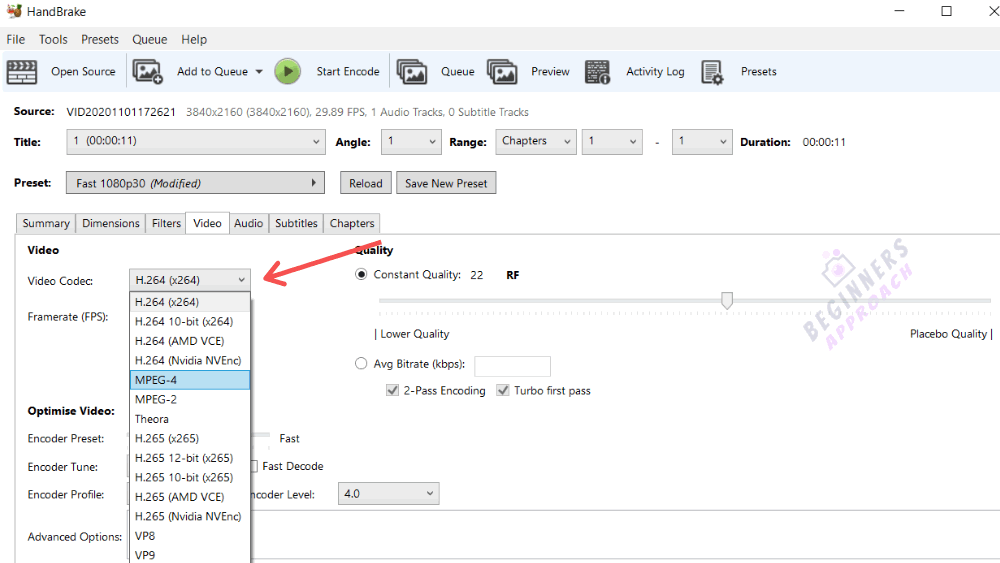
H.264, Mpeg-4, VP9, etc. are examples of compression formats. These are very resource-intensive codecs that will tax the processing capacity of your laptop or desktop computer. (Handbrake is an option.)
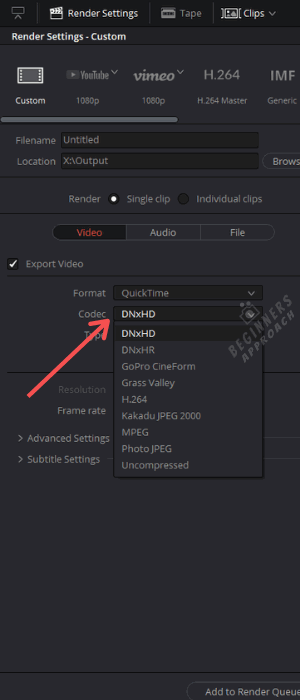
Codecs that are easy to work with in post-production, such as DNxHD (for Windows) or ProRes (Mac). However, although they use a lot of disc space, they’re quite simple to modify and colour-correct. The command-line interface tool FFMPEG (which may be used) is available.
Use Handbrake to convert FFMPEG files to editing-friendly codecs like DNxHD, PRORES, etc.
- Convert all of your videos in a bulk into a format that DaVinci can understand, such as H.264.
In DaVinci Resolve, import the video files. Then choose the delivery tab, export the video files, and import them into your desired format and post-production-friendly codec.
Using this method, you may create films that are both large in file size and simple to edit.
- Start trimming in DaVinci Resolve after importing the videos. Alternatively, After you’ve imported the DaVinci Resolve-capable video files, you’ll need to:
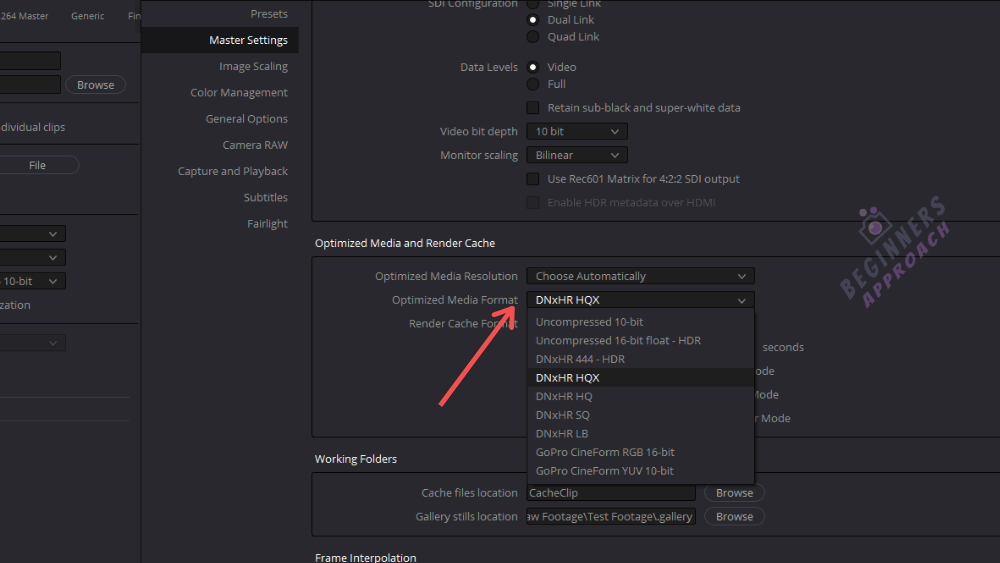
- Activate the “Optimized Media and Render Cache” option under “Project Settings” -> “Master Settings.”
- Choose a codec that’s easy to modify, such as DNxHR HQX or Uncompressed 10-bit.
- Save your work by clicking the “Save” button.
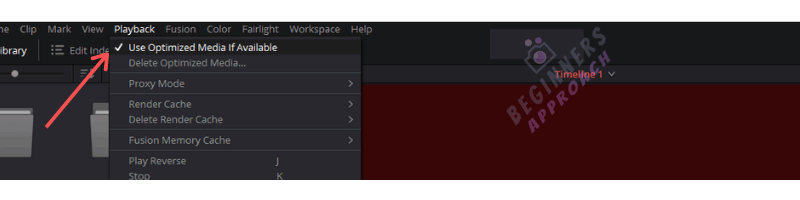
- Select “Playback” -> “Use Optimized Media If Available” from the drop-down list.
- That’s all there is to it.
Conclusion
The problem with this issue is that the software may not be properly synchronising the audio and video for the incoming media.
It occurs when you import a video file that was shot in real time with a camera that doesn’t have an electronic shutter, or when you have a footage edited with a codec such as ProRes.
This is one of the most debilitating problems in the field of digital video editing. It can result in errors that manifest while processing audio and video. If you get an error claiming that your video is offline and you can’t assess your clips, don’t panic.

Возможно, при работе с DaVinci Resolve, вы сталкивались с проблемой, когда импортированный с вашей новой камеры или телефона, с алгоритмом сжатия h.265, видеофайл — вместо видеосигнала отображает плашку Media Offline.

Возможно, при работе с DaVinci Resolve, вы сталкивались с проблемой, когда импортированный с вашей новой камеры или телефона, с алгоритмом сжатия h.265, видеофайл — вместо видеосигнала отображает плашку Media Offline.
Точно такая же плашка может появиться, когда вы утратили исходный видеофайл, например, импортировав видео с флешки, которую в последствии извлекли, и в тому подобных случаях.
Однако в отличие от случаев с действительно отсутствующим файлом, при данной проблеме вы точно имеете доступ к файлу, и более того, если начать воспроизводить его через ДаВинчи, аудиодорожка будет прекрасно работать.
Все что нужно сделать, для того чтобы избавиться от таблички «Media Offline», и научить Resolve работать с файлами HEVC, это установить соответствующий кодек в систему.
Для пользователей Windows 10 и 11
Самое простое решение — это установить из магазина приложений Windows HEVC Video Extensions, и сразу же, даже без перезапуска ДаВинчи, ваши медиафайлы начнут правильно работать.
Увы, по ссылке выше, кодек платный. Однако существует и бесплатная версия данного приложения, которая автоматически привязывалась к вашему аккаунту, если вы покупали новый ноутбук или видеокарту. Вернее, стоимость данного кодека уже была включена в стоимость вашего устройства. Раньше его спокойно можно было установить прямиком из Microsoft Store, однако уже к концу 2020 года, для его установки требовалось ввести некий код, если это приложение не было привязано к вашему аккаунту. А с зимы 2022 года и вовсе — было скрыто из магазина приложений, автоматически устанавливаясь владельцам соответствующих устройств.
Поэтому вам придется получить приложение из другого источника — я разместила установочный пакет на своем сервере.
Обязательно проверьте SHA256 хэш перед установкой! Для размещенной мною версии 2.0.53348.0_x64 он будет:
3ea5551a0cfc342fe5b0904ca2b4c21027c78ef304244b6901ee58d7a4e003e2Пользователям других операционных систем
Стоит обратить внимание на x265, либо на OpenHEVC, однако эти решения не столь тривиальны и потребуют от вас понимания того как работает операционная система, и хотя бы умения собирать исполняемые файлы из исходного кода.
Постскриптум
HEVC видео абсолютно непригодно для видеомонтажа. Настоятельно рекомендую, прежде чем приступать к монтажу, транскодировать медиафайлы в монтажный кодек, что значительно увеличит производительность программы.