
I’m trying to write a server program in C,
using another client, I get this error when I try to connect through port 2080 for example.
connection refused
What can be the reasons of this error?
![]()
asked Feb 25, 2010 at 10:55
![]()
5
There could be many reasons, but the most common are:
-
The port is not open on the destination machine.
-
The port is open on the destination machine, but its backlog of pending connections is full.
-
A firewall between the client and server is blocking access (also check local firewalls).
After checking for firewalls and that the port is open, use telnet to connect to the ip/port to test connectivity. This removes any potential issues from your application.
![]()
Remy Lebeau
550k31 gold badges450 silver badges763 bronze badges
answered Feb 25, 2010 at 11:02
![]()
a’ra’r
35.7k7 gold badges66 silver badges67 bronze badges
13
The error means the OS of the listening socket recognized the inbound connection request but chose to intentionally reject it.
Assuming an intermediate firewall is not getting in the way, there are only two reasons (that I know of) for the OS to reject an inbound connection request. One reason has already been mentioned several times — the listening port being connected to is not open.
There is another reason that has not been mentioned yet — the listening port is actually open and actively being used, but its backlog of queued inbound connection requests has reached its maximum so there is no room available for the inbound connection request to be queued at that moment. The server code has not called accept() enough times yet to finish clearing out available slots for new queue items.
Wait a moment or so and try the connection again. Unfortunately, there is no way to differentiate between «the port is not open at all» and «the port is open but too busy right now». They both use the same generic error code.
![]()
Josh Darnell
11.3k9 gold badges37 silver badges65 bronze badges
answered Mar 2, 2010 at 8:37
![]()
Remy LebeauRemy Lebeau
550k31 gold badges450 silver badges763 bronze badges
5
If you try to open a TCP connection to another host and see the error «Connection refused,» it means that
- You sent a TCP SYN packet to the other host.
- Then you received a TCP RST packet in reply.
RST is a bit on the TCP packet which indicates that the connection should be reset. Usually it means that the other host has received your connection attempt and is actively refusing your TCP connection, but sometimes an intervening firewall may block your TCP SYN packet and send a TCP RST back to you.
See https://www.rfc-editor.org/rfc/rfc793 page 69:
SYN-RECEIVED STATE
If the RST bit is set
If this connection was initiated with a passive OPEN (i.e., came
from the LISTEN state), then return this connection to LISTEN state
and return. The user need not be informed. If this connection was
initiated with an active OPEN (i.e., came from SYN-SENT state) then
the connection was refused, signal the user «connection refused». In
either case, all segments on the retransmission queue should be
removed. And in the active OPEN case, enter the CLOSED state and
delete the TCB, and return.
![]()
answered Apr 30, 2014 at 9:28
![]()
James BrockJames Brock
3,2061 gold badge28 silver badges33 bronze badges
1
Connection refused means that the port you are trying to connect to is not actually open.
So either you are connecting to the wrong IP address, or to the wrong port, or the server is listening on the wrong port, or is not actually running.
A common mistake is not specifying the port number when binding or connecting in network byte order…
answered Feb 25, 2010 at 11:03
![]()
3
Check at the server side that it is listening at the port 2080.
First try to confirm it on the server machine by issuing telnet to that port:
telnet localhost 2080
If it is listening, it is able to respond.
answered Feb 25, 2010 at 11:36
![]()
AdilAdil
2,4227 gold badges34 silver badges38 bronze badges
1.Check your server status.
2.Check the port status.
For example 3306 netstat -nupl|grep 3306.
3.Check your firewalls.
For example add 3306
vim /etc/sysconfig/iptables
# add
-A INPUT -p tcp -m state --state NEW -m tcp --dport 3306 -j ACCEPT
answered Mar 24, 2017 at 4:10
![]()
Jack SunJack Sun
2771 gold badge3 silver badges14 bronze badges
1
Although it does not seem to be the case for your situation, sometimes a connection refused error can also indicate that there is an ip address conflict on your network. You can search for possible ip conflicts by running:
arp-scan -I eth0 -l | grep <ipaddress>
and
arping <ipaddress>
This AskUbuntu question has some more information also.
![]()
answered Jan 15, 2013 at 17:35
![]()
SnapShotSnapShot
5,4445 gold badges41 silver badges40 bronze badges
I get the same problem with my work computer.
The problem is that when you enter localhost it goes to proxy’s address not local address you should bypass it follow this steps
Chrome => Settings => Change proxy settings => LAN Settings => check Bypass proxy server for local addresses.
answered Aug 21, 2013 at 6:03
![]()
1
In Ubuntu, Try
sudo ufw allow <port_number>
to allow firewall access to both of your server and db.
answered May 14, 2017 at 5:59
![]()
From the standpoint of a Checkpoint firewall, you will see a message from the firewall if you actually choose Reject as an Action thereby exposing to a propective attacker the presence of a firewall in front of the server. The firewall will silently drop all connections that doesn’t match the policy. Connection refused almost always comes from the server
answered Sep 29, 2012 at 16:20
![]()
In my case, it happens when the site is blocked in my country and I don’t use VPN.
For example when I try to access vimeo.com from Indonesia which is blocked.
answered May 28, 2020 at 13:09
![]()
Aminah NurainiAminah Nuraini
17.9k8 gold badges88 silver badges107 bronze badges
- Check if your application is
bindwith the port where you are sending the request - Check if the application is accepting connections from the host you are sending the request, maybe you forgot to allow all the incoming connections
0.0.0.0and by default, it’s only allowing connections from127.0.0.1
answered Dec 4, 2022 at 1:18
![]()
VishrantVishrant
15.2k11 gold badges71 silver badges117 bronze badges
I had the same message with a totally different cause: the wsock32.dll was not found. The ::socket(PF_INET, SOCK_STREAM, 0); call kept returning an INVALID_SOCKET but the reason was that the winsock dll was not loaded.
In the end I launched Sysinternals’ process monitor and noticed that it searched for the dll ‘everywhere’ but didn’t find it.
Silent failures are great!
answered Oct 3, 2016 at 13:55
![]()
xtoflxtofl
40.6k12 gold badges105 silver badges191 bronze badges
2
Introduction
Localhost refused to connect is a common error that may occur when working on a local machine. In this article, you will learn the most common causes of the localhost refused to connect error and how to resolve it.
Localhost is a loopback address used for testing and developing on a local machine. When a user pings localhost, the request remains on the local network and connects to the machine in use. If such a connection is not possible, the browser displays an error message:
localhost refused to connect.
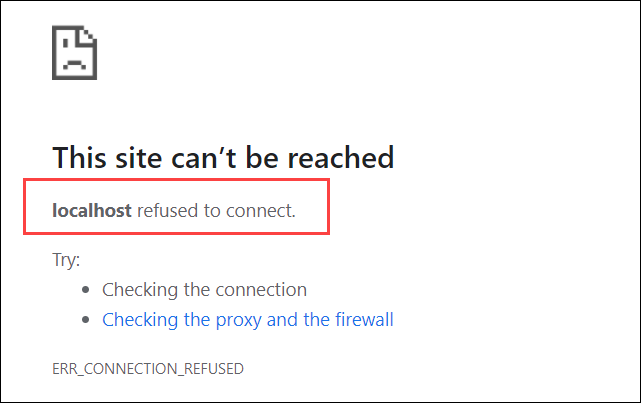
The localhost refused to connect message displays one of two possible errors:
- ERR_CONNECTION_REFUSED (the server rejected the request for connection)
- ERR_CONNECTION_TIMEOUT (the server has not responded to the request and the client is still waiting for a response)
What Causes the Localhost Refused to Connect Error
Common causes that result in localhost refusing to connect:
- The server being blocked by the firewall.
- Localhost doesn’t resolve to 127.0.0.1.
- Apache failing to run properly.
- DNS failing to function.
- The server being accessed from the wrong port.
- The browser settings blocking the connection.
To solve the issue, identify the source of the error. The best way to do so it to test out each probable cause, starting from the most frequent ones.
How to Solve the Localhost Refused to Connect Error?
The sections below provide methods to resolve the localhost refused to connect error.
Temporary Disable the Firewall
Check whether the firewall settings are blocking the localhost connection by disabling the firewall temporarily. (For OS-specific instructions, see sections below.)
Once you disable the firewall, navigate to localhost in a browser to check whether it connects. If localhost still refuses to connect, move on to other potential causes. Also, make sure to turn on the firewall once you have finished working with localhost.
Disable Firewall on Linux
The firewall configuration tool on Linux systems varies depending on the distro. While Ubuntu and Debian distributions utilize UFW, CentOS and RHEL systems use firewalld by default.
To disable the UFW firewall on Ubuntu/Debian, open the terminal window and run:
sudo ufw disableCheck the status by running:
sudo ufw status
To disable firewalld on CentOS/RHEL, use the command:
sudo systemctl stop firewalldVerify the status is inactive by running:
sudo systemctl status firewalld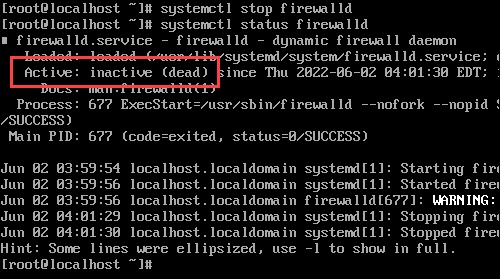
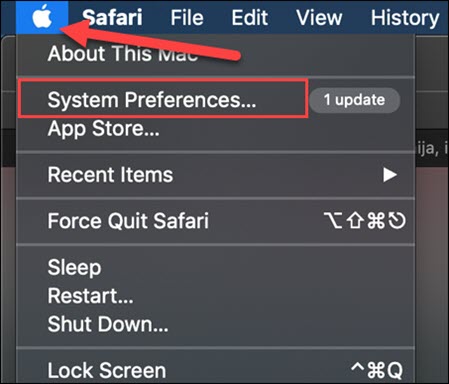
Disable the Firewall on Mac OS
1. Click the Apple icon in the upper-left corner to open the menu and select System Preferences.
2. Navigate to Security and Privacy settings and move to the Firewall tab.
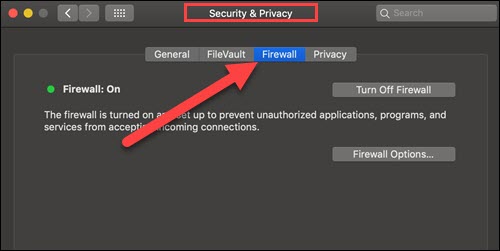
3. If the lock at the bottom left of the pane is locked, click the icon to unlock the preference pane. Type in your password to confirm.
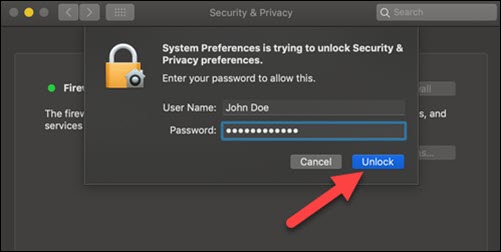
4. Click Turnoff Firewall to complete the process.
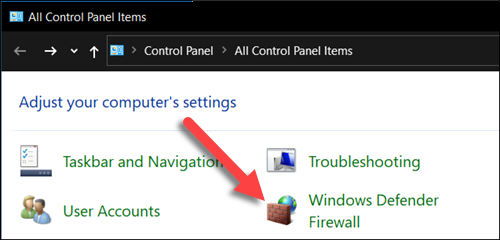
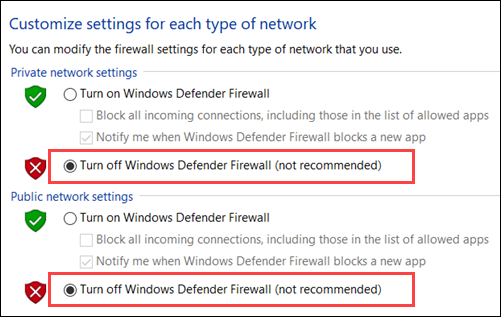
Disable the Firewall on Windows
1. Open the Windows Control Panel and click the Windows Defender Firewall icon.
2. Select Turn Windows Defender Firewall on or off from the menu on the left side of the window.
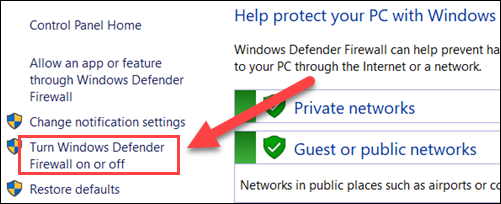
3. Finally, check the Turn off Windows Defender Firewall checkbox and click OK.
Check Localhost IP Address
Localhost and the IP address 127.0.0.1 are not completely synonymous. In most cases, 127.0.0.1 is used for loopback, however not exclusively. For instance, IPv6 systems link the localhost to the address : :1.
Additionally, if the host file has been modified, the localhost could link to a different IP address.
Try typing both localhost and 127.0.0.1 in the browser search bar, in case of a connection error.
Check Apache Server Status
Another important factor for accessing the localhost is that the Apache server is running properly. Therefore, if the system rejects the connection, it is necessary to check Apache’s status.
The command for verifying whether Apache is running on a Linux OS depends on the distribution in use. Follow the steps below and use the appropriate command.
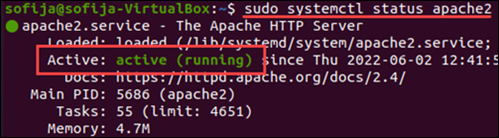
1. Verify Apache status with the command:
Ubuntu/Debian:
sudo systemctl status apache2CentOS/RHEL:
sudo systemctl status httpdThe output should display that Apache is active (running), as in the image below. If that is the case, the Apache server is working correctly and you can move to the next probably cause for error.
2. If Apache is not running properly, the output displays that its status is inactive (dead).
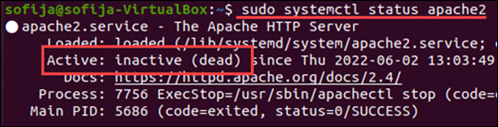
3. To fix the issue, try restarting the Apache service using:
Ubuntu/Debian:
sudo systemctl restart apache2CentOS/RHEL:
sudo systemctl restart httpd4. Check the Apache status again:
Ubuntu/Debian:
sudo systemctl status apache2CentOS/RHEL:
sudo systemctl status httpd5. If the status remains inactive, move on to deleting and reinstalling Apache on the system:
- Install Apache on Ubuntu
- Install Apache on CentOS
Flush the DNS
DNS cache is stored to speed up loading of previously visited websites. If DNS collects too many records or some of the records get corrupt, it may fail to function. Such an issue can result in localhost refusing to connect.
The best way to ensure DNS is not preventing the localhost connection is to clear the DNS cache and delete all saved DNS lookup information.
The steps for flushing the DNS vary depending on the OS in use. For detailed instructions, refer to How to Flush DNS Cache in macOS, Windows, & Linux.
Linux:
sudo /etc/init.d/nscd restartMacOS:
sudo killall -HUP mDNSResponderWindows:
ipconfig /flushdnsChange Port Settings
By default, localhost uses port number 80. If another application is using the same port, it can create a conflict resulting in localhost refusing to connect.
Change Port Number on XAMPP
If you are using the XAMPP stack, follow the steps below:
1. Open the XAMPP control panel and click on the Netstat button.

2. Netstat opens a list of all TCP listening sockets. If port 80 is already in use by another application, move on to choosing a free port for Apache.
3. Before proceeding to the next step, make sure to stop the Apache service.

4. Locate and open the httpd.conf file. The location of the file varies depending on the OS:
- Linux users will find it in bin/apache.
- Windows stores the file in C:xamppapacheconf.
- The path to the file on Mac OS is Applications/XAMPP/xamppfiles/etc/httpd.conf.
5. Find the following lines in the file:
Listen 80
ServerName localhost:80
6. Change the port number to any other free port. In this example, we change it to 8080.
Listen 8080
ServerName localhost:8080
7. Save and exit the file. Restart the Apache web server in the XAMPP control panel and try connecting to localhost again.
Change Port Number on WAMPP
If you are using the WAMP software stack and want to change the Apache port:
1. First, stop all instances running in WAMP with the End Task button.
2. Then, open the httpd.conf file located in C:wampapache2conf.
3. Locate the following lines in the file:
Listen 80
ServerName localhost:80
4. Change the port number to a free port (8080 for example).
Listen 8080
ServerName localhost:8080
5. Save the changes and exit the file.
Check Browser Settings
Make sure the browser is not responsible for causing the localhost error.
Start by navigating to localhost in a different browser. If the connection establishes, then the settings in the initial browser are the issue.
Often, browsers automatically redirect HTTP addresses to HTTPS causing the localhost refused to connect error.
Change DNS Settings in Chrome
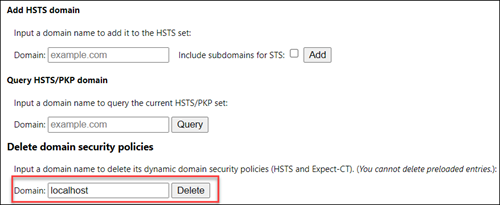
1. To change the default setting on Chrome, paste the following URL in the address bar: chrome://net-internals/#hsts
2. Then, open the Domain Security Policy tab and scroll down to the Delete domain security policies section.
3. Add localhost as the domain name and click Delete.
4. Restart the browser to apply the changes.
Change DNS Settings in Firefox
1. Open the Application Menu in the top right corner of the browser window and select Settings.
2. Navigate to Privacy & Security and scroll down to the HTTPS-Only Mode section.
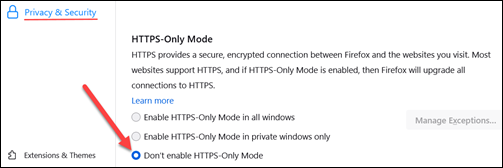
3. To apply the changes, reopen the browser.
Conclusion
After reading this article, you should know the steps to locate the cause and fix the localhost refused to connect error.
Another common issue that occurs when working locally on software stacks such as LAMP, WAMP, and others is the Access denied for user root@localhost error. Follow the link to troubleshoot Access denied for user root@localhost error in a few simple steps.
Ошибка connection refused может возникать при подключении к удаленному серверу.
- Подключение через терминалконсоль
- Ошибка в браузере
Connection refused при подключение через терминалконсоль к порту
Ошибка указывает на то, что удаленный сервер отказал в соединении. В большинстве случаев это означает, что порт, к которому идет подключение либо закрыт, либо этот порт не поддерживает ваше подключение.
Проверить, открыт ли порт, вы можете через команду telnet, например через putty: -telnet ip-адрес порт, к примеру — telnet 192.168.1.1 22
Как правило, уточните у администратора сервверахостинга порт для подключения.
Ошибка ERR_CONNECTION_REFUSED в браузере
Как правило, если ошибка появилась в браузере, и другие сайты у вас открываются — то безусловно проблема на стороне сайта и повлиять вы на нее не можете. Если такая ошибка возникает только на каком-то определенном разделе сайта, вы можете связаться с администратором сайта.
Если же ошибка возникает при попытке зайти на любой из сайтов — проблема связана с провайдером. Обратитесь в техподдержку, но прежде убедитесь, что услуги связи у вас подключены и оплачены.
If you’ve encountered the «Connect() Failed (111: Connection Refused) Error While Connecting to Upstream» issue while working with Nginx, you’re not alone. This error often occurs when Nginx is unable to establish a connection with the upstream server. In this guide, we’ll explain the root causes of this error and walk you through the process of resolving it step-by-step.
Table of Contents
- Understanding the Error
- Step 1: Check the Upstream Server
- Step 2: Verify Nginx Configuration
- Step 3: Check Firewall and Security Group Rules
- Step 4: Monitor Logs
- Step 5: Test Connectivity
- FAQs
Understanding the Error
The connect() failed (111: Connection refused) error while connecting to upstream error occurs when Nginx is unable to establish a connection with the specified upstream server. This can be caused by several factors, including:
- The upstream server is down or not responding
- Incorrect configuration settings in Nginx
- Firewall or security group rules blocking the connection
- Network issues between Nginx and the upstream server
Step 1: Check the Upstream Server
Before diving into the Nginx configuration, first, make sure the upstream server is running and responding to requests. You can use the following command to check if the upstream server is listening on the expected port:
sudo netstat -tuln | grep LISTEN
If the upstream server is not running or not responding, restart it and ensure it’s running correctly.
Step 2: Verify Nginx Configuration
Next, examine your Nginx configuration files to ensure you’ve specified the correct upstream server settings. Look for the upstream and proxy_pass directives in your Nginx configuration file (usually located at /etc/nginx/nginx.conf or /etc/nginx/sites-available/default):
http {
  upstream backend {
    server backend_server_ip:backend_server_port;
  }

  server {
    ...
    location / {
      proxy_pass http://backend;
    }
    ...
  }
}
Ensure that the backend_server_ip and backend_server_port values are correct, and the upstream server is listening on the specified port.
After making any necessary changes, reload the Nginx configuration using:
sudo nginx -t && sudo nginx -s reload
Step 3: Check Firewall and Security Group Rules
Firewalls or security group rules might be blocking Nginx from connecting to the upstream server. Check your firewall settings to ensure that the required ports are open:
- On Linux systems, use
iptablesorfirewalldto check and update firewall rules. - On cloud platforms like AWS or GCP, verify the security group rules associated with your instances.
Ensure that the rules allow incoming connections on the port used by the upstream server.
Step 4: Monitor Logs
Keep an eye on both the Nginx and upstream server logs to identify any issues. The Nginx error log is usually located at /var/log/nginx/error.log. Tail the log in real-time using:
sudo tail -f /var/log/nginx/error.log
For the upstream server, check the relevant logs, depending on the application or service you’re using.
Step 5: Test Connectivity
After completing the previous steps, test the connectivity between Nginx and the upstream server using tools like curl, telnet, or nc. For example:
curl http://backend_server_ip:backend_server_port
If the connection is successful, you should no longer encounter the «Connect() Failed (111: Connection Refused) Error While Connecting to Upstream» error.
FAQs
Q1: Can SELinux cause the «Connect() Failed (111: Connection Refused) Error While Connecting to Upstream»?
Yes, SELinux can be a source of this error. If you suspect that SELinux is the cause, you can temporarily disable it using the command sudo setenforce 0 and retest the connection. If the error disappears, you’ll need to properly configure SELinux to allow the connection.
Q2: How can I check if my Nginx configuration has errors?
You can use the nginx -t command to test your Nginx configuration for any syntax errors:
sudo nginx -t
Q3: How do I restart Nginx after making changes to the configuration files?
To restart Nginx, use the following command:
sudo systemctl restart nginx
Q4: Can I use multiple upstream servers in my configuration?
Yes, Nginx supports load balancing and failover using multiple upstream servers. You can specify multiple server directives within the upstream block:
http {
  upstream backend {
    server backend_server1_ip:backend_server1_port;
    server backend_server2_ip:backend_server2_port;
  }
  ...
}
Q5: How can I enable SSL between Nginx and the upstream server?
To enable SSL between Nginx and the upstream server, you’ll need to configure Nginx with the necessary SSL certificates and update the proxy_pass directive to use https. Check out this SSL configuration guide for detailed instructions.
- Nginx Load Balancing and Failover
- Configuring HTTPS Servers with Nginx
- SELinux Users and Administrators Guide
Improve Article
Save Article
Like Article
Improve Article
Save Article
Like Article
java.net.ConnectException: Connection refused: connect is the most frequent kind of occurring networking exception in Java whenever the software is in client-server architecture and trying to make a TCP connection from the client to the server. We need to handle the exception carefully in order to fulfill the communication problem. First, let us see the possible reasons for the occurrence of java.net.ConnectException: Connection refused.
- As client and server involved, both should be in a network like LAN or internet. If it is not present, it will throw an exception on the client-side.
- If the server is not running. Usually ports like 8080, (for tomcat), 3000 or 4200 (for react/angular), 3306(MySQL), 27017(MongoDB) or occupied by some other agents or totally down i.e. instance not started.
- Sometimes a server may be running but not listening on port because of some overridden settings etc.
- Usually, for security reasons, the Firewall will be there, and if it is disallowing the communication.
- By mistake, the wrong port is mentioned in the port or the random port generation number given.
- Connection string information wrong. For example:
Connection conn = DriverManager.getConnection(“jdbc:mysql://localhost/:3306<dbname>?” + “user=<username>&password=<password>”);
Implementation: Here we are using MySQL database connectivity and connection info should be of this format. Now let us see the ways to fixing the ways of java.net.ConnectException: Connection refused. Ping the destination host by using the commands as shown below:
ping <hostname> - to test

ipconfig(for windows)/ifconfig(linux) - to get network configuration

netstat - statistical report

nslookup - DNS lookup name
There are tools like “Putty” are available to communicate, and it is a free implementation of Telnet and SSH for Windows and Unix.

Example 1:
Java
import java.io;
import java.net.*;
import java.util.*;
public class GFG {
public static void main(String[] args)
{
String hostname = "127.0.0.1";
int port = 80;
try (Socket socket = new Socket(hostname, port)) {
InputStream inputStream
= socket.getInputStream();
InputStreamReader inputStreamReader
= new InputStreamReader(inputStream);
int data;
StringBuilder outputString
= new StringBuilder();
while ((data = inputStreamReader.read())
!= -1) {
outputString.append((char)data);
}
}
catch (IOException ex) {
System.out.println(
"Connection Refused Exception as the given hostname and port are invalid : "
+ ex.getMessage());
}
}
}
Output:

Example 2: MySQL connectivity Check
Java
import java.io.*;
import java.util.*;
import java.sql.*;
try {
Connection con = null;
String driver = "com.mysql.jdbc.Driver";
String IPADDRESS = "localhost"
String url1
String db = "<your dbname>";
String dbUser = "<username>";
String dbPasswd = "<password>";
Class.forName(driver).newInstance();
con = DriverManager.getConnection(url1 + db, dbUser,
dbPasswd);
System.out.println("Database Connection Established");
}
catch (IOException ex) {
System.out.println(
"Connection Refused Exception as the given hostname and port are invalid : "
+ ex.getMessage());
}
Similarly, for other DB, we need to specify the correct port number i.e. 27017 for MongoDB be it in case of SSL (Secure socket layer) is there, prior checks of Firewall need to be checked and hence via coding we can suggest the solutions to overcome the exception
Conclusion: As readymade commands like ping, telnet, etc are available and tools like putty are available, we can check the connectivity information and overcome the exception.
Last Updated :
04 Feb, 2022
Like Article
Save Article