
Olaf, did you read my reply where I explained my solution? First you should try the steps outlined in the article Todd references:
http://blogs.adobe.com/aftereffects/2011/02/troubleshooting-quicktime- errors-with-after-effects.htm…
There seems to be a good way to isolate if it’s the same issue I had, though. Let me go into a bit of depth for you.
The trick was to launch the OS X app called Console, located in Applications > Utilities. It is a program that compiles and displays the system logs in real time. It’s great to see the little things happening in the system that don’t make it into the user interface. When I had my Console up and generated that same error you’re having, I noticed this error in the log:

The key here is the Adobe QT32 Server, which is mentioned in the TCP part of the article I linked to above from Todd. In my case at least, what was happening was that a third party app called AirServer was talking to the system’s QuickTime over the same TCP ports the QT32 Server engine was trying, and it resulted in Adobe QT32 Server crashing, and that alert being thrown up in AfterEffects.
If you’re in the same boat, it means you have some sort of app or system extension that is also talking to QuickTime over TCP. That may not make any sense, but the easy thing to do is quit ALL third party apps, then quit AE, then restart AE.
In my situation if AE gave me the error and then I quit AirServer, the error still happened because Adobe QT32 had already crashed. You have to relaunch AE after closing the offending third party app.
To be sure you’ve quit all third party apps, open Activity Monitor (Applications > Utilities), chose «My Processes» from the dropdown menu, and scan through the list to make sure. You don’t have to recognize all the processes there, but you should be able to recognize any third party ones you put there.
Hope that helps!
Matt
Если все перечисленное выше не помогло (или просто вам неохота возиться, пробуя все подряд), значит, скорее всего ошибка происходит из-за конкретного проекта. При возникновении ошибки или другой проблемы обратите внимание на таймкод (время) ошибки. Если баг возникает каждый раз в одном и том же месте, то есть вероятность, что он вызывается каким-нибудь конкретным эффектом или анимацией, которую придется изучить и, возможно, изменить. Например, при работе с частицами можно выбрать другой режим работы CPU/GPU в плагине (если поддержка есть), уменьшить количество частиц, для Element 3D упростить геометрию, уменьшить количество полигонов, проверить материалы, текстуры, размер и т.п.
Для уточнения проблемного слоя или эффекта мне несколько раз помогал такой способ. Вы выбираете половину слоев в композиции и удаляете их все. Рендерите видео, ну или как вы там предпочитаете проверять. Тут возможны два варианта:
- Если ошибка пропала, значит, она была в удаленных слоях композиции, отменяем удаление, и теперь удаляем только половину удаленных ранее слоев. И снова запускаем рендер.
- Если ошибка осталась, то продолжаем дальше удалять слои, упрощая проект.
Если ошибку вызывает что-то конкретное, рано или поздно мы найдем виновника таким методом. Я понимаю, что это долгий, муторный и неудобный способ, но если вы знаете лучше, то пишите мне, буду благодарен! ![]()
А если ошибка возникает каждый раз в случайных местах композиции, то можно попробовать рендерить не готовое видео, а набор кадров Image Sequence. В After Effects есть несколько пресетов для этой цели под общим названием Multi-Machine Settings/Sequence в очереди рендера Render Queue.
В таком случае каждый кадр будет отдельным изображением на диске, и если рендер оборвется, вы не потеряете уже просчитанный готовый материал. А когда вы продолжите рендер (можно продублировать задание в очереди рендера Render Queue), After Effects пропустит уже существующие на диске кадры и начнет считать со следующего места. За это отвечает отдельная настройка в Render Settings — Skip existing files (allows multi-machine rendering) («Пропустить существующие файлы (позволяет осуществлять рендеринг на нескольких компьютерах)«).
Но, естественно, звук в таком виде не получится вывести из программы After Effects и придется потом дополнительно его считать как WAV файл без видео и объединять с набором отрендеренных кадров композиции. Их, конечно же, надо предварительно импортировать в любую программу для работы с видео — After Effects, Premiere Pro, да любую. Даже мой любимый FFMPEG может это сделать, да все нормальные программы умеют делать такое. Только проверьте частоту кадров, так как куча файлов на диске не имеет такой информации, и это надо задавать руками.
Вообще, это было сделано для рендеринга по сети несколькими компьютерами одновременно, чтобы они не считали одинаковые кадры, назначенные другому After Effects. А самое интересное, что такое можно провернуть и на одной машине для ускорения рендера, ведь одна копия After Effects не задействует ресурсы процессора CPU на полную. Уменьшение времени рендера в After Effects
Проблема. При запуске After Effects появляется сообщение об ошибке: «3D-рендеринг с трассировкой лучей: сбой компиляции исходного построителя текстуры (5070::0)»
В сообщении об ошибке указывается, что установлена новая карта NVIDIA, которая не поддерживает ускорение 3D-приложений с трассировкой лучей. Эта функция больше не разрабатывается, поэтому эта проблема не является критической.
К графическим процессорам NVIDIA, которые не поддерживаются для ускорения 3D-композиций с трассировкой лучей, относятся следующие:
- GTX 750
- GTX 750 Ti
- GTX 960
- GTX 970
- GTX 980
Эти карты основаны на так называемой архитектуре Максвелла.
Решение 1. Нажмите кнопку «ОК» в диалоговом окне предупреждения. Использование 4D Lite для работы с 3D и After Effects
Нажмите кнопку «ОК» в диалоговом окне предупреждения.
Для работы с 3D и After Effects используйте Cinema 4D Lite (в составе After Effects CC и более поздних версий) вместо 3D-композиций с трассировкой лучей.
Решение 2. Если ваш графический процессор поддерживается для ускорения 3D-композиций с трассировкой лучей, но вы все равно видите сообщение об ошибке, выполните следующие действия:
Вполне возможен вариант, при котором ГП поддерживается для ускорения 3D-композиций с трассировкой лучей, но сообщение об ошибке все равно появляется.
Если ваш графический процессор находится в списке системных требований для ускорения 3D-композиций (см. раздел для After Effects CC и более поздних версий и раздел для After Effects CS6), затем обновите After Effects до самой последней версии.
Если вы используете устаревшую карту NVIDIA (не Maxwell), в которой предусмотрено более 1 ГБ видеопамяти, но при этом она не поддерживается, вы можете включить не тестированный, неподдерживаемый ГП для CUDA-ускорения 3D-рендеринга с трассировкой лучей в меню «Установки» > «Предварительные просмотры» > «Сведения о ГП»: «Включить не тестированный, неподдерживаемый ГП для CUDA-ускорения 3D-рендеринга с трассировкой лучей».
Olaf, did you read my reply where I explained my solution? First you should try the steps outlined in the article Todd references:
http://blogs.adobe.com/aftereffects/2011/02/troubleshooting-quicktime- errors-with-after-effects.htm…
There seems to be a good way to isolate if it’s the same issue I had, though. Let me go into a bit of depth for you.
The trick was to launch the OS X app called Console, located in Applications > Utilities. It is a program that compiles and displays the system logs in real time. It’s great to see the little things happening in the system that don’t make it into the user interface. When I had my Console up and generated that same error you’re having, I noticed this error in the log:
The key here is the Adobe QT32 Server, which is mentioned in the TCP part of the article I linked to above from Todd. In my case at least, what was happening was that a third party app called AirServer was talking to the system’s QuickTime over the same TCP ports the QT32 Server engine was trying, and it resulted in Adobe QT32 Server crashing, and that alert being thrown up in AfterEffects.
If you’re in the same boat, it means you have some sort of app or system extension that is also talking to QuickTime over TCP. That may not make any sense, but the easy thing to do is quit ALL third party apps, then quit AE, then restart AE.
In my situation if AE gave me the error and then I quit AirServer, the error still happened because Adobe QT32 had already crashed. You have to relaunch AE after closing the offending third party app.
To be sure you’ve quit all third party apps, open Activity Monitor (Applications > Utilities), chose «My Processes» from the dropdown menu, and scan through the list to make sure. You don’t have to recognize all the processes there, but you should be able to recognize any third party ones you put there.
Hope that helps!
Matt
If you’re having trouble with After Effects not rendering after you’ve completed your composition, don’t despair, this tutorial will walk you through five easy steps you can take to troubleshoot rendering issues. Below you will learn about the Rendering Queue, Media Encoder, using CPU rendering, flushing the cache, and using the “secret” preferences panel.
Whenever you add effects, images, or video clips, After Effects must render the results for you to preview or export. This process is largely done in the background, without your knowledge. But sometimes during the final export, rendering problems can pop up unexpectedly.

Running into a rendering error after you’ve completed your composition can be extremely frustrating. On top of that, diagnosing the cause of an error can be quite difficult. That’s why we’ve outlined five steps for you to overcome the problem. If your issue is that After Effects is shutting down, check out this troubleshooting resource instead.
1. Use the Render Queue Panel
This is the most common way to render and export your After Effects projects. If you’re new to After Effects, this procedure may be new to you and worth reviewing to make sure you’re doing it correctly. If you’re an AE veteran, you may want to skip ahead.
- When you’ve completed your composition in After Effects, add it to the Render Queue by selecting Composition > Add to Render Queue from the top menu bar (shortcut Control + Command + M).
- The Render Queue panel should appear at the bottom of your After Effects window. Click the blue Best Settings to open the Render Settings window where you can choose your export options such as Frame Rate and Motion Blur. Close this window when you’re done.
- Below Render Settings is the Output Module. Lossless is a good preset for short compositions that you want to import and edit in an NLE like Premiere Pro. If your composition is longer, however, the Lossless preset may produce gigantic files that quickly fill up your hard drive. You can produce smaller video files using Media Encoder, which is covered in the next section.
- To the right, you should see Output To. By clicking the blue text here, you should open a pop-up window where you can choose the destination of your exported video file.
- Once you’ve set a destination for your render, a button should appear at the top right of the Render Queue panel that says Render. Click here to begin rendering your file.
- You can watch the progress of the render as the blue status bar fills up at the top of the Render Queue panel. When it’s finished, your file should appear at the destination you’ve set.
The built-in Render Queue is the most common export method for After Effects projects, and if you follow the above steps, you should be able to output your video compositions without a hitch. Unfortunately, errors do occur from time to time. Below we’ve outlined a few additional methods you can employ to make sure your composition renders correctly.
2. Render Using Media Encoder
Adobe Media Encoder is the creative cloud suite’s catch-all media export program, which can output your files from After Effects, Premiere Pro, Photoshop, etc. It includes a handy selection of useful presets for common platforms like YouTube and Vimeo.
If you’re having trouble rendering your final composition using After Effects’ built-in Render Queue, then you might have more luck with Media Encoder. Although it’s a separate application, it comes bundled with the Adobe CC suite. It’s pretty easy to use too, even if you’ve never opened the program before.
- Open After Effects and Media Encoder on your computer.
- In After Effects, once you’re ready to export your project, choose File > Export > Add to Media Encoder Queue.
- Switch over to Media Encoder. You should see your After Effects project appear in the Queue panel on the right side of the screen.
- To the left of your After Effects Project in the Queue panel, you should see the word Format with a small beneath it. Click this arrow to drop-down a list of all the formats you can output to. Choose your preference. In this example, we’ll be choosing H.264 because this is a very common format for online video sharing.
- To the right of Format, you should see a similar drop-down option for Preset. Click here and choose the best preset for your output. For this tutorial, we’ll choose Youtube 1080 Full HD.
- To the right of Preset, there’s a field to choose your Output File. Click here and set the destination where you’d like to save your final output file.
- When everything is set correctly, press the green arrow at the top right to Start Queue (keyboard shortcut Return).
- You can watch the progress of your export in the Encoding panel at the bottom of the screen.
Under most circumstances, your After Effects project should render in Media Encoder without a hiccup. If you’re still encountering difficulty, such as an error message, you may want to continue with the following troubleshooting steps below.
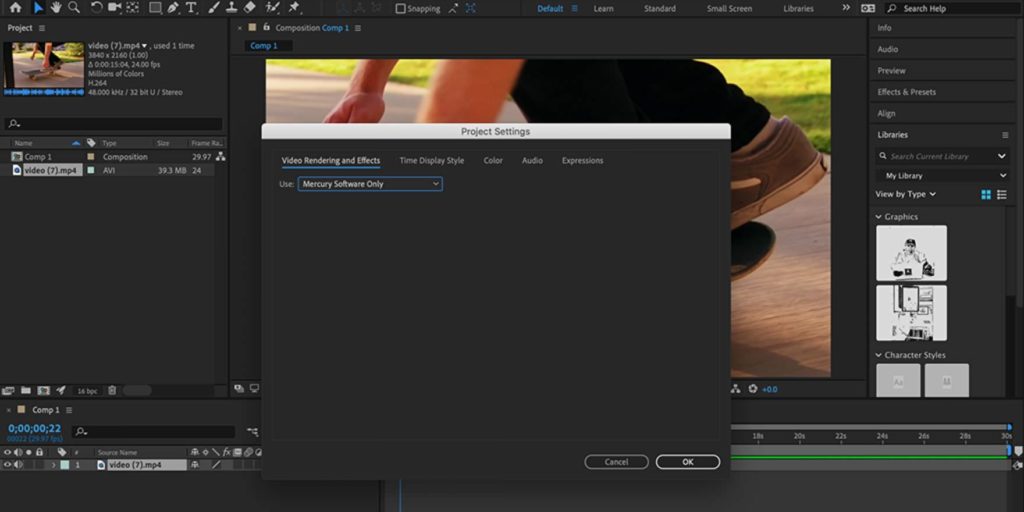
3. Switch to CPU Rendering Instead of GPU
After Effects can take advantage of several GPU technologies, like OpenGL and Metal, these allow you to render your compositions using high-performance graphics cards quickly.
While convenient, this feature has been known to cause render problems from time to time. If your render keeps failing, you may want to try switching this option off for the time being and render with just your CPU, also known as Software Rendering.
- Navigate to File > Project Settings on the top menu bar.
- Under Video Rendering and Effects, change the drop-down option to Software Only.
- Render your project using the Render Queue or Media Encoder as outlined above.
CPU rendering can be much slower than GPU rendering, so you may need to wait sometime to see the results. And don’t forget to change back to GPU rendering when you’re done!
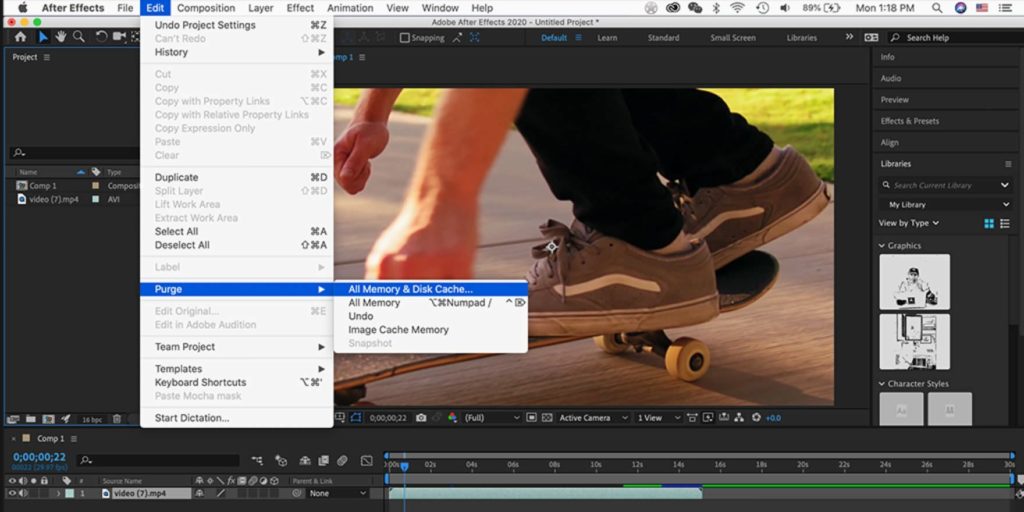
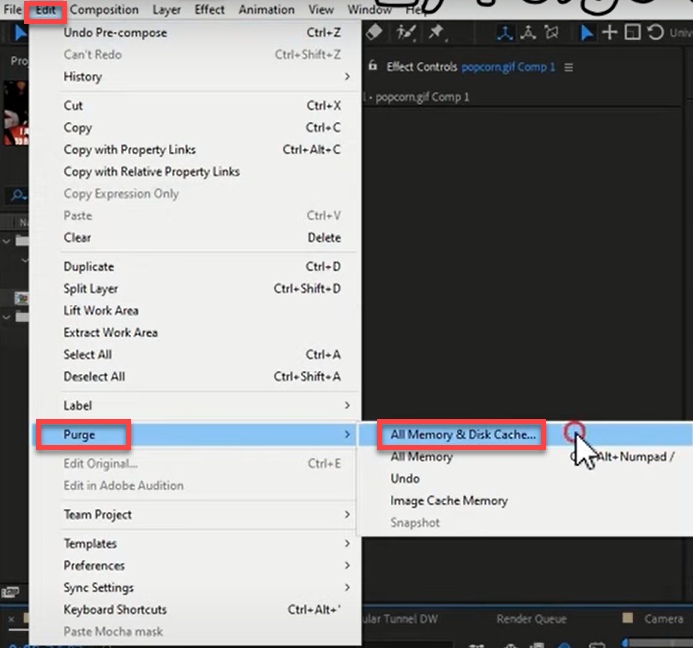
4. Flush the Cache
Behind the scenes, After Effects is storing renderings of your work as you go. This allows you to quickly preview your composition without having to wait on render times as you work. Generally, this is a helpful feature, but sometimes cache files can become large or contain errors that disrupt your rendering performance. When this happens, it’s helpful to clear the cache.
- Navigate to Edit > Purge > All Memory and Disk Cache.
- A pop-up should appear asking for confirmation. Click OK.
- A blue progress bar will appear. When it has filled up, your cache has been cleared.
- Try rendering again using the Render Queue or Media Encoder.
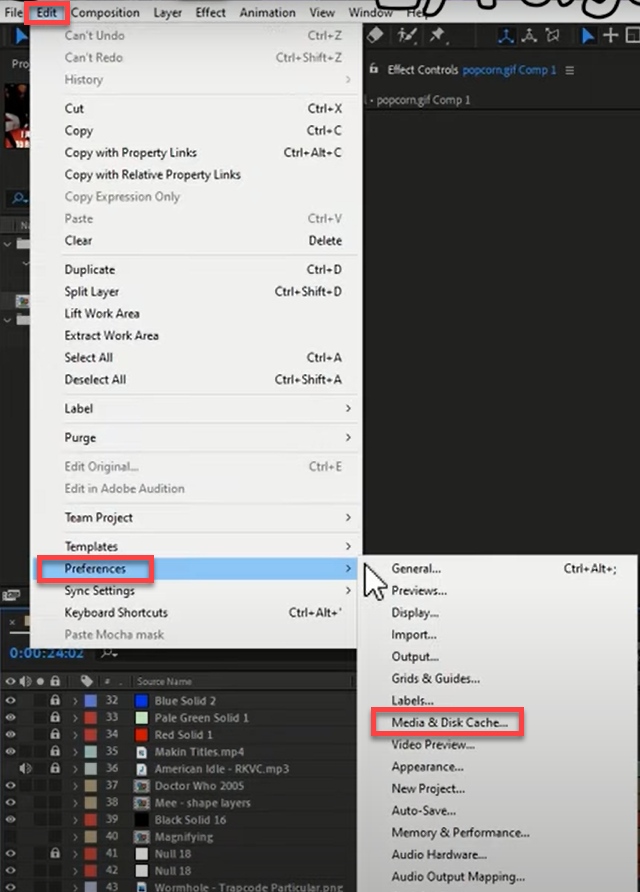
5. Use the Secret Preference Settings
If you’ve gone through the troubleshooting steps above to no avail, there is one last trick to be tried. Adobe has hidden a covert settings menu for last resort bug-fixing. Adjusting the preferences in this panel should only be used if you’ve tried everything else: it’s time for the secret Preference panel.
- If you’re a Windows user, select Edit. If you’re a Mac user, select After Effects.
- Hold down Shift and select Preferences.
- Choose General, and don’t let go of that Shift key!
- When the Preferences window pops up, you will notice a Secret category available at the bottom. Open it.
- Try adjusting these options. You can Disable Layer Cache and Ignore Sequence Rendering Errors.
- Select OK then try to render again using the Render Queue or Media Encoder.
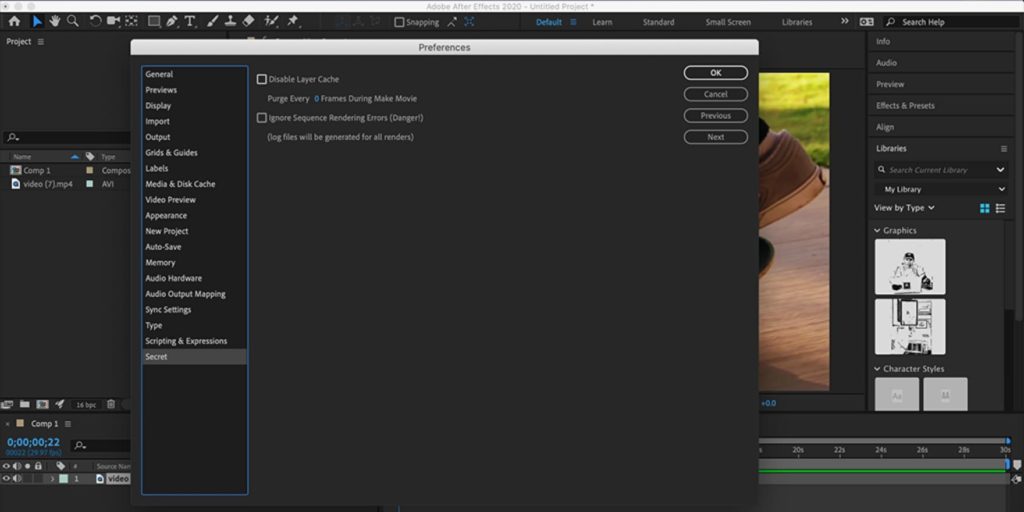
The section is hidden for a reason—these are not settings you should normally adjust. So make sure when you’re done, you go back and disable anything you changed!
That covers our 5 basic steps for overcoming render errors. By using the Render Queue, Media Encoder, CPU rendering, flushing the cache, and the elusive “secret” settings menu, hopefully, your rendering issues are far behind you.
Now that you’ve solved your rendering problems, there’s a lot more to do in After Effects. If you’d like to upgrade your AE toolkit, Motion Array has thousands of curated After Effects templates and presets available for download so you can produce stunning projects in minutes!


After Effects error: Rendering error while writing to file (-1610153453)

Одна из частовстречающихся ошибок рендера в формате H264 (и не только), в After Effects это After Effects error: Rendering error while writing to file (путь,название файла).mp4″ (-1610153453).
Решение проблемы:
Официальная поддержка Adobe рекомендует переустановить Quick Time, почистить реестр и добавить поддержку кеша при рендере (в настройках edit > preferences > media&disk cache поставить галку на enable cache и выставить свободного пространства не менее 20Гб). Но это все чаще всего не работает, особенно в русском сегменте пользователей, которые пользуются кирилицей для название папок в системе.
Итак проблема решается просто: проверьте чтобы путь сохраняемого файла был прописан АНГЛИЙСКИМИ буквами и не имел спецзнаков. Например: «D:WORKMy_intro» вместо «D:WORKМое интро»
Похожие статьи:
- Быстрое выравнивание слоев (Align)
- Пропали графические элементы в вегасе?
- Не работает превью! Черный экран вместо него!
- Как отключить окно превью при рендере в АЕ?
- Как поменять цвет у маски в АЕ?
Не пропустите:
- Шаблоны модуля вывода в АЕ
- Brightness/gamma color shift при выводе из АЕ
- Организация работы с проектом в АЕ
- Остается сетка после CC Particle World
- Проблема с системной палитрой
- (6)
- Вконтакте
У Вас недостаточно прав для добавления комментариев.
Регистрируемся,а потом можно будет писать.
August 8, 2022
duyenle
Adobe After Effects is a digital visual effects, motion graphics, and compositing application developed by Adobe Systems and used in the post-production process of film making, video games and television production. Sometimes, we have to face the problem that the project fails to render in After Effects. How we can avoid failed render in After Effects? In this article, we mention 3 ways to try when the problem happens.
The key here is the Adobe QT32 Server, which is mentioned in the TCP part of the article I linked to above from Todd. In my case at least, what was happening was that a third party app called AirServer was talking to the system’s QuickTime over the same TCP ports the QT32 Server engine was trying, and it resulted in Adobe QT32 Server crashing, and that alert being thrown up in AfterEffects.
If you’re in the same boat, it means you have some sort of app or system extension that is also talking to QuickTime over TCP. That may not make any sense, but the easy thing to do is quit ALL third party apps, then quit AE, then restart AE.
In my situation if AE gave me the error and then I quit AirServer, the error still happened because Adobe QT32 had already crashed. You have to relaunch AE after closing the offending third party app.
To be sure you’ve quit all third party apps, open Activity Monitor (Applications > Utilities), chose «My Processes» from the dropdown menu, and scan through the list to make sure. You don’t have to recognize all the processes there, but you should be able to recognize any third party ones you put there.
Hope that helps!
Matt
Если все перечисленное выше не помогло (или просто вам неохота возиться, пробуя все подряд), значит, скорее всего ошибка происходит из-за конкретного проекта. При возникновении ошибки или другой проблемы обратите внимание на таймкод (время) ошибки. Если баг возникает каждый раз в одном и том же месте, то есть вероятность, что он вызывается каким-нибудь конкретным эффектом или анимацией, которую придется изучить и, возможно, изменить. Например, при работе с частицами можно выбрать другой режим работы CPU/GPU в плагине (если поддержка есть), уменьшить количество частиц, для Element 3D упростить геометрию, уменьшить количество полигонов, проверить материалы, текстуры, размер и т.п.
Для уточнения проблемного слоя или эффекта мне несколько раз помогал такой способ. Вы выбираете половину слоев в композиции и удаляете их все. Рендерите видео, ну или как вы там предпочитаете проверять. Тут возможны два варианта:
- Если ошибка пропала, значит, она была в удаленных слоях композиции, отменяем удаление, и теперь удаляем только половину удаленных ранее слоев. И снова запускаем рендер.
- Если ошибка осталась, то продолжаем дальше удалять слои, упрощая проект.
Если ошибку вызывает что-то конкретное, рано или поздно мы найдем виновника таким методом. Я понимаю, что это долгий, муторный и неудобный способ, но если вы знаете лучше, то пишите мне, буду благодарен! ![]()
А если ошибка возникает каждый раз в случайных местах композиции, то можно попробовать рендерить не готовое видео, а набор кадров Image Sequence. В After Effects есть несколько пресетов для этой цели под общим названием Multi-Machine Settings/Sequence в очереди рендера Render Queue.
В таком случае каждый кадр будет отдельным изображением на диске, и если рендер оборвется, вы не потеряете уже просчитанный готовый материал. А когда вы продолжите рендер (можно продублировать задание в очереди рендера Render Queue), After Effects пропустит уже существующие на диске кадры и начнет считать со следующего места. За это отвечает отдельная настройка в Render Settings — Skip existing files (allows multi-machine rendering) («Пропустить существующие файлы (позволяет осуществлять рендеринг на нескольких компьютерах)«).
Но, естественно, звук в таком виде не получится вывести из программы After Effects и придется потом дополнительно его считать как WAV файл без видео и объединять с набором отрендеренных кадров композиции. Их, конечно же, надо предварительно импортировать в любую программу для работы с видео — After Effects, Premiere Pro, да любую. Даже мой любимый FFMPEG может это сделать, да все нормальные программы умеют делать такое. Только проверьте частоту кадров, так как куча файлов на диске не имеет такой информации, и это надо задавать руками.
Вообще, это было сделано для рендеринга по сети несколькими компьютерами одновременно, чтобы они не считали одинаковые кадры, назначенные другому After Effects. А самое интересное, что такое можно провернуть и на одной машине для ускорения рендера, ведь одна копия After Effects не задействует ресурсы процессора CPU на полную. Уменьшение времени рендера в After Effects
Проблема. При запуске After Effects появляется сообщение об ошибке: «3D-рендеринг с трассировкой лучей: сбой компиляции исходного построителя текстуры (5070::0)»
В сообщении об ошибке указывается, что установлена новая карта NVIDIA, которая не поддерживает ускорение 3D-приложений с трассировкой лучей. Эта функция больше не разрабатывается, поэтому эта проблема не является критической.
К графическим процессорам NVIDIA, которые не поддерживаются для ускорения 3D-композиций с трассировкой лучей, относятся следующие:
- GTX 750
- GTX 750 Ti
- GTX 960
- GTX 970
- GTX 980
Эти карты основаны на так называемой архитектуре Максвелла.
Решение 1. Нажмите кнопку «ОК» в диалоговом окне предупреждения. Использование 4D Lite для работы с 3D и After Effects
Нажмите кнопку «ОК» в диалоговом окне предупреждения.
Для работы с 3D и After Effects используйте Cinema 4D Lite (в составе After Effects CC и более поздних версий) вместо 3D-композиций с трассировкой лучей.
Решение 2. Если ваш графический процессор поддерживается для ускорения 3D-композиций с трассировкой лучей, но вы все равно видите сообщение об ошибке, выполните следующие действия:
Вполне возможен вариант, при котором ГП поддерживается для ускорения 3D-композиций с трассировкой лучей, но сообщение об ошибке все равно появляется.
Если ваш графический процессор находится в списке системных требований для ускорения 3D-композиций (см. раздел для After Effects CC и более поздних версий и раздел для After Effects CS6), затем обновите After Effects до самой последней версии.
Если вы используете устаревшую карту NVIDIA (не Maxwell), в которой предусмотрено более 1 ГБ видеопамяти, но при этом она не поддерживается, вы можете включить не тестированный, неподдерживаемый ГП для CUDA-ускорения 3D-рендеринга с трассировкой лучей в меню «Установки» > «Предварительные просмотры» > «Сведения о ГП»: «Включить не тестированный, неподдерживаемый ГП для CUDA-ускорения 3D-рендеринга с трассировкой лучей».
Olaf, did you read my reply where I explained my solution? First you should try the steps outlined in the article Todd references:
http://blogs.adobe.com/aftereffects/2011/02/troubleshooting-quicktime- errors-with-after-effects.htm…
There seems to be a good way to isolate if it’s the same issue I had, though. Let me go into a bit of depth for you.
The trick was to launch the OS X app called Console, located in Applications > Utilities. It is a program that compiles and displays the system logs in real time. It’s great to see the little things happening in the system that don’t make it into the user interface. When I had my Console up and generated that same error you’re having, I noticed this error in the log:
The key here is the Adobe QT32 Server, which is mentioned in the TCP part of the article I linked to above from Todd. In my case at least, what was happening was that a third party app called AirServer was talking to the system’s QuickTime over the same TCP ports the QT32 Server engine was trying, and it resulted in Adobe QT32 Server crashing, and that alert being thrown up in AfterEffects.
If you’re in the same boat, it means you have some sort of app or system extension that is also talking to QuickTime over TCP. That may not make any sense, but the easy thing to do is quit ALL third party apps, then quit AE, then restart AE.
In my situation if AE gave me the error and then I quit AirServer, the error still happened because Adobe QT32 had already crashed. You have to relaunch AE after closing the offending third party app.
To be sure you’ve quit all third party apps, open Activity Monitor (Applications > Utilities), chose «My Processes» from the dropdown menu, and scan through the list to make sure. You don’t have to recognize all the processes there, but you should be able to recognize any third party ones you put there.
Hope that helps!
Matt
Olaf, did you read my reply where I explained my solution? First you should try the steps outlined in the article Todd references:
http://blogs.adobe.com/aftereffects/2011/02/troubleshooting-quicktime- errors-with-after-effects.htm…
There seems to be a good way to isolate if it’s the same issue I had, though. Let me go into a bit of depth for you.
The trick was to launch the OS X app called Console, located in Applications > Utilities. It is a program that compiles and displays the system logs in real time. It’s great to see the little things happening in the system that don’t make it into the user interface. When I had my Console up and generated that same error you’re having, I noticed this error in the log:
The key here is the Adobe QT32 Server, which is mentioned in the TCP part of the article I linked to above from Todd. In my case at least, what was happening was that a third party app called AirServer was talking to the system’s QuickTime over the same TCP ports the QT32 Server engine was trying, and it resulted in Adobe QT32 Server crashing, and that alert being thrown up in AfterEffects.
If you’re in the same boat, it means you have some sort of app or system extension that is also talking to QuickTime over TCP. That may not make any sense, but the easy thing to do is quit ALL third party apps, then quit AE, then restart AE.
In my situation if AE gave me the error and then I quit AirServer, the error still happened because Adobe QT32 had already crashed. You have to relaunch AE after closing the offending third party app.
To be sure you’ve quit all third party apps, open Activity Monitor (Applications > Utilities), chose «My Processes» from the dropdown menu, and scan through the list to make sure. You don’t have to recognize all the processes there, but you should be able to recognize any third party ones you put there.
Hope that helps!
Matt
If you’re having trouble with After Effects not rendering after you’ve completed your composition, don’t despair, this tutorial will walk you through five easy steps you can take to troubleshoot rendering issues. Below you will learn about the Rendering Queue, Media Encoder, using CPU rendering, flushing the cache, and using the “secret” preferences panel.
Whenever you add effects, images, or video clips, After Effects must render the results for you to preview or export. This process is largely done in the background, without your knowledge. But sometimes during the final export, rendering problems can pop up unexpectedly.
Running into a rendering error after you’ve completed your composition can be extremely frustrating. On top of that, diagnosing the cause of an error can be quite difficult. That’s why we’ve outlined five steps for you to overcome the problem. If your issue is that After Effects is shutting down, check out this troubleshooting resource instead.
1. Use the Render Queue Panel
This is the most common way to render and export your After Effects projects. If you’re new to After Effects, this procedure may be new to you and worth reviewing to make sure you’re doing it correctly. If you’re an AE veteran, you may want to skip ahead.
- When you’ve completed your composition in After Effects, add it to the Render Queue by selecting Composition > Add to Render Queue from the top menu bar (shortcut Control + Command + M).
- The Render Queue panel should appear at the bottom of your After Effects window. Click the blue Best Settings to open the Render Settings window where you can choose your export options such as Frame Rate and Motion Blur. Close this window when you’re done.
- Below Render Settings is the Output Module. Lossless is a good preset for short compositions that you want to import and edit in an NLE like Premiere Pro. If your composition is longer, however, the Lossless preset may produce gigantic files that quickly fill up your hard drive. You can produce smaller video files using Media Encoder, which is covered in the next section.
- To the right, you should see Output To. By clicking the blue text here, you should open a pop-up window where you can choose the destination of your exported video file.
- Once you’ve set a destination for your render, a button should appear at the top right of the Render Queue panel that says Render. Click here to begin rendering your file.
- You can watch the progress of the render as the blue status bar fills up at the top of the Render Queue panel. When it’s finished, your file should appear at the destination you’ve set.
The built-in Render Queue is the most common export method for After Effects projects, and if you follow the above steps, you should be able to output your video compositions without a hitch. Unfortunately, errors do occur from time to time. Below we’ve outlined a few additional methods you can employ to make sure your composition renders correctly.
2. Render Using Media Encoder
Adobe Media Encoder is the creative cloud suite’s catch-all media export program, which can output your files from After Effects, Premiere Pro, Photoshop, etc. It includes a handy selection of useful presets for common platforms like YouTube and Vimeo.
If you’re having trouble rendering your final composition using After Effects’ built-in Render Queue, then you might have more luck with Media Encoder. Although it’s a separate application, it comes bundled with the Adobe CC suite. It’s pretty easy to use too, even if you’ve never opened the program before.
- Open After Effects and Media Encoder on your computer.
- In After Effects, once you’re ready to export your project, choose File > Export > Add to Media Encoder Queue.
- Switch over to Media Encoder. You should see your After Effects project appear in the Queue panel on the right side of the screen.
- To the left of your After Effects Project in the Queue panel, you should see the word Format with a small beneath it. Click this arrow to drop-down a list of all the formats you can output to. Choose your preference. In this example, we’ll be choosing H.264 because this is a very common format for online video sharing.
- To the right of Format, you should see a similar drop-down option for Preset. Click here and choose the best preset for your output. For this tutorial, we’ll choose Youtube 1080 Full HD.
- To the right of Preset, there’s a field to choose your Output File. Click here and set the destination where you’d like to save your final output file.
- When everything is set correctly, press the green arrow at the top right to Start Queue (keyboard shortcut Return).
- You can watch the progress of your export in the Encoding panel at the bottom of the screen.
Under most circumstances, your After Effects project should render in Media Encoder without a hiccup. If you’re still encountering difficulty, such as an error message, you may want to continue with the following troubleshooting steps below.
3. Switch to CPU Rendering Instead of GPU
After Effects can take advantage of several GPU technologies, like OpenGL and Metal, these allow you to render your compositions using high-performance graphics cards quickly.
While convenient, this feature has been known to cause render problems from time to time. If your render keeps failing, you may want to try switching this option off for the time being and render with just your CPU, also known as Software Rendering.
- Navigate to File > Project Settings on the top menu bar.
- Under Video Rendering and Effects, change the drop-down option to Software Only.
- Render your project using the Render Queue or Media Encoder as outlined above.
CPU rendering can be much slower than GPU rendering, so you may need to wait sometime to see the results. And don’t forget to change back to GPU rendering when you’re done!
4. Flush the Cache
Behind the scenes, After Effects is storing renderings of your work as you go. This allows you to quickly preview your composition without having to wait on render times as you work. Generally, this is a helpful feature, but sometimes cache files can become large or contain errors that disrupt your rendering performance. When this happens, it’s helpful to clear the cache.
- Navigate to Edit > Purge > All Memory and Disk Cache.
- A pop-up should appear asking for confirmation. Click OK.
- A blue progress bar will appear. When it has filled up, your cache has been cleared.
- Try rendering again using the Render Queue or Media Encoder.
5. Use the Secret Preference Settings
If you’ve gone through the troubleshooting steps above to no avail, there is one last trick to be tried. Adobe has hidden a covert settings menu for last resort bug-fixing. Adjusting the preferences in this panel should only be used if you’ve tried everything else: it’s time for the secret Preference panel.
- If you’re a Windows user, select Edit. If you’re a Mac user, select After Effects.
- Hold down Shift and select Preferences.
- Choose General, and don’t let go of that Shift key!
- When the Preferences window pops up, you will notice a Secret category available at the bottom. Open it.
- Try adjusting these options. You can Disable Layer Cache and Ignore Sequence Rendering Errors.
- Select OK then try to render again using the Render Queue or Media Encoder.
The section is hidden for a reason—these are not settings you should normally adjust. So make sure when you’re done, you go back and disable anything you changed!
That covers our 5 basic steps for overcoming render errors. By using the Render Queue, Media Encoder, CPU rendering, flushing the cache, and the elusive “secret” settings menu, hopefully, your rendering issues are far behind you.
Now that you’ve solved your rendering problems, there’s a lot more to do in After Effects. If you’d like to upgrade your AE toolkit, Motion Array has thousands of curated After Effects templates and presets available for download so you can produce stunning projects in minutes!
After Effects error: Rendering error while writing to file (-1610153453)
Одна из частовстречающихся ошибок рендера в формате H264 (и не только), в After Effects это After Effects error: Rendering error while writing to file (путь,название файла).mp4″ (-1610153453).
Решение проблемы:
Официальная поддержка Adobe рекомендует переустановить Quick Time, почистить реестр и добавить поддержку кеша при рендере (в настройках edit > preferences > media&disk cache поставить галку на enable cache и выставить свободного пространства не менее 20Гб). Но это все чаще всего не работает, особенно в русском сегменте пользователей, которые пользуются кирилицей для название папок в системе.
Итак проблема решается просто: проверьте чтобы путь сохраняемого файла был прописан АНГЛИЙСКИМИ буквами и не имел спецзнаков. Например: «D:WORKMy_intro» вместо «D:WORKМое интро»
Похожие статьи:
- Быстрое выравнивание слоев (Align)
- Пропали графические элементы в вегасе?
- Не работает превью! Черный экран вместо него!
- Как отключить окно превью при рендере в АЕ?
- Как поменять цвет у маски в АЕ?
Не пропустите:
- Шаблоны модуля вывода в АЕ
- Brightness/gamma color shift при выводе из АЕ
- Организация работы с проектом в АЕ
- Остается сетка после CC Particle World
- Проблема с системной палитрой
- (6)
- Вконтакте
У Вас недостаточно прав для добавления комментариев.
Регистрируемся,а потом можно будет писать.
August 8, 2022
duyenle
Adobe After Effects is a digital visual effects, motion graphics, and compositing application developed by Adobe Systems and used in the post-production process of film making, video games and television production. Sometimes, we have to face the problem that the project fails to render in After Effects. How we can avoid failed render in After Effects? In this article, we mention 3 ways to try when the problem happens.
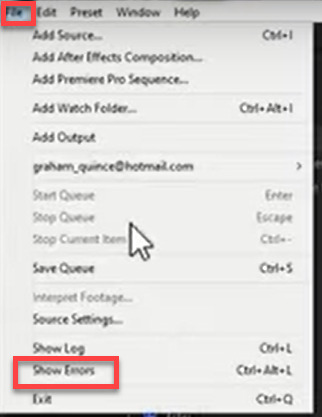
To check the log, you go to File => Show Errors. Then, you scroll down and notice that the latest fail will be at the bottom.

The most important thing is the approximate composition time when it failed. After that, you check the composition in After Effects and know which file failed to render. The first fix is rendering out just that file. If it fails to render, we will not use it. If it does render, then use the rendered video instead.
The next thing to do is going to Edit => Purge => All Memory and Disk Cache. After that, we check off “Click disk cache for all versions” and click OK to delete all the temporary renders and free up space. Ideally, this should be on a second.
You can set the location for the cache by going to Edit => Preferences => Media & Disk Cache. Occasionally, the cause of the issue is a corrupt cache file.
Another solution is that rendering out your composition as an image sequence. Adobe Media Encoder will render out each frame as its own file. Therefore, when it fails, you do not need to render the first section again. Each image is labelled sequentially, so you can then import this back into After Effects and overlay this layer into your composition and render out the composition again. It seems like a waste of time, but it helps us to finish the work without failure.
The last option is that you can turn off your computer, restart it, clear your cache and try again. Sometimes, After Effect can fail in the background and it is better to just reboot.
If you’re a fan of After Effect who wants to learn and use the latest features, but your computer configuration is still limited, don’t worry; iRender will provide you with a solution that will completely address your problem. In other words, our company offers a choice of server packages ranging from single GPU to multi GPU RTX 3090, allowing you to pick the best server package for your renderer.

Source: irendering.net

Source: irendering.net
As a result, the powerful machines make rendering enjoyable and quick. In addition, a unique feature is that you will connect to the iRender server and utilize it as your own computer, with total control over setup and capacity. Above all, our server supports any applications; therefore, you may install the program you need only once, and everything will be kept for future use. If you’re concerned about security, be assured that the safety and security of your data is our first priority. No one, including iRender, will have access to any of your data. The privacy policy of iRender may be found here. To understand more about our server’s performance with After Effect, you can see the following video:
Besides, we are committed to providing you with a rendering experience unlike any other. iRender, in particular, is running a fantastic deal for you: new clients will receive a 20% bonus on their first purchase within 24 hours of enrolling.To learn and enjoy more, please create an account here.
iRender – Happy Rendering!
Source: ShiveringCactus: VFX Tutorials
3D animation, Adobe After Effects, cloud computing, cloud gpu, cloud rendering, computer performance, gpuhub, gpurental, iRender, render farm, render online, renderer, Rendering Service
August 8, 2022
iRendercs
Adobe After Effects is a digital visual effects, motion graphics, and compositing application developed by Adobe Systems and used in the post-production process of film making, video games and television production. Sometimes, we have to face the problem that the project fails to render in After Effects. How we can avoid failed render in After Effects? In this article, we mention 3 ways to try when the problem happens.
To check the log, you go to File => Show Errors. Then, you scroll down and notice that the latest fail will be at the bottom.
The most important thing is the approximate composition time when it failed. After that, you check the composition in After Effects and know which file failed to render. The first fix is rendering out just that file. If it fails to render, we will not use it. If it does render, then use the rendered video instead.
The next thing to do is going to Edit => Purge => All Memory and Disk Cache. After that, we check off “Click disk cache for all versions” and click OK to delete all the temporary renders and free up space. Ideally, this should be on a second.
You can set the location for the cache by going to Edit => Preferences => Media & Disk Cache. Occasionally, the cause of the issue is a corrupt cache file.
Another solution is that rendering out your composition as an image sequence. Adobe Media Encoder will render out each frame as its own file. Therefore, when it fails, you do not need to render the first section again. Each image is labelled sequentially, so you can then import this back into After Effects and overlay this layer into your composition and render out the composition again. It seems like a waste of time, but it helps us to finish the work without failure.
The last option is that you can turn off your computer, restart it, clear your cache and try again. Sometimes, After Effect can fail in the background and it is better to just reboot.
If you’re a fan of After Effect who wants to learn and use the latest features, but your computer configuration is still limited, don’t worry; iRender will provide you with a solution that will completely address your problem. In other words, our company offers a choice of server packages ranging from single GPU to multi GPU RTX 3090, allowing you to pick the best server package for your renderer.
Source: irendering.net
Source: irendering.net
As a result, the powerful machines make rendering enjoyable and quick. In addition, a unique feature is that you will connect to the iRender server and utilize it as your own computer, with total control over setup and capacity. Above all, our server supports any applications; therefore, you may install the program you need only once, and everything will be kept for future use. If you’re concerned about security, be assured that the safety and security of your data is our first priority. No one, including iRender, will have access to any of your data. The privacy policy of iRender may be found here. To understand more about our server’s performance with After Effect, you can see the following video:
Besides, we are committed to providing you with a rendering experience unlike any other. iRender, in particular, is running a fantastic deal for you: new clients will receive a 20% bonus on their first purchase within 24 hours of enrolling.To learn and enjoy more, please create an account here.
iRender – Happy Rendering!
Source: ShiveringCactus: VFX Tutorials
3D animation, Adobe After Effects, cloud computing, cloud gpu, cloud rendering, computer performance, gpuhub, gpurental, iRender, render farm, render online, renderer, Rendering Service
Проблема. При запуске After Effects появляется сообщение об ошибке: «3D-рендеринг с трассировкой лучей: сбой компиляции исходного построителя текстуры (5070::0)»
В сообщении об ошибке указывается, что установлена новая карта NVIDIA, которая не поддерживает ускорение 3D-приложений с трассировкой лучей. Эта функция больше не разрабатывается, поэтому эта проблема не является критической.
К графическим процессорам NVIDIA, которые не поддерживаются для ускорения 3D-композиций с трассировкой лучей, относятся следующие:
- GTX 750
- GTX 750 Ti
- GTX 960
- GTX 970
- GTX 980
Эти карты основаны на так называемой архитектуре Максвелла.
Решение 1. Нажмите кнопку «ОК» в диалоговом окне предупреждения. Использование 4D Lite для работы с 3D и After Effects
Нажмите кнопку «ОК» в диалоговом окне предупреждения.
Для работы с 3D и After Effects используйте Cinema 4D Lite (в составе After Effects CC и более поздних версий) вместо 3D-композиций с трассировкой лучей.
Решение 2. Если ваш графический процессор поддерживается для ускорения 3D-композиций с трассировкой лучей, но вы все равно видите сообщение об ошибке, выполните следующие действия:
Вполне возможен вариант, при котором ГП поддерживается для ускорения 3D-композиций с трассировкой лучей, но сообщение об ошибке все равно появляется.
Если ваш графический процессор находится в списке системных требований для ускорения 3D-композиций (см. раздел для After Effects CC и более поздних версий и раздел для After Effects CS6), затем обновите After Effects до самой последней версии.
Если вы используете устаревшую карту NVIDIA (не Maxwell), в которой предусмотрено более 1 ГБ видеопамяти, но при этом она не поддерживается, вы можете включить не тестированный, неподдерживаемый ГП для CUDA-ускорения 3D-рендеринга с трассировкой лучей в меню «Установки» > «Предварительные просмотры» > «Сведения о ГП»: «Включить не тестированный, неподдерживаемый ГП для CUDA-ускорения 3D-рендеринга с трассировкой лучей».